Raspberry Pi Pico W Integration Example
By Humai
Cloud Studio has all the necessary resources to offer a comprehensive solution to professionals working in the IoT field, enabling the creation of notifications and alarms, and the development of visualization panels to display real-time information about the performance and status of the IoT devices they wish to connect.
To illustrate this, we will show a practical example with the Raspberry Pi Pico W (RPico W) development board, monitoring its internal temperature and sending the corresponding data to the Cloud Studio platform via the HTTP protocol. This will allow us to generate charts representing the historical and current values of the variable we are monitoring.
We will start by including the necessary lines of code to establish the RPico W connection to a WiFi network. To do this, we will need to use the network library, which provides the necessary tools for network configuration and management on devices running MicroPython.
To organize the steps efficiently, we will define a function called connect() to handle the WiFi network connection, and implement a try/except exception handling structure to manage possible errors.
We will also include the configuration of the Analog-to-Digital Converter (ADC) connected to the RPico W internal temperature sensor, along with a conversion factor that establishes a mathematical way to convert the number produced by the ADC into a fair approximation of the actual voltage it represents. Subsequently, we will add the necessary lines of code to perform the actual sensor reading. Keep in mind that this configuration must be adjusted according to the sensor being used for your IoT project.
This first part of the complete code is as follows:
import network
from machine import Pin, ADC
from utime import sleep

ssid = 'CAMBIA POR TU SSID'
password = 'TU PASSWORD'

sensor_temp = ADC(4)
factor_conversion = 3.3 / (65535)

def connect():
    red = network.WLAN(network.STA_IF)
    red.active(True)
    red.connect(ssid,password)
    while red.isconnected() == False :
        print("Estableciendo conexión..")
        sleep(1)

    ip = red.ifconfig()[0]
    print("Conexión Establecida")
    print(red.ifconfig())
    return ip

try:
    ip = connect()
except KeyboardInterrupt:
    machine.reset()
On the other hand, in MicroPython, the urequests library is used to make HTTP requests over the internet. This library allows devices using MicroPython, such as the RPico W, to interact with web services and access remote resources, such as Cloud Studio in this case.
The urequests library simplifies the process of sending GET, POST, PUT, or DELETE requests to specific URLs, as well as handling responses and received data. By using urequests, resource-constrained devices can take advantage of web service communication functionality efficiently and effectively.
To begin, we will import the urequests library along with the previously loaded libraries:
import network
import urequests as req
from machine import Pin, ADC
from utime import sleep
Now we will proceed to integrate our code with the Cloud Studio platform. To do this, we will start by using two pieces of data that are fundamental for interacting with an IoT platform and accessing its services: the access_token and the endpointID.
The access_token is a security credential used to authenticate and authorize access to the IoT platform. On the other hand, endpoints are the addresses through which we can send requests to the IoT platform API. These endpoints are represented as specific URLs indicating the location of a service or resource on the platform.
Remember that we must first create our device on the platform (in our case the RPico W) and the corresponding endpoint(s) for the variable we want to monitor (in our case the internal temperature).
In this case, to monitor the temperature of our RPico W, we will define the following:
# Esto se obtiene de la wiki de Cloud Studio
temperature_url = 'https://gear.cloud.studio/services/gear/DeviceIntegrationService.svc/UpdateTemperatureSensorStatus'

# Esto se obtiene de la platafroma de Cloud Studio
access_token = 'COLOCA TU ACCESS TOKEN'

internal_temperature = 'COLOCA EL ENDPOINT ID CORRESPONDIENTE AL SENSOR INTERNO DE TEMPERATURA'
Access the information about Access tokens here.
Next, we will create the payload, which represents the set of data sent in an HTTP request. In this case, it will be structured as follows:
payload_temperature = {
	'accessToken': access_token, # Se repite en todos los payloads que realicemos
	'endpointID': internal_temperature, # Es un numero entero y se modifica de acuerdo al sensor que utilicemos
	'temperatureCelsius': 30 # Valor inicial aleatorio
}
And now we will define a enviar_datos() function that effectively transmits the data to the Cloud Studio platform:
def enviar_datos(ip):
    while True:
        # Realizo la lectura correspondiente
        lectura = sensor_temp.read_u16() * factor_conversion
        temperature = 27 - (lectura - 0.706) / 0.001721

        # La agrega el dato al payload
        payload_temperature['temperatureCelsius'] = temperature
        print('Tomando temperatura del sensor interno', payload_temperature['temperatureCelsius'])

        # Le envío al servidor y aguardo la respuesta del servidor (200)
        response = req.post(temperature_url, json = payload_temperature)
        print('Respuesta del servidor: ', response.status_code)
        response.close()
        sleep(1)
Additionally, we will incorporate the enviar_datos() function within the try/except exception handling structure to manage possible errors.
try:
    ip = connect()
    enviar_datos(ip)
except KeyboardInterrupt:
    machine.reset()
The complete code is as follows:
import network
import urequests as req
from machine import Pin, ADC
from utime import sleep

ssid = 'CAMBIA POR TU SSID'
password = 'TU PASSWORD'

sensor_temp = ADC(4)
factor_conversion = 3.3 / (65535)

# Esto se obtiene de la wiki de Cloud Studio
temperature_url = 'https://gear.cloud.studio/services/gear/DeviceIntegrationService.svc/UpdateTemperatureSensorStatus'

access_token = 'COLOCA TU ACCESS TOKEN'

internal_temperature = 'COLOCA EL ENDPOINT ID CORRESPONDIENTE AL SENSOR INTERNO DE TEMPERATURA'

payload_temperature = {
	'accessToken': access_token, # Se repite en todos los payloads que realicemos
	'endpointID': internal_temperature, # Es un numero entero y se modifica de acuerdo al sensor que utilicemos
	'temperatureCelsius': 30 # Valor inicial aleatorio
}

def connect():
    red = network.WLAN(network.STA_IF)
    red.active(True)
    red.connect(ssid,password)
    while red.isconnected() == False :
        print("Estableciendo conexión..")
        sleep(1)

    ip = red.ifconfig()[0]
    print("Conexión Establecida")
    print(red.ifconfig())
    return ip

def enviar_datos(ip):
    while True:
        # Realizo la lectura correspondiente
        lectura = sensor_temp.read_u16() * factor_conversion
        temperature = 27 - (lectura - 0.706) / 0.001721

        # La agrega el dato al payload
        payload_temperature['temperatureCelsius'] = temperature
        print('Tomando temperatura del sensor interno', payload_temperature['temperatureCelsius'])

        # Le envío al servidor y aguardo la respuesta del servidor (200)
        response = req.post(temperature_url, json = payload_temperature)
        print('Respuesta del servidor: ', response.status_code)
        response.close()
        sleep(1)

try:
    ip = connect()
    enviar_datos(ip)
except KeyboardInterrupt:
    machine.reset()
If the data was sent successfully, you should see the HTTP 200 code in your compiler console, as shown in Figure 01. This confirms proper communication with the platform.
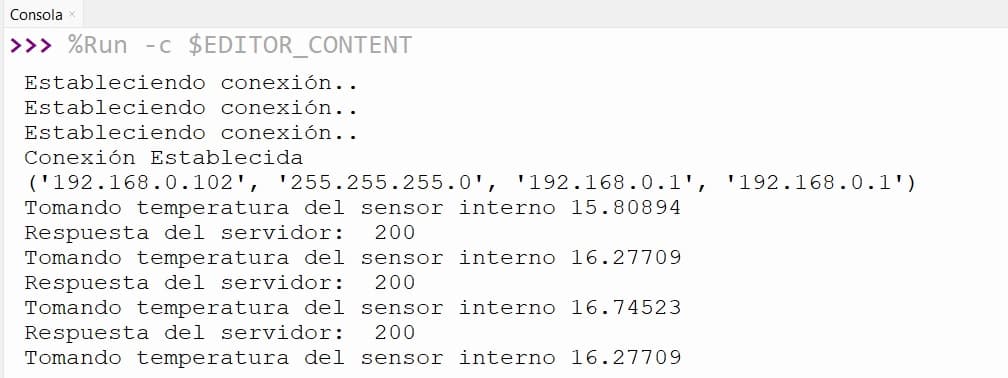
Figure 01 - Successful data communication to Cloud Studio
With this completed, everything is ready to start developing our dashboards in Cloud Studio.
Last updated on
Sensor Update Methods Matrix
Device-level data update This table contains the available methods for updating device data. Device property, Scripting method, HTTP method, HTTP RAW method.
Device Control
Gear Studio allows controlling devices that support actuation, such as appliances, dimmers, thermostats, curtain controllers, and much more.