# Fundamental Concepts
This is where we'll break down the key terms that will make you a master of our platform. We know you're already an expert, but even geniuses need a solid foundation.

Instance [#instance]
An instance is a virtual server that provides online services. Unlike maintaining your own physical server, which is costly and inefficient, cloud providers maintain the hardware in their data centers and provide virtual access to resources through a cloud instance. These resources can be used to run compute-intensive tasks, such as containers, databases, microservices, and virtual machines.
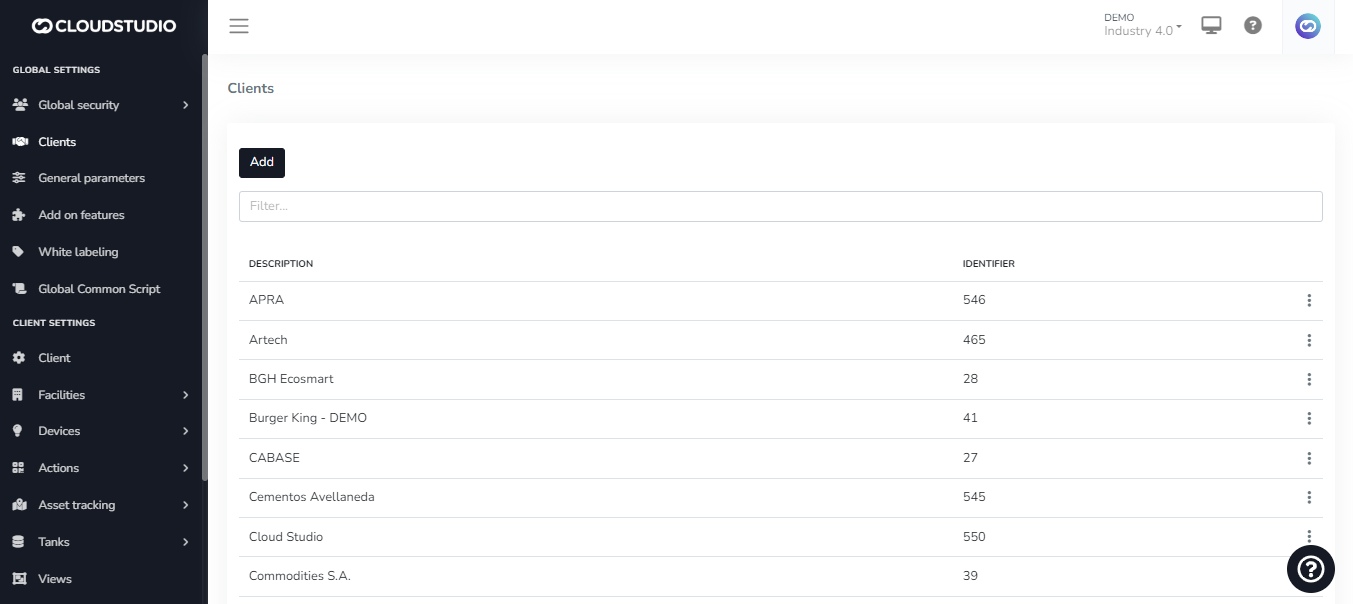
Clients [#clients]
The platform is multi-tenant, meaning it allows the coexistence of multiple clients, each monitoring their own infrastructure, in virtually independent installations. However, with the appropriate permissions, the operator can access different clients' installations to facilitate support, configuration, and platform maintenance.
The multi-tenant architecture also maximizes data center infrastructure by hosting multiple clients on the same servers and minimizing associated maintenance tasks.
Find more information about how to manage your clients [here](/docs/configuracion-del-cliente/cliente).
To use the white labeling feature, follow the steps described in this [section](/docs/configuracion-global/marca-blanca).
Facilities [#facilities]
Each client can have their own facilities (branches, buildings, etc.), which can in turn be grouped into facility types (stores, residences, or any other categorization). The type classification can be used to present information in Dashboards. It is possible to associate an image for each facility type; these images will be reflected in the list on the right side of the monitor map.
Want to start creating facilities on the platform? Check this section. (To be created)
Devices [#devices]
In the IoT ecosystem, a device refers to any object or thing that has the ability to connect to the internet and communicate with other devices or systems. IoT devices can be physical devices such as sensors, cameras, smart lights, appliances, vehicles, medical devices, etc., or virtual devices such as online applications and services.
Learn about the entire device integration process [here](/docs/configuracion-del-cliente/dispositivos-y-endpoints).
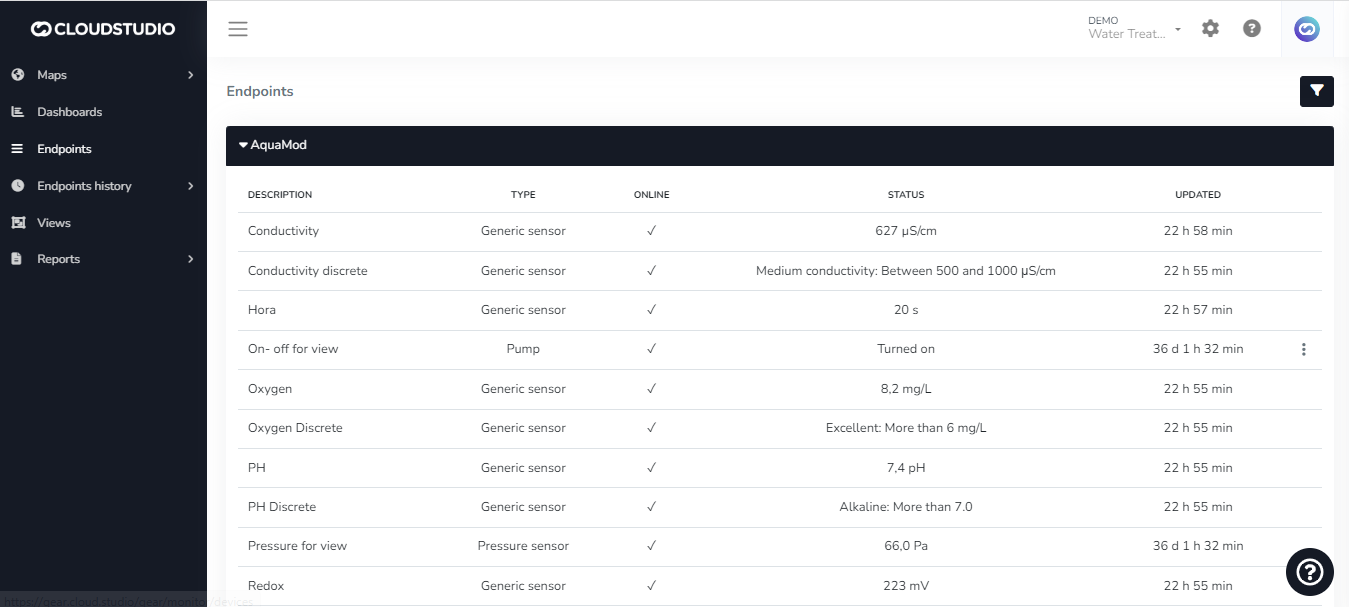
Endpoints [#endpoints]
Endpoints are the variables associated with a specific device. A device can have one or many endpoints, which it can report jointly or independently to the platform.
We expand on endpoint information on this [page](/docs/configuracion-del-cliente/dispositivos-y-endpoints/endpoints).
Tanks [#tanks]
Tanks are entities within the platform used to quickly, simply, and accurately represent the operation of this type of asset in the field. This entity has associated volume, weight, and flow sensors, and allows defining the contained material, total capacity, as well as alert thresholds.
Learn more about tanks [here](/docs/configuracion-del-cliente/verticales/monitoreo-de-tanques).
_e5fc.png)
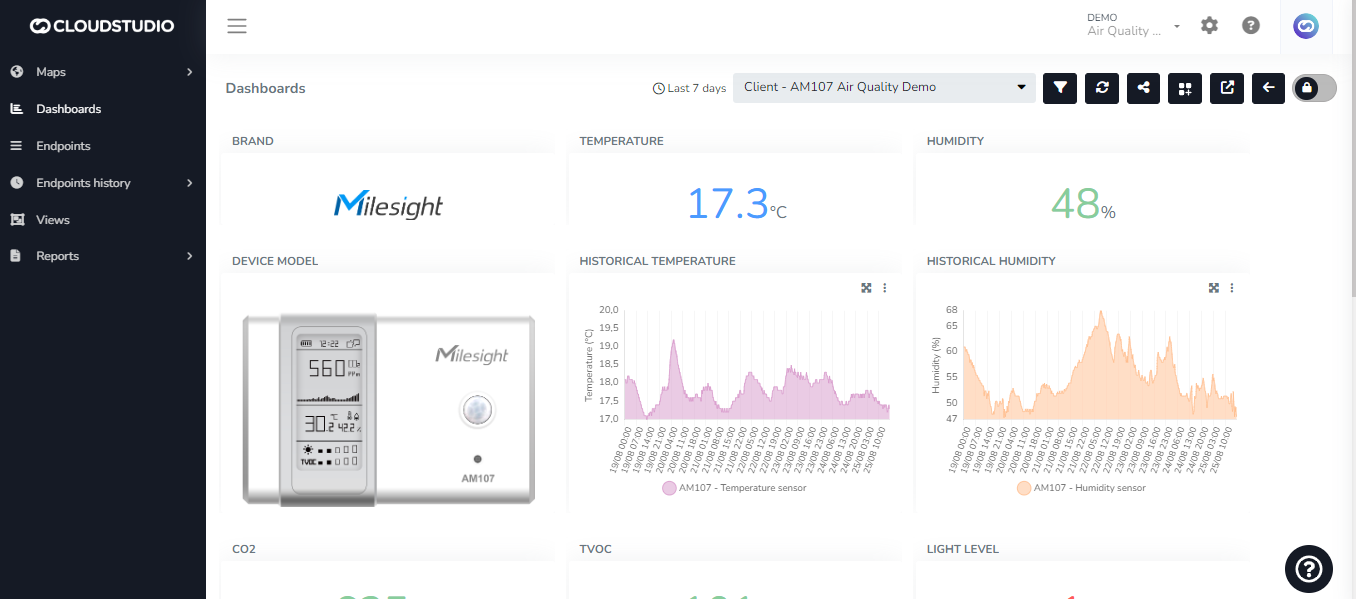
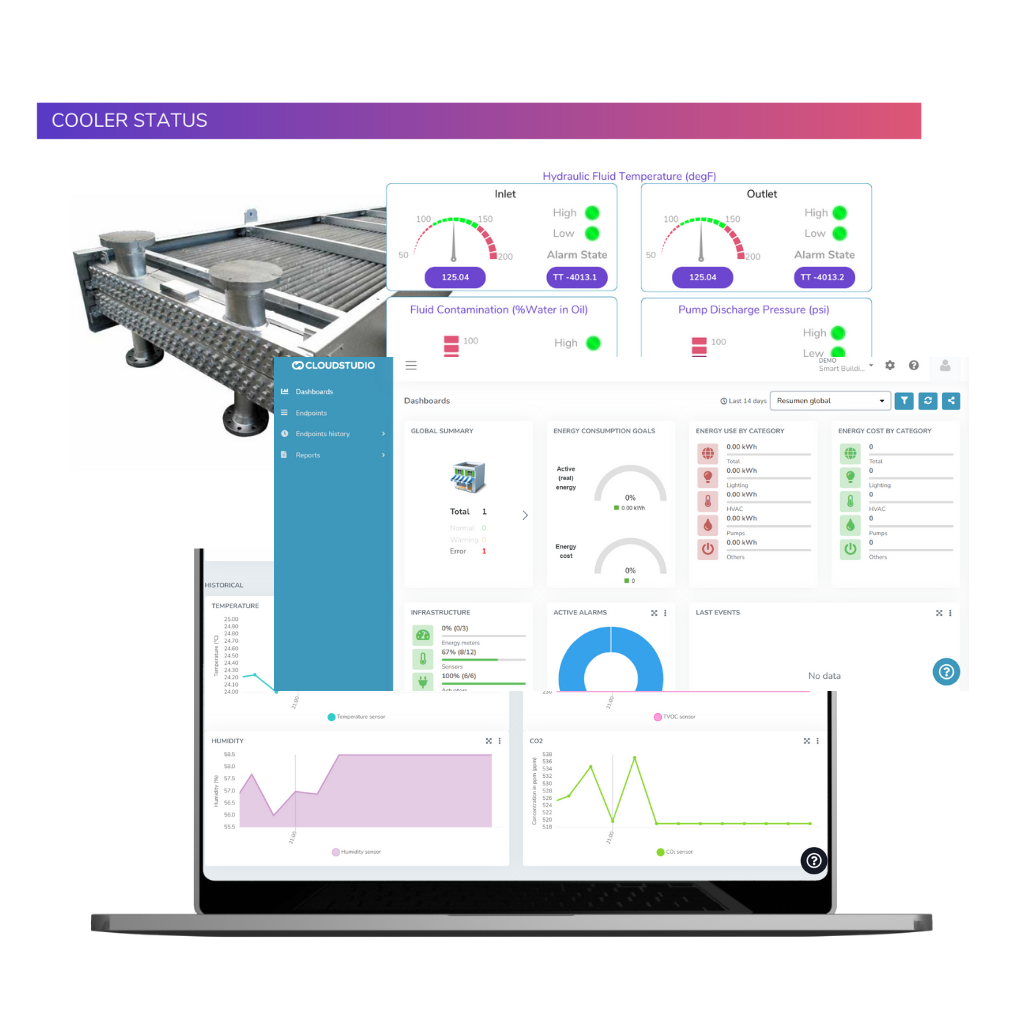
Dashboards [#dashboards]
A dashboard refers to a visual interface that displays real-time information about the performance and status of IoT devices and systems. It can provide information about a variety of metrics, such as energy consumption, temperature, humidity, pressure, speed, location, among others.
They are typically presented in the form of charts, tables, maps, and other visual elements, allowing users to understand and analyze information quickly and effectively. Some dashboards may also include alerts and notifications to indicate performance issues or anomalies, enabling users to take timely corrective action.
They are commonly used in a variety of applications, such as smart building management, industrial production monitoring, vehicle fleet management, smart agriculture, among others. In summary, an IoT dashboard is a valuable tool for visualizing and analyzing information collected by IoT devices and systems in real time.
_60d3.png)
Go to this [page](/docs/monitor/dashboards) to explore more about dashboards.

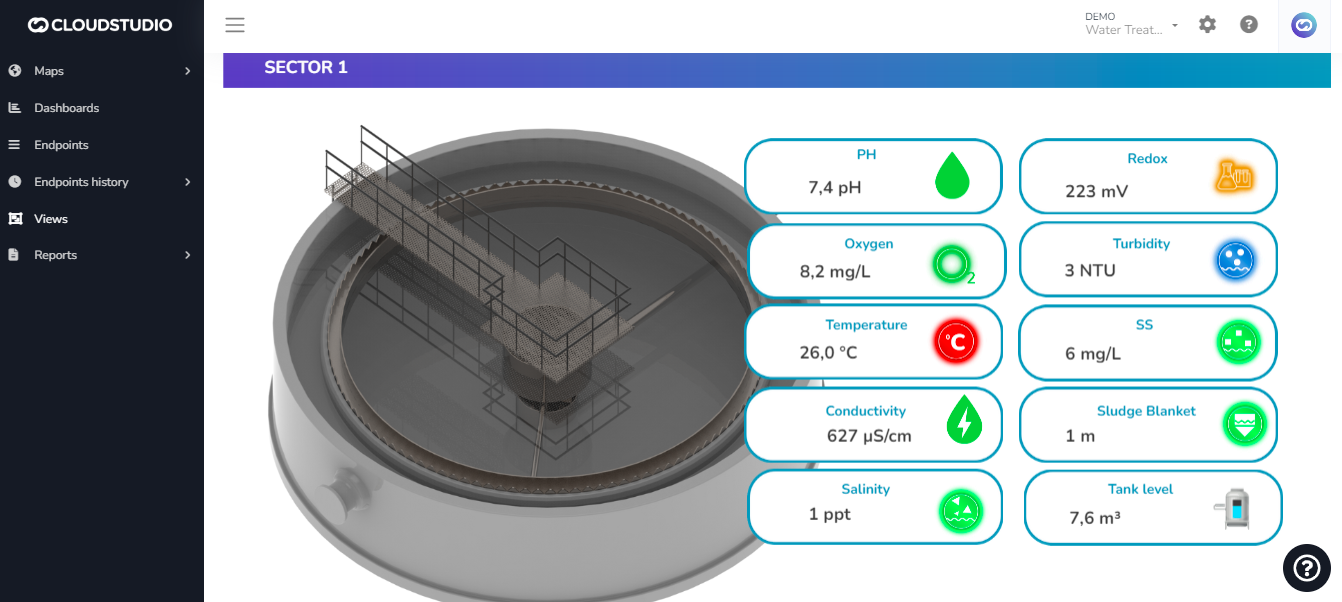
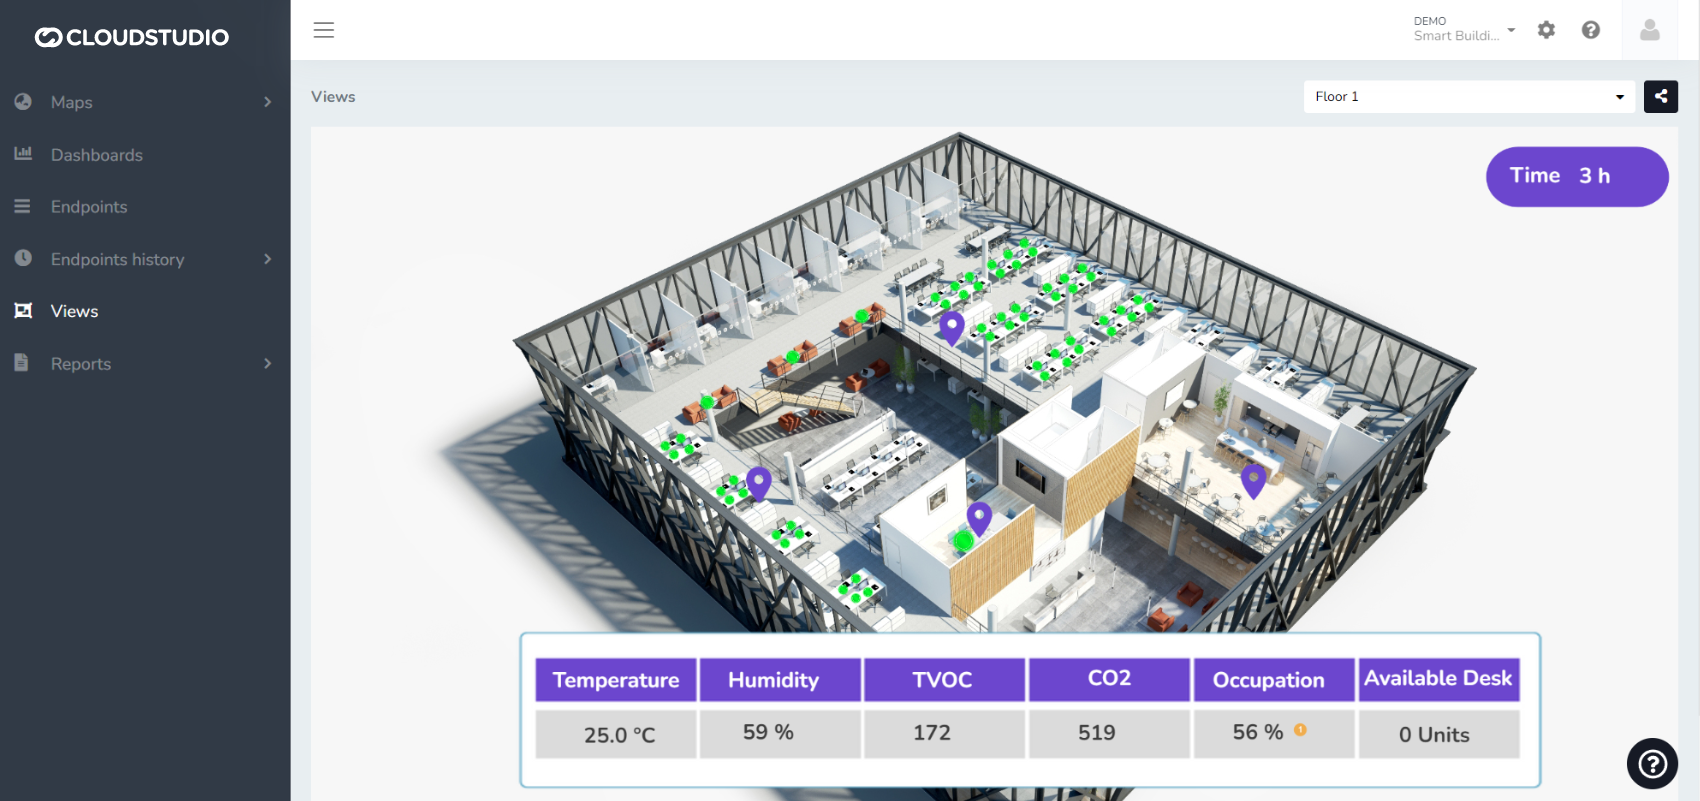
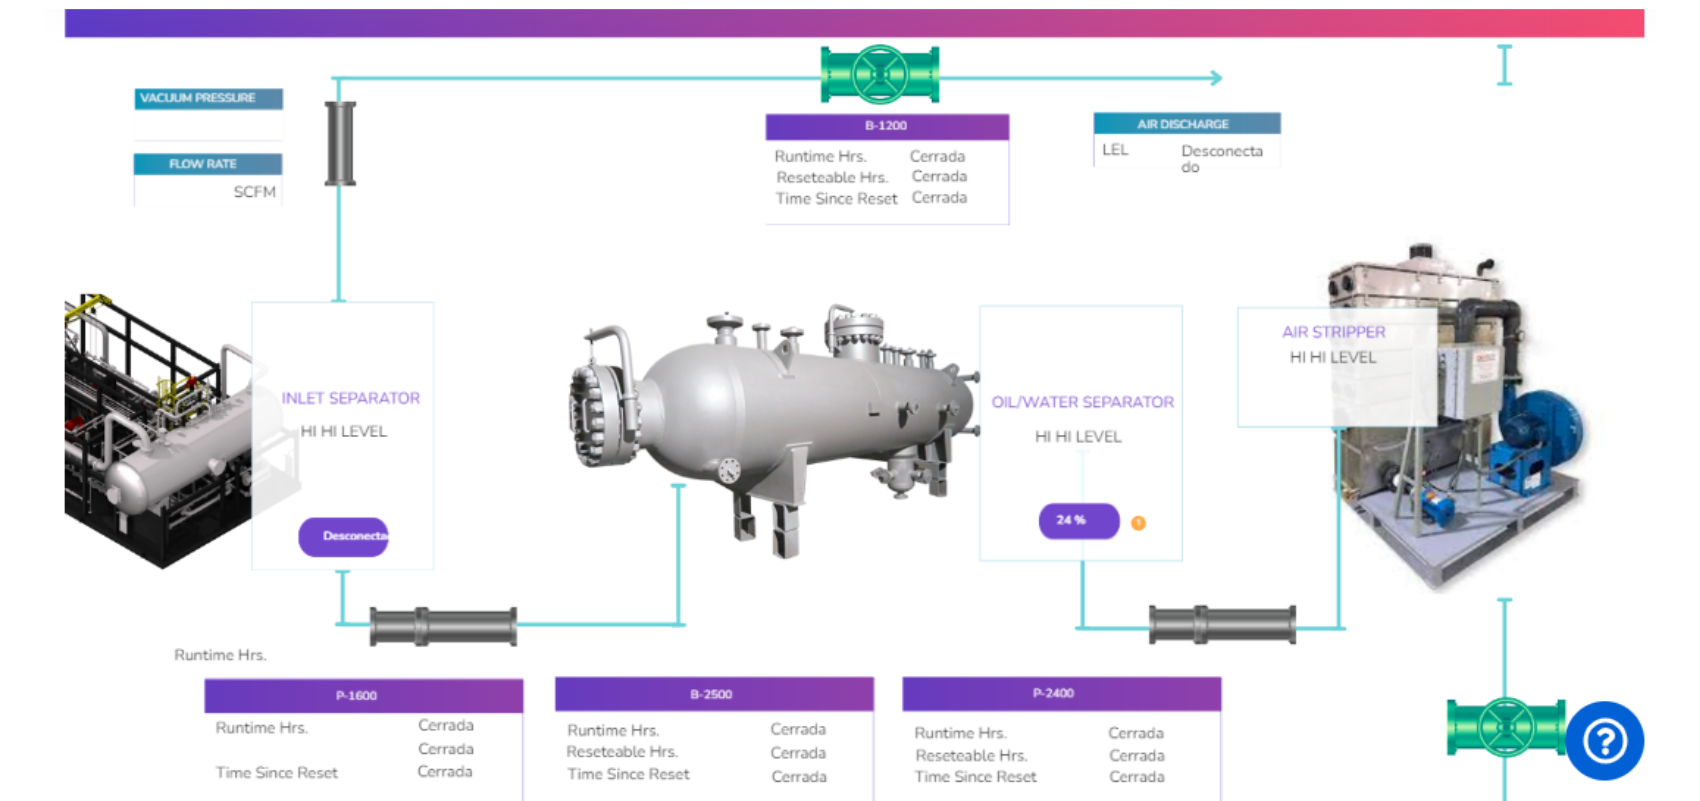
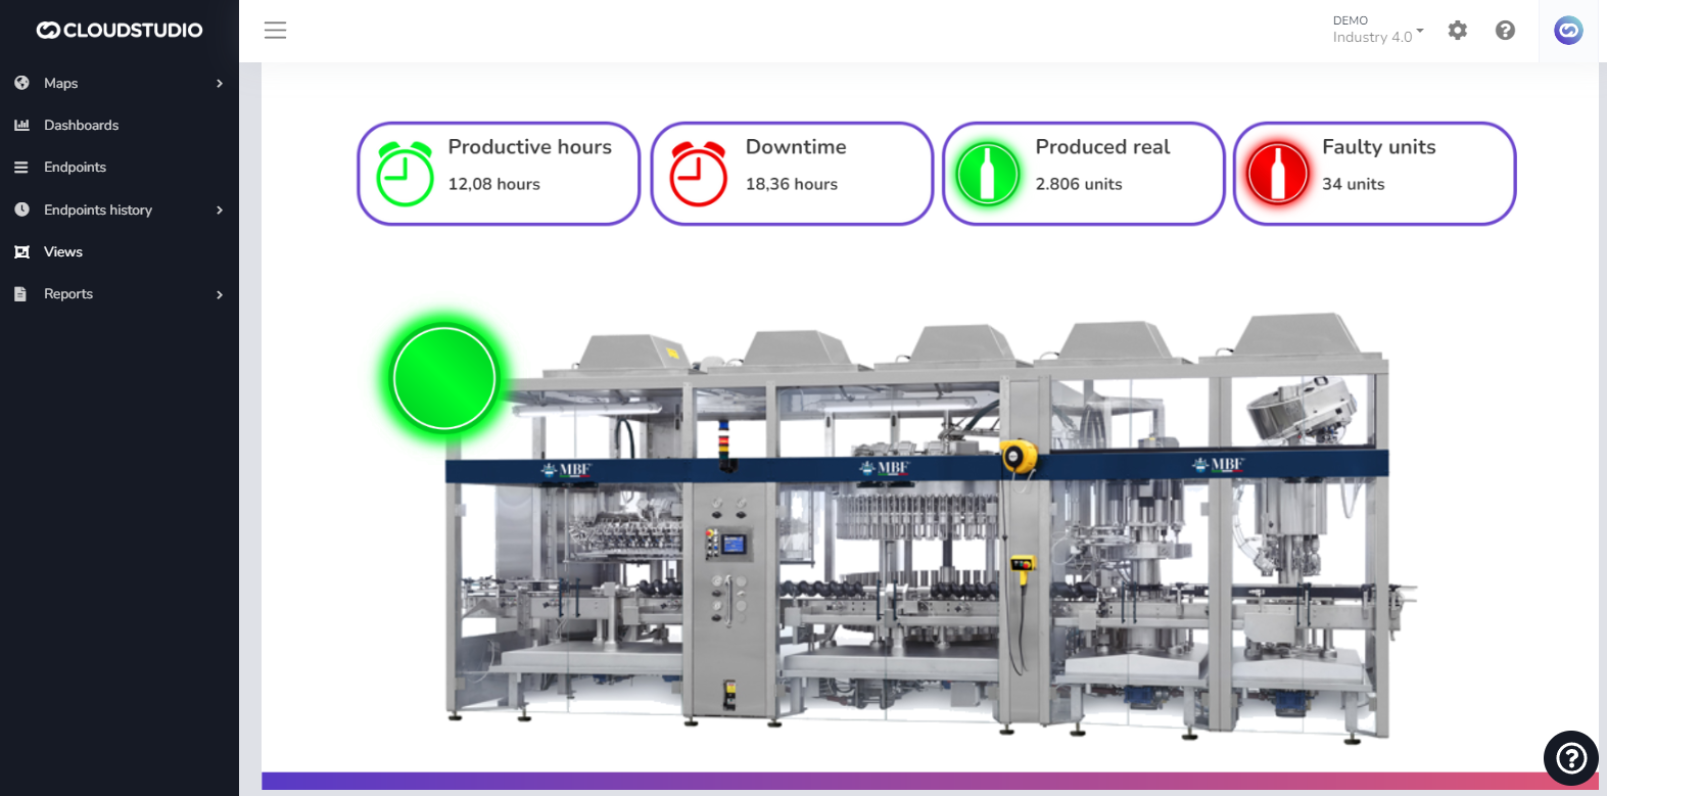
SCADA-Type Views [#scada-type-views]
These are **SCADA**-type visualizations that allow using a background image and then inserting data, graphic elements, alerts, and other components to create a highly useful visual tool for supervising and controlling an operation or production process.
Have questions about how to use SCADA-type views? Check this [section](/docs/monitor/vistas).

Alerts and Alarms [#alerts-and-alarms]
The platform is capable of receiving any alarm openings and closures. Additionally, the platform allows the creation of alerts, which can be configured to send notifications when the variable in question is outside the established parameters.
The system has different types of alarms for your devices, which can be configured to receive notifications via email, SMS, and voice calls.
It is worth noting that the alarms module can leverage all functionality related to Geozones, geolocation data, and instantaneous speed of vehicles with an installed tracker, as well as the time/duration factor, to generate specific alerts for each required use case.
Learn more about this feature [here](/docs/configuracion-del-cliente/alertas-y-alarmas).
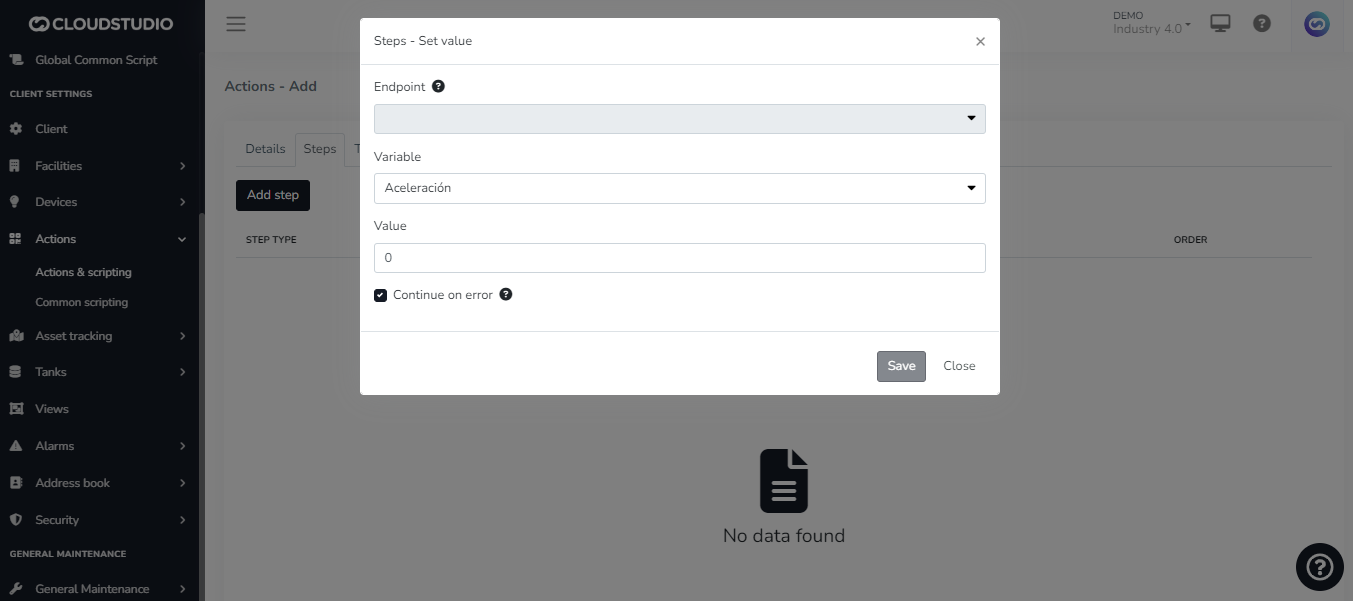
Actions [#actions]
The platform enables the application of automation rules to optimize processes and resource usage. These are applied by modifying the state of a device in response to an event. Events can be calendar-based (hour, day, month) or variations in temperature, humidity, light level, device on/off, or any other variable being reported to the platform. The engine can be used to manage energy modes, trigger actions, or fire alerts.
It allows executing complex actions with code fully definable by the user.
Access to all devices, endpoints, etc., according to each user's rights.
Learn to configure actions [here](/docs/configuracion-del-cliente/acciones).
Scripting [#scripting]
The platform includes an internal scripting engine that allows extending existing functionality, as well as modifying its behavior, when it is necessary to add support for unsupported devices or create complex business rules. (Yes, you can create your own rules.)
Access all available scripting resources [here](/docs/herramientas-low-code-scripting).
Notifications [#notifications]
The platform includes a module responsible for configuring and sending notifications, such as emails and text messages. It handles sending email notifications to users for various reasons, such as open or closed alarms, scheduled reports, etc.
Access Tokens [#access-tokens]
When integration of platform services by external applications is required, access to the services requires obtaining a token known as an Access Token. It is possible to generate as many tokens as needed and assign the necessary permissions to each one. Likewise, it is possible to set the duration of Access Tokens and delete them if necessary.
Check this [page](/docs/configuracion-del-cliente/tokens-de-acceso-access-tokens) to learn how to create Access Tokens.
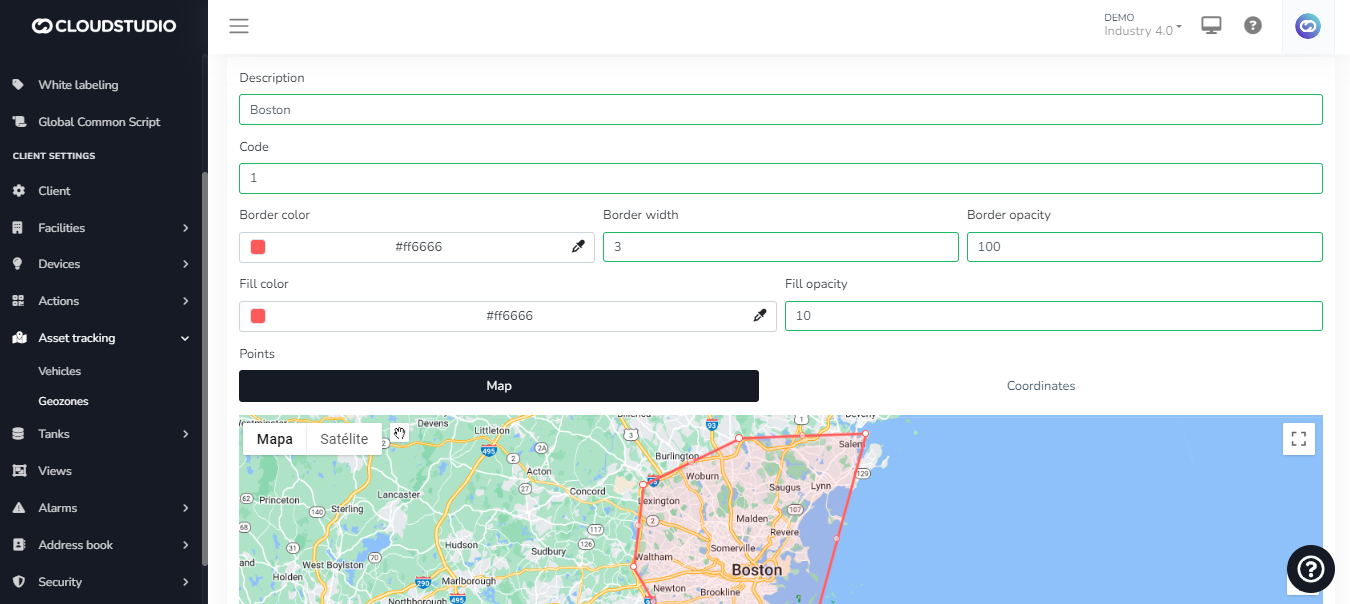
Geozones [#geozones]
This module allows the creation and management of geozones from the map tool or using coordinates (or both for greater precision). The geozone has an associated description, code, color, border thickness and opacity, and fill color and opacity. The geozone can be edited later.
It is possible to create "nested" geozones within larger geozones, or generate "overlapping" geozones and set alert rules that take into account the overlapping zone.
Go to this [page](/docs/apis-de-extraccion-de-datos/geozonas) to learn more about geozones.
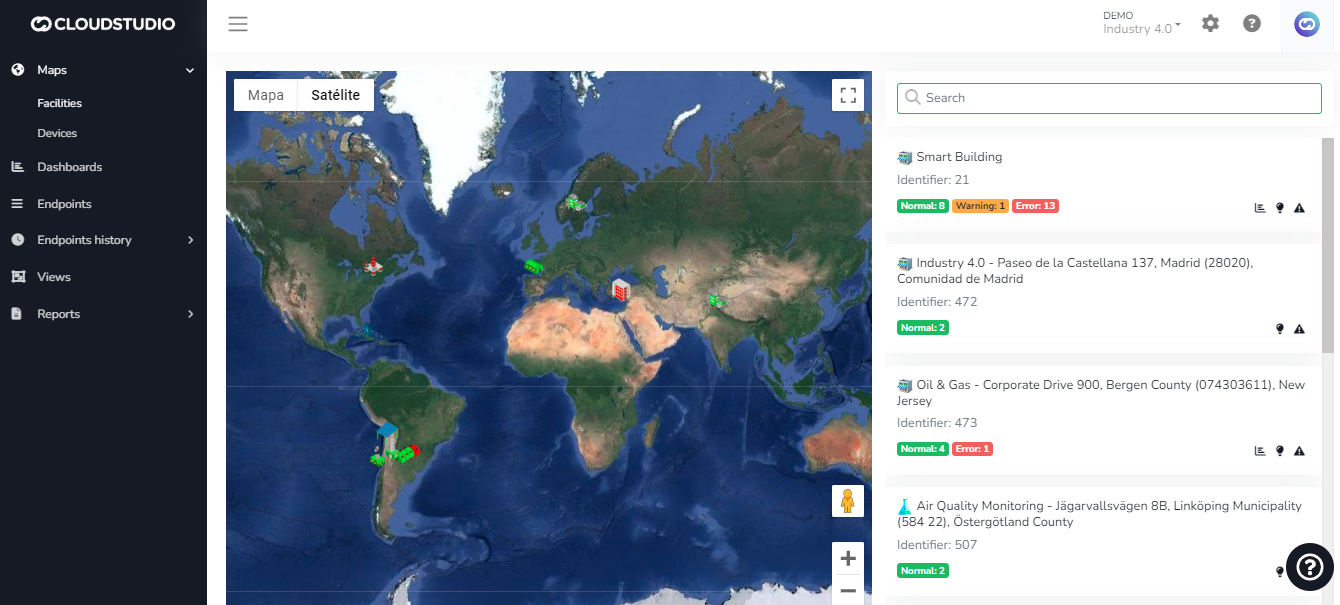
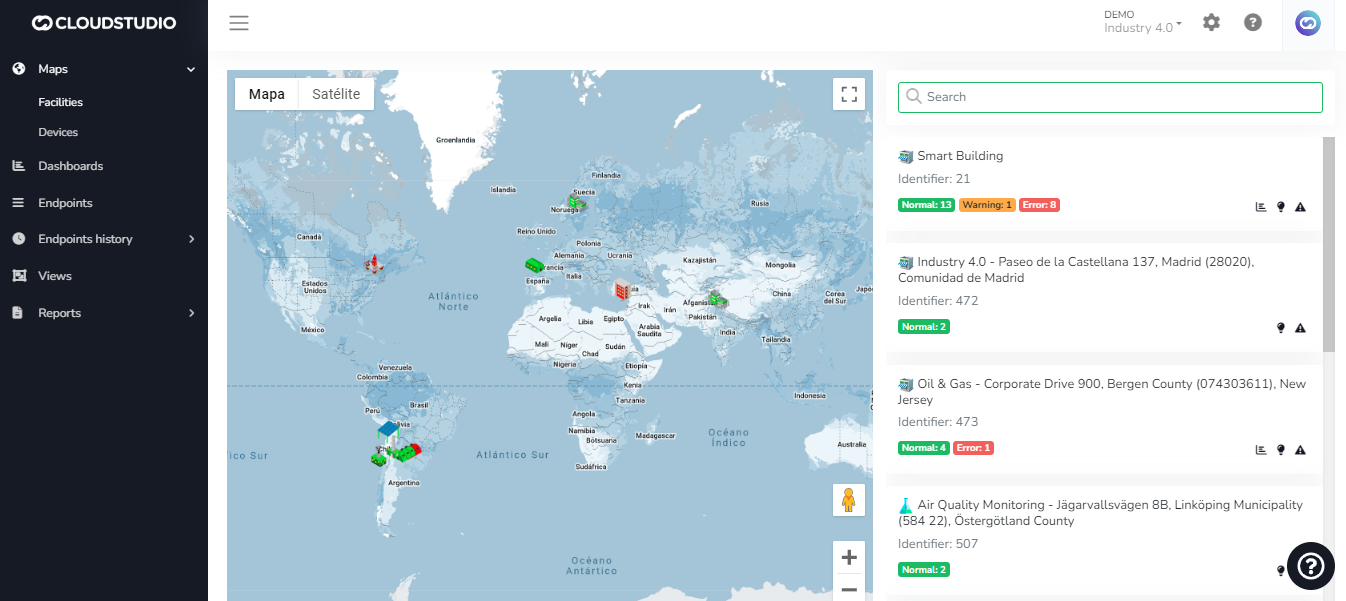
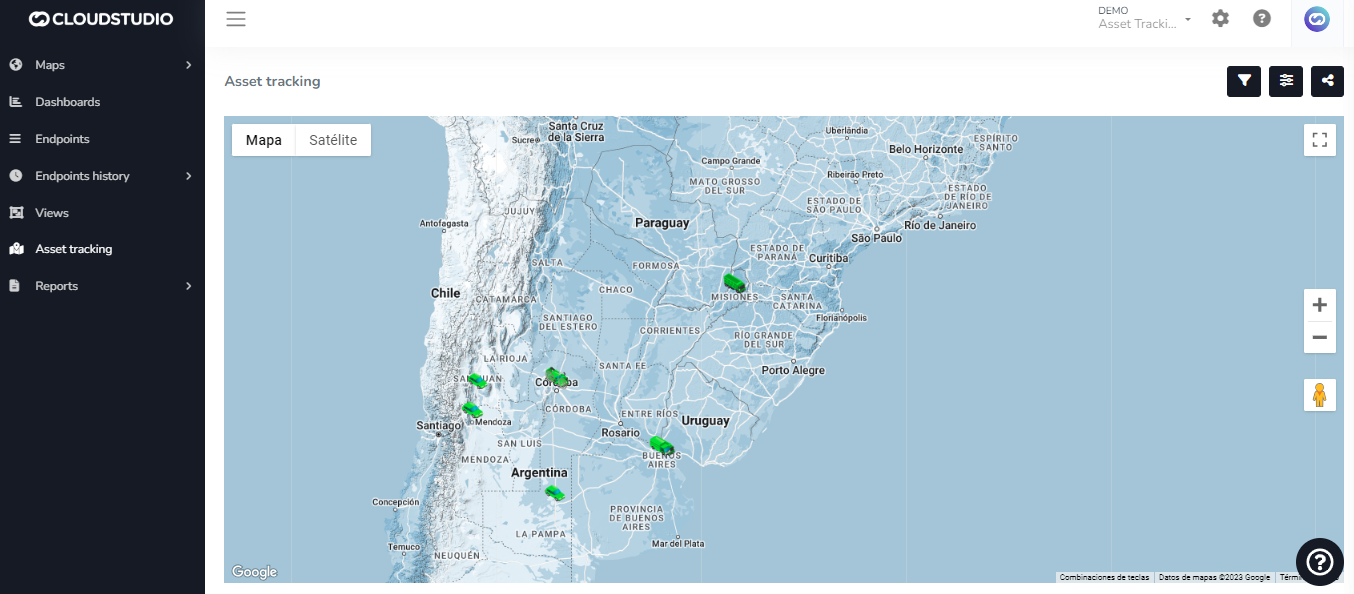
Maps [#maps]
Our platform leverages the powerful Google Maps interface to provide you with an unparalleled location experience. We offer three distinct map types:
* **Device Map:** Here you can intuitively view the location of devices connected to our platform. This view provides a clear snapshot of how your devices are distributed across the terrain.
* **Facility Map:** This map allows you to explore the location and real-time information of facilities in detail.
* **Real-Time Tracking Map:** With this feature, you can track any type of moving assets in real time.
These maps, integrated with Google Maps functionality, are not only informative but also highly functional, allowing you to interact with your data efficiently and precisely.
Reports [#reports]
At the Core level, the platform provides a series of basic reports, which can then be extended in each vertical. In Cloud Studio, in particular, a large number of reports related to energy, inventory, etc. are added. The core reports module offers all the basic functionality of server-side pagination, tabular data downloads, PDF conversion, scheduled reporting (automated scheduled reports), and much more.
Learn more about reports [here](/docs/monitor/reportes).
Users and Permissions [#users-and-permissions]
Users belong to one or more groups that have associated permissions. This way, groups can be created that have exclusive access to certain sections and not others. These same permissions can be granted individually to each user.
Learn more about permissions [here](/docs/configuracion-del-cliente/seguridad/usuarios/permisos). To understand user creation, you can access this section. (To be created)
To audit your users' activity, you can use this tool. (To be created - **User activity log**)
Need a report sent to someone who isn't a user? Go [here](https://www.cloud.studio/contact/).
Learn to create an address book of contacts on this [page](/docs/configuracion-del-cliente/libreta-de-direcciones).
*Couldn't find the information you needed?* [*Contact us*](https://www.cloud.studio/contact-us/)
# Quick Start
If you've made it here, it's because you understand the power of digital transformation in your industry. Would you like to discover how **Cloud Studio**, through its Gear platform, is leading the digital transformation in the IoT space and maximizing the value of data?
Welcome! We'll explain everything you need to know right here.
About the Gear Platform [#about-the-gear-platform]
At **Cloud Studio**, our top priority is to catalyze innovation within the **IoT** space, through a perspective focused on the application layer within the complex **IoT ecosystem**. We recognize that true digital transformation emerges when collected data is transformed into concrete, high-value actions. Therefore, our primary mission is to provide a comprehensive, specialized solution dedicated to maximizing the value of this data, from ingestion and processing to visualization and decision-making.
Our platform takes responsibility for orchestrating data processing from the very moment it is published to the cloud or to the server selected by our clients, ensuring reliability and security at every stage.
At **Cloud Studio**, we combine the physical and digital worlds using our IoT platform to create scalable use cases that address real-life verticals, offering end-to-end solutions that are innovative and flexible. We are committed to improving business processes, optimizing resource usage, and generating a positive environmental impact.
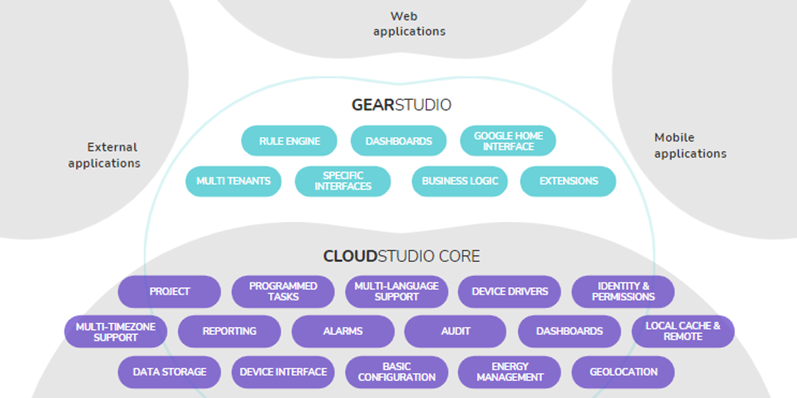
Key Features of Gear [#key-features-of-gear]
_29e0.png)
The Gear platform offers a robust set of features designed to power your IoT strategy:
* **Advanced Data Ingestion:** With our powerful **MQTT Gateway** and flexible parsers, we ensure efficient reception and decoding of data from any device, regardless of its protocol or format.
* **Intuitive Visualization (Web SCADA):** Transform complex data into actionable information with our customizable dashboards and SCADA-type views, tailored to the needs of each role.
* **Comprehensive Notification System:** Stay informed with our multi-channel notification system (email, SMS, voice, WhatsApp), fully customizable and adaptable to your workflows.
* **Multi-Tenant Management:** Manage multiple clients and facilities from a single instance, with granular permission control and client-level customization.
* **Device Simulation (Confiana):** Accelerate development and testing with our Confiana simulator, which allows you to emulate the behavior of thousands of virtual devices and validate data ingestion in a controlled environment.
* **Low-Code Design:** Empower your teams to create and customize solutions with minimal programming, fostering multidisciplinary collaboration.
* **Robust Security:** We implement security best practices, including SSL encryption, granular authentication, Single Sign-On, and continuous vulnerability scanning.
Cutting-Edge Architecture [#cutting-edge-architecture]
The platform uses open, proven technologies designed for efficiency, scalability, and adaptability. Our architecture is based on modern principles:
* **Modular Monolith Backend:** A robust .NET backend, organized into decoupled business modules (such as `CloudStudio.Core` and `CloudStudio.Core.Gear`), offering the deployment simplicity of a monolith with the flexibility of a distributed architecture.
* **Library-Based Micro-Frontends:** The Angular frontend consists of a lightweight "shell" and independently compiled feature libraries (`common-gear`, `common-cloudstudio`), enabling autonomous development and dynamic assembly.
* **Database per Module (SQL Server):** We use SQL Server with a "Database per Module" strategy, isolating business domains to improve maintainability and scalability.
* **IoT Communication (MQTT):** Data ingestion is performed exclusively through MQTT, managed by our `MQTTGateway` service and specialized parsers that decode device payloads.
Cloud Studio's architecture is designed to be used on any type of system infrastructure according to client requirements.
There are two deployment modes:
* ***On-Premise***
* ***Cloud-Hosted (PaaS)***
All **Cloud Studio** installations take into account the following best practices regarding security and development standards:
* **VPN:** Remote access to the servers hosting the platform is only available through a Virtual Private Network, thus providing greater security.
* **Separate Servers:** The platform is prepared to be installed on an infrastructure with a load balancer, with separate web and database servers, among others.
* **Development Standards:** The entire system is developed based on best practices that comply with OWASP standards.
* **Vulnerability Scanning:** To ensure system security, external vulnerability scans have been performed, all of which have been successfully passed. Cloud Studio holds vulnerability certification against, among the most important: Cross-site scripting, SQL Injection, and Sensitive Data Exposure.
Multi-Tenancy [#multi-tenancy]
The platform has been conceived from its inception as a **multi-tenant** platform. This module is responsible for managing clients, their facilities (branches, buildings, etc.), and the administration of all associated permissions, enabling:
* One operator, multiple clients.
* Multiple facilities per client (branches, buildings, complexes, factories, etc.)
* Multiple areas or environments per site.
* Unified support and maintenance.
* Access permissions for each operator user and each tenant.
* Individual billing interfaces for each tenant.
* Interfaces for tenant account management from external systems (onboarding new tenants, suspension in case of debts, etc.)
Web SCADA [#web-scada]
We believe that a clear view of your processes is essential for better decision-making. That is why we have created a platform to help you break down the barriers between **SCADA** systems and create your own process representation, one that adapts to your needs and the way you think about your business.
With our system, you can easily create different views of the same information depending on the role and focus of the person viewing it. The result? Information that is easier to understand and more likely to lead to insights that improve your business.
*Check out all these **SCADA**-type views in our **Live Demo**. Access it* [*here*](https://gear.cloud.studio/gear/common/sign-up)*.*
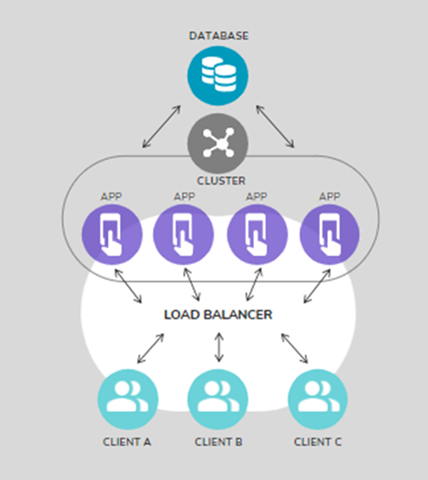
Scalability [#scalability]
The platform's fundamental strategy is horizontal scaling:
* At the **application server level**, through the use of load balancers and multiple identical servers. The platform's code allows transparent horizontal growth, also ensuring that certain processes run on a single server at a time when necessary.
* At the **remote caching server level**, through the use of Redis in cluster mode. The application server software is natively prepared for this mode.
* At the **database server level**, through the use of SQL Server replicas, particularly for reporting and data analysis.
Application server, remote cache, and database hosting is done through IIS, in standard configurations available on *AWS, Microsoft Azure, and Google Cloud*, but can be used without changes in any other datacenter or on-premise hosting.
Extensibility [#extensibility]
A fully extensible platform, based on a plugin or "layer" system.
* Allows creating new verticals without affecting core functionality.
* Allows customizations in each project without affecting core or vertical functionality.
* Examples include reports, client-specific forms, external interfaces, etc.
* The API allows not only data injection/extraction but also the creation of external apps (the same API used by the platform's own applications).
* Designed for CRM/ERP integration.
Agnostic [#agnostic]
The platform is characterized by being independent in terms of both connectivity and hardware, which enables the creation of exceptional success stories by merging diverse technologies. This allows seamless integration of a wide range of devices, including those compatible with LoRaWAN, as well as legacy systems in operation, such as programmable logic controllers (PLCs), to name one example.
**Example architecture for an Industry 4.0 solution:**
_93d8.png)
Instance and Client White Labeling [#instance-and-client-white-labeling]
With our **white labeling** feature, we provide a customizable platform designed to create a unique user experience that reflects your brand identity. This feature provides the ability to adapt the platform to your specific needs by allowing customization of your logo, color palette, background image, and more.
For businesses that need to provide a customized platform experience for different clients within the same instance, we are proud to offer two levels of customization. The first level allows customization of the entire instance, while the second level provides client-level customization options.

MQTT Broker [#mqtt-broker]
Our platform offers an embedded **MQTT broker** that allows you to easily integrate devices and control them with a simple interface that supports payload decoders and downlinks.
Low Code [#low-code]
The platform stands out for being completely "low code." The platform's low-code capability ensures that solution development and customization are accessible to different user profiles, without requiring deep programming knowledge. This fosters collaboration between multidisciplinary teams, allowing professionals from various fields to actively contribute to the design and configuration of solutions.
Responsive [#responsive]
It is highly responsive, meaning it can be accessed from both the web and a mobile application. Users can access the platform from any device with an internet connection, whether it's a desktop computer, a tablet, or a smartphone. This provides flexibility and convenience to users, allowing them to access the platform and manage data from anywhere at any time.
Supported browsers are: Microsoft Edge, Google Chrome, Mozilla Firefox, and Safari.
For mobile application downloads, check this [page](https://www.cloud.studio/downloads/).
Security and Identities [#security-and-identities]
Security is a priority when developing Internet of Things projects, which is why the platform provides:
* Maximum granularity of user permissions.
* Encryption of all communications using 2048-bit SSL.
* Single sign-on, with third-party identification.
* Secure and open APIs with individual permissions for each application.
* LDAP: Authentication with credentials (username and password, email and password, etc.) specific to each organization.
We've reached the end of the introduction! You're probably wondering, what's next? [#weve-reached-the-end-of-the-introduction-youre-probably-wondering-whats-next]
> If you're not yet a client of ours, these links may be useful
>
> [Access Live Demos](https://gear.cloud.studio/gear/common/sign-up)
>
> [Licensing information](https://www.cloud.studio/precios/)
>
> [Support plan information](https://www.cloud.studio/support/)
>
> [Schedule a video call with us](https://calendly.com/joaquincervera)
>
> [Requirements and best practices](/docs/requisitos-y-buenas-practicas)
>
> If you are a client, we recommend starting with our platform's fundamental concepts page, [here](/docs/conceptos-fundamentales).
*Couldn't find the information you needed?* [*Contact us*](https://www.cloud.studio/contact/)
# Requirements and Best Practices
This section applies only to cases where the platform needs to be installed on third-party servers (On-Premises).
Minimum Infrastructure Requirements [#minimum-infrastructure-requirements]
\- Equivalent to t3.xlarge AWS.
\- 4 vCPUs - 2.5 GHz to 3.1 GHz
\- RAM: 16 GB
\- Disk space: At least 500GB
\- Operating System: Windows Server 2019 or higher (64-bit)
\- Database: SQL Server 2019 or higher (Web or Standard) (64-bit)
AWS Recommended Practices [#aws-recommended-practices]
* Elastic IP;
* Properly configured firewall, both in AWS and Windows Firewall / Windows Defender (**Never disable**):
* General rules should be configured by the client, Cloud Studio will add the specific rules;
* Using a default network is not recommended;
* AWS VPN;
* SQL Server: A dedicated server is recommended. In all cases, it must be Web or Enterprise, never Express.
* IIS installation: .NET 4.7, HTTP activation, HTTP redirection, and URL rewriting.
# Persistent Access Tokens
This API allows obtaining a token with administrator permissions, defining its lifetime.
Once generated, these tokens allow the invocation of various Back End Platform service APIs, enabling their use during the validity period of the obtained token.
Theory of operation [#theory-of-operation]
When integration of platform services is required by external applications, accessing these services requires obtaining a token known as an **Access Token.**
Access to and use of Platform services may be needed on a permanent or temporary basis.
The Platform's Authorization service includes two APIs for obtaining and deleting persistent tokens for these integration scenarios, detailed below.
Creating an Access Token [#creating-an-access-token]
Request [#request]
```
POST /services/gear/AuthorizationService.svc/CreateClientAccessTokenAllIntegrations
Host: gear.cloud.studio
```
Request Body [#request-body]
The request body is a JSON object with the format detailed below.
In this example, the creation and persistence of an Access Token is requested without specifying an expiration date, which in this case will default to 01/01/2099.
```
}
"clientAccessToken": {
"Description": "Testing 10",
"ClientID": 79
},
"login": {
"LoginType": 1,
"Email": "xxxxx.xxxxxxx@cloud.studio",
"Password": "xxxxxxxxxxx"
}
}
```
For cases where an expiration date is desired, the request body should be as detailed below, where an expiration field is added representing the moment when the Access Token should expire.
```
{
"clientAccessToken": {
"Description": "Testing 10",
"ClientID": 79
},
"login": {
"LoginType": 1,
"Email": "xxxxxx.xxxxxx@cloud.studio",
"Password": "xxxxxxxxx"
},
"expiration": 3600
}
```
Request Body Fields [#request-body-fields]
| Name | Description | Mandatory |
| ----------- | --------------------------------------------------------------------------------------------------------------------------------------------------- | --------- |
| Description | User-defined description generally detailing the purpose of the Access Token to be created, with a maximum of 255 characters. Unicode is supported. | Yes |
| clientID | Corresponds to the client identifier for which the token will be created. | Yes |
| LoginType | This field must contain the value 1, mandatorily. | Yes |
| EMail | Corresponds to the email of the account used to request the Access Token creation (\*). | Yes |
| Password | Corresponds to the password of the account used for the Access Token creation. | Yes |
| expiration | Corresponds to the time in minutes that the Access Token should be valid from the moment of its creation. | Yes |
**(\*) The permissions and privileges that the created Access Token possesses are inherited from the permissions and privileges of the user whose credentials are included in the request. Therefore, if the Access Token needs to have the same permissions as a platform administrator, the user used to execute the API must have such privileges.**
Response [#response]
The response for a correctly processed request will return an HTTP status code of 200 and contains the created **Access Token** as well as additional data about its expiration, the **associated client identifier (see Deleting an Access Token)**, and the submitted description.
```
{
"CreateClientAccessTokenAllIntegrationsResult": {
"AccessToken": "8e15e6d1-821a-4b71-a78d-8338e3307d2b",
"ClientAccessTokenID": 214,
"ClientID": 79,
"DateTimeCreated": {
"Date": {
"Day": 16,
"Month": 12,
"Year": 2022
},
"Time": {
"Hour": 18,
"Millisecond": 660,
"Minute": 38,
"Second": 33
}
},
"Description": "German Prueba 1",
"ExpirationDateTime": {
"Date": {
"Day": 1,
"Month": 1,
"Year": 2099
},
"Time": {
"Hour": 0,
"Millisecond": 0,
"Minute": 0,
"Second": 0
}
}
}
}
```
Important Considerations [#important-considerations]
The following exception scenarios may arise when using the API based on the following possible conditions of use.
Duplicate description [#duplicate-description]
Two consecutive Access Token creation requests **with identical content in the Description field** of the JSON object sent in the request will cause the request to fail.
Repeated incorrect credentials [#repeated-incorrect-credentials]
If three consecutive requests to the Access Token creation API are sent with incorrect credentials for the Email / Password pair, the request will fail and the response will contain the error message "*Please complete the captcha*".
If this situation occurs, it can be resolved by logging into the Platform front-end and performing the login operation with the correct Email and Password combination. In this case, Captcha validation will be requested.
Once the Captcha is correctly validated and the platform is successfully accessed, the API can be retried.
Deleting an Access Token [#deleting-an-access-token]
Request [#request-1]
```
POST /services/gear/AuthorizationService.svc/DeleteClientAccessToken
Host: gear.cloud.studio
```
Request Body [#request-body-1]
```
{
"accessToken": "99a4d0a4-932d-468b-9c17-49b5afdffb0d",
"clientAccessTokenID": 14
}
```
Request Body Fields [#request-body-fields-1]
| Name | Description | Mandatory |
| ------------------- | ----------------------------------------------------------------- | --------- |
| accessToken | Previously created Access Token to be deleted. | Yes |
| clientAccessTokenID | Client identifier associated with the Access Token to be deleted. | Yes |
Response [#response-1]
The response for a correctly processed deletion request will return an HTTP status code of 200 and an empty body. A response with an HTTP status code of 500 should be considered a failed request and will contain a body as detailed below.
Response body for a successful deletion request and response body for a failed request:
```
{}
```
```
{
"Exception": {
"ClassName": "ServiceException",
"FaultCode": "8001",
"FaultData": "",
"Message": "The access token is invalid or it doesn't have sufficient permissions to execute the requested operation"
}
}
```
Platform services and their respective APIs that can be used with persistent Access Tokens [#platform-services-and-their-respective-apis-that-can-be-used-with-persistent-access-tokens]
As an example, below are some of the services that can be used with an Access Token created by this API:
1-/services/gear/DashboardService.svc/GetDashboard
2-/services/core/AlarmService.svc/GetAlert
3-/services/gear/DeviceService.svc/CreateDeviceModel
4-/services/gear/DeviceService.svc/EditDeviceModel
5-/services/gear/DeviceService.svc/DeleteDeviceMod
# Instance Mapping API
Instance Mapping API [#instance-mapping-api]
**The API allows mapping the following variables within the environment:**
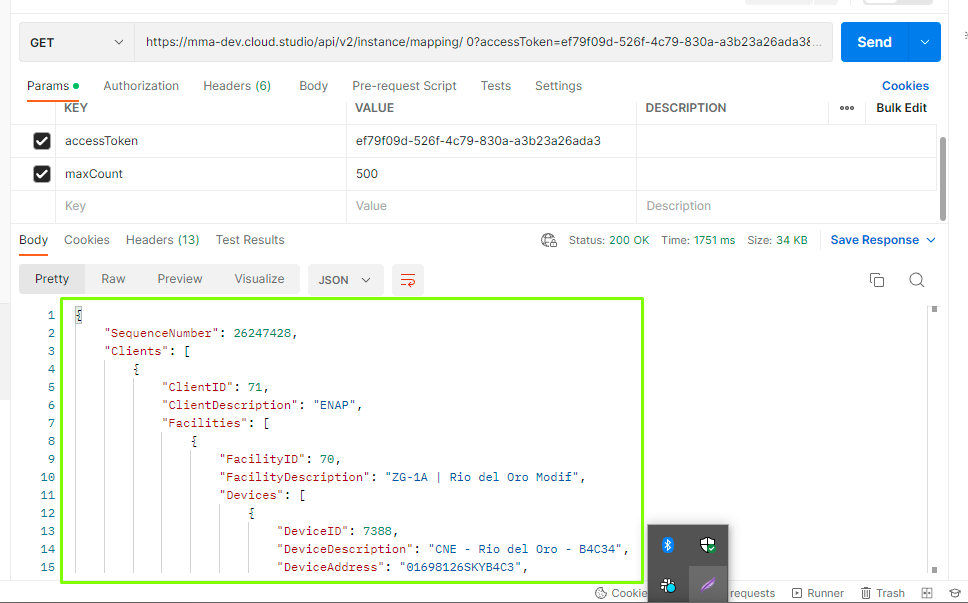
Client ID / Client Description / Facility ID / Facility Description / Device ID / Device Description / Address / Endpoint ID / Endpoint Description.
Note:
The API has a limitation of a maximum of 500 records (if not specified, it defaults to 100) to avoid impacting the environment's performance. Therefore, it must be executed multiple times to map the entire instance.
The user can execute the service as follows:
GET/api/v2/instance/mapping/\{SequenceNumber}?accessToken=\{accessToken}
Parameters [#parameters]
1. ***SequenceNumber*** = Sequence number. Starts at 0.
2. ***accessToken*** = Global Administrator Access Token
3. ***MaxFetchItems*** = Maximum number of elements to retrieve (Optional. Default 100, Maximum 500)
**Notes:**
The number of elements obtained may be larger since the API will return the owner entities of each entity, in the order (Client, Facility, Device, `Enpoint)` and, because of this, elements may repeat between executions.
**Theory of operation**
To obtain a detailed list of the instance (Endpoint, Device, Facility, Client) incrementally, the SequenceNumber field is used. This field is monotonically ascending, meaning that when changes occur in any entity, its SequenceNumber field will change to a value higher than any other entity. This allows retrieving data based on the SequenceNumber in small batches until no more data is obtained, and then continuing periodically to get updates. When the result of this API is an empty list, it means that there are currently no updates.
**Typically, an application consuming this API uses the following flow:**
1. The application starts using a stored SequenceNumber (typically in non-volatile storage). On the first execution, this value is 0.
2. The application executes the API using (stored SequenceNumber 0).
3. The application receives a list of entities, and the last SequenceNumber.
4. If the received list is empty, the application waits a few seconds and returns to step 2.
5. If the received list is not empty, the application stores the received SequenceNumber.
6. The application immediately returns to step 2.
7. When a new entity is created, or an existing one is modified, its SequenceNumber will immediately change to a value higher than the last received, so its information will be received immediately in the next execution.
**Request:**
GET:/api/v2/instance/mapping/{SequenceNumber}?accessToken={accessToken}&maxCount={MaxFetchItems} [#getapiv2instancemappingsequencenumberaccesstokenaccesstokenmaxcountmaxfetchitems]
Parameters [#parameters-1]
| It is mandatory to include the following parameters "SequenceNumber" and "accessToken". The "AccessToken" must be generated by a global administrator and the "SequenceNumber" will vary with each execution. |
| ------------------------------------------------------------------------------------------------------------------------------------------------------------------------------------------------------------- |
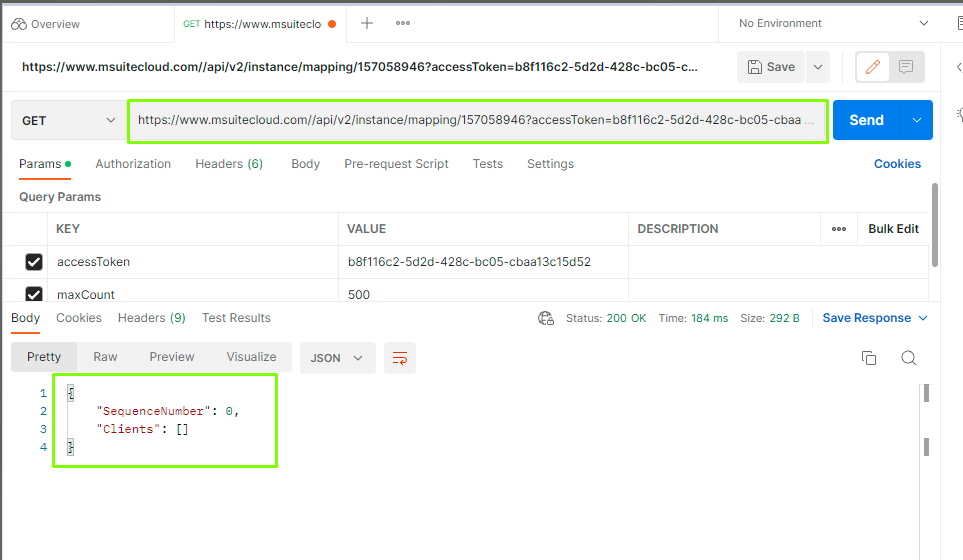
**Empty entity response:** when it returns empty after traversing all entities within an environment, the user can make the query again using 0 **"*****SequenceNumber*****"**.
**Note:**
**Important definitions.**
The complete tree will not be obtained until the entire instance has been mapped.
It will not be displayed sorted but it will be hierarchical.
Where there is no endpoint, nothing will be returned. Only the complete branch will be returned.
**Response:** The response contains the list of variables, as shown in this example:


# Data Extraction APIs
Introduction [#introduction]
This section explains how to extract data from the Gear Studio platform using the HTTP API, such as:
* [Alerts](/docs/apis-de-extraccion-de-datos/alertas): the API allows extracting the definition of all alerts created in the platform, filtering them in different ways.
* [Alarms](/docs/apis-de-extraccion-de-datos/alarmas): the API allows extracting all alarms recorded in the platform, historically, filtering them in different ways.
* [Endpoint data](/docs/apis-de-extraccion-de-datos/datos-de-endpoints): the API allows extracting all information associated with endpoints, historically, filtering it in different ways.
* [Geozones](/docs/apis-de-extraccion-de-datos/geozonas): the API allows extracting the list of geozones configured for each client, including the list of vehicles contained within them.
Getting Started [#getting-started]
Creating an access token [#creating-an-access-token]
As with any other HTTP integration, it is necessary to create an access token. [This page](/docs/configuracion-del-cliente/tokens-de-acceso-access-tokens) contains more information about managing access tokens. Access tokens allow controlling the access and permissions used for any operation.
Authentication using an access token [#authentication-using-an-access-token]
In all APIs, the access token can be sent as part of the header, using an Authorization header, as shown below:
```
Authorization: Bearer e54e0911-ece3-4b7a-b84d-afc01dfa81f1
```
Alternatively, when it is not possible to send the token through the Authorization header, the access token can be sent as part of the URL, through the "accessToken" parameter, as in the following example:
```
https://gear.cloud.studio/api/v2/alarms?accessToken=e54e0911-ece3-4b7a-b84d-afc01dfa81f1&clientID=4&maxCount=10
```
API Execution [#api-execution]
To execute the API, review each of the following sections, which contain the related information:
* [Extracting alerts](/docs/apis-de-extraccion-de-datos/alertas).
* [Extracting alarms](/docs/apis-de-extraccion-de-datos/alarmas).
* [Extracting endpoint data](/docs/apis-de-extraccion-de-datos/datos-de-endpoints).
* [Extracting geozone data](/docs/apis-de-extraccion-de-datos/geozonas).
# Client Configuration
The following sections present tutorials for the configurations offered by the Cloud Studio platform at the client level
# Access Tokens
The access token allows us to make requests via both [HTTP](/docs/configuracion-del-cliente/dispositivos-y-endpoints/dispositivos/integracion-de-dispositivos/http) and [MQTT](/docs/configuracion-del-cliente/dispositivos-y-endpoints/dispositivos/integracion-de-dispositivos/mqtt), as well as integrate other interfaces such as [The Things Network](/docs/configuracion-del-cliente/dispositivos-y-endpoints/dispositivos/integracion-de-dispositivos/lorawan-network-servers-lns/the-things-stack-ttn-tts). It is possible to generate as many tokens as needed and assign the required permissions to each one.
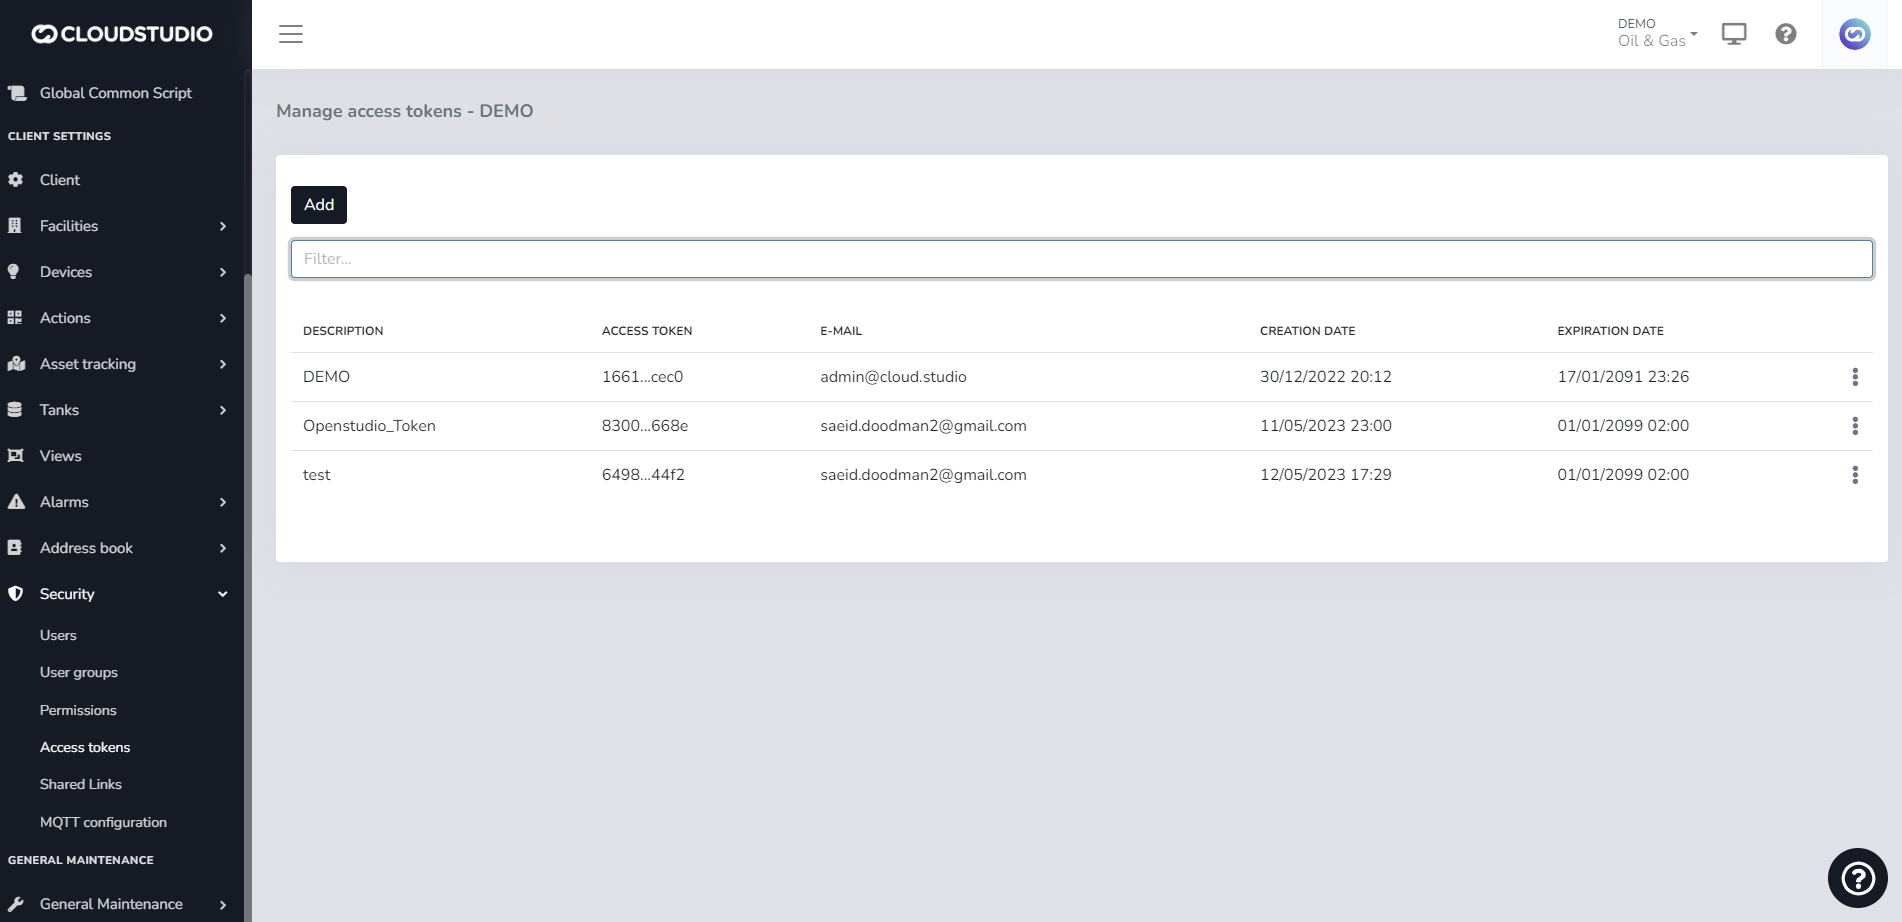
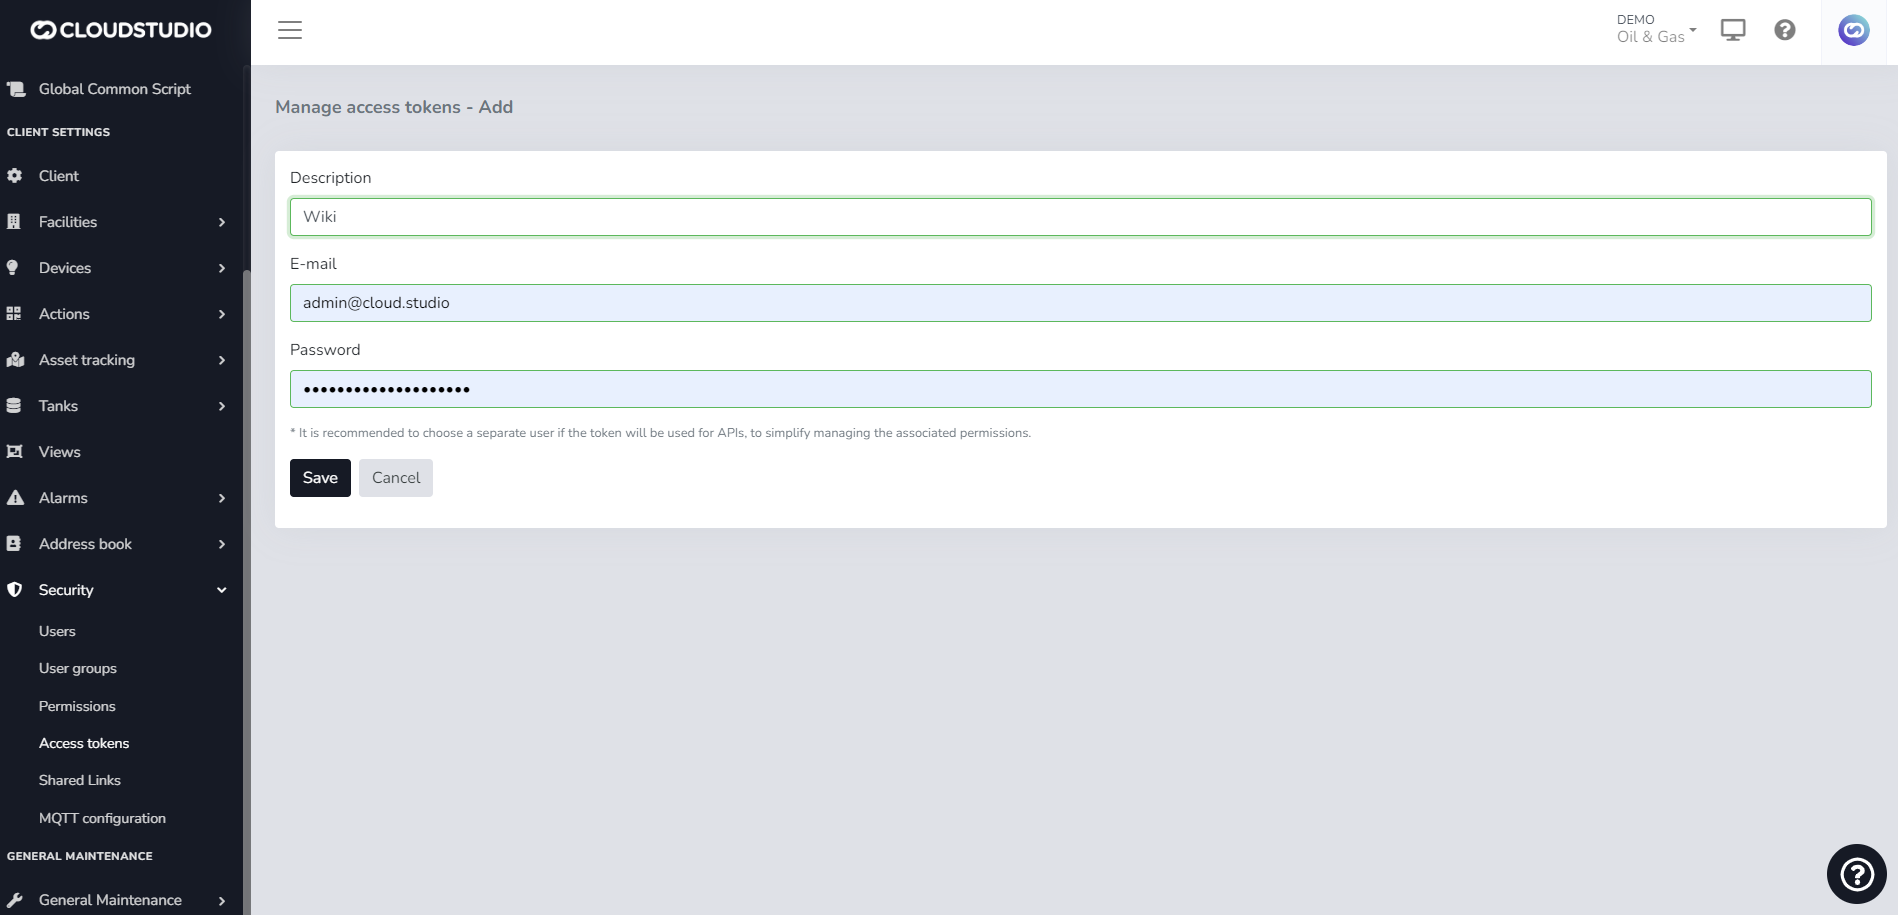
To generate an access token through the manager, navigate to the side menu and select access tokens. The manage access tokens - client window will appear, showing the list of tokens created for that client. Since no tokens have been created yet, press the add button to create a new token.
Once inside, fill in the **Description** field with the desired name. In the **Email** and **Password** fields, enter the credentials of your corresponding user, then press **Save**.
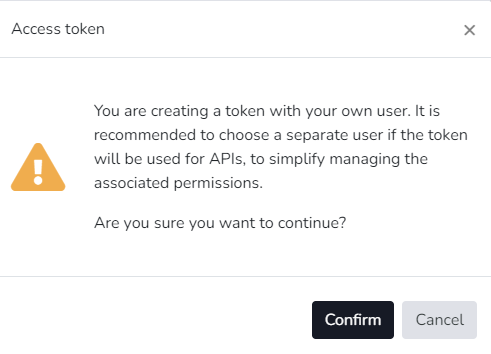
To manage token permissions in a more granular way, it is recommended to create a user exclusively for API usage, or even a different user for each token created.
A confirmation dialog will then appear asking whether you want to create the token with the current username and password. Press confirm.
Once confirmed, the token will be generated. Press **Back** to return and view the details of the created token.
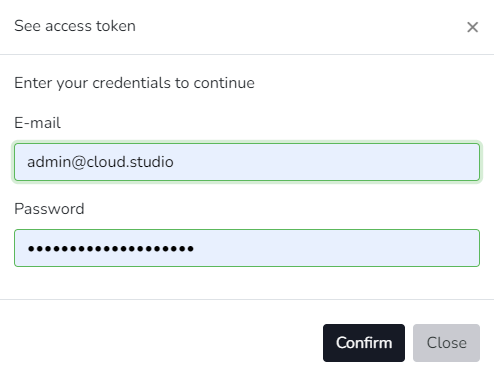
Select the added token and choose the View Token option.

Enter the username and password.
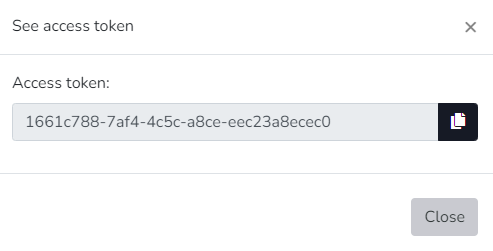
The token is displayed and can now be copied.
# Additional Features
Introduction [#introduction]
**Additional Features** are advanced system functionalities specially designed to extend the tool's reach and provide greater platform customization and usage.
> These add-ons can be requested by clicking the "Request" button below each feature.
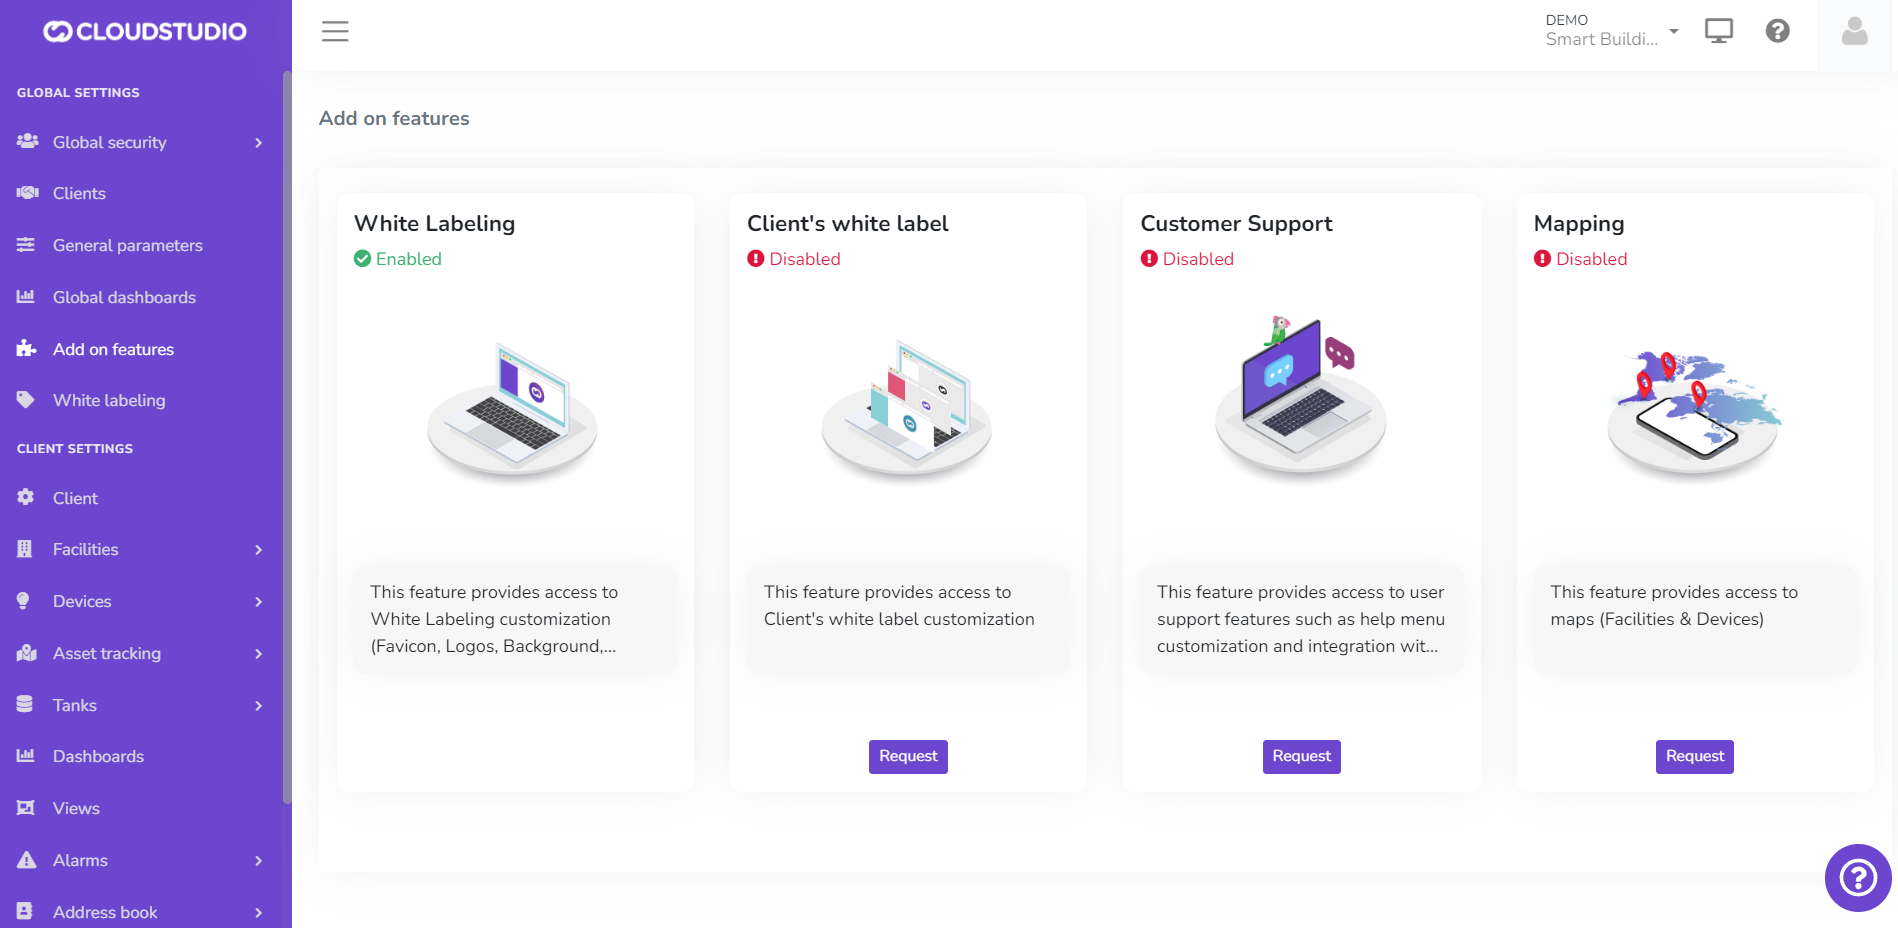
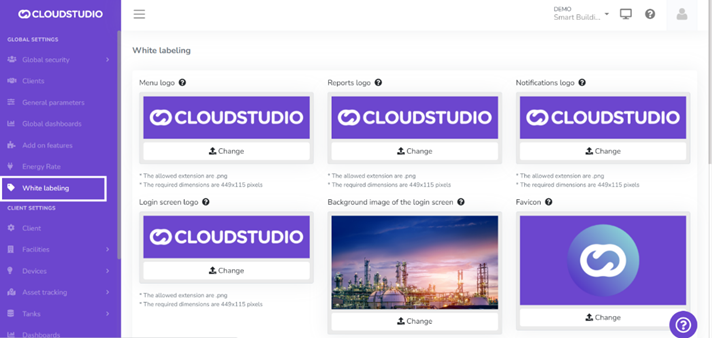
Instance-Level White Labeling [#instance-level-white-labeling]
The **White Labeling** feature gives users the ability to customize the platform, creating a unique usage experience that adapts to their brand identity. From this section, you can customize the logo in the menu, reports, notifications, and login screen. It also provides color palette selection, login screen background image, and chat and help page settings.
From this option, you can enable *instance-level White Labeling*. Learn more about how it works on this [page.](/docs/configuracion-global/marca-blanca)

Client-Level White Labeling [#client-level-white-labeling]
This advanced White Labeling feature enables platform customization for different clients within the same instance. Learn more about how it works on this [page.](/docs/configuracion-global/marca-blanca)
> **Notes:**
>
> * The Client White Labeling feature is not included in all subscription plans. Contact our [sales](https://bit.ly/3Oc8zpg) team for pricing and activation.
> * To request activation of this feature, Instance White Labeling must be enabled first.
_ba2c.png)
User Support [#user-support]
This feature enables integration with Tawk.to, also facilitating help menu customization. Once enabled, it can be used from the [White Labeling](/docs/configuracion-global/marca-blanca) menu.
From this option, the user can configure the appearance, availability, and options of the application's help chat.
> **Note:** It is important to remember that the plugin configuration is customizable so the user can create their own plugin application and, with the chat owner's ID, replace it to view it in both English and Spanish. The colors and texts customized by the user from Tawk.to will also be displayed there.
>
> When the user does not enter their own data, the user support button will not be visible.
>
> * To request activation of this feature, Instance White Labeling must be enabled first.

[Tawk.to](https://www.tawk.to/software/chat-pages/)

Mapping [#mapping]
This feature enables the display of Facility and Device maps in the monitor.
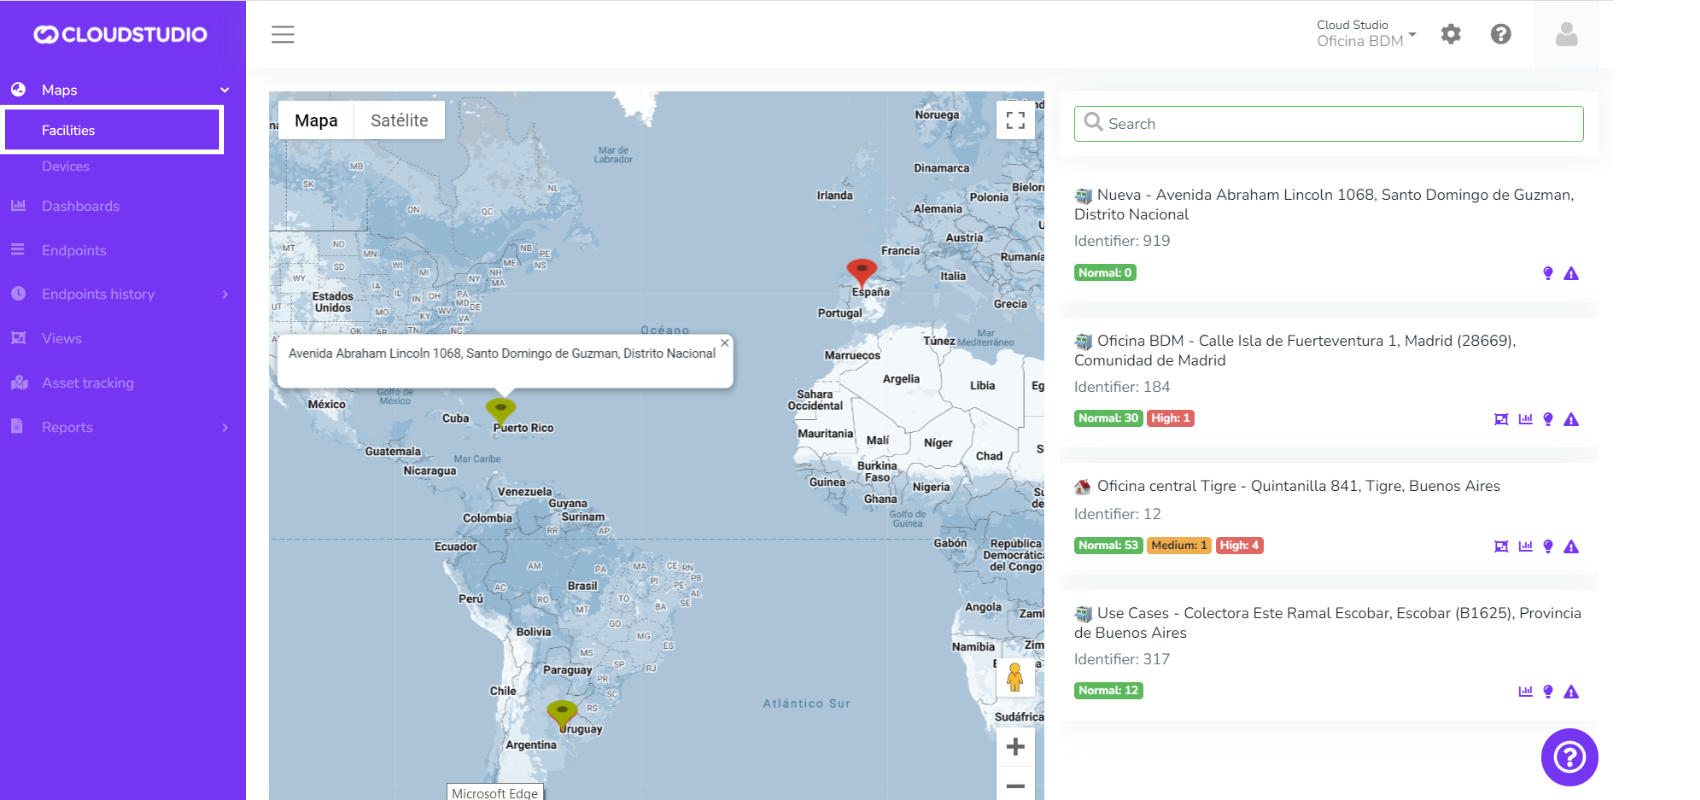
***Facility Map***
For more information about the *facility map*, check this [page.](/docs/monitor/mapa-de-instalaciones)
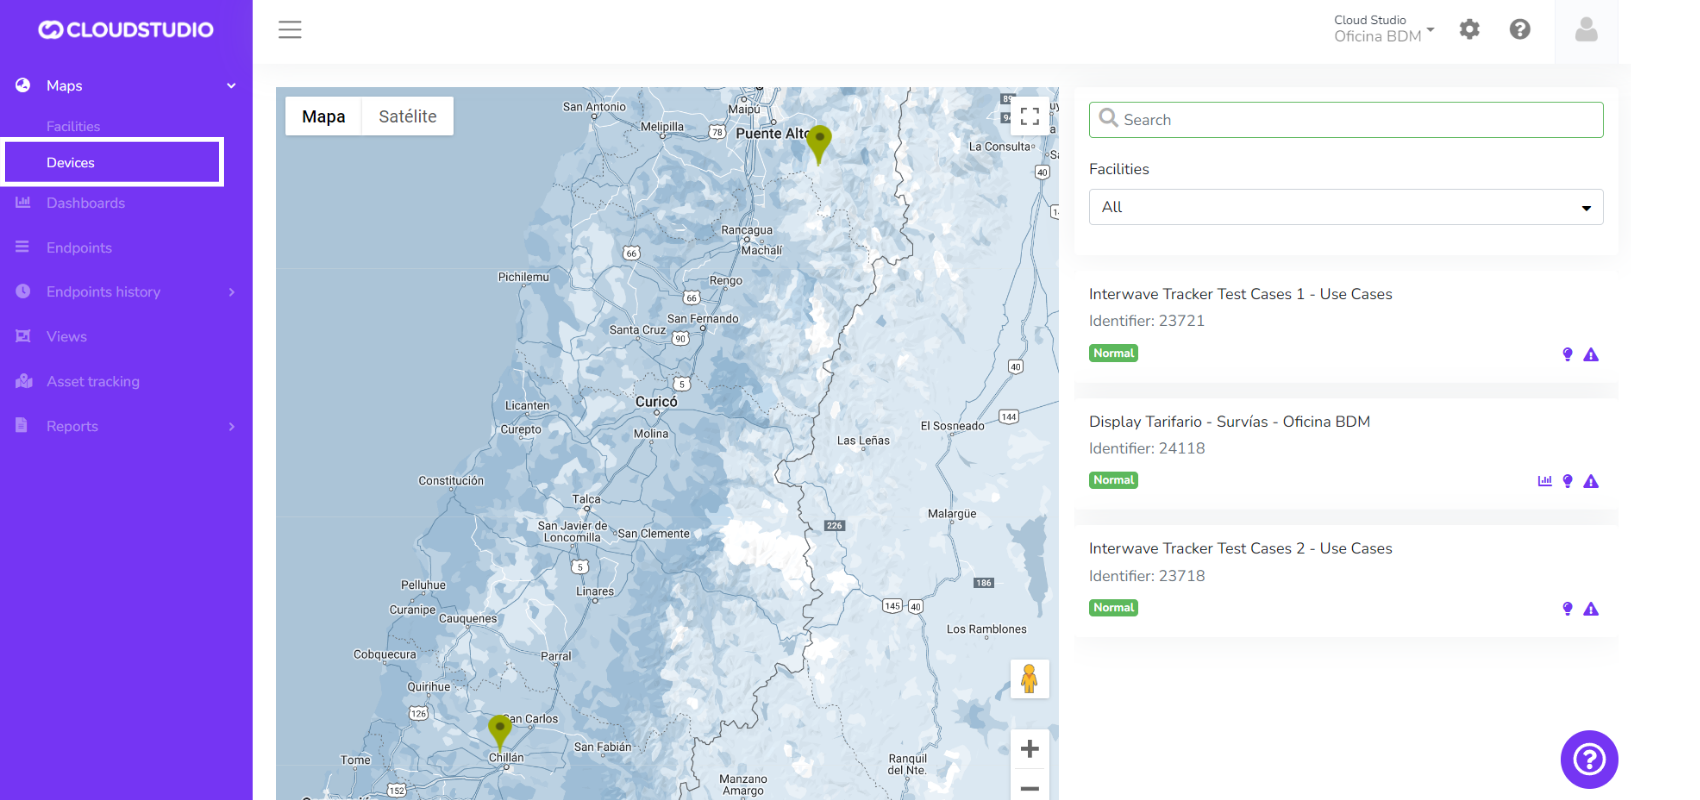
***Device Map***
For more information about the *device map*, check this [page.](/docs/monitor/mapa-de-dispositivos)
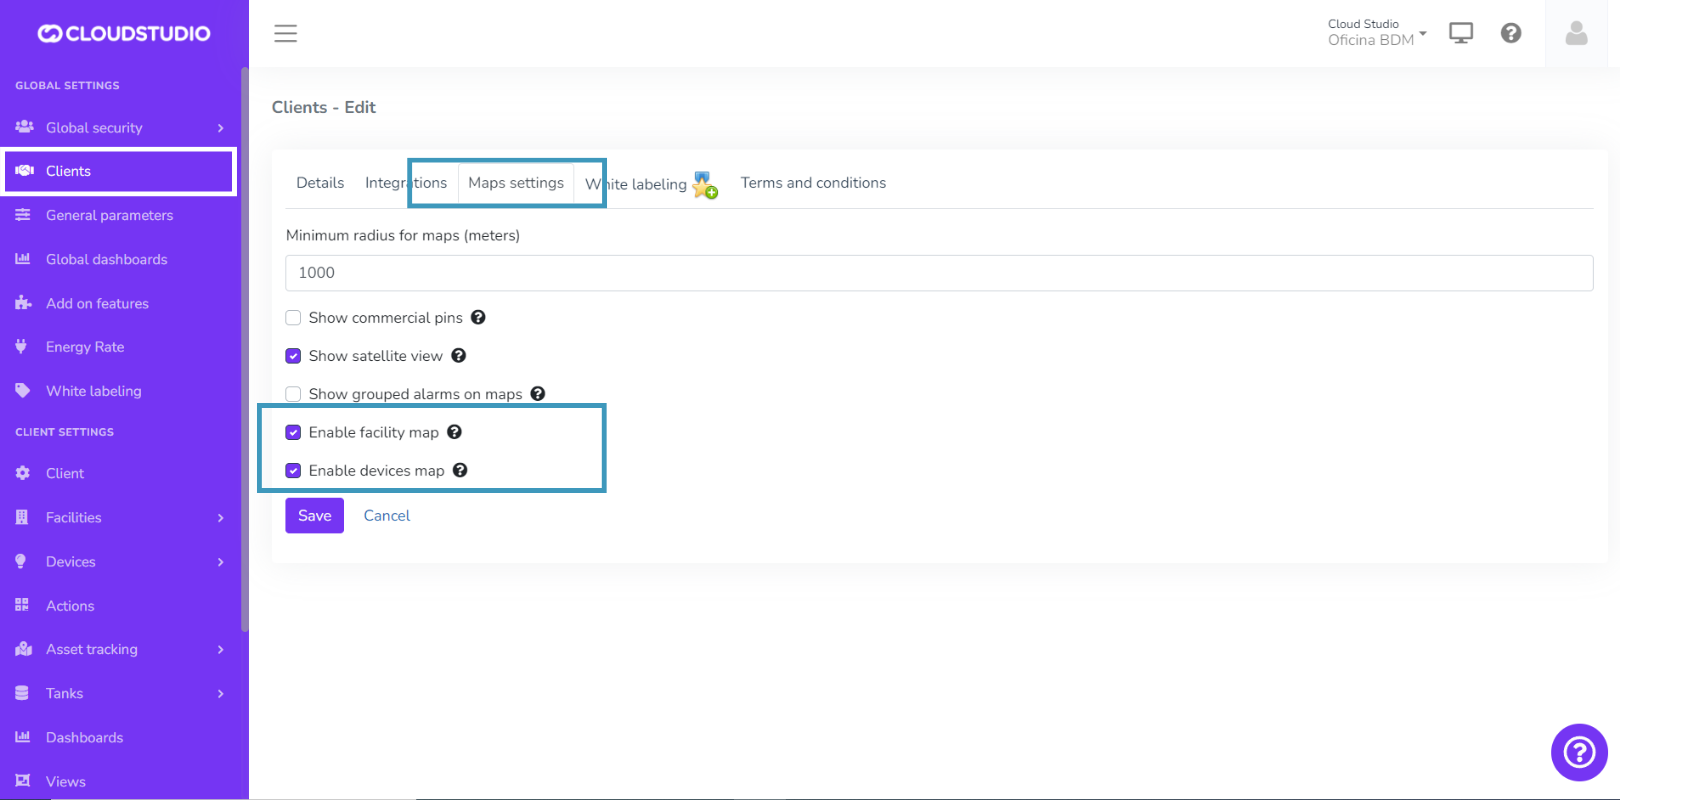
How to enable and disable maps? [#how-to-enable-and-disable-maps]
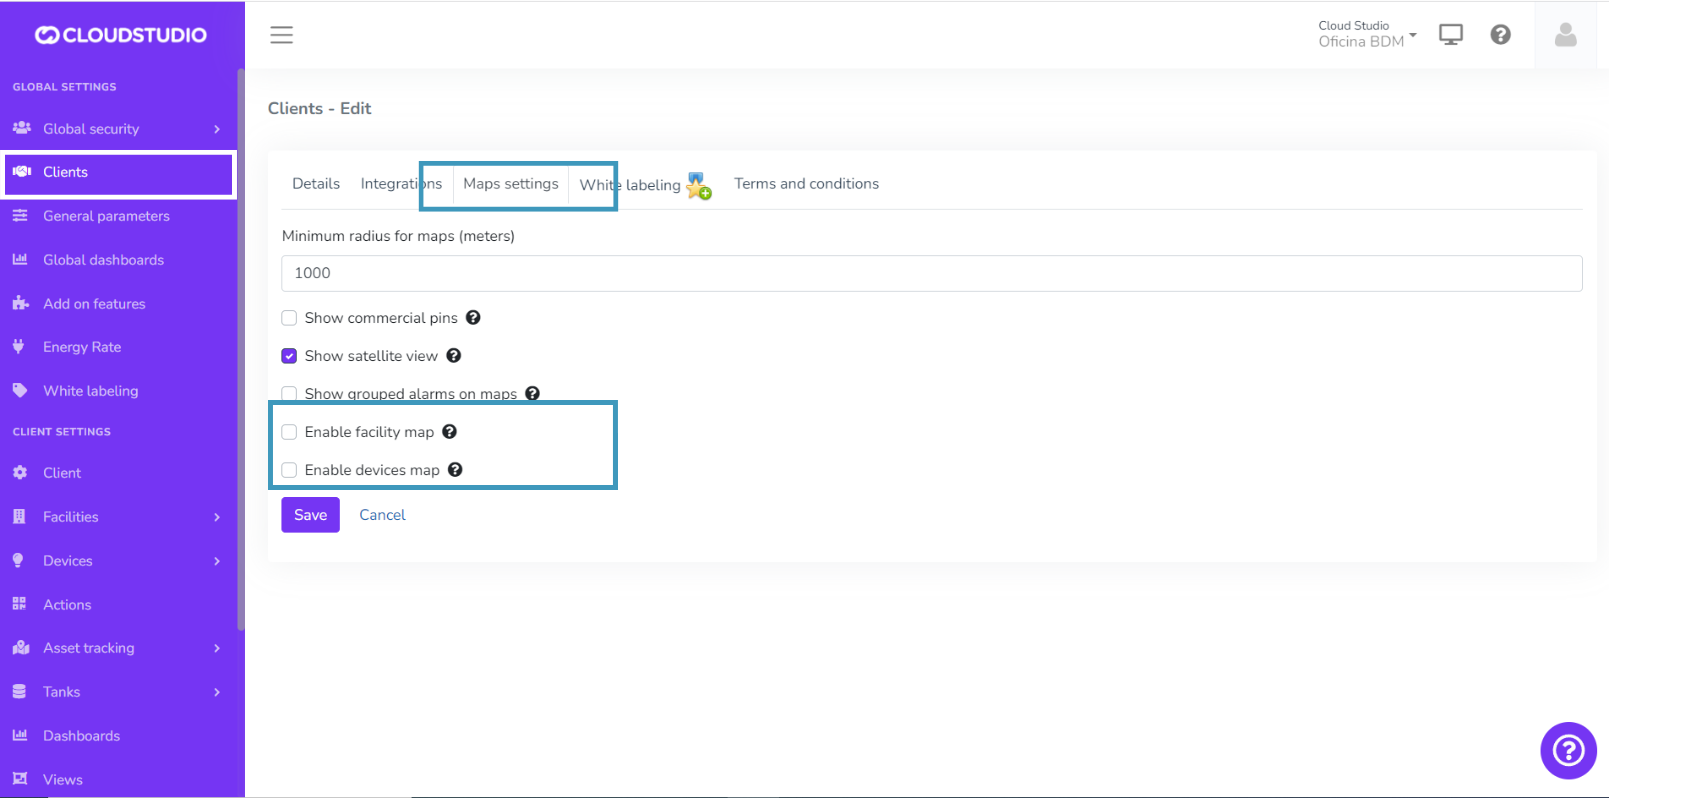
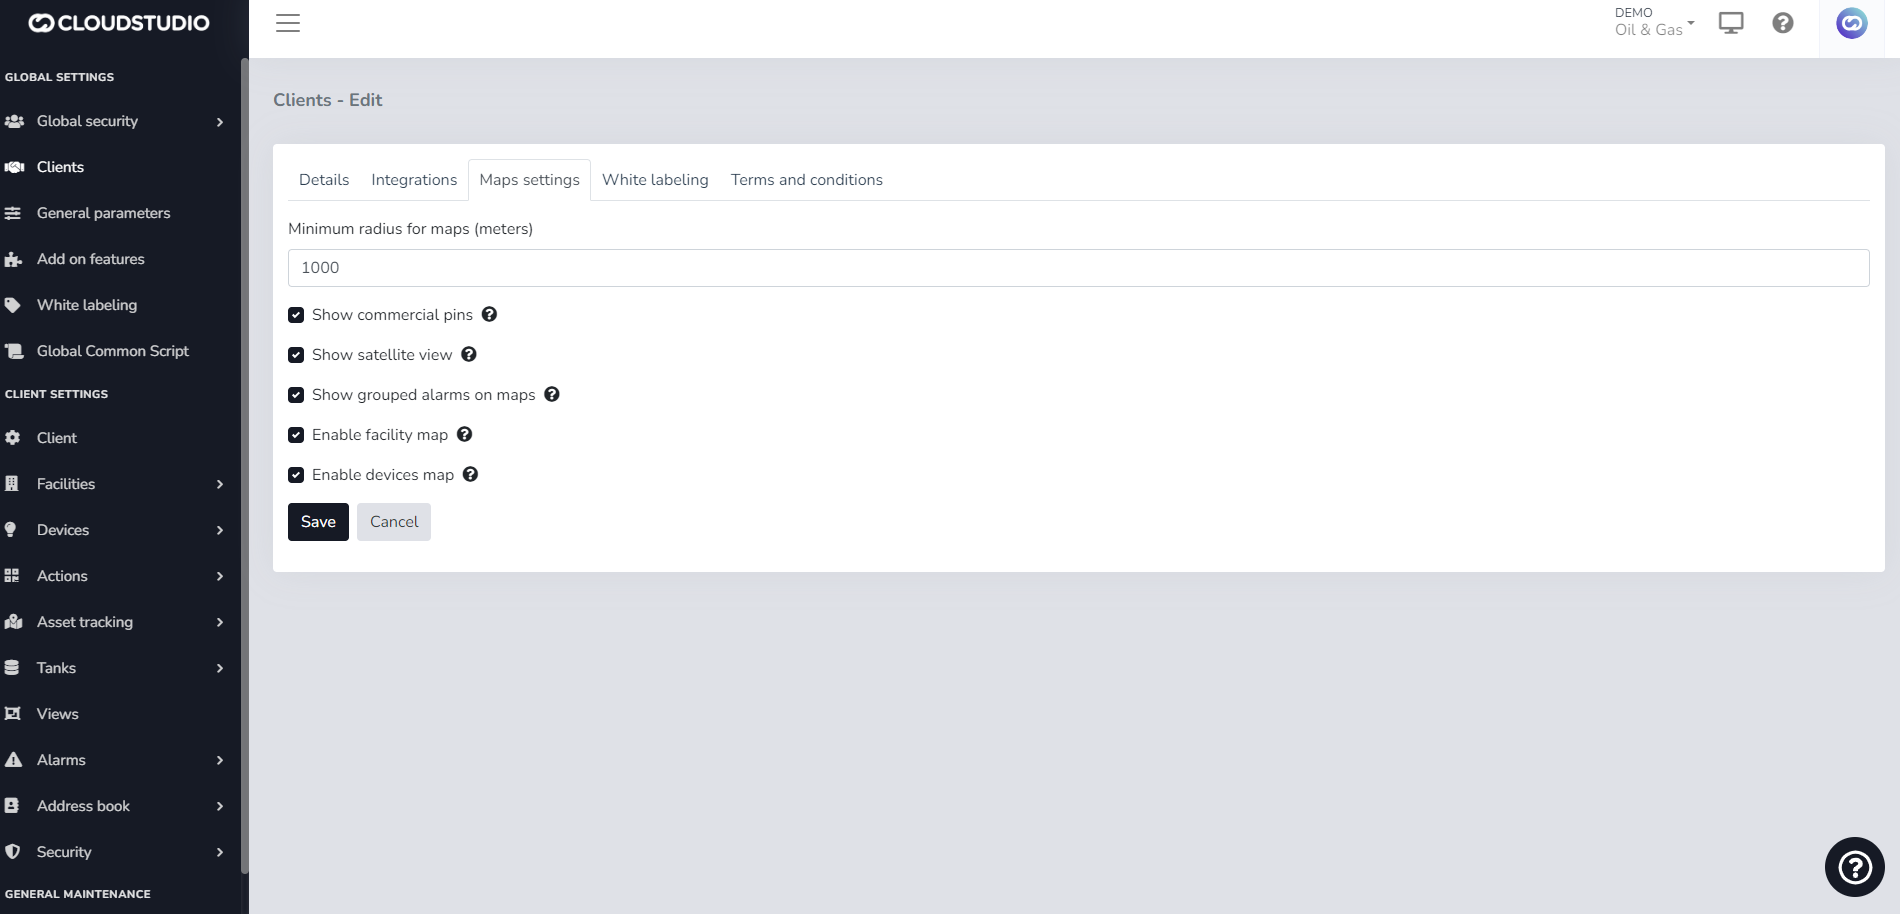
Once the feature is enabled from **Additional Features**, to modify the map views go to **Clients** in the *Global Configuration* menu.
Choose the client for which you want to modify the map views.
_7ad8.png)
Find the **Map Settings** tab and check the *Enable facility map* and *Enable device map* checkboxes. Select the checkboxes to show the maps and deselect them otherwise, then press the *Save* button.
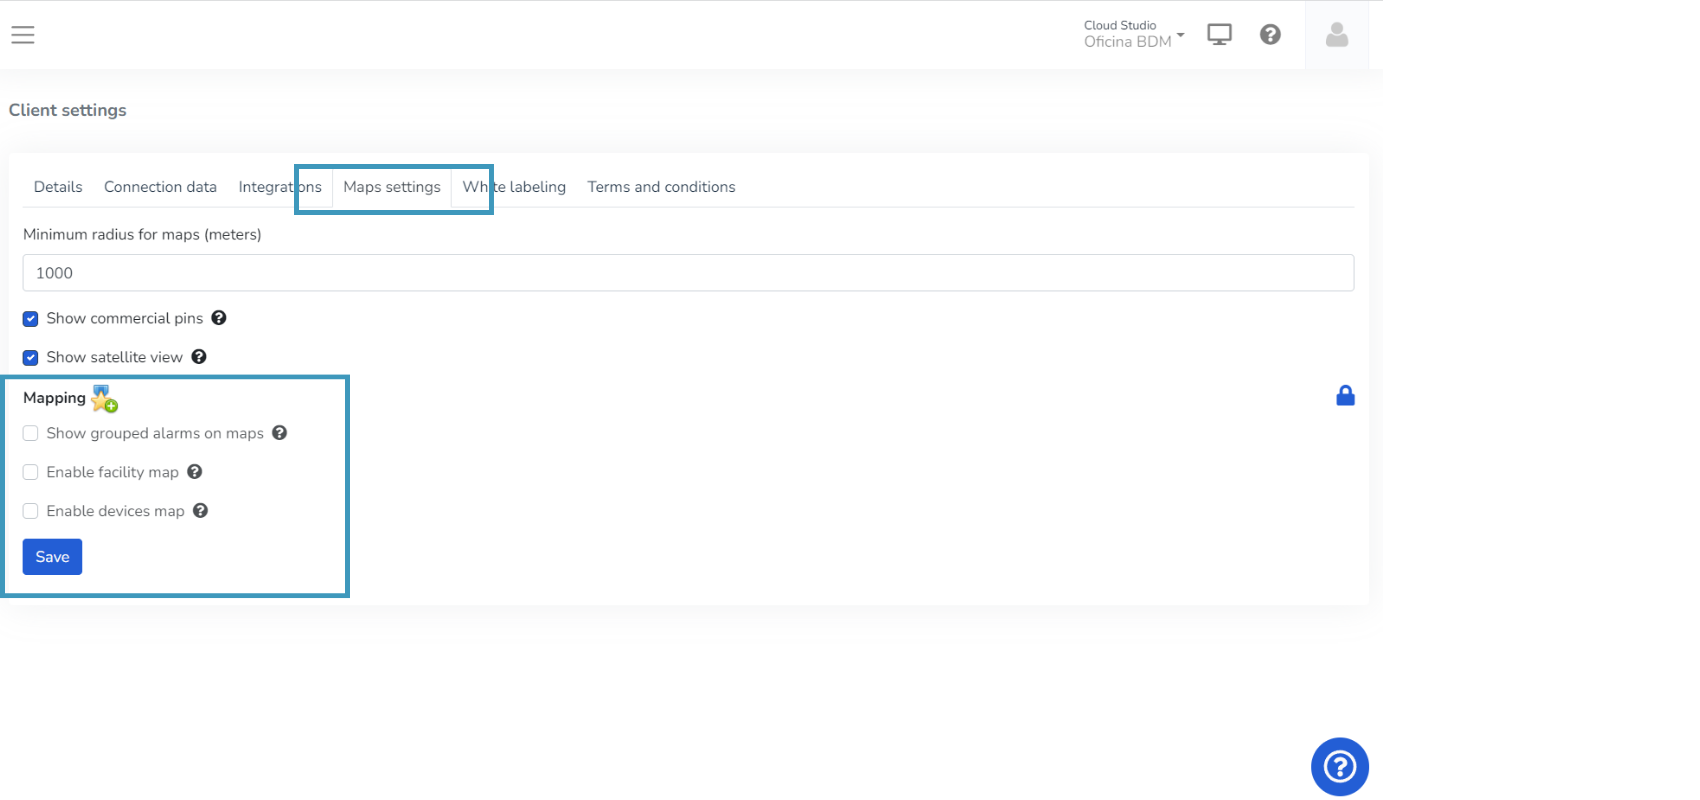
***Maps enabled***
***Maps disabled***
> **Note:** If the feature is disabled, you will not be able to modify the checkboxes and you will see the Mapping title with an icon above them.
How to modify the location of Facilities and Devices on maps? [#how-to-modify-the-location-of-facilities-and-devices-on-maps]
***Facilities***
The location of Facilities can be specified as follows:
1\. Go to the *Client Configuration* menu, find the **Facilities** option, and select the *Facility* you want to edit.
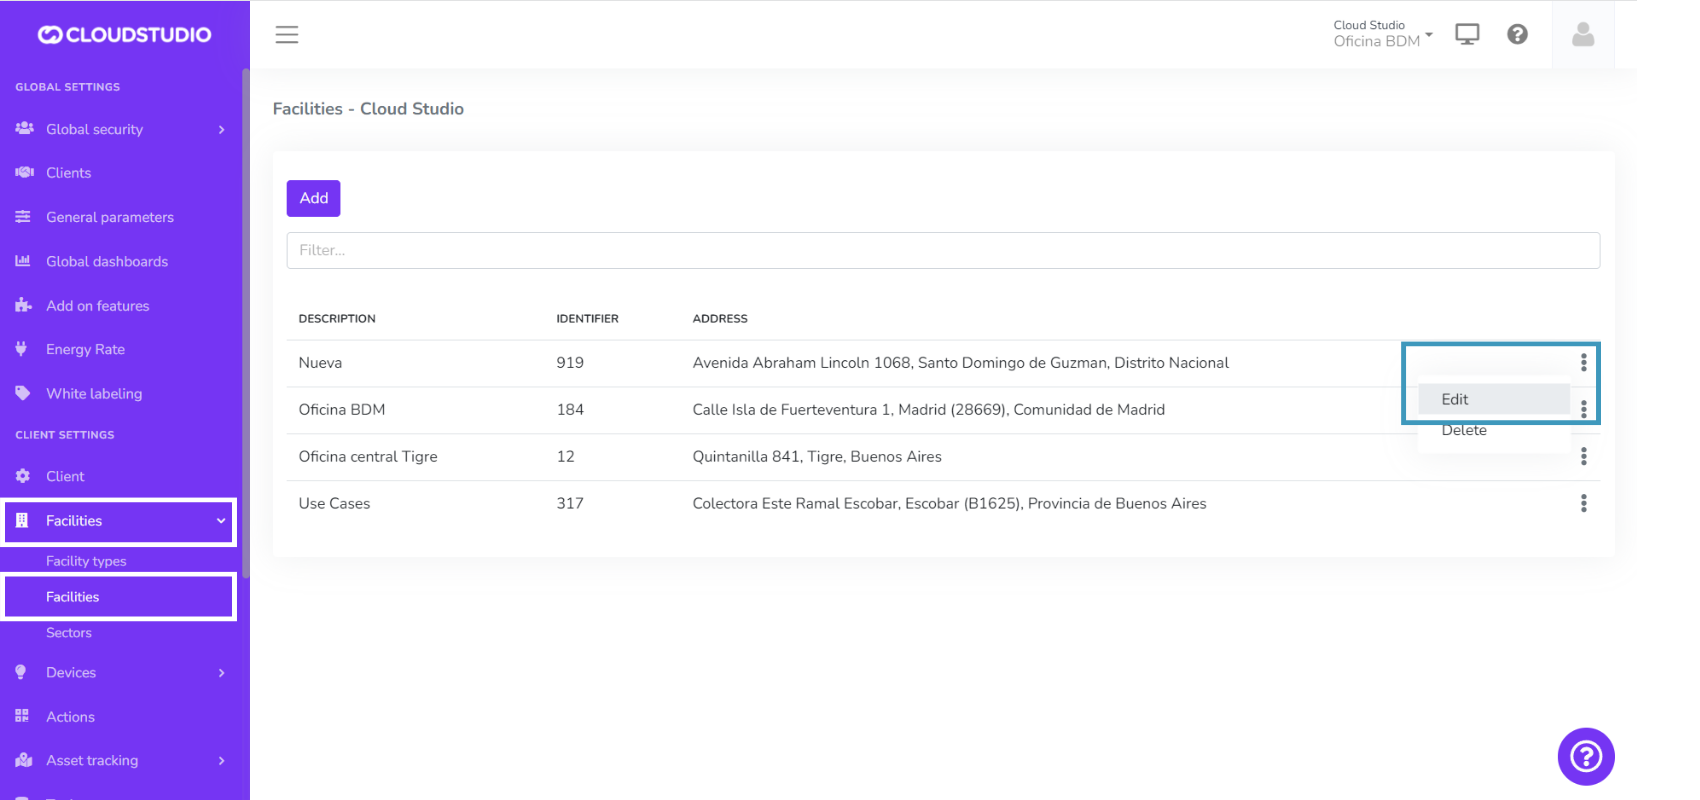
2\. Once inside the *Facility* configuration, you can enter the location coordinates in the *Latitude* and *Longitude* fields.
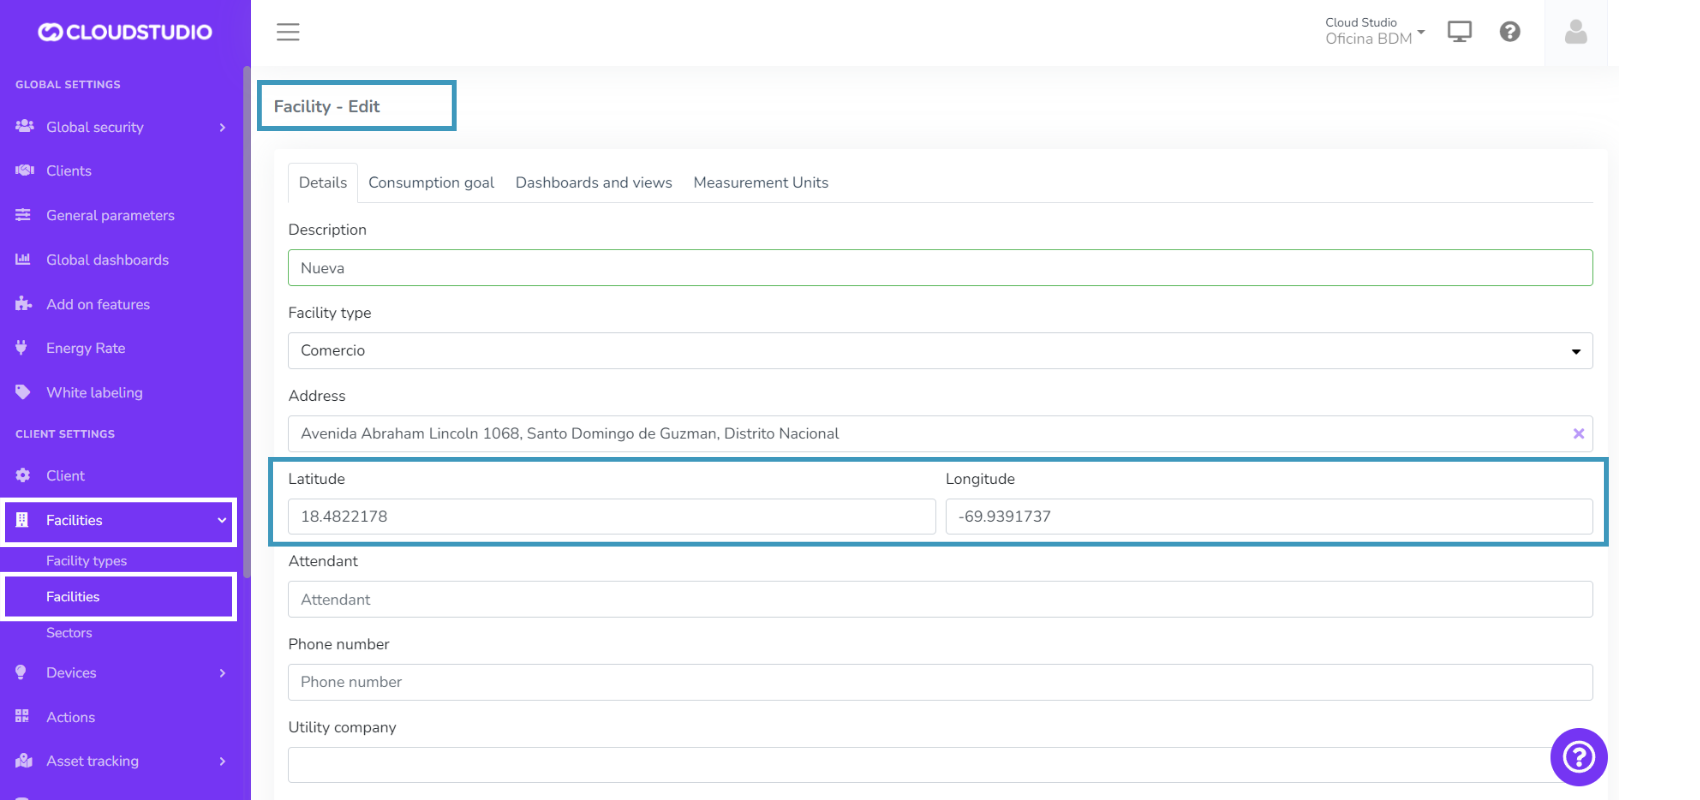
3\. Press the *Save* button to see the location change on the map.
***Devices***
You can learn how to modify a device's location on the following [page](/docs/herramientas-low-code-scripting/referencia-de-objetos-disponibles-para-scripting/device).
Map Icons [#map-icons]
This feature enables customization of **Facility**, **Device, Tank**, and **Vehicle** icons on maps.
How to choose icons? [#how-to-choose-icons]
You will have several icon groups available to select for facilities, devices, and vehicles. From their configuration, you can choose the icon group that best suits your instance.
***Facility icon configuration***
Go to the *Client Configuration* menu, find the **Facilities** option, and select the *Facility* to edit.
_eb5b.png)
Select the desired icon group and press *Save* to display it on the map.
_b32d.png)
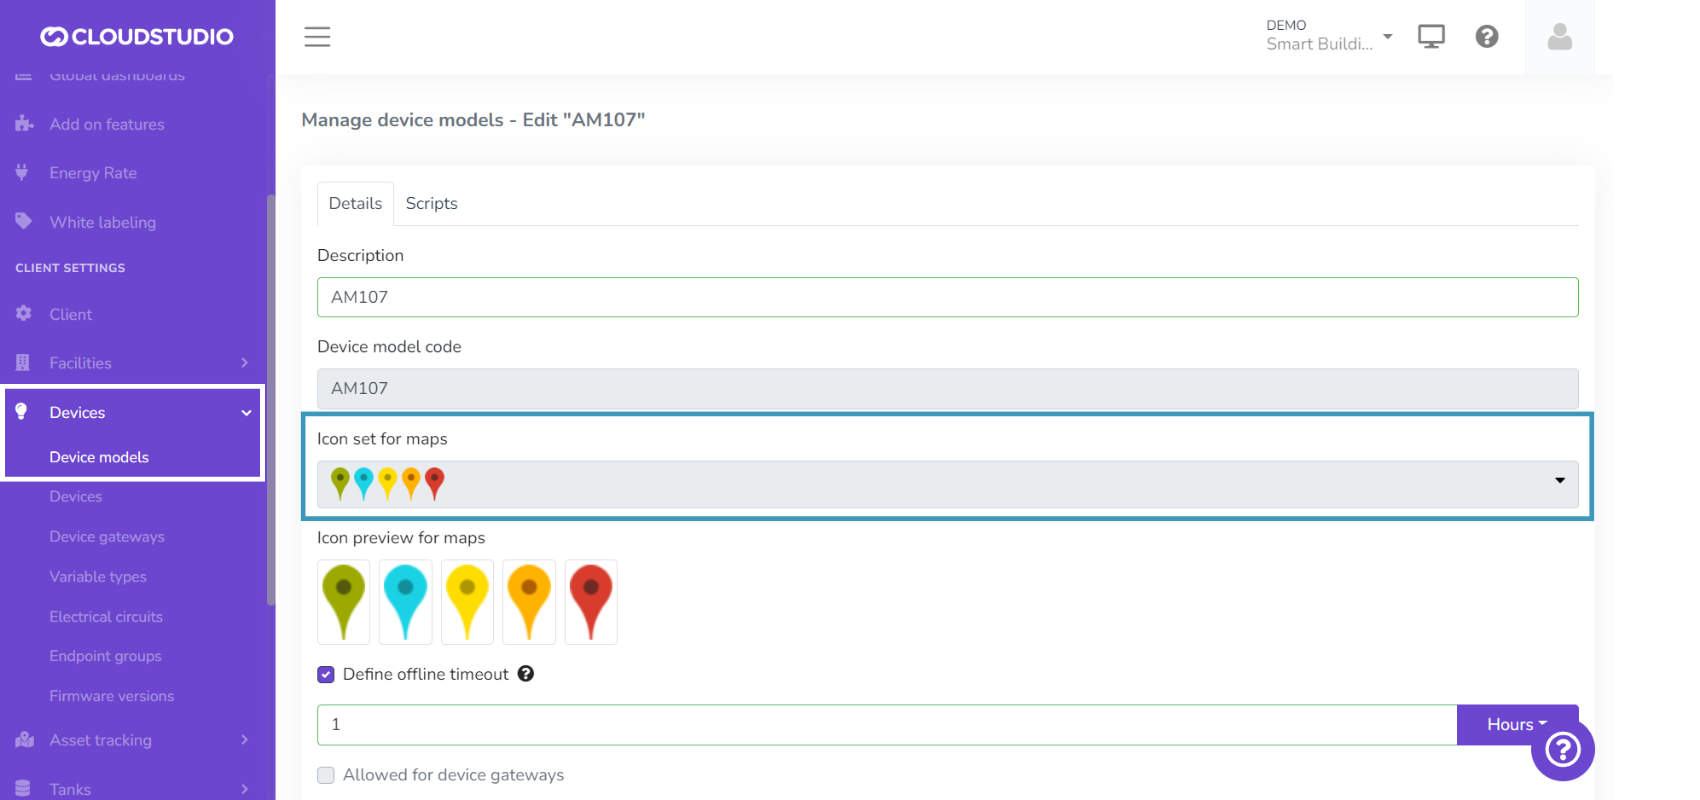
***Device icon configuration***
Go to the *Client Configuration* menu, find the **Device Models** option, and select the device to edit.
_9bd2.png)
Select the desired icon group and press *Save* to display it on the map.
Select the desired icon group and press *Save* to display it on the map.
***Vehicle icon configuration***
Go to the *Client Configuration* menu, find the **Fleet Tracking** option, enter *Vehicles*, and select the vehicle to edit.
Select the desired icon group and press *Save* to display it on the map.
_4f46.png)
***Tank icon configuration***
Go to the *Client Configuration* menu, find the **Tanks** option, and select the tank to edit.
Select the desired icon group and press *Save* to display it on the map.
_ea5d.png)
Extended Authentication [#extended-authentication]
This feature enables user authentication during the login process through external providers such as Auth0. To learn how the login process works, go to this [page](/docs/configuracion-global).
> * Configuring this feature requires having an Auth0 instance.
> * This instance can be provided by Cloud Studio or owned by a client. For more information, contact [contacto@cloud.studio](mailto:contacto@cloud.studio)
# Clients
The following sections describe how to manage clients, including their creation, modification, and deletion.

To access the specific configuration of a client, you can do so from the [Client](/docs/configuracion-del-cliente/cliente) menu.
# Global Configuration
The following sections present tutorials for the configurations offered by the Cloud Studio platform at the instance level. This section will be available only to environment administrators.
# General Parameters
From this section you can define and modify general parameters. This parameterization will apply to all existing clients within the instance in question.
The configurable parameters are:
* Action history retention period (in days)
* Automatic aggregation: maximum number of endpoints per round
* Captcha: Number of attempts before displaying it
* Default date range for dashboards. For example: "now-1h" or one hour ago
* Reports: default footer image
* Default time zone (Buenos Aires, Argentina)
* Account Administrator email address. For example: [info@cloud.studio](mailto:info@cloud.studio)
* Support email address. For example: [support@cloud.studio](mailto:support@cloud.studio)
* Prefix device names to endpoints. This option adds the device name before the endpoint to avoid having to manually modify the endpoint name and easily differentiate it from other endpoints. The option is "True" or "False".
* Geocoding: suffix for address resolution
* Accept future timestamp values up to (minutes): Example: 5
* Address used to send email notifications: [notifications@cloud.studio](mailto:notifications@cloud.studio)
* Name used to send email notifications: Cloud Studio Gear notifications
* Notifications: Email notification signature (EN). Example: Cloud Studio's team
* Notifications: Email notification signature (ES). Example: El equipo de Cloud Studio
* Number of SMTP accounts for sending emails. Example: 1
* SMTP server password used to send email notifications. The password must be written in base64 format
* SMTP server port used to send email notifications. For example: 587
* SMTP server used to send email notifications. For example: smtp.gmail.com
* SMTP server user used to send email notifications. For example: [notifications@cloud.studio](mailto:notifications@cloud.studio)
* Password rules: minimum length (characters). For example: 6
* Password rules: require lowercase characters. For example: False
* Password rules: require numbers. For example: False
* Password rules: require symbols. For example: False
* Password rules: require uppercase characters. For example: False
* Password recovery link validity (hours). For example: 24
* Endpoint view: default grouping. By group = 1, by category = 2 (default), by device = 3
# Low-Code Tools (Scripting)
Introduction [#introduction]
What are scripts? [#what-are-scripts]
Scripts are code snippets, written in JavaScript, that allow extending the platform's functionality, especially for device data processing, executing complex actions, or defining user-defined devices for which there is no native support in the platform.
What languages can scripts be written in? [#what-languages-can-scripts-be-written-in]
Currently, the Gear Studio platform allows writing scripts in JavaScript, which is a mature and widely known language, but support for other languages is planned for the future.
What are the limitations of scripts? [#what-are-the-limitations-of-scripts]
Scripts are extremely flexible and allow extending the platform easily. However, to prevent a poorly written or malicious script from negatively affecting the platform's performance, the following restrictions apply:
* Scripts are limited to a maximum execution time of 10 seconds.
* They are limited in memory usage, to prevent recursion issues.
* They can only use the objects described in the documentation.
Scripting Use Cases [#scripting-use-cases]
Actions [#actions]
To streamline the execution of specific business logic or perform custom actions, our platform offers the ability to use scripts that can collect, process, and store data, as well as trigger other actions within the platform environment. These scripts provide extraordinary flexibility for automating specific tasks, enabling greater efficiency and adaptability in process and operations management. Whether for advanced data analysis, triggering specific events, or simply customizing the user experience, scripts become an essential tool for optimizing your operations on our platform.
Device Configuration [#device-configuration]
When creating a new model for a device that is not natively supported by the platform, it is advisable to define some scripts that enhance the user experience and provide more functionality. The scripts will then be used by all devices of that model, which also saves a great deal of work, since it only needs to be done once.
For more information, see [this section](/docs/configuracion-del-cliente/dispositivos-y-endpoints/dispositivos/modelos-de-dispositivo/configuracion).
Data Conversion for LoRaWAN and MQTT Devices [#data-conversion-for-lorawan-and-mqtt-devices]
As part of a device model configuration, a script can be created for processing data received from it through LoRaWAN or MQTT. This allows:
* Processing each received payload (**uplink**)
* Updating the information of endpoints associated with the device, applying functions to convert data when necessary.
* Updating information about the device itself, such as RSSI levels, battery, etc., applying functions to convert data when necessary.
* Creating specific payloads intended for the device (**downlink**)
* Processing standard or custom commands defined in the Gear platform, and generating a payload with the format expected by the device.
For more information, see [this section](/docs/configuracion-del-cliente/dispositivos-y-endpoints/dispositivos/modelos-de-dispositivo/procesamiento-de-datos).
# 04/04/2022
Change Summary [#change-summary]
* API to report device geolocation [#](/docs/configuracion-del-cliente/dispositivos-y-endpoints/dispositivos)
* Maps
* Device maps [#](/docs/monitor/mapa-de-dispositivos)
* Facility maps [#](/docs/monitor/mapa-de-instalaciones)
* Alert severity [#](/docs/configuracion-del-cliente/alertas-y-alarmas)
* Notification report [#](/docs/monitor/reportes/listado-de-notificaciones)
# 07/03/2022
Change Summary [#change-summary]
* Actions concept [#](/docs/configuracion-del-cliente/acciones)
* Actions CRUD
* Create Actions
* Edit Actions
* Tags concept in Endpoints [#](/docs/configuracion-del-cliente/dispositivos-y-endpoints/endpoints/endpoint-tagging)
# 08-07-2022
For this production deployment, the following improvements and/or corrections suggested by the client were included:
* Device address change.
* In the Manager's device list, you will find the action in the three-dot menu called "Change address".
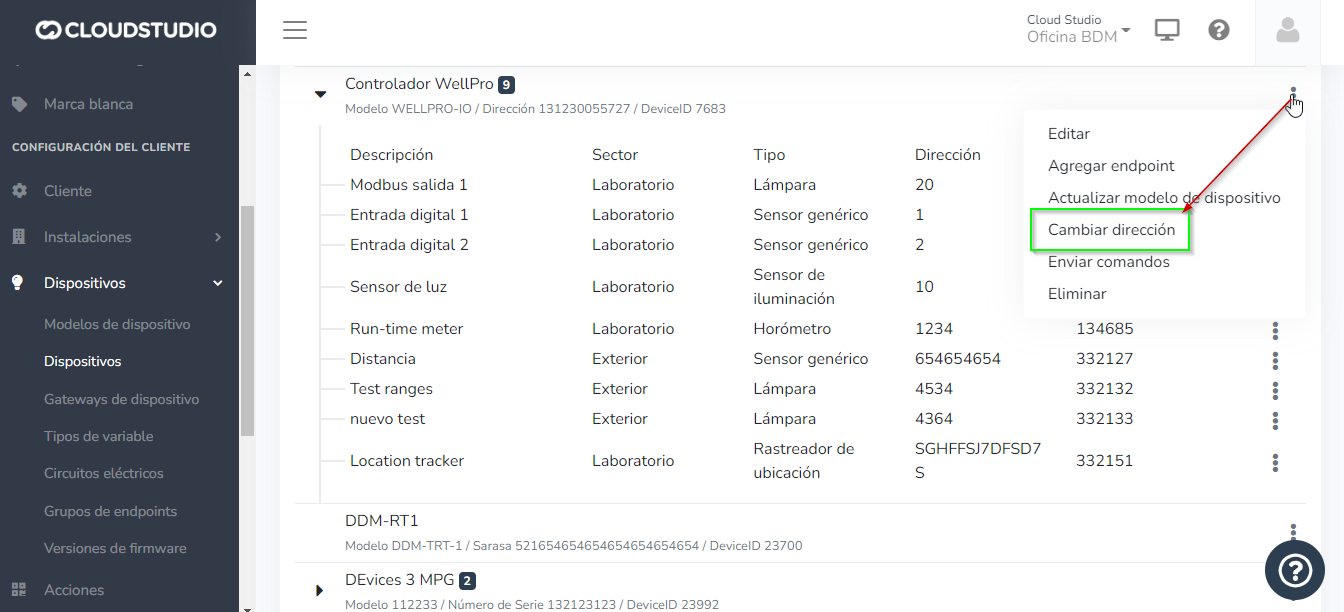
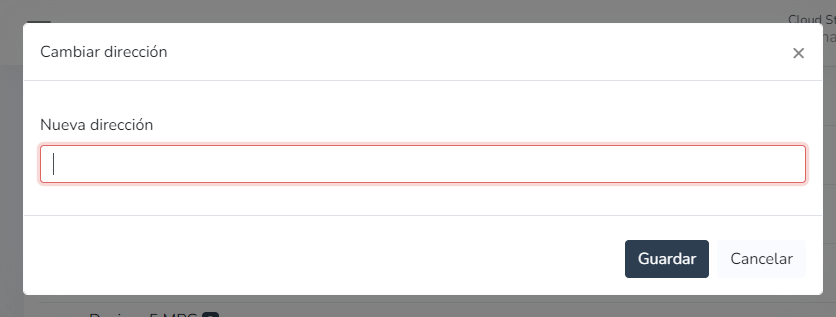
* A modal should open with a single text field that allows changing the device address. If the change is successful, the modal should close automatically and refresh the endpoint list.
* In case of an error, it should be displayed within the modal.
* Another way to change the "Address" is through scripts, located in Device > Device Models.
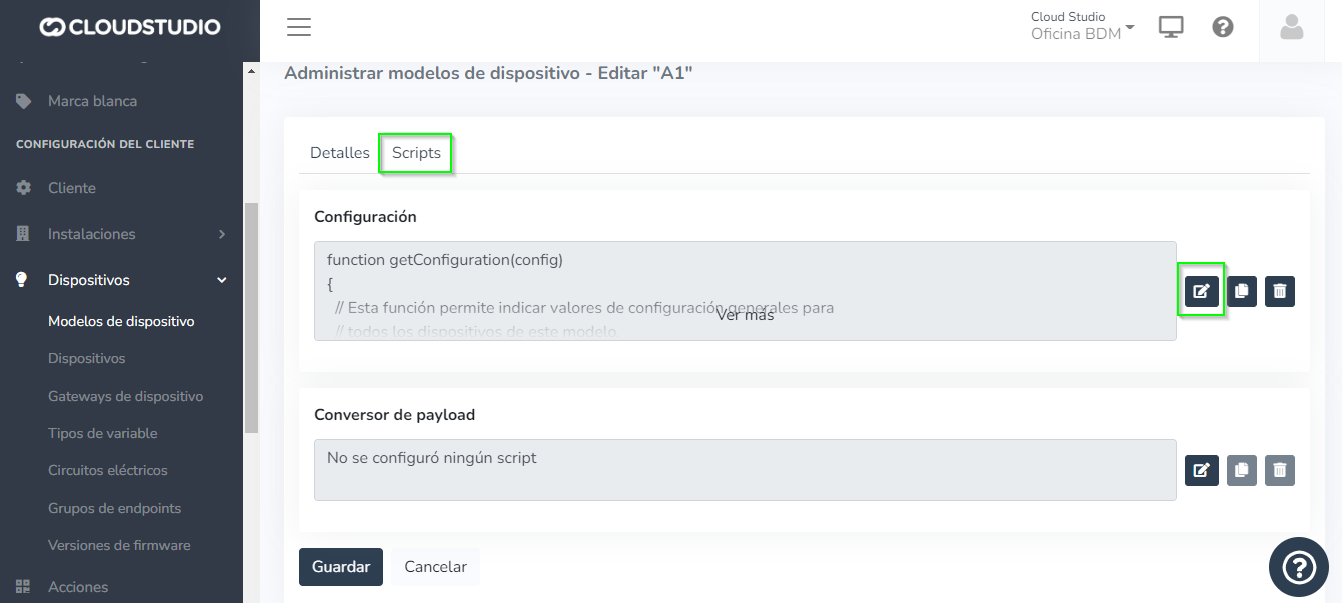
* Once inside "Edit script", proceed to modify the address as shown below:

* You can choose to change the address in either English or Spanish, depending on the language configured on the platform.
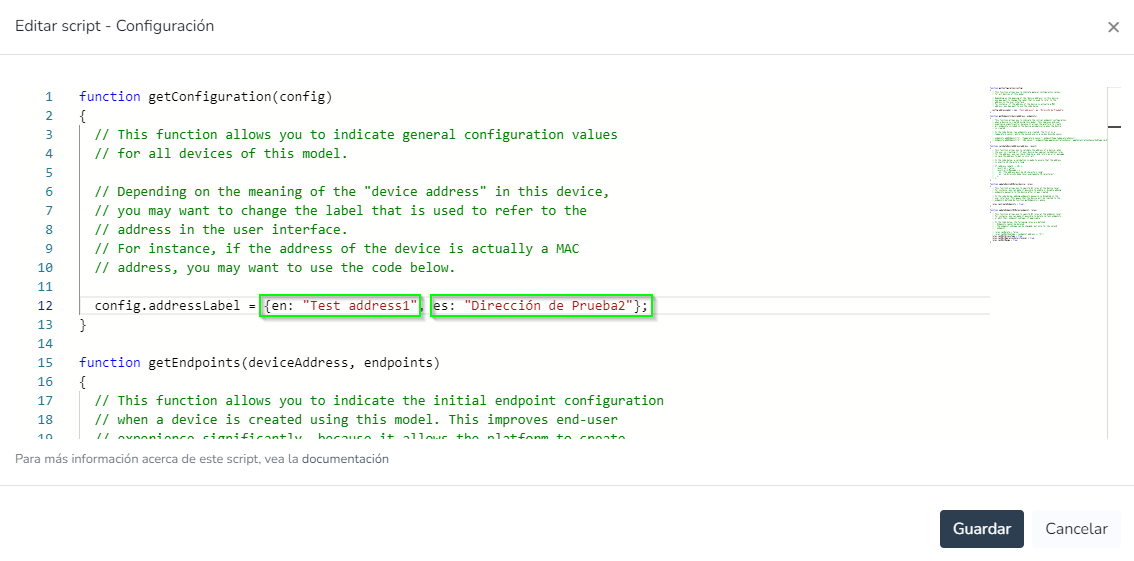
* Proceed to save the changes. A refresh of the endpoint list is required to view the new address.

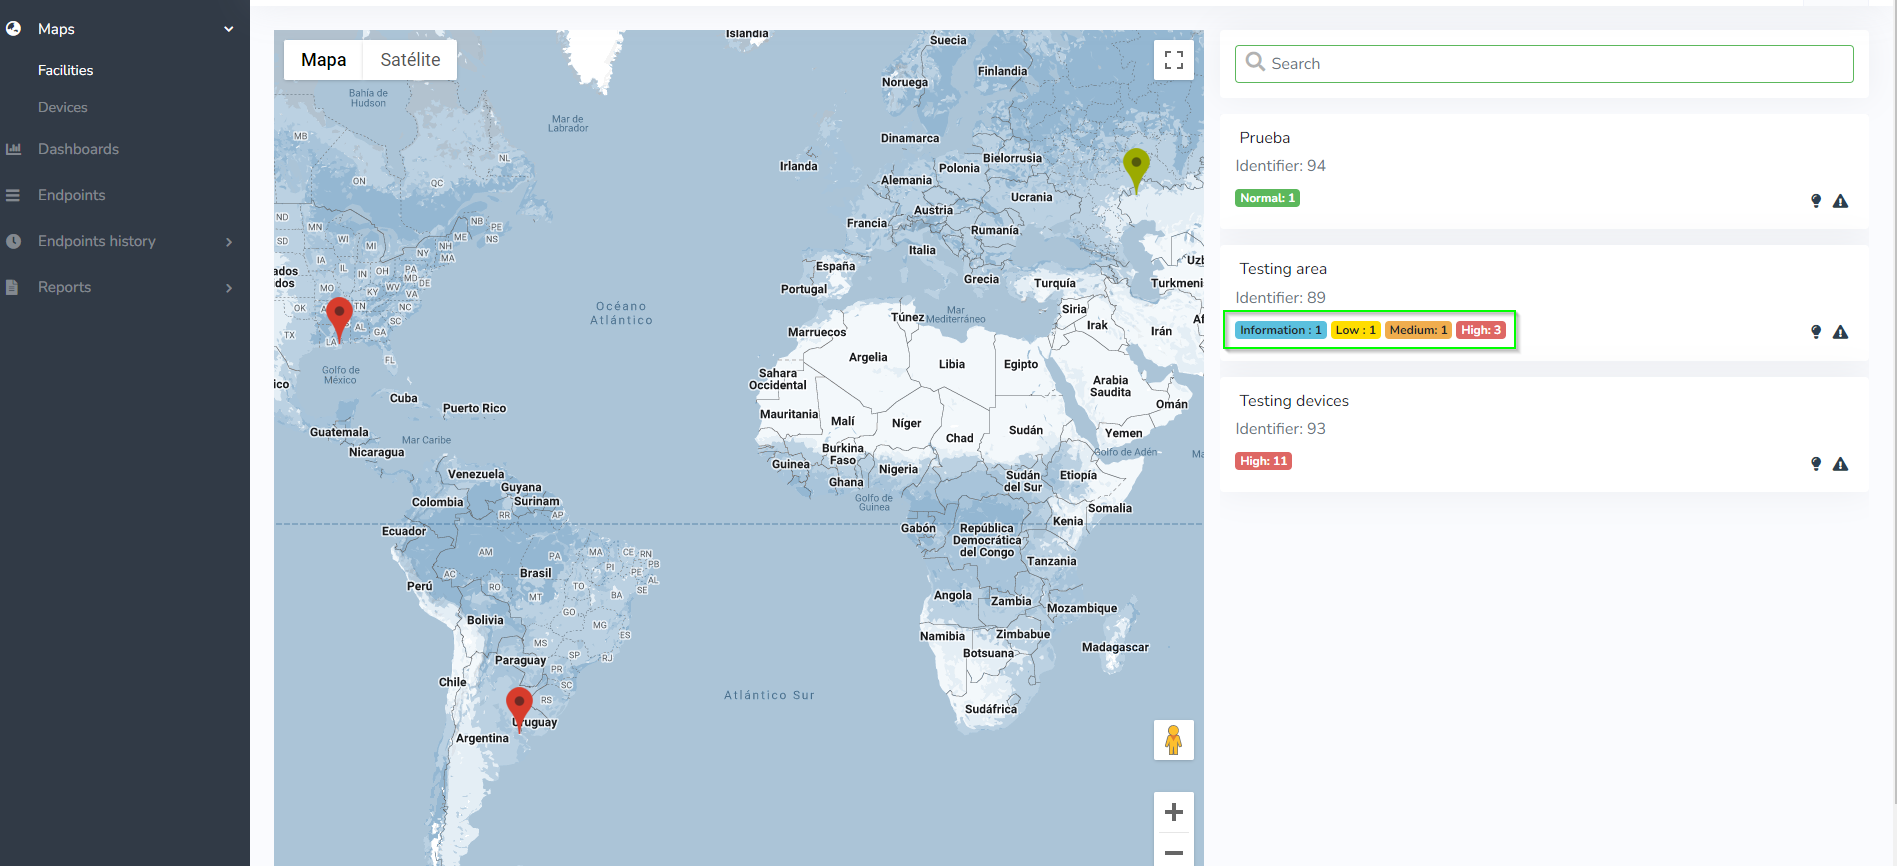
* Informational alarms.
* Severity levels in alerts indicate the criticality associated with alarms. They are defined in the following security levels:
* There are 4 severity levels defined for alarms: **Info**, **low**, **medium**, and **high**.
In the alert CRUD, the severity level can be defined when creating an alert. Because of this, everywhere the alert is represented, for example in active alarm reports or alarm history, it will be represented according to the severity level with which the alert was created.
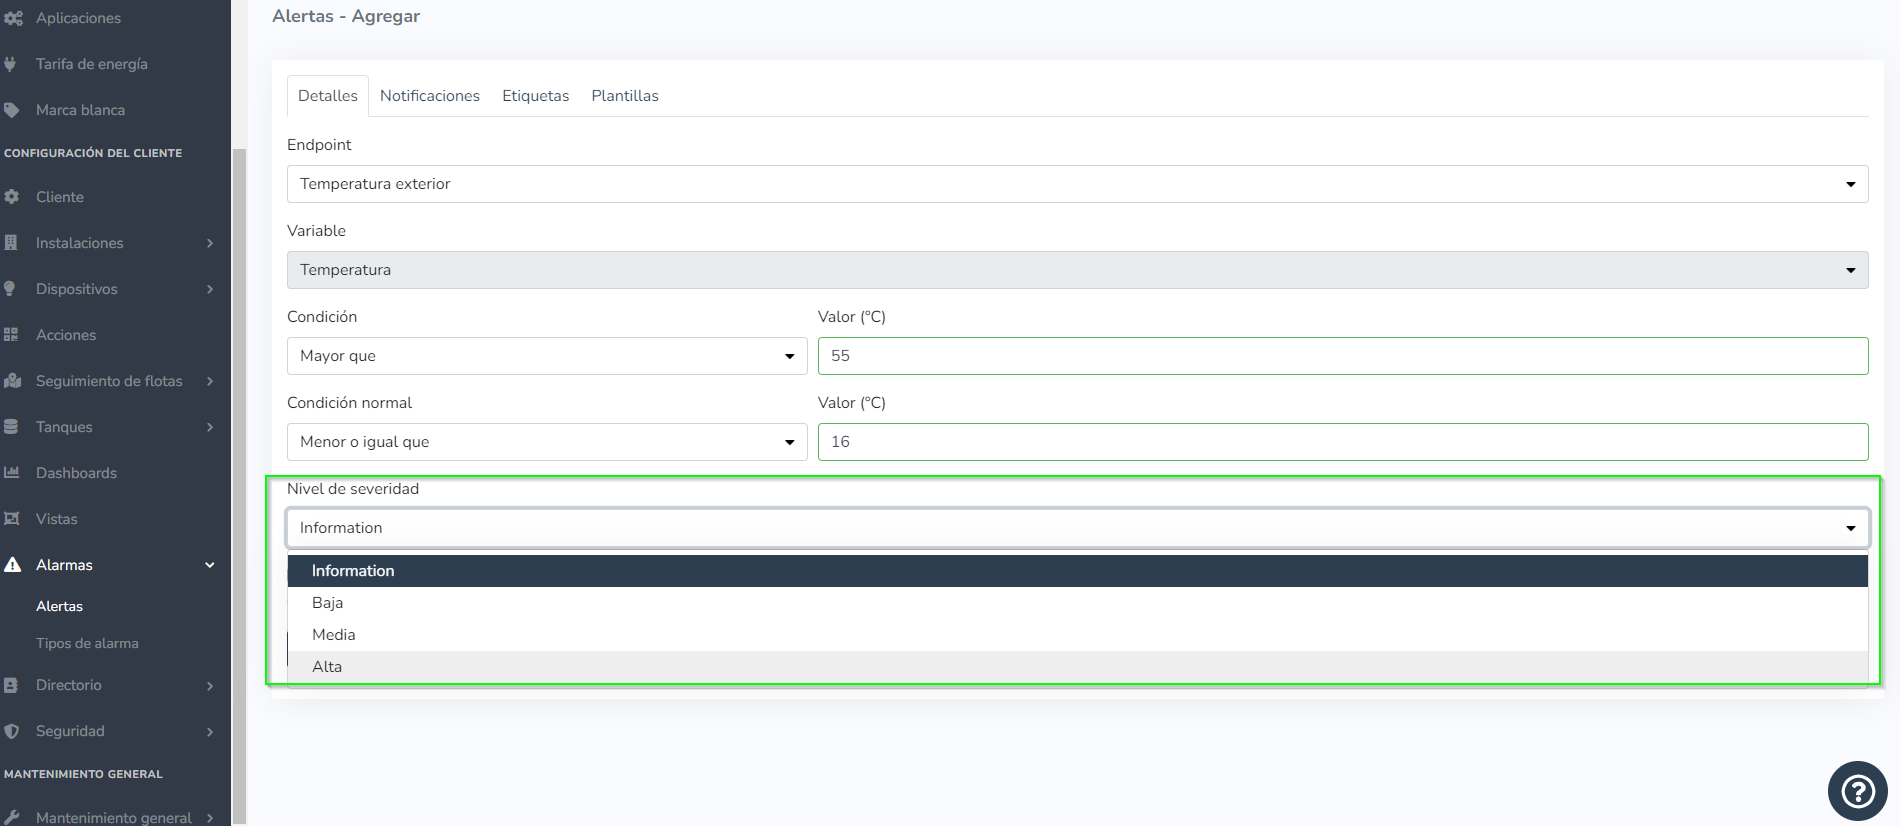
* The severity levels identified by colors are as follows:
* "Information" severity level is identified with the color **blue**.
* "Low" severity level is identified with the color **yellow**.
* "Medium" severity level is identified with the color **orange**.
* "High" severity level is identified with the color **red**.
# 18-07-2022
For this production deployment, the following improvements and/or corrections suggested by the client were included:
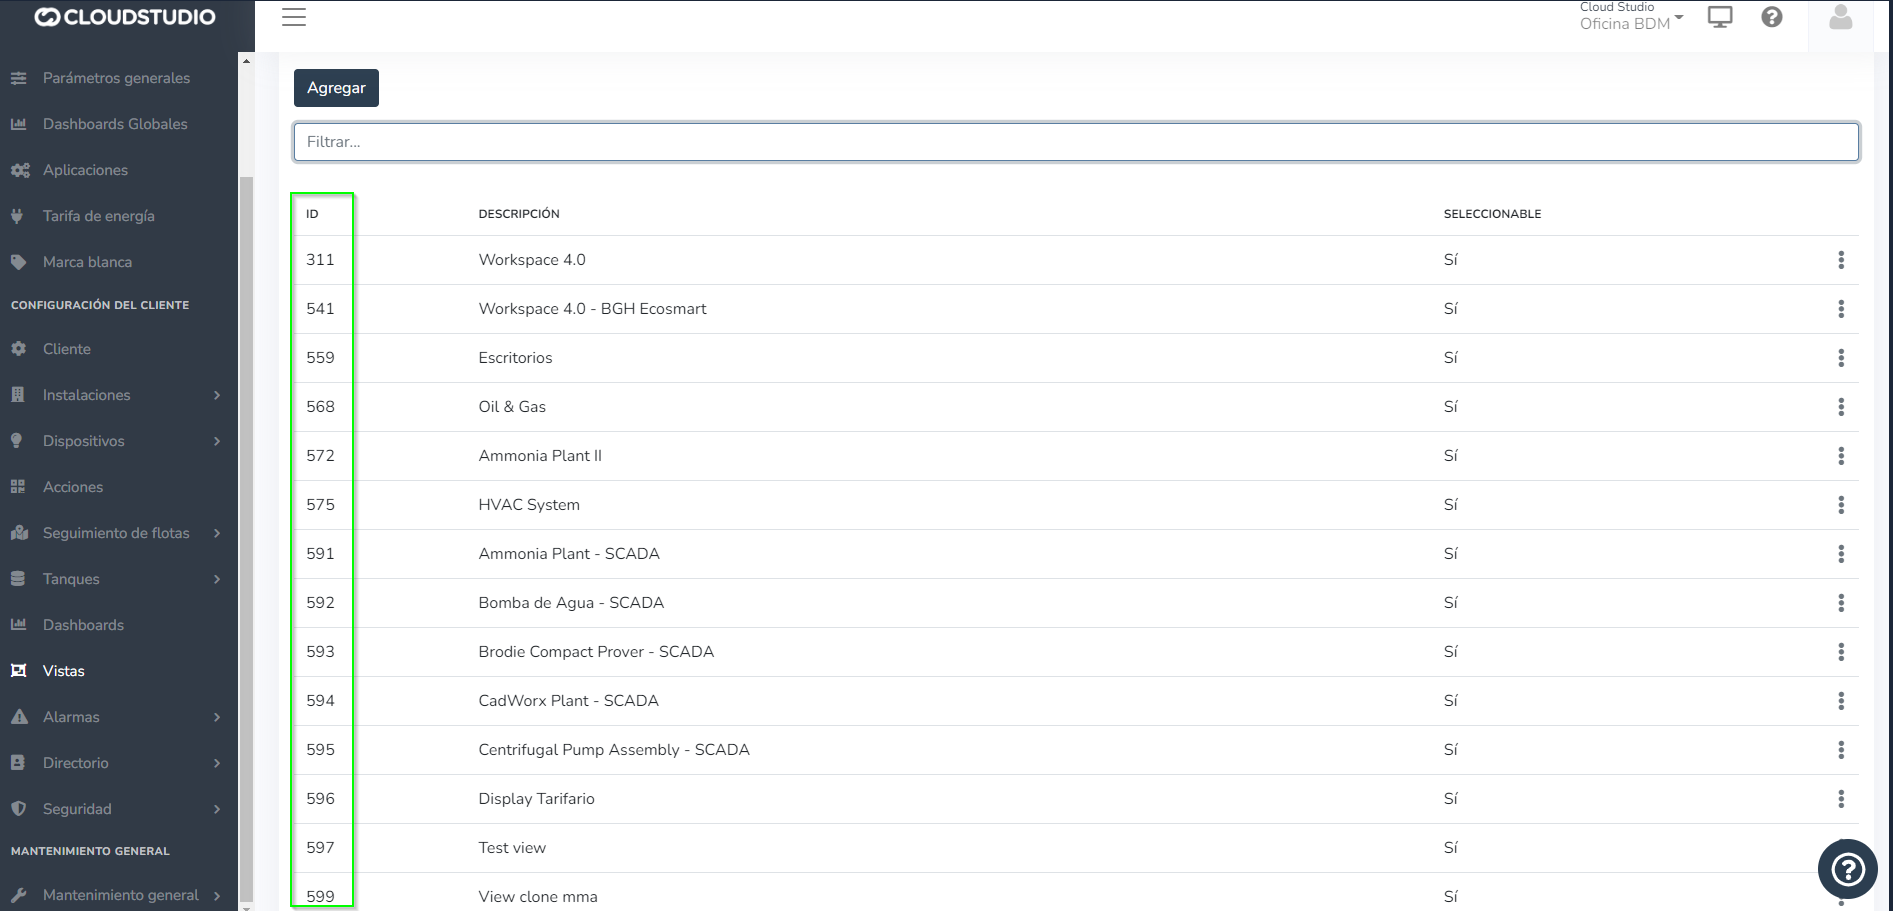
* Show view IDs on the views configuration screen:
* A new ID field was implemented within the "Views" configuration screen to keep them identified, making it easier to search for each one.
* Measurement Units for the Alerts feature:
* Units can be defined from the facilities. The unit values are those that will be displayed when creating an alert. For example, for Temperature, we select ([degrees C](https://www.e-medida.es/numero-2/oc-significa-grado-celsius-y-no-grado-centigrado/)).

* When adding an alert, start by selecting the Endpoint corresponding to the facility and the value being monitored. As an example, we can convert from ([degrees F](https://www.e-medida.es/numero-2/oc-significa-grado-celsius-y-no-grado-centigrado/)) to ([degrees C](https://www.e-medida.es/numero-2/oc-significa-grado-celsius-y-no-grado-centigrado/)), add the value, and select save.

* The next step to verify that the conversion was performed correctly is to edit that same alert and check the value.
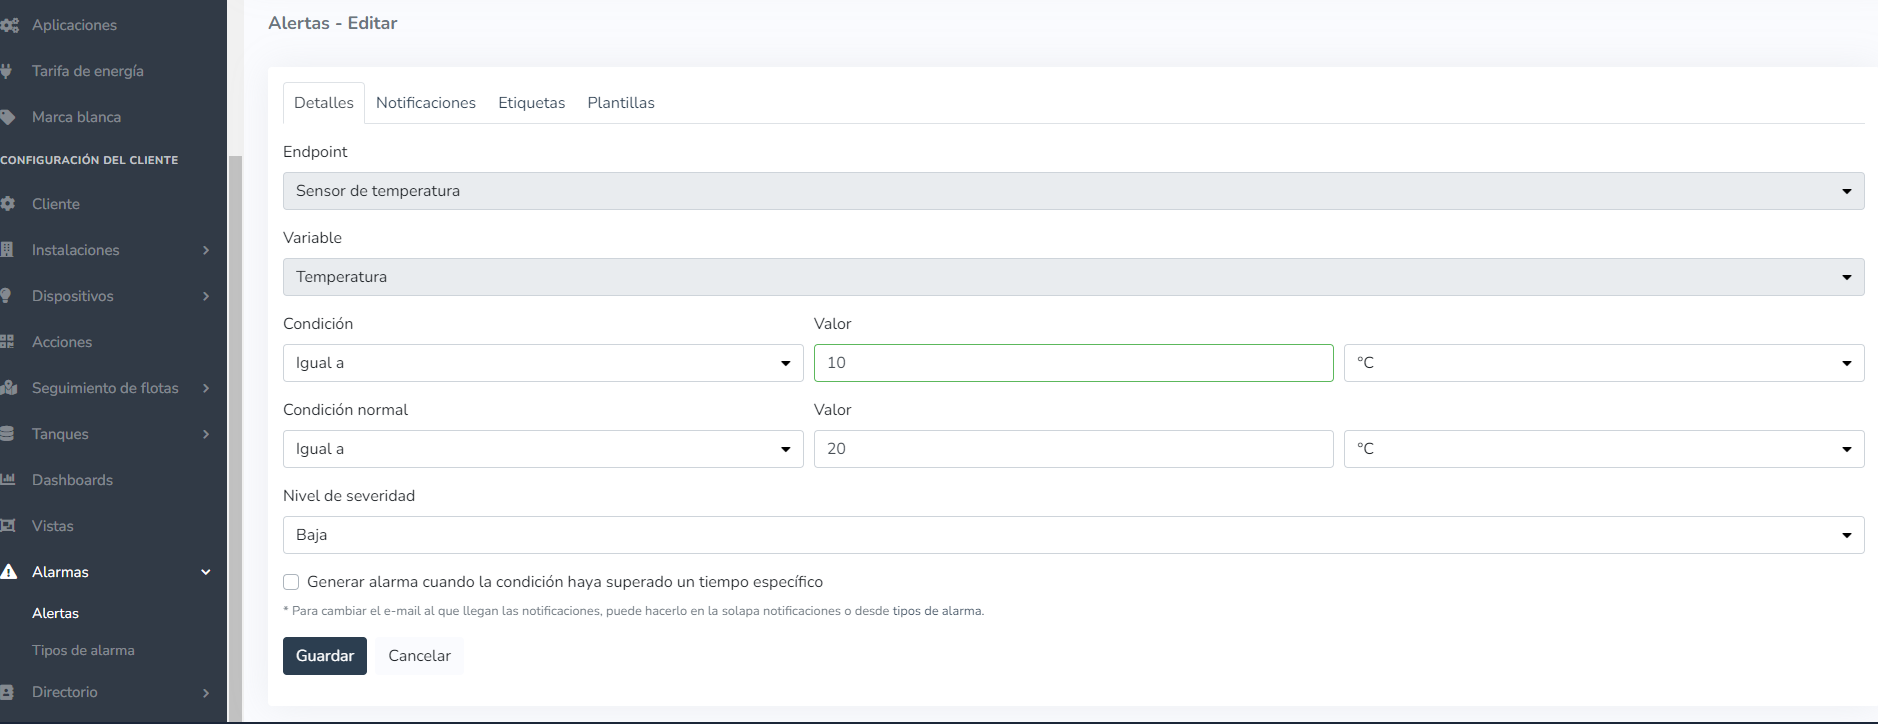
Similarly, you can create an alert with any units, depending on your specific requirements.
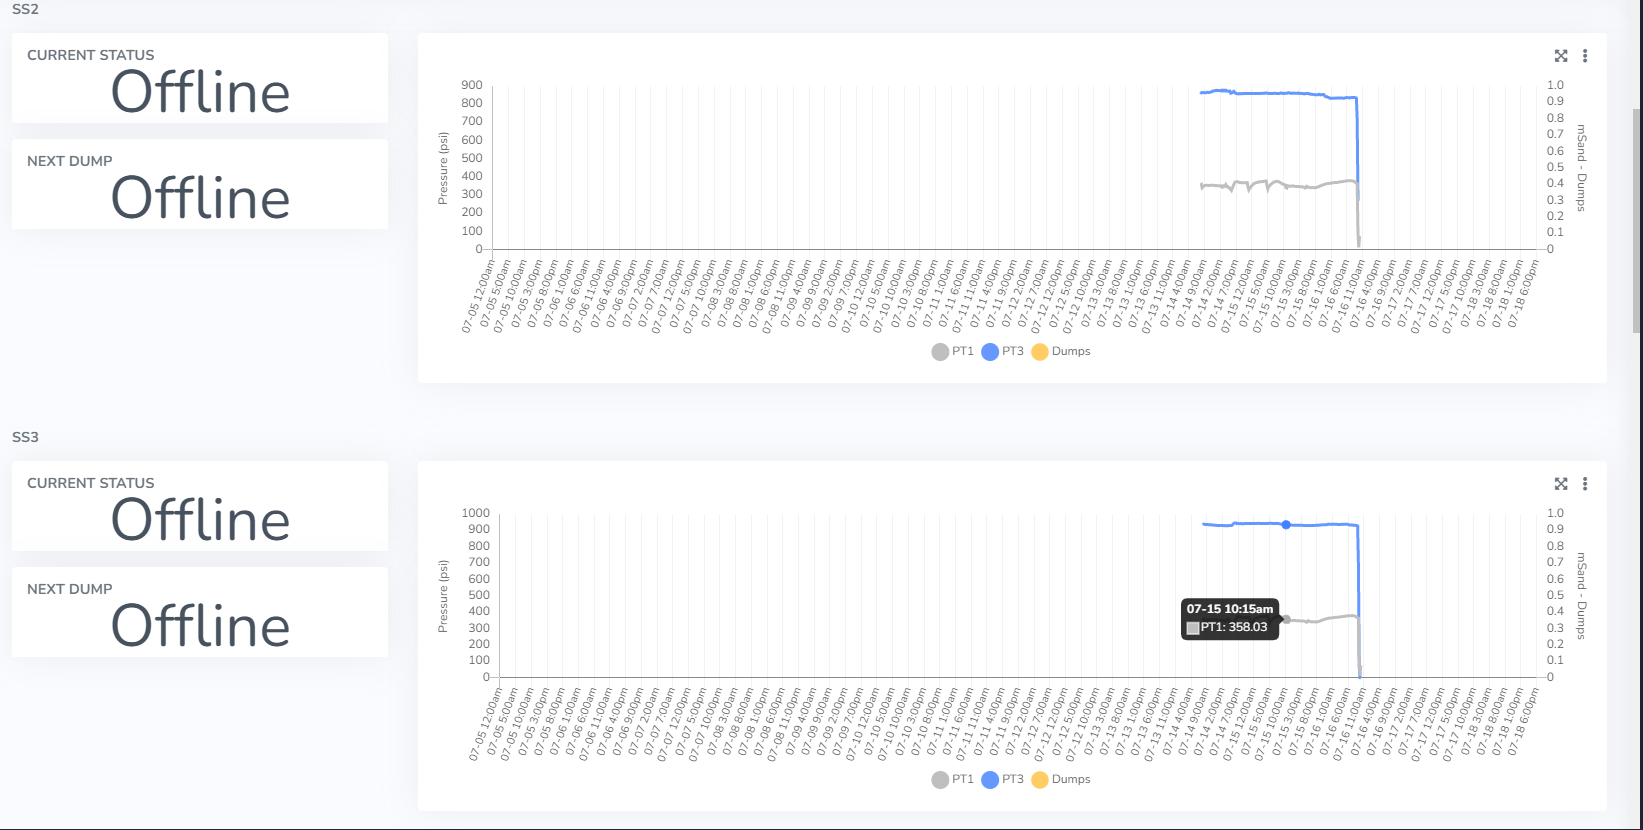
* Monitor Dashboard adjustment:
* Fixed cases where a device that has an endpoint not receiving data no longer shows any information in the charts.
* Modified the historical comparison chart tooltip to now only show the highlighted endpoint for viewing detailed information.
* Endpoint data history report adjustment:
* Multi-select fields were configured to load deselected, requiring each select to be chosen individually. When the page loads, all multi-select fields will appear deselected:

When we select, in this case a client, and click outside the multi-select, we can see how the changes are saved.

# 21/02/2022
Change Summary [#change-summary]
* Clone action to variable type [#](/docs/configuracion-del-cliente/dispositivos-y-endpoints/dispositivos/tipos-de-variables/clonar-tipos-de-variables)
* When exporting reports as CSV, a separator is used based on the facility configuration
* Multi-Language Element
* Multi-Language Element in Dashboard CRUD
* Multi-Language Element in Endpoint descriptions
* Cacheable File Assets
* Margins in Widget Groups [#](/docs/monitor/dashboards/editar-grupos-y-widgets)
* Margins in Widgets [#](/docs/monitor/dashboards/editar-grupos-y-widgets)
* Map radius from Back-End
* Minimum map radius at client level [#](/docs/configuracion-del-cliente/cliente/configuracion-de-mapas)
* Thousands separator in Widgets (e.g., metrics), endpoint screen, views, etc. [#](/docs/monitor/reportes/exportar-reportes-como-csv-usando-el-separador-correspondiente-al-facility)
* Discrete variables in Endpoint states with images, in Views [#](/docs/monitor/vistas/estados-de-endpoints-con-imagen-asociado-a-variables-discretas)
# Deployments
Deployment and release log for the Cloud Studio IoT Gear platform.
# General Maintenance
The **General Maintenance** section of the *Settings* module provides a set of diagnostic and monitoring tools that allow the administrator to obtain an overview of the instance's operational status. It includes:
**Endpoint summary** registered in the instance.
**Current service status** of the platform.
**User activity log**, useful for auditing and traceability.
**System information**, such as server resources and environment variables.
**Scheduled tasks** that are active and their status.
**Notification queue** pending delivery.
**Notification recipient list** of active notifications.
**Health checks** to ensure the platform's operational integrity.
This section is essential for maintaining operational control of the platform and anticipating potential technical incidents.
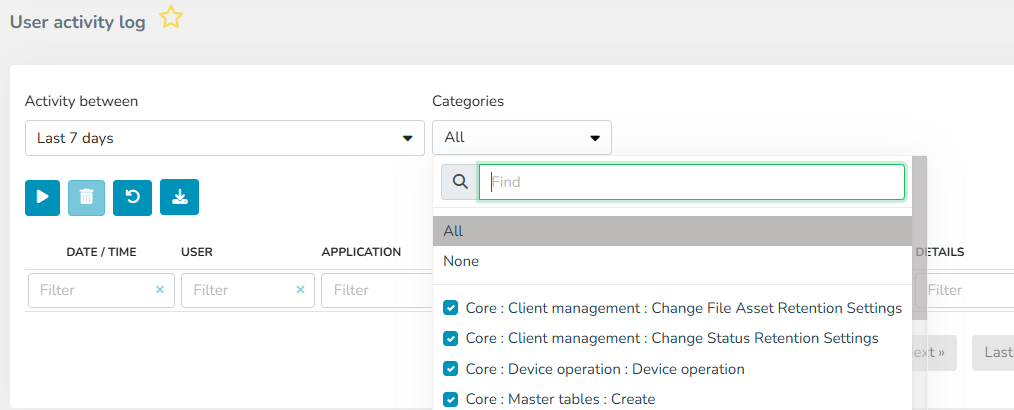
# User Activity Log
The user activity log report (**User Activity Log**) provides a clear and concise view of user interactions within the platform. It offers detailed visibility into actions performed by users with the different applications and available environments, serving as a key tool for auditing, control, and operational analysis.
To run this report, you must specify the **activity date** parameters, which -- as with all reports -- can be set to a from and to date, for today, the previous day, the last 7 days, the last 14 days, the last 30 days, or the current month) and the **activities** you want to list.
Once the query is executed, results are displayed in a table with the following information:
**Date/Time**: The moment the event was recorded.
**User**: Identifier of the user who performed the action.
**Application**: Module or application where the action was performed.
**Client**: Identification of the client where the action was performed.
**Facility**: Identification of the client's Facility where the action was performed.
**Category**: The event performed.
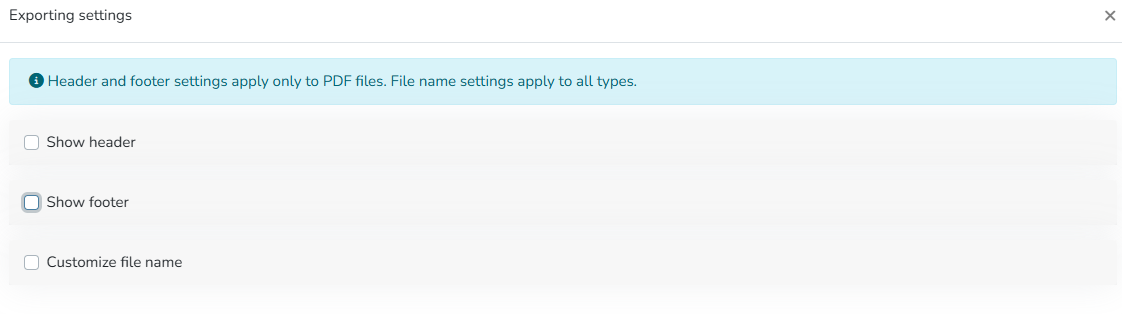
The report results can be exported in the following formats:
* Excel (.xlsx)
* PDF (.pdf)

Additionally, a report header and footer can be configured, as well as the file name.

# Monitor
This platform module provides tools for visualizing, analyzing, and operating devices connected to the platform. The platform offers different ways to visualize data such as dashboards, maps, and SCADA-type views.
# Device Map
The device map allows you to view all client devices that the user has permissions for.
To enable this feature and display the device screen in the monitor, you need to configure the permission by checking the "Enable device map" option as shown in the following image.
{/* Imagen pendiente */}
The side panel lists all client devices and shows the status of each device based on alarms. It provides quick access to the views, dashboard, endpoints, and alarms of the facility where each device is located.
{/* Imagen pendiente */}
# Facility Map
Introduction [#introduction]
The facility map allows you to view all client facilities that the user has permissions for.
Enabling the facility map [#enabling-the-facility-map]
To enable this feature and display the facility screen in the monitor, you need to configure the client permission by checking the "Enable facility map" option as shown in the following image.
The side panel lists all client facilities and shows the status of each facility based on alarms. It provides quick access to the views, dashboard, endpoints, and alarms for each facility.
{/* Imagen pendiente */}
# Alarms
Introduction [#introduction]
This section explains how to extract the definition of alarms generated from alerts in the Gear Studio platform, using the data extraction API. These alarms are generated when certain predefined alert conditions are met. When values return to normal, the alarms are automatically closed.
To query alarms, the alarm data type is used, whose documentation can be found [here](/docs/apis-de-extraccion-de-datos/alarmas/tipo-de-datos-alarm).
There are three mechanisms for obtaining alarm information:
* Get data for a specific alert by its ID, as explained [here](/docs/apis-de-extraccion-de-datos/alarmas/obtener-una-alarma-dado-su-id).
* Get information for all alerts associated with an endpoint, device, facility, or client. Documentation can be found [here](/docs/apis-de-extraccion-de-datos/alarmas/obtener-una-lista-de-alarmas-utilizando-parametros).
* Get information for all alerts associated with an endpoint, device, facility, or client, incrementally. Documentation can be found [here](/docs/apis-de-extraccion-de-datos/alarmas/obtener-una-lista-de-alarmas-en-forma-incremental).
# Get an alarm by its ID
This API allows retrieving an alarm by its ID.
Request [#request]
```
GET /api/v2/alarms/{alarmID} HTTP/1.1
Host: gear.cloud.studio
Authorization: Bearer {accessToken}
```
Parameters [#parameters]
| Name | Description |
| ----------- | ---------------------------------------------------------------------------------------------------------------------------------------------------------------------------------------------- |
| accessToken | Access token with permissions to read alarm information. See this page for more information. The access token can also be sent as part of the query string, using the "accessToken" parameter. |
| alarmID | Unique identifier of the alarm for which information is requested. |
Response [#response]
The response contains the specified alarm, as shown in this example:
```
{
"AlarmID": 1266896,
"DeviceID": 7370,
"DeviceDescription": "Controlador RUPANCO",
"EndpointID": 0,
"AlarmTypeID": 1,
"AlarmTypeDescription": "Dispositivo fuera de línea",
"AlarmSeverityID": 3,
"AlarmSeverityDescription": "Alta",
"Details": "",
"DateTimeCreated_UTC": "2021-10-15T17:34:35",
"DateTimeClosed_UTC": "2021-10-15T18:21:39",
"SequenceNumber": 28885207,
"MTTRMinutes": 47.0
}
```
# Get a list of alarms incrementally
This API allows retrieving a list of alarms incrementally. This enables fast updates of alarms as they are opened or closed without needing to retrieve the full list.
Theory of operation [#theory-of-operation]
To obtain a list of alarms incrementally, the SequenceNumber field is used. This field is monotonically ascending, meaning that when changes occur in an alarm, its SequenceNumber field will change to a value higher than any other alarm. This allows retrieving data based on the SequenceNumber in small batches until no more data is obtained, and then continuing periodically to get updates. When the result of this API is an empty list, it means that there are currently no updates.
Typically, an application consuming this API uses the following flow:
1. The application starts using a stored SequenceNumber (typically in non-volatile storage). On the first execution, this value is 1.
2. The application executes the API using (stored SequenceNumber + 1).
3. The application receives a list of alarms, sorted by SequenceNumber.
4. If the received list is empty, the application waits a few seconds and returns to step 2.
5. If the received list is not empty, the application stores the highest SequenceNumber received.
6. The application immediately returns to step 2.
7. When a new alarm is opened, or an existing one is modified, its SequenceNumber will immediately change to a value higher than the last received, so its information will be received immediately in the next execution.
8. Any element received with the DateTimeClosed\_UTC property having a non-null and non-empty value indicates that the alarm has already been closed.
| In the flow above, it is assumed that the application always executes the API with the same set of clientID, facilityID, deviceID, and endpointID parameters. If different parameters are desired, the search must start from zero. |
| ----------------------------------------------------------------------------------------------------------------------------------------------------------------------------------------------------------------------------------- |
| For debugging any application using this API, it is recommended to use maxCount = 1, to receive updates one at a time. This parameter can later be changed to a more practical value for production, such as 50. |
| ---------------------------------------------------------------------------------------------------------------------------------------------------------------------------------------------------------------- |
Request [#request]
```
GET /api/v2/alarms/incremental/{sequenceNumber}?clientID={clientID}&facilityID={facilityID}&deviceID={deviceID}&endpointID={endpointID}&maxCount={maxCount} HTTP/1.1
Host: gear.cloud.studio
Authorization: Bearer {accessToken}
```
Parameters [#parameters]
| Name | Description |
| -------------- | ---------------------------------------------------------------------------------------------------------------------------------------------------------------------------------------------- |
| accessToken | Access token with permissions to read alarm information. See this page for more information. The access token can also be sent as part of the query string, using the "accessToken" parameter. |
| sequenceNumber | Value of the SequenceNumber field from the last alarm received. Use 0 to start from the beginning. |
| clientID | Optional identifier indicating that only alarms for the given client should be retrieved. |
| facilityID | Optional identifier indicating that only alarms for the given facility should be retrieved. |
| deviceID | Optional identifier indicating that only alarms for the given device should be retrieved. |
| endpointID | Optional identifier indicating that only alarms for the given endpoint should be retrieved. |
| maxCount | Optional parameter indicating the maximum number of records to include in the result. Values greater than 500 are limited to 500 regardless of the value sent in the request. |
| It is mandatory to include one (and only one) of the parameters "clientID", "facilityID", "deviceID", or "endpointID". |
| ---------------------------------------------------------------------------------------------------------------------- |
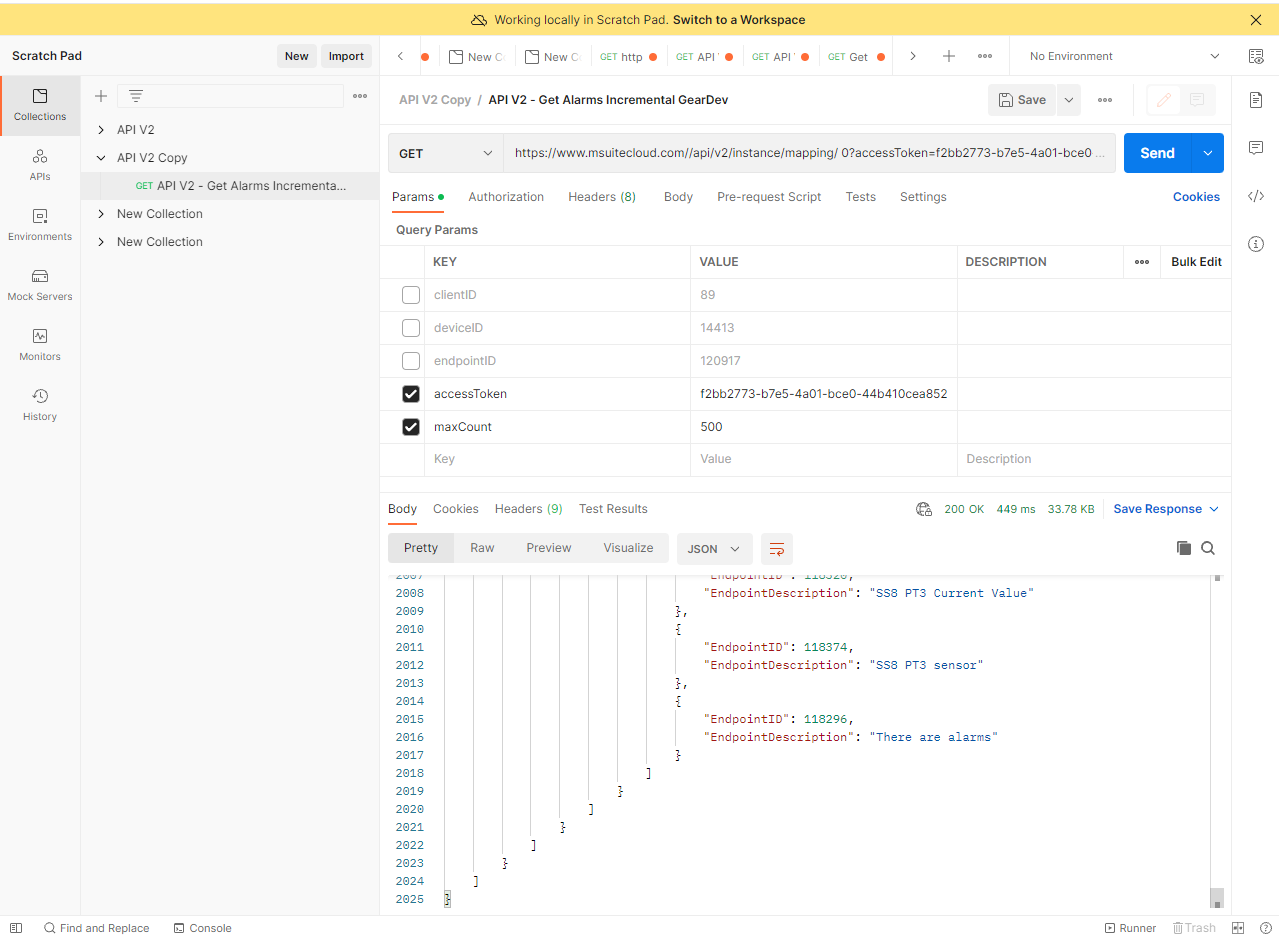
Response [#response]
The response contains the list of matching alarms, as shown in this example:
```
[
{
"AlarmID": 1266896,
"DeviceID": 7370,
"DeviceDescription": "Controlador RUPANCO",
"AlarmTypeID": 1,
"AlarmTypeDescription": "Dispositivo fuera de línea",
"AlarmSeverityID": 3,
"AlarmSeverityDescription": "Alta",
"DateTimeCreated_UTC": "2021-10-15T17:34:35",
"DateTimeClosed_UTC": "2021-10-15T18:21:39",
"SequenceNumber": 28885207,
"MTTRMinutes": 47.0
},
{
"AlarmID": 1266922,
"DeviceID": 7370,
"DeviceDescription": "Controlador RUPANCO",
"AlarmTypeID": 1,
"AlarmTypeDescription": "Dispositivo fuera de línea",
"AlarmSeverityID": 3,
"AlarmSeverityDescription": "Alta",
"DateTimeCreated_UTC": "2021-10-15T19:36:41",
"DateTimeClosed_UTC": "2021-10-15T19:37:23",
"SequenceNumber": 28885384,
"MTTRMinutes": 47.0
},
{
"AlarmID": 1266950,
"DeviceID": 7370,
"DeviceDescription": "Controlador RUPANCO",
"AlarmTypeID": 1,
"AlarmTypeDescription": "Dispositivo fuera de línea",
"AlarmSeverityID": 3,
"AlarmSeverityDescription": "Alta",
"DateTimeCreated_UTC": "2021-11-16T19:49:35",
"DateTimeClosed_UTC": "2021-11-16T19:49:46",
"SequenceNumber": 28948817,
"MTTRMinutes": 47.0
}
]
```
# Get a list of alarms using parameters
This API allows retrieving a list of alarms using parameters.
Request [#request]
```
GET /api/v2/alarms?clientID={clientID}&facilityID={facilityID}&deviceID={deviceID}&endpointID={deviceID}&maxCount={maxCount} HTTP/1.1
Host: gear.cloud.studio
Authorization: Bearer {accessToken}
```
Parameters [#parameters]
| Name | Description |
| ----------- | ---------------------------------------------------------------------------------------------------------------------------------------------------------------------------------------------- |
| accessToken | Access token with permissions to read alarm information. See this page for more information. The access token can also be sent as part of the query string, using the "accessToken" parameter. |
| clientID | Optional identifier indicating that only alarms for the given client should be retrieved. |
| facilityID | Optional identifier indicating that only alarms for the given facility should be retrieved. |
| deviceID | Optional identifier indicating that only alarms for the given device should be retrieved. |
| dateFrom | Date from which alarms for the given device should be retrieved. |
| dateTo | Date until which alarms for the given device should be retrieved. |
| endpointID | Optional identifier indicating that only alerts for the given endpoint should be retrieved. |
| state | Alarm state identifier. Possible values are "open", "closed", and "all". |
| maxCount | Optional parameter indicating the maximum number of records to include in the result. Values greater than 500 are limited to 500 regardless of the value sent in the request. |
| It is mandatory to include one (and only one) of the parameters "clientID", "facilityID", "deviceID", or "endpointID". |
| ---------------------------------------------------------------------------------------------------------------------- |
Response [#response]
The response contains the list of matching alarms, as shown in this example:
```
[
{
"AlarmID":1266896,
"DeviceID":7370,
"DeviceDescription":"Controlador RUPANCO",
"EndpointID":0,
"AlarmTypeID":1,
"AlarmTypeDescription":"Dispositivo fuera de línea",
"AlarmSeverityID":3,
"AlarmSeverityDescription":"Alta",
"Details":"",
"DateTimeCreated_UTC":"2021-10-15T17:34:35",
"DateTimeClosed_UTC":"2021-10-15T18:21:39",
"SequenceNumber":28885207,
"MTTRMinutes":47.0
},
{
"AlarmID":1266922,
"DeviceID":7370,
"DeviceDescription":"Controlador RUPANCO",
"EndpointID":0,
"AlarmTypeID":1,
"AlarmTypeDescription":"Dispositivo fuera de línea",
"AlarmSeverityID":3,
"AlarmSeverityDescription":"Alta",
"Details":"",
"DateTimeCreated_UTC":"2021-10-15T19:36:41",
"DateTimeClosed_UTC":"2021-10-15T19:37:23",
"SequenceNumber":28885384,
"MTTRMinutes":47.0
}
]
```
# Alarm data type
Introduction [#introduction]
The alarm data type allows obtaining alarm information. Below are all the properties of the alarm data type.
Properties [#properties]
\### AlarmID (int) The AlarmID property represents the unique identifier of the alarm in the platform. This identifier is automatically assigned when an alarm is created. ### DeviceID (int) The DeviceID property represents the unique identifier of the device that triggers the alarm. ### EndpointID (int) Unique identifier of the endpoint to which the alert corresponds. ### AlarmTypeID (int) The AlarmTypeID property indicates the type of alarm. ### AlarmTypeDescription (string) Description of the alarm type. Used only for listing or enumeration. ### AlarmSeverityID (int)
Indicates the severity of the alarm. Corresponds to one of the following values:
* **Information = 0:** Informational, no severity;
* **Low = 1:** Low alarm severity;
* **Medium = 2:** Medium severity;
* **High = 3:** Critical alarm, high severity.
\### AlarmSeverityDescription (string) Description of the alarm severity. ### Details (string) Details associated with the alarm. ### DateTimeCreated\_UTC (string) Date and time of alarm creation (UTC) in String format. ### DateTimeClosed\_UTC (string) Date and time of alarm closure (UTC) in String format. ### SequenceNumber (long) Sequence number associated with the alarm. The sequence number is updated with a higher number each time the alarm is modified in any way, including when it is closed. Each alarm is guaranteed to receive a number higher than any other.
# Alerts
Introduction [#introduction]
This section explains how to extract the definition of alerts created in the Gear Studio platform using the data extraction API. Alerts allow defining conditions that, once met, generate the corresponding alarms. When values return to normal, previously created alarms are automatically closed.
To report alerts, the alert data type is used, whose documentation can be found [here](/docs/apis-de-extraccion-de-datos/alertas/tipo-de-datos-alert).
There are three mechanisms for obtaining alert information:
* Get data for a specific alert by its ID, as explained [here](/docs/apis-de-extraccion-de-datos/alertas/obtener-una-alerta-dado-su-id).
* Get information for all alerts associated with an endpoint, device, facility, or client. Documentation can be found [here](/docs/apis-de-extraccion-de-datos/alertas/obtener-una-lista-de-alertas-utilizando-parametros).
* Get information for all alerts associated with an endpoint, device, facility, or client, incrementally. Documentation can be found [here](/docs/apis-de-extraccion-de-datos/alertas/obtener-una-lista-de-alertas-en-forma-incremental).
# Get an alert by its ID
This API allows retrieving an alert by its ID.
Request [#request]
```
GET /api/v2/alerts/{alertID} HTTP/1.1
Host: gear.cloud.studio
Authorization: Bearer {accessToken}
```
Parameters [#parameters]
| Name | Description |
| ----------- | ---------------------------------------------------------------------------------------------------------------------------------------------------------------------------------------------- |
| accessToken | Access token with permissions to read alert information. See this page for more information. The access token can also be sent as part of the query string, using the "accessToken" parameter. |
| alertID | Unique identifier of the alert for which information is requested. |
Response [#response]
The response contains the specified alert, as shown in this example:
```
{
"AlertID": 211,
"VariableTypeID": 1,
"EndpointID": 114092,
"ConditionType": 3,
"Threshold": 25,
"ClientID": 4,
"FacilityID": 184,
"NormalConditionType": 6,
"NormalThreshold": 24,
"MinimumDurationSeconds": 300,
"NotificationEmails": [
"someone@somewhere.com"
],
"NotificationSMSNumbers": [
"+1123456789"
],
"NotificationVoiceNumbers": [
"+1123456789"
],
"Tags": [
"default",
"gateway-default"
],
"SequenceNumber": 45701485,
"Enabled": true,
"Schedules": [
{
"Days": [
1,
2,
4,
5
],
"StartTime": {
"Hour": 0,
"Millisecond": 0,
"Minute": 0,
"Second": 0
},
"EndTime": {
"Hour": 23,
"Millisecond": 999,
"Minute": 0,
"Second": 59
}
}
],
"Timezone": {
"CurrentOffsetMinutes": -180,
"TimeZoneCode": "america/argentina/buenos_aires"
}
}
```
# Get a list of alerts incrementally
This API allows retrieving a list of alerts incrementally. This enables fast updates of alerts as they are created, modified, or deleted, without needing to retrieve the full list.
Theory of operation [#theory-of-operation]
To obtain a list of alerts incrementally, the SequenceNumber field is used. This field is monotonically ascending, meaning that when creating, modifying, or deleting an alert, its SequenceNumber field will change to a value higher than any other alert. This allows retrieving data based on the SequenceNumber in small batches until no more data is obtained, and then continuing periodically to get updates. When the result of this API is an empty list, it means that there are currently no updates.
Typically, an application consuming this API uses the following flow:
1. The application starts using a stored SequenceNumber (typically in non-volatile storage). On the first execution, this value is 1.
2. The application executes the API using (stored SequenceNumber + 1).
3. The application receives a list of alerts, sorted by SequenceNumber.
4. If the received list is empty, the application waits a few seconds and returns to step 2.
5. If the received list is not empty, the application stores the highest SequenceNumber received.
6. The application immediately returns to step 2.
7. When a new alert is created, or an existing one is modified, its SequenceNumber will immediately change to a value higher than the last received, so its information will be received immediately in the next execution.
8. Any element received with the Enabled property set to false indicates that the element has been deleted. If the Enabled property is true, it indicates that the element has just been created or modified.
| In the flow above, it is assumed that the application always executes the API with the same set of clientID, facilityID, deviceID, and endpointID parameters. If different parameters are desired, the search must start from zero. |
| ----------------------------------------------------------------------------------------------------------------------------------------------------------------------------------------------------------------------------------- |
| For debugging any application using this API, it is recommended to use maxCount = 1, to receive updates one at a time. This parameter can later be changed to a more practical value for production, such as 50. |
| ---------------------------------------------------------------------------------------------------------------------------------------------------------------------------------------------------------------- |
Request [#request]
```
GET /api/v2/alerts/incremental/{sequenceNumber}?clientID={clientID}&facilityID={facilityID}&deviceID={deviceID}&endpointID={endpointID}&maxCount={maxCount} HTTP/1.1
Host: gear.cloud.studio
Authorization: Bearer {accessToken}
```
Parameters [#parameters]
| Name | Description |
| -------------- | ---------------------------------------------------------------------------------------------------------------------------------------------------------------------------------------------- |
| accessToken | Access token with permissions to read alert information. See this page for more information. The access token can also be sent as part of the query string, using the "accessToken" parameter. |
| sequenceNumber | Value of the SequenceNumber field from the last alert received. Use 0 to start from the beginning. |
| clientID | Optional identifier indicating that only alerts for the given client should be retrieved. |
| facilityID | Optional identifier indicating that only alerts for the given facility should be retrieved. |
| deviceID | Optional identifier indicating that only alerts for the given device should be retrieved. |
| endpointID | Optional identifier indicating that only alerts for the given endpoint should be retrieved. |
| maxCount | Optional parameter indicating the maximum number of alerts to include in the result. |
| It is mandatory to include one (and only one) of the parameters "clientID", "facilityID", "deviceID", or "endpointID". |
| ---------------------------------------------------------------------------------------------------------------------- |
Response [#response]
The response contains the list of matching alerts, as shown in this example:
```
[
{
"AlertID": 211,
"VariableTypeID": 1,
"EndpointID": 114092,
"ConditionType": 3,
"Threshold": 25,
"ClientID": 4,
"FacilityID": 184,
"NormalConditionType": 6,
"NormalThreshold": 24,
"MinimumDurationSeconds": 300,
"NotificationEmails": ["someone@somewhere.com"],
"NotificationSMSNumbers": ["+1123456789"],
"NotificationVoiceNumbers": ["+1123456789"],
"Tags": ["default", "gateway-default"],
"SequenceNumber": 45701485,
"Enabled": true,
"Schedules": [],
"Timezone": {
"CurrentOffsetMinutes": -180,
"TimeZoneCode": "america/argentina/buenos_aires"
}
},
{
"AlertID": 212,
"VariableTypeID": 1,
"EndpointID": 114092,
"ConditionType": 5,
"Threshold": 20,
"ClientID": 4,
"FacilityID": 184,
"NormalConditionType": 3,
"NormalThreshold": 22,
"MinimumDurationSeconds": 300,
"NotificationEmails": ["someone@somewhere.com"],
"NotificationSMSNumbers": ["+1123456789"],
"NotificationVoiceNumbers": ["+1123456789"],
"Tags": ["default", "gateway-default"],
"SequenceNumber": 45701485,
"Enabled": true,
"Schedules": [
{
"Days": [
1,
2,
4,
5
],
"StartTime": {
"Hour": 0,
"Millisecond": 0,
"Minute": 0,
"Second": 0
},
"EndTime": {
"Hour": 23,
"Millisecond": 999,
"Minute": 0,
"Second": 59
}
}
],
"Timezone": {
"CurrentOffsetMinutes": -180,
"TimeZoneCode": "america/argentina/buenos_aires"
}
}
]
```
# Get a list of alerts using parameters
This API allows retrieving a list of alerts using parameters.
Request [#request]
```
GET /api/v2/alerts?clientID={clientID}&facilityID={facilityID}&deviceID={deviceID}&endpointID={endpointID}&maxCount={maxCount} HTTP/1.1
Host: gear.cloud.studio
Authorization: Bearer {accessToken}
```
Parameters [#parameters]
| Name | Description |
| ----------- | ---------------------------------------------------------------------------------------------------------------------------------------------------------------------------------------------- |
| accessToken | Access token with permissions to read alert information. See this page for more information. The access token can also be sent as part of the query string, using the "accessToken" parameter. |
| clientID | Optional identifier indicating that only alerts for the given client should be retrieved. |
| facilityID | Optional identifier indicating that only alerts for the given facility should be retrieved. |
| deviceID | Optional identifier indicating that only alerts for the given device should be retrieved. |
| endpointID | Optional identifier indicating that only alerts for the given endpoint should be retrieved. |
| maxCount | Optional parameter indicating the maximum number of alerts to include in the result. |
| It is mandatory to include one (and only one) of the parameters "clientID", "facilityID", "deviceID", or "endpointID". |
| ---------------------------------------------------------------------------------------------------------------------- |
Response [#response]
The response contains the list of matching alerts, as shown in this example:
```
[
{
"AlertID": 211,
"VariableTypeID": 1,
"EndpointID": 114092,
"ConditionType": 3,
"Threshold": 25,
"ClientID": 4,
"FacilityID": 184,
"NormalConditionType": 6,
"NormalThreshold": 24,
"MinimumDurationSeconds": 300,
"NotificationEmails": ["someone@somewhere.com"],
"NotificationSMSNumbers": ["+1123456789"],
"NotificationVoiceNumbers": ["+1123456789"],
"Tags": ["default", "gateway-default"],
"SequenceNumber": 45701485,
"Enabled": true,
"Schedules": [],
"Timezone": {
"CurrentOffsetMinutes": -180,
"TimeZoneCode": "america/argentina/buenos_aires"
}
},
{
"AlertID": 212,
"VariableTypeID": 1,
"EndpointID": 114092,
"ConditionType": 5,
"Threshold": 20,
"ClientID": 4,
"FacilityID": 184,
"NormalConditionType": 3,
"NormalThreshold": 22,
"MinimumDurationSeconds": 300,
"NotificationEmails": ["someone@somewhere.com"],
"NotificationSMSNumbers": ["+1123456789"],
"NotificationVoiceNumbers": ["+1123456789"],
"Tags": ["default", "gateway-default"],
"SequenceNumber": 45701485,
"Enabled": true,
"Schedules": [
{
"Days": [
1,
2,
4,
5
],
"StartTime": {
"Hour": 0,
"Millisecond": 0,
"Minute": 0,
"Second": 0
},
"EndTime": {
"Hour": 23,
"Millisecond": 999,
"Minute": 0,
"Second": 59
}
}
],
"Timezone": {
"CurrentOffsetMinutes": -180,
"TimeZoneCode": "america/argentina/buenos_aires"
}
}
]
```
# Alert data type
Introduction [#introduction]
The alert data type allows obtaining the configuration of an alert. Below are all the properties of the alert data type.
Properties [#properties]
\### AlertID (int) The AlertID property represents the unique identifier of the alert in the platform. This identifier is automatically assigned when an alert is created. ### VariableTypeID (int enum)
The VariableTypeID property indicates the type of variable associated with the alert. For user-defined variables, the ID is always equal to or greater than 1000. For the predefined variable types in the platform, the values are as follows:
* Temperature = 1
* Humidity = 2,
* Light level = 3
* Setpoint = 4
* Volume = 5
* Active energy = 6
* Run time = 7
* Discrete sensor state = 8
* Dimmerization = 9
* Weight = 10
* Flow = 11
* Voltage = 12
* Current = 13
* Active power = 14
* Reactive power = 15
* Apparent power = 16
* Power factor = 17
* Pressure = 18
* Frequency = 19
* Ppm concentration = 20
* Mass/volume concentration = 21
* AQI = 22
* People flow = 23
* People count = 24
* Reactive energy = 25
* Apparent energy = 26
* Location = 27
\### EndpointID (int) Unique identifier of the endpoint to which the alert corresponds. ### FacilityID (int) Unique identifier of the facility to which the alert corresponds. ### ClientID (int) Unique identifier of the client to which the alert corresponds. ### ConditionType (int enum)
The ConditionType property indicates the type of condition applied for comparison with the Threshold field value to trigger the alert. The possible values are as follows:
* **Equal = 1**: the alert will trigger when the reported value equals the value specified in the Threshold field.
* **NotEqual = 2**: the alert will trigger when the reported value differs from the value specified in the Threshold field.
* **Greater = 3**: the alert will trigger when the reported value is greater than the value specified in the Threshold field.
* **GreaterOrEqual = 4**: the alert will trigger when the reported value is greater than or equal to the value specified in the Threshold field.
* **Lower = 5**: the alert will trigger when the reported value is less than the value specified in the Threshold field.
* **LowerOrEqual = 6**: the alert will trigger when the reported value is less than or equal to the value specified in the Threshold field.
\### Threshold (double) Threshold used to activate the alert and generate the associated alarm. Used in conjunction with the ConditionType field. ### NormalConditionType (int enum)
The NormalConditionType property indicates the type of condition applied for comparison with the NormalThreshold field value to close the alert. The possible values are as follows:
* **Equal = 1**: the alert will close when the reported value equals the value specified in the NormalThreshold field.
* **NotEqual = 2**: the alert will close when the reported value differs from the value specified in the NormalThreshold field.
* **Greater = 3**: the alert will close when the reported value is greater than the value specified in the NormalThreshold field.
* **GreaterOrEqual = 4**: the alert will close when the reported value is greater than or equal to the value specified in the NormalThreshold field.
* **Lower = 5**: the alert will close when the reported value is less than the value specified in the NormalThreshold field.
* **LowerOrEqual = 6**: the alert will close when the reported value is less than or equal to the value specified in the NormalThreshold field.
\### NormalThreshold (double) Threshold used to return to the normal condition and deactivate the alert. Used in conjunction with the NormalConditionType field. ### MinimumDurationSeconds (int) Minimum amount of time (in seconds) that the condition must be maintained before activating the alert. ### NotificationEmails (array of string) List of email addresses to which notifications will be sent when the alert is activated or deactivated. ### NotificationSMSNumbers (array of string) List of phone numbers to which SMS notifications will be sent when the alert is activated or deactivated. ### NotificationVoiceNumbers (array of string) List of phone numbers to which voice notifications will be sent when the alert is activated or deactivated. ### Tags (array of string) List of tags associated with the alert. ### SequenceNumber (int64) Sequence number associated with the alert. The sequence number is updated with a higher number each time the alert is modified in any way, including when the alert is deleted. Each created or modified alert is guaranteed to receive a number higher than any other existing alert. ### Enabled (bool) Indicates whether the alert can be used, or if it has been deleted. The value false indicates that the alert has been deleted. Deleted alerts can only be accessed through the API for [getting a list of alerts incrementally](/docs/apis-de-extraccion-de-datos/alertas/obtener-una-lista-de-alertas-en-forma-incremental).
# Endpoint Data
Introduction [#introduction]
This section explains how to extract endpoint data created in the Gear Studio platform using the data extraction API.
To query endpoint data, the EndpointData data type is used, whose documentation can be found [here](/docs/apis-de-extraccion-de-datos/datos-de-endpoints/tipo-de-datos-endpointdata).
There are two mechanisms for obtaining endpoint information:
* Get the information of a specific endpoint by its ID and a date range, as explained [here](/docs/apis-de-extraccion-de-datos/datos-de-endpoints/obtener-datos-de-un-endpoint-utilizando-su-id-y-parametros).
* Get information of all endpoints associated with an endpoint, device, facility, or client, incrementally. Documentation can be found [here](/docs/apis-de-extraccion-de-datos/datos-de-endpoints/obtener-datos-de-endpoints-en-forma-incremental).
# Get endpoint data using its ID and parameters
This API allows retrieving endpoint data using its ID and parameters.
Request [#request]
```
GET /api/v2/endpointData/?endpointID={endpointID}&dateFrom={dateFrom}&dateTo={dateTo}&maxCount={maxCount} HTTP/1.1
Host: gear.cloud.studio
Authorization: Bearer {accessToken}
```
Parameters [#parameters]
| Name | Description |
| ----------- | ------------------------------------------------------------------------------------------------------------------------------------------------------------------------------------------------- |
| accessToken | Access token with permissions to read endpoint information. See this page for more information. The access token can also be sent as part of the query string, using the "accessToken" parameter. |
| endpointID | Mandatory identifier indicating the endpoint from which data should be extracted. |
| dateFrom | Date from which endpoint data should be retrieved. |
| dateTo | Date until which endpoint data should be retrieved. |
| maxCount | Optional parameter indicating the maximum number of records to include in the result. Values greater than 500 are limited to 500 regardless of the value sent in the request. |
| The "endpointID" parameter is optional. |
| --------------------------------------- |
Response [#response]
The response contains the list of matching EndpointData, as shown in this example:
```
[
{
"EndpointID": 113653,
"Timestamp_UTC": "2021-10-15T22:51:19",
"Value": 18.91,
"SequenceNumber": 6683839
},
{
"EndpointID": 113653,
"Timestamp_UTC": "2021-10-15T23:01:25",
"Value": 16.93,
"SequenceNumber": 6683852
},
{
"EndpointID": 113653,
"Timestamp_UTC": "2021-10-15T23:11:28",
"Value": 16.97,
"SequenceNumber": 6683864
},
{
"EndpointID": 113653,
"Timestamp_UTC": "2021-10-15T23:41:36",
"Value": 16.93,
"SequenceNumber": 6683874
}
]
```
# Get the latest data from multiple Endpoints
This service allows querying **the latest recorded data** from up to **5 devices at the same time**, using a single call.
Its use is primarily recommended when you need to display real-time information from multiple sensors simultaneously, avoiding a specific call for each one, resulting in **time savings** and **reduced network traffic**.
To use this function, make a call to the API through a specific address using the GET method.
`GET /api/v2/endpointData/multiple`
For security purposes, an access key identifying the requesting user is required. This key is the [Access Token](/docs/apis-de-extraccion-de-datos/access-tokens-persistentes) and must be included as part of the address.
```
GET https://gear-dev.cloud.studio/api/v2/endpointData/multiple?accessToken=123456789-1110-0022-3333-987654321012&endpointIds=351031,151040,252340,511088,720510
```
If the access key is missing or invalid, the API will return an error.
This error is **401**, indicating **unauthorized access**.
The required parameters are:
* Access Key (Access Token): Key identifying an authorized user.
* It is a String type and is mandatory.
* EndpointsIDs: IDs of the device sensors separated by commas, for which data should be retrieved.
* It is a List type and is mandatory.
* **NOTE**: The limit of endpoints per call is 5 (five).
When more than 5 endpointIds are sent in the request, a **400** error will be received, indicating **Bad Request**, meaning the endpoint limit has been exceeded.
Once the request is correctly made, a **list of objects** (JSON) is received. Each object in the list will represent the information of one of the requested sensors.
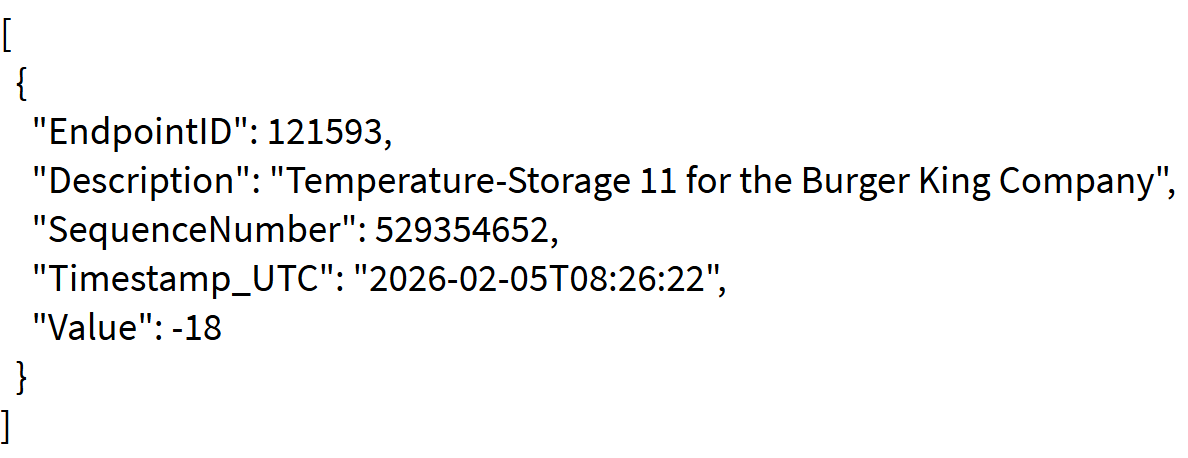
The information in the list is as follows:
* **EndpointID**: Identification number of the queried sensor
* **Description**: Name of the queried sensor
* **SequenceNumber**: Sequential number indicating the order in which data was recorded (useful for tracking/history)
* **TimeStamp\_UTC**: Exact date and time of the lastValue recording
* **Value**: Last value reported by the sensor
If an endpoint has no data, the **Value and timeStamp** fields will be *null*.
**Note**: The addition of this functionality affects all endpoint data query methods, as they now include the *description* field.
The Camera endpoint is excluded.
# EndpointData data type
Introduction [#introduction]
The EndpointData data type allows obtaining the configuration of an Endpoint. Below are all the properties of the EndpointData data type.
Properties [#properties]
\### EndpointID (int) The EndpointID property represents the unique identifier of the Endpoint in the platform. This identifier is automatically assigned when an Endpoint is created. ### Timestamp\_UTC (string) UTC timestamp corresponding to the value, in String format. ### Value (double) Numeric representation of the value. Valid for all scalar Endpoints, as well as IAS Zones. ### IsOn (bool) Boolean indicating whether the Endpoint is turned on. Valid for appliances and dimmers. ### IsMoving (bool) Boolean indicating whether the closure is moving. Valid for closures. ### DimLevel (int) Dim level. Only valid for dimmers. ### Position (int) Position. Only valid for closure controllers. ### ActiveEnergy (double) Active energy delivery. Only valid for power meters. ### ReactiveEnergy (double) Reactive energy delivery. Only valid for power meters. ### ApparentEnergy (double) Apparent energy delivered. Only valid for power meters. ### SequenceNumber (int64) Sequence number associated with the alert. The sequence number is updated with a higher number each time the alert is modified in any way, including when the alert is deleted. Each created or modified alert is guaranteed to receive a number higher than any other existing alert.
# Geozones
Introduction [#introduction]
This section explains how to extract the definition of geozones created in the Gear Studio platform using the data extraction API. Geozones allow defining a polygon that can be used to create alerts when any location tracker enters or exits them.
Geozone information uses the geozone data type, whose documentation can be found [here](/docs/apis-de-extraccion-de-datos/geozonas/tipo-de-datos-geozone).
There are three mechanisms for obtaining geozone information:
* Get data for a specific geozone by its ID, as explained [here](/docs/apis-de-extraccion-de-datos/geozonas/obtener-una-geozona-dado-su-id).
* Get information for all geozones associated with a client. Documentation can be found [here](/docs/apis-de-extraccion-de-datos/geozonas/obtener-una-lista-de-geozonas-utilizando-parametros).
* Get information for all geozones associated with a client, incrementally. Documentation can be found [here](/docs/apis-de-extraccion-de-datos/geozonas/obtener-una-lista-de-geozonas-en-forma-incremental).
# Get a geozone by its ID
This API allows retrieving a geozone by its ID.
Request [#request]
```
GET /api/v2/geozones/{geozoneID} HTTP/1.1
Host: gear.cloud.studio
Authorization: Bearer {accessToken}
```
Parameters [#parameters]
| Name | Description |
| ----------- | ----------------------------------------------------------------------------------------------------------------------------------------------------------------------------------------- |
| accessToken | Access token with permissions to read geozone data. See this page for more information. The access token can also be sent as part of the query string, using the "accessToken" parameter. |
| geozoneID | Unique identifier of the geozone for which information is requested. |
Response [#response]
The response contains the specified geozone, as shown in this example:
```
{
"GeozoneID":35,
"ClientID":79,
"Description":"Hokkaido",
"ExternalCode":"3424",
"Polygon":{
"PolygonID":35,
"Points":[
[
43.93935551,
142.57453478
],
[
43.49469073,
143.60724962
],
[
43.06278289,
143.49738634
],
[
42.9020392,
142.92609728
],
[
42.96638711,
142.6624254
],
[
42.96638711,
142.17902696
],
[
42.9020392,
141.80549181
],
[
42.88594172,
141.49787462
],
[
43.06278289,
141.34406603
],
[
43.19107519,
141.6077379
],
[
43.36703768,
141.93732775
],
[
43.669774,
141.82746446
],
[
43.82849869,
142.02521837
],
[
43.90770318,
142.37678087
]
],
"BorderColor":0,
"BorderWidth":3,
"BorderOpacity":100.0,
"FillColor":0,
"FillOpacity":50.0
},
"Vehicles":[
{
"VehicleID":133,
"Description":"Asset 70",
"LicensePlate":"XD1320070"
},
{
"VehicleID":134,
"Description":"Asset 71",
"LicensePlate":"XD1320071"
},
{
"VehicleID":135,
"Description":"Asset 72",
"LicensePlate":"XD1320072"
},
{
"VehicleID":136,
"Description":"Asset 73",
"LicensePlate":"XD1320073"
},
{
"VehicleID":138,
"Description":"Asset 75",
"LicensePlate":"XD1320075"
},
{
"VehicleID":139,
"Description":"Asset 76",
"LicensePlate":"XD1320076"
},
{
"VehicleID":140,
"Description":"Asset 77",
"LicensePlate":"XD1320077"
},
{
"VehicleID":141,
"Description":"Asset 78",
"LicensePlate":"XD1320078"
},
{
"VehicleID":142,
"Description":"Asset 79",
"LicensePlate":"XD1320079"
}
],
"SequenceNumber":74017203,
"Enabled":true
}
```
# Get a list of geozones incrementally
This API allows retrieving a list of geozones incrementally. This enables fast updates of geozones as they are created, modified, or deleted, without needing to retrieve the full list.
Theory of operation [#theory-of-operation]
To obtain a list of geozones incrementally, the SequenceNumber field is used. This field is monotonically ascending, meaning that when creating, modifying, or deleting a geozone, its SequenceNumber field will change to a value higher than any other geozone. This allows retrieving data based on the SequenceNumber in small batches until no more data is obtained, and then continuing periodically to get updates. When the result of this API is an empty list, it means that there are currently no updates.
Typically, an application consuming this API uses the following flow:
1. The application starts using a stored SequenceNumber (typically in non-volatile storage). On the first execution, this value is 1.
2. The application executes the API using (stored SequenceNumber + 1).
3. The application receives a list of geozones, sorted by SequenceNumber.
4. If the received list is empty, the application waits a few seconds and returns to step 2.
5. If the received list is not empty, the application stores the highest SequenceNumber received.
6. The application immediately returns to step 2.
7. When a new geozone is created, or an existing one is modified, its SequenceNumber will immediately change to a value higher than the last received, so its information will be received immediately in the next execution.
8. Any element received with the Enabled property set to false indicates that the element has been deleted. If the Enabled property is true, it indicates that the element has just been created or modified.
| In the flow above, it is assumed that the application always executes the API with the same clientID. If different parameters are desired, the search must start from zero. |
| --------------------------------------------------------------------------------------------------------------------------------------------------------------------------- |
| For debugging any application using this API, it is recommended to use maxCount = 1, to receive updates one at a time. This parameter can later be changed to a more practical value for production, such as 50. |
| ---------------------------------------------------------------------------------------------------------------------------------------------------------------------------------------------------------------- |
| Important: the SequenceNumber property of geozones is not modified when vehicles enter or exit the geozone, but only when the geozone configuration changes, or when it is deleted. Therefore, this method cannot be used to incrementally track entry or exit events for the geozone. |
| -------------------------------------------------------------------------------------------------------------------------------------------------------------------------------------------------------------------------------------------------------------------------------------- |
Request [#request]
```
GET /api/v2/geozones/incremental/{sequenceNumber}?clientID={clientID}&maxCount={maxCount} HTTP/1.1
Host: gear.cloud.studio
Authorization: Bearer {accessToken}
```
Parameters [#parameters]
| Name | Description |
| -------------- | ------------------------------------------------------------------------------------------------------------------------------------------------------------------------------------------------ |
| accessToken | Access token with permissions to read geozone information. See this page for more information. The access token can also be sent as part of the query string, using the "accessToken" parameter. |
| sequenceNumber | Value of the SequenceNumber field from the last geozone received. Use 0 to start from the beginning. |
| clientID | Client identifier for which the list of geozones should be retrieved. |
| maxCount | Optional parameter indicating the maximum number of geozones to include in the result. |
Response [#response]
The response contains the list of matching geozones, as shown in this example:
```
[
{
"GeozoneID":35,
"ClientID":79,
"Description":"Hokkaido",
"ExternalCode":"3424",
"Polygon":{
"PolygonID":35,
"Points":[
[
43.93935551,
142.57453478
],
[
43.49469073,
143.60724962
],
[
43.06278289,
143.49738634
],
[
42.9020392,
142.92609728
],
[
42.96638711,
142.6624254
],
[
42.96638711,
142.17902696
],
[
42.9020392,
141.80549181
],
[
42.88594172,
141.49787462
],
[
43.06278289,
141.34406603
],
[
43.19107519,
141.6077379
],
[
43.36703768,
141.93732775
],
[
43.669774,
141.82746446
],
[
43.82849869,
142.02521837
],
[
43.90770318,
142.37678087
]
],
"BorderColor":0,
"BorderWidth":3,
"BorderOpacity":100.0,
"FillColor":0,
"FillOpacity":50.0
},
"Vehicles":[
{
"VehicleID":133,
"Description":"Asset 70",
"LicensePlate":"XD1320070"
},
{
"VehicleID":134,
"Description":"Asset 71",
"LicensePlate":"XD1320071"
},
{
"VehicleID":135,
"Description":"Asset 72",
"LicensePlate":"XD1320072"
},
{
"VehicleID":136,
"Description":"Asset 73",
"LicensePlate":"XD1320073"
},
{
"VehicleID":138,
"Description":"Asset 75",
"LicensePlate":"XD1320075"
},
{
"VehicleID":139,
"Description":"Asset 76",
"LicensePlate":"XD1320076"
},
{
"VehicleID":140,
"Description":"Asset 77",
"LicensePlate":"XD1320077"
},
{
"VehicleID":141,
"Description":"Asset 78",
"LicensePlate":"XD1320078"
},
{
"VehicleID":142,
"Description":"Asset 79",
"LicensePlate":"XD1320079"
}
],
"SequenceNumber":74017203,
"Enabled":true
},
{
"GeozoneID":36,
"ClientID":79,
"Description":"1",
"ExternalCode":null,
"Polygon":{
"PolygonID":36,
"Points":[
[
0.870633,
177.7532959
],
[
0.62895465,
178.34655762
],
[
1.34295563,
177.84118652
]
],
"BorderColor":0,
"BorderWidth":3,
"BorderOpacity":100.0,
"FillColor":0,
"FillOpacity":50.0
},
"Vehicles":[
],
"SequenceNumber":74017204,
"Enabled":true
},
{
"GeozoneID":37,
"ClientID":79,
"Description":"2",
"ExternalCode":null,
"Polygon":{
"PolygonID":37,
"Points":[
[
-1.26057944,
178.3026123
],
[
-0.35979988,
179.63195801
],
[
-0.62346182,
-179.34631348
]
],
"BorderColor":0,
"BorderWidth":3,
"BorderOpacity":100.0,
"FillColor":0,
"FillOpacity":50.0
},
"Vehicles":[
],
"SequenceNumber":74017205,
"Enabled":true
}
]
```
# Get a list of geozones using parameters
This API allows retrieving a list of geozones using parameters.
Request [#request]
```
GET /api/v2/geozones?clientID={clientID}&maxCount={maxCount} HTTP/1.1
Host: gear.cloud.studio
Authorization: Bearer {accessToken}
```
Parameters [#parameters]
| Name | Description |
| ----------- | ------------------------------------------------------------------------------------------------------------------------------------------------------------------------------------------------ |
| accessToken | Access token with permissions to read geozone information. See this page for more information. The access token can also be sent as part of the query string, using the "accessToken" parameter. |
| clientID | Client identifier for which the list of geozones should be retrieved. |
| maxCount | Optional parameter indicating the maximum number of geozones to include in the result. |
Response [#response]
The response contains the list of matching geozones, as shown in this example:
```
[
{
"GeozoneID":35,
"ClientID":79,
"Description":"Hokkaido",
"ExternalCode":"3424",
"Polygon":{
"PolygonID":35,
"Points":[
[
43.93935551,
142.57453478
],
[
43.49469073,
143.60724962
],
[
43.06278289,
143.49738634
],
[
42.9020392,
142.92609728
],
[
42.96638711,
142.6624254
],
[
42.96638711,
142.17902696
],
[
42.9020392,
141.80549181
],
[
42.88594172,
141.49787462
],
[
43.06278289,
141.34406603
],
[
43.19107519,
141.6077379
],
[
43.36703768,
141.93732775
],
[
43.669774,
141.82746446
],
[
43.82849869,
142.02521837
],
[
43.90770318,
142.37678087
]
],
"BorderColor":0,
"BorderWidth":3,
"BorderOpacity":100.0,
"FillColor":0,
"FillOpacity":50.0
},
"Vehicles":[
{
"VehicleID":133,
"Description":"Asset 70",
"LicensePlate":"XD1320070"
},
{
"VehicleID":134,
"Description":"Asset 71",
"LicensePlate":"XD1320071"
},
{
"VehicleID":135,
"Description":"Asset 72",
"LicensePlate":"XD1320072"
},
{
"VehicleID":136,
"Description":"Asset 73",
"LicensePlate":"XD1320073"
},
{
"VehicleID":138,
"Description":"Asset 75",
"LicensePlate":"XD1320075"
},
{
"VehicleID":139,
"Description":"Asset 76",
"LicensePlate":"XD1320076"
},
{
"VehicleID":140,
"Description":"Asset 77",
"LicensePlate":"XD1320077"
},
{
"VehicleID":141,
"Description":"Asset 78",
"LicensePlate":"XD1320078"
},
{
"VehicleID":142,
"Description":"Asset 79",
"LicensePlate":"XD1320079"
}
],
"SequenceNumber":74017203,
"Enabled":true
},
{
"GeozoneID":36,
"ClientID":79,
"Description":"1",
"ExternalCode":null,
"Polygon":{
"PolygonID":36,
"Points":[
[
0.870633,
177.7532959
],
[
0.62895465,
178.34655762
],
[
1.34295563,
177.84118652
]
],
"BorderColor":0,
"BorderWidth":3,
"BorderOpacity":100.0,
"FillColor":0,
"FillOpacity":50.0
},
"Vehicles":[
],
"SequenceNumber":74017204,
"Enabled":true
},
{
"GeozoneID":37,
"ClientID":79,
"Description":"2",
"ExternalCode":null,
"Polygon":{
"PolygonID":37,
"Points":[
[
-1.26057944,
178.3026123
],
[
-0.35979988,
179.63195801
],
[
-0.62346182,
-179.34631348
]
],
"BorderColor":0,
"BorderWidth":3,
"BorderOpacity":100.0,
"FillColor":0,
"FillOpacity":50.0
},
"Vehicles":[
],
"SequenceNumber":74017205,
"Enabled":true
}
]
```
# Geozone data type
Introduction [#introduction]
The geozone data type allows obtaining the configuration of a geozone. Below are all the properties of the geozone data type.
Properties [#properties]
\### GeozoneID (int) The GeozoneID property represents the unique identifier of the geozone in the platform. This identifier is automatically assigned when a geozone is created. ### ClientID (int) Unique identifier of the client to which the geozone corresponds. ### Description (string) Indicates the description of the geozone. ### ExternalCode (string) Indicates an optional external code for the geozone. ### Polygon (object)
Contains the information of the polygon associated with the geozone. The polygon properties are:
* **PolygonID** (int): unique identifier of the polygon.
* **Points** (number\[]\[]): array of coordinates, where each element of the array is a coordinate with its latitude and longitude.
* **BorderColor** (int): color used for the polygon border. Used when rendering the polygon on maps. Uses 24-bit RGB encoding.
* **BorderWidth** (int): width of the polygon border, in pixels.
* **BorderOpacity** (number): opacity of the polygon border, where 1 is completely opaque and 0 is completely transparent.
* **FillColor** (int): color used for the polygon fill. Used when rendering the polygon on maps. Uses 24-bit RGB encoding.
* **FillOpacity** (number): opacity of the polygon fill, where 1 is completely opaque and 0 is completely transparent.
\### Vehicles (object array)
Contains the information of vehicles currently located within the geozone. If no vehicle is within the geozone, the returned array will be empty. For each vehicle included in the array, the following data is provided:
* **VehicleID** (int): unique identifier of the vehicle.
* **Description** (string): description of the vehicle.
* **LicensePlate** (string): license plate number of the vehicle.
\### SequenceNumber (int64) Sequence number associated with the geozone. The sequence number is updated with a higher number each time the geozone configuration is modified, and when the geozone is deleted. Each created or modified geozone is guaranteed to receive a number higher than any other existing geozone. ### Enabled (bool) Indicates whether the geozone can be used, or if it has been deleted. The value false indicates that the geozone has been deleted. Deleted geozones can only be accessed through the API for [getting a list of geozones incrementally](/docs/apis-de-extraccion-de-datos/geozonas/obtener-una-lista-de-geozonas-en-forma-incremental).
# Triggers
Triggers can be created for actions based on any event, including ***Calendar and State*** events. For each trigger, the user interface typically offers two options:

**Calendar**: In this case, the list of days of the week on which the event will be activated is presented, along with the corresponding time.

**State:** This option is basically the same as the one used for defining the firing threshold in the case of alerts.

> **An action can have multiple triggers, which means its execution will begin when any of these triggers fires.**
Disabling triggers [#disabling-triggers]
There is an action-level attribute that allows enabling or disabling all triggers. When the attribute is **activated**, trigger execution **does NOT fire the action execution**, so the action can only be executed manually or as a consequence of alerts, if applicable.
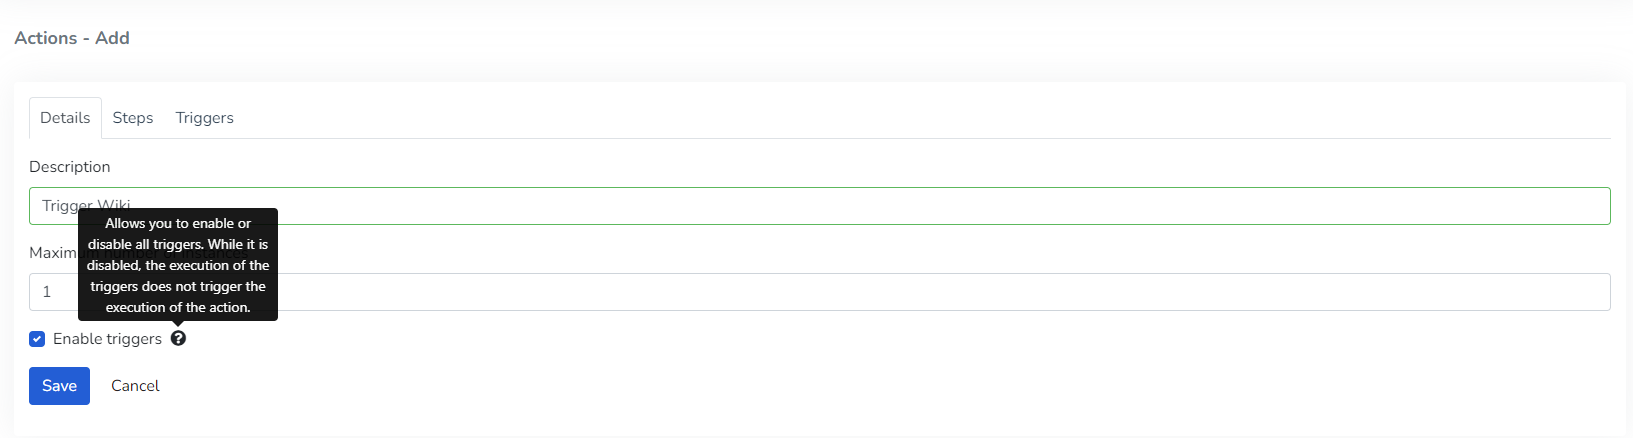
Trigger repetition frequency in minutes
From the Actions screen, in the main menu, when configuring an action you can access the creation/editing of a trigger. If the trigger is selected to be of type "*Calendar*", you can configure it to repeat at a configurable interval of minutes until the end of the day.
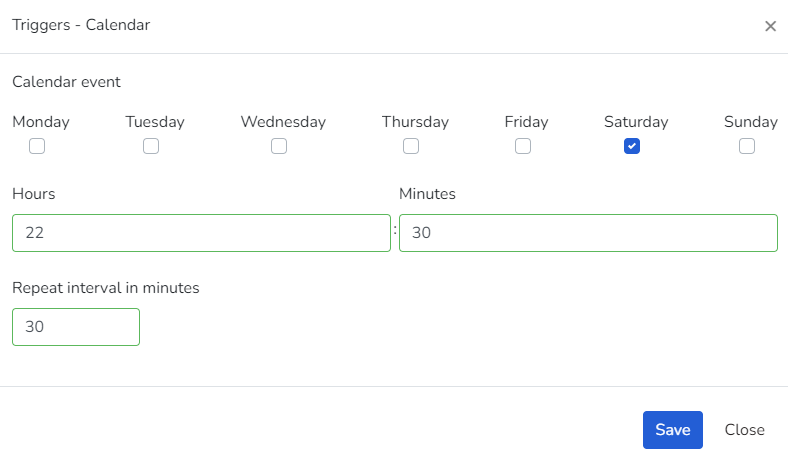
**An example of this would be**: Configure it to run on Saturdays at 10:30pm, then set it to repeat at a 30-minute interval, so it will execute at the following times: 10:30pm, 11:00pm, and 11:30pm.
# Action Execution
Action execution is based on steps, and the set of these constitutes all the activities that are triggered when the action runs, regardless of whether the action is started manually or by any of its triggers.
Steps are executed in order, one after another, until the last one is completed.
> Regardless of the step type, for each step it is possible to indicate whether execution should continue in case of error, using the following attribute:
>
> **Continue on error:** this field indicates whether, in case errors occur when executing the step, the action should stop or continue to the next step. If this field is **enabled**, the error is logged, but **the action continues** with the execution of the next step. If the field is **disabled**, the error is logged and **the action stops** immediately.
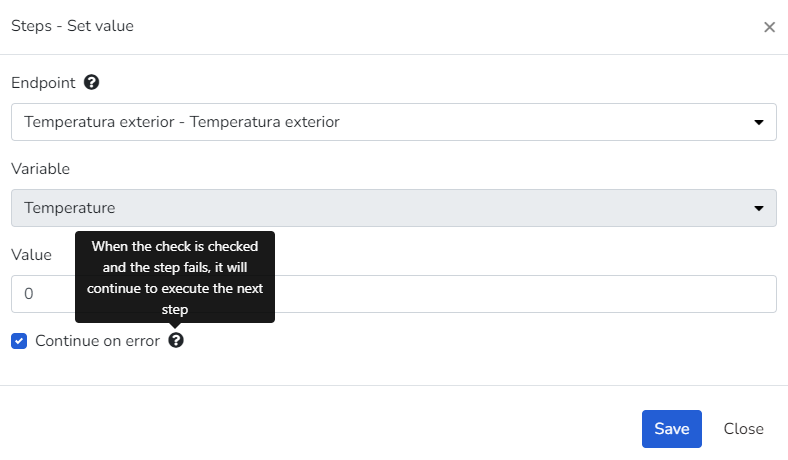
# Actions
***Actions*** are sets of **steps** that can be executed manually or as a consequence of configured events.
Once an action starts, all associated steps are executed one after another in the established order until the sequence is completed.
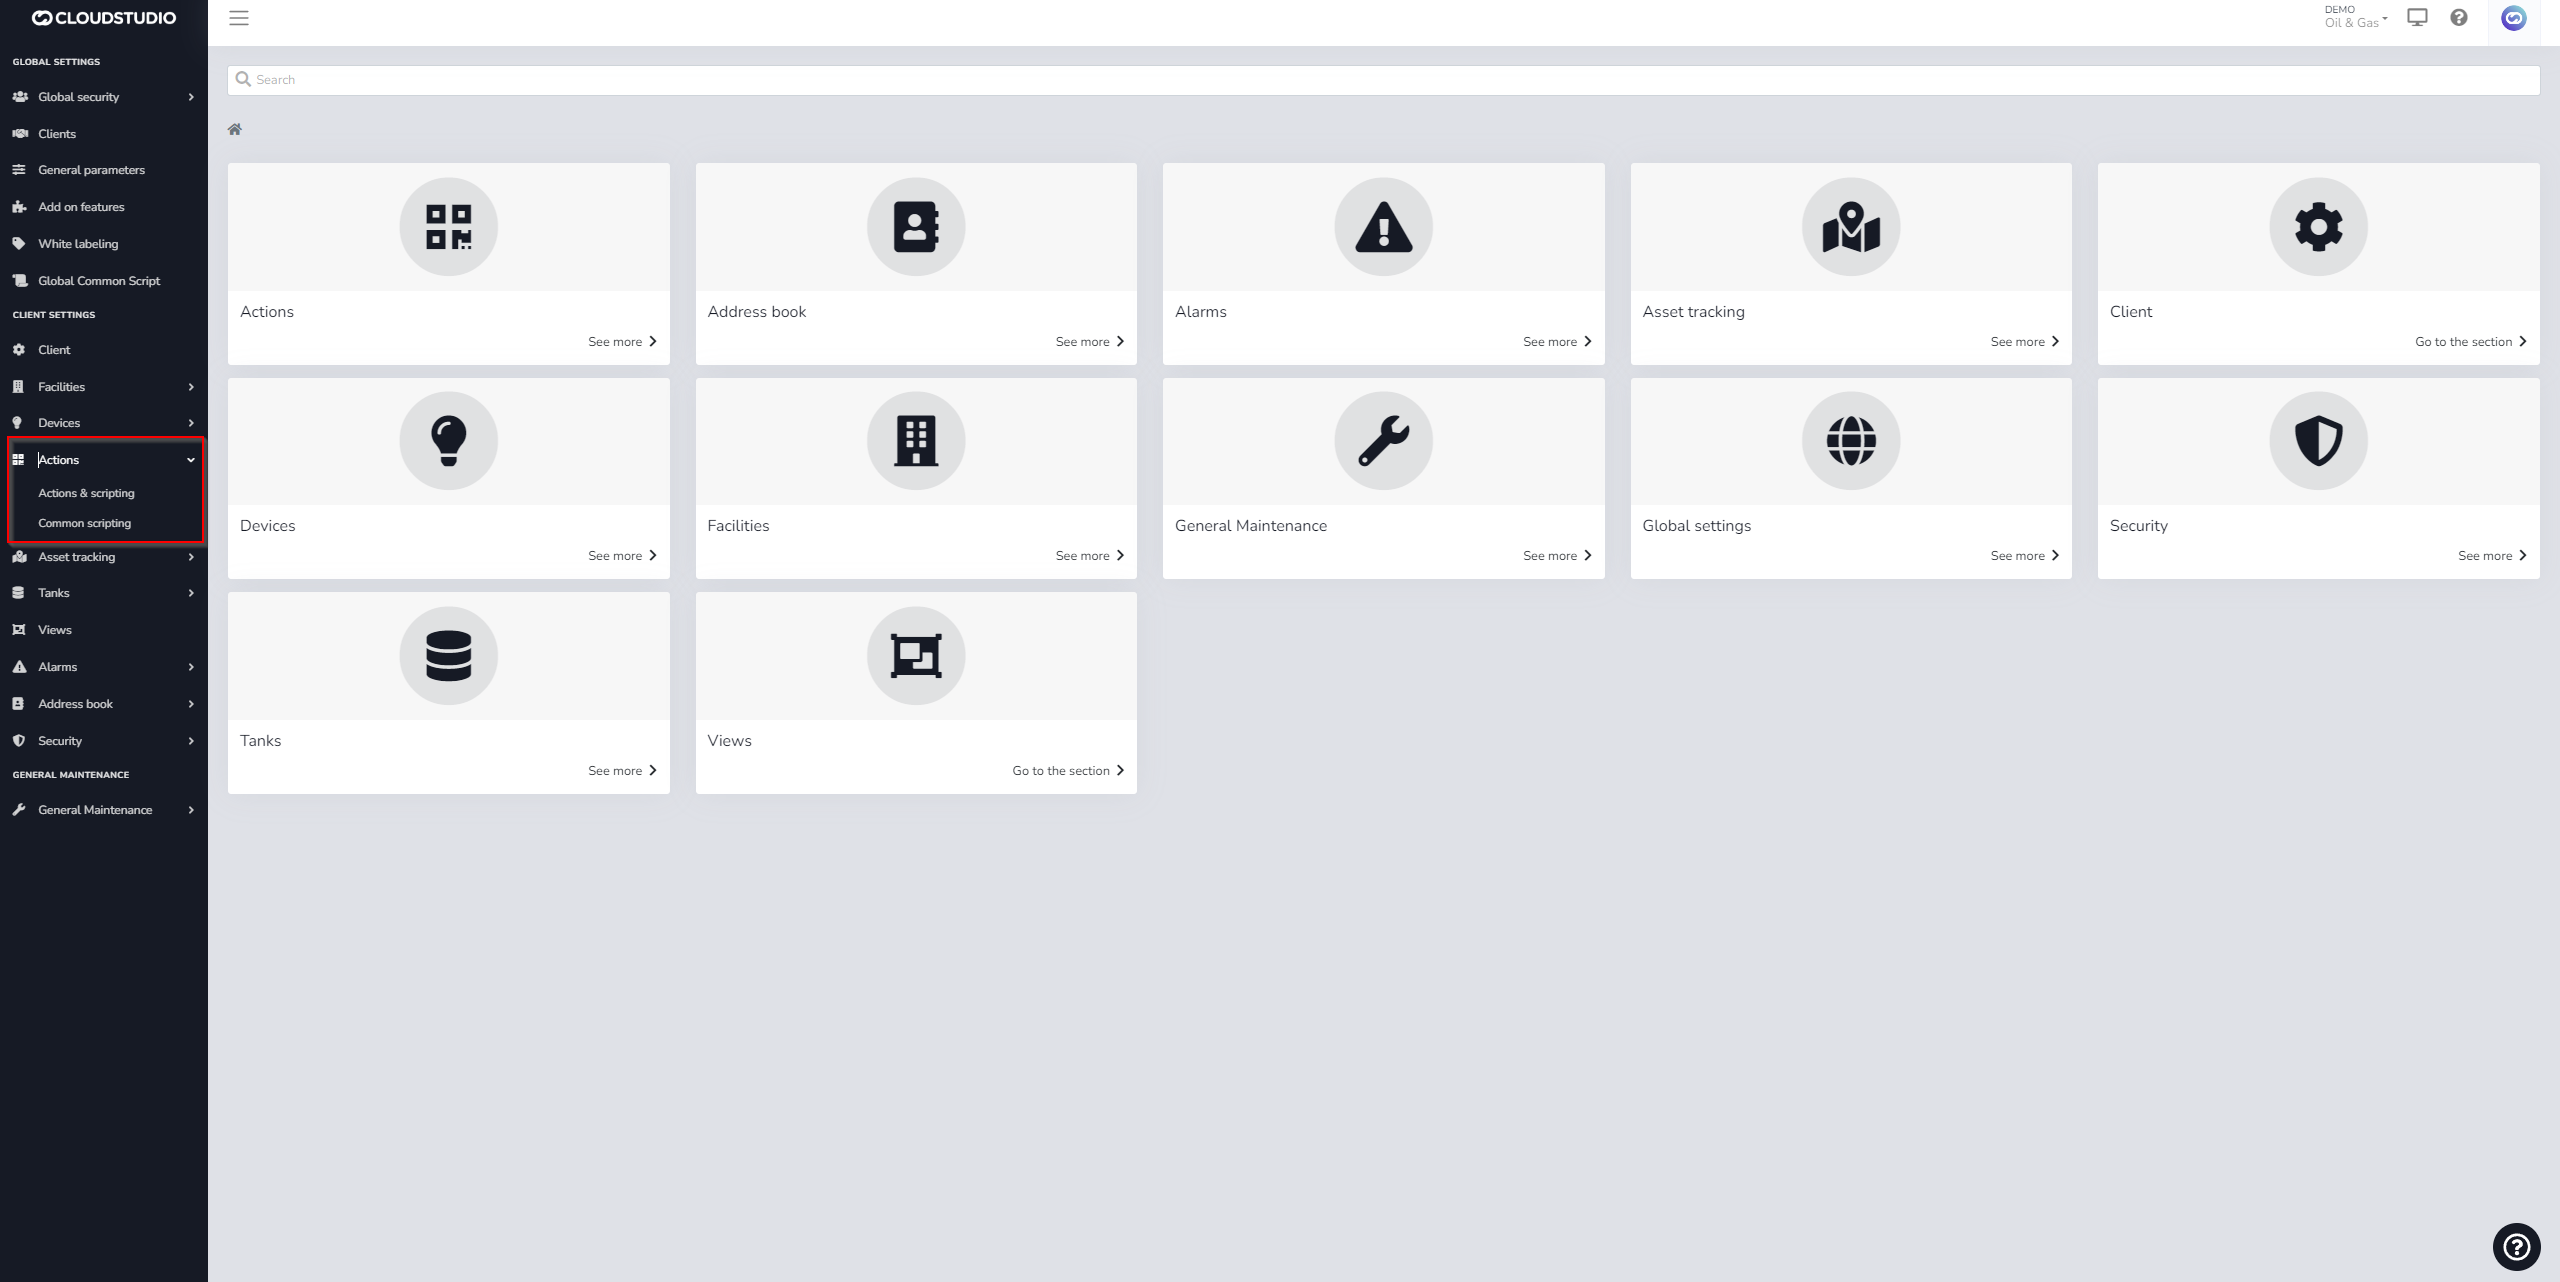
Actions and scripting [#actions-and-scripting]
To begin creating **actions** on the platform, use the **Actions and scripting** menu to activate the action management module.
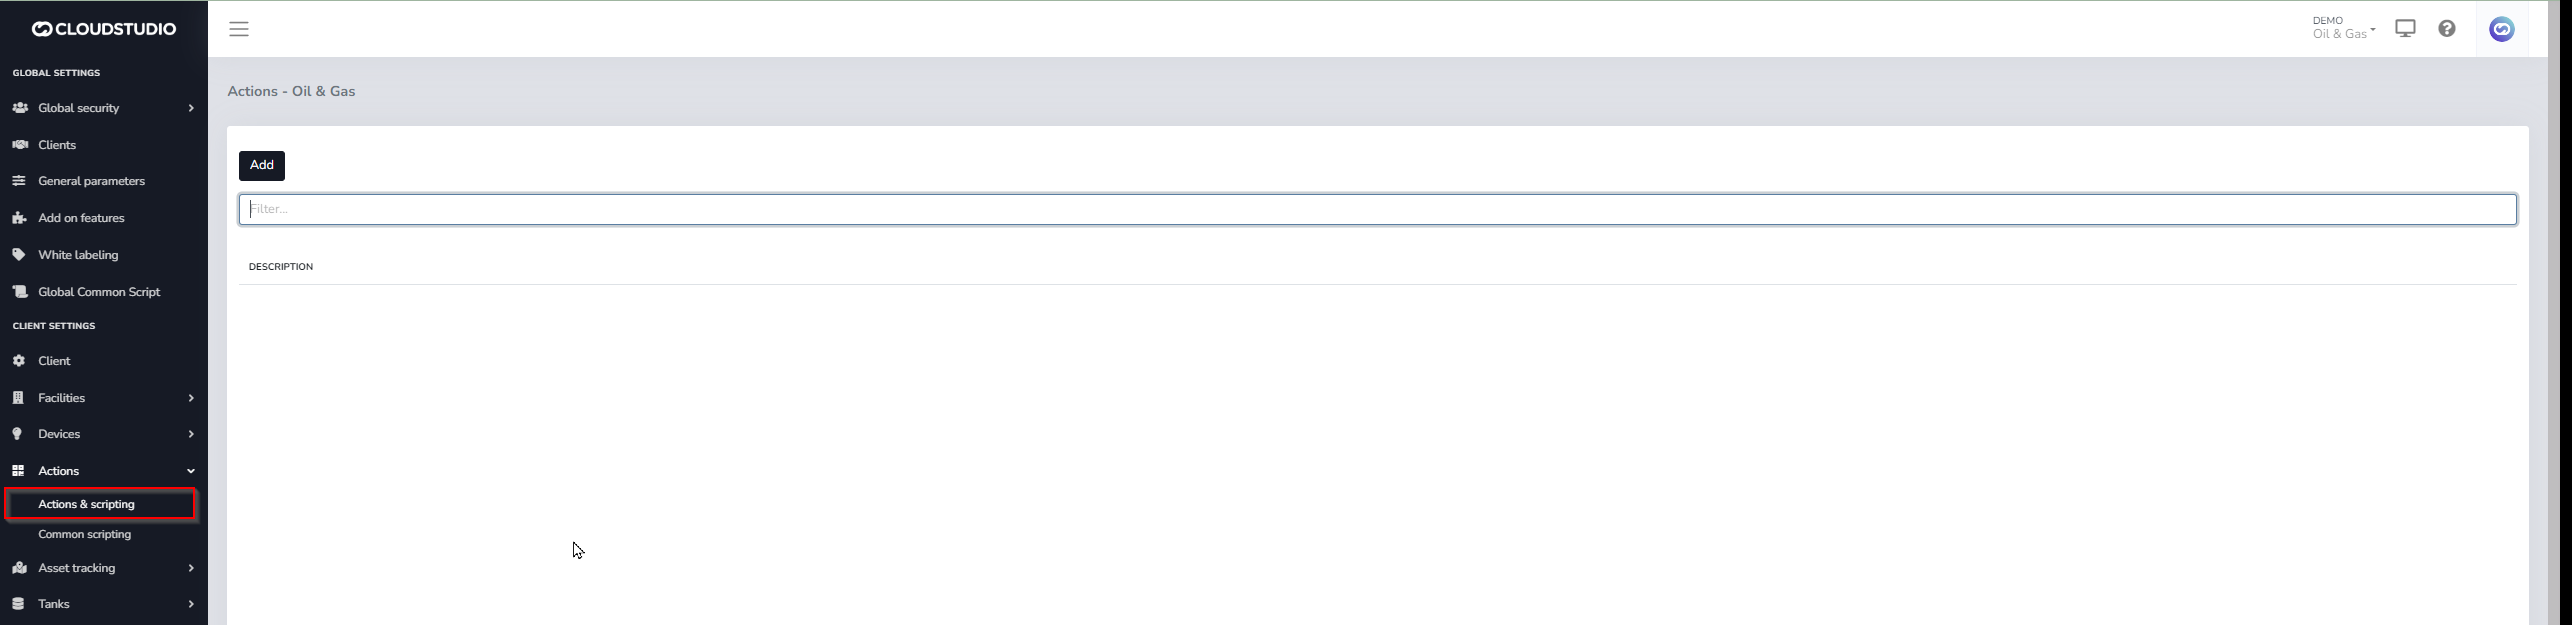
This module allows creating new actions, their steps, triggers, and also editing them.
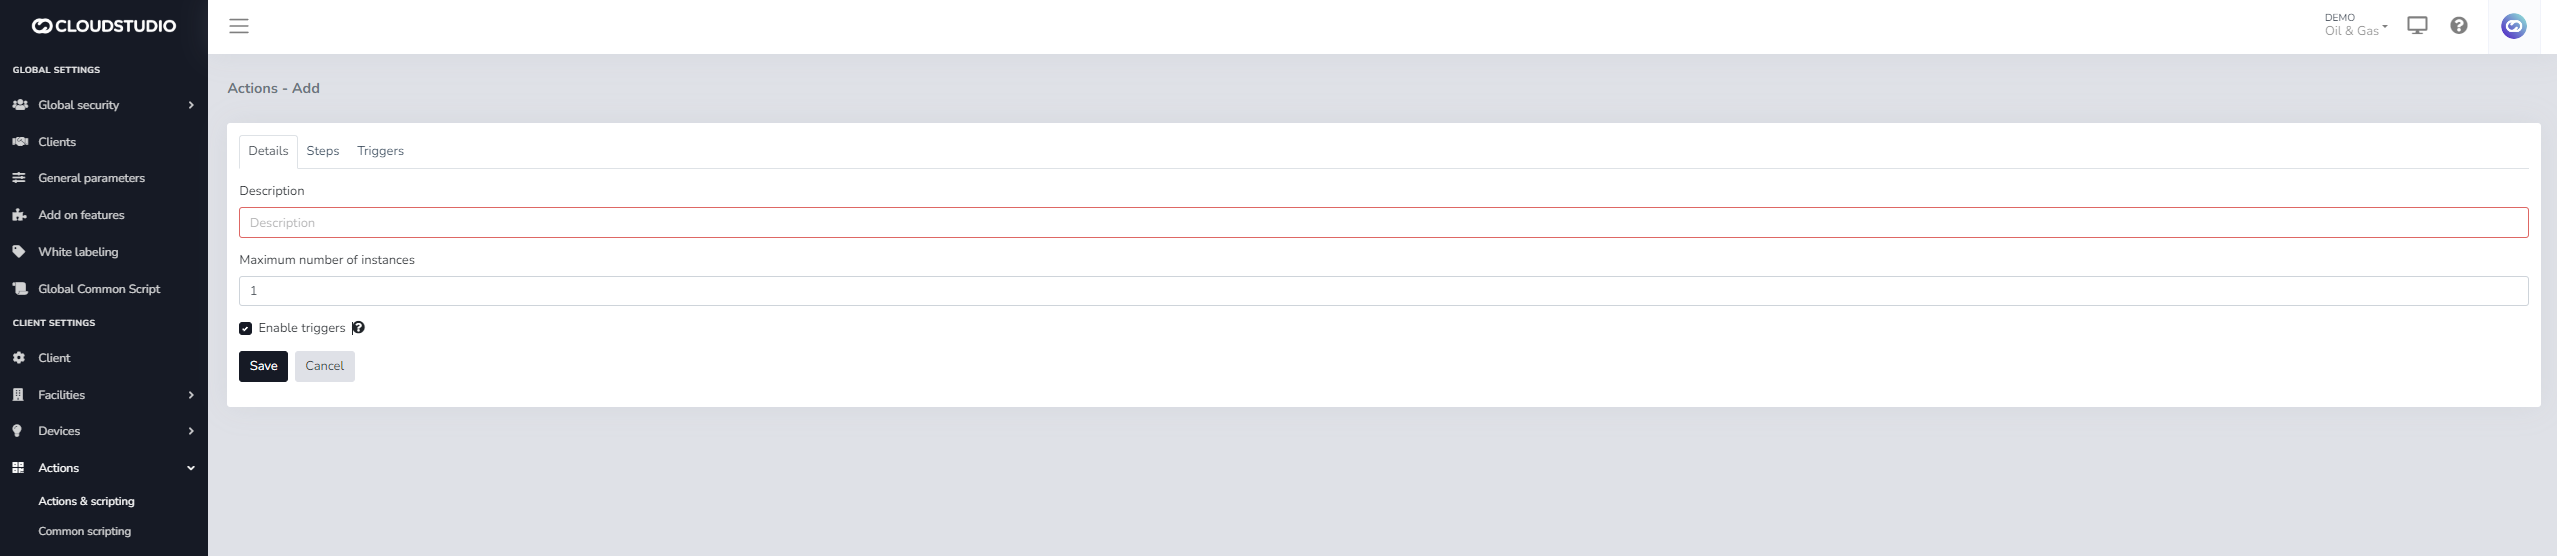
Details [#details]
**Description**: This field allows entering a description that will be used to identify the new action in the system. This field is required.
**Maximum number of instances**: This ***numeric*** value indicates how many instances of the action can run simultaneously.
This can occur when any of the triggers fires (or the action is started manually, or in any other way) while the action is already running. The default value for this attribute is 1, indicating that if the action is already running, it cannot be started again.
**Enable triggers**: Determines whether **all** triggers for the action are enabled or disabled.
Steps [#steps]
The step types allowed in actions are the following:
* **Set value**: Allows changing the value of a variable to a given value.
* **Add value**: Allows incrementing the value of a variable.
* **Subtract value**: Allows decrementing a variable by a given value.
* **Turn On**: Allows changing the state of a sensor to on.
* **Turn Off**: Allows changing the state of a sensor to off.
* **Toggle**: Allows changing the state of a sensor from ON to OFF or vice versa.
* **Email notifications**: Allows sending messages via email to an address or list of addresses.
* **SMS notifications**: Allows sending messages via SMS to a phone number or list of phone numbers.
* **Voice notifications**: Allows sending voice calls to a phone number or list of phone numbers.
* **Scripting**: Allows writing a code fragment in an interpreted language (*Javascript*) that is easy to understand, expanding the range of possibilities when processing a specific business logic. Scripts also:
* Can be related to each other to leverage code reuse.
* Can access all devices of the client in which they are running.
* Can be tested to verify correct operation before deployment.
For more information about step configuration, continue reading [Steps](/docs/configuracion-del-cliente/acciones/pasos)
Triggers [#triggers]
Triggers allow defining events that are used to fire the action. An action can have multiple triggers. When any one of them fires, the action begins executing. Any trigger that can be modeled as an event is supported, including calendar events.
> ***Actions do not need to have associated triggers. However, actions without triggers can only be executed manually or when alerts are triggered.***
For more information, continue reading [Triggers](/docs/configuracion-del-cliente/acciones/disparadores)
Execution queue [#execution-queue]
When a trigger associated with an action fires, or when started manually, or as a consequence of any other condition, a record will be created in the action queue (table "ActionInstances"). This table contains all action instances currently running.
A scheduled job (implemented as an external executable) will be responsible for periodically reviewing this table, updating the action's status, and executing the action's steps, using a separate thread for each action.
# Alerts
Alerts are applied to endpoints and allow you to define acceptable value ranges so that alarms are automatically generated when values fall outside these thresholds. To set up an alert, use the alerts screen, where you select the alert type, the endpoint it will apply to, the threshold value, and optionally, a minimum duration the condition must persist before the alert generates the corresponding alarm.
Users can use all available variables that have been enabled in their instance and can also customize alert subjects.
[**For more information about the allowed subject variables, review the documentation**](/docs/configuracion-del-cliente/alertas-y-alarmas/variables-para-notificaciones-de-alertas)

These are the allowed parameters (Variables):
| Variable | Comments |
| ----------------------------- | ------------------------------------------------------------------------- |
| \{CLIENT\_ID} | Unique client identifier |
| \{CLIENT\_NAME} | Client name/description |
| \{FACILITY\_ID} | Unique facility identifier |
| \{FACILITY\_NAME} | Facility description |
| \{DEVICE\_ID} | Unique device identifier |
| \{DEVICE\_NAME} | Device description |
| \{ENDPOINT\_ID} | Unique endpoint identifier |
| \{ENDPOINT\_NAME} | Endpoint description |
| \{DEVICE\_OR\_ENDPOINT\_NAME} | Endpoint description. If not valid, the device description will be shown. |
| \{ALARM\_TEXT} | Alarm description |
| \{ALARM\_DETAILS} | Alarm details |
# Configuring Contacts for Notifications
For each Alert, the system allows selecting the contacts or contact groups that should receive the notifications. The data that can be entered includes:
* [Preloaded contact](/docs/configuracion-del-cliente/libreta-de-direcciones/crear-un-nuevo-contacto)
* [Preloaded address groups](/docs/configuracion-del-cliente/libreta-de-direcciones/crear-un-nuevo-grupo-de-contacto)
* Email address(es) (the contact does not need to exist in the address book)
* Phone number for SMS notifications (the contact does not need to exist in the address book)
* Phone number for voice notifications (the contact does not need to exist in the address book)
> Voice and SMS notification services must be enabled at the client and facility level to be sent. For more information or to check whether these services are enabled for a client and facility, see this [page](/docs/configuracion-del-cliente/alertas-y-alarmas/servicios-de-voz-y-sms)
Edit Notifications [#edit-notifications]
To edit alert notifications, go to *Client Configuration **> Alarms** > **Alerts.***

Select the alert to modify using the three dots on the right side and press **Edit**.

Look for the *Notifications* option.
In *E-mails*, you can simply type the email address(es) you wish to add to the notifications. You can also type the name of a **contact** or **group** preloaded in the platform's [***Address Book***](/docs/configuracion-del-cliente/libreta-de-direcciones). For phone numbers, you can follow the same procedure: type the number or the names of contacts and/or groups preloaded in the system.
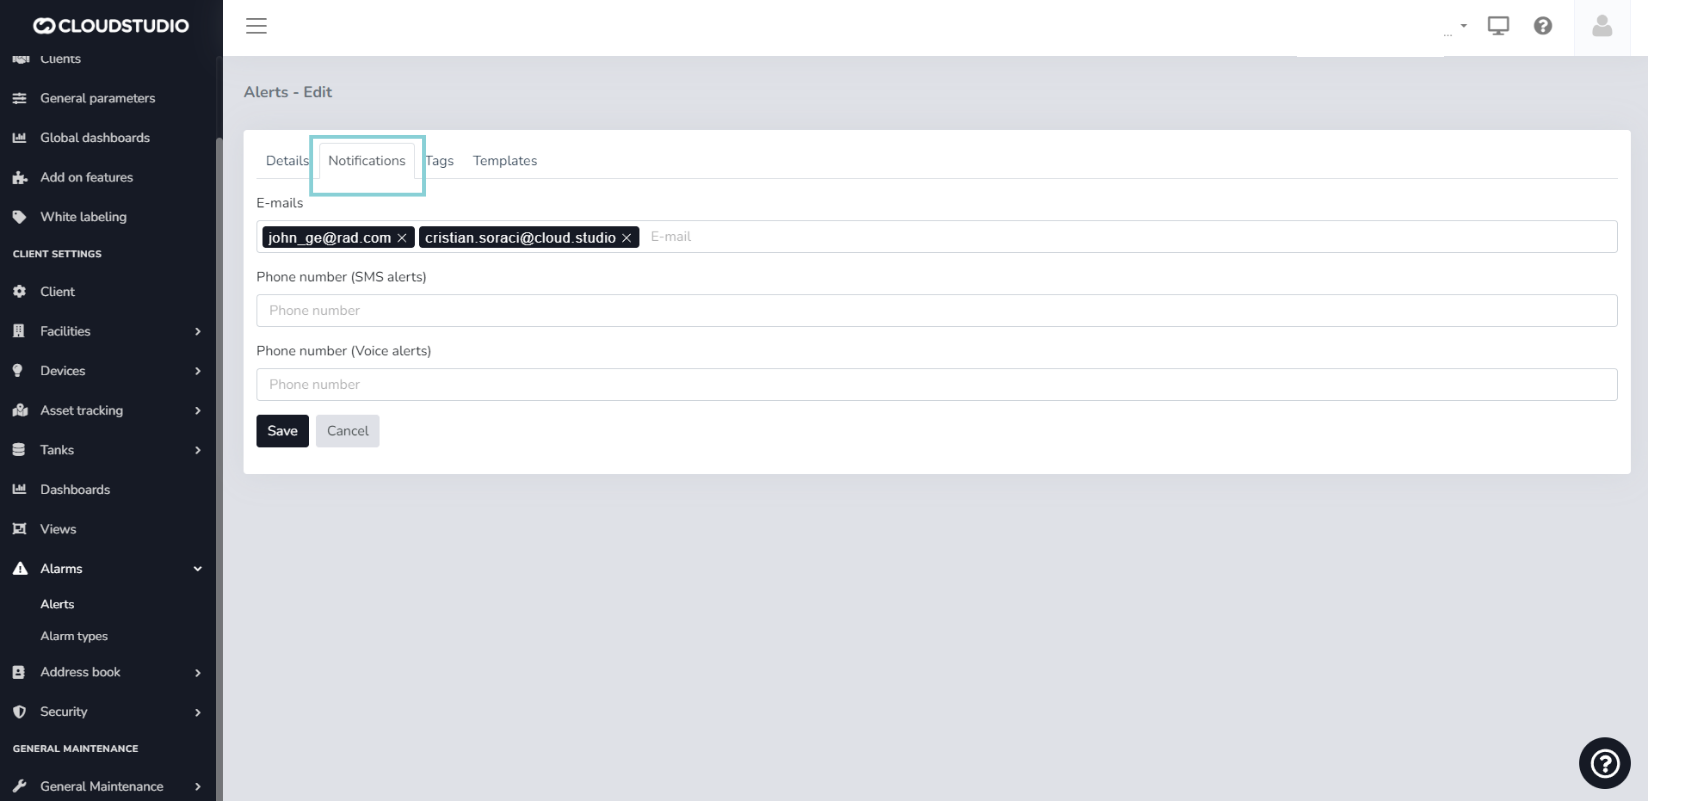
_853d.png)
> ***Important note:*** For contacts, email addresses, and phone numbers to be saved, you must press the **Enter** key after typing and ensure they appear highlighted in a box.
***Example of a group preloaded in the Address Book***
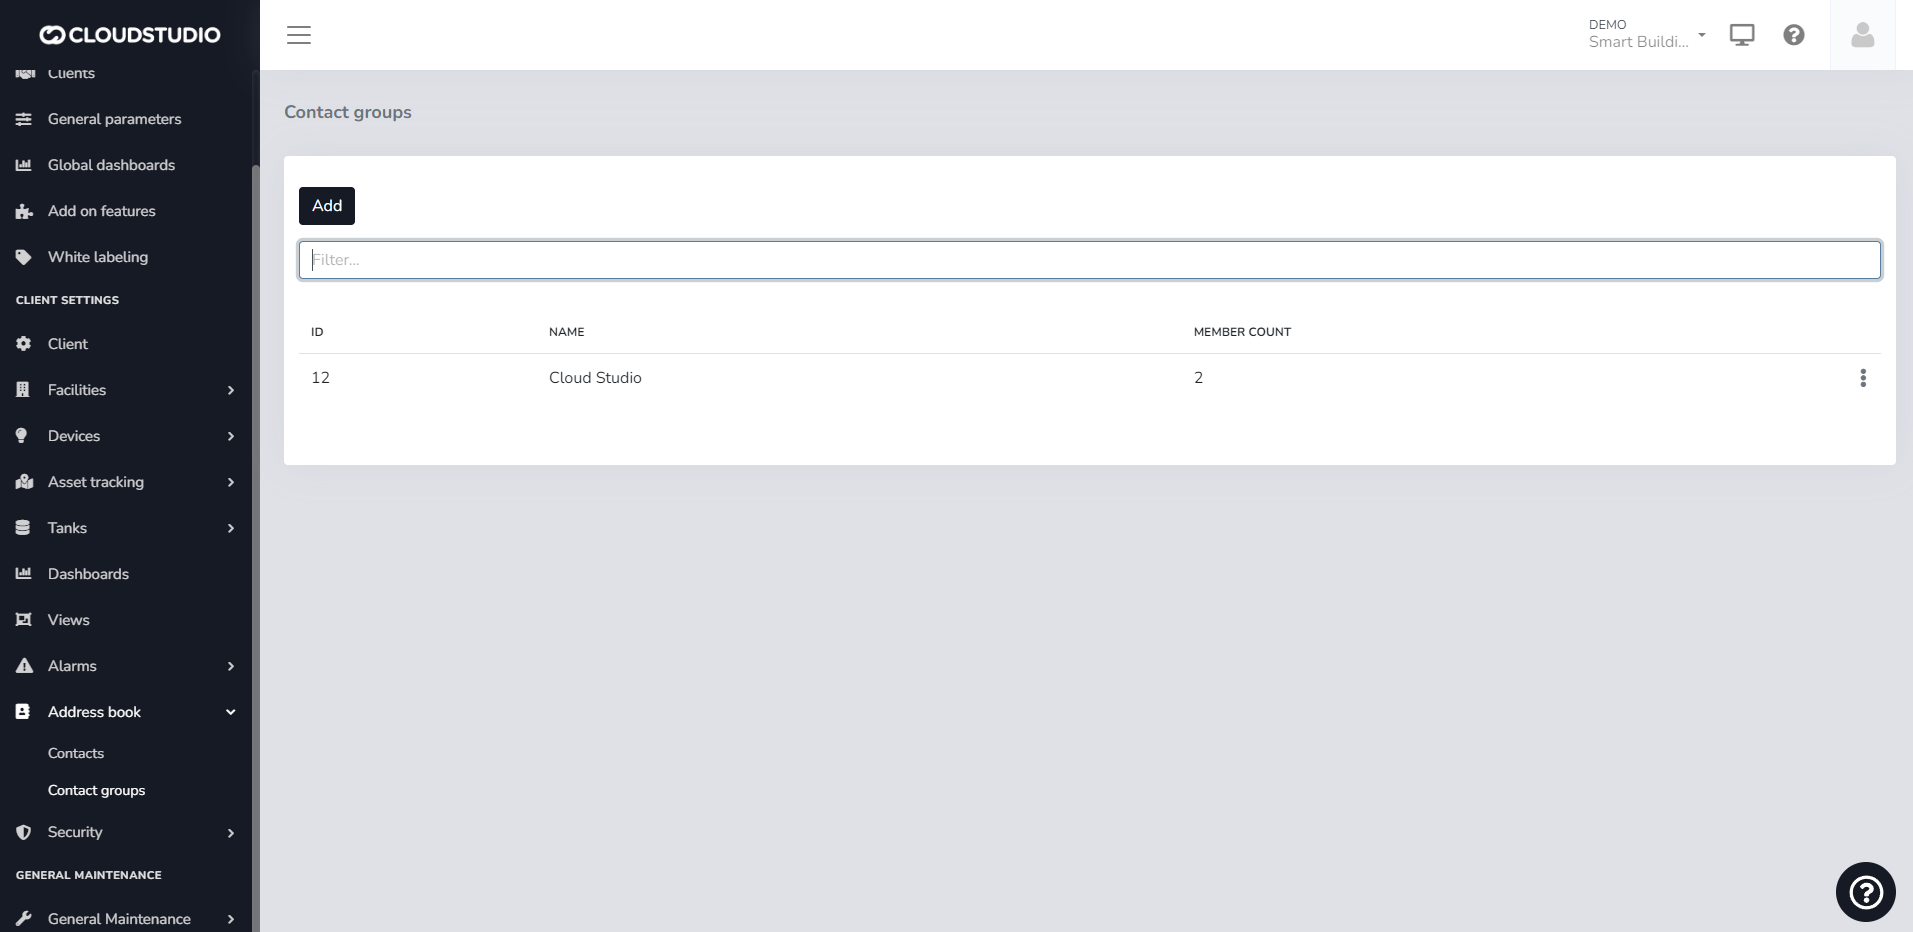
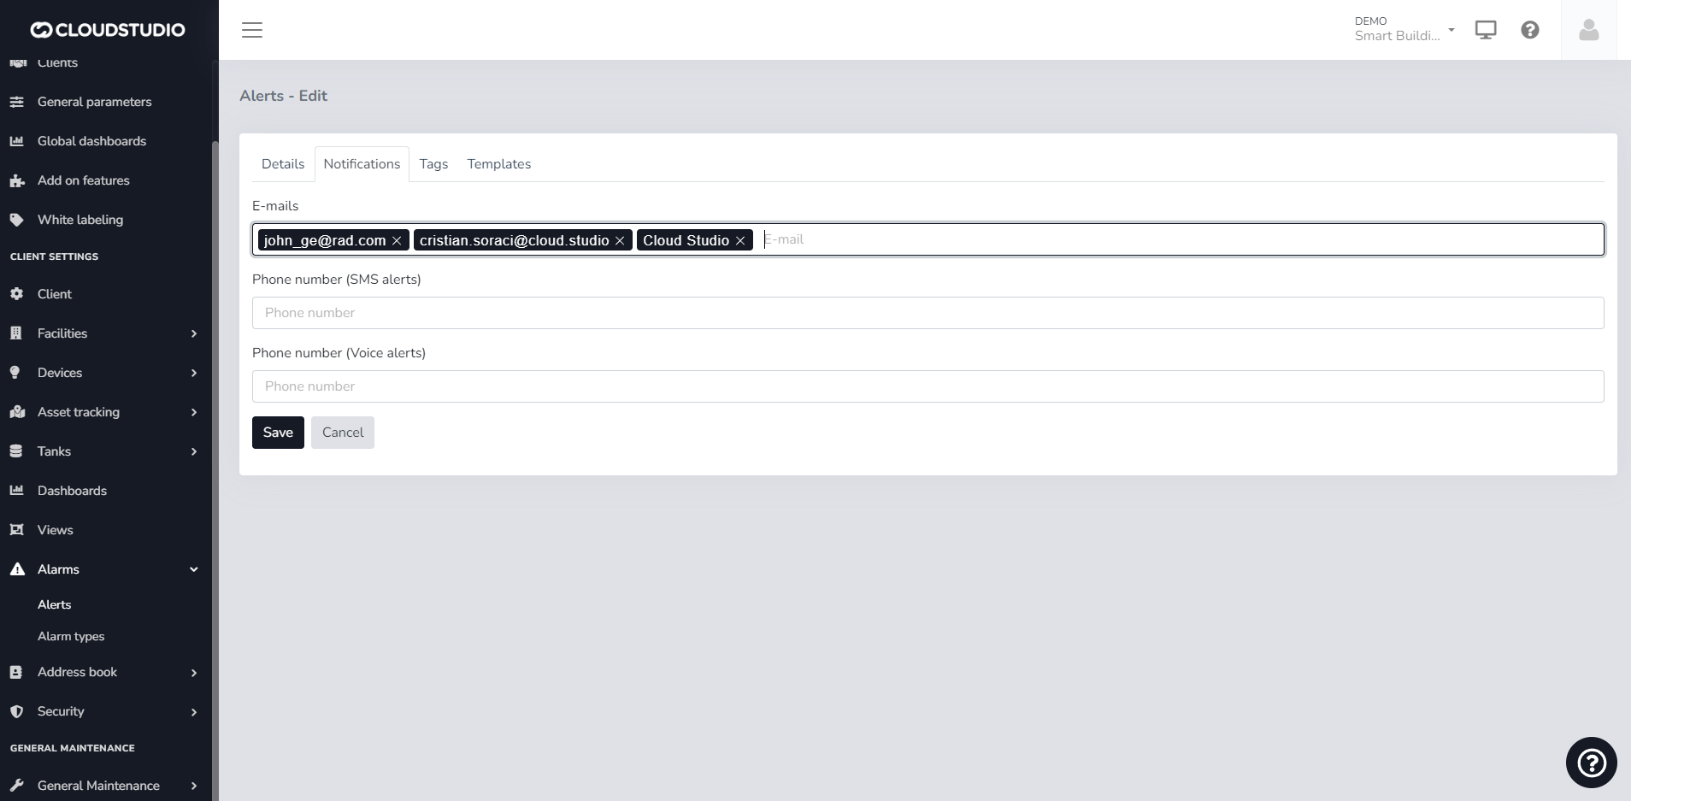
# Alerts and Alarms
The Gear Studio platform allows you to define alerts that trigger when the values of certain variables exceed defined thresholds. Alarms, on the other hand, are conditions that indicate a problem and can occur for different reasons, including alerts. In other words, alerts generate alarms when measured values fall outside established thresholds, but alarms can also be generated for other reasons, such as device malfunctions, connection errors, etc.
Alerts [#alerts]
Alerts are applied to endpoints and allow you to define acceptable value ranges so that alarms are automatically generated when values fall outside these thresholds. To set up an alert, use the alerts screen, where you select the alert type, the endpoint it will apply to, the threshold value, and optionally, a minimum duration the condition must persist before the alert generates the corresponding alarm.
Normal Value [#normal-value]
It is also possible to define a second threshold for the alert to clear. This allows establishing a hysteresis value to prevent the alert from triggering frequently when the endpoint value fluctuates near the threshold. For example, you can set a high temperature alert with the threshold at 60 degrees and a normal threshold of 55. This will cause the alert to trigger when the value exceeds 60 degrees and clear only when the temperature drops to 55 degrees. The alert will remain active from the time the temperature exceeds 60 degrees until it drops to 55.
Alert Severity [#alert-severity]
Severity levels in alerts indicate the criticality associated with alarms. Severity levels can be information, low, medium, or high as shown in the following image:
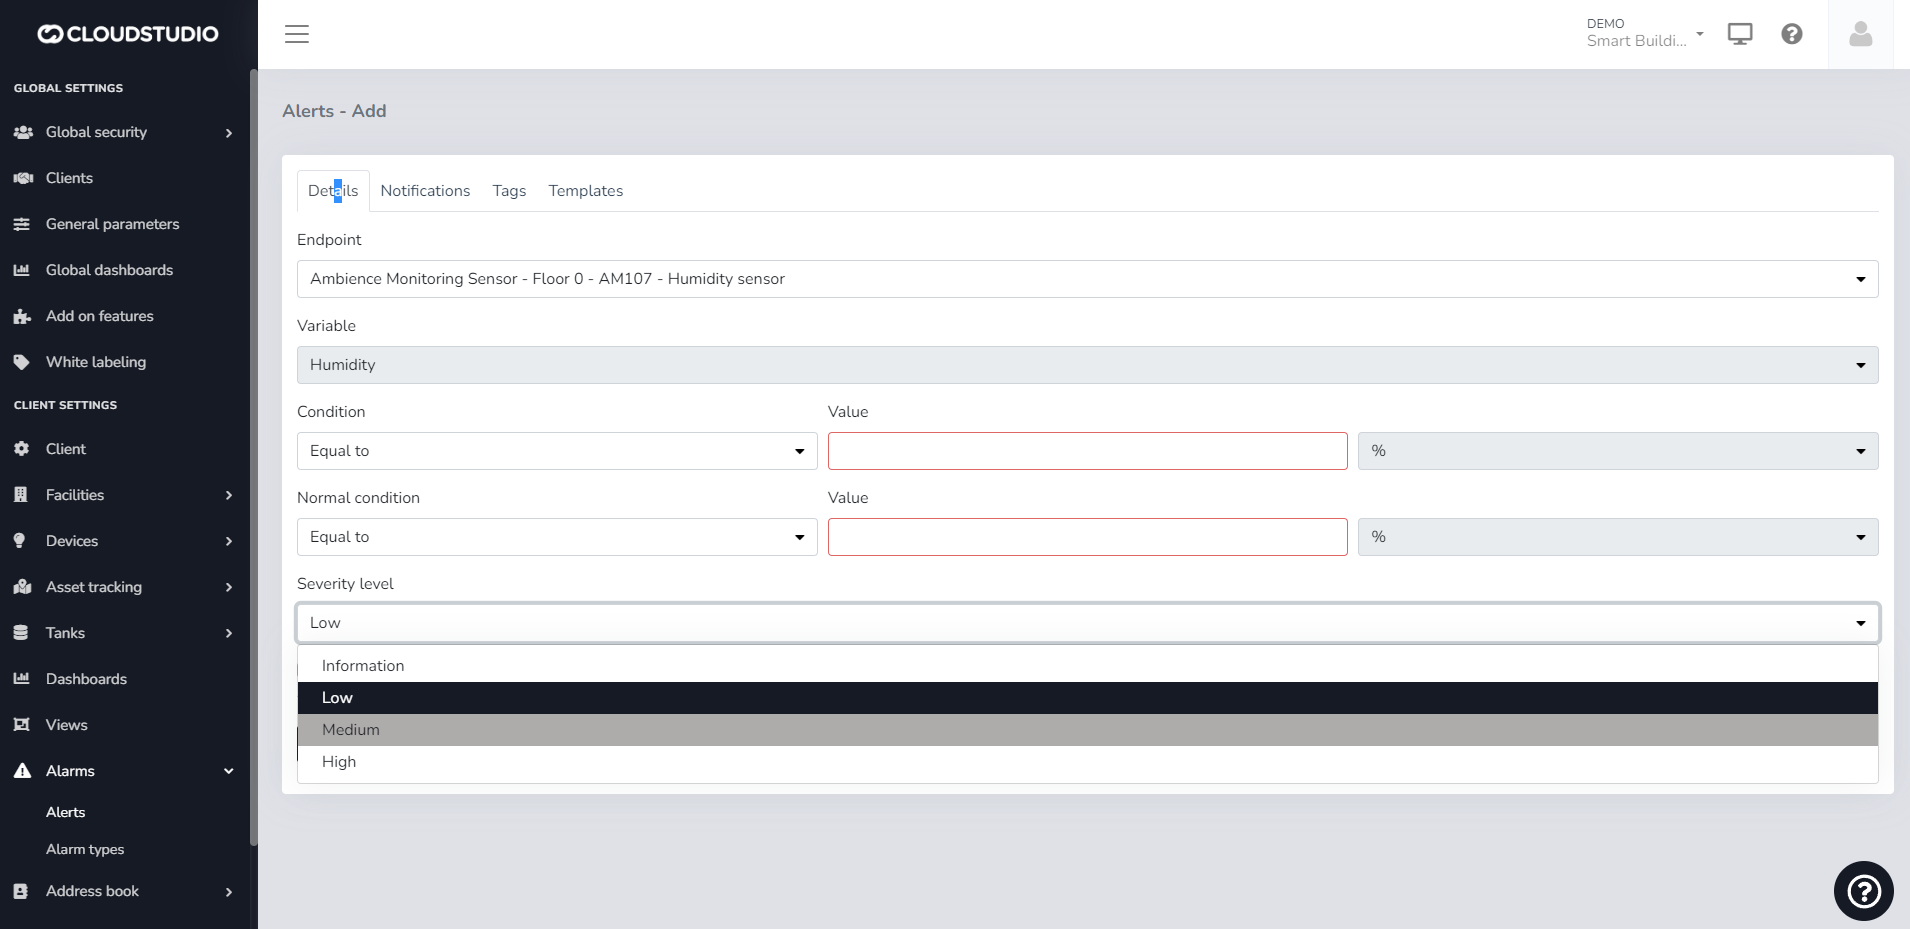
**Important**
By default, an alarm will be created with the "Low" value. If an alert is created with a severity level of "High", for example, and that alert is subsequently triggered, the alarm history report will retain the severity level with which it was created, even if the severity level was later modified through the alert settings.
Available Alert Types [#available-alert-types]
The following are the alert types available on the platform, with a brief explanation of each.
| Variable | Condition | Supports normal threshold | Supports minimum duration |
| ---------------- | ------------------------ | ------------------------- | ------------------------- |
| Temperature | High or low | Yes | Yes |
| Humidity | High or low | Yes | Yes |
| Light level | High or low | Yes | Yes |
| Volume | High or low | Yes | Yes |
| Weight | High or low | Yes | Yes |
| Pressure | High or low | Yes | Yes |
| Voltage | High or low | Yes | Yes |
| Current | High or low | Yes | Yes |
| Active power | High or low | Yes | Yes |
| Reactive power | High or low | Yes | Yes |
| Apparent power | High or low | Yes | Yes |
| Cosine phi | High or low | Yes | Yes |
| IAS sensor | Activated or deactivated | No | Yes |
| Generic variable | High or low | Yes | Yes |
Alert Configuration [#alert-configuration]
Alerts are applied to endpoints and allow you to define acceptable value ranges so that alarms are automatically generated when values fall outside these thresholds. To set up an alert, use the alerts screen, where you select the alert type, the endpoint it will apply to, the threshold value, and optionally, a minimum duration the condition must persist before the alert generates the corresponding alarm.
Users can use all available variables that have been enabled in their instance and can also customize alert subjects.
**For additional information about the allowed variables, click** [**here**](/docs/configuracion-del-cliente/alertas-y-alarmas/variables-para-notificaciones-de-alertas)
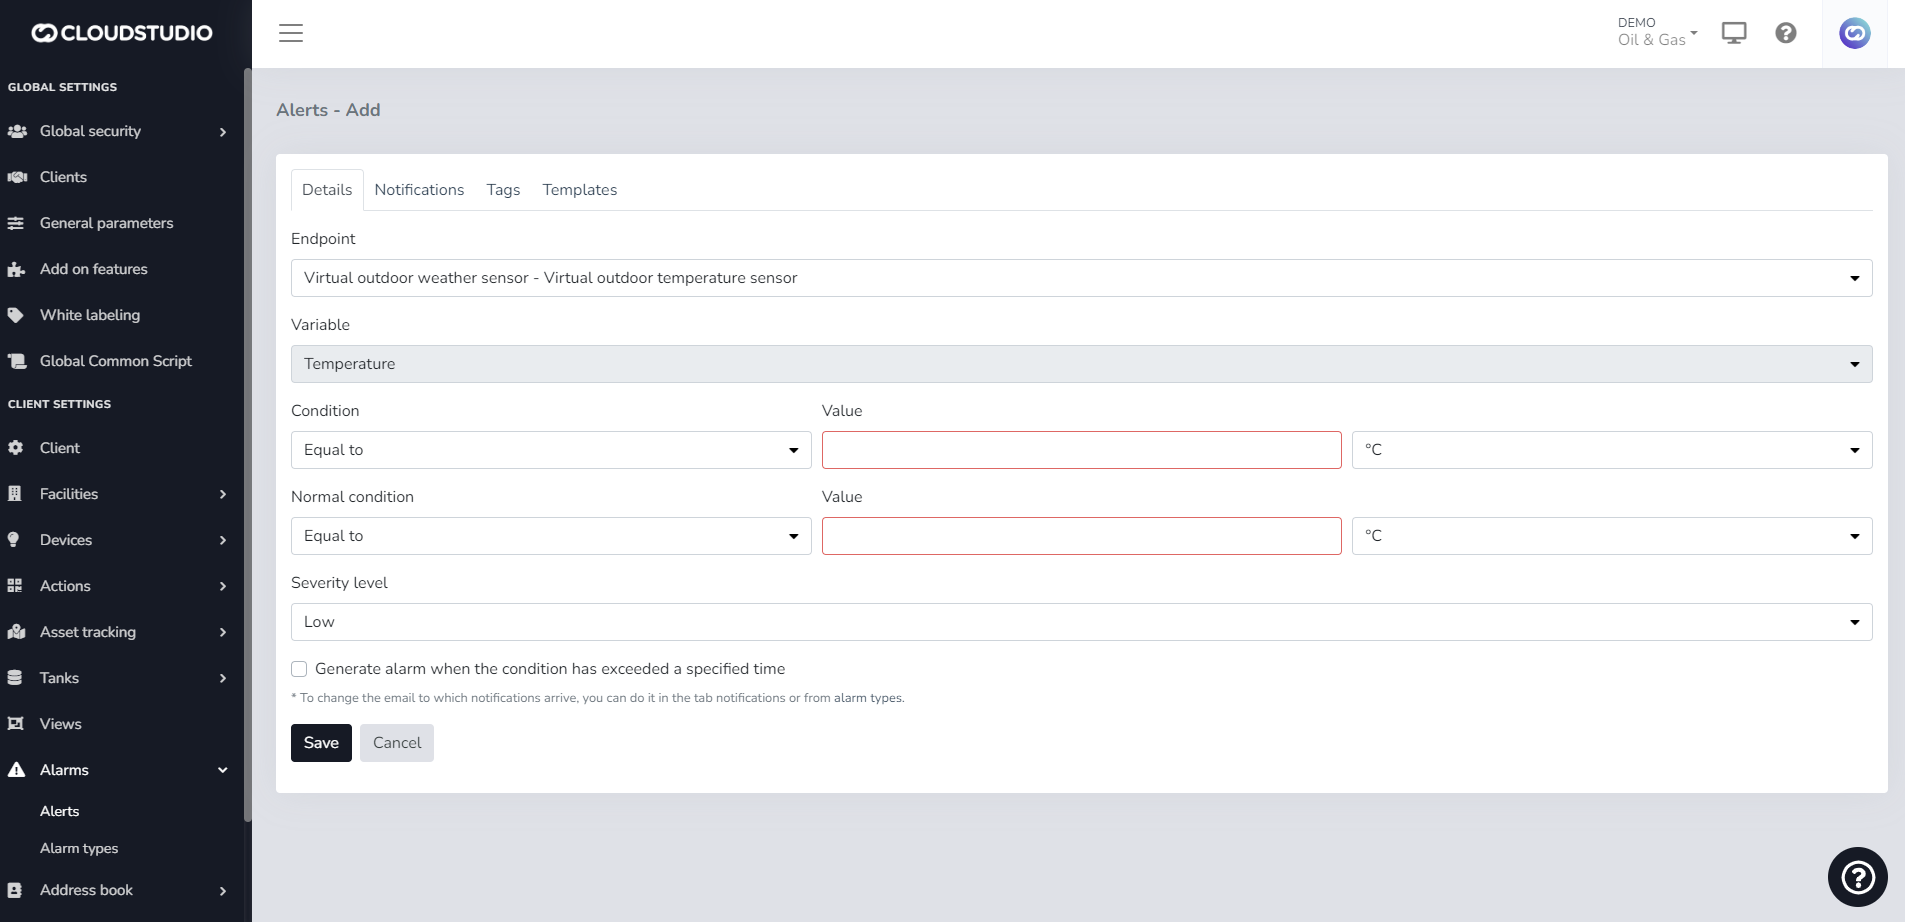
These are the allowed parameters (Variables):
| Variable | Comments |
| ----------------------------- | ------------------------------------------------------------------------- |
| \{CLIENT\_ID} | Unique client identifier |
| \{CLIENT\_NAME} | Client name/description |
| \{FACILITY\_ID} | Unique facility identifier |
| \{FACILITY\_NAME} | Facility description |
| \{DEVICE\_ID} | Unique device identifier |
| \{DEVICE\_NAME} | Device description |
| \{ENDPOINT\_ID} | Unique endpoint identifier |
| \{ENDPOINT\_NAME} | Endpoint description |
| \{DEVICE\_OR\_ENDPOINT\_NAME} | Endpoint description. If not valid, the device description will be shown. |
| \{ALARM\_TEXT} | Alarm description |
| \{ALARM\_DETAILS} | Alarm details |
Alarms [#alarms]
Alarms are triggered automatically when problems are detected with devices, endpoints, alerts, or any other anomalous situation. The most common alarm types are shown below.
| Alarm type | Comments |
| --------------------------------------------- | ---------------------------------------------------------------------------------------------------------------------------------------------------------------------------------------------------------------------------- |
| Device offline | Triggered when a device does not communicate with the platform after a certain time. The maximum time a device can go without sending information to the platform is set in each device model. |
| Alert | Triggered when an alert indicates that an endpoint value is outside the defined thresholds. For each alert type, there is a corresponding alarm type, for example, high temperature alarm, IAS sensor activation alarm, etc. |
| Low battery | Triggered when a device's battery level is low. |
| Critical battery | Triggered when a device's battery level is critical. |
| Overheating condition. All outputs turned off | This alarm type is not yet implemented |
| Low temperature condition | This alarm type is not yet implemented |
| Charging failure | This alarm type is not yet implemented |
| Informational message | This alarm type is not yet implemented |
| Unspecified or generic message | This alarm type is not yet implemented |
# Alarm Severity
Introduction [#introduction]
Severity levels in alerts indicate the criticality associated with alarms. Severity levels can be low, medium, or high as shown in the following image
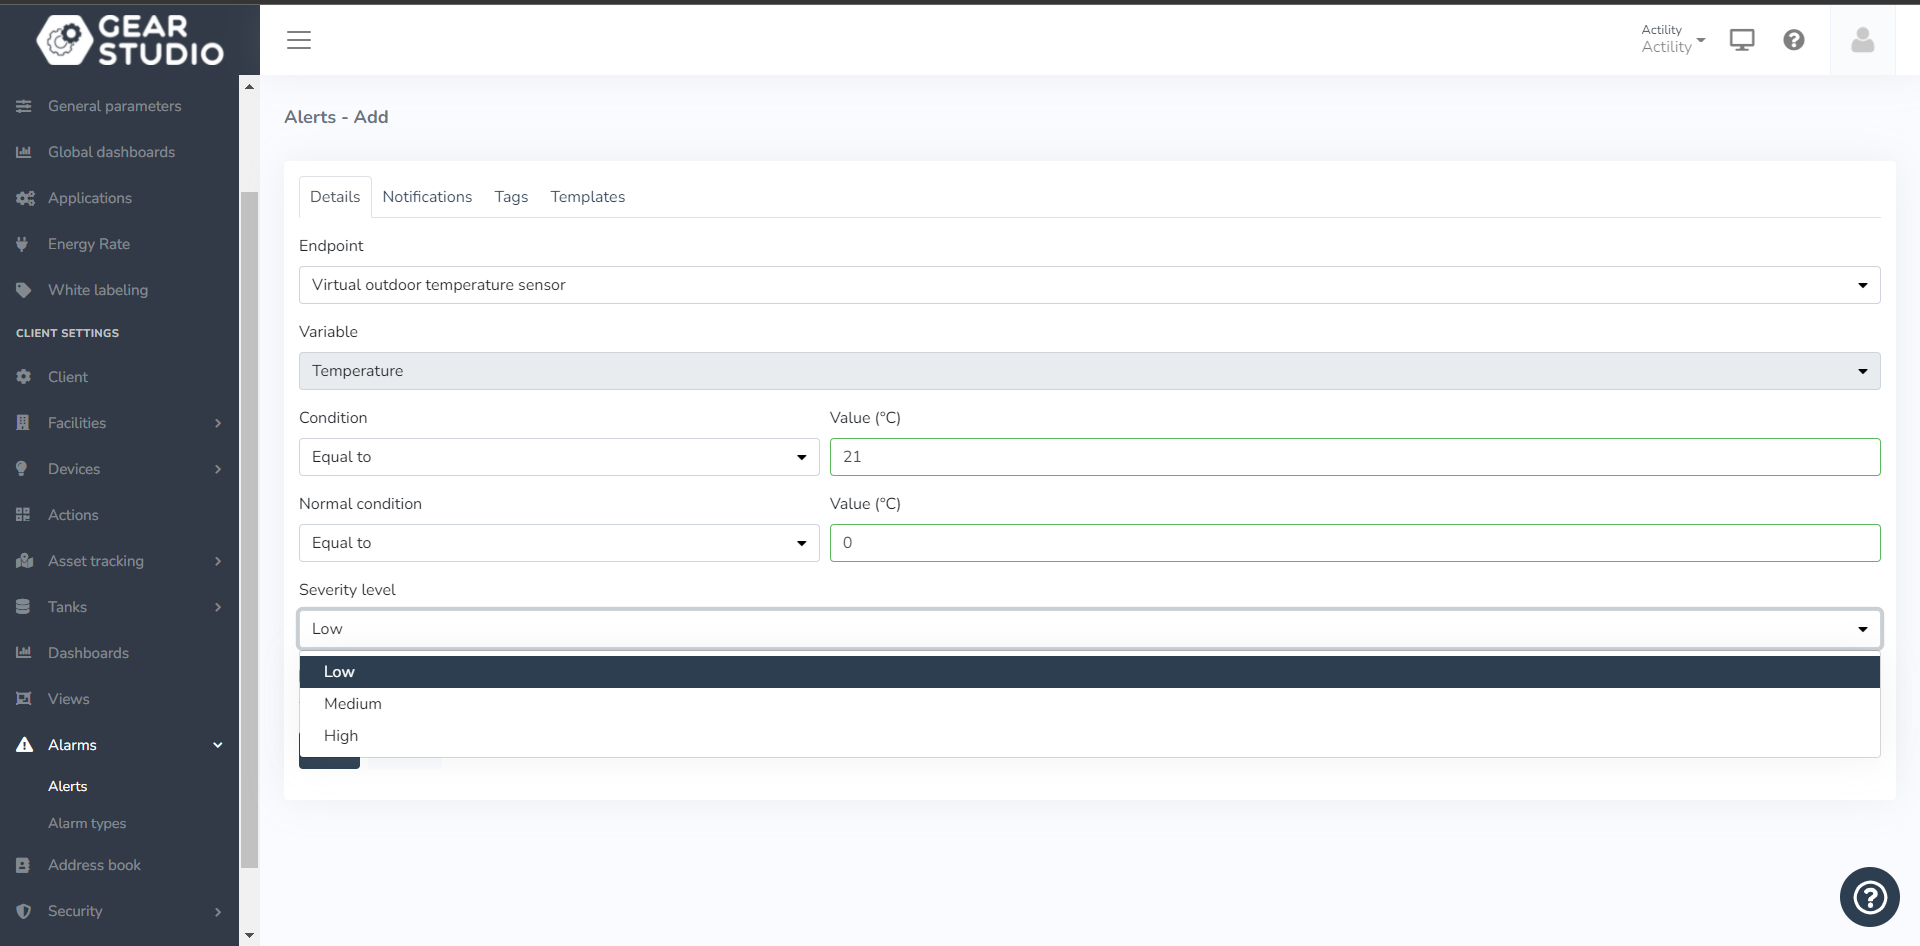
Important [#important]
By default, an alarm will be created with the "Low" value. If an alert is created with a severity level of "High", for example, and that alert is subsequently triggered, the alarm history report will retain the severity level with which it was created, even if the severity level was later modified through the alert management screen.
# Variables for Alert Notifications
Alerts are applied to endpoints and allow you to define acceptable value ranges so that alarms are automatically generated when values fall outside these thresholds. To set up an alert, use the alerts screen, where you select:
* Alert type.
* Endpoint it will apply to.
* Threshold value.
* Optionally, a minimum duration the condition must persist before the alert generates the corresponding alarm.
As a user you can:
* Type the available variables that have been enabled and that you can see within the platform.
* Leave the subject in this text box.
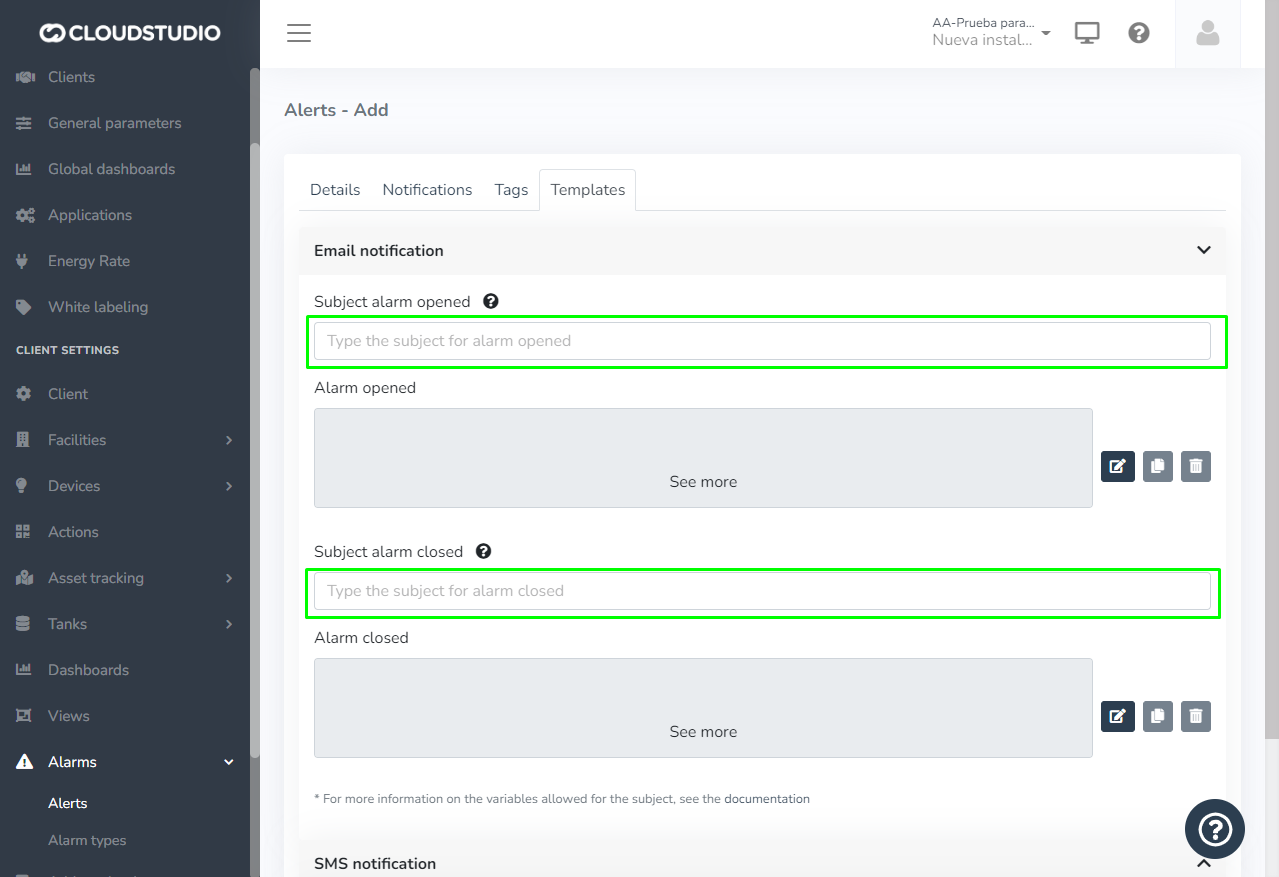
These are the allowed parameters (Variables):
| Variable | Comments |
| ----------------------------- | --------------------------------------------------------------------------------------------------------------------------------------------------------------- |
| \{CLIENT\_ID} | Contains the identifier of the client where the alarm was generated. |
| \{CLIENT\_NAME} | Contains the name/description of the client where the alarm was generated. |
| \{FACILITY\_ID} | Contains the identifier of the facility where the alarm was generated. |
| \{FACILITY\_NAME} | Contains the name/description of the facility where the alarm was generated. |
| \{DEVICE\_ID} | Contains the identifier of the device where the alarm was generated. |
| \{DEVICE\_NAME} | Contains the name/description of the device where the alarm was generated. |
| \{ENDPOINT\_ID} | Contains the identifier of the endpoint where the alarm was generated, or zero if the alarm does not correspond to a specific endpoint. |
| \{ENDPOINT\_NAME} | Contains the name/description of the endpoint where the alarm was generated, or an empty value if the alarm does not correspond to a specific endpoint. |
| \{DEVICE\_OR\_ENDPOINT\_NAME} | Contains the name/description of the endpoint where the alarm was generated, if it is an endpoint-level alarm, or the name/description of the device otherwise. |
| \{ALARM\_TEXT} | Contains the full text of the alarm that was generated. |
| \{ALARM\_DETAILS} | Contains the alarm details, such as the threshold used in the case of alerts. |
| \{ALARM\_DETAILS\_DISPLAY} | Contains the value "inline" if additional data exists, or "none" if no additional data exists. Should only be used in HTML templates. |
# Map Configuration
Within the client configuration, there is a field that refers to the minimum radius for maps.
It specifies a distance in **meters** to which the maps will adjust to the North, South, East, and West.
Although the configuration refers to **Radius**, it actually refers to the **rectangle** that composes the map.
*The client configuration is initialized with a radius of 1000 meters but can subsequently be modified, using the new value.*
**Example**
By default, a client will have a minimum map radius of 1000 meters, as shown in the following image:

It will be displayed as follows:
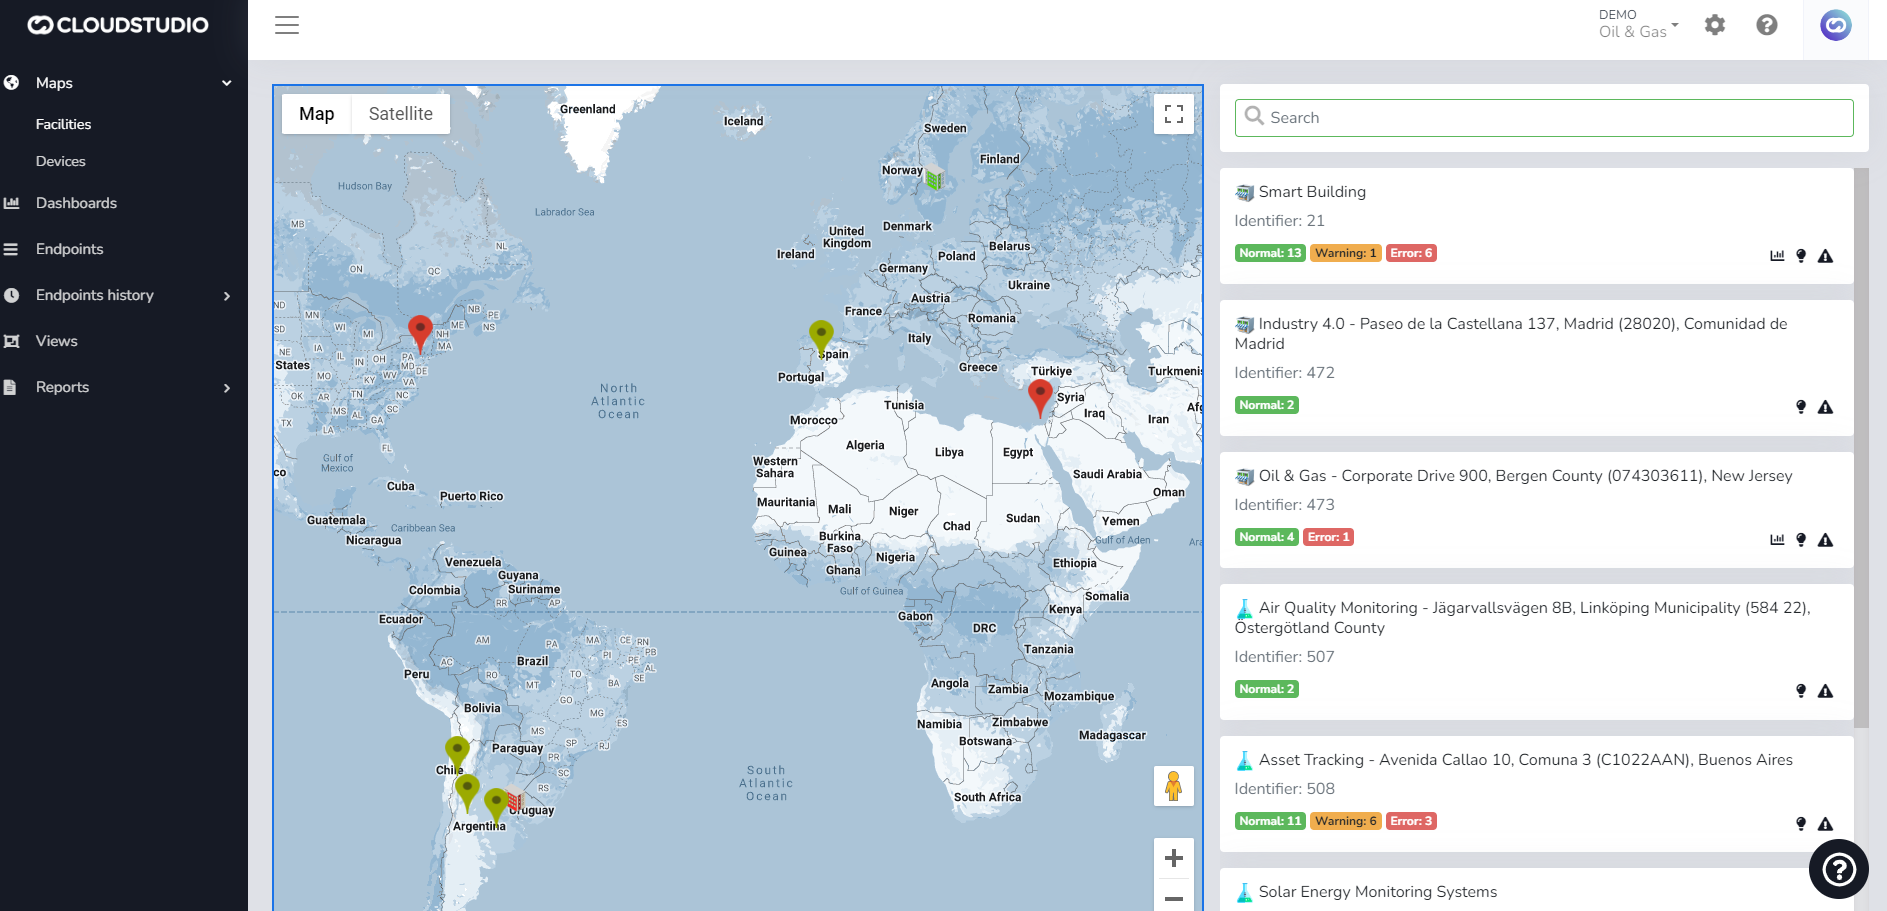
# Client
Introduction [#introduction]
The following sections describe how to manage clients, including creation, modification, and other related concepts.

To Edit the Client
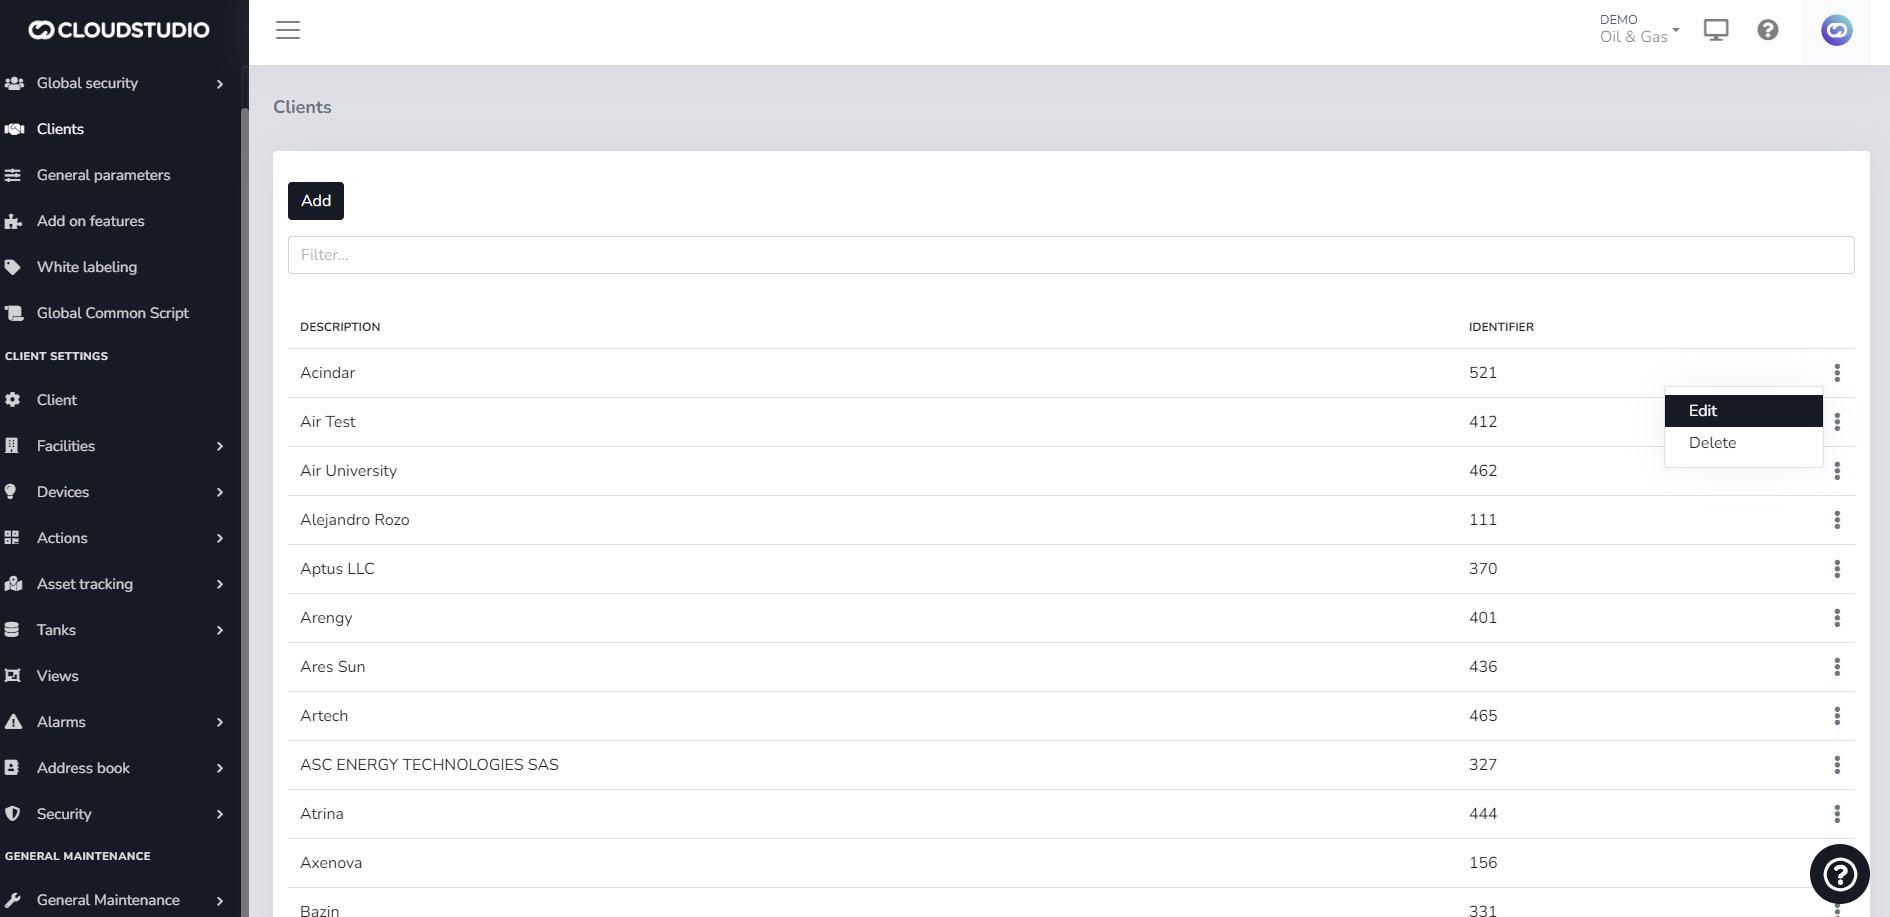
# Terms and Conditions
Introduction [#introduction]
The platform allows creating terms and conditions with optional text for each client, specifying the terms and conditions that users must accept to use the applications with each client.
If no terms and conditions text is specified for a client, any user will be able to use the client without needing to read or accept any text.
To apply this feature, in the "Terms and Conditions" tab of clients, choose a text to use.
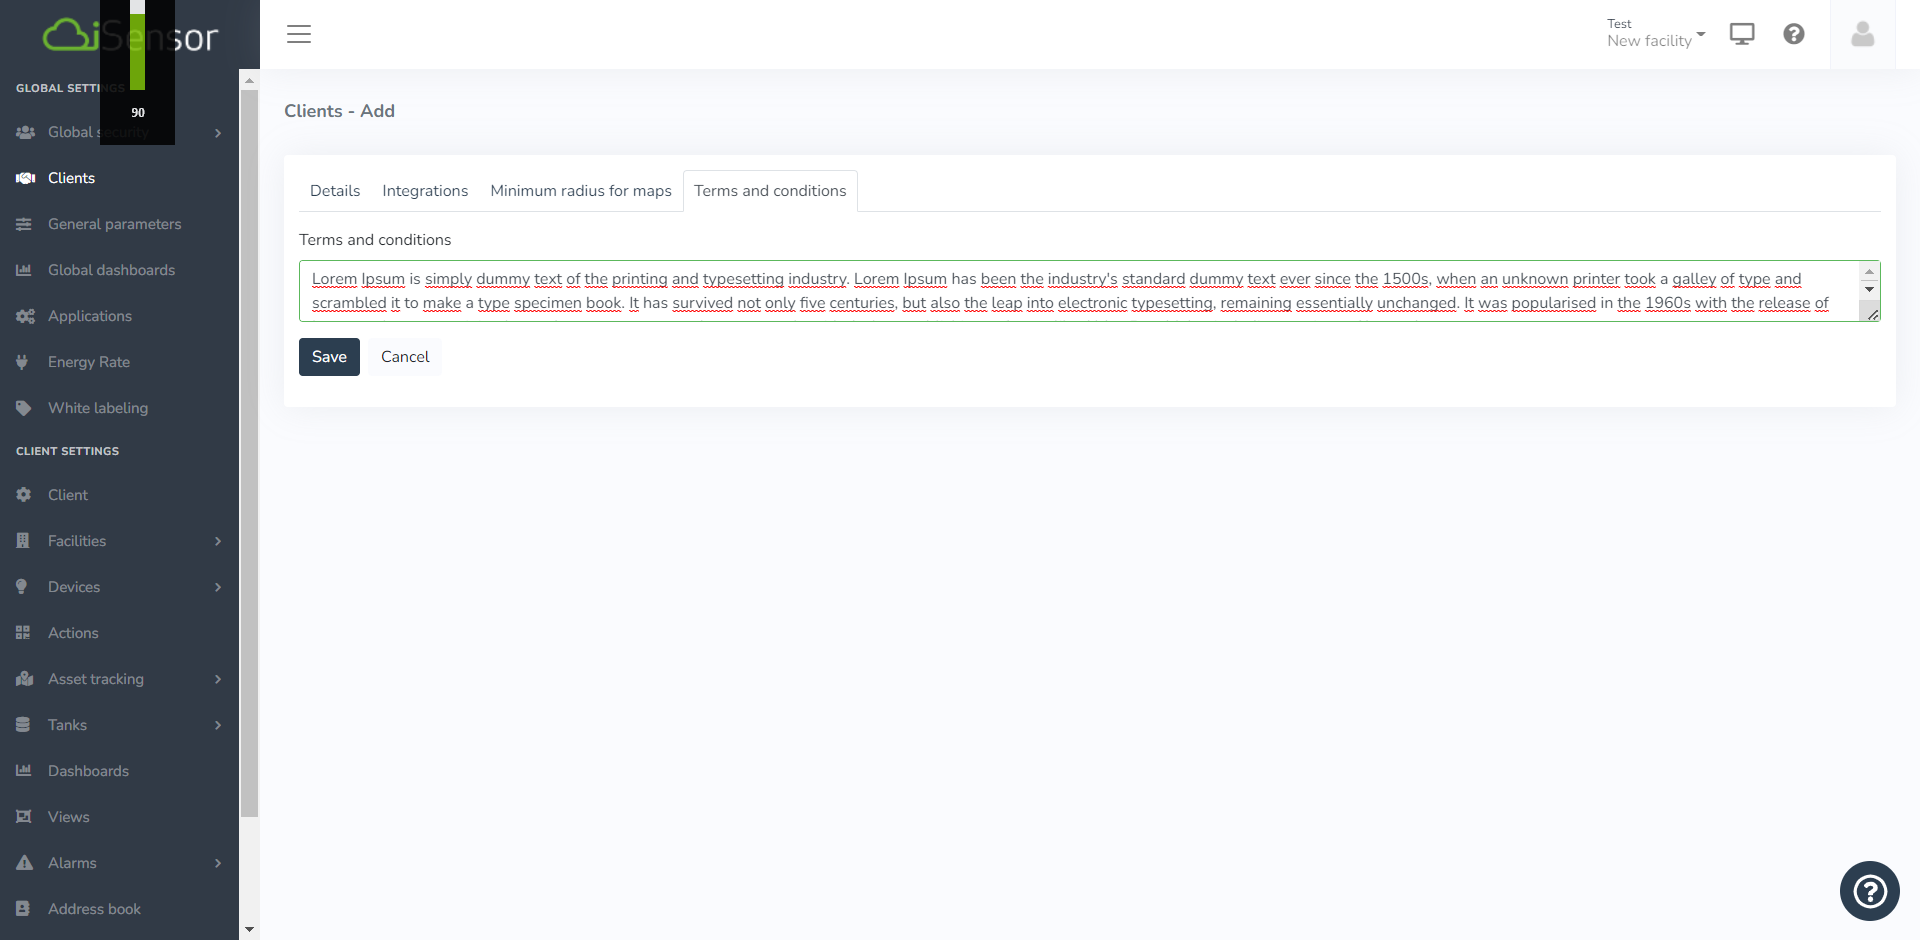
Once the client is created, when using the platform, the user must accept the "Terms and Conditions".
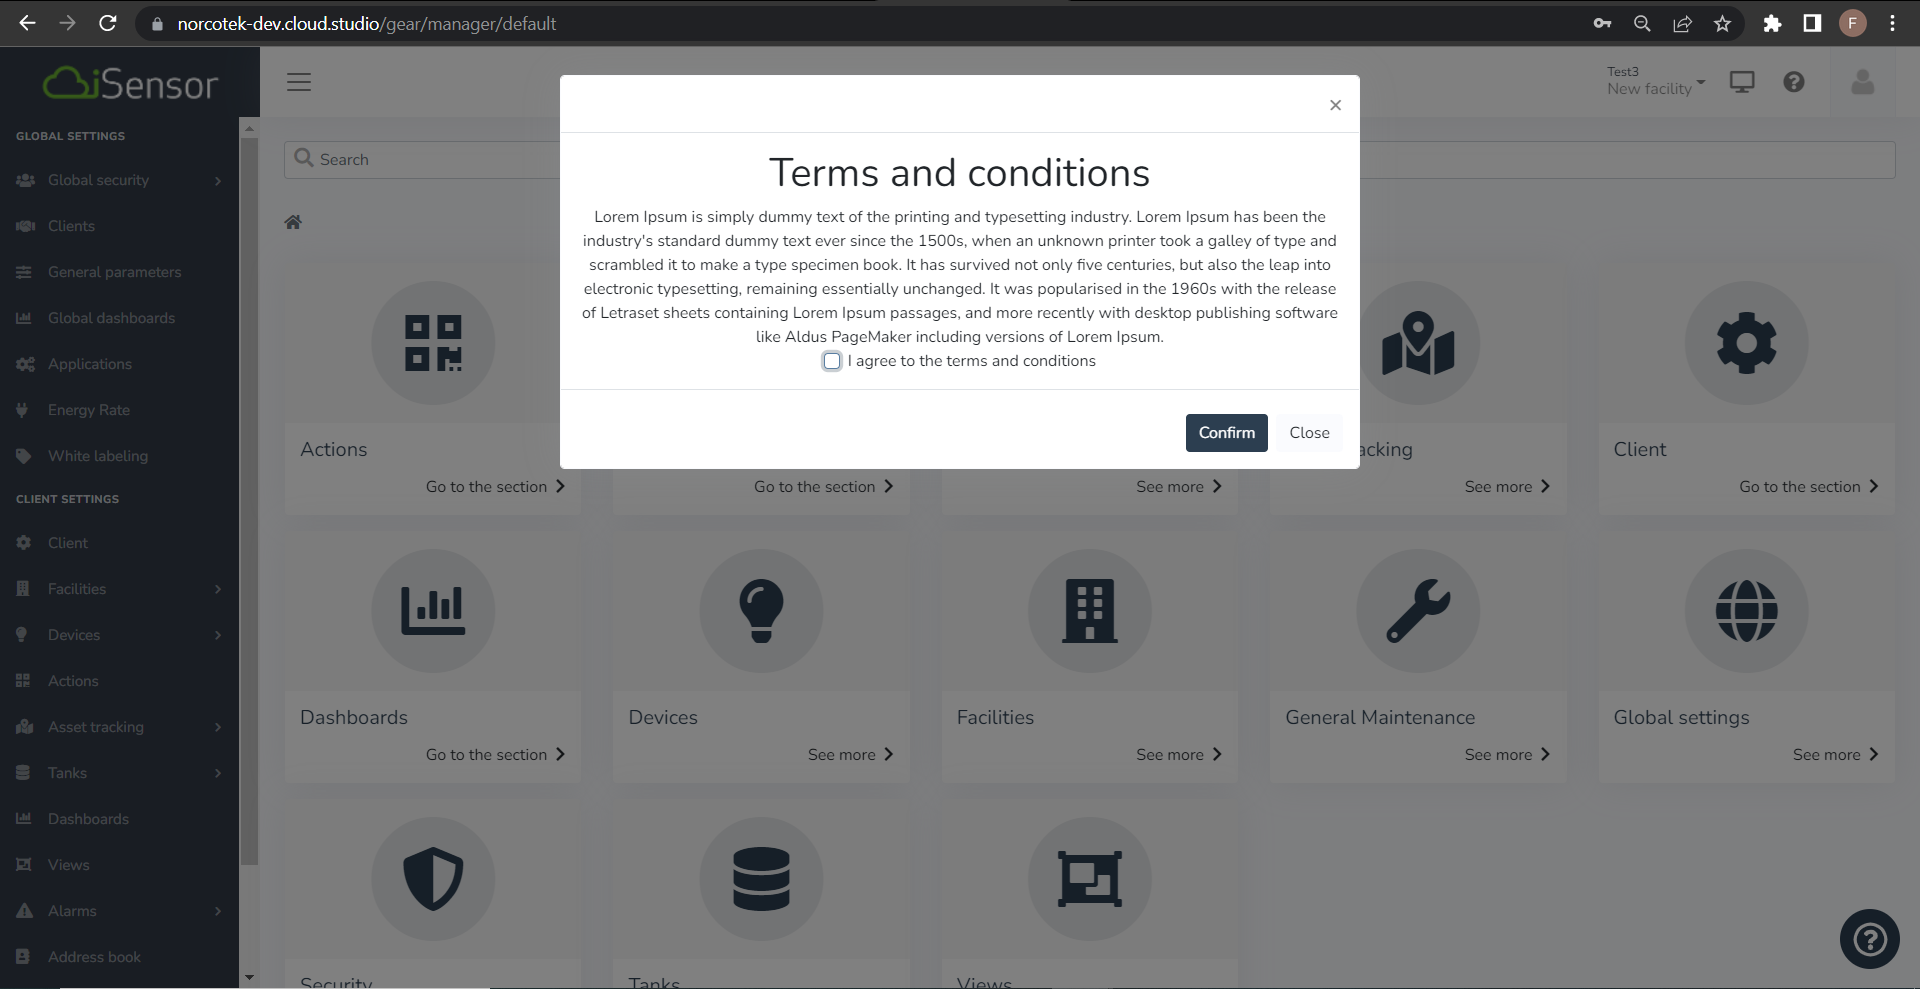
# Devices and Endpoints
In Gear Studio, the infrastructure of each facility is organized hierarchically into devices and endpoints.
Devices [#devices]
Devices constitute the first level of a facility's infrastructure. They typically correspond to physical devices such as sensors, gateways, dimmers, actuators, thermostats, etc. Devices have the following characteristics:
* They have a model (or a brand and model combination)
* They have a unique identifier, such as a MAC address or serial number.
* They have some type of communication interface (MQTT, HTTP, NB-IoT, ZigBee, LoRaWAN, etc.)
* They have a description used in Gear to identify the device more easily.
Endpoints [#endpoints]
A single device can have multiple sensors, functions, or channels. For example, in the case of a dimmer capable of controlling four light circuits, it can be said to have four distinct functions or "channels". When a user interacts with the device, they are actually interacting with one of those channels, not the entire device.
Each of these functions or channels, in Gear Studio terminology, is called an "**endpoint**". Endpoints have the following characteristics:
* They have a unique identifier within the device.
* They have a sensor type (temperature sensor, light, energy, volume, etc.)
* They have a description used in Gear to identify the endpoint more easily.
* They have an associated sector, indicating where they are installed or where they operate (the location within the facility).
* Depending on the sensor type, they may have other specific characteristics.
More Information [#more-information]
For more information about device and endpoint management, see the following tutorials:
* [Devices](/docs/configuracion-del-cliente/dispositivos-y-endpoints/dispositivos)
* [Endpoints](/docs/configuracion-del-cliente/dispositivos-y-endpoints)
* [Device Integration](/docs/configuracion-del-cliente/dispositivos-y-endpoints/dispositivos/integracion-de-dispositivos)
* [Device Management](/docs/configuracion-del-cliente/dispositivos-y-endpoints/dispositivos/dispositivos)
* [Endpoint Management](/docs/configuracion-del-cliente/dispositivos-y-endpoints/endpoints/crear-un-endpoint)
# Facilities
A facility within the IoT domain is defined as the physical environment where interconnected devices and gateways are deployed. Examples of facility types include factories, buildings, warehouses, and logistics centers among others. The main function of facilities is to provide an abstraction layer that enables data analysis from a broader perspective than that of individual devices.
Key Characteristics: [#key-characteristics]
**Facility Diversity:** Each client can have its own facilities, such as branches and buildings. These facilities can be categorized into different types, such as retail or residential, facilitating data organization and management.
**Hierarchical Grouping:** Facilities allow hierarchical grouping of devices, enabling efficient classification to present information in dashboards. This classification provides a structured and contextualized view of the data.
**Visual Association:** Each facility type can be associated with an image, which will be reflected in the side list of the monitor map. This visual feature improves identification and intuitive navigation through facilities.
In summary, facilities in the IoT context are key physical environments that facilitate data collection and analysis at the macro level, enabling a more complete and strategic understanding of the connected device network.
# Facilities
In the facilities section of the platform, a complete suite of tools is offered for detailed and customized management.
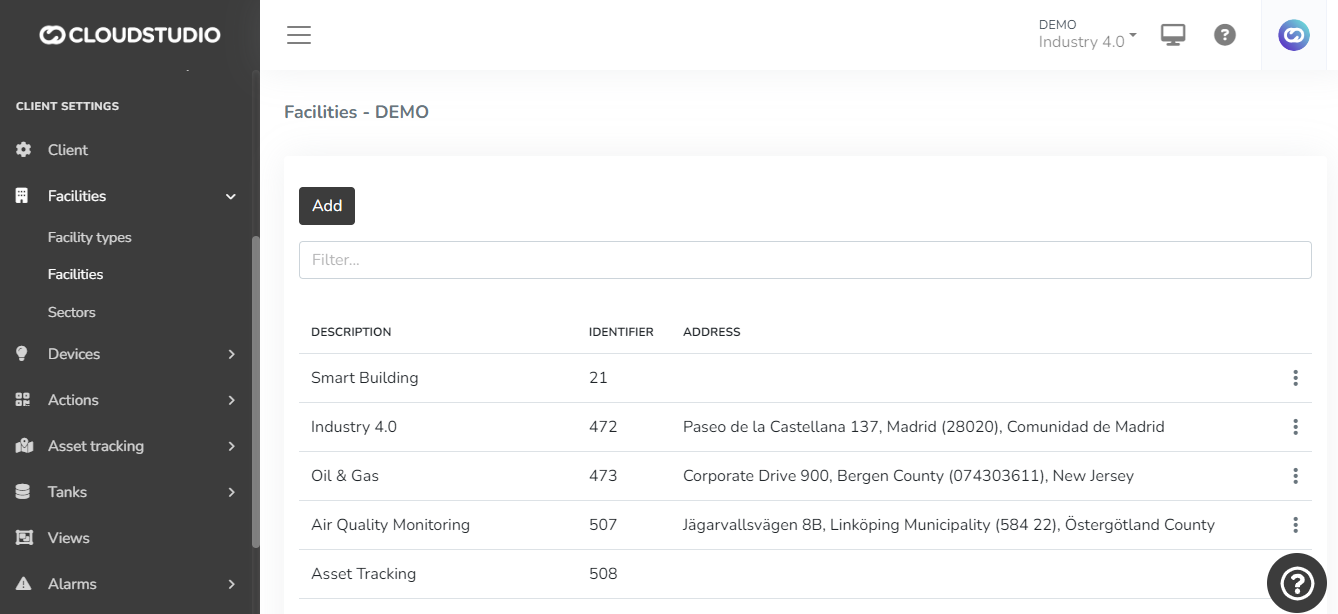
Here is a detailed description of the capabilities:
Details [#details]
**Creation, Editing, and Deletion:** In this section, the user can create, edit, and delete facilities, providing flexibility in environment management.
**Detailed Configuration:** Key details can be defined, such as description, facility type, country, locality, and address, providing essential contextual and geographic information.
**Customizable Location:** The facility location can be set via address (e.g., Google Maps) or latitude and longitude, offering versatile options for geolocation.
**Manager and Contact:** Assignment of a facility manager with their respective contact number, facilitating communication and operational management.
**Energy Data:** Ability to assign the energy provider company and associated tariffs, enabling detailed monitoring and analysis of energy consumption.
**Default Camera:** The option to assign a default camera to the facility, improving security and providing a real-time view.
**Custom Configuration:** Selection of time zone, preferred language, and icon set to represent the facility on the map, offering a personalized visual and configuration experience.
**Representative Images:** Upload of a main facility image, enriching the visual representation and facilitating identification.
**Notification Configuration:** If SMS and voice messages have been enabled at the client level, the platform allows enabling/disabling these features at each facility level, providing precise control over notifications.
This robust functionality optimizes facility management and monitoring, providing a personalized and efficient experience.
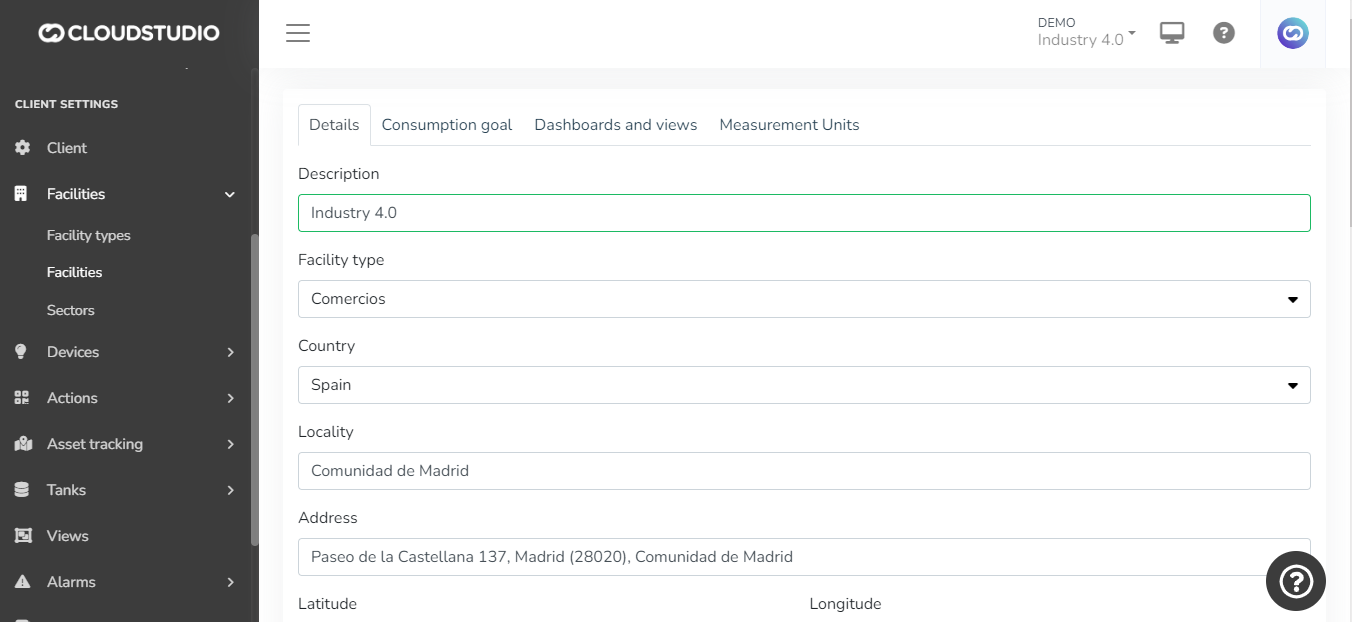
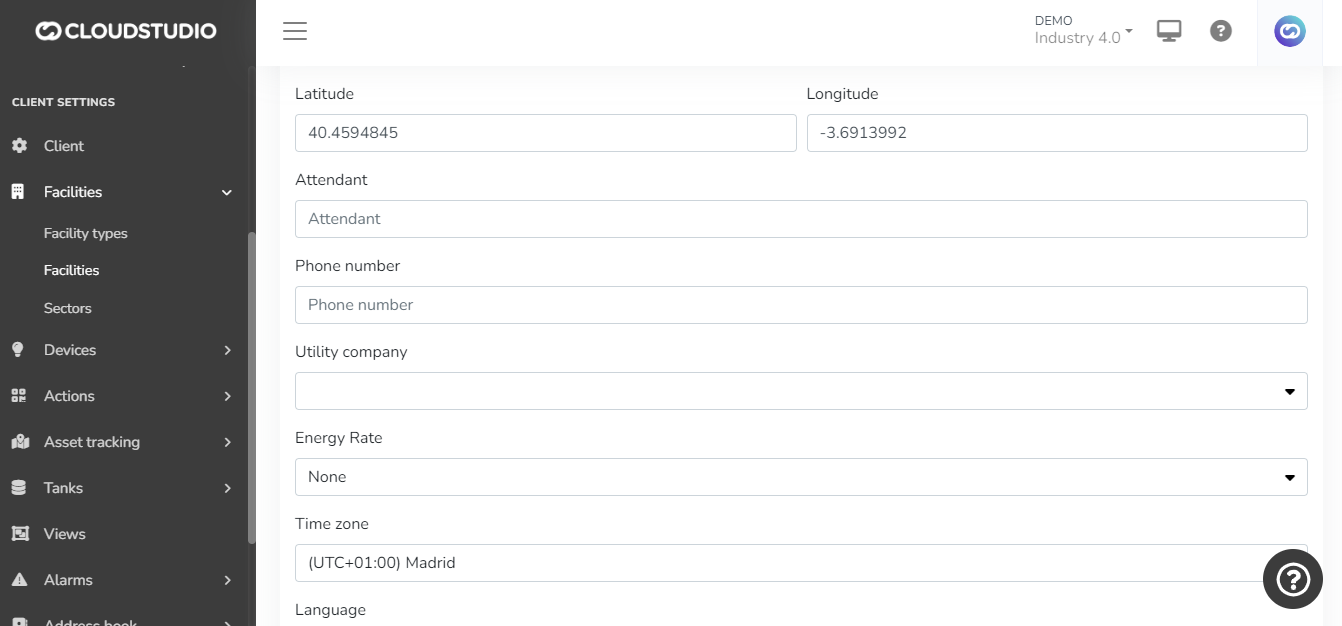
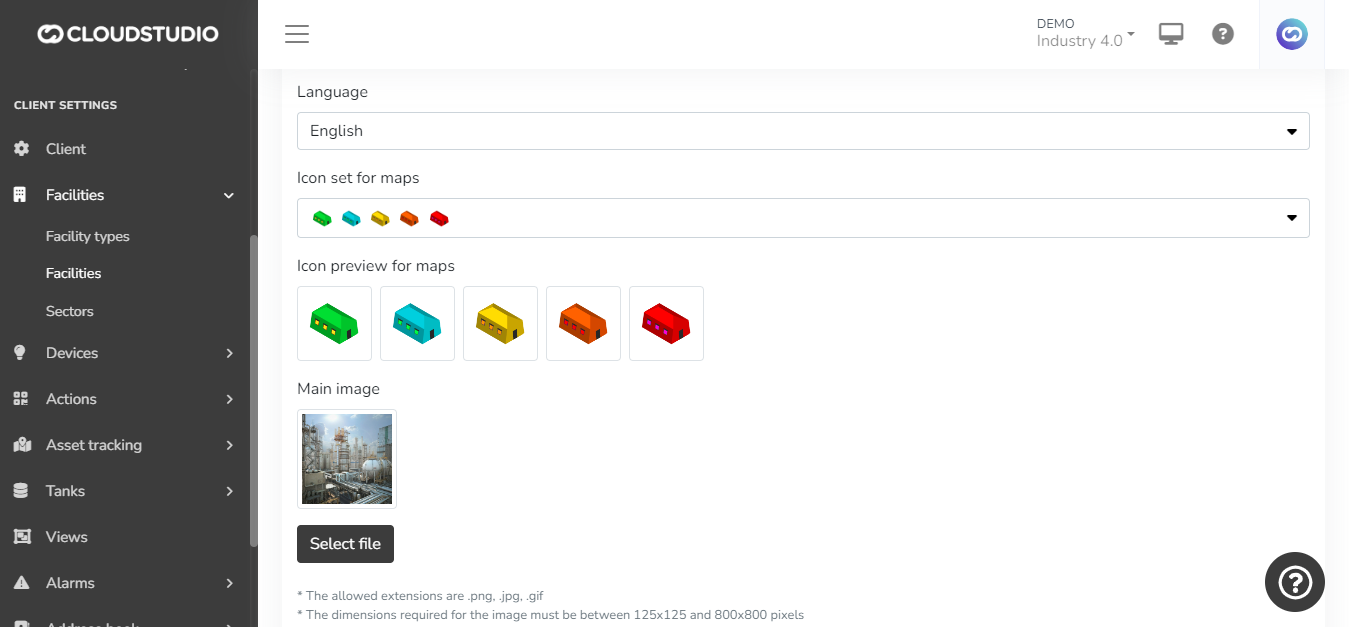
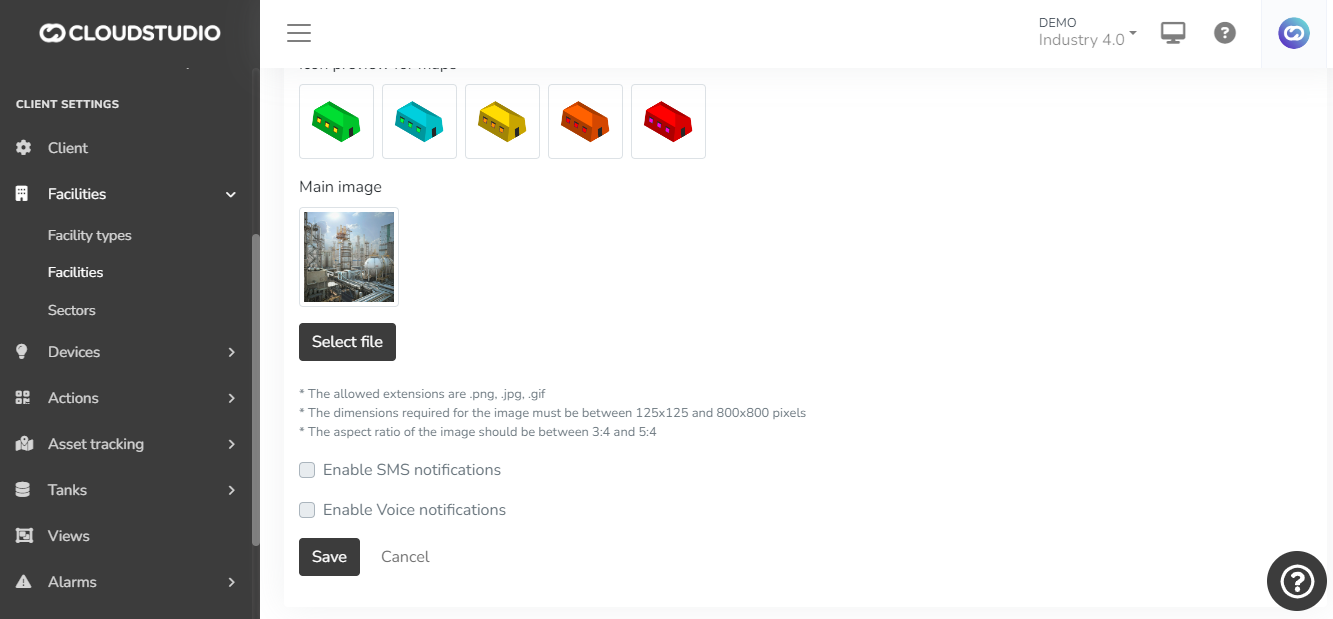
Consumption Targets [#consumption-targets]
Within this subsection, the platform allows defining consumption targets, providing a set of key parameters for efficient energy management. Here are the elements that can be configured:
**Start Date:** Allows selecting the date from which the consumption targets will apply, providing flexibility in time planning.
**Energy Consumption Target:** A quantitative target for energy consumption can be set, providing a specific goal to achieve.
**Power Target:** Defines a specific target for electrical power, contributing to the management and control of installed capacity.
**Cost Target:** Allows setting a financial target for the cost associated with energy consumption, facilitating budget planning.
**Fixed Cost Prorated per kWh:** This configuration allows assigning a fixed cost that will be prorated per kWh consumed, providing a detailed cost structure.
**Minimum COS(phi):** Sets a minimum value for the power factor (COS(phi)), contributing to optimizing energy efficiency and avoiding penalties for low power factor.
These parameters offer a comprehensive tool for strategic energy consumption management, allowing specific goals to be set and performance monitored against these targets.
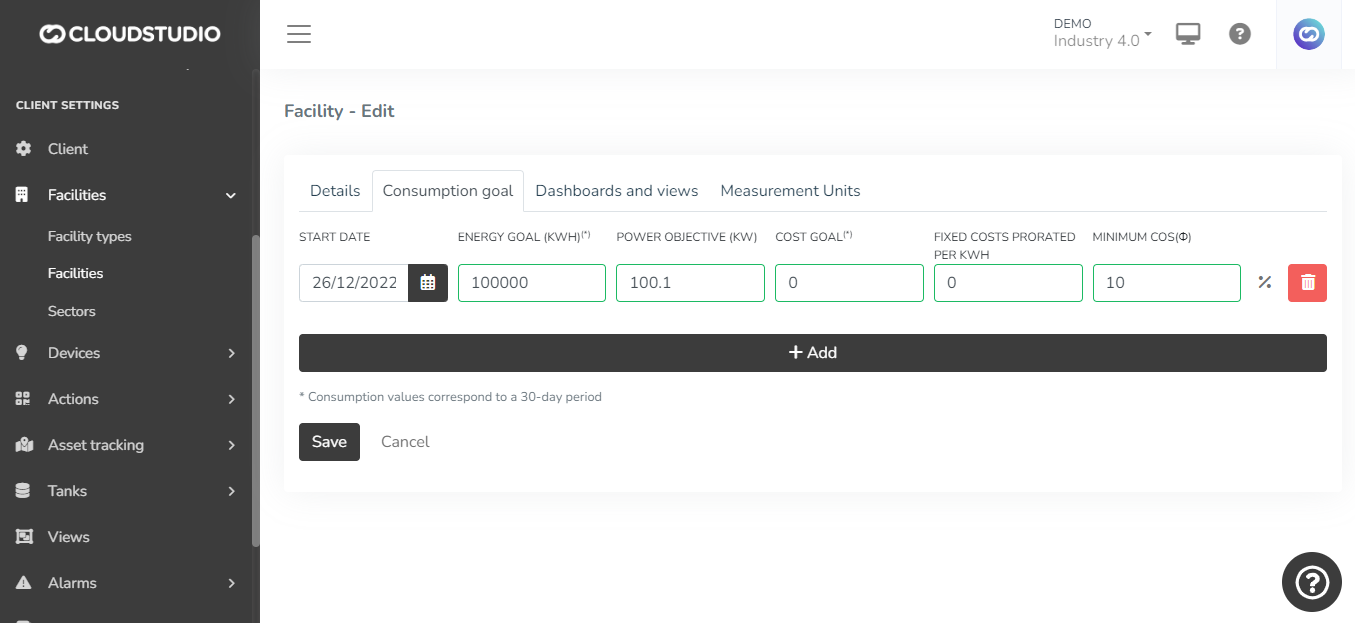
Dashboards and Views [#dashboards-and-views]
Within the dashboards and views subsection, a key feature is offered to customize the user experience on the platform. The available options are detailed below:
**Dashboard Selection:** Users have the ability to select the specific dashboards that will be accessible from the facility in question. This allows adapting the displayed information to the particular needs of each facility.
**Default Dashboard and View Assignment:** Additionally, the ability to assign a default dashboard and view is offered. This means that when accessing the side menu of the facility map, users will be automatically redirected to the default dashboard and view, speeding up access to relevant information.
This feature provides flexibility and customization, allowing users to define their preferred starting point and simplifying access to key information.
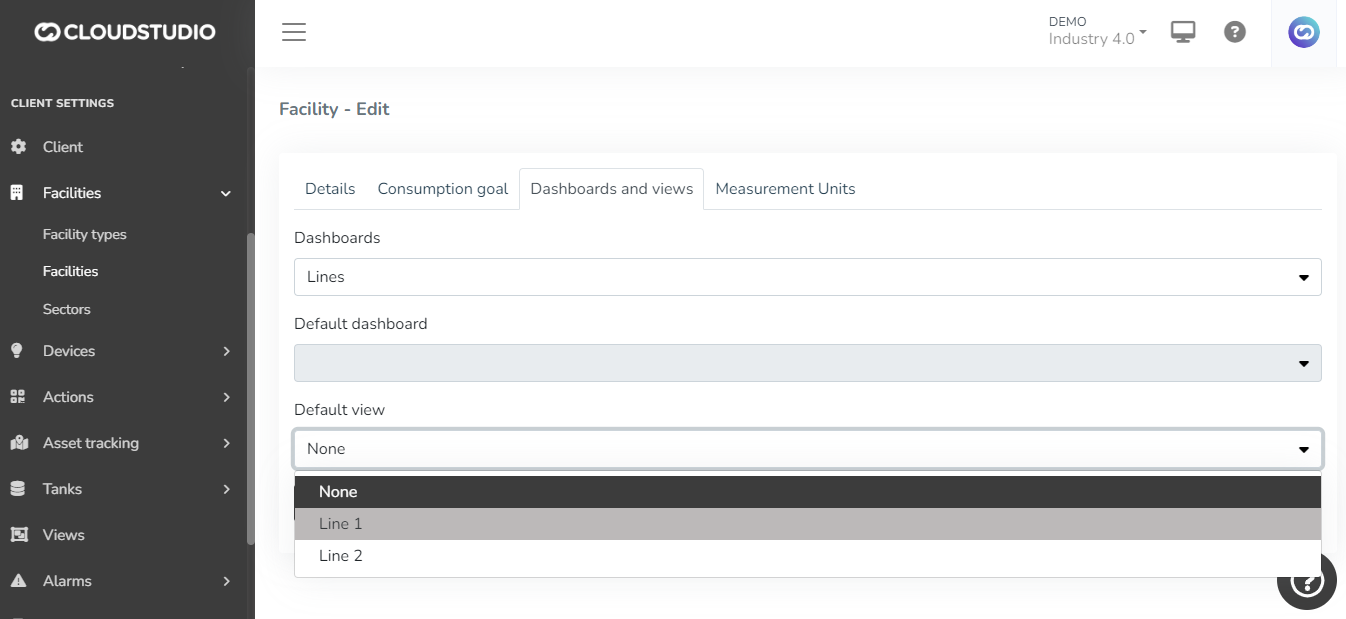
Units of Measurement [#units-of-measurement]
Within the units of measurement subsection, users are provided with an essential tool to customize data display in dashboards and views. The key characteristics of this feature are described below:
**Unit of Measurement Selection:** Users have the ability to select the desired units of measurement at each facility level. This allows adapting data presentation according to local preferences or specific standards.
**Automatic Unit Conversion:** The platform incorporates automatic unit conversion functionality. This feature ensures that data reported in different units is displayed consistently in dashboards and views, improving information comprehension and comparability.
**Reporting Requirement Limitations:** It is important to note that the unit selection in this subsection does not modify the fundamental requirements for the units in which data must be reported to the platform. For example, certain parameters, such as temperature, must be reported in specific units (e.g., degrees C), regardless of the display unit selection.
**Configurable Variable Types:** Configuration options are offered for various variable types, including density, pressure, temperature, volume, weight, and runtime. This flexibility ensures that the platform can adapt to a variety of contexts and needs.
The unit of measurement configuration in the facilities subsection improves the versatility and usefulness of the platform, allowing users to effectively customize data presentation.
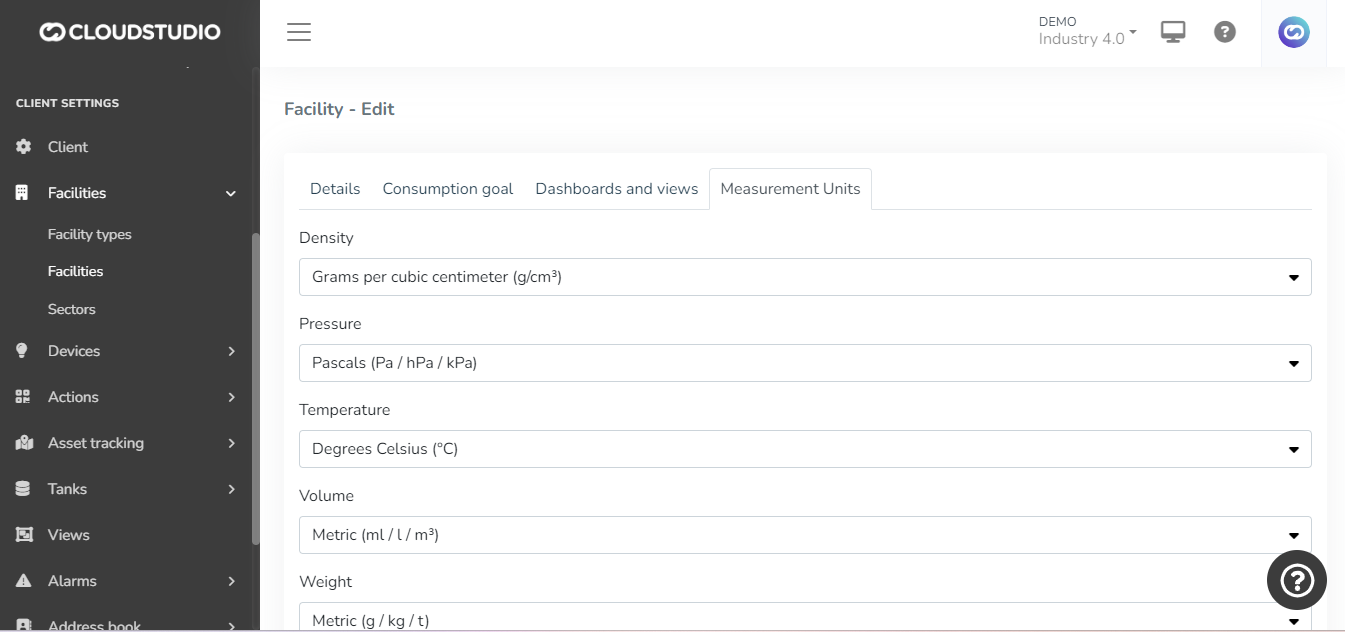
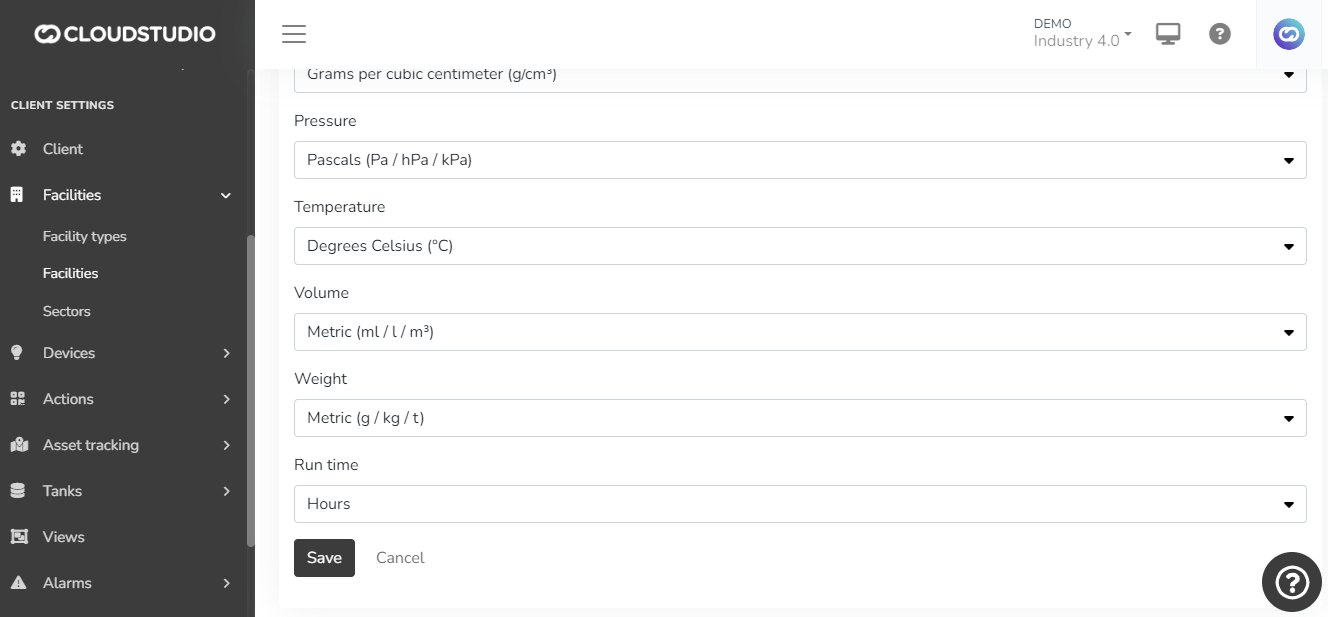
# Sectors
In the context of the platform, sectors play a crucial role in delineating different environments within a facility. The key functionality associated with sectors is the ability to configure specific automation rules for each of these environments. The relevant aspects of this configuration are detailed below:
**Sector Definition:** Sectors are used to delimit and organize the different environments or areas within a facility. These can represent geographic zones, departments, or any relevant categorization.
**Automation Rule Configuration:** Each sector offers the ability to establish exclusive automation rules. These rules allow defining automatic behaviors associated with specific events occurring within that sector.
**Per-Environment Customization:** By being able to configure rules at the sector level, effective customization is achieved. Each area can have unique requirements and conditions, and automation rules allow adapting the system response according to the specific characteristics of each sector.
**Trigger Events:** Automation rules can be associated with various events, such as telemetry changes, device activation, or any other relevant occurrence. This allows a dynamic and contextualized response.
The ability to configure automation rules at the sector level improves operational efficiency and allows more precise management of environments within a facility. This is essential for adapting to the particular needs of each sector and maximizing the platform's usefulness.
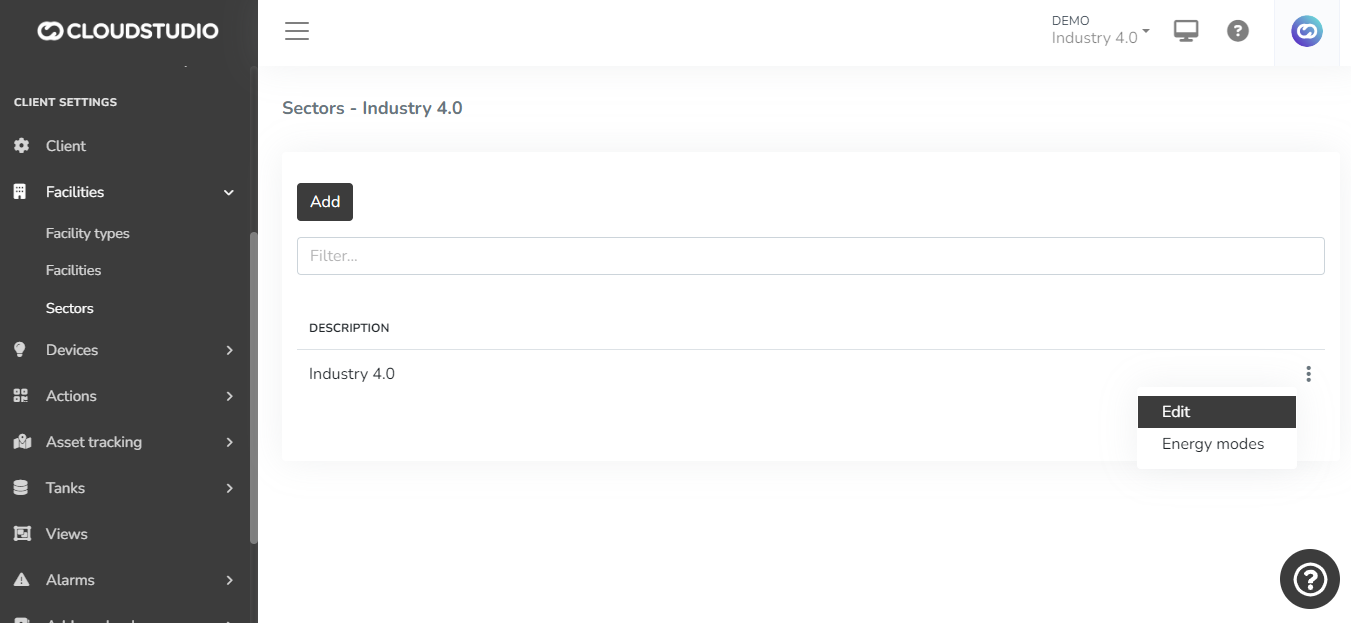
# Facility Types
Facility types in the IoT context are categories that allow differentiating and grouping data according to the nature and function of the physical environments where connected devices and gateways are deployed. This parameter is essential for analyzing information in a differentiated and strategic manner. Each facility type can be associated with a representative icon, which will be visually reflected in the dashboard.


# Create a New Contact
To create a new contact in the Address Book, simply click the "Add" button that appears on the contact creation screen.
It is also possible to add contacts with the text box filter active. When clearing the characters typed in the text box, the added contact will appear in the list along with the rest of the existing contacts.
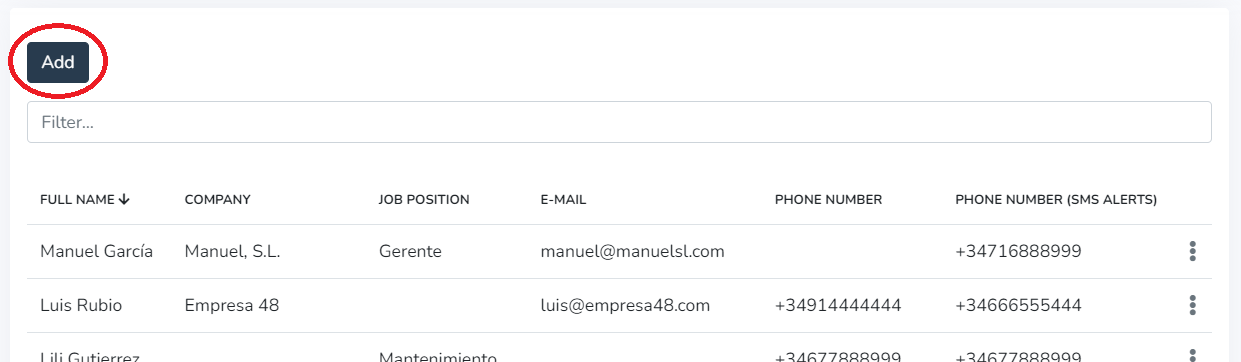
The Address Book **allows including the following data** in each record:
* Full name (***required***)
* Company
* Position
* Email
* Phone number
* Phone number for SMS notifications
1- In the Personal Information tab, the user can fill in the contact's personal details.
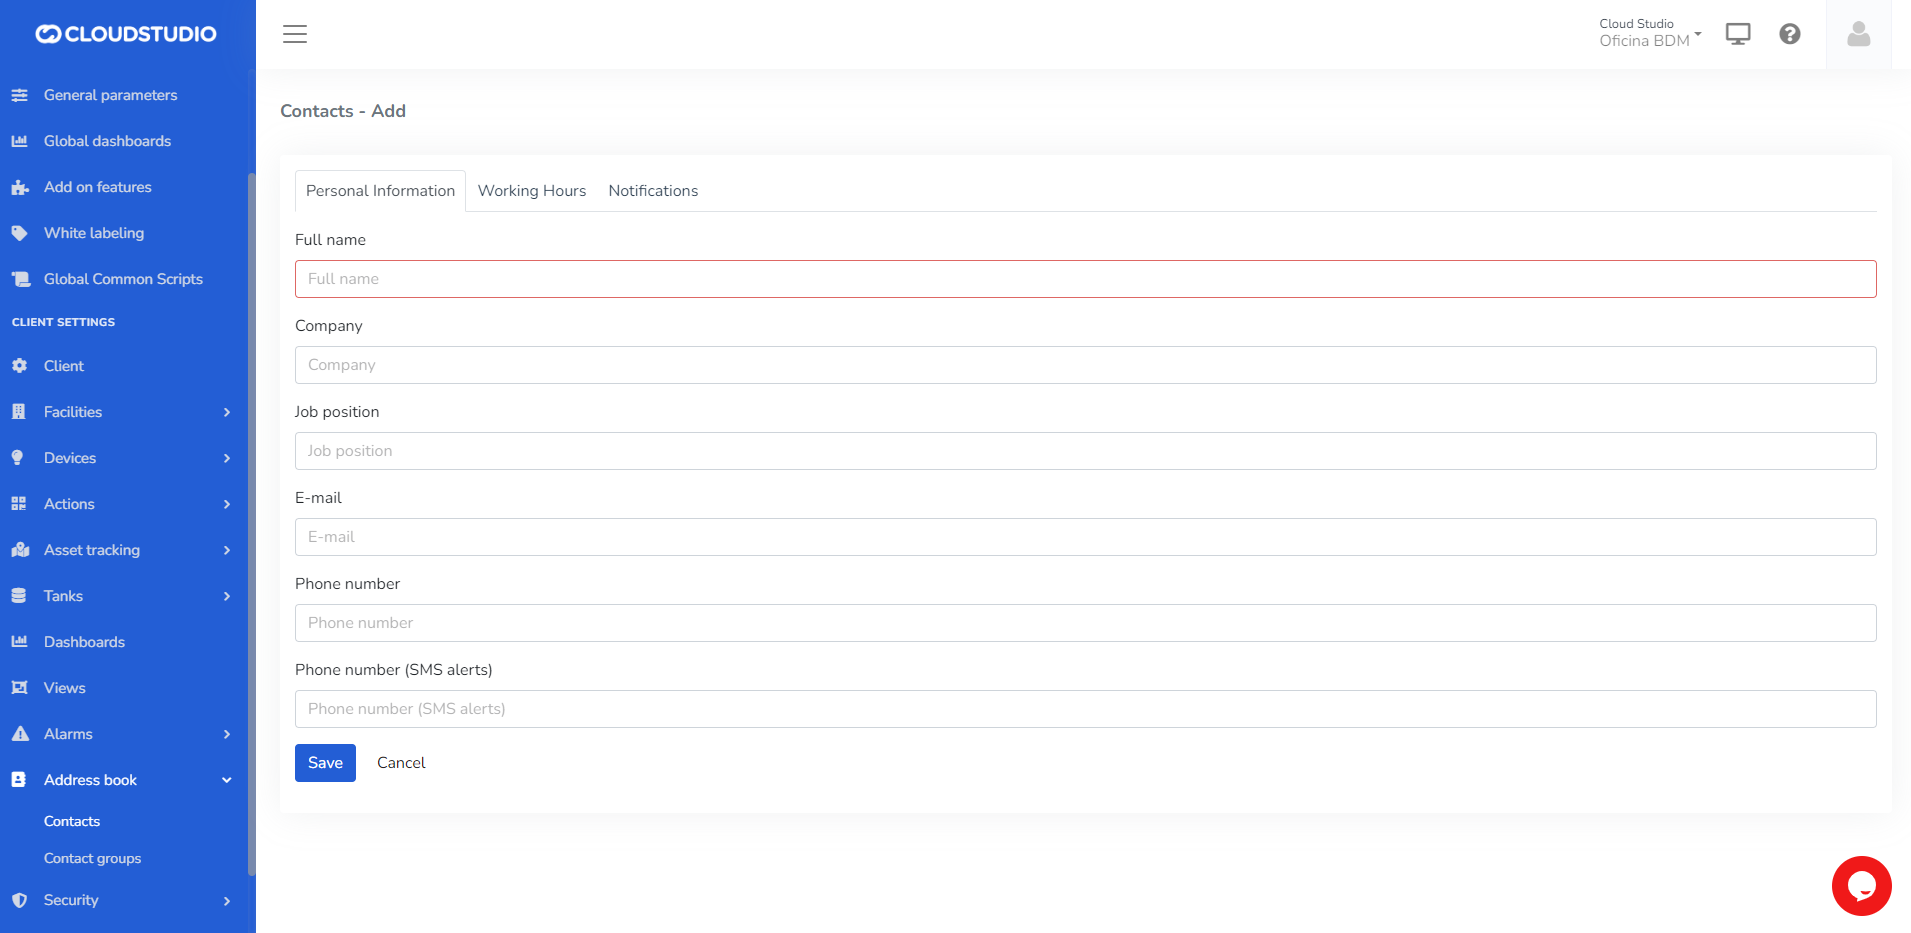
**IMPORTANT:** Do not leave required fields empty.
Once the desired data has been entered, keeping in mind that the "Full Name" field is required, click the "**Save**" button or press the "**Enter**" key on the keyboard to save the contact to your list.
2- In the Working Hours tab, the user can configure the time zone corresponding to the contact's location.
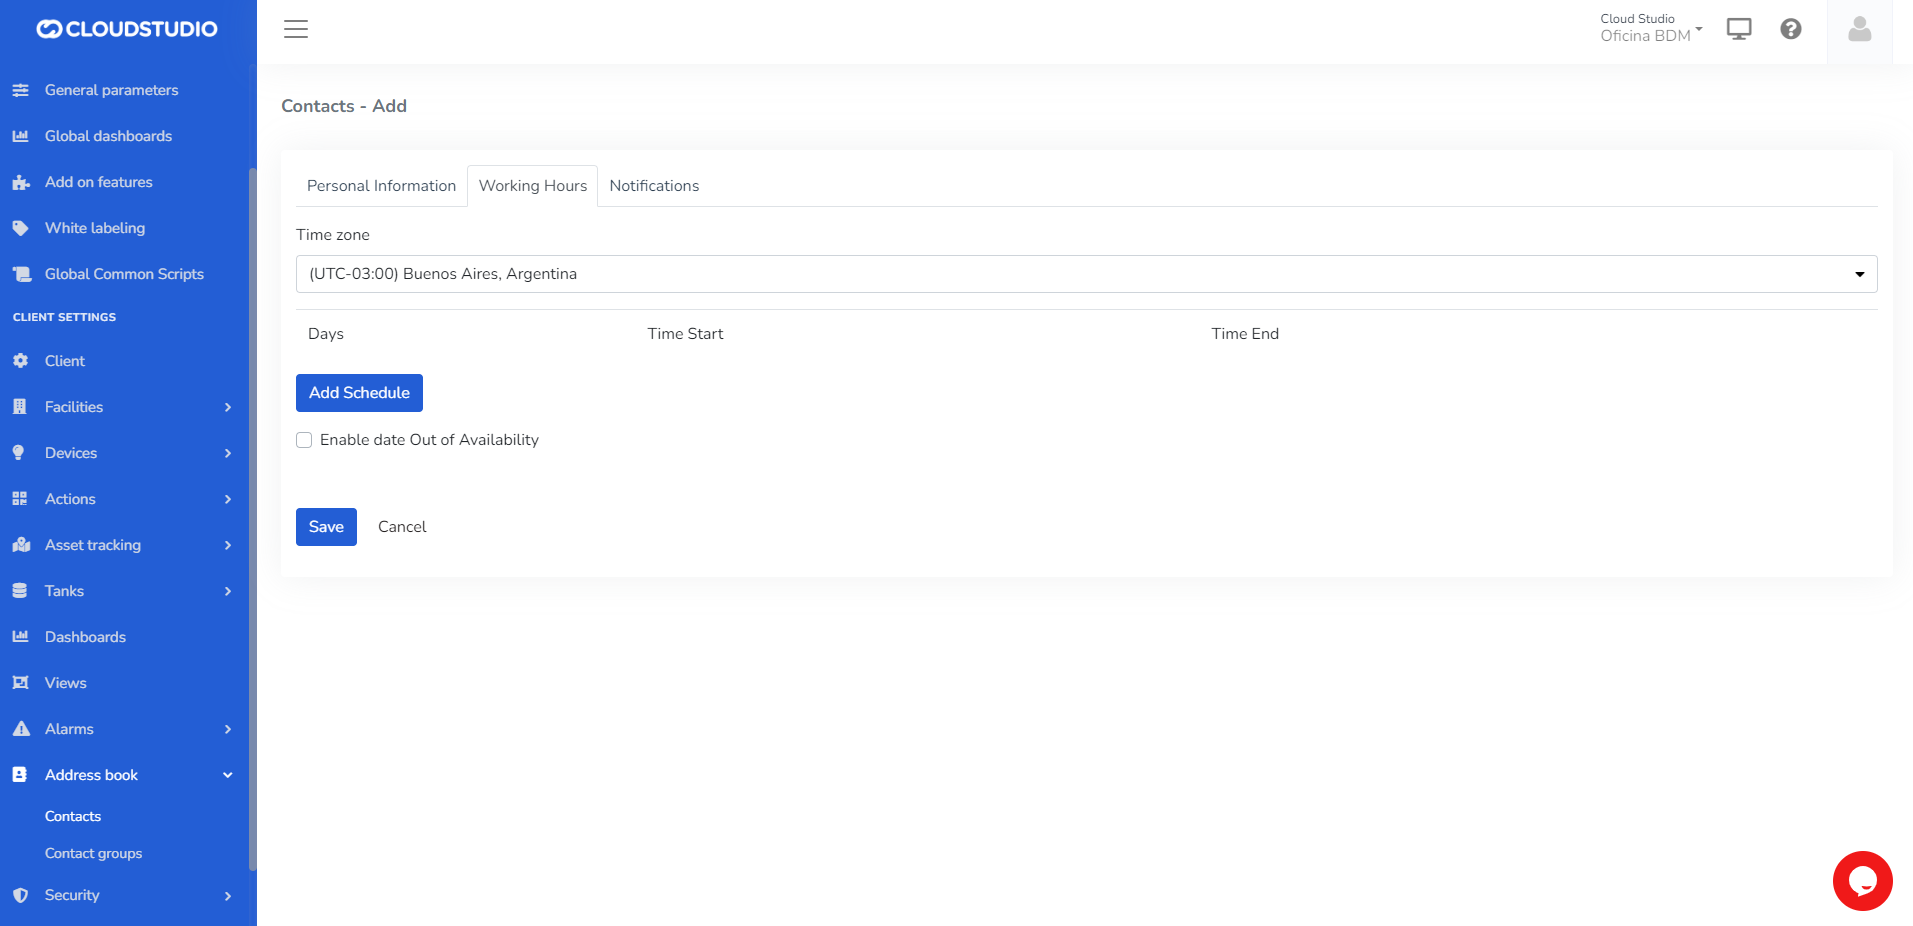
Then, set the days and time ranges during which they wish to receive alerts.

The user can edit or delete previously configured days.
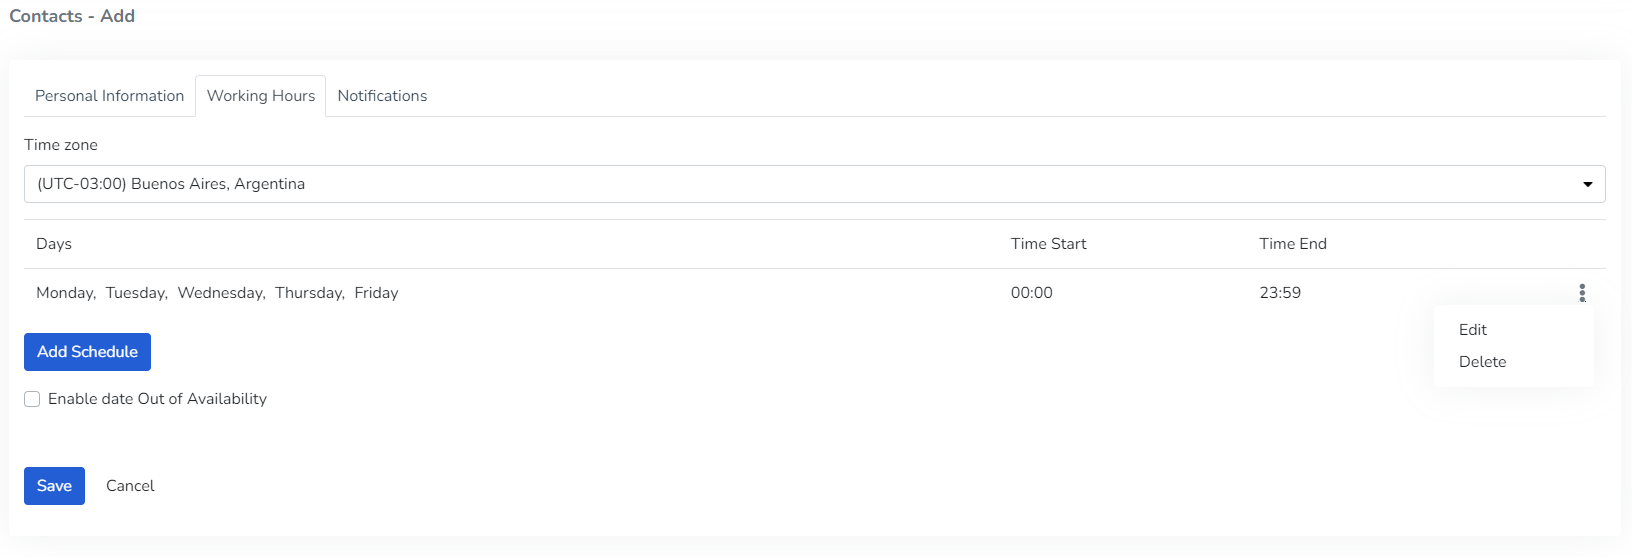
The user can enable the "Enable out-of-availability date" option to indicate vacation or inactivity periods for the contact.

3- In the Notifications tab, the user can:
* Configure which device or devices to assign > **Level**

* Configure the severity of notifications to receive > **Severity Level**

* Configure the channels through which notifications will be sent > **Channels**

Below is an example of a generated contact.
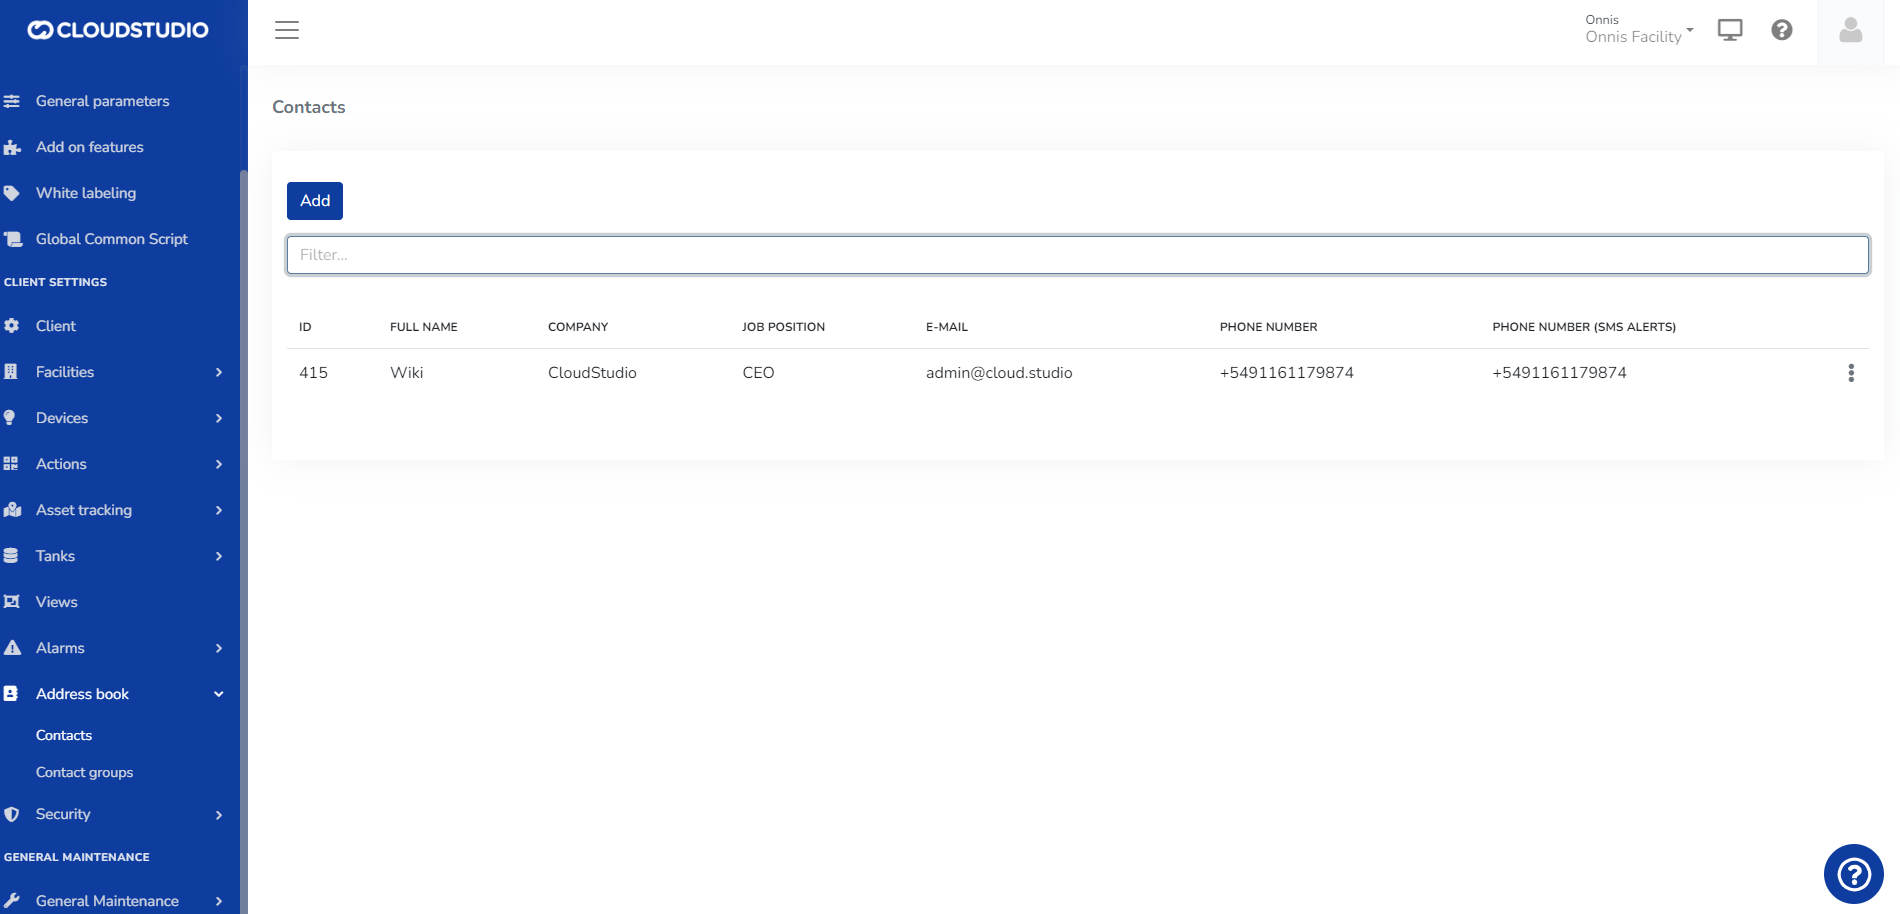
More Information [#more-information]
[Address Book](/docs/configuracion-del-cliente/libreta-de-direcciones)
[Edit an entry in the address book](/docs/configuracion-del-cliente/libreta-de-direcciones/editar-un-contacto)
# Create a New Contact Group
To create a new contact group in the ***Address Book***, go to *Client Configuration >* Address Book > **Contact Groups**.
_fe2d.png)
Press add and the following screen will open:
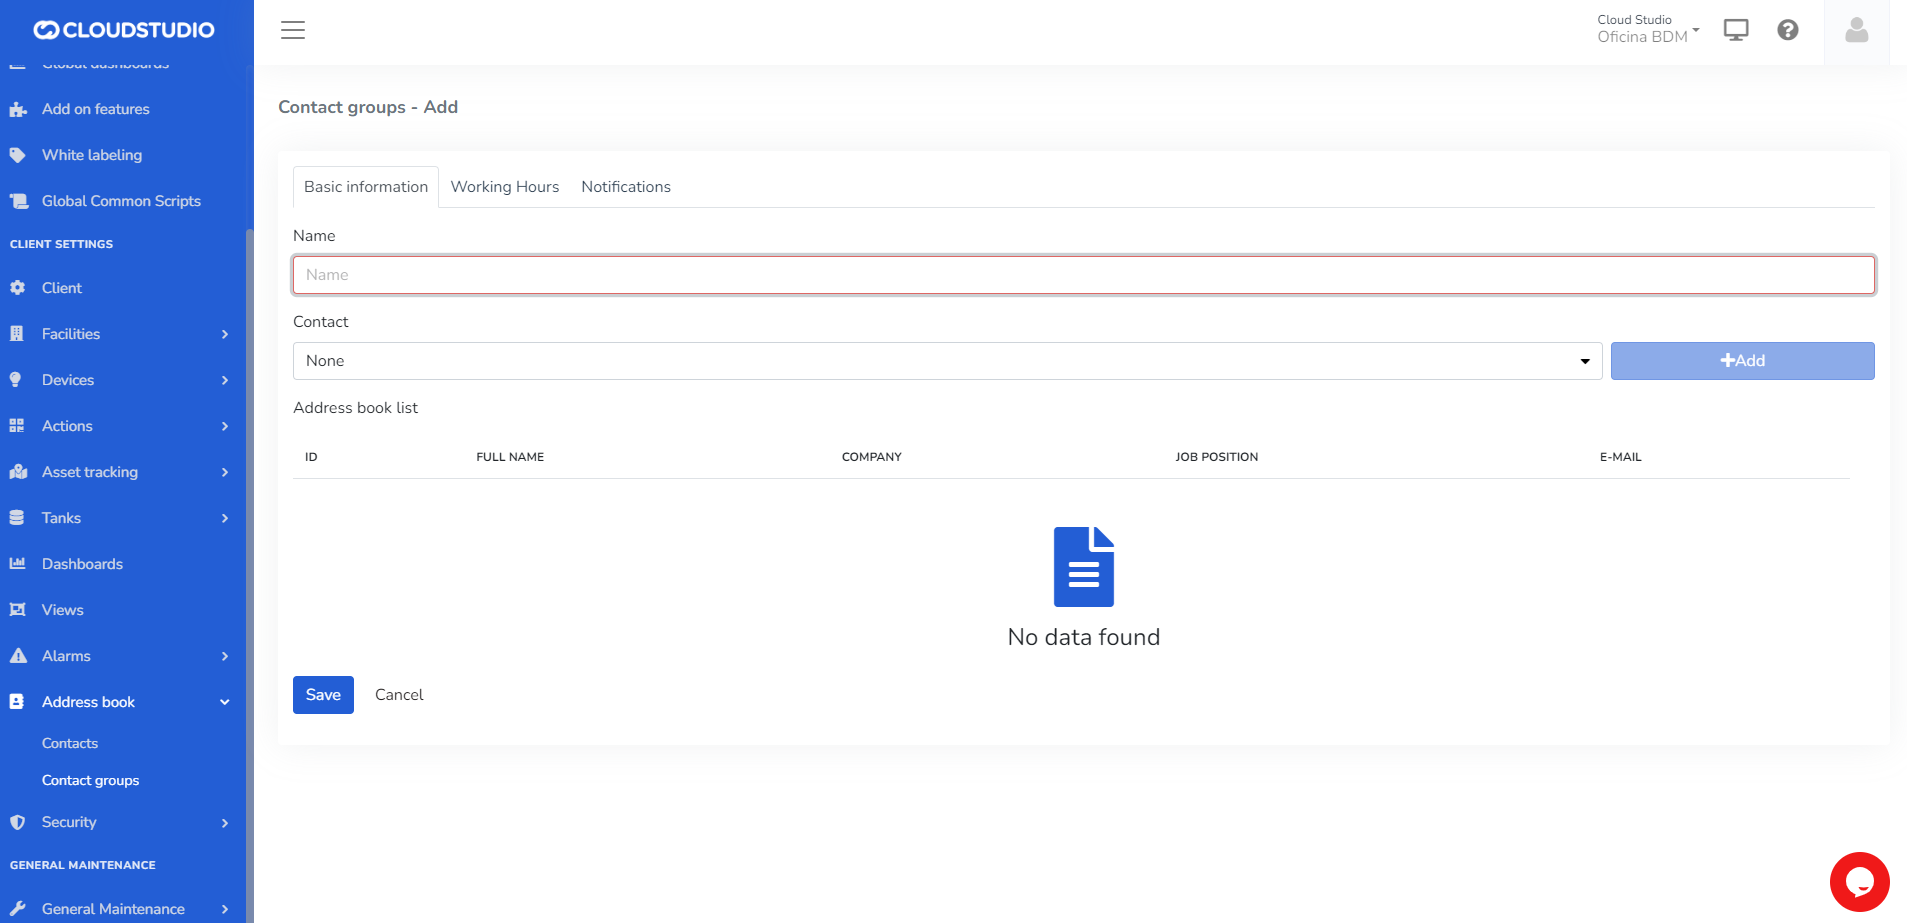
The ***Address Group Book*** allows including the following data in each record:
* Group name (***required***)
* Contacts
Type the group name in ***Name.*** To add contacts, they must have been previously loaded in the platform. You can learn more about creating contacts in this [section](/docs/configuracion-del-cliente/libreta-de-direcciones/crear-un-nuevo-contacto). Select the contact you wish to add from the dropdown list and click **Add**.
_2b25.png)

> **IMPORTANT:**
>
> * Do not leave required fields empty, including the "**Name**" field for the group.
> * Once a contact is selected, you must always press "**Add**" or it will not be added to the list.
Once the desired data has been entered, press the "**Save**" button or press the "**Enter**" key on the keyboard to update the list.
2- In the *Working Hours* tab, add the time zone, as well as the days and hours during which you wish to receive alerts.

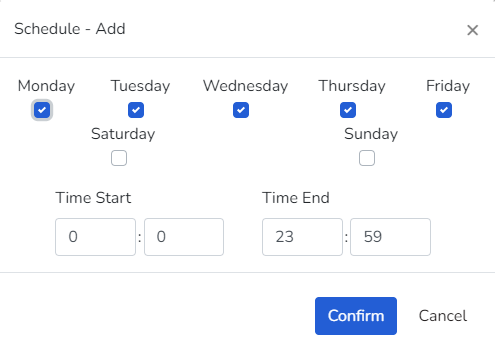
The user can enable the *Enable out-of-availability date* option.

3- In the *Notifications* tab, the user can:
* Configure which device or devices to assign > **Level**

* Configure the severity of notifications to receive > **Severity Level**

* Configure the channels through which notifications will be sent > **Channels**

Below is an example of a generated contact group.

More Information [#more-information]
[Address Book](/docs/configuracion-del-cliente/libreta-de-direcciones)
[Create a new address group](/docs/configuracion-del-cliente/libreta-de-direcciones/crear-un-nuevo-contacto)
# Edit a Contact
To **EDIT** a contact in the address book, expand the three-dot menu that appears to the right of the contact to edit. This menu shows two options: *Edit* and *Delete*.

Click on the **EDIT** option in the menu and a screen will open with the contact's data ready to be changed or updated.
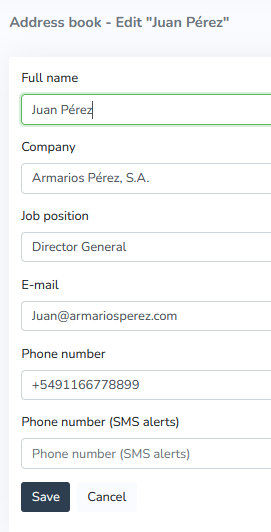
**IMPORTANT:** Do not leave required fields empty.
Once the necessary changes have been made and saved by clicking the "**Save**" button, the contact will appear in the address book list with the applied corrections.
If the goal is to **DELETE** the selected contact, clicking "Delete" will display a confirmation message before permanently deleting the contact.
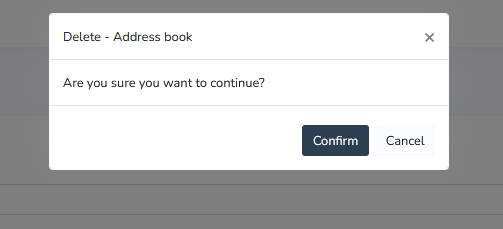
Clicking the "**Confirm**" button will permanently delete the contact without the possibility of recovery.
Clicking the "**Cancel**" button will leave the contact unchanged.
More Information [#more-information]
[Address Book](/docs/configuracion-del-cliente/libreta-de-direcciones)
[Create a new entry in the address book](/docs/configuracion-del-cliente/libreta-de-direcciones/crear-un-nuevo-contacto)
# Edit a Contact Group
To **Edit** a contact in the address book, expand the three-dot menu that appears to the right of the contact to edit. This menu shows two options: *Edit* and *Delete*.
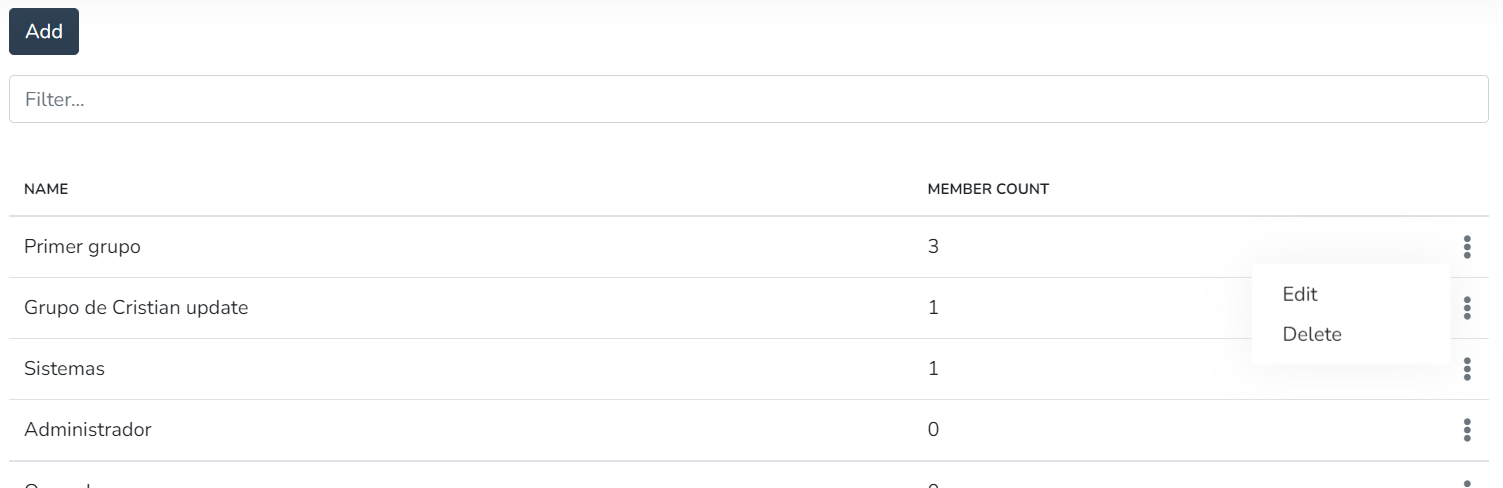
Click on the ***Edit*** option in the menu, and a screen will open with the list data ready to be edited.
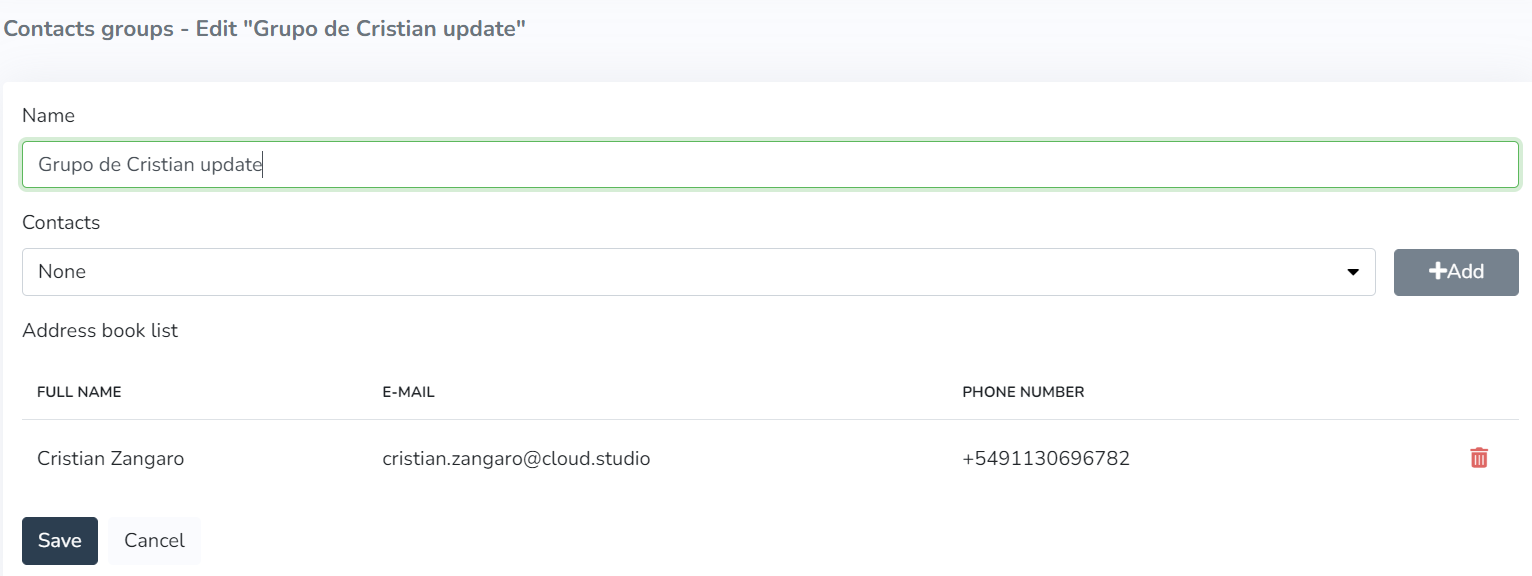
> **IMPORTANT:** Do not leave required fields empty.
Add More Contacts [#add-more-contacts]
The ***Address Group Book*** allows including the following data in each record:
* Group name (***required***)
* Contacts
Type the group name in ***Name.*** To add contacts, they must be loaded in the platform. You can learn more about creating contacts in this [section](/docs/configuracion-del-cliente/libreta-de-direcciones/crear-un-nuevo-contacto). Select the contact you wish to add from the dropdown list and click **Add**.
_2b25.png)
_2bc7.png)
Delete Contacts [#delete-contacts]
If the goal is to **Delete** the selected contact, clicking the *Trash can* icon will display a confirmation message before permanently deleting the contact.
Press the **Confirm** button to permanently delete the contact without the possibility of recovery. You can click the **Cancel** button to leave the contact unchanged.
More Information [#more-information]
[Address Book](/docs/configuracion-del-cliente/libreta-de-direcciones)
[Create a new address group](/docs/configuracion-del-cliente/libreta-de-direcciones/crear-un-nuevo-contacto)
# Address Book
The Address Book is a list that centralizes contact information for notifications, including SMS, Email, and voice calls. For each contact, the Address Book **allows including the following data**:
* Full name (required)
* Company
* Position
* Email
* Phone number
* Phone number for SMS notifications
Data can be **sorted** by different columns in ascending or descending order according to user preference. By default, the display follows the order of record entry in ascending order, and the appearance is as follows:
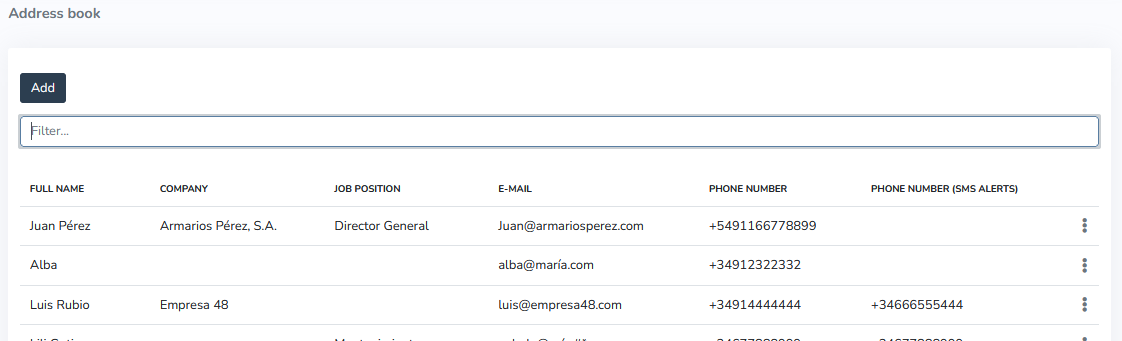
Using the "[Add](/docs/configuracion-del-cliente/libreta-de-direcciones/crear-un-nuevo-contacto)" button that appears on the Address Book display screen, new contacts can be added with the desired data, keeping in mind that Full Name is a required field that must always be filled in to include the new contact in the list.
Next to each Address Book record, there is a three-dot icon that provides access to a context menu for that record with the following options:
* [Edit](/docs/configuracion-del-cliente/libreta-de-direcciones/editar-un-contacto): to edit the record or contact.
* **Delete**: to delete the record or contact. The system requests confirmation before deleting a record to prevent accidental data deletion.
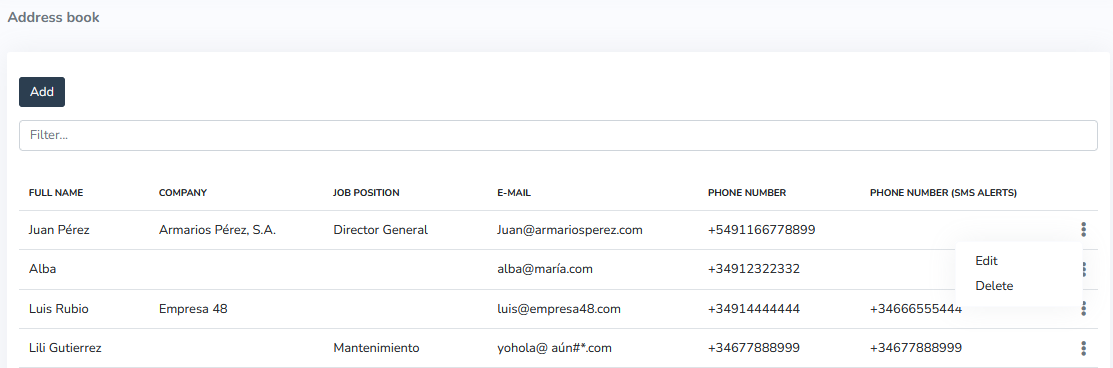
Menu expansion
The list content can be **filtered** using a text box to find the desired contact by simply typing part of the name, phone number, or any other data. In the following example, we searched for Juan Perez and there was no other contact with the characters "ju":
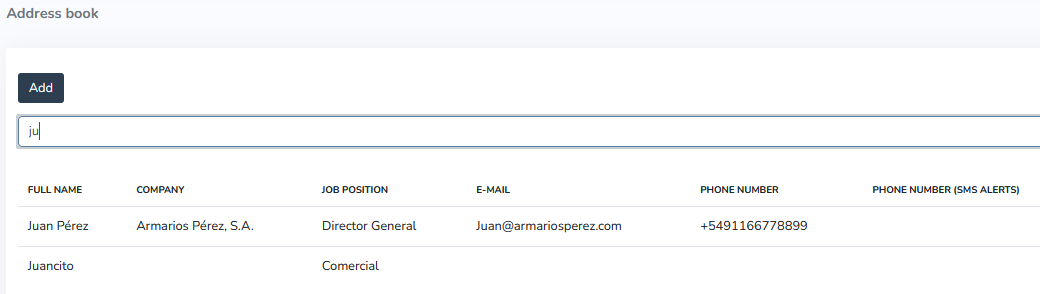
The Address Book can be accessed **from any device with Internet access**. It can be viewed and modified in any browser and on any device (computer, tablet, or mobile phone).
The Address Book is the best way to have all the necessary contacts in one place for sending application-related notifications, with the ability to **send those notifications in an automated manner.**
The Address Book enables communication and sending of alerts to selected contacts and/or other devices through the system quickly and efficiently to **stay informed at all times about the status of the devices included in the application.**
More Information [#more-information]
[Create a new entry in the address book](/docs/configuracion-del-cliente/libreta-de-direcciones/crear-un-nuevo-contacto)
[Edit an entry in the address book](/docs/configuracion-del-cliente/libreta-de-direcciones/editar-un-contacto)
# Security
Within "Client Configuration" in the Manager panel, you will find the Security option. Here you can add users, edit them, set a password, delete them, and also suspend them.
**Security Screen**

When **Adding** a user, you can assign them to a particular User Group, assigning them special roles such as Administrator, Operate-only, and View-only functions, among other pre-configurable options.
**User Groups Screen**
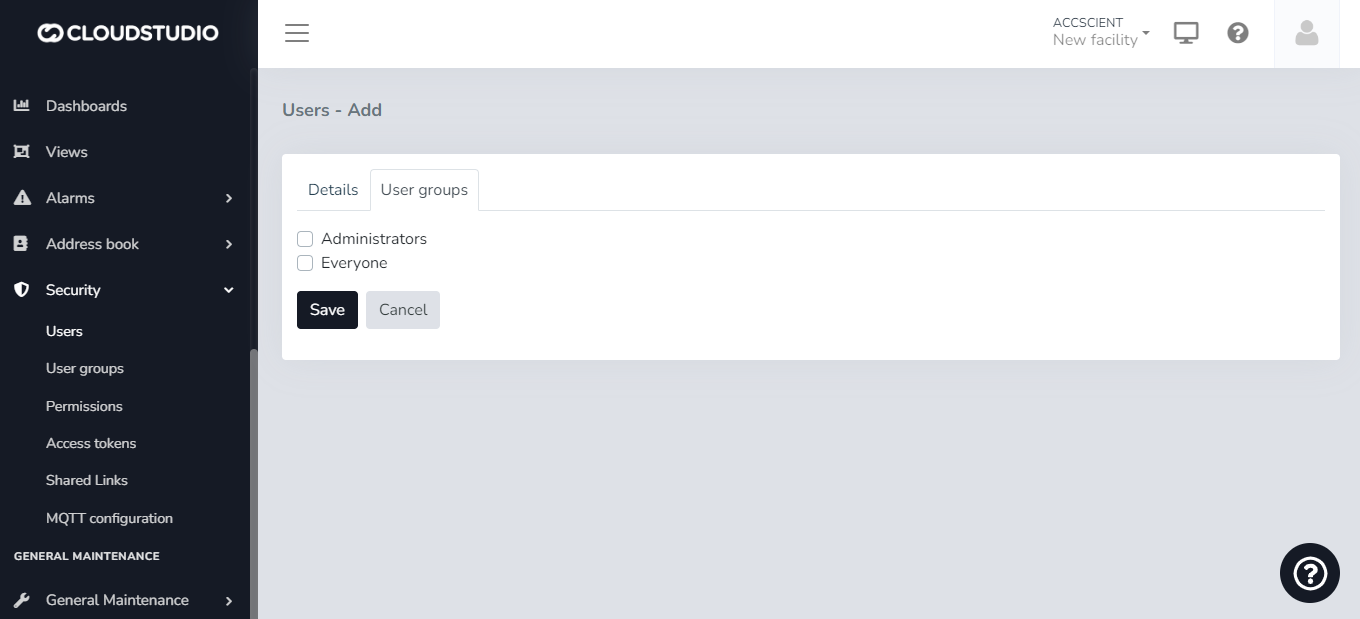
In the User Groups sub-option, you can add new specific groups and then assign users to those groups.
Groups can be Edited and/or Deleted from the main screen by clicking the three dots on a group.
**Screen for Creating New User Groups**
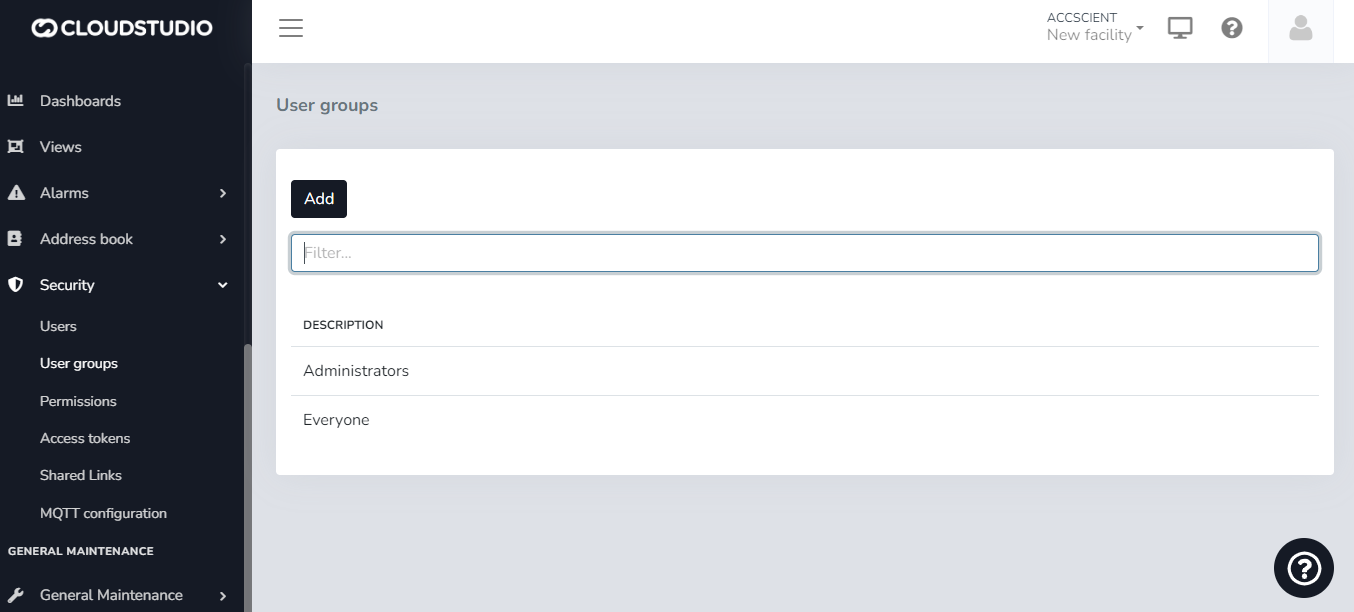
Below that is the Permissions option. Here users can assign permissions to special features.
**Permissions Screen**
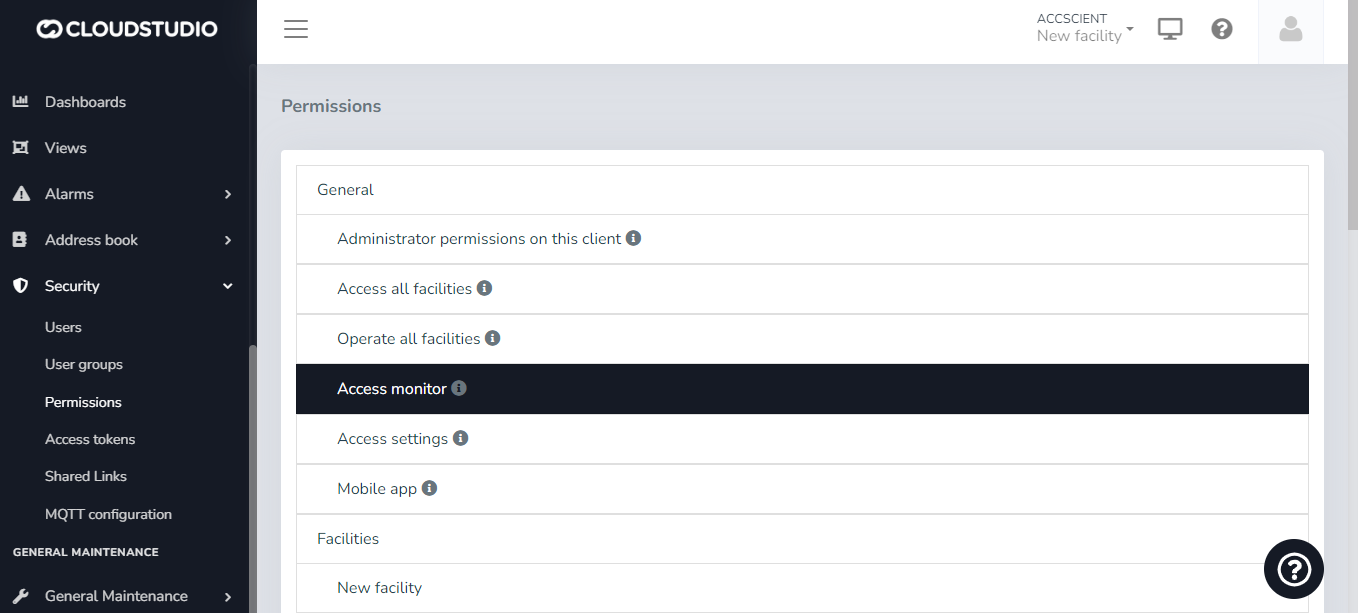
Individual users or a user group assigned to a User Group (as seen above) can be assigned.
**Individual and User Group Permission Assignment Screen**
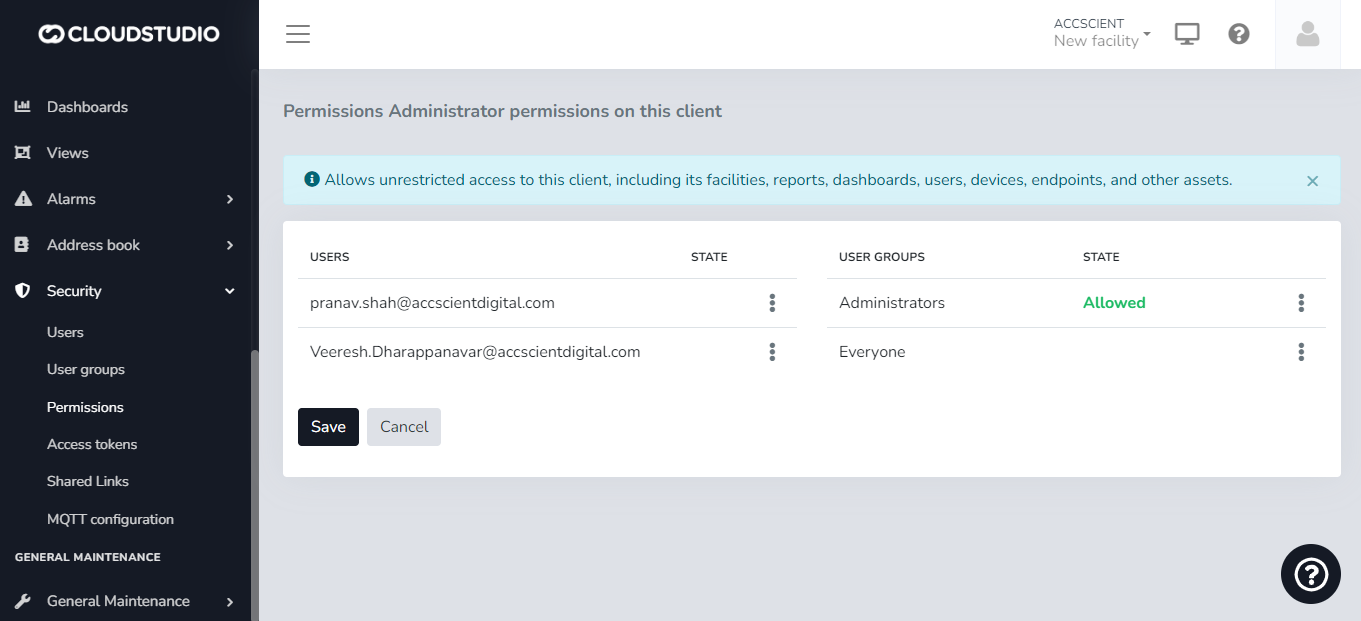
# Verticals
The Gear Studio platform contains a series of verticals that can be leveraged directly, applying existing knowledge about the most important use cases.
The currently implemented verticals are:
* [Energy monitoring](/docs/configuracion-del-cliente/verticales/monitoreo-de-energia).
* [Tank monitoring](/docs/configuracion-del-cliente/verticales/monitoreo-de-tanques).
* [Asset tracking](/docs/configuracion-del-cliente/verticales/seguimiento-de-activos).
# Tank Monitoring
The tank monitoring feature helps prevent costly and dangerous problems by detecting failures early. Covering real-time readings, tank temperature, and alarm system, it provides users with a visual representation of tank contents, tank temperature, and total volume present, among other available variables.
Tank monitoring systems give tank operators, managers, and technicians access to real-time information.
**To add tanks**
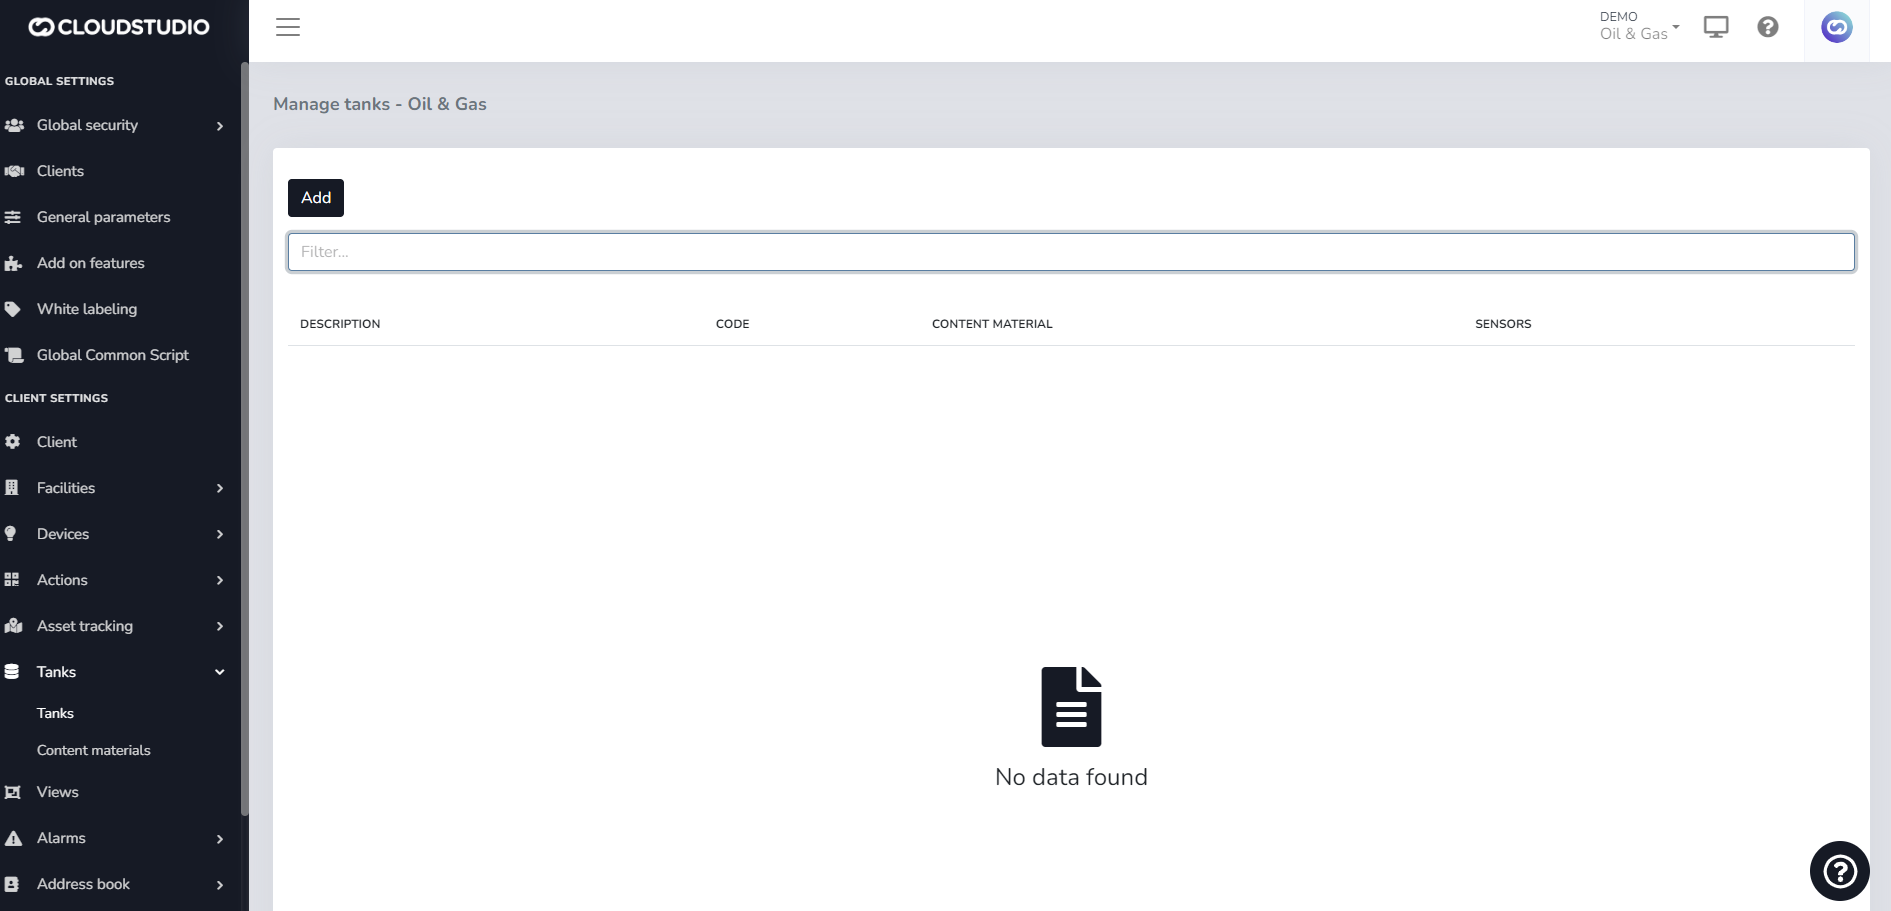
**To manage tanks in Content Material**
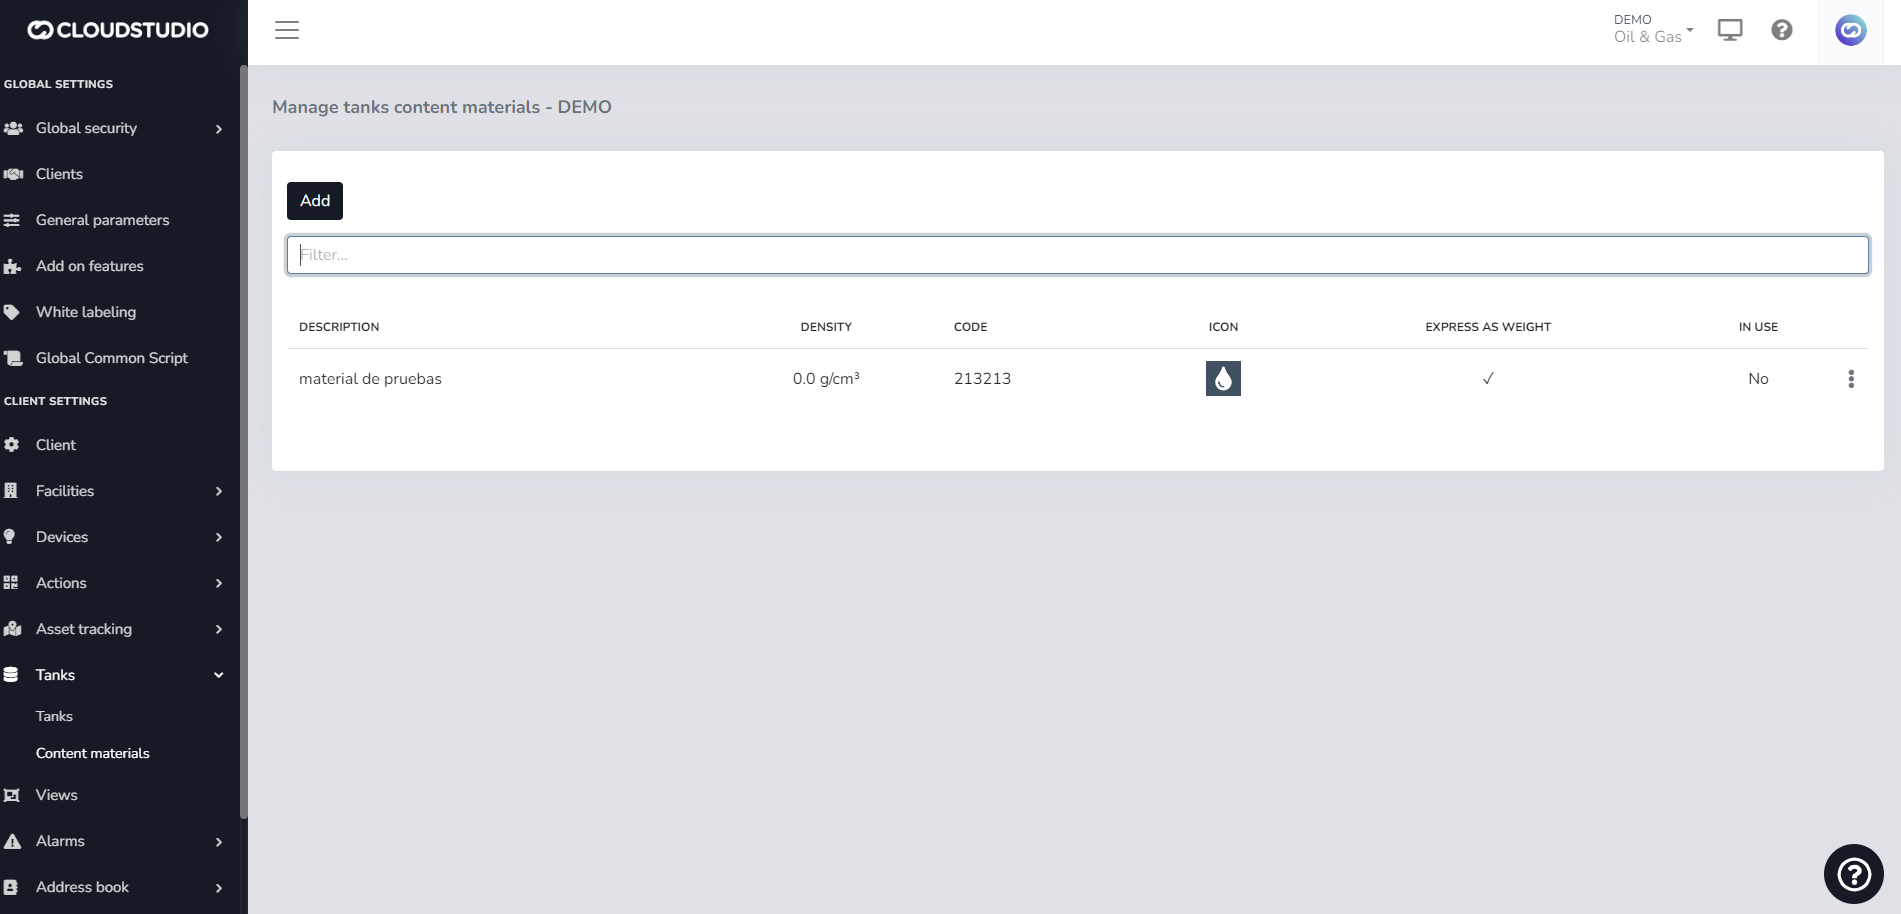
# White Labeling
Introduction [#introduction]
The **White Labeling** feature gives users the ability to customize the platform, creating a unique usage experience that adapts to their brand identity. From this section, you can customize the logo in the menu, reports, notifications, and login screen. It also provides color palette selection, login screen background image, and chat and help page settings.
For situations where there is a need to customize the platform for different clients within the same instance, White Labeling is offered at two levels. The first level allows instance-level customization, and the second level provides the option to customize the experience for these users, whom we call clients.
> Important note: The Client White Labeling feature is not included in all subscription plans. Contact our [sales](https://bit.ly/3Oc8zpg) team for pricing and activation.
!\[]\(/images/wiki/image\_bbf3.png)
Instance-Level White Labeling [#instance-level-white-labeling]
To start using the feature, go to **Settings** and in the *Global Configuration* menu select **White Labeling**:
!\[]\(/images/wiki/5\_78b4.png)
!\[]\(/images/wiki/6\_6dfe.png)
Menu Logo [#menu-logo]
This option allows the user to modify the logo displayed in the platform menu.
Press **Change** and then select the image file from your computer. For the changes to take effect on the platform, press **Save** at the bottom of the page.
> **Image requirements:**
>
> \* The allowed extension is .png\
> \* The required dimensions are 449x115 pixels
!\[]\(/images/wiki/7\_360d.png)
!\[]\(/images/wiki/image\_bbf3.png)
Reports Logo [#reports-logo]
This option is used to customize the logo that will appear in application reports when exported to PDF.
Press **Change** and then select the image file from your computer. For the changes to take effect on the platform, press **Save** at the bottom of the page.
> **Image requirements:**
>
> \* The allowed extension is .png\
> \* The required dimensions are 449x115 pixels
!\[]\(/images/wiki/8\_224f.png)
Notifications Logo [#notifications-logo]
From this option, you can select the logo for email notifications.
Press **Change** and then select the image file from your computer. For the changes to take effect on the platform, press **Save** at the bottom of the page.
> **Image requirements:**
>
> \* The allowed extension is .png\
> \* The required dimensions are 449x115 pixels
!\[]\(/images/wiki/9\_7872.png)
Login Screen Logo [#login-screen-logo]
This option allows customizing the logo on the platform's login screen.
> Note: The login screen is the first screen displayed when accessing your instance's domain.
!\[]\(/images/wiki/image\_650a.png)
Press **Change** and then select the image file from your computer. For the changes to take effect on the platform, press **Save** at the bottom of the page.
> **Image requirements:**
>
> \* The allowed extension is .png\
> \* The required dimensions are 449x115 pixels
!\[]\(/images/wiki/10\_562c.png)
Login Screen Background Image [#login-screen-background-image]
Allows setting a predefined background image on the login screen.
Press **Change** and then select the image file from your computer. For the changes to take effect on the platform, press **Save** at the bottom of the page.
> **Image requirements:**
>
> \* The allowed extension is .png\
> \* The required dimensions are 1600x900 pixels
!\[]\(/images/wiki/11\_4757.png)
Favicon [#favicon]
This option allows customizing the logo associated with the platform's domain, displayed at the top of browser tabs.
Press **Change** and then select the image file from your computer. For the changes to take effect on the platform, press **Save** at the bottom of the page.
> **Image requirements:**
>
> \* The allowed extension is .png\
> \* The required dimensions are 192x192 pixels
!\[]\(/images/wiki/12\_f933.png)
Color Configuration [#color-configuration]
This option provides color palette selection for the platform. Two colors can be chosen: a primary color and a secondary color. For example, the primary color is displayed as the menu background, and the secondary color is displayed on menu icons and text. Similarly, it allows modifying the primary text color and the secondary color displayed on platform button text.
The platform includes a hexadecimal color picker, making it possible to configure any color as needed.
!\[]\(/images/wiki/image\_33da.png)
User Support Chat Tool [#user-support-chat-tool]
In this option, the user can configure the appearance, availability, and options of the application's help chat.
!\[]\(/images/wiki/image\_bb21.png)
> **Note:** It is important to highlight that this feature allows configuring the Tawk.to plugin, so having a previously created Tawk.to account is an essential requirement. This way, the user can create their own plugin application and, with the chat owner's ID, replace it to view it in both English and Spanish. The colors and texts customized by the user from Tawk.to will also be displayed there.
>
> When the user does not enter their own data, the user support button will not be visible.
Help Menu Configuration [#help-menu-configuration]
In this option, you can customize the help menu. You can set a contact email and a destination URL that the instance owner wants to define with the platform's user manual. You can also choose to **Disable** these options or **Reset** them.
!\[]\(/images/wiki/image\_420a.png)
**Help Menu Considerations**
*User manual:*
This field allows the user to show or hide the application's user manual as appropriate.
* If disabled, no option will be shown in the help menu.
* If a URL is entered, the "User manual" option will appear and will redirect to the entered URL;
* If reset, the URL will be cleared and the default help menu will be shown ("Introduction to Gear Studio", "Integrator's Guide", "User Manual", "Deployments", etc.).
*Contact email:*
This field allows the user to show or hide the contact email option as appropriate.
* If disabled, no option will be shown in the help menu.
* If an email is entered, the "Send feedback" option will appear, and user submissions will be sent to the email address entered in the help menu.
* If reset, the "Send feedback" option will be shown, sending emails to the support inbox.
!\[]\(/images/wiki/image\_fffd.png)
!\[]\(/images/wiki/image\_e772.png)
!\[]\(/images/wiki/image\_da53.png)
White Labeling - Client Level [#white-labeling---client-level]
This advanced White Labeling feature enables platform customization for different clients within the same instance.
> Important note: The Client White Labeling feature is not included in all subscription plans. Contact our [sales](https://bit.ly/3Oc8zpg) team for pricing and activation.
To access platform customization for clients, select **Client** in the *Client Configuration* menu and find the **White Labeling** option.
!\[]\(/images/wiki/Dise%C3%B1o%20sin%20t%C3%ADtulo%20(63)\_ba2c.png)
Menu Logo [#menu-logo-1]
This option allows the user to modify the logo displayed in the platform menu.
Press **Change** and then select the image file from your computer. For the changes to take effect on the platform, press **Save** at the bottom of the page.
> **Image requirements:**
>
> \* The allowed extension is .png\
> \* The required dimensions are 449x115 pixels
!\[]\(/images/wiki/15\_1f8c.png)
Login Screen Logo [#login-screen-logo-1]
This option allows customizing the logo on the platform's login screen.
Press **Change** and then select the image file from your computer. For the changes to take effect on the platform, press **Save** at the bottom of the page.
> **Image requirements:**
>
> \* The allowed extension is .png\
> \* The required dimensions are 449x115 pixels
!\[]\(/images/wiki/16\_8d45.png)
Login Screen Background Image [#login-screen-background-image-1]
Allows setting a predefined background image on the login screen.
Press **Change** and then select the image file from your computer. For the changes to take effect on the platform, press **Save** at the bottom of the page.
> **Image requirements:**
>
> \* The allowed extension is .png\
> \* The required dimensions are 1600x900 pixels
!\[]\(/images/wiki/17\_3d4f.png)
Color Configuration [#color-configuration-1]
This option provides color palette selection for the platform. Two colors can be chosen: a primary color and a secondary color. For example, the primary color is displayed as the menu background, and the secondary color is displayed on menu icons and text. Similarly, it allows modifying the primary text color and the secondary color displayed on platform button text.
The platform includes a hexadecimal color picker, making it possible to configure any color as needed.
!\[]\(/images/wiki/image\_ec9d.png)
User Support [#user-support]
In this option, the user can configure the appearance, availability, and options of the application's help chat.
!\[]\(/images/wiki/image\_bb21.png)
> **Note:** It is important to remember that the plugin configuration is customizable so the user can create their own plugin application and, with the chat owner's ID, replace it to view it in both English and Spanish. The colors and texts customized by the user from Tawk.to will also be displayed there.
>
> When the user does not enter their own data, the user support button will not be visible.
**Help Menu Configuration**
In this option, you can customize the help menu. You can set a contact email and a custom URL for the user manual. You can also choose to **Disable** these options or **Reset** them.
!\[]\(/images/wiki/image\_420a.png)
**Help Menu Considerations**
*User manual:*
This field allows the user to show or hide the application's user manual as appropriate.
* If disabled, no option will be shown in the help menu.
* If a URL is entered, the "User manual" option will appear and will redirect to the entered URL;
* If reset, the URL will be cleared and the default help menu will be shown ("Introduction to Gear Studio", "Integrator's Guide", "User Manual", "Deployments", etc.).
*Contact email:*
This field allows the user to show or hide the contact email option as appropriate.
* If disabled, no option will be shown in the help menu.
* If an email is entered, the "Send feedback" option will appear, and user submissions will be sent to the email address entered in the help menu.
* If reset, the "Send feedback" option will be shown, sending emails to the support inbox.
!\[]\(/images/wiki/image\_fffd.png)
!\[]\(/images/wiki/image\_e772.png)
!\[]\(/images/wiki/image\_da53.png)
White Labeling: Enable and Disable [#white-labeling-enable-and-disable]
The options to enable and disable **Instance White Labeling** and **Client White Labeling** are visible only to platform administrator users. This feature can be enabled from the **Additional Features** section, located in the *Global Configuration* menu.
!\[]\(/images/wiki/Dise%C3%B1o%20sin%20t%C3%ADtulo%20(66)\_968a.png)
If **Instance White Labeling** is disabled, an icon will appear next to its name in the menu and when entering the section.
!\[]\(/images/wiki/19\_cdc4.png)
> **Notes:**
>
> * If Instance White Labeling is disabled, it will not be possible to enable Client White Labeling. Instance White Labeling must be enabled first.
> * If Instance White Labeling is not enabled, the platform will display default colors, logos, and images corresponding to the Cloud Studio brand.
**Activation Request**
When the option is not enabled, the user can request the administrator to enable it. This is communicated through the following message: This feature is an add-on. To enable it, contact your administrator.
!\[]\(/images/wiki/20\_9e55.png)
**White Labeling Validation Message**
Values configured at the Client White Labeling level will take priority and be maintained over those configured at the Instance White Labeling level. When a user wants to modify Instance White Labeling, they will be notified through an informational message that different options are configured at the client level. Similarly, if the client does not have client-level configurations applied, the platform will maintain the instance-level configurations.
!\[]\(/images/wiki/Dise%C3%B1o%20sin%20t%C3%ADtulo%20(67)\_db26.png)
> Check out our [tutorial](https://youtu.be/4E3pYdhg8Vc) on YouTube
White Labeling - User Level [#white-labeling---user-level]
Just as there is [instance-level white labeling](/docs/configuracion-global/marca-blanca) and [client-level white labeling](/docs/configuracion-global/marca-blanca), each user can modify the logo, background colors, and text to adapt the interface to personal preferences, improving visibility and creating a more pleasant and appropriate environment for each user. These changes only apply to the active user's session and are not visible to other users.
Menu Logo [#menu-logo-2]
This option allows the user to modify the Logo displayed in the platform menu for the user who configured it, when logging in with that profile, while maintaining the look and feel configured at the Instance level for other users.
Press **Change** and then select the image file from your computer. For the changes to take effect on the platform, press **Save** at the bottom of the page.
> ***Image requirements:***
>
> *\* The allowed extension is .png*\
> *\* The required dimensions are 449x115 pixels*
# White Labeling - User Level
Just as there is [instance-level white labeling](/docs/configuracion-global/marca-blanca) and [client-level white labeling](/docs/configuracion-global/marca-blanca), each user can modify the logo, background colors, and text to adapt the interface to personal preferences, improving visibility and creating a more pleasant and appropriate environment for each user. These changes only apply to the active user's session and are not visible to other users.
Menu Logo [#menu-logo]
This option allows the user to modify the Logo displayed in the platform menu for the user who configured it, when logging in with that profile, while maintaining the look and feel configured at the Instance level for other users.
Press **Change** and then select the image file from your computer. For the changes to take effect on the platform, press **Save** at the bottom of the page.
> ***Image requirements:***
>
> *\* The allowed extension is .png*
> *\* The required dimensions are 449x115 pixels*
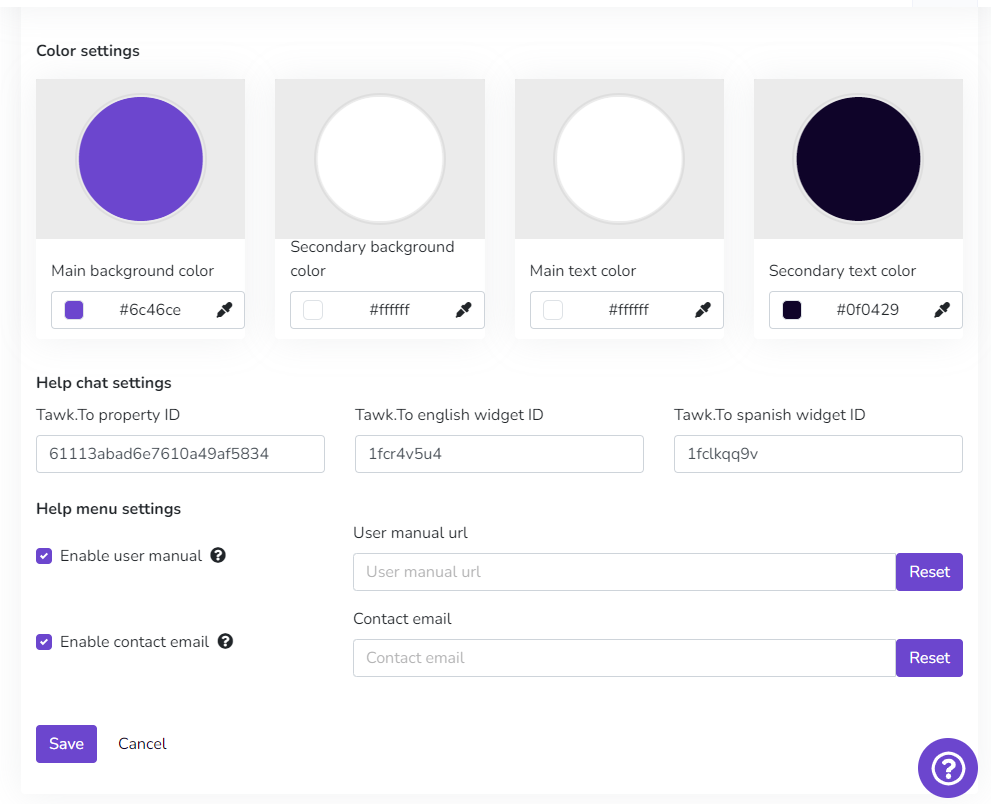
Color Configuration [#color-configuration]
This option provides color palette selection for the individual user's platform. It allows selecting two colors (primary and secondary). For example, the primary color is displayed as the menu background, and the secondary color is displayed on menu icons and text. Similarly, it allows modifying the primary text color and the secondary color displayed on platform button text.
The platform includes a hexadecimal color picker, making it possible to configure any color as needed.
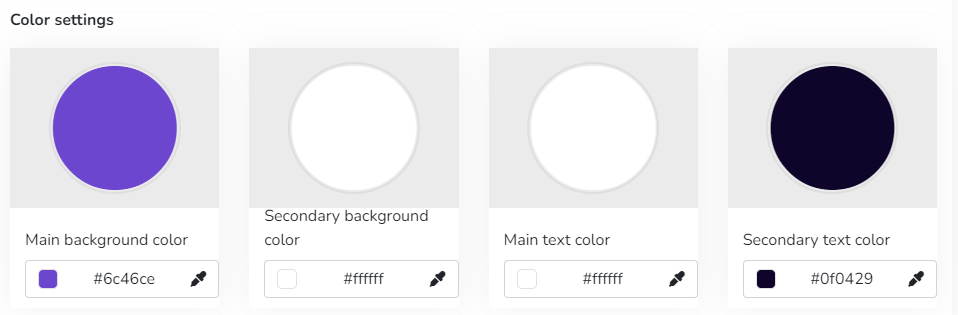
# Add Global Script
Select the Common Scripts option from the menu.
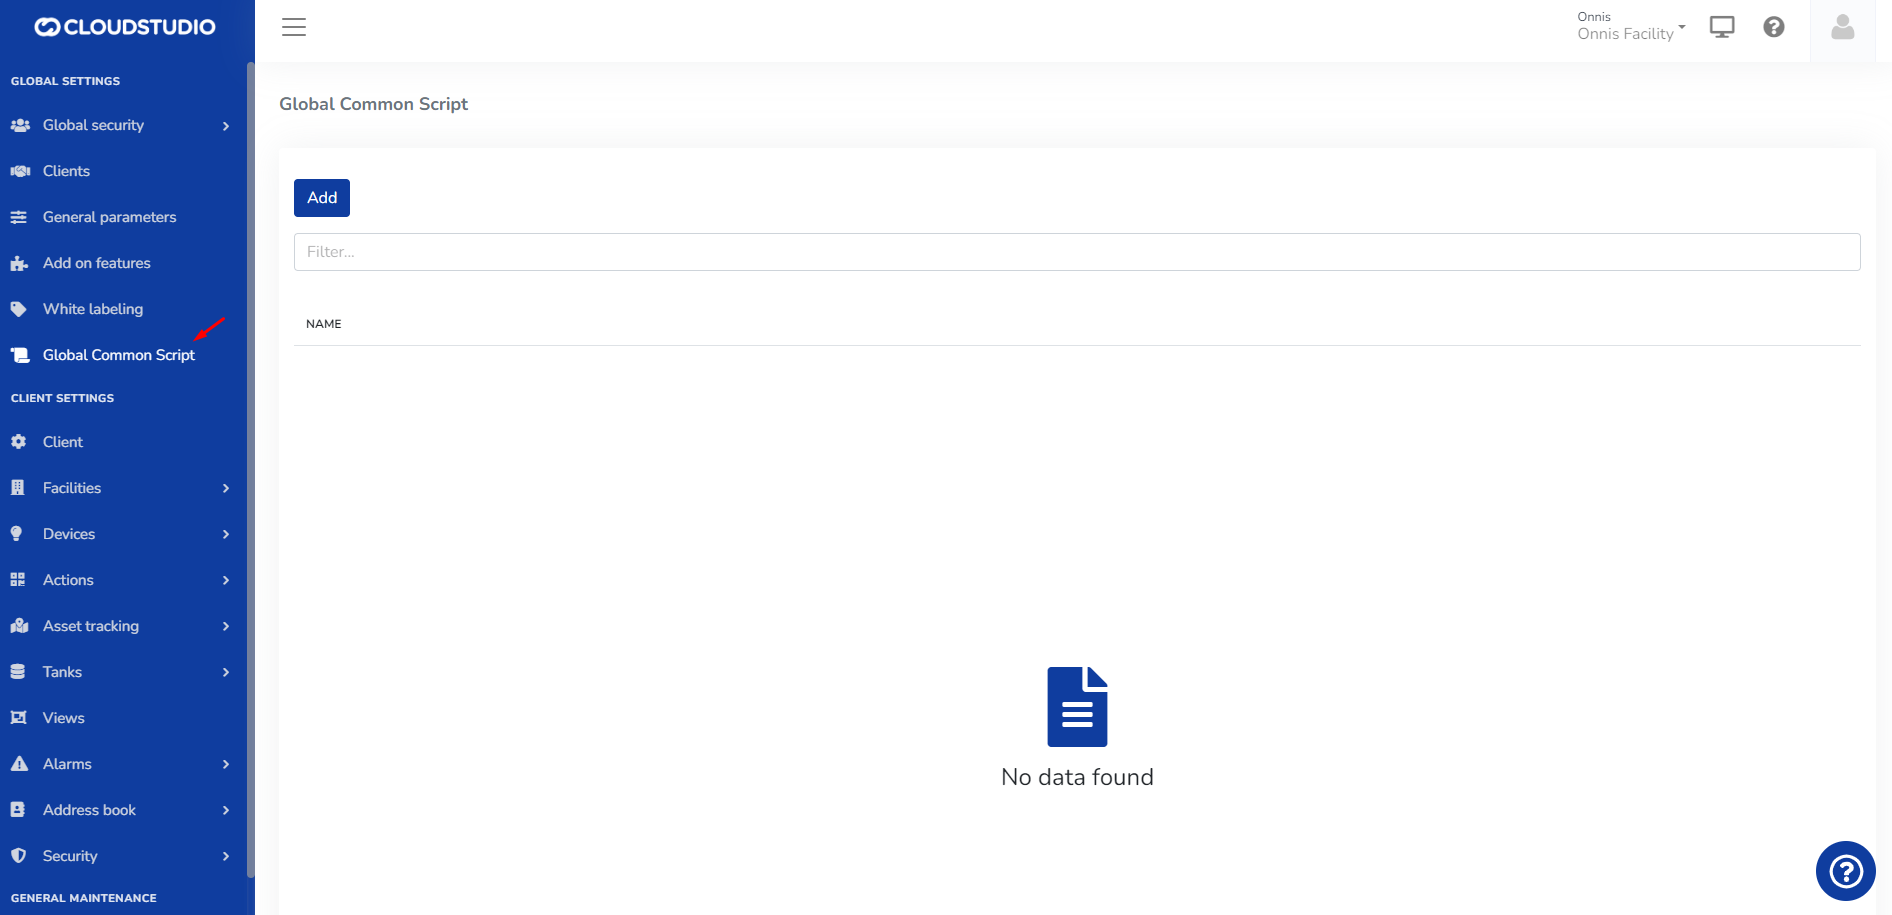
When selecting **Add**, the user can include a description, select a dependency, and enter the JS code below.
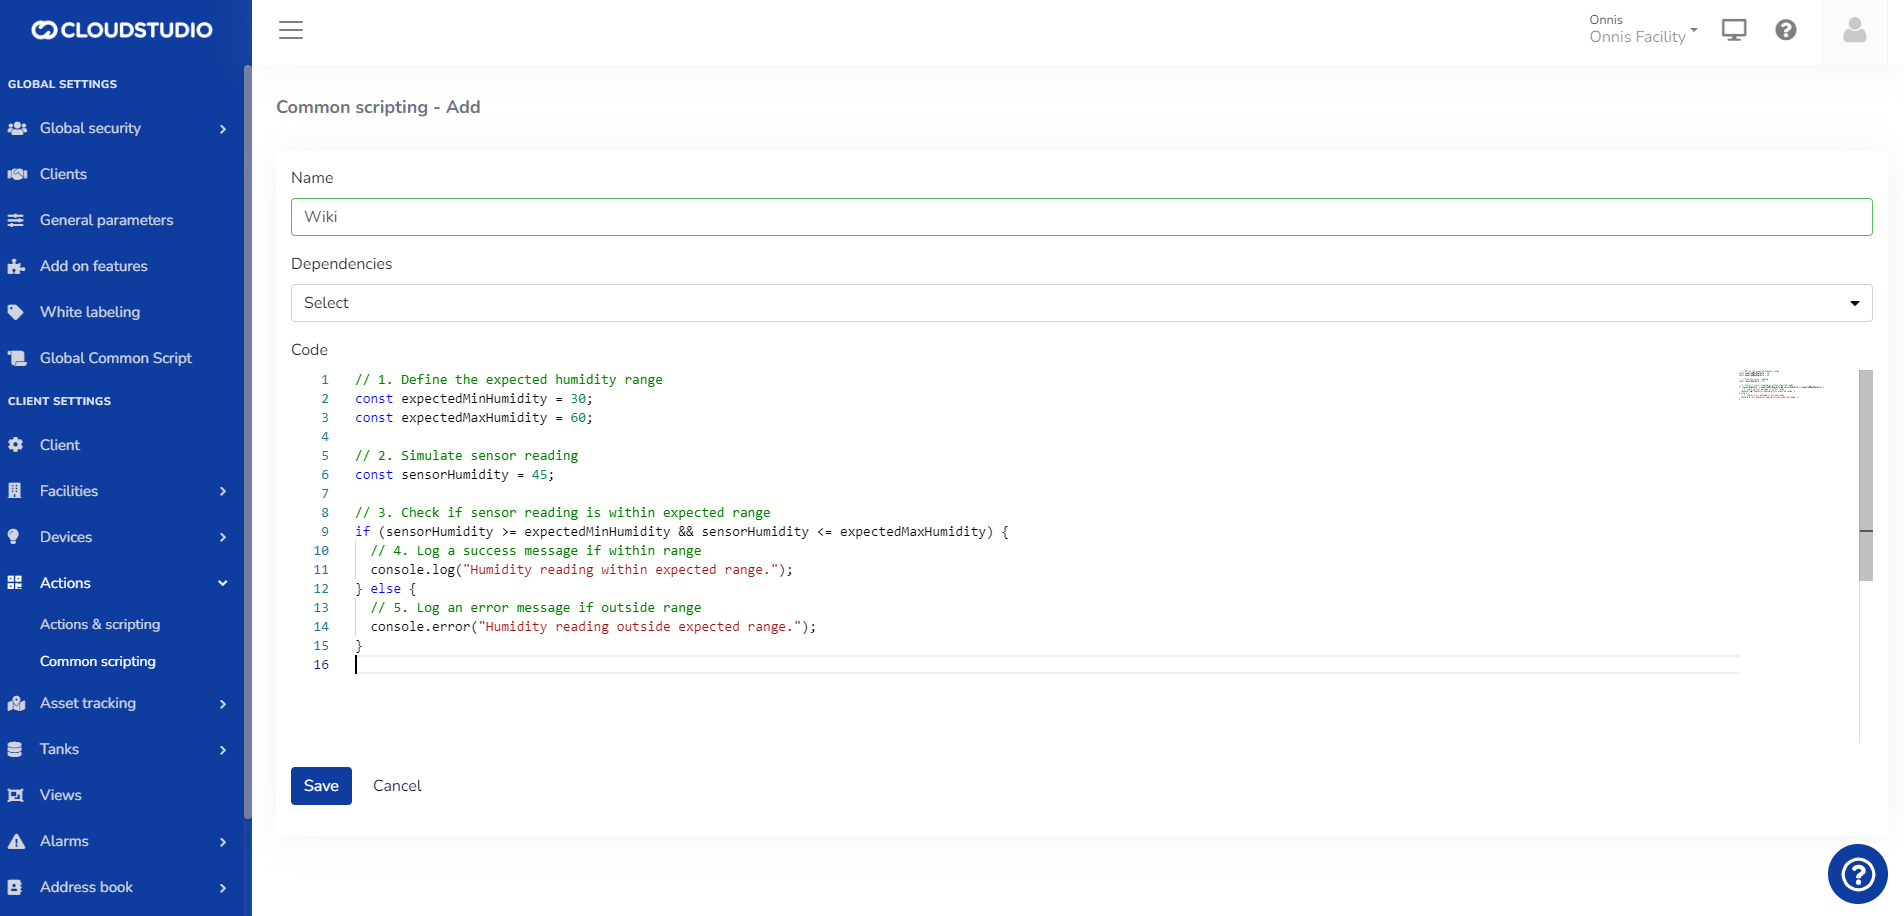
# Edit Global Script
In the Common Scripts general section, select the three dots on the right side of the screen.
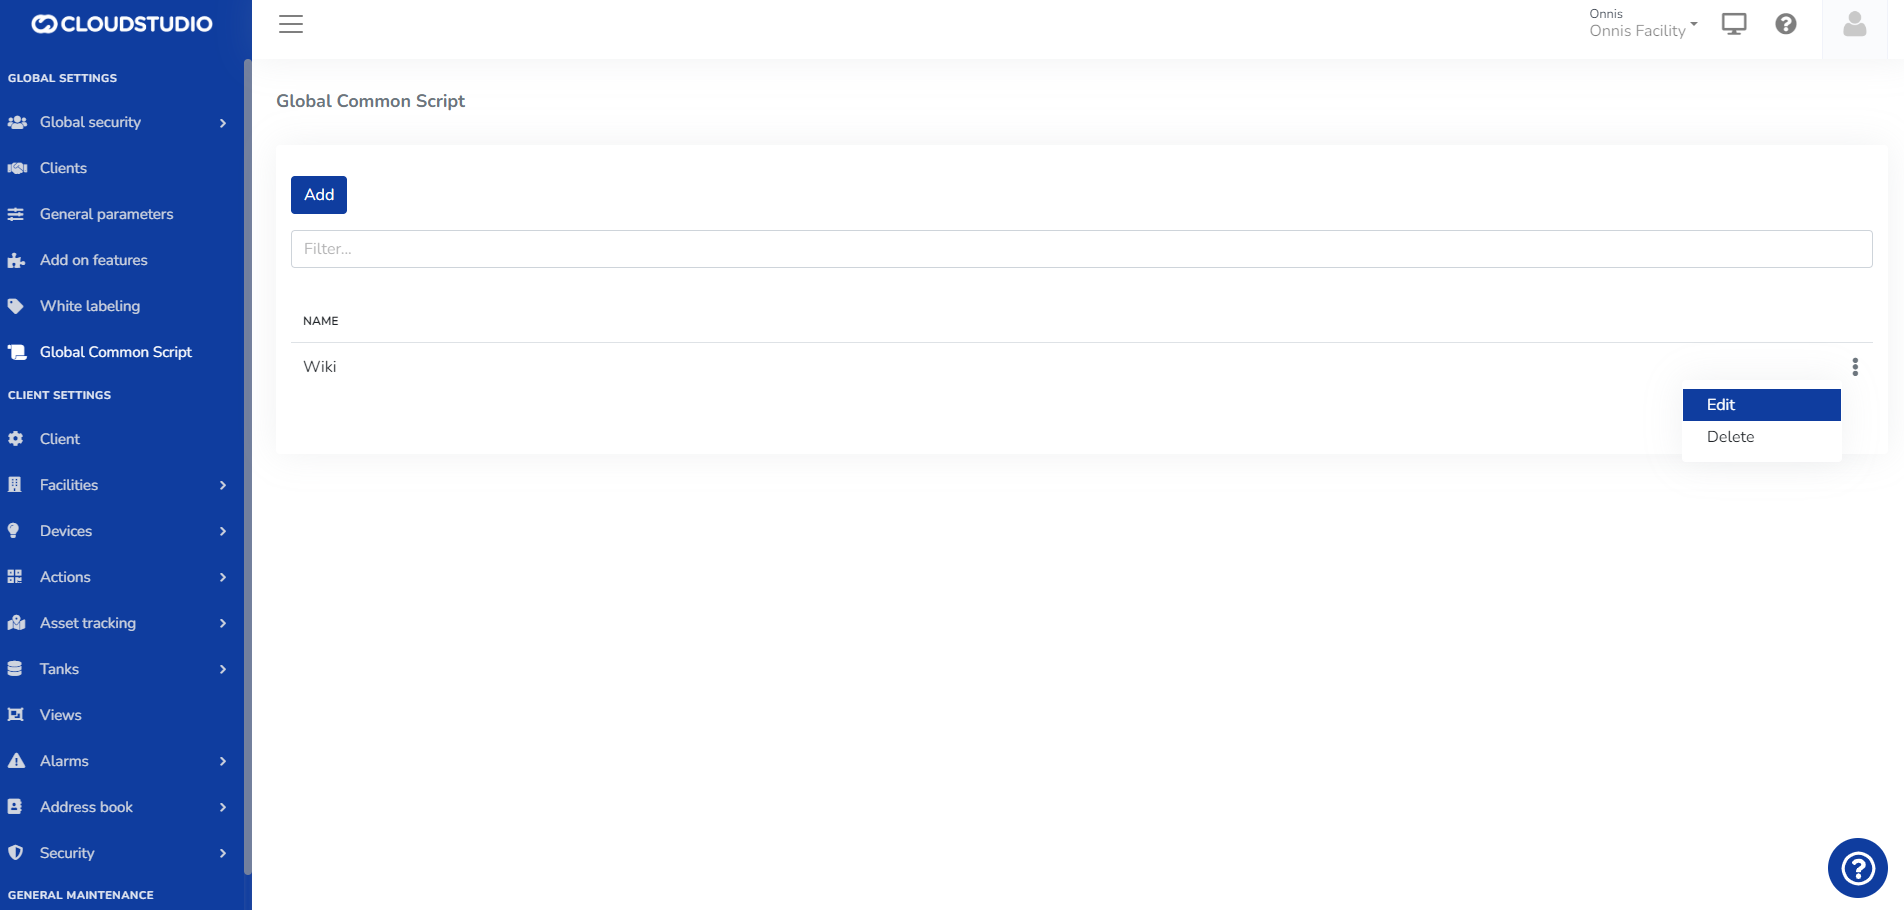
# Delete Global Script
In the Global Common Scripts general section, select the three dots on the right side of the screen.
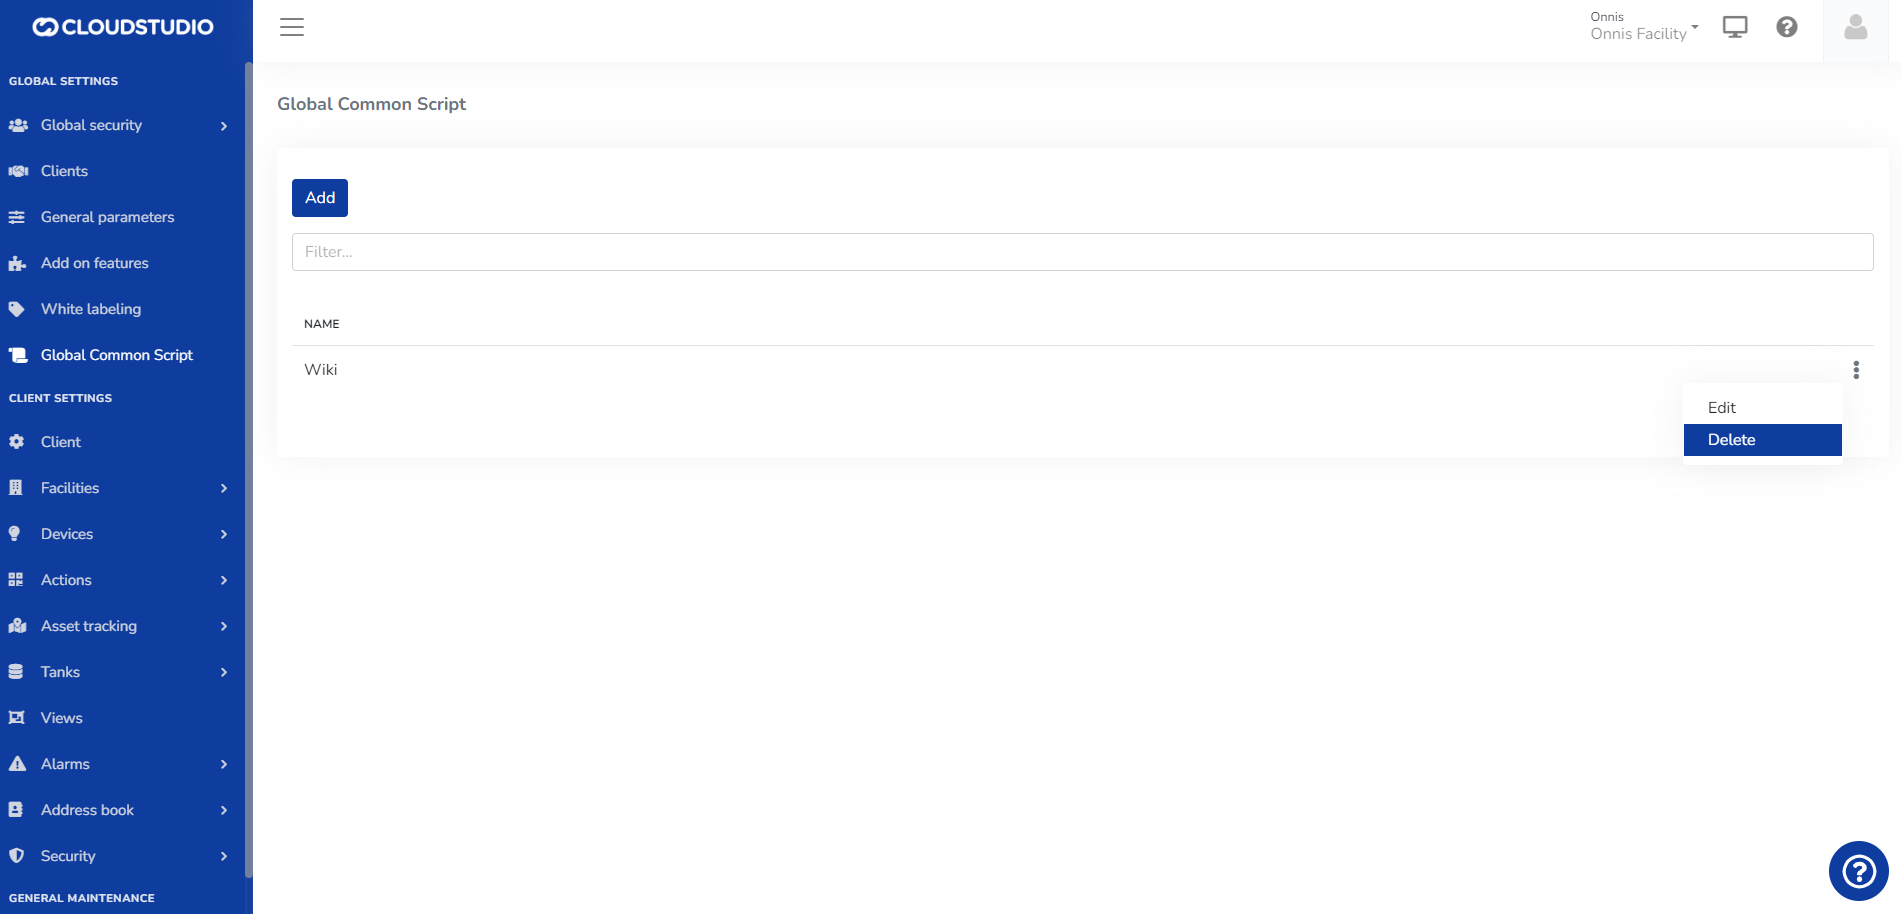
The user must **Confirm** or **Cancel** the requested action.
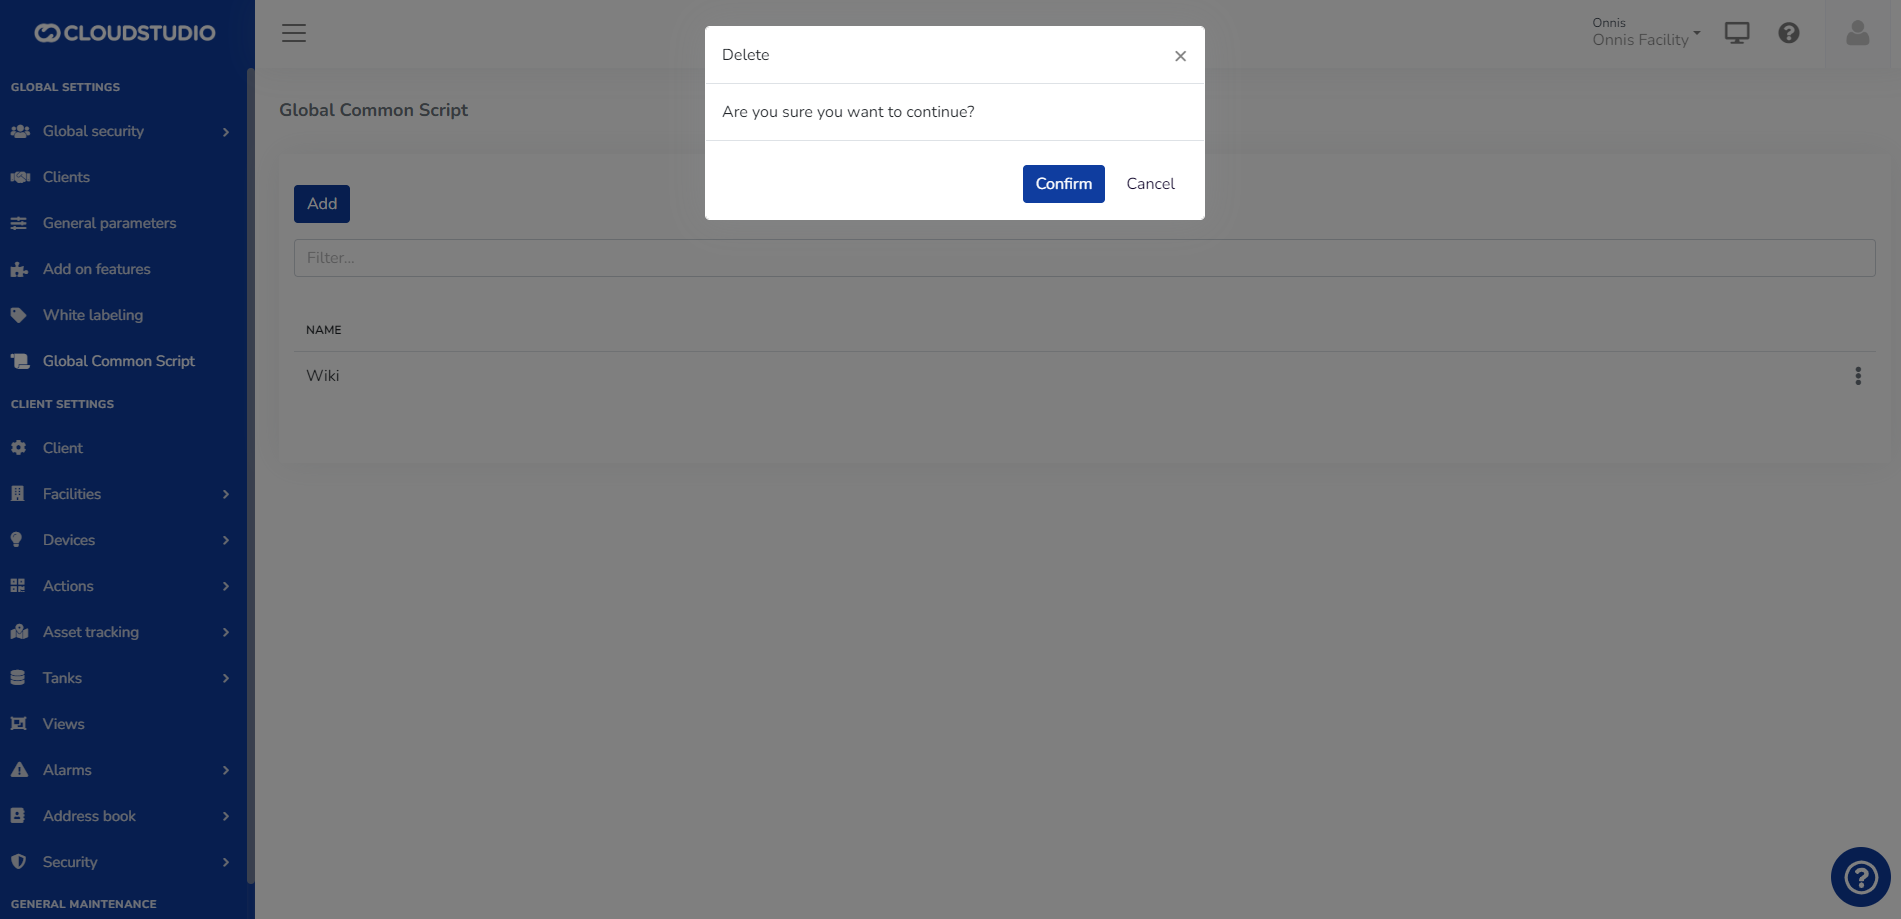
Upon confirmation, the Common Script is deleted and the user is redirected to the general screen for that option.

# Global Common Scripts
The following module allows working with **"Global Common Scripts" for all clients**, to reuse, simplify, and reduce the code of Device and Action Scripts.
A Script is a code fragment in an interpreted language (*JavaScript*) that is easy to understand, expanding the range of tools available when processing a specific business logic.
> Global Common Scripts will be used as libraries of common functionalities.
> Global Common Scripts will be used as dependencies in other scripts.
The module allows viewing the list of Global Common Scripts generated for all clients, as well as creating, editing, or deleting those scripts. Scripts can:
relate to each other to leverage code reuse.
access all devices of the client in which they are executing.
**From the following menu option**
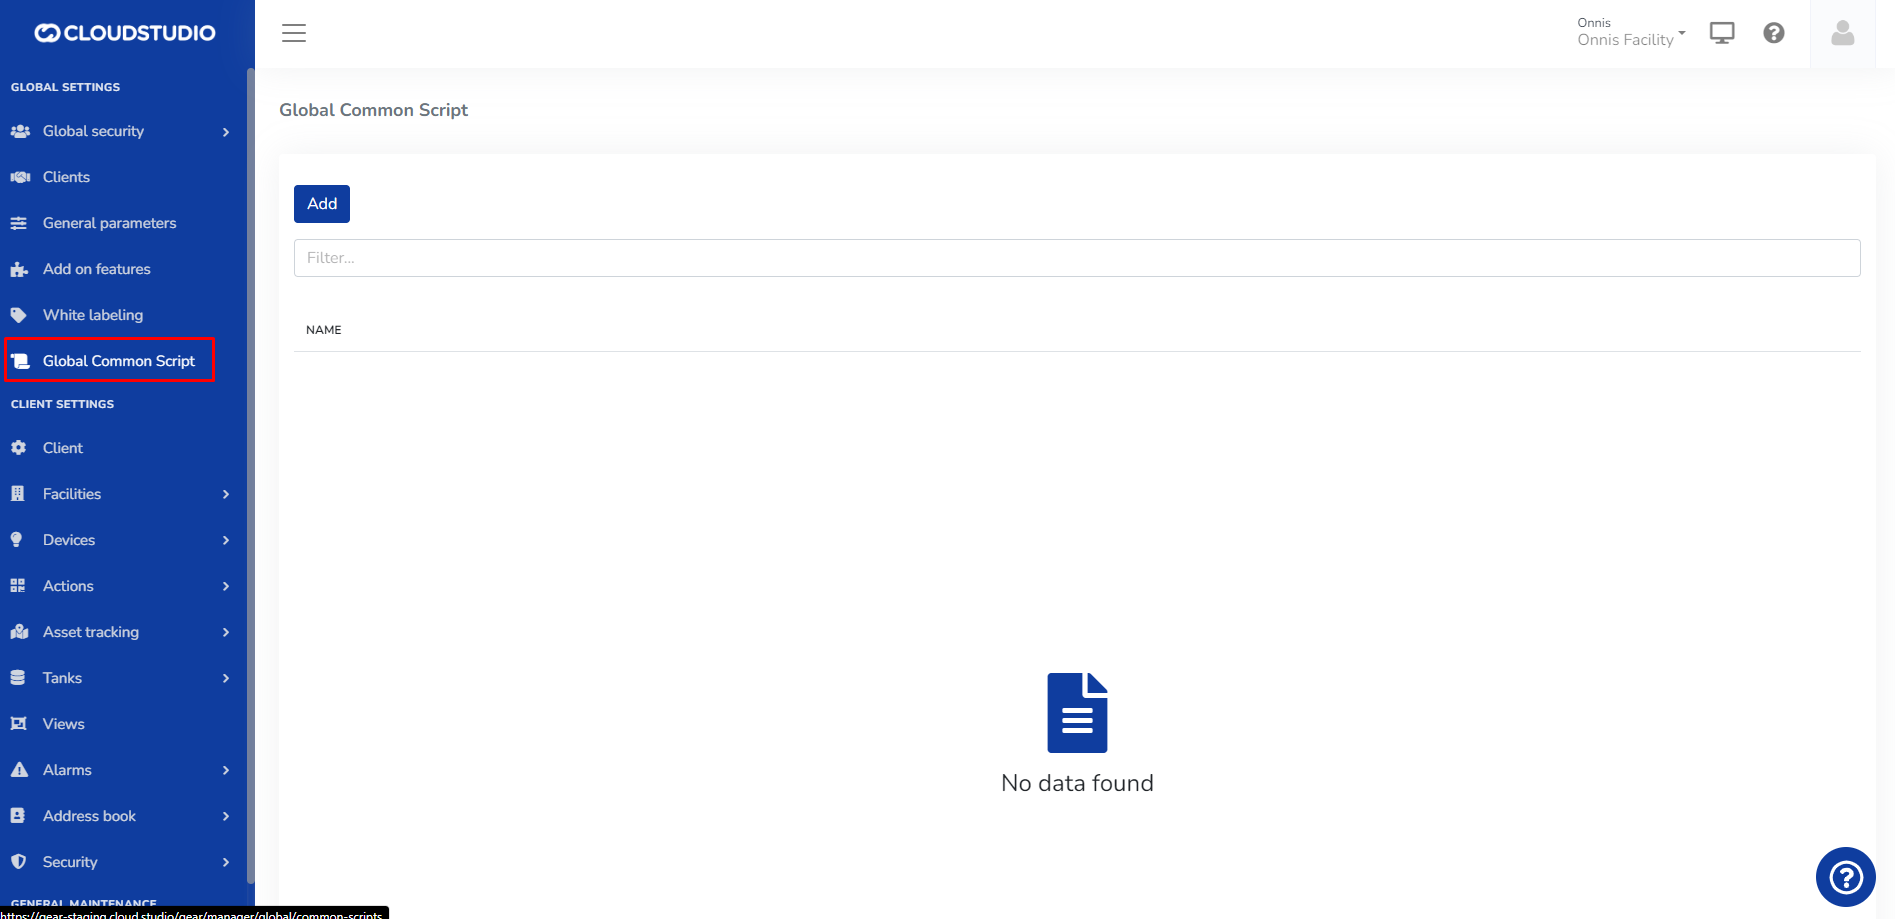
# Global Groups
**Global groups** allow quickly assigning permissions by associating **global permissions** to them and then associating **global users** to those groups, automatically inheriting the **global permissions** of the group in question.
# Global Security
Within "Global Configuration" in the Manager panel, you will find the Global Security option. Here you can add global users, edit them, set passwords, delete them, and also suspend them.
# Battery status
The battery status object represents the status of a device battery. This object is normally used to update the battery level through the `updateDeviceBattery` method of the [device](/docs/herramientas-low-code-scripting/referencia-de-objetos-disponibles-para-scripting/device) object, usually as part of a [LoRaWAN or MQTT data conversion](/docs/configuracion-del-cliente/dispositivos-y-endpoints/dispositivos/modelos-de-dispositivo/procesamiento-de-datos) script.
Properties [#properties]
\### type (int enum)
The type property indicates the battery type. The possible values for this property are as follows:
* **batteryType.default (1)**: this is the default value for this property, normally used when the device has a single battery.
* **batteryType.primary (2)**: when the device has more than one battery, this value indicates it is the primary battery.
* **batteryType.secondary (3)**: when the device has more than one battery, this value indicates it is the secondary battery.
* **batteryType.backup (4)**: when the device has more than one battery, this value indicates it is the backup battery.
**Examples**
This example shows how to report a battery level of 72% for the primary battery, and 68% for the secondary battery, on a device that has both primary and secondary batteries.
```javascript
myDevice.updateDeviceBattery
(
[
{ type: batterytype.primary, percentage: 72 },
{ type: batteryType.secondary, percentage: 68}
]
);
```
\### percentage (int) The percentage property indicates the battery charge percentage (0-100%).
**Examples**
This example shows how to report a battery level of 72% for the primary battery, and 68% for the secondary battery, on a device that has both primary and secondary batteries.
```javascript
myDevice.updateDeviceBattery
(
[
{ type: batterytype.primary, percentage: 72 },
{ type: batteryType.secondary, percentage: 68}
]
);
```
\### voltage (double) The voltage property allows indicating the battery voltage.
**Examples**
This example shows how to report a battery voltage of 2.95V for a device that has a single battery.
```javascript
myDevice.updateDeviceBattery({ voltage: 2.95 });
```
\### state (int enum)
The state property allows indicating the battery status. The possible values for this property are as follows:
* **batteryState.ok (1)**: indicates that the battery charge allows the device to function normally.
* **batteryState.low (2)**: indicates that the battery charge is low and should be replaced.
If the battery state is not reported, the platform will assume the **ok** state.
**Examples**
This example shows how to report a low battery state for a device that has a single battery.
```javascript
myDevice.updateDeviceBattery({ voltage: 2.95, state: batteryState.low });
```
# Command
The command object represents a command to be sent to a device or endpoint. This object is normally received as a parameter in the `buildDownlink` method as part of a [LoRaWAN or MQTT data conversion](/docs/configuracion-del-cliente/dispositivos-y-endpoints/dispositivos/modelos-de-dispositivo/procesamiento-de-datos) script.
Properties [#properties]
\### commandId (int) The **commandId** property indicates an internal number that uniquely identifies the command. If the device is capable of responding to the command, the response must contain the same **commandId**.
**Examples**
The following is an example based on the `buildDownlink` method documentation in the [LoRaWAN or MQTT data conversion](/docs/configuracion-del-cliente/dispositivos-y-endpoints/dispositivos/modelos-de-dispositivo/procesamiento-de-datos) section.
```javascript
function buildDownlink(device, endpoint, command, payload)
{
payload.port = 25; // This device receives commands on LoRaWAN port 25
payload.buildResult = downlinkBuildResult.ok;
switch (command.type) {
case commandType.onOff:
switch (command.onOff.type) {
case onOffCommandType.turnOn:
payload.setAsBytes([30]); // Command ID 30 is "turn on"
break;
case onOffCommandType.turnOff:
payload.setAsBytes([31]); // Command ID 31 is "turn off"
break;
case onOffCommandType.toggle:
payload.setAsBytes([32]); // Command ID 32 is "toggle"
break;
default:
payload.buildResult = downlinkBuildResult.unsupported;
break;
}
break;
default:
payload.buildResult = downlinkBuildResult.unsupported;
break;
}
}
```
\### type (int, enum)
The type property indicates the command type. The possible values are as follows:
* **commandType.onOff (1)**: indicates that the command is of on/off type, meaning it is for turning on, turning off, or toggling an endpoint.
* **commandType.dimmer (2)**: indicates that the command is for altering the level of a dimmer.
* **commandType.closure (3)**: indicates that the command is for controlling a closure, such as a curtain or blind.
* **commandType.thermostat (4)**: indicates that the command is for controlling a thermostat.
* **commandType.management (5)**: indicates that the command is for managing the device (reboot, firmware upgrade, etc.).
* **commandType.custom (6)**: indicates that it is a user-defined command.
**Examples**
A complete example is presented at the beginning of this section.
\### onOff (object)
The **onOff** property is an object containing the command parameters when it is of type **commandType.onOff**. The object has the following properties:
* **type (int enum)**: indicates the on/off command type, among the following:
* **onOffCommandType.turnOn (0)**: indicates that the command is to turn on the endpoint.
* **onOffCommandType.turnOff (1)**: indicates that the command is to turn off the endpoint.
* **onOffCommandType.toggle (2)**: indicates that the command is to toggle the endpoint.
**Examples**
A complete example is presented at the beginning of this section.
\### dimmer (object)
The **dimmer** property is an object containing the command parameters when it is of type **commandType.dimmer**. The object has the following properties:
* **level (double)**: indicates the dimming level as a percentage, from zero to 100%.
**Examples**
A complete example is presented at the beginning of this section.
\### thermostat (object)
The **thermostat** property is an object containing the command parameters when it is of type **commandType.thermostat**. The object has the following properties:
* **type (int enum)**: indicates the type of command sent to the thermostat, among the following:
* **thermostatCommandType.setMode (0)**: the command is to change the thermostat mode.
* **thermostatCommandType.setFanMode (1)**: the command is to change the thermostat fan mode.
* **thermostatCommandType.setSetpoint (2)**: the command is to change the setpoint.
* **thermostatCommandType.setAll (3)**: the command is to change all parameters simultaneously.
* **mode (int enum)**: indicates the mode the thermostat should switch to, when the type is **thermostatCommandType.setMode** or **thermostatCommandType.setAll**. The possible values are as follows:
* **thermostatMode.off (1)**: the thermostat should be turned off.
* **thermostatMode.auto (2)**: the thermostat should switch to auto mode.
* **thermostatMode.heat (3)**: the thermostat should switch to heat mode.
* **thermostatMode.cool (4)**: the thermostat should switch to cool mode.
* **thermostatMode.dry (5)**: the thermostat should switch to dehumidification (dry) mode.
* **thermostatMode.fan (6)**: the thermostat should switch to fan mode.
* **fanMode (int enum)**: indicates the fan mode the thermostat should switch to, when the type is **thermostatCommandType.setFanMode** or **thermostatCommandType.setAll**. The possible values are as follows:
* **thermostatFanMode.auto (1)**: the fan should switch to auto mode.
* **thermostatFanMode.low (2)**: the fan should switch to low mode.
* **thermostatFanMode.mid (3)**: the fan should switch to mid mode.
* **thermostatFamMode.high (4)**: the fan should switch to high mode.
* **setpoint (double)**: indicates the setpoint in degrees Celsius, when the type is **thermostatCommandType.setSetpoint** or **thermostatCommandType.setAll**.
**Examples**
A complete example is presented at the beginning of this section.
\### closure (object)
The **closure** property is an object containing the command parameters when it is of type **commandType.closure**. The object has the following properties:
* **type (int enum)**: indicates the type of command sent to the closure, among the following:
* **closureCommandType.open (0)**: the command is for the closure to open.
* **closureCommandType.close (1)**: the command is for the closure to close.
* **closureCommandType.position (2)**: the command is to change the position of the closure.
* **closureCommandType.stop (3)**: the command is to stop the closure movement.
* **closureCommandType.openStop (4)**: the command is to open the closure, or stop it if it is moving.
* **closureCommandType.closeStop (5)**: the command is to close the closure, or stop it if it is moving.
* **position (int)**: indicates the position to which the closure should move, when the type is **closureCommandType.position**, as a percentage, between 0% (closed) and 100% (open).
**Examples**
A complete example is presented at the beginning of this section.
\### management (object)
The **management** property is an object containing the command parameters when it is of type **commandType.management**. The object has the following properties:
* **type (int enum)**: indicates the type of command sent to the device, among the following:
* **managementCommandType.identify (0)**: requests the device to identify itself. This is used on some devices to have the device activate a visual or audible indicator.
* **managementCommandType.reboot (1)**: requests the device to restart.
* **managementCommandType.powerOff (2)**: requests the device to power off.
* **managementCommandType.poll (3)**: requests the device to send updated information as soon as possible.
* **managementCommandType.updateFirmware (4)**: requests the device to update its firmware.
* **managementCommandType.setValue (5)**: requests the device to change a value.
* **updateFirmware (object)**: indicates the firmware update parameters, when the value of the **type** field is **managementCommandType.updateFirmware**. The properties of this object are as follows:
* **downloadUrl (string)**: indicates the URL from which the device should download the firmware update.
* **setValue (object)**: the setValue object contains the necessary information to change the value, when the value of the **type** field is **managementCommandType.setValue**. The properties of this object are as follows:
* **newValue (double)**: indicates the new value to be assigned.
**Examples**
A complete example is presented at the beginning of this section.
\### custom (object)
The **custom** property is an object containing the command parameters when it is of type **commandType.custom**. The object has the following properties:
* **type (int)**: arbitrary value indicating the custom command type.
* **data (string)**: arbitrary value to be sent to the device.
**Examples**
A complete example is presented at the beginning of this section.
# Data payload
The data payload object represents a payload received from a device, for example a device with MQTT, HTTP, or LoRaWAN connectivity. The object allows accessing received data in binary form, as text, as a JSON object, and in other ways. This object is usually received as a parameter in certain scripts, such as [MQTT, HTTP, or LoRaWAN data conversion](/docs/configuracion-del-cliente/dispositivos-y-endpoints/dispositivos/modelos-de-dispositivo/procesamiento-de-datos) scripts.
Properties [#properties]
\### port (int, only available for LoRaWAN packets) The port property indicates the LoRaWAN port to which the device sent the payload. This property only has a value for payloads received through a LoRaWAN network. For other communication methods, the value is always zero.
**Examples**
This example shows the payload port in the log console.
```javascript
env.log('Payload port: ', payload.port);
```
\### topic (string, only available for MQTT packets) The topic property indicates the MQTT topic to which the device sent the payload. This property only has a value for payloads received through MQTT. For other communication methods, the value is always an empty string.
**Examples**
This example shows the payload topic in the log console.
```javascript
env.log('Payload topic: ', payload.topic);
```
\### buildResult (enum, only for downlinks)
The buildResult property allows indicating the result of building a payload for downlinks. This is typically used in the buildDownlink() function of the [data processing script](/docs/configuracion-del-cliente/dispositivos-y-endpoints/dispositivos/modelos-de-dispositivo/procesamiento-de-datos) for LoRaWAN and MQTT. The possible values for this property are as follows:
* **downlinkBuildResult.ok (0)**: .
* **downlinkBuildResult.error (1)**: .
* **downlinkBuildResult.unsupported (2)**: .
**Examples**
This example shows a code snippet indicating an error message during the creation of a downlink payload.
```javascript
payload.buildResult = downlinkBuildResult.error;
payload.errorMessage = { en: "Invalid parameter", es: "Parámetro no válido" };
```
\### errorMessage (string or multi-language literal, only for downlinks) The errorMessage property allows indicating an error message during the construction of a payload for downlinks. This is typically used in the buildDownlink() function of the [data processing script](/docs/configuracion-del-cliente/dispositivos-y-endpoints/dispositivos/modelos-de-dispositivo/procesamiento-de-datos) for LoRaWAN and MQTT, when using the value **downlinkBuildResult.error** in the **buildResult** property. The value assigned to this property can be a string, or a [multi-language literal](/docs/herramientas-low-code-scripting/referencia-de-objetos-disponibles-para-scripting/multi-language-literal) object.
**Examples**
This example shows a code snippet indicating an error message during the creation of a downlink payload.
```javascript
payload.buildResult = downlinkBuildResult.error;
payload.errorMessage = { en: "Invalid parameter", es: "Parámetro no válido" };
```
\### requiresResponse (boolean, only for downlinks)
The **requiresResponse** property allows indicating whether the message being built requires a response from the device, or whether the command should be considered successfully completed as soon as it is sent.
* If the property has the value **false** (default value), the command will be considered sent as soon as the payload is sent to the MQTT broker (for MQTT devices), or the payload is queued at the LoRaWAN gateway (for LoRaWAN devices).
* If the property has the value **true**, the command will remain open until the device itself sends a response to the command.
The default value of this property is **false**.
**Examples**
This example shows a code snippet indicating that the payload does not require a response from the device.
```javascript
payload.requiresResponse = false;
```
\### latitude (double, only for uplinks) The **latitude** property allows knowing the latitude of the device that sent data. This property is only available if the information provider was able to calculate the device's location through triangulation or an equivalent method.
**Examples**
This example shows a code snippet that displays the device's latitude.
```javascript
env.log("Latitude: ", payload.latitude);
```
\### longitude (double, only for uplinks) The **longitude** property allows knowing the longitude of the device that sent data. This property is only available if the information provider was able to calculate the device's location through triangulation or an equivalent method.
**Examples**
This example shows a code snippet that displays the device's longitude.
```javascript
env.log("Longitude: ", payload.longitude);
```
\### altitude (double, only for uplinks) The **altitude** property allows knowing the altitude of the device that sent data. This property is only available if the information provider was able to calculate the device's location through triangulation or an equivalent method.
**Examples**
This example shows a code snippet that displays the device's altitude.
```javascript
env.log("Altitude: ", payload.altitude);
```
Methods [#methods]
\### asBytes() The asBytes() method allows obtaining the payload content as a byte array. This is primarily used when the payload needs to be processed in binary form.
**Example 1**
This example shows the payload content as bytes, through the log console.
```javascript
payload.asBytes().forEach(element => env.log(element));
```
\### asString() The asString() method allows obtaining the payload content as a string, converting the binary content to a string and assuming UTF-8 encoding. This is primarily used when the payload needs to be processed as text.
**Example 1**
This example shows the payload content as a string, through the log console.
```javascript
env.log(payload.asString());
```
\### asJsonObject() The asJsonObject() method allows obtaining the payload content as an object, assuming the payload is text encoded in JSON format. This is primarily used when the payload needs to be processed as JSON text.
**Example 1**
This example shows the payload content as a JSON object, through the log console.
```javascript
env.log(payload.asJsonObject());
```
\### asParsedObject() The asParsedObject() method allows obtaining the parsed version of the payload, as sent to the platform. Some communication platforms, such as Actility and The Things Stack, are capable of sending a processed version of the payload information, in addition to the binary data. This method allows accessing the information sent by these platforms directly. Note that the result may be null if no processed data was received.
**Example 1**
This example shows the payload content processed by the communication platform, through the log console.
```javascript
env.log(payload.asParsedObject());
```
\### setAsBytes(bytesContent) The setAsBytes() method allows setting the payload content as a byte array. This method is normally used when creating downlinks.
**Parameters**
* **bytesContent** (array of bytes): new payload content, expressed as a byte array.
**Example 1**
This example shows how to set the payload as a five-byte array.
```javascript
payload.setAsBytes([9, 8, 7, 6, 5]);
```
\### setAsString(stringContent) The setAsString() method allows setting the payload content as text. This method is normally used when creating downlinks.
**Parameters**
* **stringContent** (string): new payload content, expressed as text.
**Example 1**
This example shows how to set the payload as text.
```javascript
payload.setAsString("Some text");
```
\### setAsJsonObject(objectContent) The setAsJsonObject() method allows setting the payload content as an object, which will be converted to its JSON format representation. This method is normally used when creating downlinks.
**Parameters**
* **objectContent** (object): new payload content, expressed as an object.
**Example 1**
This example shows how to set the payload as an object.
```javascript
payload.setAsJsonObject({ on: true, dimLevel: 65 });
```
\_\_\_\_\_\_\_\_\_\_\_\_\_\_\_\_\_\_\_\_\_\_\_\_\_\_\_\_\_\_\_\_\_\_\_\_\_\_\_\_\_\_\_\_\_\_\_\_\_\_\_\_\_\_\_\_\_\_\_\_\_\_\_\_\_\_\_\_\_\_\_\_\_\_\_\_\_\_\_\_\_\_\_\_\_\_\_\_\_\_\_\_\_\_\_\_\_\_\_\_\_\_\_\_\_\_\_\_\_\_\_\_\_\_\_\_\_\_\_\_\_\_\_\_
**Network Signal**
`payload.rssi.quality`
Measures the quality of the signal with which the message is received. It is a percentage and its value can range between 0 and 100.
```
Javascript
var rssiQuality = payload.rssi.quality;
env.log("Quality:", rssiQuality);
Ejemplo:
Json
"rssi":
{
"quality": 87
}
```
**Signal Strength**
`payload.rssi.strength`
Is the signal strength. Measures the power, generally in decibels. It is better when the number is lower.
```
Javascript
var rssiStrength = payload.rssi.strength;
env.log("Strength:", rssiStrength);
Ejemplo:
Json
"rssi": {
"strength": 8
}
```
**Signal Type**
`payload.rssi.type`
References the communication method type used by the device to send the message. For example: LoRaWAN, NbIoT, LTE, etc.
```
Javascript
var rssiType = payload.rssi.type;
env.log("Type:", rssiType);
Json
Ejemplo:
"rssi":
{
"type": "lora"
}
```
**PORT**
`payload.port`
The logical port used by the device that serves to identify the data type or format.
```
Javascript
var port = payload.port;
env.log("Port:", port);
Json
"port": 1
```
**TOPIC**
`payload.topic`
The channel through which the message was received. Useful for architectures with multiple routes or MQTT type.
```
javascript
var topic = payload.topic;
env.log("Topic:", topic);
Json
"topic": "uplink/temperature"
```
**LATITUDE**
`payload.latitude`
Indicates the north/south position from where the message was sent.
`var latitude = payload.latitude; env.log("Latitude:", latitude);`
```
javascript
var latitude = payload.latitude;
env.log("Latitude:", latitude);
Json
"latitude": 19.4326
```
LONGITUDE [#longitude]
`payload.longitude`
Indicates the east/west position from where the message originated.
```
Javascript
var longitude = payload.longitude;
env.log("Longitude:", longitude);
Ejemplo:
"longitude": -99.1332
```
Altitude [#altitude]
`payload.altitude`
Represents the height in meters above sea level where the device that made the transmission is located.
```
javascript
var altitude = payload.altitude;
env.log("Altitude:", altitude);
Json
"altitude": 2250
```
# DataPoint
The DataPoint object represents a value, typically used to represent the state of an endpoint at a given moment.
Properties [#properties]
\### value (number) The value property represents the endpoint value as a number. See the table at the end of this section for the endpoint types to which this property applies and its meaning.
**Examples**
This example shows the current value of the first endpoint of a device, through the log console.
```javascript
env.log('Endoint value: ', myDevice.endpoints.byIndex(0).getCurrentValue().value);
```
\### isOn (boolean) The isOn property indicates whether the endpoint is currently turned on. See the table at the end of this section for the endpoint types to which this property applies and its meaning.
**Examples**
This example shows the current state of the first endpoint of a device, through the log console.
```javascript
env.log('Endoint state: ', myDevice.endpoints.byIndex(0).getCurrentValue().isOn);
```
\### state (number) The state property indicates the current state of the endpoint. This property applies to IAS Sensor type endpoints.
**Examples**
This example shows the current state of the first endpoint of a device, through the log console.
```javascript
env.log('Endoint state: ', myDevice.endpoints.byIndex(0).getCurrentValue().state);
```
\### position (number) The position property indicates the current position, for Closure type endpoints.
**Examples**
This example shows the current position of the first endpoint of a device, through the log console.
```javascript
env.log('Endoint position: ', myDevice.endpoints.byIndex(0).getCurrentValue().position);
```
\### mode (number) The mode property indicates the current mode of a Thermostat type endpoint.
**Examples**
This example shows the current mode of the first endpoint of a device, through the log console.
```javascript
env.log('Thermostat mode: ', myDevice.endpoints.byIndex(0).getCurrentValue().mode);
```
\### fanMode (number) The fanMode property indicates the current fan mode of a Thermostat type endpoint.
**Examples**
This example shows the current fan mode of the first endpoint of a device, through the log console.
```javascript
env.log('Fan mode: ', myDevice.endpoints.byIndex(0).getCurrentValue().fanMode);
```
\### setpoint (number) The setpoint property indicates the desired temperature for a Thermostat type endpoint.
**Examples**
This example shows the desired temperature of the first endpoint of a device, through the log console.
```javascript
env.log('Setpoint: ', myDevice.endpoints.byIndex(0).getCurrentValue().setpoint);
```
\### ambientTemperature (number) The ambientTemperature property indicates the current ambient temperature of a Thermostat type endpoint.
**Examples**
This example shows the current ambient temperature of the first endpoint of a device, through the log console.
```javascript
env.log('Ambient temperature: ', myDevice.endpoints.byIndex(0).getCurrentValue().ambientTemperature);
```
\### latitude (number) The latitude property indicates the latitude for a Location Tracker type endpoint.
**Examples**
This example shows the current coordinates of the first endpoint of a device, through the log console.
```javascript
var v = myDevice.endpoints.byIndex(0).getCurrentValue();
env.log('Coordinates: ', v.latitude, ' - ', v.longitude);
```
\### longitude (number) The longitude property indicates the longitude for a Location Tracker type endpoint.
**Examples**
This example shows the current coordinates of the first endpoint of a device, through the log console.
```javascript
var v = myDevice.endpoints.byIndex(0).getCurrentValue();
env.log('Coordinates: ', v.latitude, ' - ', v.longitude);
```
\### flags (number) The flags property indicates the special conditions of a Location Tracker type endpoint.
**Examples**
This example shows the flags of the first endpoint of a device, through the log console.
```javascript
env.log('Flags: ', myDevice.endpoints.byIndex(0).getCurrentValue().flags);
```
\### activeEnergy (number) The activeEnergy property indicates the active energy of an Energy Meter type endpoint.
**Examples**
This example shows the active, reactive, and apparent energy of the first endpoint of a device, through the log console.
```javascript
var v = myDevice.endpoints.byIndex(0).getCurrentValue();
env.log('Energy (active / reactive / apparent): ', v.activeEnergy, '/', v.reactiveEnergy, '/', v.apparentEnergy);
```
\### reactiveEnergy (number) The reactiveEnergy property indicates the reactive energy of an Energy Meter type endpoint.
**Examples**
This example shows the active, reactive, and apparent energy of the first endpoint of a device, through the log console.
```javascript
var v = myDevice.endpoints.byIndex(0).getCurrentValue();
env.log('Energy (active / reactive / apparent): ', v.activeEnergy, '/', v.reactiveEnergy, '/', v.apparentEnergy);
```
\### apparentEnergy (number) The apparentEnergy property indicates the apparent energy of an Energy Meter type endpoint.
**Examples**
This example shows the active, reactive, and apparent energy of the first endpoint of a device, through the log console.
```javascript
var v = myDevice.endpoints.byIndex(0).getCurrentValue();
env.log('Energy (active / reactive / apparent): ', v.activeEnergy, '/', v.reactiveEnergy, '/', v.apparentEnergy);
```
\### text (string) The text property indicates the text associated with a Text Container type endpoint.
**Examples**
This example shows the text associated with the first endpoint of a device, through the log console.
```javascript
env.log('Text: ', myDevice.endpoints.byIndex(0).getCurrentValue().text);
```
DataPoint object properties for each endpoint type [#datapoint-object-properties-for-each-endpoint-type]
| Property | Endpoint type | Meaning |
| ------------------ | ------------------------------------------ | ------------------- |
| value | Numeric endpoints (scalar, discrete, etc.) | Current value |
| Appliance | Off: 0On: 1 | |
| Dimmer | Off: 0On: current level | |
| Closure | Current position | |
| IAS Sensor | Current state | |
| isOn | Appliance / Dimmer / Thermostat | Off: falseOn: true |
| Closure | Stopped: falseMoving: true | |
| state | IAS Sensor | Current state |
| position | Closure | Current position |
| mode | Thermostat | Current mode |
| fanMode | Thermostat | Current fan mode |
| setpoint | Thermostat | Desired temperature |
| ambientTemperature | Thermostat | Ambient temperature |
| latitude | Location tracker | Latitude |
| longitude | Location tracker | Longitude |
| flags | Location tracker | Location flags |
| activeEnergy | Energy Meter | Active energy |
| reactiveEnergy | Energy Meter | Reactive energy |
| apparentEnergy | Energy Meter | Apparent energy |
| text | Text container | Current text |
# Device address validation result
The device address validation result object represents the result of a device address validation, typically used in [device model configuration](/docs/configuracion-del-cliente/dispositivos-y-endpoints/dispositivos/modelos-de-dispositivo/configuracion) scripts.
The `validateDeviceAddress` function receives an object of this type as a parameter, which allows validating the given address and indicating the validation result.
Properties [#properties]
\### ok (boolean) The **ok** property indicates whether the validation was successful. The value true indicates that the specified address is correct, while the value false indicates that the address cannot be accepted. When returning the value true, it is also possible to optionally assign a value to the **updatedAddress** property, if the specified address needs to be modified. In that case, the platform will use the **updatedAddress** property value for the device.
**Examples**
This example validates a device address, verifying that it has 10 characters. If the validation is successful, the address is also converted to lowercase. If the validation is not successful, an error message is indicated.
```javascript
function validateDeviceAddress(address, result)
{
result.ok = address.length == 10;
if (result.ok)
{
result.updatedAddress = address.toLowerCase();
}
else
{
result.errorMessage = {
en: "The address must be exactly 10 characters long",
es: "La dirección debe tener exactamente 10 caracteres"
};
}
}
```
\### updatedAddress (string) The updatedAddress property allows modifying the address being validated, so that if the validation is successful, a different address can be used. By default, the value of this property is equal to the address passed as a parameter to the `validateDeviceAddress` function. Typically, the address can be changed to give it a consistent format.
**Examples**
A complete example can be found in the documentation of the **ok** property above.
\### errorMessage (string or multi-language literal) The errorMessage property allows indicating an error message when the **ok** property has the value false. To indicate an error message, a string or [multi language literal](/docs/herramientas-low-code-scripting/referencia-de-objetos-disponibles-para-scripting/multi-language-literal) value can be specified. If a [multi language literal](/docs/herramientas-low-code-scripting/referencia-de-objetos-disponibles-para-scripting/multi-language-literal) object is used, it is possible to indicate messages in different languages.
**Examples**
A complete example can be found in the documentation of the **ok** property above.
# Device model configuration
The device model configuration object allows establishing the basic configuration for a device model, typically used in [device model configuration](/docs/configuracion-del-cliente/dispositivos-y-endpoints/dispositivos/modelos-de-dispositivo/configuracion) scripts.
The `getConfiguration` function receives an object of this type as a parameter, which allows establishing the basic configuration of the device model for which the script has been written.
Properties [#properties]
\### addressLabel (string or multi-language literal) The **addressLabel** property allows setting the text to be displayed in the user interface for the "address" field. For example, if it is a LoRaWAN device, it would be preferable to use the name "DEVEUI" instead of "address", or use "MAC address" if it is a Wi-Fi device. If this property is not set, the default value will be "Address". If a string value is assigned, this string will be used in the UI regardless of the user's preferred language. If a multi-language literal is specified (as in the example below), the platform will use the text corresponding to the user's preferred language.
**Examples**
This example shows the address of the first endpoint of a device, through the log console.
```javascript
config.addressLabel = {en: "MAC address", es: "Dirección MAC"};
```
# Device UI rules
The device UI rules object represents the user interface rules applied to a device, typically used in [device model configuration](/docs/configuracion-del-cliente/dispositivos-y-endpoints/dispositivos/modelos-de-dispositivo/configuracion) scripts.
The `updateDeviceUIRules` function receives an object of this type as a parameter, which allows establishing the user interface rules for the device given as a parameter in the script.
Properties [#properties]
\### canCreateEndpoints (boolean) The canCreateEndpoints property indicates whether it is possible to create endpoints on the device given as a parameter. The value true indicates that creating endpoints is allowed, while the value false prevents the creation of new endpoints.
**Examples**
This example prevents creating new endpoints on a device.
```javascript
function updateDeviceUIRules(device, rules)
{
rules.canCreateEndpoints = false;
}
```
# Device
The device object represents a device installed in the platform. Certain scripts, such as LoRaWAN or MQTT data conversion scripts, receive a device object as a parameter representing the device to which the data is destined. In scripts executed from actions, it is possible to access the list of devices through the devices property of the global variable **env**, which represents the execution environment.
Properties [#properties]
\### address (string) The address property represents the address of the device, as text.
**Examples**
This example shows the address of a device in the log console.
```javascript
env.log('Device address: ', myDevice.address);
```
\### endpoints (endpoint collection) The endpoints property represents the list of endpoints contained within the device. This list is an object of type [endpoint collection](/docs/herramientas-low-code-scripting/referencia-de-objetos-disponibles-para-scripting/endpoint-collection).
**Examples**
This example shows the number of endpoints of a device in the log console.
```javascript
env.log('Endpoint count: ', myDevice.endpoints.count);
```
\### description (string) The description property represents the description of the device.
**Examples**
This example shows the description of a device in the log console.
```javascript
env.log('Device description: ', myDevice.description);
```
Methods [#methods]
\### updateDeviceBattery(battery) The updateDeviceBattery() method allows updating the battery status of the device, including for devices that contain more than one battery (for example, main and backup battery).
**Parameters**
* battery ([battery status](/docs/herramientas-low-code-scripting/referencia-de-objetos-disponibles-para-scripting/battery-status) object, or array of [battery status](/docs/herramientas-low-code-scripting/referencia-de-objetos-disponibles-para-scripting/battery-status) objects): this parameter indicates the battery status. If the device contains a single battery, a [battery status](/docs/herramientas-low-code-scripting/referencia-de-objetos-disponibles-para-scripting/battery-status) object should be passed. If the device contains more than one battery, an array of [battery status](/docs/herramientas-low-code-scripting/referencia-de-objetos-disponibles-para-scripting/battery-status) objects should be passed, containing the status of all batteries. For each object passed as a parameter, at least the [percentage](/docs/herramientas-low-code-scripting/referencia-de-objetos-disponibles-para-scripting/battery-status) property (if the charge percentage is available), or the [voltage](/docs/herramientas-low-code-scripting/referencia-de-objetos-disponibles-para-scripting/battery-status) property (if the voltage is available), or both, should be specified. If the [type](/docs/herramientas-low-code-scripting/referencia-de-objetos-disponibles-para-scripting/battery-status) property is omitted, the [batteryType.default](/docs/herramientas-low-code-scripting/referencia-de-objetos-disponibles-para-scripting/battery-status) type will be assumed. When reporting the status of multiple batteries, it is mandatory to report the [type](/docs/herramientas-low-code-scripting/referencia-de-objetos-disponibles-para-scripting/battery-status) property for each one.
**Example 1**
This example shows how to report a battery level of 45% on a device that has a single battery.
```javascript
myDevice.updateDeviceBattery({ percentage: 45 });
```
**Example 2**
This example shows how to report a battery level of 72% for the primary battery, and 68% for the secondary battery, on a device that has both primary and secondary batteries.
```javascript
myDevice.updateDeviceBattery
(
[
{ type: batteryType.primary, percentage: 72 },
{ type: batteryType.secondary, percentage: 68}
]
);
```
**Example 3**
This example shows how to report a battery level of 2.92 volts, on a device with a single battery that reports voltage instead of remaining charge percentage.
```javascript
myDevice.updateDeviceBattery({ voltage: 2.92 });
```
\### updateDeviceFirmwareVersion(version) The updateDeviceFirmwareVersion() method allows indicating the firmware version currently installed on the device.
**Parameters**
* version (string): this parameter indicates the current firmware version of the device, using one of the following formats:
* "X", where X is a number between 0 and 65535.
* "X.Y", where X and Y are numbers between 0 and 65535.
* "X.Y.Z", where X, Y, and Z are numbers between 0 and 65535.
* "X.Y.Z.W", where X, Y, Z, and W are numbers between 0 and 65535.
For more information about version numbers, visit [this page](https://wikipedia.org/wiki/Software_versioning).
**Example 1**
This example shows how to indicate that a device has firmware version "1.2.3".
```javascript
myDevice.updateDeviceFirmwareVersion("1.2.3");
```
\### updateDeviceRssi(rssi) The updateDeviceRssi() method allows updating the signal level (RSSI) of the device, including for devices that contain multiple wireless communication interfaces.
**Parameters**
* rssi ([rssi status](/docs/herramientas-low-code-scripting/referencia-de-objetos-disponibles-para-scripting/rssi-status) object, or array of [rssi status](/docs/herramientas-low-code-scripting/referencia-de-objetos-disponibles-para-scripting/rssi-status) objects): this parameter indicates the signal level. If the device contains a single wireless interface, an [rssi status](/docs/herramientas-low-code-scripting/referencia-de-objetos-disponibles-para-scripting/rssi-status) object should be passed. If the device contains more than one wireless interface (for example, cellular and Wi-Fi), an array of [rssi status](/docs/herramientas-low-code-scripting/referencia-de-objetos-disponibles-para-scripting/rssi-status) objects should be passed, containing the signal level of each interface. For each object passed as a parameter, at least the [quality](/docs/herramientas-low-code-scripting/referencia-de-objetos-disponibles-para-scripting/rssi-status) property (if the signal percentage is available), or the [strength](/docs/herramientas-low-code-scripting/referencia-de-objetos-disponibles-para-scripting/rssi-status) property (if the attenuation level is available), or both, should be specified. If the [type](/docs/herramientas-low-code-scripting/referencia-de-objetos-disponibles-para-scripting/rssi-status) property is omitted, the [rssiType.default](/docs/herramientas-low-code-scripting/referencia-de-objetos-disponibles-para-scripting/rssi-status) type will be assumed. When reporting the status of multiple interfaces, it is mandatory to report the [type](/docs/herramientas-low-code-scripting/referencia-de-objetos-disponibles-para-scripting/rssi-status) property for each one.
**Example 1**
This example shows how to report a signal level of 68% on a device that has a single communication interface.
```javascript
myDevice.updateDeviceRssi({ quality: 68 });
```
**Example 2**
This example shows how to report a signal level of 72% for the cellular interface, and 68% for the Wi-Fi interface, on a device that has both interface types.
```javascript
myDevice.updateDeviceRssi
(
[
{ type: rssiType.cellular, quality: 72 },
{ type: rssiType.wiFi, quality: 68 }
]
);
```
**Example 3**
This example shows how to report a signal level with an attenuation of -68 dBm, on a device with a single communication interface.
```javascript
myDevice.updateDeviceRssi({ strength: -68 });
```
\### updateDeviceGeolocation(latitude, longitude) The updateDeviceGeolocation() method allows indicating the device's location, specifying latitude and longitude.
**Parameters**
* **latitude** (double): indicates the latitude of the device's current location.
* **longitude** (double): indicates the longitude of the device's current location.
**Example 1**
This example shows how to indicate that a device is located at coordinates (40.4052, -3.87699).
```javascript
myDevice.updateDeviceGeolocation(40.4052, -3.87699);
```
# Endpoint collection
The endpoint collection object represents a collection of endpoints contained within a device. Typically, the list of endpoints is accessed through the **endpoints** property of the [device](/docs/herramientas-low-code-scripting/referencia-de-objetos-disponibles-para-scripting/device) object.
Properties [#properties]
\### count (integer) The count property indicates the number of endpoints included in the collection.
**Examples**
This example shows the number of endpoints of a device in the log console.
```javascript
env.log('Endpoint count: ', myDevice.endpoints.count);
```
Methods [#methods]
\### byAddress(address) The byAddress() method allows finding an endpoint within the collection by specifying its address.
**Parameters**
* **address** (string): this parameter indicates the address of the endpoint being searched. The search is case insensitive.
**Result**
If the method finds an endpoint with the specified address, an [endpoint](/docs/herramientas-low-code-scripting/referencia-de-objetos-disponibles-para-scripting/endpoint) object representing that endpoint will be returned. If no endpoint with the specified address can be found, the value **null** will be returned.
**Example 1**
This example shows the description of the endpoint with address "1" in a device, using the log console.
```javascript
env.log(myDevice.endpoints.byAddress("1").description);
```
\### byIndex(index) The byIndex() method allows finding an endpoint within the collection by specifying its position in the collection.
**Parameters**
* **index** (integer): this parameter indicates the position of the endpoint within the collection. The first endpoint in the collection has index 0 (zero).
**Result**
If the method finds an endpoint with the given index, an [endpoint](/docs/herramientas-low-code-scripting/referencia-de-objetos-disponibles-para-scripting/endpoint) object representing that endpoint will be returned. If no endpoint with the specified index can be found, the value **null** will be returned.
**Example 1**
This example shows the description of the fourth endpoint of a device, using the log console.
```javascript
env.log(myDevice.endpoints.byIndex(3).description);
```
\### byType(type \[, subType]) The byType() method allows finding the first endpoint of a given type (and optionally of a subtype) within the collection.
**Parameters**
* **type** (integer): this parameter indicates the endpoint type being searched. The possible values for the type parameter can be found in the explanation of the **endpointType** property of the [endpoint](/docs/herramientas-low-code-scripting/referencia-de-objetos-disponibles-para-scripting/endpoint) object.
* **subType** (optional, integer): if this parameter is included, the method will search for the first endpoint that is of the type specified in the type parameter, and that is also of the subtype specified in the subType parameter. The possible values for the subType parameter can be found in the explanation of the endpointSubType property of the [endpoint](/docs/herramientas-low-code-scripting/referencia-de-objetos-disponibles-para-scripting/endpoint) object.
**Result**
If the method finds an endpoint with the specified type and subtype, an [endpoint](/docs/herramientas-low-code-scripting/referencia-de-objetos-disponibles-para-scripting/endpoint) object representing that endpoint will be returned. If no endpoint with the given type and subtype can be found, the value **null** will be returned.
**Example 1**
This example shows the description of the first temperature sensor contained in a device, using the log console.
```javascript
env.log(myDevice.endpoints.byType(endpointType.temperatureSensor).description);
```
**Example 2**
This example shows the description of the first CO2 concentration sensor contained in a device, using the log console.
```javascript
env.log
(
myDevice.endpoints.byType
(
endpointType.ppmConcentrationSensor,
ppmConcentrationSensorSubType.carbonDioxide
)
.description
);
```
\### allByType(type \[, subType]) The AllByType() method works similarly to the byType() method, but returns an array with all endpoints that match the specified criteria.
**Parameters**
* **type** (integer): this parameter indicates the endpoint type being searched. The possible values for the type parameter can be found in the explanation of the **endpointType** property of the [endpoint](/docs/herramientas-low-code-scripting/referencia-de-objetos-disponibles-para-scripting/endpoint) object.
* **subType** (optional, integer): if this parameter is included, the method will search only for endpoints that are of the type specified in the type parameter, and that are also of the subtype specified in the subType parameter. The possible values for the subType parameter can be found in the explanation of the endpointSubType property of the [endpoint](/docs/herramientas-low-code-scripting/referencia-de-objetos-disponibles-para-scripting/endpoint) object.
**Result**
The method returns an array with all endpoints that match the specified criteria. If no endpoint is found, the method will return an empty array.
**Example 1**
This example shows the descriptions of all temperature sensors contained in a device, using the log console.
```javascript
myDevice.endpoints.allByType(endpointType.temperatureSensor).forEach((item) => env.log(item.description));
```
\### byTag(tag) The byTag() method allows finding the first endpoint that contains the specified tag within the collection.
**Parameters**
* **tag** (string): this parameter indicates the tag being searched. The search is case insensitive.
**Result**
If the method finds an endpoint with the specified tag, an [endpoint](/docs/herramientas-low-code-scripting/referencia-de-objetos-disponibles-para-scripting/endpoint) object representing that endpoint will be returned. If no endpoint with the specified tag can be found, the value **null** will be returned.
**Example 1**
This example shows the description of the first endpoint with the tag "SomeTag".
```javascript
env.log(myDevice.endpoints.byTag("SomeTag").description);
```
\### allByTag(tag) The AllByTag() method works similarly to the byTag() method, but returns an array with all endpoints that match the specified criteria.
**Parameters**
* **tag** (string): this parameter indicates the tag being searched. The search is case insensitive.
**Result**
The method returns an array with all endpoints that match the specified criteria. If no endpoint is found, the method will return an empty array.
**Example 1**
This example shows the descriptions of all endpoints that contain the tag "SomeTag".
```javascript
myDevice.endpoints.allByTag("SomeTag").forEach((item) => env.log(item.description));
```
\### toArray() The toArray() method allows converting the endpoint collection to an array containing all endpoints in the collection.
**Example 1**
This example shows the description of all endpoints of a device, using the log console.
```javascript
myDevice.endpoints.toArray().forEach(element => env.log(element.description));
```
# Endpoint configuration collection
The endpoint configuration collection object represents a collection of endpoints for which initial configuration is to be established, typically in [device model configuration](/docs/configuracion-del-cliente/dispositivos-y-endpoints/dispositivos/modelos-de-dispositivo/configuracion) scripts.
The `getEndpoints` function receives an object of this type as a parameter, which allows establishing the list of endpoints that should be included within a newly created device, as well as their basic initial configuration. This function is included in the device model script being created.
Methods [#methods]
\### addEndpoint(address, description, endpointType \[, endpointSubType]) The `addEndpoint` method allows adding a new endpoint to the collection.
**Parameters**
* **address** (string): indicates the address of the endpoint within the device. The address must be unique within the device, although endpoints with the same address can exist in different devices.
* **description** (string): indicates the description to be used for this endpoint.
* **endpointType** (enum): indicates the type of the endpoint being added. To learn more about endpoint types, see the [endpoint](/docs/herramientas-low-code-scripting/referencia-de-objetos-disponibles-para-scripting/endpoint) object reference, especially the endpointType property.
* **endpointSubType** (enum, optional): this parameter indicates the endpoint subtype, and can be optionally specified only for certain endpoint types. To learn more about endpoint types and subtypes, see the [endpoint](/docs/herramientas-low-code-scripting/referencia-de-objetos-disponibles-para-scripting/endpoint) object reference, especially the endpointSubType property.
**Return value**
The `addEndpoint` method returns an [endpoint configuration](/docs/herramientas-low-code-scripting/referencia-de-objetos-disponibles-para-scripting/endpoint-configuration) object, which represents the endpoint that was just added to the collection.
**Example 1**
This example shows how to create 2 endpoints within the device, one of temperature sensor type with address "1", and another of carbon dioxide sensor type with address "2".
```javascript
function getEndpoints(deviceAddress, endpoints)
{
endpoints.addEndpoint("1", "Temperature sensor", endpointType.TemperatureSensor);
endpoints.addEndpoint("2", "CO2 sensor", endpointType.PpmConcentrationSensor, ppmConcentrationSensorSubType.CarbonDioxide);
}
```
# Endpoint configuration
The endpoint configuration object represents the initial configuration of an endpoint, typically in [device model configuration](/docs/configuracion-del-cliente/dispositivos-y-endpoints/dispositivos/modelos-de-dispositivo/configuracion) scripts.
Objects of this type are created through the `add()` method of the [endpoint configuration collection](/docs/herramientas-low-code-scripting/referencia-de-objetos-disponibles-para-scripting/endpoint-configuration-collection) object.
Properties [#properties]
\### address (string) The address property represents the address of the endpoint, as text.
**Examples**
This example shows the address of an endpoint, through the log console.
```javascript
env.log('Endoint address: ', endpoint.address);
```
\### defaultDescription (string or multi-language literal) The defaultDescription property represents the description that will be used when creating the endpoint. It can be a string, or a [multi-language literal](/docs/herramientas-low-code-scripting/referencia-de-objetos-disponibles-para-scripting/multi-language-literal) object.
**Examples**
This example shows the description of an endpoint, through the log console.
```javascript
env.log('Endoint description: ', endpoint.defaultDescription);
```
\### endpointType (int enum) The endpointType property indicates the endpoint type. The possible values for this property are the same as those of the **endpointType** property of the [endpoint](/docs/herramientas-low-code-scripting/referencia-de-objetos-disponibles-para-scripting/endpoint) object.
**Examples**
This example shows the type of an endpoint, through the log console.
```javascript
env.log('Endoint type: ', endpoint.endpointType);
```
\### endpointSubType (int enum) The endpointSubType property indicates the endpoint subtype. The possible values for this property are the same as those of the **endpointSubType** property of the [endpoint](/docs/herramientas-low-code-scripting/referencia-de-objetos-disponibles-para-scripting/endpoint) object.
**Examples**
This example shows the subtype of an endpoint, through the log console.
```javascript
env.log('Endoint subtype: ', endpoint.endpointSubType);
```
\### variableTypeId (int enum) The variableTypeId property indicates the custom variable type associated with the endpoint. This property applies only to endpoints of type **endpointType.genericSensor** and **endpointType.genericFlowSensor**.
**Examples**
This example creates a flow sensor type endpoint and assigns it the variable with ID 1071.
```javascript
var e = endpoints.addEndpoint("1", "My generic sensor", endpointType.genericSensor);
e.variableTypeId = 1071;
```
\### accessType (int enum) The accessType property indicates the type of access applied to the endpoint. By default, access will be **read only**. The possible values for this property are the same as those of the accessType property of the [endpoint](/docs/herramientas-low-code-scripting/referencia-de-objetos-disponibles-para-scripting/endpoint) object.
**Examples**
This example creates a generic sensor type endpoint and assigns it read-write access.
```javascript
var e = endpoints.addEndpoint("1", "My generic sensor", endpointType.genericSensor);
e.accessType = endpointAccessType.readWrite;
```
\### operationSecurityLevel (int enum) The operationSecurityLevel property indicates the security level associated with the endpoint operation. By default, the security level will be **simple**. The possible values for this property are the same as those of the operationSecurityLevel property of the [endpoint](/docs/herramientas-low-code-scripting/referencia-de-objetos-disponibles-para-scripting/endpoint) object.
**Examples**
This example creates a generic sensor type endpoint and assigns it a medium security level.
```javascript
var e = endpoints.addEndpoint("1", "My generic sensor", endpointType.genericSensor);
e.operationSecurityLevel = endpointOperationSecurityLevel.medium;
```
\### operationWarningMessage (string or multi-language literal) The operationWarningMessage property represents the warning message that will be displayed when attempting to manually operate the device, if the security level in the operationSecurityLevel property is medium or high. It can be a string, or a [multi-language literal](/docs/herramientas-low-code-scripting/referencia-de-objetos-disponibles-para-scripting/multi-language-literal) object.
**Examples**
This example creates a generic sensor type endpoint and assigns it a multi-language warning message.
```javascript
var e = endpoints.addEndpoint("1", "My generic sensor", endpointType.genericSensor);
e.operationWarningMessage = {en: "This is a critical operation. Continue?", es: "Esta es una operación crítica. ¿Continuar?"};
```
\### range (endpoint range) The range property allows indicating the range of allowed values for an endpoint. It is only applicable to scalar type endpoints. The range is expressed as an [endpoint range](/docs/herramientas-low-code-scripting/referencia-de-objetos-disponibles-para-scripting/endpoint-range) type object. The default value for this property is null, indicating that any value is acceptable.
**Examples**
This example creates a generic sensor type endpoint and assigns it a value range from -100 to +100.
```javascript
var e = endpoints.addEndpoint("1", "My generic sensor", endpointType.genericSensor);
e.range = {lowestValue: -100, highestValue: 100};
```
\### summationAutoResetThreshold (int or null)
The summationAutoResetThreshold property controls the endpoint behavior when a cumulative value lower than the last received one is received. This property applies only to endpoints of type **endpointType.flowSensor**, **endpointType.genericFlowSensor**, **endpointType.peopleFlowSensor**, and **endpointType.energyMeter**.
When a cumulative value lower than the previous one is received, the platform must decide how to interpret the new value. Typically, some devices may send a lower value if there has actually been "negative" consumption, for example:
* When a flow sensor is capable of measuring flow in the opposite direction to normal.
* When an energy meter is capable of measuring generated energy, rather than only measuring consumed energy.
However, many other devices report a value lower than the last when they are restarted or powered off, because they only maintain the cumulative value in volatile memory. When restarted or powered off, they lose the accumulated count, resetting it to zero.
The summationAutoResetThreshold property can take any of the following values:
* **null**: indicates that a threshold for the cumulative value is not used. If a value lower than the last is received, it will be considered as "negative" consumption.
* **0 (zero)**: indicates that when a value lower than the last is received, it should be considered that the device has reset the cumulative value, because it has lost the previous value. The new value is then considered as a positive consumption value.
* **Any value greater than zero**: when receiving a cumulative value lower than the last received, the platform will consider that the cumulative has been reset only if the difference between the previous value and the new value is greater than or equal to the specified threshold. If the difference is less than this threshold, it will be considered as negative consumption.
It is recommended that for all devices that are not capable of measuring negative flows, the value of this property be set to **zero**.
**Examples**
This example creates a generic sensor type endpoint and assigns the value zero to the summationAutoResetThreshold property.
```javascript
var e = endpoints.addEndpoint("1", "My flow sensor", endpointType.flowSensor);
e.summationAutoResetThreshold = 0;
```
\### tags (array) The tags property indicates the set of tags applied to the endpoint. This property is an array of strings, each of which indicates a tag.
**Examples**
This example creates a generic sensor type endpoint and assigns three tags corresponding to the texts "sensor", "generic", and "customer1".
```javascript
var e = endpoints.addEndpoint("1", "My generic sensor", endpointType.genericSensor);
e.tags = ["sensor", "generic", "customer1"];
```
\### requiresElectricalCircuit (boolean)
The **requiresElectricalCircuit** property indicates whether the endpoint should automatically create an associated **electrical circuit** when the device is registered in the platform.
This property **only applies to endpoints of type** `**endpointType.voltageSensor**`.
For all other endpoint types, the property is ignored and its behavior remains unchanged.
The default value of this property is **false**, meaning no electrical circuit will be created unless explicitly indicated.
**Examples**
This example creates a voltage sensor type endpoint and configures the property so that an electrical circuit is automatically created in the platform:
```javascript
var voltageSensor = endpoints.addEndpoint("2", "Battery", endpointType.voltageSensor);
voltageSensor.requiresElectricalCircuit = true;
```
Methods [#methods]
\### addAlert() The addAlert() method allows creating a new alert related to the endpoint. The method returns an alert object that must be configured with the corresponding parameters.
**Result**
The result of this method is an alert object, which must be configured through the following properties:
* **variableTypeId (int)**: indicates the variable type associated with the alert. It must correspond to a variable type supported by the endpoint. The identifier of any custom variable, or any of the predefined variable types, can be used, as long as they are supported by the endpoint. The values corresponding to predefined variable types are as follows:
* **variableType.temperature (1)**
* **variableType.humidity (2)**
* **variableType.lightLevel (3)**
* **variableType.setPoint (4)**
* **variableType.volume (5)**
* **variableType.activeEnergy (6)**
* **variableType.runTime (7)**
* **variableType.discreteSensorState (8)**
* **variableType.dimmerization (9)**
* **variableType.weight (10)**
* **variableType.flow (11)**
* **variableType.voltage (12)**
* **variableType.current (13)**
* **variableType.activePower (14)**
* **variableType.reactivePower (15)**
* **variableType.apparentPower (16)**
* **variableType.cosPhi (17)**
* **variableType.pressure (18)**
* **variableType.frequency (19)**
* **variableType.ppmConcentration (20)**
* **variableType.mvConcentration (21)**
* **variableType.aqi (22)**
* **variableType.peopleFlow (23)**
* **variableType.peopleCount (24)**
* **variableType.reactiveEnergy (25)**
* **variableType.apparentEnergy (26)**
* **variableType.location (27)**
* **conditionType (enum)**: indicates the condition type used to trigger the alert. It can be one of the following values:
* **conditionType.equal (1)**: indicates that the value must equal the specified value.
* **conditionType.notEqual (2)**: indicates that the value must differ from the specified value.
* **conditionType.greater (3)**: indicates that the value must be greater than the specified value.
* **conditionType.greaterOrEqual (4)**: indicates that the value must be greater than or equal to the specified value.
* **conditionType.lower (5)**: indicates that the value must be less than the specified value.
* **conditionType.lowerOrEqual (6)**: indicates that the value must be less than or equal to the specified value.
* **threshold (double)**: indicates the value used to trigger the alert, according to the condition type.
* **normalConditionType (enum)**: indicates the condition type used to close the alert. The values are the same as those of the **conditionType** field.
* **normalThreshold (double)**: indicates the value used to close the alert, according to the normal condition type.
* **minimumDurationSeconds (int)**: indicates that the trigger condition must be maintained for a certain time, specified in seconds, for the alert to trigger. The default value is zero, indicating that the alert triggers immediately.
* **severity (enum)**: indicates the alert severity. It can be one of the following values:
* **alarmSeverity.Information (0)**: informational alert.
* **alarmSeverity.low (1)**: low severity alert.
* **alarmSeverity.medium (2)**: medium severity alert.
* **alarmSeverity.high (3)**: high severity alert.
* **geoZoneId (int)**: geozone identifier, in case the alert refers to entry or exit of a geozone.
* **notificationEmails (string\[])**: array of strings indicating the email addresses of people who should be notified when the alert triggers or closes. Contacts can be specified using the form "@ab:id" where "id" indicates the contact identifier in the address book.
* **notificationSmsNumbers (string\[])**: array of strings indicating the phone numbers of people who should be notified by SMS when the alert triggers or closes. Contacts can be specified using the form "@ab:id" where "id" indicates the contact identifier in the address book.
* **notificationVoiceNumbers (string\[])**: array of strings indicating the phone numbers of people who should be notified by voice call when the alert triggers or closes. Contacts can be specified using the form "@ab:id" where "id" indicates the contact identifier in the address book.
* **emailTemplates (object)**: optional object indicating the template used for email, both for opening and closing the alert.
Allows the use of [variables](/docs/configuracion-del-cliente/alertas-y-alarmas/alertas) and has the following properties:
* **openSubjectTemplate (string)**: template to use for the subject when opening the alert. If left blank or set to null, the default subject will be used.
* **openTemplate (string)**: template for opening the alert. If left blank or set to null, the default template will be used.
* **closeSubjectTemplate (string)**: template to use for the subject when closing the alert. If left blank or set to null, the default subject will be used.
* **closeTemplate (string)**: template for closing the alert. If left blank or set to null, the default template will be used.
* **smsTemplates (object)**: optional object indicating the template used for text messages, both for opening and closing the alert. It has the same properties as the **emailTemplates** object. The openSubjectTemplate and closeSubjectTemplate properties will be ignored.
* **voiceTemplates (object)**: optional object indicating the template used for voice calls, both for opening and closing the alert. It has the same properties as the **emailTemplates** object. The openSubjectTemplate and closeSubjectTemplate properties will be ignored.
* **tags (string\[])**: array of strings optionally indicating tags for the alert.
**Example 1**
This example shows the creation of an alert for an endpoint.
```javascript
var alert = myEndpoint.addAlert();
alert.variableTypeId = variableType.temperature;
alert.conditionType = conditionType.greater;
alert.threshold = 25;
alert.normalConditionType = conditionType.lowerOrEqual;
alert.normalThreshold = 20;
alert.severity = alarmSeverity.medium;
alert.notificationEmails = ['someone@somedomain.com', 'someone_else@somedomain.com'];
alert.tags = ['alert', 'test'];
alert.emailTemplates = [ openTemplate: "correo@email.com", closeTemplate: "correo2@email.com" ];
```
# Endpoint range
The endpoint range object allows indicating an acceptable range of values for an endpoint.
Properties [#properties]
\### lowestValue (double) The lowestValue property indicates the minimum acceptable value for the endpoint. If this property is omitted or specified with a null value, it is assumed that there is no minimum value.
**Examples**
This example shows how to build a range object that has a minimum value of 18 and a maximum of 200.
```javascript
var myRange = { lowestValue: 18, highestValue: 200 };
```
\### highestValue (double) The highestValue property indicates the maximum acceptable value for the endpoint. If this property is omitted or specified with a null value, it is assumed that there is no maximum value.
**Examples**
This example shows how to build a range object that has a minimum value of 18 and a maximum of 200.
```javascript
var myRange = { lowestValue: 18, highestValue: 200 };
```
# Endpoint Scripting Utils
Methods [#methods]
| (DataPoint\[]) getDataPoints(Date fromUTCDatetime) |
| ----------------------------------------------------------------------------------------------------------------------------------------------------------------------------------------------------------------------------------------------------------------------------------------------------------------------------------------------------------------------------------------------------------------------- |
| The getDataPoints() method allows knowing the different states of an endpoint from the moment specified as fromUTCDateTime. The returned DataPoint object is polymorphic, meaning that depending on the endpoint type whose state is to be known, its properties are different. For more information about DataPoint see this page |
| Examples |
| const subtractHours = (date, hours) => \{ const result = new Date(date); result.setHours(result.getHours() - hours); return result; }; let endpoints = env.facility.endpoints; let myendPointsArray = endpoints.toArray(); myendPointsArray.forEach((ep)=> \{ let dataPoints = ep.getDataPoints(subtractHours(utils.utcNow, 10)); env.log(dataPoints); }); |
| |
| (DataPoint\[]) - Local Time getDataPoints(Date from LocalTime Datetime) |
| --------------------------------------------------------------------------------------------------------------------------------------------------------------------------------------------------------------------------------------------------------------------------------------------------------------------------------------------------------------------------------------------------------------------------------------------------------------------------------------------------------------- |
| The getDataPoints() method allows knowing the different states of an endpoint from the moment specified as from local Time. The returned DataPoint object is polymorphic, meaning that depending on the endpoint type whose state is to be known, its properties are different. For more information about DataPoint see this page |
| Examples |
| const subtractHours = (date, hours) => \{ const result = new Date("2024-07-01"); result.setHours(result.getHours() - hours); return result; }; var epAddr = "Add1"; var ep = env.facility.endpoints.byAddress(epAddr); let endpoints = env.facility.endpoints; let myendPointsArray = endpoints.toArray(); myendPointsArray.forEach((ep)=> \{ let dataPoints = ep.getDataPoints(subtractHours(utils.ltNow, 1)); env.log(dataPoints); }); |
| |
| (double) getDataPointsAvg(Date fromUTCDatetime, Date toUTCDateTime) |
| -------------------------------------------------------------------------------------------------------------------------------------------------------------------------------------------------------------------------------------------------------------------------------------------------------------------------------------------------------------------------------------------------------------------------- |
| The getDataPointsAvg() method allows knowing the arithmetic average of the states of an endpoint from the moment specified as fromUTCDateTime until the moment specified in the toUTCDateTime parameter. For more information about DataPoint see this page |
| Examples |
| const subtractHours = (date, hours) => \{ const result = new Date(date); result.setHours(result.getHours() - hours); return result; }; let endpoints = env.facility.endpoints; let myendPointsArray = endpoints.toArray(); myendPointsArray.forEach((ep)=> \{ let avg = ep.getDataPointsAvg(subtractHours(utils.utcNow, 10), utils.utcNow); env.log(avg); }); |
| |
| (double) getDataPointsAvg(Date from local Time Datetime, Date to local Time DateTime) |
| ------------------------------------------------------------------------------------------------------------------------------------------------------------------------------------------------------------------------------------------------------------------------------------------------------------------------------------------------------------------------------------------------------------------ |
| The getDataPointsAvg() method allows knowing the arithmetic average of the states of an endpoint from the moment specified as from localTime DateTime until the moment specified in the to localDateTime parameter. For more information about DataPoint see this page |
| Examples |
| const subtractHours = (date, hours) => \{ const result = new Date("2024-05-10"); result.setHours(result.getHours() - hours); return result; }; let endpoints = env.facility.endpoints; let myendPointsArray = endpoints.toArray(); myendPointsArray.forEach((ep)=> \{ let avg = ep.getDataPointsAvg(subtractHours(utils.ltNow, 2)); env.log(avg); }); |
| |
| (double) getDataPointsMax(Date fromUTCDatetime) |
| ------------------------------------------------------------------------------------------------------------------------------------------------------------------------------------------------------------------------------------------------------------------------------------------------------------------------------------------------------------------------------------------------------------ |
| The getDataPointsMax() method allows knowing the maximum value of the states of an endpoint from the moment specified as fromUTCDateTime. For more information about DataPoint see this page |
| Examples |
| const subtractHours = (date, hours) => \{ const result = new Date(date); result.setHours(result.getHours() - hours); return result; }; let endpoints = env.facility.endpoints; let myendPointsArray = endpoints.toArray(); myendPointsArray.forEach((ep)=> \{ let avg = ep.getDataPointsMax(subtractHours(utils.utcNow, 10)); env.log(avg); }); |
| |
| (double) getDataPointsMax(Date fromUTCDatetime, Date toUTCDateTime) |
| -------------------------------------------------------------------------------------------------------------------------------------------------------------------------------------------------------------------------------------------------------------------------------------------------------------------------------------------------------------------------------------------------------------------------- |
| The getDataPointsMax() method allows knowing the maximum value of the states of an endpoint from the moment specified as fromUTCDateTime until the moment specified in the toUTCDateTime parameter. For more information about DataPoint see this page |
| Examples |
| const subtractHours = (date, hours) => \{ const result = new Date(date); result.setHours(result.getHours() - hours); return result; }; let endpoints = env.facility.endpoints; let myendPointsArray = endpoints.toArray(); myendPointsArray.forEach((ep)=> \{ let avg = ep.getDataPointsMax(subtractHours(utils.utcNow, 10), utils.utcNow); env.log(avg); }); |
| |
| (double) getDataPointsMin(Date fromUTCDatetime) |
| ------------------------------------------------------------------------------------------------------------------------------------------------------------------------------------------------------------------------------------------------------------------------------------------------------------------------------------------------------------------------------------------------------------ |
| The getDataPointsMin() method allows knowing the minimum value of the states of an endpoint from the moment specified as fromUTCDateTime. For more information about DataPoint see this page |
| Examples |
| const subtractHours = (date, hours) => \{ const result = new Date(date); result.setHours(result.getHours() - hours); return result; }; let endpoints = env.facility.endpoints; let myendPointsArray = endpoints.toArray(); myendPointsArray.forEach((ep)=> \{ let avg = ep.getDataPointsMin(subtractHours(utils.utcNow, 10)); env.log(avg); }); |
| |
| (double) getDataPointsMin(Date fromUTCDatetime, Date toUTCDateTime) |
| -------------------------------------------------------------------------------------------------------------------------------------------------------------------------------------------------------------------------------------------------------------------------------------------------------------------------------------------------------------------------------------------------------------------------- |
| The getDataPointsMin() method allows knowing the minimum value of the states of an endpoint from the moment specified as fromUTCDateTime until the moment specified in the toUTCDateTime parameter. For more information about DataPoint see this page |
| Examples |
| const subtractHours = (date, hours) => \{ const result = new Date(date); result.setHours(result.getHours() - hours); return result; }; let endpoints = env.facility.endpoints; let myendPointsArray = endpoints.toArray(); myendPointsArray.forEach((ep)=> \{ let avg = ep.getDataPointsMin(subtractHours(utils.utcNow, 10), utils.utcNow); env.log(avg); }); |
| |
| (double) getDataPointsSum(Date fromUTCDatetime) |
| ------------------------------------------------------------------------------------------------------------------------------------------------------------------------------------------------------------------------------------------------------------------------------------------------------------------------------------------------------------------------------------------------------------ |
| The getDataPointsSum method allows knowing the sum of the state values of an endpoint from the moment specified as fromUTCDateTime. For more information about DataPoint see this page |
| Examples |
| const subtractHours = (date, hours) => \{ const result = new Date(date); result.setHours(result.getHours() - hours); return result; }; let endpoints = env.facility.endpoints; let myendPointsArray = endpoints.toArray(); myendPointsArray.forEach((ep)=> \{ let avg = ep.getDataPointsSum(subtractHours(utils.utcNow, 10)); env.log(avg); }); |
| |
| (double) getDataPointsSum(Date fromUTCDatetime, Date toUTCDateTime) |
| -------------------------------------------------------------------------------------------------------------------------------------------------------------------------------------------------------------------------------------------------------------------------------------------------------------------------------------------------------------------------------------------------------------------------- |
| The getDataPointsSum() method allows knowing the sum of the state values of an endpoint from the moment specified as the fromUTCDateTime parameter until the moment specified in the toUTCDateTime parameter. For more information about DataPoint see this page |
| Examples |
| const subtractHours = (date, hours) => \{ const result = new Date(date); result.setHours(result.getHours() - hours); return result; }; let endpoints = env.facility.endpoints; let myendPointsArray = endpoints.toArray(); myendPointsArray.forEach((ep)=> \{ let avg = ep.getDataPointsSum(subtractHours(utils.utcNow, 10), utils.utcNow); env.log(avg); }); |
| |
\=====
Local Time Methods [#local-time-methods]
| (DataPoint\[]) getDataPointsLT(DateTime from ) |
| ---------------------------------------------------------------------------------------------------------------------------------------------------------------------------------------------------------------------------------------------------------------------------------------------------------------------------------------------------------------------------------------------------------------------------------- |
| The getDataPointsLT() method allows knowing the different states of an endpoint from the moment specified as 'from Local Time'. The returned DataPoint object is polymorphic, meaning that depending on the endpoint type whose state is to be known, its properties are different. For more information about DataPoint see this page |
| Examples |
| const subtractHours = (date, hours) => \{ const result = new Date(date); result.setHours(result.getHours() - hours); return result; }; let endpoints = env.facility.endpoints; let myendPointsArray = endpoints.toArray(); myendPointsArray.forEach((ep)=> \{ let dataPoints = ep.getDataPoints(subtractHours(utils.localTime, 10)); env.log(dataPoints); }); |
| |
| (double) getDataPointsAvg(Date from local Time) |
| ------------------------------------------------------------------------------------------------------------------------------------------------------------------------------------------------------------------------------------------------------------------------------------------------------------------------------------------------------------------------------------------------------------------ |
| The getDataPointsAvg() method allows knowing the arithmetic average of the states of an endpoint from the moment specified as 'from local time'. For more information about DataPoint see this page |
| Examples |
| const subtractHours = (date, hours) => \{ const result = new Date(date); result.setHours(result.getHours() - hours); return result; }; let endpoints = env.facility.endpoints; let myendPointsArray = endpoints.toArray(); myendPointsArray.forEach((ep)=> \{ let avg = ep.getDataPointsAvg(subtractHours(utils.localTimeNow, 10)); env.log(avg); }); |
| |
| (double) getDataPointsAvg(Date from LocalTime, LocalTime) |
| -------------------------------------------------------------------------------------------------------------------------------------------------------------------------------------------------------------------------------------------------------------------------------------------------------------------------------------------------------------------------------------------------------------------------------------- |
| The getDataPointsAvg() method allows knowing the arithmetic average of the states of an endpoint from the moment specified as from Local Time until the moment specified in the to Local Time parameter. For more information about DataPoint see this page |
| Examples |
| const subtractHours = (date, hours) => \{ const result = new Date(date); result.setHours(result.getHours() - hours); return result; }; let endpoints = env.facility.endpoints; let myendPointsArray = endpoints.toArray(); myendPointsArray.forEach((ep)=> \{ let avg = ep.getDataPointsAvg(subtractHours(utils.localTimeNow, 10), utils.localTimeNow); env.log(avg); }); |
| |
| (double) getDataPointsMax(Date from localTime) |
| ------------------------------------------------------------------------------------------------------------------------------------------------------------------------------------------------------------------------------------------------------------------------------------------------------------------------------------------------------------------------------------------------------------------ |
| The getDataPointsMax() method allows knowing the maximum value of the states of an endpoint from the moment specified as from localTime. For more information about DataPoint see this page |
| Examples |
| const subtractHours = (date, hours) => \{ const result = new Date(date); result.setHours(result.getHours() - hours); return result; }; let endpoints = env.facility.endpoints; let myendPointsArray = endpoints.toArray(); myendPointsArray.forEach((ep)=> \{ let avg = ep.getDataPointsMax(subtractHours(utils.localTimeNow, 10)); env.log(avg); }); |
| |
| (double) getDataPointsMax(Date from localTime Datetime, Date to localTime DateTime) |
| ----------------------------------------------------------------------------------------------------------------------------------------------------------------------------------------------------------------------------------------------------------------------------------------------------------------------------------------------------------------------------------------------------------------------- |
| The getDataPointsMax() method allows knowing the maximum value of the states of an endpoint from the moment specified as 'from localTime DateTime' until the moment specified in the 'to localTime DateTime' parameter. For more information about DataPoint see this page |
| Examples |
| const subtractHours = (date, hours) => \{ const result = new Date(date); result.setHours(result.getHours() - hours); return result; }; let endpoints = env.facility.endpoints; let myendPointsArray = endpoints.toArray(); myendPointsArray.forEach((ep)=> \{ let avg = ep.getDataPointsMax(subtractHours(utils.Now, 10), utils.utcNow); env.log(avg); }); |
| |
| (double) getDataPointsMin(Date from localTime Datetime) |
| ------------------------------------------------------------------------------------------------------------------------------------------------------------------------------------------------------------------------------------------------------------------------------------------------------------------------------------------------------------------------------------------------------------------ |
| The getDataPointsMin() method allows knowing the minimum value of the states of an endpoint from the moment specified as 'from LocalTime'. For more information about DataPoint see this page |
| Examples |
| const subtractHours = (date, hours) => \{ const result = new Date(date); result.setHours(result.getHours() - hours); return result; }; let endpoints = env.facility.endpoints; let myendPointsArray = endpoints.toArray(); myendPointsArray.forEach((ep)=> \{ let avg = ep.getDataPointsMin(subtractHours(utils.localTimeNow, 10)); env.log(avg); }); |
| |
| (double) getDataPointsMin(Date from localTime Datetime, Date to localTime DateTime) |
| -------------------------------------------------------------------------------------------------------------------------------------------------------------------------------------------------------------------------------------------------------------------------------------------------------------------------------------------------------------------------------------------------------------------------------------- |
| The getDataPointsMin() method allows knowing the minimum value of the states of an endpoint from the moment specified as 'from localTime DateTime' until the moment specified in the 'to localTime DateTime' parameter. For more information about DataPoint see this page |
| Examples |
| const subtractHours = (date, hours) => \{ const result = new Date(date); result.setHours(result.getHours() - hours); return result; }; let endpoints = env.facility.endpoints; let myendPointsArray = endpoints.toArray(); myendPointsArray.forEach((ep)=> \{ let avg = ep.getDataPointsMin(subtractHours(utils.localTimeNow, 10), utils.localTimeNow); env.log(avg); }); |
| |
| (double) getDataPointsSum(Date from localTime Datetime) |
| ------------------------------------------------------------------------------------------------------------------------------------------------------------------------------------------------------------------------------------------------------------------------------------------------------------------------------------------------------------------------------------------------------------------ |
| The getDataPointsSum method allows knowing the sum of the state values of an endpoint from the moment specified as from localTime DateTime. For more information about DataPoint see this page |
| Examples |
| const subtractHours = (date, hours) => \{ const result = new Date(date); result.setHours(result.getHours() - hours); return result; }; let endpoints = env.facility.endpoints; let myendPointsArray = endpoints.toArray(); myendPointsArray.forEach((ep)=> \{ let avg = ep.getDataPointsSum(subtractHours(utils.localTimeNow, 10)); env.log(avg); }); |
| |
| (double) getDataPointsSum(Date from localTime Datetime, Date to localTime DateTime) |
| -------------------------------------------------------------------------------------------------------------------------------------------------------------------------------------------------------------------------------------------------------------------------------------------------------------------------------------------------------------------------------------------------------------------------------------- |
| The getDataPointsSum() method allows knowing the sum of the state values of an endpoint from the moment specified as the 'localTime DateTime' parameter until the moment specified in the 'to localTime DateTime' parameter. For more information about DataPoint see this page |
| Examples |
| const subtractHours = (date, hours) => \{ const result = new Date(date); result.setHours(result.getHours() - hours); return result; }; let endpoints = env.facility.endpoints; let myendPointsArray = endpoints.toArray(); myendPointsArray.forEach((ep)=> \{ let avg = ep.getDataPointsSum(subtractHours(utils.localTimeNow, 10), utils.localTimeNow); env.log(avg); }); |
| |
# Endpoint UI rules
The endpoint UI rules object represents the user interface rules applied to a device, typically used in [device model configuration](/docs/configuracion-del-cliente/dispositivos-y-endpoints/dispositivos/modelos-de-dispositivo/configuracion) scripts.
The `updateEndpointUIRules` function receives an object of this type as a parameter, which allows establishing the user interface rules for the endpoint given as a parameter in the script.
Properties [#properties]
\### canDelete (boolean) The canDelete property indicates whether it is possible to delete the endpoint given as a parameter. The value true indicates that deleting the endpoint is allowed, while the value false prevents its deletion.
**Examples**
This example allows deleting any endpoint, except if its address is "1".
```javascript
function updateEndpointUIRules(endpoint, rules)
{
rules.canDelete = (endpoint.address != "1");
}
```
\### canEditSubType (boolean) The canEditSubType property indicates whether it is possible to change the endpoint subtype, corresponding to the [endpointSubType](/docs/herramientas-low-code-scripting/referencia-de-objetos-disponibles-para-scripting/endpoint-configuration) property. The value true indicates that editing the subtype is allowed, while the value false prevents it.
**Examples**
This example allows modifying the subtype of any endpoint, but only if it is of appliance type.
```javascript
function updateEndpointUIRules(endpoint, rules)
{
rules.canEditSubType = (endpoint.endpointType == endpointType.appliance);
}
```
\### canEditAccessType (boolean) The canEditAccessType property indicates whether it is possible to edit the [accessType](/docs/herramientas-low-code-scripting/referencia-de-objetos-disponibles-para-scripting/endpoint-configuration) property of the endpoint. The value true indicates that editing is allowed, while the value false prevents it. The default value for this property is false. For more information about the accessType property, see [this section](/docs/herramientas-low-code-scripting/referencia-de-objetos-disponibles-para-scripting/endpoint).
**Examples**
This example allows modifying the accessType property of any endpoint.
```javascript
function updateEndpointUIRules(endpoint, rules)
{
rules.canEditAccessType = true;
}
```
\### canEditOperationSecurityLevel (boolean) The canEditOperationSecurityLevel property indicates whether it is possible to edit the [operationSecurityLevel](/docs/herramientas-low-code-scripting/referencia-de-objetos-disponibles-para-scripting/endpoint-configuration) property of the endpoint. The value true indicates that editing is allowed, while the value false prevents it. The default value for this property is false. For more information about the operationSecurityLevel property, see [this section](/docs/herramientas-low-code-scripting/referencia-de-objetos-disponibles-para-scripting/endpoint).
**Examples**
This example allows modifying the operationSecurityLevel property of any endpoint.
```javascript
function updateEndpointUIRules(endpoint, rules)
{
rules.canEditOperationSecurityLevel = true;
}
```
\### canEditRange (boolean) The canEditRange property indicates whether it is possible to edit the [range](/docs/herramientas-low-code-scripting/referencia-de-objetos-disponibles-para-scripting/endpoint-configuration) property of the endpoint. The value true indicates that editing is allowed, while the value false prevents it. The default value for this property is false. For more information about the range property, see [this section](/docs/herramientas-low-code-scripting/referencia-de-objetos-disponibles-para-scripting/endpoint-configuration).
**Examples**
This example allows modifying the range property of any endpoint.
```javascript
function updateEndpointUIRules(endpoint, rules)
{
rules.canEditRange = false;
}
```
\### canEditSummationAutoReset (boolean) The canEditSummationAutoReset property indicates whether it is possible to change the value of the [summationAutoResetThreshold](/docs/herramientas-low-code-scripting/referencia-de-objetos-disponibles-para-scripting/endpoint-configuration) property. The value true indicates that editing is allowed, while the value false prevents it.
**Examples**
This example allows modifying the "summation auto reset" property of any endpoint, but only if it is of energy meter type.
```javascript
function updateEndpointUIRules(endpoint, rules)
{
rules.canEditSummationAutoReset = (endpoint.endpointType == endpointType.energyMeter);
}
```
\### canEditElectricalCircuit (boolean) The canEditElectricalCircuit property indicates whether it is possible to edit the electrical circuit associated with the endpoint. The value true indicates that editing is allowed, while the value false prevents it.
**Examples**
This example allows modifying the electrical circuit of any endpoint, but only if it is of energy meter type.
```javascript
function updateEndpointUIRules(endpoint, rules)
{
rules.canEditElectricalCircuit = (endpoint.endpointType == endpointType.energyMeter);
}
```
# Environment
Environment is a global object that is always available in all scripts. It contains some basic functions, which are detailed below. To access the global Environment object, use the global variable **env**. This variable is always available, automatically, in all scripts.
Methods [#methods]
\### log(p1, ....., pn) The log() function allows writing information to the log window. The log window is only available when a script is executed in test mode. When the script runs in its normal form (outside of test mode), this function is ignored.
**Parameters**
* **p1..pn** (any quantity and type): The log function can receive any number of parameters, of any type. The text sent to the log console is the concatenation of all parameters passed.
**Examples**
This example shows a numeric value in the log console.
```javascript
env.log('Value: ', 25);
```
This example shows a fixed text and a variable in the log console, to display a device address.
```javascript
env.log('Device address: ', myDevice.address);
```
# HttpResponse
The HttpResponse object allows returning data when sending [uplink](/docs/configuracion-del-cliente/dispositivos-y-endpoints/dispositivos/modelos-de-dispositivo/procesamiento-de-datos) data through [HTTP](/docs/configuracion-del-cliente/dispositivos-y-endpoints/dispositivos/integracion-de-dispositivos/http/intercambio-de-datos-flexible).
Properties [#properties]
\### statusCode (int) The statusCode property allows indicating the HTTP response status code. The default value for this property is 200 (OK).
**Examples**
This example shows the creation of an HTTP response with status 200 and JSON content.
```javascript
var httpResponse = new HttpReponse();
httpResponse.statusCode = 200;
httpResponse.contentType = "application/json";
httpResponse.content.setAsJson({ result: ultimo });
```
\### contentType (string) The contentType property indicates the type of content that will be returned in the HTTP request.
**Examples**
This example shows the creation of an HTTP response with status 200 and JSON content.
```javascript
var httpResponse = new HttpReponse();
httpResponse.statusCode = 200;
httpResponse.contentType = "application/json";
httpResponse.content.setAsJson({ result: ultimo });
```
Methods [#methods]
\### content.setAsJson(object) The content.setAsJson() method allows setting the response content in JSON format, with the data of the given object as parameter.
**Parameters**
* **object** (object): this parameter contains the object to be sent as a response. The object will be converted to JSON format.
**Example**
This example shows the creation of an HTTP response with status 200 and JSON content.
```javascript
var httpResponse = new HttpReponse();
httpResponse.statusCode = 200;
httpResponse.contentType = "application/json";
httpResponse.content.setAsJson({ result: ultimo });
```
\### content.setAsString(text) The content.setAsString() method allows setting the response content using the given text as parameter.
**Parameters**
* **text** (string): this parameter contains the text to be sent as a response.
**Example**
This example shows the creation of an HTTP response with status 200 and text content.
```javascript
var httpResponse = new HttpReponse();
httpResponse.statusCode = 200;
httpResponse.contentType = "text/plain";
httpResponse.content.setAsString("This is some text");
```
\### content.setAsBytes(bytes) The content.setAsBytes() method allows setting the response content in binary form, using the given data as parameter.
**Parameters**
* **bytes** (int\[]): this parameter contains the byte array to be sent as a response.
**Example**
This example shows the creation of an HTTP response with status 200 and binary content of 5 bytes.
```javascript
var httpResponse = new HttpReponse();
httpResponse.statusCode = 200;
httpResponse.contentType = "application/octet-stream";
httpResponse.content.setAsBytes([1, 2, 3, 4, 5]);
```
# Scripting Object Reference
This section contains information about the objects available for [scripting](/docs/herramientas-low-code-scripting). See the sub-sections for more information about each object type.
# Multi-language literal
The multi-language literal object allows constructing messages in multiple languages, especially for error or informational messages.
Properties [#properties]
\### en (string) This property indicates the content of the message in English.
**Examples**
This example shows how to construct a multi-language message.
```javascript
var myMessage = { en: "This is a message", es: "Este es un mensaje", pt: "Esta é uma mensagem" };
```
\### es (string) This property indicates the content of the message in Spanish.
**Examples**
This example shows how to construct a multi-language message.
```javascript
var myMessage = { en: "This is a message", es: "Este es un mensaje", pt: "Esta é uma mensagem" };
```
\### pt (string) This property indicates the content of the message in Portuguese.
**Examples**
This example shows how to construct a multi-language message.
```javascript
var myMessage = { en: "This is a message", es: "Este es un mensaje", pt: "Esta é uma mensagem" };
```
# RSSI status
The RSSI status object represents the signal level of a wireless connection of a device. This object is normally used to update the signal level through the `updateDeviceRssi` method of the [device](/docs/herramientas-low-code-scripting/referencia-de-objetos-disponibles-para-scripting/device) object, usually as part of a [LoRaWAN or MQTT data conversion](/docs/configuracion-del-cliente/dispositivos-y-endpoints/dispositivos/modelos-de-dispositivo/procesamiento-de-datos) script.
Properties [#properties]
\### type (int enum)
The type property indicates the connection type. The possible values for this property are as follows:
* **rssiType.default (1)**: this is the default value for this property, normally used when the device has a single type of wireless connection.
* **rssiType.wiFi (2)**: indicates that the connection type is Wi-Fi.
* **rssiType.loRaWan (3)**: indicates that the connection type is LoRaWAN.
* **rssiType.cellular (4)**: indicates that the connection type is cellular.
* **rssiType.zigBee (5)**: indicates that the connection type is ZigBee.
* **rssiType.rF (1)**: indicates that the connection type is some other type.
**Examples**
This example shows how to report a signal level of 72% for the cellular interface, and 68% for the Wi-Fi interface, on a device that has both interface types.
```javascript
myDevice.updateDeviceRssi
(
[
{ type: rssiType.cellular, quality: 72 },
{ type: rssiType.wiFi, quality: 68 }
]
);
```
\### quality (int) The quality property indicates the connection quality, as a percentage (0-100%).
**Examples**
This example shows how to report a signal level of 72% for the cellular interface, and 68% for the Wi-Fi interface, on a device that has both interface types.
```javascript
myDevice.updateDeviceRssi
(
[
{ type: rssiType.cellular, quality: 72 },
{ type: rssiType.wiFi, quality: 68 }
]
);
```
\### strength (int) The strength property allows indicating the signal level as attenuation, in dBm.
**Examples**
This example shows how to report a signal level with an attenuation of -68 dBm, on a device with a single communication interface.
```javascript
myDevice.updateDeviceRssi({ strength: -68 });
```
# Create Dashboards
To create a new dashboard, navigate to the ***Dashboards*** menu in the Monitor and press the *Add Dashboard* button.

The user can add a Description and Comments in the **Details** tab as needed.
> The description will serve as the dashboard's identifying name.
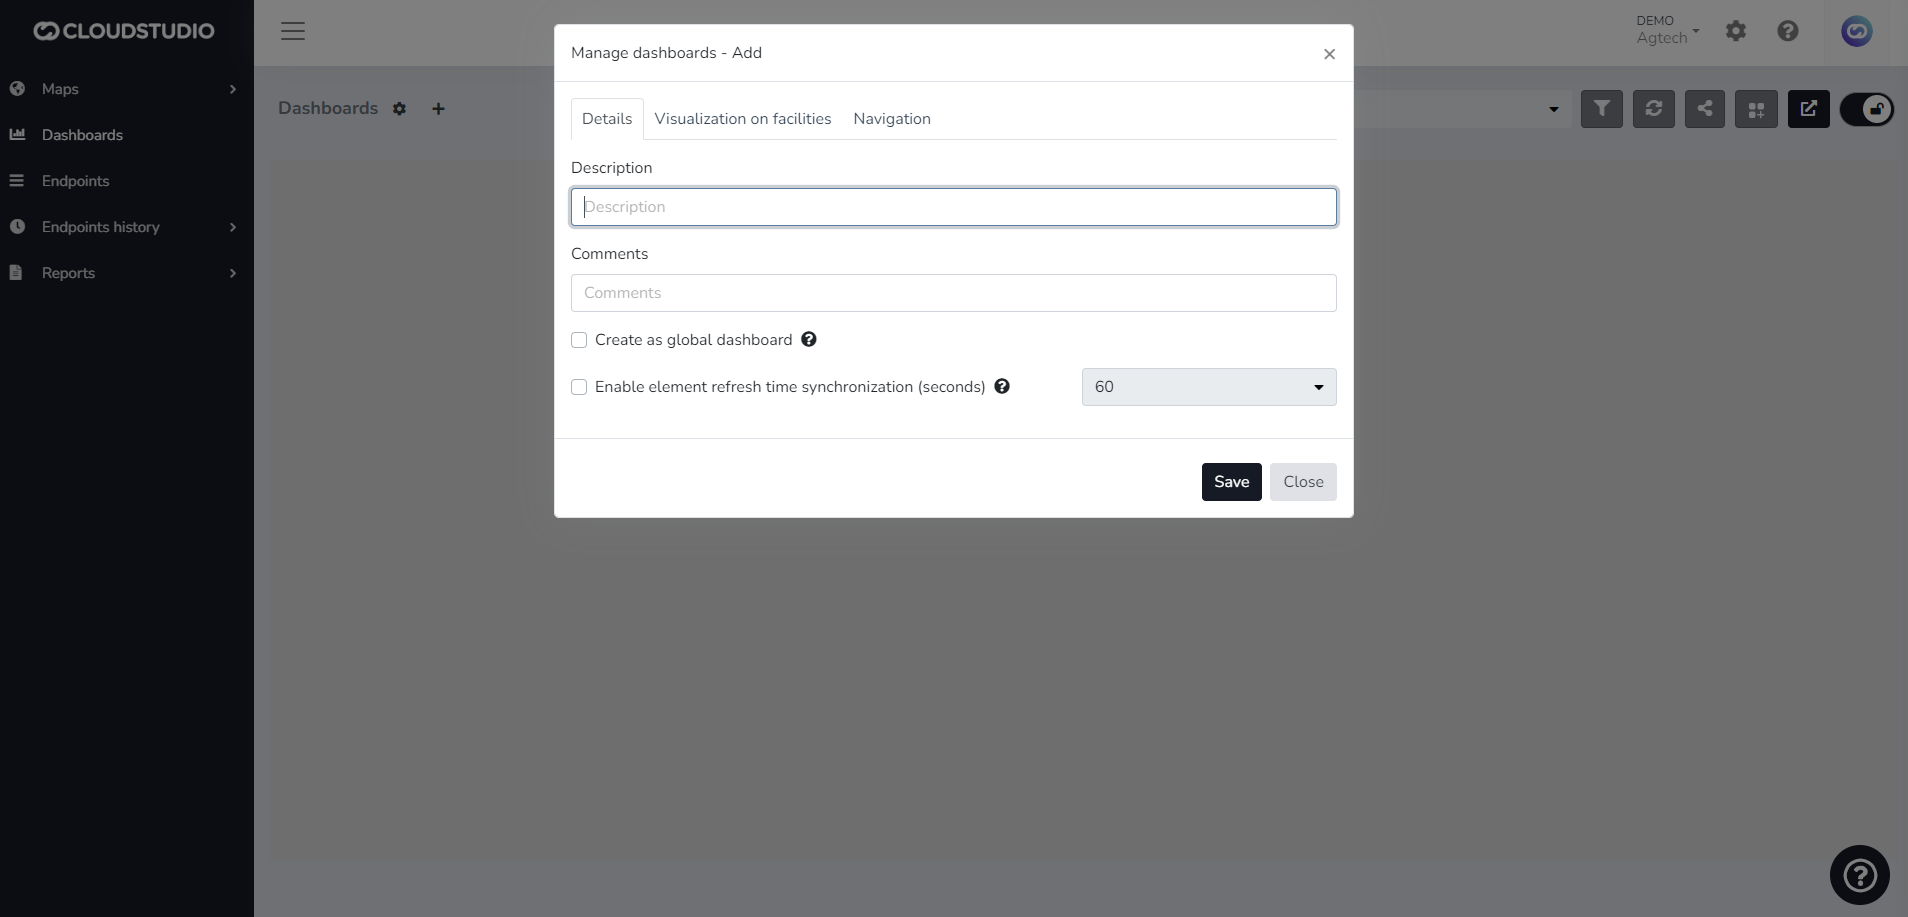
You can also decide whether to create it as **Global**. If not, the dashboard will only be visible in the **Client** instance.
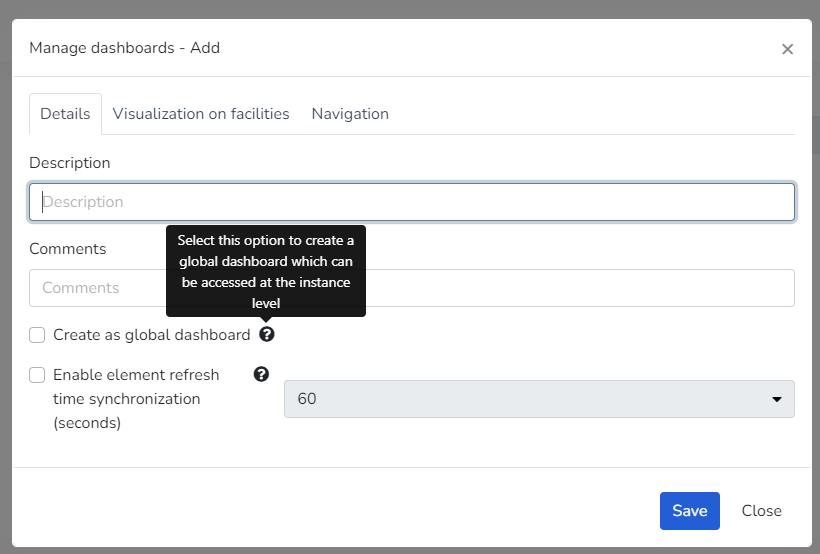
The **Facility Display** tab allows you to select whether it should be visible in a specific facility, all facilities, or none. This option is not mandatory.
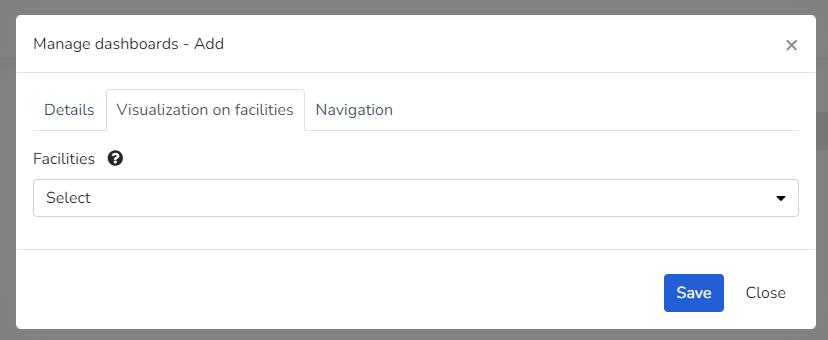
The **Navigation** tab enables the option for the user to define whether viewing the dashboard should redirect to another one. This option is not mandatory.
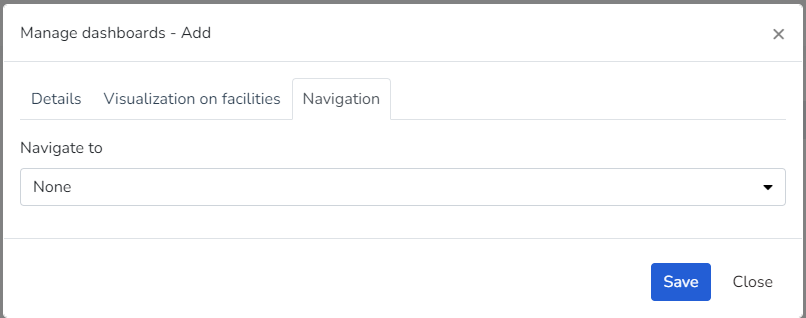
# Create Groups and Widgets
The platform includes predefined **widgets** that facilitate data presentation in dashboards. Some of the available widgets are:
* **Active alarms:** displays a pie chart with the distribution of currently active alarm types.
* **Alarm counter:** Displays a counter of active alarms, allowing hierarchy indication.
* **Individual alarm counter:** Displays a counter of active alarms, allowing severity and hierarchy indication.
* **Past and projected energy consumption:** shows past energy consumption and targets, as well as a projection of consumption and targets for the coming days.
* **Energy consumption by category:** shows energy consumption for selected categories.
* **Energy consumption by phase:** pie chart showing energy consumption by phase.
* **Daily energy consumption by category:** shows daily energy consumption for selected categories.
* **Daily consumption by phase:** shows daily consumption by phase for selected categories.
* **Energy cost by category:** shows the energy cost for selected categories.
* **Past and projected energy costs:** shows past energy costs and targets, as well as a projection of costs and targets for the coming days.
* **Weather status:** shows the current weather status of the facility.
* **Daily power factor:** shows the daily evolution of the power factor.
* **Infrastructure:** shows the current availability of the infrastructure.
* **Facility map:** shows a map containing the location of the current facility.
* **Energy consumption targets:** shows energy consumption information relative to defined targets.
* **Daily maximum power:** shows the maximum daily power used in a 15-minute period.
* **Daily average power:** Shows the daily evolution of the power used.
* **Facility summary:** shows summary information for the current facility.
* **Global summary:** shows summary information for all facilities.
* **Latest events:** Displays a list of the most recent events.
* **Endpoint history:** line chart showing the variation of an endpoint variable type over time.
* **Comparative endpoint history:** line chart showing the comparative variation of two endpoint variable types over time.
* **Metric:** Displays the value of a variable in real time.
* **View:** Displays a SCADA-type view designed in the views section.
These widgets can be edited individually or grouped together.
Whether you want to create a widget or a group of widgets, navigate to the *Add element* button found on the **Dashboards** screen.
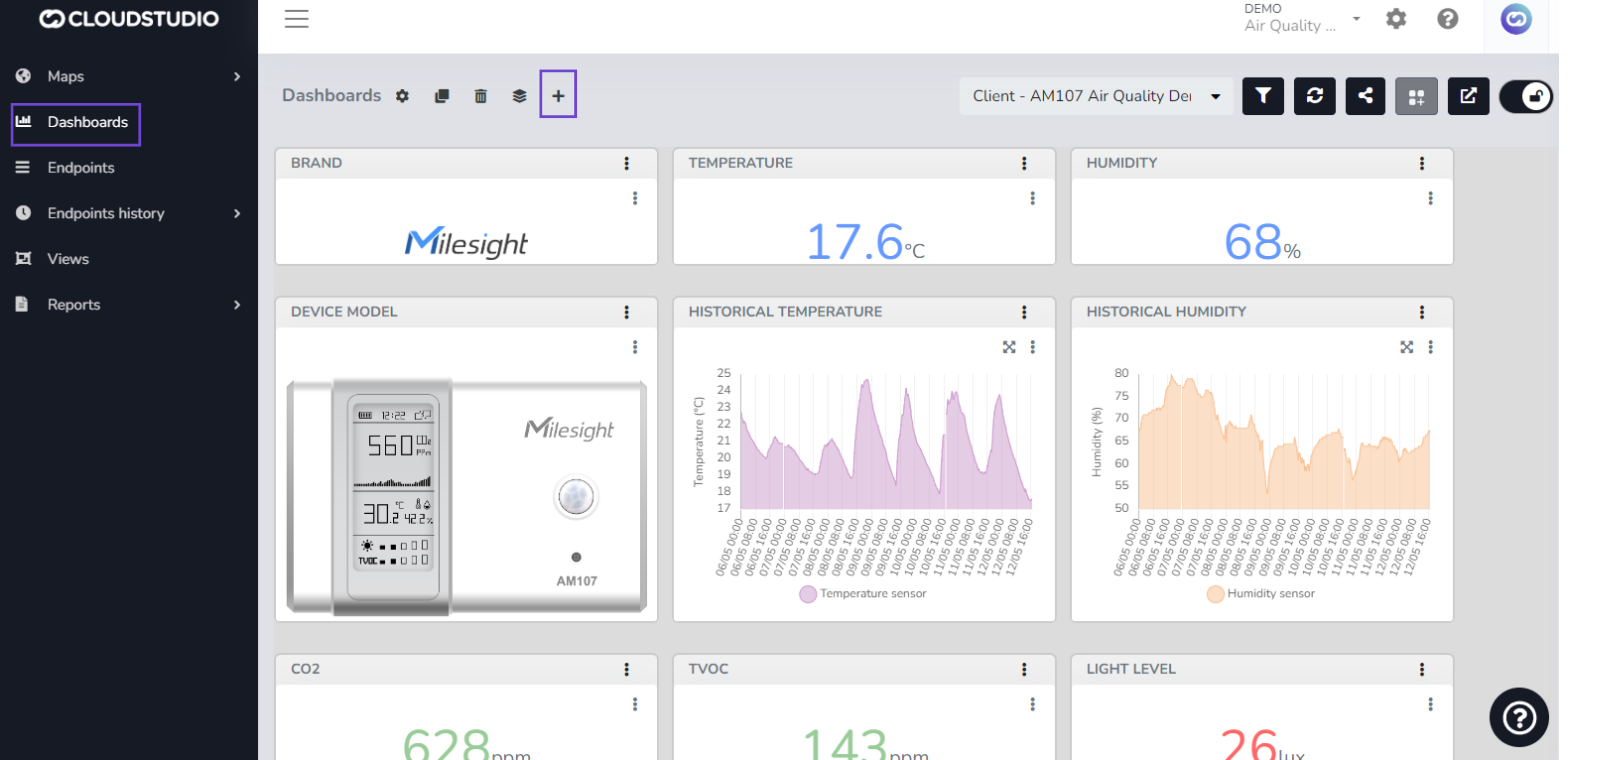
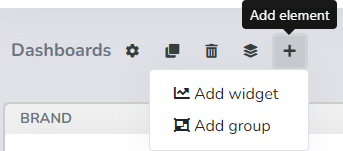
If you select the *Add widget* option, a screen with the available widgets will appear.
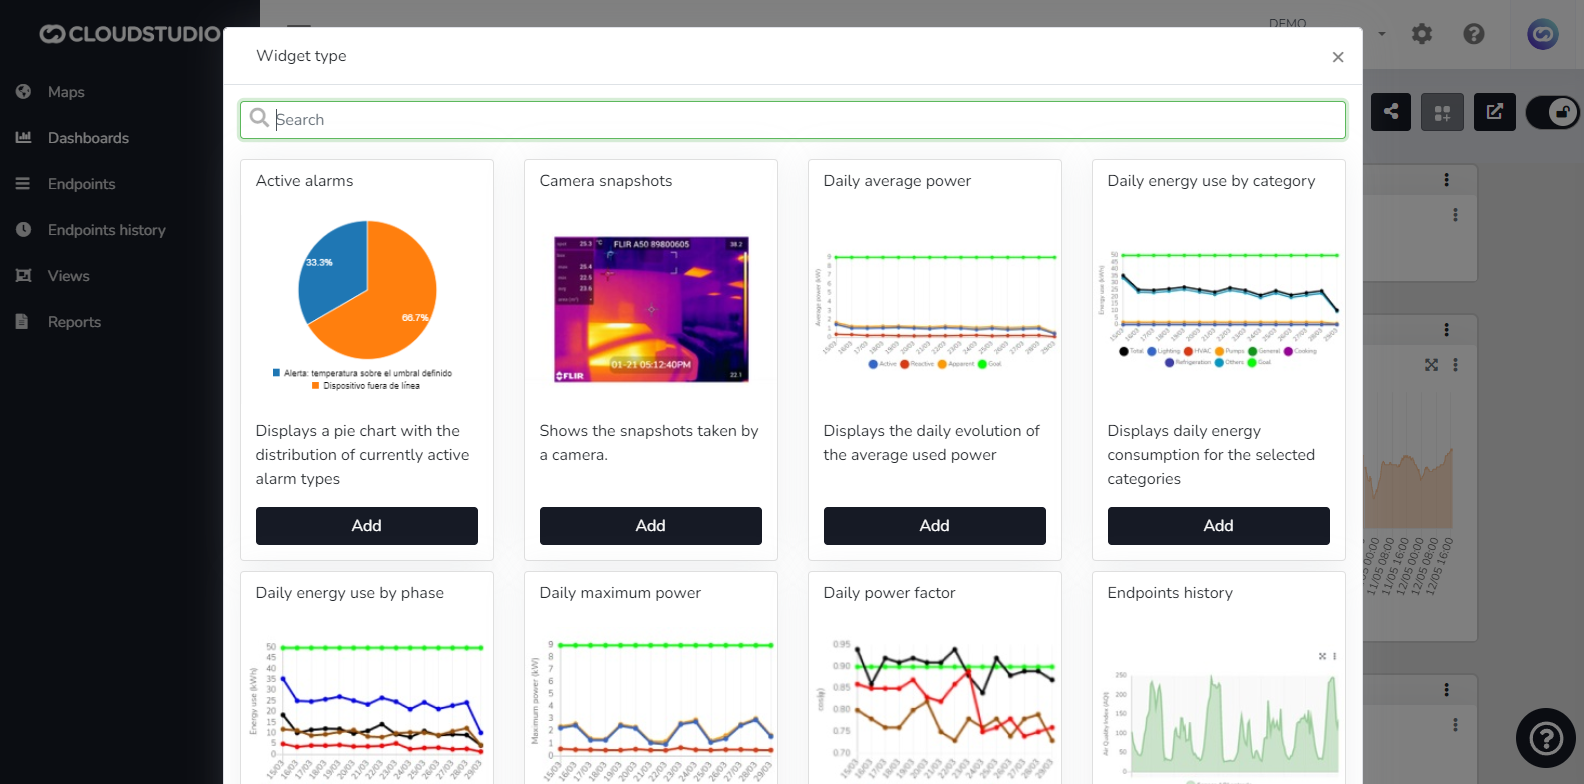
Each widget has a different configuration screen depending on the data it needs to collect.
Example of a *Comparative endpoint history* widget:
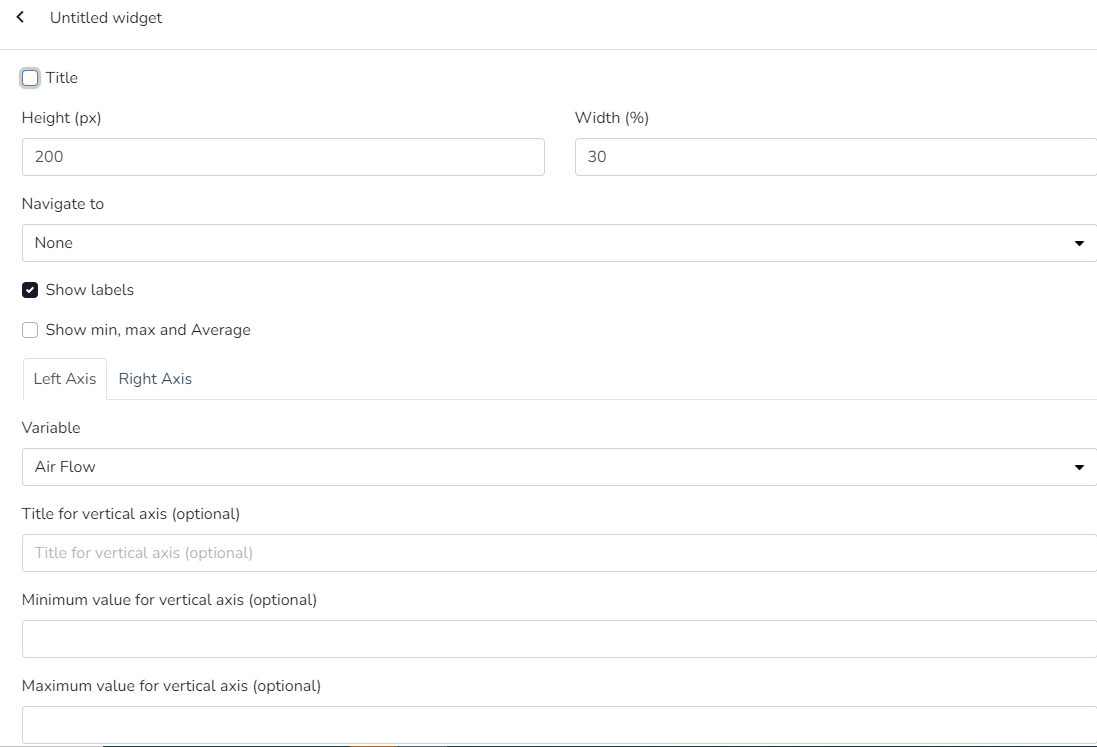
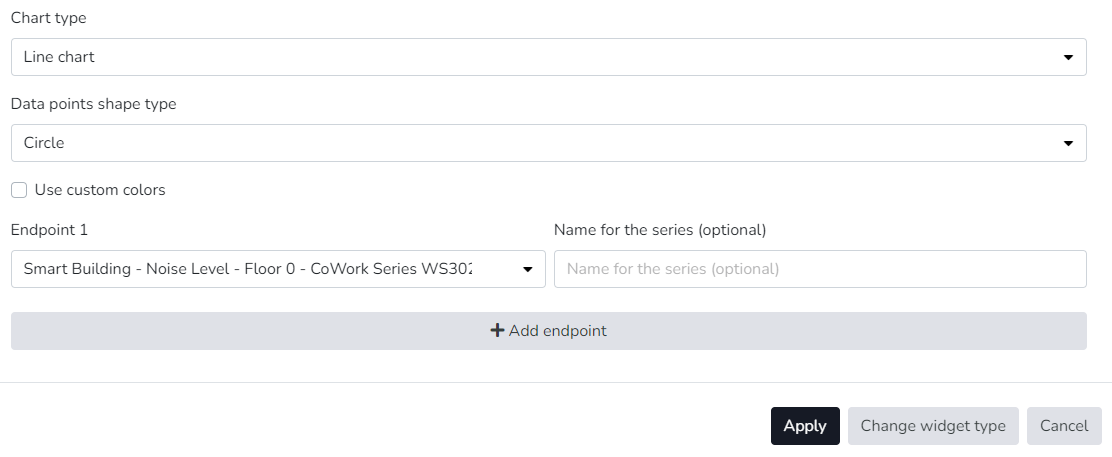
For all widgets, you can define a name, dimensions (height and width), and whether clicking should redirect to another dashboard (navigation). The name and navigation option are not mandatory.
To add a new **group**, follow the same procedure but select the *Add group* button. The following screen will appear:
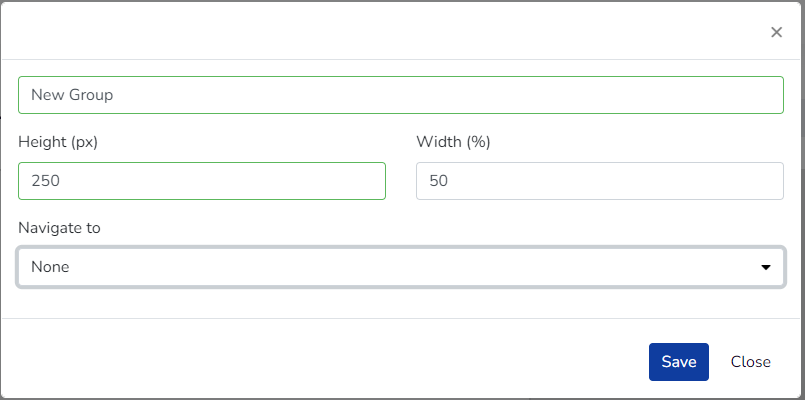
New Group Addition
Once the *Save* button is pressed, the group will be visible in the dashboard.
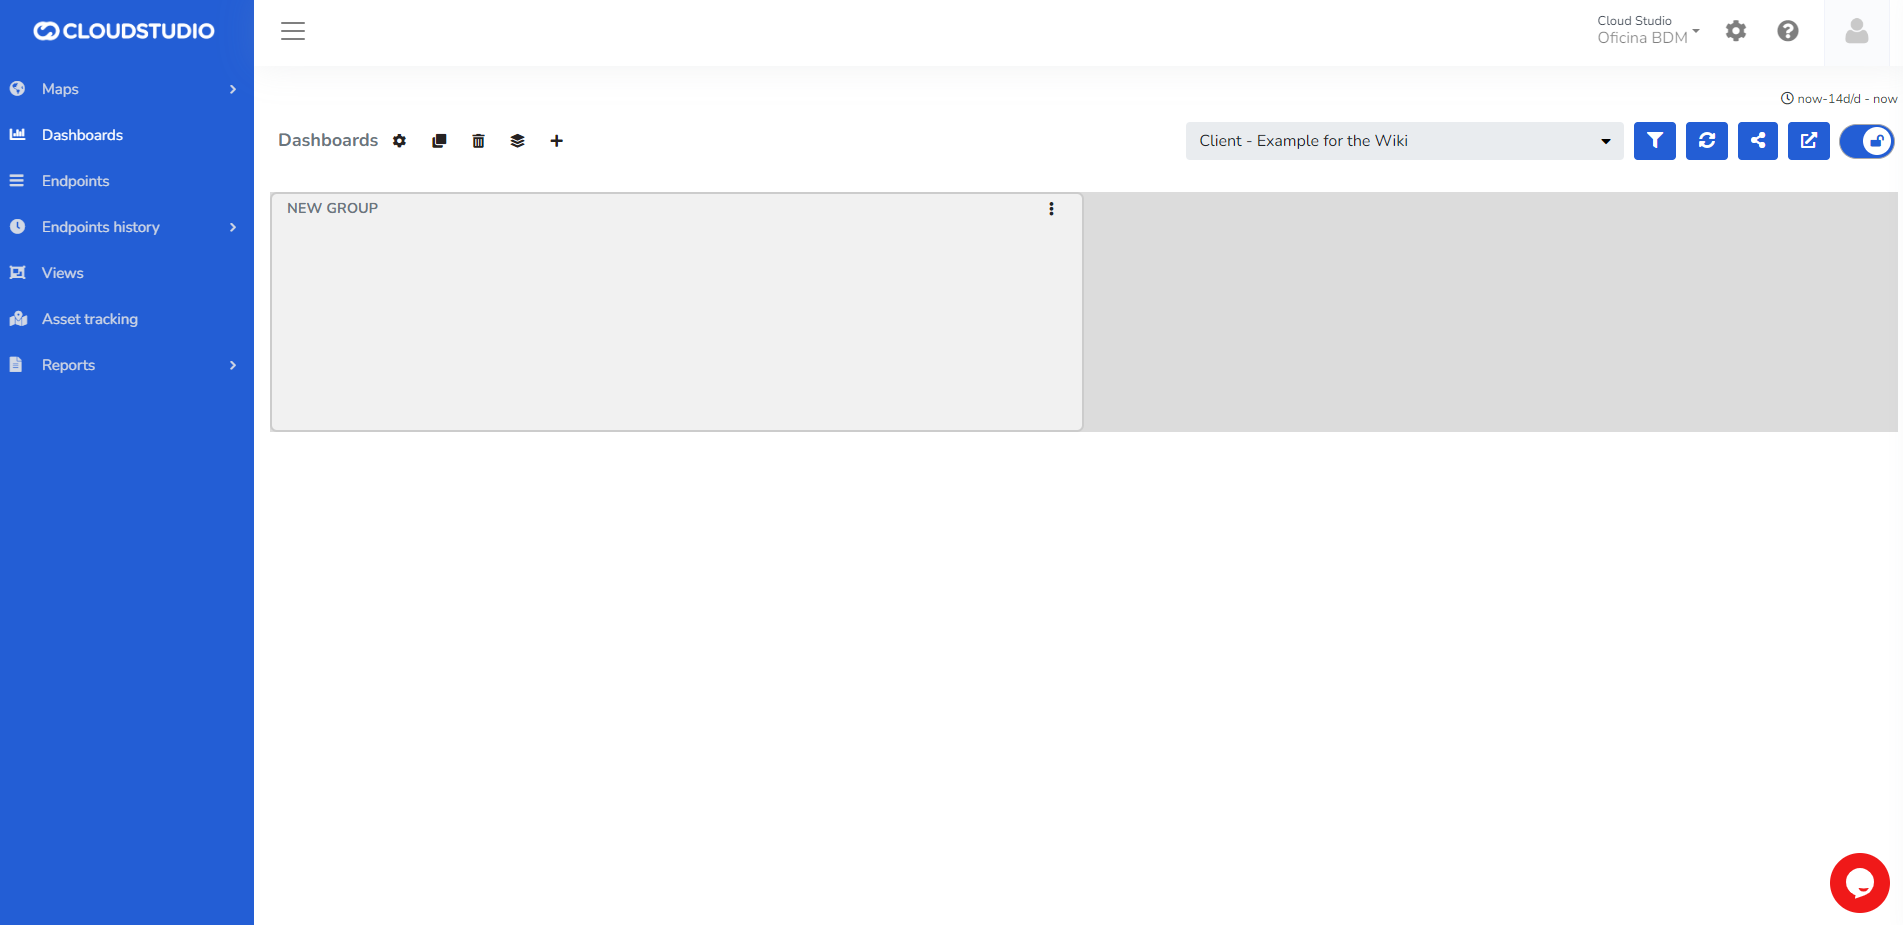
New Group Addition
To add widgets inside the created group, look for the *Add widget* option in the three dots located in the upper right corner of the group.
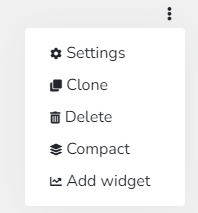
Example of a widget inside a group.
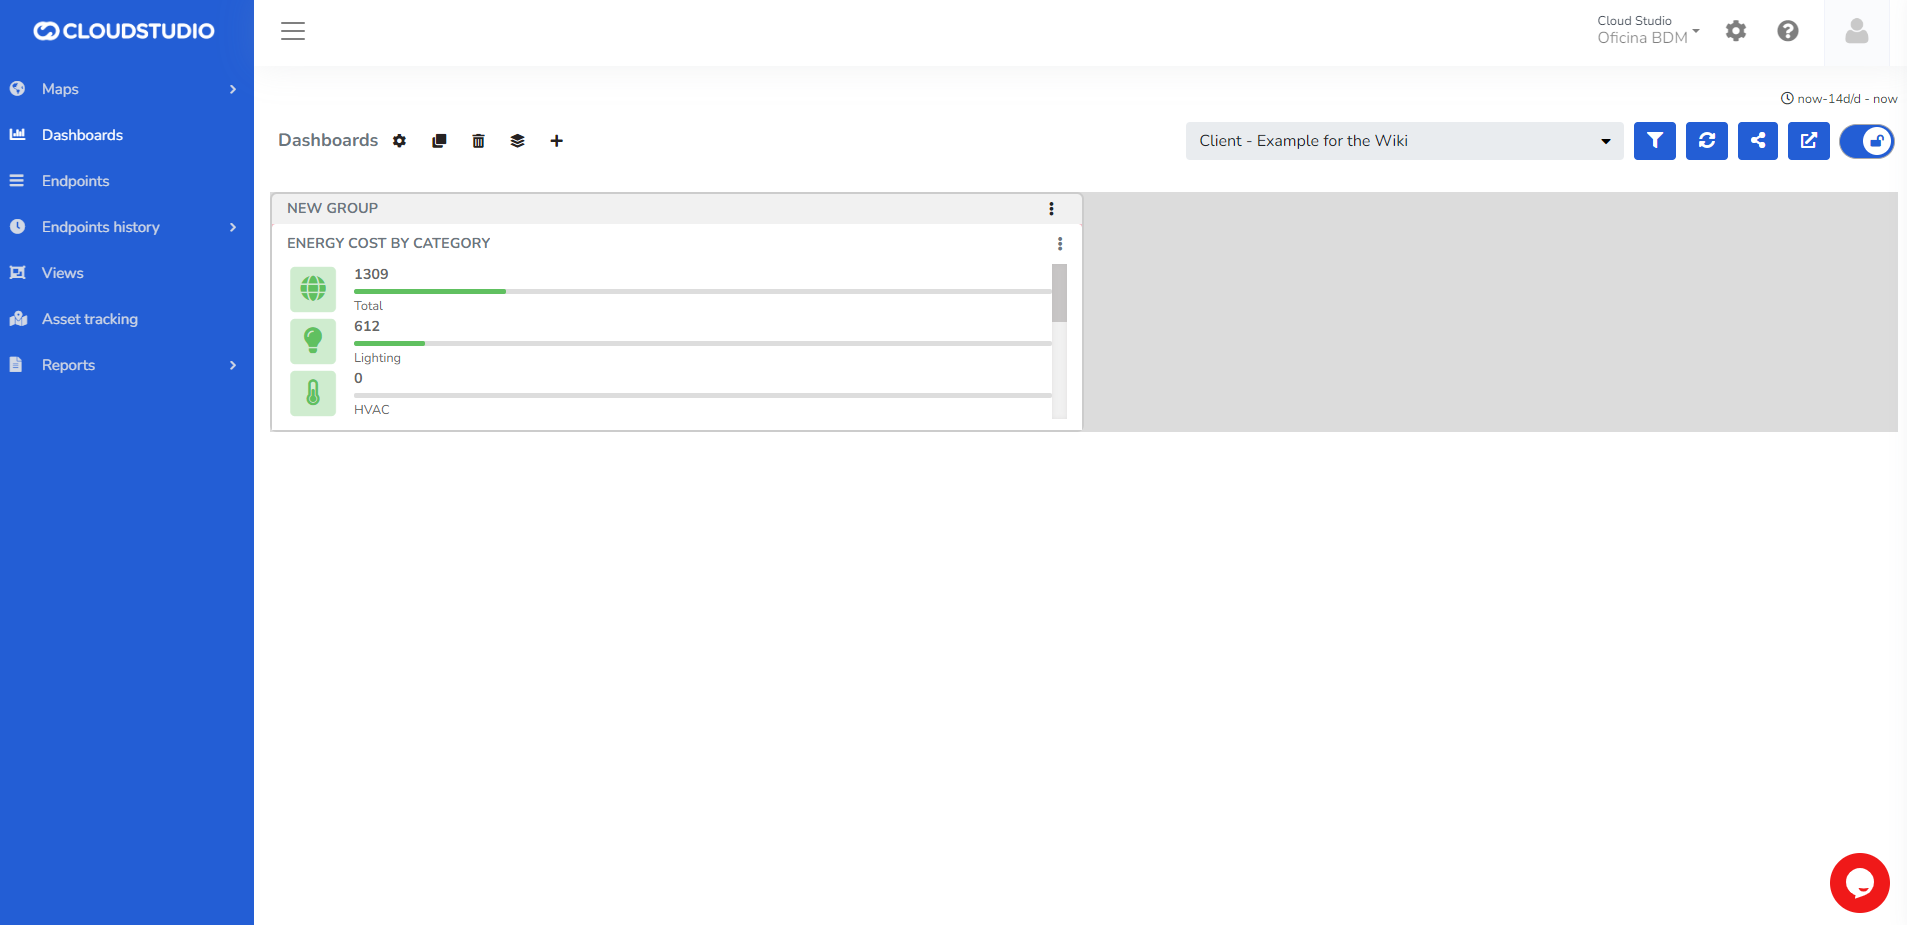
New Widget into a Group
# Edit Groups and Widgets
Dashboard *Design* editing is tied to each user's permissions. If the user has the required permission, they can use the edit button located in the upper right corner of the dashboards when entering the **Dashboards** option in the Monitor menu.


With the Drag and Drop system, you can move and resize widgets and groups as desired. As shown below:
_f58e.gif)
Each **Widget** has its own options in edit mode. Depending on the widget type, the user can access configuration, clone the widget, delete it, export it in JPG format, export it in CSV format, and reset the zoom on a chart widget.
Some widgets allow you to choose any color for data visualization when accessing settings. Color ranges can also be set according to variable values. For charts, users can choose different formats such as lines or bars.
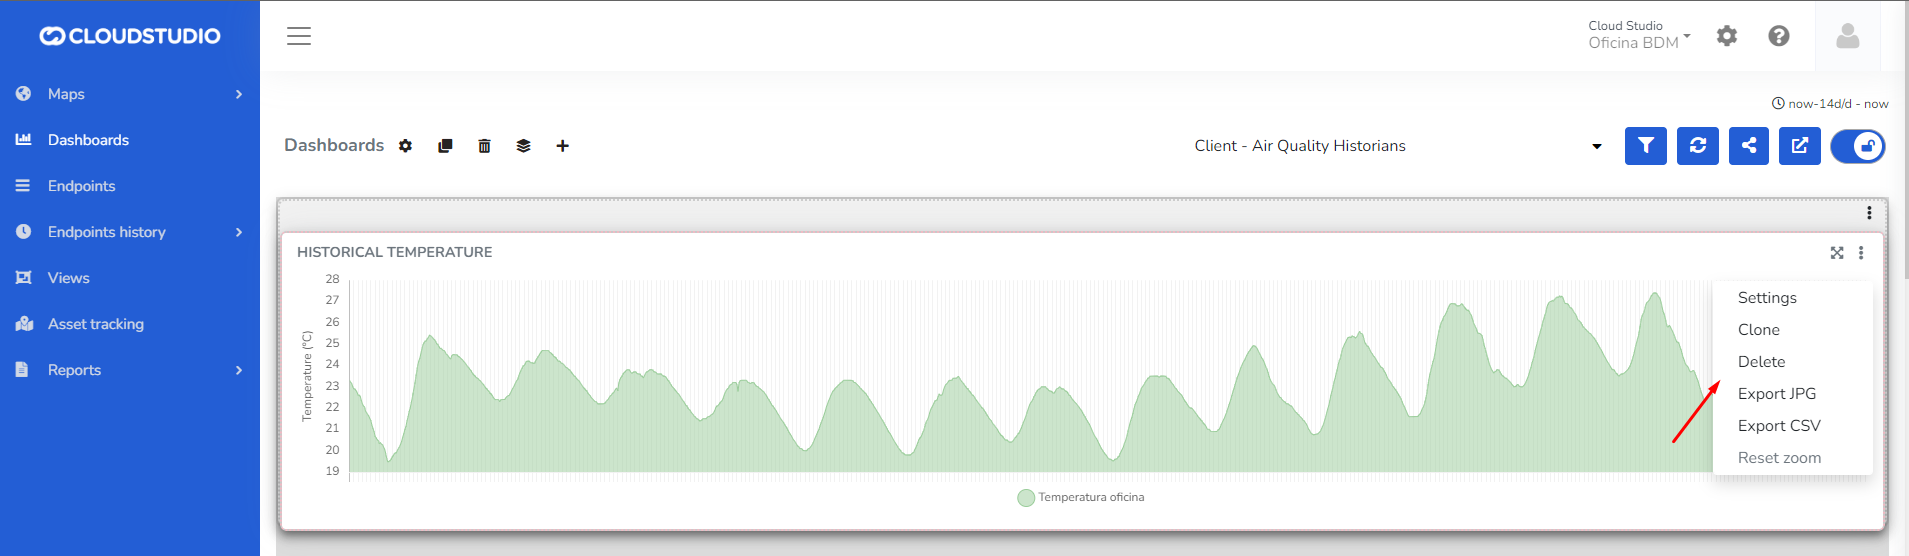
Each **Group** has its own editing options. The user can configure the group, clone it into an identical one, delete it, compact the widgets inside by removing empty spaces, and add new widgets within it.
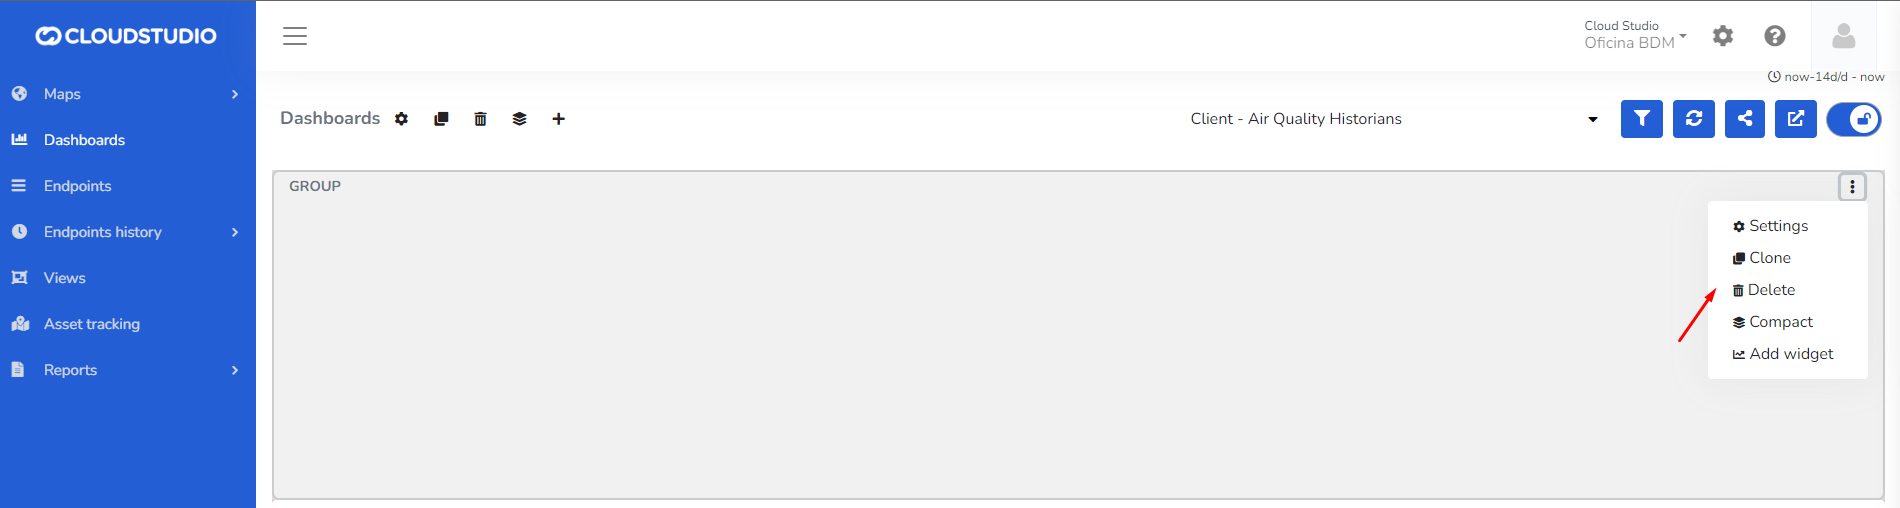
# Filters
The user can use the filter icon to perform a specific search within a defined time period, in order to obtain the data that devices recorded during the selected dates.


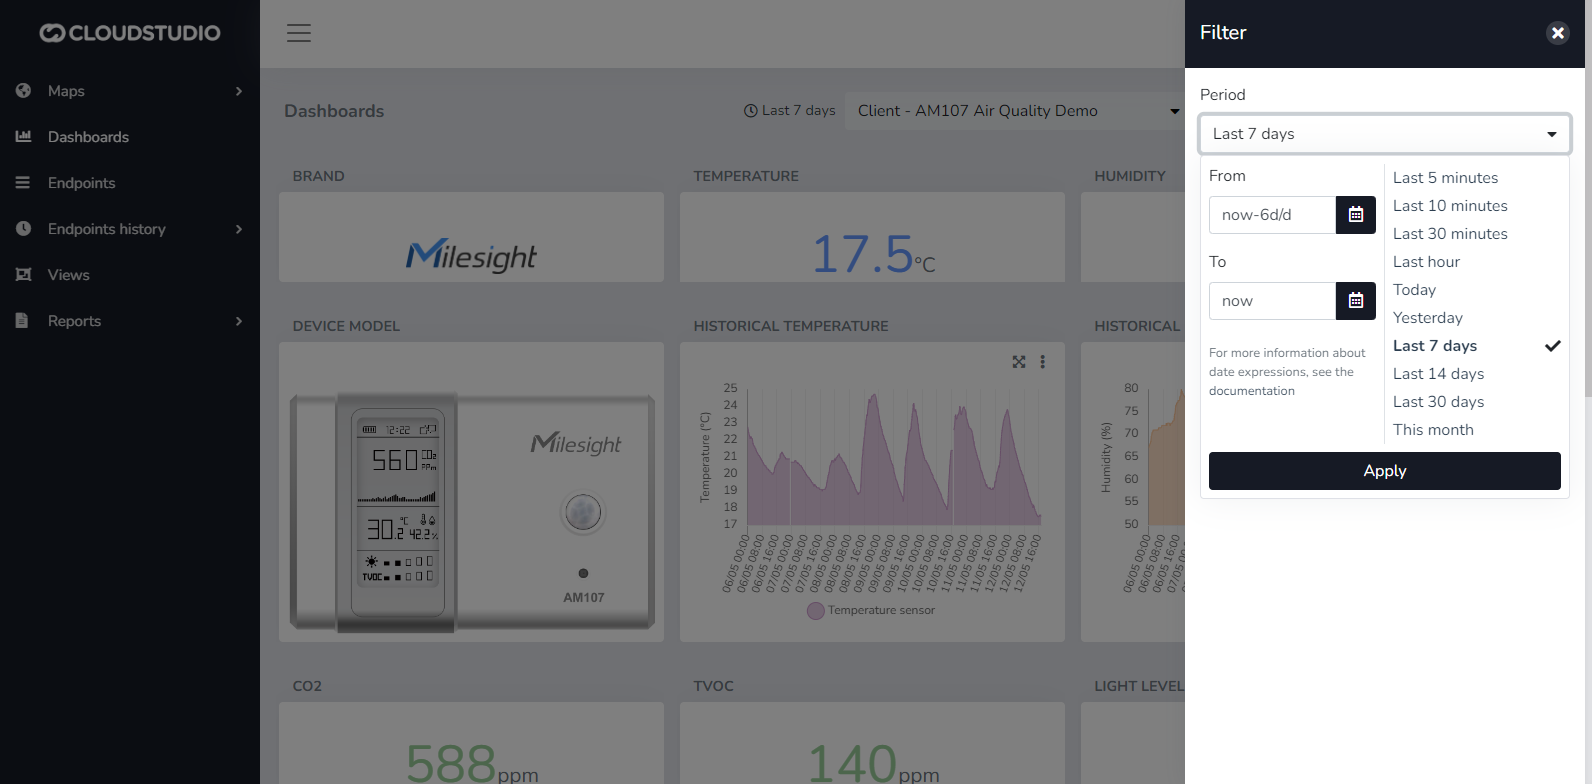
> Remember to press the "Apply" button before closing the filter menu so that the selected dates are applied correctly.
# Dashboards
A **Dashboard** is a graphical screen designed to present data and information in a visual, quick, and clear manner. Dashboards help users make data-driven decisions from multiple sources.
The Cloud Studio platform features a series of specific widgets for branch monitoring, energy consumption, variable history, real-time metrics, weather data, and more, for use in dashboards customizable by the end user.
Since platform version 1.2.20, all dashboard features have been relocated and unified in the Monitor application.
> To learn more about creating dashboards and the new drag & drop features, start [here](/docs/monitor/dashboards/crear-dashboards) or watch this [video](https://youtu.be/cYEkFLk_QVE) on YouTube.
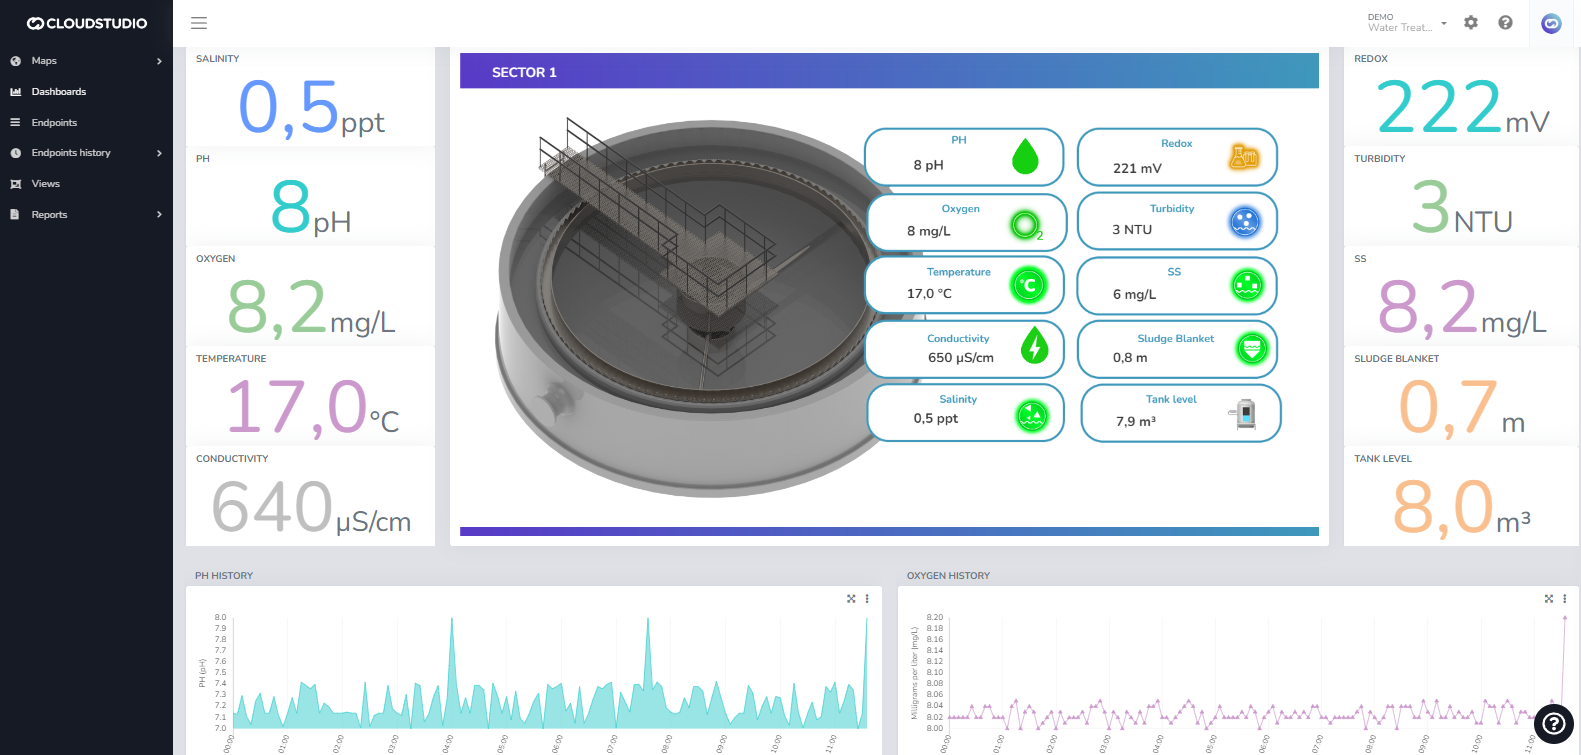
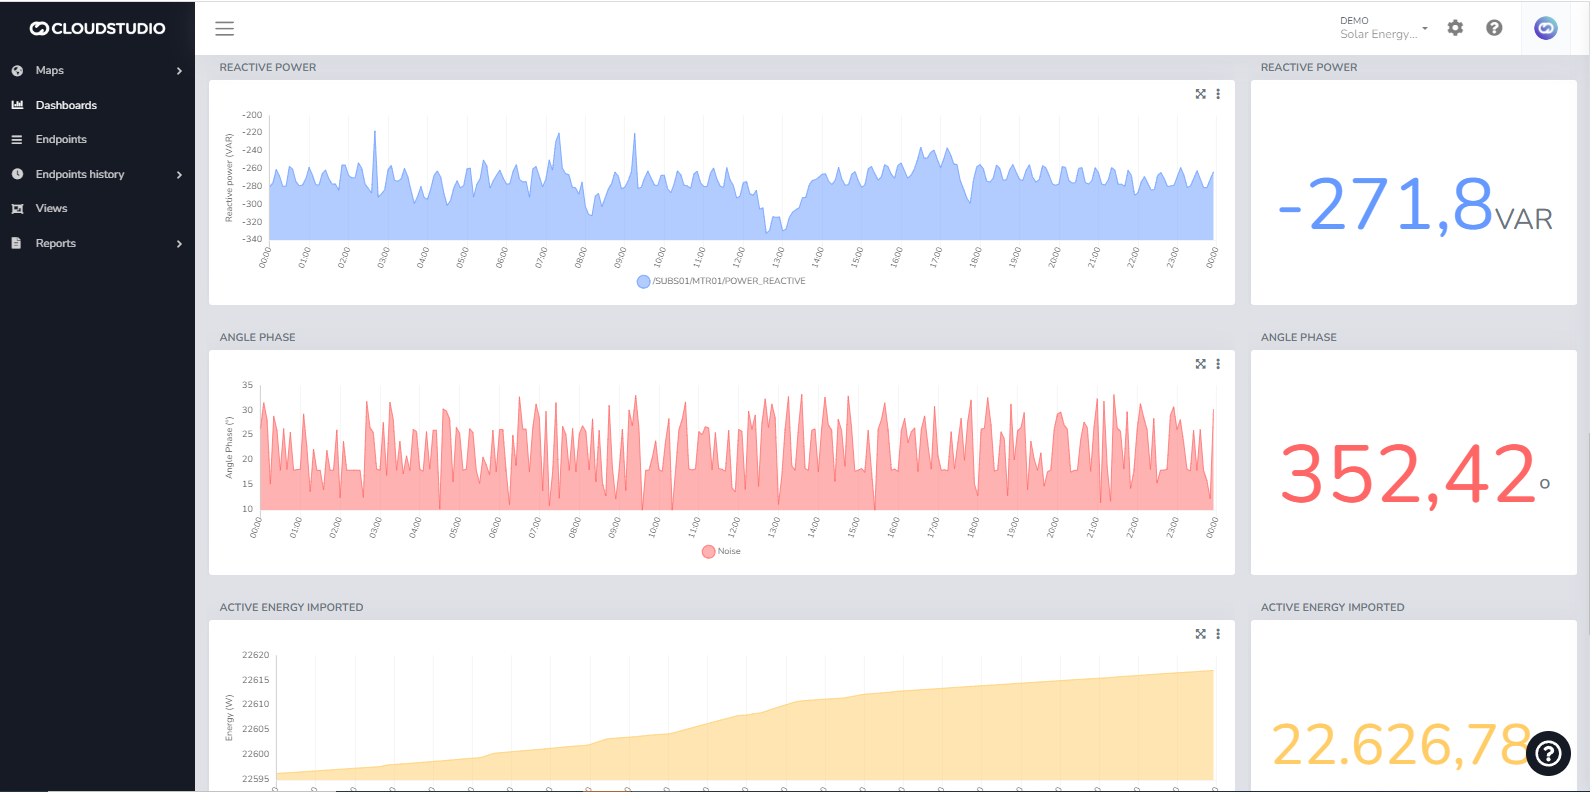
# Dashboard List
From this section, the user can manage all dashboards they have created.
From the **Dashboards** option and selecting the icon shown below, the dashboard list can be accessed.
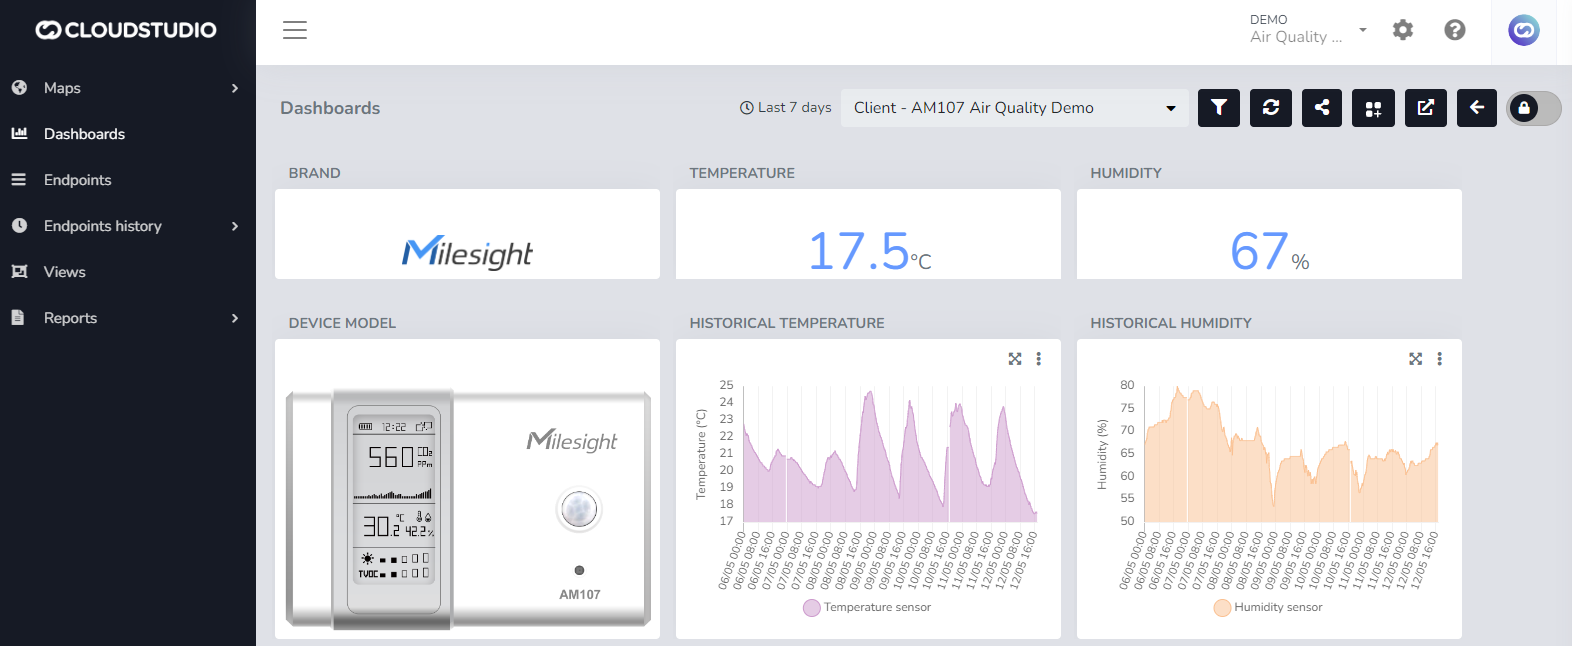

The user can **Create** dashboards, **Edit** dashboards, and **Delete** dashboards that are no longer needed.
# Time Period Selection
Introduction [#introduction]
The platform allows time period selection in various situations, such as:
* Dashboards
* Widgets
* Historical data visualization
* Reports
In all cases, the user interface presents a component like the following:
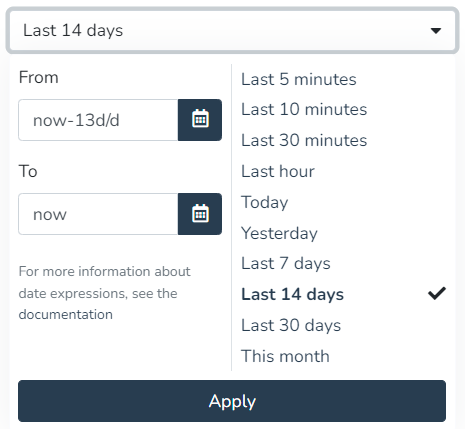
Choosing absolute and relative time periods [#choosing-absolute-and-relative-time-periods]
This component allows selecting a date range (including time, if applicable), both in absolute and relative form. Below is how this feature is used.
Absolute time periods [#absolute-time-periods]
To specify an absolute time period, use the buttons to enter dates. You can choose a start date and time, as well as an end date and time.
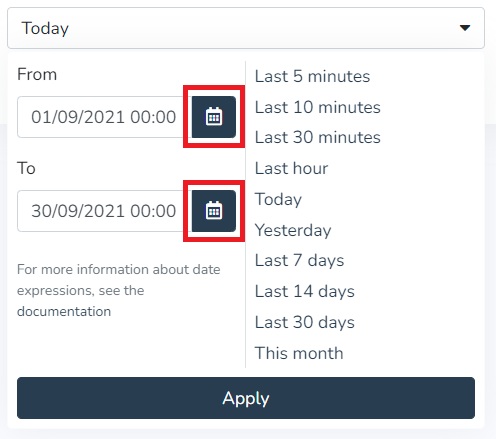
When pressing the "Apply" button, the selector will display the selected period:

Relative time periods [#relative-time-periods]
To choose relative time periods, you can use the options bar on the right, as shown here, as well as enter arbitrary relative time expressions. The following image shows the list of predefined relative time options:
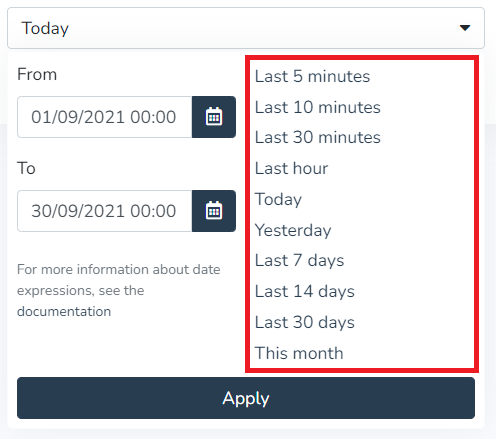
However, you can also enter any relative time period by typing it in the respective "From" and "To" fields, as shown in the following example:
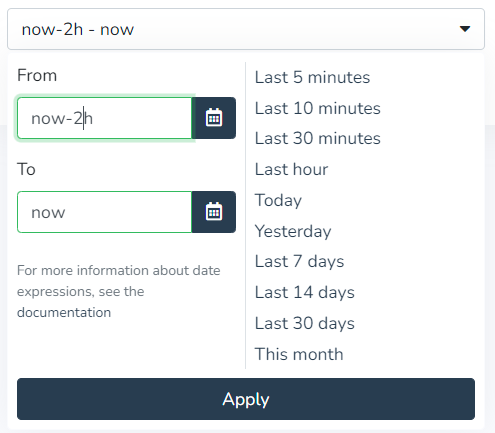
The syntax for relative expressions is as follows:
* **now** always represents the current date and time.
* Then, you can add or subtract an arbitrary amount of seconds, minutes, hours, days, months, or years.
* **s** represents seconds
* **m** represents minutes
* **h** represents hours
* **d** represents days
* **M** represents months
* **y** represents years
* Optionally, you can "round" the date to the beginning of the day, month, or year by adding any of the following modifiers:
* **/d** represents the beginning of the day
* **/M** represents the beginning of the month
* **/y** represents the beginning of the year
Examples of relative expressions:
| Start expression | End expression | Meaning |
| ---------------- | -------------- | ------------------------------------------ |
| now/d | now | From the beginning of today until now. |
| now/M | now | From the beginning of the month until now. |
| now-1d/d | now/d | Yesterday. |
| now-6h | now | The last 6 hours. |
| now-30m | now | The last 30 minutes. |
| now-14/d | now | The last 15 days (including today). |
Mixed time periods [#mixed-time-periods]
You can also use a combination of fixed and relative periods. For example, to indicate the time period "from January 1, 2021 until now", you can enter the absolute date "January 1, 2021" in the "from" field, and then the relative expression "now" in the "to" field.
# Export reports as CSV using the facility-specific separator
This section allows exporting the alarm history to a Microsoft Excel document.
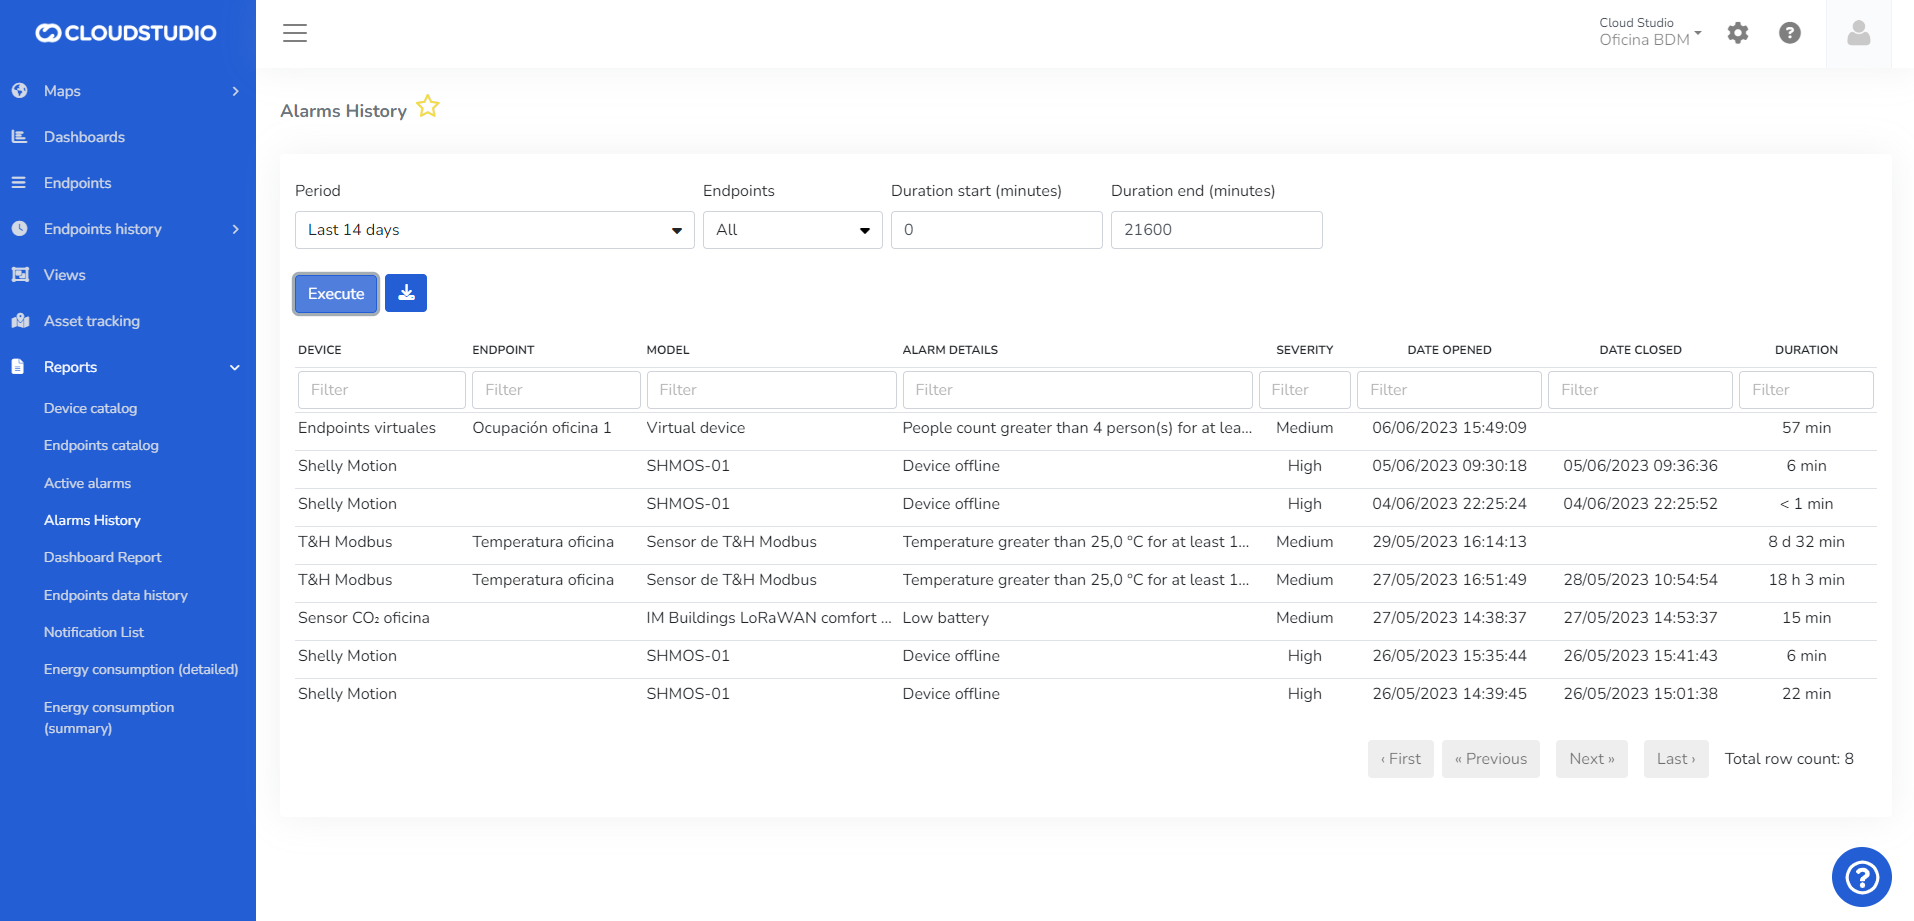
# Reports
In the Reports section, the user can view different types of options from which to download a report.
The available reports for viewing and downloading are the following:
**Device Catalog**

**Endpoint Catalog**
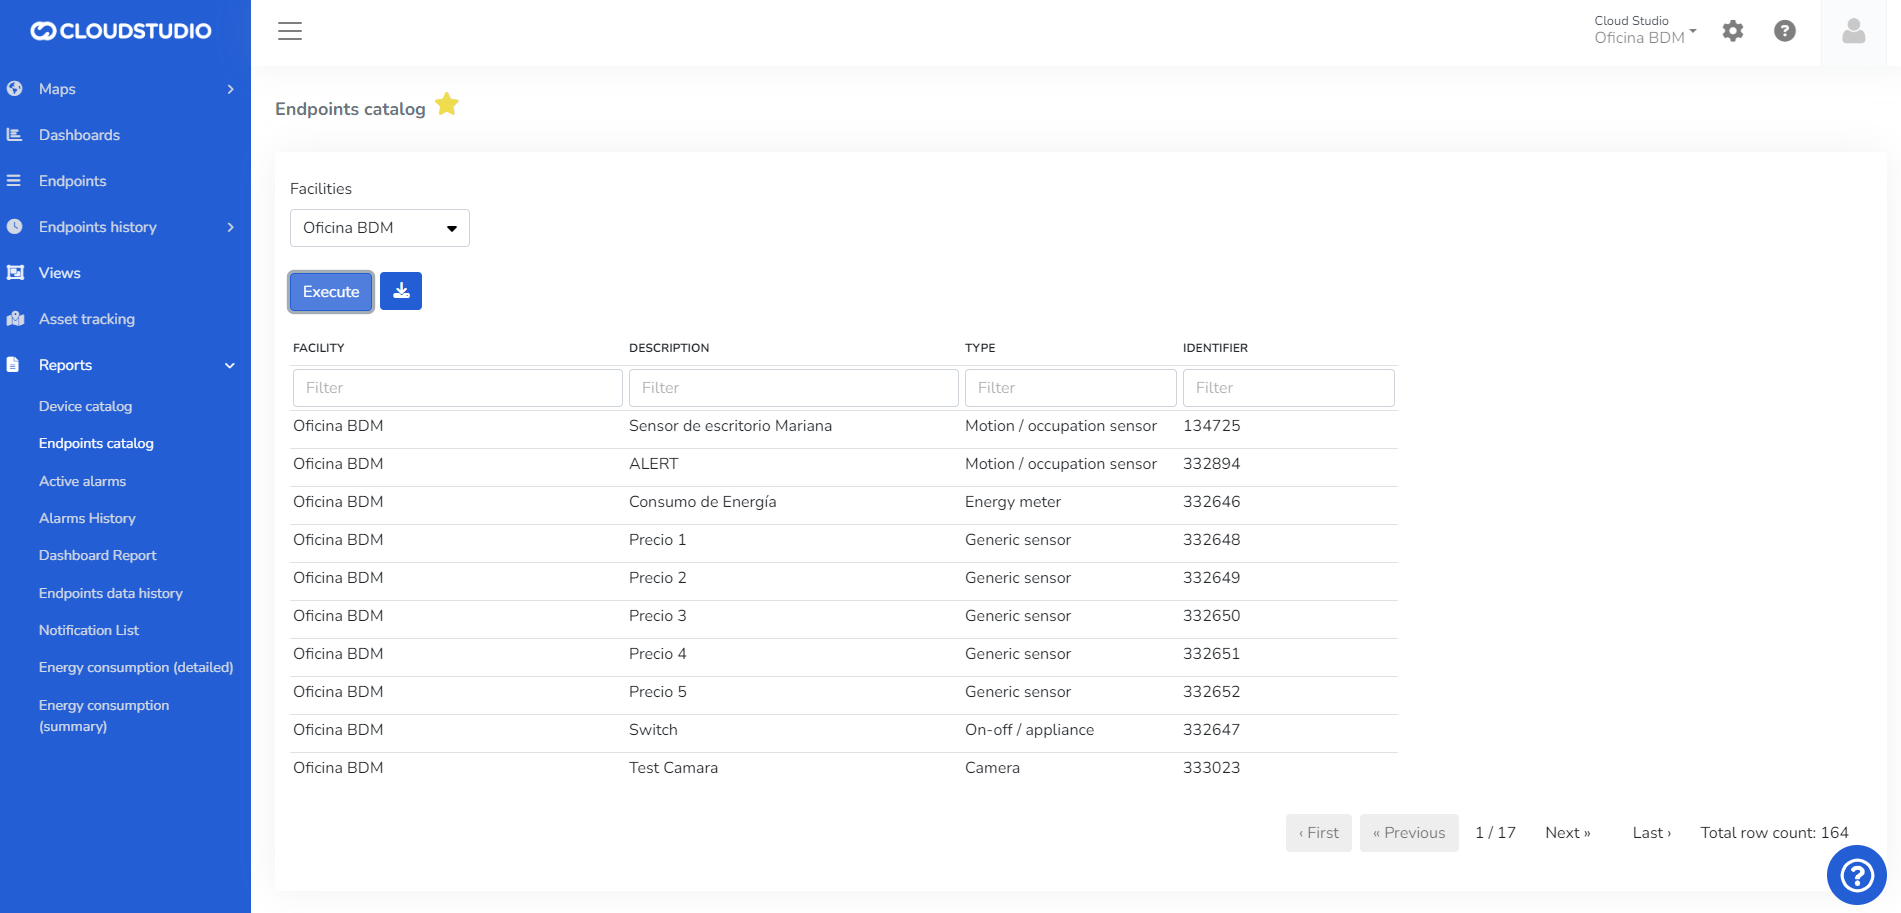
**Active Alarms >** For more details on filters to include hidden Endpoints, click **here**
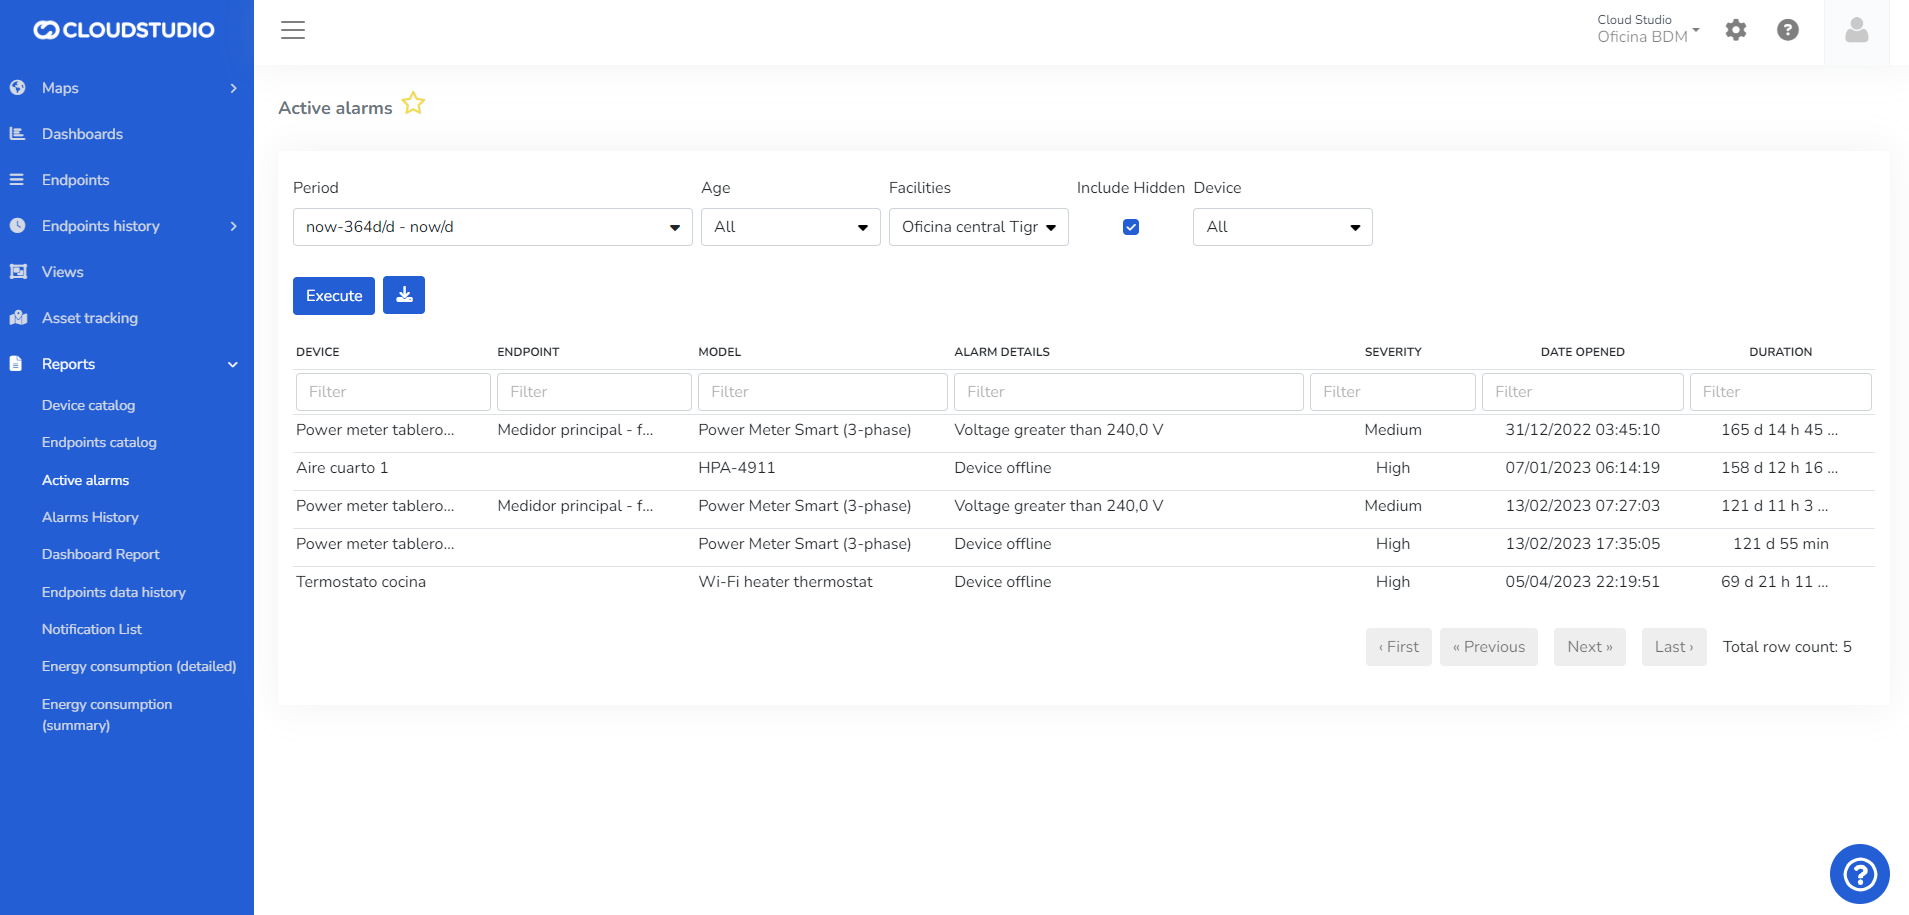
**Alarm History**

**Dashboard Report**
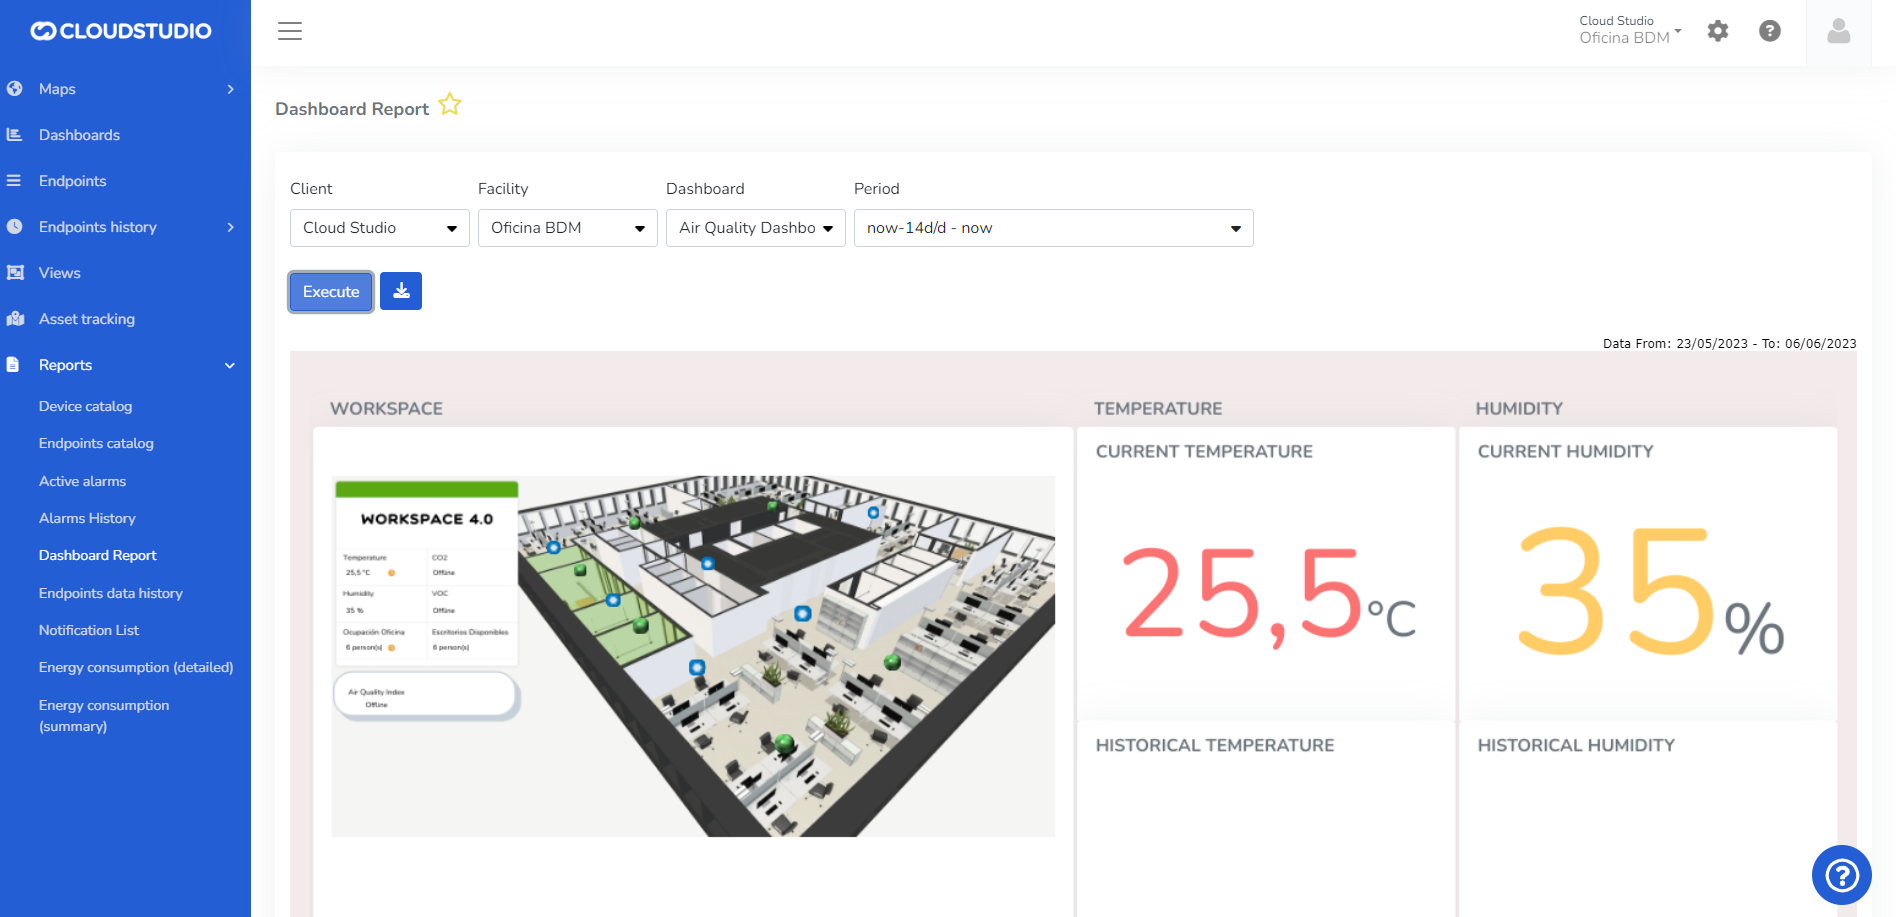
**Endpoint Historical Data**
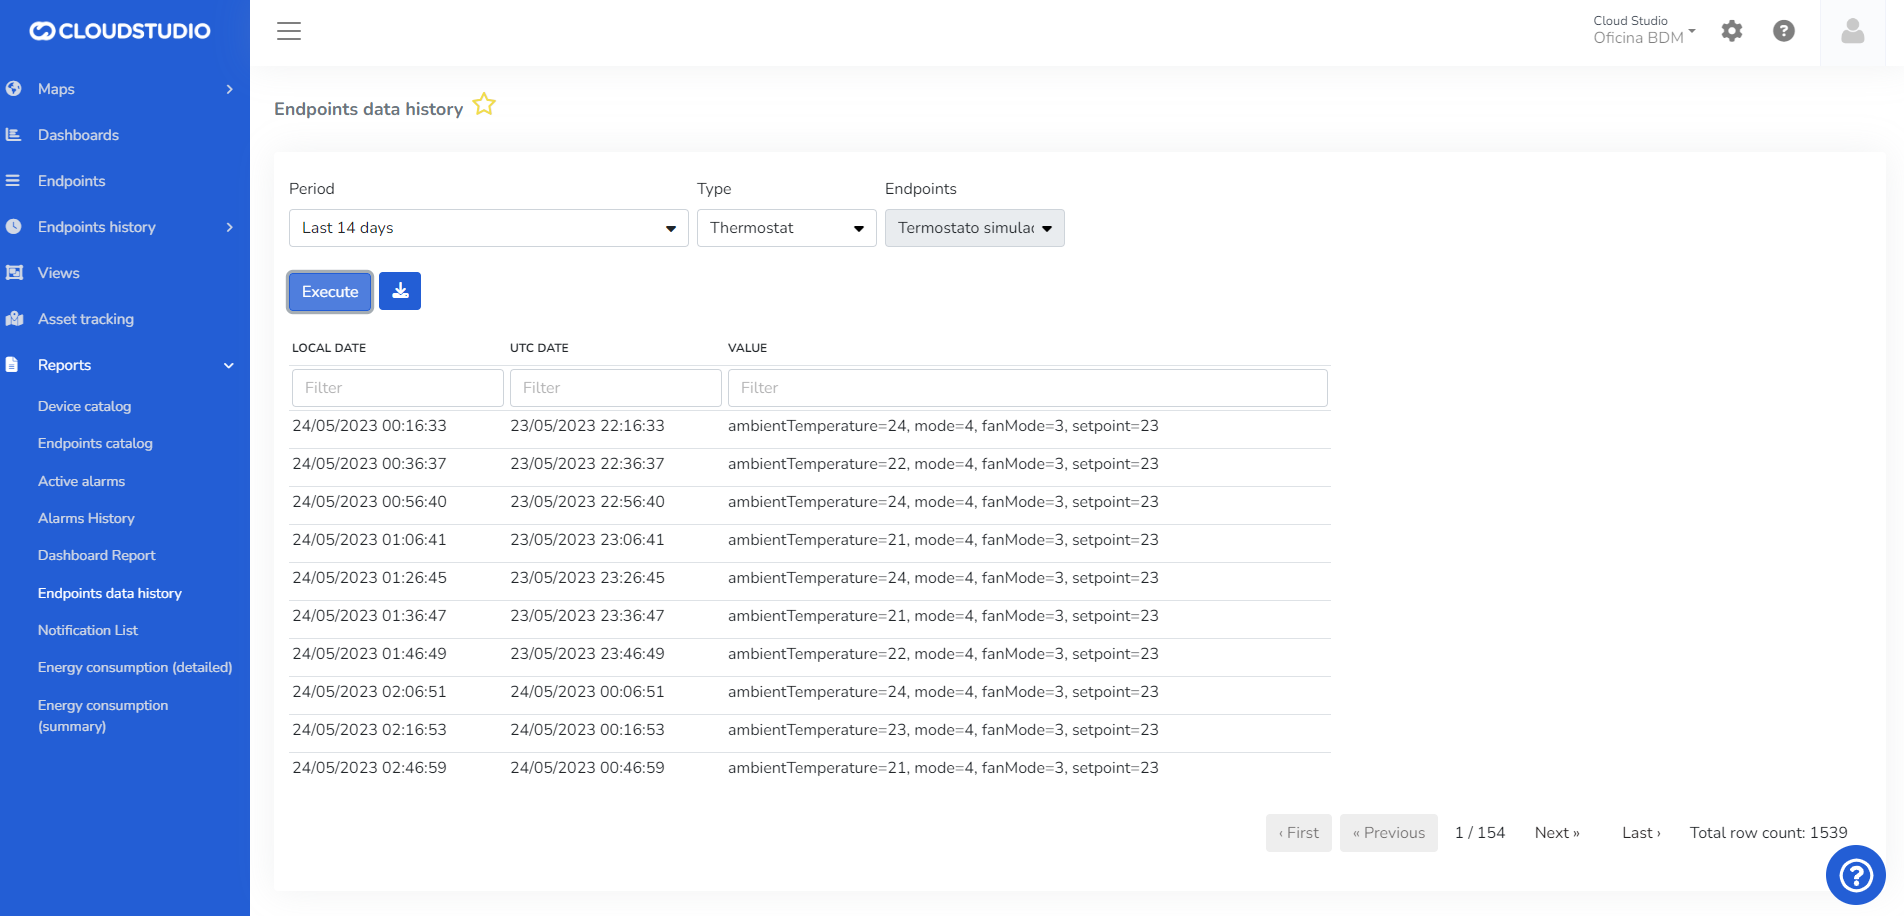
**Notification List**

**Detailed Energy Consumption**
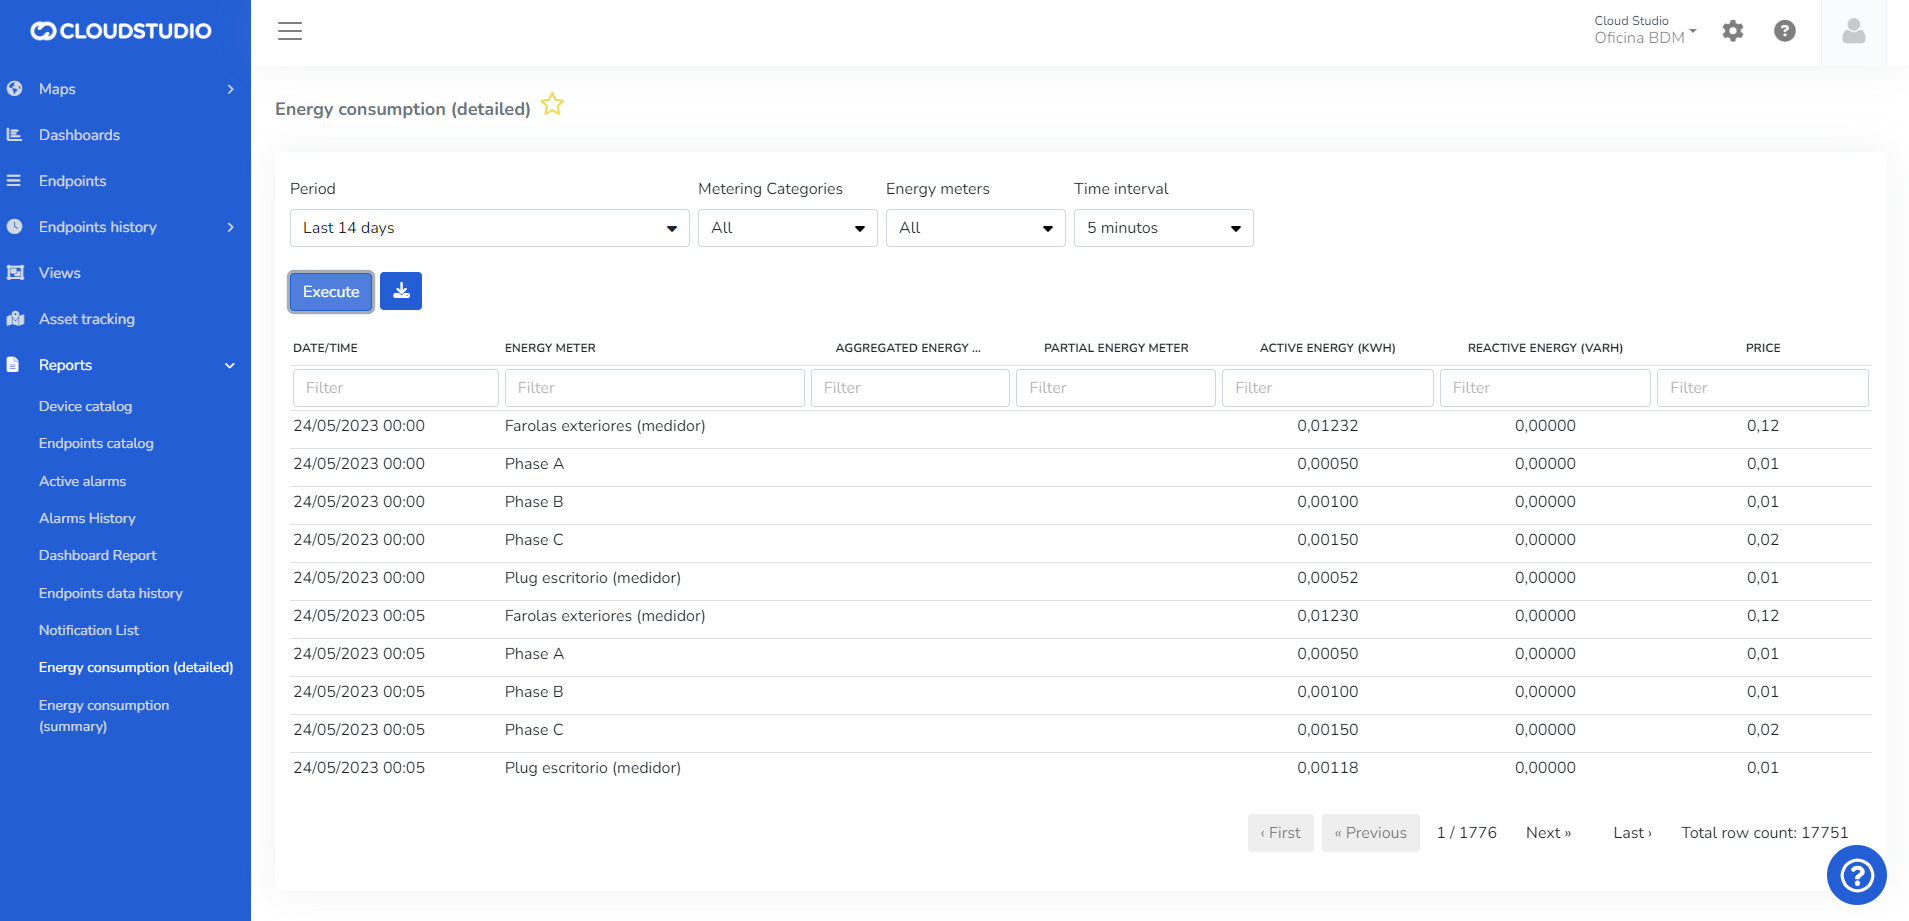
**Summary Energy Consumption**
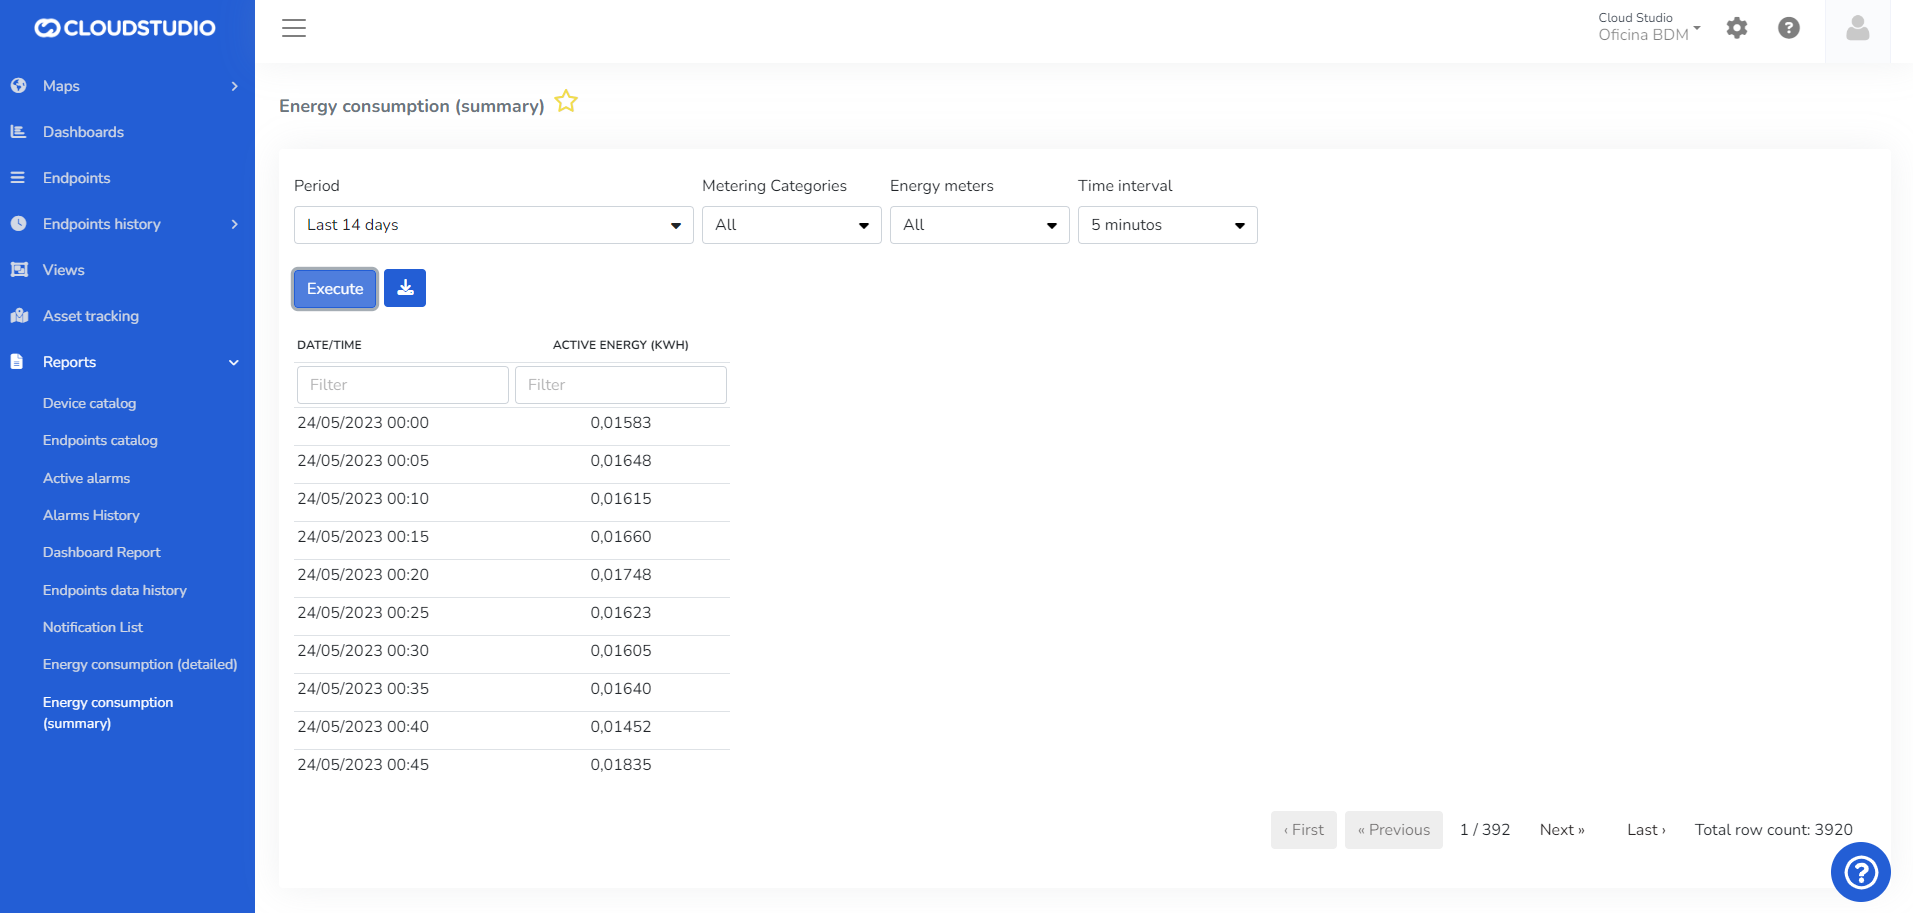
Each option can be configured to generate the specific report needed, and it will be downloaded in PDF or Excel format.
# Notification List
Introduction [#introduction]
The notification list allows viewing the report filtered by Creation date, Facility, notification type, channel, and Client. An administrator with a global user can filter by multiple clients. The platform allows downloading the report in PDF/Excel.
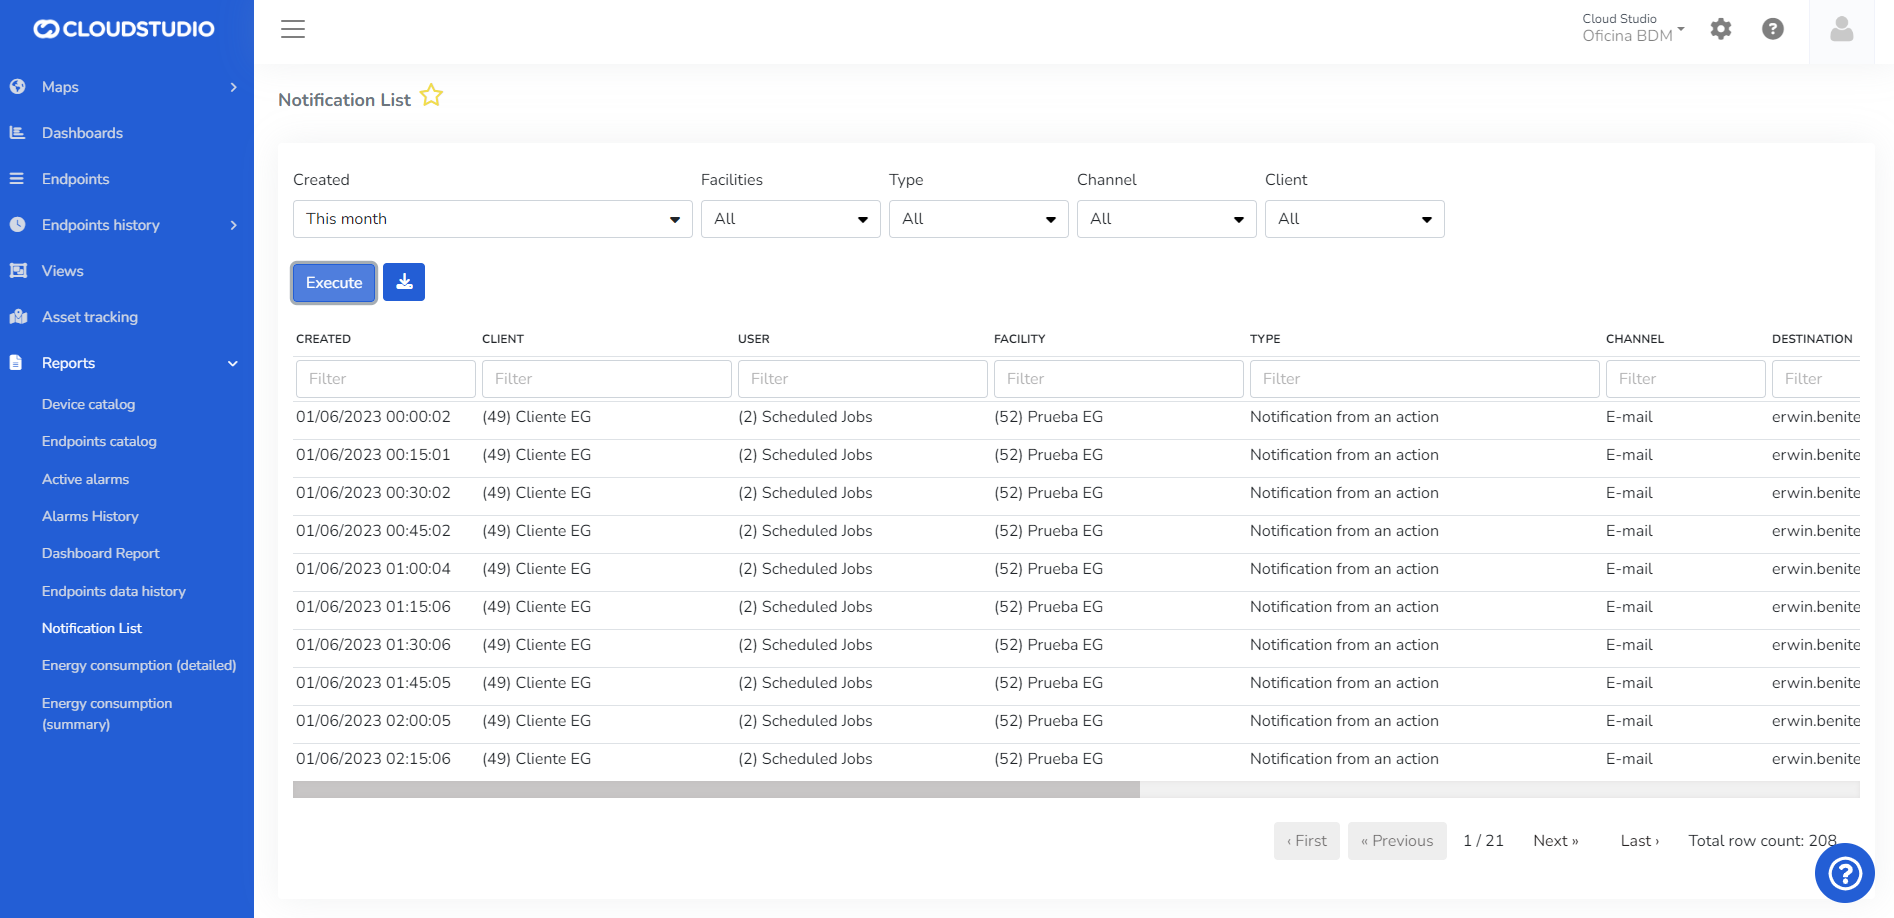
# Report Export Customization
This feature allows customizing the subject and body of the email sent when scheduling a report. Additionally, it allows adjusting the name of the attached document, the header, and the footer.
Export configuration [#export-configuration]
In the download dropdown of each report, a new option called "export configuration" will appear.
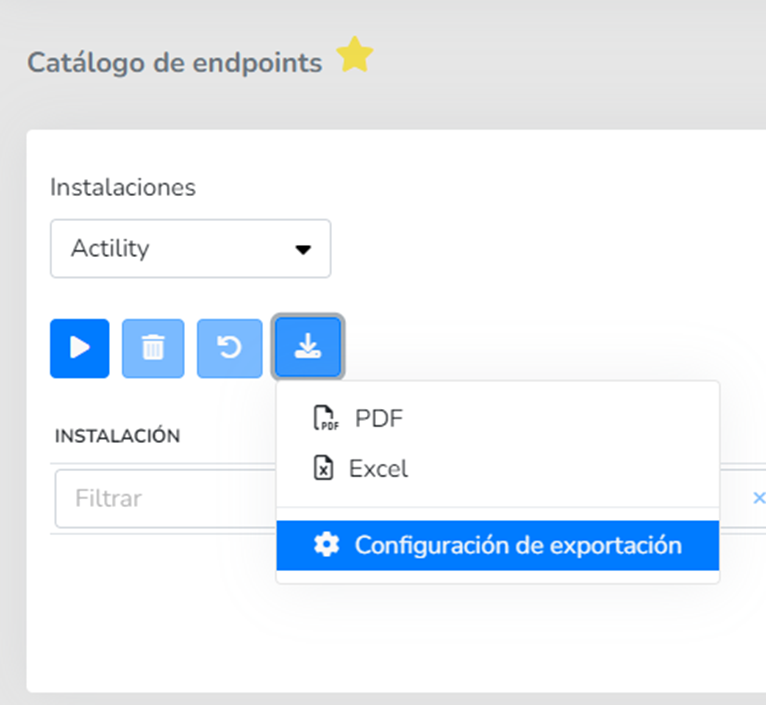
This option will open a modal that allows customizing the header, footer, and generated file name. Additionally, through a checkbox, it allows enabling or disabling each of these settings. For example, you can deactivate the display of the header and footer:
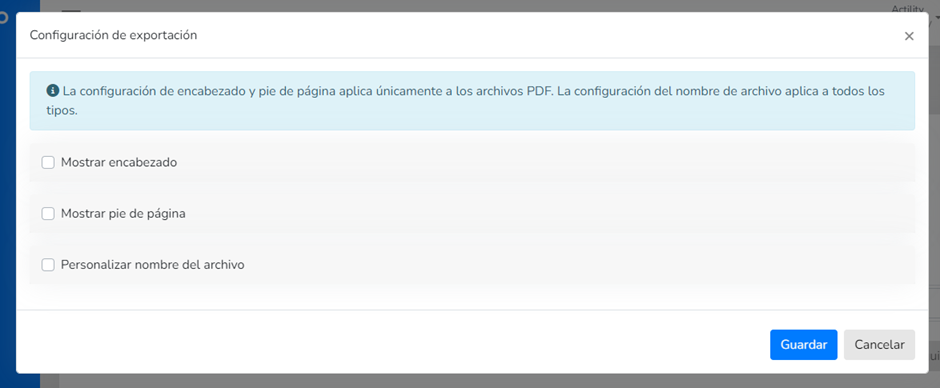
Header and Footer [#header-and-footer]
When enabling either option via the checkbox, a code editor will appear below each one to enter the HTML template you want to use for the report's header or footer.
File name [#file-name]
When enabling the customize checkbox, a text field will appear where you can type the custom name for the file that will be generated during export. Only alphanumeric values and hyphens are allowed.
Save as favorite [#save-as-favorite]
When saving the report as a favorite, the export configuration (header, footer, and file name) will also be saved. It can subsequently be edited from the favorite editing view:
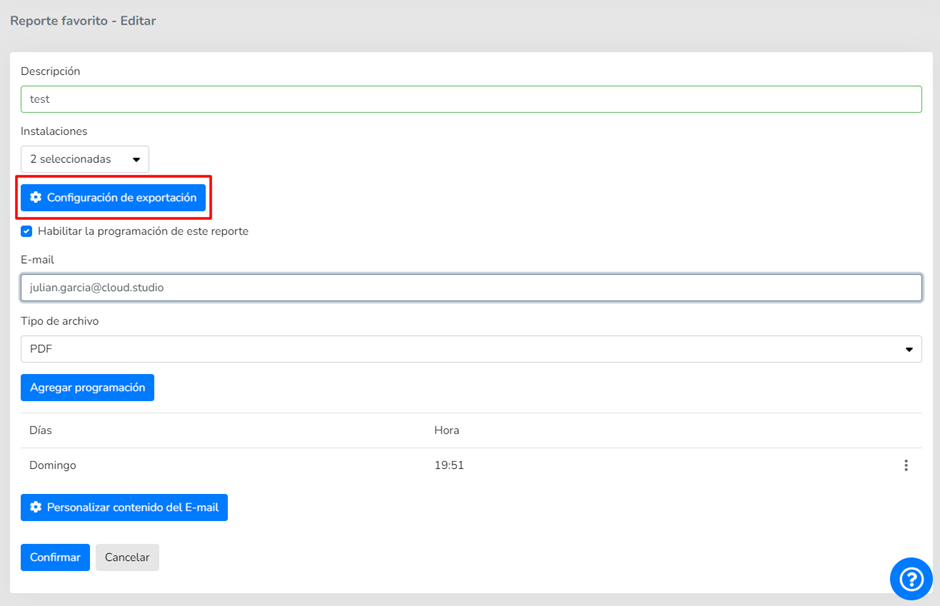
When pressing the configuration button, the same modal mentioned above will appear with the export settings.
It is worth noting that if the report is scheduled, it will also be generated with the saved configuration.
Notification email customization [#notification-email-customization]
When saving a favorite report, it can be scheduled to be sent according to the established criteria. Below the scheduling options, a button with the text "customize E-mail content" has been added, which allows customizing the subject and content of the email sent when scheduling a report:
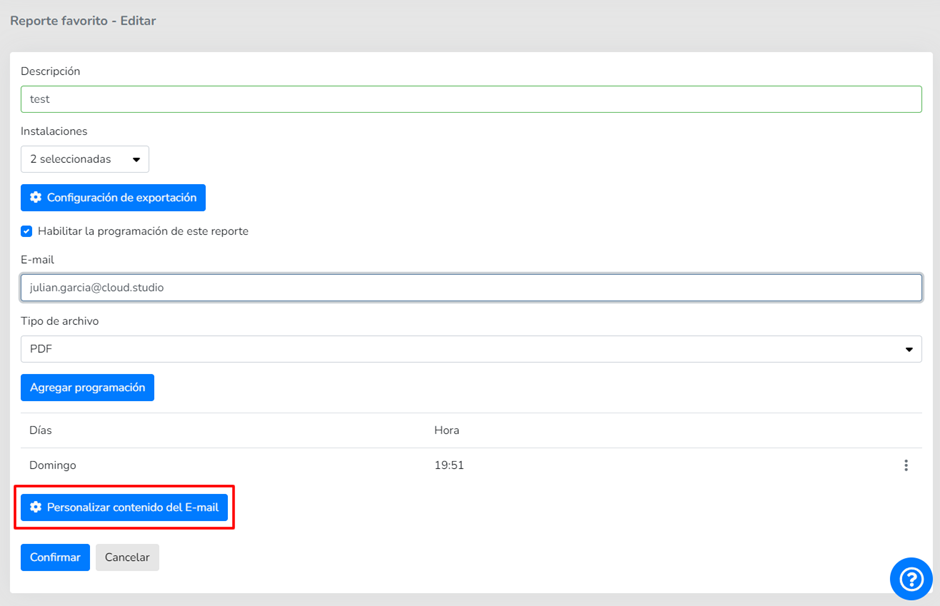
When pressing this button, a modal will open with a code editor and a checkbox to enable or disable subject customization:
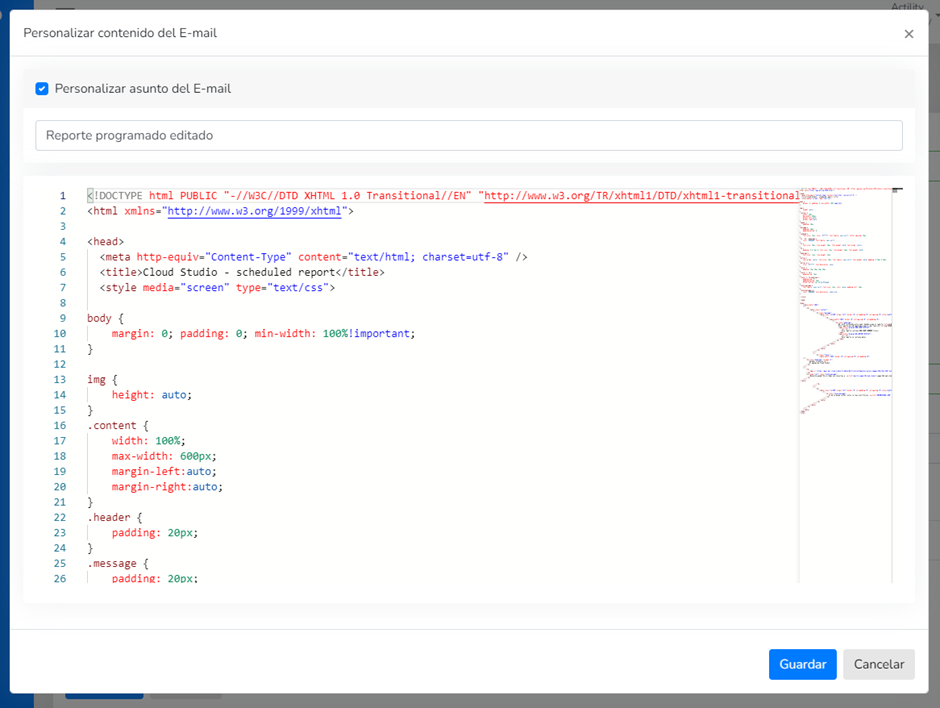
Subject [#subject]
Through a checkbox, you can enable or disable subject customization. If the checkbox is enabled, a text field will appear allowing you to enter the custom subject text.
Body [#body]
Below the subject, a code editor field will appear that, by default, shows the template currently used in Gear Studio.
To save changes made to a favorite's customization (both email and export configuration), you must save the favorite. That is, press the "confirm" button on the favorite report editing screen:
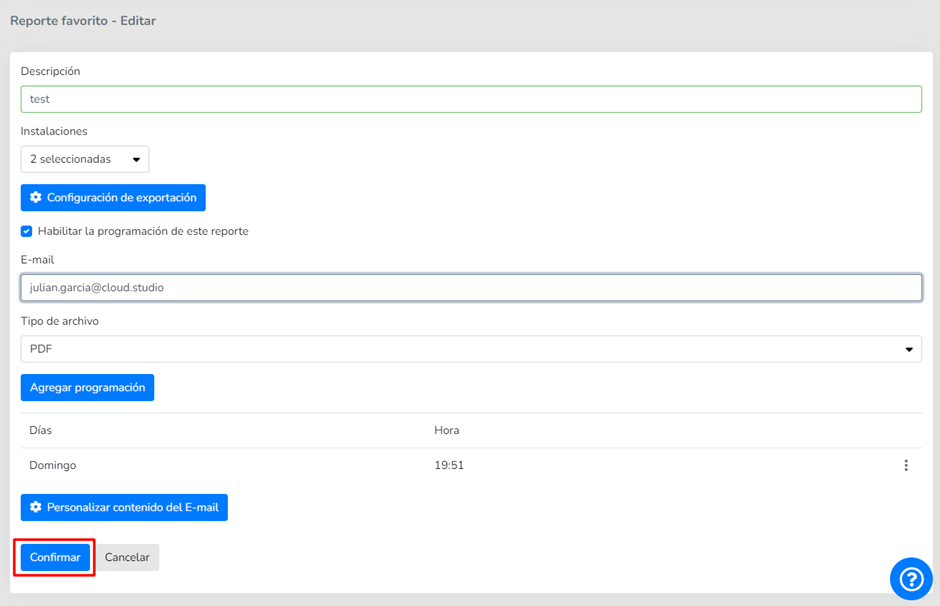
# Configured Notifications Report by Instance
This report lists the notifications configured at the instance level, considering all *Clients* and *Facilities* it contains.
**Filters**:
* **Client** (*all or selected list*)
* **Facility** (*all or selected list*)
* **Channel** (*all or selected list*)
* **Contact methods (recipients):** allows entering a full or partial phone number or email address once the report has been run with the previous filters (Client, Facility, and Channel)
This last filter can consist of an email address and/or phone number that the user manually enters in order to find which instance client or which configuration (alarm or alert types) contains the entered contact method configured for a notification.
* The user can download the report in PDF and Excel formats.
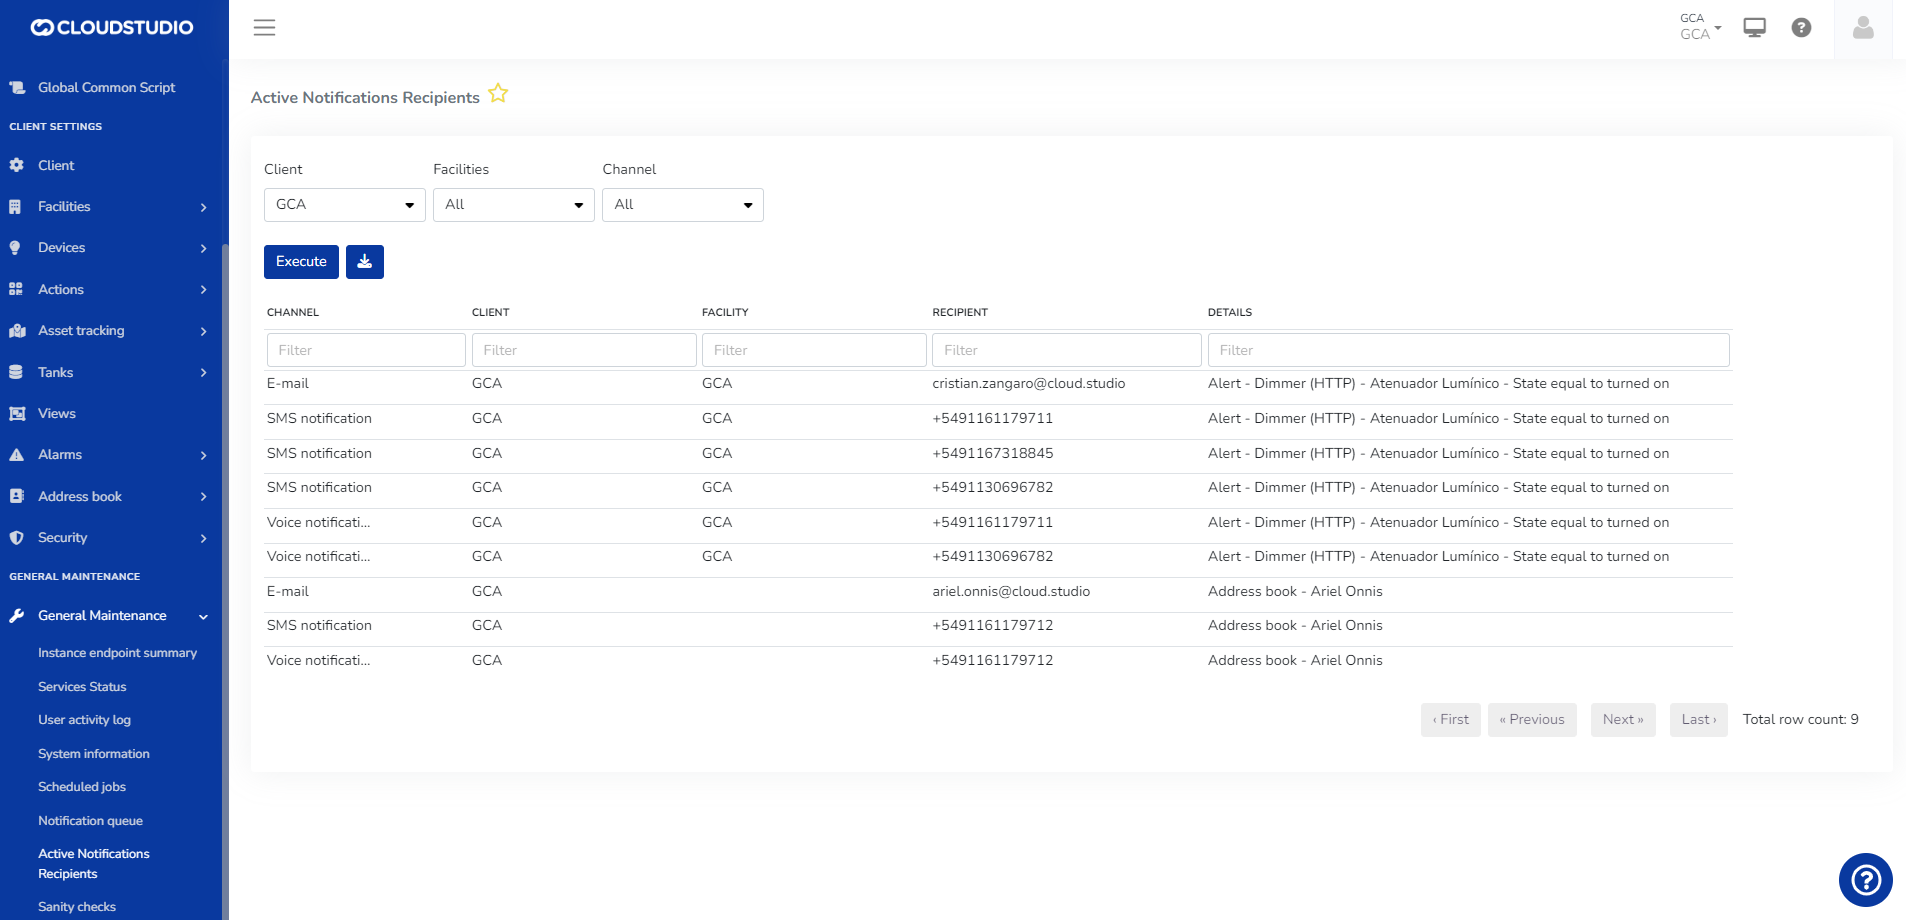
# Operable Endpoints
The following table details the endpoint types that allow operation, meaning those endpoint types that support updating an endpoint's state from a view.
| Endpoint Type | Operable |
| --------------------------------------------------- | -------- |
| Temperature Sensors | Yes |
| Humidity Sensors | Yes |
| Light Level Sensors (light sensor) | Yes |
| Weight Sensors | Yes |
| Volume Sensors | Yes |
| Pressure Sensors | Yes |
| IAS Sensors (binary, occupancy, and motion sensors) | Yes |
| Voltage Sensors | Yes |
| Current Sensors | Yes |
| Active Power Sensors | Yes |
| Reactive Power Sensors | Yes |
| Apparent Power Sensors | Yes |
| Power Factor Sensor (CosPhiSensor) | Yes |
| Frequency Meters | Yes |
| Energy Consumption Sensors | Yes |
| Flow Sensors | No |
| Generic Sensors | Yes |
| Generic Flow Rate Sensors | Yes |
| Appliances and other on/off devices | Yes |
| Dimmers | Yes |
| Curtain and closure controllers | Yes |
| Runtime counters | No |
| Location trackers | No |
| Concentration Sensors (ppm) | Yes |
| Concentration Sensors (mass/volume) | Yes |
| Air Quality Index (AQI) Sensors | Yes |
| People Flow Sensors | Yes |
| People Counters | Yes |
| HVAC / Thermostats | Yes |
| Cameras | No |
# Endpoint States with Image Associated to Discrete Variables
It is possible to associate discrete variables to the states of a Custom Endpoint, to subsequently associate those Endpoints to the Endpoint status image element. If no image exists for a value, a default image will be displayed.
**Example**
For the endpoint, we choose the images we want to assign to those states. In this case: 0 Off, 1 On, and a default image for any other number.


The states can be modified with images such as off/on.

# Views
Views allow designing SCADA visualizations where images can be inserted and then overlaid with data that, unlike what can be achieved with dashboards, updates in near real-time.
In views, sensor (endpoint) data from devices is inserted using a WYSIWYG design tool through the use of visual objects called elements.
Views are implemented in two applications:
1. The view manager sub-module, which includes the designer and is found in the Manager.
2. The visualization sub-module, which allows selecting a running view and is found in the Monitor.
Creating views [#creating-views]
To create a new view or modify an existing one, go to the views menu in the Manager application.

Once created, a canvas with the background chosen by the user will open. In views, the following actions can be performed:
* [Add static text elements](/docs/monitor/vistas/elementos/texto)
* [Add static and predefined image elements](/docs/monitor/vistas/elementos/imagen)
* [Add real-time endpoint status elements in text format](/docs/monitor/vistas/elementos/endpoint-status-text)
* [Add real-time endpoint status elements with predefined images based on the variable type.](/docs/monitor/vistas/elementos/endpoint-status-image)
* [Add occupancy elements.](/docs/monitor/vistas/elementos/elementos-de-ocupacion)
* [Add alarm elements.](/docs/monitor/vistas/elementos/elementos-de-alarmas)
* [Add camera-type endpoint snapshots](/docs/monitor/vistas/elementos/elementos-de-snapshot)
**Tips:**
> * The recommended size for views is 1600px x 900px. However, it can be customized to the user's needs.
> * We recommend .PNG format for images with transparent backgrounds.
> * Watch our [video](https://youtu.be/0P7CbN4bvVA) on YouTube to learn more about SCADA-type views.
Once the view is configured, the user can view it from the *Monitor* as shown in the following image:

# Get endpoint data incrementally
This API allows retrieving a list of Endpoints incrementally. This enables fast updates of Endpoints without needing to retrieve the full list.
Theory of operation [#theory-of-operation]
To obtain a list of Endpoints incrementally, the SequenceNumber field is used. This field is monotonically ascending, meaning that when changes occur in EndpointData, its SequenceNumber field will change to a value higher than any other. This allows retrieving data based on the SequenceNumber in small batches until no more data is obtained, and then continuing periodically to get updates. When the result of this API is an empty list, it means that there are currently no updates.
Typically, an application consuming this API uses the following flow:
1. The application starts using a stored SequenceNumber (typically in non-volatile storage). On the first execution, this value is 1.
2. The application executes the API using (stored SequenceNumber + 1).
3. The application receives a list of Endpoint data, sorted by SequenceNumber.
4. If the received list is empty, the application waits a few seconds and returns to step 2.
5. If the received list is not empty, the application stores the highest SequenceNumber received.
6. The application immediately returns to step 2.
7. When there is a new data reading from an Endpoint, its SequenceNumber will immediately change to a value higher than the last received, so its information will be received immediately in the next execution.
| In the flow above, it is assumed that the application always executes the API with the same set of clientID, facilityID, deviceID, and endpointID parameters. If different parameters are desired, the search must start from zero. |
| ----------------------------------------------------------------------------------------------------------------------------------------------------------------------------------------------------------------------------------- |
| For debugging any application using this API, it is recommended to use maxCount = 1, to receive updates one at a time. This parameter can later be changed to a more practical value for production, such as 50. |
| ---------------------------------------------------------------------------------------------------------------------------------------------------------------------------------------------------------------- |
Request [#request]
```
GET /api/v2/endpointData/incremental/{sequenceNumber}?clientID={clientID}&facilityID={facilityID}&deviceID={deviceID}&endpointID={endpointID}&maxCount={maxCount} HTTP/1.1
Host: gear.cloud.studio
Authorization: Bearer {accessToken}
```
Parameters [#parameters]
| Name | Description |
| -------------- | ------------------------------------------------------------------------------------------------------------------------------------------------------------------------------------------------- |
| accessToken | Access token with permissions to read endpoint information. See this page for more information. The access token can also be sent as part of the query string, using the "accessToken" parameter. |
| sequenceNumber | Value of the SequenceNumber field from the last EndpointData received. Use 0 to start from the beginning. |
| clientID | Optional identifier indicating that only EndpointData for the given client should be retrieved. |
| facilityID | Optional identifier indicating that only EndpointData for the given facility should be retrieved. |
| deviceID | Optional identifier indicating that only EndpointData for the given device should be retrieved. |
| endpointID | Optional identifier indicating that only EndpointData for the given endpoint should be retrieved. |
| maxCount | Optional parameter indicating the maximum number of records to include in the result. Values greater than 500 are limited to 500 regardless of the value sent in the request. |
| It is mandatory to include one (and only one) of the parameters "clientID", "facilityID", "deviceID", or "endpointID". |
| ---------------------------------------------------------------------------------------------------------------------- |
Response [#response]
The response contains the list of matching EndpointData, as shown in this example:
```
[
{
"EndpointID": 113653,
"Timestamp_UTC": "2021-10-15T23:01:25",
"Value": 16.93,
"SequenceNumber": 6683852
},
{
"EndpointID": 113653,
"Timestamp_UTC": "2021-10-15T23:11:28",
"Value": 16.97,
"SequenceNumber": 6683864
},
{
"EndpointID": 113653,
"Timestamp_UTC": "2021-10-15T23:41:36",
"Value": 16.93,
"SequenceNumber": 6683874
},
{
"EndpointID": 113653,
"Timestamp_UTC": "2021-10-16T00:01:44",
"Value": 16.99,
"SequenceNumber": 6683887
},
{
"EndpointID": 113653,
"Timestamp_UTC": "2021-10-16T00:11:48",
"Value": 15.93,
"SequenceNumber": 6683900
}
]
```
# Steps
When creating a new step, it is necessary to indicate the step type and whether it should continue to the next step in case of error. Additionally, the required attributes for each particular type must be completed.
Regardless of the step type, for each step it is possible to indicate whether execution should continue in case of error, using the **Continue on error** attribute: this field indicates whether, in case errors occur when executing the step, the action should stop or continue to the next step. If this field is **enabled**, the error is logged, but **the action continues** with the execution of the next step. If the field is **disabled**, the error is logged and **the action stops** immediately.
**Steps are divided into the following types:**
Set, Add and Subtract [#set-add-and-subtract]
These three step types are represented with the same user interface, where you can select **1** Endpoint to act on, **1** variable associated with the Endpoint, and **1** numeric value which will modify the state of this Endpoint.

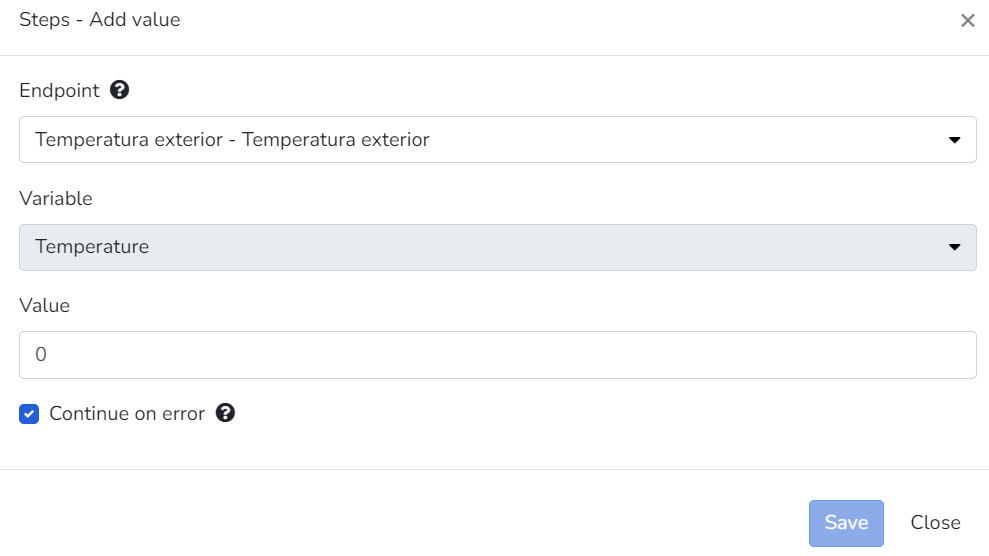
Add value
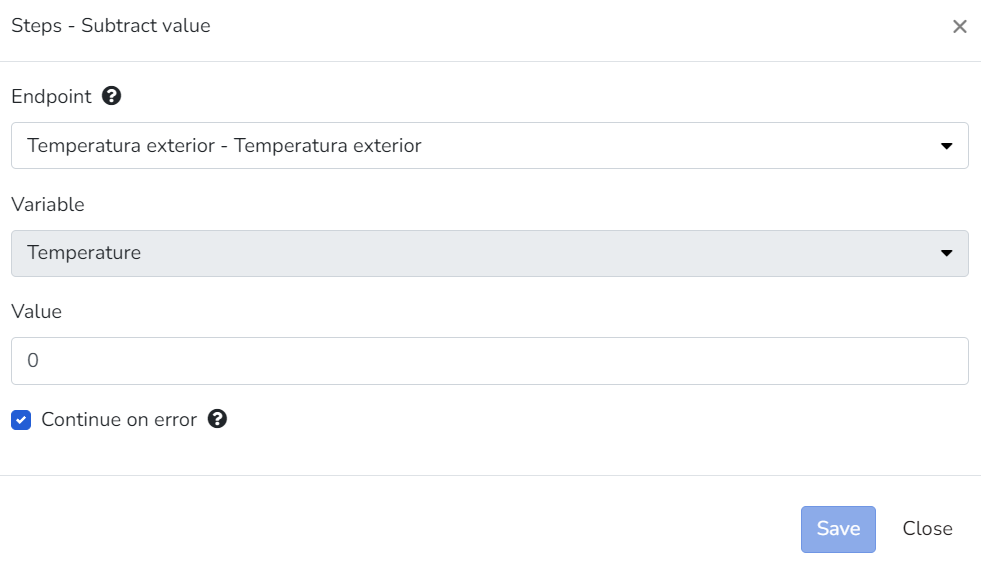
Subtract value
> * **Endpoints that have access set to Read Only mode will not be visible for selection for this step type.**
> * **By default, Endpoints have access set to Read Only mode, and there are cases where this cannot be modified due to the Endpoint type with which it was created.**
> * **If the Endpoint type allows modifying access, this can be done by accessing the security tab within the Endpoint configuration.**
Turn On, Turn Off and Toggle [#turn-on-turn-off-and-toggle]
These three step types are represented with the same user interface, where you can select **1** Endpoint to act on to change its state. They can only be used for Endpoints of type **Appliances, Dimmer, and Thermostat.**
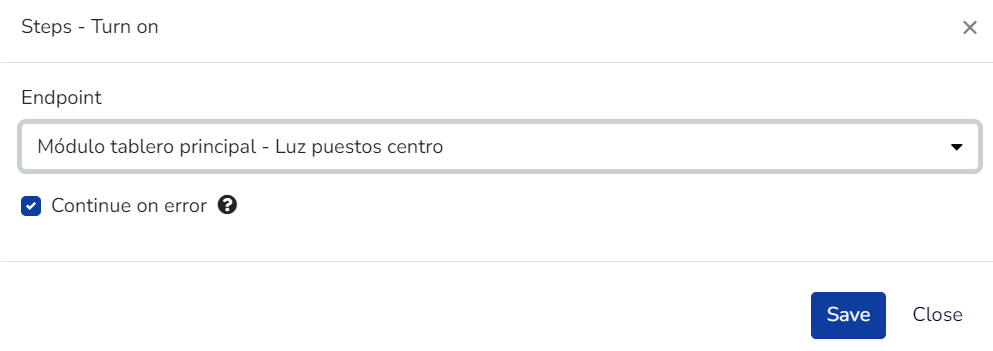
Turn On
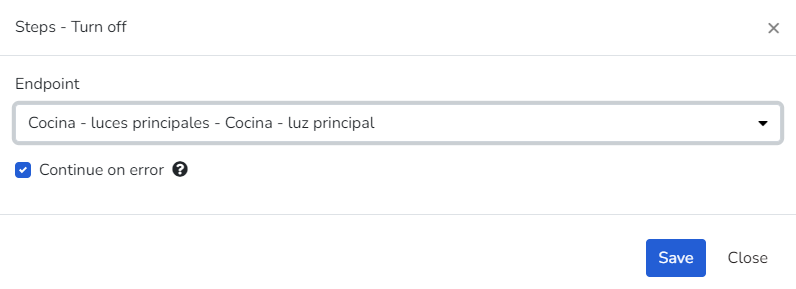
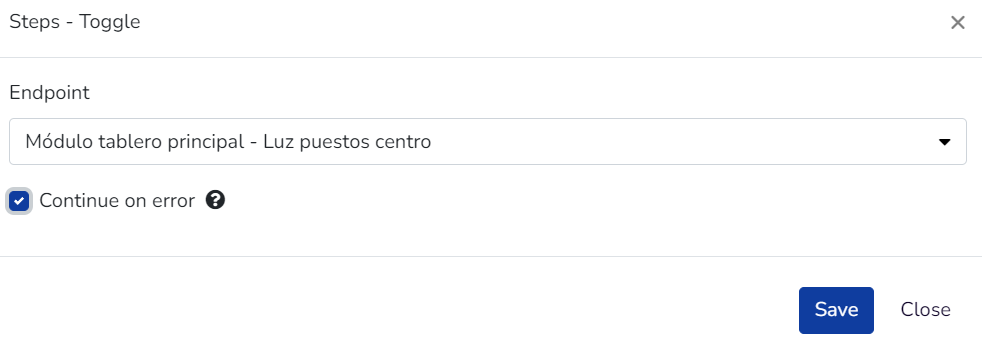
Toggle
> **For the "Toggle" type, the behavior will be to toggle the state: if it was "on", this step will change it to off and vice versa.**
Email, SMS and Voice Message [#email-sms-and-voice-message]
These three step types allow sending a notification via e-mail, SMS, or voice.
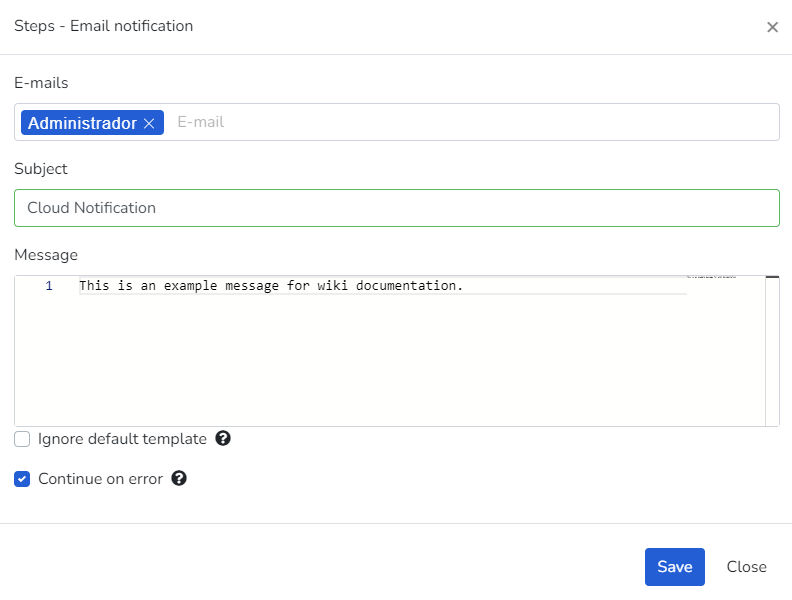
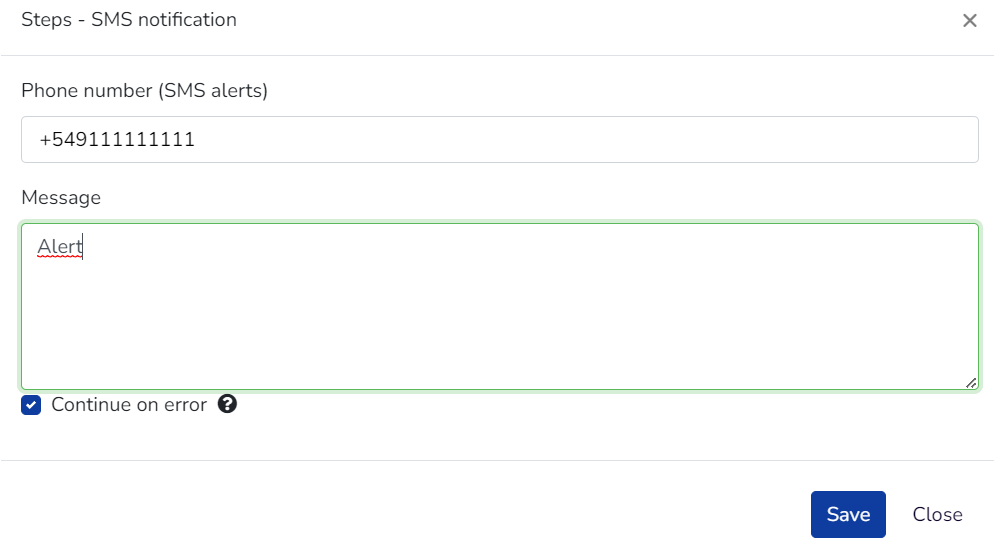
SMS Notification
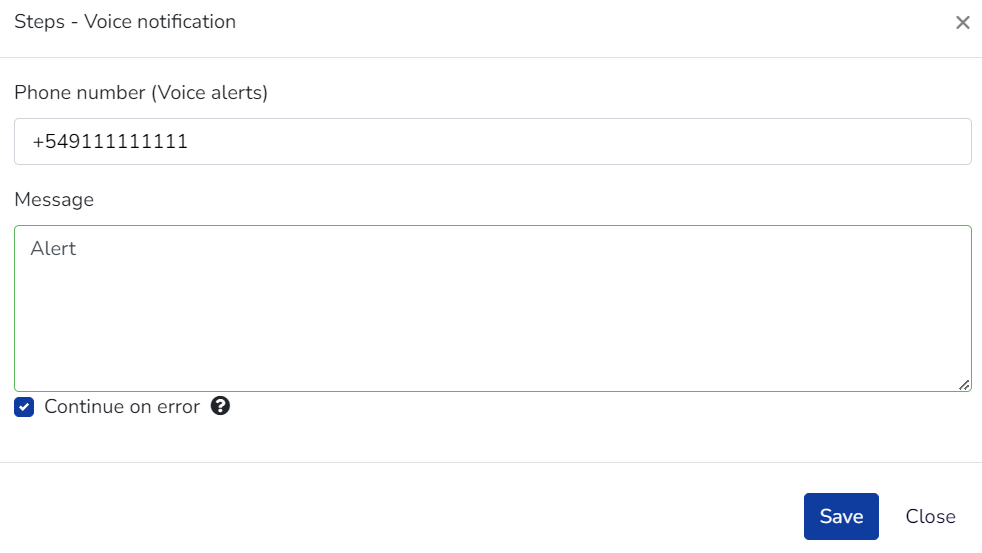
Voice notification
Script [#script]
A code fragment in an interpreted language (*JavaScript*) that is easy to understand, expanding the range of tools available when processing a specific business logic.
* **Code tab:** Allows editing the JavaScript code that the action step will execute. These scripts can also include methods from the Cloud Studio [utility library](/docs/configuracion-del-cliente/acciones/pasos/scripting-utils) for JavaScript.
* **Test tab**: Allows testing the execution of the action step's script, allowing modification of the [event received by the action for testing purposes](/docs/configuracion-del-cliente/acciones/pasos).
* **Dependencies:** Allows selecting scripts from the common and global script library that will be dependencies for the action step's script.
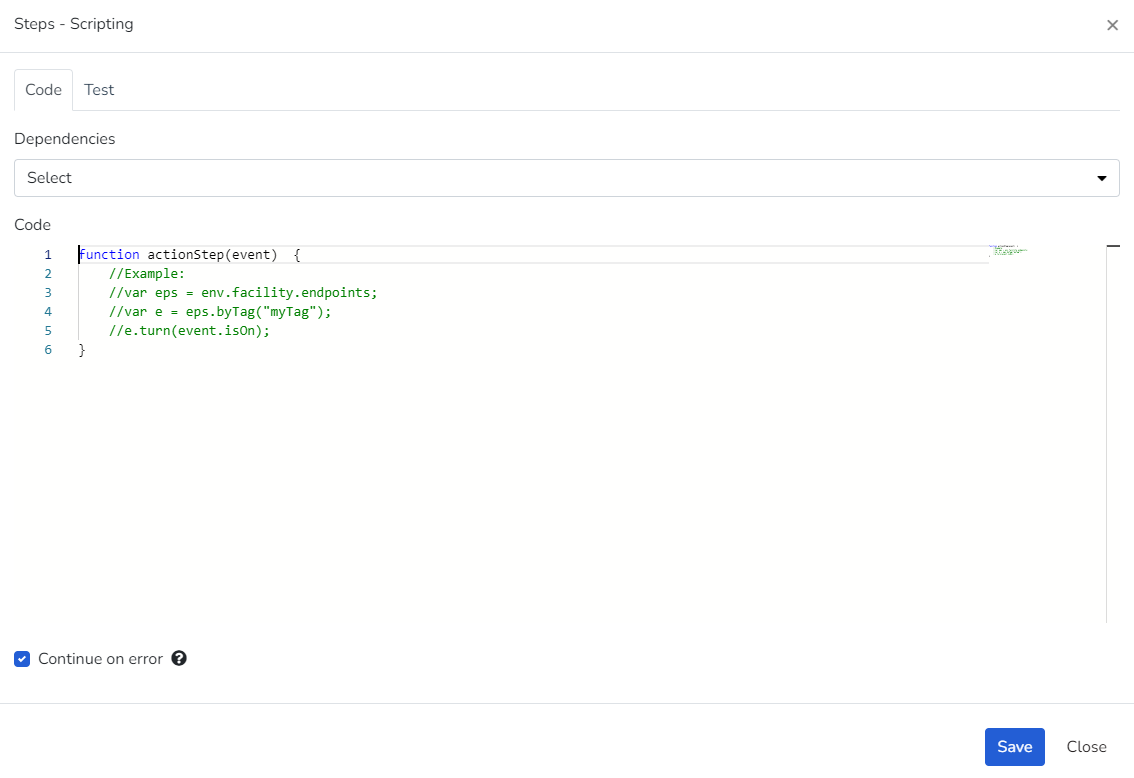
Scripting
# Scripting utils
Scripting utils is a complementary library of JavaScript functions that is part of the Cloud Studio platform and whose methods can be invoked from user-built JavaScript scripts in actions.
Properties
| utcNow (DateTime) |
| --------------------------------------------------------------- |
| The utcNow property represents the current date and time in UTC |
| Examples |
| let now = utils.utcNow; |
Date and time functions
| DateTime addDays (double days, DateTime dateTime) |
| ---------------------------------------------------------------------------------------------------------------------------- |
| The addDays function allows adding and also subtracting days from a date |
| ExamplesThis example adds and subtracts two days from the current UTC date and time |
| //Add two days let date = utils.addDays(2, utils.utcNow); // Subtract two days let date = utils.addDays(-2, utils.utcNow); |
| DateTime addHours(double hours, DateTime dateTime) |
| ---------------------------------------------------------------------------------------------------------------------------------- |
| The addHours function allows adding and also subtracting hours from a date |
| ExamplesThis example shows how to add one hour to the current date and time and how to subtract one hour from the current UTC time |
| //Add one hour let date = utils.addHours(1, utils.utcNow); //Subtract one hour let date = utils.addHours(-1, utils.utcNow); |
| DateTime addMinutes(double minutes, DateTime dateTime) |
| ----------------------------------------------------------------------------------------------------------------------------- |
| The addMinutes function allows adding and also subtracting minutes from a date |
| ExamplesThis example adds one minute to the current UTC date and time and subtracts one minute from the current UTC time |
| //Add one minute let date = utils.addMinutes(1, datetime); // Subtract one minute let date = utils.addMinutes(-1, datetime); |
| DateTime addMonths(double months, DateTime dateTime) |
| ------------------------------------------------------------------------------------------------------------------------- |
| The addMonths function allows adding and also subtracting months from a date |
| ExamplesThis example adds and subtracts six months from the current date and time |
| //Add six months let date = utils.addMonths(6, datetime); //Subtract six months let date = utils.addMonths(-6, datetime); |
| DateTime addSeconds(double seconds, DateTime dateTime) |
| -------------------------------------------------------------------------------------------------------------------------- |
| The addSeconds function allows adding and subtracting seconds from a date |
| ExamplesThis example adds and subtracts 25 seconds from the current date and time |
| // Add seconds let date = utils.addSeconds(25, datetime); // Subtract seconds let date = utils.addSeconds(-25, datetime); |
| DateTime addYears(double years, DateTime dateTime) |
| --------------------------------------------------------------------------------------------------------------- |
| The addYears function allows adding and subtracting years from a date |
| ExamplesThis example adds and subtracts 3 years from the current date and time |
| // Add years let date = utils.addYears(3, datetime); // Subtract years let date = utils.addYears(3, datetime); |
| DateTime getLastMonday(\*DateTime) |
| -------------------------------------------------------------------------------------------------------------------------------------------------------- |
| The getLastMonday() function gets the Monday before the current UTC date and time |
| ExamplesThis example gets the Monday before the current UTC date and time or the Monday before the optional date and time parameter |
| let date = utils.getLastMonday(); env.log(date); let myDate = new Date('2024-06-16T03:24:00'); let mondate = utils.getLastMonday(myDate); env.log(date); |
| DateTime getNextMonday(\*DateTime) |
| ----------------------------------------------------------------------------------------------------------------------------------------------------------- |
| The getNextMonday() function gets the Monday after the current UTC date and time |
| ExamplesThis example gets the Monday after the current UTC date and time or the Monday after the optional date and time parameter |
| let date = utils.getNextMonday(); env.log(date); let myDate = new Date('2024-06-16T03:24:00'); let mondate = utils.getNextMonday(myDate); env.log(mondate); |
| DateTime getLastSunday(\*DateTime) |
| -------------------------------------------------------------------------------------------------------------------------------------------------------- |
| The getLastSunday() function gets the last Sunday before the current UTC date and time |
| ExamplesThis example gets the last Sunday before the current UTC date and time or the last Sunday before the optional date and time parameter |
| let date = utils.getLastSunday(); env.log(date); let myDate = new Date('2024-06-16T03:24:00'); let mydate= utils.getLastSunday(myDate); env.log(mydate); |
| DateTime getNextSunday(\*DateTime) |
| -------------------------------------------------------------------------------------------------------------------------------------------------------- |
| The getNextSunday() function gets the Sunday after the current UTC date and time |
| ExamplesThis example gets the Sunday after the current UTC date and time or the Sunday after the optional date and time parameter |
| let date = utils.getNextSunday(); env.log(date); let myDate = new Date('2024-06-16T03:24:00'); let mydate= utils.getNextSunday(myDate); env.log(mydate); |
| DateTime getFirstDayOfMonth(\*DateTime) |
| ------------------------------------------------------------------------------------------------------------------------------------------------------------------ |
| The getFirstDayOfMonth() function gets the first day of the month of the current UTC date and time |
| ExamplesThis example gets the first day of the month of the current UTC date and time or the first day of the month of the optional date and time parameter |
| let date = utils.getFirstDayOfMonth(); env.log(date); let myDate = new Date('2024-06-16T03:24:00'); let mydate= utils.getFirstDayOfMonth(myDate); env.log(mydate); |
| DateTime getLastDayOfMonth(\*DateTime) |
| ---------------------------------------------------------------------------------------------------------------------------------------------------------------- |
| The getLastDayOfMonth() function gets the last day of the month of the current UTC date and time |
| ExamplesThis example gets the last day of the month of the current UTC date and time or the last day of the month of the optional date and time parameter |
| let date = utils.getLastDayOfMonth(); env.log(date); let myDate = new Date('2024-06-16T03:24:00'); let mydate= utils.getLastDayOfMonth(myDate); env.log(mydate); |
| DateTime getFirstDayOfYear(\*DateTime) |
| ---------------------------------------------------------------------------------------------------------------------------------------------------------------- |
| The getFirstDayOfYear() function gets the first day of the year of the current UTC date and time |
| ExamplesThis example gets the first day of the year of the current UTC date and time or the first day of the year of the optional date and time parameter |
| let date = utils.getFirstDayOfYear(); env.log(date); let myDate = new Date('2024-06-16T03:24:00'); let mydate= utils.getFirstDayOfYear(myDate); env.log(mydate); |
| DateTime getLastDayOfYear(\*DateTime) |
| -------------------------------------------------------------------------------------------------------------------------------------------------------------- |
| The getLastDayOfYear() function gets the last day of the year of the current UTC date and time |
| ExamplesThis example gets the last day of the year of the current UTC date and time or the last day of the year of the optional date and time parameter |
| let date = utils.getLastDayOfYear(); env.log(date); let myDate = new Date('2024-06-16T03:24:00'); let mydate= utils.getLastDayOfYear(myDate); env.log(mydate); |
| DateTime getFirstDayOfQuarter(\*DateTime) |
| ---------------------------------------------------------------------------------------------------------------------------------------------------------------------- |
| The getFirstDayOfQuarter() function gets the first day of the quarter of the current UTC date and time |
| ExamplesThis example gets the first day of the quarter of the current UTC date and time or the first day of the quarter of the optional date and time parameter |
| let date = utils.getFirstDayOfQuarter(); env.log(date); let myDate = new Date('2024-06-16T03:24:00'); let mydate= utils.getFirstDayOfQuarter(myDate); env.log(mydate); |
| DateTime getLastDayOfQuarter(\*DateTime) |
| -------------------------------------------------------------------------------------------------------------------------------------------------------------------- |
| The getLastDayOfQuarter() function gets the last day of the quarter of the current UTC date and time |
| ExamplesThis example gets the last day of the quarter of the current UTC date and time or the last day of the quarter of the optional date and time parameter |
| let date = utils.getLastDayOfQuarter(); env.log(date); let myDate = new Date('2024-06-16T03:24:00'); let mydate= utils.getLastDayOfQuarter(myDate); env.log(mydate); |
Interpolation functions
| double linearInterpolation(params double\[] values) |
| --------------------------------------------------------------------------------------------------------------------------------------------------------------------------------------------- |
| The first parameter is the value to interpolate, the remaining parameters are points (x, y), with a minimum of 2 points (5 parameters total) and a maximum of 20 points (41 parameters total) |
| ExamplesThis example interpolates the value 1.5 to the values 1.1, 2.3, and 3 |
| const parameters = \[]; parameters.push(1.5, 1.1, 2.3 , 3) let interpolated = utils.linearInterpolation(parameters); |
# Add Common Script
Select the Common Scripts option from the menu
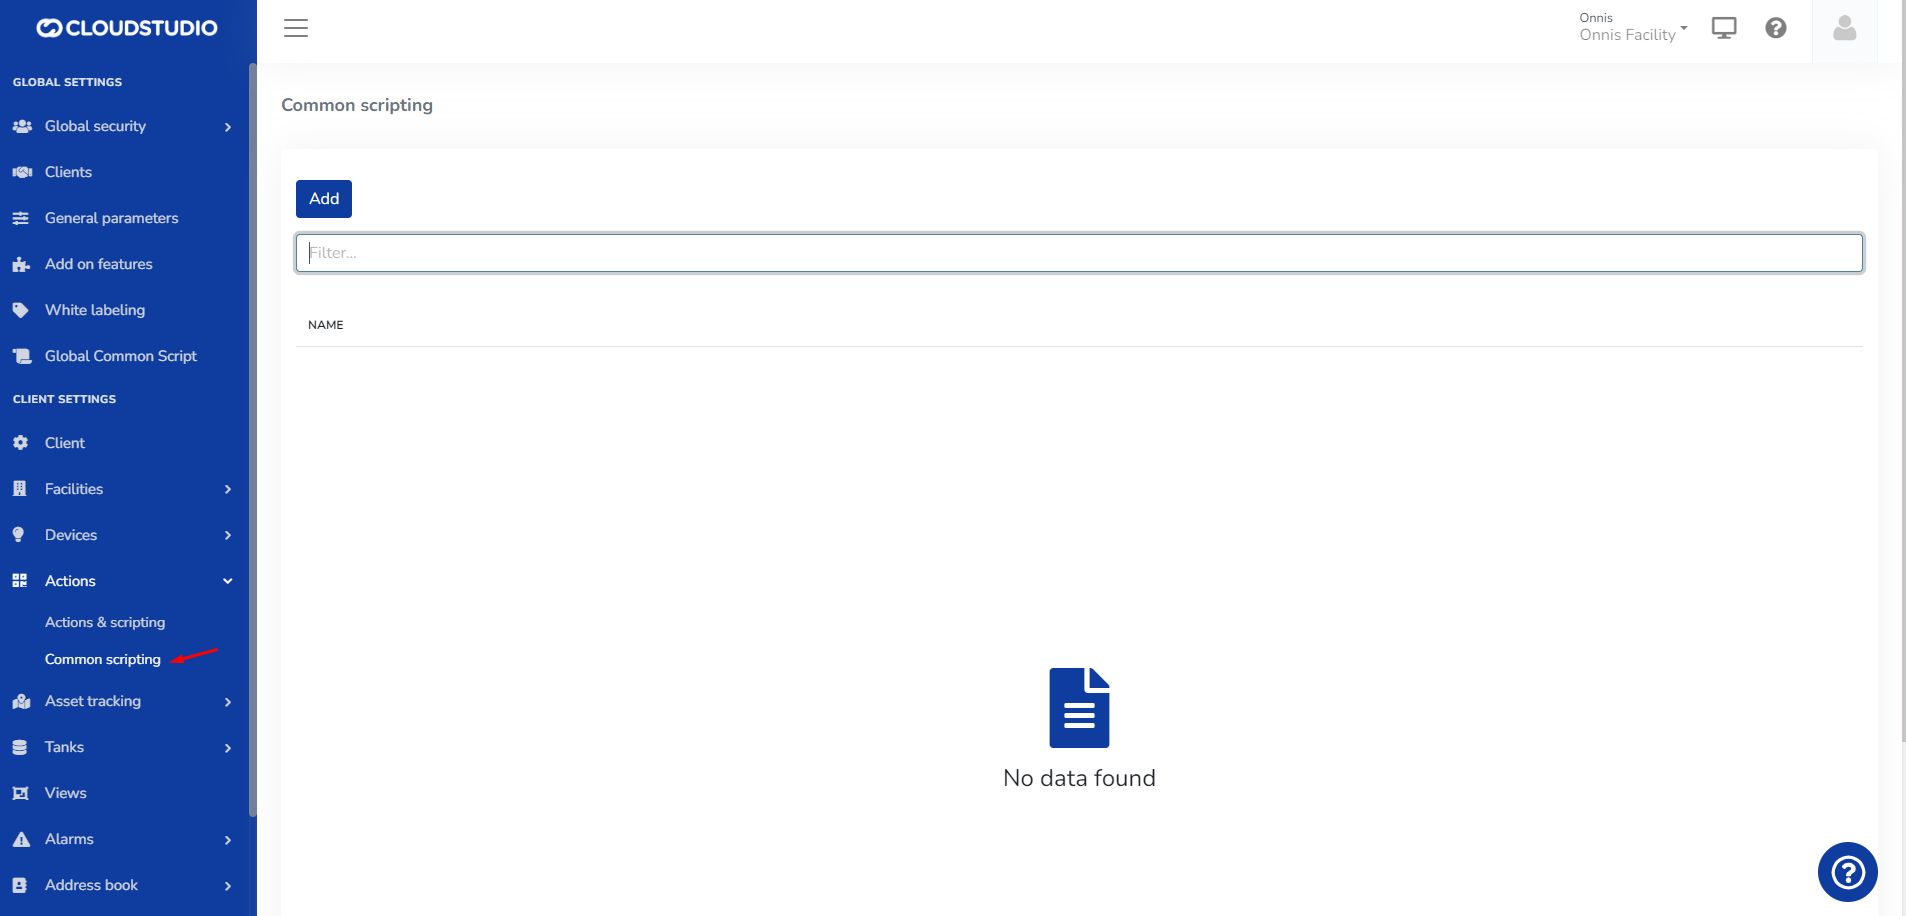
When selecting **Add**, the user can include a description, select a dependency, and enter the JS code below

# Edit Common Script
In the Common Scripts general section, select the three dots on the right side of the screen
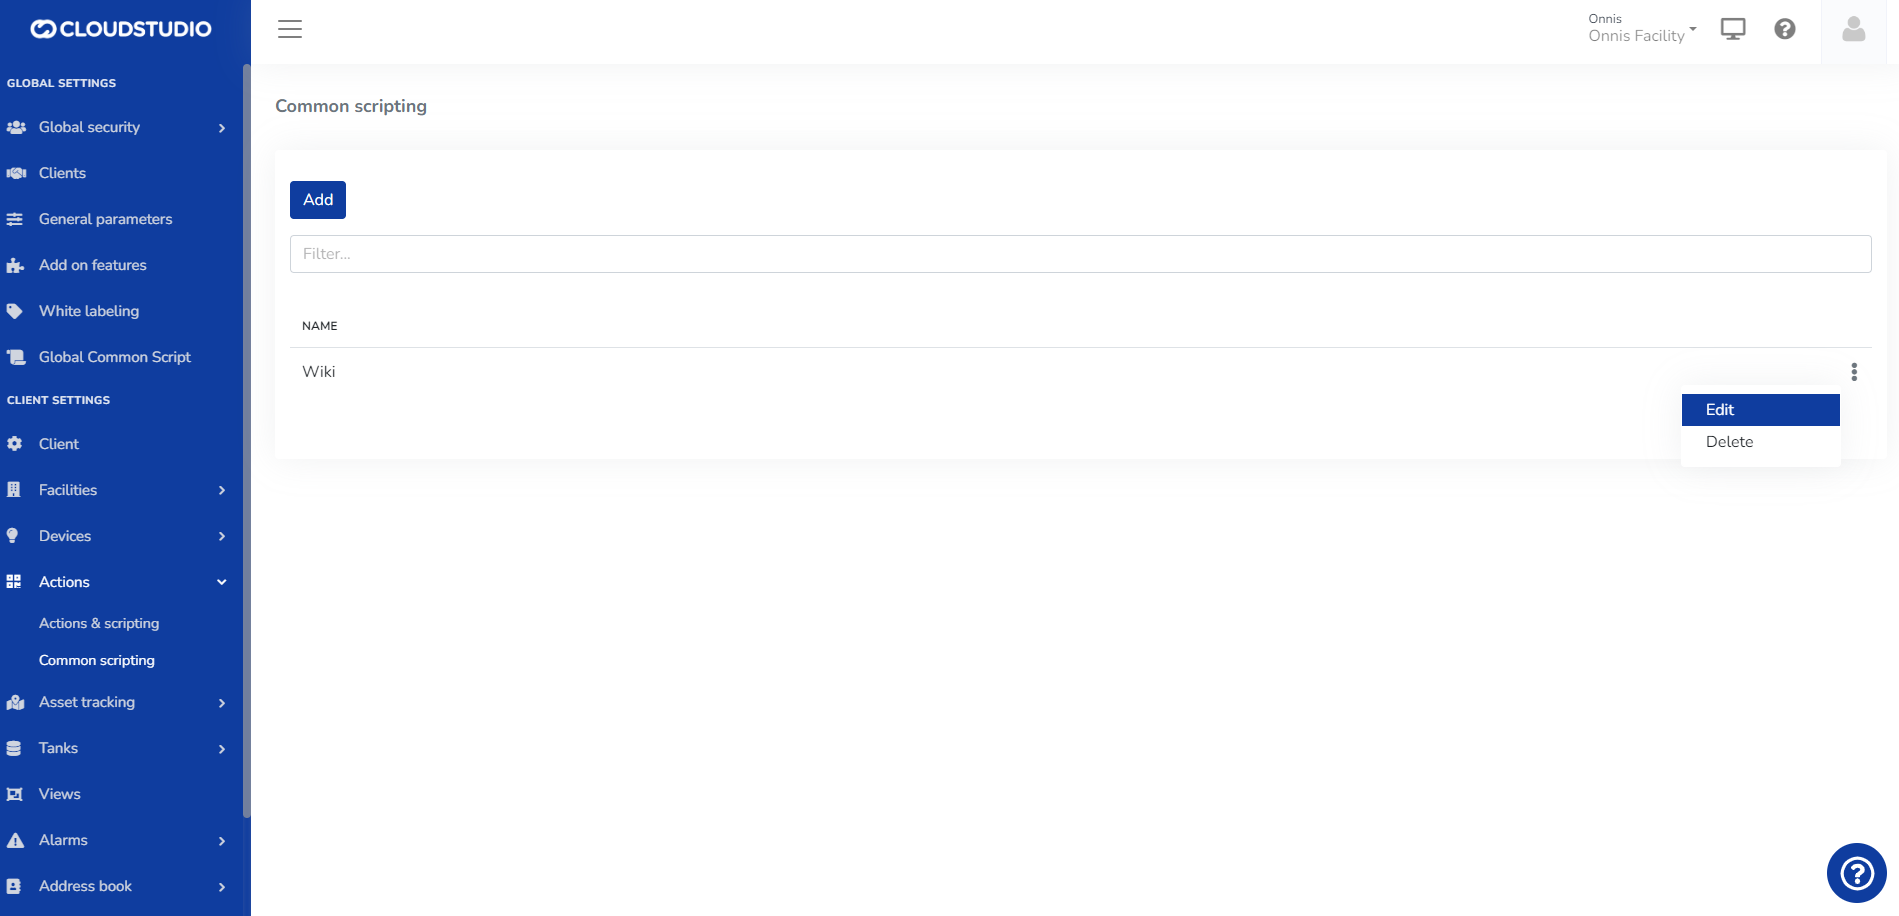
# Delete Common Script
In the Common Scripts general section, select the three dots on the right side of the screen
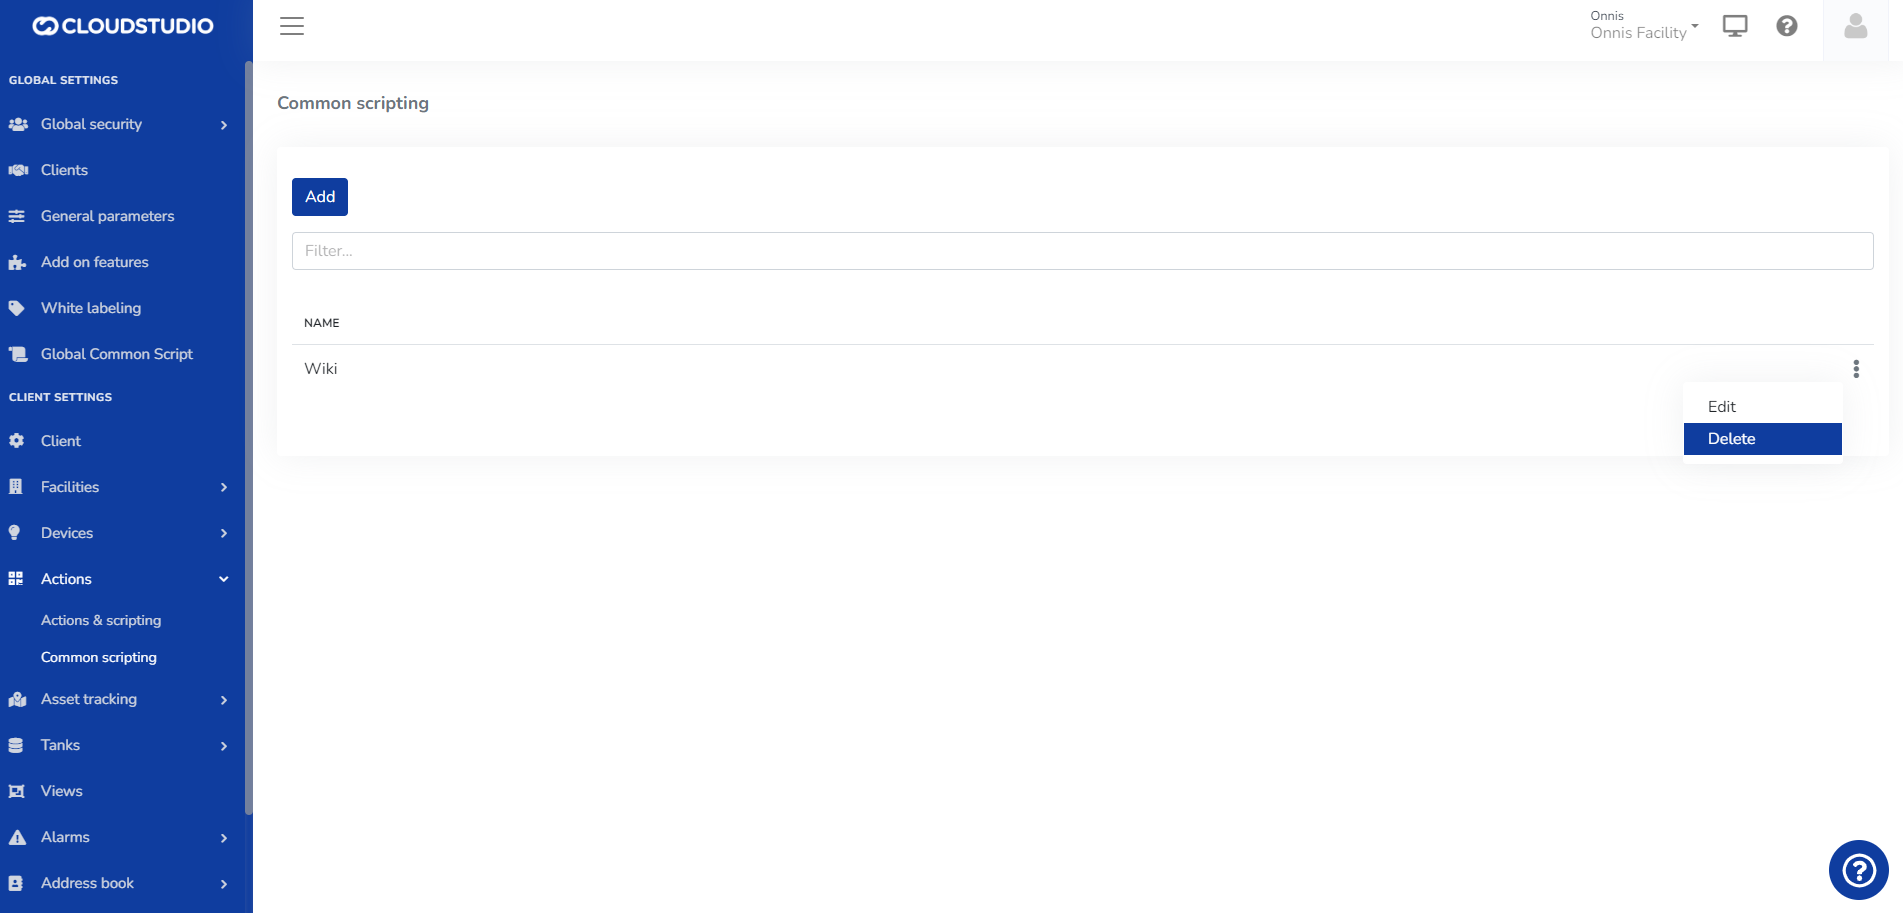
The user must **Confirm** or **Cancel** the requested action
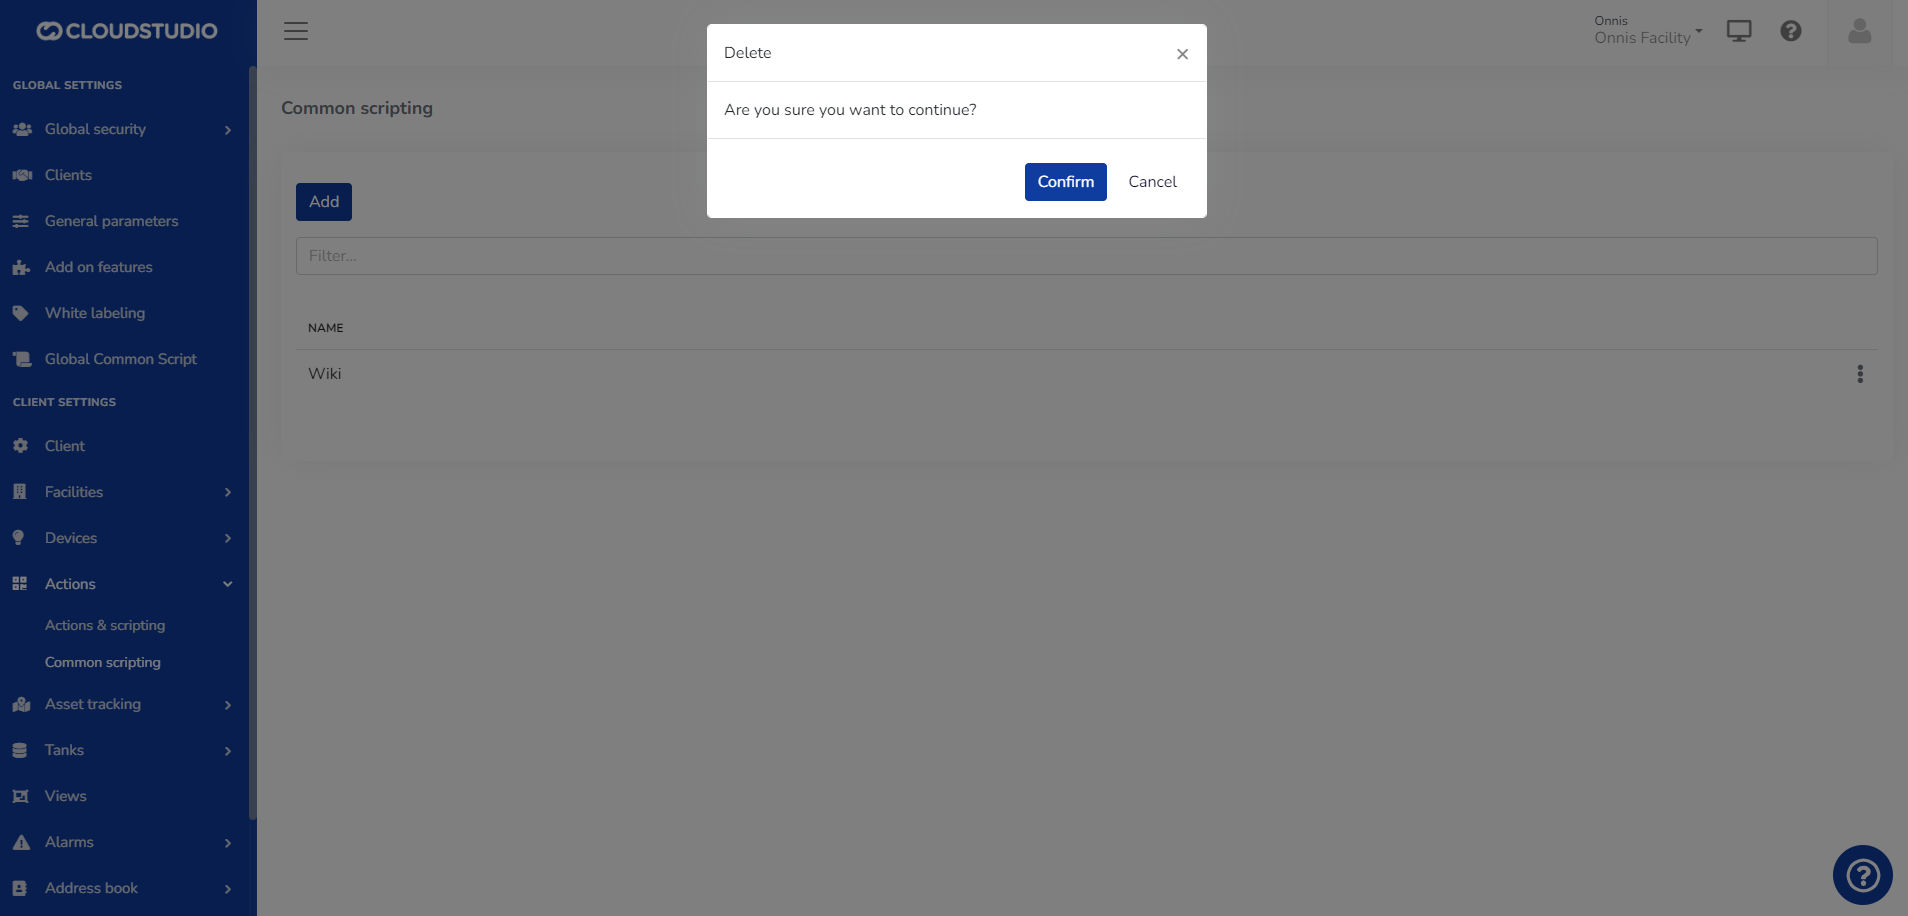
Upon confirming, the Common Script is deleted and the user is redirected to the general screen of that option.
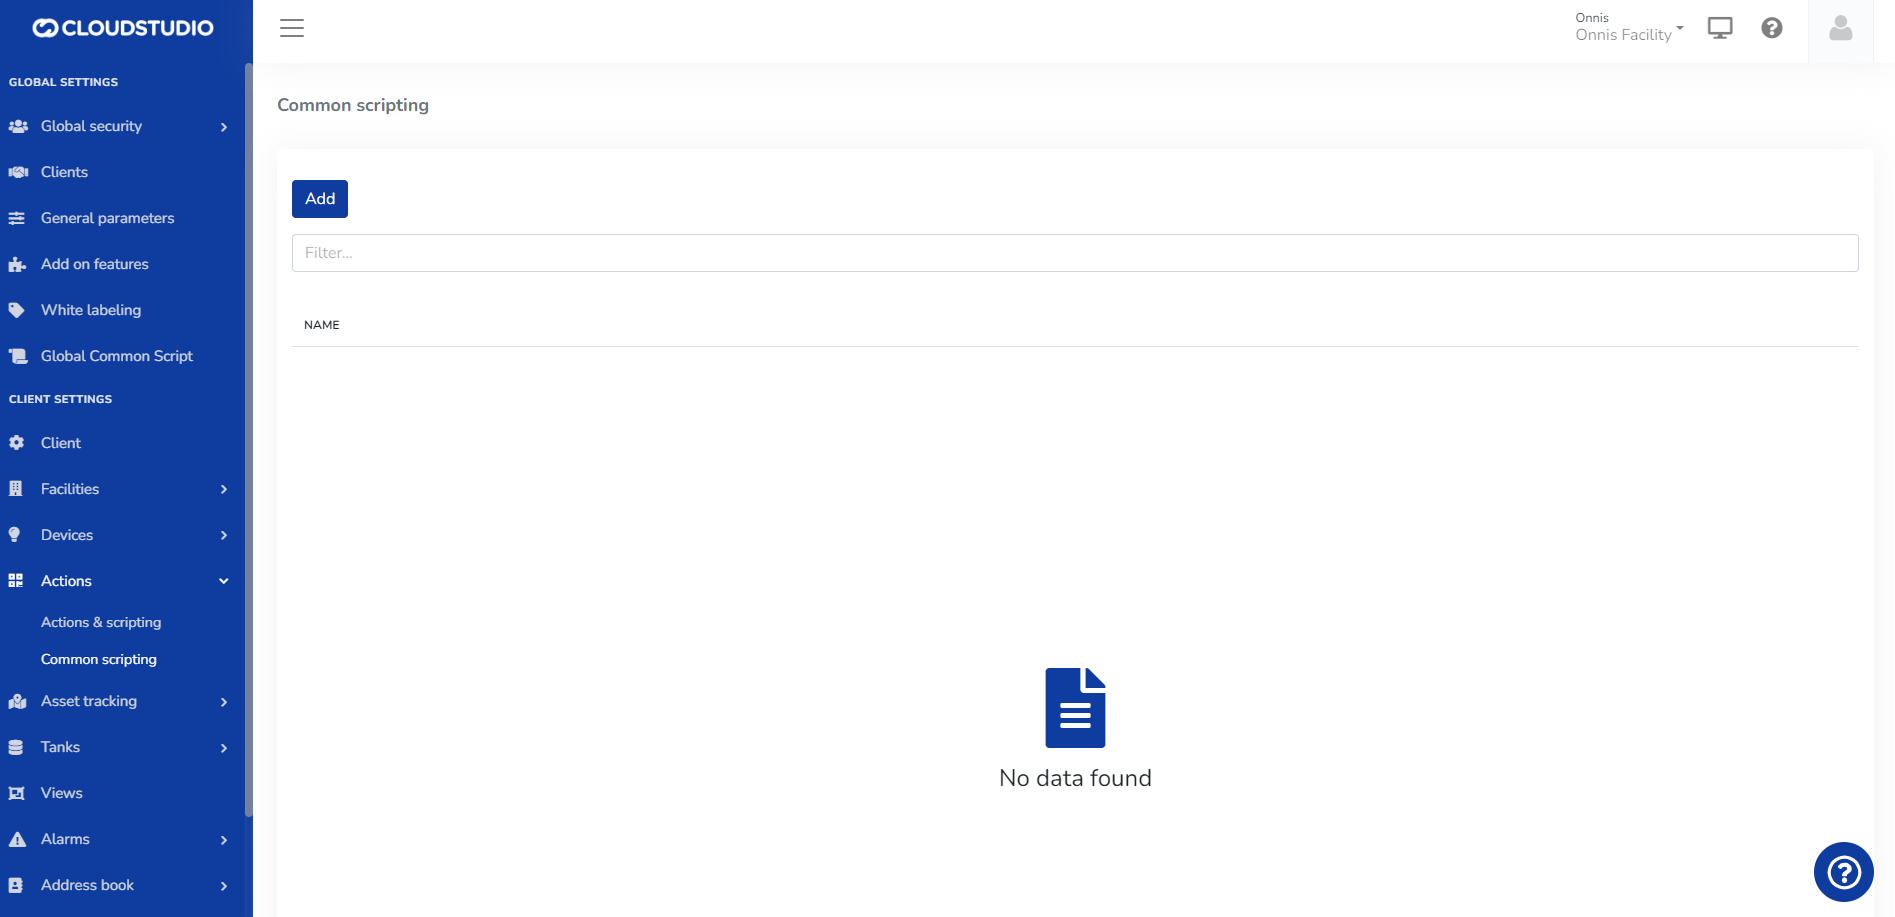
# Common Scripts
This module allows working with "**Common Scripts**" **within the selected client**, to fulfill the function of reusing, simplifying, and reducing the code of Scripts for Devices and Actions.
A Script is a code fragment in an interpreted language (*JavaScript*) that is easy to understand, expanding the range of tools available when processing a specific business logic.
> Common Scripts will be used as libraries of common functionalities.
> Common Scripts will be used as dependencies in other scripts.
The module allows viewing the list of Common Scripts generated by the client, as well as creating, editing, or deleting those scripts. Scripts can *be related to each other to leverage code reuse and access all devices of the client in which they are running.*
**From the following menu option**
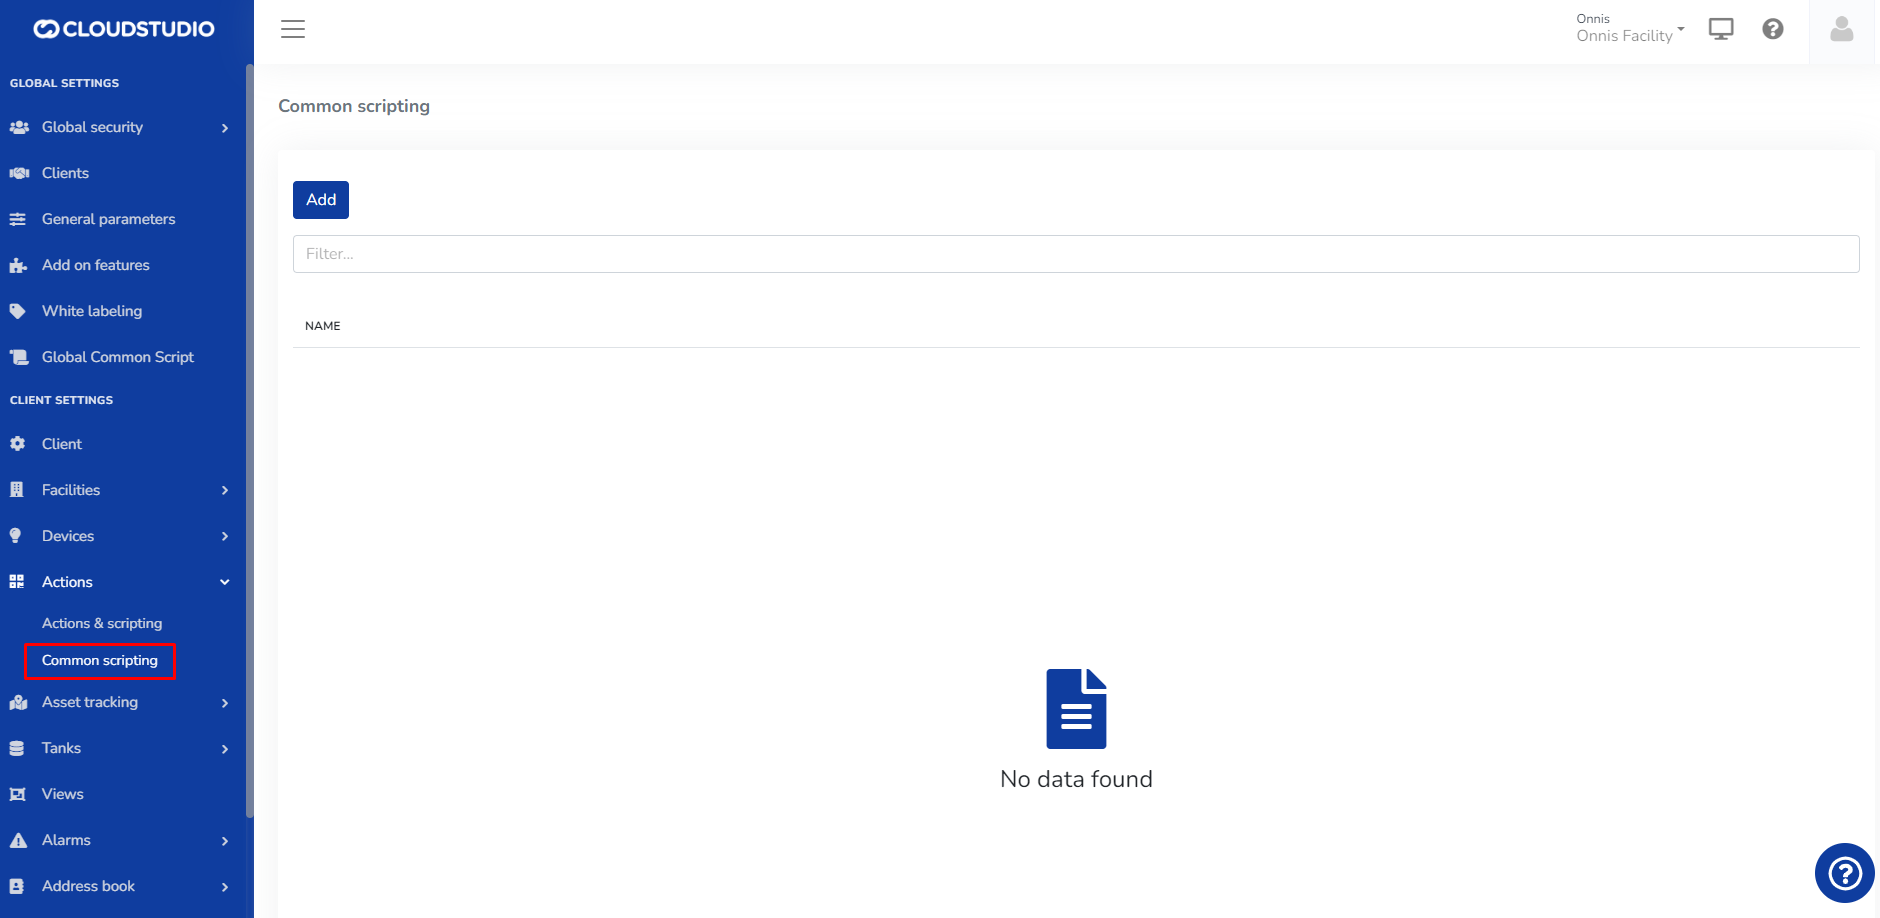
# Alerts - Contacts and Contact Groups
From the following screen, the user can create an alert based on the created *Contacts* or *Contact Groups*.
1- In the *Details* tab, configure the Sensor, the Condition that will trigger the notification, and the Normal Condition under which the notification will not be triggered.
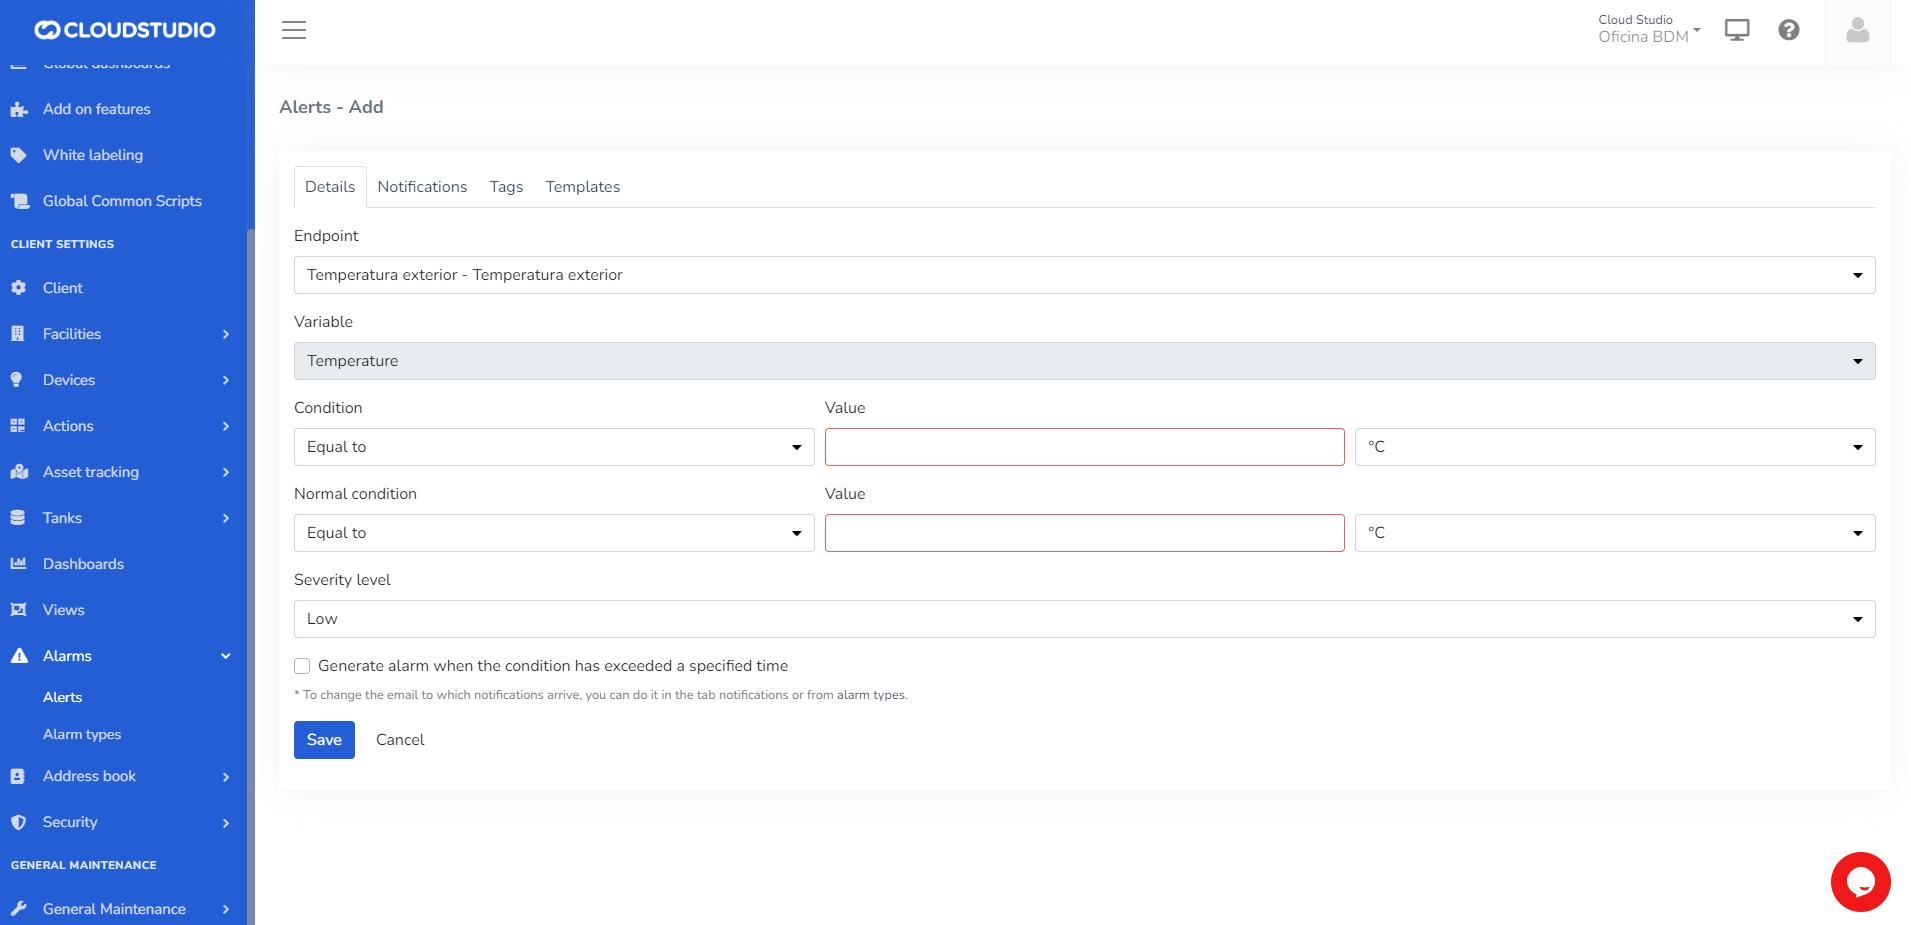
2- In the *Notifications* tab, fill in the channels through which notifications will be received. You can use standalone emails and phone numbers, or emails and phone numbers created in Contacts and Contact Groups, which will be easily visible when typing their names in the corresponding fields.
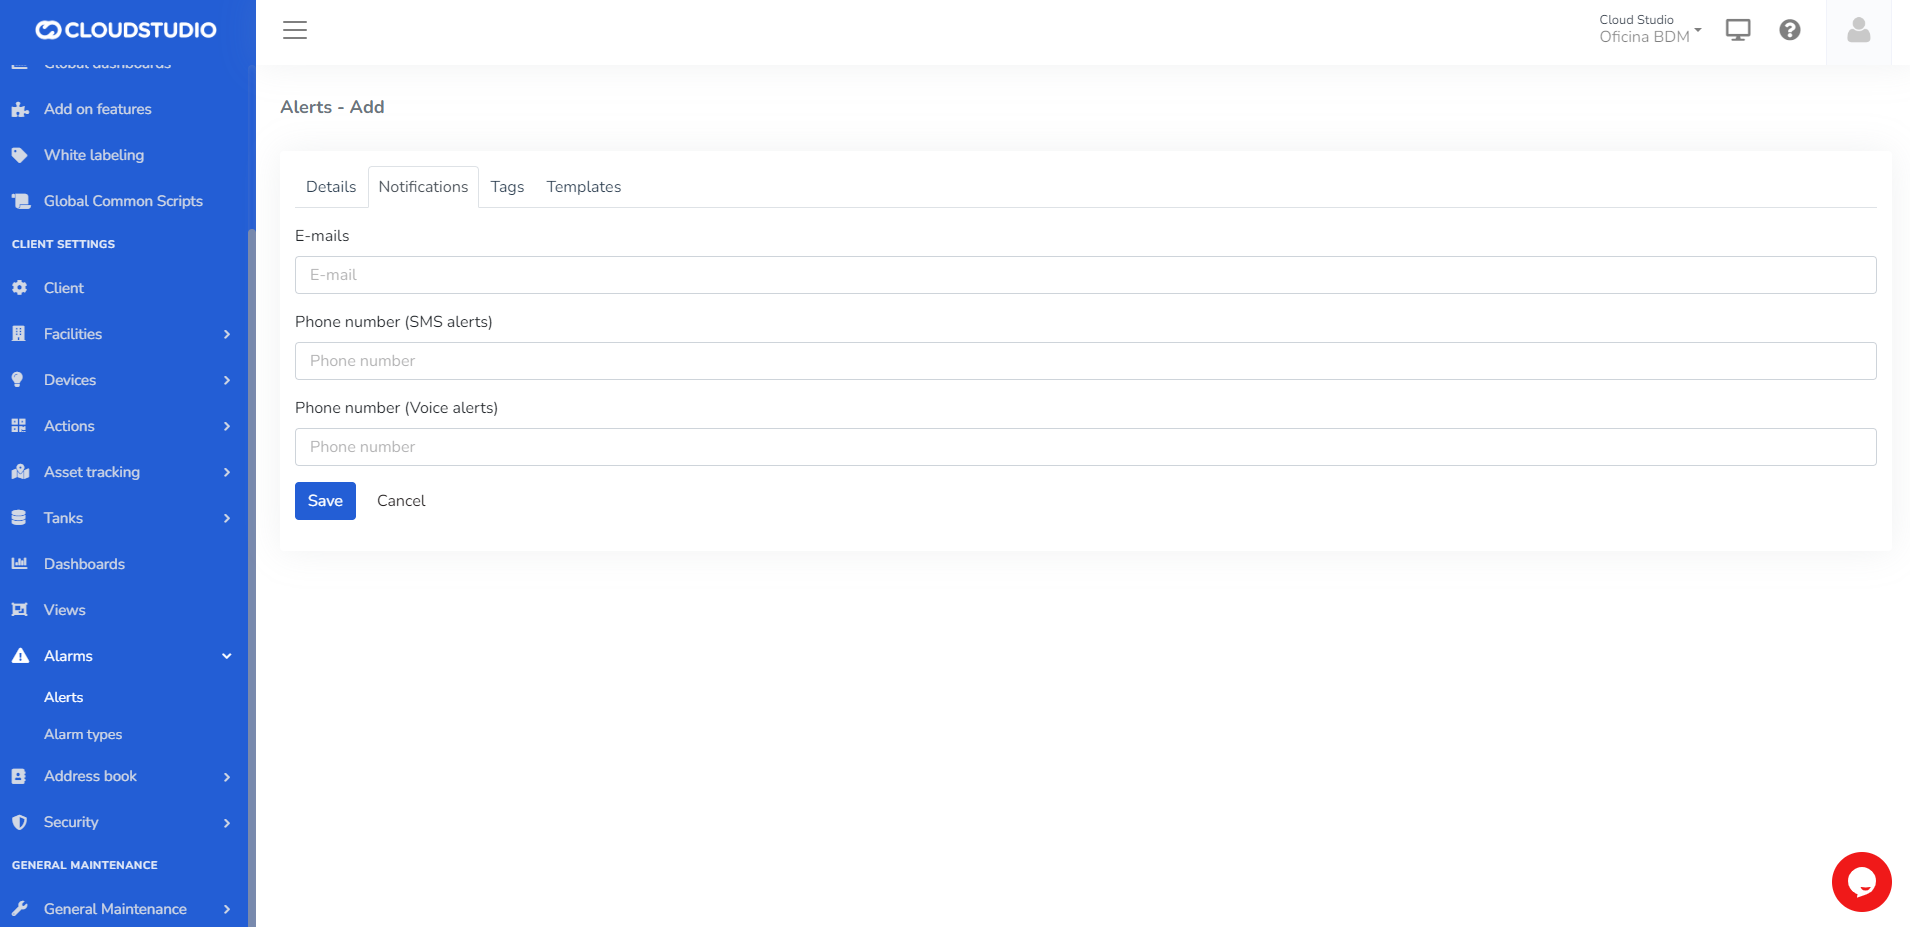
3- In the *Tags* tab, the user can create a set of Tags.
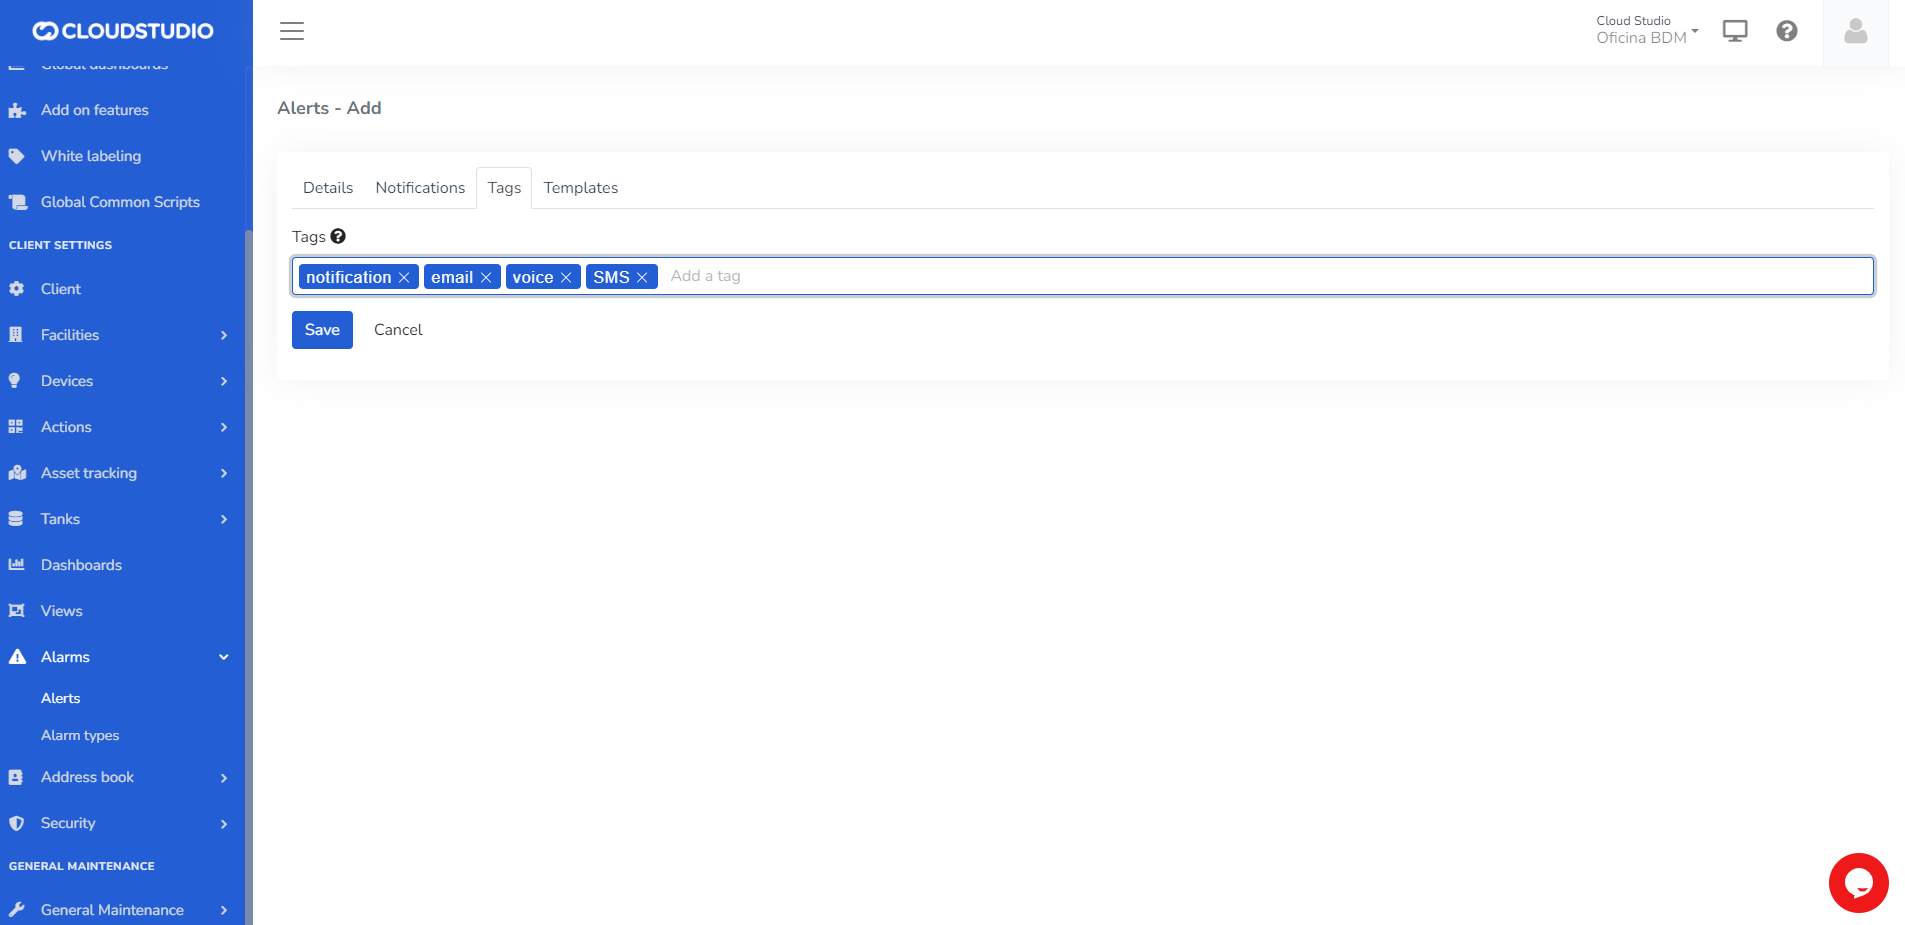
3- In *Templates*, the user can create the notification formats to be sent.
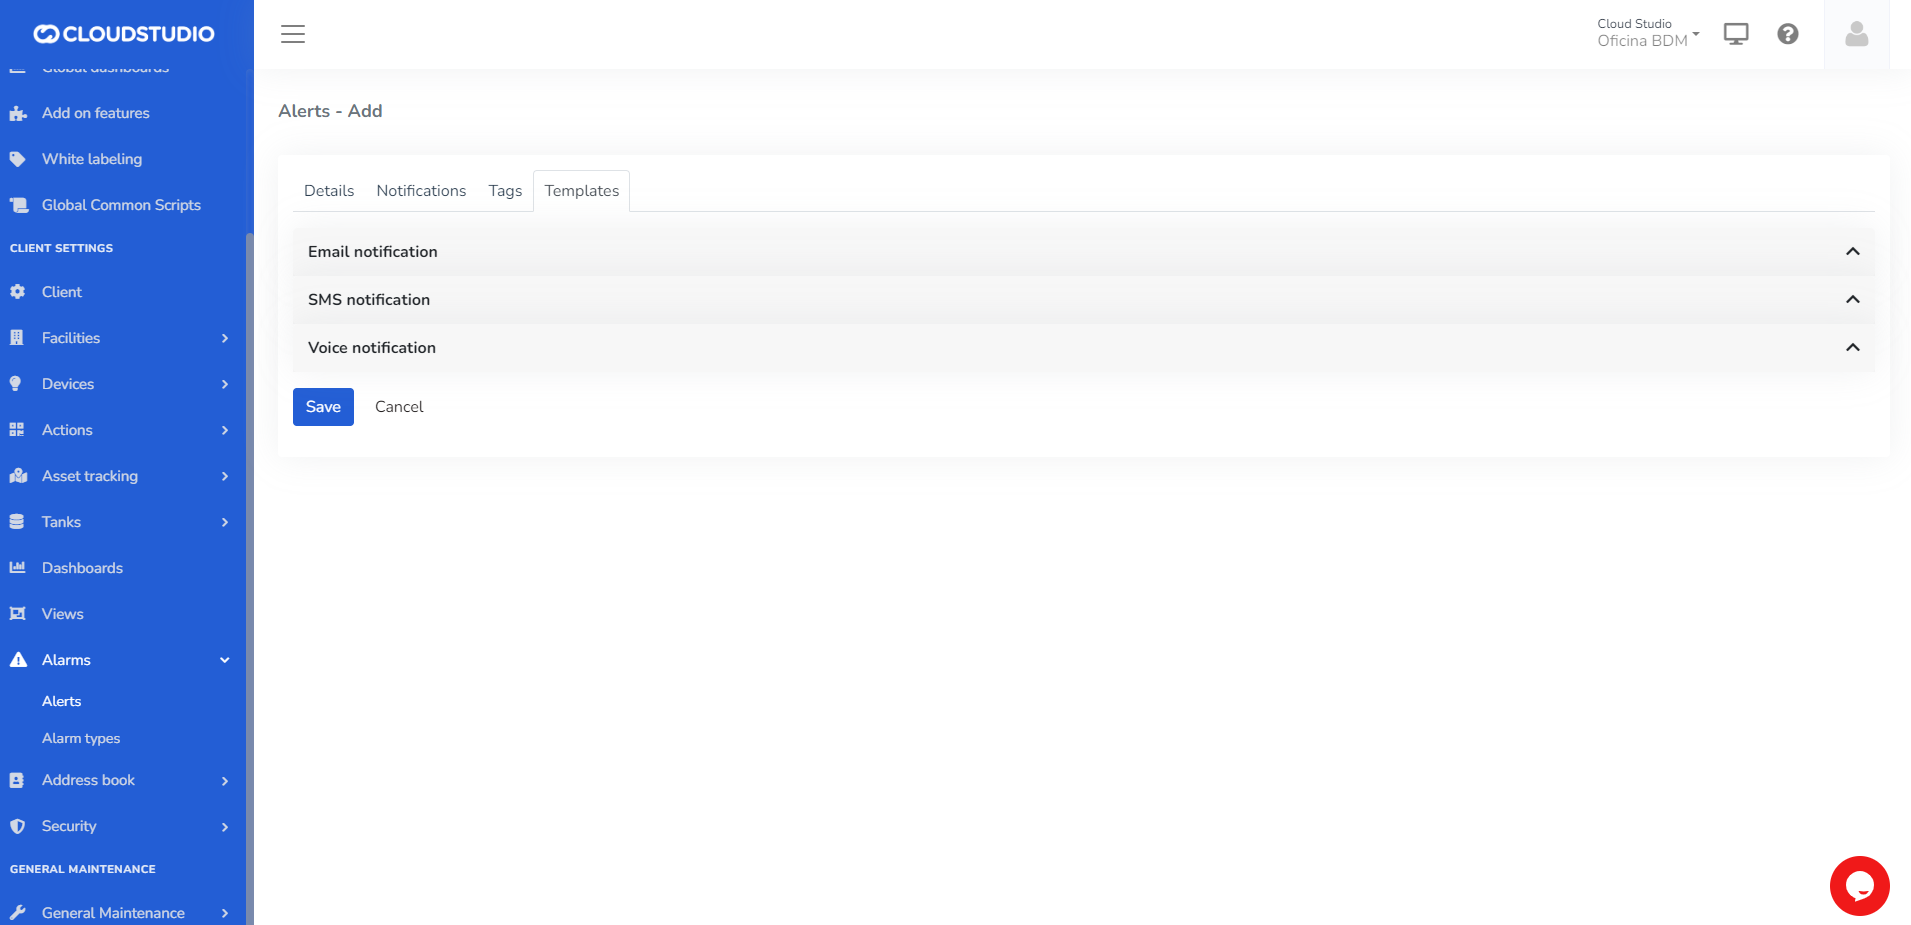
# Flexible Alarms
This feature aims to make notification delivery to contacts more flexible by allowing configuration of *time zone*, *working days* and *hours*, and *vacation or out-of-office periods*. This configuration can be applied at the contact or contact group level.
This provides the ability to perform more precise configuration that helps make the notifications/alerts generated to specific contacts more effective.
Modify alarms by contact [#modify-alarms-by-contact]
To modify notification delivery to a contact, navigate to the following path:
**Navigation menu > Directory > Contacts > Working hours**
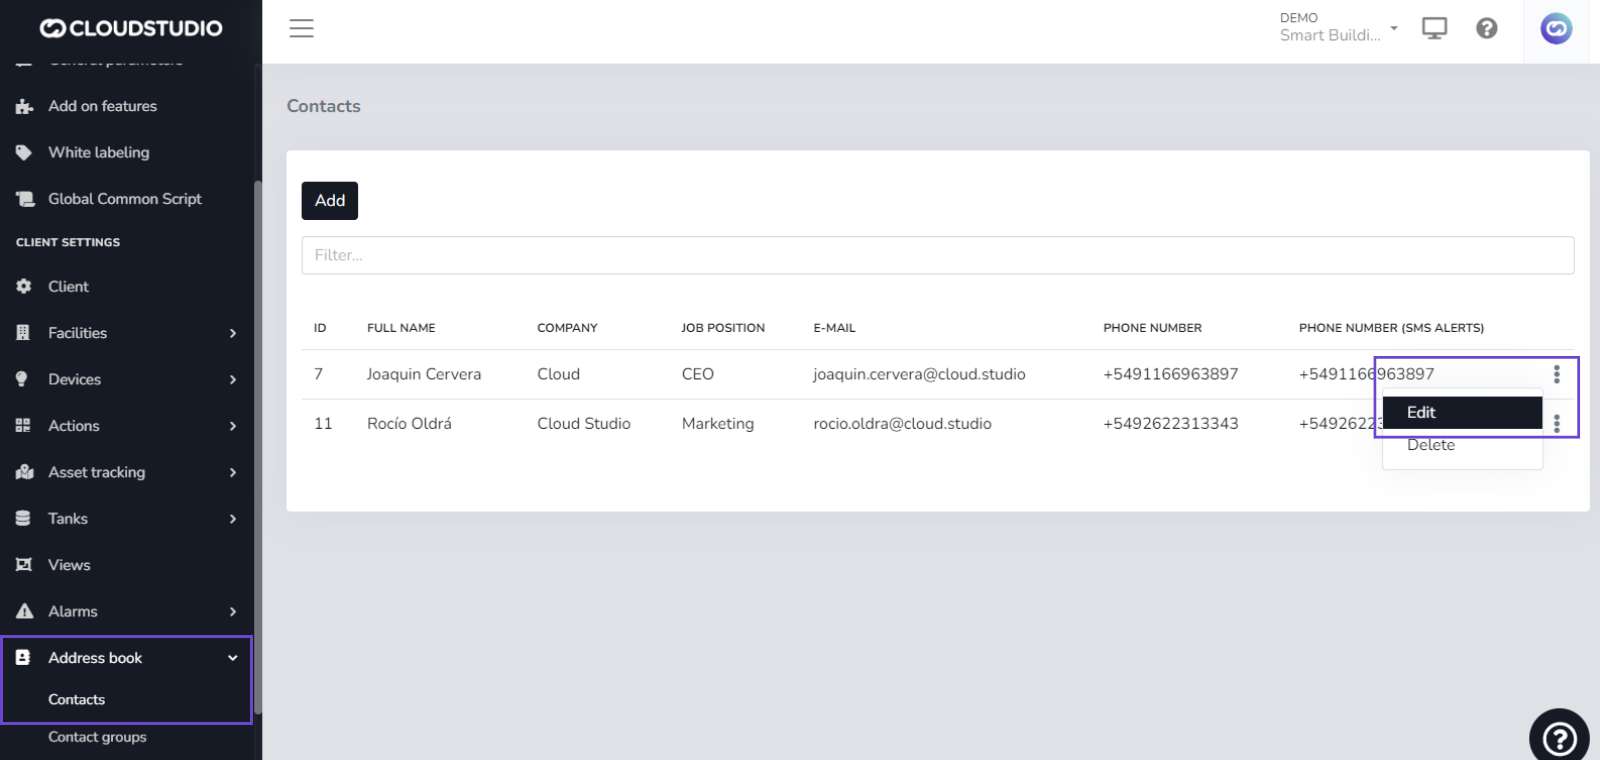
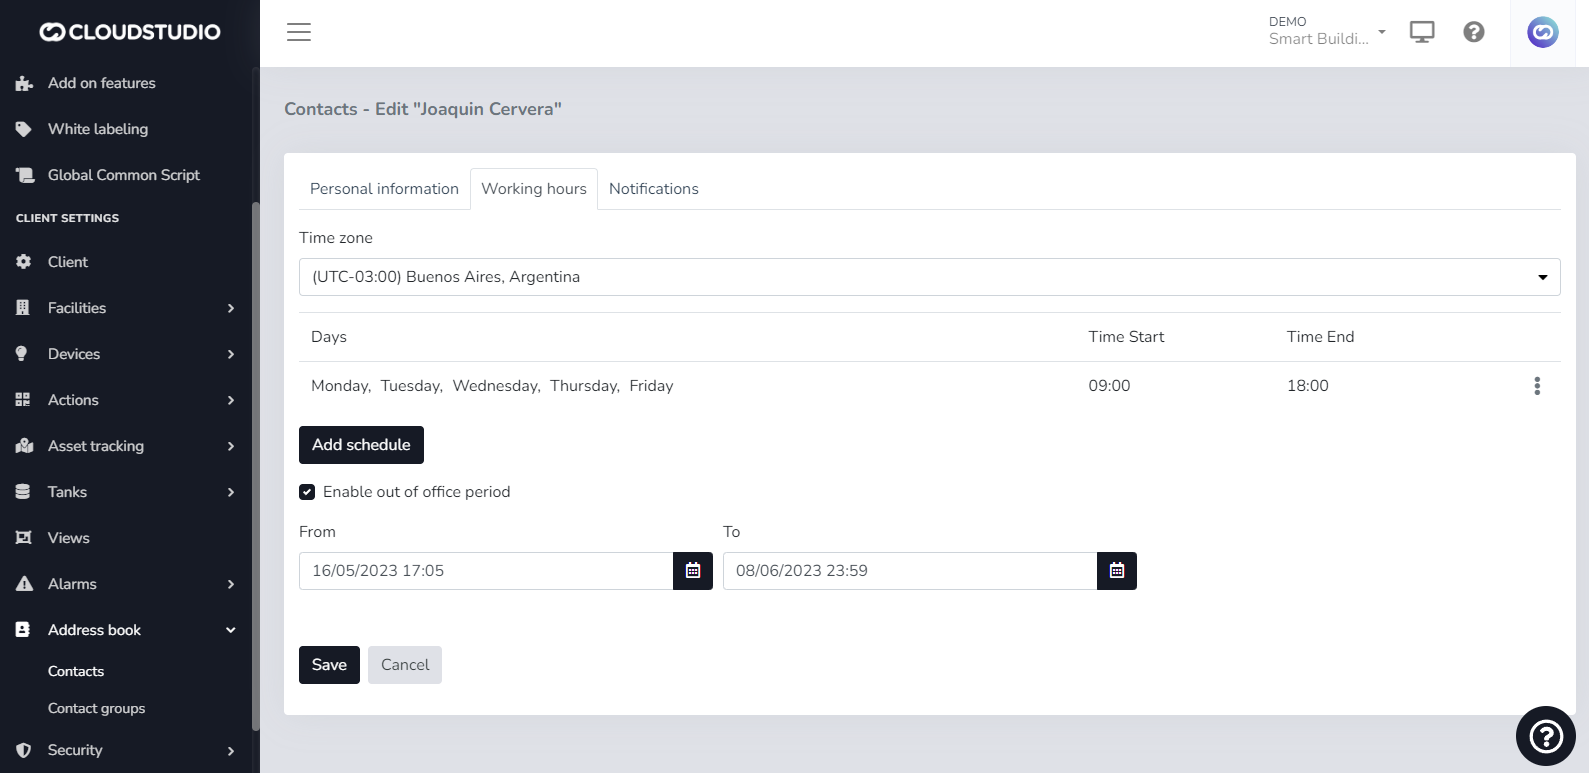
Modify alarms by contact group [#modify-alarms-by-contact-group]
If you need to modify notifications for a contact group, navigate to:
**Navigation menu > Directory > Contact Groups > Working hours**
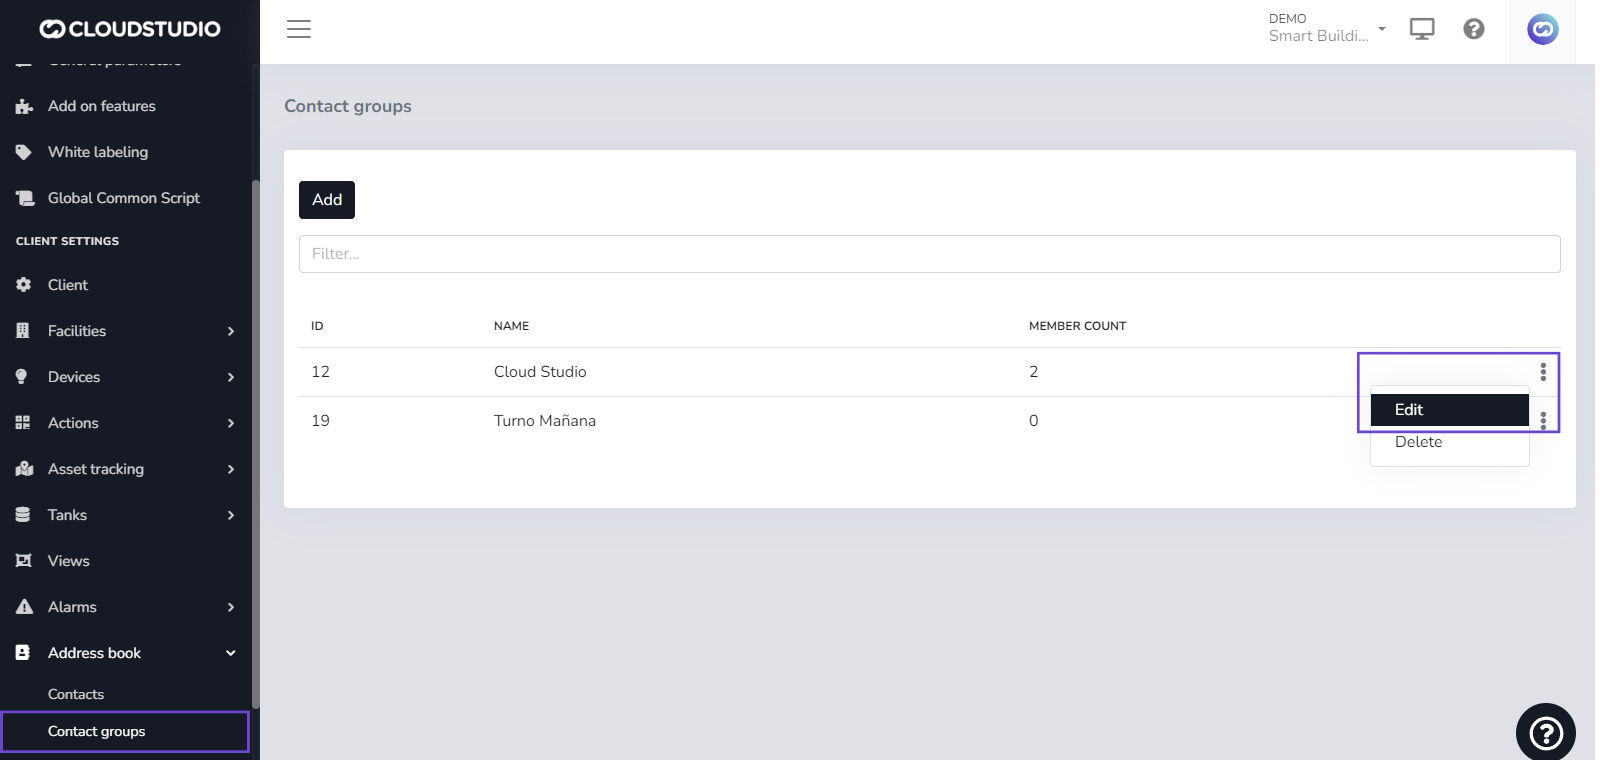
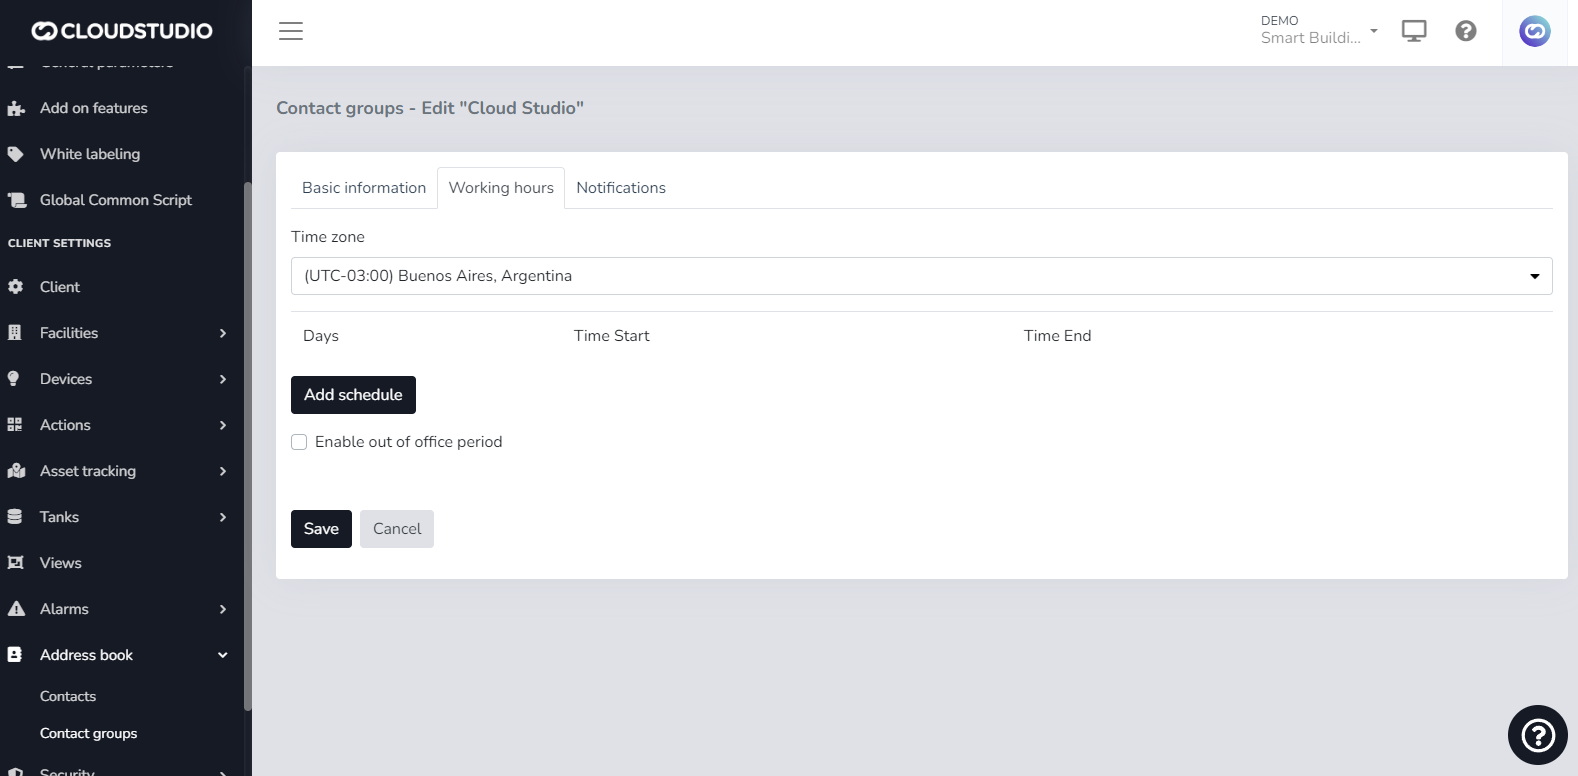
# Voice and SMS Services
Voice and SMS notification services have an associated cost.
The user can view messages in the notifications tab within *Alerts* and *Alert Types* that warn about the configuration status of these services on the platform.
If enabled at the *Client* level, a user with administrator permissions can enable or disable SMS and Voice notification delivery at the *Facility* level, deciding which ones will be active.
If the options are not **enabled** at the *Client* level, the user will see the options as **disabled at the *Facility* level. That is, to enable voice and SMS notifications at the facility level, they must first be enabled at the client level.**
> **By default, alerts for all Clients and Facilities are email-only and have no cost.**
1. **ALERT MESSAGES FOR SMS AND VOICE**
**Clients** > Disable SMS and Voice services
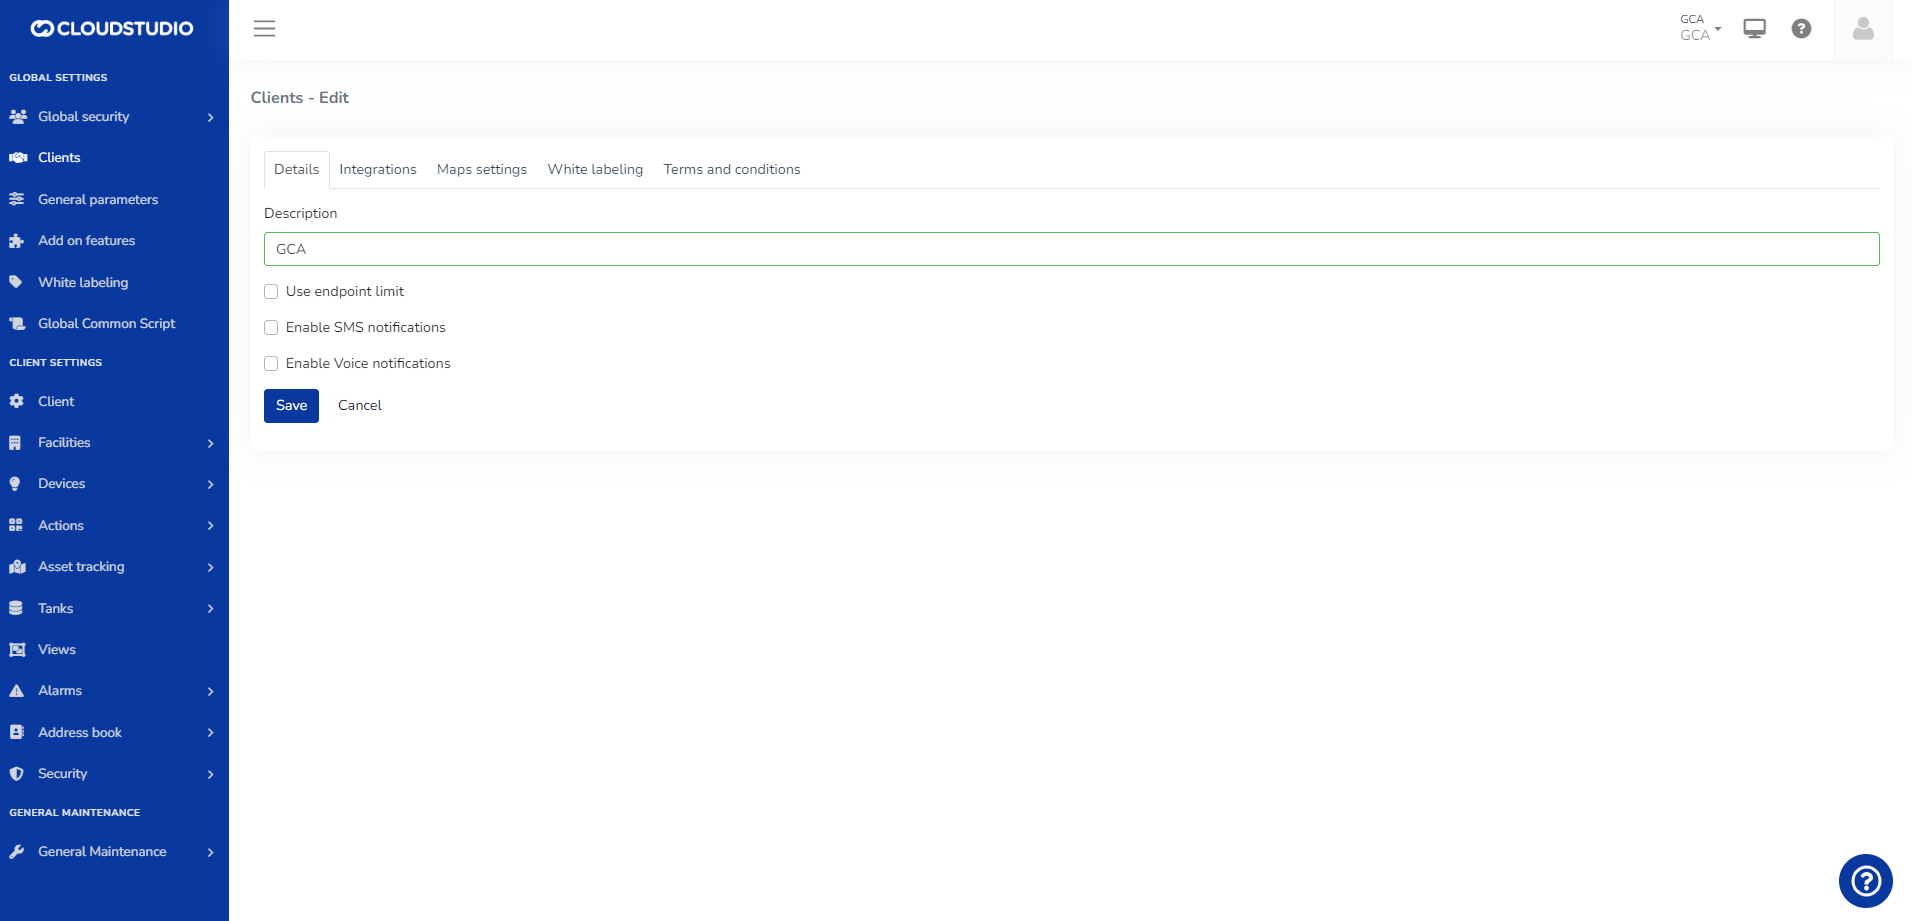
**Facilities** > The user will not be able to select the facility if the Global configuration is not previously enabled

**Alarms** > Alerts
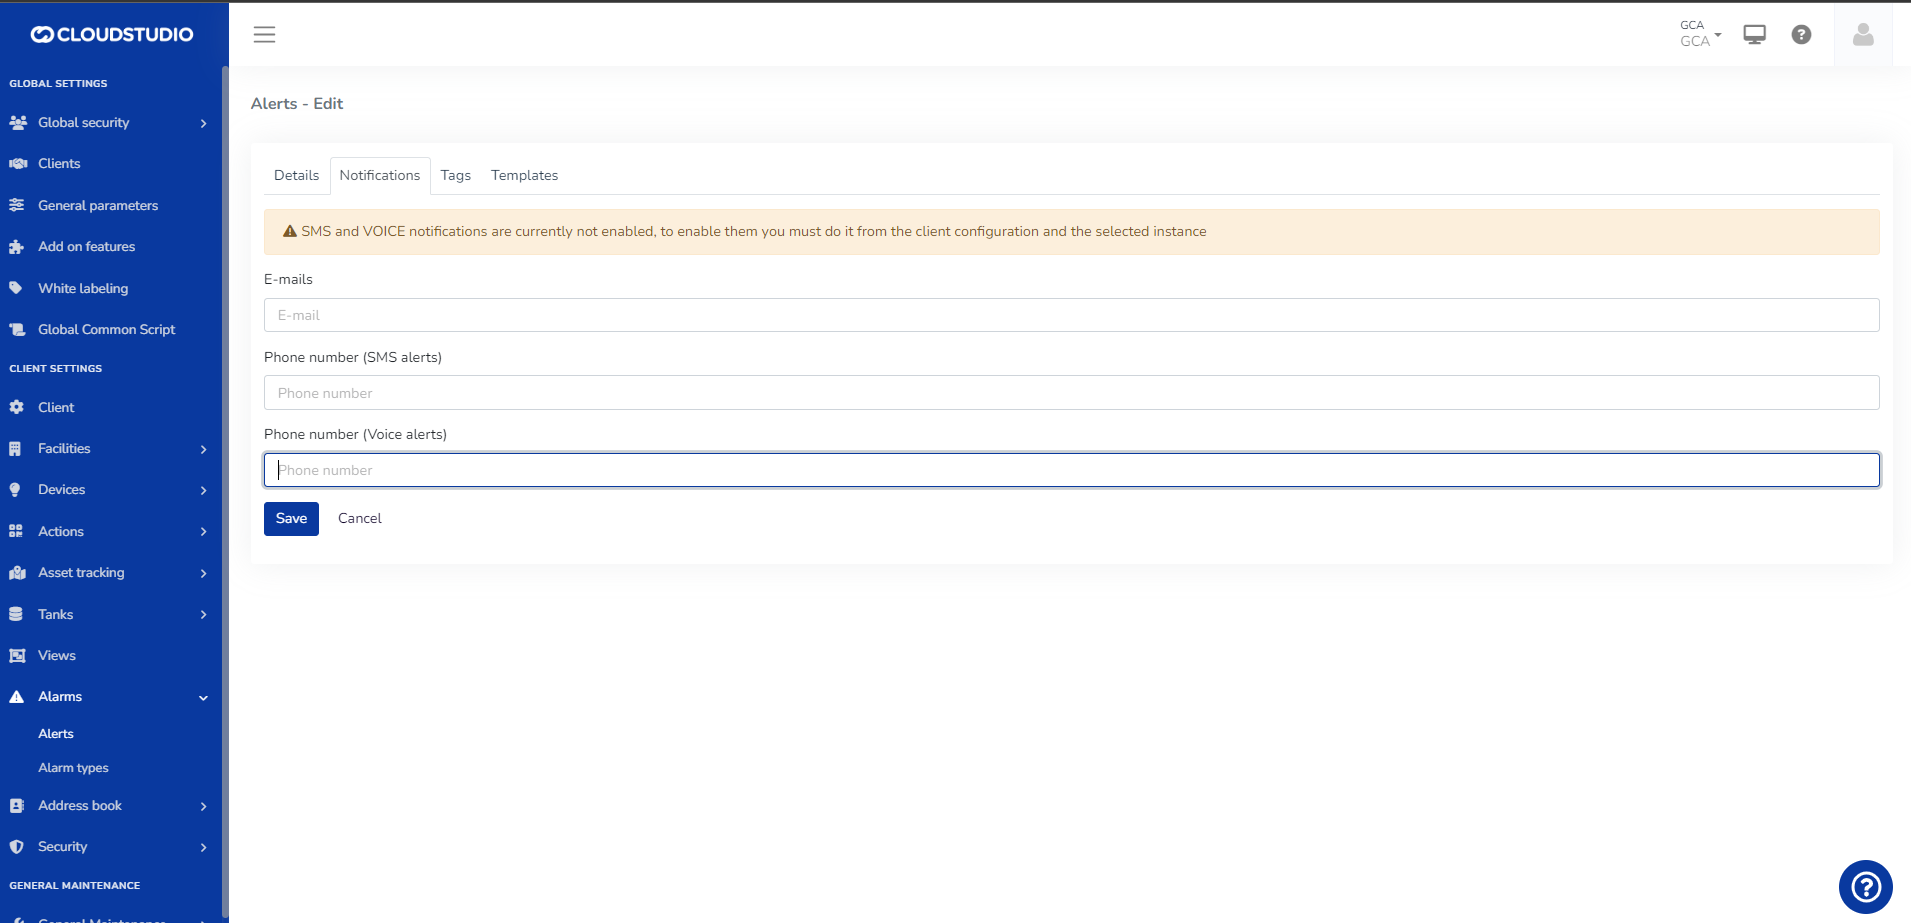
**Alarms** > Alert Types

2. **ALERT MESSAGES FOR VOICE**
**Clients** > Uncheck Voice and select SMS
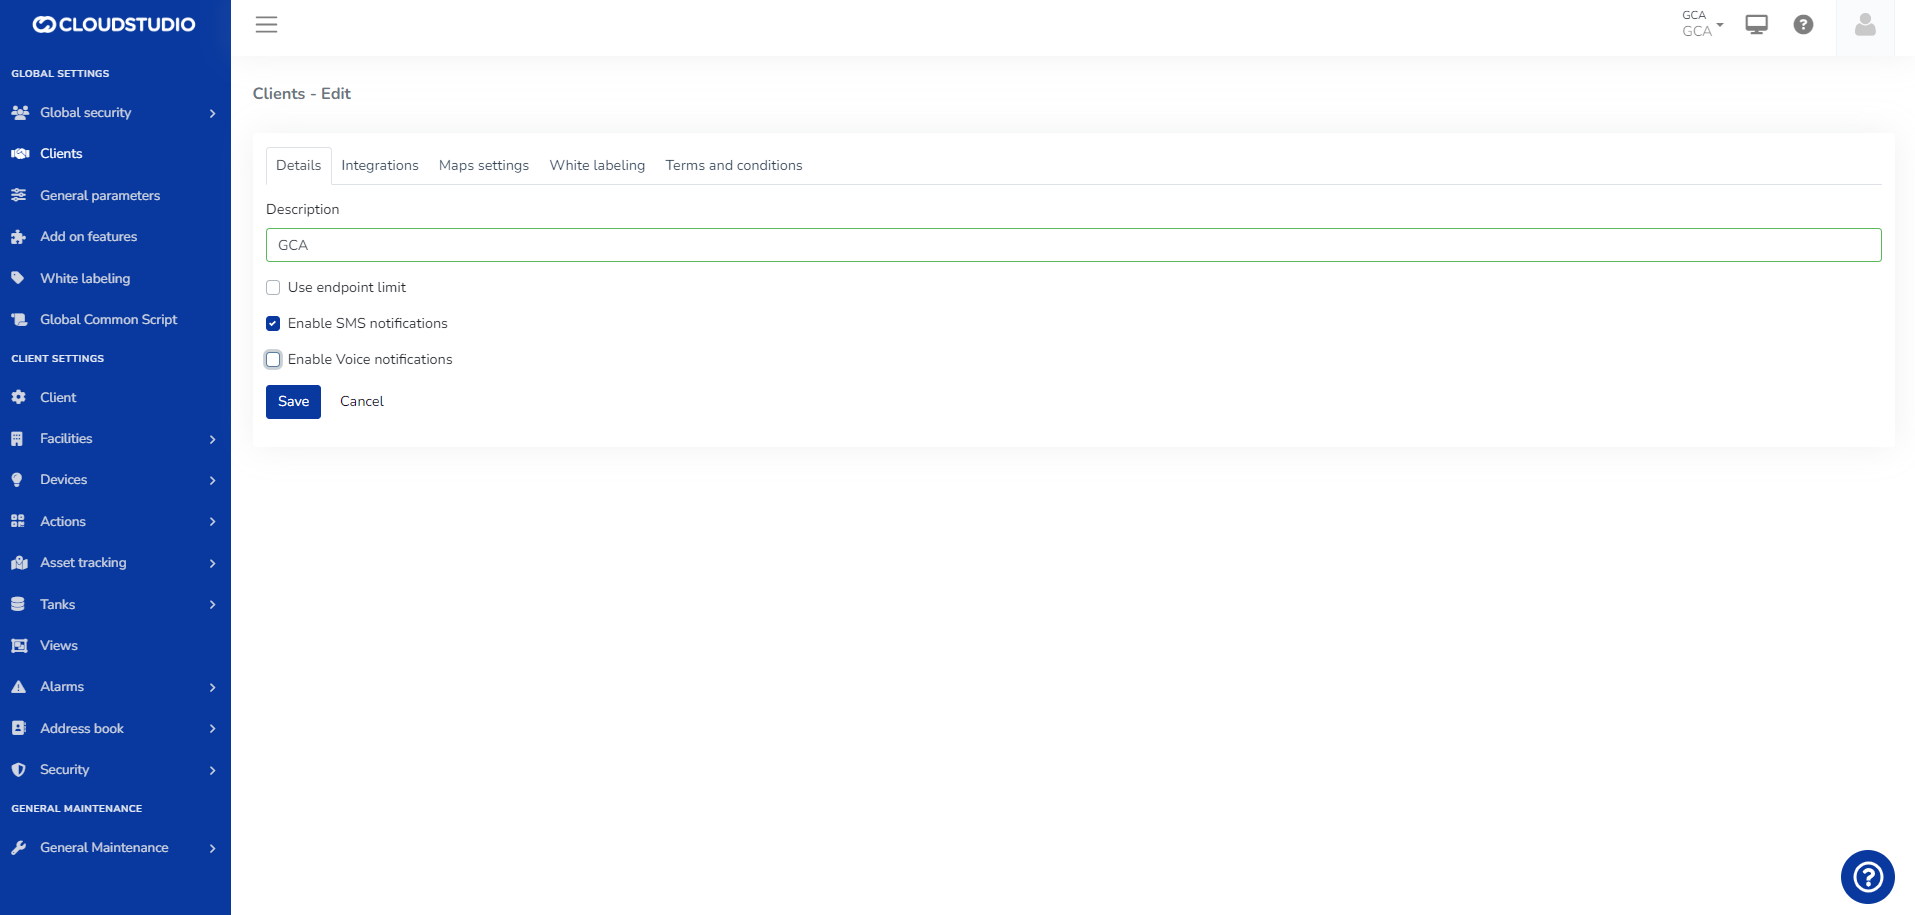
**Facilities** > The user can select the SMS facility and will see the Voice option as disabled
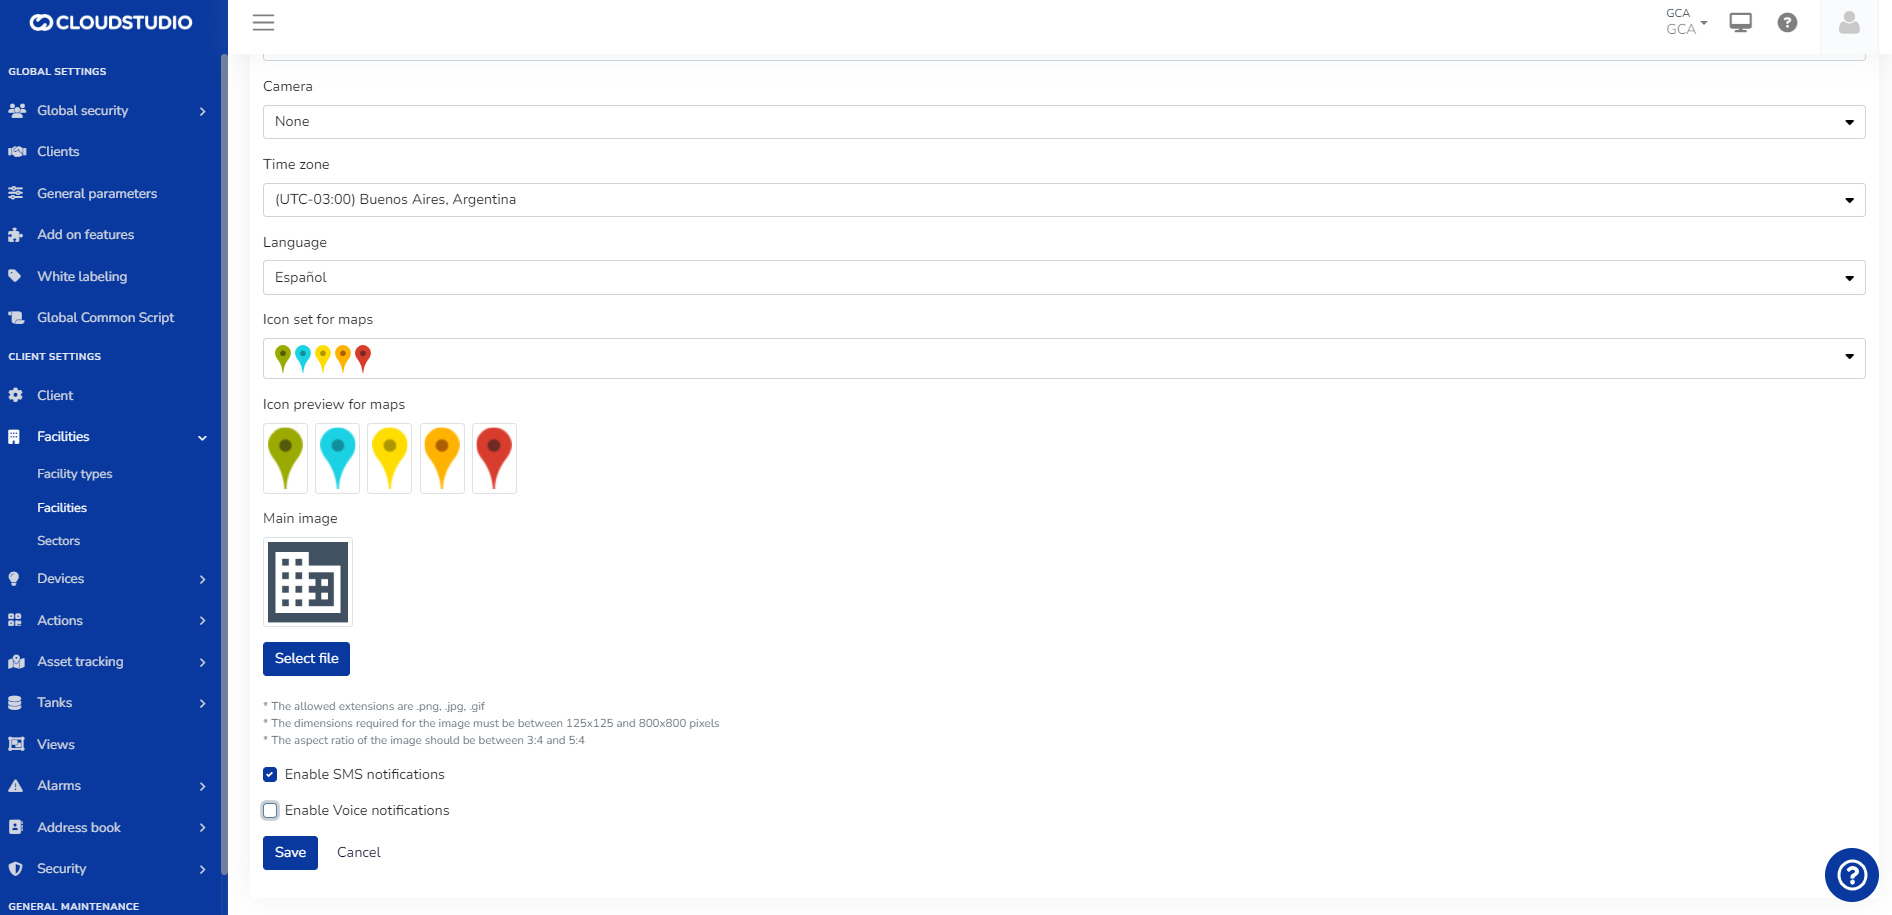
**Alarms** > Alerts
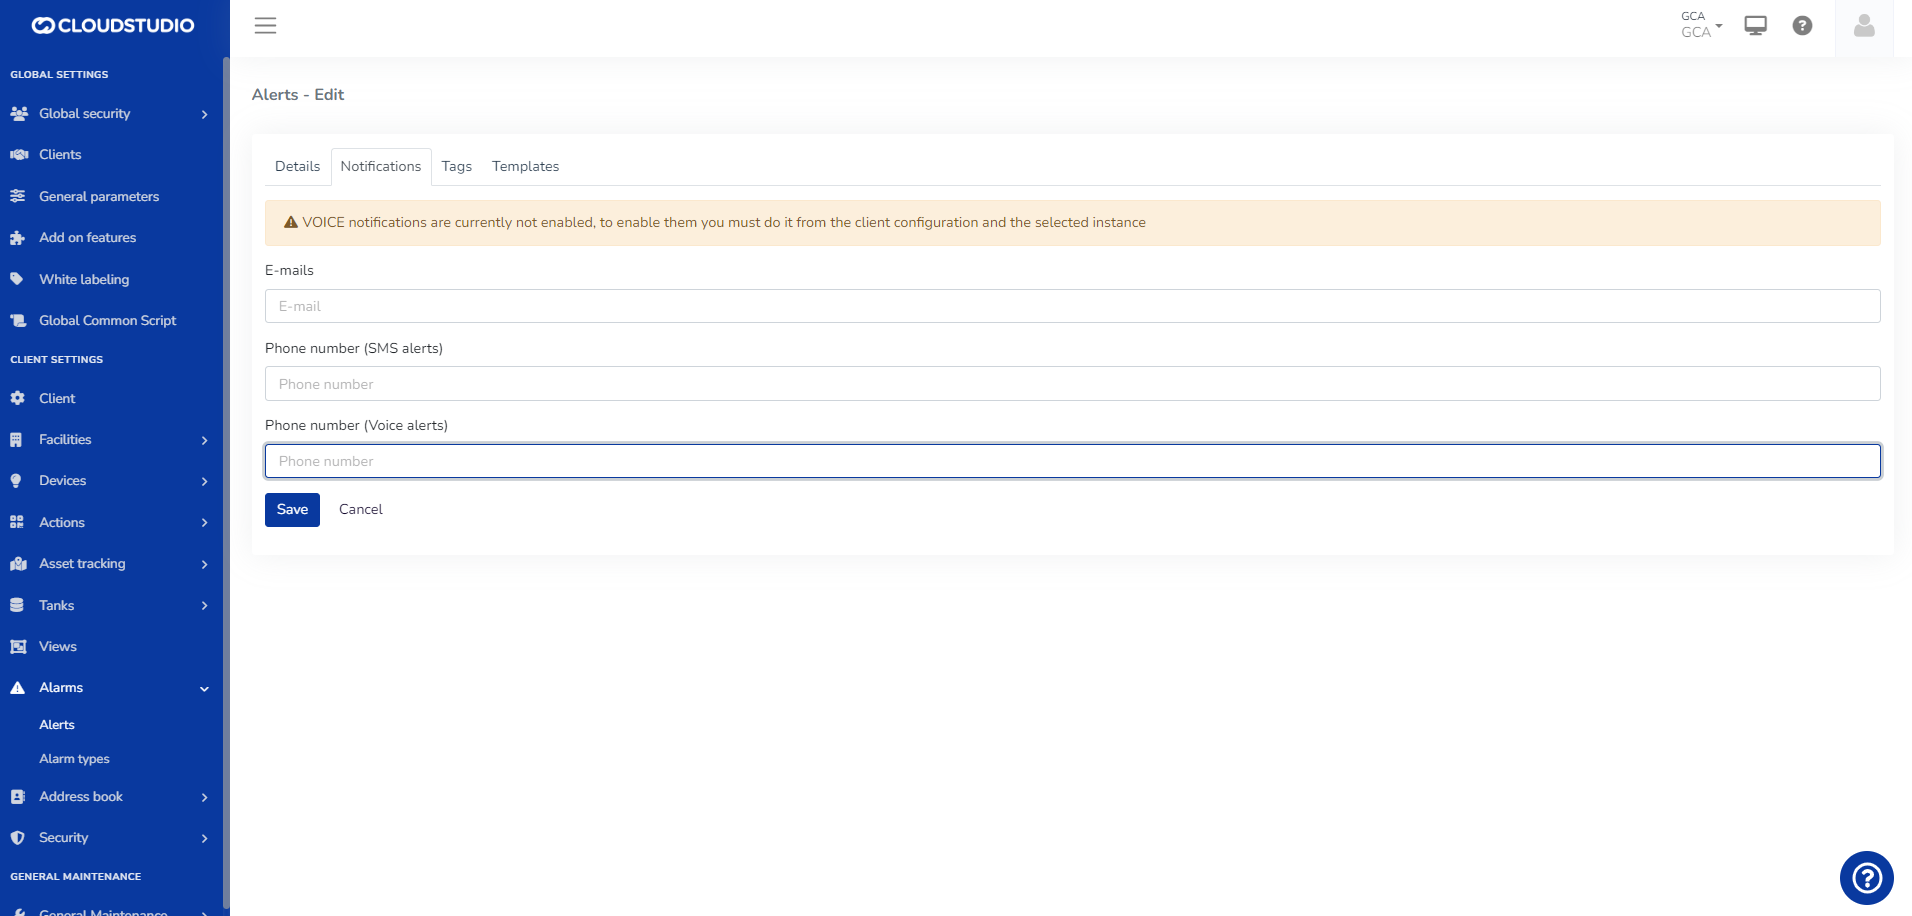
**Alarms** > Alert Types
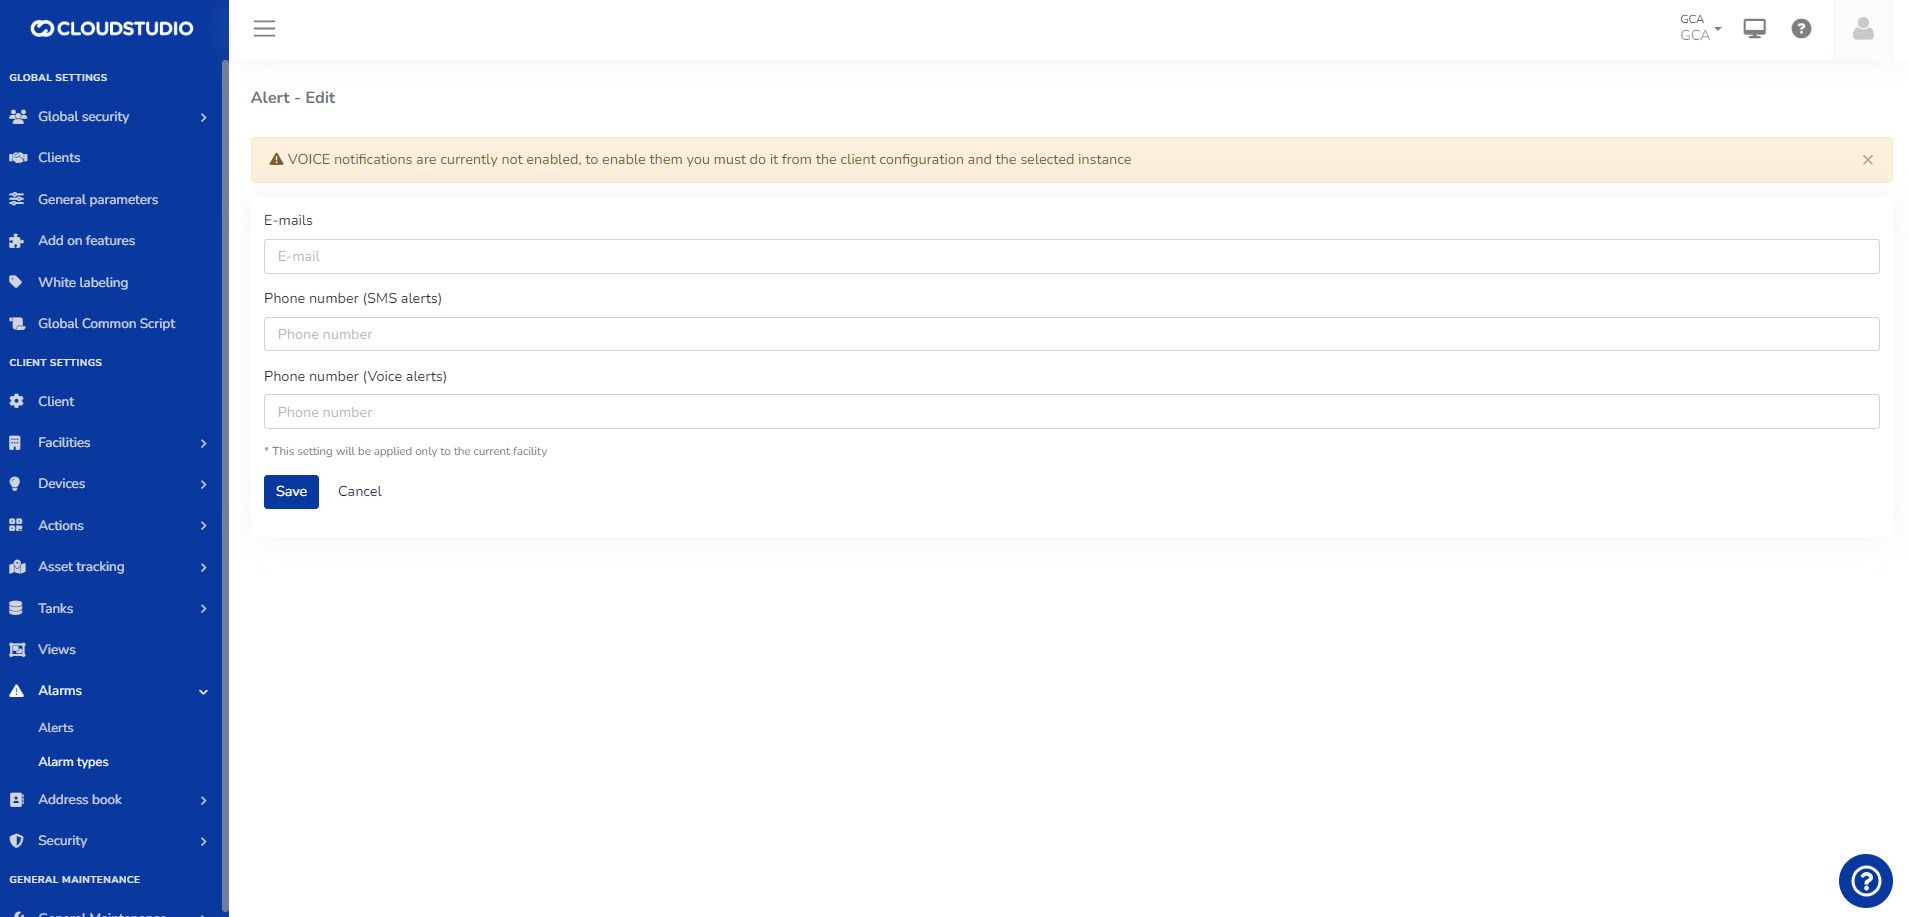
3. **ALERT MESSAGES FOR SMS**
**Clients** > Uncheck SMS and select Voice
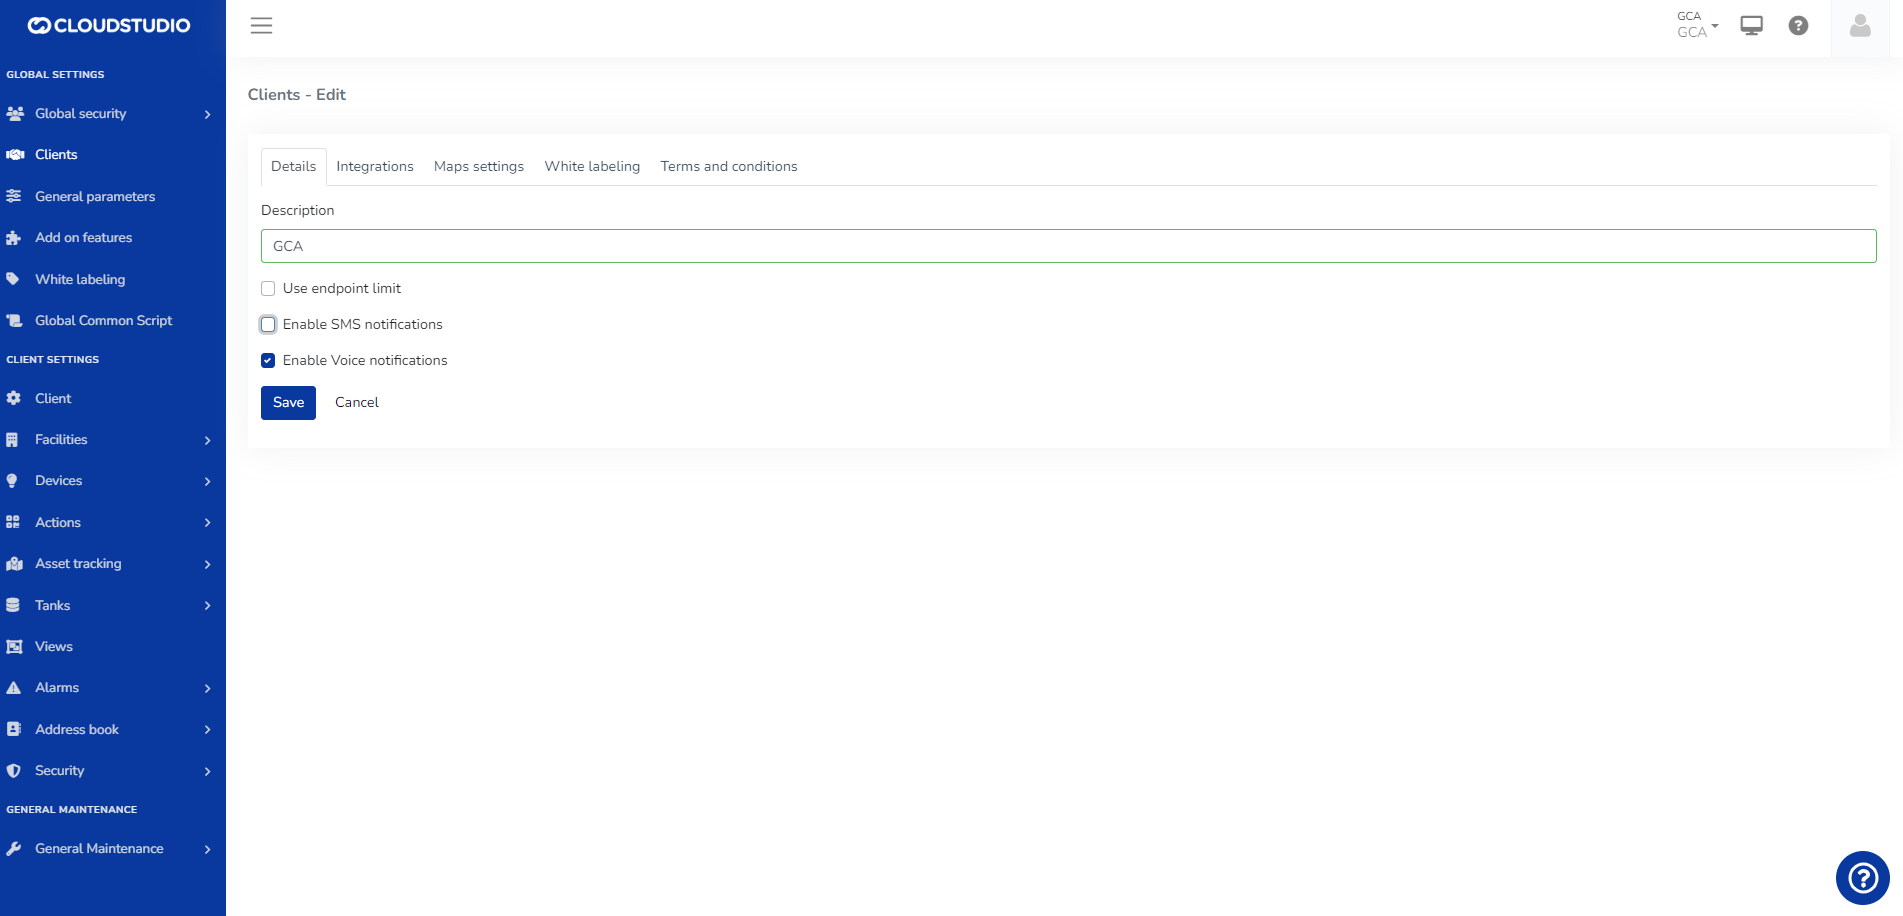
**Facilities** > The user can select the Voice facility and will see the SMS option as disabled
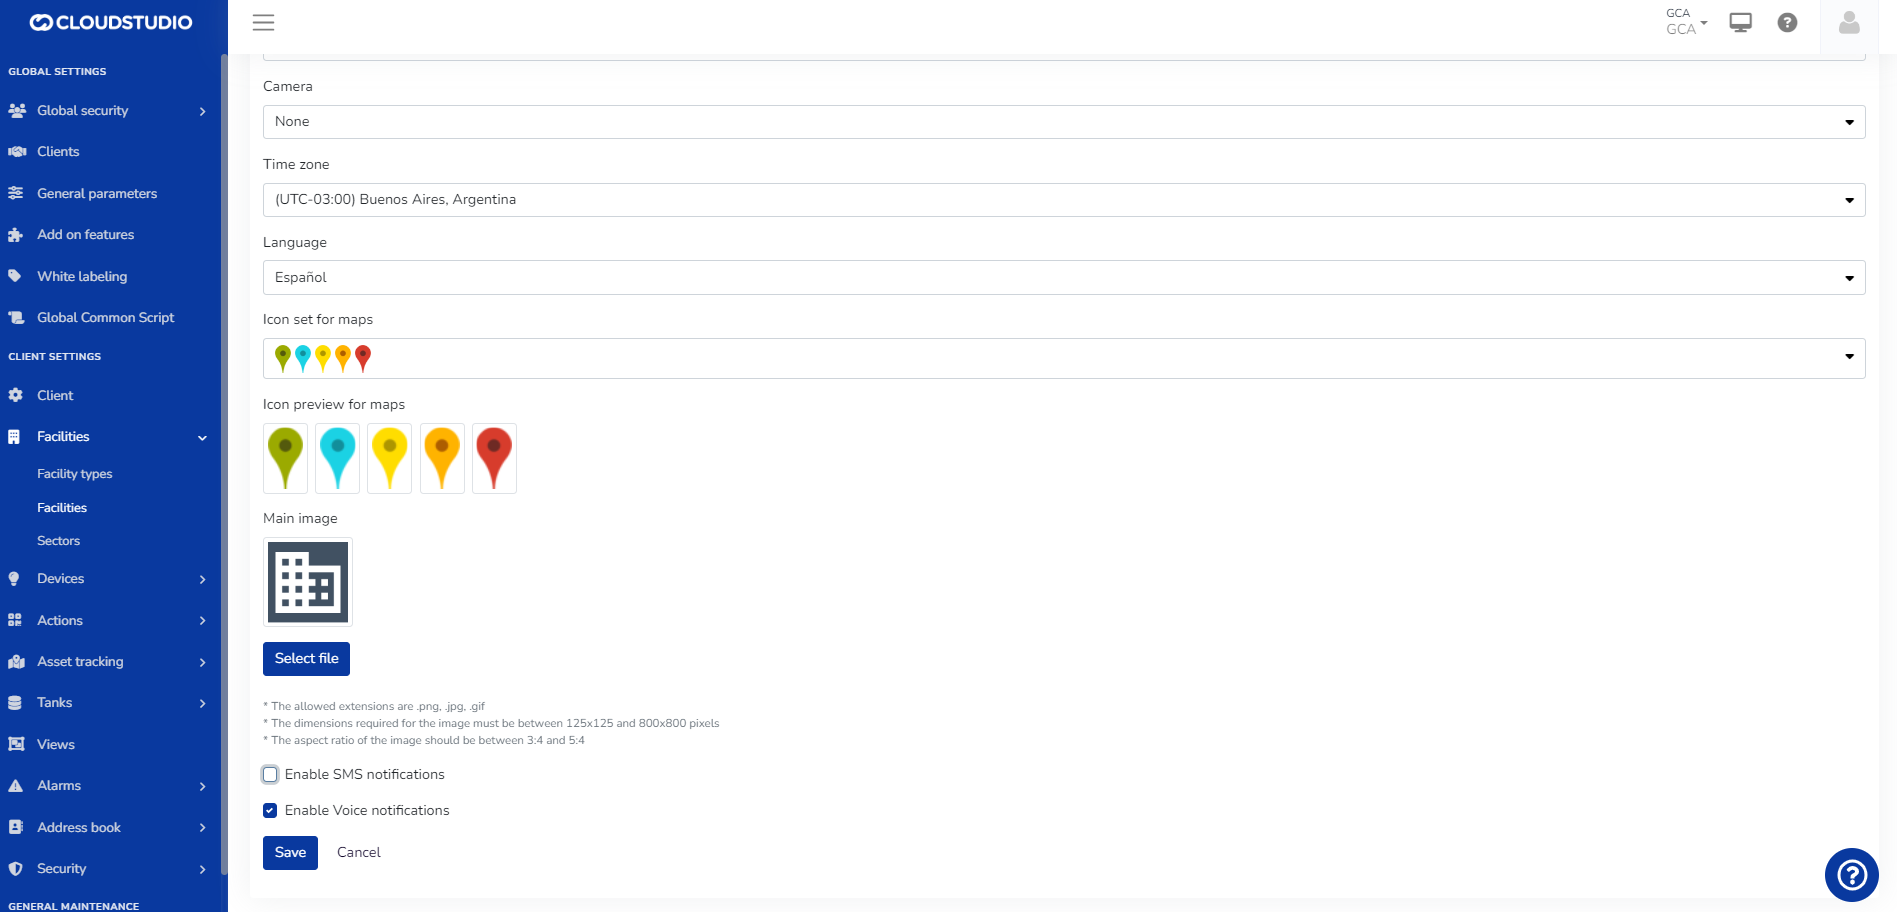
**Alarms** > Alerts
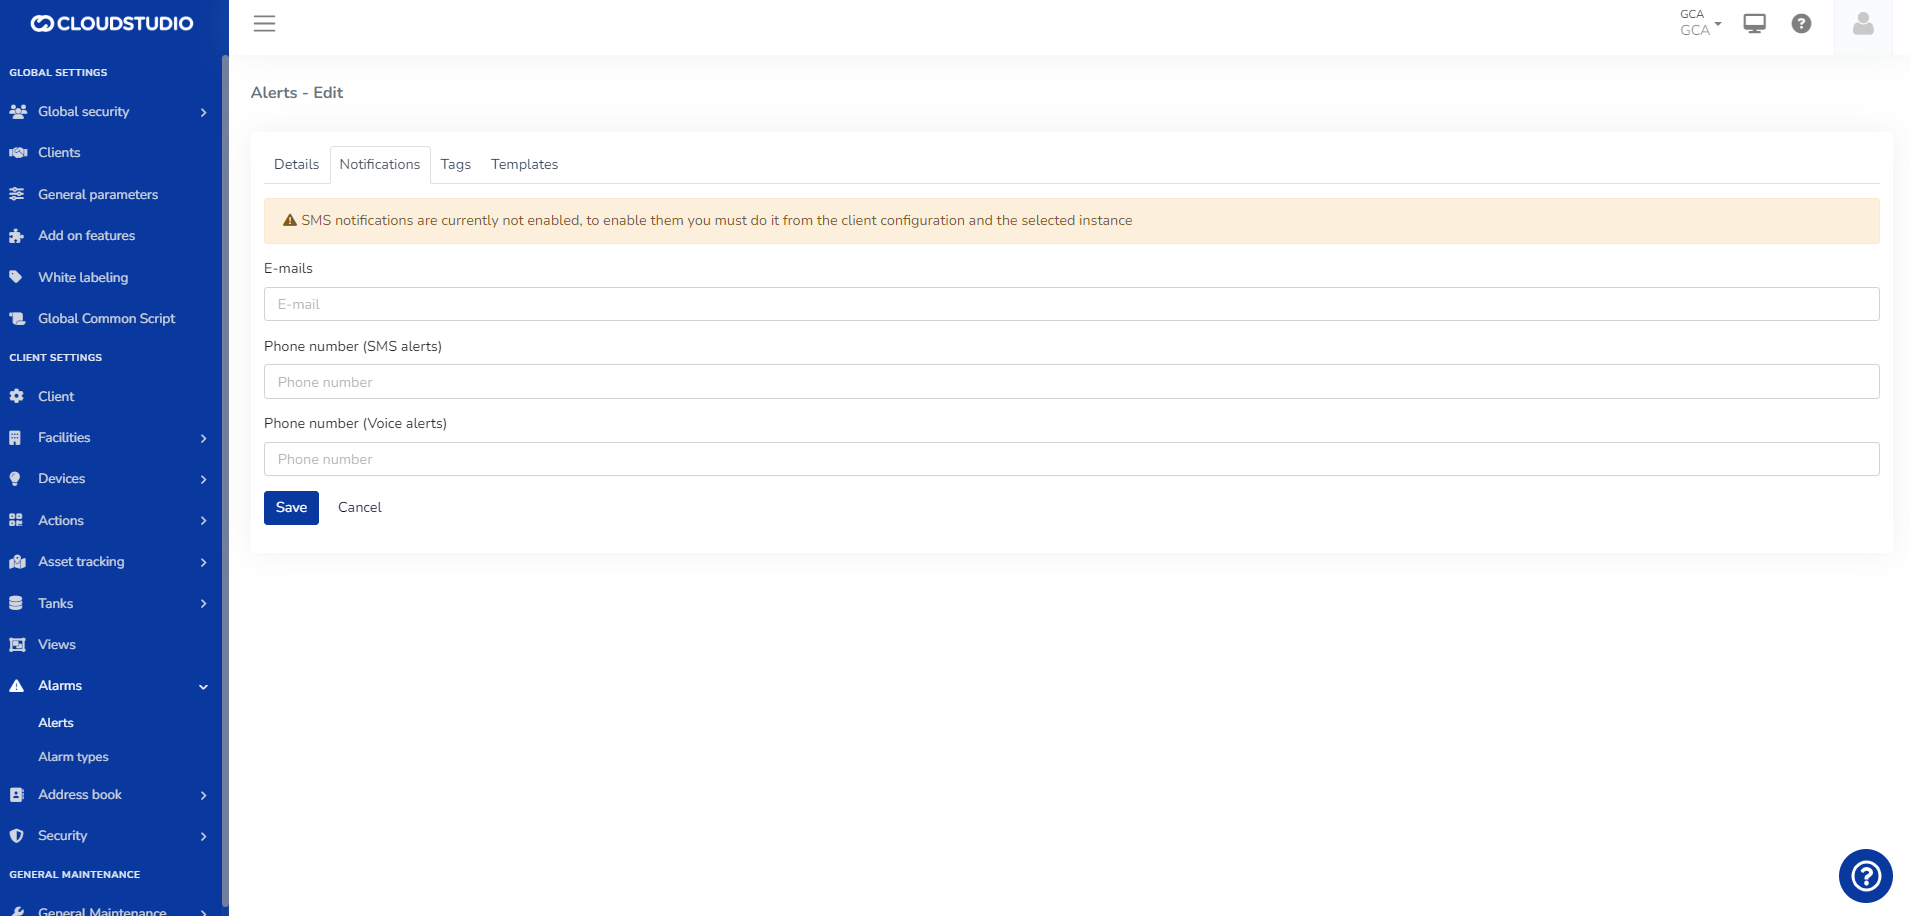
**Alarms** > Alert Types
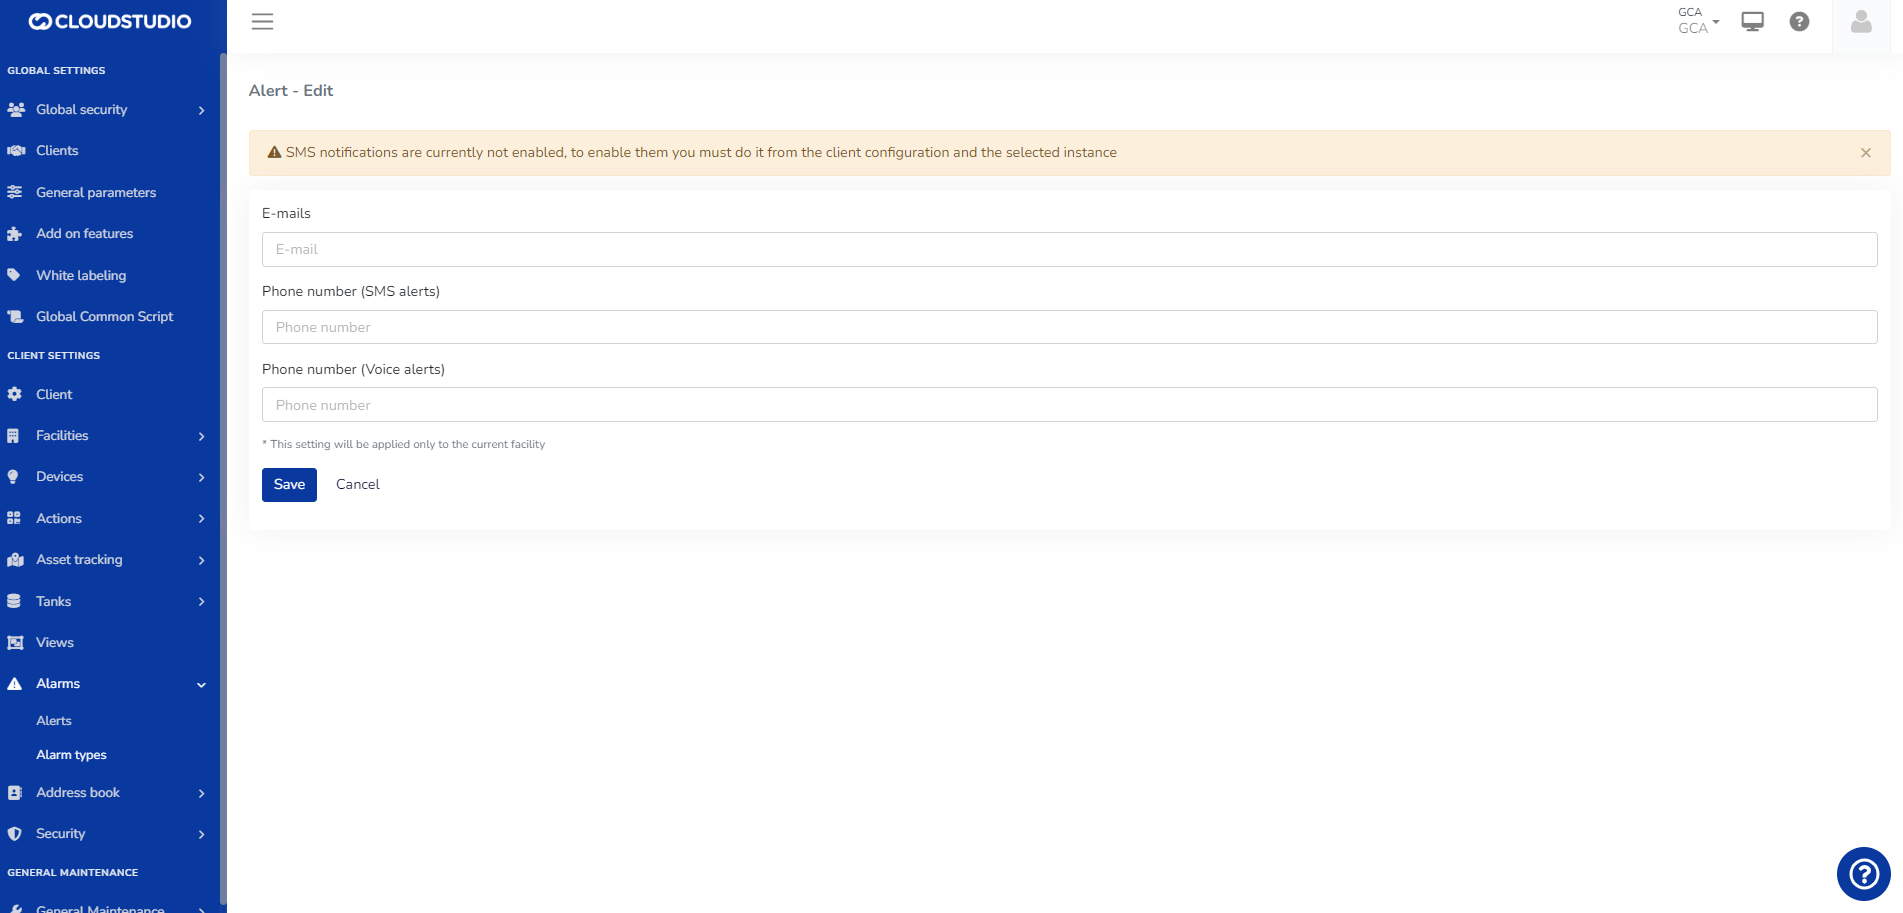
4. **ALERT MESSAGES WITHOUT DISPLAY**
**Clients** > Select the SMS and Voice option
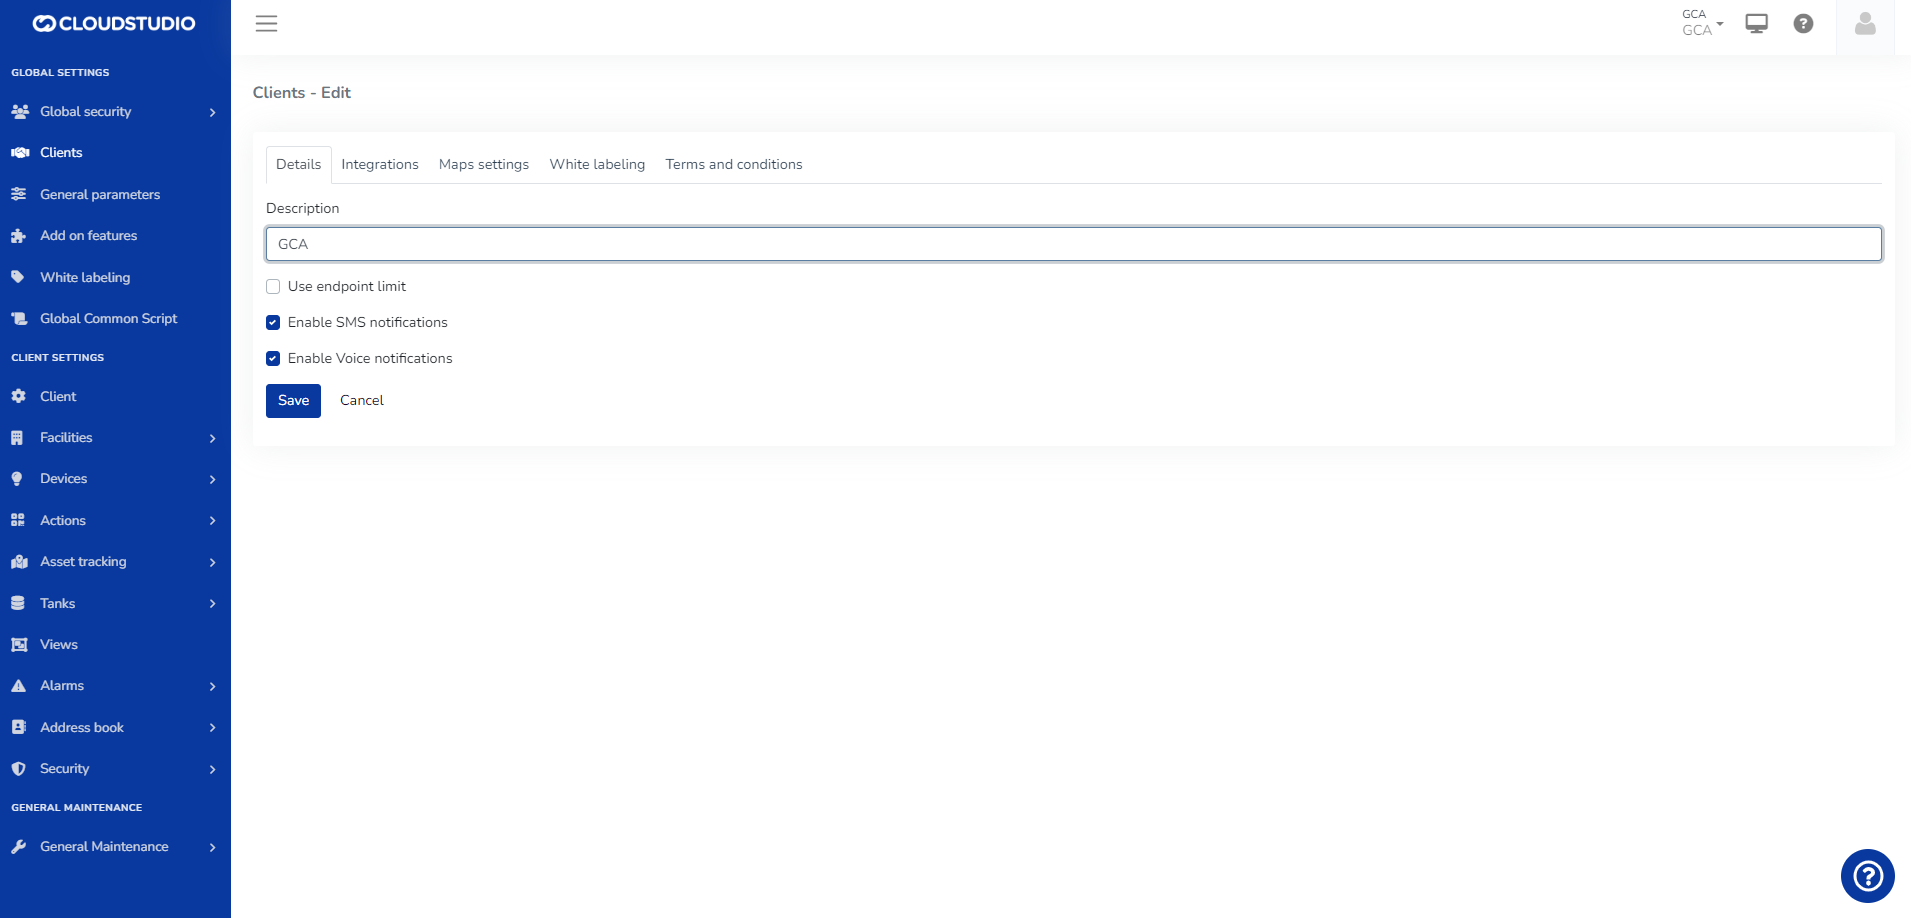
**Facilities** > The user can select the Voice and SMS facility
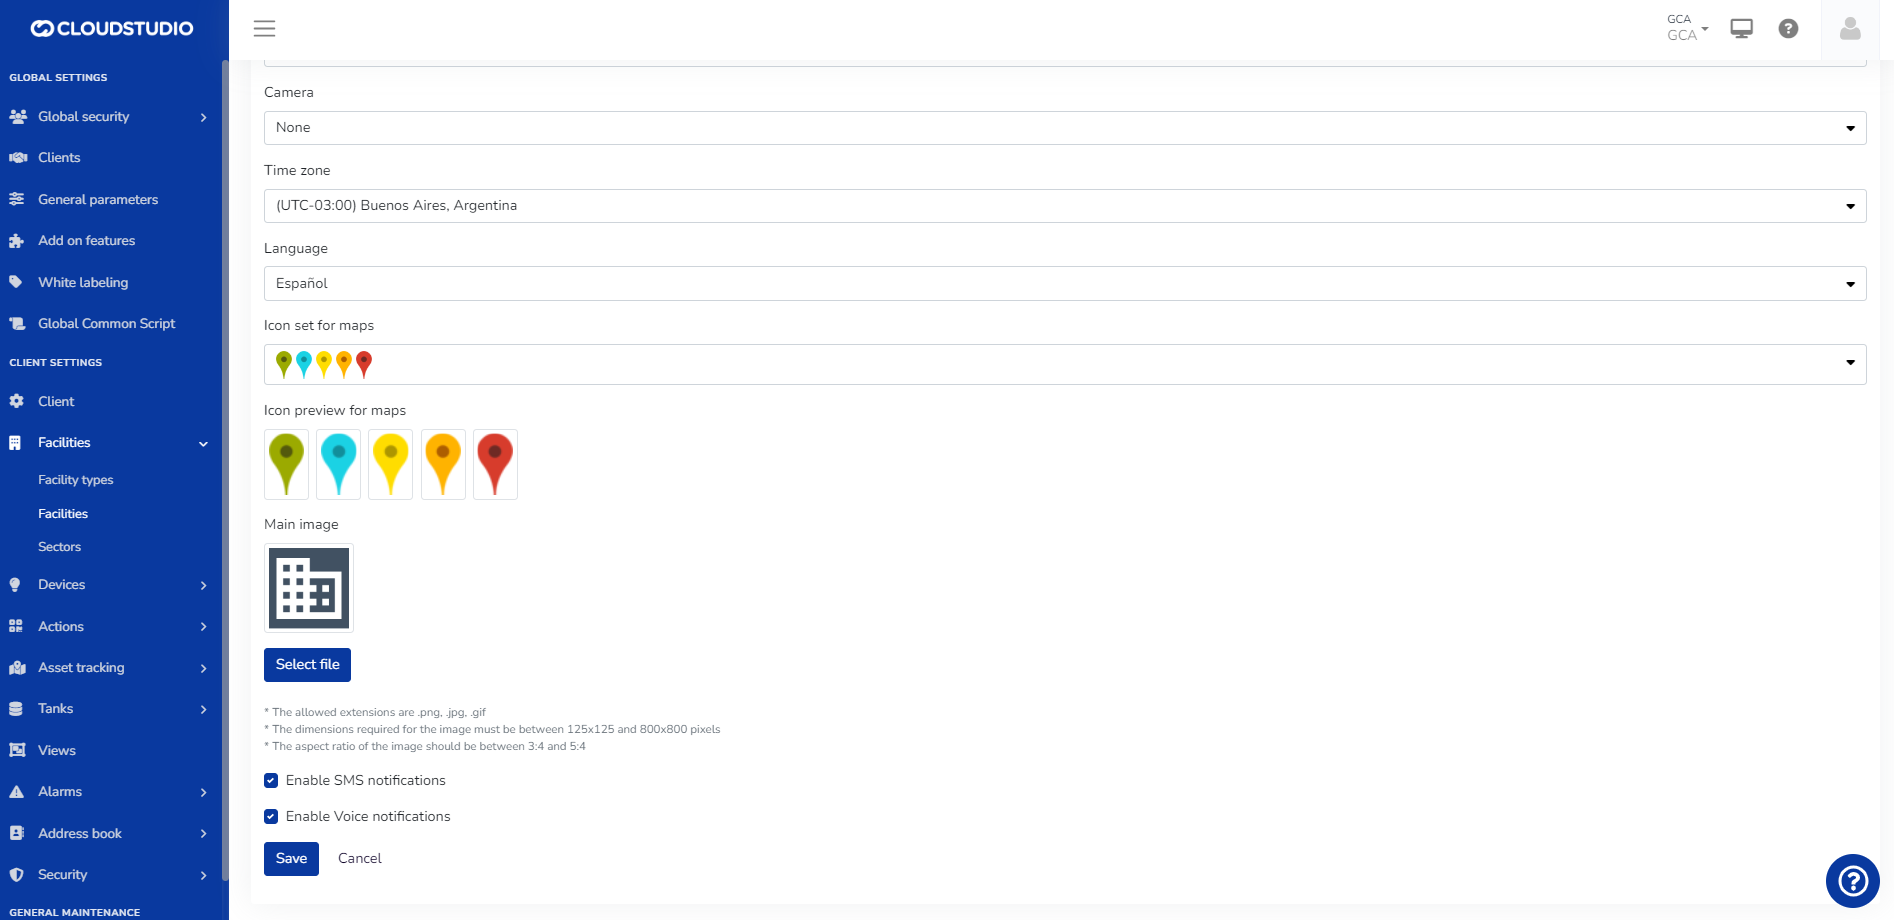
**Alarms** > Alerts
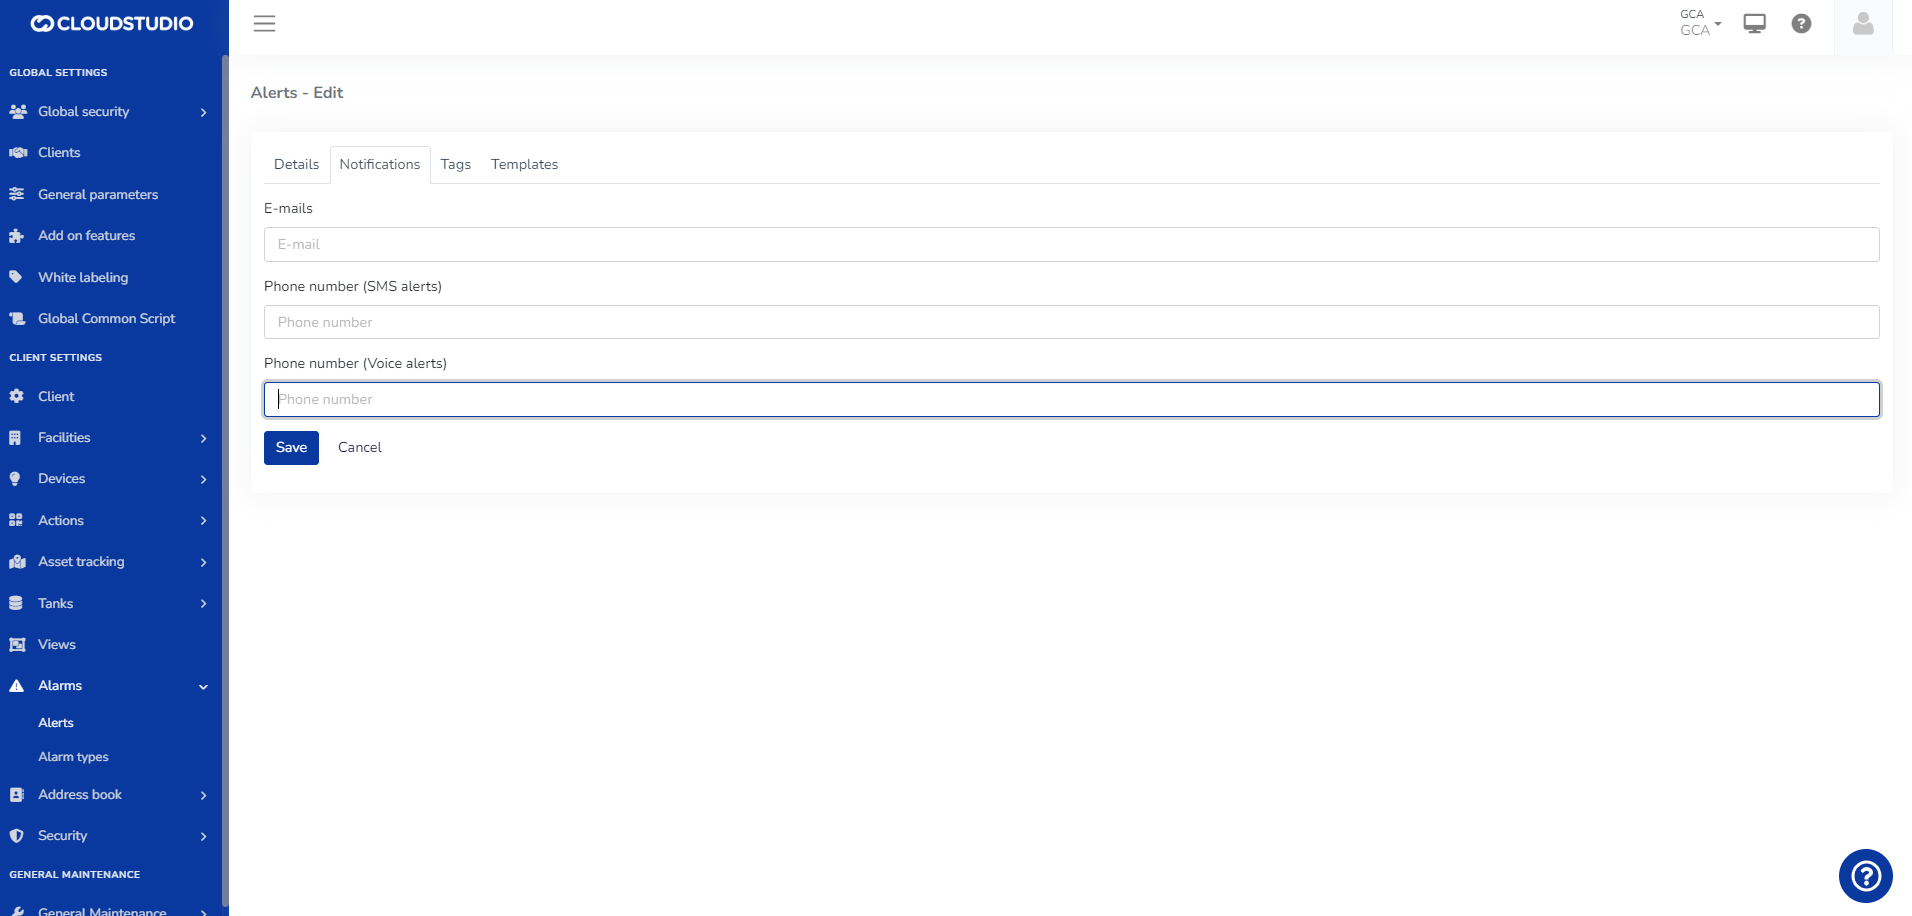
**Alarms** > Alert Types
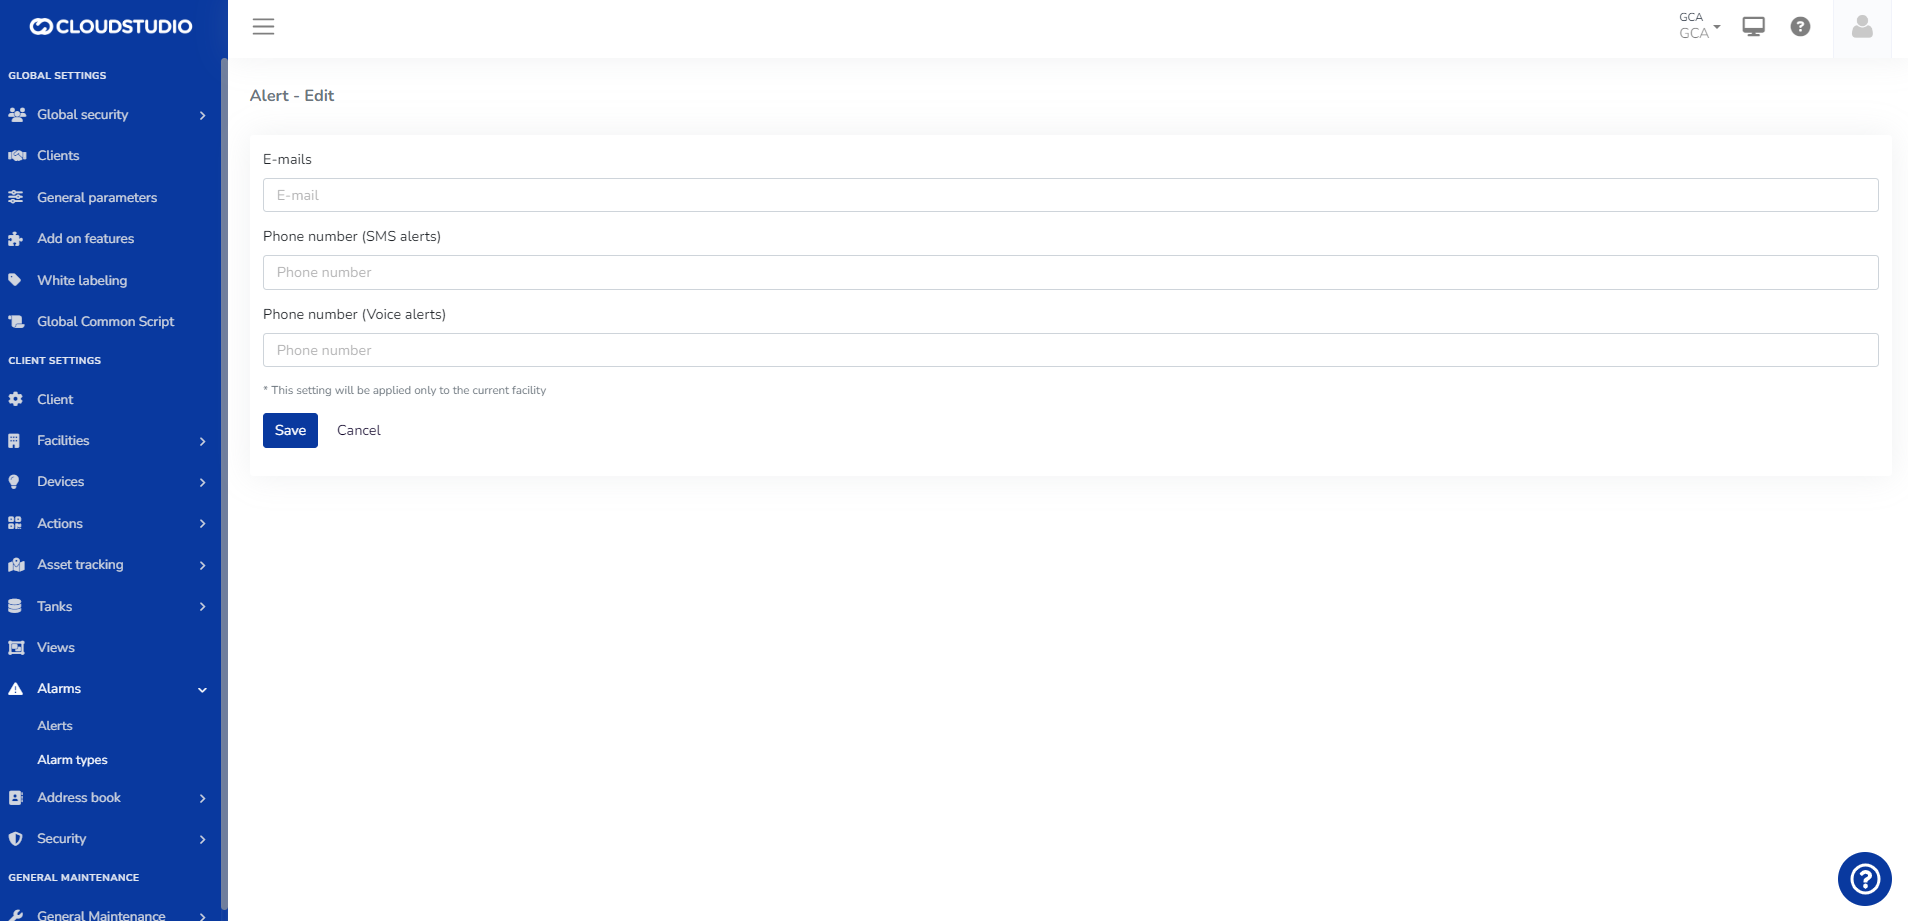
# Voice, SMS, and WhatsApp Services
Voice, SMS, and WhatsApp notification services have an associated cost.
The user can view messages in the notifications tab within *Alerts* and *Alert Types* that warn about the configuration status of these services on the platform.
If enabled at the *Client* level, a user with administrator permissions can enable or disable SMS, Voice, and WhatsApp notification delivery at the *Facility* level, deciding which ones will be active.
If the options are not **enabled** at the *Client* level, the user will see the options as **disabled at the *Facility* level. That is, to enable voice, SMS, and WhatsApp notifications at the Facility level, they must first be enabled at the client level.**
**By default, alerts for all Clients and Facilities are email-only and have no cost.**
1. **ALERT MESSAGES FOR SMS, WhatsApp**
**Clients** > Enable SMS, Voice, and WhatsApp services

**Facilities** > The user will not be able to select the facility if the Global configuration is not previously enabled

**Alarms** > Alerts
When enabled, the Notifications section of Alerts will display the fields for entering contact information. Both the email and the phone number can be the same or vary depending on the notification type (SMS, Voice Message, WhatsApp)
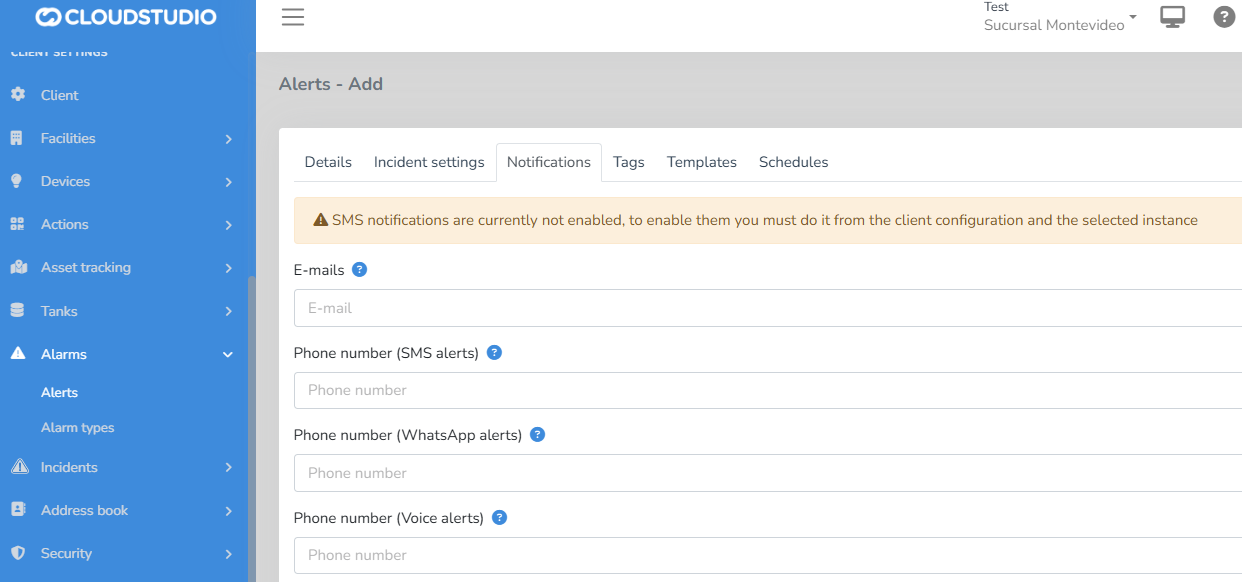
**Alarms** > Alert Types
The Notification type configuration is also available for Alert Types. You can configure notifications via Email (no additional cost), as well as via text messages (SMS), voice messages, and WhatsApp, with additional cost

**Actions & Scripting** > Notifications
In the Actions and Notifications steps, you can also access the Notification delivery configuration.
The enabled Notification channels for the Facility are displayed
* By email

\- By SMS
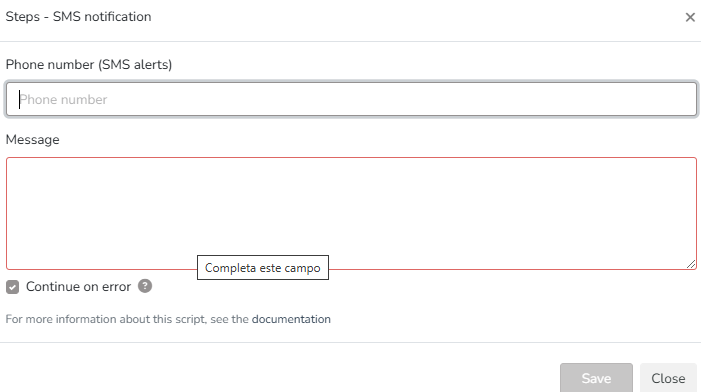
\- By Voice
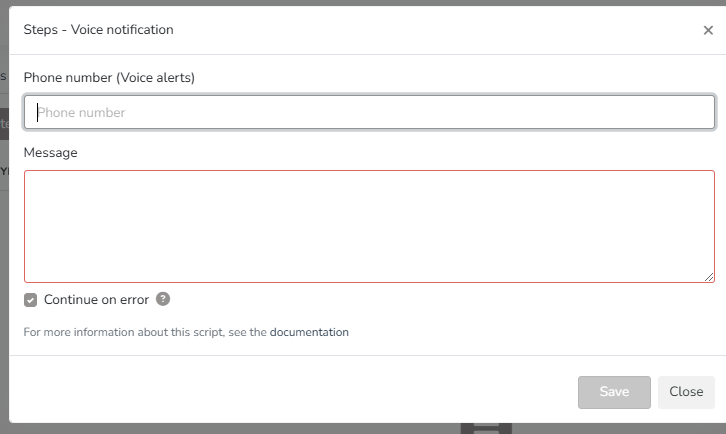
By WhatsApp
**Clients** > Remove contacts from the different Notification channels
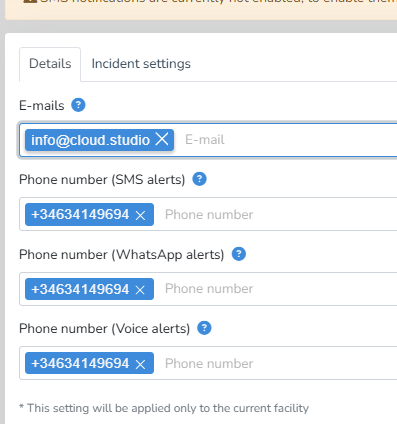
**Clients** > Disable Notification Channels
You can remove a notification channel by disabling it in the Facility configuration. Once done, the channel will no longer be visible for configuration in the Notification settings
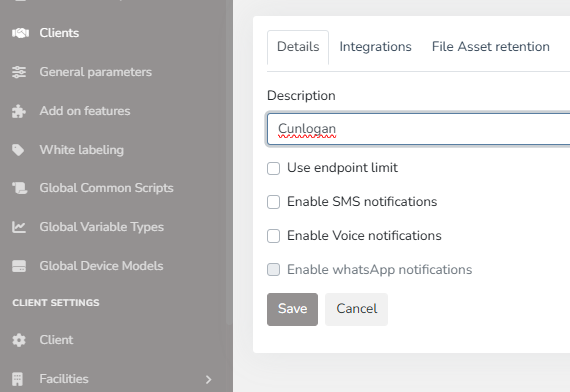
# Device Control
Gear Studio allows controlling devices that support actuation, such as appliances, dimmers, thermostats, curtain controllers, and much more.
Device Control from the App [#device-control-from-the-app]
The Gear Studio app allows viewing the status of all devices, and also allows acting directly on them, if the user has the necessary permissions.
| | | |
| - | - | - |
Device Control from the Monitor [#device-control-from-the-monitor]
The "Devices" section of the monitor allows viewing the entire device infrastructure of a facility, as well as manual operation when necessary. For each device with control capability, the list displays all possible actions for its current state.
# Devices
Devices are the first level of a facility's infrastructure. They typically correspond to physical devices such as sensors, gateways, dimmers, actuators, thermostats, etc. Devices have the following characteristics:
* They have a model (or a brand and model combination)
* They have a unique identifier, such as a MAC address or a serial number.
* They have some type of communication interface (MQTT, HTTP, NB-IoT, ZigBee, LoRaWAN, etc.)
* They have a description used in Gear to more easily identify the device.
* They have certain associated attributes that can be updated during operation.
Device Attributes [#device-attributes]
Devices can have associated attributes that may change during operation. Examples of these attributes include:
* **Battery level**. Gear Studio allows reporting the battery level of devices that have one or more batteries. For devices with more than one battery, it is possible to report the status of each one separately.
* **Signal level**. The platform allows reporting the signal level for devices that use wireless communication. For devices that support more than one wireless communication medium, it is possible to report the status of each one separately (e.g., cellular, Wi-Fi, LoRaWAN, ZigBee, etc.)
* **Firmware version**. The firmware version installed on the device can be reported, if available. This enables the version control functionality, to quickly identify devices that need to be updated.
More Information [#more-information]
For more information about device and endpoint management, see the following tutorials:
* [Device Integration](/docs/configuracion-del-cliente/dispositivos-y-endpoints/dispositivos/integracion-de-dispositivos)
* [Device Management](/docs/configuracion-del-cliente/dispositivos-y-endpoints/dispositivos/dispositivos)
* [Endpoint Management](/docs/configuracion-del-cliente/dispositivos-y-endpoints/endpoints/crear-un-endpoint)
# Create an endpoint
> **IMPORTANT**: as a general rule, endpoints can only be created on devices that correspond to user-defined [device models](/docs/configuracion-del-cliente/dispositivos-y-endpoints/dispositivos/modelos-de-dispositivo). This is because when creating devices that correspond to models built into Gear Studio, the platform automatically creates all necessary endpoints.
When adding a new **endpoint**, the following fields must be completed.
* **Description**: Defined by the user, represents a description used to name the endpoint being created.
* **Address**: Defined by the user, represents the unique identifier of the endpoint.
* **Type**: Dropdown list for selecting the device type for which the endpoint is being created.
* **Subtype**: Based on the selected device type, this dropdown list allows selection of the corresponding subtype.

Once the endpoint has been created for the user-defined device model, the created **endpoint** can be found with its details, giving you the option to edit or delete it as needed.
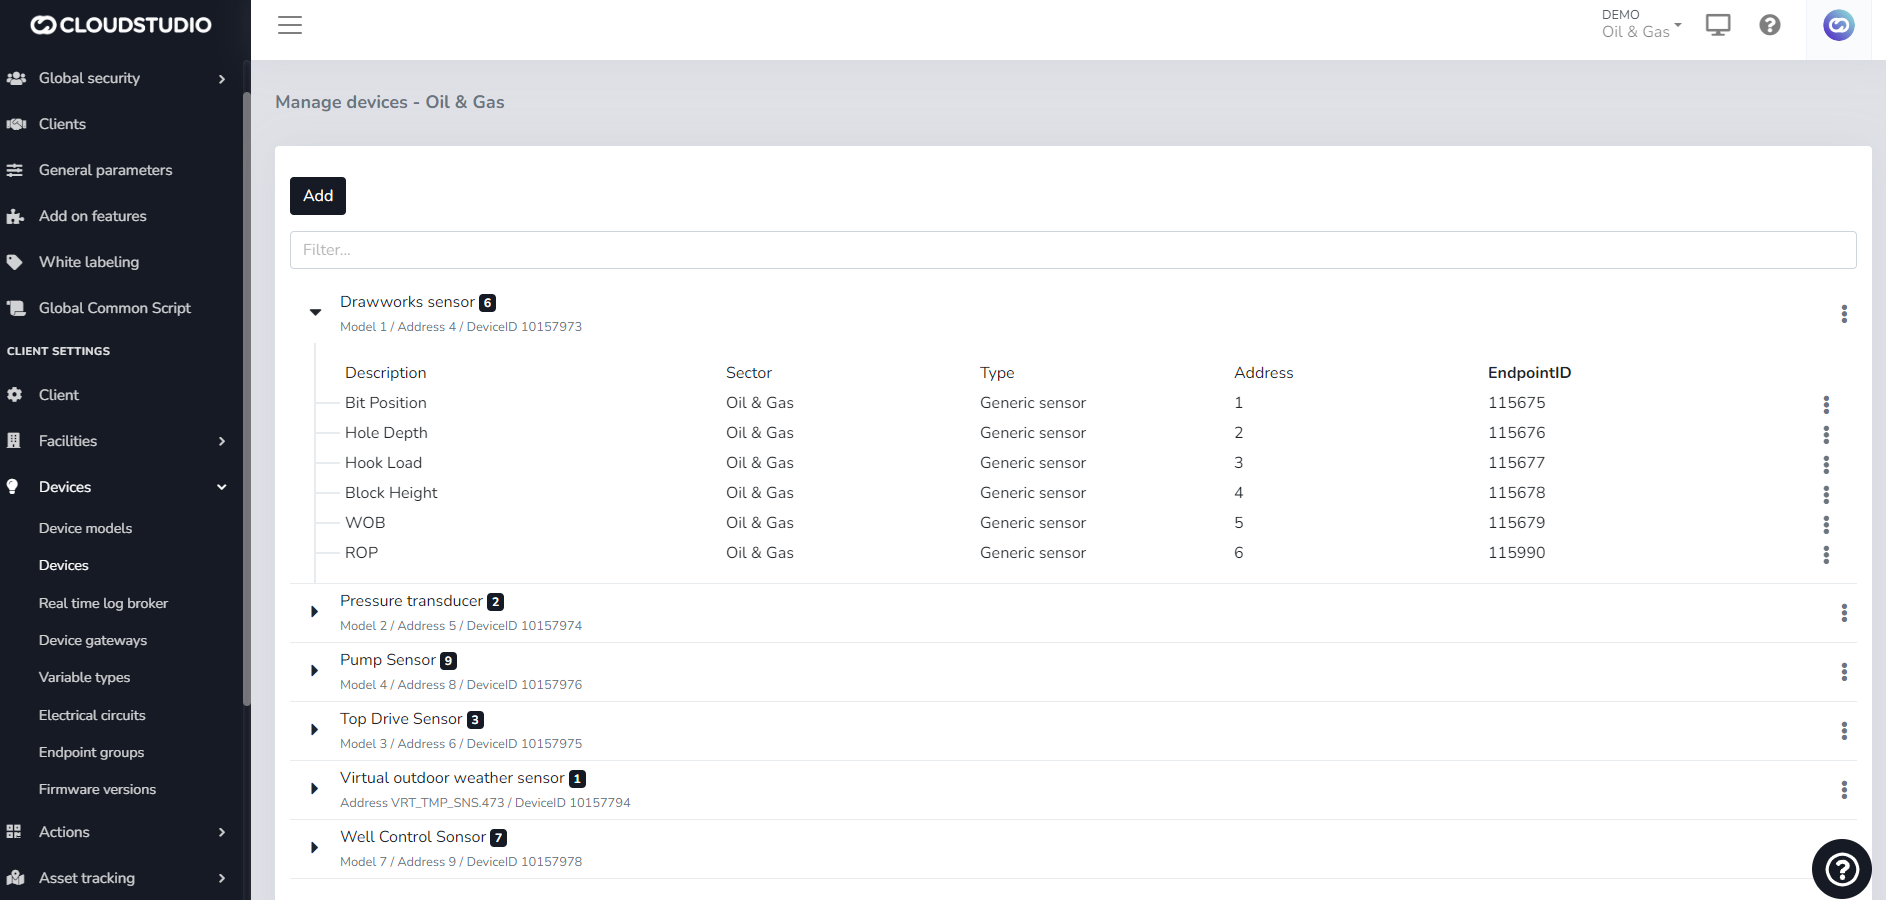
When editing it, you can change the **Description** and, in the case of this **endpoint**, modify the **Endpoint subtype** with which it was originally created.
# Endpoint tagging
Introduction [#introduction]
The goal of this feature is to allow dashboard definitions that can be used across multiple facilities, or even different clients, without the need to create independent copies. To achieve this, endpoint tags, or tags on the devices that contain them, are used to reference endpoints indirectly. The current option (reference to a specific endpoint) is maintained, and the ability to reference endpoints or groups of endpoints indirectly through tags is added.
**The goal is to allow dashboard definitions that can be used across multiple facilities, or even different clients, without the need to create copies that involve additional effort and are then difficult to maintain.**
Selecting an endpoint [#selecting-an-endpoint]
To select an endpoint in a widget, the following methods are available:
* **Individual endpoint selection** (current method). In this case, a specific endpoint is chosen from the list, as is currently done. The widget is bound to the endpoint at dashboard design time, and will always refer to the specified endpoint. This type of selection must not be allowed in global dashboards.
* **Indirect selection by tags** (additional new method). In this case, a list of one or more tags is entered, and the chosen endpoint is determined at runtime on the back-end (when viewing the dashboard) based on the selected facility. The algorithm for choosing the endpoint to use is as follows:
1. First endpoint containing the specified tag, of the appropriate type, belonging to the current facility.
2. First endpoint containing the specified tag, of the appropriate type, belonging to any facility of the current client that the user has permission to access.
3. First endpoint containing the specified tag, of the appropriate type, belonging to any client that the user has permission to access.
**NOTE: When "first endpoint" is mentioned in the paragraphs above, it refers to the first one meeting the condition, sorted by Endpoint ID.**
Example [#example]
1. Dashboard 1 (any facility)
2. Widget 1 - Sensor containing the tag "temperature-sensor".
3. Widget 2 - Sensor containing the tag "humidity-sensor"
4. Widget 3 - Sensor containing the tag "people-counter"
2. Then, in each facility, only the appropriate tags need to be assigned:
* Assign the tag "temperature-sensor" to the temperature sensors in all 3 facilities.
* Assign the tag "humidity-sensor" to the humidity sensors in all 3 facilities.
* Assign the tag "people-counter" to the people counters in all 3 facilities.
By implementing the dashboard this way, the same dashboard can be used in any facility, and the dashboard content will automatically adapt when switching from one facility to another. Additionally, if an endpoint is removed and replaced by another in any facility, the dashboard will continue to work normally as long as the new endpoint receives the appropriate tags.
# Endpoints
*A device can have multiple sensors, functions, or channels. For example, a dimmer capable of controlling four light circuits can be said to have four distinct functions or "channels". When a user interacts with the device, they are actually interacting with one of those channels, not the entire device.*
Each of these functions or channels, in Gear Studio terminology, is called an "**endpoint**". Endpoints have the following characteristics:
* They have a unique identifier within the device.
* They have a sensor type (temperature sensor, light, energy, volume, etc.)
* They have a description used in Gear to identify the endpoint more easily.
* They have an associated sector, indicating where they are installed or where they operate (their location within the facility).
* Depending on the sensor type, they may have other specific characteristics.
Below are some examples of endpoints in commonly used devices.
| Device | Endpoints |
| --------------------------------- | ---------------------------------------------------------------------------------------------------------------------------------------------------------- |
| Temperature and humidity sensor | Endpoint 1: temperatureEndpoint 2: humidity |
| 2-channel dimmer | Endpoint 1: dimmer channel 1Endpoint 2: dimmer channel 2 |
| Electrical consumption meter | Endpoint 1: active and reactive energy meterEndpoint 2: voltage meterEndpoint 3: current meterEndpoint 4: active power meterEndpoint 5: power factor meter |
| 5-in-1 sensor (example: HPA-4416) | Endpoint 1: temperature sensorEndpoint 2: humidity sensorEndpoint 3: light sensorEndpoint 4: motion detectorEndpoint 5: door/window opening detector |
More information [#more-information]
For more information about device and endpoint management, see the following tutorials:
* [Device management](/docs/configuracion-del-cliente/dispositivos-y-endpoints/dispositivos/dispositivos)
* [Endpoint management](/docs/configuracion-del-cliente/dispositivos-y-endpoints/endpoints/crear-un-endpoint)
# Users
**Users** belong to one or more **groups** which have associated **permissions**. This way, groups can be created that have exclusive access to certain sections and not to others. These same permissions can be granted individually to each user.
# Permissions
Cloud Studio has a permissions system that allows establishing, for each user or user group, the set of features they have access to. To access the permissions list, use the Manager permissions module, which allows:
* Granting or denying permissions at the user level.
* Granting or denying permissions at the user group level.
Global [#global]
Access is through Global Configuration > Global Security > Global Permissions. In this section, the following categories are available:
* **General**
* Global administrator permissions: Enables management (creation, editing, or deletion) of Global Dashboards and Scripts for device models, client editing, white-label configuration, and deletion of shared links. Additionally, it is the parent permission of all permissions in the General category, so any user who has this permission will also have access to the others.
* Change account passwords: *Not yet implemented.*
* Manage master tables: Allows managing (creating, editing, or deleting) external alarm sources and maintenance contractors, and viewing access permissions.
* Manage applications: *Not yet implemented.*
* Manage general parameters: Allows modifying the general application parameters.
* Manage alarm types: *Not yet implemented.*
* Manage external addresses: *Not yet implemented.*
* Manage user groups: *Not yet implemented.*
* Manage system users: Allows viewing system users. It is the parent permission for user creation, editing, and deletion.
* Assign user permissions: Allows assigning or unassigning an account from a group and modifying the user's access permissions.
* **Gear**
* **Reports**
* Device catalog: Grants access to the *Device catalog* report.
* Endpoint summary: Grants access to the Manager report, *Endpoint summary*.
* Endpoint catalog: Grants access to the *Endpoint catalog* report.
* Active alarms: Grants access to the *Active alarms* report.
* Alarm history: Grants access to the *Alarm history* report.
* Raw endpoint data: Grants access to the *Raw endpoint data* report.
* Energy consumption (detailed): Grants access to the *Energy consumption (detailed)* report.
* Energy consumption (summary): Grants access to the *Energy consumption (summary)* report.
* Tank status: Grants access to the *Tank status* report.
* User activity log: Grants access to the Manager report, *User activity log*.
* System information: Grants access to the Manager report, *System information*.
* Scheduled tasks: Grants access to the *Scheduled tasks* report.
* Notification queue: Grants access to the *Notification queue*.
* Health checks: Grants access to the *Health checks* reports.
* **Dashboards**
* Global summary: Grants access to Dashboard #1 *Global summary*.
* Facility summary: Grants access to Dashboard #2 *Facility summary*.
* Global energy: Grants access to Dashboard #3 *Global energy*.
* Facility energy: Grants access to Dashboard #4 *Facility energy*.
Client [#client]
Access is through Client Configuration > Security > Permissions. Within, the following are available:
* **General**
* Administrator permissions for this client: Allows management (creation, editing, or deletion) of client device firmware, geozones, address book, users (as well as said user's permissions), client facilities, Endpoint types, and Scripts for device models, and expiring shared links.
* Access all facilities: Inherits the permission to manage each client facility.
* Operate all facilities: Inherits the permission to operate each client facility.
* Access the monitor: Allows accessing the monitor.
* Access configuration: Allows accessing the administrator settings.
* Mobile application: *Not yet implemented.*
* **Facilities**
* **Facility**: These permissions are per facility; the facility name will be shown at this level.
* Administrator: Allows listing client facilities and managing (creating, editing, or deleting) electrical circuits for a client facility.
* Access: Grants access permission to the facility and allows viewing tank details.
* Operate: Grants access to active energy information and linking Google Home accounts.
* **Reports**
* Device catalog: Grants access to the *Device catalog* report.
* Endpoint summary: Grants access to the Manager report, *Endpoint summary*.
* Endpoint catalog: Grants access to the *Endpoint catalog* report.
* Active alarms: Grants access to the *Active alarms* report.
* Alarm history: Grants access to the *Alarm history* report.
* Raw endpoint data: Grants access to the *Raw endpoint data* report.
* Energy consumption (detailed): Grants access to the *Energy consumption (detailed)* report.
* Energy consumption (summary): Grants access to the *Energy consumption (summary)* report.
* Tank status: Grants access to the *Tank status* report.
* **Dashboards**
* Global summary: Grants access to Dashboard #1 *Global summary*.
* Facility summary: Grants access to Dashboard #2 *Facility summary*.
* Global energy: Grants access to Dashboard #3 *Global energy*.
* Facility energy: Grants access to Dashboard #4 *Facility energy*.
* Additional client dashboards will appear here, to allow or restrict access.
| It should be noted that in both divisions, the information in the "Dashboards" section is dynamic. That is, it varies according to the dashboards that exist and are active at the time. At the global level, they are managed by the instance administrator, and at the client level, by users who have creation permissions. |
| ------------------------------------------------------------------------------------------------------------------------------------------------------------------------------------------------------------------------------------------------------------------------------------------------------------------------------ |
# Energy Monitoring
The energy monitoring vertical is designed to provide access to information related to electrical energy usage, including:
* The definition of electrical circuits with their hierarchical representation, phase type, and consumption category.
* The creation of devices for consumption measurement (energy meters).
* The creation of devices for measuring other electrical variables (voltage, current, power, cosine phi, etc.)
* The visualization of this information in dashboards.
* The visualization of real-time information in the device monitor.
* The creation of [alerts](/docs/configuracion-del-cliente/alertas-y-alarmas) when electrical parameters fall outside defined limits.
# Asset Tracking Filters
In Filters, the user can filter the display.
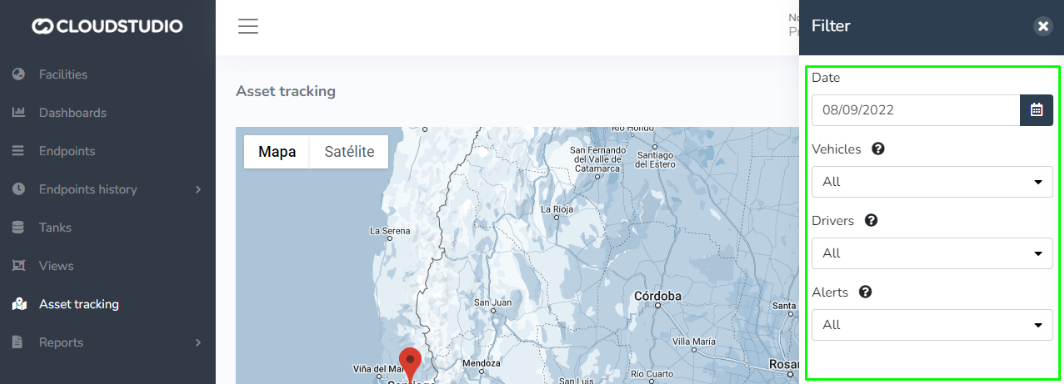
**Important note about filter display:**
Depending on each instance's configuration options, some of these options may not be available.
Button display on the Asset tracking screen.
**Filter/Configurations/share asset tracking.**

Description [#description]
When the screen loads, all selected filters are displayed with the current date.
When no filter is selected and/or no information (Asset) exists, the map centers on the facility.
The "show route" option will be checked for previous dates in the Configurations tab.
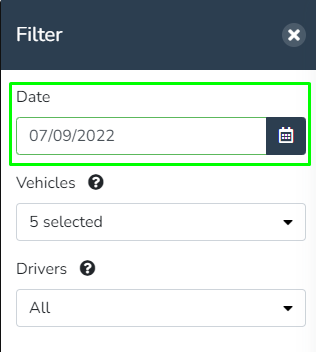
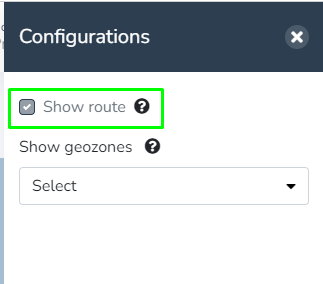
Future dates in the date filter are disabled.

The filter order is as follows:
**Filter tab:**
* Date
* Vehicles
* Drivers
* Alerts

**Alerts:**
The "Alerts" filter has the following functionality:
All "TAGS" associated with alerts for the client's Vehicles will be listed, along with options to show those that have no active alarms or that are not associated with any "TAG".
For example: There are 2 alerts where each has the following associated tags:
* Alert 1 -> Tags: Taxi, Panic, Emergency
* Alert 2 -> Tags: Patrol, Emergency
The alerts filter will show different items according to each client's needs, initially starting with:
**\*No active alarms.**
**\*Alarms without tags.**
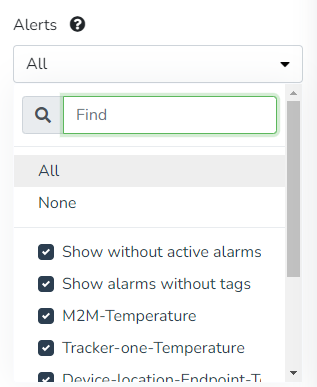
**Note:** This means that for the alerts filter to have more than one item in the list, tags must be configured for each alert that should be displayed in the "Alerts" filter.
**This alert TAG configuration can also be done via Scripting with the current features.**
**Configuration tab:**
* Show Route
* Geozones
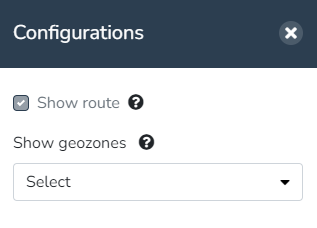
**Modifiable default filters.**
* Date
* Vehicles

**Route tracking:** In this option, the user can view the asset's route. The route start and end points (A, B) can also be seen.

**Route tracking start and end:** In this option, the user can view the asset's route. The user can see the start and end points of the filtered vehicles' routes (A, B).
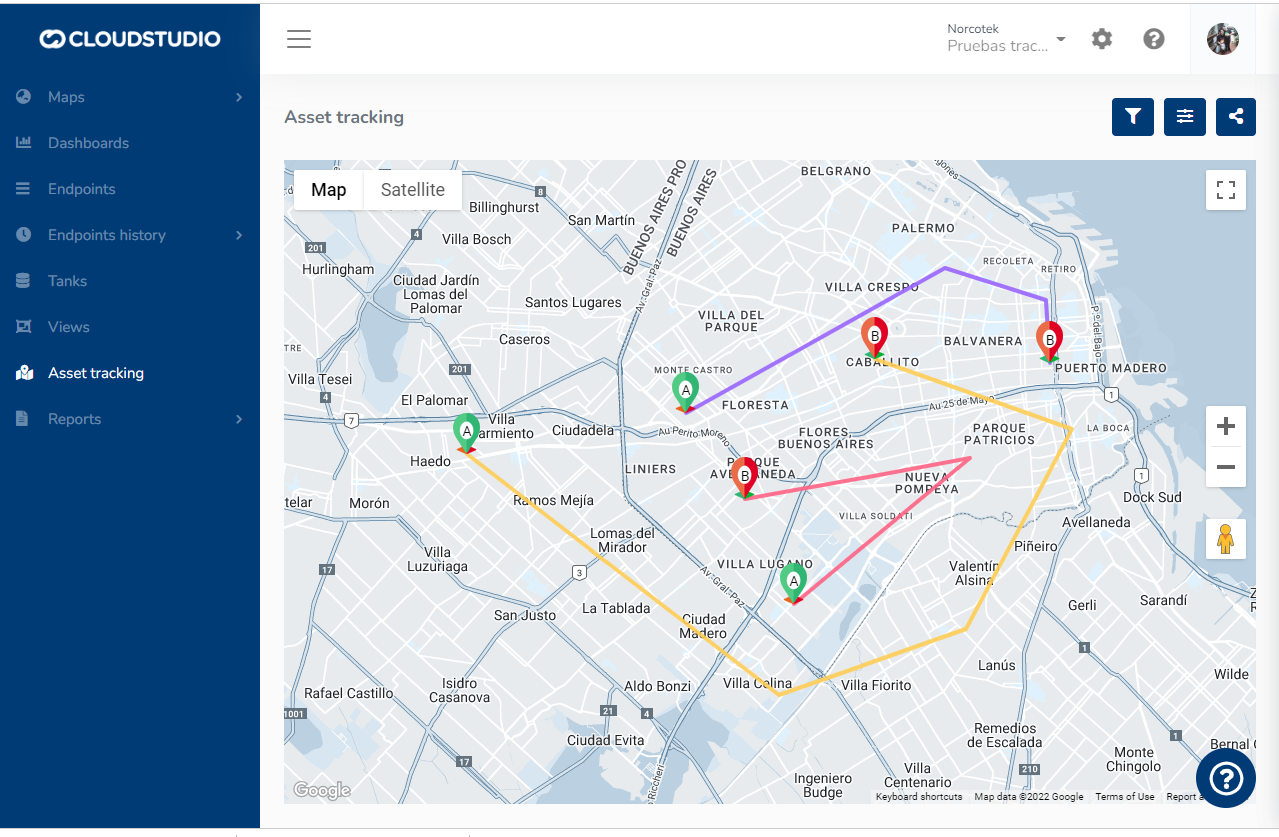
# Asset Tracking
Introduction [#introduction]
Asset tracking allows you to access real-time data from your fleet using detailed analytics that can be shared with your employees. This means you will have full confidence that your resources are being well utilized and distributed.
On the Asset Tracking screen, you can track vehicles (in real time or with a deferred date). The screen is dynamic, allowing the client to show and hide different filters according to each client's needs.
# Global Permissions
Cloud Studio has a global permissions system that allows establishing, for each user or group of users, the set of functionalities they have access to at the instance level. To access the permissions list, the Manager's global permissions module is used, which allows:
* Allowing or denying permissions at the global user level.
* Allowing or denying permissions at the global user group level.
Global [#global]
Access is from Global Configuration > Global Security > Global Permissions. In this section, you will have access to the following categories:
* **General**
* Global administrator permissions: Enables management (creation, editing, or deletion) of Global Dashboards and Scripts for device models, client editing, white labeling configuration, and deletion of shared links. It is also the parent permission of all permissions in the General category, so any user who has this permission will also have access to the others.
* Change account passwords: *Not yet implemented.*
* Manage master tables: Allows managing (creating, editing, or deleting) external alarm sources and maintenance contractors, and viewing access permissions.
* Manage applications: *Not yet implemented.*
* Manage general parameters: Allows modifying the application's general parameters.
* Manage alarm types: *Not yet implemented.*
* Manage external addresses: *Not yet implemented.*
* Manage user groups: *Not yet implemented.*
* Manage system users: Allows viewing system users. It is the parent permission for user creation, editing, and deletion.
* Assign user permissions: Allows assigning or unassigning an account from a group and modifying user access permissions.
* **Gear**
* **Reports**
* Device catalog: Grants access to the *Device catalog* report.
* Endpoint summary: Grants access to the Manager's *Endpoint summary* report.
* Endpoint catalog: Grants access to the *Endpoint catalog* report.
* Active alarms: Grants access to the *Active alarms* report.
* Alarm history: Grants access to the *Alarm history* report.
* Endpoint raw data: Grants access to the *Endpoint raw data* report.
* Energy consumption (detailed): Grants access to the *Energy consumption (detailed)* report.
* Energy consumption (summary): Grants access to the *Energy consumption (summary)* report.
* Tank status: Grants access to the *Tank status* report.
* User activity log: Grants access to the Manager's *User activity log* report.
* System information: Grants access to the Manager's *System information* report.
* Scheduled tasks: Grants access to the *Scheduled tasks* report.
* Notification queue: Grants access to the *Notification queue*.
* Health checks: Grants access to the *Health checks* reports.
* **Dashboards**
* Global summary: Grants access to Dashboard #1 *Global summary*.
* Facility summary: Grants access to Dashboard #2 *Facility summary*.
* Global energy: Grants access to Dashboard #3 *Global energy*.
* Facility energy: Grants access to Dashboard #4 *Facility energy.*
# Global Users
**Global users** can have access to configuration options at the instance and client level. They can also belong to one or more **global groups** that have associated **global permissions**. This way, groups can be created that have exclusive access to certain sections. These same permissions can be granted individually to each user.
# Endpoint
The endpoint object represents an endpoint within a device installed in the platform. Endpoints are normally accessed through the **endpoints** property of the [device](/docs/herramientas-low-code-scripting/referencia-de-objetos-disponibles-para-scripting/device) object.
Properties [#properties]
\### address (string) The address property represents the address of the endpoint, as text.
**Examples**
This example shows the address of the first endpoint of a device, through the log console.
```javascript
env.log('Endoint address: ', myDevice.endpoints.byIndex(0).address);
```
\### description (string) The description property represents the description of the endpoint.
**Examples**
This example shows the description of the first endpoint of a device, through the log console.
```javascript
env.log('Endoint description: ', myDevice.endpoints.byIndex(0).description);
```
\### endpointType (int enum)
The endpointType property indicates the endpoint type. The possible values for this property are as follows:
* **endpointType.appliance (1)**: the endpoint is of on/off type, meaning it can be turned on and off, such as a lamp without brightness control, a valve, a water pump, etc.
* **endpointType.dimmer (2)**: the endpoint can be turned on and off, but its brightness can also be controlled.
* **endpointType.lightSensor (4)**: the endpoint is a light sensor.
* **endpointType.colorDimmer (7)**: the endpoint is capable of controlling chromatic light (RGB or similar).
* **endpointType.closureController (10)**: the endpoint is a valve, curtain, or closure controller that can be opened, closed, and positioned.
* **endpointType.curtainController (10)**: equivalent to endpointType.closureController. This value exists for backward compatibility.
* **endpointType.thermostat (12)**: the endpoint is a thermostat.
* **endpointType.camera (13)**: the endpoint is a camera.
* **endpointType.temperatureSensor (14)**: the endpoint is a temperature sensor.
* **endpointType.energyMeter (17)**: the endpoint is an energy meter.
* **endpointType.doorLock (19)**: the endpoint is an electronic lock.
* **endpointType.iasSensor (20)**: the endpoint is an intrusion, presence, motion, or any other security sensor that has a discrete number of states.
* **endpointType.locationTracker (22)**: the endpoint is a position tracker (GPS).
* **endpointType.humiditySensor (23)**: the endpoint is a humidity sensor.
* **endpointType.volumeSensor (24)**: the endpoint is a volume sensor.
* **endpointType.weightSensor (25)**: the endpoint is a weight sensor.
* **endpointType.pressureSensor (26)**: the endpoint is a pressure sensor.
* **endpointType.flowSensor (27)**: the endpoint is a flow sensor for liquids or gases, meaning the flow unit is a volume.
* **endpointType.genericSensor (28)**: the endpoint is a generic scalar sensor, for which units can be chosen arbitrarily.
* **endpointType.genericFlowSensor (29)**: the endpoint is a generic flow sensor of some other type, for which units can be chosen arbitrarily.
* **endpointType.voltageSensor (30)**: the endpoint is a voltage sensor (voltmeter).
* **endpointType.currentSensor (31)**: the endpoint is a current sensor (ammeter).
* **endpointType.activePowerSensor (32)**: the endpoint is an active power sensor.
* **endpointType.reactivePowerSensor (33)**: the endpoint is a reactive power sensor.
* **endpointType.apparentPowerSensor (34)**: the endpoint is an apparent power sensor.
* **endpointType.cosPhiSensor (35)**: the endpoint is a power factor sensor.
* **endpointType.frequencyMeter (36)**: the endpoint is a frequency sensor (frequency meter).
* **endpointType.runTimeMeter (37)**: the endpoint is a usage time meter (hour meter / run time meter).
* **endpointType.ppmConcentrationSensor (38)**: the endpoint is a concentration sensor, expressed in parts per million (ppm).
* **endpointType.mvConcentrationSensor (39)**: the endpoint is a concentration sensor, expressed in mass per volume units.
* **endpointType.airQualityIndexSensor**: the endpoint is an air quality sensor ([AQI](https://en.wikipedia.org/wiki/Air_quality_index)).
* **endpointType.peopleFlowSensor (41)**: the endpoint is a people flow sensor, meaning it can detect the entry and/or exit of people.
* **endpointType.peopleCounter (42)**: the endpoint is a people count sensor, meaning it can detect how many people are present in a given area.
* **endpointType.textContainer (43)**: the endpoint is a text sensor, meaning it can store any text up to 255 characters in length.
**Examples**
This example shows the endpoint type of the first endpoint of a device, through the log console.
```javascript
env.log('Endoint type: ', myDevice.endpoints.byIndex(0).endpointType);
```
\### endpointSubType (int enum)
The endpointSubType property indicates the endpoint subtype. The subtype can only be specified for certain endpoint types, as indicated below. The possible values for this property are as follows:
For endpoints of type **endpointType.appliance**:
* **applianceEndpointSubType.lamp (1)**: indicates that the endpoint is a lamp.
* **applianceEndpointSubType.valve (2)**: indicates that the endpoint is a valve.
* **applianceEndpointSubType.socket (3)**: indicates that the endpoint is a socket or plug-in switch.
* **applianceEndpointSubType.pump (4)**: indicates that the endpoint is a water or other liquid pump.
* **applianceEndpointSubType.sprinkler (5)**: indicates that the endpoint is a sprinkler or irrigation circuit.
* **applianceEndpointSubType.fan (6)**: indicates that the endpoint is a fan.
For endpoints of type **endpointType.iasSensor**:
* **iasEndpointSubType.motionSensor (1)**: indicates that the endpoint is a motion sensor.
* **iasEndpointSubType.doorSensor (2)**: indicates that the endpoint is a door or window sensor.
* **iasEndpointSubType.floodSensor (3)**: indicates that the endpoint is a flood detector.
* **iasEndpointSubType.presenceSensor (4)**: indicates that the endpoint is a presence sensor.
* **iasEndpointSubType.alarmInput (5)**: indicates that the endpoint is an alarm sensor.
* **iasEndpointSubType.coSensor (6)**: indicates that the endpoint is a carbon monoxide sensor.
* **iasEndpointSubType.co2Sensor (7)**: indicates that the endpoint is a carbon dioxide sensor.
* **iasEndpointSubType.gasSensor (8)**: indicates that the endpoint is a sensor for other types of gases.
* **iasEndpointSubType.smokeDetector (9)**: indicates that the endpoint is a smoke sensor.
* **iasEndpointSubType.parkingSensor (10)**: indicates that the endpoint is a vehicular parking sensor.
For endpoints of type **endpointType.ppmConcentrationSensor**:
* **ppmConcentrationSensorSubType.ammonia (1)**: indicates that the endpoint is an ammonia sensor.
* **ppmConcentrationSensorSubType.Ozone (2)**: indicates that the endpoint is an ozone sensor.
* **ppmConcentrationSensorSubType.nitricOxide (3)**: indicates that the endpoint is a nitric oxide sensor.
* **ppmConcentrationSensorSubType.nitrogenDioxide (4)**: indicates that the endpoint is a nitrogen dioxide sensor.
* **ppmConcentrationSensorSubType.sulfurDioxide (5)**: indicates that the endpoint is a sulfur dioxide sensor.
* **ppmConcentrationSensorSubType.carbonMonoxide (6)**: indicates that the endpoint is a carbon monoxide sensor.
* **ppmConcentrationSensorSubType.carbonDioxide (7)**: indicates that the endpoint is a carbon dioxide sensor.
* **ppmConcentrationSensorSubType.voc (8)**: indicates that the endpoint is a volatile organic compounds sensor.
For endpoints of type **endpointType.mvConcentrationSensor**:
* **mvConcentrationSensorSubType.lead (1)**: indicates that the endpoint is a lead sensor.
* **mvConcentrationSensorSubType.pm2\_5 (2)**: indicates that the endpoint detects particulate matter up to 2.5 microns.
* **mvConcentrationSensorSubType.pm10 (3)**: indicates that the endpoint detects particulate matter up to 10 microns.
**Examples**
This example shows the endpoint subtype of the first endpoint of a device, through the log console.
```javascript
env.log('Endoint subtype: ', myDevice.endpoints.byIndex(0).endpointSubType);
```
\### accessType (int enum)
The accessType property indicates the type of access applied to the endpoint. The possible values for this property are as follows:
* **endpointAccessType.readOnly (1)**: indicates that the value associated with the endpoint cannot be modified manually.
* **endpointAccessType.readWrite (2)**: indicates that the value associated with the endpoint can be modified manually. When doing so, the new value will be recorded immediately, without interacting with the device.
* **endpointAccessType.readWriteCommand (3)**: indicates that the value associated with the endpoint can be modified manually. When doing so, a command will be sent to the device to change the value. It is the device's responsibility to report the new value upon accepting the command.
**Examples**
This example shows the accessType property value of the first endpoint of a device, through the log console.
```javascript
env.log('Endoint access type: ', myDevice.endpoints.byIndex(0).accessType);
```
\### operationSecurityLevel (int enum)
The operationSecurityLevel property indicates the security level associated with the endpoint operation. The possible values for this property are as follows:
* **endpointOperationSecurityLevel.simple (1)**: indicates that the endpoint can be operated directly. No warning message or user confirmation is required. In user interfaces, when operating the endpoint, the corresponding command is sent immediately.
* **endpointOperationSecurityLevel.medium (2)**: indicates that to operate the endpoint, a confirmation message must first be displayed, along with the corresponding options to accept or cancel the operation. The message is configurable at the individual endpoint level, but is optional. If no message is specified, a default confirmation message will be used.
* **endpointOperationSecurityLevel.high (3)**: indicates that to operate the endpoint, the confirmation corresponding to the **medium** security level is required, but additionally the user is asked to re-enter their password.
**Examples**
This example shows the operationSecurityLevel property value of the first endpoint of a device, through the log console.
```javascript
env.log('Endoint access type: ', myDevice.endpoints.byIndex(0).operationSecurityLevel);
```
\### tags (array) The tags property indicates the set of tags applied to the endpoint. This property is an array of strings, each of which indicates a tag.
**Examples**
This example shows the list of tags of the first endpoint of a device.
```javascript
myDevice.endpoints.byIndex(0).tags.forEach(item => env.log(item));
```
Methods [#methods]
\### getCurrentState() The getCurrentState() method allows obtaining the current state of the endpoint.
**Parameters**
This method has no parameters.
**Result**
The value returned by the method is a [DataPoint](/docs/herramientas-low-code-scripting/referencia-de-objetos-disponibles-para-scripting/datapoint) object that represents the current state of the endpoint. If the current state of the endpoint has not yet been established, the returned value is null.
**Example 1**
This example shows the current temperature at an endpoint.
```javascript
env.log(myDevice.endpoints.byIndex(0).getCurrentState().value);
```
\### updateTemperatureSensorStatus(temperature \[, utcDateTime]) The updateTemperatureSensorStatus() method allows updating the value of a temperature sensor, optionally specifying the date and time of the update.
**Parameters**
* **temperature** (double): this parameter indicates the measured temperature, in degrees Celsius.
* **utcDateTime** (date, optional): this parameter indicates the UTC date and time of the sample. If the parameter is omitted, the current date and time will be assumed.
**Example 1**
This example shows how to report a temperature of 32 degrees Celsius on the first endpoint of a device.
```javascript
myDevice.endpoints.byIndex(0).updateTemperatureSensorStatus(32);
```
\### updateHumiditySensorStatus(humidity \[, utcDateTime]) The updateHumiditySensorStatus() method allows updating the value of a humidity sensor, optionally specifying the date and time of the update.
**Parameters**
* **humidity** (double): this parameter indicates the measured humidity, as a percentage.
* **utcDateTime** (date, optional): this parameter indicates the UTC date and time of the sample. If the parameter is omitted, the current date and time will be assumed.
**Example 1**
This example shows how to report a humidity of 47% on the first endpoint of a device.
```javascript
myDevice.endpoints.byIndex(0).updateHumiditySensorStatus(47);
```
\### updateLightSensorStatus(lightIntensity \[, utcDateTime]) The updateLightSensorStatus() method allows updating the value of a light sensor, optionally specifying the date and time of the update.
**Parameters**
* **lightIntensity** (double): this parameter indicates the measured light intensity, expressed in lux.
* **utcDateTime** (date, optional): this parameter indicates the UTC date and time of the sample. If the parameter is omitted, the current date and time will be assumed.
**Example 1**
This example shows how to report a light intensity of 7550 lux on the first endpoint of a device.
```javascript
myDevice.endpoints.byIndex(0).updateLightSensorStatus(7550);
```
\### updateWeightSensorStatus(weightGrams \[, utcDateTime]) The updateWeightSensorStatus() method allows updating the value of a weight sensor, optionally specifying the date and time of the update.
**Parameters**
* **weightGrams** (double): this parameter indicates the measured weight, in grams.
* **utcDateTime** (date, optional): this parameter indicates the UTC date and time of the sample. If the parameter is omitted, the current date and time will be assumed.
**Example 1**
This example shows how to report a weight of 72.5 kg on the first endpoint of a device.
```javascript
myDevice.endpoints.byIndex(0).updateWeightSensorStatus(72500);
```
\### updateVolumeSensorStatus(volumeLiters \[, utcDateTime]) The updateVolumeSensorStatus() method allows updating the value of a volume sensor, optionally specifying the date and time of the update.
**Parameters**
* **volumeLiters** (double): this parameter indicates the measured volume, in liters.
* **utcDateTime** (date, optional): this parameter indicates the UTC date and time of the sample. If the parameter is omitted, the current date and time will be assumed.
**Example 1**
This example shows how to report a volume of 15,000 liters on the first endpoint of a device.
```javascript
myDevice.endpoints.byIndex(0).updateVolumeSensorStatus(15000);
```
\### updatePressureSensorStatus(pressurePascals \[, utcDateTime]) The updatePressureSensorStatus() method allows updating the value of a pressure sensor, optionally specifying the date and time of the update.
**Parameters**
* **pressurePascals** (double): this parameter indicates the measured pressure, in Pascals.
* **utcDateTime** (date, optional): this parameter indicates the UTC date and time of the sample. If the parameter is omitted, the current date and time will be assumed.
**Example 1**
This example shows how to report a pressure of 1013 hectopascals (101300 pascals) on the first endpoint of a device.
```javascript
myDevice.endpoints.byIndex(0).updatePressureSensorStatus(101300);
```
\### updateIASSensorStatus(state \[, utcDateTime]) The updateIASSensorStatus() method allows updating the state of an IAS sensor, optionally specifying the date and time of the update.
**Parameters**
* **state** (int): this parameter indicates the sensor state, among the following:
* **iasSensorState.Unknown (0)**: Unknown. The sensor state is not known.
* **iasSensorState.idle (1)**: Idle. The sensor registers no activity.
* **iasSensorState.active (2)**: Active. The sensor registers activity.
* **iasSensorState.cleaning (3)**: Cleaning. The space associated with the sensor is being cleaned.
* **iasSensorState.cleaningNeeded (4)**: Cleaning needed. The space associated with the sensor needs cleaning.
* **iasSensorState.testMode (5)**: Test mode. The sensor is currently in test mode.
* **iasSensorState.tampered (6)**: The sensor has been tampered with and may not be functioning correctly.
* **iasSensorState.maintenanceNeeded (7)**: The sensor requires maintenance and may not be functioning correctly.
* **iasSensorState.entering (8)**: The sensor detects that a vehicle is entering the parking space.
* **iasSensorState.leaving(9)**: The sensor detects that a vehicle is leaving the parking space.
* **iasSensorState.violation(10)**: The sensor reports that the parking space is in violation.
* **utcDateTime** (date, optional): this parameter indicates the UTC date and time of the sample. If the parameter is omitted, the current date and time will be assumed.
**Example 1**
This example shows how to report the idle state on the first endpoint of a device.
```javascript
myDevice.endpoints.byIndex(0).updateIASSensorStatus(1);
```
\### updateVoltageSensorStatus(voltageVolts \[, utcDateTime]) The updateVoltageSensorStatus() method allows updating the state of a voltage sensor, optionally specifying the date and time of the update.
**Parameters**
* **voltageVolts** (double): this parameter indicates the measured voltage, in Volts.
* **utcDateTime** (date, optional): this parameter indicates the UTC date and time of the sample. If the parameter is omitted, the current date and time will be assumed.
**Example 1**
This example shows how to report a measurement of 235V on the first endpoint of a device.
```javascript
myDevice.endpoints.byIndex(0).updateVoltageSensorStatus(235);
```
\### updateCurrentSensorStatus(currentAmps \[, utcDateTime]) The updateCurrentSensorStatus() method allows updating the state of a current sensor, optionally specifying the date and time of the update.
**Parameters**
* **currentAmps** (double): this parameter indicates the measured current, in Amperes.
* **utcDateTime** (date, optional): this parameter indicates the UTC date and time of the sample. If the parameter is omitted, the current date and time will be assumed.
**Example 1**
This example shows how to report a measurement of 19.5A on the first endpoint of a device.
```javascript
myDevice.endpoints.byIndex(0).updateCurrentSensorStatus(19.5);
```
\### updateActivePowerSensorStatus(activePowerWatts \[, utcDateTime]) The updateActivePowerSensorStatus() method allows updating the state of an active power sensor, optionally specifying the date and time of the update.
**Parameters**
* **activePowerWatts** (double): this parameter indicates the measured active power, in Watts.
* **utcDateTime** (date, optional): this parameter indicates the UTC date and time of the sample. If the parameter is omitted, the current date and time will be assumed.
**Example 1**
This example shows how to report a measurement of 1250W on the first endpoint of a device.
```javascript
myDevice.endpoints.byIndex(0).updateActivePowerSensorStatus(1250);
```
\### updateReactivePowerSensorStatus(reactivePowerVAR \[, utcDateTime]) The updateReactivePowerSensorStatus() method allows updating the state of a reactive power sensor, optionally specifying the date and time of the update.
**Parameters**
* **reactivePowerVAR** (double): this parameter indicates the measured reactive power, in Volt-Ampere-Reactive (VAR).
* **utcDateTime** (date, optional): this parameter indicates the UTC date and time of the sample. If the parameter is omitted, the current date and time will be assumed.
**Example 1**
This example shows how to report a measurement of 750VAR on the first endpoint of a device.
```javascript
myDevice.endpoints.byIndex(0).updateReactivePowerSensorStatus(750);
```
\### updateApparentPowerSensorStatus(apparentPowerVA \[, utcDateTime]) The updateApparentPowerSensorStatus() method allows updating the state of an apparent power sensor, optionally specifying the date and time of the update.
**Parameters**
* **apparentPowerVA** (double): this parameter indicates the measured apparent power, in Volt-Ampere (VA).
* **utcDateTime** (date, optional): this parameter indicates the UTC date and time of the sample. If the parameter is omitted, the current date and time will be assumed.
**Example 1**
This example shows how to report a measurement of 1300VA on the first endpoint of a device.
```javascript
myDevice.endpoints.byIndex(0).updateApparentPowerSensorStatus(1300);
```
\### updateCosPhiSensorStatus(cosPhi \[, utcDateTime]) The updateCosPhiSensorStatus() method allows updating the state of a cosine phi (power factor) sensor, optionally specifying the date and time of the update.
**Parameters**
* **cosPhi** (double): this parameter indicates the measured cosine phi.
* **utcDateTime** (date, optional): this parameter indicates the UTC date and time of the sample. If the parameter is omitted, the current date and time will be assumed.
**Example 1**
This example shows how to report a cosine phi measurement of 0.98 on the first endpoint of a device.
```javascript
myDevice.endpoints.byIndex(0).updateCosPhiSensorStatus(0.98);
```
\### updateFrequencySensorStatus(frequencyHz \[, utcDateTime]) The updateFrequencySensorStatus() method allows updating the state of a frequency sensor (frequency meter), optionally specifying the date and time of the update.
**Parameters**
* **frequencyHz** (double): this parameter indicates the measured frequency, in Hz.
* **utcDateTime** (date, optional): this parameter indicates the UTC date and time of the sample. If the parameter is omitted, the current date and time will be assumed.
**Example 1**
This example shows how to report a frequency measurement of 60Hz on the first endpoint of a device.
```javascript
myDevice.endpoints.byIndex(0).updateFrequencySensorStatus(60);
```
\### updateGenericSensorStatus(value \[, utcDateTime]) The updateGenericSensorStatus() method allows updating the state of a generic scalar sensor, optionally specifying the date and time of the update.
**Parameters**
* **value** (double): this parameter indicates the measured value, in the units selected for the endpoint.
* **utcDateTime** (date, optional): this parameter indicates the UTC date and time of the sample. If the parameter is omitted, the current date and time will be assumed.
**Example 1**
This example shows how to report a measurement of value 1234 on the first endpoint of a device.
```javascript
myDevice.endpoints.byIndex(0).updateGenericSensorStatus(1234);
```
\### updatePpmConcentrationSensorStatus(value \[, utcDateTime]) The updatePpmConcentrationSensorStatus() method allows updating the state of a concentration measurement sensor, optionally specifying the date and time of the update. This function is only valid for concentration sensors expressed as parts per million (ppm).
**Parameters**
* **value** (double): this parameter indicates the measured value, in parts per million (ppm).
* **utcDateTime** (date, optional): this parameter indicates the UTC date and time of the sample. If the parameter is omitted, the current date and time will be assumed.
**Example 1**
This example shows how to report a measurement of value 1234 ppm on the first endpoint of a device.
```javascript
myDevice.endpoints.byIndex(0).updatePpmConcentrationSensorStatus(1234);
```
\### updateMvConcentrationSensorStatus(value \[, utcDateTime]) The updateMvConcentrationSensorStatus() method allows updating the state of a concentration measurement sensor, optionally specifying the date and time of the update. This function is only valid for concentration sensors expressed as mass per volume ratio (m/v).
**Parameters**
* **value** (double): this parameter indicates the measured value, in micrograms per cubic meter (ug/m3).
* **utcDateTime** (date, optional): this parameter indicates the UTC date and time of the sample. If the parameter is omitted, the current date and time will be assumed.
**Example 1**
This example shows how to report a measurement of value 1234 ug/m3 on the first endpoint of a device.
```javascript
myDevice.endpoints.byIndex(0).updateMvConcentrationSensorStatus(1234);
```
\### updateAqiSensorStatus(value \[, utcDateTime]) The updateAqiSensorStatus() method allows updating the state of an air quality sensor, optionally specifying the date and time of the update.
**Parameters**
* **value** (double): this parameter indicates the measured value, according to the [AQI scale](https://en.wikipedia.org/wiki/Air_quality_index) (0-500).
* **utcDateTime** (date, optional): this parameter indicates the UTC date and time of the sample. If the parameter is omitted, the current date and time will be assumed.
**Example 1**
This example shows how to report a measurement of value 123 on the first endpoint of a device.
```javascript
myDevice.endpoints.byIndex(0).updateAqiSensorStatus(123);
```
\### updateApplianceStatus(turnedOn\[, utcDateTime]) The updateApplianceStatus() method allows updating the state of an on-off type endpoint (appliance), optionally specifying the date and time of the update.
**Parameters**
* **turnedOn** (boolean): this parameter indicates whether the endpoint is turned on (true) or off (false).
* **utcDateTime** (date, optional): this parameter indicates the UTC date and time of the update. If the parameter is omitted, the current date and time will be assumed.
**Example 1**
This example shows how to report that the first endpoint of a device is turned on.
```javascript
myDevice.endpoints.byIndex(0).updateApplianceStatus(true);
```
\### updateDimmerStatus(turnedOn, level\[, utcDateTime]) The updateDimmerStatus() method allows updating the state of a dimmer type endpoint, optionally specifying the date and time of the update.
**Parameters**
* **turnedOn** (boolean): this parameter indicates whether the endpoint is turned on (true) or off (false).
* **level** (int): this parameter indicates the brightness level, between 1% (minimum) and 100% (maximum), regardless of whether the dimmer is turned on or off.
* **utcDateTime** (date, optional): this parameter indicates the UTC date and time of the update. If the parameter is omitted, the current date and time will be assumed.
**Example 1**
This example shows how to report that the first endpoint of a device is turned on at 75%.
```javascript
myDevice.endpoints.byIndex(0).updateDimmerStatus(true, 75);
```
\### updateClosureControllerStatus(moving, position\[, utcDateTime]) The updateClosureControllerStatus() method allows updating the state of a closure type endpoint (curtain, motorized gate, etc.), optionally specifying the date and time of the update.
**Parameters**
* **moving** (boolean): this parameter indicates whether the closure is currently in motion (opening or closing). The value **true** indicates it is moving, while the value **false** indicates it is stopped.
* **position** (int): this parameter indicates the current position, from 0% (closed) to 100% (open).
* **utcDateTime** (date, optional): this parameter indicates the UTC date and time of the update. If the parameter is omitted, the current date and time will be assumed.
**Example 1**
This example shows how to report that the first endpoint of a device is stopped in the "open" position.
```javascript
myDevice.endpoints.byIndex(0).updateClosureControllerStatus(false, 100);
```
\### updateHVACStatus(mode, fanMode, setpoint, ambientTemperature\[, utcDateTime]) The updateHVACStatus() method allows updating the state of an HVAC device, such as a thermostat, optionally specifying the date and time of the update.
**Parameters**
* **mode** (enum): current mode of the device:
* **thermostatMode.off = 1**: the device is off.
* **thermostatMode.auto = 2**: the device is on in automatic mode.
* **thermostatMode.heat = 3**: the device is on in heat mode.
* **thermostatMode.cool = 4**: the device is on in cool mode.
* **thermostatMode.dry = 5**: the device is on in dehumidification mode.
* **thermostatMode.fan = 6**: the device is on in fan mode.
* **fanMode** (enum): indicates the current fan mode:
* **thermostatFanMode.auto = 1**: the fan is in auto mode.
* **thermostatFanMode.low = 2**: the fan is at low speed.
* **thermostatFanMode.mid = 3**: the fan is at medium speed.
* **thermostatFanMode.high = 4**: the fan is at high speed.
* **setpoint** (number): indicates the desired temperature value, in degrees Celsius.
* **ambientTemperature** (number): indicates the ambient temperature value, in degrees Celsius.
* **utcDateTime** (date, optional): this parameter indicates the UTC date and time of the update. If the parameter is omitted, the current date and time will be assumed.
**Example 1**
This example shows how to report that the first endpoint of a device is on in cool mode, with the fan at automatic speed, a desired temperature of 25 degrees Celsius, and an ambient temperature of 26 degrees Celsius.
```javascript
myDevice.endpoints.byIndex(0).updateHVACStatus(thermostatMode.cool, thermostatFanMode.auto, 25, 27);
```
\### updateLocationTrackerStatus(latitude, longitude \[, altitude, flags, utcDateTime]) The updateLocationTrackerStatus() method allows updating the state of a location tracker, optionally specifying the date and time of the update.
**Parameters**
* **latitude** (double): Indicates the latitude. The value must be between -90 and 90. The decimal separator is a period.
* **longitude** (double): Indicates the longitude. The value must be between -180 and 180. The decimal separator is a period.
* **altitude** (double): Indicates the altitude. Numeric value. The decimal separator is a period.
* **flags** (int, optional): Indicates extra information for the position. It is an integer value representing a bitwise sum. The available states are:
* **locationTrackerFlags.none (0):** Nothing special
* **locationTrackerFlags.moving (1):** The sensor position is changing
* **locationTrackerFlags.noPosition (2):** The sensor cannot acquire the position
* **locationTrackerFlags.malfunctioning (4):** The sensor is not functioning correctly. The reported position may be incorrect
* **locationTrackerFlags.lowPrecision (8):** The reported position has low precision
Values can be combined through the OR operation. For example, to indicate that the reported position has low precision and the position is changing, use (**8 OR 1**) = **9**.
* **utcDateTime** (date, optional): this parameter indicates the UTC date and time of the sample. If the parameter is omitted, the current date and time will be assumed.
**Example 1**
This example shows how to report a location with latitude -13.9957594 and longitude 48.933938 on the first endpoint of a device.
```javascript
myDevice.endpoints.byIndex(0).updateLocationTrackerStatus(-13.9957594, 48.933938);
```
**Example 2**
This example shows how to report a location with latitude -13.9957594, longitude 48.933938, and altitude 123 on the first endpoint of a device.
```javascript
myDevice.endpoints.byIndex(0).updateLocationTrackerStatus(-13.9957594, 48.933938, 123);
```
**Example 3**
This example shows how to report a location with latitude -13.9957594, longitude 48.933938, altitude 123, and flag 1 (the sensor position is changing) on the first endpoint of a device.
```javascript
myDevice.endpoints.byIndex(0).updateLocationTrackerStatus(-13.9957594, 48.933938, 123, locationTrackerFlags.moving);
```
**Example 4**
This example shows how to report a location with latitude -13.9957594, longitude 48.933938, and a specific timestamp on the first endpoint of a device.
```javascript
myDevice.endpoints.byIndex(0).updateLocationTrackerStatus(-13.9957594, 48.933938, 0, locationTrackerFlags.none, '2021-02-23T14:55:03');
```
\### updateEnergySensorValueSummation(activeEnergySummationWh, reactiveEnergySummationVARh \[, utcDateTime]) The updateEnergySensorValueSummation() method allows updating the active and reactive energy summation of an energy sensor, optionally specifying the date and time of the update.
**Parameters**
* **activeEnergySummationWh** (double): Indicates the current value of the active energy summation, expressed in Wh.
* **reactiveEnergySummationVARh** (double): Indicates the current value of the reactive energy summation, expressed in VARh.
* **utcDateTime** (date, optional): this parameter indicates the UTC date and time of the sample. If the parameter is omitted, the current date and time will be assumed.
**Example 1**
This example shows how to report a cumulative active and reactive energy of 14650 Wh and 1280 VARh respectively, on the first endpoint of a device.
```javascript
myDevice.endpoints.byIndex(0).updateEnergySensorValueSummation(14650, 1280);
```
\### updateEnergySensorValueUnits(activeEnergyWh, reactiveEnergyVARh \[, utcDateTime]) The updateEnergySensorValueUnits() method allows adding an active and reactive energy consumption value from an energy sensor, optionally specifying the date and time of the update.
**Parameters**
* **activeEnergyWh** (double): indicates the amount of active energy consumed, expressed in Wh. This value will be added to the previously recorded active energy consumption.
* **reactiveEnergyVARh** (double): Indicates the amount of reactive energy consumed, expressed in VARh. This value will be added to the previously recorded reactive energy consumption.
* **utcDateTime** (date, optional): this parameter indicates the UTC date and time of the sample. If the parameter is omitted, the current date and time will be assumed.
**Example 1**
This example shows how to report a consumption of 160 Wh and 22 VARh respectively, on the first endpoint of a device.
```javascript
myDevice.endpoints.byIndex(0).updateEnergySensorValueUnits(160, 22);
```
\### updateFlowSensorValueSummation(summationValue, \[, utcDateTime]) The updateFlowSensorValueSummation() method allows updating the flow summation of a flow sensor, generic flow sensor, or people flow sensor, optionally specifying the date and time of the update.
**Parameters**
* **summationValue** (double): Indicates the current value of the flow summation.
* For flow sensors, the value must be expressed in liters.
* For generic flow sensors, the value must be expressed in the unit associated with the variable chosen for the sensor.
* For people flow sensors, the value is indicated in people.
* **utcDateTime** (date, optional): this parameter indicates the UTC date and time of the sample. If the parameter is omitted, the current date and time will be assumed.
**Example 1**
This example shows how to report a cumulative flow of 14650 liters on the first endpoint of a device.
```javascript
myDevice.endpoints.byIndex(0).updateFlowSensorValueSummation(14650);
```
\### updateFlowSensorValueUnits(value, \[, utcDateTime]) The updateFlowSensorValueUnits() method allows adding a value to the flow recorded by a flow sensor, generic flow sensor, or people flow sensor, optionally specifying the date and time of the update.
**Parameters**
* value (double): indicates the recorded flow value. This value will be added to the previously recorded value.
* For flow sensors, the value must be expressed in liters.
* For generic flow sensors, the value must be expressed in the unit associated with the variable chosen for the sensor.
* For people flow sensors, the value is indicated in people.
* **utcDateTime** (date, optional): this parameter indicates the UTC date and time of the sample. If the parameter is omitted, the current date and time will be assumed.
**Example 1**
This example shows how to report a flow of 182 liters on the first endpoint of a device.
```javascript
myDevice.endpoints.byIndex(0).updateFlowSensorValueUnits(182);
```
\### updateTextContainerStatus(text, \[, utcDateTime]) The updateTextContainerStatus() method allows adding text up to 255 characters in length.
**Parameters**
* **text**: Indicates the text to be added.
* **utcDateTime** (date, optional): this parameter indicates the UTC date and time of the sample. If the parameter is omitted, the current date and time will be assumed.
**Example 1**
This example shows how to add text.
```javascript
myDevice.endpoints.byIndex(0).updateTextContainerStatus("Sample text for text container endpoint");
```
\### uploadCameraSnapshot(base64Content, fileType, \[, utcDateTime]) The uploadCameraSnapshot() method allows storing an image obtained from a camera.
**Parameters**
* **base64Content**: the text, in base64 format, corresponding to the binary content of the image.
* **fileType**: indicates the image type. Accepted values are "jpg" and "png".
* **utcDateTime** (date, optional): this parameter indicates the UTC date and time when the image was taken. If the parameter is omitted, the current date and time will be assumed.
**Example 1**
This example shows how to upload a camera snapshot.
```javascript
myDevice.endpoints.byIndex(0).uploadCameraSnapshot("VGhpcyBpcyBzb21lIHRleHQ....[more text].....", "jpg");
```
# Share Dashboard - Mobile App
The user can use the corresponding icon to share the Dashboard.
> *When accessing the Dashboard from the **Dashboard List** and editing is required, the Share option will not be enabled until edit mode is closed.*
**1- Share Dashboard:** Select the Share Dashboard option.

This opens a message indicating that a unique link is generated that can be accessed without credentials. An optional description can also be provided.
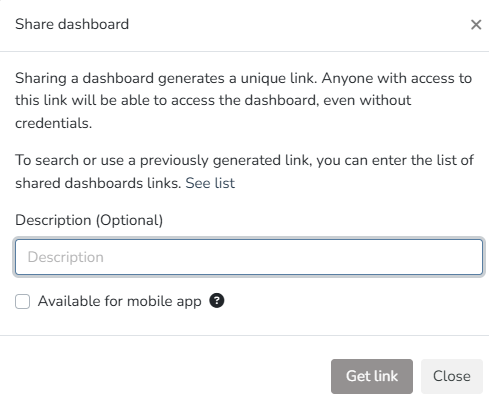
Once the Get Link button is pressed, an access link to the dashboard you want to share is generated.
The link can be opened and viewed in a browser without needing access to the platform.
**2- Share Dashboard - Mobile:** Select the Share Dashboard option.

This opens a message indicating that a unique link is generated that can be accessed without credentials. An optional description can also be provided.

To make it available in the mobile version, check the '*Available for the mobile application*' option.
Once the Get Link button is pressed, an access link to the dashboard you want to share is generated.
The link can be opened and viewed in a browser without needing access to the platform, as well as on a mobile device.
3- **Access to shared links**
You can access and manage shared links. To do this, go through the manager with the required permissions. Navigate to Security > Shared Links.

Once there, all previously shared links are displayed with the following information:
Description, Facility, link, user who shared it, creation date, last used date, and expiration date.

Through the context menu, you can either open the previously created link or expire it, provided you have the necessary permissions.
# Share Dashboard
The user can use the corresponding icon to share the Dashboard and/or download it in two formats.
> When accessing the Dashboard from the ***Dashboard List*** and editing is required, the Share option will not be enabled until edit mode is closed.
**1- Share Dashboard:** By selecting the *Get Link* button, the user will generate an access link to the dashboard they want to share. This link can be opened and viewed in a browser without needing access to the platform.
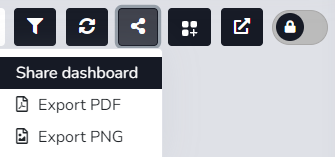
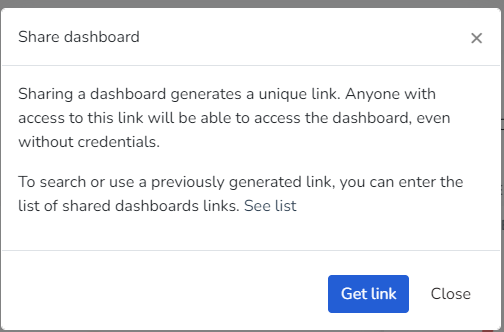
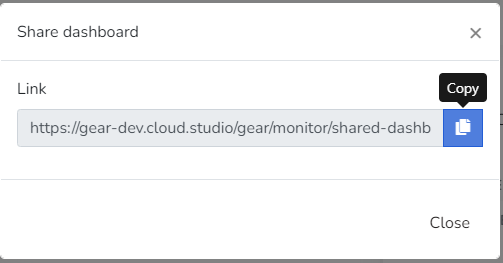
**2- Export PDF:** Here the user can download the dashboard in Portable Document Format (PDF) according to the applied filter.
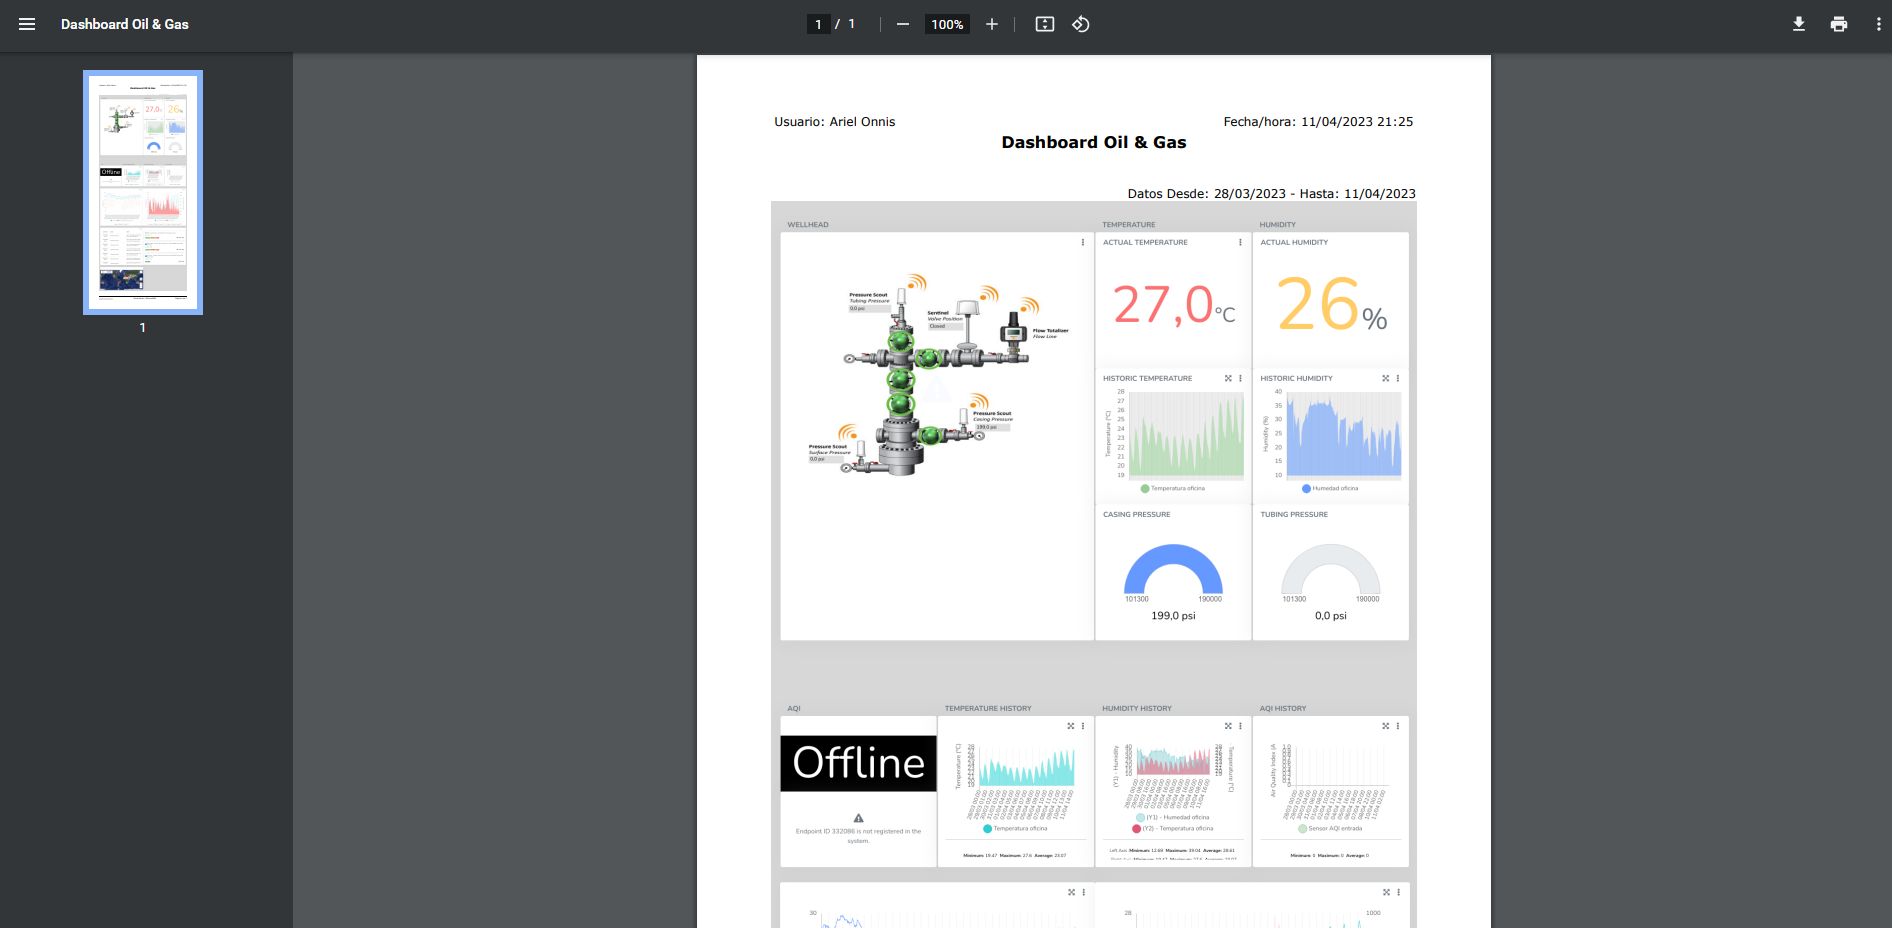
**3- Export PNG:** The user can download the dashboard in Portable Network Graphic (PNG) format according to the applied filter.
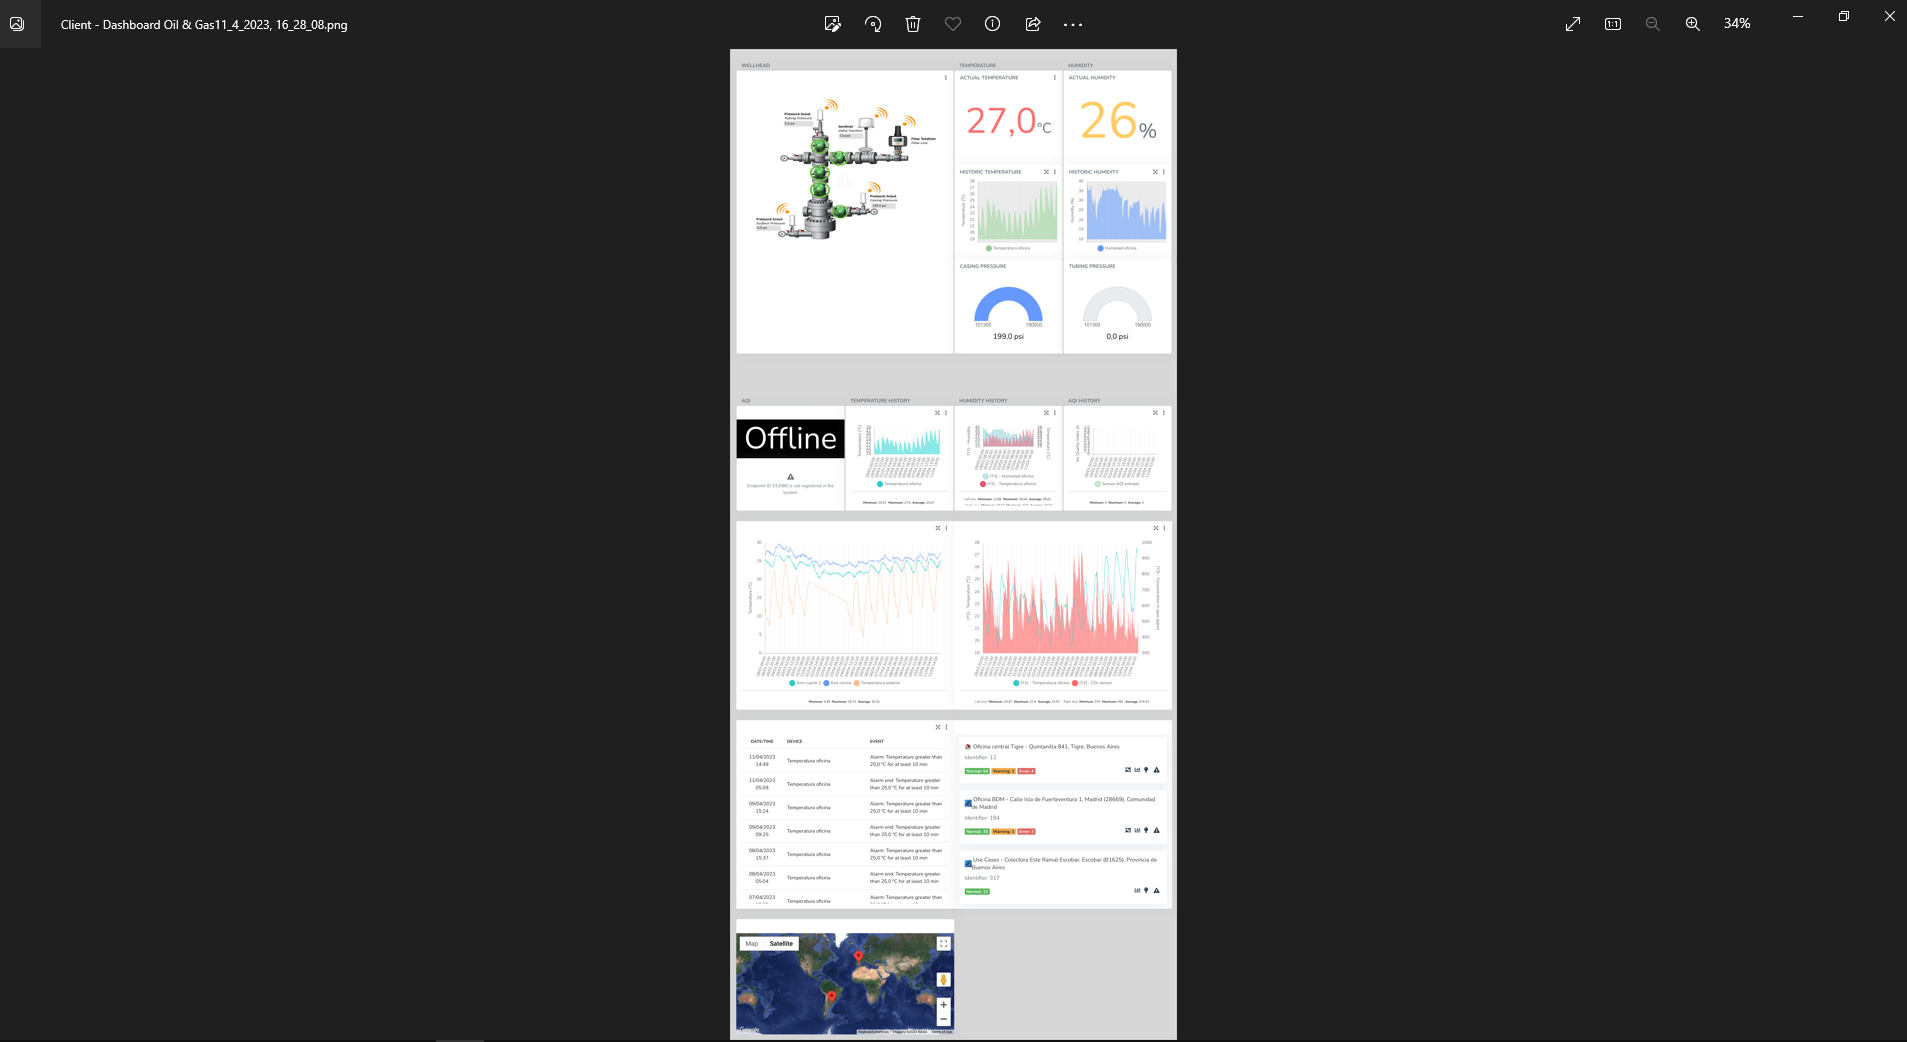
# Metrics
A metric is a quantitative measure used to evaluate and monitor the performance of an IoT system or device in real time. Metrics are used to collect data that can be analyzed to gain valuable insights into the behavior and effectiveness of the IoT device.
In an environmental monitoring system, metrics could include temperature, humidity, and air quality. In an asset tracking device, metrics could include the location, speed, and direction of the object in real time. These metrics are used to measure device performance and provide valuable information that can be used to improve its efficiency and effectiveness.
# Widgets
The Cloud Studio platform features a series of specific widgets for branch monitoring, energy consumption, power history, consumption, weather data, and more, for use in dashboards customizable by the end user.
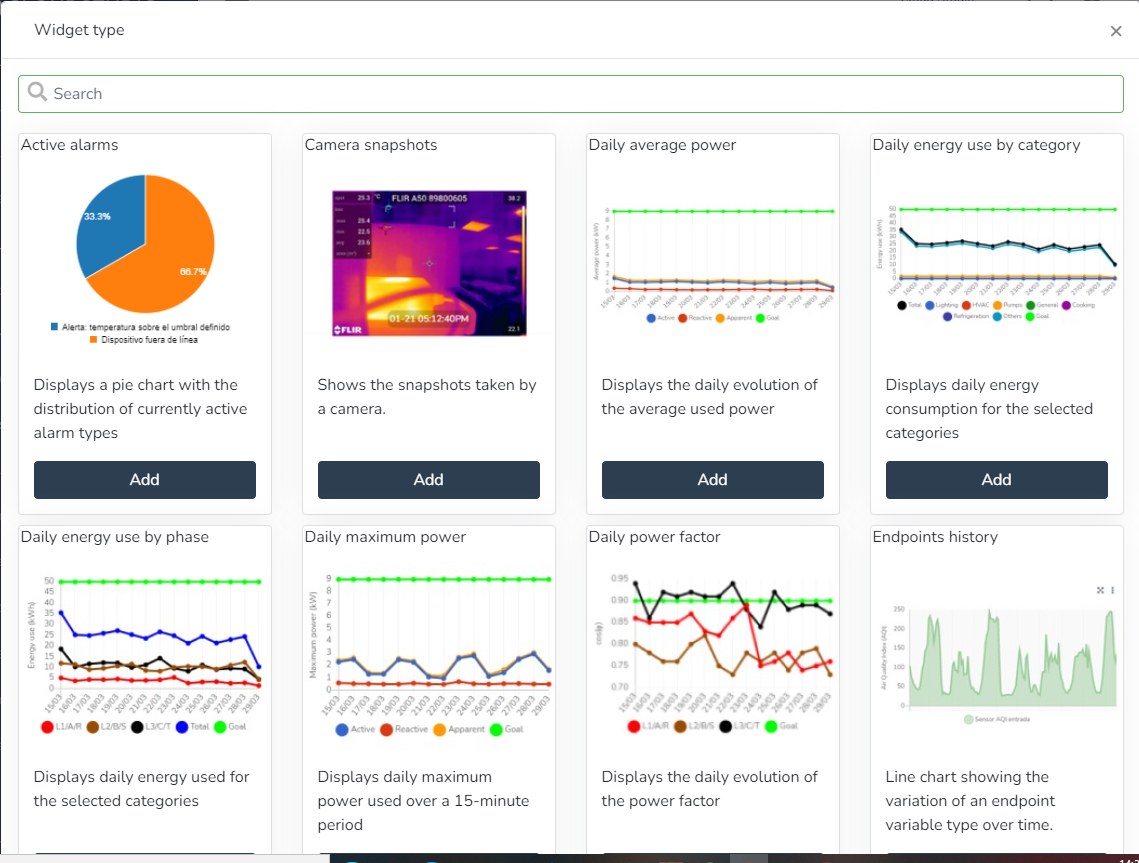


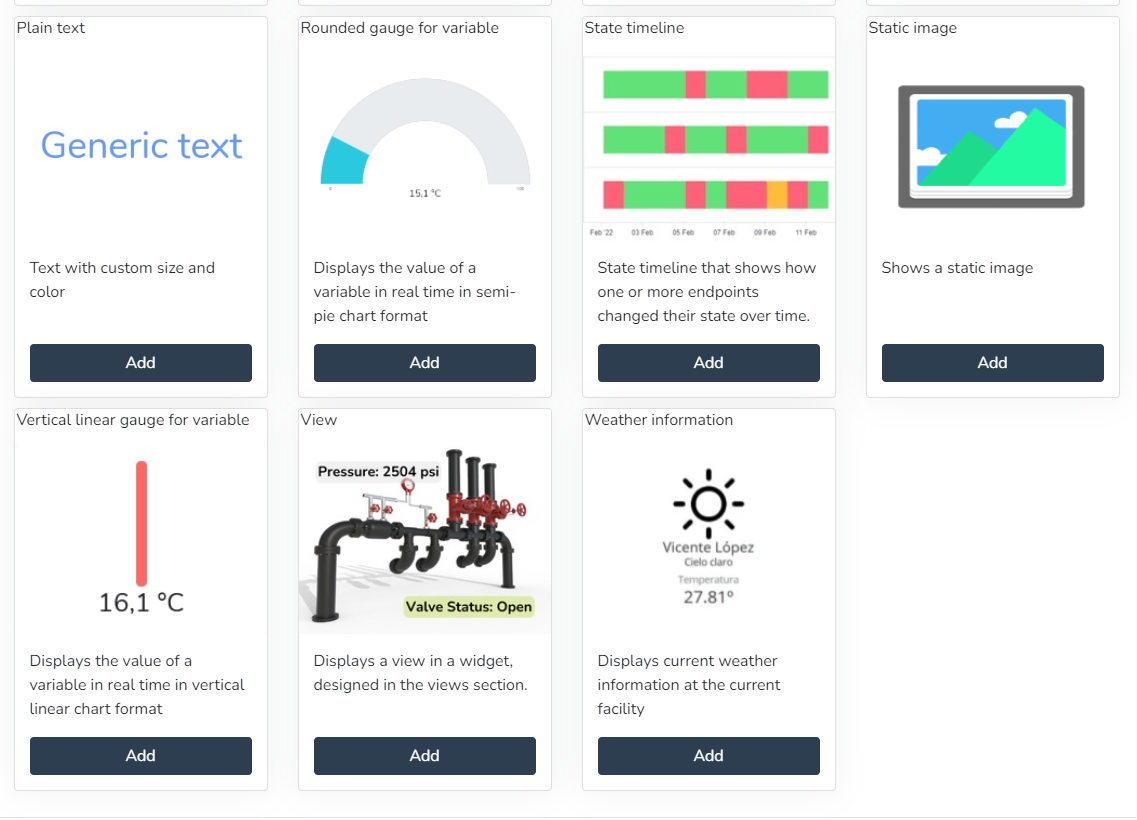
* Active alarms (Displays a pie chart with the distribution of currently active alarm types)
* Past and projected energy consumption (Displays past energy consumption and targets, as well as a projection of consumption and targets for the coming days)
* Energy consumption by category (Displays energy consumption for selected categories)
* Energy consumption by phase (Pie chart showing energy consumption by phase)
* Daily energy consumption by category (Displays daily energy consumption for selected categories)
* Daily consumption by phase (Displays daily consumption by phase for selected categories)
* Energy cost by category (Displays energy cost for selected categories)
* Past and projected energy costs (Displays past energy costs and targets, as well as a projection of costs and targets for the coming days)
* Weather status (Displays the weather status at the current facility)
* Daily power factor (Displays the daily evolution of the power factor)
* Infrastructure (Displays the current availability of the infrastructure)
* Facility map (Displays a map containing the location of the current facility)
* Energy consumption targets (Displays energy consumption information relative to defined targets)
* Daily maximum power (Displays the maximum daily power used in a 15-minute period)
* Daily average power (Displays the daily evolution of the power used)
* Facility summary (Displays summary information for the current facility)
* Global summary (Displays summary information for all facilities)
* Latest events (Displays a list with the latest events)
* Camera snapshots (Displays snapshots taken by a camera)
* Endpoint history (Line chart showing the variation of an endpoint variable type over time)
* Comparative endpoint history (Line chart showing the comparative variation of two endpoint variable types over time)
* Facility list (Displays a list containing facility information)
* World summary (Displays summary information for all facilities)
* Infrastructure (Displays the current availability of the infrastructure)
* Latest events (Displays a list containing the latest items)
* Linear gauge for variable (Displays the value of a variable in real time as a linear chart)
* Metric (Displays the value of a variable in real time)
* Occupancy (Displays the occupancy)
* Plain text (Displays text with custom colors and formatting)
* Rounded gauge for variable (Displays the value of a variable in real time as a semicircular chart)
* State timeline (State timeline showing how one or more endpoints changed their state over time.)
* Static image (Displays a static image)
* Vertical linear indicator for variable (Displays the value of a variable in real time as a vertical linear chart)
* View (Displays a view in a widget, designed in the views section)
* Weather information (Displays the current weather information at the current facility)
**Active Alarms:**
The user can use this Widget to create a pie chart with the distribution of currently active alarm types.
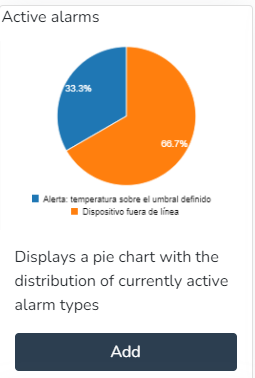

**Camera Snapshots:**
The user can use this Widget to view snapshots taken by a camera.
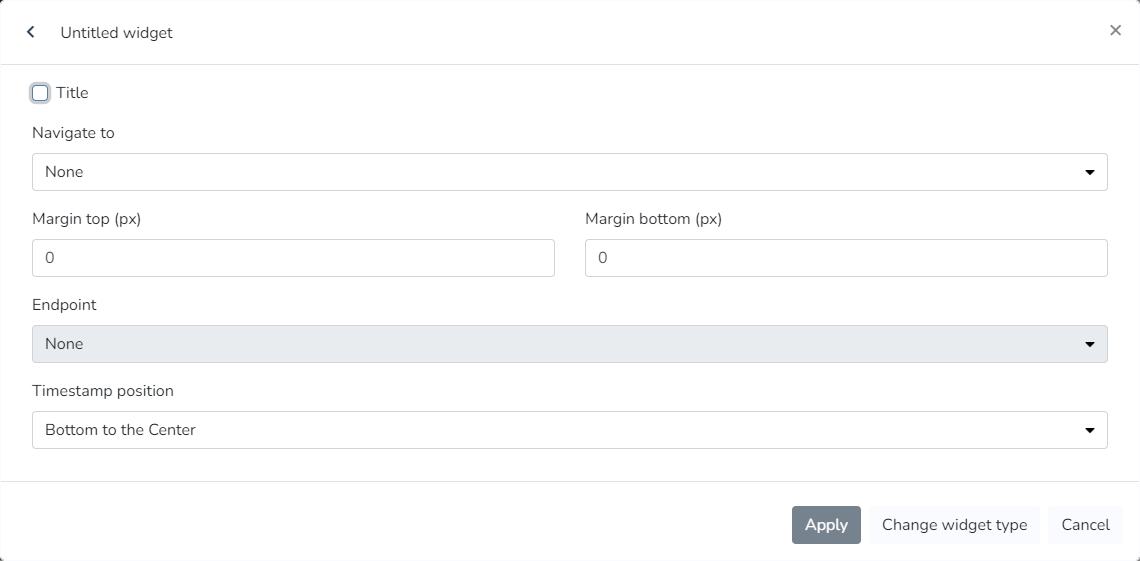
**Daily Average Power:**
The user can use this Widget to view the daily evolution of the power used.
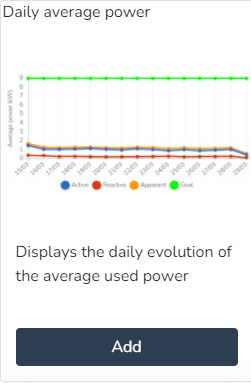

**Daily Energy Consumption by Category:**
The user can use this Widget to view the daily energy consumption for selected categories.
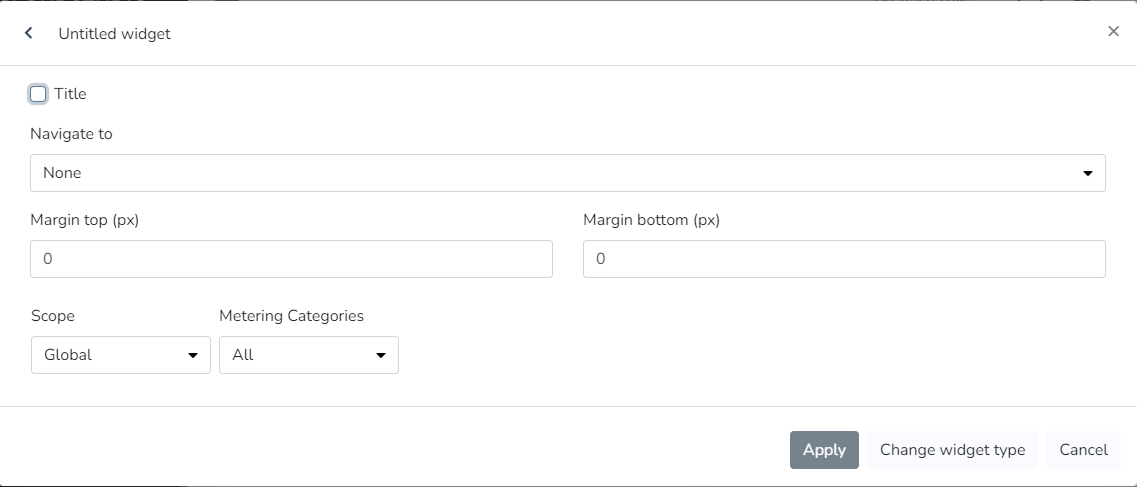
**Daily Energy Consumption by Phase:**
The user can use this Widget to view the daily energy used for selected categories.
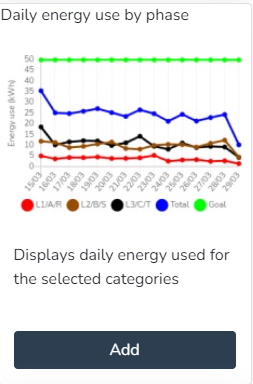

**Daily Maximum Power:**
The user can use this Widget to view the maximum daily power used in a 15-minute period.


**Daily Power Factor:**
The user can use this Widget to view the daily evolution of the power factor.
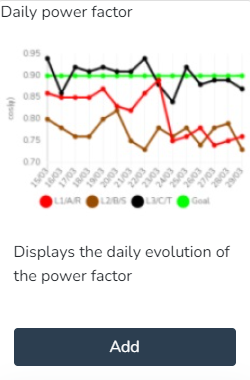
**Daily Power Factor:**
The user can use this Widget to view the daily evolution of the power factor.

**Endpoint History:**
The user can use this Widget to generate a line chart showing the variation of an endpoint variable type over time.
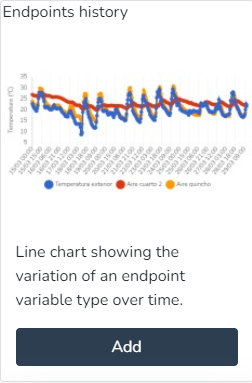

**Comparative Endpoint History:**
The user can use this Widget to generate a line chart showing the comparative variation of two endpoint variable types over time.

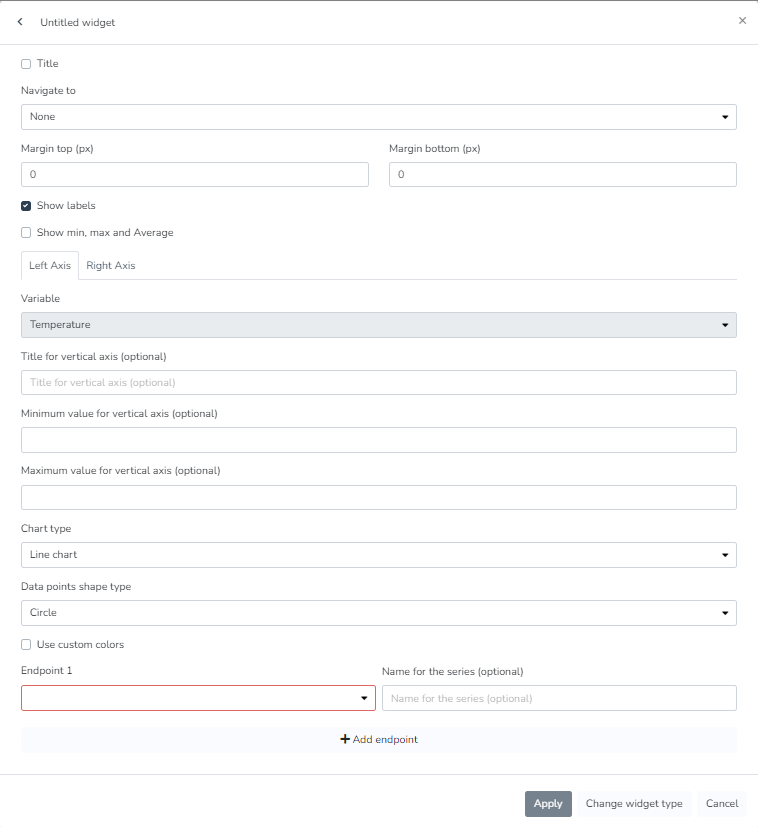
**Energy Consumption Targets:**
The user can use this Widget to view current energy consumption data relative to defined targets.


**Energy Consumption Targets:**
The user can use this Widget to view the energy cost for selected categories.
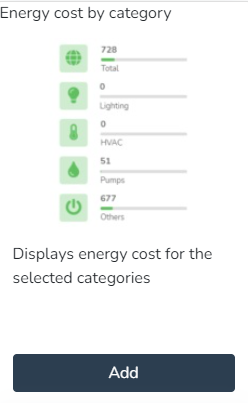
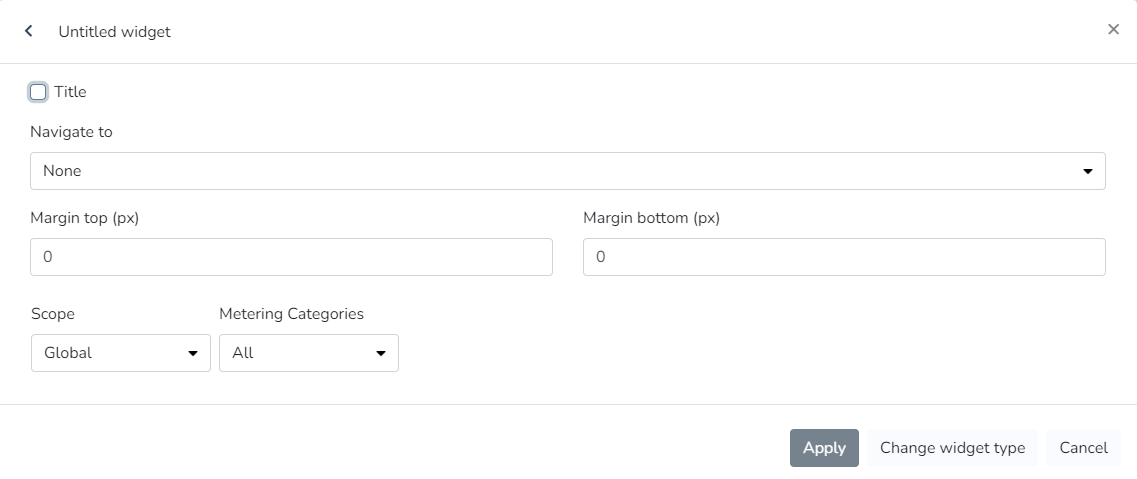
**Energy Consumption by Category:**
The user can use this Widget to view energy consumption for selected categories.
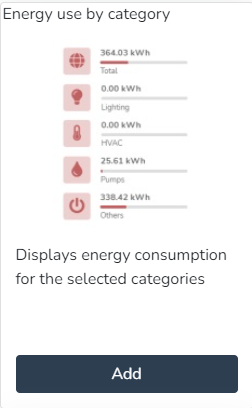

**Energy Consumption by Phase:**
The user can use this Widget to view a pie chart showing energy usage by phase.

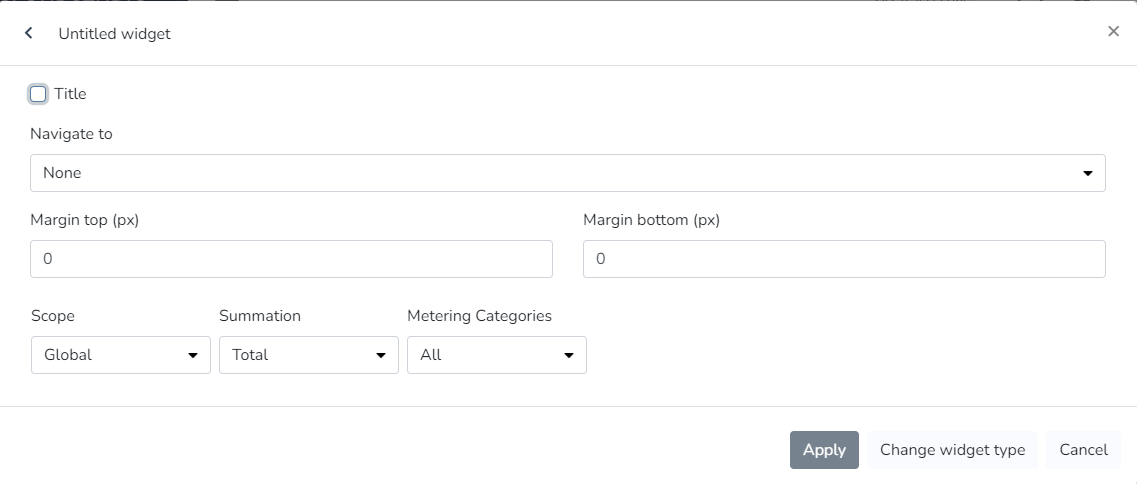
**Energy Consumption by Phase:**
The user can use this Widget to view a list containing facility information.
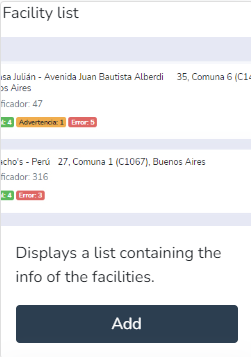

**Facility Map:**
The user can use this Widget to view a map containing the location of the current facility.

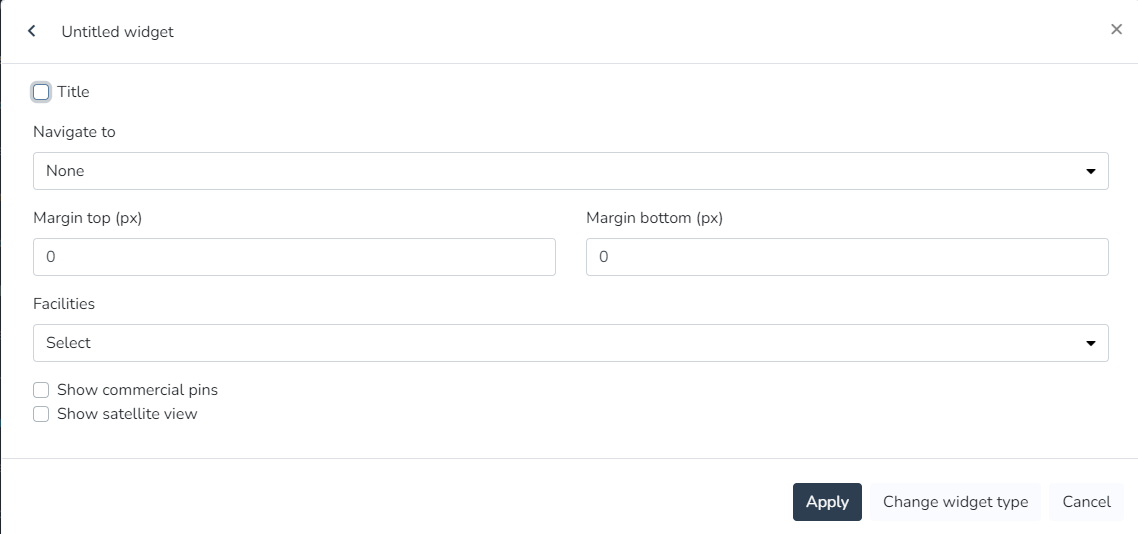
**Facility Summary:**
The user can use this Widget to view summary information for the current facility.
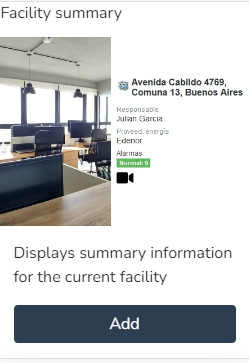
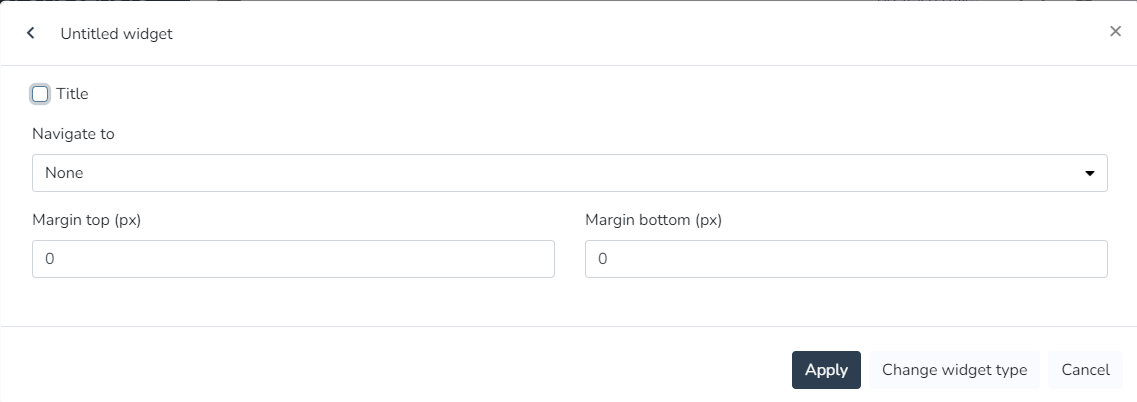
**World Summary:**
The user can use this Widget to view summary information for all facilities.

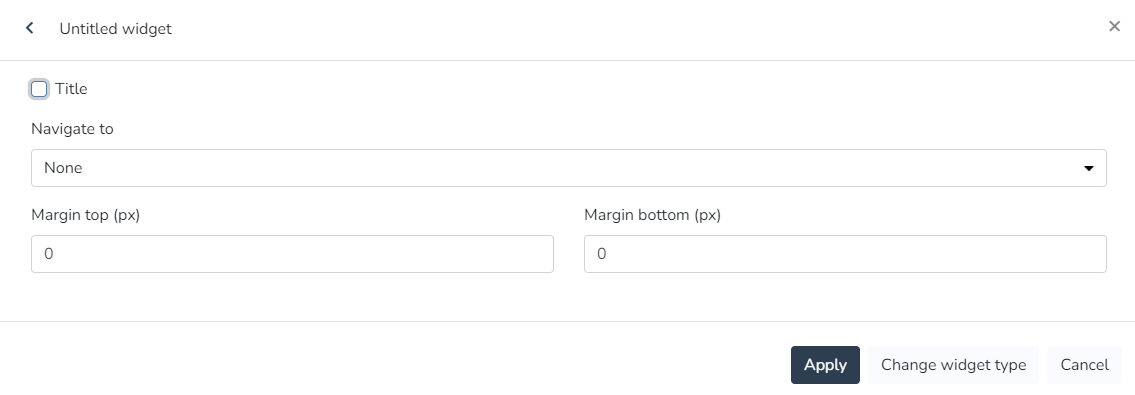
**Infrastructure:**
The user can use this Widget to view the current availability of the infrastructure.

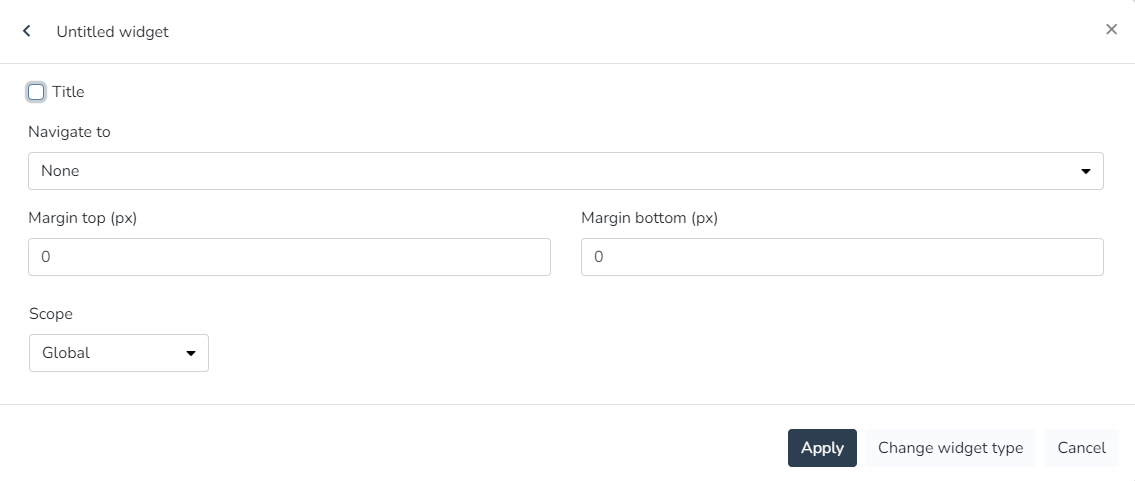
**Latest Events:**
The user can use this Widget to view a list containing the latest events.


**Linear Gauge for Variable:**
The user can use this Widget to view the value of a variable in real time as a linear chart.
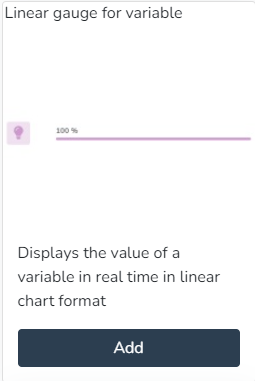

**Metric:**
The user can use this Widget to view the value of a variable in real time.
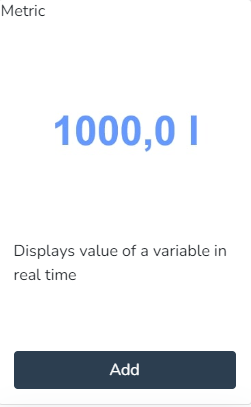

**Occupancy:**
The user can use this Widget to view the occupancy.


**Past and Projected Energy Costs:**
The user can use this Widget to view past energy costs and targets, and a projection of costs and targets for the coming days.


**Past and Projected Energy Consumption:**
The user can use this Widget to view past energy consumption and targets, and a projection of consumption and targets for the coming days.

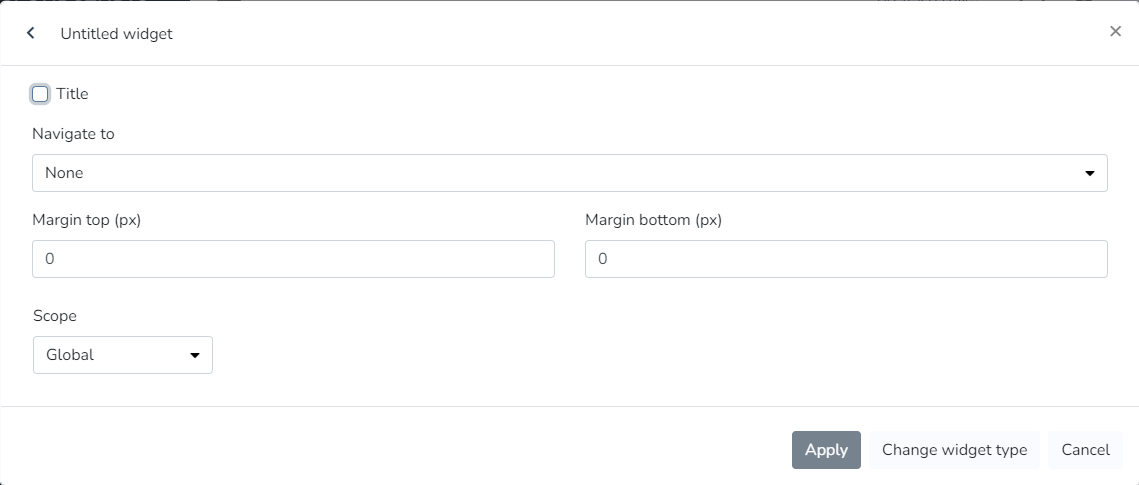
**Plain Text:**
The user can use this Widget to enter text with custom colors and sizes.

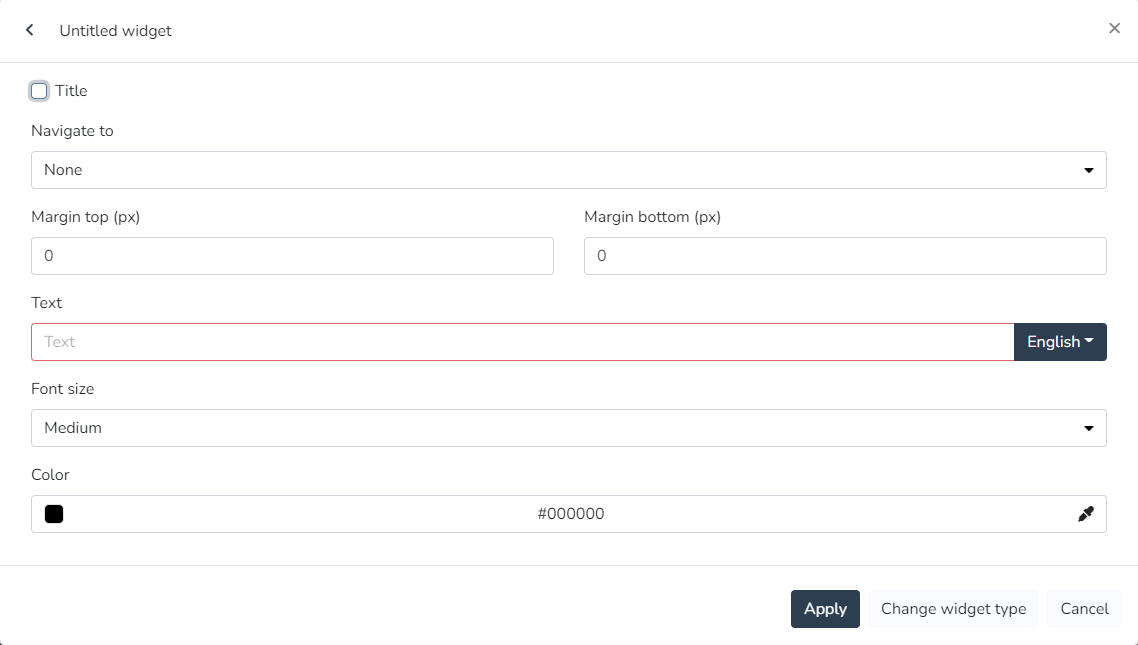


**State Timeline:**
The user can use this Widget to view a state timeline showing how one or more endpoints changed their state over time.
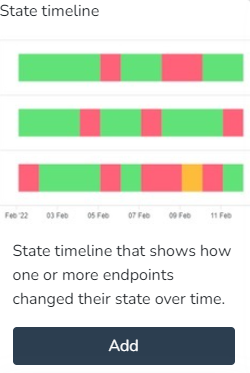

**Static Image:**
The user can use this Widget to view a static image.

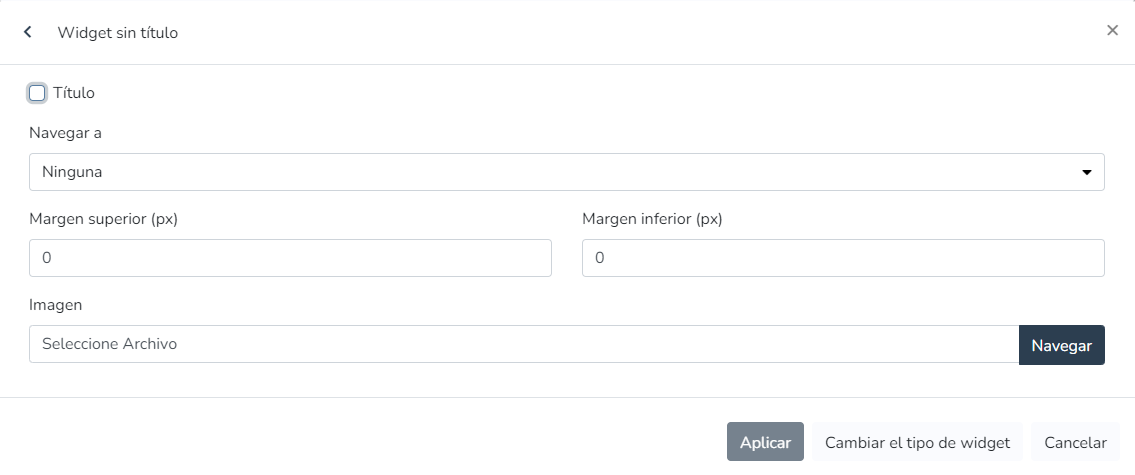
**Vertical Linear Indicator for Variable:**
The user can use this Widget to view the value of a variable in real time as a vertical linear chart.
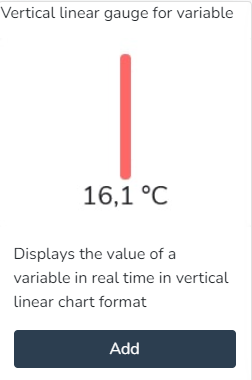
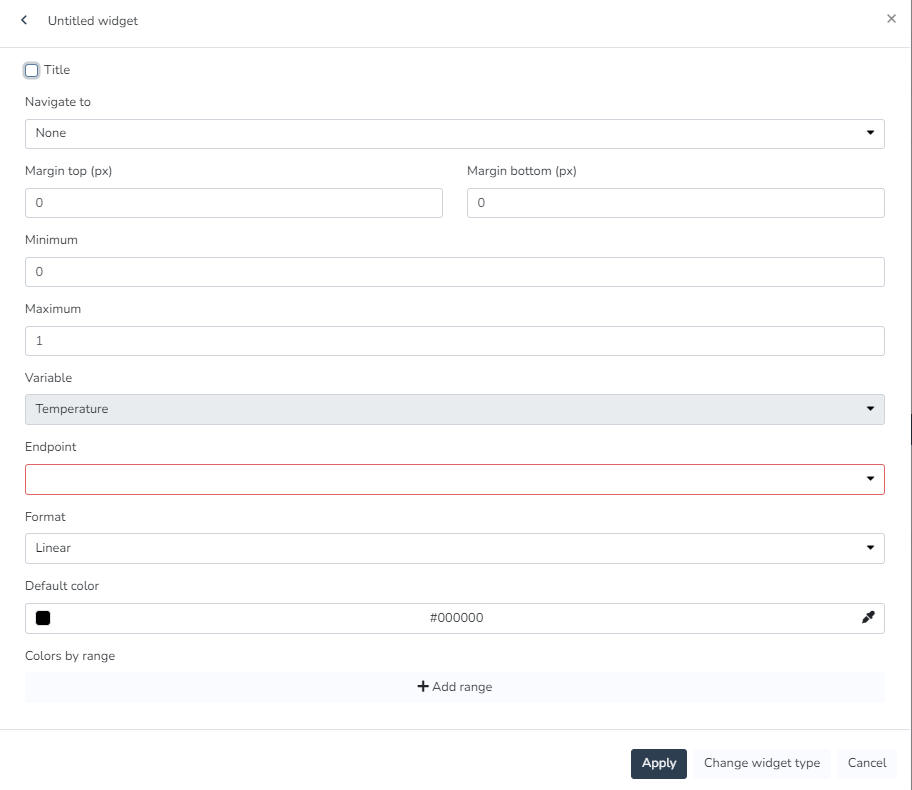
**Views:**
The user can use this Widget to view a view in a widget, designed in the views section.
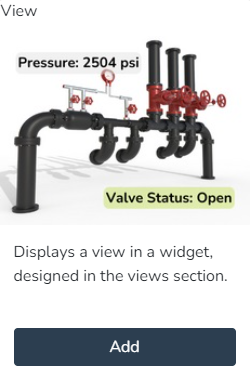

**Weather Information:**
The user can use this Widget to view the current weather information at the current facility.


Dashboard Widgets (Monitor) [#dashboard-widgets-monitor]
In the monitor, the dashboard can be configured to the client's needs using any combination of the [**available widgets**](/docs/monitor/dashboards/widgets):
**Endpoint History Widget:**
Line chart showing the variation of an endpoint variable type over time. In endpoint history charts, the user can enter minimum and maximum values to define the Y-axis ranges, as well as modify the variable names associated with the Y-axis titles.
Dashboard

* *The user can edit the minimum and maximum values that define the Y-axis ranges of the charts.*
!\[Graphical user interface, Text, Application, Email
Automatically generated description]\(/images/wiki/dashboards/widgets/index/image\_272e.png)
* *The user can modify the Y-axis titles (instead of displaying the variable type names).*


* *The user can view the tooltips of history charts*, *which display all data points associated with an X position.*
!\[Chart, Line chart
Automatically generated description]\(/images/wiki/dashboards/widgets/index/image\_c4df.png)
**Comparative Endpoint History Widget:**
Endpoint history charts where the user can enter minimum and maximum values to define the Y-axis ranges, as well as modify the variable names associated with the Y-axis titles.
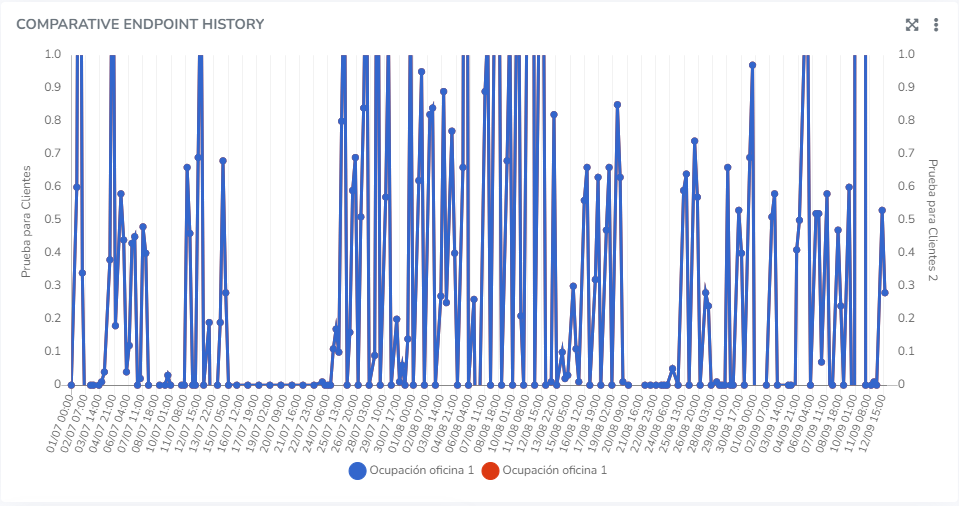
*The user can edit the minimum and maximum values that define the Y-axis ranges of the charts.*
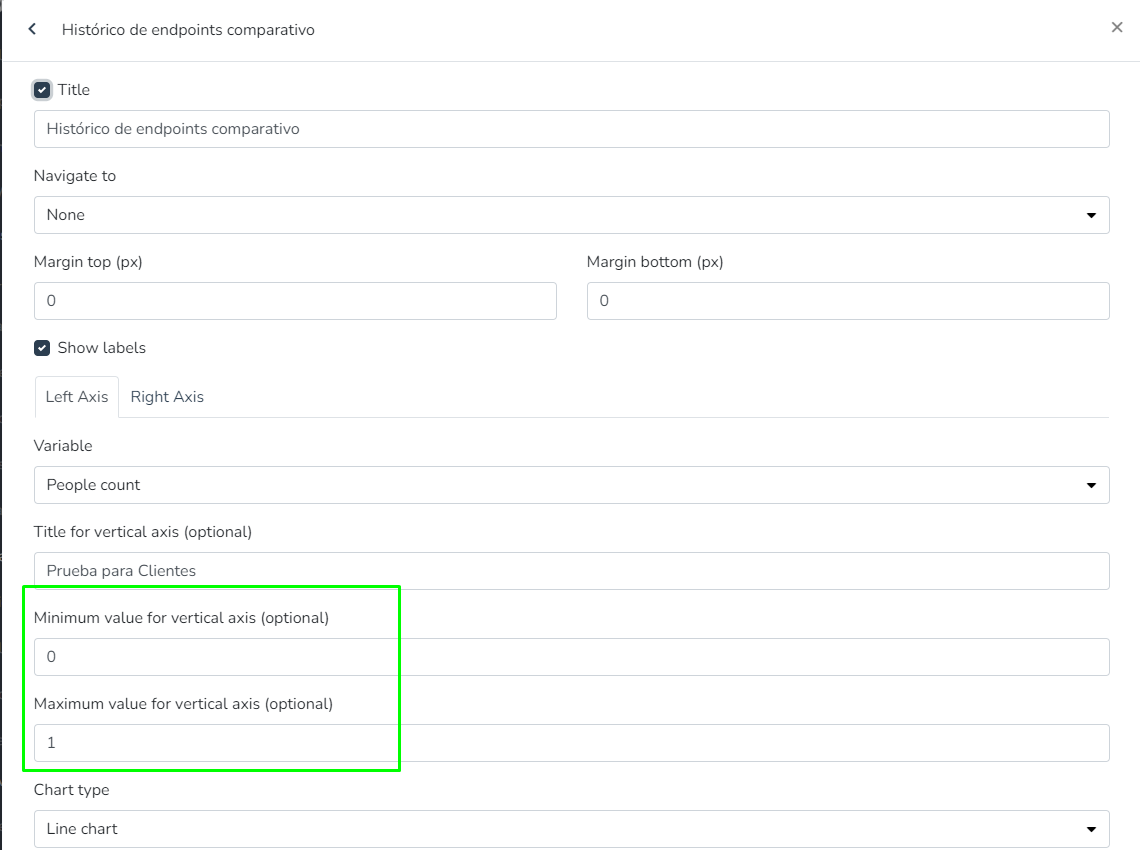
*The user can modify the Y-axis titles (instead of displaying the variable type names).*

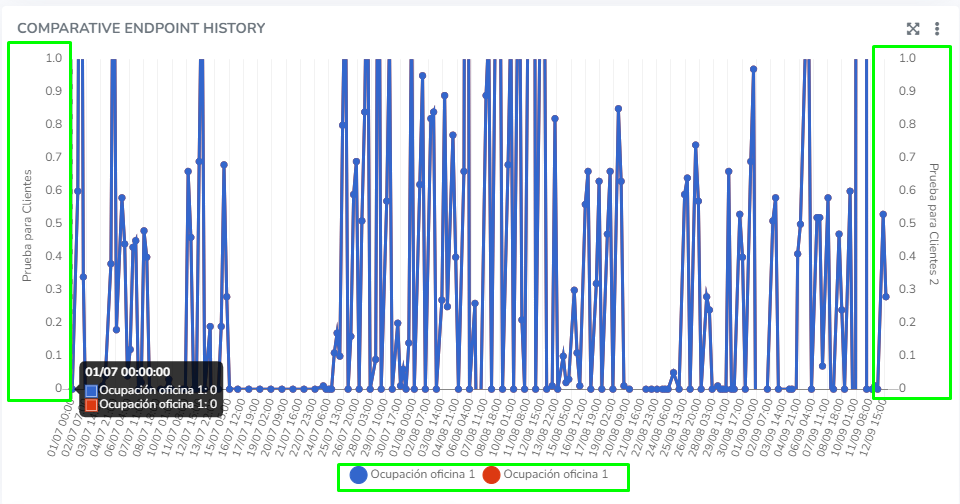
*The user can view the tooltips of history charts*, *which display all data points associated with an X position.*
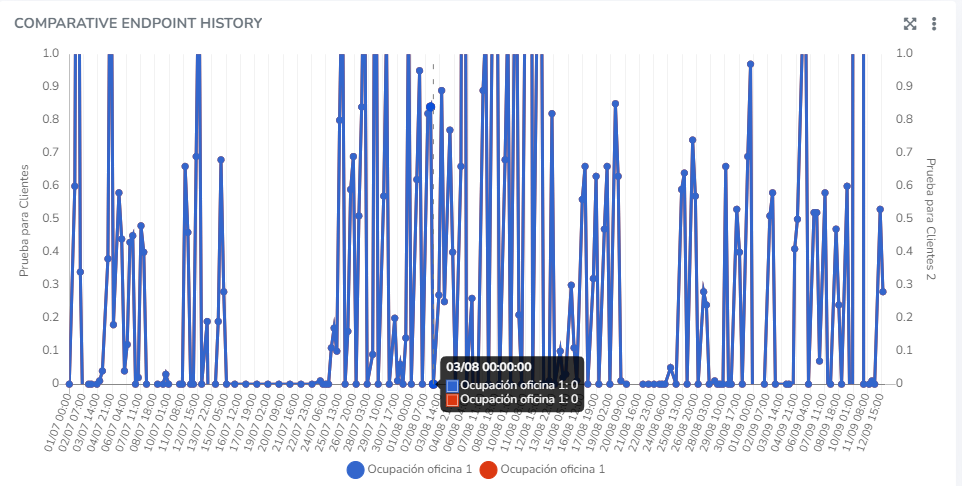
# Dynamic Widget Titles
Widgets with dynamic titles allow customizing the information displayed on the dashboard by using variables such as `**{facility_desc}**`, `**{device_desc}**`, and `**{endpoint_desc}**`. To use them, include them in the "Title" field when creating your widget and check the "Title" checkbox to enable this feature.
To learn how to create a Widget and add a title, we suggest visiting our [Create Groups and Widgets](/docs/monitor/dashboards/crear-grupos-y-widgets) page.
The variables entered in the title are automatically replaced with the name of the selected facility, device, or endpoint, making the title change dynamically. This helps avoid repeating generic information and provides a clearer, more relevant context for the displayed data.
| Variable | Description |
| ----------------- | ---------------------------------------------------------------------------------------------------------------------------------------------------- |
| \{facility\_desk} | Replaced with the name of the facility selected by the user upon logging in. |
| \{device\_desk} | Replaced with the name of the device being used in the widget. If no device is selected, it will use the device associated with the endpoint in use. |
| \{endpoint\_desk} | Replaced with the name of the endpoint selected in the widget. If there is more than one endpoint, the first one in the list is shown by default. |
These variables help display personalized and relevant information on the dashboard in a clean and automated way. Remember to use a Widget compatible with your desired variable.
Example of creating a widget that uses all available variables, combining them in the title with spaces or optional special characters, such as the hyphen "-" in this case, to improve readability:
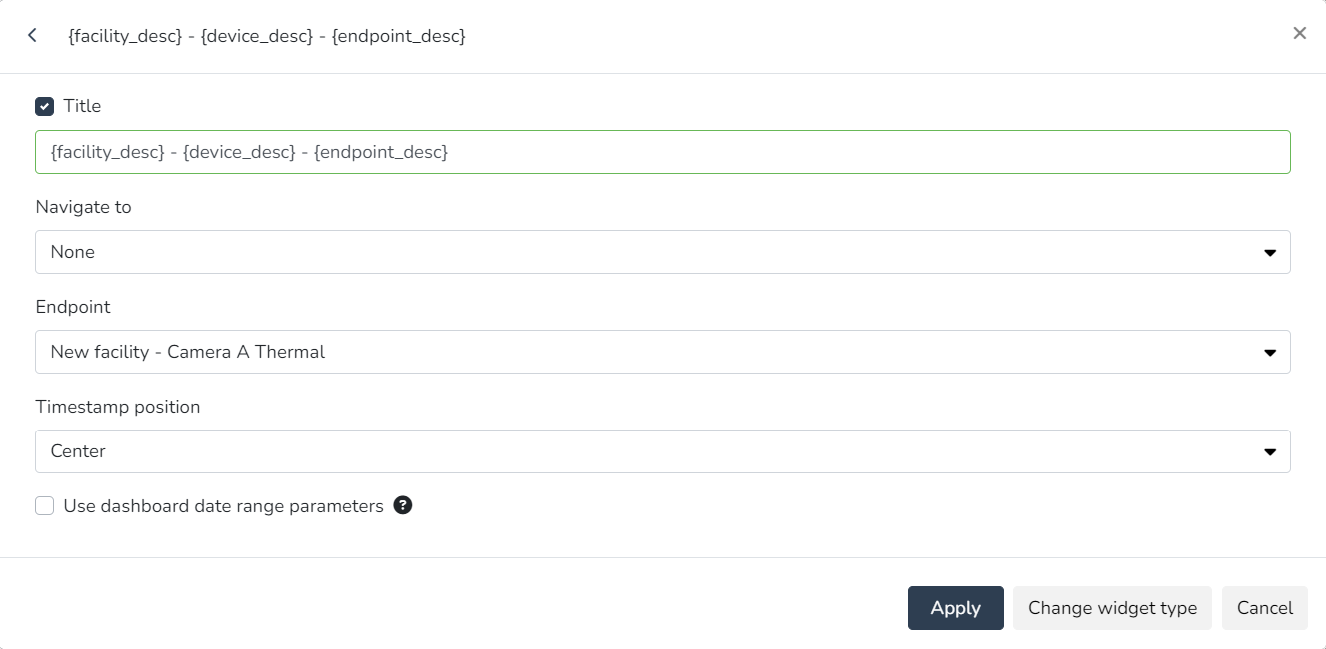
And how the variables appear once the changes are applied:

Widget display with dynamic titles.
Widgets that support this feature [#widgets-that-support-this-feature]
| Widget type | Supports facility description variable - \{facility\_desc} | Supports device description variable - \{device\_desc} | Supports endpoint description variable - \{endpoint\_desc} | Notes |
| ------------------------------------- | ---------------------------------------------------------- | ------------------------------------------------------ | ---------------------------------------------------------- | ------------------------------------------------------------------------------------------------------------------------------ |
| Past and projected energy costs | YES | NO | NO | |
| Past and projected energy consumption | YES | NO | NO | |
| Active alarms | YES | NO | NO | |
| Alarm counter | YES | NO | NO | |
| Energy consumption targets | YES | NO | NO | |
| Device | YES | YES | YES | |
| Comparative endpoint history | YES | YES | YES | If there are no endpoints selected on the left axis, it will look for the first selected endpoint on the right axis |
| Endpoint history | YES | YES | YES | |
| Energy consumption by category | YES | NO | NO | |
| Energy cost by category | YES | NO | NO | |
| Daily energy consumption by category | YES | NO | NO | |
| Energy consumption by phase | YES | NO | NO | |
| Daily consumption by phase | YES | NO | NO | |
| Latest events | YES | NO | NO | |
| Facility list | YES | NO | NO | The facilities selected in the widget are not considered; instead, the current facility selected by the logged-in user is used |
| Facility map | YES | NO | NO | The facilities selected in the widget are not considered; instead, the current facility selected by the logged-in user is used |
| Facility summary | YES | NO | NO | |
| Weather status | YES | NO | NO | |
| Global summary | NO | NO | NO | |
| Infrastructure | YES | NO | NO | |
| Daily maximum power | YES | NO | NO | |
| Occupancy | YES | YES | YES | |
| Plain text | YES | NO | NO | |
| View | YES | NO | NO | |
| Daily power factor | YES | NO | NO | |
| Daily average power | YES | NO | NO | |
| Individual alarm counter | YES | NO | NO | |
| Camera snapshots | YES | YES | YES | |
| State timeline | YES | YES | YES | |
| Static image | YES | NO | NO | |
| Linear variable gauge | YES | YES | YES | |
| Metrics | YES | YES | YES | |
| Rounded variable gauge | YES | YES | YES | |
| Vertical linear variable gauge | YES | YES | YES | |
# Device Widget
The user can use this Widget to view relevant information about a specific device, as well as data from up to 2 of its endpoints.
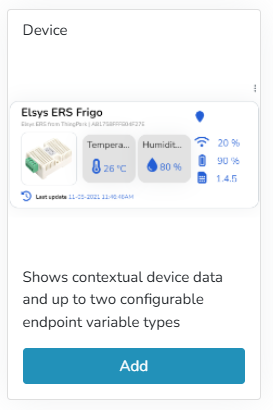
The information that can be optionally displayed according to the configuration of this Widget includes:
* Image: device image
* Status: status of the selected endpoint(s)
* Device model
* Battery level.
* *For this Widget, the device battery type used is the **first** one*
* Firmware version
* Device location
* RSSI signal level
* Last update date and time
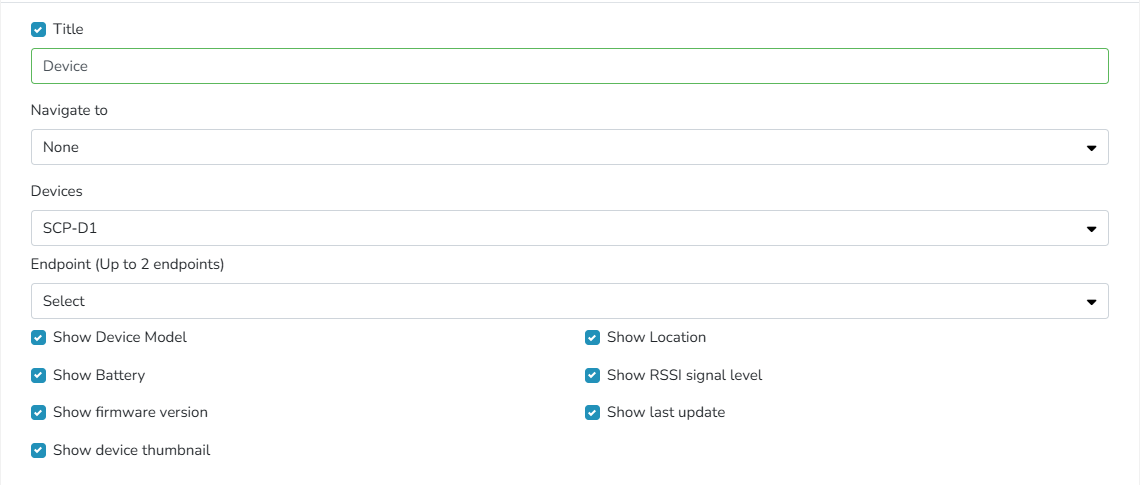
# Alarm Elements
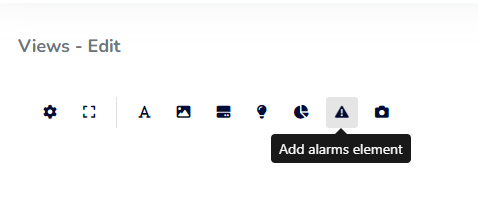
# Occupancy Elements
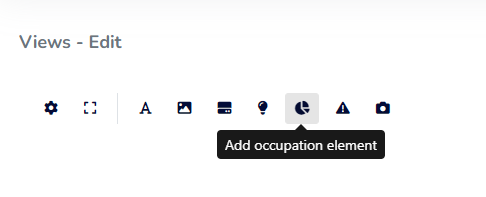
# Snapshot Elements
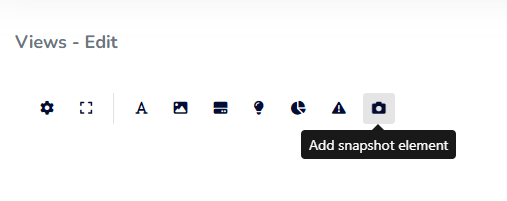
# Endpoint Status Image
From the *Views* section in the *Monitor* panel, the user can view the states of a discrete or scalar variable associated with an endpoint. The *Endpoint status image* element will display the preconfigured image based on the state reported by the endpoint.
If the value entered by the user does not correspond to the variable's values, the Endpoint will display the default image preconfigured in the element editing.
> ***This feature supports a list of operable sensors available*** ***here***
* Add New Element:
* **Manager >** **Views** > Add an element of type **Endpoint Status Image.**

* Endpoint Selection & Image Upload:
* **Properties Tab** > Select the Endpoint > Only Endpoints of the following types will be selectable: *IAS Sensors (motion, occupancy, and binary sensors),* *Appliances* & *Endpoints that have associated discrete variable types.*

* Make Endpoint Operable:
* **Click Events Tab**, within the **Click Event Types** list, an option called **Operate** will appear, which will allow the user to subsequently modify the Endpoint from *Monitor*
* This option will be visible if the Endpoint's Security section has the ***Read Write** or **Read Write Command*** options selected
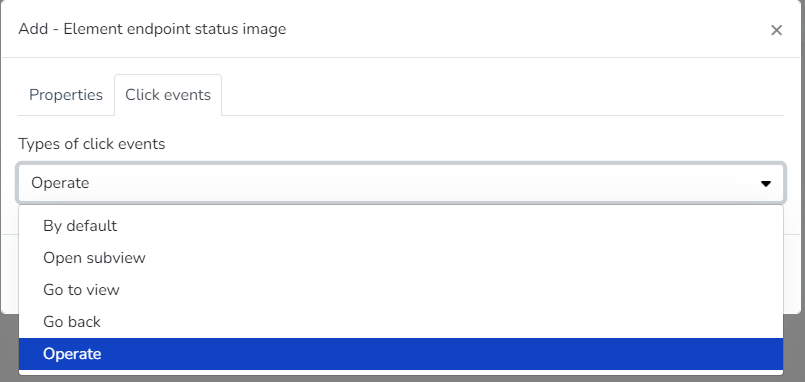
* Edit, Clone, or Delete Element:
* The user can right-click to resize, Edit, Clone, or Delete the selected element
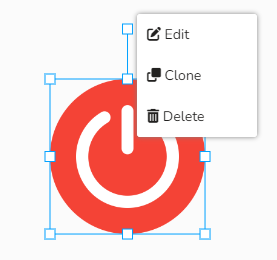
* Modify Element Values:
* **Monitor Panel >** **Views** > **Select View** > The user will see the added sensor(s), which can be modified from here by clicking on the added image element.
**Appliances & ON-OFF devices**
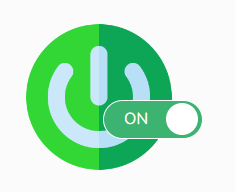
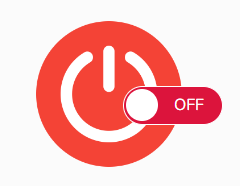
**Curtains & Closure Control**
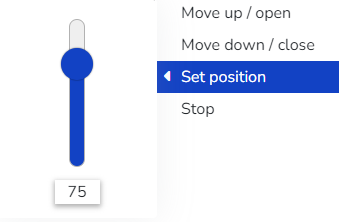
**Update Dimmer**
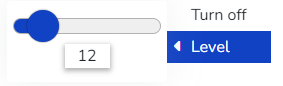
**Update Thermostat**
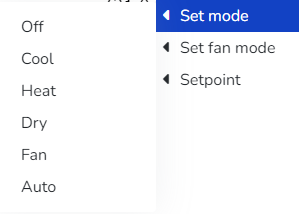
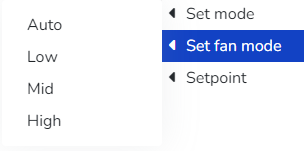

* When the sensor's security level is **Medium >** The user can configure an optional *alert message*.
* When the sensor's security level is **High >** The user can:
* Configure an alert message (*Optional*)
* The user must enter the password when editing the Endpoint to confirm the new value.
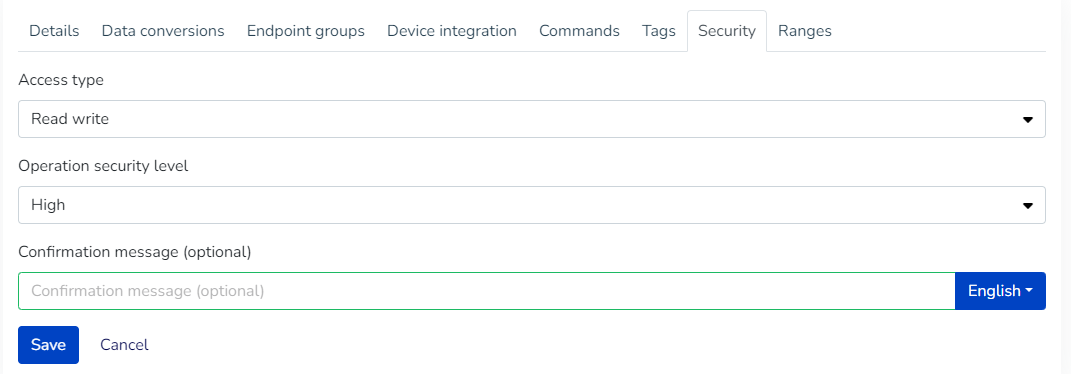
# Endpoint Status Text
From the *Views* section in the *Monitor* panel, the user can view the states of a discrete or scalar variable associated with an endpoint. The *Endpoint status text* element will display the preconfigured value based on the state reported by the endpoint.
> ***This feature supports a list of operable sensors available*** [***here***](/docs/monitor/vistas/endpoints-operables)
* Add New Element:
* **Manager >** **Views** > Add an element of type **Endpoint Status Text.**
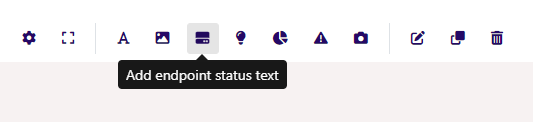
* Endpoint Selection & Image Upload:
* **Properties Tab** > Select the Endpoint > Only Endpoints of the following types will be selectable: *Current Sensor, Flow Sensor* & *Generic Flow Sensor*
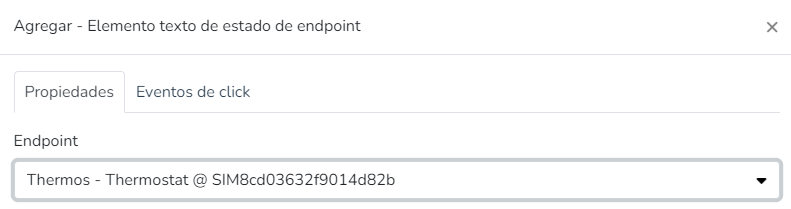
* Make Endpoint Operable:
* **Click Events Tab**, within the **Click Event Types** list, an option called **Operate** will appear, which will allow the user to subsequently modify the Endpoint from *Monitor*
* This option will be visible if the Endpoint's Security section has the ***Read Write** or **Read Write Command*** options selected

Define Endpoint as Operable
* Edit, Clone, or Delete Element:
* The user can right-click to resize, Edit, Clone, or Delete the selected element
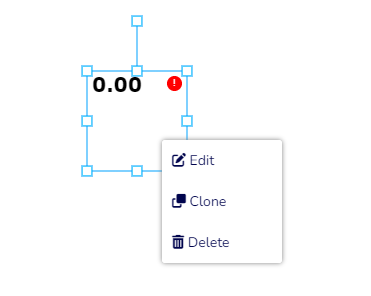
* Modify Element Values:
* Modify Element Values:
* **Monitor Panel >** **Views** > **Select View** > The user will see the added sensor(s), which can be modified from here by clicking on the added text element and selecting "Change Value"
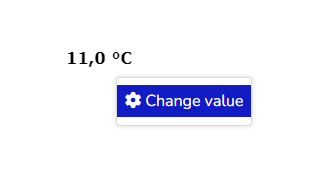
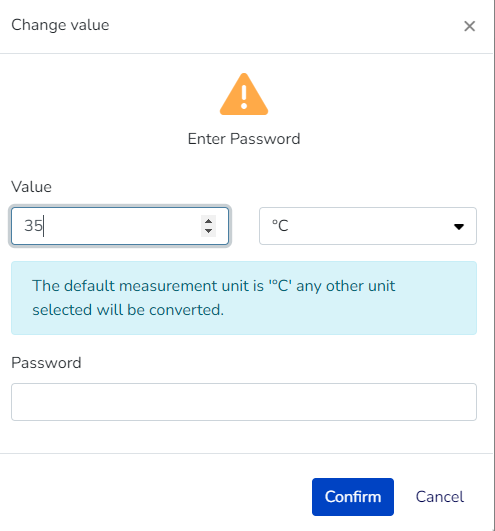
* **Value >** If the endpoint's variable type is ***scalar***, an input field is displayed with the endpoint's state value that you want to modify.
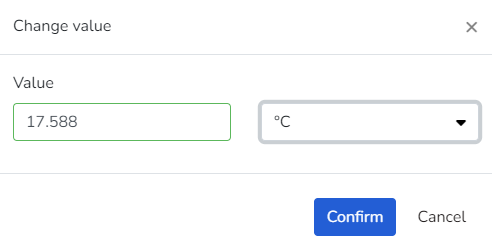
* If the selected endpoint's variable type is ***discrete***, a list of that variable's states is displayed.

* **Unit >** If the endpoint's variable type is ***scalar***, a list of measurement units based on the magnitude represented by the endpoint's state is displayed.
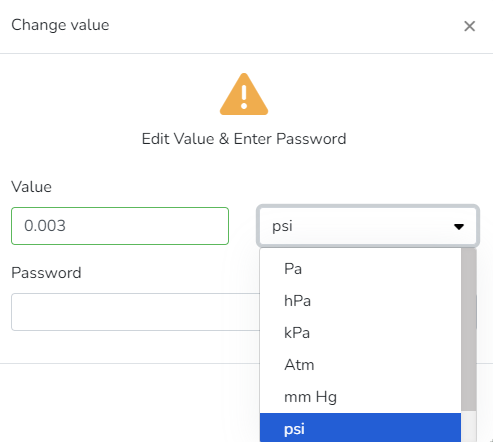
* When the sensor's security level is **Medium >** The user can configure an optional *alert message*.
* When the sensor's security level is **High >** The user can:
* Configure an alert message (*Optional*)
* The user must enter the password when editing the Endpoint to confirm the new value.

# Image
# Elements
# Text
The text element allows inserting an element that contains a fixed and predefined text, meaning a text defined by the user that will not change once it has been configured.
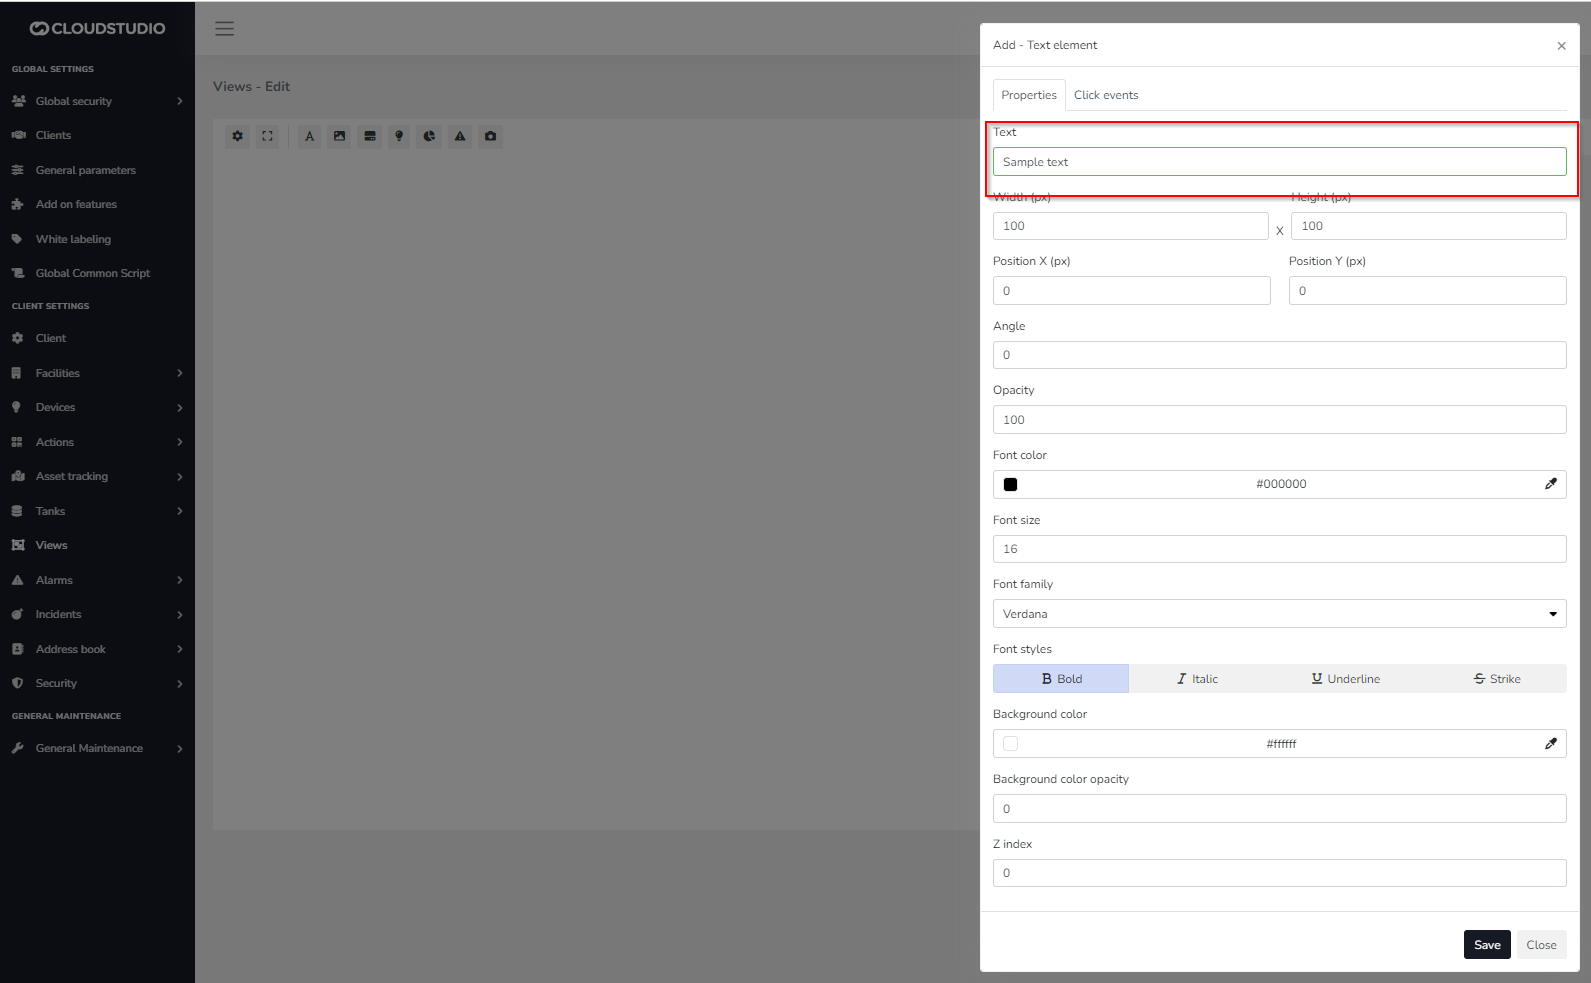
# Environment
The environment (env) object is the entry point to the context in which other objects exist that represent business entities in the platform such as the facility, devices and endpoints, allowing access to their methods and properties in action script development.
Properties
| (integer) clientID |
| -------------------------------------------------------------------------------------- |
| The clientID property gets the unique client identifier to which the facility belongs. |
| Examples |
| let client= env.clientID env.log(client) |
| (object) facility |
| ---------------------------------------------------------------------------------- |
| The facility property returns a facility object, see facility for more information |
| Examples |
| let facility = env.facility env.log(facility) |
| facility\[] facilities |
| ----------------------------------------------------------------------------------------------- |
| The facilities property returns an array of facility objects, see facility for more information |
| Examples |
| let facilities = env.facilities env.log(facilities ) |
| (integer) facilityID |
| ------------------------------------------------------------------ |
| The facilityID property gets the unique identifier of the facility |
| Examples |
| let facilityId = env.facilityID env.log(facilityId) |
| (bool) testMode |
| --------------------------------------------------------------------------------- |
| The testMode property indicates whether the script is running in test mode or not |
| Examples |
| let test = env.testMode env.log(test) |
# Facility
Properties
| (string) description |
| -------------------------------------------------------------------------------------------------- |
| The description property gets the description that has been defined in the facility configuration. |
| Examples |
| let facilityDescription= env.facility.description env.log(facilityDescription) |
| (object) devices |
| ------------------------------------------------------------------------------- |
| The devices property returns a devices object, see devices for more information |
| Examples |
| let devices= env.facility.devices env.log(devices) |
| (object) endpoints |
| --------------------------------------------------------------------------------------- |
| The endpoints property returns an endpoints object, see endpoints for more information. |
| Examples |
| let endpoints= env.facility.endpoints env.log(endpoints) |
| (integer) facilityID |
| --------------------------------------------------------------------- |
| The facilityID property returns the unique identifier of the facility |
| Examples |
| let facilityID= env.facility.facilityID env.log(facilityID) |
# Scripting objects, methods and properties
In these pages you will find the guide to the objects, their properties and methods that are available for developing action scripts.
It is recommended to start reading from [here](/docs/configuracion-del-cliente/acciones/pasos/scripting-objects-methods-and-properties/environment). For any needs or questions about action development, you can request support [here](https://www.cloud.studio/support/) at any time.
# Batch Device Creation
The **batch device creation** feature allows users to efficiently load multiple devices using a CSV file. This tool is especially useful for large-scale installations, as it avoids manual entry one by one, even allowing you to combine different device models in a single file.

Reference File [#reference-file]
Before uploading, the platform offers a sample CSV file for download. This file contains the structure and columns needed to facilitate correct device entry. A sample file is generated for each registered device model, although you can later include devices of different models in the same file.
Each row in the file represents a device, and each column represents an attribute. The required fields are described below:
**Description**: the name used to identify the device
**Address**: the device's address (logical address)
**Device model**: the device type, created in the Device Models section, that indicates its characteristics, such as: endpoints, offline timeout periods, etc.
**Device model ID**: a unique identifier for the device model
**Latitude**: one of the two coordinates for geolocating the device (position relative to the equator line)
**Longitude**: one of the two coordinates for geolocating the device (east-west orientation, relative to meridians)
**Icon ID**: identifier for the device's image icon
**Default dashboard ID**: identifier for the default dashboard for that device
**Default view ID**: identifier for the default view for that device
**Communication Interface**: name used to identify the device in the Device Gateway
Upload Process [#upload-process]
Once the CSV file is prepared, it can be easily uploaded from the corresponding feature, either by browsing or dragging the file to the designated area.

After selecting the file and clicking **Next**, you access an **editable preview** showing all included devices. At this stage:
The system validates the data automatically.
Detected errors are highlighted for easy inline correction.
Values can be edited directly from the preview.
When the file has no errors and the data has been verified, press **Confirm** to execute the batch creation.
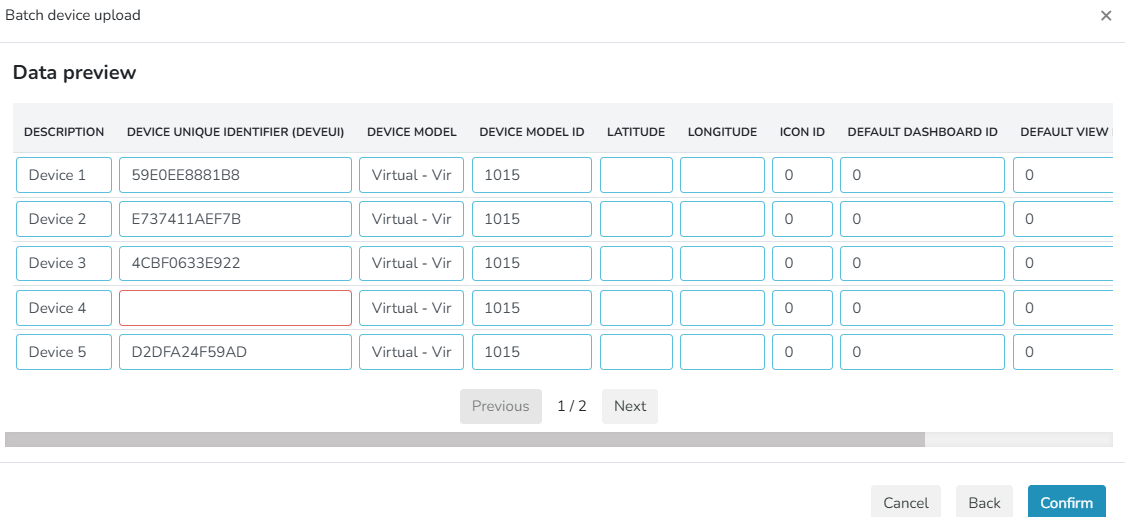
Confirmation and Display [#confirmation-and-display]
Once the process is complete, the system shows a summary indicating:
* Which devices were created successfully.
* Which could not be created (for example, if they already existed in the instance).

By clicking **Save**, the new devices are integrated into the general list of the corresponding instance.

# Devices
When creating a device in Gear Studio, you can choose its model. Gear Studio supports two types of device models:
* **Models built into Gear Studio**. These are native, platform-certified models that are supported without any integration. For these device models, you generally only need to configure each device to report to the platform, and the platform will then automatically receive and process the information. When creating a device corresponding to a natively supported model, all necessary endpoints will be created automatically.
* **User-defined models**. These models are managed from the [device models](/docs/configuracion-del-cliente/dispositivos-y-endpoints/dispositivos/modelos-de-dispositivo) page. User-defined models are used to create devices that the platform does not natively support.
When you need to create a device corresponding to a user-defined model, the model must be created beforehand using the [device models](/docs/configuracion-del-cliente/dispositivos-y-endpoints/dispositivos/modelos-de-dispositivo) page.
To begin creating a device, navigate to the side menu and select **Devices**. This page shows the list of devices currently available in the facility, along with the list of endpoints defined for each one. If you need more information about the difference between devices and endpoints, we recommend consulting [this page](/docs/configuracion-del-cliente/dispositivos-y-endpoints).
To create a new device, choose the **Add** option.
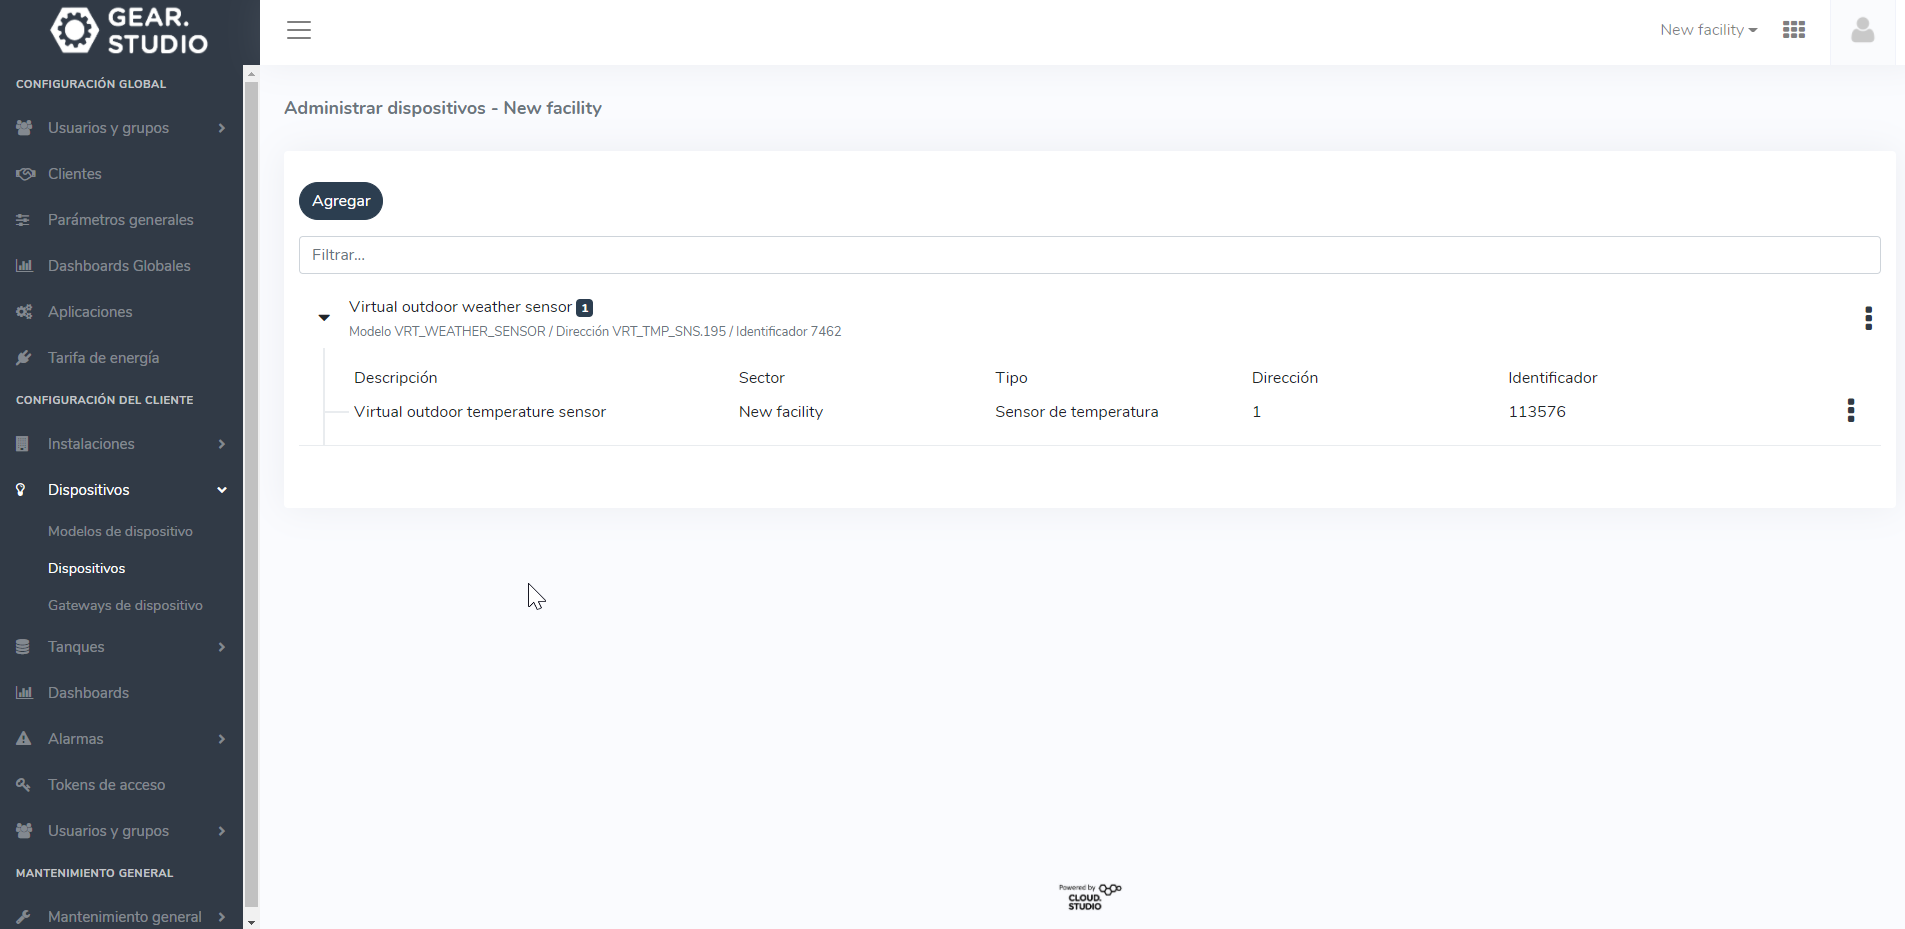
Next, you will be presented with some fields to fill in. In the **Description** field, add a name to easily identify the device -- we will name it **Custom Device**. Then expand the **Models** dropdown offered by the platform and select the desired one. In our case, we select our **Test Model**.
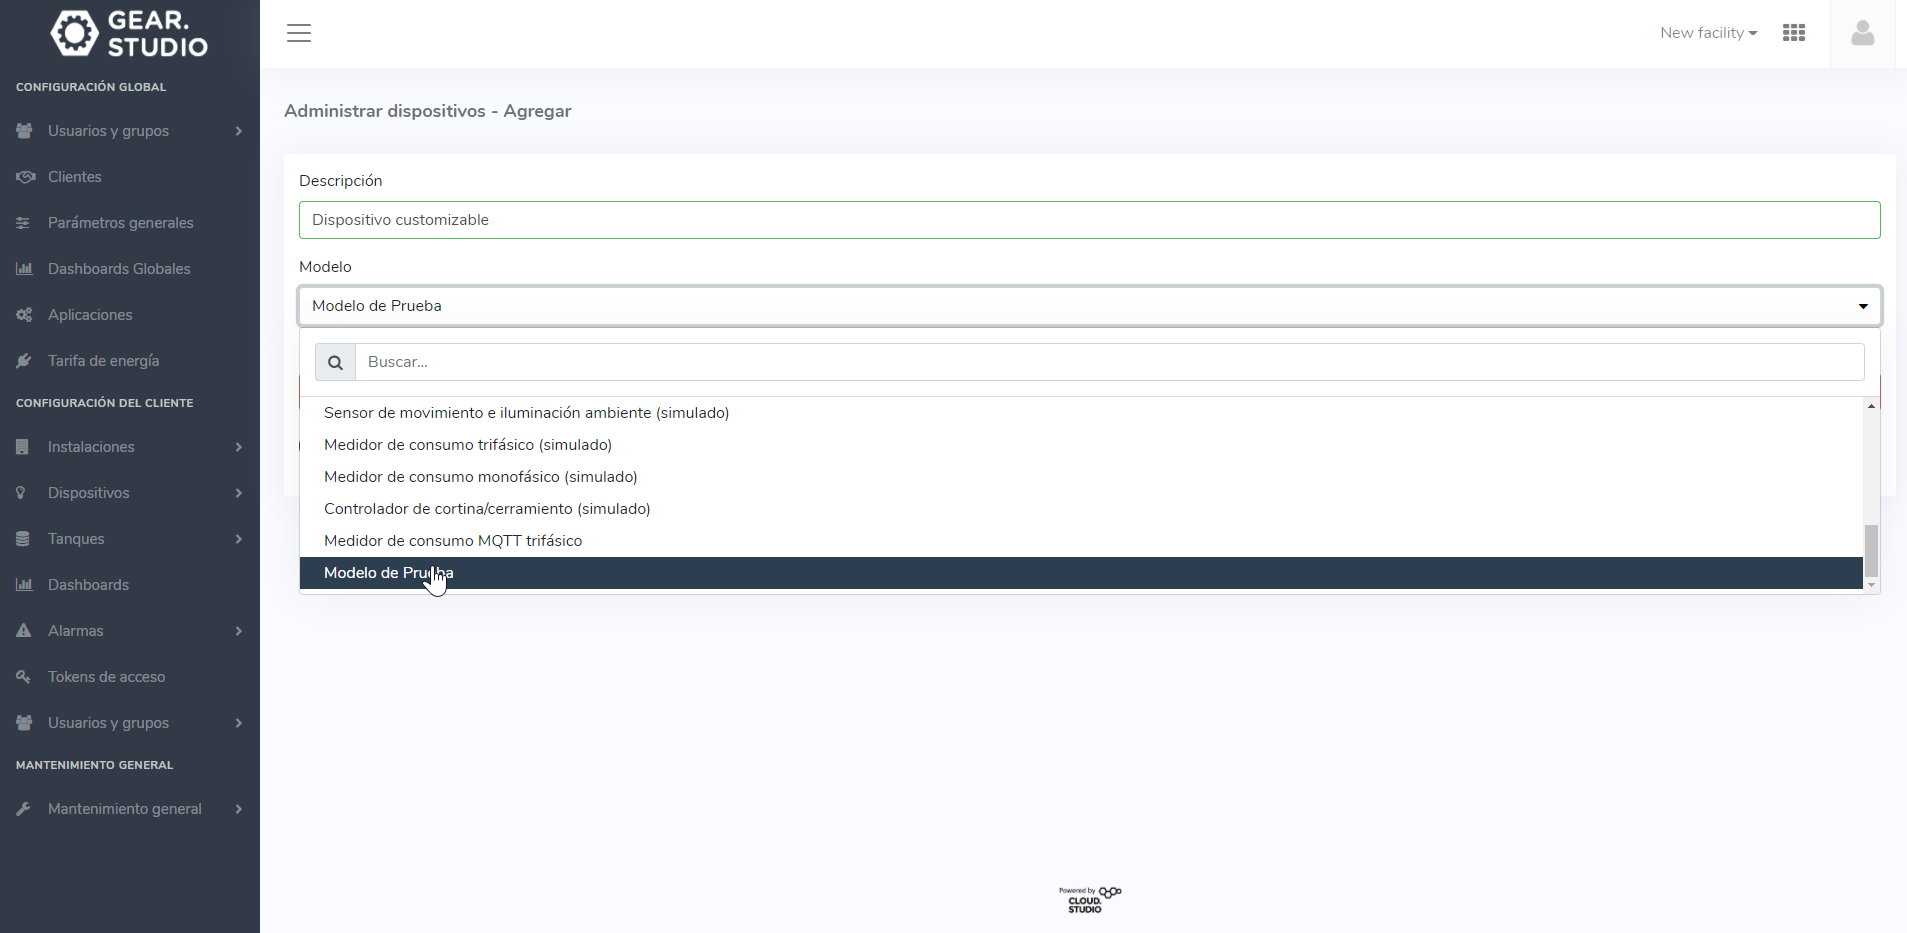
You must also add a unique address for the device. We recommend **using a MAC address or a naming convention with a consistent pattern** to simplify management, whenever possible.
> For certain device models, the platform will automatically validate the address format. This typically occurs for native devices where the platform already knows the address must be a valid MAC.
In our case, since our device has a model created by us, we add the address we want, then press **Save**.

We have returned to the list of created devices where we can see our custom device, which has zero endpoints. However, we have the ability to add and remove as many as needed.
> As mentioned earlier, if you created a device corresponding to a natively supported model on the platform, all corresponding endpoints will also be created automatically.
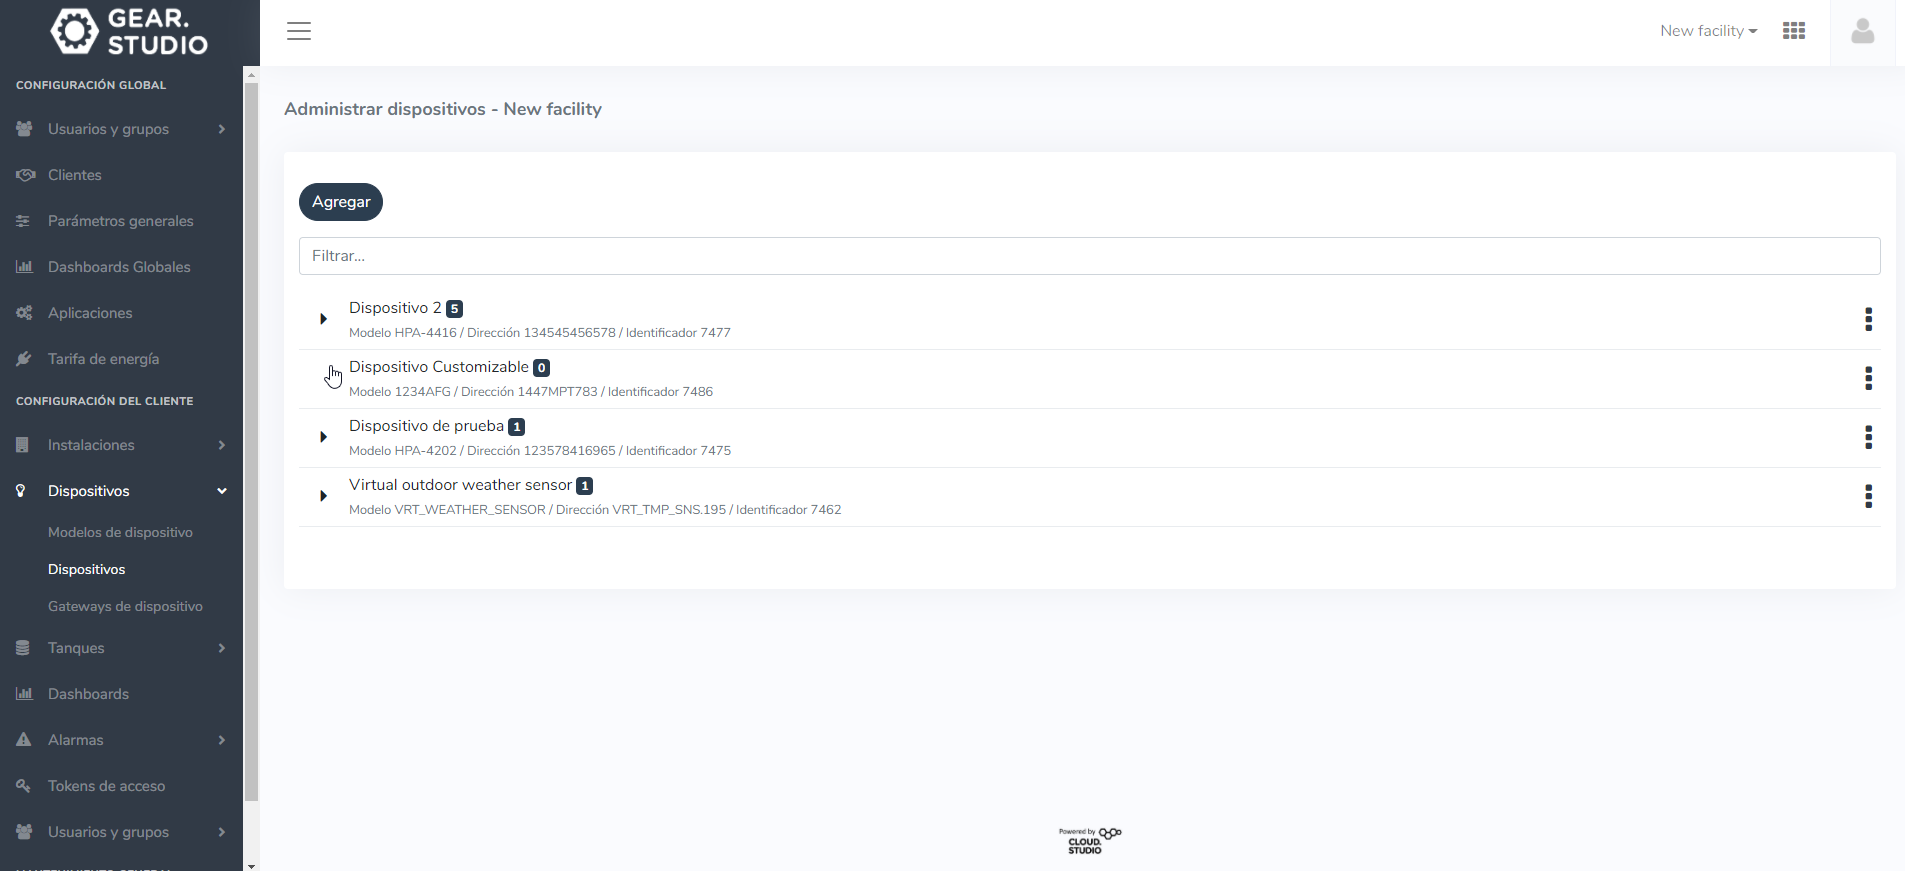
More Information [#more-information]
For more information about the differences between devices and endpoints, we recommend reading [devices and endpoints](/docs/configuracion-del-cliente/dispositivos-y-endpoints). To learn how to manage endpoints, read the [endpoints](/docs/configuracion-del-cliente/dispositivos-y-endpoints/endpoints/crear-un-endpoint) section in the tutorials list.
# Device Model Promotion
On the platform, device models can exist at the **local** level (specific to a client) or at the **global** level (available to all clients in the instance). This feature allows **promoting a local device model to a global model**, with the goal of reusing configurations across different clients.
When promoting a local model to global:
It is **removed from the local models list** of the original client.
It is **added to the global models list**, accessible by all clients in the instance.
It becomes **available for creating new devices** at the global level.
Warning: This process is **not reversible**.
How to Promote a Device Model [#how-to-promote-a-device-model]
Go to the **Device Models** section of the original client.
Right-click on the desired model to open the **context menu**.
Select the **Promote to Global** option.
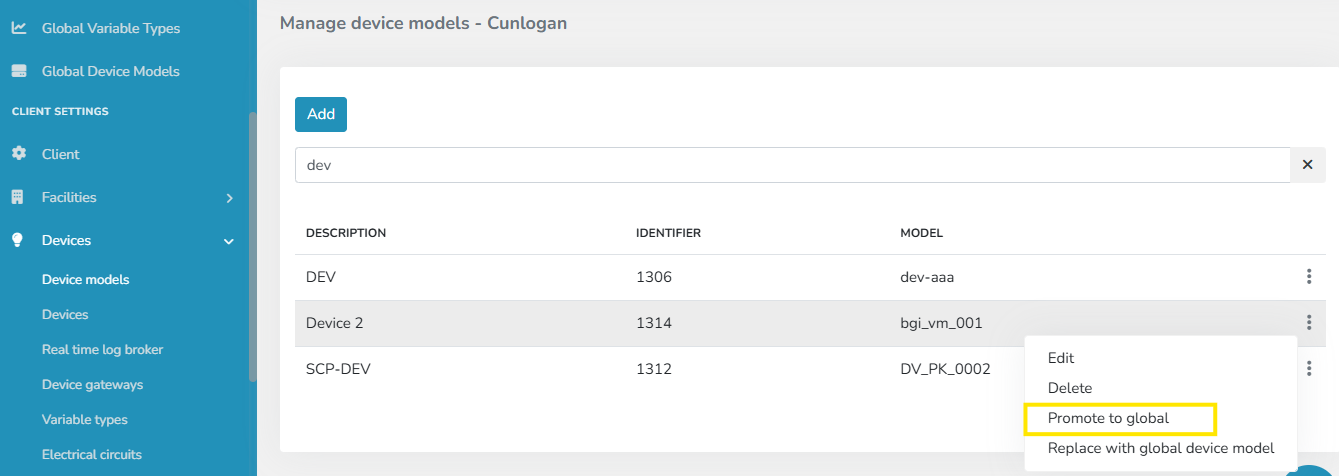
Action Confirmation
When selecting this option, a message will be displayed requesting confirmation of the action.
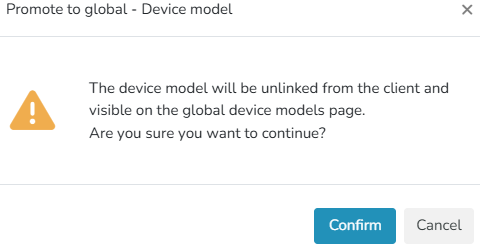
[#-1]
Promotion Result
* The model **will no longer be available** in the client's local models list.
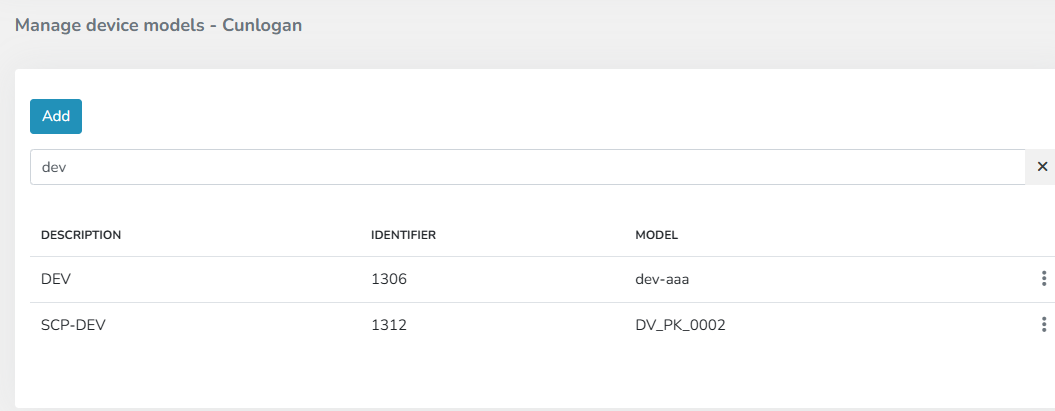
* It will be visible in the **Global Device Models list**.
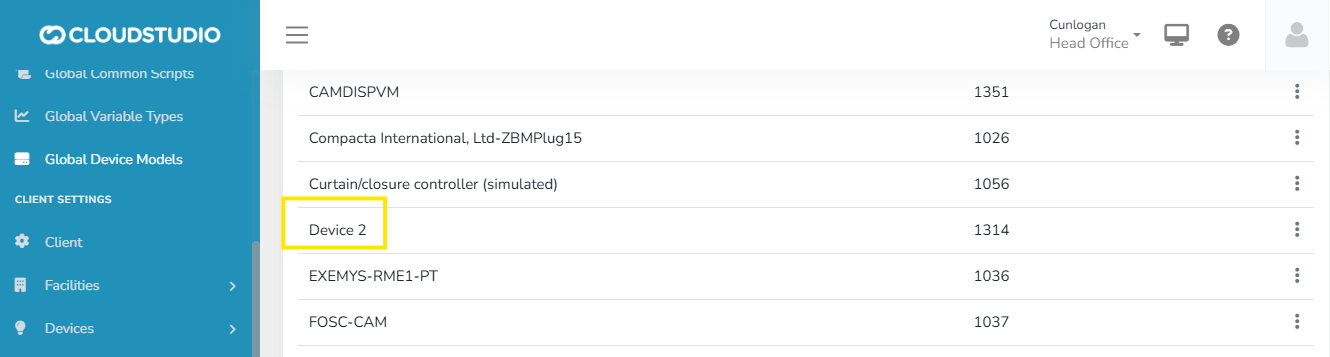
* It will be available to **all clients in the instance** when creating new devices.
This action can be performed on **any device model** belonging to a client.
# Raspberry Pi Pico W Integration Example
By [Humai](https://ihum.ai/)
**Cloud Studio** has all the necessary resources to offer a comprehensive solution to professionals working in the **IoT** field, enabling the creation of notifications and alarms, and the development of visualization panels to display real-time information about the performance and status of the **IoT devices** they wish to connect.
To illustrate this, we will show a practical example with the **Raspberry Pi Pico W (RPico W)** development board, monitoring its internal temperature and sending the corresponding data to the **Cloud Studio** platform via the **HTTP** protocol. This will allow us to generate charts representing the historical and current values of the variable we are monitoring.
We will start by including the necessary lines of code to establish the **RPico W** connection to a **WiFi** network. To do this, we will need to use the *network* library, which provides the necessary tools for network configuration and management on devices running **MicroPython**.
To organize the steps efficiently, we will define a function called *connect()* to handle the **WiFi** network connection, and implement a *try/except* exception handling structure to manage possible errors.
We will also include the configuration of the **Analog-to-Digital Converter** (*ADC*) connected to the **RPico W** internal temperature sensor, along with a *conversion factor* that establishes a mathematical way to convert the number produced by the **ADC** into a fair approximation of the actual voltage it represents. Subsequently, we will add the necessary lines of code to perform the actual sensor reading. Keep in mind that this configuration must be adjusted according to the sensor being used for your **IoT** project.
This first part of the complete code is as follows:
```
import network
from machine import Pin, ADC
from utime import sleep
ssid = 'CAMBIA POR TU SSID'
password = 'TU PASSWORD'
sensor_temp = ADC(4)
factor_conversion = 3.3 / (65535)
def connect():
red = network.WLAN(network.STA_IF)
red.active(True)
red.connect(ssid,password)
while red.isconnected() == False :
print("Estableciendo conexión..")
sleep(1)
ip = red.ifconfig()[0]
print("Conexión Establecida")
print(red.ifconfig())
return ip
try:
ip = connect()
except KeyboardInterrupt:
machine.reset()
```
On the other hand, in **MicroPython**, the *urequests* library is used to make HTTP requests over the internet. This library allows devices using **MicroPython**, such as the **RPico W**, to interact with web services and access remote resources, such as **Cloud Studio** in this case.
The *urequests* library simplifies the process of sending GET, POST, PUT, or DELETE requests to specific URLs, as well as handling responses and received data. By using *urequests*, resource-constrained devices can take advantage of web service communication functionality efficiently and effectively.
To begin, we will import the *urequests* library along with the previously loaded libraries:
```
import network
import urequests as req
from machine import Pin, ADC
from utime import sleep
```
Now we will proceed to integrate our code with the **Cloud Studio** platform. To do this, we will start by using two pieces of data that are fundamental for interacting with an **IoT platform** and accessing its services: the *access\_token* and the *endpointID*.
The *access\_token* is a security credential used to authenticate and authorize access to the **IoT platform**. On the other hand, *endpoints* are the addresses through which we can send requests to the **IoT platform** API. These *endpoints* are represented as specific URLs indicating the location of a service or resource on the platform.
Remember that we must first create our device on the platform (in our case the **RPico W**) and the corresponding endpoint(s) for the variable we want to monitor (in our case the internal temperature).
In this case, to monitor the temperature of our **RPico W**, we will define the following:
```
# Esto se obtiene de la wiki de Cloud Studio
temperature_url = 'https://gear.cloud.studio/services/gear/DeviceIntegrationService.svc/UpdateTemperatureSensorStatus'
# Esto se obtiene de la platafroma de Cloud Studio
access_token = 'COLOCA TU ACCESS TOKEN'
internal_temperature = 'COLOCA EL ENDPOINT ID CORRESPONDIENTE AL SENSOR INTERNO DE TEMPERATURA'
```
Access the information about Access tokens [here](/docs/configuracion-del-cliente/tokens-de-acceso-access-tokens).
Next, we will create the *payload*, which represents the set of data sent in an **HTTP** request. In this case, it will be structured as follows:
```
payload_temperature = {
'accessToken': access_token, # Se repite en todos los payloads que realicemos
'endpointID': internal_temperature, # Es un numero entero y se modifica de acuerdo al sensor que utilicemos
'temperatureCelsius': 30 # Valor inicial aleatorio
}
```
And now we will define a *enviar\_datos()* function that effectively transmits the data to the **Cloud Studio** platform:
```
def enviar_datos(ip):
while True:
# Realizo la lectura correspondiente
lectura = sensor_temp.read_u16() * factor_conversion
temperature = 27 - (lectura - 0.706) / 0.001721
# La agrega el dato al payload
payload_temperature['temperatureCelsius'] = temperature
print('Tomando temperatura del sensor interno', payload_temperature['temperatureCelsius'])
# Le envío al servidor y aguardo la respuesta del servidor (200)
response = req.post(temperature_url, json = payload_temperature)
print('Respuesta del servidor: ', response.status_code)
response.close()
sleep(1)
```
Additionally, we will incorporate the *enviar\_datos()* function within the *try/except* exception handling structure to manage possible errors.
```
try:
ip = connect()
enviar_datos(ip)
except KeyboardInterrupt:
machine.reset()
```
The complete code is as follows:
```
import network
import urequests as req
from machine import Pin, ADC
from utime import sleep
ssid = 'CAMBIA POR TU SSID'
password = 'TU PASSWORD'
sensor_temp = ADC(4)
factor_conversion = 3.3 / (65535)
# Esto se obtiene de la wiki de Cloud Studio
temperature_url = 'https://gear.cloud.studio/services/gear/DeviceIntegrationService.svc/UpdateTemperatureSensorStatus'
access_token = 'COLOCA TU ACCESS TOKEN'
internal_temperature = 'COLOCA EL ENDPOINT ID CORRESPONDIENTE AL SENSOR INTERNO DE TEMPERATURA'
payload_temperature = {
'accessToken': access_token, # Se repite en todos los payloads que realicemos
'endpointID': internal_temperature, # Es un numero entero y se modifica de acuerdo al sensor que utilicemos
'temperatureCelsius': 30 # Valor inicial aleatorio
}
def connect():
red = network.WLAN(network.STA_IF)
red.active(True)
red.connect(ssid,password)
while red.isconnected() == False :
print("Estableciendo conexión..")
sleep(1)
ip = red.ifconfig()[0]
print("Conexión Establecida")
print(red.ifconfig())
return ip
def enviar_datos(ip):
while True:
# Realizo la lectura correspondiente
lectura = sensor_temp.read_u16() * factor_conversion
temperature = 27 - (lectura - 0.706) / 0.001721
# La agrega el dato al payload
payload_temperature['temperatureCelsius'] = temperature
print('Tomando temperatura del sensor interno', payload_temperature['temperatureCelsius'])
# Le envío al servidor y aguardo la respuesta del servidor (200)
response = req.post(temperature_url, json = payload_temperature)
print('Respuesta del servidor: ', response.status_code)
response.close()
sleep(1)
try:
ip = connect()
enviar_datos(ip)
except KeyboardInterrupt:
machine.reset()
```
If the data was sent successfully, you should see the HTTP *200* code in your compiler console, as shown in **Figure 01**. This confirms proper communication with the platform.
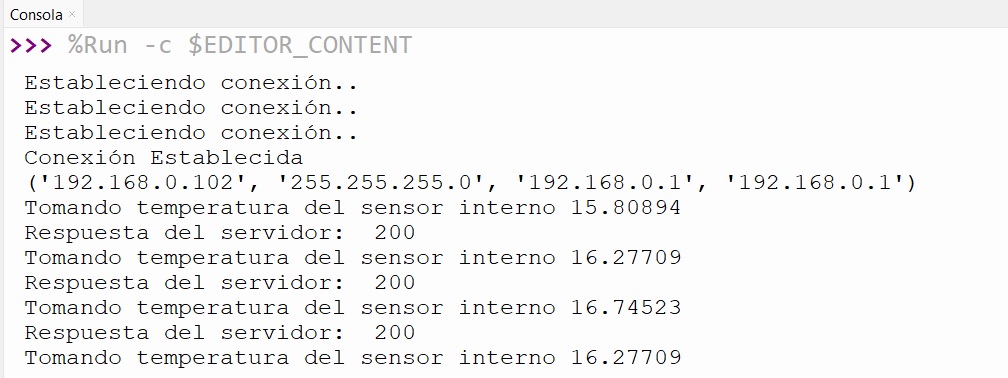
*Figure 01 - Successful data communication to Cloud Studio*
With this completed, everything is ready to start developing our [dashboards](/docs/monitor/dashboards) in **Cloud Studio**.
# Helium
The integration with [**Helium**](https://www.helium.com/) allows the **Cloud Studio IoT Platform** to communicate with **LoRaWAN** devices using a variety of device models available on the market. This article describes the steps necessary to complete the integration.
Requirements [#requirements]
Prior to integration, the user must have:
* An instance identifier. Depending on your Gear Studio subscription, the most common instance names are:
* **gear.cloud.studio**. This instance name corresponds to a common Gear Studio instance, including the free version.
* **xxxx.cloud.studio**. This instance name corresponds to Flex instances where hosting is provided by Cloud Studio, but the client can choose the subdomain used (xxxx).
* **Other**. For Enterprise clients using their own domain, the chosen domain name should be used.
* An [Access Token](/docs/configuracion-del-cliente/tokens-de-acceso-access-tokens). Data sent from [Helium Console](https://console.helium.com/) will use this access token to access the platform, and therefore Helium will have the permissions associated with this access token. It is recommended to create a new access token specifically for the Helium integration to simplify security control.
Creating a Connection with UI [#creating-a-connection-with-ui]
Log in to [console.helium.com](https://console.helium.com/). Then follow these steps:
1. Click on Integrations -> Add New Integration -> HTTP\*\*.\*\*
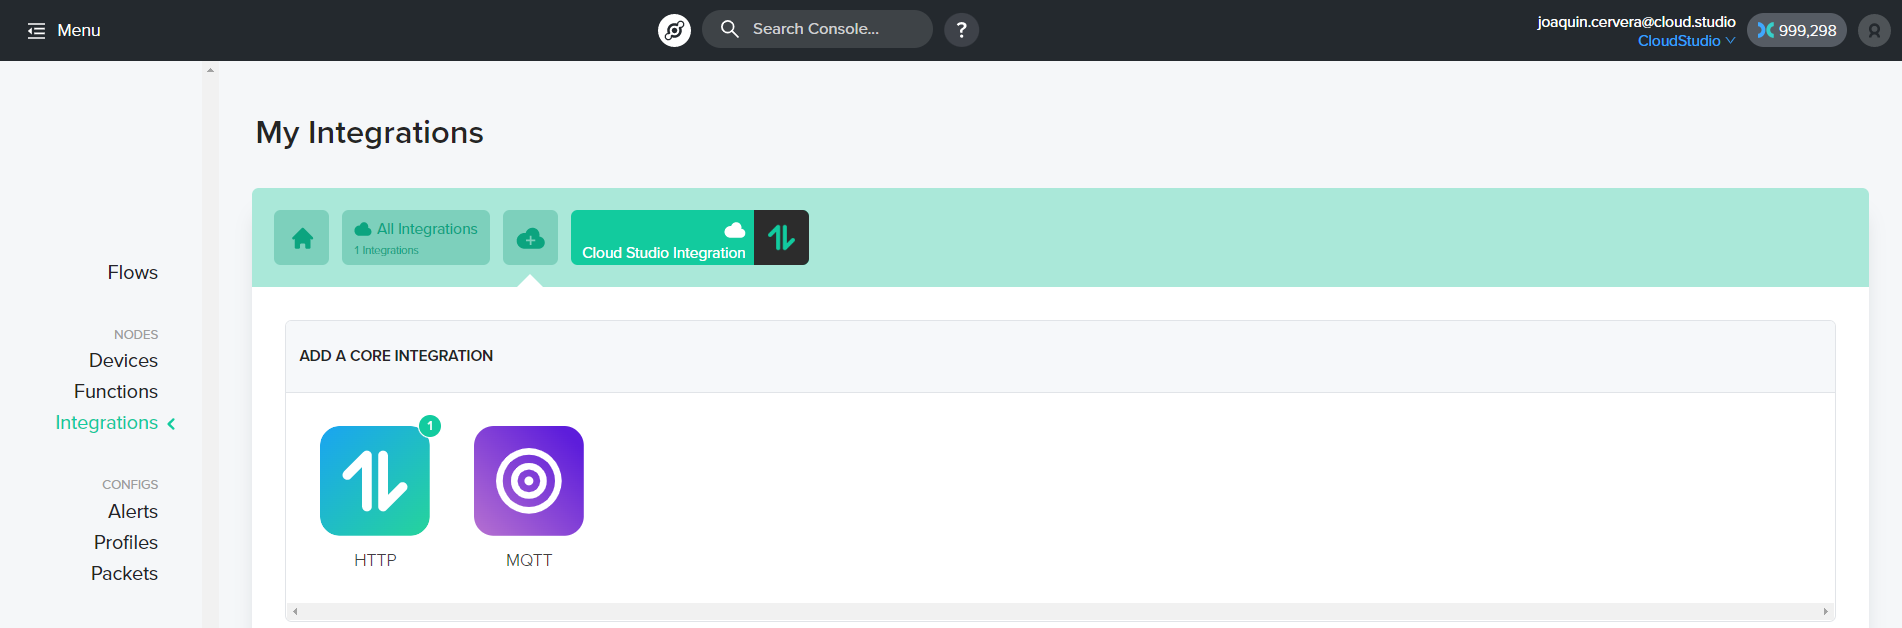
2. A new page will open. You will need to update the information within the section: "Update your connection details".
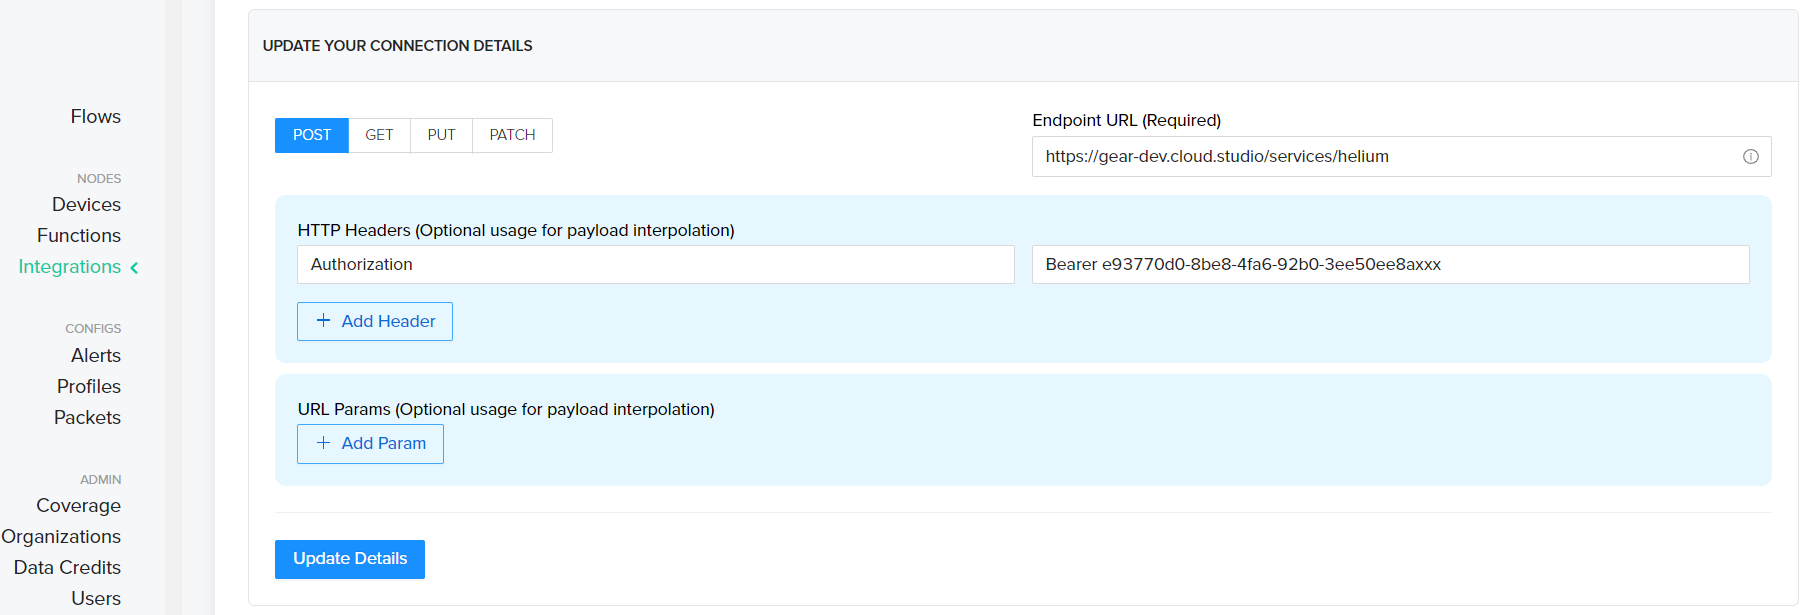
The fields to update are:
* **Endpoint URL (Required):** Must be filled with the instance URL followed by "/service/helium". For example, when using the general Gear.cloud.studio instance, the URL to enter would be [https://gear.cloud.studio/services/helium](https://gear.cloud.studio/services/helium).
* **HTTP Headers (Optional usage for payload interpolation):** The "Key" variable must be filled with the word "Authorization" and the "Value" variable must be filled with the word "Bearer" followed by the previously generated access token, separated by a space.
Finally, add the selected name for the integration and click "Add the integration".
3\. Within the main menu, go to the **Flow** option, add the devices (previously connected), add the integration created in the previous step, and then connect both nodes.
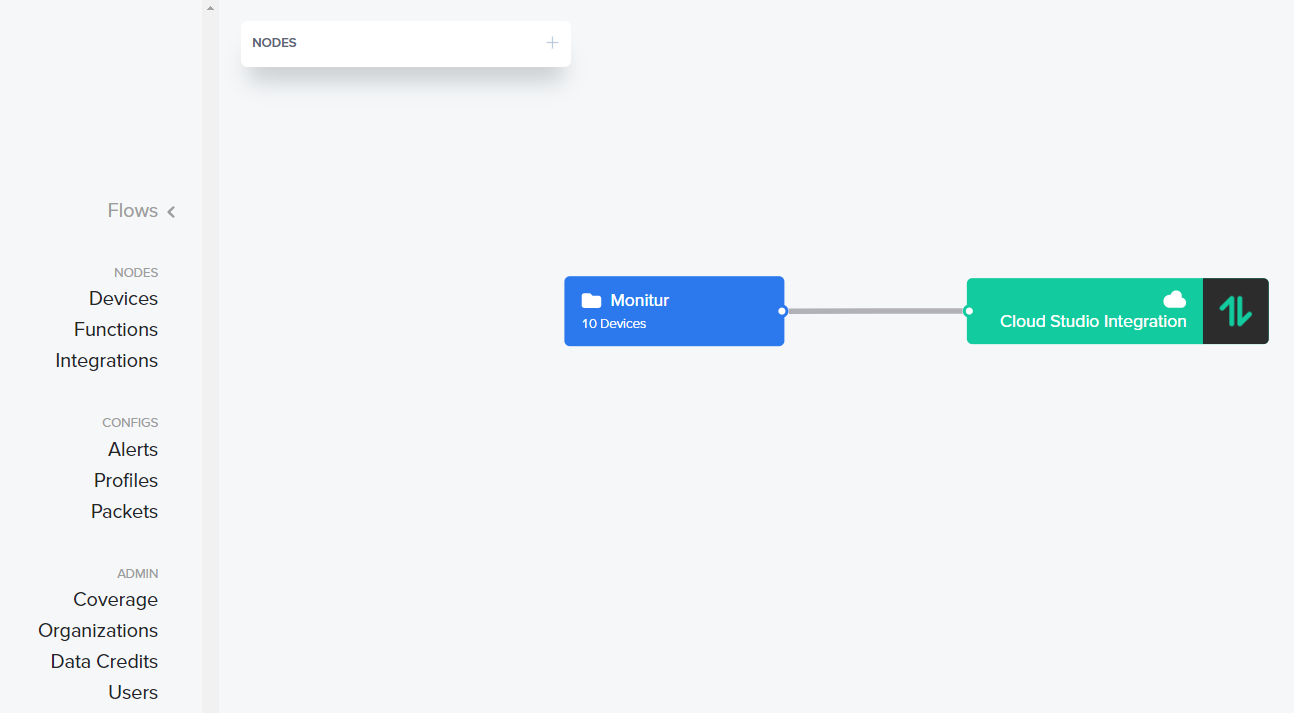
4. You can verify the correct data delivery by clicking on the device and then clicking on the "Debug" tab.
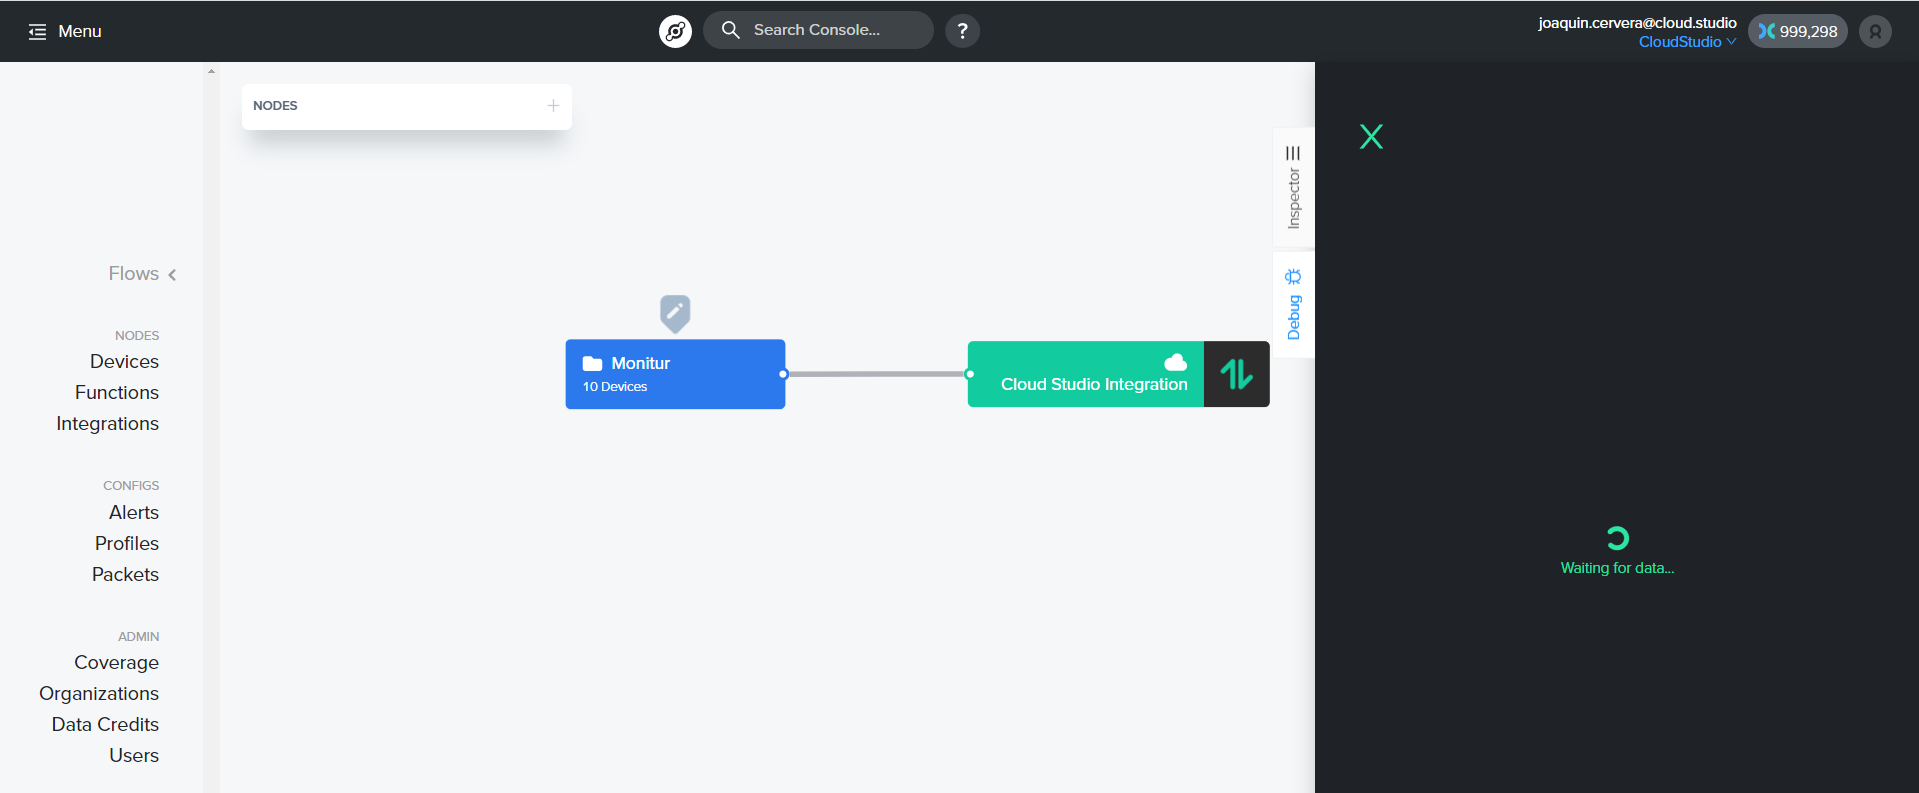
Viewing Information on the Cloud Studio IoT Platform [#viewing-information-on-the-cloud-studio-iot-platform]
Connect to your **Gear Studio** instance and navigate to the configuration.
1\. Go to the **Devices** section and click the **Add** button to [create a new Device](/docs/configuracion-del-cliente/dispositivos-y-endpoints/dispositivos/dispositivos).

2\. Fill in the form using the **Device Model** created earlier (or using the available drivers), select the "**Helium interface**" communication interface, and the **Address** field corresponds to your **DevEUI** (find it in the **Helium** device list).
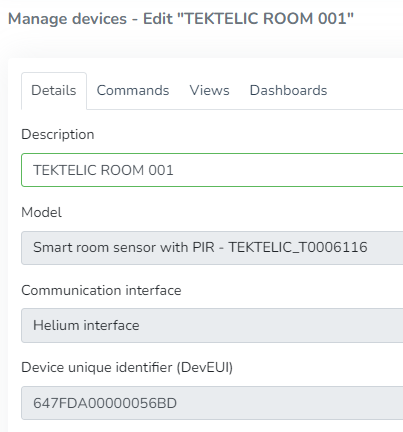
3\. After the device is created, data reported to the platform will be displayed in the **Endpoints** section in the left menu of the **Monitor**. Note that **LoRaWAN** devices may report every 5 to 15 minutes, so the display will depend on this interval.
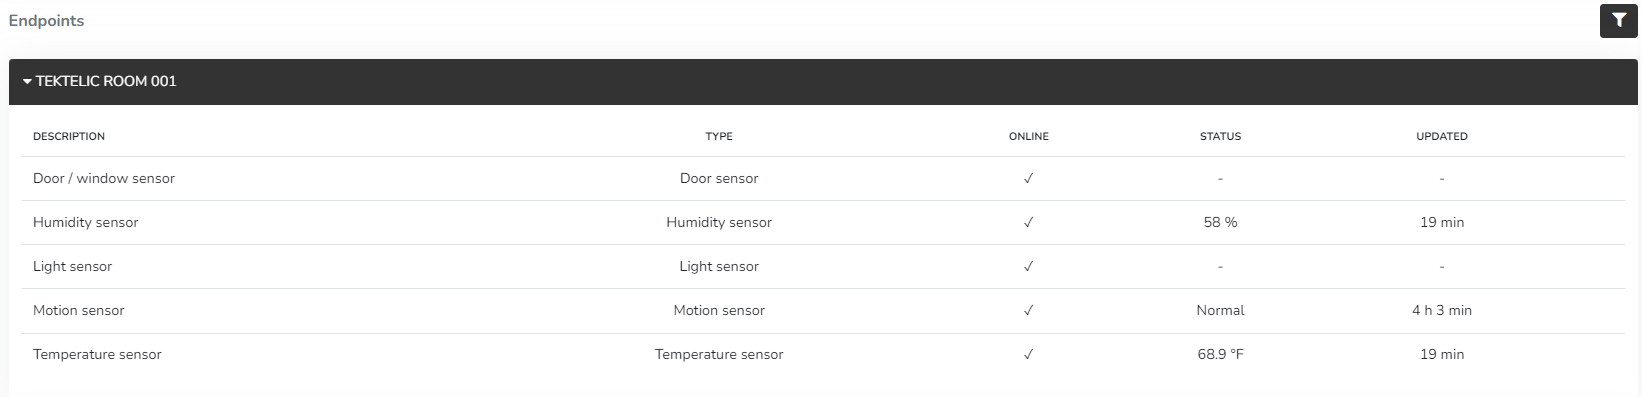
4\. Once the devices are correctly connected, you can create a custom **Dashboard** using a wide variety of **Widgets** to display the data being sent by the device.
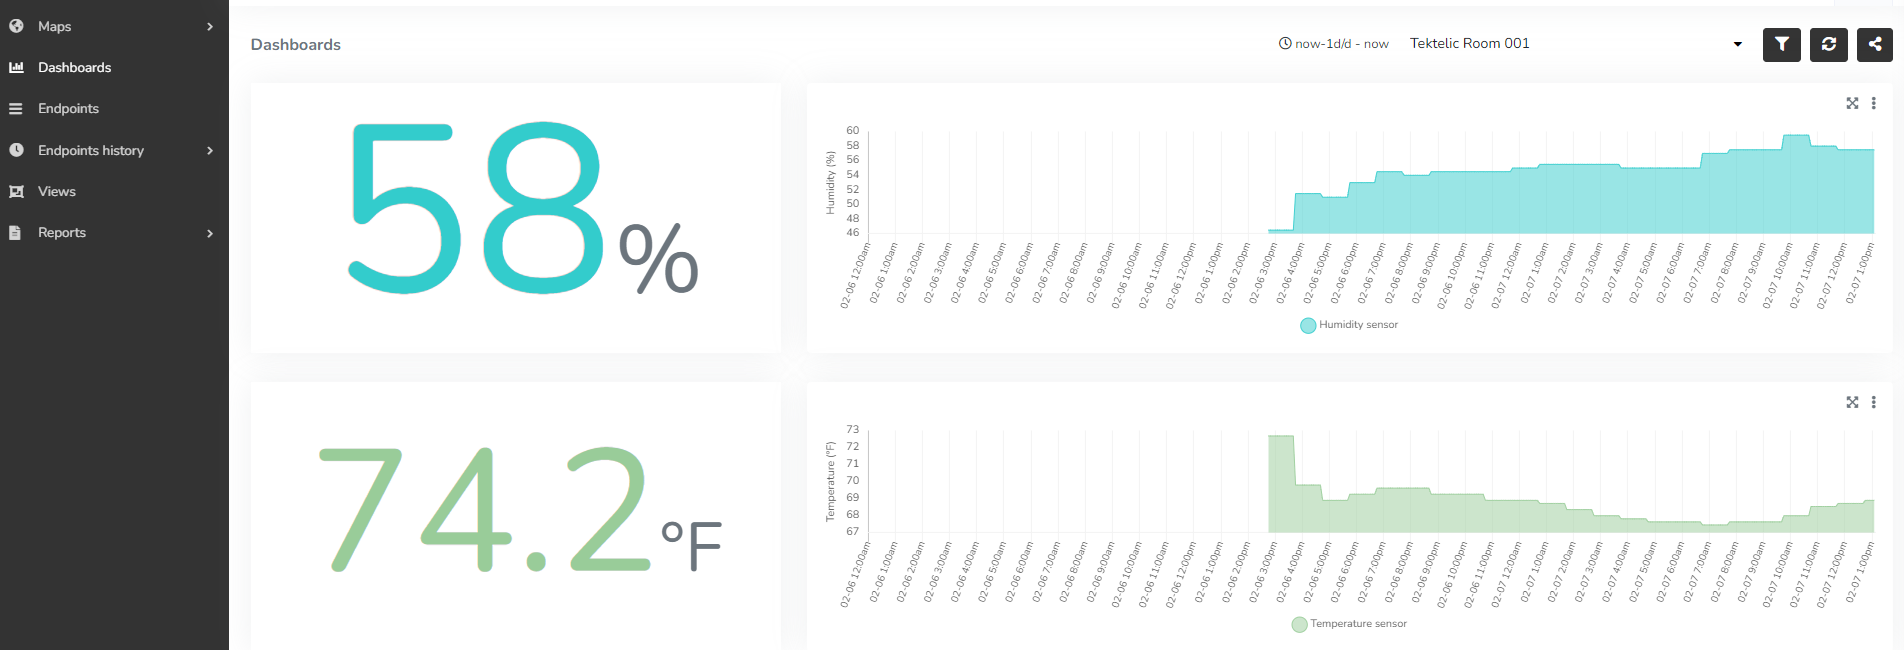
# Device Integration
Introduction [#introduction]
This section explains how to integrate devices into the Gear Studio platform, that is:
* How to get devices to send data to the platform.
* How to get the platform to send data to devices, if the devices support it.
Once a device is integrated into the platform, the following is possible:
* Create dashboards that display device status in real time.
* View information in a variety of reports.
* Create configurable alerts with email and SMS notifications.
* Export information using APIs.
* Monitor and control devices from Gear Studio web applications.
* Monitor and control devices from iOS and Android using the Gear Studio app.
**Important**: device integration is not only available for commercial devices, but also allows connecting custom-made devices based on [Arduino](https://www.arduino.cc/), [nodeMCU](https://www.nodemcu.com/), [Raspberry Pi](https://www.raspberrypi.org/) and many more.
If you are not sure what exactly a "device" is, you can use this page to learn more about [devices and endpoints](/docs/configuracion-del-cliente/dispositivos-y-endpoints).
Key Concepts [#key-concepts]
Data Messages [#data-messages]
Integrations are primarily responsible for processing messages received from devices so they can be processed by the platform, as well as converting commands sent by the platform into a format that devices can process. Two types of messages are considered:
* **Uplink**: uplink messages are all those sent from devices to the platform. The platform must be able to process uplink messages to store the relevant information and process it.
* **Downlink**: downlink messages are those sent from the platform to devices, typically in the form of commands. Some devices do not support downlink messages, while others only support them for specific configuration operations.
Many devices have a native integration in the Gear Studio platform, and all that is needed is to connect and configure them correctly. For devices not natively supported, integration consists of defining how uplink messages are processed and how downlink messages are built.
Device Models [#device-models]
Uplink and downlink message processing is performed per [device model](/docs/configuracion-del-cliente/dispositivos-y-endpoints/dispositivos/modelos-de-dispositivo). For natively supported devices, the integration is already available without additional work.
When a device is not natively supported, integration mostly consists of creating a device model that correctly represents it, and specifying how uplink messages are processed and how downlink messages are built. In these cases, scripts can be used to automatically handle all the work, so that these device models behave the same way as if they were natively supported.
Getting Started [#getting-started]
Creating an Access Token [#creating-an-access-token]
For integrations performed via HTTP, MQTT, or LoRaWAN, it is first necessary to create an access token. [This page](/docs/configuracion-del-cliente/tokens-de-acceso-access-tokens) contains more information about access token management. Access tokens allow controlling the access and permissions used for any operation.
Selecting a Device Model [#selecting-a-device-model]
It is important to understand whether the device to integrate is natively supported on the platform. If so, no additional work is needed. However, if the device model is not supported, you will need to create a new device model. See [this reference](/docs/configuracion-del-cliente/dispositivos-y-endpoints/dispositivos/modelos-de-dispositivo) for more information on this topic.
Creating a Device [#creating-a-device]
Once you have an access token and the platform contains the device model to integrate, all that remains is to create it on the platform so it can connect. This can be accomplished by following [this guide](/docs/configuracion-del-cliente/dispositivos-y-endpoints/dispositivos/dispositivos). If you are not sure what exactly a "device" is, you can use this page to learn more about [devices and endpoints](/docs/configuracion-del-cliente/dispositivos-y-endpoints).
If the device model is natively supported, or if a device model has been created to represent it along with a script that defines the endpoints it contains, no other steps are necessary. However, in some cases, you may need to manually create endpoints within the device. In that case, you can do so by following [this guide](/docs/configuracion-del-cliente/dispositivos-y-endpoints/endpoints/crear-un-endpoint). If you are not sure what exactly an "endpoint" is, you can use this page to learn more about [devices and endpoints](/docs/configuracion-del-cliente/dispositivos-y-endpoints).
Integration Options [#integration-options]
Currently, there are three integration alternatives, detailed below.
| Integration | Reference / Help |
| ----------- | ----------------------------------------------------------------------------------------------- |
| MQTT | Device integration via MQTT |
| HTTP | Device integration via HTTP |
| LoRaWAN | Integration through The Things Stack, Integration through ThingPark, Integration through Helium |
# Configuration
| Note: The Gear Studio platform natively supports a wide variety of devices from different technologies. These devices do not require the use of scripting. The information on this page is useful for configuring new device models that are not natively supported by the platform. |
| ------------------------------------------------------------------------------------------------------------------------------------------------------------------------------------------------------------------------------------------------------------------------------------ |
Introduction [#introduction]
When creating a new model for a device that is not natively supported by the platform, it is advisable to define some scripts that improve the user experience and add more functionality. The scripts will then be used by all devices of that model, which also saves considerable work since it only needs to be done once.
Defining a script for the initial configuration of a device model allows you to:
* Specify the device structure, i.e., which endpoints it contains and their types and subtypes.
* Define validation rules for the device address (for example, verifying that the address has a specific format).
* Define user interface rules:
* Address field name, to use more appropriate text for the device (for example, "DEVEUI" for a LoRaWAN device, or "MAC address" for a Wi-Fi device).
* Indicate whether the device allows manual endpoint creation.
* Indicate whether the device allows manual endpoint deletion.
* Indicate whether manually editing endpoint data, such as the subtype, is allowed.
Defining Basic Device Model Information [#defining-basic-device-model-information]
You can define basic aspects of the device model that are useful for improving the user experience. This basic information currently includes the name you want to use for the "address" field. For example, for a LoRaWAN device, it is preferable to use the name "DEVEUI" instead of "address", or use "MAC address" for a Wi-Fi device.
The `getConfiguration` function is used for this basic configuration, as shown below.
```javascript
function getConfiguration(config)
{
config.addressLabel = {en: "DevEUI", es: "DevEUI"};
}
```
In the example above, you can see a `getConfiguration` function that changes the address field name (addressLabel), so that the end user sees it instead.
The `getConfiguration` function is automatically executed by the platform when it needs to retrieve basic device model information. The function receives a single parameter:
* **config**: this parameter is of type [device model configuration](/docs/herramientas-low-code-scripting/referencia-de-objetos-disponibles-para-scripting/device-model-configuration), and the function code must modify the properties of this object as needed. If no properties of the object are modified, the default values will be used.
If the script does not include the `getConfiguration` function, the default values will be used. For more information, see [device model configuration](/docs/herramientas-low-code-scripting/referencia-de-objetos-disponibles-para-scripting/device-model-configuration).
Defining the Device Structure [#defining-the-device-structure]
To improve the user experience when creating a device, you can specify the structure (i.e., the list of endpoints) that should be created when creating a device of this model. This simplifies the device creation process, minimizes the possibility of errors, and enables an experience identical to what can be achieved with any natively supported device model.
The `getEndpoints` function is used to obtain the list of endpoints that should be created when creating a device of this model, as shown below.
```javascript
function getEndpoints(deviceAddress, endpoints)
{
endpoints.addEndpoint("1", "Temperature sensor", endpointType.TemperatureSensor);
endpoints.addEndpoint("2", "CO2 sensor", endpointType.PpmConcentrationSensor, ppmConcentrationSensorSubType.CarbonDioxide);
}
```
The `getEndpoints` function is automatically executed by the platform before creating a device using this model. The platform will then use the value of the endpoints parameter to create the endpoints within the device. The function receives the following parameters:
* **deviceAddress**: this parameter is of type string and contains the address of the device that will be created. The parameter can be used, for example, to include it in the description of the endpoints that will be created within the device.
* **endpoints**: this parameter is of type [endpoint collection configuration](/docs/herramientas-low-code-scripting/referencia-de-objetos-disponibles-para-scripting/endpoint-configuration-collection) and contains the endpoint collection to which the script must add the endpoint list. This is achieved through the `addEndpoint()` method, as shown in the example code. For each endpoint added to the collection, you can specify the following:
* An **address**, which is unique for each endpoint within the device (but can of course be repeated in other endpoints of other devices).
* A **description**.
* An **endpoint type**.
* Optionally, an endpoint **subtype**, if applicable (see [here](/docs/herramientas-low-code-scripting/referencia-de-objetos-disponibles-para-scripting/endpoint) for more details).
If the script does not include the `getEndpoints` function, a device with no endpoints will be created.
For more information, see [endpoint configuration](/docs/herramientas-low-code-scripting/referencia-de-objetos-disponibles-para-scripting/endpoint-configuration).
Device Address Validation [#device-address-validation]
You can include the `validateDeviceAddress` function in the configuration script to validate device addresses used for all devices of this model. This prevents users from entering incorrect addresses and displays a clear message when they do. Below is an example implementation of the `validateDeviceAddress` function.
```javascript
function validateDeviceAddress(address, result)
{
address = address.toLowerCase();
result.ok = true;
if (address.length == 12) {
var validchars = ['0', '1', '2', '3', '4', '5', '6', '7', '8', '9', 'a', 'b', '', 'c', 'd', 'e', 'f'];
for (var i = 0; i < address.length; i++) {
if (!validchars.includes(address.charAt(i))) {
result.ok = false;
break;
}
}
}
else {
result.ok = false;
}
if (!result.ok)
result.errorMessage = {
en: "The address must be 12 characters long and only have hexadecimal characters",
es: "La dirección debe tener 12 caracteres y tener sólo caracteres hexadecimales"
};
}
```
The `validateDeviceAddress` function is automatically executed by the platform before creating a device using this model. The function receives the following parameters:
* **address**: this parameter is of type string and contains the address of the device that will be created. The function must verify the validity of this address.
* **result**: this parameter is of type [device address validation result](/docs/herramientas-low-code-scripting/referencia-de-objetos-disponibles-para-scripting/device-address-validation-result) and is used to indicate the validation result. Typically, the function will modify the following properties:
* **ok**: this boolean property indicates whether the address was verified correctly.
* **errorMessage**: this property, which can be of type string or [multi language literal](/docs/herramientas-low-code-scripting/referencia-de-objetos-disponibles-para-scripting/multi-language-literal), allows specifying an error message if the validation fails. If a [multi language literal](/docs/herramientas-low-code-scripting/referencia-de-objetos-disponibles-para-scripting/multi-language-literal) object is used, messages in different languages can be specified.
If the script does not include the `validateDeviceAddress` function, any address will be considered valid.
For more information, see [device address validation result](/docs/herramientas-low-code-scripting/referencia-de-objetos-disponibles-para-scripting/device-address-validation-result).
Defining Device-Level User Interface Rules [#defining-device-level-user-interface-rules]
You can include the `updateDeviceUIRules` function in the configuration script to set user interface rules for devices of this model, specifying, for example, whether endpoints can be created manually. Below is an example function:
```javascript
function updateDeviceUIRules(device, rules)
{
rules.canCreateEndpoints = true;
}
```
The `updateDeviceUIRules` function is automatically executed by the platform before presenting options on the device and endpoint creation screen. Based on the values returned by this function, options such as creating endpoints within the device will be shown or hidden. The function receives the following parameters:
* **device**: this parameter is of type [device](/docs/herramientas-low-code-scripting/referencia-de-objetos-disponibles-para-scripting/device) and contains the data of the device for which the user interface rules are needed. The function can use this parameter if the rules depend on some specific characteristic of the device.
* **rules**: this parameter is of type [device UI rules](/docs/herramientas-low-code-scripting/referencia-de-objetos-disponibles-para-scripting/device-ui-rules) and is used to specify the rules. Typically, the function will modify the following properties:
* **canCreateEndpoints**: this boolean property indicates whether manual endpoint creation should be allowed. If the returned value is false, the platform's user interface will not allow creating additional endpoints within the device.
If the script does not include the `updateDeviceUIRules` function, the default user interface rules will be used.
For more information, see [device UI rules](/docs/herramientas-low-code-scripting/referencia-de-objetos-disponibles-para-scripting/device-ui-rules).
Defining Endpoint-Level User Interface Rules [#defining-endpoint-level-user-interface-rules]
You can include the `updateEndpointUIRules` function in the configuration script to set user interface rules for each endpoint contained in a device of this model, specifying, for example, whether the endpoint can be deleted or whether its subtype can be changed. Below is an example function:
```javascript
function updateEndpointUIRules(endpoint, rules)
{
rules.canDelete = false;
rules.canEditSubtype = (endpoint.address == "2");
}
```
The `updateEndpointUIRules` function is automatically executed by the platform before presenting options on the device and endpoint creation screen, as well as on the endpoint editing screen. Based on the values returned by this function, options such as deleting endpoints or modifying their endpoint subtype will be shown or hidden. The function receives the following parameters:
* **endpoint**: this parameter is of type [endpoint](/docs/herramientas-low-code-scripting/referencia-de-objetos-disponibles-para-scripting/endpoint) and contains the data of the endpoint for which the user interface rules are needed. The function can use this parameter if the rules depend on some specific characteristic of the endpoint.
* **rules**: this parameter is of type [endpoint UI rules](/docs/herramientas-low-code-scripting/referencia-de-objetos-disponibles-para-scripting/endpoint-ui-rules) and is used to specify the rules. Typically, the function will modify the following properties:
* **canDelete**: this boolean property indicates whether the endpoint can be manually deleted.
* **canEditSubtype**: this boolean property indicates whether changing the endpoint subtype is allowed. This property is only relevant for certain endpoint types, as can be seen [here](/docs/herramientas-low-code-scripting/referencia-de-objetos-disponibles-para-scripting/endpoint).
* **canEditSummationAutoReset**: this boolean property indicates whether manually changing the "summation auto reset" behavior of the endpoint is allowed. This property is only relevant for energy meter and flow sensor endpoints.
* **canEditElectricalCircuit**: this boolean property indicates whether manually changing the electrical circuit associated with the endpoint is allowed. This property is only relevant for electrical energy-related endpoints (energy meters, voltmeters, ammeters, etc.).
If the script does not include the `updateEndpointUIRules` function, the default user interface rules will be used.
For more information, see [endpoint UI rules](/docs/herramientas-low-code-scripting/referencia-de-objetos-disponibles-para-scripting/endpoint-ui-rules).
# Device Models
Introduction [#introduction]
To facilitate device creation, the Gear Studio platform allows creating device models. Device models are primarily used to automatically describe each device's structure, its endpoints, basic properties, serial number validation rules, among many other things. Once a device model has been created, as many devices as needed can be created using that same model. Gear Studio supports two types of device models:
* **Models built into Gear Studio (built-in)**. These are native models or drivers, certified on the platform, that are supported without any integration. For these device models, you generally only need to configure each device to report to the platform, and the platform will then automatically receive and process the information. When creating a device corresponding to a natively supported model, all necessary endpoints will also be created automatically.
* **User-defined models (custom)**. These models are managed from the device models page, as described here. User-defined models are used to create devices that the platform does not natively support. Optionally, custom device models can contain scripts that help the platform process received data, as described in the [scripting](/docs/herramientas-low-code-scripting) section.
Creating a New Device Model [#creating-a-new-device-model]
Device Model Management [#device-model-management]
To create a user-defined device model, use the [Manager](https://gear.cloud.studio/gear/manager/login). Select the **Device Models** option within the **Devices** section.
This screen contains the list of all previously created custom device models, with the ability to edit their configuration, delete them, etc. To create a new model, select the "Add" option.

To create a new model, certain information must be completed:
* **Description**: this field contains the descriptive name for the new model.
* **Model code**: this field cannot be modified after creation and is used to internally identify the device model. It is recommended to always use a consistent pattern for device model codes.
Additionally, you can define the **offline timeout**. This field allows associating a maximum inactivity time, so that any device of this model is considered offline after this period elapses without receiving information from the device. When using this option, if a device remains disconnected from the platform for longer than the specified time, the platform will automatically generate a **device offline** alarm. The alarm will automatically close when the device transmits any data to the platform.
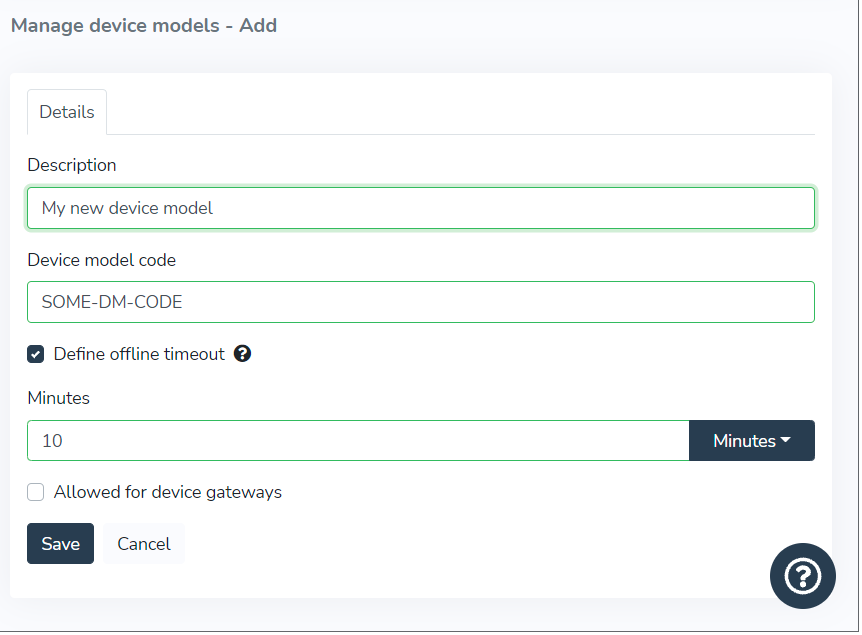
Once a device has been created, it can be edited or deleted using the "Edit" and "Delete" options.
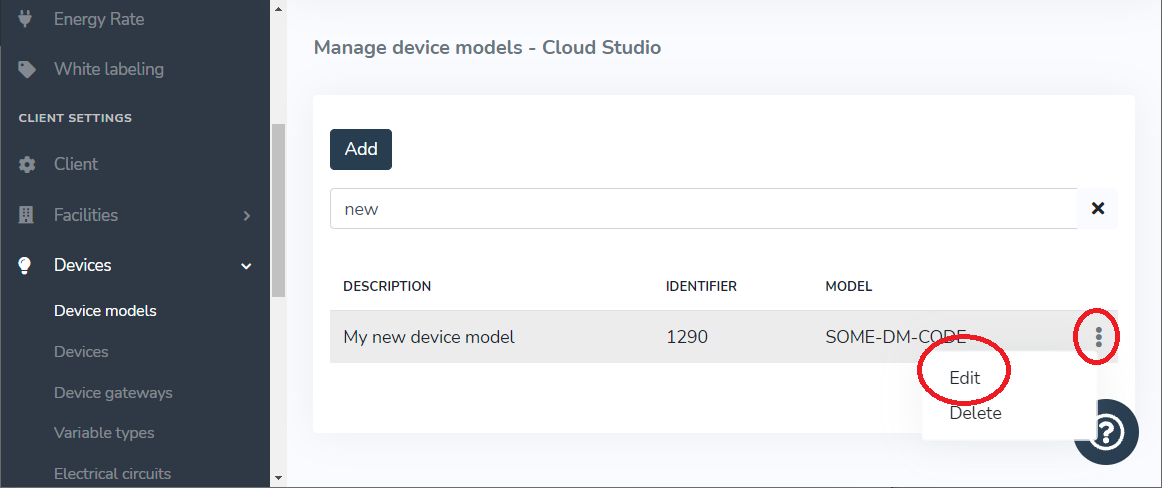
When editing a device model, you can also edit and test the model's [configuration script](/docs/configuracion-del-cliente/dispositivos-y-endpoints/dispositivos/modelos-de-dispositivo/configuracion) and the [data conversion script](/docs/configuracion-del-cliente/dispositivos-y-endpoints/dispositivos/modelos-de-dispositivo/procesamiento-de-datos).
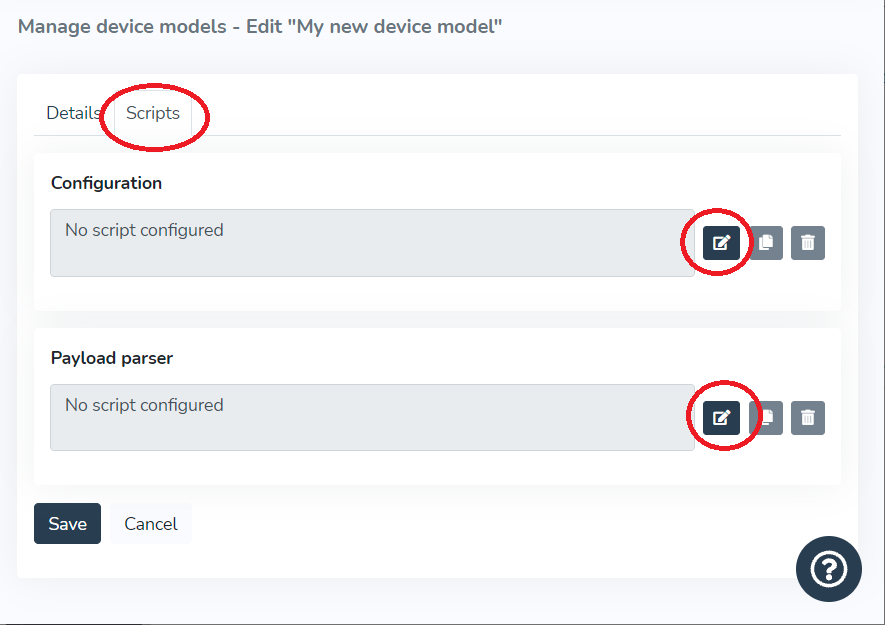
For more information about configuration and data conversion scripts, see the [scripting](/docs/herramientas-low-code-scripting) section.
# Data Processing
| Note: The Gear Studio platform natively supports a wide variety of devices from different technologies. These devices do not require the use of scripting. The information on this page is useful for configuring new device models that are not natively supported by the platform. |
| ------------------------------------------------------------------------------------------------------------------------------------------------------------------------------------------------------------------------------------------------------------------------------------ |
Introduction [#introduction]
As part of a device model configuration, you can create a script for processing data received from the device via MQTT, HTTP, or LoRaWAN. This allows:
* Processing each received payload (**uplink**)
* Updating the information of endpoints associated with the device, applying conversion functions to the data when necessary.
* Updating information about the device itself, such as RSSI levels, battery, etc., applying conversion functions to the data when necessary.
* Creating specific payloads destined for the device (**downlink**)
* Processing standard or custom commands defined in the Gear platform, and generating a payload with the format expected by the device.
Processing Received Payloads (Uplink) [#processing-received-payloads-uplink]
To process each payload received from the device (regardless of whether it is received via HTTP, MQTT, or LoRaWAN), you can create a `parseUplink` function, as shown in the example below. This example is written assuming a temperature and humidity sensor that reports the temperature in the first byte of the payload, the humidity in the second byte, and the battery percentage in the third byte.
```javascript
function parseUplink(device, payload)
{
// Payload is binary, so it's easier to handle as an array of bytes
var bytes = payload.asBytes();
// Verify payload contains exactly 3 bytes
if (bytes.length != 3)
return;
// Parse and store temperature
var temperatureSensor = device.endpoints.byType(endpointType.temperatureSensor);
if (temperatureSensor != null)
{
var temperature = bytes[0] & 0x7f;
if (bytes[0] & 0x80) // Negative temperature?
temperature -= 128;
temperatureSensor.updateTemperatureSensorStatus(temperature);
}
// Parse and store humidity
var humiditySensor = device.endpoints.byType(endpointType.humiditySensor);
if (humiditySensor != null)
{
var humidity = bytes[1];
humiditySensor.updateHumiditySensorStatus(humidity);
}
// Parse and store battery percentage
var batteryPercentage = bytes[2];
device.updateDeviceBattery({ percentage: batteryPercentage });
}
```
In the example above, you can see a `parseUplink` function that processes a 3-byte payload and then uses that information to update the status of the device's endpoints (temperature sensor and humidity sensor), as well as the device's battery level.
The `parseUplink` function is automatically executed by the platform each time a payload is received for the device. The function receives the following parameters:
* **device**: this parameter is of type [device](/docs/herramientas-low-code-scripting/referencia-de-objetos-disponibles-para-scripting/device) and contains all information about the device that sent the payload, including the list of associated endpoints. For more information, see the [device](/docs/herramientas-low-code-scripting/referencia-de-objetos-disponibles-para-scripting/device) object reference.
* **payload**: this parameter is of type [data payload](/docs/herramientas-low-code-scripting/referencia-de-objetos-disponibles-para-scripting/data-payload) and contains the payload received from the device. The payload object provides a series of methods that allow easy access to the payload content, such as:
* asBytes() reads the payload content as a byte array and is useful when the payload is binary.
* asString() reads the payload content as text and is useful when the payload is ASCII.
* asJsonObject() reads the payload content as a JSON object and is useful when the payload is in JSON format.
* asParsedObject() accesses data pre-parsed by an external platform. This option is available for platforms like Actility and The Things Stack, which allow data parsing before sending to the Gear Studio platform.
The payload object also has a **port** property, available for data received from LoRaWAN networks, which reflects the LoRaWAN port number to which the data was sent. Similarly, for data received via MQTT, there is a **topic** property that reflects the topic to which the data was sent.
The `parseUplink` function executes atomically, meaning data is only updated if the script executes successfully. In case of script execution errors, all changes will be reverted as if the payload had not been received. For this reason, it is important that the script handles error conditions correctly.
If the script does not include the `parseUplink` function, the received packet will be ignored.
Responses for HTTP Uplink Submissions [#responses-for-http-uplink-submissions]
When uplinks are sent via HTTP, the platform will normally return a 200 status code and an empty body. However, this behavior can be changed by returning an [HttpResponse](/docs/herramientas-low-code-scripting/referencia-de-objetos-disponibles-para-scripting/httpresponse) object, specifying the information to return, including:
* Status code
* Content type
* Content
Below is an example of this.
```javascript
function parseUplink(device, payload)
{
[...]
[ More code ]
[...]
var httpResponse = new HttpReponse();
httpResponse.statusCode = 200;
httpResponse.contentType = "application/json";
httpResponse.content.setAsJson({ textField: "some text", aNumber: 25 });
return httpResponse;
}
```
For more information, see the [HttpResponse](/docs/herramientas-low-code-scripting/referencia-de-objetos-disponibles-para-scripting/httpresponse) object reference.
Building Payloads for the Device (Downlink) [#building-payloads-for-the-device-downlink]
To send data to the device (typically commands), you can create a `buildDownlink` function, as shown in the example below. This example is written assuming a device that contains a single endpoint of type appliance that can be turned on, turned off, and toggled. It is assumed that a single byte must be sent in the payload indicating the operation type.
```javascript
function buildDownlink(device, endpoint, command, payload)
{
payload.port = 25; // This device receives commands on LoRaWAN port 25
payload.buildResult = downlinkBuildResult.ok;
switch (command.type) {
case commandType.onOff:
switch (command.onOff.type) {
case onOffCommandType.turnOn:
payload.setAsBytes([30]); // Command ID 30 is "turn on"
break;
case onOffCommandType.turnOff:
payload.setAsBytes([31]); // Command ID 31 is "turn off"
break;
case onOffCommandType.toggle:
payload.setAsBytes([32]); // Command ID 32 is "toggle"
break;
default:
payload.buildResult = downlinkBuildResult.unsupported;
break;
}
break;
default:
payload.buildResult = downlinkBuildResult.unsupported;
break;
}
}
```
In the example above, you can see a `buildDownlink` function that processes a platform command and creates a 1-byte payload from it. The script only supports commands for on/off type endpoints, and therefore shows an error if any other type of command is attempted.
The `buildDownlink` function is automatically executed by the platform each time any command is sent to the device, regardless of whether the command is sent from an app, a scheduled action, etc. The function receives the following parameters:
* **device**: this parameter is of type [device](/docs/herramientas-low-code-scripting/referencia-de-objetos-disponibles-para-scripting/device) and contains all information about the device to which the command will be sent, including the list of associated endpoints. For more information, see the [device](/docs/herramientas-low-code-scripting/referencia-de-objetos-disponibles-para-scripting/device) object reference.
* **endpoint**: this parameter is of type [endpoint](/docs/herramientas-low-code-scripting/referencia-de-objetos-disponibles-para-scripting/endpoint) and contains the data of the endpoint to which the command will be sent. This field can be null if the command is being sent to the device rather than a specific endpoint. For example, when sending a "reboot" command, the command is sent to the device since restarting an individual endpoint does not make sense.
* **command**: this parameter is of type [command](/docs/herramientas-low-code-scripting/referencia-de-objetos-disponibles-para-scripting/command) and contains the command that the platform will send. The function code normally uses the information in this object to build the payload that must be sent to the device. For more information about the command content, see [this section](/docs/herramientas-low-code-scripting/referencia-de-objetos-disponibles-para-scripting/command).
* **payload**: this parameter is of type [data payload](/docs/herramientas-low-code-scripting/referencia-de-objetos-disponibles-para-scripting/data-payload) and is used to create the payload that will ultimately be sent to the device. The payload object provides a series of methods that allow modifying its content, such as:
* setAsBytes() writes the payload content using a byte array.
* setAsString() writes the payload content as text and is useful when the payload is ASCII.
* setAsJsonObject() writes the payload content as a JSON object and is useful when the payload is in JSON format.
The payload object also has a **port** property, available for devices with LoRaWAN connectivity, which reflects the LoRaWAN port number to which the data will be sent. Similarly, for devices with MQTT communication, there is a **topic** property that allows specifying the topic to which the data will be sent.
If the script does not include the `buildDownlink` function, the command will be rejected indicating that it is not supported.
# Real Time Log Broker
**Real Time Log Broker** is a service that provides real-time visibility into platform events related to data processing from devices (Uplink) as well as command delivery from the platform to devices (Downlink) in the form of log entries covering integrations that implement MQTT or HTTP API.
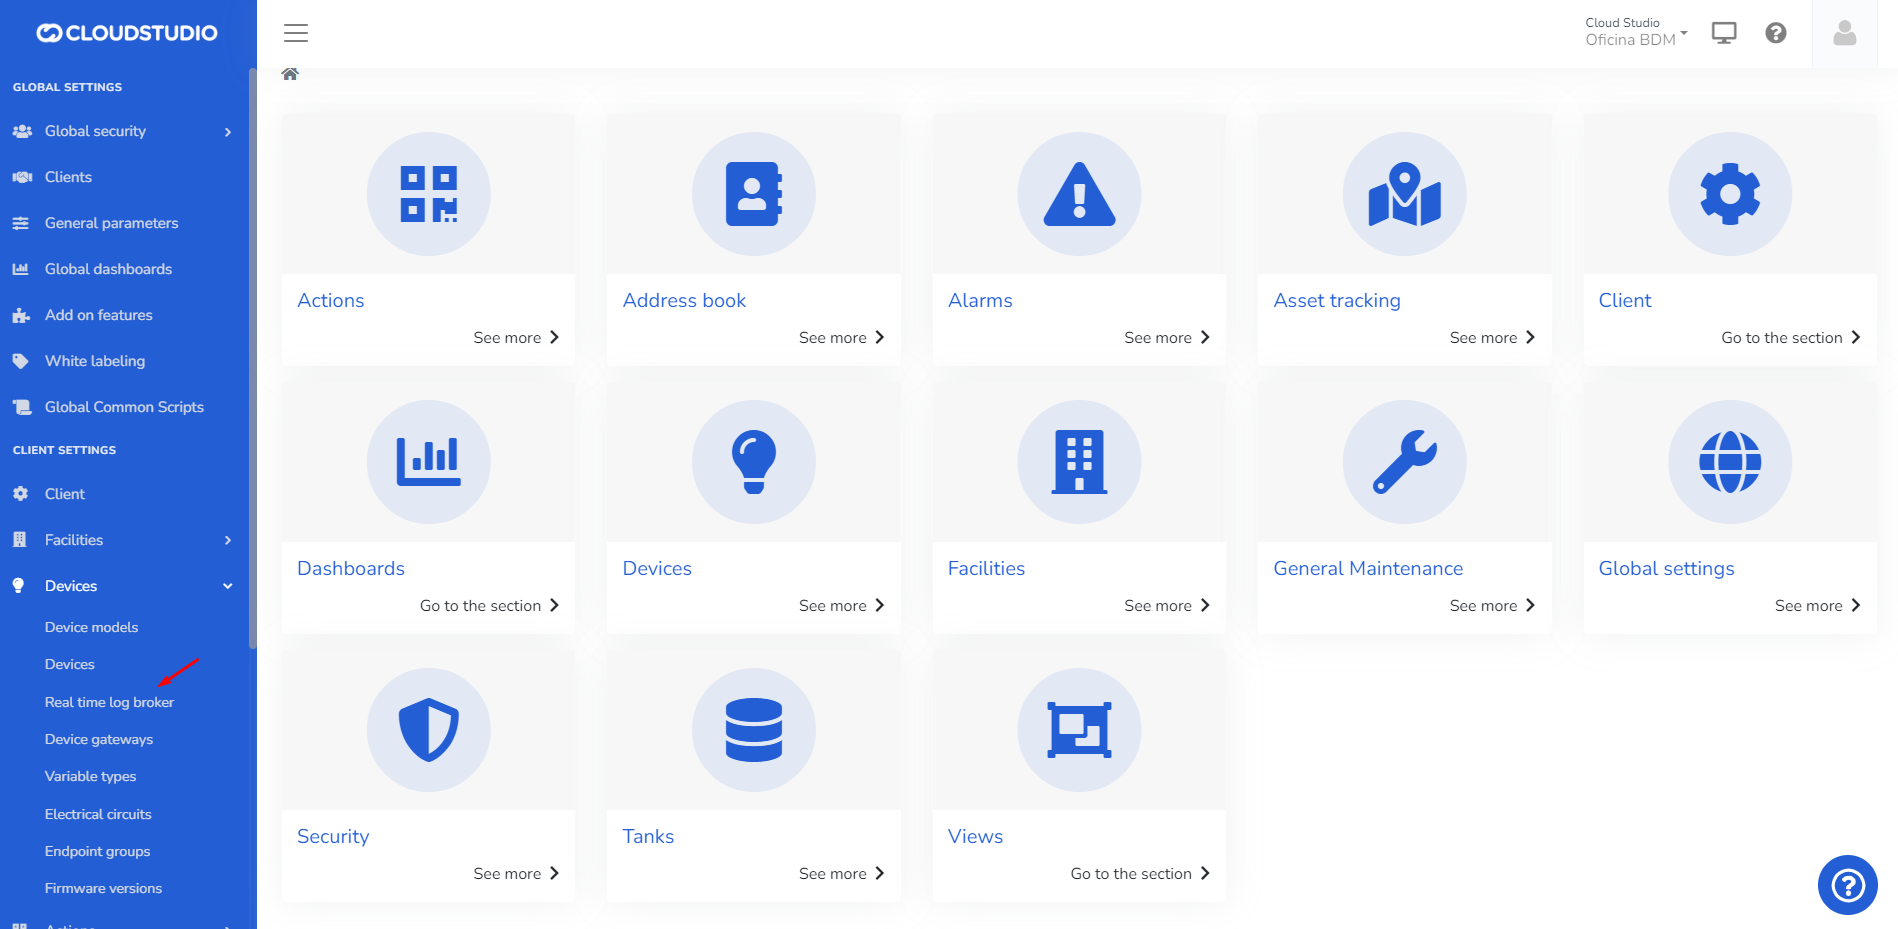
When accessing the Real Time Log Broker, a new session will automatically start and open in a new browser tab, allowing you to view the previously described events in real time. It is important to note that this log is not saved on the platform and is deleted when the window is closed.
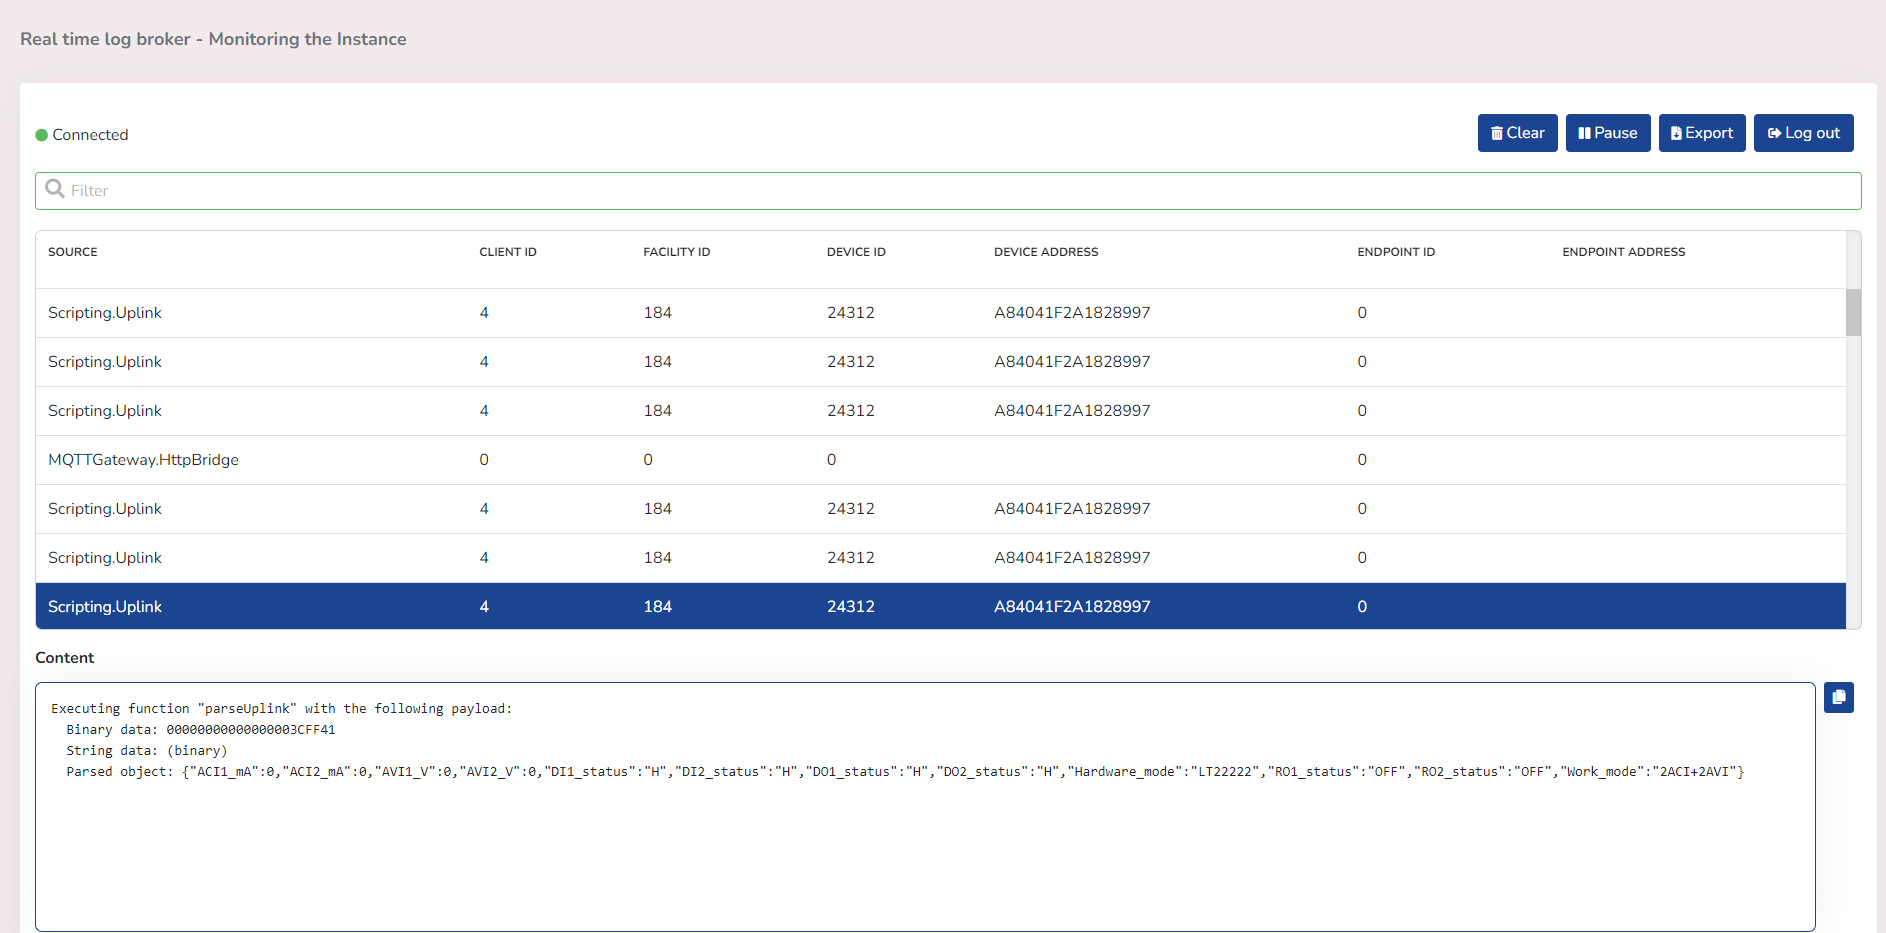
# Menu Options
**Once the session is open, the user can access the following functions through the control panel**

**CLEAR**: Clears the grid and its *content*, allowing new queued entries to begin logging.
**PAUSE**: *Pauses* the incoming information in the grid and its content. *Note:* The 120-second timer will not be paused. Only the reception of information is paused.
**EXPORT**: *Downloads* the content of a specific Source selected in the grid. The downloadable format is .TXT and the file name format is: *YYYYMMDD-HHMMSS.*
**LOG OUT:** Automatic login occurs when a Real Time Log session is opened. This happens in a new browser tab where the user interface is displayed, allowing you to have as many windows (RTL sessions) as desired while continuing to operate the platform.
When the user accesses for the first time, they will already be *connected* and will begin receiving information in the grid with its description in the Content (*Log*).
> ***NOTE**: During the session, the user can narrow their search using the "**Filter**" field for better visualization.*
>
> *Filtering is available by: Source, Client ID, Facility ID, Device ID, Device Address, Endpoint ID, Endpoint Address.*
**When the session has ended or the user has logged out, the following functions are available:**

**CLEAR** > Clears the grid and its *content*, this time preventing new entries from being recorded. The user must reconnect.
**EXPORT** **>** *Downloads* the content of a specific Source selected in the grid. Since the session has ended, only the information that was loaded in the grid at the time of disconnection will be downloaded.
**LOG IN** > Once the session expires or is ended by the user, the Log In button must be selected to start recording information again.
> ***NOTE**: While the session is paused or off, the user can narrow their search using the "**Filter**" field for better visualization.*
>
> *Filtering is available by: Source, Client ID, Facility ID, Device ID, Device Address, Endpoint ID, Endpoint Address.*
# Roles
When a user with ***Global*** permissions accesses the platform and opens the Real Time Log Broker application, they will be able to view the monitored records of the instance.
**Real Time Log Broker will display with the following title.**
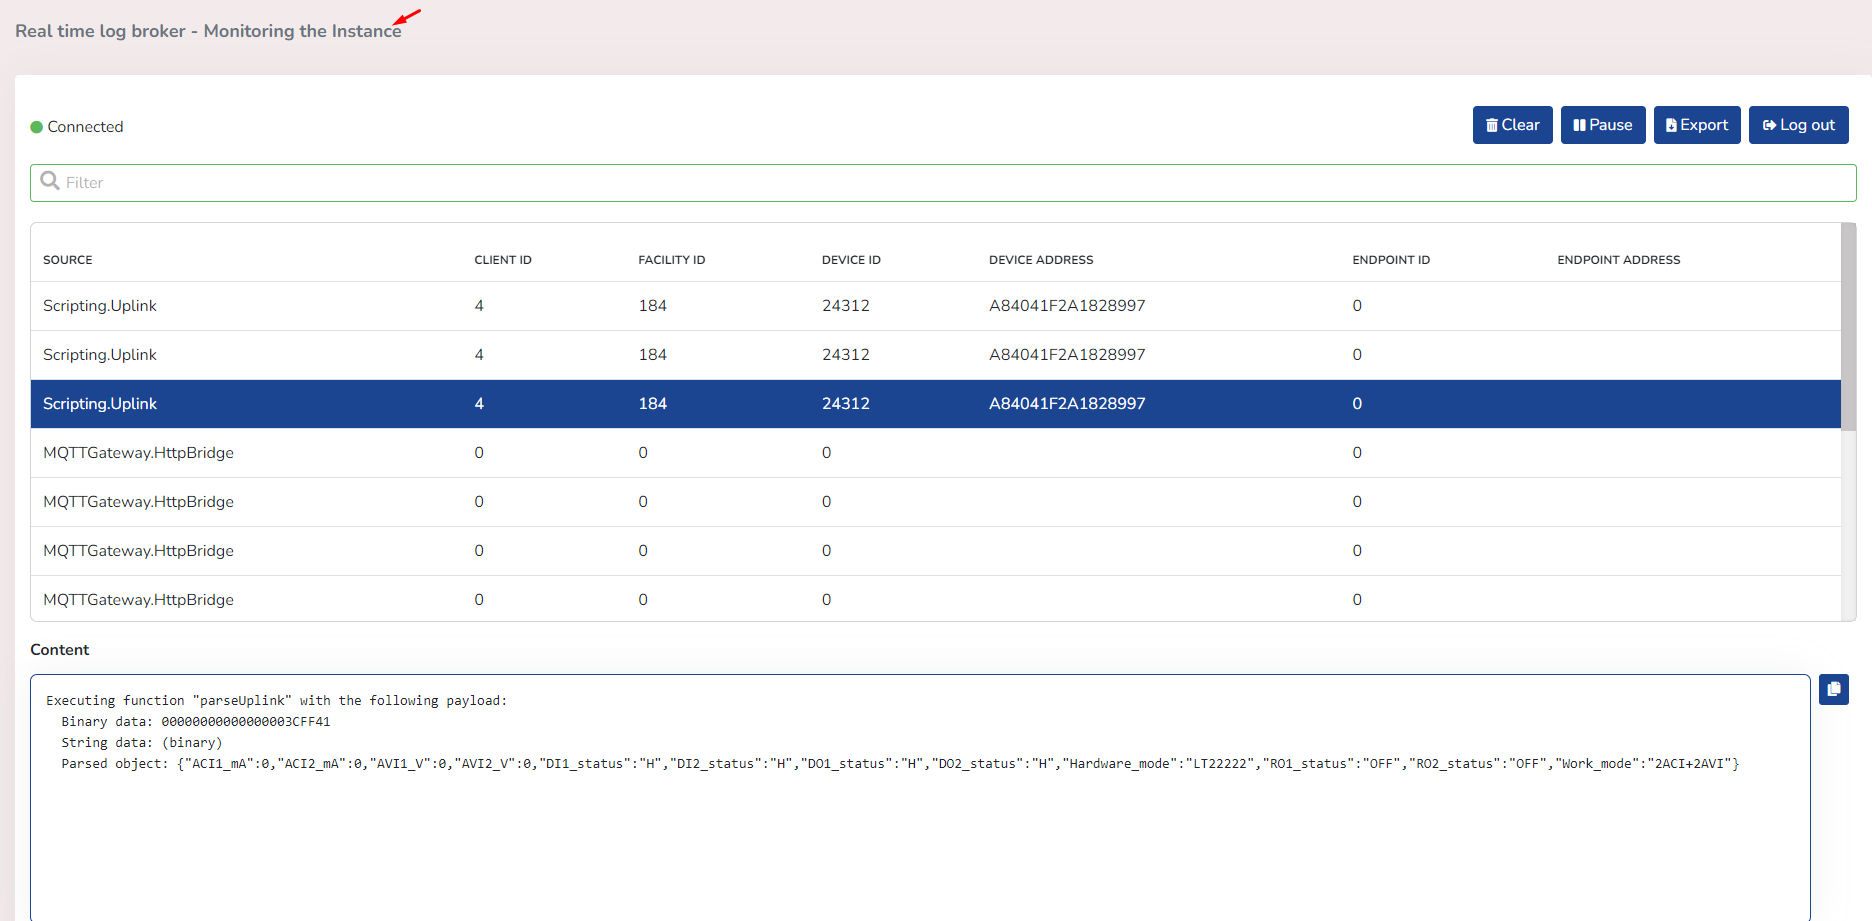
When a user ***does not have Global permissions***, they can only access this option if they have been granted the necessary permissions.
**Real Time Log Broker will display with the following title.**
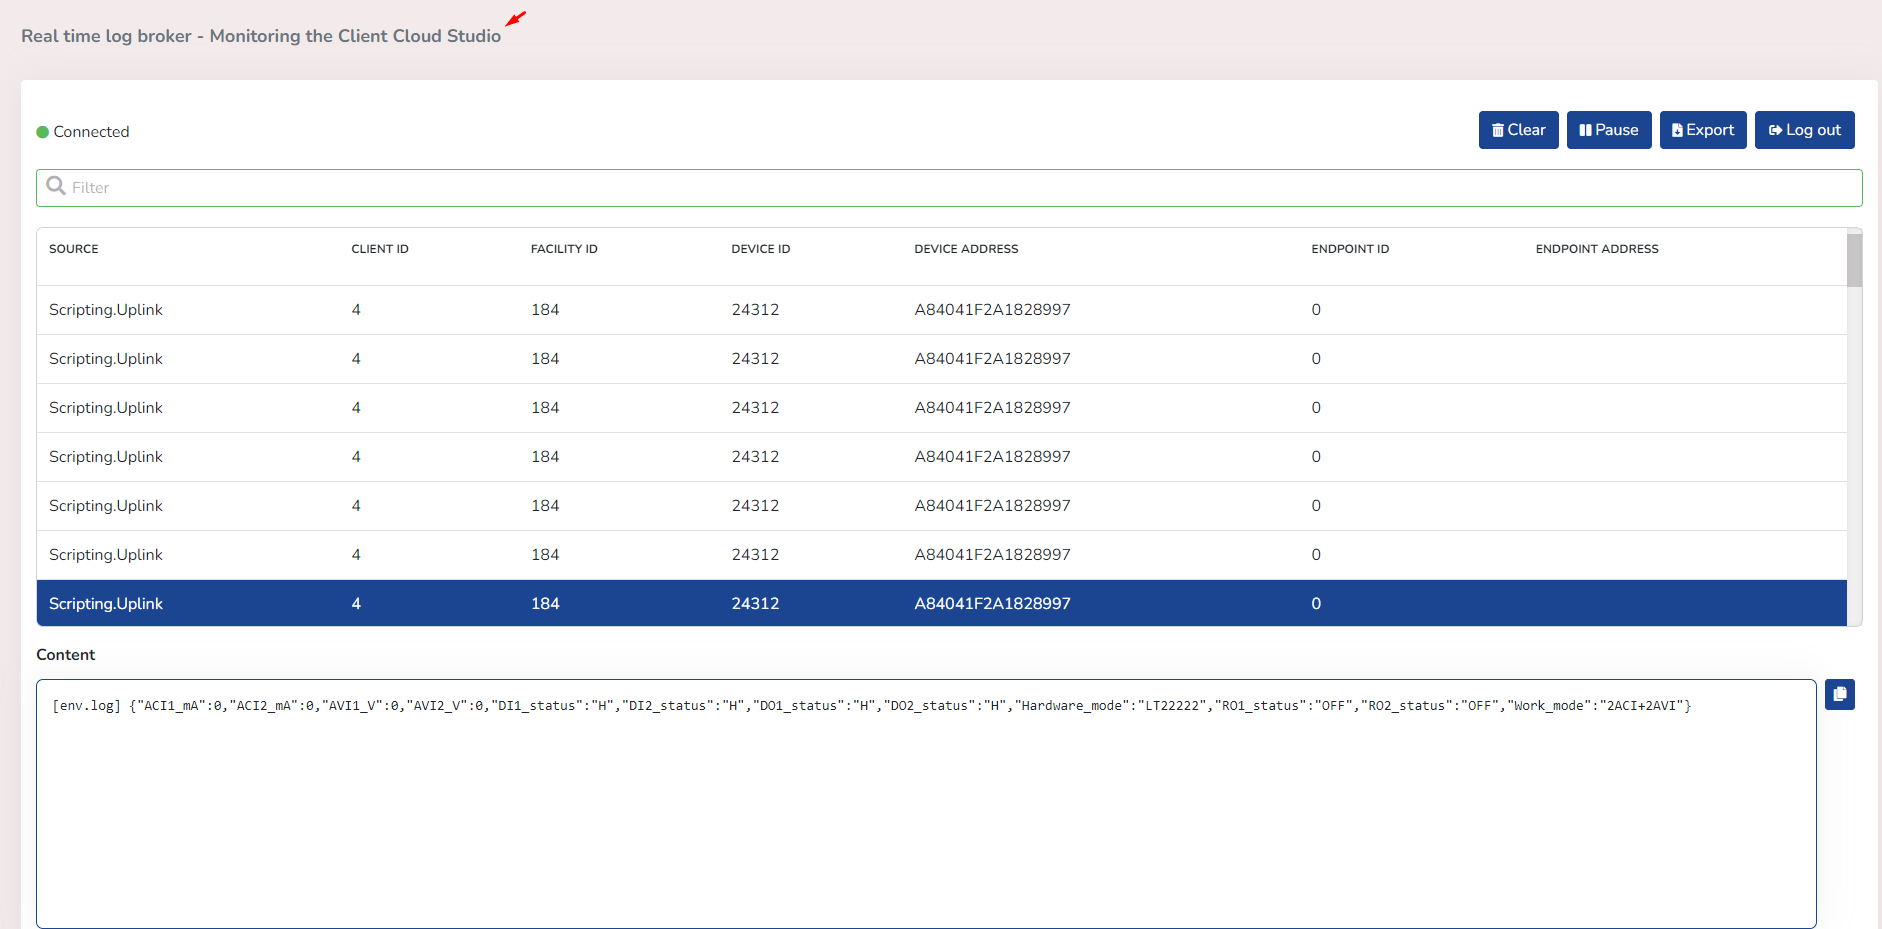
# Clone Variable Types
Introduction [#introduction]
Variables allow us to define and determine counts or measurements of multiple states, such as temperature, time, occupancy, people flow, among others. Due to the diverse uses of variables within the platform, variable cloning was created.
**Example**
Click on the three dots on the right and choose the "Clone" option as shown in the image.
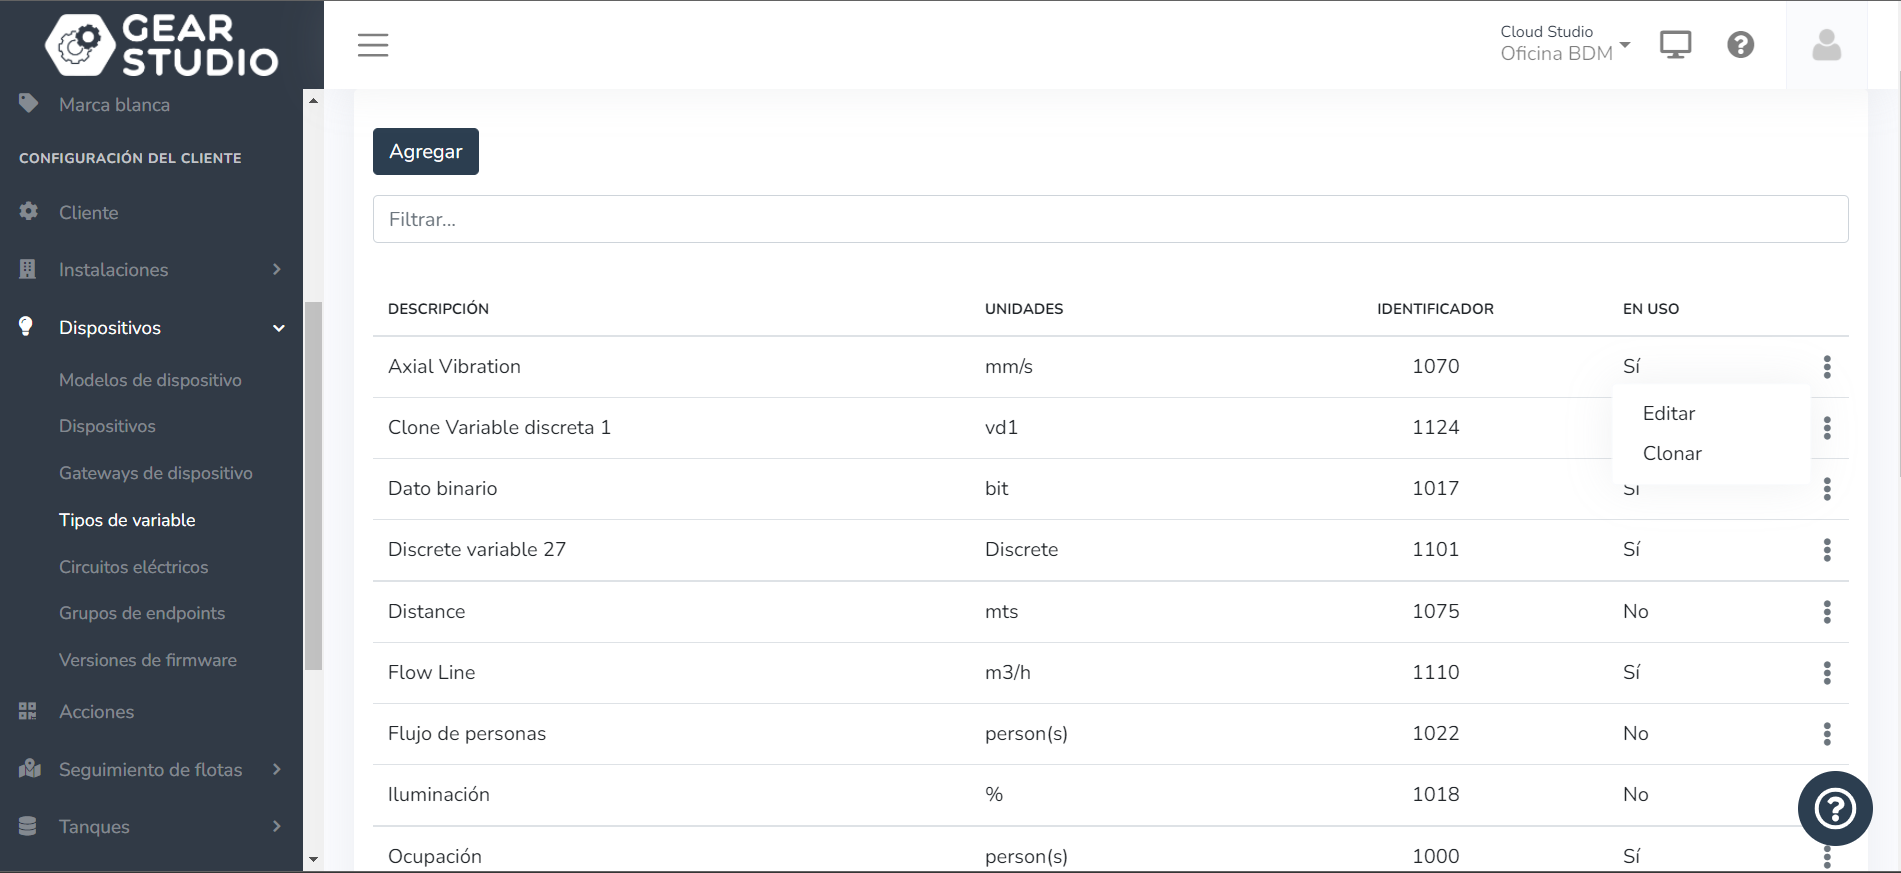
Add the description and finally click Save.
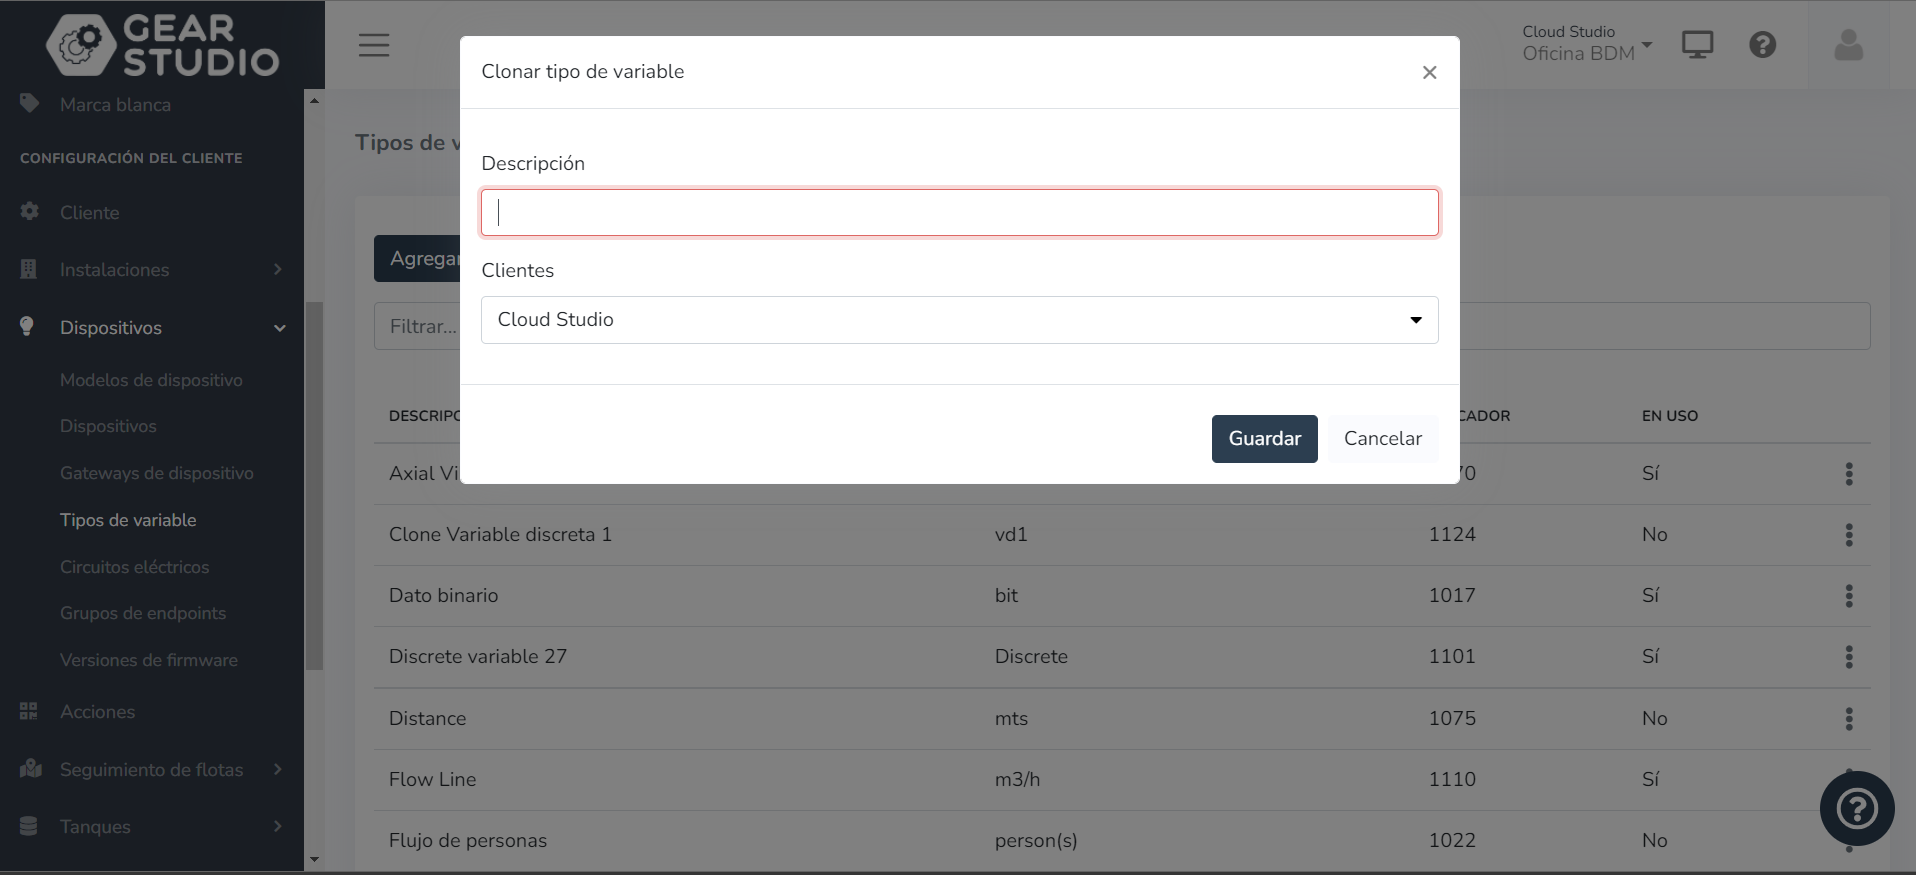
# Create a Variable Type
Go to the client, device configuration, and within it select the 'Variable Types' option.
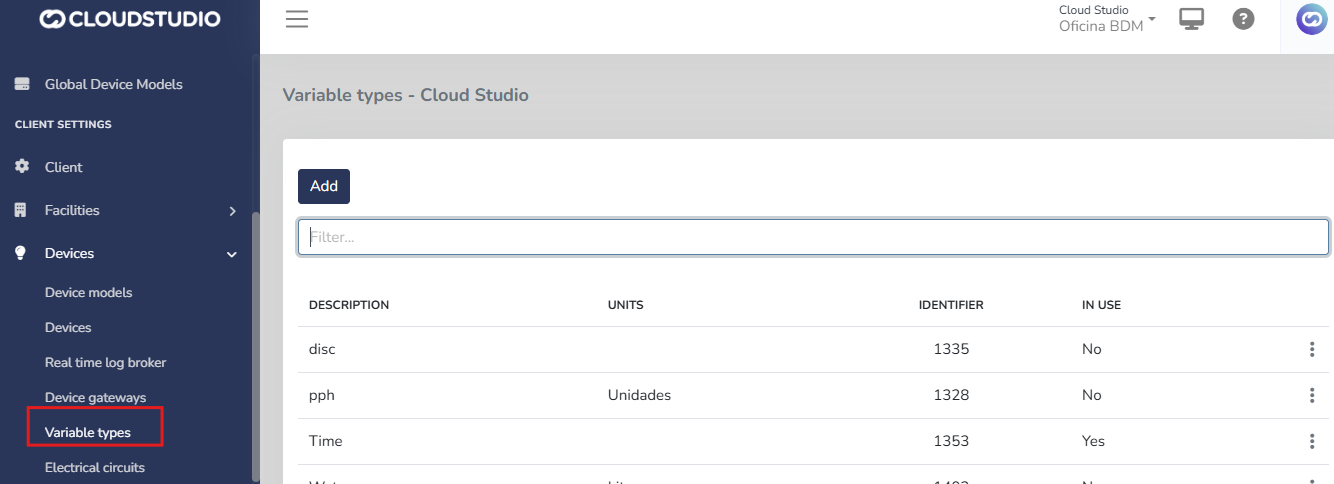
Then press the Add button to configure the variable.
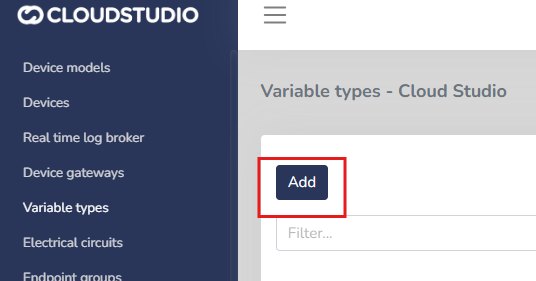
Once the "Add" button is pressed, a form will be displayed where you can fill in the variable information.
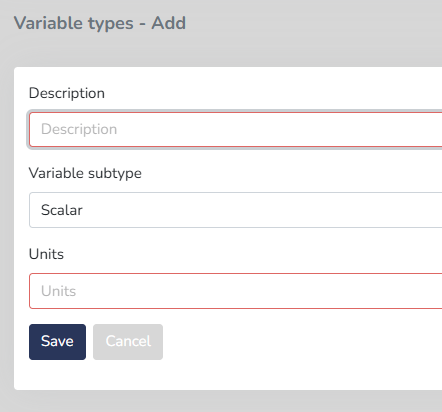
In the **"Description"** field, enter a representative name to identify the created variable and what type of sensor it will be measuring.
In the **"Variable Type"** field, select from the list the subtype that represents the received measurement.
There are several subtypes available on the platform:
* **Scalar:** for variables that can take any value within a given range. Example: temperature, pressure, etc.
* **Discrete:** for variables that can only take specific values, often representing categories or fixed states. Example: on/off, active/inactive, etc.
* **Flow:** for variables that measure the flow of something moving through a system. Example: water flow, gas flow, etc.
* **Date:** for variables that measure a specific date (without considering the exact time). Example: event date.
* **Time:** for variables that measure a time range or exact time (without being associated with a date). Example: system time.
* **Date and Time:** for variables that receive both the date and exact time of an event. Example: sensor timestamp.
Finally, define the unit of measurement with which states will be recorded in that variable. It is important that this unit is aligned with the selected variable type.
Some common units include:
**Scalar:** Degrees Celsius (C), Pascals (Pa), meters (m), etc.
**Discrete:** states are defined (on/off, positive/negative/neutral).
**Flow:** Liters per minute (L/min), cubic meters per hour (m3/h), etc.
**Date:** Date in format (DD/MM/YYYY).
**Time:** Time in format (HH:MM).
**Date and Time:** Date and time in format (DD/MM/YYYY HH:MM).
To define the values of discrete variables, States must be created.
States are *fixed values* that describe different conditions or categories in which the variable can be.
For each state, the following fields must be completed:
**Value:**
This field indicates the value associated with the state (for example, 1 for "on" or 0 for "off").
**Color:**
Each state can have an associated color for quick and clear visualization. For example, green for "active" and red for "inactive".
**State Description Text:**
Provides a brief description or explanation for each state. For example, if the value is 1 and the state is "On", the description text could be: "Active".
Finally, press the Save button to create the variable.
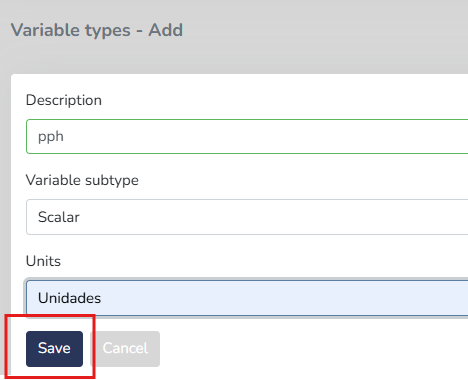
The variable will then be available in the client's variable list.
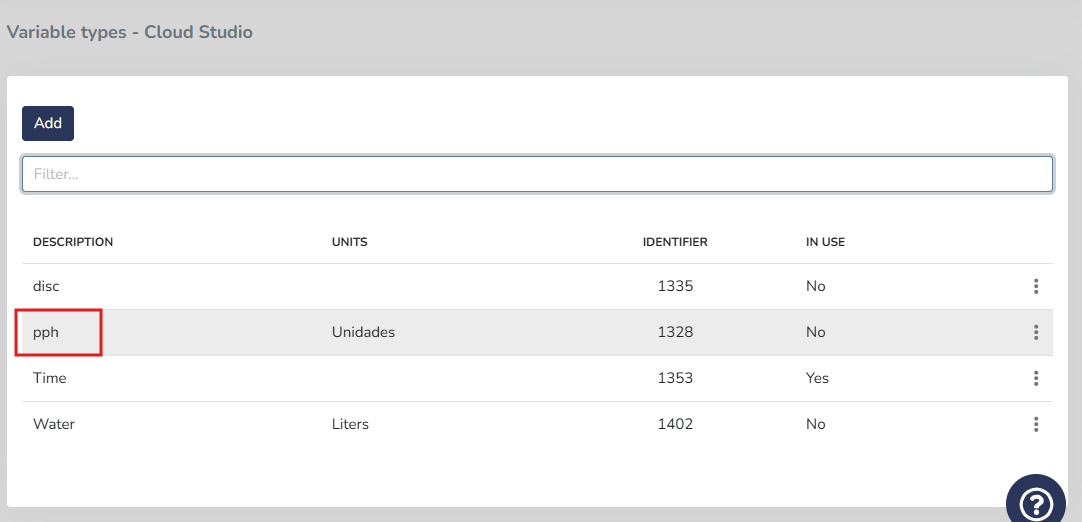
These variables will subsequently be available for use in the configuration of any of the client's devices, through the device model [configuration script](/docs/herramientas-low-code-scripting).
Creating a Custom Variable [#creating-a-custom-variable]
Requirements:
* Declare it in the `**getEndpoints()**` method, which requires a generic type (`endpointType.genericSensor`) and a variable identification through the `variableTypeId`.
**You can update its value using the** `**parseUplink()**` method, extracting values from the payload.
Example: Custom Variable for SNR [#example-custom-variable-for-snr]
In this example, a custom SNR (Signal-to-Noise Ratio) variable called **SNR\_FT** is created, corresponding to the value received through the payload.
Step 1: Define the endpoint in `getEndpoints()`
javascript
```
function getEndpoints(deviceAddress, endpoints)
{
var snr = endpoints.addEndpoint("3", "SNR_FT", endpointType.genericSensor);
snr.variableTypeId = 1433;
}
```
With this code:
* A new endpoint with ID `"3"` is added.
* It is named `"SNR_FT"`.
* The endpoint type is `genericSensor` for any variables that cannot be defined within the predefined sensors.
* A unique identifier is assigned -- the `variableTypeId = 1433` which must match the variable type configured on the platform (for example, a generic, numeric, or SNR-specific data type).
Step 2: Process the payload in parseUplink() [#step-2-process-the-payload-in-parseuplink]
javascript
```
function parseUplink(device, payload) {
var parsed = payload.asParsedObject();
if (parsed.snr != 0) {
device.endpoints.byIndex(2).updateGenericSensorStatus(parsed.snr);
} else {
device.endpoints.byIndex(2).updateGenericSensorStatus(null);
}
}
```
With this code:
* The payload is converted to an accessible object (`asParsedObject()`).
* It checks whether the received `snr` value is different from 0.
* If it is, the corresponding endpoint value is updated with that data.
* When the value is 0, the sensor is updated as null (left without data).
Recommendations [#recommendations]
* `device.endpoints.byIndex(2)` refers to the third added endpoint (zero-based index). It is essential to ensure that the endpoint creation order matches the index being used.
* Verify that the `variableTypeId` is correctly configured (type matches) and is available on the platform.
* Use descriptive names for custom variables (for example, `SNR_FT`, `BatteryVoltage`, etc.).
* For multiple custom variables, it is critical to properly document the indices (`byIndex(n)`) for correct information mapping.
# Variable Types
Introduction [#introduction]
Variable types define the units of measurement and expected behavior of a variable reported to the platform. There are certain standard variable types defined by default on the platform, such as temperature, humidity, and pressure. For "custom" variable types, you can create them on the platform by defining the units to use and the applicable type (scalar, discrete, flow, etc.).
Click on [Create Variable Types](/docs/configuracion-del-cliente/dispositivos-y-endpoints/dispositivos/tipos-de-variables/crear-un-tipo-de-variable) to learn how to create a custom variable type.
# Local Variable Promotion
On the platform, variables can be defined at the client level (local) or at the global level (shared by all clients in an instance). This feature allows **promoting a local variable to a global variable**, facilitating its reuse across multiple contexts within the platform.
When a variable is promoted:
* It is **removed from the local variables list** of the client that originally defined it.
* It is **added to the global variables list**, available to all clients within the instance.
* It becomes available for use in device configuration for any client.
> Warning: This action is **not reversible**.
How to Promote a Variable [#how-to-promote-a-variable]
* Go to the client's **Variable Types** list.
* Click on the **context menu** of the desired variable.
* Select the **Promote to Global** option.
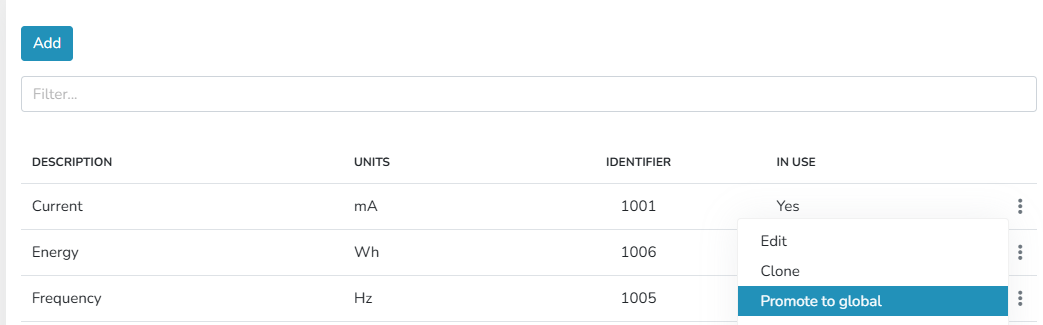
Promotion Confirmation [#promotion-confirmation]
When selecting the option, the platform displays a warning indicating that the variable will move from the local scope to the global scope.
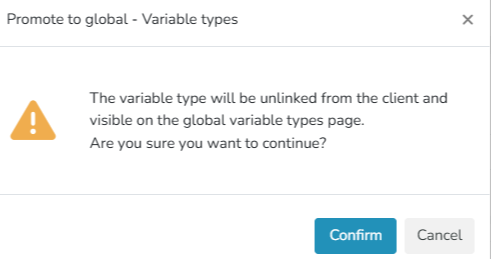
Once the action is confirmed:
* The variable **will no longer be available exclusively to the original client**.
* It will be included in the **global variables list**.

Post-Promotion Management [#post-promotion-management]
Promoted variables can be **managed** (edited, cloned, or deleted) in the same way as those originally created as global variables.
# Global Variable Replacement
This is the process by which a **local variable (defined by a client)** is removed and replaced by a [**global variable**](/docs/configuracion-del-cliente/dispositivos-y-endpoints/dispositivos/tipos-de-variables), applying this change across all devices, models, or environments where it was previously configured.
This action allows unifying and avoiding redundant or duplicate variables, centralizing environment configuration management, and simplifying maintenance.
Warning: This process is **not reversible**.
To perform this action:
1. Go to client configuration -> Devices -> Variable Types
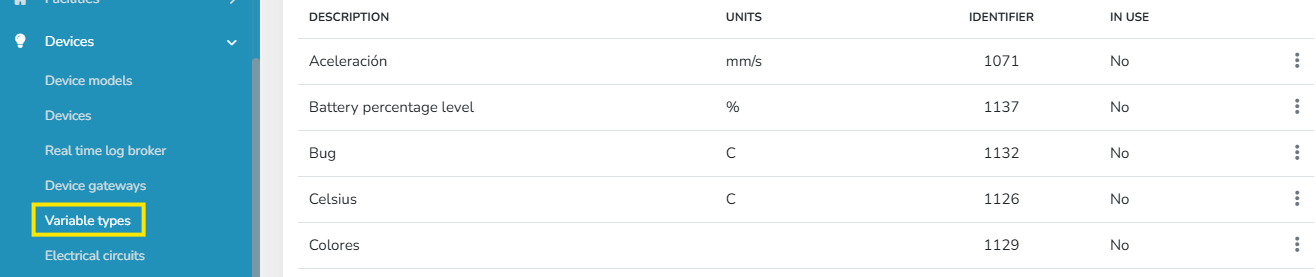
2\. Click on the context menu and select the Replace with Global Variable option.
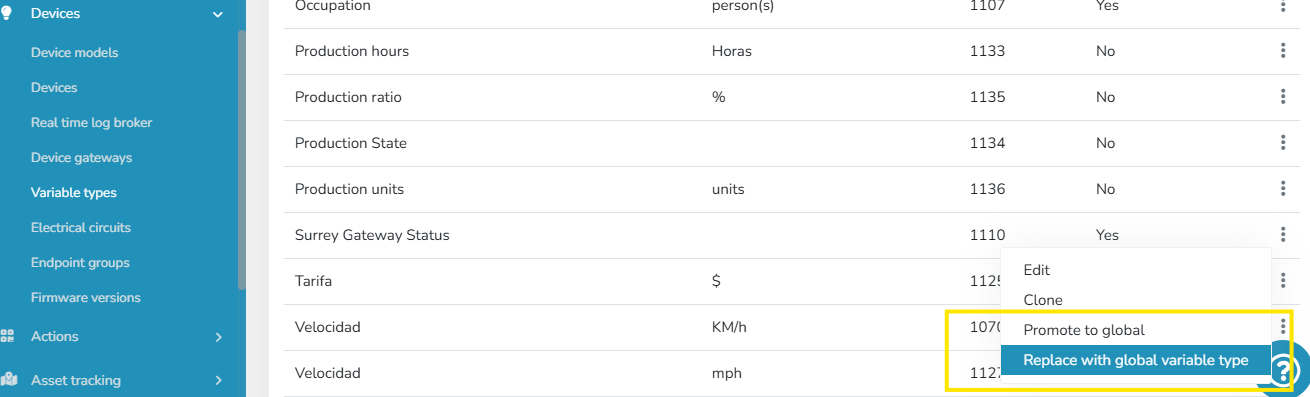
3. Once this option is selected, an informational message appears for confirmation of the local variable replacement, along with a selector showing all existing global variables in the instance.

Warning: The global variables shown for replacement are **only** those of the **same type** as the local variable (e.g., a discrete local variable can only be replaced by a discrete global variable).
Warning: This process is **not reversible**.
Once this action is performed, the local variable ceases to exist in the variable types list. At the same time, it is replaced in Device Models, devices, scripts, and every location where the local variable previously existed.
# Raw Data Conversion
Raw data conversion performs calculations on data obtained from a device and adapts it to the values needed for input into the platform. This allows the use of devices from virtually any brand and model, simply by creating expressions that convert the values delivered by the device.
How can I inject raw data into the platform? [#how-can-i-inject-raw-data-into-the-platform]
Raw data is sent, both via HTTP and MQTT, using APIs ending in "Raw". For example, to feed the platform with information from a temperature sensor using "raw" data, the "**UpdateTemperatureSensorStatusRaw**" API must be used. It is recommended to consult [the following table](/docs/configuracion-del-cliente/dispositivos-y-endpoints/dispositivos/integracion-de-dispositivos/matriz-de-metodos-para-actualizacion-de-sensores) to learn about the available methods for injecting raw data for each endpoint type.
Using expressions and the "RawData" variable [#using-expressions-and-the-rawdata-variable]
All APIs ending in "Raw" have a "rawData" parameter where the device must report the measured value. This value is internally converted into a variable called "**RawData**", which can be used in the expression evaluator.
As an example conversion, we will use a temperature sensor with the following characteristics:
* Units: the device reports temperature in degrees Fahrenheit.
* Measurement range: from -30 degrees Fahrenheit to +140 degrees Fahrenheit.
* Temperature is reported in tenths of a degree Fahrenheit (meaning it has no decimals, but is multiplied by 10).
The Gear platform, however, requires temperatures to be reported in degrees Celsius, which therefore requires a conversion. To achieve this conversion, the following steps are necessary:
* Divide the obtained value by 10.
* Convert the received temperature from degrees Fahrenheit to Celsius.
To accomplish this, the following expression should be used:
```
FahrenheitToCelsius(ToNumber(RawData) / 10)
```
This expression does the following:
* Uses the RawData variable, which is an implicit variable that exists in all raw data conversion operations, and represents the raw data content as a [string](/docs/configuracion-del-cliente/dispositivos-y-endpoints/endpoints/conversion-de-datos-crudos-raw/expresiones).
* Uses the [ToNumber](/docs/configuracion-del-cliente/dispositivos-y-endpoints/endpoints/conversion-de-datos-crudos-raw/expresiones/funciones/otras-funciones/tonumber) function to convert the RawData variable to an equivalent numeric value.
* Divides the obtained value by 10.
* Finally, uses the [FahrenheitToCelsius](/docs/configuracion-del-cliente/dispositivos-y-endpoints/endpoints/conversion-de-datos-crudos-raw/expresiones/funciones/funciones-matematicas/fahrenheittocelsius) function to convert this value to degrees Celsius.
More information [#more-information]
For more information about using expressions, see the [Expressions](/docs/configuracion-del-cliente/dispositivos-y-endpoints/endpoints/conversion-de-datos-crudos-raw/expresiones) section, which contains a more detailed description of the expression engine, data types, operators, functions, and examples of each.
# Custom Filters
Within the History Widget, you can use the **Custom Filters** option to adapt the view according to your needs.
This feature allows you to select from different preloaded filters and apply them to refine the displayed information.
Preloaded Filters are preconfigured sets of filtering criteria that facilitate the quick selection and application of specific filters without having to configure each criterion manually.
In the History Widget, check the 'enable custom filters' option.
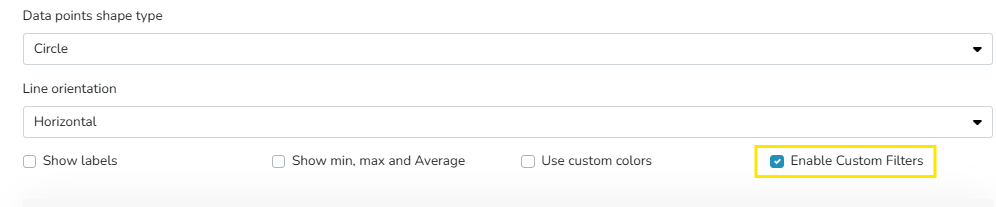
This enables the section to choose filters.
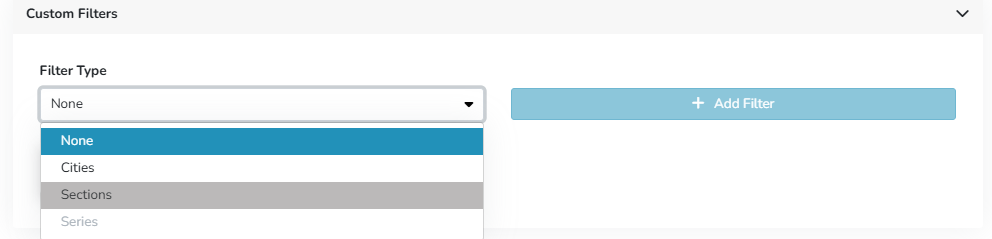
Once selected, they are displayed as follows within the widget:
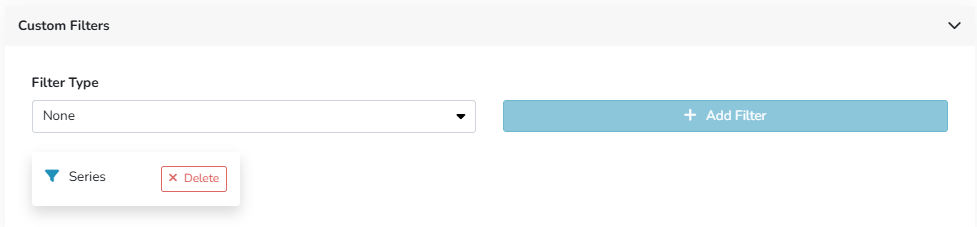
The widget view will update automatically, showing only the information that meets the selected filter criteria.
Its benefits include:
* More relevant information visualization
* Combination of filters for more specific results
* Easy to apply
# History - Aggregation
Another feature of the history and comparative history **widgets** is the ability to view aggregated (grouped) measurements through different calculations.
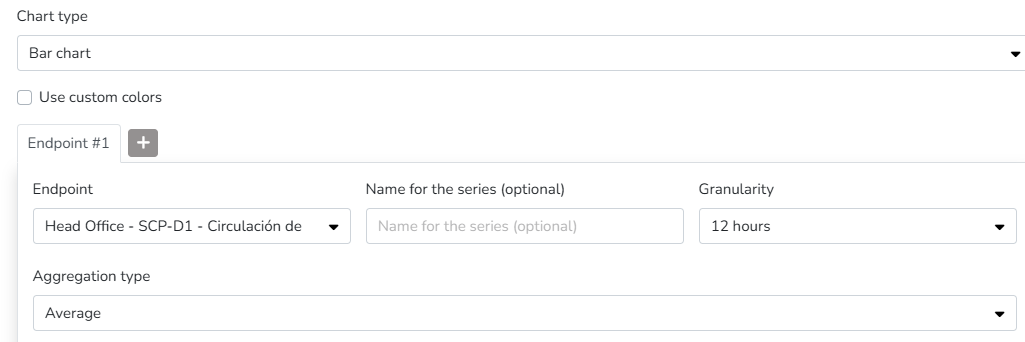
The available options for aggregation calculations are:
* Default
* Minimum: the resulting value is the **minimum** of all states or measurements recorded in a specific time interval.
* Maximum: the **highest** value of all states or measurements during a time period.
* Average (mean): the **average** of all measurement values recorded in a given interval is calculated.
State aggregation is an extremely useful tool for synthesizing and presenting device data in a more understandable and useful way. The different aggregation methods allow users to choose the strategy that best suits their analysis and decision-making needs. This functionality optimizes monitoring and facilitates the detection of patterns and important events in complex systems.
# History - Granularity
**State granularity** is a feature that allows users to adjust the level of detail at which device state measurements are presented.
This control over granularity provides crucial flexibility for monitoring, as users can choose how data is presented based on the context and analysis needs.
This feature is available in the history and comparative history **widgets**.
The available time ranges are:
* Default
* 5 minutes
* 15 minutes
* 1 hour
* 3 hours
* 12 hours
* Day
* Week
* Biweekly
* Month
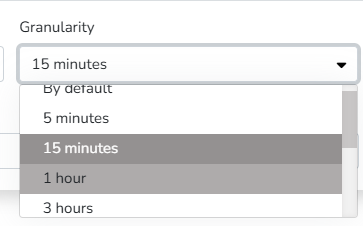
These measurements will be displayed according to the selected time range, for the period indicated in the filter if the Dashboard option is selected in the Time Range Type selector, or according to the period indicated if the Time Offset option is selected.
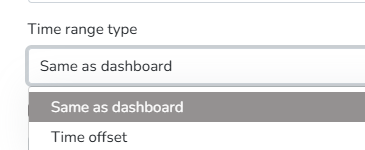
The state granularity feature provides essential control over data presentation in monitoring systems. Users can adjust the granularity according to the level of detail they need for efficient analysis. This flexibility facilitates the interpretation of large volumes of data and optimizes decision-making based on the specific monitoring or analysis needs of each user.
# History - Grid
The platform includes predefined **widgets** that facilitate data presentation in dashboards. Among them are the history and comparative history widgets.
They allow viewing the evolution of Endpoint measurements over time.
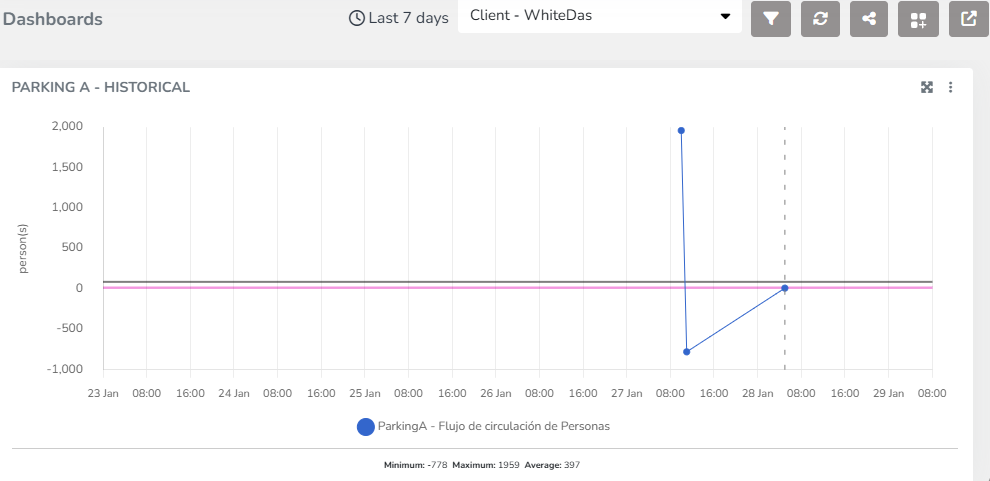
Among the display options for this widget, you can select the chart type for data visualization: line, bar, or area format.
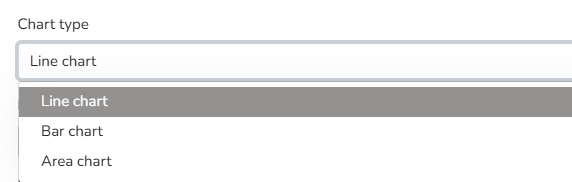
You can also choose the Data Point Shape Type from the following options: Circle, Triangle, Square, or none.

Additionally, you can set the orientation of the chart grid lines. Available options include Horizontal, Vertical, or Both.
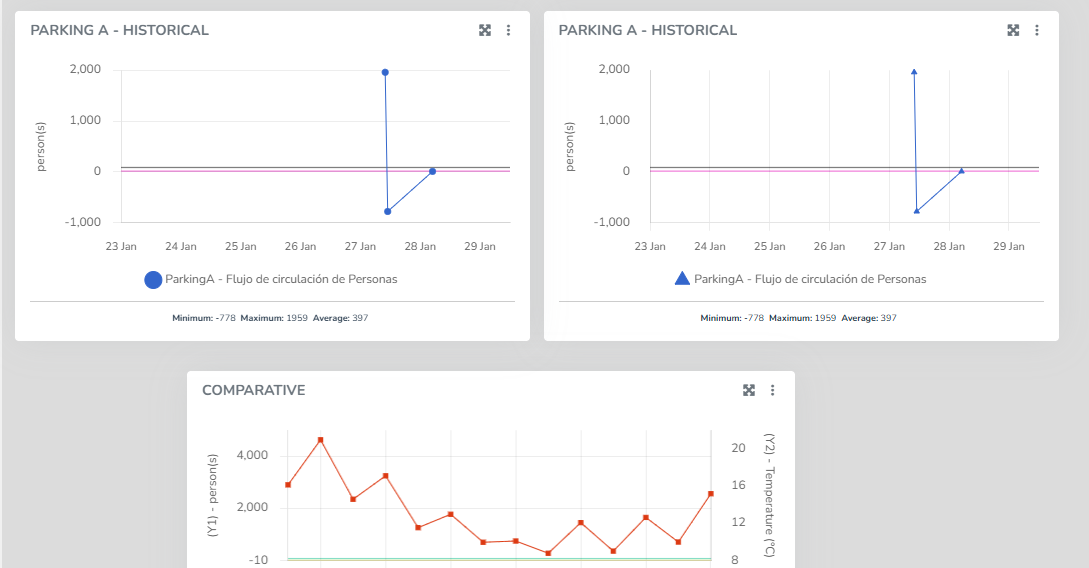
These features are available for both the History widget and the Comparative History widget. In the latter, the same chart can display measurements for two different variable types, one per axis.
# History - Disconnection Time
There are occasions when a device disconnects but measurements continue to be generated. When the device reconnects, the stored measurements from that device are automatically synchronized with the system, allowing the user to see the complete data sequence without manual intervention.
These measurements can be viewed in the History Widget and the Comparative History Widget. The selection to show or hide offline measurements can be made individually for each Endpoint. These measurements are displayed as dashed lines in the Widget to distinguish them from received measurements.
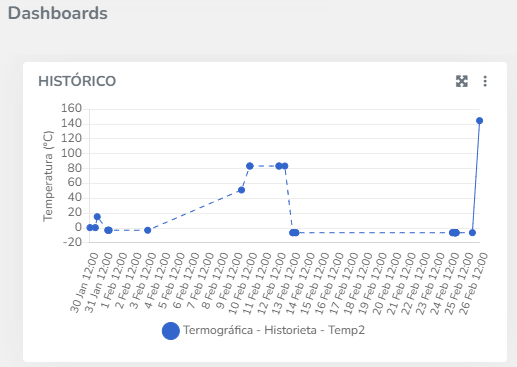
The configuration for displaying offline measurements is done through the Widget Settings, in each Endpoint's configuration by checking or unchecking the 'Show offline periods' field.

Similarly, this can be configured for different variables on both axes in the Comparative History Widget, individually for each Endpoint.
# History
Line chart showing the variation of an endpoint variable type over time. In endpoint history charts, the user can enter minimum and maximum values to define the Y-axis ranges, as well as modify the variable names associated with the Y-axis titles.
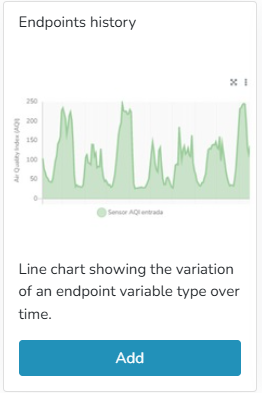
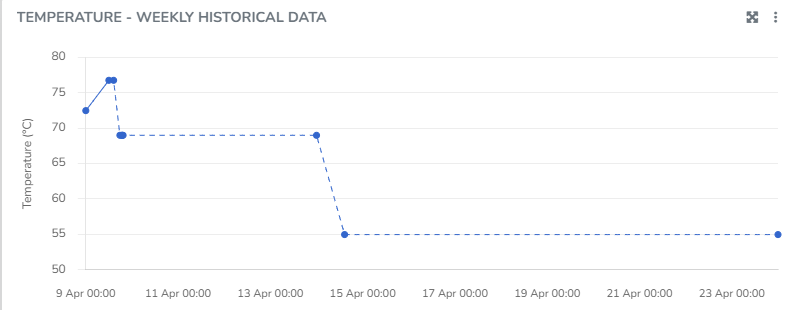
You can view information corresponding to states when the Endpoint was connected, as well as when it was disconnected. You can choose to display the grid line direction, endpoint labels, minimum/maximum/average values, use custom colors, and apply the available filters.
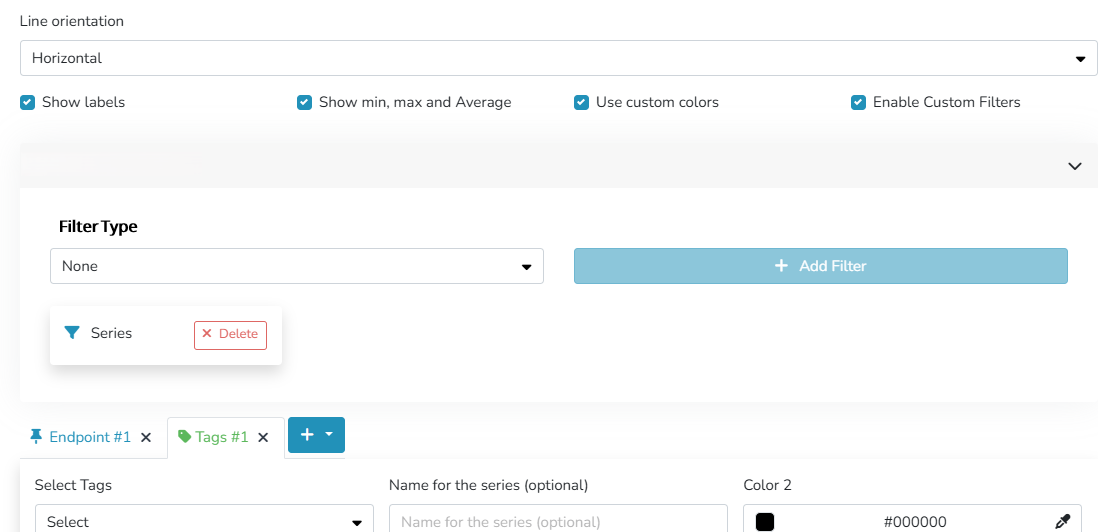
The user can organize the information and visualization of these charts through different criteria within the Widget:
* [Grid line orientation](/docs/monitor/dashboards/widgets/historicos/historicos-grilla): Horizontal/Vertical/Both
* Labels for naming series
* Show or hide Maximum/Minimum/Average values
* Custom colors
* [Custom filters](/docs/monitor/dashboards/widgets/historicos/filtros-personalizados)
* [Granularity](/docs/monitor/dashboards/widgets/historicos/historicos-granularidad)
* [Aggregation](/docs/monitor/dashboards/widgets/historicos/historicos-agregacion)
* [Disconnection Time](/docs/monitor/dashboards/widgets/historicos/historicos-tiempo-de-desconexion)
* Time range: this can match the dashboard's time range or be a different time range, specifying the dates to be viewed in this widget.
You can choose to display information either by identifying one or more endpoints of the same type, or by labels associated with those endpoints.
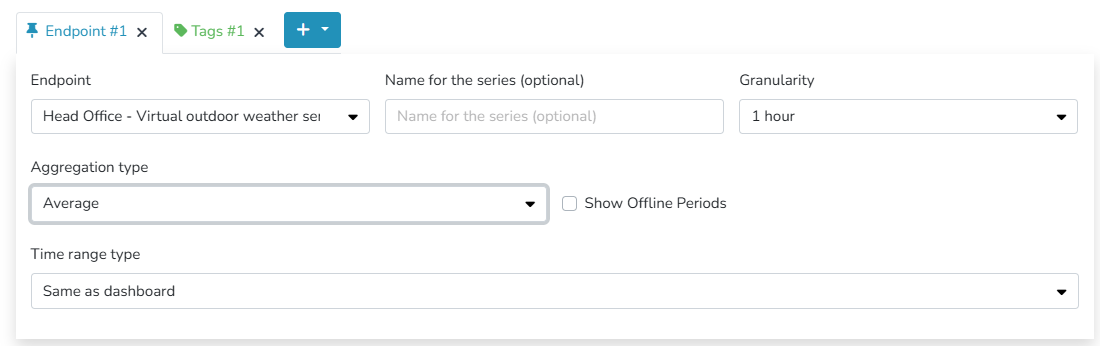
Additionally, there is an option to define different [Comfort Zones](/docs/monitor/dashboards/widgets/widgets-beta/widgets-con-zona-de-confort) within the allowed value ranges for the endpoint.

# Widgets with Comfort Zone
The Cloud Studio platform features a series of specific widgets for branch monitoring, energy consumption, power history, consumption, weather data, and more, for use in dashboards configurable by the end user.

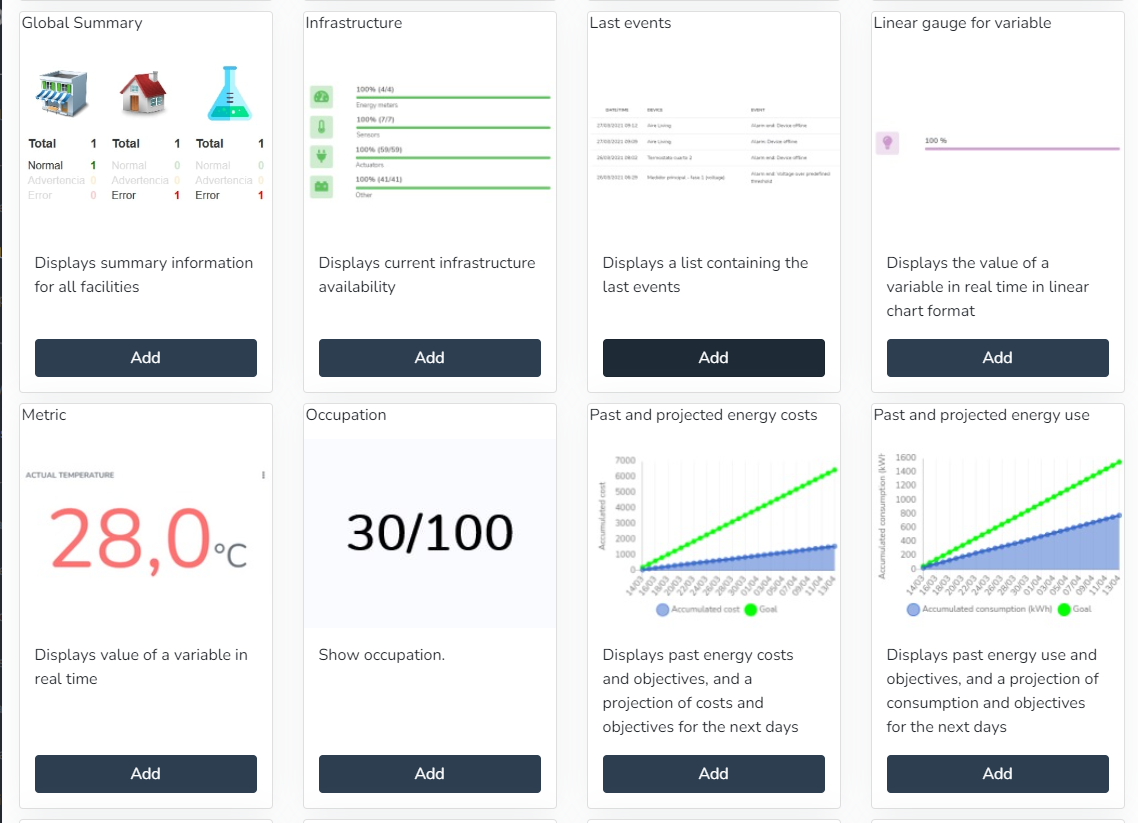

* Active alarms (Displays a pie chart with the distribution of currently active alarm types)
* Past and projected energy consumption (Displays past energy consumption and targets, as well as a projection of consumption and targets for the coming days)
* Energy consumption by category (Displays energy consumption for selected categories)
* Energy consumption by phase (Pie chart showing energy consumption by phase)
* Daily energy consumption by category (Displays daily energy consumption for selected categories)
* Daily consumption by phase (Displays daily consumption by phase for selected categories)
* Energy cost by category (Displays energy cost for selected categories)
* Past and projected energy costs (Displays past energy costs and targets, as well as a projection of costs and targets for the coming days)
* Weather status (Displays the weather status at the current facility)
* Daily power factor (Displays the daily evolution of the power factor)
* Infrastructure (Displays the current availability of the infrastructure)
* Facility map (Displays a map containing the location of the current facility)
* Energy consumption targets (Displays energy consumption information relative to defined targets)
* Daily maximum power (Displays the maximum daily power used in a 15-minute period)
* Daily average power (Displays the daily evolution of the power used)
* Facility summary (Displays summary information for the current facility)
* Global summary (Displays summary information for all facilities)
* Latest events (Displays a list with the latest events)
* Camera snapshots (Displays snapshots taken by a camera)
* Endpoint history (Line chart showing the variation of an endpoint variable type over time)
* Comparative endpoint history (Line chart showing the comparative variation of two endpoint variable types over time)
* Facility list (Displays a list containing facility information)
* World summary (Displays summary information for all facilities)
* Infrastructure (Displays the current availability of the infrastructure)
* Latest events (Displays a list containing the latest items)
* Linear gauge for variable (Displays the value of a variable in real time as a linear chart)
* Metric (Displays the value of a variable in real time)
* Occupancy (Displays the occupancy)
* Plain text (Displays text with custom colors and formatting)
* Rounded gauge for variable (Displays the value of a variable in real time as a semicircular chart)
* State timeline (State timeline showing how one or more endpoints changed their state over time.)
* Static image (Displays a static image)
* Vertical linear indicator for variable (Displays the value of a variable in real time as a vertical linear chart)
* View (Displays a view in a widget, designed in the views section)
* Weather information (Displays the current weather information at the current facility)
**Active Alarms:**
The user can use this Widget to create a pie chart with the distribution of currently active alarm types.

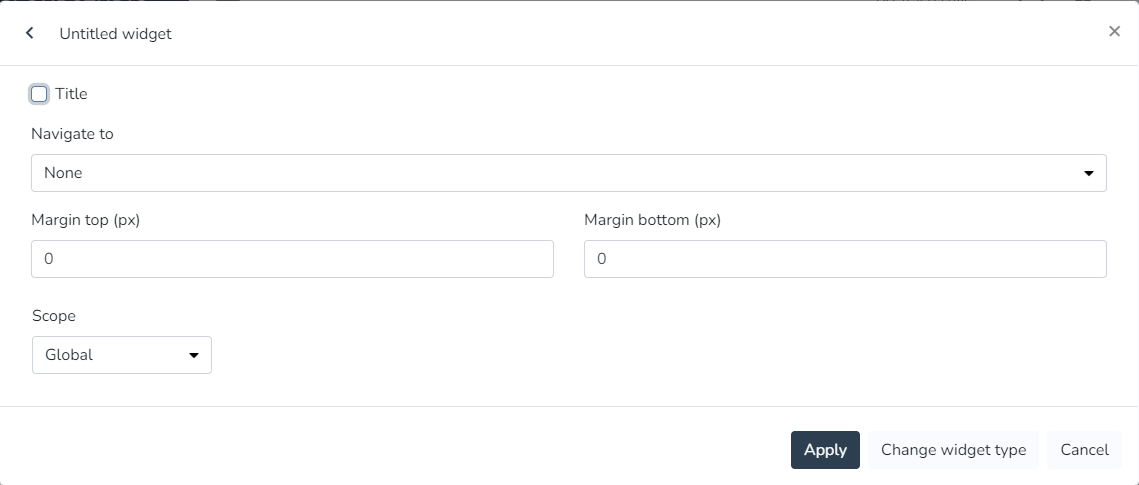
**Camera Snapshots:**
The user can use this Widget to view snapshots taken by a camera.


**Daily Average Power:**
The user can use this Widget to view the daily evolution of the power used.

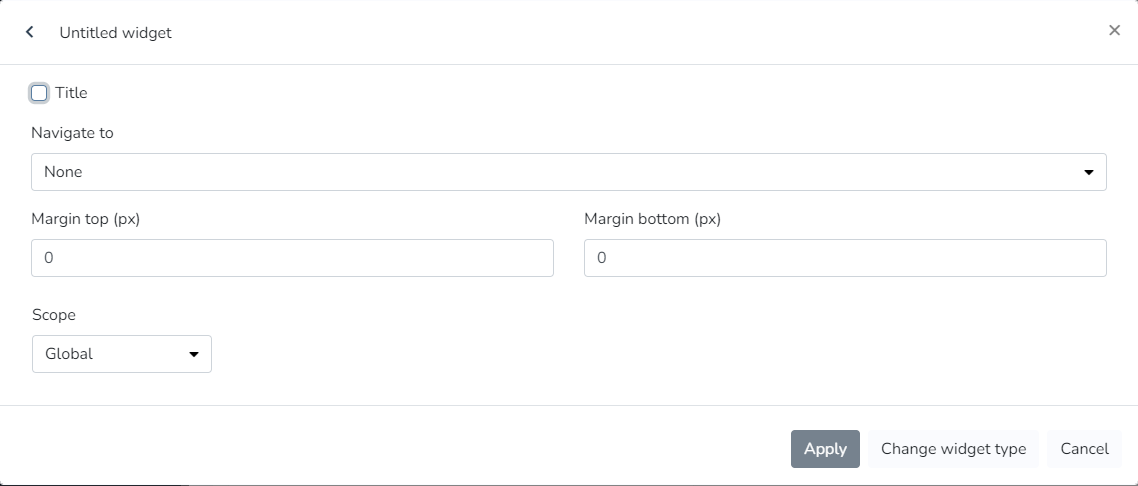
**Daily Energy Consumption by Category:**
The user can use this Widget to view the daily energy consumption for selected categories.
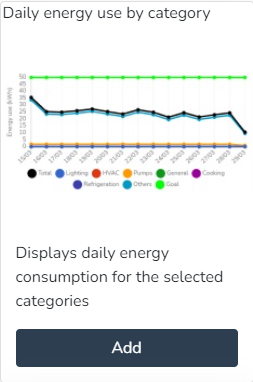

**Daily Energy Consumption by Phase:**
The user can use this Widget to view the daily energy used for selected categories.


**Daily Maximum Power:**
The user can use this Widget to view the maximum daily power used in a 15-minute period.
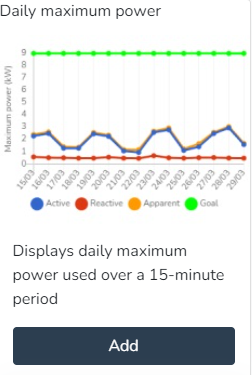
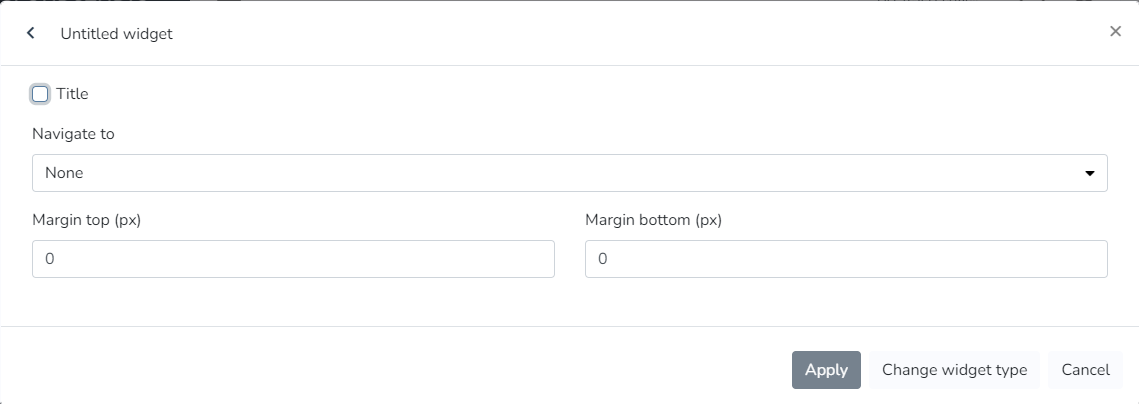
**Daily Power Factor:**
The user can use this Widget to view the daily evolution of the power factor.

**Daily Power Factor:**
The user can use this Widget to view the daily evolution of the power factor.

**Endpoint History:**
The user can use this Widget to generate a line chart showing the variation of an endpoint variable type over time.

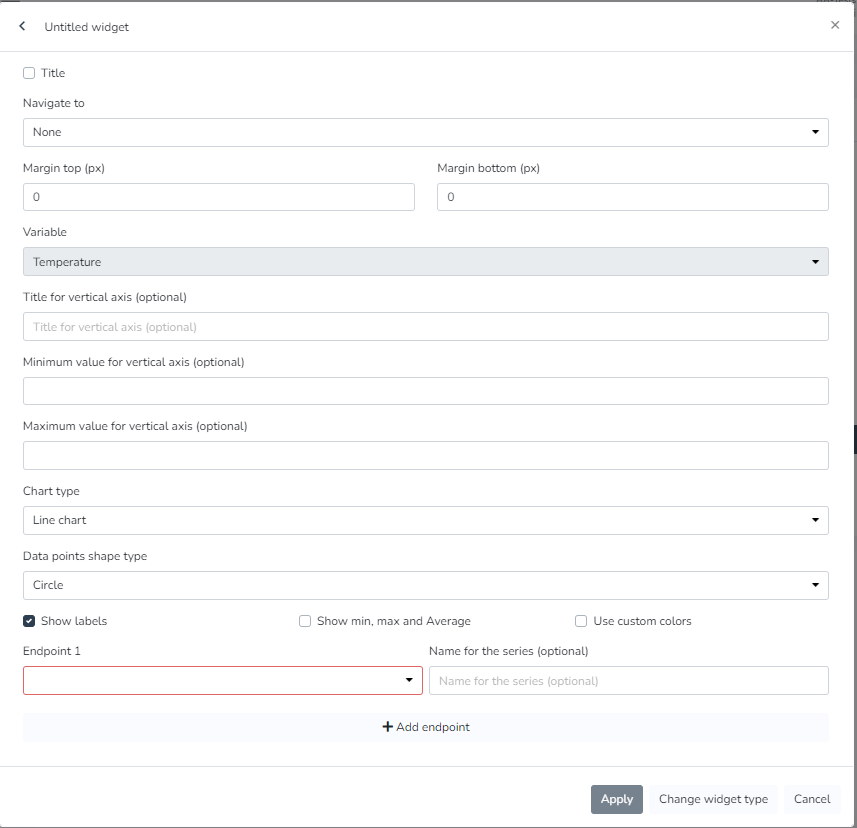
**Comparative Endpoint History:**
The user can use this Widget to generate a line chart showing the comparative variation of two endpoint variable types over time.
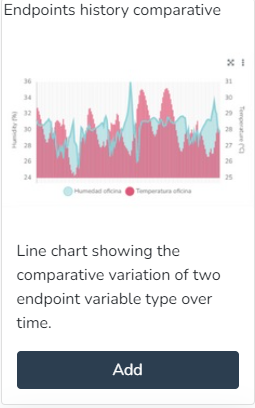

**Energy Consumption Targets:**
The user can use this Widget to view current energy consumption data relative to defined targets.
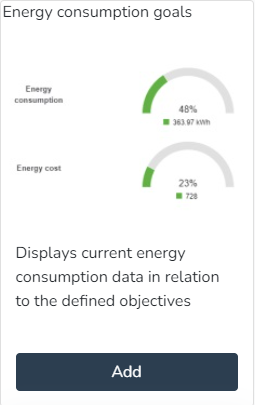
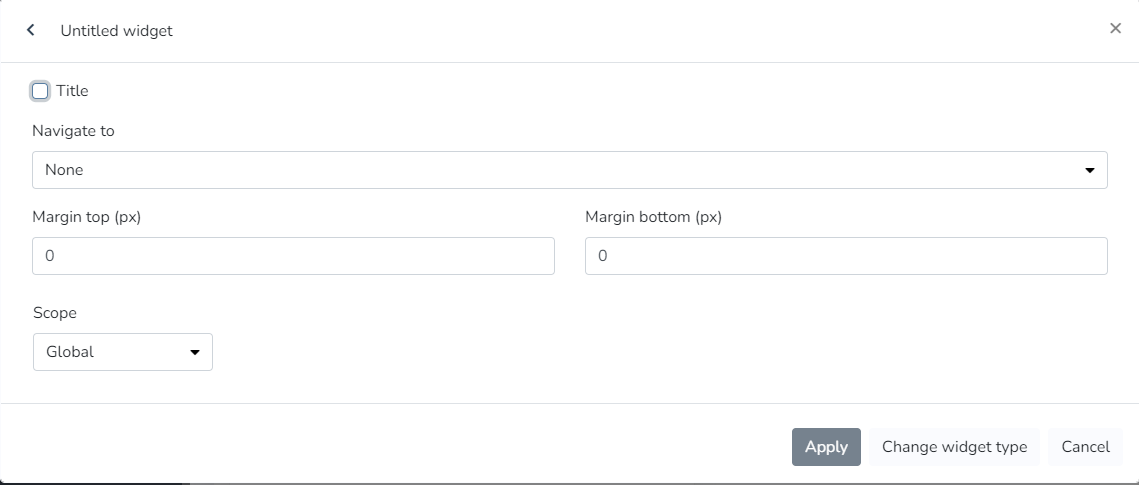
**Energy Consumption Targets:**
The user can use this Widget to view the energy cost for selected categories.


**Energy Consumption by Category:**
The user can use this Widget to view energy consumption for selected categories.

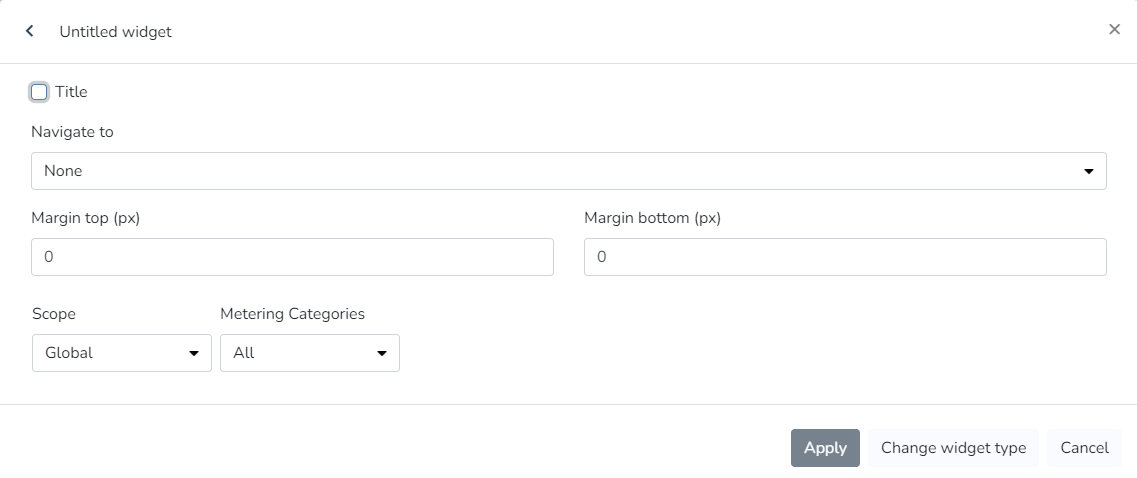
**Energy Consumption by Phase:**
The user can use this Widget to view a pie chart showing energy usage by phase.
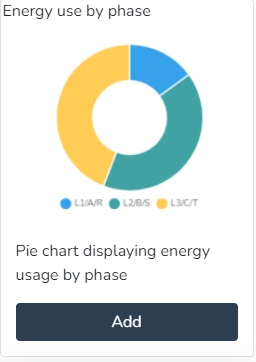

**Energy Consumption by Phase:**
The user can use this Widget to view a list containing facility information.


**Facility Map:**
The user can use this Widget to view a map containing the location of the current facility.
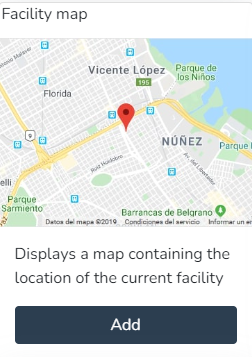

**Facility Summary:**
The user can use this Widget to view summary information for the current facility.


**World Summary:**
The user can use this Widget to view summary information for all facilities.
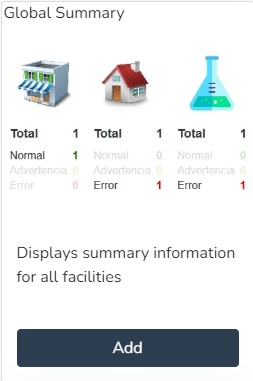

**Infrastructure:**
The user can use this Widget to view the current availability of the infrastructure.
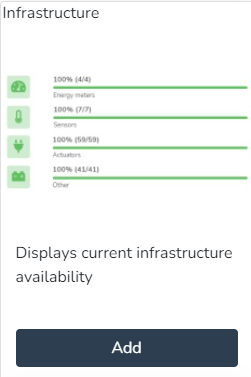

**Latest Events:**
The user can use this Widget to view a list containing the latest events.
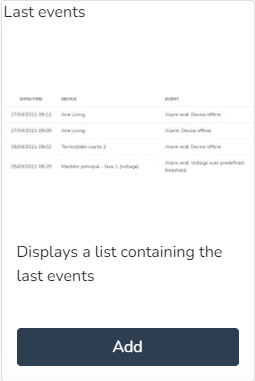

**Linear Gauge for Variable:**
The user can use this Widget to view the value of a variable in real time as a linear chart.

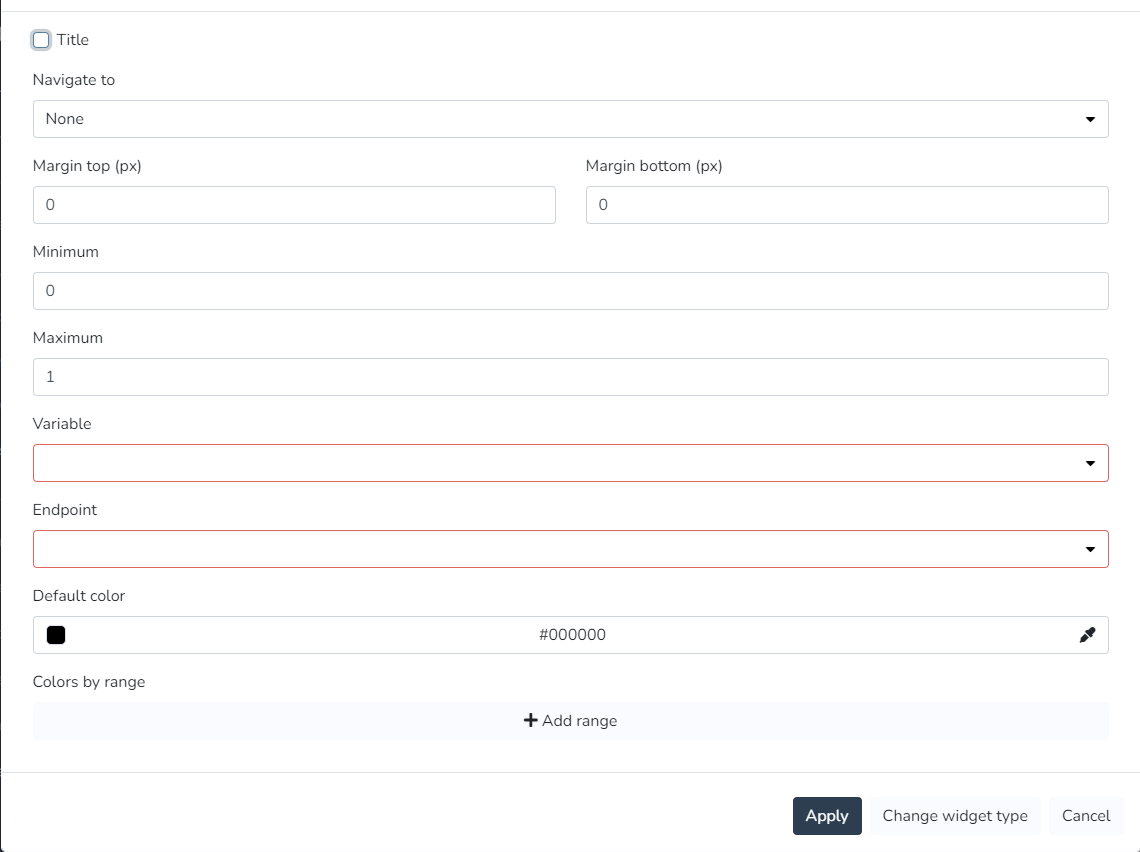
**Metric:**
The user can use this Widget to view the value of a variable in real time.

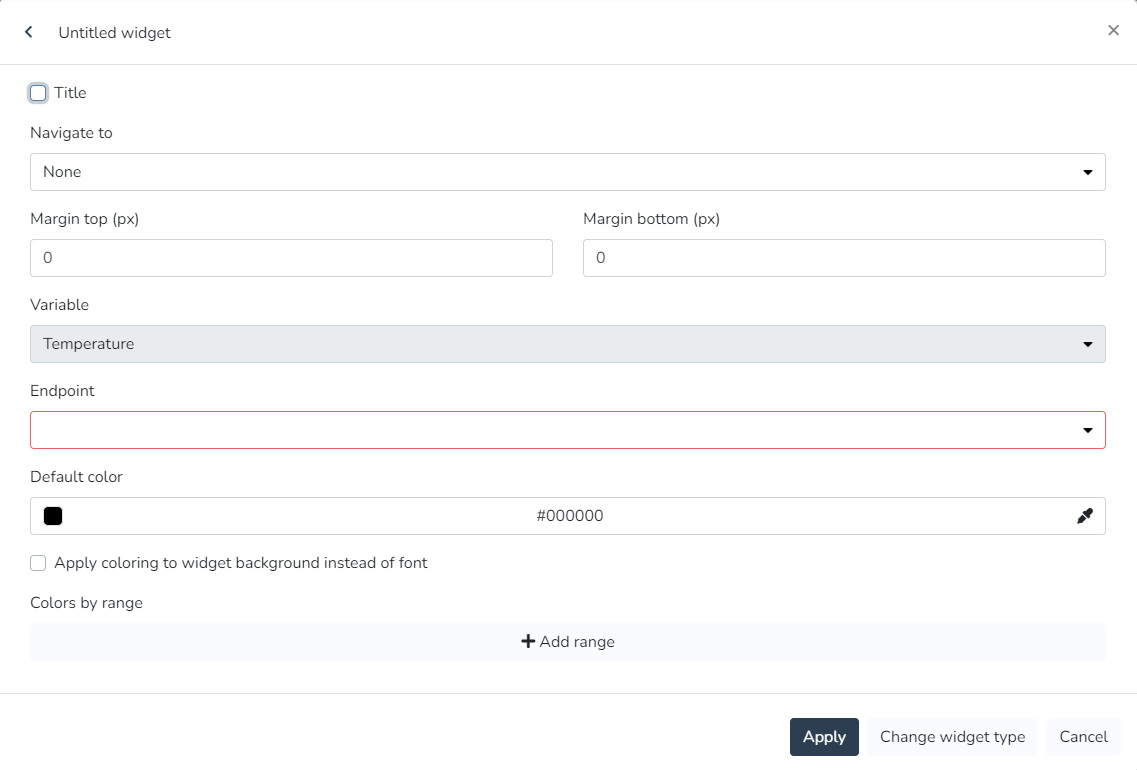
**Occupancy:**
The user can use this Widget to view the occupancy.
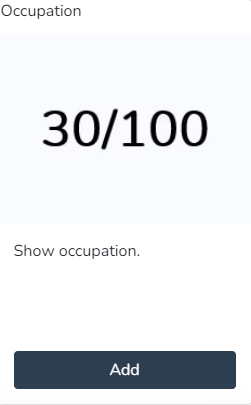
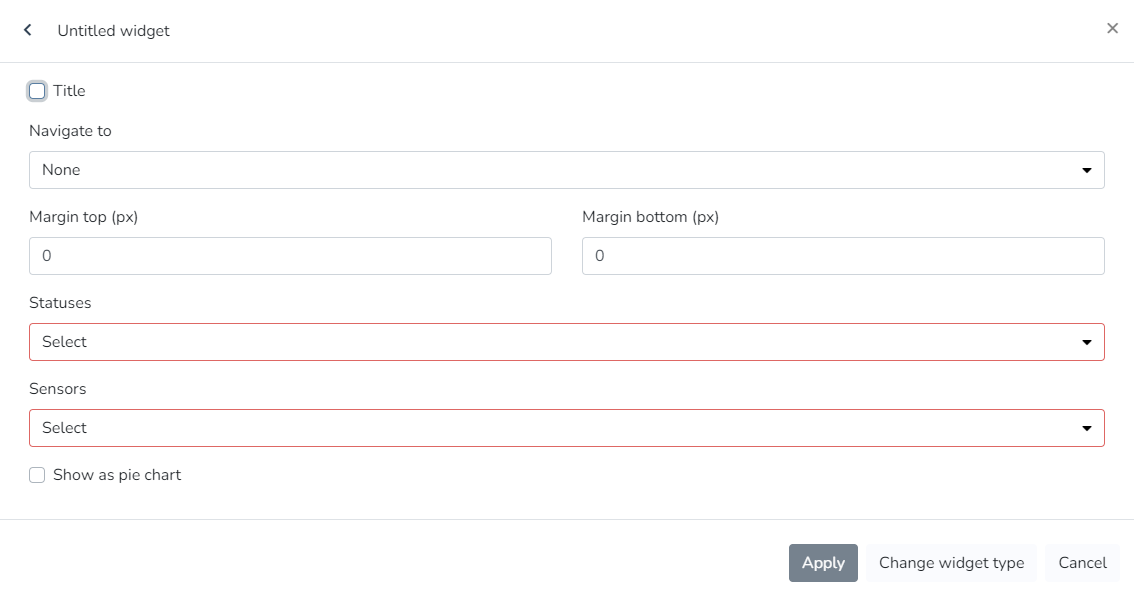
**Past and Projected Energy Costs:**
The user can use this Widget to view past energy costs and targets, and a projection of costs and targets for the coming days.
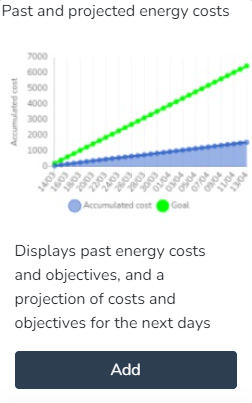

**Past and Projected Energy Consumption:**
The user can use this Widget to view past energy consumption and targets, and a projection of consumption and targets for the coming days.
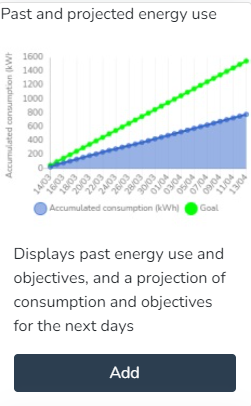

**Plain Text:**
The user can use this Widget to enter text with custom colors and sizes.

**Rounded Gauge for Variable:**
The user can use this Widget to view the value of a variable in real time as a semicircular chart.
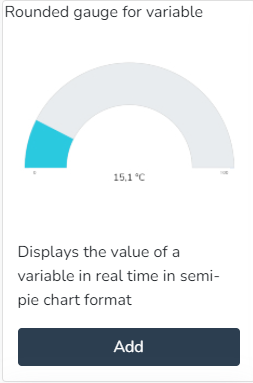
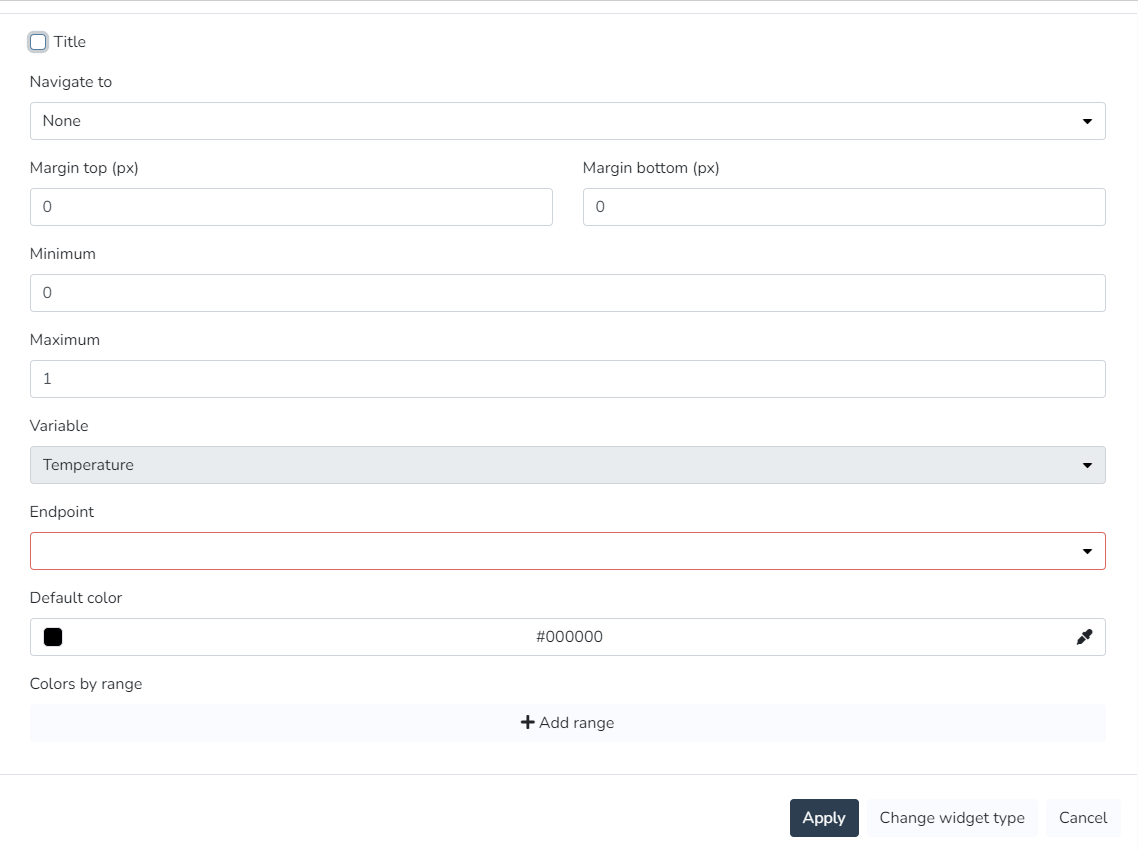
**State Timeline:**
The user can use this Widget to view a state timeline showing how one or more endpoints changed their state over time.


**Static Image:**
The user can use this Widget to view a static image.

**Vertical Linear Indicator for Variable:**
The user can use this Widget to view the value of a variable in real time as a vertical linear chart.


**Views:**
The user can use this Widget to view a view in a widget, designed in the views section.

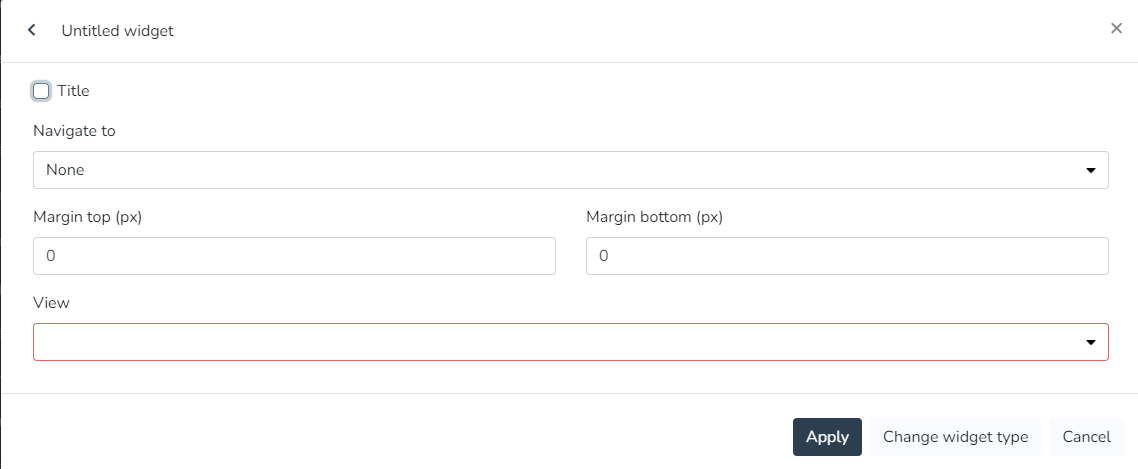
**Weather Information:**
The user can use this Widget to view the current weather information at the current facility.

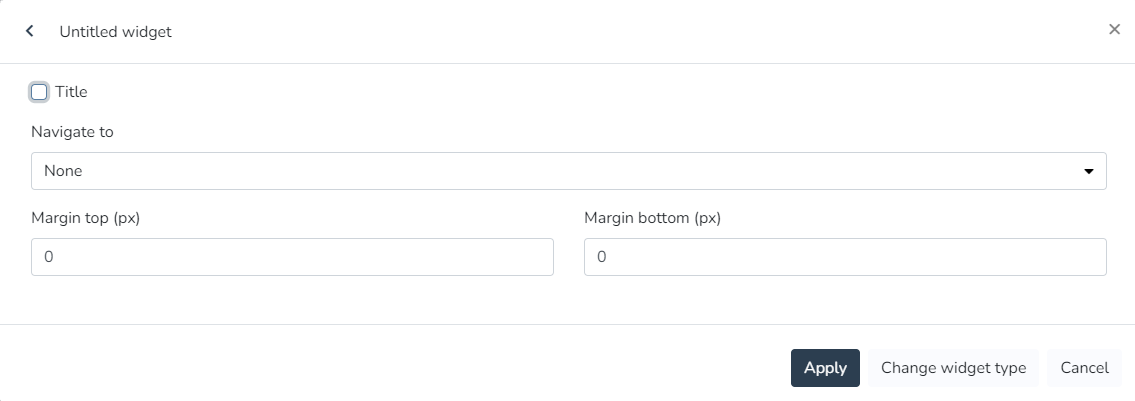
Dashboard Widgets (Monitor) [#dashboard-widgets-monitor]
In the monitor, the dashboard can be configured to the client's needs using any combination of the [**available widgets**](/docs/monitor/dashboards/widgets):
**Endpoint History Widget:**
Line chart showing the variation of an endpoint variable type over time. In endpoint history charts, the user can enter minimum and maximum values to define the Y-axis ranges, as well as modify the variable names associated with the Y-axis titles.
Dashboard
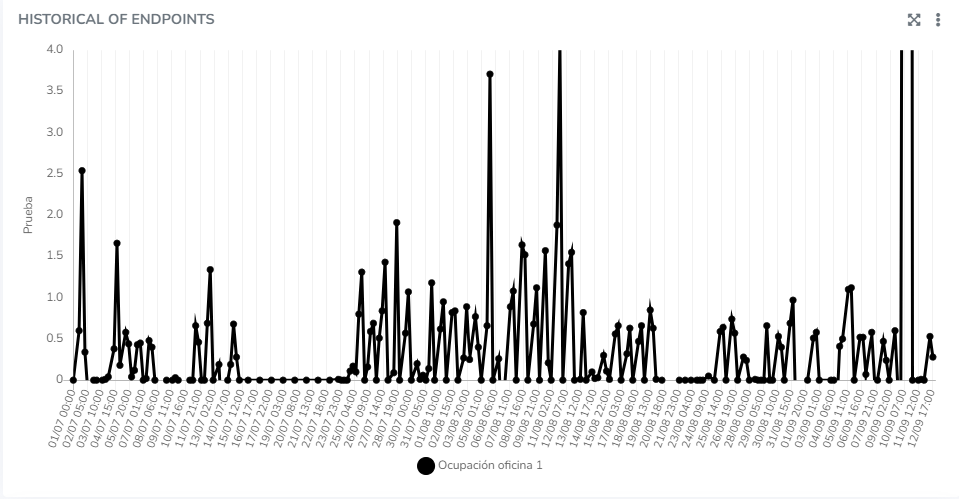
* *The user can edit the minimum and maximum values that define the Y-axis ranges of the charts.*
!\[Graphical user interface, Text, Application, Email
Automatically generated description]\(/images/wiki/dashboards/widgets/widgets-beta/widgets-con-zona-de-confort/image\_272e.png)
*This is a visualization of the minimum and maximum values that define the Y-axis ranges of the charts.*
* *The user can define **Comfort Zones** for history charts. This allows configuring value ranges where measurements are expected. It is for visualization purposes and multiple zones can be configured for the same chart.*
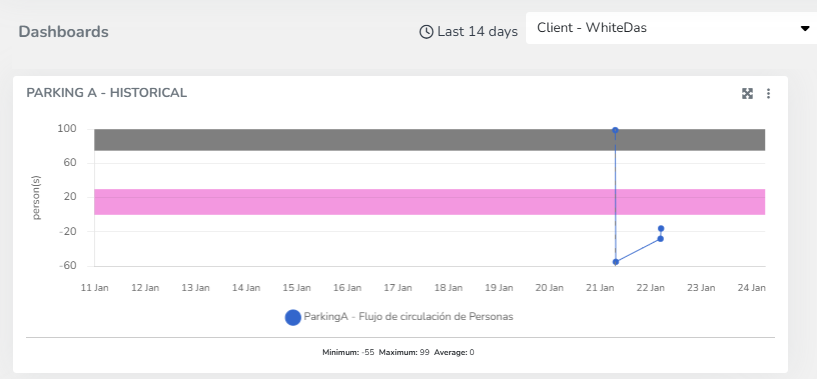
The user can also define Comfort Zones for the Comparative History Widget.

* *The user can modify the Y-axis titles (instead of displaying the variable type names).*

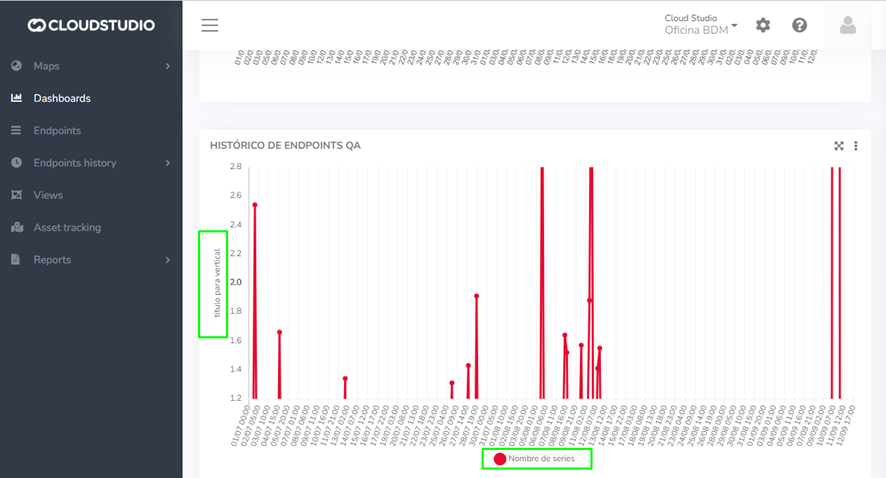
* *The user can view the tooltips of history charts*, *which display all data points associated with an X position.*
!\[Chart, Line chart
Automatically generated description]\(/images/wiki/dashboards/widgets/widgets-beta/widgets-con-zona-de-confort/image\_c4df.png)
**Comparative Endpoint History Widget:**
Endpoint history charts where the user can enter minimum and maximum values to define the Y-axis ranges, as well as modify the variable names associated with the Y-axis titles.

*The user can edit the minimum and maximum values that define the Y-axis ranges of the charts.*

*The user can modify the Y-axis titles (instead of displaying the variable type names).*
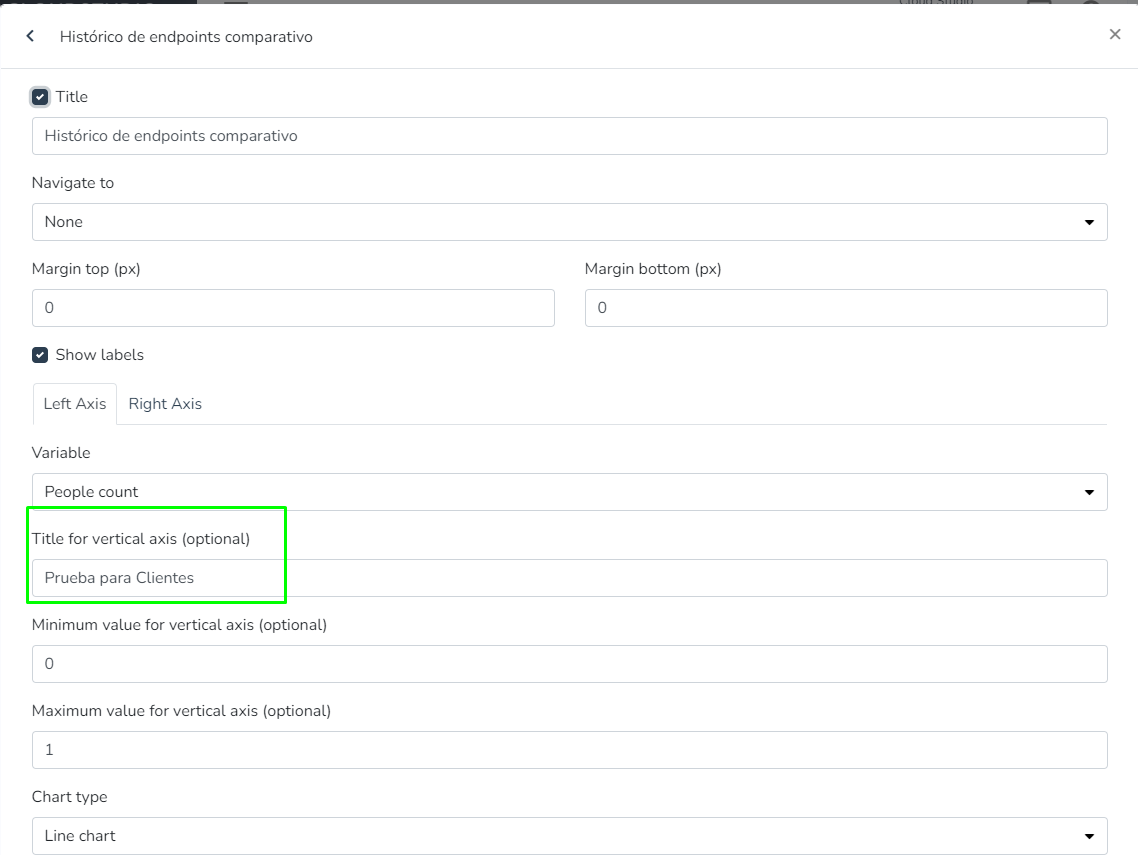

*The user can view the tooltips of history charts*, *which display all data points associated with an X position.*

# Device
Properties
| address(string) - read only |
| -------------------------------------------------------------------------------------------------------------------------------------------- |
| The address property gets the address of a device |
| Examples |
| let devices = env.facility.devices; let mydevices = devices.toArray() mydevices.forEach((device)=> \{ env.log(device.address) }); |
| |
| description (string) - read only |
| ------------------------------------------------------------------------------------------------------------------------------------------------ |
| The description property gets the description of a device |
| Examples |
| let devices = env.facility.devices; let mydevices = devices.toArray() mydevices.forEach((device)=> \{ env.log(device.description) }); |
| endpoints - read only |
| ---------------------------------------------------------------------------------------------------------------------------------------------------------------------------------------- |
| The endpoints property gets an endpoints object, for more information see endpoints |
| Examples |
| let devices = env.facility.devices; let mydevices = devices.toArray() mydevices.forEach((device)=> \{ let endpoints = device.endpoints env.log(device.endpoints) }); |
| isOnline (boolean)- read only |
| ------------------------------------------------------------------------------------------------------------------------------------------------------------------------ |
| The isOnline property allows knowing whether the device is online or offline. Note: This property is available starting from platform version 1.5. |
| Examples |
| let devices = env.facility.devices; let mydevices = devices.toArray() mydevices.forEach((dev)=> \{ let online= dev.isOnline; env.log(dev.online) }); |
Methods [#methods]
For more information see this [page](/docs/herramientas-low-code-scripting/referencia-de-objetos-disponibles-para-scripting/device)
# Devices
Properties
| facilityID (integer) - read only |
| ---------------------------------------------------------------------------------------------- |
| The facilityID property gets the unique identifier of the facility to which the device belongs |
| Examples |
| let devices = env.facility.devices; env.log(devices.facilityID) |
| count (integer) - read only |
| ------------------------------------------------------------------------ |
| The count property gets the number of devices that exist in the facility |
| Examples |
| let devices = env.facility.devices; env.log(devices.count) |
Methods [#methods]
| byAddress(string deviceAddress ) |
| ------------------------------------------------------------------------------------------------------------------------------------------------------------------------------------------------------------------------------- |
| The byAddress method returns a device object whose address matches the one specified in the deviceAddress parameter. If no device is found with the specified address, the method returns null. For more information see device |
| Examples |
| let devices = env.facility.devices; let device = devices.byAddress('1') env.log(device) |
| byIndex(integer index) |
| -------------------------------------------------------------------------------------------------------------------------------------------------------------------------------------------------------------------------------------------------------------------- |
| The byIndex method returns a device object whose index matches the one specified in the index parameter. A value of zero is equivalent to the first device. If no device is found with the specified index, the method returns null. For more information see device |
| Examples |
| let devices = env.facility.devices; let device = devices.byIndex(0) env.log(device) |
| toArray() |
| ----------------------------------------------------------------------------------------- |
| The toArray method returns an array of device objects. For more information see device |
| Examples |
| let devices = env.facility.devices; let deviceArr = devices.toArray() env.log(deviceArr) |
# Endpoint
Properties [#properties]
| (EndPointAccessType) accessType |
| ---------------------------------------------------------------------------------------------------------------------------------------------------------------------------------------- |
| The accessType property gets the type of access applied to an endpoint. For more information about endpoint access types see this page |
| Examples |
| let endpoints = env.facility.endpoints; let myendPointsArray = endpoints.toArray(); myendPointsArray.forEach((ep)=> \{ let aType = ep.accessType; env.log(aType); }); |
| |
| (string) address |
| ----------------------------------------------------------------------------------------------------------------------------------------------------------------------------------- |
| The address property gets the address of an endpoint. For more information about endpoints see this page |
| Examples |
| let endpoints = env.facility.endpoints; let myendPointsArray = endpoints.toArray(); myendPointsArray.forEach((ep)=> \{ let addr = ep.address; env.log(addr); }); |
| |
| (string) description |
| ----------------------------------------------------------------------------------------------------------------------------------------------------------------------------------- |
| The description property gets the description that was defined for an endpoint when it was created. For more information about endpoints see this page |
| Examples |
| let endpoints = env.facility.endpoints; let myendPointsArray = endpoints.toArray(); myendPointsArray.forEach((ep)=> \{ let addr = ep.address; env.log(addr); }); |
| |
| (integer) endpointID |
| -------------------------------------------------------------------------------------------------------------------------------------------------------------------------------- |
| The endpointID property gets the unique identifier of an endpoint. For more information about endpoints see this page |
| Examples |
| let endpoints = env.facility.endpoints; let myendPointsArray = endpoints.toArray(); myendPointsArray.forEach((ep)=> \{ let id= ep.endpointID; env.log(id); }); |
| |
| (integer) endpointSubType |
| ------------------------------------------------------------------------------------------------------------------------------------------------------------------------------------------------ |
| The endpointSubType property gets the endpoint subtype of an endpoint. If the endpoint has no defined subtype, null will be returned. For more information about endpoint subtypes see this page |
| Examples |
| let endpoints = env.facility.endpoints; let myendPointsArray = endpoints.toArray(); myendPointsArray.forEach((ep)=> \{ let st = ep.endpointSubtype; env.log(st); }); |
| |
| (integer) operationSecurityLevel |
| ----------------------------------------------------------------------------------------------------------------------------------------------------------------------------------------------- |
| The operationSecurityLevel property gets the type of security that has been defined when operating on an endpoint. For more information about endpoint operation security levels see this page |
| Examples |
| let endpoints = env.facility.endpoints; let myendPointsArray = endpoints.toArray(); myendPointsArray.forEach((ep)=> \{ let osl = ep.operationSecurityLevel; env.log(osl); }); |
| |
| string\[] tags |
| --------------------------------------------------------------------------------------------------------------------------------------------------------------------------------------------------------------------- |
| The tags property gets all tags that have been defined for an endpoint. For more information about endpoints see this page |
| Examples |
| let endpoints = env.facility.endpoints; let myendPointsArray = endpoints.toArray(); myendPointsArray.forEach((ep)=> \{ let tags= ep.tags; tags.forEach((tag)=>\{ env.log(tag); }); }); |
| |
| (Device) device |
| -------------------------------------------------------------------------------------------------------------------------------------------------------------------------------- |
| The device property gets the device object to which an endpoint belongs. For more information about endpoints see this page |
| Examples |
| let endpoints = env.facility.endpoints; let myendPointsArray = endpoints.toArray(); myendPointsArray.forEach((ep)=> \{ let device = ep.device; env.log(device); }); |
| |
Methods [#methods]
| (DataPoint) getCurrentState() |
| ----------------------------------------------------------------------------------------------------------------------------------------------------------------------------------------------------------------------------------------------------------------------------------------------------------------------------------------------------------------------------------------------------------------------------------------------------------------------------- |
| The getCurrentState() method gets the current state of an endpoint for all endpoint types that have a state. If the endpoint type does not have a state, the method will return an error with the description "Unsupported endpoint type in method getCurrentState". The returned DataPoint object is polymorphic, meaning that depending on the endpoint type whose state is being queried, its properties are different. For more information about DataPoint see this page |
| Examples |
| let endpoints = env.facility.endpoints; let myendPoint = endpoints.byTag('vitrina'); let status = myendPoint.getCurrentState(); let value = status.value; env.log(value); |
| |
| (DataPoint\[]) getDataPoints(Date fromUTCDatetime) |
| ----------------------------------------------------------------------------------------------------------------------------------------------------------------------------------------------------------------------------------------------------------------------------------------------------------------------------------------------------------------------------------------------------------------------- |
| The getDataPoints() method gets the different states of an endpoint from the moment indicated as fromUTCDateTime. The returned DataPoint object is polymorphic, meaning that depending on the endpoint type whose state is being queried, its properties are different. For more information about DataPoint see this page |
| Examples |
| const subtractHours = (date, hours) => \{ const result = new Date(date); result.setHours(result.getHours() - hours); return result; }; let endpoints = env.facility.endpoints; let myendPointsArray = endpoints.toArray(); myendPointsArray.forEach((ep)=> \{ let dataPoints = ep.getDataPoints(subtractHours(utils.utcNow, 10)); env.log(dataPoints); }); |
| |
| (double) getDataPointsAvg(Date fromUTCDatetime) |
| ------------------------------------------------------------------------------------------------------------------------------------------------------------------------------------------------------------------------------------------------------------------------------------------------------------------------------------------------------------------------------------------------------------ |
| The getDataPointsAvg() method gets the arithmetic average of an endpoint's states from the moment indicated as fromUTCDateTime. For more information about DataPoint see this page |
| Examples |
| const subtractHours = (date, hours) => \{ const result = new Date(date); result.setHours(result.getHours() - hours); return result; }; let endpoints = env.facility.endpoints; let myendPointsArray = endpoints.toArray(); myendPointsArray.forEach((ep)=> \{ let avg = ep.getDataPointsAvg(subtractHours(utils.utcNow, 10)); env.log(avg); }); |
| |
| (double) getDataPointsAvg(Date fromUTCDatetime, Date toUTCDateTime) |
| -------------------------------------------------------------------------------------------------------------------------------------------------------------------------------------------------------------------------------------------------------------------------------------------------------------------------------------------------------------------------------------------------------------------------- |
| The getDataPointsAvg() method gets the arithmetic average of an endpoint's states from the moment indicated as fromUTCDateTime up to the moment indicated in the toUTCDateTime parameter. For more information about DataPoint see this page |
| Examples |
| const subtractHours = (date, hours) => \{ const result = new Date(date); result.setHours(result.getHours() - hours); return result; }; let endpoints = env.facility.endpoints; let myendPointsArray = endpoints.toArray(); myendPointsArray.forEach((ep)=> \{ let avg = ep.getDataPointsAvg(subtractHours(utils.utcNow, 10), utils.utcNow); env.log(avg); }); |
| |
| (double) getDataPointsMax(Date fromUTCDatetime) |
| ------------------------------------------------------------------------------------------------------------------------------------------------------------------------------------------------------------------------------------------------------------------------------------------------------------------------------------------------------------------------------------------------------------ |
| The getDataPointsMax() method gets the maximum value of an endpoint's states from the moment indicated as fromUTCDateTime. For more information about DataPoint see this page |
| Examples |
| const subtractHours = (date, hours) => \{ const result = new Date(date); result.setHours(result.getHours() - hours); return result; }; let endpoints = env.facility.endpoints; let myendPointsArray = endpoints.toArray(); myendPointsArray.forEach((ep)=> \{ let avg = ep.getDataPointsMax(subtractHours(utils.utcNow, 10)); env.log(avg); }); |
| |
| (double) getDataPointsMax(Date fromUTCDatetime, Date toUTCDateTime) |
| -------------------------------------------------------------------------------------------------------------------------------------------------------------------------------------------------------------------------------------------------------------------------------------------------------------------------------------------------------------------------------------------------------------------------- |
| The getDataPointsMax() method gets the maximum value of an endpoint's states from the moment indicated as fromUTCDateTime up to the moment indicated in the toUTCDateTime parameter. For more information about DataPoint see this page |
| Examples |
| const subtractHours = (date, hours) => \{ const result = new Date(date); result.setHours(result.getHours() - hours); return result; }; let endpoints = env.facility.endpoints; let myendPointsArray = endpoints.toArray(); myendPointsArray.forEach((ep)=> \{ let avg = ep.getDataPointsMax(subtractHours(utils.utcNow, 10), utils.utcNow); env.log(avg); }); |
| |
| (double) getDataPointsMin(Date fromUTCDatetime) |
| ------------------------------------------------------------------------------------------------------------------------------------------------------------------------------------------------------------------------------------------------------------------------------------------------------------------------------------------------------------------------------------------------------------ |
| The getDataPointsMin() method gets the minimum value of an endpoint's states from the moment indicated as fromUTCDateTime. For more information about DataPoint see this page |
| Examples |
| const subtractHours = (date, hours) => \{ const result = new Date(date); result.setHours(result.getHours() - hours); return result; }; let endpoints = env.facility.endpoints; let myendPointsArray = endpoints.toArray(); myendPointsArray.forEach((ep)=> \{ let avg = ep.getDataPointsMin(subtractHours(utils.utcNow, 10)); env.log(avg); }); |
| |
| (double) getDataPointsMin(Date fromUTCDatetime, Date toUTCDateTime) |
| -------------------------------------------------------------------------------------------------------------------------------------------------------------------------------------------------------------------------------------------------------------------------------------------------------------------------------------------------------------------------------------------------------------------------- |
| The getDataPointsMin() method gets the minimum value of an endpoint's states from the moment indicated as fromUTCDateTime up to the moment indicated in the toUTCDateTime parameter. For more information about DataPoint see this page |
| Examples |
| const subtractHours = (date, hours) => \{ const result = new Date(date); result.setHours(result.getHours() - hours); return result; }; let endpoints = env.facility.endpoints; let myendPointsArray = endpoints.toArray(); myendPointsArray.forEach((ep)=> \{ let avg = ep.getDataPointsMin(subtractHours(utils.utcNow, 10), utils.utcNow); env.log(avg); }); |
| |
| (double) getDataPointsSum(Date fromUTCDatetime) |
| ------------------------------------------------------------------------------------------------------------------------------------------------------------------------------------------------------------------------------------------------------------------------------------------------------------------------------------------------------------------------------------------------------------ |
| The getDataPointsSum method gets the sum of the values of an endpoint's states from the moment indicated as fromUTCDateTime. For more information about DataPoint see this page |
| Examples |
| const subtractHours = (date, hours) => \{ const result = new Date(date); result.setHours(result.getHours() - hours); return result; }; let endpoints = env.facility.endpoints; let myendPointsArray = endpoints.toArray(); myendPointsArray.forEach((ep)=> \{ let avg = ep.getDataPointsSum(subtractHours(utils.utcNow, 10)); env.log(avg); }); |
| |
| (double) getDataPointsSum(Date fromUTCDatetime, Date toUTCDateTime) |
| -------------------------------------------------------------------------------------------------------------------------------------------------------------------------------------------------------------------------------------------------------------------------------------------------------------------------------------------------------------------------------------------------------------------------- |
| The getDataPointsSum() method gets the sum of the values of an endpoint's states from the moment indicated as the fromUTCDateTime parameter up to the moment indicated in the toUTCDateTime parameter. For more information about DataPoint see this page |
| Examples |
| const subtractHours = (date, hours) => \{ const result = new Date(date); result.setHours(result.getHours() - hours); return result; }; let endpoints = env.facility.endpoints; let myendPointsArray = endpoints.toArray(); myendPointsArray.forEach((ep)=> \{ let avg = ep.getDataPointsSum(subtractHours(utils.utcNow, 10), utils.utcNow); env.log(avg); }); |
| |
| (DataPoint\[]) getDataPointsLT(Date fromUTCDatetime, Date toUTCDateTime\*) |
| ------------------------------------------------------------------------------------------------------------------------------------------------------------------------------------------------------------------------------------------------------------------------------------------------------------------------------------------------------------------------------------------------------------------------- |
| The getDataPointsLT() method gets the states of an endpoint from the moment indicated as the fromUTCDateTime parameter up to the moment indicated in the toUTCDateTime parameter in the local time of the facility to which they belong. For more information about DataPoint see this page |
| Examples |
| const subtractHours = (date, hours) => \{ const result = new Date(date); result.setHours(result.getHours() - hours); return result; }; let endpoints = env.facility.endpoints; let myendPointsArray = endpoints.toArray(); myendPointsArray.forEach((ep)=> \{ let avg = ep.getDataPointsLT(subtractHours(utils.utcNow, 10), utils.utcNow); env.log(avg); }); |
| |
| (double) getDataPointsMaxLT(Date fromUTCDatetime, Date toUTCDateTime\*) |
| ---------------------------------------------------------------------------------------------------------------------------------------------------------------------------------------------------------------------------------------------------------------------------------------------------------------------------------------------------------------------------------------------------------------------------- |
| The getDataPointsMaxLT() method gets the maximum value of an endpoint from the moment indicated as the fromUTCDateTime parameter up to the moment indicated in the toUTCDateTime parameter in the local time of the facility to which they belong. For more information about DataPoint see this page |
| Examples |
| const subtractHours = (date, hours) => \{ const result = new Date(date); result.setHours(result.getHours() - hours); return result; }; let endpoints = env.facility.endpoints; let myendPointsArray = endpoints.toArray(); myendPointsArray.forEach((ep)=> \{ let avg = ep.getDataPointsMaxLT(subtractHours(utils.utcNow, 10), utils.utcNow); env.log(avg); }); |
| |
| (double) getDataPointsMinLT(Date fromUTCDatetime, Date toUTCDateTime\*) |
| ---------------------------------------------------------------------------------------------------------------------------------------------------------------------------------------------------------------------------------------------------------------------------------------------------------------------------------------------------------------------------------------------------------------------------- |
| The getDataPointsMinLT() method gets the minimum value of an endpoint from the moment indicated as the fromUTCDateTime parameter up to the moment indicated in the toUTCDateTime parameter in the local time of the facility to which they belong. For more information about DataPoint see this page |
| Examples |
| const subtractHours = (date, hours) => \{ const result = new Date(date); result.setHours(result.getHours() - hours); return result; }; let endpoints = env.facility.endpoints; let myendPointsArray = endpoints.toArray(); myendPointsArray.forEach((ep)=> \{ let avg = ep.getDataPointsMinLT(subtractHours(utils.utcNow, 10), utils.utcNow); env.log(avg); }); |
| |
| (double) getDataPointsSumLT(Date fromUTCDatetime, Date toUTCDateTime\*) |
| ---------------------------------------------------------------------------------------------------------------------------------------------------------------------------------------------------------------------------------------------------------------------------------------------------------------------------------------------------------------------------------------------------------------------------- |
| The getDataPointsSumLT() method gets the sum of the states of an endpoint from the moment indicated as the fromUTCDateTime parameter up to the moment indicated in the toUTCDateTime parameter in the local time of the facility to which they belong. For more information about DataPoint see this page |
| Examples |
| const subtractHours = (date, hours) => \{ const result = new Date(date); result.setHours(result.getHours() - hours); return result; }; let endpoints = env.facility.endpoints; let myendPointsArray = endpoints.toArray(); myendPointsArray.forEach((ep)=> \{ let avg = ep.getDataPointsSumLT(subtractHours(utils.utcNow, 10), utils.utcNow); env.log(avg); }); |
| |
# Endpoints
Properties [#properties]
| (integer) count |
| ----------------------------------------------------------------------------------------------------------------------------------------------------------------------------- |
| The count property gets the number of endpoints that a device has |
| Examples |
| devices = env.facility.devices; mydevices = devices.toArray() mydevices.forEach((dev)=> \{ totalEndpoints = dev.endpoints.count env.log(totalEndpoints) }); |
| |
| (integer) deviceID |
| ------------------------------------------------------------------------------------------------------------------------------------------------------------------------------ |
| The deviceID property gets the unique device identifier to which an endpoint belongs |
| Examples |
| let devices = env.facility.devices; let mydevices = devices.toArray() mydevices.forEach((dev)=> \{ let deviceId = dev.endpoints.deviceID env.log(deviceId) }); |
| |
| (integer) facilityID |
| -------------------------------------------------------------------------------------------------------------------------------------------------------------------------- |
| The facilityID property gets the unique facility identifier to which an endpoint belongs |
| Examples |
| let devices = env.facility.devices; let mydevices = devices.toArray() mydevices.forEach((dev)=> \{ let facilityId = dev.endpoints.facilityID env.log(facilityId) }); |
| |
Methods [#methods]
| (object) byTag(string tag) |
| -------------------------------------------------------------------------------------------------------------------- |
| The byTag method gets an endpoint object given a specific tag, for more information see endpoint |
| Examples |
| let endpoints = env.facility.endpoints; let myendPoint = endpoints.byTag("My test endpoint tag") env.log(myendPoint) |
| |
| (object\[]) allByTag(string tag) |
| ------------------------------------------------------------------------------------------------------------------------- |
| The allByTag method gets all endpoint objects as an array that have a specific tag, for more information see endpoint |
| Examples |
| let endpoints = env.facility.endpoints; let myendPoints = endpoints.allByTag("Head office endpoint") env.log(myendPoints) |
| |
| (object) byType(EndpointType type) |
| ----------------------------------------------------------------------------------------------------------------------------- |
| The byType method gets an endpoint object given an endpoint type, for more information about endpoint types see this page |
| Examples |
| let endpoints = env.facility.endpoints; let myendPoint = endpoints.byType(endpointType.locationTracker) env.log(myendPoint) |
| |
| (object) byType(EndpointType type EndPointSubType subtype) |
| ------------------------------------------------------------------------------------------------------------------------------------------------------- |
| The byType method gets an endpoint object given an endpoint type and subtype, for more information about endpoint types and subtypes see this page |
| Examples |
| let endpoints = env.facility.endpoints; let myendPoint = endpoints.byType(endpointType.appliance, applianceEndpointSubType.lamp) env.log(myendPoint) |
| |
| (object\[]) AllByType(EndpointType type) |
| ---------------------------------------------------------------------------------------------------------------------------------------------------------------------- |
| The AllByType method gets all endpoint objects given an endpoint type, for more information about endpoint types and subtypes see this page |
| Examples |
| let endpoints = env.facility.endpoints; let myendPointsArrray = endpoints.AllByType(endpointType.appliance, applianceEndpointSubType.lamp) env.log(myendPointsArray) |
| |
| (object\[]) AllByType(EndpointType type EndPointSubType subtype) |
| ----------------------------------------------------------------------------------------------------------------------------------------------------------------------------- |
| The AllByType method gets all endpoint objects as an array that match a given endpoint type and subtype, for more information about endpoint types and subtypes see this page |
| Examples |
| let endpoints = env.facility.endpoints; let myendPointsArray = endpoints.AllByType(endpointType.appliance, applianceEndpointSubType.lamp) env.log(myendPointsArray) |
| |
| (object) ByAddress(string endpointaddress) |
| ------------------------------------------------------------------------------------------------------------ |
| The ByAddress method gets an endpoint object given its address, for more information see this page |
| Examples |
| let endpoints = env.facility.endpoints; let myendPoint = endpoints.byAddress('16785349') env.log(myendPoint) |
| |
| (object) byIndex(integer index) |
| ------------------------------------------------------------------------------------------------------------------------------------------------------- |
| The byIndex method gets an existing endpoint object in the facility given its index where zero is the first element, for more information see this page |
| Examples |
| let endpoints = env.facility.endpoints; let myendPoint = endpoints.byIndex(0); env.log(myendPoint) |
| |
| object\[] toArray() |
| ----------------------------------------------------------------------------------------------------------------------- |
| The toArray() method gets all existing endpoint objects in the facility as an array, for more information see this page |
| Examples |
| let endpoints = env.facility.endpoints; let myendPointsArray = endpoints.toArray(); env.log(myendPointsArray) |
| |
# HTTP
Introduction [#introduction]
This section describes integration with the Gear Studio platform using HTTP. This functionality is designed to allow integration with devices from a variety of manufacturers, as well as custom-built devices with Arduino, nodeMCU, Raspberry Pi, and any other platform that supports HTTP communication.
Integration Alternatives [#integration-alternatives]
There are two HTTP integration alternatives:
* [Flexible data exchange](/docs/configuracion-del-cliente/dispositivos-y-endpoints/dispositivos/integracion-de-dispositivos/http/intercambio-de-datos-flexible): Flexible data exchange allows sending data from devices (uplink) and processing it with scripting to interpret and store the information. It is extremely flexible and can be easily implemented with scripting knowledge. Using flexible data exchange is recommended when it is not possible to adapt the data format sent by the device to use the HTTP API.
* [HTTP API](/docs/configuracion-del-cliente/dispositivos-y-endpoints/dispositivos/integracion-de-dispositivos/http/api-http): The HTTP API allows devices to communicate with the platform using a specific message format, documented in the following sections, which enables:
* Uploading device data to the platform. [This page](/docs/configuracion-del-cliente/dispositivos-y-endpoints/dispositivos/integracion-de-dispositivos/http/api-http/almacenamiento-de-datos-de-sensores) shows the reference for everything needed for each sensor type.
* Updating device-specific data, such as battery and RSSI levels. Follow [this reference](/docs/configuracion-del-cliente/dispositivos-y-endpoints/dispositivos/integracion-de-dispositivos/http/api-http/actualizacion-de-datos-del-dispositivo/estado-de-bateria-y-rssi) for more information.
* Receiving and responding to commands sent from the platform. More information on this topic can be found on [this page](/docs/configuracion-del-cliente/dispositivos-y-endpoints/dispositivos/integracion-de-dispositivos/http/api-http/recepcion-y-confirmacion-de-comandos).
**Important**: if it is not possible to modify the data format sent by the device, then using [flexible data exchange](/docs/configuracion-del-cliente/dispositivos-y-endpoints/dispositivos/integracion-de-dispositivos/http/intercambio-de-datos-flexible) is recommended. This makes it possible to send data in any format and process it on the platform using scripting.
# Flexible Data Exchange
Introduction [#introduction]
Flexible data exchange is the recommended HTTP integration method when it is not possible to modify the data format sent by the device.
Flexible data exchange supports only **Uplink** messages. Uplink messages are all those sent from devices to the platform. The platform must be able to process uplink messages to store the relevant information and process it. This is achieved using [scripting](/docs/configuracion-del-cliente/dispositivos-y-endpoints/dispositivos/modelos-de-dispositivo/procesamiento-de-datos) to interpret message content and store the information on the platform.
It is not possible to send **Downlink** messages (i.e., from the platform to the device) using flexible HTTP data exchange.
Steps to Follow [#steps-to-follow]
Configuring the Data Upload URL [#configuring-the-data-upload-url]
For the platform to receive device data, you need to configure the device to POST HTTP messages to the following URL:
```
https://gear.cloud.studio/api/v2/uplink/{DeviceAddress}
```
Where:
* **DeviceAddress** is the device address, as entered when creating the device on the platform.
For example, if the device address is ***06A022B39C14***, then the device should be configured to POST to the following URL:
```
https://gear.cloud.studio/api/v2/uplink/06A022B39C14
```
Configuring the Access Token [#configuring-the-access-token]
The access token must also be sent as part of the header, using an Authorization header, as shown below:
```
Authorization: Bearer e54e0911-ece3-4b7a-b84d-afc01dfa81f1
```
Alternatively, when it is not possible to send the token through the Authorization header, the access token can be sent as part of the URL via the "accessToken" parameter, as in the following example:
```
https://gear.cloud.studio/api/v2/uplink/06A022B39C14?accessToken=e54e0911-ece3-4b7a-b84d-afc01dfa81f1
```
Once these steps are completed, the platform will begin receiving and processing device information. If the device uses a model not natively supported by the platform, you will also need to define the [data processing scripts](/docs/configuracion-del-cliente/dispositivos-y-endpoints/dispositivos/modelos-de-dispositivo/procesamiento-de-datos), as described in [this section](/docs/configuracion-del-cliente/dispositivos-y-endpoints/dispositivos/modelos-de-dispositivo/procesamiento-de-datos).
# LoRaWAN Network Servers (LNS)
This section details the integration processes with different LoRaWAN Network Servers.
# LORIOT
The integration with [LORIOT](https://loriot.io/) enables the platform to have solid communication between a connectivity provider and a quality IoT Platform like Cloud Studio IoT.
Requirements [#requirements]
The integration is easy and only requires the following:
* An instance identifier. Depending on your Gear Studio subscription, the most common instance names are:
* **gear.cloud.studio**. This instance name corresponds to a common Gear Studio instance, including the free version.
* **xxxx.cloud.studio**. This instance name corresponds to Flex instances where hosting is provided by Cloud Studio, but the client can choose the subdomain used (xxxx).
* **Other**. For Enterprise clients using their own domain, the chosen domain name should be used.
* An [Access Token](/docs/configuracion-del-cliente/tokens-de-acceso-access-tokens). Data sent to the Cloud Studio IoT Gear platform from LORIOT will use this access token for access, and therefore LORIOT will have the permissions associated with this access token. It is recommended to create a new access token specifically for the LORIOT integration to simplify security control.
**Configuration in LORIOT**
Once we have all the necessary permissions and requirements for the integration, it is time to create our first application in LORIOT. Log in and access with your credentials, then go to **Applications**:
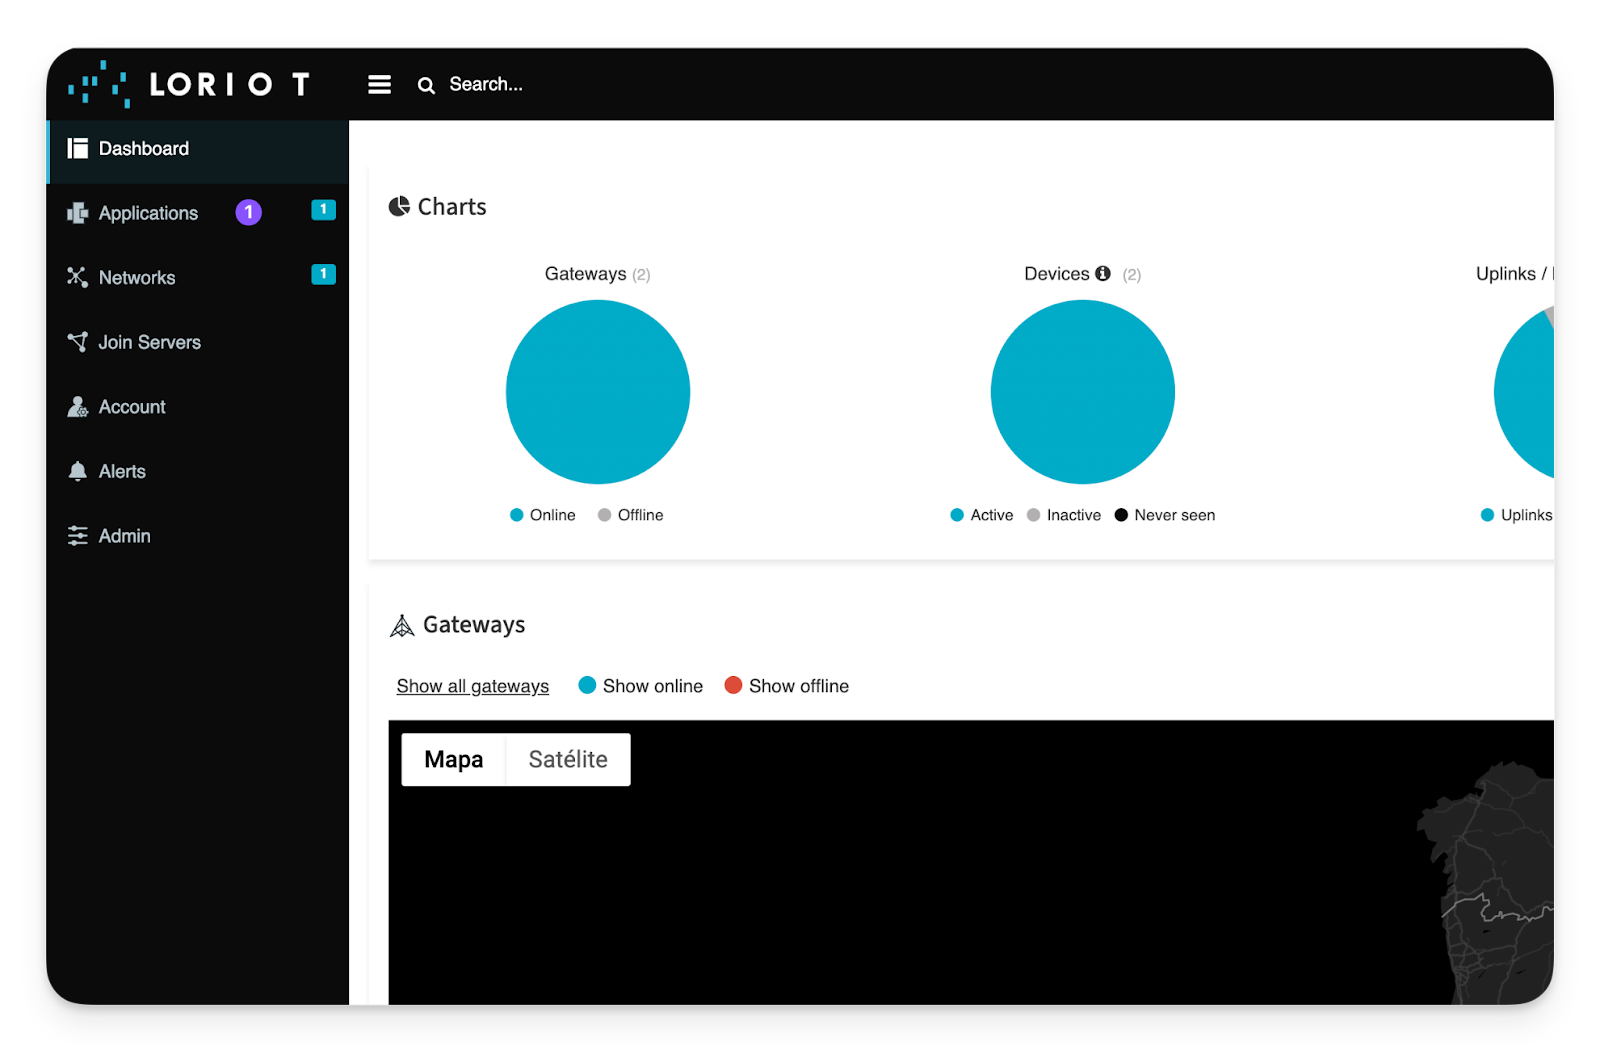
Within **Applications**, go to **Output**: **Applications -> Output**
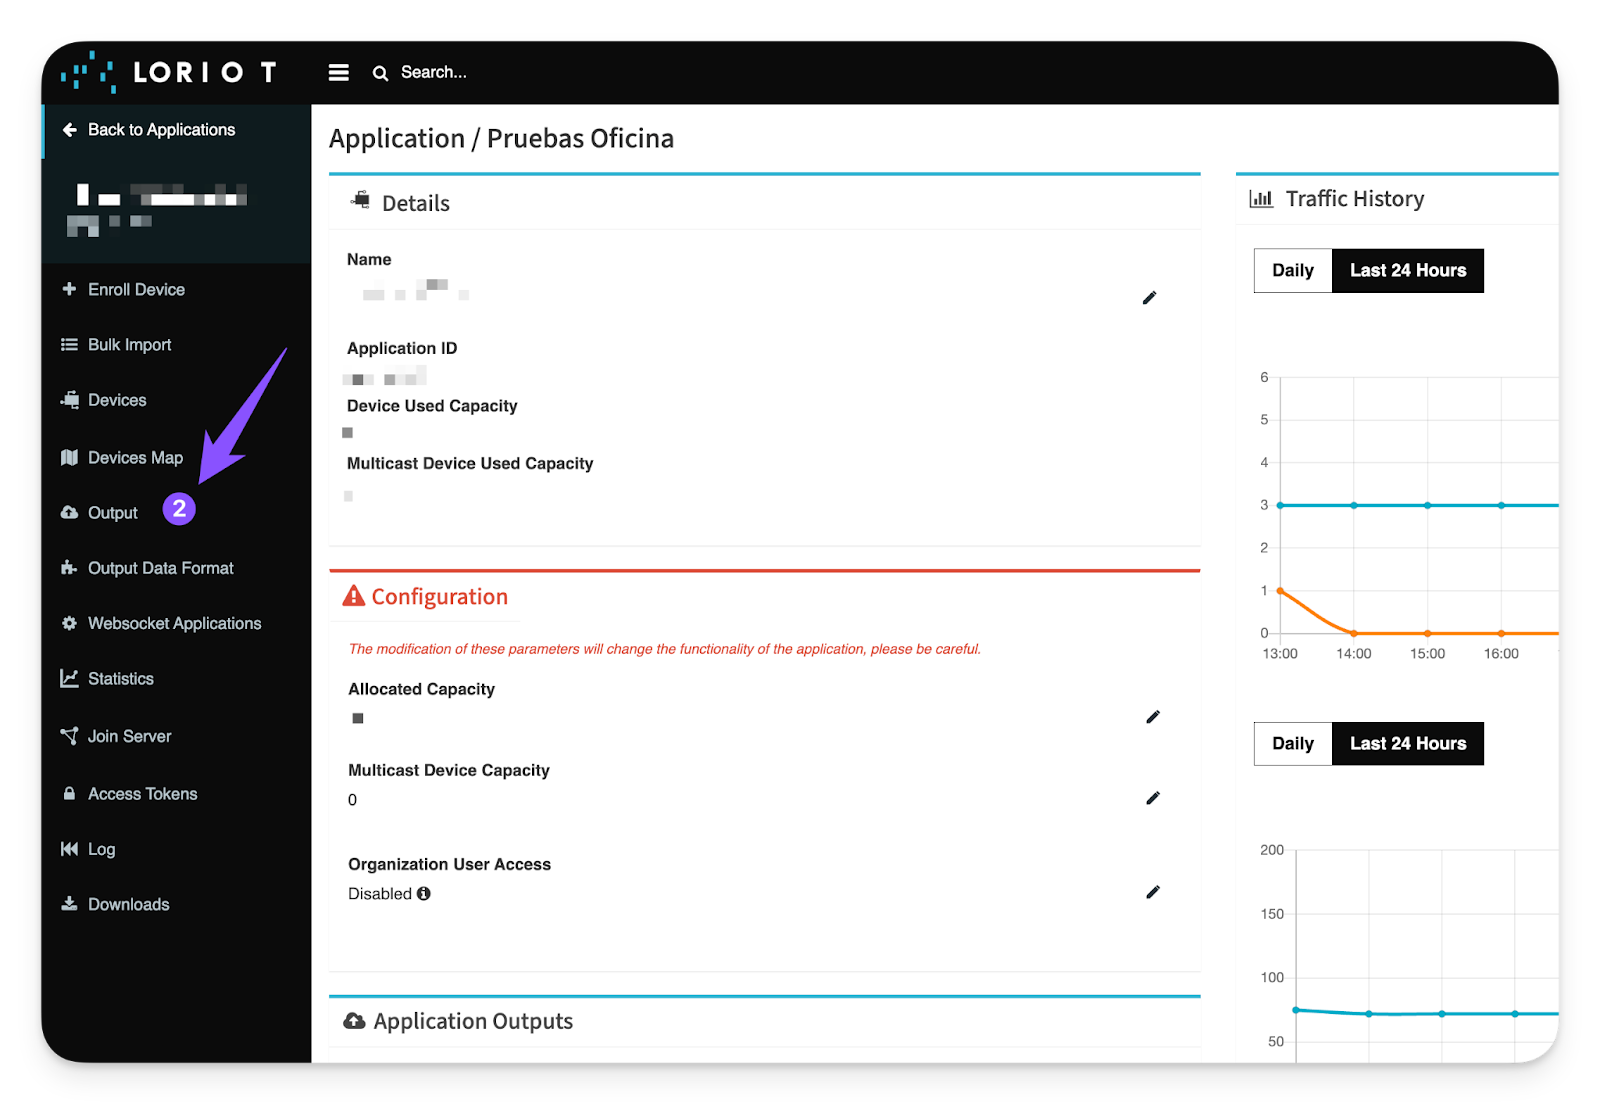
Within the **Output** options, we need to add a new **Output** type that is directed specifically to the Cloud Studio IoT platform. This **Output** type must be **HTTP Push**. To do this, click the "**Add new output**" button:
**Output** -> **Add new output** -> **HTTP Push**
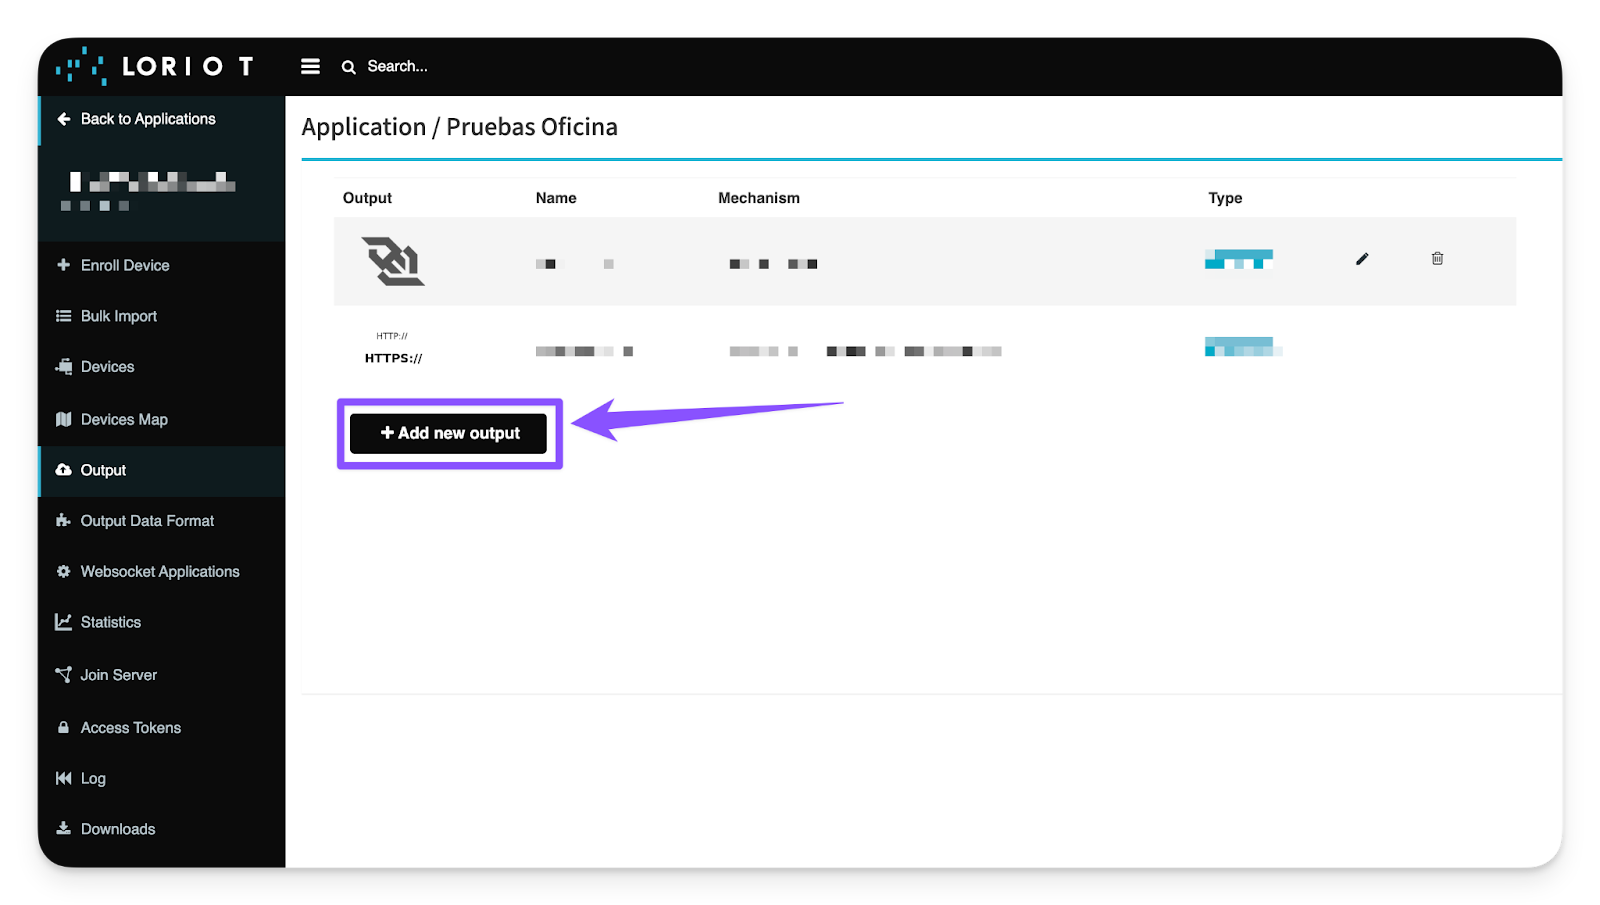
Within the HTTP Push options, we identify three key fields to fill in:
* **Output Name:** This field is optional and fully customizable; it will help identify the Output later. For example, "Cloud Studio IoT - Integration".
* **Target URL for POSTs:** In this field, you must enter the predefined link to our IoT Platform, Cloud Studio IoT:
[https://gear.cloud.studio/services/loriot](https://gear.cloud.studio/services/loriot)
* Note: If your instance is customized, you must enter your instance link in this format: [https://XXXXX/services/loriot](https://XXXXX/services/loriot)
Where XXXXX is the address of your customized Cloud Studio IoT instance.
* **"Authorization" header value (Optional):** Here you must enter the **Access Token** generated earlier on the Cloud Studio IoT Platform before starting with the guide.
It is important to note that the field must be completed in this format: "**Bearer \{AccessToken}**". The "**Bearer**" is important (capitalized and with a space before the actual Access Token). For example:
Bearer A823h0HSUBDmnmbcu9ae2nskdn.
To finish, simply click "Add Output" to complete the integration.
**Output Name** + **Target URL for POSTs** + **"Authorization" header value (Optional)** -> **Add Output**
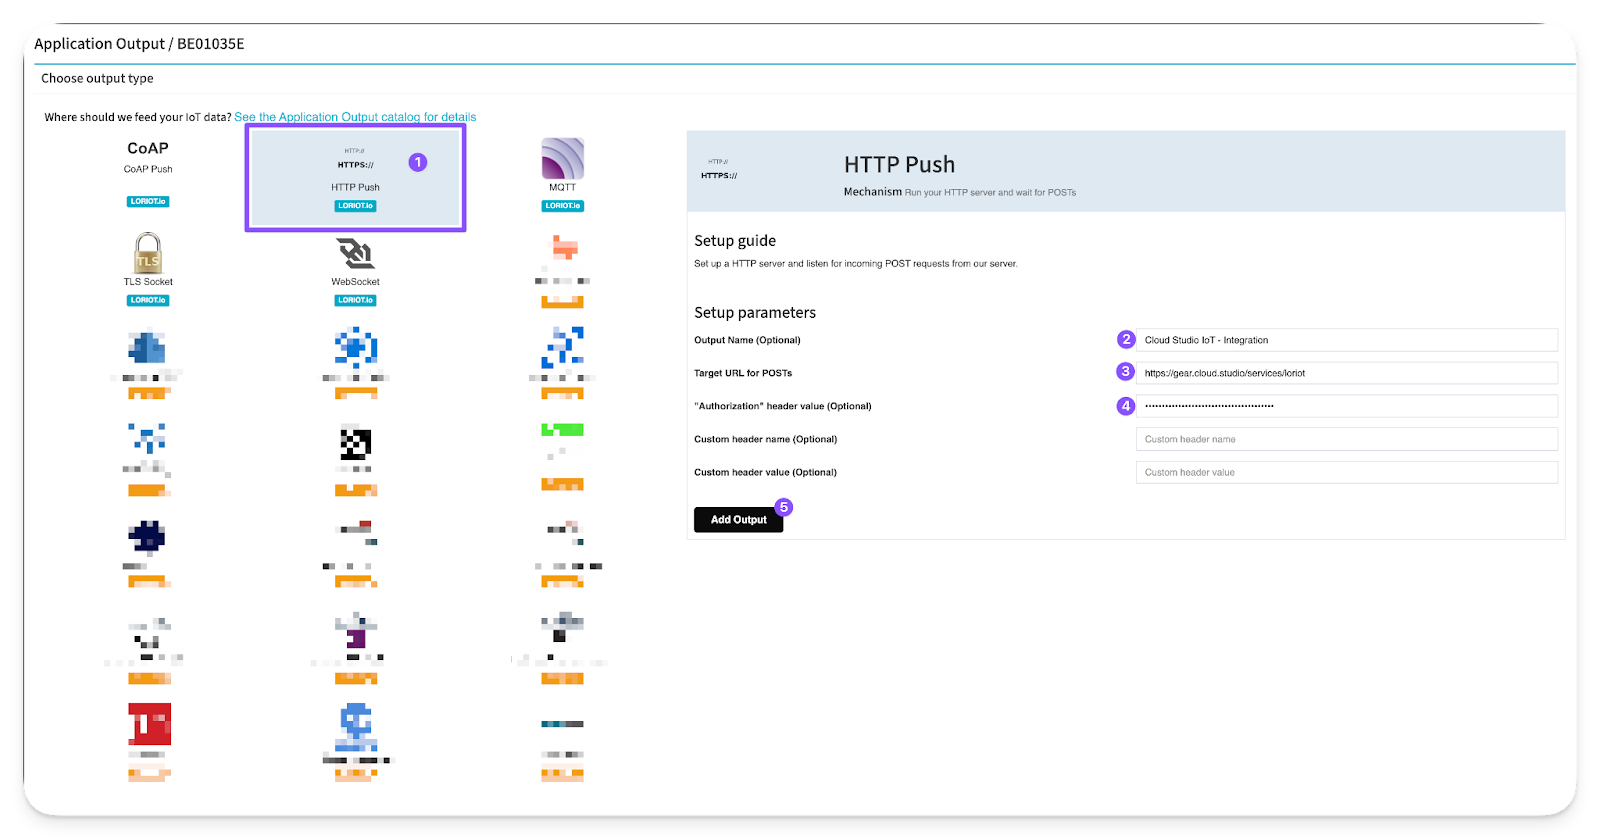
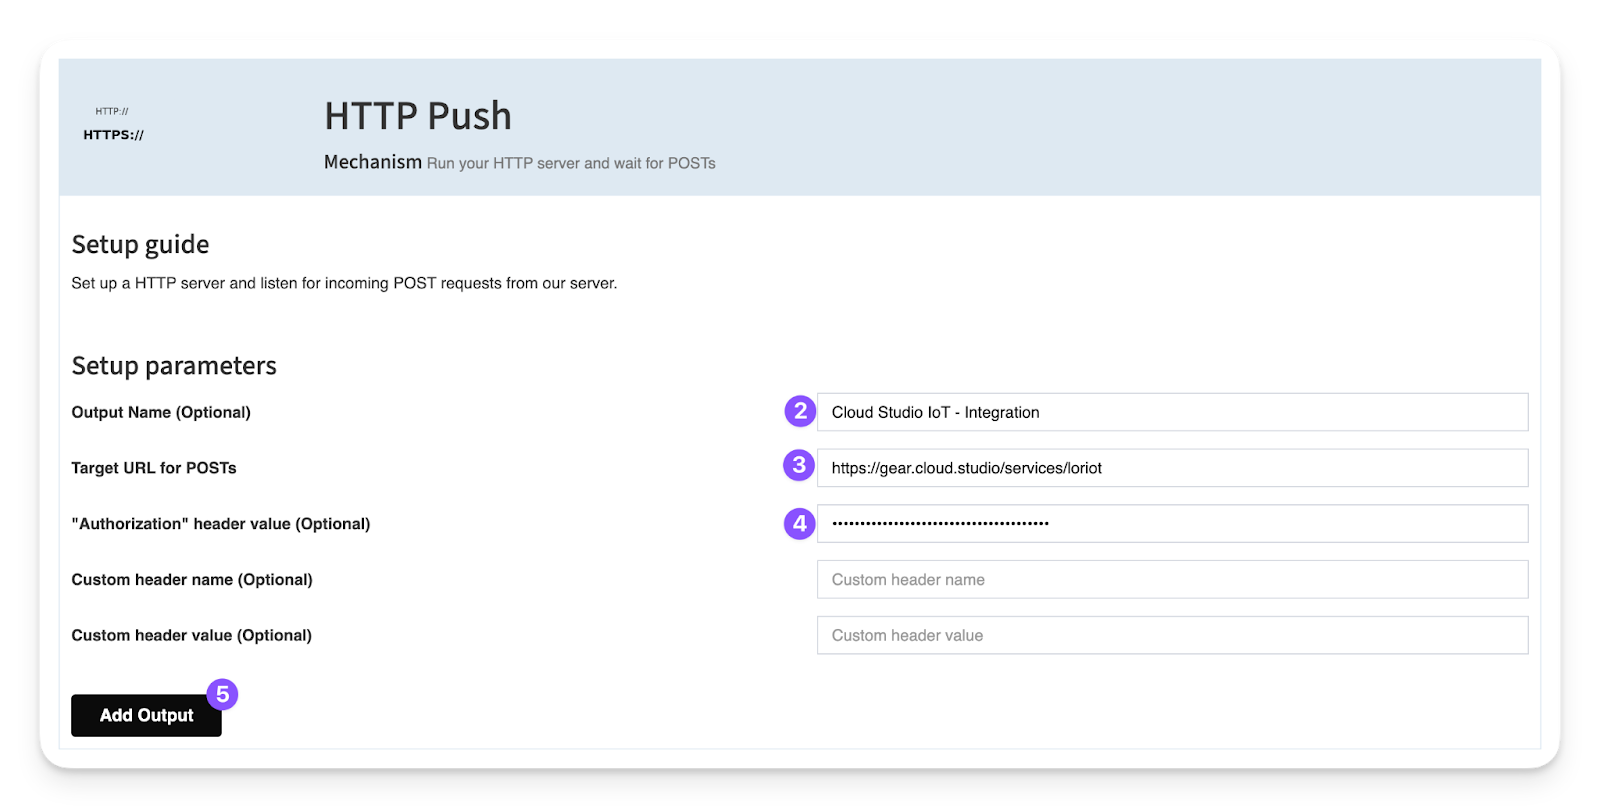
As a final step and as a security measure, we recommend visiting the "**Log**" tool **within LORIOT** to verify that all outgoing connections are succeeding toward the Cloud Studio IoT platform.
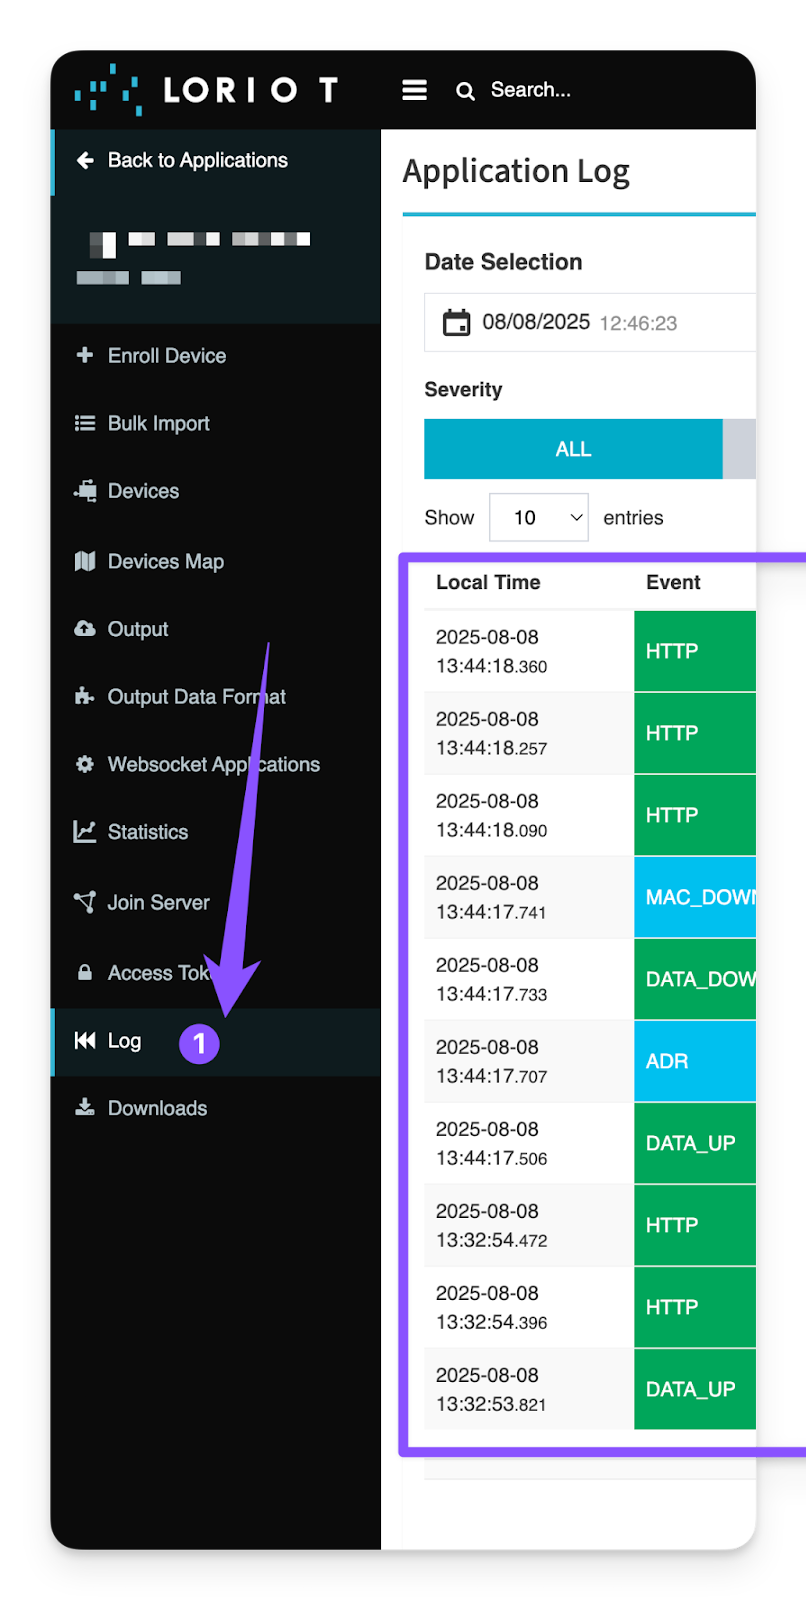
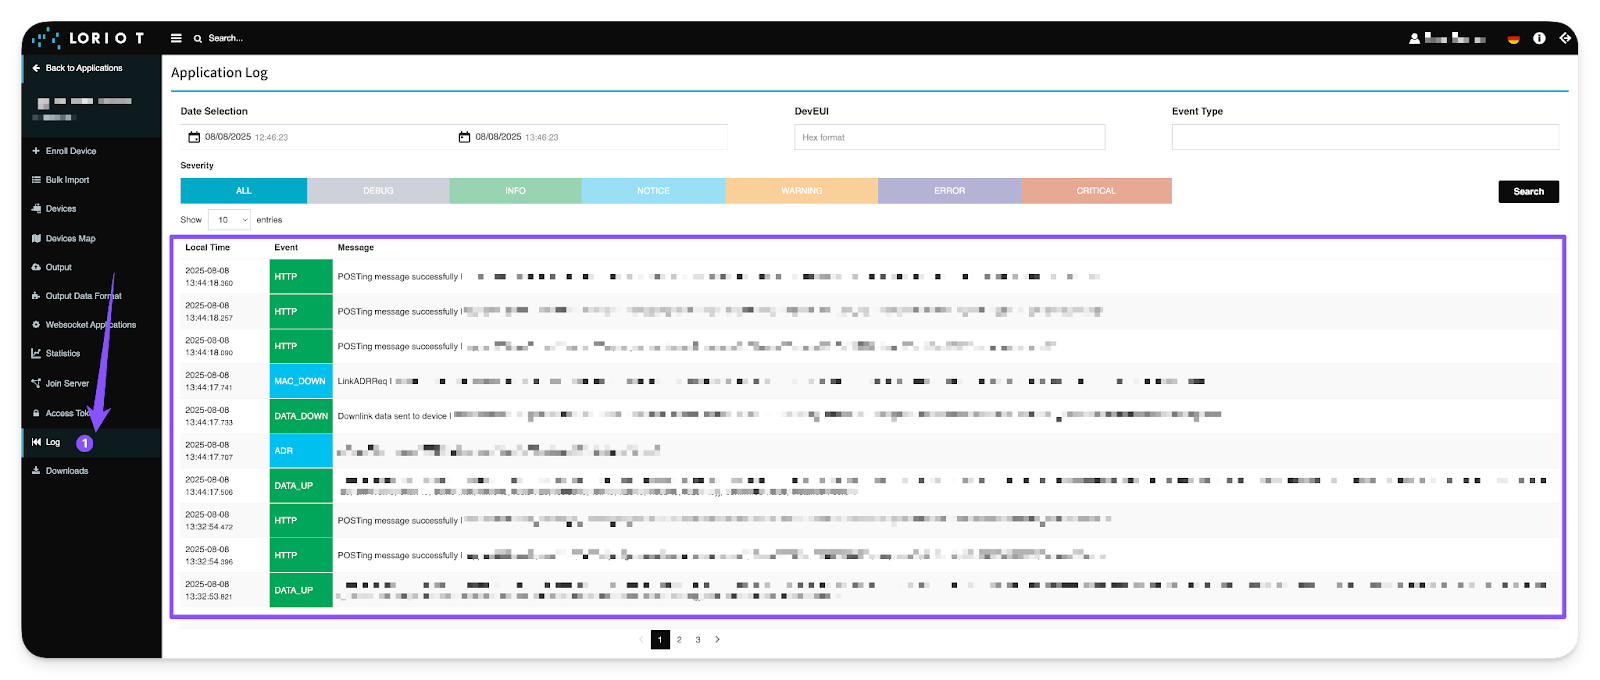
# The Things Stack (TTN / TTS)
The integration with [The Things Stack](https://www.thethingsindustries.com/stack) allows the platform to communicate with LoRaWAN devices using a variety of gateways available on the market. This article describes the steps necessary to complete the integration.
Requirements [#requirements]
The integration is very straightforward and only requires the following:
* An instance identifier. Depending on your Gear Studio subscription, the most common instance names are:
* **gear.cloud.studio**. This instance name corresponds to a common Gear Studio instance, including the free version.
* **xxxx.cloud.studio**. This instance name corresponds to Flex instances where hosting is provided by Cloud Studio, but the client can choose the subdomain used (xxxx).
* **Other**. For Enterprise clients using their own domain, the chosen domain name should be used.
* An [Access Token](/docs/configuracion-del-cliente/tokens-de-acceso-access-tokens). Data sent from TTN will use this access token to access the platform, and therefore TTN will have the permissions associated with this access token. It is recommended to create a new access token specifically for the TTN integration to simplify security control.
Configuration in TTN [#configuration-in-ttn]
To configure the integration in TTN, follow these steps:
* Create an application (if you do not already have one)
* Configure the webhook integration with the Gear Studio platform.
* Connect devices to this application and verify that information is received correctly.
* Register the devices on the Gear Studio platform.
Creating an Application [#creating-an-application]
If you do not already have an application in TTN, you will need to create one. To do this, follow the online tutorials and videos available, such as:
* [Adding Applications | The Things Stack for LoRaWAN (thethingsindustries.com)](https://www.thethingsindustries.com/docs/integrations/adding-applications/)
* [Creating applications and adding devices to The Things Stack - YouTube](https://www.youtube.com/watch?v=PpbkBgz1CbI)
Below is an example of what the application creation window looks like:
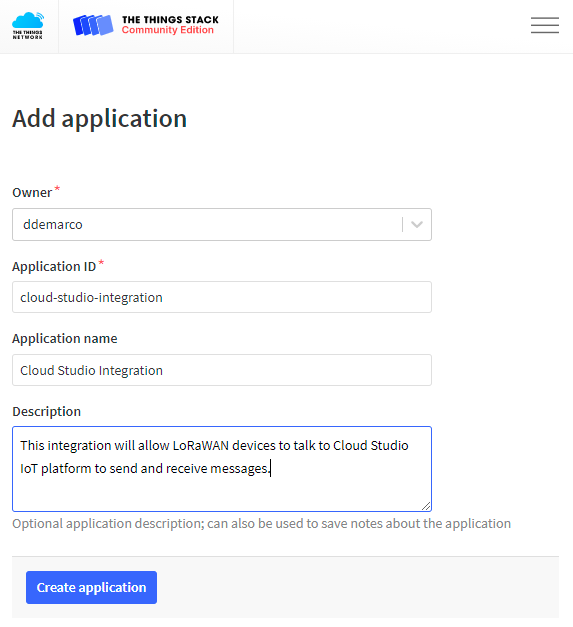
Configuring Webhooks in TTN [#configuring-webhooks-in-ttn]
To enable TTN to exchange information with the Gear Studio platform, a webhook integration must be used. The Cloud Studio webhook can be used for this purpose.
Integrations > Webhooks > Add webhook

When using the webhook, use the following values:
* Webhook ID: any name can be freely chosen, for example "cloud-studio". The name cannot contain spaces and other special characters, but can include hyphens.
* Access token: an access token with permissions to update device information. See [this page](/docs/configuracion-del-cliente/tokens-de-acceso-access-tokens) for more information.
Below is an example of the Cloud Studio webhook pointing to the Gear Studio platform, using the default instance.
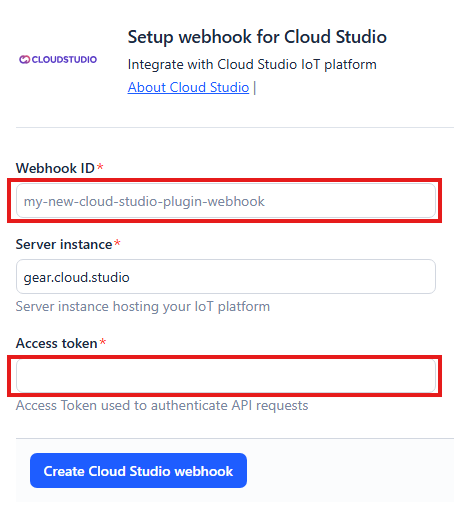
Installing Devices in TTN [#installing-devices-in-ttn]
If you have not done so already, also install the devices in The Things Network. To do this, you can follow the online tutorials available, such as:
* [Adding Devices | The Things Stack for LoRaWAN (thethingsindustries.com)](https://www.thethingsindustries.com/docs/devices/adding-devices/)
* [Creating applications and adding devices to The Things Stack - YouTube](https://www.youtube.com/watch?v=PpbkBgz1CbI)
Once the devices are created, verify that The Things Network receives device data correctly.
Installing Devices on the Gear Studio Platform [#installing-devices-on-the-gear-studio-platform]
Finally, for the Gear Studio platform to accept the registered data, the devices need to be added. This process will depend on whether the device is already supported on the platform, either natively or by having manually created an appropriate device model.
If the Device Model Is Not Natively Supported [#if-the-device-model-is-not-natively-supported]
If the device model is not natively supported by the platform, you will first need to create a device model on the platform by following [these steps](/docs/configuracion-del-cliente/dispositivos-y-endpoints/dispositivos/modelos-de-dispositivo). Once the device model is created, you can create as many devices as needed using this model.
To correctly process device data, it will be necessary, as part of the model configuration, to specify at least a [script to define the device structure](/docs/configuracion-del-cliente/dispositivos-y-endpoints/dispositivos/modelos-de-dispositivo/configuracion), and a script to [process data received from the LoRaWAN network](/docs/configuracion-del-cliente/dispositivos-y-endpoints/dispositivos/modelos-de-dispositivo/procesamiento-de-datos) (payload).
Creating the Device in Gear Studio [#creating-the-device-in-gear-studio]
Finally, the device can be installed by following these steps:
* Navigate to the device management screen.
* Click the "Add" button.
* Enter a description for the new device.
* Select the model from the dropdown list.
* Enter the communication interface.
* Enter the unique device identifier (DevEUI).
* Click "Save".
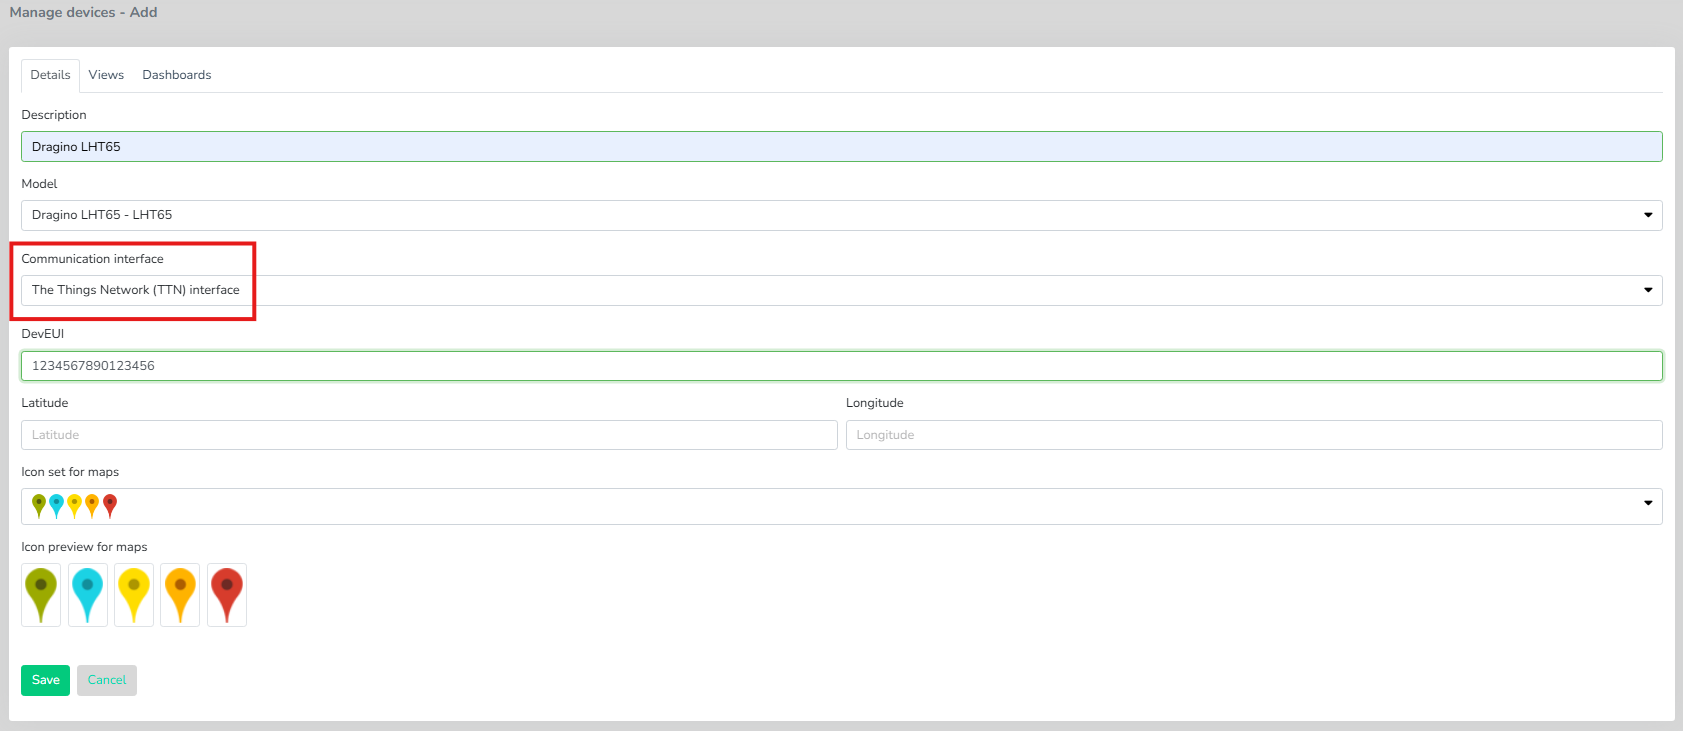
At this point, the device will be ready and will start receiving data immediately. Optionally, you can review the configuration of each device endpoint if necessary.
# ThingPark X IoT Flow (Actility)
The integration with [**ThingPark X IoT Flow**](https://community.thingpark.io) allows the **Cloud Studio IoT Platform** to communicate with **LoRaWAN** devices using a variety of gateways available on the market. This article describes the steps necessary to complete the integration.
Requirements [#requirements]
Prior to integration, the user must have:
* An instance identifier. Depending on your Gear Studio subscription, the most common instance names are:
* **gear.cloud.studio**. This instance name corresponds to a common Gear Studio instance, including the free version.
* **xxxx.cloud.studio**. This instance name corresponds to Flex instances where hosting is provided by Cloud Studio, but the client can choose the subdomain used (xxxx).
* **Other**. For Enterprise clients using their own domain, the chosen domain name should be used.
* An [Access Token](/docs/configuracion-del-cliente/tokens-de-acceso-access-tokens). Data sent from TPX will use this access token to access the platform, and therefore TPX will have the permissions associated with this access token. It is recommended to create a new access token specifically for the TPX integration to simplify security control.
Creating a Connection with UI
Log in to [**community.thingpark.io**](https://community.thingpark.io). Then follow these steps:
1. Click on Connections -> Create -> **ThingPark X IoT Flow.**

2. A new page will open. Select the connection type: **Gear Studio**.
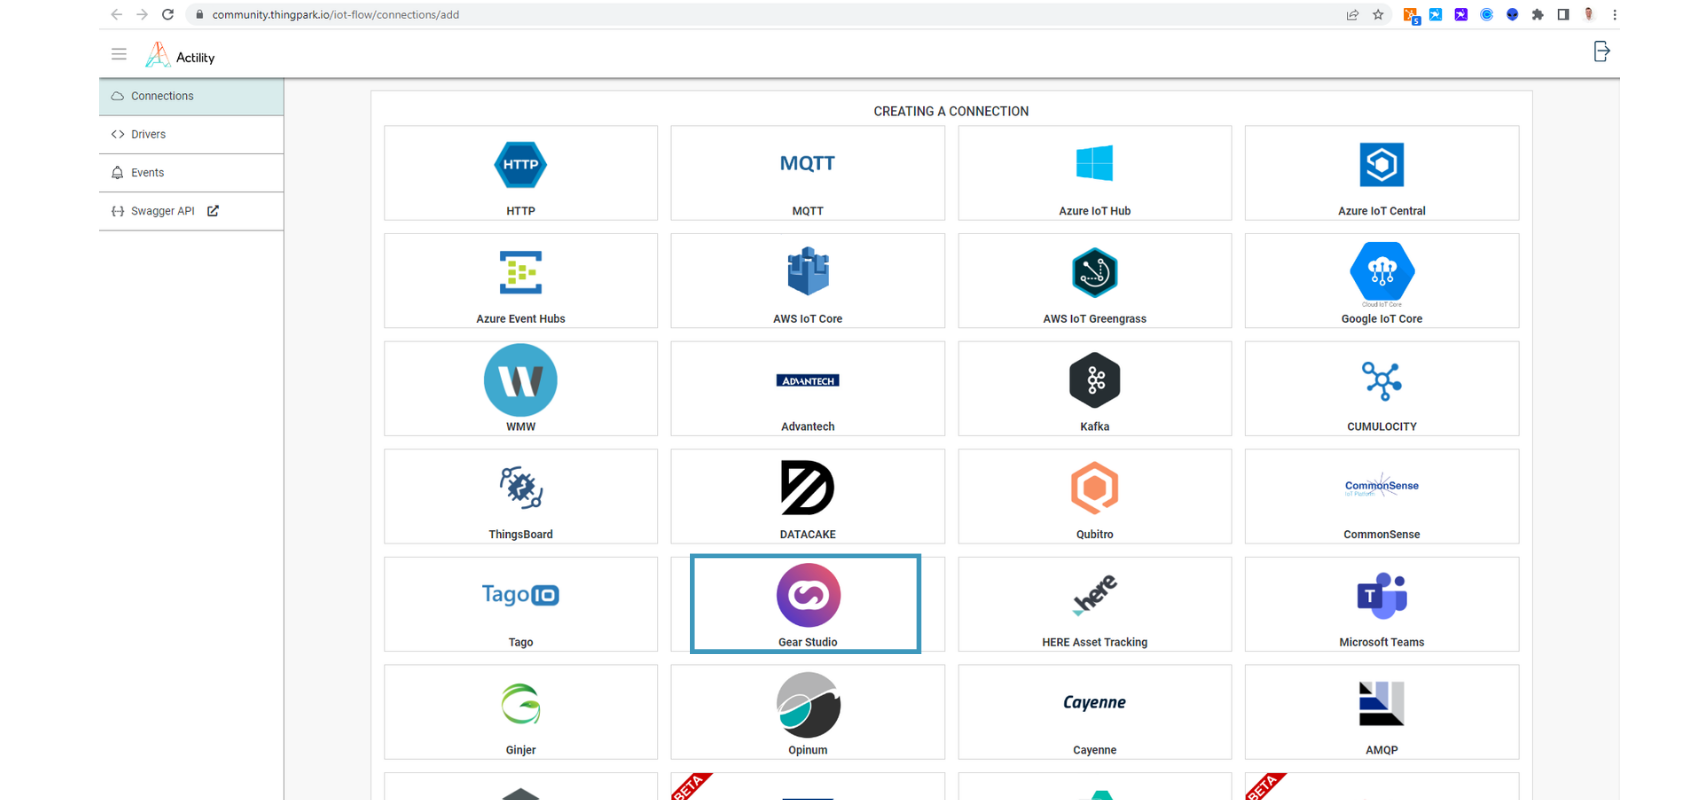
3. Complete the form as shown in the following example and click **Create**.
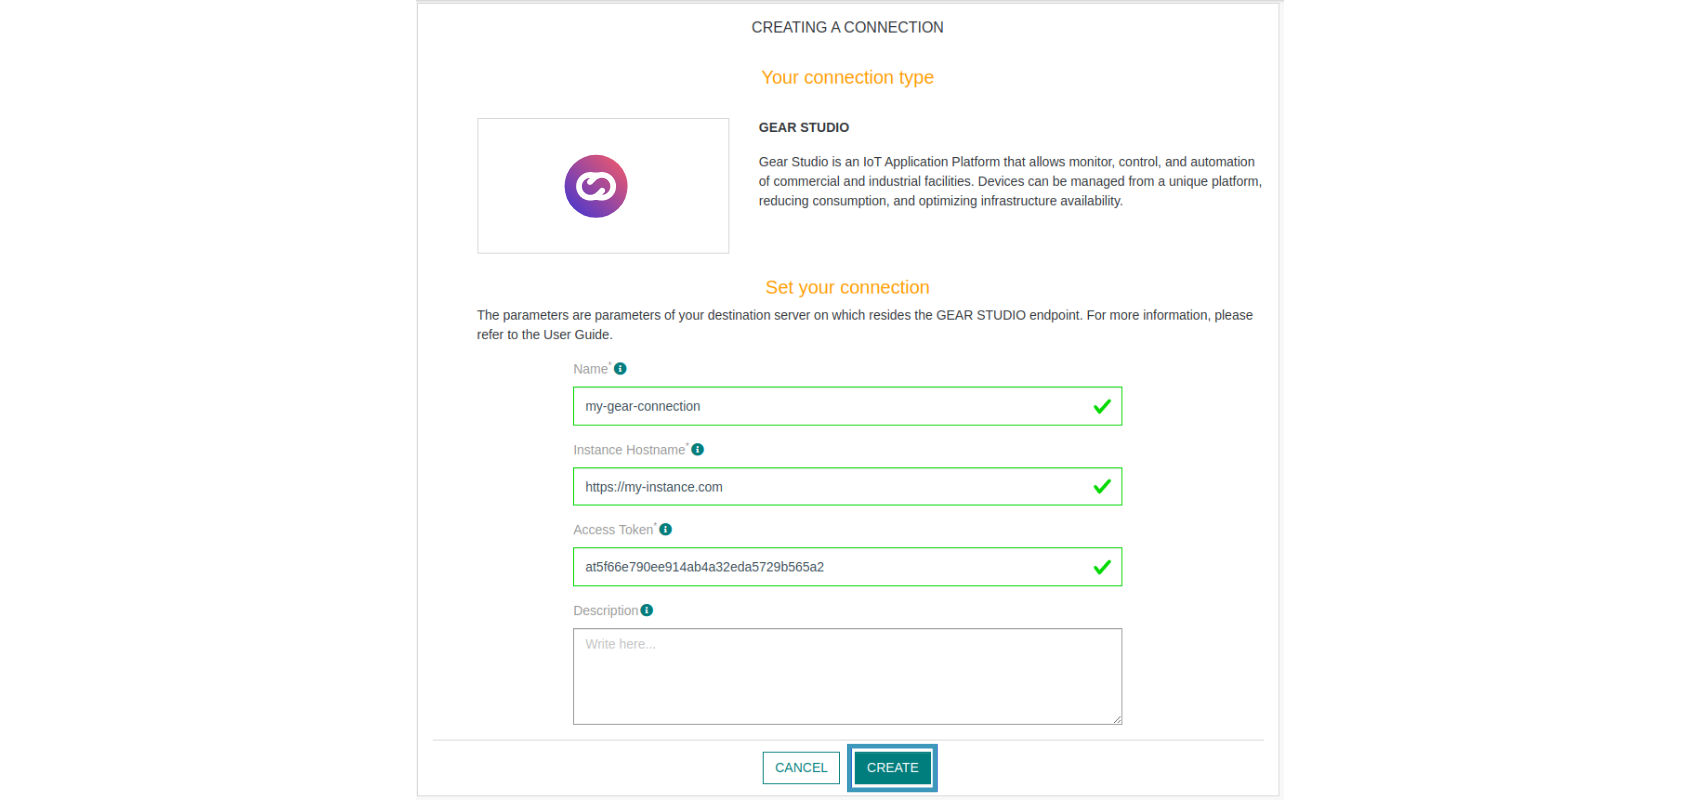
> Note
>
> Parameters marked with \* are mandatory.
4. A notification will appear in the upper right corner of your screen to confirm that the application has been created.
5. After creating the application, you will be redirected to the connection details.
Viewing Information on the Cloud Studio IoT Platform [#viewing-information-on-the-cloud-studio-iot-platform]
Connect to your **Gear Studio** instance and navigate to the configuration.
1\. Go to the **Devices** section and click the **Add** button to [create a new Device](/docs/configuracion-del-cliente/dispositivos-y-endpoints/dispositivos/dispositivos).
_bc3f.png)
2\. Fill in the form using the **Device Model** created earlier. The **Address** field corresponds to your **Device EUI** (find it in the **ThingPark** device list).
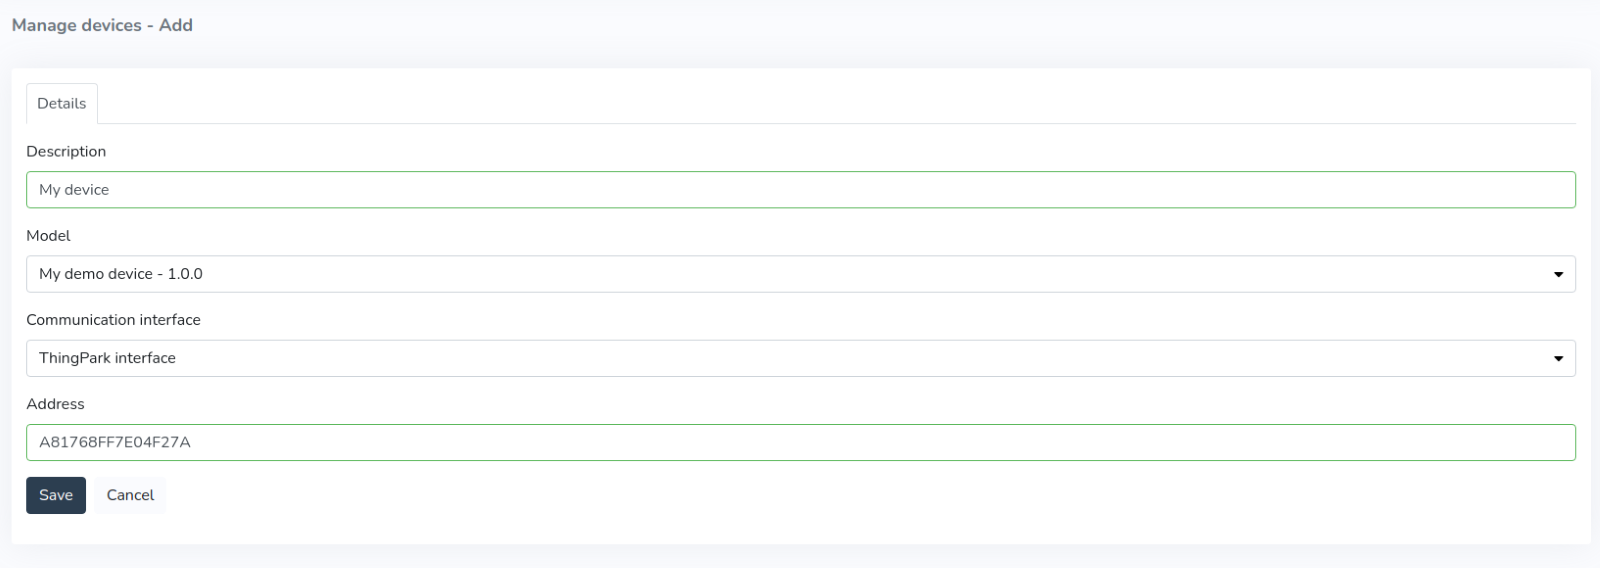
3\. After the device is created, data reported to the platform will be displayed in the **Endpoints** section in the left menu of the **Monitor**. Note that **LoRaWAN** devices may report every 5 to 15 minutes, so the display will depend on this interval.
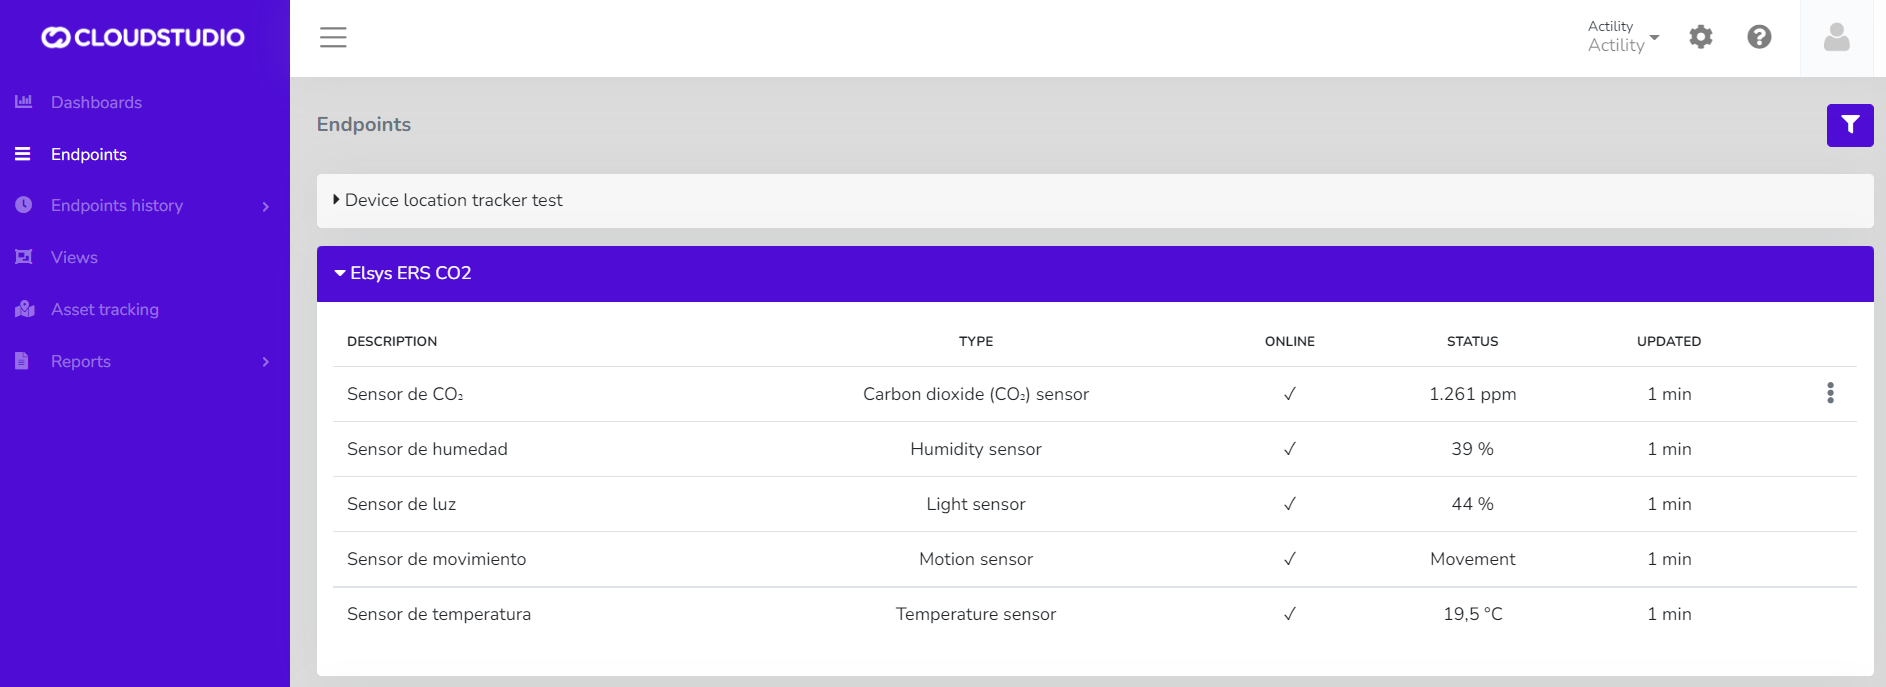
4\. Once the devices are correctly connected, you can create a custom **Dashboard** using a wide variety of **Widgets** to display the data being sent by the device.
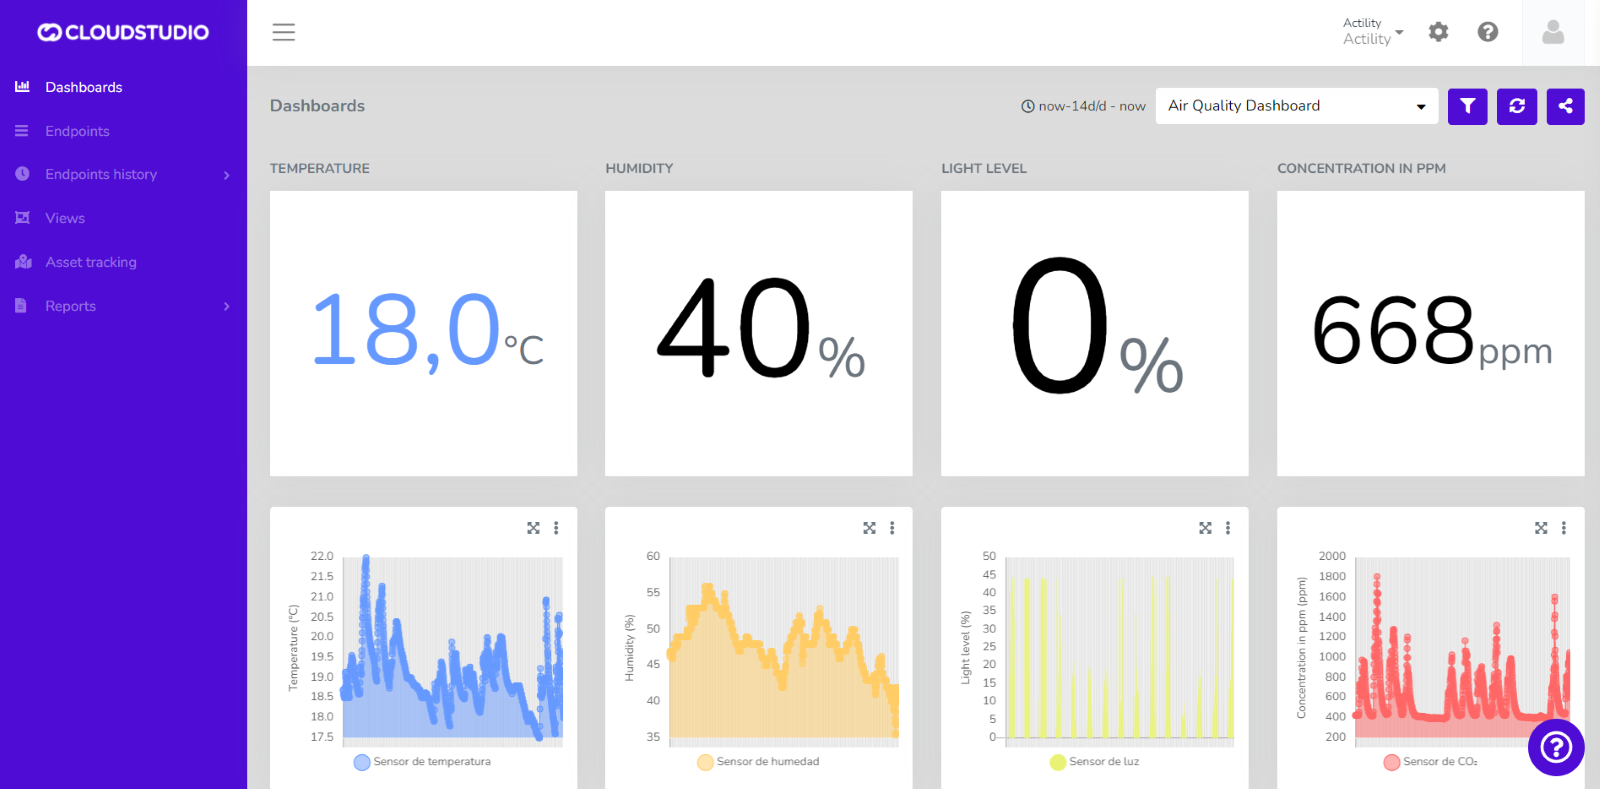
> Check out our [tutorial](https://www.youtube.com/watch?v=OmJ1RJ4tGKY) on YouTube
# Sensor Update Methods Matrix
Device-Level Data Update [#device-level-data-update]
This table contains the available methods for updating device data.
| Device Property | Scripting Method | HTTP Method | HTTP RAW Method |
| -------------------- | ----------------------- | ----------------------- | --------------- |
| Device location | updateDeviceGeolocation | UpdateDeviceGeolocation | - |
| Device RSSI level | updateDeviceRssi | UpdateDeviceStatus | - |
| Device battery level | updateDeviceBattery | UpdateDeviceStatus | - |
Endpoint-Level Data Update [#endpoint-level-data-update]
This table contains the available methods for updating endpoint data.
| Sensor Type | Scripting Method | HTTP Method | HTTP RAW Method |
| -------------------------------------------------------- | -------------------------------------------------------------- | -------------------------------- | ----------------------------------- |
| Temperature sensors | updateTemperatureSensorStatus | UpdateTemperatureSensorStatus | UpdateTemperatureSensorStatusRaw |
| Humidity sensors | updateHumiditySensorStatus | UpdateHumiditySensorStatus | UpdateHumiditySensorStatusRaw |
| Appliances and on/off devices | updateApplianceStatus | UpdateApplianceStatus | UpdateApplianceStatusRaw |
| Light level sensors | updateLightSensorStatus | UpdateLightSensorStatus | UpdateLightSensorStatusRaw |
| IAS sensors, binary, contacts, etc. | updateIASSensorStatus | UpdateIASSensorStatus | UpdateIASSensorStatusRaw |
| Weight sensors | updateWeightSensorStatus | UpdateWeightSensorStatus | UpdateWeightSensorStatusRaw |
| Pressure sensors | updatePressureSensorStatus | UpdatePressureSensorStatus | UpdatePressureSensorStatusRaw |
| Volume sensors | updateVolumeSensorStatus | UpdateVolumeSensorStatus | UpdateVolumeSensorStatusRaw |
| Generic sensors | updateGenericSensorStatus | UpdateGenericSensorStatus | UpdateGenericSensorStatusRaw |
| Voltage sensors | updateVoltageSensorStatus | UpdateVoltageSensorStatus | UpdateVoltageSensorStatusRaw |
| Current sensors | updateCurrentSensorStatus | UpdateCurrentSensorStatus | UpdateCurrentSensorStatusRaw |
| Active power sensors | updateActivePowerSensorStatus | UpdateActivePowerSensorStatus | UpdateActivePowerSensorStatusRaw |
| Reactive power sensors | updateReactivePowerSensorStatus | UpdateReactivePowerSensorStatus | UpdateReactivePowerSensorStatusRaw |
| Apparent power sensors | updateApparentPowerSensorStatus | UpdateApparentPowerSensorStatus | UpdateApparentPowerSensorStatusRaw |
| Cos phi / power factor sensors | updateCosPhiSensorStatus | UpdateCosPhiSensorStatus | UpdateCosPhiSensorStatusRaw |
| Energy consumption meters | updateEnergySensorValueSummation, updateEnergySensorValueUnits | UpdateEnergySensorValueSummation | UpdateEnergySensorValueSummationRaw |
| Flow meters, generic flow meters, and people flow meters | updateFlowSensorValueSummation, updateFlowSensorValueUnits | UpdateFlowSensorValueSummation | UpdateFlowSensorValueSummationRaw |
| Frequency meters | updateFrequencySensorStatus | UpdateFrequencySensorStatus | UpdateFrequencyMeterStatusRaw |
| Dimmers | updateDimmerStatus | UpdateDimmerStatus | UpdateDimmerStatus |
| Curtains and other closures | updateClosureControllerStatus | UpdateClosureControllerStatus | UpdateClosureControllerStatusRaw |
| PPM concentration sensors | updatePpmConcentrationSensorStatus | UpdateConcentrationSensorStatus | UpdateConcentrationSensorStatusRaw |
| Mass/volume concentration sensors | updateMvConcentrationSensorStatus | UpdateConcentrationSensorStatus | UpdateConcentrationSensorStatusRaw |
| Air quality sensors (AQI) | updateAqiSensorStatus | UpdateAirQualitySensorStatus | UpdateAirQualitySensorStatusRaw |
| Location trackers | updateLocationTrackerStatus | UpdateLocationTrackerStatus | UpdateLocationTrackerStatusRaw |
| People counters | updatePeopleCounterStatus | UpdatePeopleCounterStatus | UpdatePeopleCounterStatusRaw |
| HVAC/Thermostats | updateHVACStatus | updateHVACStatus | - |
| Cameras | - | UploadCameraSnapshot | - |
| Text | updateTextContainerStatus | UpdateTextContainerStatus | - |
# MQTT
Introduction [#introduction]
This section describes integration with the Gear Studio platform using MQTT. This functionality is designed to allow integration with devices from a variety of manufacturers, as well as custom-built devices with Arduino, nodeMCU, Raspberry Pi, and any other platform that supports MQTT communication with TLS security.
Integration Alternatives [#integration-alternatives]
There are two MQTT integration alternatives:
* [Flexible data exchange](/docs/configuracion-del-cliente/dispositivos-y-endpoints/dispositivos/integracion-de-dispositivos/mqtt/intercambio-de-datos-flexible) (**recommended**): Flexible data exchange allows receiving data from devices (uplink) as well as sending data to devices (downlink). It is extremely flexible and can be easily implemented.
* [HTTP Bridge](/docs/configuracion-del-cliente/dispositivos-y-endpoints/dispositivos/integracion-de-dispositivos/mqtt/puente-http) (**for device migration**): The HTTP bridge allows migrating devices that use the HTTP interface so they use MQTT instead.
**Important**: The HTTP bridge is primarily designed for migrating devices from HTTP to MQTT, but for new devices, it is recommended to use [flexible data exchange](/docs/configuracion-del-cliente/dispositivos-y-endpoints/dispositivos/integracion-de-dispositivos/mqtt/intercambio-de-datos-flexible), which can be found [here](/docs/configuracion-del-cliente/dispositivos-y-endpoints/dispositivos/integracion-de-dispositivos/mqtt/intercambio-de-datos-flexible). Flexible data exchange allows representing data with much more flexibility, and generally in a more compact form.
Authentication and Security [#authentication-and-security]
Each Gear Studio instance has its own dedicated MQTT server, usually set up for secure TLS connections on port 8883. The MQTT server connection requires:
* **Username and password**, which can be managed through the "MQTT Configuration" option within the "Security" section of the Gear Manager application. The user ID is also used as a suffix for all MQTT topics.
* **TLS certificate**, used so the device can verify it is connected to the correct server.
Using a Client ID [#using-a-client-id]
Some MQTT clients require defining a "Client ID" before connecting, while others allow using a random one. If you need to explicitly define a Client ID, we recommend using a string that contains the username followed by a unique suffix. For example, you can follow a naming convention like this:
\{**client-secure-id**}\{**generic-value**}
E.g.: **16SAD5656S\*\*\*\*01**
Where:
* 16SAD5656S is the username used in the connection, and
* 01 is the "generic value", which should be different for each connection.
# Flexible Data Exchange
Introduction [#introduction]
Flexible data exchange is the recommended MQTT integration method on the Gear Studio platform. All MQTT devices natively supported by the platform use flexible data exchange, but this method is also recommended for non-natively supported device models.
Flexible data exchange is based on two types of messages:
* **Uplink**: uplink messages are all those sent from devices to the platform. The platform must be able to process uplink messages to store the relevant information and process it.
* **Downlink**: downlink messages are those sent from the platform to devices, typically in the form of commands. Some devices do not support downlink messages, while others only support them for specific configuration operations.
For device models not natively supported by the platform, flexible data exchange allows using scripts to easily define uplink message processing and downlink message creation.
Steps to Follow [#steps-to-follow]
Configuring the Topic for Sending Data to the Platform [#configuring-the-topic-for-sending-data-to-the-platform]
For the platform to receive device data, you need to configure the device to publish to the topic `{**MQTTUserID**}/uplink/{**DeviceAddress**}`, where:
* **MQTTUserID** is the MQTT user identifier chosen for the device. More information [here](/docs/configuracion-del-cliente/dispositivos-y-endpoints/dispositivos/integracion-de-dispositivos/mqtt).
* **DeviceAddress** is the device address, as entered when creating the device on the platform.
For example, if the device uses the MQTT user ***JH529LQK91G7*** and the device address is ***06A022B39C14***, then it should be configured to publish information to the following topic:
`JH529LQK91G7/uplink/06A022B39C14`
Configuring the Topic for Receiving Data from the Platform (Optional) [#configuring-the-topic-for-receiving-data-from-the-platform-optional]
For the platform to send data to the device, you need to configure the device to subscribe to the topic `{**MQTTUserID**}/downlink/{**DeviceAddress**}`, where:
* **MQTTUserID** is the MQTT user identifier chosen for the device. More information [here](/docs/configuracion-del-cliente/dispositivos-y-endpoints/dispositivos/integracion-de-dispositivos/mqtt).
* **DeviceAddress** is the device address, as entered when creating the device on the platform.
For example, if the device uses the MQTT user ***JH529LQK91G7*** and the device address is ***06A022B39C14***, then it should be configured to subscribe to the following topic:
`JH529LQK91G7/downlink/06A022B39C14`
Once these steps are completed, the platform will begin receiving and processing device information. If the device uses a model not natively supported by the platform, you will also need to define the [data processing scripts](/docs/configuracion-del-cliente/dispositivos-y-endpoints/dispositivos/modelos-de-dispositivo/procesamiento-de-datos), as described in [this section](/docs/configuracion-del-cliente/dispositivos-y-endpoints/dispositivos/modelos-de-dispositivo/procesamiento-de-datos).
# Expressions
Expressions allow performing calculations, primarily for [raw data conversion](/docs/configuracion-del-cliente/dispositivos-y-endpoints/endpoints/conversion-de-datos-crudos-raw) in devices.
What are expressions? [#what-are-expressions]
Expressions are texts that allow evaluating data, performing calculations, and ultimately returning a single value. Expressions can include variables, so that the values of those variables are used in the calculations.
Data types [#data-types]
The expression engine built into Gear Studio supports three data types: number, string, and boolean, as shown below:
| Data type | Comments |
| --------- | --------------------------------------------------------------------------------------------------------------------------------------------------------------------------------------------------------------------- |
| Number | Number data types represent numbers, either integers or floating-point (with decimals). |
| String | Represent texts, and when written as constants, they must be enclosed using single quotes ('). When a text must contain a single quote, it can be represented as a constant using two consecutive single quotes (''). |
| Boolean | Represents a boolean (logical) condition, which can only be true or false. |
Variables [#variables]
When expressions are used for [raw data conversion](/docs/configuracion-del-cliente/dispositivos-y-endpoints/endpoints/conversion-de-datos-crudos-raw) in devices, there is an implicit variable [RawData](/docs/configuracion-del-cliente/dispositivos-y-endpoints/endpoints/conversion-de-datos-crudos-raw), which contains the raw value sent by the device. This variable can be used directly in any data conversion expression, but it is important to note that the variable is of type string. It is usually necessary to convert the variable to a number (using the [ToNumber](/docs/configuracion-del-cliente/dispositivos-y-endpoints/endpoints/conversion-de-datos-crudos-raw/expresiones/funciones/otras-funciones/tonumber) function), and apply other conversion functions as needed.
Some expression examples [#some-expression-examples]
| Expression | Comments |
| ------------------------------------- | ---------------------------------------------------------------------------------------------------------------------------------------------------------------------- |
| 25 | Constant, with value 25 (number) |
| 'Hola, mundo' | Constant, with value "Hola, mundo" (string) |
| False | Constant, with value false (boolean) |
| 'I''m happy with expressions' | Constant with value "I'm happy with expressions" (string). Note the use of double single quotes for the single quote after "I". |
| 5 \* 6 | Expression with value 30 (number), corresponding to the multiplication of 5 by 6. |
| (2 + 3) \* 6 | Expression with value 30 (number), corresponding to an addition and a multiplication. |
| 'Tengo ' + ToString(6 \* 5) + ' anos' | Expression with value "Tengo 30 anos" (string), using a multiplication and a number-to-string conversion using the ToString function. |
| 25 \< 8 | Expression with value false (boolean), corresponding to a less-than comparison. |
| not (25 \< 8) | Expression with value true (boolean), corresponding to the negation of a less-than comparison. |
| Sqrt(81) | Expression with value 9 (number), calculated as the square root of 81 using the Sqrt function. |
| ToNumber(RawData) / 10 | Numeric expression whose value depends on the special RawData variable. The expression takes the value of RawData, converts it to a number, and then divides it by 10. |
What effect do uppercase and lowercase have on expressions? [#what-effect-do-uppercase-and-lowercase-have-on-expressions]
In the Cloud Studio platform expression engine, variable names, functions, etc., are not case-sensitive, meaning it does not matter whether they are written in uppercase, lowercase, or a mix of both. For example, all of the following expressions are equivalent:
```
ToString(NOT (valor < 25))
tostring(not (valor < 25))
TOSTRING(not (VALOR< 25))
```
Where can expressions be used? [#where-can-expressions-be-used]
Currently, expressions can be used for [raw data conversion](/docs/configuracion-del-cliente/dispositivos-y-endpoints/endpoints/conversion-de-datos-crudos-raw) in devices. This allows obtaining raw information from certain devices (typically sensors), and using expressions to convert that data to values that can be injected into the platform.
Can I program using expressions? [#can-i-program-using-expressions]
No, expressions are not a programming tool, but a calculation tool. Expressions do not have control structures such as for, while, etc., and are not designed for that purpose.
How can I test my expressions? [#how-can-i-test-my-expressions]
In general, any functionality that allows the use of expressions has the ability to test each expression right there with test values. As an example, you can consult the [raw data conversion](/docs/configuracion-del-cliente/dispositivos-y-endpoints/endpoints/conversion-de-datos-crudos-raw) reference for devices.
How can I represent hexadecimal numbers? [#how-can-i-represent-hexadecimal-numbers]
The expression engine allows representing hexadecimal numbers by prepending the prefix "0x", or alternatively, the prefix "$" (both methods are equivalent). For example, the value 0x100 (or alternatively, $100), represents the hexadecimal number 100, equivalent to decimal 256.
More information [#more-information]
For more information about expressions, consult the [operators](/docs/configuracion-del-cliente/dispositivos-y-endpoints/endpoints/conversion-de-datos-crudos-raw/expresiones/operadores) and [functions](/docs/configuracion-del-cliente/dispositivos-y-endpoints/endpoints/conversion-de-datos-crudos-raw/expresiones/funciones) reference.
# HTTP API
Introduction [#introduction]
[HTTP API](/docs/configuracion-del-cliente/dispositivos-y-endpoints/dispositivos/integracion-de-dispositivos/http/api-http/almacenamiento-de-datos-de-sensores): The HTTP API allows devices to communicate with the platform using a specific message format, documented in the following sections, which enables:
* Uploading device data to the platform. [This page](/docs/configuracion-del-cliente/dispositivos-y-endpoints/dispositivos/integracion-de-dispositivos/http/api-http/almacenamiento-de-datos-de-sensores) shows the reference for everything needed for each sensor type.
* Updating device-specific data, such as battery and RSSI levels. Follow [this reference](/docs/configuracion-del-cliente/dispositivos-y-endpoints/dispositivos/integracion-de-dispositivos/http/api-http/actualizacion-de-datos-del-dispositivo) for more information.
* Receiving and responding to commands sent from the platform. More information on this topic can be found on [this page](/docs/configuracion-del-cliente/dispositivos-y-endpoints/dispositivos/integracion-de-dispositivos/http/api-http/recepcion-y-confirmacion-de-comandos).
# Command Reception and Confirmation
Basic Command Integration Flow [#basic-command-integration-flow]
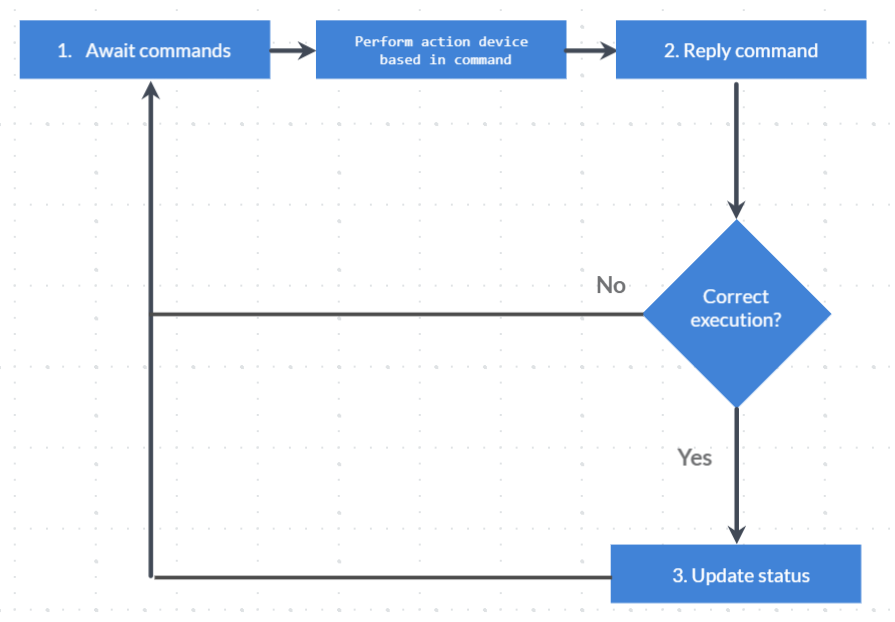
Basic command integration flow
The gateway, device, or endpoint must be listening for commands by executing the corresponding method. A long polling mechanism is used for this, where the request remains on the server side for a defined amount of time and returns with the response either when the specified time has elapsed or when a command execution has been detected.
This response must be interpreted by the device, the corresponding actions must be performed, and a response must be sent through the command response method to report whether the execution was successful or not.
If successful, the method to update the device status must be executed accordingly.
Finally, ensure that command listening continues with the first method mentioned.
1. Wait for Commands [#1-wait-for-commands]
Commands can be listened to at 3 levels:
1. At the Gateway level
2. At the Device level
3. At the Endpoint level
These commands must be called cyclically to constantly listen for executed commands.
Endpoint Commands [#endpoint-commands]
The `WaitForCommand_Endpoint` method must be called via HTTP POST:
```
POST /services/gear/DeviceIntegrationService.svc/WaitForCommand_Endpoint HTTP/1.1
Host: gear-dev.cloud.studio
Content-Type: application/json
{
"accessToken": "",
"endpointID": 1,
"timeoutSeconds": 60
}
```
Parameters [#parameters]
| Name | Description | Data Type |
| -------------- | ---------------------------------------------------------------------------------------------------- | --------- |
| accessToken | Unique Access Token | text |
| endpointID | Unique endpoint identifier, obtained from the Manager | numeric |
| timeoutSeconds | Time in seconds the server will wait before returning the response if no commands have been detected | numeric |
**Response**
The response is a list within the `WaitForCommand_EndpointResult` property that will contain each of the corresponding commands:
```
{
"WaitForCommand_EndpointResult":[
{
"Closure":null,
"CommandID":1120907993,
"CommandType":1,
"Custom":null,
"DeviceID":7246,
"Dimmer":null,
"EndpointID":113139,
"Management":null,
"OnOff":{
"AutomaticOverrideMinutes":0,
"CommandType":1
},
"Thermostat":null
}
]
}
```
For more information about the response properties, [see the documentation](https://www.cloud.studio/developers/gear/api/html/T_CloudStudio_Services_Types_DeviceCommand.htm).
Depending on the type of command executed, the corresponding property must be considered to determine the action to perform.
For example, if the `CommandType` is 1, it means it is a command for an "Appliance" type endpoint. Therefore, the information in the `OnOff` property must be considered.
The different command types can be [found in this documentation](https://www.cloud.studio/developers/gear/api/html/T_CloudStudio_Services_Types_DeviceCommandType.htm).
2. Respond to a Command [#2-respond-to-a-command]
If a command has been received with any of the `WaitForCommands_*` methods and after executing the corresponding actions on the endpoint (hardware), the command must be responded to whether it succeeded or failed.
To report that the command has been executed, call the following method:
```
POST /services/gear/DeviceIntegrationService.svc/RespondCommand HTTP/1.1
Host: gear-dev.cloud.studio
Content-Type: application/json
{
"accessToken": "",
"response":{
"CommandID": 1120907993,
"ResponseType": 0,
"ErrorCode": "",
"ErrorMessage": "",
"ResponseData": "ok"
}
}
```
The `CommandID` must correspond to the one obtained from the corresponding command wait method. The `ResponseType` must be [one of the enum values](https://www.cloud.studio/developers/gear/api/html/T_CloudStudio_Services_Types_CommandResponseType.htm), as appropriate. In this case it is 0, which means ***"success".***
3. Update Endpoint Status [#3-update-endpoint-status]
If the command execution was successful, the new endpoint status must be reported. To do this, use the [corresponding method](/docs/configuracion-del-cliente/dispositivos-y-endpoints/dispositivos/integracion-de-dispositivos/http) for the endpoint type.
Following the appliance example, call the following method:
```
POST /services/gear/DeviceIntegrationService.svc/UpdateApplianceStatus HTTP/1.1
Host: gear-dev.cloud.studio
Content-Type: application/json
{
"accessToken": "",
"endpointID": 1,
"isOn": true
}
```
For more information about this method, see the [on/off appliances](/docs/configuracion-del-cliente/dispositivos-y-endpoints/dispositivos/integracion-de-dispositivos/http/api-http/almacenamiento-de-datos-de-sensores/appliances-y-otros-dispositivos-on-off) section.
# Update RSSI Status and Battery Level
Reportar el estado de RRSI y/o nivel de batería de un dispositivo [#reportar-el-estado-de-rrsi-yo-nivel-de-batería-de-un-dispositivo]
Este método no almacena un histórico del estado, solamente toma el último reportado y lo muestra en la plataforma. Es decir, si en un primer request se reportaron 3 baterías, y en el segundo request se reporta solo una, entonces se asume que el dispositivo ahora tiene una sola batería. Lo mismo ocurre con los RRSI. Si se envían arrays vacíos, entonces se asumirá que no hay registro de nivel de batería ni de RSSI y se borrará lo reportado anteriormente.
The integration por MQTT de estado de RRSI y nivel de batería uses the following structure:
```
{
"accessToken": "xxxxxxxxxxxxxxxxxxxxxxxxxxxxxxxxxxxxxxxx",
"deviceID": 1,
"battery": [
{
"type": 2,
"percentage": 30,
"voltage": 3.5
},
{
"type": 3,
"percentage": 100,
"voltage": 5
}
],
"rssi": [
{
"type": 2,
"quality": 100,
"strength": -40
}
],
"mqttMethod": "UpdateDeviceStatus",
"mqttRID": "tkrs34"
}
```
Más información acerca de las peticiones y topics en la sección de [integración por MQTT](/docs/configuracion-del-cliente/dispositivos-y-endpoints/dispositivos/integracion-de-dispositivos/mqtt)
Parameters [#parameters]
| Name | Description | Data Type |
| ----------- | ---------------------------------------------------------------------------------------------------------------------------------------------------------------------------------------------------- | --------- |
| accessToken | Access token with permissions to update endpoint information. See this page for more information. | text |
| deviceID | Unique device identifier or device address in format \[deviceAddress] (e.g.: \[device-1234]). These values can be found on the device management page. | number |
| battery | Lista de los estados de las distintas baterías que tiene el dispositivo. Se pueden enviar 1 o varias. Puede encontrar la descripción de las propiedades de este parámetros más abajo. | array |
| rssi | Lista de los estados de las distintas conexiones inalámbricas que tiene el dispositivo. Se pueden enviar 1 o varias. Puede encontrar la descripción de las propiedades de este parámetros más abajo. | array |
| mqttMethod | Método correspondiente del servicio, en este caso UpdateDeviceStatus | text |
| mqttRID | Identificador opcional para la petición, en caso de que se desee obtener una respuesta de confirmación. | text |
Parámetro array “battery” [#parámetro-array-battery]
En cada uno de los elementos de este array se debe reportar, al menos, “percentage” o “voltage”. Type es obligatorio.
| Name | Description | Data Type |
| ---------- | ------------------------------------------------------------------------------------------------------------------------------------------------------------------------------------------------------------------------------------ | --------- |
| type | Tipo de batería que se está reportando. Los tipos permitidos son:0: Desconocido. Si se envía este valor, se cambiará automáticamente a 11: Por defecto2: Primaria3: Secundaria4: BackupNo se pueden repetir tipos en un mismo array. | number |
| percentage | Valor numérico del porcentaje restante de la batería. | number |
| voltage | Valor numérico del voltaje actual de la batería. | number |
Parámetro array “rssi” [#parámetro-array-rssi]
En cada uno de los elementos de este array se debe reportar, al menos, “quality” o “strength”. Type es obligatorio.
| Name | Description | Data Type |
| -------- | ------------------------------------------------------------------------------------------------------------------------------------------------------------------------------------------------------------------------------------------------------------------------------------------------------------------------- | --------- |
| type | Representa un tipo de tecnología inalámbrica en la que se puede medir RSSI. Los valores permitidos son:0: Desconocido. Si se envía este valor, se cambiará automáticamente a 11: Por defecto2: WiFi3: LoRaWAN4: Cellular (2G/3G/4G/5G/Cat-M/NB-IoT/etc)5: ZigBee6: Custom RFNo se pueden repetir tipos en un mismo array. | number |
| quality | Valor numérico que representa la calidad de la señal. De 0 a 100. Si este valor no es informado, pero el parámetro “strength” si, el valor de este parámetro será auto calculado | number |
| strength | Valor numérico que representa la intensidad de la señal en dBm (negativo). Si el valor informado es positivo, se cambiará su signo. Si este valor no es informado, pero el parámetro “quality” si, el valor de este parámetro será auto calculado. | number |
# Update Device Location
Reportar la ubicación geográfica de un dispositivo [#reportar-la-ubicación-geográfica-de-un-dispositivo]
La actualización de la ubicación del dispositivo por MQTT uses the following structure:
```
{
"accessToken": "xxxxxxxxxxxxxxxxxxxxxxxxxxxxxxxxxxxxxxxx",
"deviceID": 1,
"latitude": 40.4052,
"longitude": -3.87699,
"mqttMethod": "UpdateDeviceGeolocation",
"mqttRID": "tkrs34"
}
```
Parameters [#parameters]
| Name | Description | Data Type |
| ----------- | ------------------------------------------------------------------------------------------------------------------------------------------------------ | --------- |
| accessToken | Access token with permissions to update endpoint information. See this page for more information. | text |
| deviceID | Unique device identifier or device address in format \[deviceAddress] (e.g.: \[device-1234]). These values can be found on the device management page. | number |
| latitude | Indica la latitud de la ubicación actual del dispositivo. | number |
| longitude | Indica la longitud de la ubicación actual del dispositivo. | number |
| mqttMethod | Método correspondiente del servicio, en este caso UpdateDeviceGeolocation. | text |
| mqttRID | Identificador opcional para la petición, en caso de que se desee obtener una respuesta de confirmación. | text |
# Appliances and Other On/Off Devices
Reporting Endpoint Status [#reporting-endpoint-status]
The integration de appliances y otros dispositivos on-off (válvulas, lámparas, motores, etc.) por MQTT uses the following structure:
```
{
"accessToken": "xxxxxxxxxxxxxxxxxxxxxxxxxxxxxxxxxxxxxxxx",
"endpointID": 1,
"isOn": true,
"timestamp": "2021-02-23T14:55:03",
"mqttMethod": "UpdateApplianceStatus",
"mqttRID": "tkrs34"
}
```
Parameters [#parameters]
| Name | Description | Data Type |
| ----------- | ---------------------------------------------------------------------------------------------------------------------------------------------------------------------------------------------------------------------------------------------------------------------------- | --------- |
| accessToken | Access token with permissions to update endpoint information. See this page for more information. | text |
| endpointID | Unique endpoint identifier or combination of device address and endpoint address in format \[deviceAddress]:endpointAddress (e.g.: \[device-1234]:1). These values can be found on the endpoint management page. | text |
| isOn | Indica si el artefacto está encendido (true) o apagado (false) | bool |
| timestamp | Optional value indicating the UTC date and time corresponding to the measurement. The date format must match one of those specified in the date formats section. If the field is omitted, the platform will assume the measurement corresponds to the current date and time. | text |
| mqttMethod | Método correspondiente del servicio, en este caso UpdateApplianceStatus | string |
| mqttRID | Identificador opcional para la petición, en caso de que se desee obtener una respuesta de confirmación. | string |
Reporte de estado en formato "raw" [#reporte-de-estado-en-formato-raw]
El estado del endpoint puede ser reportado como un **valor crudo (raw),** utilizando el [conversor de expresiones](/docs/configuracion-del-cliente/dispositivos-y-endpoints/endpoints/conversion-de-datos-crudos-raw). Esta opción es conveniente cuando el dispositivo no es capaz de realizar conversiones, y emite valores que necesitan ser transformados antes de inyectarse en la plataforma.
A continuación, se muestra un ejemplo de una petición en formato raw:
```
{
"accessToken": "xxxxxxxxxxxxxxxxxxxxxxxxxxxxxxxxxxxxxxxx",
"endpointID": 1,
"rawData": "true",
"timestamp": "2021-02-23T14:55:03",
"mqttMethod": "UpdateApplianceStatusRaw",
"mqttRID": "tkrs34"
}
```
Parameters [#parameters-1]
| Name | Description | Data Type |
| ----------- | ---------------------------------------------------------------------------------------------------------------------------------------------------------------------------------------------------------------------------------------------------------------------------- | --------- |
| accessToken | Access token with permissions to update endpoint information. See this page for more information. | text |
| endpointID | Unique endpoint identifier, which can be found on the endpoint management page. | numeric |
| rawData | Valor reportado por el sensor, como texto. Debe indicarse una expresión en el conversor de expresiones. La expresión debe devolver un valor booleano indicando si el artefacto está encendido (true) o apagado (false). | text |
| timestamp | Optional value indicating the UTC date and time corresponding to the measurement. The date format must match one of those specified in the date formats section. If the field is omitted, the platform will assume the measurement corresponds to the current date and time. | text |
| mqttMethod | Método correspondiente del servicio, en este caso UpdateApplianceStatusRaw | string |
| mqttRID | Identificador opcional para la petición, en caso de que se desee obtener una respuesta de confirmación. | string |
# People Counters
Reporting Endpoint Status [#reporting-endpoint-status]
The integration de sensores de contadores de personas por MQTT uses the following structure:
```
{
"accessToken": "xxxxxxxxxxxxxxxxxxxxxxxxxxxxxxxxxxxxxxxx",
"endpointID": 1,
"peopleCount": 30,
"timestamp": "2021-02-23T14:55:03",
"mqttMethod": "UpdatePeopleCounterStatus",
"mqttRID": "tkrs34"
}
```
Parameters [#parameters]
| Name | Description | Data Type |
| ----------- | ---------------------------------------------------------------------------------------------------------------------------------------------------------------------------------------------------------------------------------------------------------------------------- | --------- |
| accessToken | Access token with permissions to update endpoint information. See this page for more information. | text |
| endpointID | Unique endpoint identifier or combination of device address and endpoint address in format \[deviceAddress]:endpointAddress (e.g.: \[device-1234]:1). These values can be found on the endpoint management page. | text |
| peopleCount | Indica la cantidad de personas detectadas por el sensor. | numeric |
| timestamp | Optional value indicating the UTC date and time corresponding to the measurement. The date format must match one of those specified in the date formats section. If the field is omitted, the platform will assume the measurement corresponds to the current date and time. | text |
| mqttMethod | Método correspondiente del servicio, en este caso UpdatePeopleCounterStatus | string |
| mqttRID | Identificador opcional para la petición, en caso de que se desee obtener una respuesta de confirmación. | string |
Reporte de estado en formato "raw" [#reporte-de-estado-en-formato-raw]
El estado del endpoint puede ser reportado como un **valor crudo (raw),** utilizando el [conversor de expresiones](/docs/configuracion-del-cliente/dispositivos-y-endpoints/endpoints/conversion-de-datos-crudos-raw). Esta opción es conveniente cuando el dispositivo no es capaz de realizar conversiones, y emite valores que necesitan ser transformados antes de inyectarse en la plataforma.
A continuación, se muestra un ejemplo de una petición en formato raw:
```
{
"accessToken": "xxxxxxxxxxxxxxxxxxxxxxxxxxxxxxxxxxxxxxxx",
"endpointID": 1,
"rawData": 30,
"timestamp": "2021-02-23T14:55:03",
"mqttMethod": "UpdatePeopleCounterStatusRaw",
"mqttRID": "tkrs34"
}
```
Parameters [#parameters-1]
| Name | Description | Data Type |
| ----------- | ---------------------------------------------------------------------------------------------------------------------------------------------------------------------------------------------------------------------------------------------------------------------------- | --------- |
| accessToken | Access token with permissions to update endpoint information. See this page for more information. | text |
| endpointID | Unique endpoint identifier, which can be found on the endpoint management page. | numeric |
| rawData | Valor reportado por el sensor, como texto. Debe indicarse una expresión en el conversor de expresiones. La expresión debe devolver un valor numérico indicando la cantidad de personas detectadas por el sensor. | text |
| timestamp | Optional value indicating the UTC date and time corresponding to the measurement. The date format must match one of those specified in the date formats section. If the field is omitted, the platform will assume the measurement corresponds to the current date and time. | text |
| mqttMethod | Método correspondiente del servicio, en este caso UpdatePeopleCounterStatusRaw | string |
| mqttRID | Identificador opcional para la petición, en caso de que se desee obtener una respuesta de confirmación. | string |
# Curtain and Closure Controllers
Reporting Endpoint Status [#reporting-endpoint-status]
The integration por MQTT de controladores de cortinas y otros cerramientos uses the following structure:
```
{
"accessToken": "xxxxxxxxxxxxxxxxxxxxxxxxxxxxxxxxxxxxxxxx",
"endpointID": 1,
"position": 75,
"isMoving": true,
"timestamp": "2021-02-23T14:55:03",
"mqttMethod": "UpdateClosureControllerStatus",
"mqttRID": "tkrs34"
}
```
Parameters [#parameters]
| Name | Description | Data Type |
| ----------- | ---------------------------------------------------------------------------------------------------------------------------------------------------------------------------------------------------------------------------------------------------------------------------- | --------- |
| accessToken | Access token with permissions to update endpoint information. See this page for more information. | text |
| endpointID | Unique endpoint identifier or combination of device address and endpoint address in format \[deviceAddress]:endpointAddress (e.g.: \[device-1234]:1). These values can be found on the endpoint management page. | text |
| position | Indica la posición actual del cerramiento como porcentaje, entre 0 (completamente cerrado) y 100 (completamente abierto). | bool |
| isMoving | Indica si el cerramiento está actualmente en movimiento. El valor true indica que el cerramiento está siendo cerrado o abierto, mientras que el valor false indica que está detenido. | numeric |
| timestamp | Optional value indicating the UTC date and time corresponding to the measurement. The date format must match one of those specified in the date formats section. If the field is omitted, the platform will assume the measurement corresponds to the current date and time. | text |
| mqttMethod | Corresponding method of the service, in this case UpdateClosureControllerStatus | string |
| mqttRID | Optional identifier for the request, in case you want to get a confirmation response. | string |
Reporte de estado en formato "raw" [#reporte-de-estado-en-formato-raw]
El estado del endpoint puede ser reportado como un **valor crudo (raw),** utilizando el [conversor de expresiones](/docs/configuracion-del-cliente/dispositivos-y-endpoints/endpoints/conversion-de-datos-crudos-raw). Esta opción es conveniente cuando el dispositivo no es capaz de realizar conversiones, y emite valores que necesitan ser transformados antes de inyectarse en la plataforma.
A continuación, se muestra un ejemplo de una petición en formato raw:
```
{
"accessToken": "xxxxxxxxxxxxxxxxxxxxxxxxxxxxxxxxxxxxxxxx",
"endpointID": 1,
"rawData": "75,true",
"timestamp": "2021-02-23T14:55:03",
"mqttMethod": "UpdateClosureControllerStatusRaw",
"mqttRID": "tkrs34"
}
```
Parameters [#parameters-1]
| Name | Description | Data Type |
| ----------- | ---------------------------------------------------------------------------------------------------------------------------------------------------------------------------------------------------------------------------------------------------------------------------------------------------------------------------------------------------------------------------------------------------------------------------------------------------------------------------------------------------------------------------------------- | --------- |
| accessToken | Access token with permissions to update endpoint information. See this page for more information. | text |
| endpointID | Unique endpoint identifier, which can be found on the endpoint management page. | numeric |
| rawData | Valor reportado por el sensor, como texto. Deben indicarse dos expresiones en el conversor de expresiones:La primera expresión debe devolver un valor numérico indicando la posición actual del cerramiento como porcentaje, entre 0 (completamente cerrado) y 100 (completamente abierto).La segunda expresión debe devolver un valor booleano indicando si el cerramiento está actualmente en movimiento. El valor true indica que el cerramiento está siendo cerrado o abierto, mientras que el valor false indica que está detenido. | text |
| timestamp | Optional value indicating the UTC date and time corresponding to the measurement. The date format must match one of those specified in the date formats section. If the field is omitted, the platform will assume the measurement corresponds to the current date and time. | text |
| mqttMethod | Corresponding method of the service, in this case UpdateClosureControllerStatusRaw | string |
| mqttRID | Optional identifier for the request, in case you want to get a confirmation response. | string |
# Dimmers
Reporting Endpoint Status [#reporting-endpoint-status]
The integration por MQTT de dimmers y otros dispositivos similares (variadores de velocidad, etc.) uses the following structure:
```
{
"accessToken": "xxxxxxxxxxxxxxxxxxxxxxxxxxxxxxxxxxxxxxxx",
"endpointID": 1,
"isOn": true,
"dimValue"; 75,
"timestamp": "2021-02-23T14:55:03",
"mqttMethod": "UpdateDimmerStatus",
"mqttRID": "tkrs34"
}
```
Parameters [#parameters]
| Name | Description | Data Type |
| ----------- | ---------------------------------------------------------------------------------------------------------------------------------------------------------------------------------------------------------------------------------------------------------------------------- | --------- |
| accessToken | Access token with permissions to update endpoint information. See this page for more information. | text |
| endpointID | Unique endpoint identifier or combination of device address and endpoint address in format \[deviceAddress]:endpointAddress (e.g.: \[device-1234]:1). These values can be found on the endpoint management page. | text |
| isOn | Indica si el artefacto está encendido (true) o apagado (false) | bool |
| dimValue | Indica el nivel de dimerización, como porcentaje entre 1 y 100. | numeric |
| timestamp | Optional value indicating the UTC date and time corresponding to the measurement. The date format must match one of those specified in the date formats section. If the field is omitted, the platform will assume the measurement corresponds to the current date and time. | text |
| mqttMethod | Corresponding method of the service, in this case UpdateDimmerStatus | string |
| mqttRID | Optional identifier for the request, in case you want to get a confirmation response. | string |
Reporte de estado en formato "raw" [#reporte-de-estado-en-formato-raw]
El estado del endpoint puede ser reportado como un **valor crudo (raw),** utilizando el [conversor de expresiones](/docs/configuracion-del-cliente/dispositivos-y-endpoints/endpoints/conversion-de-datos-crudos-raw). Esta opción es conveniente cuando el dispositivo no es capaz de realizar conversiones, y emite valores que necesitan ser transformados antes de inyectarse en la plataforma.
A continuación, se muestra un ejemplo de una petición en formato raw:
```
{
"accessToken": "xxxxxxxxxxxxxxxxxxxxxxxxxxxxxxxxxxxxxxxx",
"endpointID": 1,
"rawData": "true/75",
"timestamp": "2021-02-23T14:55:03",
"mqttMethod": "UpdateDimmerStatusRaw",
"mqttRID": "tkrs34"
}
```
Parameters [#parameters-1]
| Name | Description | Data Type |
| ----------- | -------------------------------------------------------------------------------------------------------------------------------------------------------------------------------------------------------------------------------------------------------------------------------------------------------------------------------------------------------------------- | --------- |
| accessToken | Access token with permissions to update endpoint information. See this page for more information. | text |
| endpointID | Unique endpoint identifier, which can be found on the endpoint management page. | numeric |
| rawData | Valor reportado por el sensor, como texto. Deben indicarse dos expresiones en el conversor de expresiones:La primera expresión debe devolver un valor booleano indicando si el artefacto está encendido (true) o apagado (false).La segunda expresión debe devolver un valor numérico indicando el nivel de dimerización del aparato, como porcentaje entre 1 y 100. | text |
| timestamp | Optional value indicating the UTC date and time corresponding to the measurement. The date format must match one of those specified in the date formats section. If the field is omitted, the platform will assume the measurement corresponds to the current date and time. | text |
| mqttMethod | Corresponding method of the service, in this case UpdateDimmerStatusRaw | string |
| mqttRID | Optional identifier for the request, in case you want to get a confirmation response. | string |
# Frequency Meters
Reporting Frequency in Hertz [#reporting-frequency-in-hertz]
The integration de frecuencímetros por MQTT uses the following structure:
```
{
"accessToken": "xxxxxxxxxxxxxxxxxxxxxxxxxxxxxxxxxxxxxxxx",
"endpointID": 1,
"frequency": 45,
"timestamp": "2021-02-23T14:55:03",
"mqttMethod": "UpdateFrequencySensorStatus",
"mqttRID": "tkrs34"
}
```
Parameters [#parameters]
| Name | Description | Data Type |
| ----------- | ---------------------------------------------------------------------------------------------------------------------------------------------------------------------------------------------------------------------------------------------------------------------------- | --------- |
| accessToken | Access token with permissions to update endpoint information. See this page for more information. | text |
| endpointID | Unique endpoint identifier or combination of device address and endpoint address in format \[deviceAddress]:endpointAddress (e.g.: \[device-1234]:1). These values can be found on the endpoint management page. | text |
| frequency | Frecuencia expresada en Hertz. | numeric |
| timestamp | Optional value indicating the UTC date and time corresponding to the measurement. The date format must match one of those specified in the date formats section. If the field is omitted, the platform will assume the measurement corresponds to the current date and time. | text |
| mqttMethod | Método correspondiente del servicio, en este caso UpdateFrequencySensorStatus | string |
| mqttRID | Identificador opcional para la petición, en caso de que se desee obtener una respuesta de confirmación. | string |
Reporte de frecuencia en formato "raw" [#reporte-de-frecuencia-en-formato-raw]
La frecuencia puede ser reportada como un **valor crudo (raw),** utilizando el [conversor de expresiones](/docs/configuracion-del-cliente/dispositivos-y-endpoints/endpoints/conversion-de-datos-crudos-raw). Esta opción es conveniente cuando el dispositivo no es capaz de realizar conversiones, y emite valores que necesitan ser transformados antes de inyectarse en la plataforma.
A continuación, se muestra un ejemplo de una petición en formato raw:
```
{
"accessToken": "xxxxxxxxxxxxxxxxxxxxxxxxxxxxxxxxxxxxxxxx",
"endpointID": 1,
"rawData": "45",
"timestamp": "2021-02-23T14:55:03",
"mqttMethod": "UpdateFrequencySensorStatusRaw",
"mqttRID": "tkrs34"
}
```
Parameters [#parameters-1]
| Name | Description | Data Type |
| ----------- | ---------------------------------------------------------------------------------------------------------------------------------------------------------------------------------------------------------------------------------------------------------------------------- | --------- |
| accessToken | Access token with permissions to update endpoint information. See this page for more information. | text |
| endpointID | Unique endpoint identifier, which can be found on the endpoint management page. | numeric |
| rawData | Valor reportado por el sensor, como texto. Debe indicarse una expresión en el conversor de expresiones. La expresión debe devolver un valor numérico indicando la frecuencia, expresada en Hertz. | text |
| timestamp | Optional value indicating the UTC date and time corresponding to the measurement. The date format must match one of those specified in the date formats section. If the field is omitted, the platform will assume the measurement corresponds to the current date and time. | text |
| mqttMethod | Método correspondiente del servicio, en este caso UpdateFrequencySensorStatusRaw | string |
| mqttRID | Identificador opcional para la petición, en caso de que se desee obtener una respuesta de confirmación. | string |
# HVAC / Thermostats
Reporting Endpoint Status [#reporting-endpoint-status]
The integration de sensores de contadores de personas por MQTT uses the following structure:
```
{
"accessToken": "xxxxxxxxxxxxxxxxxxxxxxxxxxxxxxxxxxxxxxxx",
"endpointID": 1,
"mode": 4,
"fanMode": 1,
"setpoint": 21,
"ambientTemperature": 21.5,
"timestamp": "2021-02-23T14:55:03",
"mqttMethod": "UpdateHVACStatus",
"mqttRID": "tkrs34"
}
```
Parameters [#parameters]
| Name | Description | Data Type |
| ------------------ | --------------------------------------------------------------------------------------------------------------------------------------------------------------------------------------------------------------------------------------------------------------------------------------------------------------------------- | --------- |
| accessToken | Access token with permissions to update endpoint information. See this page for more information. | text |
| endpointID | Unique endpoint identifier or combination of device address and endpoint address in format \[deviceAddress]:endpointAddress (e.g.: \[device-1234]:1). These values can be found on the endpoint management page. | text |
| mode | Modo actual del dispositivo:1: el dispositivo está apagado.2: el dispositivo está encendido en modo automático.3: el dispositivo está encendido en modo calor.4: el dispositivo está encendido en modo frío.5: el dispositivo está encendido en modo deshumidificación.6: el dispositivo está encendido en modo ventilador. | numeric |
| fanMode | Modo actual del ventilador:1: el ventilador está en modo automático.2: el ventilador está en velocidad baja.3: el ventilador está en velocidad media.4: el ventilador está en velocidad alta. | numeric |
| setpoint | Indica el valor de temperatura deseado, en grados Celsius. | numeric |
| ambientTemperature | Indica el valor de la temperatura ambiente, en grados Celsius. | numeric |
| timestamp | Optional value indicating the UTC date and time corresponding to the measurement. The date format must match one of those specified in the date formats section. If the field is omitted, the platform will assume the measurement corresponds to the current date and time. | text |
| mqttMethod | Método correspondiente del servicio, en este caso UpdateHVACStatus | string |
| mqttRID | Identificador opcional para la petición, en caso de que se desee obtener una respuesta de confirmación. | string |
# HTTP Bridge
Introduction [#introduction]
The HTTP bridge is a feature of the Gear Studio platform that allows device integration using the HTTP API through MQTT. This makes it possible to migrate devices that use the HTTP interface to use MQTT instead, with minimal changes.
**Important**: The HTTP bridge is primarily designed for migrating devices from HTTP to MQTT, but for new devices, it is recommended to use [flexible data exchange](/docs/configuracion-del-cliente/dispositivos-y-endpoints/dispositivos/integracion-de-dispositivos/mqtt/intercambio-de-datos-flexible), which can be found [here](/docs/configuracion-del-cliente/dispositivos-y-endpoints/dispositivos/integracion-de-dispositivos/mqtt/intercambio-de-datos-flexible). Flexible data exchange allows representing data with much more flexibility, and generally in a more compact form.
Requests [#requests]
To send a request through the HTTP bridge, the following topic structure must be used:
**\{client-secure-id}/HttpApi/DeviceIntegration**
Where client-secure-id is the username used in the connection. The topic structure includes the user ID as the first element, since each user only has permission for topics that start with that ID.
Each request must contain a JSON message, whose structure depends on the message type. However, some fields are common to all message types:
* **accessToken**: this field indicates the access token that must be used to authenticate and authorize the request.
* **mqttMethod**: this field indicates the request type. For example, to report a temperature value, the value "UpdateTemperatureSensorStatus" is used.
* **mqttRID**: this is an optional field that can take any value, typically chosen at random. If this field is provided, the platform will automatically generate a response to the sent command and include the same mqttRID in that response, allowing the client to link the response with the original request.
Optionally, a response subtopic can be specified by concatenating a slash and a value at the beginning of the mqttRID. That is, **\{subtopic}/\{random value}**
For example, using the subtopic **/device1** and the RID **1238j9**. The complete mqttRID would be **device1/1238j9**
Simple and Multiple Requests [#simple-and-multiple-requests]
Simple Requests [#simple-requests]
Simple requests allow sending a single piece of data at a time to the platform. They are generally used to report the status of a single endpoint.
**Simple request example:**
```
{
"accessToken": "xxxxxxxxxxxxxxxxxxxxxxxxxxxxxxxxxxxxxxxx",
"endpointID": 1,
"temperatureCelsius": 25,
"timestamp": "2021-02-23T14:55:03",
"mqttMethod": "UpdateTemperatureSensorStatus",
"mqttRID": "RXmp123"
}
```
Multiple Requests (Arrays) [#multiple-requests-arrays]
Multiple requests allow sending several pieces of data in a single MQTT message. JSON array syntax is used, with brackets at the beginning and end, containing the data separated by commas. Multiple requests are normally used to report the status of multiple endpoints in a single message. They are also useful for a device to send data that was stored during a period without communication. In any case, the data can include different endpoints from the same device, or even endpoints from different devices.
**Multiple request example:**
```
[
{
"accessToken": "xxxxxxxxxxxxxxxxxxxxxxxxxxxxxxxxxxxxxxxx",
"endpointID": 1,
"temperatureCelsius": 25,
"timestamp": "2021-02-23T14:55:03",
"mqttMethod": "UpdateTemperatureSensorStatus",
"mqttRID": "RXmp123"
},
{
"accessToken": "xxxxxxxxxxxxxxxxxxxxxxxxxxxxxxxxxxxxxxxx",
"endpointID": 2,
"humidityPercentage": 30,
"timestamp": "2021-02-23T15:55:03",
"mqttMethod": "UpdateHumiditySensorStatus",
"mqttRID": "xQzt395"
}
]
```
Responses [#responses]
If a value is provided in the **mqttRID** field, the platform will create a response message in the topic
**\{client-secure-id}/HttpApi/DeviceIntegrationResponse**
If a **subtopic** is concatenated at the beginning of the **mqttRID**, it will be appended to the response topic:
**\{client-secure-id}/HttpApi/DeviceIntegrationResponse/\{subtopic}**
This allows knowing the final status of the request and optionally obtaining response information if the command requires it.
The response payload typically has the following format:
```
{
"mqttRID":"RXmp123",
"mqttStatus":200,
"mqttData":"{}"
}
```
| Name | Description | Type |
| ---------- | ---------------------------------------------------------------------------------------------------------------------------------------------------------------- | ------- |
| mqttRID | Unique identifier for each request | string |
| mqttStatus | Returns the server status code (200, 500, 400, etc). If the request executed successfully, it will be 200. In case of error, it can return any code (400 or 500) | integer |
| mqttData | The body of the server response. It is a string containing JSON. | string |
Integration by Sensor Type [#integration-by-sensor-type]
[Temperature Sensors](/docs/configuracion-del-cliente/dispositivos-y-endpoints/dispositivos/integracion-de-dispositivos/mqtt/puente-http/sensores-de-temperatura)
[Humidity Sensors](/docs/configuracion-del-cliente/dispositivos-y-endpoints/dispositivos/integracion-de-dispositivos/mqtt/puente-http/sensores-de-humedad)
[Light Level Sensors](/docs/configuracion-del-cliente/dispositivos-y-endpoints/dispositivos/integracion-de-dispositivos/mqtt/puente-http/sensores-de-nivel-de-iluminacion)
[Weight Sensors](/docs/configuracion-del-cliente/dispositivos-y-endpoints/dispositivos/integracion-de-dispositivos/mqtt/puente-http/sensores-de-peso)
[Volume Sensors](/docs/configuracion-del-cliente/dispositivos-y-endpoints/dispositivos/integracion-de-dispositivos/mqtt/puente-http/sensores-de-volumen)
[Pressure Sensors](/docs/configuracion-del-cliente/dispositivos-y-endpoints/dispositivos/integracion-de-dispositivos/mqtt/puente-http/sensores-de-presion)
[IAS Sensors (Motion, Occupancy, and Binary Sensors)](/docs/configuracion-del-cliente/dispositivos-y-endpoints/dispositivos/integracion-de-dispositivos/mqtt/puente-http/sensores-ias-movimiento-ocupacion-y-sensores-binarios)
[Voltage Sensors](/docs/configuracion-del-cliente/dispositivos-y-endpoints/dispositivos/integracion-de-dispositivos/mqtt/puente-http/sensores-de-voltaje)
[Current Sensors](/docs/configuracion-del-cliente/dispositivos-y-endpoints/dispositivos/integracion-de-dispositivos/mqtt/puente-http/sensores-de-corriente)
[Active Power Sensors](/docs/configuracion-del-cliente/dispositivos-y-endpoints/dispositivos/integracion-de-dispositivos/mqtt/puente-http/sensores-de-potencia-activa)
[Reactive Power Sensors](/docs/configuracion-del-cliente/dispositivos-y-endpoints/dispositivos/integracion-de-dispositivos/mqtt/puente-http/sensores-de-potencia-reactiva)
[Apparent Power Sensors](/docs/configuracion-del-cliente/dispositivos-y-endpoints/dispositivos/integracion-de-dispositivos/mqtt/puente-http/sensores-de-potencia-aparente)
[Cos Phi Sensors](/docs/configuracion-del-cliente/dispositivos-y-endpoints/dispositivos/integracion-de-dispositivos/mqtt/puente-http/sensores-de-coseno-fi)
[Frequency Meters](/docs/configuracion-del-cliente/dispositivos-y-endpoints/dispositivos/integracion-de-dispositivos/mqtt/puente-http/frecuencimetros)
[Energy Consumption Sensors](/docs/configuracion-del-cliente/dispositivos-y-endpoints/dispositivos/integracion-de-dispositivos/mqtt/puente-http/sensores-de-consumo-de-energia)
[Flow Sensors](/docs/configuracion-del-cliente/dispositivos-y-endpoints/dispositivos/integracion-de-dispositivos/mqtt/puente-http/sensores-de-flujo)
[Generic Sensors](/docs/configuracion-del-cliente/dispositivos-y-endpoints/dispositivos/integracion-de-dispositivos/mqtt/puente-http/sensores-genericos)
[Generic Flow Sensors](/docs/configuracion-del-cliente/dispositivos-y-endpoints/dispositivos/integracion-de-dispositivos/mqtt/puente-http/sensores-genericos-de-flujo)
[Appliances and Other On/Off Devices](/docs/configuracion-del-cliente/dispositivos-y-endpoints/dispositivos/integracion-de-dispositivos/mqtt/puente-http/appliances-y-otros-dispositivos-on-off)
[Dimmers](/docs/configuracion-del-cliente/dispositivos-y-endpoints/dispositivos/integracion-de-dispositivos/mqtt/puente-http/dimmers)
[Curtain and Closure Controllers](/docs/configuracion-del-cliente/dispositivos-y-endpoints/dispositivos/integracion-de-dispositivos/mqtt/puente-http/controladores-de-cortinas-y-cerramientos)
[Run-time Meters (Hour Meters)](/docs/configuracion-del-cliente/dispositivos-y-endpoints/dispositivos/integracion-de-dispositivos/mqtt/puente-http/run-time-meters-horometros)
[Location Trackers](/docs/configuracion-del-cliente/dispositivos-y-endpoints/dispositivos/integracion-de-dispositivos/mqtt/puente-http/rastreadores-de-ubicacion)
[PPM Concentration Sensors](/docs/configuracion-del-cliente/dispositivos-y-endpoints/dispositivos/integracion-de-dispositivos/mqtt/puente-http/sensores-de-concentracion-ppm)
[Mass/Volume Concentration Sensors](/docs/configuracion-del-cliente/dispositivos-y-endpoints/dispositivos/integracion-de-dispositivos/mqtt/puente-http/sensores-de-concentracion-masavolumen)
[Air Quality Sensors (AQI)](/docs/configuracion-del-cliente/dispositivos-y-endpoints/dispositivos/integracion-de-dispositivos/mqtt/puente-http/sensores-de-calidad-de-aire-aqi)
[People Flow Sensors](/docs/configuracion-del-cliente/dispositivos-y-endpoints/dispositivos/integracion-de-dispositivos/mqtt/puente-http/sensores-de-flujo-de-personas)
[People Counters](/docs/configuracion-del-cliente/dispositivos-y-endpoints/dispositivos/integracion-de-dispositivos/mqtt/puente-http/contadores-de-personas)
Commands [#commands]
[Receiving Commands](/docs/configuracion-del-cliente/dispositivos-y-endpoints/dispositivos/integracion-de-dispositivos/mqtt/puente-http/recibir-comandos)
# Location Trackers
Reporting Endpoint Status [#reporting-endpoint-status]
The integration por MQTT de rastreadores de ubicación uses the following structure:
```
{
"accessToken": "xxxxxxxxxxxxxxxxxxxxxxxxxxxxxxxxxxxxxxxx",
"endpointID": 1,
"latitude": -13.9957594,
"longitude": 48.9339384,
"flags": 0,
"timestamp": "2021-02-23T14:55:03"
"mqttMethod": "UpdateLocationTrackerStatus",
"mqttRID": "tkrs34"
}
```
Parameters [#parameters]
| Name | Description | Data Type |
| ----------- | ----------------------------------------------------------------------------------------------------------------------------------------------------------------------------------------------------------------------------------------------------------------------------------------------------------------------------------------------------------------------------------------------------------------------------------------------------------------------------------------------------------------------------------------------------------------------- | --------- |
| accessToken | Access token with permissions to update endpoint information. See this page for more information. | text |
| endpointID | Unique endpoint identifier or combination of device address and endpoint address in format \[deviceAddress]:endpointAddress (e.g.: \[device-1234]:1). These values can be found on the endpoint management page. | text |
| latitude | Indica la latitud. El valor debe ser entre -90 y 90. El separador para los decimales es el punto | numeric |
| longitude | Indica la longitud. El valor debe ser entre -180 y 180. El separador para los decimales es el punto | numeric |
| flags | Indica información extra para la posición. Es un valor entero que representa una suma bit a bit. Los estados disponibles son: 0 = Nada en especial1 = La posición del sensor está cambiando2 = El sensor no puede adquirir la posición4 = El sensor no funciona correctamente. La posición informada puede ser incorrecta8 = La posición informada tiene baja precisiónLos valores pueden combinarse a través de la operación OR. Por ejemplo, para indicar que la posición informada tiene baja precisión, y la posición está cambiando, debe utilizarse (8 OR 1) = 9. | numeric |
| timestamp | Optional value indicating the UTC date and time corresponding to the measurement. The date format must match one of those specified in the date formats section. If the field is omitted, the platform will assume the measurement corresponds to the current date and time. | text |
| mqttMethod | Método correspondiente del servicio, en este caso UpdateLocationTrackerStatus | string |
| mqttRID | Identificador opcional para la petición, en caso de que se desee obtener una respuesta de confirmación. | string |
Reporte de estado en formato "raw" [#reporte-de-estado-en-formato-raw]
El estado del endpoint puede ser reportado como un **valor crudo (raw),** utilizando el [conversor de expresiones](/docs/configuracion-del-cliente/dispositivos-y-endpoints/endpoints/conversion-de-datos-crudos-raw). Esta opción es conveniente cuando el dispositivo no es capaz de realizar conversiones, y emite valores que necesitan ser transformados antes de inyectarse en la plataforma.
A continuación, se muestra un ejemplo de una petición en formato raw:
```
{
"accessToken": "xxxxxxxxxxxxxxxxxxxxxxxxxxxxxxxxxxxxxxxx",
"endpointID": 1,
"rawData": "-13.9957594,48.933938,0",
"timestamp": "2021-02-23T14:55:03"
"mqttMethod": "UpdateLocationTrackerStatusRaw",
"mqttRID": "RXmp123"
}
```
Parameters [#parameters-1]
| Name | Description | Data Type |
| ----------- | ------------------------------------------------------------------------------------------------------------------------------------------------------------------------------------------------------------------------------------------------------------------------------------------------------------------------------------------------------------------------------------------------------------------------------------------------------------------------------------------------------------------------------------------------------------------------------------------------------------------------------------------------------------------------------------------------------------------------------------------------------------------------------------------------------------------------------------------------------------------------------------------------------------------------------------------------------------------------------------------------------------------------------------------------------- | --------- |
| accessToken | Access token with permissions to update endpoint information. See this page for more information. | text |
| endpointID | Unique endpoint identifier, which can be found on the endpoint management page. | numeric |
| rawData | Valor reportado por el sensor, como texto. Deben indicarse dos expresiones en el conversor de expresiones:La primera expresión debe devolver un valor numérico indicando la longitud. El valor debe ser entre -90 y 90. El separador para los decimales es el puntoLa segunda expresión debe devolver un valor numérico indicando la longitud. El valor debe ser entre -180 y 180. El separador para los decimales es el puntoLa tercera expresión debe devolver un valor entero indicando detalles de la posición (flags). Es un valor entero que representa una suma bit a bit. Los estados disponibles son:0 = Nada en especial1 = La posición del sensor está cambiando2 = El sensor no puede adquirir la posición4 = El sensor no funciona correctamente. La posición informada puede ser incorrecta8 = La posición informada tiene baja precisiónLos valores pueden combinarse a través de la operación OR. Por ejemplo, para indicar que la posición informada tiene baja precisión, y la posición está cambiando, debe utilizarse (8 OR 1) = 9. | text |
| timestamp | Optional value indicating the UTC date and time corresponding to the measurement. The date format must match one of those specified in the date formats section. If the field is omitted, the platform will assume the measurement corresponds to the current date and time. | text |
| mqttMethod | Método correspondiente del servicio, en este caso UpdateLocationTrackerStatusRaw | string |
| mqttRID | Identificador opcional para la petición, en caso de que se desee obtener una respuesta de confirmación. | string |
# Receiving Commands
Comandos [#comandos]
Flujo básico de integración de comandos [#flujo-básico-de-integración-de-comandos]

El gateway, dispositivo o endpoint deberá estar escuchando por comandos suscribiendose al siguiente topic:\
`**{client-secure-id}/commands/requests/{device-address}**`
* **cliente-secure-id:** es el usuario utilizado en la conexión. La estructura de topics incluye el id de usuario como primer elemento, dado que cada usuario tiene permiso únicamente para los topics que comiencen con ese ID.
* **device-address**: Es el ingresado en el campo “address” al crear el dispositivo.
Esta respuesta deberá ser interpretada por el dispositivo, realizar las acciones correspondientes y responder a través del método de respuesta de comandos para informar si la ejecución del mismo fue correcta o no.
En caso de ser correcta, se deberá ejecutar el método para actualizar el estado del dispositivo según corresponda.
Por último, asegurarse de seguir escuchando comandos con el primer método mencionado.
1. Esperar por comandos [#1-esperar-por-comandos]
Para que un dispositivo esté escuchando por comandos debe suscribirse al topic: `{client-secure-id}/commands/requests/{device-address}`
* **cliente-secure-id:** es el usuario utilizado en la conexión. La estructura de topics incluye el id de usuario como primer elemento, dado que cada usuario tiene permiso únicamente para los topics que comiencen con ese ID. Este valor se puede consultar en la sección de [seguridad > configuración MQTT](https://gear.cloud.studio/gear/manager/master-tables/mqtt-configuration)
* **device-address**: Es el ingresado en el campo “address” al crear el dispositivo. Si es un dispositivo ya creado, este valor se puede obtener desde el [listado](https://gear.cloud.studio/gear/manager/master-tables/endpoints):

**Respuesta**
La respuesta es una lista dentro de la propiedad `WaitForCommand_EndpointResult` que tendrá cada uno de los comandos correspondientes:
```
{
"Closure":null,
"CommandID":1120907993,
"CommandType":1,
"Custom":null,
"DeviceID":7246,
"Dimmer":null,
"EndpointID":113139,
"Management":null,
"OnOff":{
"AutomaticOverrideMinutes":0,
"CommandType":0
},
"Thermostat":null
}
```
Para mas información acerca de las propiedades de la respuesta [ver la documentación](https://www.cloud.studio/developers/gear/api/html/T_CloudStudio_Services_Types_DeviceCommand.htm)
Según el tipo de comando que se haya ejecutado, se deberá tener en cuenta la propiedad correspondiente para conocer la acción a realizar.
Por ejemplo, si el `CommandType` es 1, quiere decir que es un comando para un endpoint tipo "Appliance". Por lo que se deberá tener en cuenta lo que se informe en la propiedad `OnOff`
Los distintos command types se pueden [ver en esta documentación](https://www.cloud.studio/developers/gear/api/html/T_CloudStudio_Services_Types_DeviceCommandType.htm).
2. Responder un comando [#2-responder-un-comando]
En caso de haber recibido un comando y luego de ejecutar las acciones correspondientes en el dispositivo(hardware) se deberá responder el comando ya sea en caso de éxito o error.
Para informar que el comando ha sido ejecutado, se debe hacer un publish al topic `{client-secure-id}/HttpApi/DeviceIntegration` con el siguiente payload:
```
{
"accessToken":"xxxxxxxxxxxxxxxxxxxxxxxxxxxxxxxxxxxxxxxx",
"mqttMethod":"RespondCommand",
"mqttRID":"c392",
"response":{
"CommandID":1120907993,
"ResponseType":0,
"ResponseData":"ok",
"ErrorCode":"1",
"ErrorMessage":""
}
}
```
Descripción de los campos del payload:
| Name | Description | Data Type |
| ----------- | ------------------------------------------------------------------------------------------------------- | --------- |
| accessToken | Access token with permissions to update endpoint information. See this page for more information. | text |
| mqttMethod | Método correspondiente del servicio. Para comandos debe ser siempre RespondCommand | string |
| mqttRID | Identificador opcional para la petición, en caso de que se desee obtener una respuesta de confirmación. | string |
| response | Objeto con la respuesta del comando | object |
Descripción de los campos del sub objeto “response”:
| Name | Description | Data Type |
| ------------ | ----------------------------------------------------------------------------------------------------------------- | --------- |
| CommandID | Debe corresponder al obtenido en la suscripción del topic \{client-secure-id}/HttpApi/DeviceIntegration (paso 1). | integer |
| ResponseType | Debe ser alguno de los del enum, según corresponda. En este caso es 0, que significa "success". | integer |
| ResponseData | Texto informativo acerca del comando | string |
| ErrorCode | Código de error, solo válido si ResponseType es Error. | string |
| ErrorMessage | Mensaje de error, solo válido si ResponseType es Error. | string |
Para mas información acerca del objeto “response” [ver la documentación](https://www.cloud.studio/developers/gear/api/html/T_CloudStudio_Services_Types_DeviceCommandResponse.htm).
3. Actualizar estado del endpoint [#3-actualizar-estado-del-endpoint]
En caso de que la ejecución del comando haya sido exitosa, se deberá informar el nuevo estado del endpoint. Para esto se deberá utilizar el [método correspondiente](/docs/configuracion-del-cliente/dispositivos-y-endpoints/dispositivos/integracion-de-dispositivos/mqtt) al tipo de endpoint (ver “Integración por tipo de sensor”).
Siguiendo el ejemplo de appliance, se debe hacer un publish al topic `{client-secure-id}/HttpApi/DeviceIntegration` con el siguiente payload:
```
{
"accessToken": "xxxxxxxxxxxxxxxxxxxxxxxxxxxxxxxxxxxxxxxx",
"endpointID": 113139,
"isOn": true,
"mqttMethod": "UpdateApplianceStatus",
"mqttRID": "tkrs34"
}
```
Para más información acerca de este método ver la sección de [artefactos on/off](/docs/configuracion-del-cliente/dispositivos-y-endpoints/dispositivos/integracion-de-dispositivos/mqtt/puente-http/appliances-y-otros-dispositivos-on-off)
# Run-time Meters (Hour Meters)
> The integration de run-time meters utiliza la misma API que los sensores de flujo no-genéricos. La única diferencia es que los run time meters deben informar el flujo de tiempo **en segundos**.
Reporte de tiempo acumulado en segundos [#reporte-de-tiempo-acumulado-en-segundos]
The integration de run time meters por MQTT lleva la siguiente estructura, que es idéntica a la de cualquier sensor de flujo:
```
{
"accessToken": "xxxxxxxxxxxxxxxxxxxxxxxxxxxxxxxxxxxxxxxx",
"endpointID": 1,
"summationValue": 112685,
"timestamp": "2021-02-23T14:55:03",
"mqttMethod": "UpdateFlowSensorValueSummation",
"mqttRID": "tkrs34"
}
```
Parameters [#parameters]
| Name | Description | Data Type |
| -------------- | ---------------------------------------------------------------------------------------------------------------------------------------------------------------------------------------------------------------------------------------------------------------------------- | --------- |
| accessToken | Access token with permissions to update endpoint information. See this page for more information. | text |
| endpointID | Unique endpoint identifier or combination of device address and endpoint address in format \[deviceAddress]:endpointAddress (e.g.: \[device-1234]:1). These values can be found on the endpoint management page. | text |
| summationValue | Valor acumulado de tiempo informado por el sensor, expresado en segundos. | numeric |
| timestamp | Optional value indicating the UTC date and time corresponding to the measurement. The date format must match one of those specified in the date formats section. If the field is omitted, the platform will assume the measurement corresponds to the current date and time. | text |
| mqttMethod | Corresponding method of the service, in this case UpdateFlowSensorValueSummation | string |
| mqttRID | Optional identifier for the request, in case you want to get a confirmation response. | string |
Reporte de tiempo acumulado en formato "raw" [#reporte-de-tiempo-acumulado-en-formato-raw]
El tiempo acumulado puede ser reportado como un **valor crudo (raw),** utilizando el [conversor de expresiones](/docs/configuracion-del-cliente/dispositivos-y-endpoints/endpoints/conversion-de-datos-crudos-raw). Esta opción es conveniente cuando el dispositivo no es capaz de realizar conversiones, y emite valores que necesitan ser transformados antes de inyectarse en la plataforma.
A continuación, se muestra un ejemplo de una petición en formato raw:
```
{
"accessToken": "xxxxxxxxxxxxxxxxxxxxxxxxxxxxxxxxxxxxxxxx",
"endpointID": 1,
"rawData": "112685",
"timestamp": "2021-02-23T14:55:03",
"mqttMethod": "UpdateFlowSensorValueSummationRaw",
"mqttRID": "tkrs34"
}
```
Parameters [#parameters-1]
| Name | Description | Data Type |
| ----------- | ---------------------------------------------------------------------------------------------------------------------------------------------------------------------------------------------------------------------------------------------------------------------------- | --------- |
| accessToken | Access token with permissions to update endpoint information. See this page for more information. | text |
| endpointID | Unique endpoint identifier, which can be found on the endpoint management page. | numeric |
| rawData | Valor reportado por el sensor, como texto. Debe indicarse una expresión en el conversor de expresiones. La expresión debe devolver un valor numérico indicando el tiempo acumulado informado por el sensor, expresado en segundos. | text |
| timestamp | Optional value indicating the UTC date and time corresponding to the measurement. The date format must match one of those specified in the date formats section. If the field is omitted, the platform will assume the measurement corresponds to the current date and time. | text |
| mqttMethod | Corresponding method of the service, in this case UpdateFlowSensorValueSummationRaw | string |
| mqttRID | Optional identifier for the request, in case you want to get a confirmation response. | string |
# Air Quality Sensors (AQI)
Reporting Endpoint Status [#reporting-endpoint-status]
The integration de sensores de calidad de aire (AQI) por MQTT uses the following structure:
```
{
"accessToken": "xxxxxxxxxxxxxxxxxxxxxxxxxxxxxxxxxxxxxxxx",
"endpointID": 1,
"index": 500,
"timestamp": "2021-02-23T14:55:03",
"mqttMethod": "UpdateAirQualitySensorStatus",
"mqttRID": "tkrs34"
}
```
Parameters [#parameters]
| Name | Description | Data Type |
| ----------- | ---------------------------------------------------------------------------------------------------------------------------------------------------------------------------------------------------------------------------------------------------------------------------- | --------- |
| accessToken | Access token with permissions to update endpoint information. See this page for more information. | text |
| endpointID | Unique endpoint identifier or combination of device address and endpoint address in format \[deviceAddress]:endpointAddress (e.g.: \[device-1234]:1). These values can be found on the endpoint management page. | text |
| index | Indica el valor del índice de calidad del aire, el valor deber ser entre 0 a 500, expresada en AQI:0-50: Buena51-100: Moderada101-150: Insalubre para grupos sensibles151-200: Insalubre201-300: Muy insalubre301-500: Peligrosa | numeric |
| timestamp | Optional value indicating the UTC date and time corresponding to the measurement. The date format must match one of those specified in the date formats section. If the field is omitted, the platform will assume the measurement corresponds to the current date and time. | text |
| mqttMethod | Método correspondiente del servicio, en este caso UpdateAirQualitySensorStatus | string |
| mqttRID | Identificador opcional para la petición, en caso de que se desee obtener una respuesta de confirmación. | string |
Reporte de estado en formato "raw" [#reporte-de-estado-en-formato-raw]
El estado del endpoint puede ser reportado como un **valor crudo (raw),** utilizando el [conversor de expresiones](/docs/configuracion-del-cliente/dispositivos-y-endpoints/endpoints/conversion-de-datos-crudos-raw). Esta opción es conveniente cuando el dispositivo no es capaz de realizar conversiones, y emite valores que necesitan ser transformados antes de inyectarse en la plataforma.
A continuación, se muestra un ejemplo de una petición en formato raw:
```
{
"accessToken": "xxxxxxxxxxxxxxxxxxxxxxxxxxxxxxxxxxxxxxxx",
"endpointID": 1,
"rawData": "500",
"timestamp": "2021-02-23T14:55:03",
"mqttMethod": "UpdateAirQualitySensorStatusRaw",
"mqttRID": "RXmp123"
}
```
Parameters [#parameters-1]
| Name | Description | Data Type |
| ----------- | -------------------------------------------------------------------------------------------------------------------------------------------------------------------------------------------------------------------------------------------------------------------------------------------------------------------------------------------------- | --------- |
| accessToken | Access token with permissions to update endpoint information. See this page for more information. | text |
| endpointID | Unique endpoint identifier, which can be found on the endpoint management page. | numeric |
| rawData | Valor reportado por el sensor, como texto. Debe indicarse una expresión en el conversor de expresiones. La expresión debe devolver un valor numérico indicando la calidad del aire (entre 0 a 500), expresada en AQI.0-50: Buena51-100: Moderada101-150: Insalubre para grupos sensibles151-200: Insalubre201-300: Muy insalubre301-500: Peligrosa | text |
| timestamp | Optional value indicating the UTC date and time corresponding to the measurement. The date format must match one of those specified in the date formats section. If the field is omitted, the platform will assume the measurement corresponds to the current date and time. | text |
| mqttMethod | Método correspondiente del servicio, en este caso UpdateAirQualitySensorStatusRaw | string |
| mqttRID | Identificador opcional para la petición, en caso de que se desee obtener una respuesta de confirmación. | string |
# Mass/Volume Concentration Sensors
Reporting Endpoint Status [#reporting-endpoint-status]
The integration de sensores de concentración (masa/volumen) por MQTT uses the following structure:
```
{
"accessToken": "xxxxxxxxxxxxxxxxxxxxxxxxxxxxxxxxxxxxxxxx",
"endpointID": 1,
"concentration": 17.9,
"timestamp": "2021-02-23T14:55:03",
"mqttMethod": "UpdateConcentrationSensorStatus",
"mqttRID": "tkrs34"
}
```
Parameters [#parameters]
| Name | Description | Data Type |
| ------------- | ---------------------------------------------------------------------------------------------------------------------------------------------------------------------------------------------------------------------------------------------------------------------------- | --------- |
| accessToken | Access token with permissions to update endpoint information. See this page for more information. | text |
| endpointID | Unique endpoint identifier or combination of device address and endpoint address in format \[deviceAddress]:endpointAddress (e.g.: \[device-1234]:1). These values can be found on the endpoint management page. | text |
| concentration | Indica la concentración de materia (masa/volumen), expresada en microgramos/metro cúbico (μg/m³). El separador para los decimales es el punto. | numeric |
| timestamp | Optional value indicating the UTC date and time corresponding to the measurement. The date format must match one of those specified in the date formats section. If the field is omitted, the platform will assume the measurement corresponds to the current date and time. | text |
| mqttMethod | Método correspondiente del servicio, en este caso UpdateConcentrationSensorStatus | string |
| mqttRID | Identificador opcional para la petición, en caso de que se desee obtener una respuesta de confirmación. | string |
Reporte de estado en formato "raw" [#reporte-de-estado-en-formato-raw]
La concentración puede ser reportada como un **valor crudo (raw),** utilizando el [conversor de expresiones](/docs/configuracion-del-cliente/dispositivos-y-endpoints/endpoints/conversion-de-datos-crudos-raw). Esta opción es conveniente cuando el dispositivo no es capaz de realizar conversiones, y emite valores que necesitan ser transformados antes de inyectarse en la plataforma.
A continuación, se muestra un ejemplo de una petición en formato raw:
```
{
"accessToken": "xxxxxxxxxxxxxxxxxxxxxxxxxxxxxxxxxxxxxxxx",
"endpointID": 1,
"rawData": "17.9",
"timestamp": "2021-02-23T14:55:03",
"mqttMethod": "UpdateConcentrationSensorStatusRaw",
"mqttRID": "RXmp123"
}
```
Parameters [#parameters-1]
| Name | Description | Data Type |
| ----------- | ---------------------------------------------------------------------------------------------------------------------------------------------------------------------------------------------------------------------------------------------------------------------------- | --------- |
| accessToken | Access token with permissions to update endpoint information. See this page for more information. | text |
| endpointID | Unique endpoint identifier, which can be found on the endpoint management page. | numeric |
| rawData | Valor reportado por el sensor, como texto. Debe indicarse una expresión en el conversor de expresiones. La expresión debe devolver un valor numérico indicando la concentración de materia (masa/volumen), expresada en microgramos/metro cúbico (μg/m³). | text |
| timestamp | Optional value indicating the UTC date and time corresponding to the measurement. The date format must match one of those specified in the date formats section. If the field is omitted, the platform will assume the measurement corresponds to the current date and time. | text |
| mqttMethod | Método correspondiente del servicio, en este caso UpdateConcentrationSensorStatusRaw | string |
| mqttRID | Identificador opcional para la petición, en caso de que se desee obtener una respuesta de confirmación. | string |
# PPM Concentration Sensors
Reporting Endpoint Status [#reporting-endpoint-status]
The integration de sensores de concentración (ppm) por MQTT uses the following structure:
```
{
"accessToken": "xxxxxxxxxxxxxxxxxxxxxxxxxxxxxxxxxxxxxxxx",
"endpointID": 1,
"concentration": 15.3,
"timestamp": "2021-02-23T14:55:03",
"mqttMethod": "UpdateConcentrationSensorStatus",
"mqttRID": "tkrs34"
}
```
Parameters [#parameters]
| Name | Description | Data Type |
| ------------- | ---------------------------------------------------------------------------------------------------------------------------------------------------------------------------------------------------------------------------------------------------------------------------- | --------- |
| accessToken | Access token with permissions to update endpoint information. See this page for more information. | text |
| endpointID | Unique endpoint identifier or combination of device address and endpoint address in format \[deviceAddress]:endpointAddress (e.g.: \[device-1234]:1). These values can be found on the endpoint management page. | text |
| concentration | Indica la concentración expresada en partes por millón (ppm). El separador para los decimales es el punto. | numeric |
| timestamp | Optional value indicating the UTC date and time corresponding to the measurement. The date format must match one of those specified in the date formats section. If the field is omitted, the platform will assume the measurement corresponds to the current date and time. | text |
| mqttMethod | Método correspondiente del servicio, en este caso UpdateConcentrationSensorStatus | string |
| mqttRID | Identificador opcional para la petición, en caso de que se desee obtener una respuesta de confirmación. | string |
Reporte de estado en formato "raw" [#reporte-de-estado-en-formato-raw]
La concentración puede ser reportada como un **valor crudo (raw),** utilizando el [conversor de expresiones](/docs/configuracion-del-cliente/dispositivos-y-endpoints/endpoints/conversion-de-datos-crudos-raw). Esta opción es conveniente cuando el dispositivo no es capaz de realizar conversiones, y emite valores que necesitan ser transformados antes de inyectarse en la plataforma.
A continuación, se muestra un ejemplo de una petición en formato raw:
```
{
"accessToken": "xxxxxxxxxxxxxxxxxxxxxxxxxxxxxxxxxxxxxxxx",
"endpointID": 1,
"rawData": "15.3",
"timestamp": "2021-02-23T14:55:03",
"mqttMethod": "UpdateConcentrationSensorStatusRaw",
"mqttRID": "RXmp123"
}
```
Parameters [#parameters-1]
| Name | Description | Data Type |
| ----------- | ---------------------------------------------------------------------------------------------------------------------------------------------------------------------------------------------------------------------------------------------------------------------------- | --------- |
| accessToken | Access token with permissions to update endpoint information. See this page for more information. | text |
| endpointID | Unique endpoint identifier, which can be found on the endpoint management page. | numeric |
| rawData | Valor reportado por el sensor, como texto. Debe indicarse una expresión en el conversor de expresiones. La expresión debe devolver un valor numérico indicando la concentración, expresada partes por millón (ppm). | text |
| timestamp | Optional value indicating the UTC date and time corresponding to the measurement. The date format must match one of those specified in the date formats section. If the field is omitted, the platform will assume the measurement corresponds to the current date and time. | text |
| mqttMethod | Método correspondiente del servicio, en este caso UpdateConcentrationSensorStatusRaw | string |
| mqttRID | Identificador opcional para la petición, en caso de que se desee obtener una respuesta de confirmación. | string |
# Energy Consumption Sensors
Reporting Accumulated Energy in Wh and VARh [#reporting-accumulated-energy-in-wh-and-varh]
The integration de sensores de energía por MQTT uses the following structure:
```
{
"accessToken": "xxxxxxxxxxxxxxxxxxxxxxxxxxxxxxxxxxxxxxxx",
"endpointID": 1,
"activeEnergySummationWh": 112685.9,
"reactiveEnergySummationVARh": 18973.4,
"timestamp": "2021-02-23T14:55:03",
"mqttMethod": "UpdateEnergySensorValueSummation",
"mqttRID": "tkrs34"
}
```
Parameters [#parameters]
| Name | Description | Data Type |
| --------------------------- | ---------------------------------------------------------------------------------------------------------------------------------------------------------------------------------------------------------------------------------------------------------------------------- | --------- |
| accessToken | Access token with permissions to update endpoint information. See this page for more information. | text |
| endpointID | Unique endpoint identifier or combination of device address and endpoint address in format \[deviceAddress]:endpointAddress (e.g.: \[device-1234]:1). These values can be found on the endpoint management page. | text |
| activeEnergySummationWh | Valor acumulado de energía activa informado por el sensor, expresado en watt-hora (Wh). | numeric |
| reactiveEnergySummationVARh | Valor acumulado de energía reactiva informado por el sensor, expresado en volt-ampere-reactivo-hora (VARh). | numeric |
| timestamp | Optional value indicating the UTC date and time corresponding to the measurement. The date format must match one of those specified in the date formats section. If the field is omitted, the platform will assume the measurement corresponds to the current date and time. | text |
| mqttMethod | Método correspondiente del servicio, en este caso UpdateEnergySensorValueSummation | string |
| mqttRID | Identificador opcional para la petición, en caso de que se desee obtener una respuesta de confirmación. | string |
Reporte de energía acumulada en formato "raw" [#reporte-de-energía-acumulada-en-formato-raw]
La energía acumulada puede ser reportada como un **valor crudo (raw),** utilizando el [conversor de expresiones](/docs/configuracion-del-cliente/dispositivos-y-endpoints/endpoints/conversion-de-datos-crudos-raw). Esta opción es conveniente cuando el dispositivo no es capaz de realizar conversiones, y emite valores que necesitan ser transformados antes de inyectarse en la plataforma.
A continuación, se muestra un ejemplo de una petición en formato raw:
```
{
"accessToken": "xxxxxxxxxxxxxxxxxxxxxxxxxxxxxxxxxxxxxxxx",
"endpointID": 1,
"rawData": "112685.9/18973.4",
"timestamp": "2021-02-23T14:55:03",
"mqttMethod": "UpdateEnergySensorValueSummationRaw",
"mqttRID": "tkrs34"
}
```
Como puede verse en este ejemplo, el campo RawData combina el acumulado de energía activa y el acumulado de energía reactiva en un único string, en el que ambos valores están separados por una coma.
Parameters [#parameters-1]
| Name | Description | Data Type |
| ----------- | -------------------------------------------------------------------------------------------------------------------------------------------------------------------------------------------------------------------------------------------------------------------------------------------------------------------------------------------------------------------------------------------------------------------------------------------------------------------------------------------------------------------------------------------------------------------------------------------------------------------------------------------------------------------------------------------------------------------------------------------------------------- | --------- |
| accessToken | Access token with permissions to update endpoint information. See this page for more information. | text |
| endpointID | Unique endpoint identifier, which can be found on the endpoint management page. | numeric |
| rawData | Valor reportado por el sensor, como texto. Deben indicarse dos expresiones en el conversor de expresiones. La primera expresión se utiliza para obtener la energía activa acumulada a partir de la variable rawData. La expresión debe devolver un valor numérico indicando expresado en expresado en watt-hora (Wh). En el ejemplo anterior, podría utilizarse la siguiente expresión:ToNumber(StringPart(rawData, 1, ','))La segunda expresión se utiliza para obtener la energía reactiva acumulada a partir de la variable rawData. La expresión debe devolver un valor numérico indicando expresado en expresado volt-ampere-reactivo-hora (VARh). En el ejemplo anterior, podría utilizarse la siguiente expresión:ToNumber(StringPart(rawData, 2, ',')) | text |
| timestamp | Optional value indicating the UTC date and time corresponding to the measurement. The date format must match one of those specified in the date formats section. If the field is omitted, the platform will assume the measurement corresponds to the current date and time. | text |
| mqttMethod | Método correspondiente del servicio, en este caso UpdateEnergySensorValueSummationRaw | string |
| mqttRID | Identificador opcional para la petición, en caso de que se desee obtener una respuesta de confirmación. | string |
# Current Sensors
Reporting Current in Amperes [#reporting-current-in-amperes]
The integration de sensores de corriente por MQTT uses the following structure:
```
{
"accessToken": "xxxxxxxxxxxxxxxxxxxxxxxxxxxxxxxxxxxxxxxx",
"endpointID": 1,
"currentAmperes": 18.5,
"timestamp": "2021-02-23T14:55:03",
"mqttMethod": "UpdateCurrentSensorStatus",
"mqttRID": "tkrs34"
}
```
Parameters [#parameters]
| Name | Description | Data Type |
| -------------- | ---------------------------------------------------------------------------------------------------------------------------------------------------------------------------------------------------------------------------------------------------------------------------- | --------- |
| accessToken | Access token with permissions to update endpoint information. See this page for more information. | text |
| endpointID | Unique endpoint identifier or combination of device address and endpoint address in format \[deviceAddress]:endpointAddress (e.g.: \[device-1234]:1). These values can be found on the endpoint management page. | text |
| currentAmperes | Current, expressed in Amperes. | numeric |
| timestamp | Optional value indicating the UTC date and time corresponding to the measurement. The date format must match one of those specified in the date formats section. If the field is omitted, the platform will assume the measurement corresponds to the current date and time. | text |
| mqttMethod | Método correspondiente del servicio, en este caso UpdateCurrentSensorStatus | string |
| mqttRID | Identificador opcional para la petición, en caso de que se desee obtener una respuesta de confirmación. | string |
Reporte de corriente en formato "raw" [#reporte-de-corriente-en-formato-raw]
La corriente puede ser reportada como un **valor crudo (raw),** utilizando el [conversor de expresiones](/docs/configuracion-del-cliente/dispositivos-y-endpoints/endpoints/conversion-de-datos-crudos-raw). Esta opción es conveniente cuando el dispositivo no es capaz de realizar conversiones, y emite valores que necesitan ser transformados antes de inyectarse en la plataforma.
A continuación, se muestra un ejemplo de una petición en formato raw:
```
{
"accessToken": "xxxxxxxxxxxxxxxxxxxxxxxxxxxxxxxxxxxxxxxx",
"endpointID": 1,
"rawData": "233",
"timestamp": "2021-02-23T14:55:03",
"mqttMethod": "UpdateCurrentSensorStatusRaw",
"mqttRID": "tkrs34"
}
```
Parameters [#parameters-1]
| Name | Description | Data Type |
| ----------- | ---------------------------------------------------------------------------------------------------------------------------------------------------------------------------------------------------------------------------------------------------------------------------- | --------- |
| accessToken | Access token with permissions to update endpoint information. See this page for more information. | text |
| endpointID | Unique endpoint identifier, which can be found on the endpoint management page. | numeric |
| rawData | Valor reportado por el sensor, como texto. Debe indicarse una expresión en el conversor de expresiones. La expresión debe devolver un valor numérico indicando la corriente, expresada en Amperes. | text |
| timestamp | Optional value indicating the UTC date and time corresponding to the measurement. The date format must match one of those specified in the date formats section. If the field is omitted, the platform will assume the measurement corresponds to the current date and time. | text |
| mqttMethod | Método correspondiente del servicio, en este caso UpdateCurrentSensorStatusRaw | string |
| mqttRID | Identificador opcional para la petición, en caso de que se desee obtener una respuesta de confirmación. | string |
# Cos Phi Sensors
Reporting Cos Phi [#reporting-cos-phi]
The integration de sensores de [coseno fi](https://es.wikipedia.org/wiki/Factor_de_potencia) por MQTT uses the following structure:
```
{
"accessToken": "xxxxxxxxxxxxxxxxxxxxxxxxxxxxxxxxxxxxxxxx",
"endpointID": 1,
"cosPhi": 0.96,
"timestamp": "2021-02-23T14:55:03",
"mqttMethod": "UpdateCosPhiSensorStatus",
"mqttRID": "tkrs34"
}
```
Parameters [#parameters]
| Name | Description | Data Type |
| ----------- | ---------------------------------------------------------------------------------------------------------------------------------------------------------------------------------------------------------------------------------------------------------------------------- | --------- |
| accessToken | Access token with permissions to update endpoint information. See this page for more information. | text |
| endpointID | Unique endpoint identifier or combination of device address and endpoint address in format \[deviceAddress]:endpointAddress (e.g.: \[device-1234]:1). These values can be found on the endpoint management page. | text |
| cosPhi | Coseno fi, en el rango de -1 a 1. | numeric |
| timestamp | Optional value indicating the UTC date and time corresponding to the measurement. The date format must match one of those specified in the date formats section. If the field is omitted, the platform will assume the measurement corresponds to the current date and time. | text |
| mqttMethod | Método correspondiente del servicio, en este caso UpdateCosPhiSensorStatus | string |
| mqttRID | Identificador opcional para la petición, en caso de que se desee obtener una respuesta de confirmación. | string |
Reporting Cos Phi en formato "raw" [#reporting-cos-phi-en-formato-raw]
El coseno fi puede ser reportado como un **valor crudo (raw),** utilizando el [conversor de expresiones](/docs/configuracion-del-cliente/dispositivos-y-endpoints/endpoints/conversion-de-datos-crudos-raw). Esta opción es conveniente cuando el dispositivo no es capaz de realizar conversiones, y emite valores que necesitan ser transformados antes de inyectarse en la plataforma.
A continuación, se muestra un ejemplo de una petición en formato raw:
```
{
"accessToken": "xxxxxxxxxxxxxxxxxxxxxxxxxxxxxxxxxxxxxxxx",
"endpointID": 1,
"rawData": "0.96",
"timestamp": "2021-02-23T14:55:03",
"mqttMethod": "UpdateCosPhiSensorStatusRaw",
"mqttRID": "tkrs34"
}
```
Parameters [#parameters-1]
| Name | Description | Data Type |
| ----------- | ---------------------------------------------------------------------------------------------------------------------------------------------------------------------------------------------------------------------------------------------------------------------------- | --------- |
| accessToken | Access token with permissions to update endpoint information. See this page for more information. | text |
| endpointID | Unique endpoint identifier, which can be found on the endpoint management page. | numeric |
| rawData | Valor reportado por el sensor, como texto. Debe indicarse una expresión en el conversor de expresiones. La expresión debe devolver un valor numérico indicando el coseno fi, en el rango de -1 a 1. | text |
| timestamp | Optional value indicating the UTC date and time corresponding to the measurement. The date format must match one of those specified in the date formats section. If the field is omitted, the platform will assume the measurement corresponds to the current date and time. | text |
| mqttMethod | Método correspondiente del servicio, en este caso UpdateCosPhiSensorStatusRaw | string |
| mqttRID | Identificador opcional para la petición, en caso de que se desee obtener una respuesta de confirmación. | string |
# Flow Sensors de personas
Reporting Endpoint Status [#reporting-endpoint-status]
The integration de sensores de flujo de personas por MQTT uses the following structure:
```
{
"accessToken": "xxxxxxxxxxxxxxxxxxxxxxxxxxxxxxxxxxxxxxxx",
"endpointID": 1,
"summationValue": 25,
"timestamp": "2021-02-23T14:55:03",
"mqttMethod": "UpdateFlowSensorValueSummation",
"mqttRID": "tkrs34"
}
```
Parameters [#parameters]
| Name | Description | Data Type |
| -------------- | ---------------------------------------------------------------------------------------------------------------------------------------------------------------------------------------------------------------------------------------------------------------------------- | --------- |
| accessToken | Access token with permissions to update endpoint information. See this page for more information. | text |
| endpointID | Unique endpoint identifier or combination of device address and endpoint address in format \[deviceAddress]:endpointAddress (e.g.: \[device-1234]:1). These values can be found on the endpoint management page. | text |
| summationValue | Valor acumulado de flujo informado por el sensor, expresado en personas. | numeric |
| timestamp | Optional value indicating the UTC date and time corresponding to the measurement. The date format must match one of those specified in the date formats section. If the field is omitted, the platform will assume the measurement corresponds to the current date and time. | text |
| mqttMethod | Método correspondiente del servicio, en este caso UpdateFlowSensorValueSummation | string |
| mqttRID | Identificador opcional para la petición, en caso de que se desee obtener una respuesta de confirmación. | string |
Reporte de estado en formato "raw" [#reporte-de-estado-en-formato-raw]
El estado del endpoint puede ser reportado como un **valor crudo (raw),** utilizando el [conversor de expresiones](/docs/configuracion-del-cliente/dispositivos-y-endpoints/endpoints/conversion-de-datos-crudos-raw). Esta opción es conveniente cuando el dispositivo no es capaz de realizar conversiones, y emite valores que necesitan ser transformados antes de inyectarse en la plataforma.
A continuación, se muestra un ejemplo de una petición en formato raw:
```
{
"accessToken": "xxxxxxxxxxxxxxxxxxxxxxxxxxxxxxxxxxxxxxxx",
"endpointID": 1,
"rawData": 25,
"timestamp": "2021-02-23T14:55:03",
"mqttMethod": "UpdateFlowSensorValueSummationRaw",
"mqttRID": "tkrs34"
}
```
Parameters [#parameters-1]
| Name | Description | Data Type |
| ----------- | ---------------------------------------------------------------------------------------------------------------------------------------------------------------------------------------------------------------------------------------------------------------------------- | --------- |
| accessToken | Access token with permissions to update endpoint information. See this page for more information. | text |
| endpointID | Unique endpoint identifier, which can be found on the endpoint management page. | numeric |
| rawData | Valor reportado por el sensor, como texto. Debe indicarse una expresión en el conversor de expresiones. La expresión debe devolver un valor numérico indicando el valor acumulado de flujo informado por el sensor, expresado en personas. | text |
| timestamp | Optional value indicating the UTC date and time corresponding to the measurement. The date format must match one of those specified in the date formats section. If the field is omitted, the platform will assume the measurement corresponds to the current date and time. | text |
| mqttMethod | Método correspondiente del servicio, en este caso UpdateFlowSensorValueSummationRaw | string |
| mqttRID | Identificador opcional para la petición, en caso de que se desee obtener una respuesta de confirmación. | string |
# Flow Sensors
Reporting Accumulated Flow in Liters [#reporting-accumulated-flow-in-liters]
The integration de sensores de flujo por MQTT uses the following structure:
```
{
"accessToken": "xxxxxxxxxxxxxxxxxxxxxxxxxxxxxxxxxxxxxxxx",
"endpointID": 1,
"summationValue": 112685,
"timestamp": "2021-02-23T14:55:03",
"mqttMethod": "UpdateFlowSensorValueSummation",
"mqttRID": "tkrs34"
}
```
Parameters [#parameters]
| Name | Description | Data Type |
| -------------- | ---------------------------------------------------------------------------------------------------------------------------------------------------------------------------------------------------------------------------------------------------------------------------- | --------- |
| accessToken | Access token with permissions to update endpoint information. See this page for more information. | text |
| endpointID | Unique endpoint identifier or combination of device address and endpoint address in format \[deviceAddress]:endpointAddress (e.g.: \[device-1234]:1). These values can be found on the endpoint management page. | text |
| summationValue | Valor acumulado de flujo informado por el sensor, expresado en litros. | numeric |
| timestamp | Optional value indicating the UTC date and time corresponding to the measurement. The date format must match one of those specified in the date formats section. If the field is omitted, the platform will assume the measurement corresponds to the current date and time. | text |
| mqttMethod | Método correspondiente del servicio, en este caso UpdateFlowSensorValueSummation | string |
| mqttRID | Identificador opcional para la petición, en caso de que se desee obtener una respuesta de confirmación. | string |
Reporte de flujo acumulado en formato "raw" [#reporte-de-flujo-acumulado-en-formato-raw]
El flujo puede ser reportado como un **valor crudo (raw),** utilizando el [conversor de expresiones](/docs/configuracion-del-cliente/dispositivos-y-endpoints/endpoints/conversion-de-datos-crudos-raw). Esta opción es conveniente cuando el dispositivo no es capaz de realizar conversiones, y emite valores que necesitan ser transformados antes de inyectarse en la plataforma.
A continuación, se muestra un ejemplo de una petición en formato raw:
```
{
"accessToken": "xxxxxxxxxxxxxxxxxxxxxxxxxxxxxxxxxxxxxxxx",
"endpointID": 1,
"rawData": "112685",
"timestamp": "2021-02-23T14:55:03",
"mqttMethod": "UpdateFlowSensorValueSummationRaw",
"mqttRID": "tkrs34"
}
```
Parameters [#parameters-1]
| Name | Description | Data Type |
| ----------- | ---------------------------------------------------------------------------------------------------------------------------------------------------------------------------------------------------------------------------------------------------------------------------- | --------- |
| accessToken | Access token with permissions to update endpoint information. See this page for more information. | text |
| endpointID | Unique endpoint identifier, which can be found on the endpoint management page. | numeric |
| rawData | Valor reportado por el sensor, como texto. Debe indicarse una expresión en el conversor de expresiones. La expresión debe devolver un valor numérico indicando el valor acumulado de flujo informado por el sensor, expresado en litros. | text |
| timestamp | Optional value indicating the UTC date and time corresponding to the measurement. The date format must match one of those specified in the date formats section. If the field is omitted, the platform will assume the measurement corresponds to the current date and time. | text |
| mqttMethod | Método correspondiente del servicio, en este caso UpdateFlowSensorValueSummationRaw | string |
| mqttRID | Identificador opcional para la petición, en caso de que se desee obtener una respuesta de confirmación. | string |
# Humidity Sensors
Reporting Humidity as Percentage [#reporting-humidity-as-percentage]
The integration de sensores de humedad por MQTT uses the following structure:
```
{
"accessToken": "xxxxxxxxxxxxxxxxxxxxxxxxxxxxxxxxxxxxxxxx",
"endpointID": 1,
"humidityPercentage": 20,
"timestamp": "2021-02-23T14:55:03",
"mqttMethod": "UpdateHumiditySensorStatus",
"mqttRID": "RXmp123"
}
```
Parameters [#parameters]
| Name | Description | Data Type |
| ------------------ | ---------------------------------------------------------------------------------------------------------------------------------------------------------------------------------------------------------------------------------------------------------------------------- | --------- |
| accessToken | Access token with permissions to update endpoint information. See this page for more information. | text |
| endpointID | Unique endpoint identifier or combination of device address and endpoint address in format \[deviceAddress]:endpointAddress (e.g.: \[device-1234]:1). These values can be found on the endpoint management page. | text |
| humidityPercentage | Humidity percentage, from 0 to 100. | text |
| timestamp | Optional value indicating the UTC date and time corresponding to the measurement. The date format must match one of those specified in the date formats section. If the field is omitted, the platform will assume the measurement corresponds to the current date and time. | text |
| mqttMethod | Método correspondiente del servicio, en este caso UpdateHumiditySensorStatus | string |
| mqttRID | Identificador opcional para la petición, en caso de que se desee obtener una respuesta de confirmación. | string |
Reporte de humedad en formato "raw" [#reporte-de-humedad-en-formato-raw]
La humedad puede ser reportada como un **valor crudo (raw),** utilizando el [conversor de expresiones](/docs/configuracion-del-cliente/dispositivos-y-endpoints/endpoints/conversion-de-datos-crudos-raw). Esta opción es conveniente cuando el dispositivo no es capaz de realizar conversiones, y emite valores que necesitan ser transformados antes de inyectarse en la plataforma.
A continuación, se muestra un ejemplo de una petición en formato raw:
```
{
"accessToken": "xxxxxxxxxxxxxxxxxxxxxxxxxxxxxxxxxxxxxxxx",
"endpointID": 1,
"rawData": "25",
"timestamp": "2021-02-23T14:55:03",
"mqttMethod": "UpdateHumiditySensorStatusRaw",
"mqttRID": "RXmp123"
}
```
Parameters [#parameters-1]
| Name | Description | Data Type |
| ----------- | ---------------------------------------------------------------------------------------------------------------------------------------------------------------------------------------------------------------------------------------------------------------------------- | --------- |
| accessToken | Access token with permissions to update endpoint information. See this page for more information. | text |
| endpointID | Unique endpoint identifier, which can be found on the endpoint management page. | numeric |
| rawData | Valor reportado por el sensor, como texto. Debe indicarse una expresión en el conversor de expresiones. La expresión debe devolver un valor numérico entre 0 y 100. | text |
| timestamp | Optional value indicating the UTC date and time corresponding to the measurement. The date format must match one of those specified in the date formats section. If the field is omitted, the platform will assume the measurement corresponds to the current date and time. | text |
| mqttMethod | Método correspondiente del servicio, en este caso UpdateHumiditySensorStatusRaw | string |
| mqttRID | Identificador opcional para la petición, en caso de que se desee obtener una respuesta de confirmación. | string |
# Light Level Sensors
Reporting Light Level as Percentage [#reporting-light-level-as-percentage]
The integration de sensores de iluminación por MQTT uses the following structure:
```
{
"accessToken": "xxxxxxxxxxxxxxxxxxxxxxxxxxxxxxxxxxxxxxxx",
"endpointID": 1,
"lightIntensity": 7550,
"timestamp": "2021-02-23T14:55:03",
"mqttMethod": "UpdateLightSensorStatus",
"mqttRID": "Ht4jk"
}
```
Parameters [#parameters]
| Name | Description | Data Type |
| -------------- | ---------------------------------------------------------------------------------------------------------------------------------------------------------------------------------------------------------------------------------------------------------------------------- | --------- |
| accessToken | Access token with permissions to update endpoint information. See this page for more information. | text |
| endpointID | Unique endpoint identifier or combination of device address and endpoint address in format \[deviceAddress]:endpointAddress (e.g.: \[device-1234]:1). These values can be found on the endpoint management page. | text |
| lightIntensity | Light intensity expressed in lux. | text |
| timestamp | Optional value indicating the UTC date and time corresponding to the measurement. The date format must match one of those specified in the date formats section. If the field is omitted, the platform will assume the measurement corresponds to the current date and time. | text |
| mqttMethod | Método correspondiente del servicio, en este caso UpdateLightSensorStatus | string |
| mqttRID | Identificador opcional para la petición, en caso de que se desee obtener una respuesta de confirmación. | string |
Reporte de nivel de iluminación en formato "raw" [#reporte-de-nivel-de-iluminación-en-formato-raw]
El nivel de iluminación puede ser reportado como un **valor crudo (raw),** utilizando el [conversor de expresiones](/docs/configuracion-del-cliente/dispositivos-y-endpoints/endpoints/conversion-de-datos-crudos-raw). Esta opción es conveniente cuando el dispositivo no es capaz de realizar conversiones, y emite valores que necesitan ser transformados antes de inyectarse en la plataforma.
A continuación, se muestra un ejemplo de una petición en formato raw:
```
{
"accessToken": "xxxxxxxxxxxxxxxxxxxxxxxxxxxxxxxxxxxxxxxx",
"endpointID": 1,
"rawData": "7550",
"timestamp": "2021-02-23T14:55:03",
"mqttMethod": "UpdateLightSensorStatusRaw",
"mqttRID": "RXmp123"
}
```
Parameters [#parameters-1]
| Name | Description | Data Type |
| ----------- | ---------------------------------------------------------------------------------------------------------------------------------------------------------------------------------------------------------------------------------------------------------------------------- | --------- |
| accessToken | Access token with permissions to update endpoint information. See this page for more information. | text |
| endpointID | Unique endpoint identifier, which can be found on the endpoint management page. | numeric |
| rawData | Valor reportado por el sensor, como texto. Debe indicarse una expresión en el conversor de expresiones. La expresión debe devolver un valor numérico indicando la intensidad luminosa expresada en lux. | text |
| timestamp | Optional value indicating the UTC date and time corresponding to the measurement. The date format must match one of those specified in the date formats section. If the field is omitted, the platform will assume the measurement corresponds to the current date and time. | text |
| mqttMethod | Método correspondiente del servicio, en este caso UpdateLightSensorStatusRaw | string |
| mqttRID | Identificador opcional para la petición, en caso de que se desee obtener una respuesta de confirmación. | string |
# Weight Sensors
Reporting Weight in Grams [#reporting-weight-in-grams]
The integration de sensores de peso por MQTT uses the following structure:
```
{
"accessToken": "xxxxxxxxxxxxxxxxxxxxxxxxxxxxxxxxxxxxxxxx",
"endpointID": 1,
"weightGrams": 45,
"timestamp": "2021-02-23T14:55:03",
"mqttMethod": "UpdateWeightSensorStatus",
"mqttRID": "tkrs34"
}
```
Parameters [#parameters]
| Name | Description | Data Type |
| ----------- | ---------------------------------------------------------------------------------------------------------------------------------------------------------------------------------------------------------------------------------------------------------------------------- | --------- |
| accessToken | Access token with permissions to update endpoint information. See this page for more information. | text |
| endpointID | Unique endpoint identifier or combination of device address and endpoint address in format \[deviceAddress]:endpointAddress (e.g.: \[device-1234]:1). These values can be found on the endpoint management page. | text |
| weightGrams | Weight, expressed in grams. | numeric |
| timestamp | Optional value indicating the UTC date and time corresponding to the measurement. The date format must match one of those specified in the date formats section. If the field is omitted, the platform will assume the measurement corresponds to the current date and time. | text |
| mqttMethod | Método correspondiente del servicio, en este caso UpdateWeightSensorStatus | string |
| mqttRID | Identificador opcional para la petición, en caso de que se desee obtener una respuesta de confirmación. | string |
Reporte de peso en formato "raw" [#reporte-de-peso-en-formato-raw]
El peso puede ser reportado como un **valor crudo (raw),** utilizando el [conversor de expresiones](/docs/configuracion-del-cliente/dispositivos-y-endpoints/endpoints/conversion-de-datos-crudos-raw). Esta opción es conveniente cuando el dispositivo no es capaz de realizar conversiones, y emite valores que necesitan ser transformados antes de inyectarse en la plataforma.
A continuación, se muestra un ejemplo de una petición en formato raw:
```
{
"accessToken": "xxxxxxxxxxxxxxxxxxxxxxxxxxxxxxxxxxxxxxxx",
"endpointID": 1,
"rawData": "25",
"timestamp": "2021-02-23T14:55:03",
"mqttMethod": "UpdateWeightSensorStatusRaw",
"mqttRID": "RXmp123"
}
```
Parameters [#parameters-1]
| Name | Description | Data Type |
| ----------- | ---------------------------------------------------------------------------------------------------------------------------------------------------------------------------------------------------------------------------------------------------------------------------- | --------- |
| accessToken | Access token with permissions to update endpoint information. See this page for more information. | text |
| endpointID | Unique endpoint identifier, which can be found on the endpoint management page. | numeric |
| rawData | Valor reportado por el sensor, como texto. Debe indicarse una expresión en el conversor de expresiones. La expresión debe devolver un valor numérico indicando el peso, expresado en gramos. | text |
| timestamp | Optional value indicating the UTC date and time corresponding to the measurement. The date format must match one of those specified in the date formats section. If the field is omitted, the platform will assume the measurement corresponds to the current date and time. | text |
| mqttMethod | Método correspondiente del servicio, en este caso UpdateWeightSensorStatusRaw | string |
| mqttRID | Identificador opcional para la petición, en caso de que se desee obtener una respuesta de confirmación. | string |
# Active Power Sensors
Reporting Active Power in Watts [#reporting-active-power-in-watts]
The integration de sensores de potencia activa por MQTT uses the following structure:
```
{
"accessToken": "xxxxxxxxxxxxxxxxxxxxxxxxxxxxxxxxxxxxxxxx",
"endpointID": 1,
"activePowerWatts": 18.5,
"timestamp": "2021-02-23T14:55:03",
"mqttMethod": "UpdateActivePowerSensorStatus",
"mqttRID": "tkrs34"
}
```
Parameters [#parameters]
| Name | Description | Data Type |
| ---------------- | ---------------------------------------------------------------------------------------------------------------------------------------------------------------------------------------------------------------------------------------------------------------------------- | --------- |
| accessToken | Access token with permissions to update endpoint information. See this page for more information. | text |
| endpointID | Unique endpoint identifier or combination of device address and endpoint address in format \[deviceAddress]:endpointAddress (e.g.: \[device-1234]:1). These values can be found on the endpoint management page. | text |
| activePowerWatts | Active power, expressed in Watts. | numeric |
| timestamp | Optional value indicating the UTC date and time corresponding to the measurement. The date format must match one of those specified in the date formats section. If the field is omitted, the platform will assume the measurement corresponds to the current date and time. | text |
| mqttMethod | Método correspondiente del servicio, en este caso UpdateActivePowerSensorStatus | string |
| mqttRID | Identificador opcional para la petición, en caso de que se desee obtener una respuesta de confirmación. | string |
Reporte de potencia activa en formato "raw" [#reporte-de-potencia-activa-en-formato-raw]
La potencia activa puede ser reportada como un **valor crudo (raw),** utilizando el [conversor de expresiones](/docs/configuracion-del-cliente/dispositivos-y-endpoints/endpoints/conversion-de-datos-crudos-raw). Esta opción es conveniente cuando el dispositivo no es capaz de realizar conversiones, y emite valores que necesitan ser transformados antes de inyectarse en la plataforma.
A continuación, se muestra un ejemplo de una petición en formato raw:
```
{
"accessToken": "xxxxxxxxxxxxxxxxxxxxxxxxxxxxxxxxxxxxxxxx",
"endpointID": 1,
"rawData": "18.5",
"timestamp": "2021-02-23T14:55:03",
"mqttMethod": "UpdateActivePowerSensorStatusRaw",
"mqttRID": "tkrs34"
}
```
Parameters [#parameters-1]
| Name | Description | Data Type |
| ----------- | ---------------------------------------------------------------------------------------------------------------------------------------------------------------------------------------------------------------------------------------------------------------------------- | --------- |
| accessToken | Access token with permissions to update endpoint information. See this page for more information. | text |
| endpointID | Unique endpoint identifier, which can be found on the endpoint management page. | numeric |
| rawData | Valor reportado por el sensor, como texto. Debe indicarse una expresión en el conversor de expresiones. La expresión debe devolver un valor numérico indicando la potencia activa medida, expresada en Watts. | text |
| timestamp | Optional value indicating the UTC date and time corresponding to the measurement. The date format must match one of those specified in the date formats section. If the field is omitted, the platform will assume the measurement corresponds to the current date and time. | text |
| mqttMethod | Método correspondiente del servicio, en este caso UpdateActivePowerSensorStatusRaw | string |
| mqttRID | Identificador opcional para la petición, en caso de que se desee obtener una respuesta de confirmación. | string |
# Apparent Power Sensors
Reporting Apparent Power in VA [#reporting-apparent-power-in-va]
The integration de sensores de [potencia aparente](https://es.wikipedia.org/wiki/Potencia_el%C3%A9ctrica) por MQTT uses the following structure:
```
{
"accessToken": "xxxxxxxxxxxxxxxxxxxxxxxxxxxxxxxxxxxxxxxx",
"endpointID": 1,
"apparentPowerVA": 2850.5,
"timestamp": "2021-02-23T14:55:03",
"mqttMethod": "UpdateApparentPowerSensorStatus",
"mqttRID": "tkrs34"
}
```
Parameters [#parameters]
| Name | Description | Data Type |
| --------------- | ---------------------------------------------------------------------------------------------------------------------------------------------------------------------------------------------------------------------------------------------------------------------------- | --------- |
| accessToken | Access token with permissions to update endpoint information. See this page for more information. | text |
| endpointID | Unique endpoint identifier or combination of device address and endpoint address in format \[deviceAddress]:endpointAddress (e.g.: \[device-1234]:1). These values can be found on the endpoint management page. | text |
| apparentPowerVA | Apparent power, expressed in VA. | numeric |
| timestamp | Optional value indicating the UTC date and time corresponding to the measurement. The date format must match one of those specified in the date formats section. If the field is omitted, the platform will assume the measurement corresponds to the current date and time. | text |
| mqttMethod | Método correspondiente del servicio, en este caso UpdateApparentPowerSensorStatus | string |
| mqttRID | Identificador opcional para la petición, en caso de que se desee obtener una respuesta de confirmación. | string |
Reporte de potencia aparente en formato "raw" [#reporte-de-potencia-aparente-en-formato-raw]
La potencia aparente puede ser reportado como un **valor crudo (raw),** utilizando el [conversor de expresiones](/docs/configuracion-del-cliente/dispositivos-y-endpoints/endpoints/conversion-de-datos-crudos-raw). Esta opción es conveniente cuando el dispositivo no es capaz de realizar conversiones, y emite valores que necesitan ser transformados antes de inyectarse en la plataforma.
A continuación, se muestra un ejemplo de una petición en formato raw:
```
{
"accessToken": "xxxxxxxxxxxxxxxxxxxxxxxxxxxxxxxxxxxxxxxx",
"endpointID": 1,
"rawData": "2850.5",
"timestamp": "2021-02-23T14:55:03",
"mqttMethod": "UpdateApparentPowerSensorStatusRaw",
"mqttRID": "tkrs34"
}
```
Parameters [#parameters-1]
| Name | Description | Data Type |
| ----------- | ---------------------------------------------------------------------------------------------------------------------------------------------------------------------------------------------------------------------------------------------------------------------------- | --------- |
| accessToken | Access token with permissions to update endpoint information. See this page for more information. | text |
| endpointID | Unique endpoint identifier, which can be found on the endpoint management page. | numeric |
| rawData | Valor reportado por el sensor, como texto. Debe indicarse una expresión en el conversor de expresiones. La expresión debe devolver un valor numérico indicando la potencia aparente, expresada en VA. | text |
| timestamp | Optional value indicating the UTC date and time corresponding to the measurement. The date format must match one of those specified in the date formats section. If the field is omitted, the platform will assume the measurement corresponds to the current date and time. | text |
| mqttMethod | Método correspondiente del servicio, en este caso UpdateApparentPowerSensorStatusRaw | string |
| mqttRID | Identificador opcional para la petición, en caso de que se desee obtener una respuesta de confirmación. | string |
# Reactive Power Sensors
Reporting Reactive Power in VAR [#reporting-reactive-power-in-var]
The integration de sensores de [potencia reactiva](https://es.wikipedia.org/wiki/Potencia_el%C3%A9ctrica) por MQTT uses the following structure:
```
{
"accessToken": "xxxxxxxxxxxxxxxxxxxxxxxxxxxxxxxxxxxxxxxx",
"endpointID": 1,
"reactivePowerVAR": 2850.5,
"timestamp": "2021-02-23T14:55:03",
"mqttMethod": "UpdateReactivePowerSensorStatus",
"mqttRID": "tkrs34"
}
```
Parameters [#parameters]
| Name | Description | Data Type |
| ---------------- | ---------------------------------------------------------------------------------------------------------------------------------------------------------------------------------------------------------------------------------------------------------------------------- | --------- |
| accessToken | Access token with permissions to update endpoint information. See this page for more information. | text |
| endpointID | Unique endpoint identifier or combination of device address and endpoint address in format \[deviceAddress]:endpointAddress (e.g.: \[device-1234]:1). These values can be found on the endpoint management page. | text |
| reactivePowerVAR | Reactive power, expressed in VAR. | numeric |
| timestamp | Optional value indicating the UTC date and time corresponding to the measurement. The date format must match one of those specified in the date formats section. If the field is omitted, the platform will assume the measurement corresponds to the current date and time. | text |
| mqttMethod | Método correspondiente del servicio, en este caso UpdateReactivePowerSensorStatus | string |
| mqttRID | Identificador opcional para la petición, en caso de que se desee obtener una respuesta de confirmación. | string |
Reporte de potencia reactiva en formato "raw" [#reporte-de-potencia-reactiva-en-formato-raw]
La potencia reactiva puede ser reportado como un **valor crudo (raw),** utilizando el [conversor de expresiones](/docs/configuracion-del-cliente/dispositivos-y-endpoints/endpoints/conversion-de-datos-crudos-raw). Esta opción es conveniente cuando el dispositivo no es capaz de realizar conversiones, y emite valores que necesitan ser transformados antes de inyectarse en la plataforma.
A continuación, se muestra un ejemplo de una petición en formato raw:
```
{
"accessToken": "xxxxxxxxxxxxxxxxxxxxxxxxxxxxxxxxxxxxxxxx",
"endpointID": 1,
"rawData": "2850.5",
"timestamp": "2021-02-23T14:55:03",
"mqttMethod": "UpdateReactivePowerSensorStatusRaw",
"mqttRID": "tkrs34"
}
```
Parameters [#parameters-1]
| Name | Description | Data Type |
| ----------- | ---------------------------------------------------------------------------------------------------------------------------------------------------------------------------------------------------------------------------------------------------------------------------- | --------- |
| accessToken | Access token with permissions to update endpoint information. See this page for more information. | text |
| endpointID | Unique endpoint identifier, which can be found on the endpoint management page. | numeric |
| rawData | Valor reportado por el sensor, como texto. Debe indicarse una expresión en el conversor de expresiones. La expresión debe devolver un valor numérico indicando la potencia reactiva, expresada en VAR. | text |
| timestamp | Optional value indicating the UTC date and time corresponding to the measurement. The date format must match one of those specified in the date formats section. If the field is omitted, the platform will assume the measurement corresponds to the current date and time. | text |
| mqttMethod | Método correspondiente del servicio, en este caso UpdateReactivePowerSensorStatusRaw | string |
| mqttRID | Identificador opcional para la petición, en caso de que se desee obtener una respuesta de confirmación. | string |
# Pressure Sensors
Reporting Pressure in Pascals [#reporting-pressure-in-pascals]
The integration de sensores de presión por MQTT uses the following structure:
```
{
"accessToken": "xxxxxxxxxxxxxxxxxxxxxxxxxxxxxxxxxxxxxxxx",
"endpointID": 1,
"pressurePascals": 101300,
"timestamp": "2021-02-23T14:55:03"
"mqttMethod": "UpdatePressureSensorStatus",
"mqttRID": "Prafw6H"
}
```
Parameters [#parameters]
| Name | Description | Data Type |
| --------------- | ---------------------------------------------------------------------------------------------------------------------------------------------------------------------------------------------------------------------------------------------------------------------------- | --------- |
| accessToken | Access token with permissions to update endpoint information. See this page for more information. | text |
| endpointID | Unique endpoint identifier or combination of device address and endpoint address in format \[deviceAddress]:endpointAddress (e.g.: \[device-1234]:1). These values can be found on the endpoint management page. | text |
| pressurePascals | Pressure, expressed in Pascals. | numeric |
| timestamp | Optional value indicating the UTC date and time corresponding to the measurement. The date format must match one of those specified in the date formats section. If the field is omitted, the platform will assume the measurement corresponds to the current date and time. | text |
| mqttMethod | Método correspondiente del servicio, en este caso UpdatePressureSensorStatus | string |
| mqttRID | Identificador opcional para la petición, en caso de que se desee obtener una respuesta de confirmación. | string |
Reporte de presión en formato "raw" [#reporte-de-presión-en-formato-raw]
La presión puede ser reportada como un **valor crudo (raw),** utilizando el [conversor de expresiones](/docs/configuracion-del-cliente/dispositivos-y-endpoints/endpoints/conversion-de-datos-crudos-raw). Esta opción es conveniente cuando el dispositivo no es capaz de realizar conversiones, y emite valores que necesitan ser transformados antes de inyectarse en la plataforma.
A continuación, se muestra un ejemplo de una petición en formato raw:
```
{
"accessToken": "xxxxxxxxxxxxxxxxxxxxxxxxxxxxxxxxxxxxxxxx",
"endpointID": 1,
"rawData": "101300",
"timestamp": "2021-02-23T14:55:03"
"mqttMethod": "UpdatePressureSensorStatusRaw",
"mqttRID": "Prafw6H"
}
```
Parameters [#parameters-1]
| Name | Description | Data Type |
| ----------- | ---------------------------------------------------------------------------------------------------------------------------------------------------------------------------------------------------------------------------------------------------------------------------- | --------- |
| accessToken | Access token with permissions to update endpoint information. See this page for more information. | text |
| endpointID | Unique endpoint identifier, which can be found on the endpoint management page. | numeric |
| rawData | Valor reportado por el sensor, como texto. Debe indicarse una expresión en el conversor de expresiones. La expresión debe devolver un valor numérico indicando la presión medida, expresada en Pascales. | text |
| timestamp | Optional value indicating the UTC date and time corresponding to the measurement. The date format must match one of those specified in the date formats section. If the field is omitted, the platform will assume the measurement corresponds to the current date and time. | text |
| mqttMethod | Método correspondiente del servicio, en este caso UpdatePressureSensorStatusRaw | string |
| mqttRID | Identificador opcional para la petición, en caso de que se desee obtener una respuesta de confirmación. | string |
# Temperature Sensors
Reporting Temperature in Degrees Celsius [#reporting-temperature-in-degrees-celsius]
The integration de sensores de temperatura por MQTT uses the following structure:
```
{
"accessToken": "xxxxxxxxxxxxxxxxxxxxxxxxxxxxxxxxxxxxxxxx",
"endpointID": 1,
"temperatureCelsius": 25,
"timestamp": "2021-02-23T14:55:03",
"mqttMethod": "UpdateTemperatureSensorStatus",
"mqttRID": "RXmp123"
}
```
Parameters [#parameters]
| Name | Description | Data Type |
| ------------------ | ---------------------------------------------------------------------------------------------------------------------------------------------------------------------------------------------------------------------------------------------------------------------------- | --------- |
| accessToken | Access token with permissions to update endpoint information. See this page for more information. | text |
| endpointID | Unique endpoint identifier or combination of device address and endpoint address in format \[deviceAddress]:endpointAddress (e.g.: \[device-1234]:1). These values can be found on the endpoint management page. | text |
| temperatureCelsius | Measured temperature, numeric value greater than or equal to -273.15, indicating the measured temperature in degrees Celsius (C). | numeric |
| timestamp | Optional value indicating the UTC date and time corresponding to the measurement. The date format must match one of those specified in the date formats section. If the field is omitted, the platform will assume the measurement corresponds to the current date and time. | text |
| mqttMethod | Método correspondiente del servicio, en este caso UpdateTemperatureSensorStatus | string |
| mqttRID | Identificador opcional para la petición, en caso de que se desee obtener una respuesta de confirmación. | string |
Reporte de temperatura en formato "raw" [#reporte-de-temperatura-en-formato-raw]
La temperatura puede ser reportada como un **valor crudo (raw),** utilizando el [conversor de expresiones](/docs/configuracion-del-cliente/dispositivos-y-endpoints/endpoints/conversion-de-datos-crudos-raw). Esta opción es conveniente cuando el dispositivo no es capaz de realizar conversiones, y emite valores que necesitan ser transformados antes de inyectarse en la plataforma.
A continuación, se muestra un ejemplo de una petición en formato raw:
```
{
"accessToken": "xxxxxxxxxxxxxxxxxxxxxxxxxxxxxxxxxxxxxxxx",
"endpointID": 1,
"rawData": "45",
"timestamp": "2021-02-23T14:55:03",
"mqttMethod": "UpdateTemperatureSensorStatusRaw",
"mqttRID": "RXmp123"
}
```
Parameters [#parameters-1]
| Name | Description | Data Type |
| ----------- | ---------------------------------------------------------------------------------------------------------------------------------------------------------------------------------------------------------------------------------------------------------------------------- | --------- |
| accessToken | Access token with permissions to update endpoint information. See this page for more information. | text |
| endpointID | Unique endpoint identifier, which can be found on the endpoint management page. | numeric |
| rawData | Valor reportado por el sensor, como texto. Debe indicarse una expresión en el conversor de expresiones. La expresión debe devolver un valor numérico mayor o igual a -273.15, indicando la temperatura medida, en grados Celsius (ºC). | text |
| timestamp | Optional value indicating the UTC date and time corresponding to the measurement. The date format must match one of those specified in the date formats section. If the field is omitted, the platform will assume the measurement corresponds to the current date and time. | text |
| mqttMethod | Método correspondiente del servicio, en éste caso UpdateTemperatureSensorStatusRaw | string |
| mqttRID | Identificador opcional para la petición, en caso de que se desee obtener una respuesta de confirmación. | string |
# Voltage Sensors
Reporting Voltage in Volts [#reporting-voltage-in-volts]
The integration de sensores de voltaje por MQTT uses the following structure:
```
{
"accessToken": "xxxxxxxxxxxxxxxxxxxxxxxxxxxxxxxxxxxxxxxx",
"endpointID": 1,
"voltageVolts": 233,
"timestamp": "2021-02-23T14:55:03",
"mqttMethod": "UpdateVoltageSensorStatus",
"mqttRID": "tkrs34"
}
```
Parameters [#parameters]
| Name | Description | Data Type |
| ------------ | ---------------------------------------------------------------------------------------------------------------------------------------------------------------------------------------------------------------------------------------------------------------------------- | --------- |
| accessToken | Access token with permissions to update endpoint information. See this page for more information. | text |
| endpointID | Unique endpoint identifier or combination of device address and endpoint address in format \[deviceAddress]:endpointAddress (e.g.: \[device-1234]:1). These values can be found on the endpoint management page. | text |
| voltageVolts | Voltage expressed in volts. | numeric |
| timestamp | Optional value indicating the UTC date and time corresponding to the measurement. The date format must match one of those specified in the date formats section. If the field is omitted, the platform will assume the measurement corresponds to the current date and time. | text |
| mqttMethod | Método correspondiente del servicio, en este caso UpdateVoltageSensorStatus | string |
| mqttRID | Identificador opcional para la petición, en caso de que se desee obtener una respuesta de confirmación. | string |
Reporte de voltaje en formato "raw" [#reporte-de-voltaje-en-formato-raw]
El voltaje puede ser reportado como un **valor crudo (raw),** utilizando el [conversor de expresiones](/docs/configuracion-del-cliente/dispositivos-y-endpoints/endpoints/conversion-de-datos-crudos-raw). Esta opción es conveniente cuando el dispositivo no es capaz de realizar conversiones, y emite valores que necesitan ser transformados antes de inyectarse en la plataforma.
A continuación, se muestra un ejemplo de una petición en formato raw:
```
{
"accessToken": "xxxxxxxxxxxxxxxxxxxxxxxxxxxxxxxxxxxxxxxx",
"endpointID": 1,
"rawData": "233",
"timestamp": "2021-02-23T14:55:03",
"mqttMethod": "UpdateVoltageSensorStatusRaw",
"mqttRID": "tkrs34"
}
```
Parameters [#parameters-1]
| Name | Description | Data Type |
| ----------- | ---------------------------------------------------------------------------------------------------------------------------------------------------------------------------------------------------------------------------------------------------------------------------- | --------- |
| accessToken | Access token with permissions to update endpoint information. See this page for more information. | text |
| endpointID | Unique endpoint identifier, which can be found on the endpoint management page. | numeric |
| rawData | Valor reportado por el sensor, como texto. Debe indicarse una expresión en el conversor de expresiones. La expresión debe devolver un valor numérico indicando el voltaje, expresado en voltios. | text |
| timestamp | Optional value indicating the UTC date and time corresponding to the measurement. The date format must match one of those specified in the date formats section. If the field is omitted, the platform will assume the measurement corresponds to the current date and time. | text |
| mqttMethod | Método correspondiente del servicio, en este caso UpdateVoltageSensorStatusRaw | string |
| mqttRID | Identificador opcional para la petición, en caso de que se desee obtener una respuesta de confirmación. | string |
# Volume Sensors
Reporting Volume in Liters [#reporting-volume-in-liters]
The integration de sensores de volumen por MQTT uses the following structure:
```
{
"accessToken": "xxxxxxxxxxxxxxxxxxxxxxxxxxxxxxxxxxxxxxxx",
"endpointID": 1,
"volumeLiters": 45,
"timestamp": "2021-02-23T14:55:03",
"mqttMethod": "UpdateVolumeSensorStatus",
"mqttRID": "tkrs34"
}
```
Parameters [#parameters]
| Name | Description | Data Type |
| ------------ | ---------------------------------------------------------------------------------------------------------------------------------------------------------------------------------------------------------------------------------------------------------------------------- | --------- |
| accessToken | Access token with permissions to update endpoint information. See this page for more information. | text |
| endpointID | Unique endpoint identifier or combination of device address and endpoint address in format \[deviceAddress]:endpointAddress (e.g.: \[device-1234]:1). These values can be found on the endpoint management page. | text |
| volumeLiters | Volume expressed in liters. | numeric |
| timestamp | Optional value indicating the UTC date and time corresponding to the measurement. The date format must match one of those specified in the date formats section. If the field is omitted, the platform will assume the measurement corresponds to the current date and time. | text |
| mqttMethod | Método correspondiente del servicio, en este caso UpdateVolumeSensorStatus | string |
| mqttRID | Identificador opcional para la petición, en caso de que se desee obtener una respuesta de confirmación. | string |
Reporte de volumen en formato "raw" [#reporte-de-volumen-en-formato-raw]
El volumen puede ser reportado como un **valor crudo (raw),** utilizando el [conversor de expresiones](/docs/configuracion-del-cliente/dispositivos-y-endpoints/endpoints/conversion-de-datos-crudos-raw). Esta opción es conveniente cuando el dispositivo no es capaz de realizar conversiones, y emite valores que necesitan ser transformados antes de inyectarse en la plataforma.
A continuación, se muestra un ejemplo de una petición en formato raw:
```
{
"accessToken": "xxxxxxxxxxxxxxxxxxxxxxxxxxxxxxxxxxxxxxxx",
"endpointID": 1,
"rawData": "25",
"timestamp": "2021-02-23T14:55:03",
"mqttMethod": "UpdateVolumeSensorStatusRaw",
"mqttRID": "RXmp123"
}
```
Parameters [#parameters-1]
| Name | Description | Data Type |
| ----------- | ---------------------------------------------------------------------------------------------------------------------------------------------------------------------------------------------------------------------------------------------------------------------------- | --------- |
| accessToken | Access token with permissions to update endpoint information. See this page for more information. | text |
| endpointID | Unique endpoint identifier, which can be found on the endpoint management page. | numeric |
| rawData | Valor reportado por el sensor, como texto. Debe indicarse una expresión en el conversor de expresiones. La expresión debe devolver un valor numérico indicando el volumen medido, expresado en litros. | text |
| timestamp | Optional value indicating the UTC date and time corresponding to the measurement. The date format must match one of those specified in the date formats section. If the field is omitted, the platform will assume the measurement corresponds to the current date and time. | text |
| mqttMethod | Método correspondiente del servicio, en este caso UpdateVolumeSensorStatusRaw | string |
| mqttRID | Identificador opcional para la petición, en caso de que se desee obtener una respuesta de confirmación. | string |
# Generic Sensors de flujo
> The integration de sensores de flujo genéricos utiliza la misma API que los sensores de flujo no-genéricos. La única diferencia es que los sensores genéricos deben informar el flujo utilizando la unidad de medida correspondiente a la variable genérica asociada al sensor.
Reporte de flujo acumulado en unidades [#reporte-de-flujo-acumulado-en-unidades]
The integration de sensores genéricos de flujo por MQTT lleva la siguiente estructura, que es idéntica a la de los sensores de flujo no-genéricos:
```
{
"accessToken": "xxxxxxxxxxxxxxxxxxxxxxxxxxxxxxxxxxxxxxxx",
"endpointID": 1,
"summationValue": 112685,
"timestamp": "2021-02-23T14:55:03",
"mqttMethod": "UpdateFlowSensorValueSummation",
"mqttRID": "tkrs34"
}
```
Parameters [#parameters]
| Name | Description | Data Type |
| -------------- | ---------------------------------------------------------------------------------------------------------------------------------------------------------------------------------------------------------------------------------------------------------------------------- | --------- |
| accessToken | Access token with permissions to update endpoint information. See this page for more information. | text |
| endpointID | Unique endpoint identifier or combination of device address and endpoint address in format \[deviceAddress]:endpointAddress (e.g.: \[device-1234]:1). These values can be found on the endpoint management page. | text |
| summationValue | Valor acumulado de flujo informado por el sensor. Las unidades son las mismas que las elegidas para la variable genérica asociada al sensor. | numeric |
| timestamp | Optional value indicating the UTC date and time corresponding to the measurement. The date format must match one of those specified in the date formats section. If the field is omitted, the platform will assume the measurement corresponds to the current date and time. | text |
| mqttMethod | Método correspondiente del servicio, en este caso UpdateFlowSensorValueSummation | string |
| mqttRID | Identificador opcional para la petición, en caso de que se desee obtener una respuesta de confirmación. | string |
Reporte de flujo acumulado en formato "raw" [#reporte-de-flujo-acumulado-en-formato-raw]
El flujo puede ser reportado como un **valor crudo (raw),** utilizando el [conversor de expresiones](/docs/configuracion-del-cliente/dispositivos-y-endpoints/endpoints/conversion-de-datos-crudos-raw). Esta opción es conveniente cuando el dispositivo no es capaz de realizar conversiones, y emite valores que necesitan ser transformados antes de inyectarse en la plataforma.
A continuación, se muestra un ejemplo de una petición en formato raw:
```
{
"accessToken": "xxxxxxxxxxxxxxxxxxxxxxxxxxxxxxxxxxxxxxxx",
"endpointID": 1,
"rawData": "112685",
"timestamp": "2021-02-23T14:55:03",
"mqttMethod": "UpdateFlowSensorValueSummationRaw",
"mqttRID": "tkrs34"
}
```
Parameters [#parameters-1]
| Name | Description | Data Type |
| ----------- | ----------------------------------------------------------------------------------------------------------------------------------------------------------------------------------------------------------------------------------------------------------------------------------------- | --------- |
| accessToken | Access token with permissions to update endpoint information. See this page for more information. | text |
| endpointID | Unique endpoint identifier, which can be found on the endpoint management page. | numeric |
| rawData | Valor reportado por el sensor, como texto. Debe indicarse una expresión en el conversor de expresiones. La expresión debe devolver un valor numérico indicando el valor acumulado de flujo informado por el sensor, expresado en las unidades de la variable genérica asociada al sensor. | text |
| timestamp | Optional value indicating the UTC date and time corresponding to the measurement. The date format must match one of those specified in the date formats section. If the field is omitted, the platform will assume the measurement corresponds to the current date and time. | text |
| mqttMethod | Método correspondiente del servicio, en este caso UpdateFlowSensorValueSummationRaw | string |
| mqttRID | Identificador opcional para la petición, en caso de que se desee obtener una respuesta de confirmación. | string |
# Generic Sensors
Reporting Generic Sensor Value [#reporting-generic-sensor-value]
The integration de sensores genéricos por MQTT uses the following structure:
```
{
"accessToken": "xxxxxxxxxxxxxxxxxxxxxxxxxxxxxxxxxxxxxxxx",
"endpointID": 1,
"value": 45,
"timestamp": "2021-02-23T14:55:03",
"mqttMethod": "UpdateGenericSensorStatus",
"mqttRID": "tkrs34"
}
```
Parameters [#parameters]
| Name | Description | Data Type |
| ----------- | ---------------------------------------------------------------------------------------------------------------------------------------------------------------------------------------------------------------------------------------------------------------------------- | --------- |
| accessToken | Access token with permissions to update endpoint information. See this page for more information. | text |
| endpointID | Unique endpoint identifier or combination of device address and endpoint address in format \[deviceAddress]:endpointAddress (e.g.: \[device-1234]:1). These values can be found on the endpoint management page. | text |
| value | Valor genérico. La unidad de medida dependerá de lo que se establezca en la configuración del tipo de variable correspondiente al endpoint. | numeric |
| timestamp | Optional value indicating the UTC date and time corresponding to the measurement. The date format must match one of those specified in the date formats section. If the field is omitted, the platform will assume the measurement corresponds to the current date and time. | text |
| mqttMethod | Método correspondiente del servicio, en este caso UpdateGenericSensorStatus | string |
| mqttRID | Identificador opcional para la petición, en caso de que se desee obtener una respuesta de confirmación. | string |
Reporte de valor en formato "raw" [#reporte-de-valor-en-formato-raw]
El valor del sensor genérico puede ser reportado como un **valor crudo (raw),** utilizando el [conversor de expresiones](/docs/configuracion-del-cliente/dispositivos-y-endpoints/endpoints/conversion-de-datos-crudos-raw). Esta opción es conveniente cuando el dispositivo no es capaz de realizar conversiones, y emite valores que necesitan ser transformados antes de inyectarse en la plataforma.
A continuación, se muestra un ejemplo de una petición en formato raw:
```
{
"accessToken": "xxxxxxxxxxxxxxxxxxxxxxxxxxxxxxxxxxxxxxxx",
"endpointID": 1,
"rawData": "45",
"timestamp": "2021-02-23T14:55:03",
"mqttMethod": "UpdateGenericSensorStatusRaw",
"mqttRID": "tkrs34"
}
```
Parameters [#parameters-1]
| Name | Description | Data Type |
| ----------- | --------------------------------------------------------------------------------------------------------------------------------------------------------------------------------------------------------------------------------------------------------------------------------- | --------- |
| accessToken | Access token with permissions to update endpoint information. See this page for more information. | text |
| endpointID | Unique endpoint identifier, which can be found on the endpoint management page. | numeric |
| rawData | Valor reportado por el sensor, como texto. Debe indicarse una expresión en el conversor de expresiones. La expresión debe devolver un valor numérico. La unidad de medida dependerá de lo que se establezca en la configuración del tipo de variable correspondiente al endpoint. | text |
| timestamp | Optional value indicating the UTC date and time corresponding to the measurement. The date format must match one of those specified in the date formats section. If the field is omitted, the platform will assume the measurement corresponds to the current date and time. | text |
| mqttMethod | Método correspondiente del servicio, en este caso UpdateGenericSensorStatusRaw | string |
| mqttRID | Identificador opcional para la petición, en caso de que se desee obtener una respuesta de confirmación. | string |
# IAS Sensors (Motion, Occupancy, and Binary Sensors)
Reporting Sensor Status [#reporting-sensor-status]
The integration de sensores IAS MQTT uses the following structure:
```
{
"accessToken": "xxxxxxxxxxxxxxxxxxxxxxxxxxxxxxxxxxxxxxxx",
"endpointID": 1,
"state": 2,
"timestamp": "2021-02-23T14:55:03",
"mqttMethod": "UpdateIASSensorStatus",
"mqttRID": "Prafw6H"
}
```
Parameters [#parameters]
| Name | Description | Data Type |
| ----------- | ---------------------------------------------------------------------------------------------------------------------------------------------------------------------------------------------------------------------------------------------------------------------------------------------------------------------------------------------------------------------------------------------------------------------------------------------------------------------------------------------------------------------------------------------------------------------------------------------------------------------------------------------------------------------------------------------------------------------------------------------------------------------------------------------------------------- | --------- |
| accessToken | Access token with permissions to update endpoint information. See this page for more information. | text |
| endpointID | Unique endpoint identifier or combination of device address and endpoint address in format \[deviceAddress]:endpointAddress (e.g.: \[device-1234]:1). These values can be found on the endpoint management page. | text |
| state | Indicates the sensor status. The possible states are as follows:1: Inactive. The sensor detects no activity.2: Active. The sensor detects activity.3: En limpieza. El espacio asociado al sensor está siendo limpiado.4: Necesita limpieza. El espacio asociado al sensor necesita limpieza.5: En modo test. El sensor está actualmente en modo de prueba.6: Manipulado. El sensor ha sido manipulado y puede no estar funcionando correctamente.7: En mantenimiento. El sensor requiere mantenimiento y puede no estar funcionando correctamente.8: El sensor detecta que un vehículo está entrando a la plaza de estacionamiento.9: El sensor detecta que un vehículo está saliendo de la plaza de estacionamiento.10: El sensor informa que la plaza de estacionamiento se encuentra en estado de infracción. | numeric |
| timestamp | Optional value indicating the UTC date and time corresponding to the measurement. The date format must match one of those specified in the date formats section. If the field is omitted, the platform will assume the measurement corresponds to the current date and time. | text |
| mqttMethod | Método correspondiente del servicio, en este caso UpdateIASSensorStatus | string |
| mqttRID | Identificador opcional para la petición, en caso de que se desee obtener una respuesta de confirmación. | string |
Reporte de estado en formato "raw" [#reporte-de-estado-en-formato-raw]
El estado del sensor puede ser reportado como un **valor crudo (raw),** utilizando el [conversor de expresiones](/docs/configuracion-del-cliente/dispositivos-y-endpoints/endpoints/conversion-de-datos-crudos-raw). Esta opción es conveniente cuando el dispositivo no es capaz de realizar conversiones, y emite valores que necesitan ser transformados antes de inyectarse en la plataforma.
A continuación, se muestra un ejemplo de una petición en formato raw:
```
{
"accessToken": "xxxxxxxxxxxxxxxxxxxxxxxxxxxxxxxxxxxxxxxx",
"endpointID": 1,
"rawData": "2",
"timestamp": "2021-02-23T14:55:03",
"mqttMethod": "UpdateIASSensorStatusRaw",
"mqttRID": "RXmp123"
}
```
Parameters [#parameters-1]
| Name | Description | Data Type |
| ----------- | ---------------------------------------------------------------------------------------------------------------------------------------------------------------------------------------------------------------------------------------------------------------------------- | --------- |
| accessToken | Access token with permissions to update endpoint information. See this page for more information. | text |
| endpointID | Unique endpoint identifier, which can be found on the endpoint management page. | numeric |
| rawData | Valor reportado por el sensor, como texto. Debe indicarse una expresión en el conversor de expresiones. La expresión debe devolver un valor numérico que corresponda a los estados de la tabla que puede verse más arriba. | text |
| timestamp | Optional value indicating the UTC date and time corresponding to the measurement. The date format must match one of those specified in the date formats section. If the field is omitted, the platform will assume the measurement corresponds to the current date and time. | text |
| mqttMethod | Método correspondiente del servicio, en este caso UpdateIASSensorStatusRaw | string |
| mqttRID | Identificador opcional para la petición, en caso de que se desee obtener una respuesta de confirmación. | string |
# Date formats
The platform allows some flexibility in the use of date/time fields in the HTTP and MQTT APIs. Fields are always of type string, but the content can be specified using the formats described here. This section also describes characteristics related to UTC handling, time zone conversion, and other details.
Separators [#separators]
Date separator [#date-separator]
The characters "/" and "-" are accepted interchangeably as date separators.
Time separator [#time-separator]
The time separator must always be ":".
Date and time separator [#date-and-time-separator]
Optionally, a "**T**" character can be used to separate the date and time. The following two dates, for example, are equivalent:
```
2020-02-25 14:35:18
2020-02-25T14:35:18
```
Formats [#formats]
Date formats (without time) [#date-formats-without-time]
The platform supports the following formats for specifying a date.
| Format | Comments |
| ---------- | ----------------------------------------------------------------------------------------------------------------------------------------------------- |
| yyyy/M/d | Specifies the 4-digit year, followed by month and day, without using zeros to pad month and day. The date separator can be any of the supported ones. |
| yyyy/MM/dd | Specifies the 4-digit year, followed by month and day, using zeros to pad month and day. The date separator can be any of the supported ones. |
Time formats [#time-formats]
The platform supports the following formats for time.
| Format | Comments |
| -------- | --------------------------------------------------------------------------------------------------------------------------- |
| H:m | Time is specified in 24-hour format, providing hours and minutes, without zero-padding, using the time separator. |
| H:m:s | Time is specified in 24-hour format, providing hours, minutes, and seconds, without zero-padding, using the time separator. |
| HH:mm | Time is specified in 24-hour format, providing hours and minutes, with zero-padding, using the time separator. |
| HH:mm:ss | Time is specified in 24-hour format, providing hours, minutes, and seconds, with zero-padding, using the time separator. |
Epoch format [#epoch-format]
It is possible to specify a date and time in [epoch](https://en.wikipedia.org/wiki/Unix_time) format, that is, as the number of seconds since midnight on January 1, 1970, UTC. The epoch format is always expressed in UTC, and therefore does not allow time zone indication.
| Format | Comments |
| ---------- | ----------------------------------------------------------------------------------------------------------------------------------------------------------------------------------------------------------- |
| nnnnnnnnnn | Epoch format. In this format, the date and time are reported as a number of seconds from midnight on January 1, 1970, UTC. For example, the date "2010/10/23 02:47:25" corresponds to the value 1287802045. |
Time zone indication (optional) [#time-zone-indication-optional]
All APIs require the use of UTC dates and times. However, local times are allowed as long as they contain the time zone offset indication.
* For all dates and times that do not contain a time zone offset (or that contain the "Z" suffix), they will be assumed to be expressed in UTC.
* If a time zone offset is provided, it must consist of a "+" or "-" sign, followed by hours and minutes using the time separator between them.
* Time zone offsets are not compatible with epoch format. Epoch format must always be reported in UTC.
Below are some examples.
| Example | UTC value used | Comments |
| -------------------------- | -------------------------- | ------------------------------------------------------------------------------------------------------------------ |
| 2020-02-21 03:37:14 | 2020-02-21 03:37:14 (same) | No time indication, so UTC is assumed. Corresponds to 03:37:14 on February 21, 2020, UTC time. |
| 2020-02-21 03:37:14Z | 2020-02-21 03:37:14 (same) | The Z suffix indicates the time is expressed in UTC, so this example is equivalent to the previous one. |
| 2020-02-21 20:30:25 -05:00 | 2020/02/22 01:30:25 | Indicates a 5-hour offset to the west. Note that in UTC time, the date advances 5 hours and moves to the next day. |
| 2020-02-21 20:30:25 +05:00 | 2020-02-21 15:30:25 | Indicates a 5-hour offset to the east. |
# Data Formats
When using the APIs via HTTP and MQTT, certain data formats must be followed, as described below.
[Date formats](/docs/configuracion-del-cliente/dispositivos-y-endpoints/endpoints/conversion-de-datos-crudos-raw/expresiones/formatos-de-datos/formatos-de-fechas)
# Functions
Functions allow obtaining values through the transformation of others. The following is a list of functions divided into categories, according to their typical use.
Mathematical functions [#mathematical-functions]
| Function | Comments |
| ------------------- | ---------------------------------------------------------------- |
| CelsiusToFahrenheit | Converts a temperature in degrees Celsius to degrees Fahrenheit. |
| FahrenheitToCelsius | Converts a temperature in degrees Fahrenheit to degrees Celsius. |
| Max | Returns the maximum value among a series of values. |
| Min | Returns the minimum value among a series of values. |
| Power | Returns the result of raising a given number to a given power. |
| Round | Rounds a number to the specified number of decimal places. |
| Sqrt | Calculates the square root of a number. |
| Trunc | Truncates a number, removing the fractional part. |
String handling functions [#string-handling-functions]
| Function | Comments |
| ----------- | ----------------------------------------------------- |
| LowerCase | Converts all characters in a string to lowercase. |
| StringClean | Cleans a string by removing all unwanted characters. |
| StringPart | Returns a part of a string that contains sub-strings. |
| UpperCase | Converts all characters in a string to uppercase. |
Interpolation functions [#interpolation-functions]
| Function | Comments |
| ------------------- | ----------------------------------------------------------------- |
| LinearInterpolation | Performs a linear interpolation between a series of given points. |
JSON handling functions [#json-handling-functions]
| Function | Comments |
| --------- | ----------------------------------------------------------------- |
| JsonField | Gets the value of a field within a text expressed in JSON format. |
Other functions [#other-functions]
| Function | Comments |
| ----------- | ---------------------------------------------------------------- |
| Error | Generates an error condition containing the specified message. |
| HexToNumber | Converts a number in hexadecimal format (string) to a number. |
| If | Returns a value, between two given values, based on a condition. |
| ToBoolean | Converts a value of any type to boolean. |
| ToNumber | Converts a value of any type to numeric. |
| ToString | Converts a value of any type to string. |
# Operators
[Operators](https://en.wikipedia.org/wiki/Operator_\(computer_programming\)) allow creating expressions by modifying or calculating values from others, known as "operands".
Depending on the type of operation to perform, and/or the data type they apply to, operators can be classified as:
* **Arithmetic operators**. Applied in mathematical operations, and the result of their application is always a number.
* **Logical operators**. Applied in logical operations, and the result of their application is always a boolean value (true / false).
* **String operators**. Applied to strings, and the result of their application is always a string value.
* **Relational operators**. Applied in comparison operations, and the result of their application is always a boolean value (true / false).
Additionally, depending on the number of operands the operator acts on, they can be classified as:
* **Unary operators**. These operators act on a single operand.
* **Binary operators**. These operators act on two operands.
The following table summarizes the list of all operators available in the Gear Studio platform, classified by operation type. In each case, additional information can be obtained by clicking on the respective operator.
Arithmetic operators [#arithmetic-operators]
Arithmetic operators are applied in mathematical operations, and the result of their application is always a number.
| Operator | Explanation | Unary / Binary |
| -------- | ------------------------------------------------------------------------------------------------------------------------------------------------------------------------------------- | -------------- |
| + | Adds the two numbers on each side of the operator. | Binary |
| - | Takes the number to the left of the operator and subtracts the number to the right of the operator. | Binary |
| \* | Multiplies the two numbers on both sides of the operator. | Binary |
| / | Takes the number to the left of the operator and divides it by the number to the right of the operator. | Binary |
| MOD | Takes the number to the left of the operator, divides it by the number to the right of the operator, and returns the remainder of the division. | Binary |
| - | Sign change. This unary operator changes the sign of the operand to its right. | Unary |
| NOT | Takes the number given as a parameter, considered as a 32-bit integer, and inverts all bits. Commonly known as "bitwise NOT". | Unary |
| AND | Takes the operands on both sides of the operator, considered as 32-bit integers, and performs a logical AND operation for each bit of both operands. Commonly known as "bitwise AND". | Binary |
| OR | Takes the operands on both sides of the operator, considered as 32-bit integers, and performs a logical OR operation for each bit of both operands. Commonly known as "bitwise OR". | Binary |
| XOR | Takes the operands on both sides of the operator, considered as 32-bit integers, and performs a logical XOR operation for each bit of both operands. Commonly known as "bitwise XOR". | Binary |
Logical operators [#logical-operators]
Logical operators are applied in logical operations, and the result of their application is always a boolean value (true / false).
| Operator | Explanation | Unary / Binary |
| -------- | ------------------------------------------------------------------------------------------------------------------------------------------------------------------------------------------------------------- | -------------- |
| NOT | Computes the complement of the operand to the right of the operator. If the operand is true, the result is false and vice versa. | Unary |
| AND | Computes the logical AND operation between the operands on both sides of the operator. The AND operation results in a true value only when both operands have a true value, and false otherwise. | Binary |
| OR | Computes the logical OR operation between the operands on both sides of the operator. The OR operation results in a true value if at least one of the operands has a true value, and false in any other case. | Binary |
| XOR | Computes the logical XOR operation between the operands on both sides of the operator. The XOR operation results in a true value if only one of the operands has a true value, and false in any other case. | Binary |
String operators [#string-operators]
String operators are applied to character strings, and the result of their application is always a string value.
| Operator | Explanation | Unary / Binary |
| -------- | -------------------------------------------------------------------------------------------------------------------------------- | -------------- |
| + | Concatenates (joins) the operands on both sides of the operator, using the left one first, and then concatenating the right one. | Binary |
Relational operators [#relational-operators]
Relational operators are applied in comparison operations, and the result of their application is always a boolean value (true / false). They can be applied to any data type, but in all cases, both operands must be of the same type. It is important to remember some comparison rules:
* When comparing boolean values, the value true is considered greater than the value false.
* For string values, a string is considered greater than another if it is sorted alphabetically after the other.
| Operator | Explanation | Unary / Binary |
| -------- | ------------------------------------------------------------------------------------------------------------------------------------- | -------------- |
| `>` | Compares the operands on both sides of the operator and returns true when the left operand is greater than the right one. | Binary |
| `>=` | Compares the operands on both sides of the operator and returns true when the left operand is greater than or equal to the right one. | Binary |
| `<` | Compares the operands on both sides of the operator and returns true when the left operand is less than the right one. | Binary |
| `<=` | Compares the operands on both sides of the operator and returns true when the left operand is less than or equal to the right one. | Binary |
| `=` | Compares the operands on both sides of the operator and returns true when both are equal. | Binary |
| `<>` | Compares the operands on both sides of the operator and returns true when both are different. | Binary |
# Arithmetic operators
Arithmetic operators [#arithmetic-operators]
Arithmetic operators are applied in mathematical operations, and the result of their application is always a number.
| Operator | Explanation | Unary / Binary |
| -------- | ------------------------------------------------------------------------------------------------------------------------------------------------------------------------------------- | -------------- |
| + | Adds the two numbers on each side of the operator. | Binary |
| - | Takes the number to the left of the operator and subtracts the number to the right of the operator. | Binary |
| \* | Multiplies the two numbers on both sides of the operator. | Binary |
| / | Takes the number to the left of the operator and divides it by the number to the right of the operator. | Binary |
| MOD | Takes the number to the left of the operator, divides it by the number to the right of the operator, and returns the remainder of the division. | Binary |
| - | Sign change. This unary operator changes the sign of the operand to its right. | Unary |
| NOT | Takes the number given as a parameter, considered as a 32-bit integer, and inverts all bits. Commonly known as "bitwise NOT". | Unary |
| AND | Takes the operands on both sides of the operator, considered as 32-bit integers, and performs a logical AND operation for each bit of both operands. Commonly known as "bitwise AND". | Binary |
| OR | Takes the operands on both sides of the operator, considered as 32-bit integers, and performs a logical OR operation for each bit of both operands. Commonly known as "bitwise OR". | Binary |
| XOR | Takes the operands on both sides of the operator, considered as 32-bit integers, and performs a logical XOR operation for each bit of both operands. Commonly known as "bitwise XOR". | Binary |
# Logical operators
Logical operators [#logical-operators]
Logical operators are applied in logical operations, and the result of their application is always a boolean value (true / false).
| Operator | Explanation | Unary / Binary |
| -------- | ------------------------------------------------------------------------------------------------------------------------------------------------------------------------------------------------------------- | -------------- |
| NOT | Computes the complement of the operand to the right of the operator. If the operand is true, the result is false and vice versa. | Unary |
| AND | Computes the logical AND operation between the operands on both sides of the operator. The AND operation results in a true value only when both operands have a true value, and false otherwise. | Binary |
| OR | Computes the logical OR operation between the operands on both sides of the operator. The OR operation results in a true value if at least one of the operands has a true value, and false in any other case. | Binary |
| XOR | Computes the logical XOR operation between the operands on both sides of the operator. The XOR operation results in a true value if only one of the operands has a true value, and false in any other case. | Binary |
# String operators
String operators [#string-operators]
String operators are applied to character strings, and the result of their application is always a string value.
| Operator | Explanation | Unary / Binary |
| -------- | -------------------------------------------------------------------------------------------------------------------------------- | -------------- |
| + | Concatenates (joins) the operands on both sides of the operator, using the left one first, and then concatenating the right one. | Binary |
# Relational operators
Relational operators [#relational-operators]
Relational operators are applied in comparison operations, and the result of their application is always a boolean value (true / false). They can be applied to any data type, but in all cases, both operands must be of the same type. It is important to remember some comparison rules:
* When comparing boolean values, the value true is considered greater than the value false.
* For string values, a string is considered greater than another if it is sorted alphabetically after the other.
| Operator | Explanation | Unary / Binary |
| -------- | ------------------------------------------------------------------------------------------------------------------------------------- | -------------- |
| `>` | Compares the operands on both sides of the operator and returns true when the left operand is greater than the right one. | Binary |
| `>=` | Compares the operands on both sides of the operator and returns true when the left operand is greater than or equal to the right one. | Binary |
| `<` | Compares the operands on both sides of the operator and returns true when the left operand is less than the right one. | Binary |
| `<=` | Compares the operands on both sides of the operator and returns true when the left operand is less than or equal to the right one. | Binary |
| `=` | Compares the operands on both sides of the operator and returns true when both are equal. | Binary |
| `<>` | Compares the operands on both sides of the operator and returns true when both are different. | Binary |
# Battery and RSSI Status
Report the RSSI Status and/or Battery Level of a Device [#report-the-rssi-status-andor-battery-level-of-a-device]
This method does not store a history of the status; it only takes the last reported value and displays it on the platform. That is, if 3 batteries were reported in the first request and only one is reported in the second request, then it is assumed that the device now has only one battery. The same applies to RSSI. If empty arrays are sent, it will be assumed that there is no battery level or RSSI record and previously reported data will be cleared.
The HTTP integration for RSSI status and battery level uses the following structure:
```
POST /services/gear/DeviceIntegrationService.svc/UpdateDeviceStatus HTTP/1.1
Host: gear-dev.cloud.studio
Content-Type: application/json
{
"accessToken": "xxxxxxxxxxxxxxxxxxxxxxxxxxxxxxxxxxxxxxxx",
"deviceID": 1,
"battery": [
{
"type": 2,
"percentage": 30,
"voltage": 3.5
},
{
"type": 3,
"percentage": 100,
"voltage": 5
}
],
"rssi": [
{
"type": 2,
"quality": 100,
"strength": -40
}
]
}
```
Parameters [#parameters]
| Name | Description | Data Type |
| ----------- | ------------------------------------------------------------------------------------------------------------------------------------------------------- | --------- |
| accessToken | Access token with permissions to update endpoint information. See this page for more information. | text |
| deviceID | Unique device identifier or device address in format \[deviceAddress] (e.g.: \[device-1234]). These values can be found on the device management page. | number |
| battery | List of statuses for the device's different batteries. One or more can be sent. Property descriptions for this parameter can be found below. | array |
| rssi | List of statuses for the device's different wireless connections. One or more can be sent. Property descriptions for this parameter can be found below. | array |
"battery" Array Parameter [#battery-array-parameter]
In each element of this array, at least "percentage" or "voltage" must be reported. Type is mandatory.
| Name | Description | Data Type |
| ---------- | ------------------------------------------------------------------------------------------------------------------------------------------------------------------------------------------------------------------------- | --------- |
| type | Type of battery being reported. Allowed types are: 0: Unknown. If this value is sent, it will automatically be changed to 1. 1: Default. 2: Primary. 3: Secondary. 4: Backup. Types cannot be repeated in the same array. | number |
| percentage | Numeric value of the remaining battery percentage. | number |
| voltage | Numeric value of the current battery voltage. | number |
"rssi" Array Parameter [#rssi-array-parameter]
In each element of this array, at least "quality" or "strength" must be reported. Type is mandatory.
| Name | Description | Data Type |
| -------- | -------------------------------------------------------------------------------------------------------------------------------------------------------------------------------------------------------------------------------------------------------------------------------------------------------------------- | --------- |
| type | Represents a type of wireless technology where RSSI can be measured. Allowed values are: 0: Unknown. If this value is sent, it will automatically be changed to 1. 1: Default. 2: WiFi. 3: LoRaWAN. 4: Cellular (2G/3G/4G/5G/Cat-M/NB-IoT/etc). 5: ZigBee. 6: Custom RF. Types cannot be repeated in the same array. | number |
| quality | Numeric value representing signal quality. From 0 to 100. If this value is not provided but the "strength" parameter is, this parameter's value will be auto-calculated. | number |
| strength | Numeric value representing signal strength in dBm (negative). If the provided value is positive, its sign will be changed. If this value is not provided but the "quality" parameter is, this parameter's value will be auto-calculated. | number |
# Device Data Update
Introduction [#introduction]
This section describes the options for updating device information, such as geographic location, battery level, or signal level. For more information, see the following sections:
[Battery and RSSI Status](/docs/configuracion-del-cliente/dispositivos-y-endpoints/dispositivos/integracion-de-dispositivos/http/api-http/actualizacion-de-datos-del-dispositivo/estado-de-bateria-y-rssi)
[Geographic Location](/docs/configuracion-del-cliente/dispositivos-y-endpoints/dispositivos/integracion-de-dispositivos/http/api-http/actualizacion-de-datos-del-dispositivo/ubicacion-geografica)
# Geographic Location
Report the Geographic Location of a Device [#report-the-geographic-location-of-a-device]
This method allows updating the current location of the device on the platform. Location history is not stored.
The HTTP device location update uses the following structure:
```
POST /services/gear/DeviceIntegrationService.svc/UpdateDeviceGeolocation HTTP/1.1
Host: gear.cloud.studio
Content-Type: application/json
{
"accessToken": "xxxxxxxxxxxxxxxxxxxxxxxxxxxxxxxxxxxxxxxx",
"deviceID": 1,
"latitude": 40.4052,
"longitude": -3.87699
}
```
Parameters [#parameters]
| Name | Description | Data Type |
| ----------- | ------------------------------------------------------------------------------------------------------------------------------------------------------ | --------- |
| accessToken | Access token with permissions to update endpoint information. See this page for more information. | text |
| deviceID | Unique device identifier or device address in format \[deviceAddress] (e.g.: \[device-1234]). These values can be found on the device management page. | number |
| latitude | Indicates the latitude of the device's current location. | number |
| longitude | Indicates the longitude of the device's current location. | number |
Example [#example]
We choose a device to modify; in this case, we choose one named "Interwave Tracker Test 1". The parameter we need is the device's "DeviceID", which in this case is "23712".
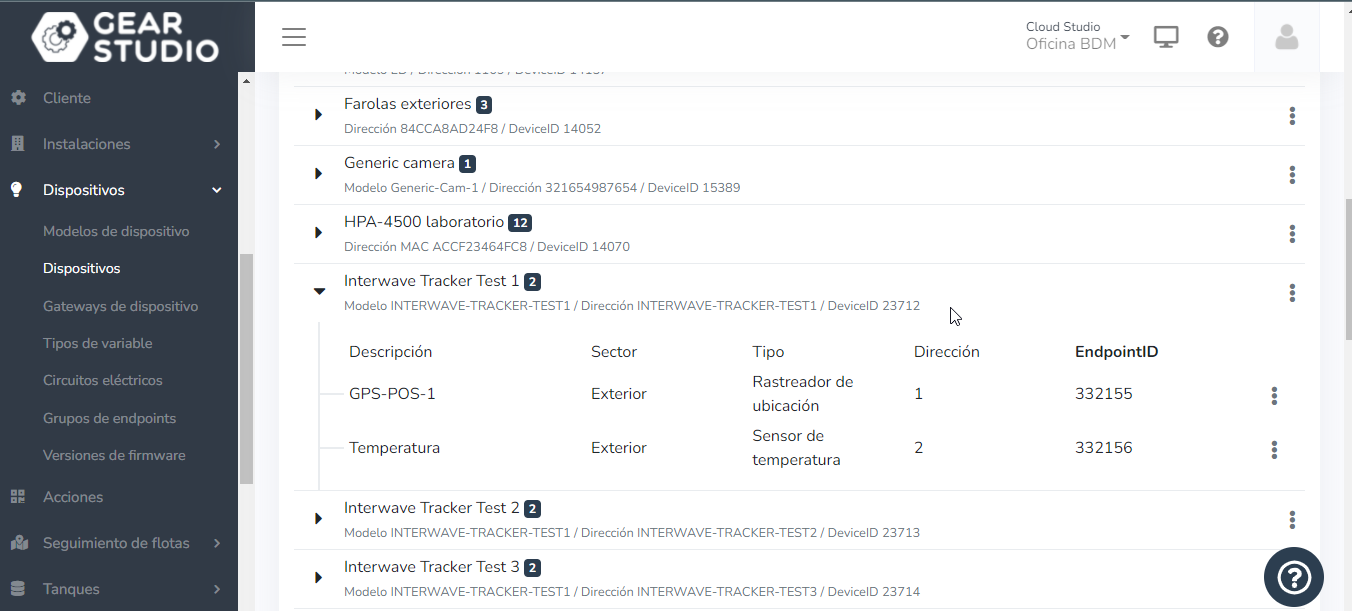
Open Postman and use the "UpdateDeviceGeolocation" method, enter the accessToken, the DeviceId (which in this case is 23712), and then send the longitude and latitude of the device. Once the data is loaded, press "Send" and the device will change position.
_fac2.png)
This position change can be viewed on the device map.
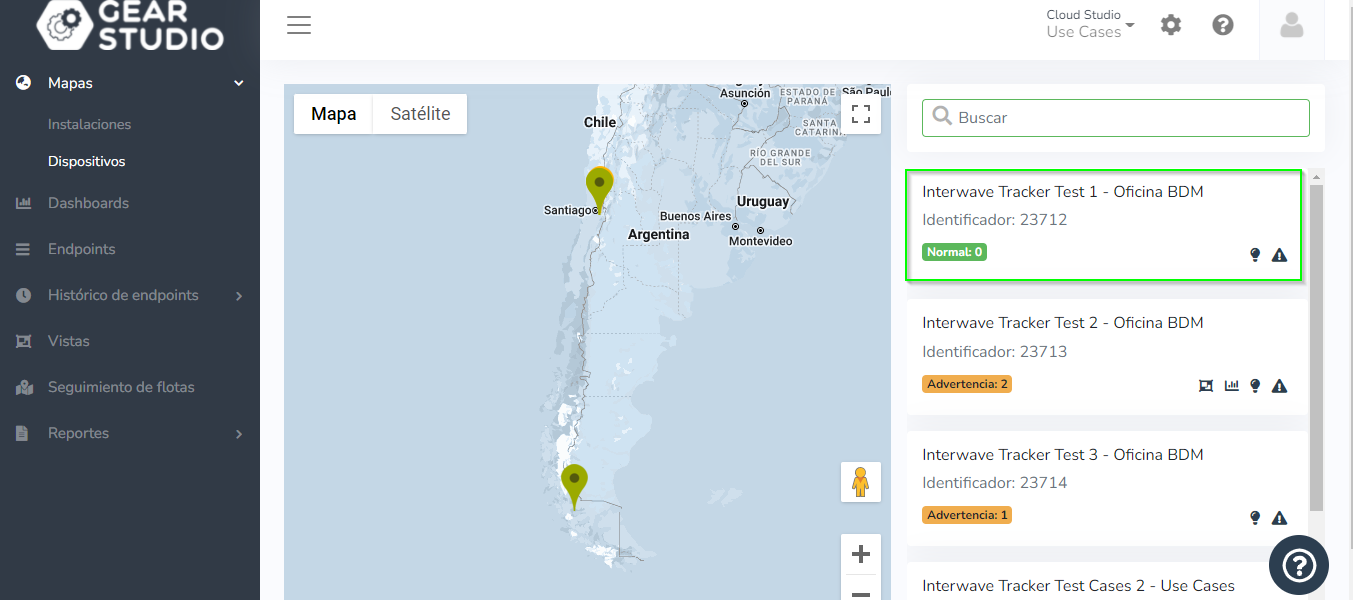
# Air Quality Index (AQI) Sensors
Reporting Endpoint Status [#reporting-endpoint-status]
The HTTP integration of air quality (AQI) sensors uses the following structure:
```
POST /services/gear/DeviceIntegrationService.svc/UpdateAirQualitySensorStatus HTTP/1.1
Host: gear.cloud.studio
Content-Type: application/json
{
"accessToken": "xxxxxxxxxxxxxxxxxxxxxxxxxxxxxxxxxxxxxxxx",
"endpointID": 1,
"index": 15,
"timestamp": "2021-02-23T14:55:03"
}
```
Parameters [#parameters]
| Name | Description | Data Type |
| ----------- | ---------------------------------------------------------------------------------------------------------------------------------------------------------------------------------------------------------------------------------------------------------------------------- | --------- |
| accessToken | Access token with permissions to update endpoint information. See this page for more information. | text |
| endpointID | Unique endpoint identifier or combination of device address and endpoint address in format \[deviceAddress]:endpointAddress (e.g.: \[device-1234]:1). These values can be found on the endpoint management page. | numeric |
| index | Indica el valor del índice de calidad del aire, el valor deber ser entre 0 a 500, expresada en AQI:0-50: Buena51-100: Moderada101-150: Insalubre para grupos sensibles151-200: Insalubre201-300: Muy insalubre301-500: Peligrosa | numeric |
| timestamp | Optional value indicating the UTC date and time corresponding to the measurement. The date format must match one of those specified in the date formats section. If the field is omitted, the platform will assume the measurement corresponds to the current date and time. | text |
Reporting Status in "raw" Format [#reporting-status-in-raw-format]
El estado del endpoint can be reported as a **raw value** using the [expression converter](/docs/configuracion-del-cliente/dispositivos-y-endpoints/endpoints/conversion-de-datos-crudos-raw). This option is convenient when the device is unable to perform conversions and emits values that need to be transformed before being injected into the platform.
Below is an example of a raw format request:
```
POST /services/gear/DeviceIntegrationService.svc/UpdateAirQualitySensorStatusRaw HTTP/1.1
Host: gear.cloud.studio
Content-Type: application/json
{
"accessToken": "xxxxxxxxxxxxxxxxxxxxxxxxxxxxxxxxxxxxxxxx",
"endpointID": 1,
"rawData": "15",
"timestamp": "2021-02-23T14:55:03"
}
```
Parameters [#parameters-1]
| Name | Description | Data Type |
| ----------- | ---------------------------------------------------------------------------------------------------------------------------------------------------------------------------------------------------------------------------------------------------------------------------------------------------------------------------------------------- | --------- |
| accessToken | Access token with permissions to update endpoint information. See this page for more information. | text |
| endpointID | Unique endpoint identifier, which can be found on the endpoint management page. | numeric |
| rawData | Value reported by the sensor, as text. An expression must be specified in the expression converter. La expresión debe devolver un valor numérico indicando la calidad del aire (entre 0 a 500), expresada en AQI.0-50: Buena51-100: Moderada101-150: Insalubre para grupos sensibles151-200: Insalubre201-300: Muy insalubre301-500: Peligrosa | text |
| timestamp | Optional value indicating the UTC date and time corresponding to the measurement. The date format must match one of those specified in the date formats section. If the field is omitted, the platform will assume the measurement corresponds to the current date and time. | text |
# Appliances and Other On/Off Devices
Reporting Endpoint Status [#reporting-endpoint-status]
The HTTP integration of appliances and other on/off devices (valves, lamps, motors, etc.) uses the following structure:
```
POST /services/gear/DeviceIntegrationService.svc/UpdateApplianceStatus HTTP/1.1
Host: gear.cloud.studio
Content-Type: application/json
{
"accessToken": "xxxxxxxxxxxxxxxxxxxxxxxxxxxxxxxxxxxxxxxx",
"endpointID": 1,
"isOn": true,
"timestamp": "2021-02-23T14:55:03"
}
```
Parameters [#parameters]
| Name | Description | Data Type |
| ----------- | ---------------------------------------------------------------------------------------------------------------------------------------------------------------------------------------------------------------------------------------------------------------------------- | --------- |
| accessToken | Access token with permissions to update endpoint information. See this page for more information. | text |
| endpointID | Unique endpoint identifier or combination of device address and endpoint address in format \[deviceAddress]:endpointAddress (e.g.: \[device-1234]:1). These values can be found on the endpoint management page. | numeric |
| isOn | Indica si el artefacto está encendido (true) o apagado (false) | bool |
| timestamp | Optional value indicating the UTC date and time corresponding to the measurement. The date format must match one of those specified in the date formats section. If the field is omitted, the platform will assume the measurement corresponds to the current date and time. | text |
Reporting Status in "raw" Format [#reporting-status-in-raw-format]
El estado del endpoint can be reported as a **raw value** using the [expression converter](/docs/configuracion-del-cliente/dispositivos-y-endpoints/endpoints/conversion-de-datos-crudos-raw). This option is convenient when the device is unable to perform conversions and emits values that need to be transformed before being injected into the platform.
Below is an example of a raw format request:
```
POST /services/gear/DeviceIntegrationService.svc/UpdateApplianceStatusRaw HTTP/1.1
Host: gear.cloud.studio
Content-Type: application/json
{
"accessToken": "xxxxxxxxxxxxxxxxxxxxxxxxxxxxxxxxxxxxxxxx",
"endpointID": 1,
"rawData": "true",
"timestamp": "2021-02-23T14:55:03"
}
```
Parameters [#parameters-1]
| Name | Description | Data Type |
| ----------- | ---------------------------------------------------------------------------------------------------------------------------------------------------------------------------------------------------------------------------------------------------------------------------- | --------- |
| accessToken | Access token with permissions to update endpoint information. See this page for more information. | text |
| endpointID | Unique endpoint identifier, which can be found on the endpoint management page. | numeric |
| rawData | Value reported by the sensor, as text. An expression must be specified in the expression converter. La expresión debe devolver un valor booleano indicando si el artefacto está encendido (true) o apagado (false). | text |
| timestamp | Optional value indicating the UTC date and time corresponding to the measurement. The date format must match one of those specified in the date formats section. If the field is omitted, the platform will assume the measurement corresponds to the current date and time. | text |
# Cameras
Storing Snapshots [#storing-snapshots]
The HTTP integration of cameras allows storing snapshots using the following structure:
```
POST /services/gear/DeviceIntegrationService.svc/UploadCameraSnapshot HTTP/1.1
Host: gear.cloud.studio
Content-Type: application/json
{
"accessToken": "xxxxxxxxxxxxxxxxxxxxxxxxxxxxxxxxxxxxxxxx",
"endpointID": 1,
"fileType": "jpg",
"content": "/9j/4QB4RXhpZgAATU0AKgAAAAgABAEAAAQAAAABAAAFAAEBAAQAAAABAAAC0IdpAAQAAAA....[truncated]....",
"timestamp": "2021-02-23T14:55:03"
}
```
Parameters [#parameters]
| Name | Description | Data Type |
| ----------- | ----------------------------------------------------------------------------------------------------------------------------------------------------------------------------------------------------------------------------------------------------------- | --------- |
| accessToken | Access token with permissions to update endpoint information. See this page for more information. | text |
| endpointID | Unique endpoint identifier or combination of device address and endpoint address in format \[deviceAddress]:endpointAddress (e.g.: \[device-1234]:1). These values can be found on the endpoint management page. | numeric |
| fileType | Tipo de archivo que se está almacenando, por ejemplo “jpg”, o “png”. | text |
| content | Contenido binario del snapshot, en formato base/64. Nota: en el ejemplo más arriba, el campo “content” está truncado para más legibilidad. | text |
| timestamp | Optional value indicating the UTC date and time of the snapshot. The date format must match one of those specified in the date formats section. If the field is omitted, the platform will assume the measurement corresponds to the current date and time. | text |
# People Counters
Reporting Endpoint Status [#reporting-endpoint-status]
The HTTP integration of people counters uses the following structure:
```
POST /services/gear/DeviceIntegrationService.svc/UpdatePeopleCounterStatus HTTP/1.1
Host: gear.cloud.studio
Content-Type: application/json
{
"accessToken": "xxxxxxxxxxxxxxxxxxxxxxxxxxxxxxxxxxxxxxxx",
"endpointID": 1,
"peopleCount": 25,
"timestamp": "2021-02-23T14:55:03"
}
```
Parameters [#parameters]
| Name | Description | Data Type |
| ----------- | ---------------------------------------------------------------------------------------------------------------------------------------------------------------------------------------------------------------------------------------------------------------------------- | --------- |
| accessToken | Access token with permissions to update endpoint information. See this page for more information. | text |
| endpointID | Unique endpoint identifier or combination of device address and endpoint address in format \[deviceAddress]:endpointAddress (e.g.: \[device-1234]:1). These values can be found on the endpoint management page. | numeric |
| peopleCount | Indica la cantidad de personas detectadas por el sensor. | numeric |
| timestamp | Optional value indicating the UTC date and time corresponding to the measurement. The date format must match one of those specified in the date formats section. If the field is omitted, the platform will assume the measurement corresponds to the current date and time. | text |
Reporting Status in "raw" Format [#reporting-status-in-raw-format]
El estado del endpoint can be reported as a **raw value** using the [expression converter](/docs/configuracion-del-cliente/dispositivos-y-endpoints/endpoints/conversion-de-datos-crudos-raw). This option is convenient when the device is unable to perform conversions and emits values that need to be transformed before being injected into the platform.
Below is an example of a raw format request:
```
POST /services/gear/DeviceIntegrationService.svc/UpdatePeopleCounterStatusRaw HTTP/1.1
Host: gear.cloud.studio
Content-Type: application/json
{
"accessToken": "xxxxxxxxxxxxxxxxxxxxxxxxxxxxxxxxxxxxxxxx",
"endpointID": 1,
"rawData": "15.3",
"timestamp": "2021-02-23T14:55:03"
}
```
Parameters [#parameters-1]
| Name | Description | Data Type |
| ----------- | ---------------------------------------------------------------------------------------------------------------------------------------------------------------------------------------------------------------------------------------------------------------------------- | --------- |
| accessToken | Access token with permissions to update endpoint information. See this page for more information. | text |
| endpointID | Unique endpoint identifier, which can be found on the endpoint management page. | numeric |
| rawData | Value reported by the sensor, as text. An expression must be specified in the expression converter. La expresión debe devolver un valor numérico indicando la cantidad de personas detectadas por el sensor. | text |
| timestamp | Optional value indicating the UTC date and time corresponding to the measurement. The date format must match one of those specified in the date formats section. If the field is omitted, the platform will assume the measurement corresponds to the current date and time. | text |
# Curtain and Closure Controllers
Reporting Endpoint Status [#reporting-endpoint-status]
The HTTP integration of curtain controllers and other closures uses the following structure:
```
POST /services/gear/DeviceIntegrationService.svc/UpdateClosureControllerStatus HTTP/1.1
Host: gear.cloud.studio
Content-Type: application/json
{
"accessToken": "xxxxxxxxxxxxxxxxxxxxxxxxxxxxxxxxxxxxxxxx",
"endpointID": 1,
"position": 75,
"isMoving": true,
"timestamp": "2021-02-23T14:55:03"
}
```
Parameters [#parameters]
| Name | Description | Data Type |
| ----------- | ---------------------------------------------------------------------------------------------------------------------------------------------------------------------------------------------------------------------------------------------------------------------------- | --------- |
| accessToken | Access token with permissions to update endpoint information. See this page for more information. | text |
| endpointID | Unique endpoint identifier or combination of device address and endpoint address in format \[deviceAddress]:endpointAddress (e.g.: \[device-1234]:1). These values can be found on the endpoint management page. | numeric |
| position | Indica la posición actual del cerramiento como porcentaje, entre 0 (completamente cerrado) y 100 (completamente abierto). | bool |
| isMoving | Indica si el cerramiento está actualmente en movimiento. El valor true indica que el cerramiento está siendo cerrado o abierto, mientras que el valor false indica que está detenido. | numeric |
| timestamp | Optional value indicating the UTC date and time corresponding to the measurement. The date format must match one of those specified in the date formats section. If the field is omitted, the platform will assume the measurement corresponds to the current date and time. | text |
Reporting Status in "raw" Format [#reporting-status-in-raw-format]
El estado del endpoint can be reported as a **raw value** using the [expression converter](/docs/configuracion-del-cliente/dispositivos-y-endpoints/endpoints/conversion-de-datos-crudos-raw). This option is convenient when the device is unable to perform conversions and emits values that need to be transformed before being injected into the platform.
Below is an example of a raw format request:
```
POST /services/gear/DeviceIntegrationService.svc/UpdateClosureControllerStatus HTTP/1.1
Host: gear.cloud.studio
Content-Type: application/json
{
"accessToken": "xxxxxxxxxxxxxxxxxxxxxxxxxxxxxxxxxxxxxxxx",
"endpointID": 1,
"rawData": "75/true",
"timestamp": "2021-02-23T14:55:03"
}
```
Parameters [#parameters-1]
| Name | Description | Data Type |
| ----------- | ---------------------------------------------------------------------------------------------------------------------------------------------------------------------------------------------------------------------------------------------------------------------------------------------------------------------------------------------------------------------------------------------------------------------------------------------------------------------------------------------------------------------------------------- | --------- |
| accessToken | Access token with permissions to update endpoint information. See this page for more information. | text |
| endpointID | Unique endpoint identifier, which can be found on the endpoint management page. | numeric |
| rawData | Valor reportado por el sensor, como texto. Deben indicarse dos expresiones en el conversor de expresiones:La primera expresión debe devolver un valor numérico indicando la posición actual del cerramiento como porcentaje, entre 0 (completamente cerrado) y 100 (completamente abierto).La segunda expresión debe devolver un valor booleano indicando si el cerramiento está actualmente en movimiento. El valor true indica que el cerramiento está siendo cerrado o abierto, mientras que el valor false indica que está detenido. | text |
| timestamp | Optional value indicating the UTC date and time corresponding to the measurement. The date format must match one of those specified in the date formats section. If the field is omitted, the platform will assume the measurement corresponds to the current date and time. | text |
# Dimmers
Reporting Endpoint Status [#reporting-endpoint-status]
The HTTP integration of dimmers and other similar devices (speed controllers, etc.) uses the following structure:
```
POST /services/gear/DeviceIntegrationService.svc/UpdateDimmerStatus HTTP/1.1
Host: gear.cloud.studio
Content-Type: application/json
{
"accessToken": "xxxxxxxxxxxxxxxxxxxxxxxxxxxxxxxxxxxxxxxx",
"endpointID": 1,
"isOn": true,
"dimValue": 75,
"timestamp": "2021-02-23T14:55:03"
}
```
Parameters [#parameters]
| Name | Description | Data Type |
| ----------- | ---------------------------------------------------------------------------------------------------------------------------------------------------------------------------------------------------------------------------------------------------------------------------- | --------- |
| accessToken | Access token with permissions to update endpoint information. See this page for more information. | text |
| endpointID | Unique endpoint identifier or combination of device address and endpoint address in format \[deviceAddress]:endpointAddress (e.g.: \[device-1234]:1). These values can be found on the endpoint management page. | numeric |
| isOn | Indica si el artefacto está encendido (true) o apagado (false) | bool |
| dimValue | Indica el nivel de dimerización, como porcentaje entre 1 y 100. | numeric |
| timestamp | Optional value indicating the UTC date and time corresponding to the measurement. The date format must match one of those specified in the date formats section. If the field is omitted, the platform will assume the measurement corresponds to the current date and time. | text |
Reporting Status in "raw" Format [#reporting-status-in-raw-format]
El estado del endpoint can be reported as a **raw value** using the [expression converter](/docs/configuracion-del-cliente/dispositivos-y-endpoints/endpoints/conversion-de-datos-crudos-raw). This option is convenient when the device is unable to perform conversions and emits values that need to be transformed before being injected into the platform.
Below is an example of a raw format request:
```
POST /services/gear/DeviceIntegrationService.svc/UpdateDimmerStatusRaw HTTP/1.1
Host: gear.cloud.studio
Content-Type: application/json
{
"accessToken": "xxxxxxxxxxxxxxxxxxxxxxxxxxxxxxxxxxxxxxxx",
"endpointID": 1,
"rawData": "true/75",
"timestamp": "2021-02-23T14:55:03"
}
```
Parameters [#parameters-1]
| Name | Description | Data Type |
| ----------- | -------------------------------------------------------------------------------------------------------------------------------------------------------------------------------------------------------------------------------------------------------------------------------------------------------------------------------------------------------------------- | --------- |
| accessToken | Access token with permissions to update endpoint information. See this page for more information. | text |
| endpointID | Unique endpoint identifier, which can be found on the endpoint management page. | numeric |
| rawData | Valor reportado por el sensor, como texto. Deben indicarse dos expresiones en el conversor de expresiones:La primera expresión debe devolver un valor booleano indicando si el artefacto está encendido (true) o apagado (false).La segunda expresión debe devolver un valor numérico indicando el nivel de dimerización del aparato, como porcentaje entre 1 y 100. | text |
| timestamp | Optional value indicating the UTC date and time corresponding to the measurement. The date format must match one of those specified in the date formats section. If the field is omitted, the platform will assume the measurement corresponds to the current date and time. | text |
# Frequency Meters
Reporting Frequency in Hertz [#reporting-frequency-in-hertz]
The HTTP integration of frequency meters uses the following structure:
```
POST /services/gear/DeviceIntegrationService.svc/UpdateFrequencySensorStatus HTTP/1.1
Host: gear.cloud.studio
Content-Type: application/json
{
"accessToken": "xxxxxxxxxxxxxxxxxxxxxxxxxxxxxxxxxxxxxxxx",
"endpointID": 1,
"frequency": 45,
"timestamp": "2021-02-23T14:55:03"
}
```
Parameters [#parameters]
| Name | Description | Data Type |
| ----------- | ---------------------------------------------------------------------------------------------------------------------------------------------------------------------------------------------------------------------------------------------------------------------------- | --------- |
| accessToken | Access token with permissions to update endpoint information. See this page for more information. | text |
| endpointID | Unique endpoint identifier or combination of device address and endpoint address in format \[deviceAddress]:endpointAddress (e.g.: \[device-1234]:1). These values can be found on the endpoint management page. | numeric |
| frequency | Frecuencia expresada en Hertz. | numeric |
| timestamp | Optional value indicating the UTC date and time corresponding to the measurement. The date format must match one of those specified in the date formats section. If the field is omitted, the platform will assume the measurement corresponds to the current date and time. | text |
Reporting Frequency in "raw" Format [#reporting-frequency-in-raw-format]
Frequency can be reported as a **raw value** using the [expression converter](/docs/configuracion-del-cliente/dispositivos-y-endpoints/endpoints/conversion-de-datos-crudos-raw). This option is convenient when the device is unable to perform conversions and emits values that need to be transformed before being injected into the platform.
Below is an example of a raw format request:
```
POST /services/gear/DeviceIntegrationService.svc/UpdateFrequencySensorStatusRaw HTTP/1.1
Host: gear.cloud.studio
Content-Type: application/json
{
"accessToken": "xxxxxxxxxxxxxxxxxxxxxxxxxxxxxxxxxxxxxxxx",
"endpointID": 1,
"rawData": "45",
"timestamp": "2021-02-23T14:55:03"
}
```
Parameters [#parameters-1]
| Name | Description | Data Type |
| ----------- | ---------------------------------------------------------------------------------------------------------------------------------------------------------------------------------------------------------------------------------------------------------------------------- | --------- |
| accessToken | Access token with permissions to update endpoint information. See this page for more information. | text |
| endpointID | Unique endpoint identifier, which can be found on the endpoint management page. | numeric |
| rawData | Value reported by the sensor, as text. An expression must be specified in the expression converter. La expresión debe devolver un valor numérico indicando la frecuencia, expresada en Hertz. | text |
| timestamp | Optional value indicating the UTC date and time corresponding to the measurement. The date format must match one of those specified in the date formats section. If the field is omitted, the platform will assume the measurement corresponds to the current date and time. | text |
# HVAC / Thermostats
Reporting HVAC Device Status [#reporting-hvac-device-status]
The HTTP integration of HVAC devices uses the following structure:
```
POST /services/gear/DeviceIntegrationService.svc/UpdateHVACStatus HTTP/1.1
Host: gear.cloud.studio
Content-Type: application/json
{
"accessToken": "xxxxxxxxxxxxxxxxxxxxxxxxxxxxxxxxxxxxxxxx",
"endpointID": 1,
"mode": 4,
"fanMode": 1,
"setpoint": 21,
"ambientTemperature": 21.5,
"timestamp": "2021-02-23T14:55:03"
}
```
Parameters [#parameters]
| Name | Description | Data Type |
| ------------------ | --------------------------------------------------------------------------------------------------------------------------------------------------------------------------------------------------------------------------------------------------------------------------------------------------------------------------- | --------- |
| accessToken | Access token with permissions to update endpoint information. See this page for more information. | text |
| endpointID | Unique endpoint identifier or combination of device address and endpoint address in format \[deviceAddress]:endpointAddress (e.g.: \[device-1234]:1). These values can be found on the endpoint management page. | numeric |
| mode | Modo actual del dispositivo:1: el dispositivo está apagado.2: el dispositivo está encendido en modo automático.3: el dispositivo está encendido en modo calor.4: el dispositivo está encendido en modo frío.5: el dispositivo está encendido en modo deshumidificación.6: el dispositivo está encendido en modo ventilador. | numeric |
| fanMode | Modo actual del ventilador:1: el ventilador está en modo automático.2: el ventilador está en velocidad baja.3: el ventilador está en velocidad media.4: el ventilador está en velocidad alta. | numeric |
| setpoint | Indica el valor de temperatura deseado, en grados Celsius. | numeric |
| ambientTemperature | Indica el valor de la temperatura ambiente, en grados Celsius. | numeric |
| timestamp | Optional value indicating the UTC date and time corresponding to the measurement. The date format must match one of those specified in the date formats section. If the field is omitted, the platform will assume the measurement corresponds to the current date and time. | text |
# Sensor Data Storage
Introduction [#introduction]
This section contains information about storing data from sensors using the REST API over HTTP/HTTPS. Integration examples are provided for all endpoint types supported on the platform.
Integration by Sensor Type [#integration-by-sensor-type]
[Temperature Sensors](/docs/configuracion-del-cliente/dispositivos-y-endpoints/dispositivos/integracion-de-dispositivos/http/api-http/almacenamiento-de-datos-de-sensores/sensores-de-temperatura)
[Humidity Sensors](/docs/configuracion-del-cliente/dispositivos-y-endpoints/dispositivos/integracion-de-dispositivos/http/api-http/almacenamiento-de-datos-de-sensores/sensores-de-humedad)
[Light Level Sensors](/docs/configuracion-del-cliente/dispositivos-y-endpoints/dispositivos/integracion-de-dispositivos/http/api-http/almacenamiento-de-datos-de-sensores/sensores-de-nivel-de-iluminacion)
[Weight Sensors](/docs/configuracion-del-cliente/dispositivos-y-endpoints/dispositivos/integracion-de-dispositivos/http/api-http/almacenamiento-de-datos-de-sensores/sensores-de-peso)
[Volume Sensors](/docs/configuracion-del-cliente/dispositivos-y-endpoints/dispositivos/integracion-de-dispositivos/http/api-http/almacenamiento-de-datos-de-sensores/sensores-de-volumen)
[Pressure Sensors](/docs/configuracion-del-cliente/dispositivos-y-endpoints/dispositivos/integracion-de-dispositivos/http/api-http/almacenamiento-de-datos-de-sensores/sensores-de-presion)
[IAS Sensors (Motion, Occupancy, and Binary Sensors)](/docs/configuracion-del-cliente/dispositivos-y-endpoints/dispositivos/integracion-de-dispositivos/http/api-http/almacenamiento-de-datos-de-sensores/sensores-ias-movimiento-ocupacion-y-sensores-binarios)
[Voltage Sensors](/docs/configuracion-del-cliente/dispositivos-y-endpoints/dispositivos/integracion-de-dispositivos/http/api-http/almacenamiento-de-datos-de-sensores/sensores-de-voltaje)
[Current Sensors](/docs/configuracion-del-cliente/dispositivos-y-endpoints/dispositivos/integracion-de-dispositivos/http/api-http/almacenamiento-de-datos-de-sensores/sensores-de-corriente)
[Active Power Sensors](/docs/configuracion-del-cliente/dispositivos-y-endpoints/dispositivos/integracion-de-dispositivos/http/api-http/almacenamiento-de-datos-de-sensores/sensores-de-potencia-activa)
[Reactive Power Sensors](/docs/configuracion-del-cliente/dispositivos-y-endpoints/dispositivos/integracion-de-dispositivos/http/api-http/almacenamiento-de-datos-de-sensores/sensores-de-potencia-reactiva)
[Apparent Power Sensors](/docs/configuracion-del-cliente/dispositivos-y-endpoints/dispositivos/integracion-de-dispositivos/http/api-http/almacenamiento-de-datos-de-sensores/sensores-de-potencia-aparente)
[Cos Phi Sensors](/docs/configuracion-del-cliente/dispositivos-y-endpoints/dispositivos/integracion-de-dispositivos/http/api-http/almacenamiento-de-datos-de-sensores/sensores-de-coseno-fi)
[Frequency Meters](/docs/configuracion-del-cliente/dispositivos-y-endpoints/dispositivos/integracion-de-dispositivos/http/api-http/almacenamiento-de-datos-de-sensores/frecuencimetros)
[Energy Consumption Sensors](/docs/configuracion-del-cliente/dispositivos-y-endpoints/dispositivos/integracion-de-dispositivos/http/api-http/almacenamiento-de-datos-de-sensores/sensores-de-consumo-de-energia)
[Flow Sensors](/docs/configuracion-del-cliente/dispositivos-y-endpoints/dispositivos/integracion-de-dispositivos/http/api-http/almacenamiento-de-datos-de-sensores/sensores-de-flujo)
[Generic Sensors](/docs/configuracion-del-cliente/dispositivos-y-endpoints/dispositivos/integracion-de-dispositivos/http/api-http/almacenamiento-de-datos-de-sensores/sensores-genericos)
[Generic Flow Sensors](/docs/configuracion-del-cliente/dispositivos-y-endpoints/dispositivos/integracion-de-dispositivos/http/api-http/almacenamiento-de-datos-de-sensores/sensores-genericos-de-flujo)
[Appliances and Other On/Off Devices](/docs/configuracion-del-cliente/dispositivos-y-endpoints/dispositivos/integracion-de-dispositivos/http/api-http/almacenamiento-de-datos-de-sensores/appliances-y-otros-dispositivos-on-off)
[Dimmers](/docs/configuracion-del-cliente/dispositivos-y-endpoints/dispositivos/integracion-de-dispositivos/http/api-http/almacenamiento-de-datos-de-sensores/dimmers)
[Curtain and Closure Controllers](/docs/configuracion-del-cliente/dispositivos-y-endpoints/dispositivos/integracion-de-dispositivos/http/api-http/almacenamiento-de-datos-de-sensores/controladores-de-cortinas-y-cerramientos)
[Run-time Meters (Hour Meters)](/docs/configuracion-del-cliente/dispositivos-y-endpoints/dispositivos/integracion-de-dispositivos/http/api-http/almacenamiento-de-datos-de-sensores/run-time-meters-horometros)
[Location Trackers](/docs/configuracion-del-cliente/dispositivos-y-endpoints/dispositivos/integracion-de-dispositivos/http/api-http/almacenamiento-de-datos-de-sensores/rastreadores-de-ubicacion)
[PPM Concentration Sensors](/docs/configuracion-del-cliente/dispositivos-y-endpoints/dispositivos/integracion-de-dispositivos/http/api-http/almacenamiento-de-datos-de-sensores/sensores-de-concentracion-ppm)
[Mass/Volume Concentration Sensors](/docs/configuracion-del-cliente/dispositivos-y-endpoints/dispositivos/integracion-de-dispositivos/http/api-http/almacenamiento-de-datos-de-sensores/sensores-de-concentracion-masavolumen)
[Air Quality Sensors (AQI)](/docs/configuracion-del-cliente/dispositivos-y-endpoints/dispositivos/integracion-de-dispositivos/http/api-http/almacenamiento-de-datos-de-sensores/air-quality-index-aqi-sensors)
[People Flow Sensors](/docs/configuracion-del-cliente/dispositivos-y-endpoints/dispositivos/integracion-de-dispositivos/http/api-http/almacenamiento-de-datos-de-sensores/sensores-de-flujo-de-personas)
[People Counters](/docs/configuracion-del-cliente/dispositivos-y-endpoints/dispositivos/integracion-de-dispositivos/http/api-http/almacenamiento-de-datos-de-sensores/contadores-de-personas)
[Cameras](/docs/configuracion-del-cliente/dispositivos-y-endpoints/dispositivos/integracion-de-dispositivos/http/api-http/almacenamiento-de-datos-de-sensores/camaras)
[Text](/docs/configuracion-del-cliente/dispositivos-y-endpoints/dispositivos/integracion-de-dispositivos/http/api-http/almacenamiento-de-datos-de-sensores/sensores-de-texto)
# Location Trackers
Reporting Endpoint Status [#reporting-endpoint-status]
The HTTP integration of location trackers uses the following structure:
```
POST /services/gear/DeviceIntegrationService.svc/UpdateLocationTrackerStatus HTTP/1.1
Host: gear.cloud.studio
Content-Type: application/json
{
"accessToken": "xxxxxxxxxxxxxxxxxxxxxxxxxxxxxxxxxxxxxxxx",
"endpointID": 1,
"latitude": -13.9957594,
"longitude": 48.9339384,
"flags": 0,
"timestamp": "2021-02-23T14:55:03"
}
```
Parameters [#parameters]
| Name | Description | Data Type |
| ----------- | ----------------------------------------------------------------------------------------------------------------------------------------------------------------------------------------------------------------------------------------------------------------------------------------------------------------------------------------------------------------------------------------------------------------------------------------------------------------------------------------------------------------------------------------------------------------------- | --------- |
| accessToken | Access token with permissions to update endpoint information. See this page for more information. | text |
| endpointID | Unique endpoint identifier or combination of device address and endpoint address in format \[deviceAddress]:endpointAddress (e.g.: \[device-1234]:1). These values can be found on the endpoint management page. | numeric |
| latitude | Indica la latitud. El valor debe ser entre -90 y 90. El separador para los decimales es el punto | numeric |
| longitude | Indica la longitud. El valor debe ser entre -180 y 180. El separador para los decimales es el punto | numeric |
| flags | Indica información extra para la posición. Es un valor entero que representa una suma bit a bit. Los estados disponibles son: 0 = Nada en especial1 = La posición del sensor está cambiando2 = El sensor no puede adquirir la posición4 = El sensor no funciona correctamente. La posición informada puede ser incorrecta8 = La posición informada tiene baja precisiónLos valores pueden combinarse a través de la operación OR. Por ejemplo, para indicar que la posición informada tiene baja precisión, y la posición está cambiando, debe utilizarse (8 OR 1) = 9. | numeric |
| timestamp | Optional value indicating the UTC date and time corresponding to the measurement. The date format must match one of those specified in the date formats section. If the field is omitted, the platform will assume the measurement corresponds to the current date and time. | text |
Reporting Status in "raw" Format [#reporting-status-in-raw-format]
El estado del endpoint can be reported as a **raw value** using the [expression converter](/docs/configuracion-del-cliente/dispositivos-y-endpoints/endpoints/conversion-de-datos-crudos-raw). This option is convenient when the device is unable to perform conversions and emits values that need to be transformed before being injected into the platform.
Below is an example of a raw format request:
```
POST /services/gear/DeviceIntegrationService.svc/UpdateLocationTrackerStatusRaw HTTP/1.1
Host: gear.cloud.studio
Content-Type: application/json
{
"accessToken": "xxxxxxxxxxxxxxxxxxxxxxxxxxxxxxxxxxxxxxxx",
"endpointID": 1,
"rawData": "-13.9957594,48.933938,0",
"timestamp": "2021-02-23T14:55:03"
}
```
Parameters [#parameters-1]
| Name | Description | Data Type |
| ----------- | ------------------------------------------------------------------------------------------------------------------------------------------------------------------------------------------------------------------------------------------------------------------------------------------------------------------------------------------------------------------------------------------------------------------------------------------------------------------------------------------------------------------------------------------------------------------------------------------------------------------------------------------------------------------------------------------------------------------------------------------------------------------------------------------------------------------------------------------------------------------------------------------------------------------------------------------------------------------------------------------------------------------------------------------------------- | --------- |
| accessToken | Access token with permissions to update endpoint information. See this page for more information. | text |
| endpointID | Unique endpoint identifier, which can be found on the endpoint management page. | numeric |
| rawData | Valor reportado por el sensor, como texto. Deben indicarse dos expresiones en el conversor de expresiones:La primera expresión debe devolver un valor numérico indicando la longitud. El valor debe ser entre -90 y 90. El separador para los decimales es el puntoLa segunda expresión debe devolver un valor numérico indicando la longitud. El valor debe ser entre -180 y 180. El separador para los decimales es el puntoLa tercera expresión debe devolver un valor entero indicando detalles de la posición (flags). Es un valor entero que representa una suma bit a bit. Los estados disponibles son:0 = Nada en especial1 = La posición del sensor está cambiando2 = El sensor no puede adquirir la posición4 = El sensor no funciona correctamente. La posición informada puede ser incorrecta8 = La posición informada tiene baja precisiónLos valores pueden combinarse a través de la operación OR. Por ejemplo, para indicar que la posición informada tiene baja precisión, y la posición está cambiando, debe utilizarse (8 OR 1) = 9. | text |
| timestamp | Optional value indicating the UTC date and time corresponding to the measurement. The date format must match one of those specified in the date formats section. If the field is omitted, the platform will assume the measurement corresponds to the current date and time. | text |
# Run-time Meters (Hour Meters)
> The integration de run-time meters utiliza la misma API que los sensores de flujo no-genéricos. La única diferencia es que los run time meters deben informar el flujo de tiempo **en segundos**.
Reporte de tiempo acumulado en segundos [#reporte-de-tiempo-acumulado-en-segundos]
The integration de run time meters por HTTP uses the following structure, que es idéntica a la de cualquier sensor de flujo:
```
POST /services/gear/DeviceIntegrationService.svc/UpdateFlowSensorValueSummation HTTP/1.1
Host: gear.cloud.studio
Content-Type: application/json
{
"accessToken": "xxxxxxxxxxxxxxxxxxxxxxxxxxxxxxxxxxxxxxxx",
"endpointID": 1,
"summationValue": 112685,
"timestamp": "2021-02-23T14:55:03"
}
```
Parameters [#parameters]
| Name | Description | Data Type |
| -------------- | ---------------------------------------------------------------------------------------------------------------------------------------------------------------------------------------------------------------------------------------------------------------------------- | --------- |
| accessToken | Access token with permissions to update endpoint information. See this page for more information. | text |
| endpointID | Unique endpoint identifier or combination of device address and endpoint address in format \[deviceAddress]:endpointAddress (e.g.: \[device-1234]:1). These values can be found on the endpoint management page. | numeric |
| summationValue | Valor acumulado de tiempo informado por el sensor, expresado en segundos. | numeric |
| timestamp | Optional value indicating the UTC date and time corresponding to the measurement. The date format must match one of those specified in the date formats section. If the field is omitted, the platform will assume the measurement corresponds to the current date and time. | text |
Reporte de tiempo acumulado en formato "raw" [#reporte-de-tiempo-acumulado-en-formato-raw]
Accumulated time can be reported as a **raw value** using the [expression converter](/docs/configuracion-del-cliente/dispositivos-y-endpoints/endpoints/conversion-de-datos-crudos-raw). This option is convenient when the device is unable to perform conversions and emits values that need to be transformed before being injected into the platform.
Below is an example of a raw format request:
```
POST /services/gear/DeviceIntegrationService.svc/UpdateFlowSensorValueSummationRaw HTTP/1.1
Host: gear.cloud.studio
Content-Type: application/json
{
"accessToken": "xxxxxxxxxxxxxxxxxxxxxxxxxxxxxxxxxxxxxxxx",
"endpointID": 1,
"rawData": "112685",
"timestamp": "2021-02-23T14:55:03"
}
```
Parameters [#parameters-1]
| Name | Description | Data Type |
| ----------- | ---------------------------------------------------------------------------------------------------------------------------------------------------------------------------------------------------------------------------------------------------------------------------- | --------- |
| accessToken | Access token with permissions to update endpoint information. See this page for more information. | text |
| endpointID | Unique endpoint identifier, which can be found on the endpoint management page. | numeric |
| rawData | Value reported by the sensor, as text. An expression must be specified in the expression converter. La expresión debe devolver un valor numérico indicando el tiempo acumulado informado por el sensor, expresado en segundos. | text |
| timestamp | Optional value indicating the UTC date and time corresponding to the measurement. The date format must match one of those specified in the date formats section. If the field is omitted, the platform will assume the measurement corresponds to the current date and time. | text |
# Mass/Volume Concentration Sensors
Reporting Endpoint Status [#reporting-endpoint-status]
The HTTP integration of mass/volume concentration sensors uses the following structure:
```
POST /services/gear/DeviceIntegrationService.svc/UpdateConcentrationSensorStatus HTTP/1.1
Host: gear.cloud.studio
Content-Type: application/json
{
"accessToken": "xxxxxxxxxxxxxxxxxxxxxxxxxxxxxxxxxxxxxxxx",
"endpointID": 1,
"concentration": 17.9,
"timestamp": "2021-02-23T14:55:03"
}
```
Parameters [#parameters]
| Name | Description | Data Type |
| ------------- | ---------------------------------------------------------------------------------------------------------------------------------------------------------------------------------------------------------------------------------------------------------------------------- | --------- |
| accessToken | Access token with permissions to update endpoint information. See this page for more information. | text |
| endpointID | Unique endpoint identifier or combination of device address and endpoint address in format \[deviceAddress]:endpointAddress (e.g.: \[device-1234]:1). These values can be found on the endpoint management page. | numeric |
| concentration | Indica la concentración de materia (masa/volumen), expresada en microgramos/metro cúbico (μg/m³). El separador para los decimales es el punto. | numeric |
| timestamp | Optional value indicating the UTC date and time corresponding to the measurement. The date format must match one of those specified in the date formats section. If the field is omitted, the platform will assume the measurement corresponds to the current date and time. | text |
Reporting Status in "raw" Format [#reporting-status-in-raw-format]
El estado del endpoint can be reported as a **raw value** using the [expression converter](/docs/configuracion-del-cliente/dispositivos-y-endpoints/endpoints/conversion-de-datos-crudos-raw). This option is convenient when the device is unable to perform conversions and emits values that need to be transformed before being injected into the platform.
Below is an example of a raw format request:
```
POST /services/gear/DeviceIntegrationService.svc/UpdateConcentrationSensorStatusRaw HTTP/1.1
Host: gear.cloud.studio
Content-Type: application/json
{
"accessToken": "xxxxxxxxxxxxxxxxxxxxxxxxxxxxxxxxxxxxxxxx",
"endpointID": 1,
"rawData": "17.9",
"timestamp": "2021-02-23T14:55:03"
}
```
Parameters [#parameters-1]
| Name | Description | Data Type |
| ----------- | ---------------------------------------------------------------------------------------------------------------------------------------------------------------------------------------------------------------------------------------------------------------------------- | --------- |
| accessToken | Access token with permissions to update endpoint information. See this page for more information. | text |
| endpointID | Unique endpoint identifier, which can be found on the endpoint management page. | numeric |
| rawData | Value reported by the sensor, as text. An expression must be specified in the expression converter. La expresión debe devolver un valor numérico indicando la concentración de materia (masa/volumen), expresada en microgramos/metro cúbico (μg/m³). | text |
| timestamp | Optional value indicating the UTC date and time corresponding to the measurement. The date format must match one of those specified in the date formats section. If the field is omitted, the platform will assume the measurement corresponds to the current date and time. | text |
# PPM Concentration Sensors
Reporting Endpoint Status [#reporting-endpoint-status]
The HTTP integration of PPM concentration sensors uses the following structure:
```
POST /services/gear/DeviceIntegrationService.svc/UpdateConcentrationSensorStatus HTTP/1.1
Host: gear.cloud.studio
Content-Type: application/json
{
"accessToken": "xxxxxxxxxxxxxxxxxxxxxxxxxxxxxxxxxxxxxxxx",
"endpointID": 1,
"concentration": 17.9,
"timestamp": "2021-02-23T14:55:03"
}
```
Parameters [#parameters]
| Name | Description | Data Type |
| ------------- | ---------------------------------------------------------------------------------------------------------------------------------------------------------------------------------------------------------------------------------------------------------------------------- | --------- |
| accessToken | Access token with permissions to update endpoint information. See this page for more information. | text |
| endpointID | Unique endpoint identifier or combination of device address and endpoint address in format \[deviceAddress]:endpointAddress (e.g.: \[device-1234]:1). These values can be found on the endpoint management page. | numeric |
| concentration | Indica la concentración de materia, expresada en en partes por millón (ppm). El separador para los decimales es el punto. | numeric |
| timestamp | Optional value indicating the UTC date and time corresponding to the measurement. The date format must match one of those specified in the date formats section. If the field is omitted, the platform will assume the measurement corresponds to the current date and time. | text |
Reporting Status in "raw" Format [#reporting-status-in-raw-format]
El estado del endpoint can be reported as a **raw value** using the [expression converter](/docs/configuracion-del-cliente/dispositivos-y-endpoints/endpoints/conversion-de-datos-crudos-raw). This option is convenient when the device is unable to perform conversions and emits values that need to be transformed before being injected into the platform.
Below is an example of a raw format request:
```
POST /services/gear/DeviceIntegrationService.svc/UpdateConcentrationSensorStatusRaw HTTP/1.1
Host: gear.cloud.studio
Content-Type: application/json
{
"accessToken": "xxxxxxxxxxxxxxxxxxxxxxxxxxxxxxxxxxxxxxxx",
"endpointID": 1,
"rawData": "17.9",
"timestamp": "2021-02-23T14:55:03"
}
```
Parameters [#parameters-1]
| Name | Description | Data Type |
| ----------- | ---------------------------------------------------------------------------------------------------------------------------------------------------------------------------------------------------------------------------------------------------------------------------- | --------- |
| accessToken | Access token with permissions to update endpoint information. See this page for more information. | text |
| endpointID | Unique endpoint identifier, which can be found on the endpoint management page. | numeric |
| rawData | Value reported by the sensor, as text. An expression must be specified in the expression converter. La expresión debe devolver un valor numérico indicando la concentración de materia en partes por millón (ppm). | text |
| timestamp | Optional value indicating the UTC date and time corresponding to the measurement. The date format must match one of those specified in the date formats section. If the field is omitted, the platform will assume the measurement corresponds to the current date and time. | text |
# Energy Consumption Sensors
Reporting Accumulated Energy in Wh and VARh [#reporting-accumulated-energy-in-wh-and-varh]
The HTTP integration of energy sensors uses the following structure:
```
POST /services/gear/DeviceIntegrationService.svc/UpdateEnergySensorValueSummation HTTP/1.1
Host: gear.cloud.studio
Content-Type: application/json
{
"accessToken": "xxxxxxxxxxxxxxxxxxxxxxxxxxxxxxxxxxxxxxxx",
"endpointID": 1,
"activeEnergySummationWh": 112685.9,
"reactiveEnergySummationVARh": 18973.4,
"timestamp": "2021-02-23T14:55:03"
}
```
Parameters [#parameters]
| Name | Description | Data Type |
| --------------------------- | ---------------------------------------------------------------------------------------------------------------------------------------------------------------------------------------------------------------------------------------------------------------------------- | --------- |
| accessToken | Access token with permissions to update endpoint information. See this page for more information. | text |
| endpointID | Unique endpoint identifier or combination of device address and endpoint address in format \[deviceAddress]:endpointAddress (e.g.: \[device-1234]:1). These values can be found on the endpoint management page. | numeric |
| activeEnergySummationWh | Valor acumulado de energía activa informado por el sensor, expresado en watt-hora (Wh). | numeric |
| reactiveEnergySummationVARh | Valor acumulado de energía reactiva informado por el sensor, expresado en volt-ampere-reactivo-hora (VARh). | numeric |
| timestamp | Optional value indicating the UTC date and time corresponding to the measurement. The date format must match one of those specified in the date formats section. If the field is omitted, the platform will assume the measurement corresponds to the current date and time. | text |
Reporting Accumulated Energy in "raw" Format [#reporting-accumulated-energy-in-raw-format]
Accumulated energy can be reported as a **raw value** using the [expression converter](/docs/configuracion-del-cliente/dispositivos-y-endpoints/endpoints/conversion-de-datos-crudos-raw). This option is convenient when the device is unable to perform conversions and emits values that need to be transformed before being injected into the platform.
Below is an example of a raw format request:
```
POST /services/gear/DeviceIntegrationService.svc/UpdateFlowSensorValueSummationRaw HTTP/1.1
Host: gear.cloud.studio
Content-Type: application/json
{
"accessToken": "xxxxxxxxxxxxxxxxxxxxxxxxxxxxxxxxxxxxxxxx",
"endpointID": 1,
"rawData": "112685.9,18973.4",
"timestamp": "2021-02-23T14:55:03"
}
```
Como puede verse en este ejemplo, el campo RawData combina el acumulado de energía activa y el acumulado de energía reactiva en un único string, en el que ambos valores están separados por una coma.
Parameters [#parameters-1]
| Name | Description | Data Type |
| ----------- | -------------------------------------------------------------------------------------------------------------------------------------------------------------------------------------------------------------------------------------------------------------------------------------------------------------------------------------------------------------------------------------------------------------------------------------------------------------------------------------------------------------------------------------------------------------------------------------------------------------------------------------------------------------------------------------------------------------------------------------------------------------- | --------- |
| accessToken | Access token with permissions to update endpoint information. See this page for more information. | text |
| endpointID | Unique endpoint identifier, which can be found on the endpoint management page. | numeric |
| rawData | Valor reportado por el sensor, como texto. Deben indicarse dos expresiones en el conversor de expresiones. La primera expresión se utiliza para obtener la energía activa acumulada a partir de la variable rawData. La expresión debe devolver un valor numérico indicando expresado en expresado en watt-hora (Wh). En el ejemplo anterior, podría utilizarse la siguiente expresión:ToNumber(StringPart(rawData, 1, ','))La segunda expresión se utiliza para obtener la energía reactiva acumulada a partir de la variable rawData. La expresión debe devolver un valor numérico indicando expresado en expresado volt-ampere-reactivo-hora (VARh). En el ejemplo anterior, podría utilizarse la siguiente expresión:ToNumber(StringPart(rawData, 2, ',')) | text |
| timestamp | Optional value indicating the UTC date and time corresponding to the measurement. The date format must match one of those specified in the date formats section. If the field is omitted, the platform will assume the measurement corresponds to the current date and time. | text |
# Current Sensors
Reporting Current in Amperes [#reporting-current-in-amperes]
The HTTP integration of current sensors uses the following structure:
```
POST /services/gear/DeviceIntegrationService.svc/UpdateCurrentSensorStatus HTTP/1.1
Host: gear.cloud.studio
Content-Type: application/json
{
"accessToken": "xxxxxxxxxxxxxxxxxxxxxxxxxxxxxxxxxxxxxxxx",
"endpointID": 1,
"currentAmperes": 18.5,
"timestamp": "2021-02-23T14:55:03"
}
```
Parameters [#parameters]
| Name | Description | Data Type |
| -------------- | ---------------------------------------------------------------------------------------------------------------------------------------------------------------------------------------------------------------------------------------------------------------------------- | --------- |
| accessToken | Access token with permissions to update endpoint information. See this page for more information. | text |
| endpointID | Unique endpoint identifier or combination of device address and endpoint address in format \[deviceAddress]:endpointAddress (e.g.: \[device-1234]:1). These values can be found on the endpoint management page. | numeric |
| currentAmperes | Current, expressed in Amperes. | numeric |
| timestamp | Optional value indicating the UTC date and time corresponding to the measurement. The date format must match one of those specified in the date formats section. If the field is omitted, the platform will assume the measurement corresponds to the current date and time. | text |
Reporting Current in "raw" Format [#reporting-current-in-raw-format]
Current can be reported as a **raw value** using the [expression converter](/docs/configuracion-del-cliente/dispositivos-y-endpoints/endpoints/conversion-de-datos-crudos-raw). This option is convenient when the device is unable to perform conversions and emits values that need to be transformed before being injected into the platform.
Below is an example of a raw format request:
```
POST /services/gear/DeviceIntegrationService.svc/UpdateCurrentSensorStatusRaw HTTP/1.1
Host: gear.cloud.studio
Content-Type: application/json
{
"accessToken": "xxxxxxxxxxxxxxxxxxxxxxxxxxxxxxxxxxxxxxxx",
"endpointID": 1,
"rawData": "18.5",
"timestamp": "2021-02-23T14:55:03"
}
```
Parameters [#parameters-1]
| Name | Description | Data Type |
| ----------- | ---------------------------------------------------------------------------------------------------------------------------------------------------------------------------------------------------------------------------------------------------------------------------- | --------- |
| accessToken | Access token with permissions to update endpoint information. See this page for more information. | text |
| endpointID | Unique endpoint identifier, which can be found on the endpoint management page. | numeric |
| rawData | Value reported by the sensor, as text. An expression must be specified in the expression converter. The expression must return a numeric value indicating current, expressed in Amperes. | text |
| timestamp | Optional value indicating the UTC date and time corresponding to the measurement. The date format must match one of those specified in the date formats section. If the field is omitted, the platform will assume the measurement corresponds to the current date and time. | text |
# Cos Phi Sensors
Reporting Cos Phi [#reporting-cos-phi]
The integration de sensores de [coseno fi](https://es.wikipedia.org/wiki/Factor_de_potencia) por HTTP uses the following structure:
```
POST /services/gear/DeviceIntegrationService.svc/UpdateCosPhiSensorStatus HTTP/1.1
Host: gear.cloud.studio
Content-Type: application/json
{
"accessToken": "xxxxxxxxxxxxxxxxxxxxxxxxxxxxxxxxxxxxxxxx",
"endpointID": 1,
"cosPhi": 0.96,
"timestamp": "2021-02-23T14:55:03"
}
```
Parameters [#parameters]
| Name | Description | Data Type |
| ----------- | ---------------------------------------------------------------------------------------------------------------------------------------------------------------------------------------------------------------------------------------------------------------------------- | --------- |
| accessToken | Access token with permissions to update endpoint information. See this page for more information. | text |
| endpointID | Unique endpoint identifier or combination of device address and endpoint address in format \[deviceAddress]:endpointAddress (e.g.: \[device-1234]:1). These values can be found on the endpoint management page. | numeric |
| cosPhi | Coseno fi, en el rango de -1 a 1. | numeric |
| timestamp | Optional value indicating the UTC date and time corresponding to the measurement. The date format must match one of those specified in the date formats section. If the field is omitted, the platform will assume the measurement corresponds to the current date and time. | text |
Reporting Cos Phi en formato "raw" [#reporting-cos-phi-en-formato-raw]
Cos phi can be reported as a **raw value** using the [expression converter](/docs/configuracion-del-cliente/dispositivos-y-endpoints/endpoints/conversion-de-datos-crudos-raw). This option is convenient when the device is unable to perform conversions and emits values that need to be transformed before being injected into the platform.
Below is an example of a raw format request:
```
POST /services/gear/DeviceIntegrationService.svc/UpdateCosPhiSensorStatusRaw HTTP/1.1
Host: gear.cloud.studio
Content-Type: application/json
{
"accessToken": "xxxxxxxxxxxxxxxxxxxxxxxxxxxxxxxxxxxxxxxx",
"endpointID": 1,
"rawData": "0.96",
"timestamp": "2021-02-23T14:55:03"
}
```
Parameters [#parameters-1]
| Name | Description | Data Type |
| ----------- | ---------------------------------------------------------------------------------------------------------------------------------------------------------------------------------------------------------------------------------------------------------------------------- | --------- |
| accessToken | Access token with permissions to update endpoint information. See this page for more information. | text |
| endpointID | Unique endpoint identifier, which can be found on the endpoint management page. | numeric |
| rawData | Value reported by the sensor, as text. An expression must be specified in the expression converter. La expresión debe devolver un valor numérico indicando el coseno fi, en el rango de -1 a 1. | text |
| timestamp | Optional value indicating the UTC date and time corresponding to the measurement. The date format must match one of those specified in the date formats section. If the field is omitted, the platform will assume the measurement corresponds to the current date and time. | text |
# Flow Sensors de personas
Reporting Endpoint Status [#reporting-endpoint-status]
The HTTP integration of people flow sensors uses the following structure:
```
POST /services/gear/DeviceIntegrationService.svc/UpdateFlowSensorValueSummation HTTP/1.1
Host: gear.cloud.studio
Content-Type: application/json
{
"accessToken": "xxxxxxxxxxxxxxxxxxxxxxxxxxxxxxxxxxxxxxxx",
"endpointID": 1,
"summationValue": 25,
"timestamp": "2021-02-23T14:55:03"
}
```
Parameters [#parameters]
| Name | Description | Data Type |
| -------------- | ---------------------------------------------------------------------------------------------------------------------------------------------------------------------------------------------------------------------------------------------------------------------------- | --------- |
| accessToken | Access token with permissions to update endpoint information. See this page for more information. | text |
| endpointID | Unique endpoint identifier or combination of device address and endpoint address in format \[deviceAddress]:endpointAddress (e.g.: \[device-1234]:1). These values can be found on the endpoint management page. | numeric |
| summationValue | Valor acumulado de flujo informado por el sensor, expresado en personas. | numeric |
| timestamp | Optional value indicating the UTC date and time corresponding to the measurement. The date format must match one of those specified in the date formats section. If the field is omitted, the platform will assume the measurement corresponds to the current date and time. | text |
Reporting Status in "raw" Format [#reporting-status-in-raw-format]
El estado del endpoint can be reported as a **raw value** using the [expression converter](/docs/configuracion-del-cliente/dispositivos-y-endpoints/endpoints/conversion-de-datos-crudos-raw). This option is convenient when the device is unable to perform conversions and emits values that need to be transformed before being injected into the platform.
Below is an example of a raw format request:
```
POST /services/gear/DeviceIntegrationService.svc/UpdateFlowSensorValueSummationRaw HTTP/1.1
Host: gear.cloud.studio
Content-Type: application/json
{
"accessToken": "xxxxxxxxxxxxxxxxxxxxxxxxxxxxxxxxxxxxxxxx",
"endpointID": 1,
"rawData": "25",
"timestamp": "2021-02-23T14:55:03"
}
```
Parameters [#parameters-1]
| Name | Description | Data Type |
| ----------- | ---------------------------------------------------------------------------------------------------------------------------------------------------------------------------------------------------------------------------------------------------------------------------- | --------- |
| accessToken | Access token with permissions to update endpoint information. See this page for more information. | text |
| endpointID | Unique endpoint identifier, which can be found on the endpoint management page. | numeric |
| rawData | Value reported by the sensor, as text. An expression must be specified in the expression converter. La expresión debe devolver un valor numérico indicando el valor acumulado de flujo informado por el sensor, expresado en personas. | text |
| timestamp | Optional value indicating the UTC date and time corresponding to the measurement. The date format must match one of those specified in the date formats section. If the field is omitted, the platform will assume the measurement corresponds to the current date and time. | text |
# Flow Sensors
Reporting Accumulated Flow in Liters [#reporting-accumulated-flow-in-liters]
The HTTP integration of flow sensors uses the following structure:
```
POST /services/gear/DeviceIntegrationService.svc/UpdateFlowSensorValueSummation HTTP/1.1
Host: gear.cloud.studio
Content-Type: application/json
{
"accessToken": "xxxxxxxxxxxxxxxxxxxxxxxxxxxxxxxxxxxxxxxx",
"endpointID": 1,
"summationValue": 112685,
"timestamp": "2021-02-23T14:55:03"
}
```
Parameters [#parameters]
| Name | Description | Data Type |
| -------------- | ---------------------------------------------------------------------------------------------------------------------------------------------------------------------------------------------------------------------------------------------------------------------------- | --------- |
| accessToken | Access token with permissions to update endpoint information. See this page for more information. | text |
| endpointID | Unique endpoint identifier or combination of device address and endpoint address in format \[deviceAddress]:endpointAddress (e.g.: \[device-1234]:1). These values can be found on the endpoint management page. | numeric |
| summationValue | Valor acumulado de flujo informado por el sensor, expresado en litros. | numeric |
| timestamp | Optional value indicating the UTC date and time corresponding to the measurement. The date format must match one of those specified in the date formats section. If the field is omitted, the platform will assume the measurement corresponds to the current date and time. | text |
Reporting Accumulated Flow in "raw" Format [#reporting-accumulated-flow-in-raw-format]
Flow can be reported as a **raw value** using the [expression converter](/docs/configuracion-del-cliente/dispositivos-y-endpoints/endpoints/conversion-de-datos-crudos-raw). This option is convenient when the device is unable to perform conversions and emits values that need to be transformed before being injected into the platform.
Below is an example of a raw format request:
```
POST /services/gear/DeviceIntegrationService.svc/UpdateFlowSensorValueSummationRaw HTTP/1.1
Host: gear.cloud.studio
Content-Type: application/json
{
"accessToken": "xxxxxxxxxxxxxxxxxxxxxxxxxxxxxxxxxxxxxxxx",
"endpointID": 1,
"rawData": "112685",
"timestamp": "2021-02-23T14:55:03"
}
```
Parameters [#parameters-1]
| Name | Description | Data Type |
| ----------- | ---------------------------------------------------------------------------------------------------------------------------------------------------------------------------------------------------------------------------------------------------------------------------- | --------- |
| accessToken | Access token with permissions to update endpoint information. See this page for more information. | text |
| endpointID | Unique endpoint identifier, which can be found on the endpoint management page. | numeric |
| rawData | Value reported by the sensor, as text. An expression must be specified in the expression converter. La expresión debe devolver un valor numérico indicando el valor acumulado de flujo informado por el sensor, expresado en litros. | text |
| timestamp | Optional value indicating the UTC date and time corresponding to the measurement. The date format must match one of those specified in the date formats section. If the field is omitted, the platform will assume the measurement corresponds to the current date and time. | text |
# Humidity Sensors
Reporting Humidity as Percentage [#reporting-humidity-as-percentage]
The HTTP integration of humidity sensors uses the following structure:
```
POST /services/gear/DeviceIntegrationService.svc/UpdateHumiditySensorStatus HTTP/1.1
Host: gear.cloud.studio
Content-Type: application/json
{
"accessToken": "xxxxxxxxxxxxxxxxxxxxxxxxxxxxxxxxxxxxxxxx",
"endpointID": 1,
"humidityPercentage": 49,
"timestamp": "2021-02-23T14:55:03"
}
```
Parameters [#parameters]
| Name | Description | Data Type |
| ------------------ | ---------------------------------------------------------------------------------------------------------------------------------------------------------------------------------------------------------------------------------------------------------------------------- | --------- |
| accessToken | Access token with permissions to update endpoint information. See this page for more information. | text |
| endpointID | Unique endpoint identifier or combination of device address and endpoint address in format \[deviceAddress]:endpointAddress (e.g.: \[device-1234]:1). These values can be found on the endpoint management page. | text |
| humidityPercentage | Humidity percentage, from 0 to 100. | text |
| timestamp | Optional value indicating the UTC date and time corresponding to the measurement. The date format must match one of those specified in the date formats section. If the field is omitted, the platform will assume the measurement corresponds to the current date and time. | text |
Reporting Humidity in "raw" Format [#reporting-humidity-in-raw-format]
Humidity can be reported as a **raw value** using the [expression converter](/docs/configuracion-del-cliente/dispositivos-y-endpoints/endpoints/conversion-de-datos-crudos-raw). This option is convenient when the device is unable to perform conversions and emits values that need to be transformed before being injected into the platform.
Below is an example of a raw format request:
```
POST /services/gear/DeviceIntegrationService.svc/UpdateHumiditySensorStatusRaw HTTP/1.1
Host: gear.cloud.studio
Content-Type: application/json
{
"accessToken": "",
"endpointID": 1,
"rawData": "49",
"timestamp": "2021-02-23T14:55:03"
}
```
Parameters [#parameters-1]
| Name | Description | Data Type |
| ----------- | ---------------------------------------------------------------------------------------------------------------------------------------------------------------------------------------------------------------------------------------------------------------------------- | --------- |
| accessToken | Access token with permissions to update endpoint information. See this page for more information. | text |
| endpointID | Unique endpoint identifier, which can be found on the endpoint management page. | numeric |
| rawData | Value reported by the sensor, as text. An expression must be specified in the expression converter. The expression must return a numeric value between 0 and 100. | text |
| timestamp | Optional value indicating the UTC date and time corresponding to the measurement. The date format must match one of those specified in the date formats section. If the field is omitted, the platform will assume the measurement corresponds to the current date and time. | text |
# Light Level Sensors
Reporting Light Level as Percentage [#reporting-light-level-as-percentage]
The HTTP integration of light sensors uses the following structure:
```
POST /services/gear/DeviceIntegrationService.svc/UpdateLightSensorStatus HTTP/1.1
Host: gear.cloud.studio
Content-Type: application/json
{
"accessToken": "xxxxxxxxxxxxxxxxxxxxxxxxxxxxxxxxxxxxxxxx",
"endpointID": 1,
"lightIntensity": 7550,
"timestamp": "2021-02-23T14:55:03"
}
```
Parameters [#parameters]
| Name | Description | Data Type |
| -------------- | ---------------------------------------------------------------------------------------------------------------------------------------------------------------------------------------------------------------------------------------------------------------------------- | --------- |
| accessToken | Access token with permissions to update endpoint information. See this page for more information. | text |
| endpointID | Unique endpoint identifier or combination of device address and endpoint address in format \[deviceAddress]:endpointAddress (e.g.: \[device-1234]:1). These values can be found on the endpoint management page. | text |
| lightIntensity | Light intensity expressed in lux. | text |
| timestamp | Optional value indicating the UTC date and time corresponding to the measurement. The date format must match one of those specified in the date formats section. If the field is omitted, the platform will assume the measurement corresponds to the current date and time. | text |
Reporting Light Level in "raw" Format [#reporting-light-level-in-raw-format]
Light level can be reported as a **raw value** using the [expression converter](/docs/configuracion-del-cliente/dispositivos-y-endpoints/endpoints/conversion-de-datos-crudos-raw). This option is convenient when the device is unable to perform conversions and emits values that need to be transformed before being injected into the platform.
Below is an example of a raw format request:
```
POST /services/gear/DeviceIntegrationService.svc/UpdateLightSensorStatusRaw HTTP/1.1
Host: gear.cloud.studio
Content-Type: application/json
{
"accessToken": "xxxxxxxxxxxxxxxxxxxxxxxxxxxxxxxxxxxxxxxx",
"endpointID": 1,
"rawData": "7550",
"timestamp": "2021-02-23T14:55:03"
}
```
Parameters [#parameters-1]
| Name | Description | Data Type |
| ----------- | ---------------------------------------------------------------------------------------------------------------------------------------------------------------------------------------------------------------------------------------------------------------------------- | --------- |
| accessToken | Access token with permissions to update endpoint information. See this page for more information. | text |
| endpointID | Unique endpoint identifier, which can be found on the endpoint management page. | numeric |
| rawData | Value reported by the sensor, as text. An expression must be specified in the expression converter. The expression must return a numeric value indicating light intensity expressed in lux. | text |
| timestamp | Optional value indicating the UTC date and time corresponding to the measurement. The date format must match one of those specified in the date formats section. If the field is omitted, the platform will assume the measurement corresponds to the current date and time. | text |
# Weight Sensors
Reporting Weight in Grams [#reporting-weight-in-grams]
The HTTP integration of weight sensors uses the following structure:
```
POST /services/gear/DeviceIntegrationService.svc/UpdateWeightSensorStatus HTTP/1.1
Host: gear.cloud.studio
Content-Type: application/json
{
"accessToken": "xxxxxxxxxxxxxxxxxxxxxxxxxxxxxxxxxxxxxxxx",
"endpointID": 1,
"weightGrams": 4500,
"timestamp": "2021-02-23T14:55:03"
}
```
Parameters [#parameters]
| Name | Description | Data Type |
| ----------- | ---------------------------------------------------------------------------------------------------------------------------------------------------------------------------------------------------------------------------------------------------------------------------- | --------- |
| accessToken | Access token with permissions to update endpoint information. See this page for more information. | text |
| endpointID | Unique endpoint identifier or combination of device address and endpoint address in format \[deviceAddress]:endpointAddress (e.g.: \[device-1234]:1). These values can be found on the endpoint management page. | text |
| weightGrams | Weight, expressed in grams. | numeric |
| timestamp | Optional value indicating the UTC date and time corresponding to the measurement. The date format must match one of those specified in the date formats section. If the field is omitted, the platform will assume the measurement corresponds to the current date and time. | text |
Reporting Weight in "raw" Format [#reporting-weight-in-raw-format]
Weight can be reported as a **raw value** using the [expression converter](/docs/configuracion-del-cliente/dispositivos-y-endpoints/endpoints/conversion-de-datos-crudos-raw). This option is convenient when the device is unable to perform conversions and emits values that need to be transformed before being injected into the platform.
Below is an example of a raw format request:
```
POST /services/gear/DeviceIntegrationService.svc/UpdateWeightSensorStatusRaw HTTP/1.1
Host: gear.cloud.studio
Content-Type: application/json
{
"accessToken": "xxxxxxxxxxxxxxxxxxxxxxxxxxxxxxxxxxxxxxxx",
"endpointID": 1,
"rawData": "4500",
"timestamp": "2021-02-23T14:55:03"
}
```
Parameters [#parameters-1]
| Name | Description | Data Type |
| ----------- | ---------------------------------------------------------------------------------------------------------------------------------------------------------------------------------------------------------------------------------------------------------------------------- | --------- |
| accessToken | Access token with permissions to update endpoint information. See this page for more information. | text |
| endpointID | Unique endpoint identifier, which can be found on the endpoint management page. | numeric |
| rawData | Value reported by the sensor, as text. An expression must be specified in the expression converter. The expression must return a numeric value indicating weight, expressed in grams. | text |
| timestamp | Optional value indicating the UTC date and time corresponding to the measurement. The date format must match one of those specified in the date formats section. If the field is omitted, the platform will assume the measurement corresponds to the current date and time. | text |
# Active Power Sensors
Reporting Active Power in Watts [#reporting-active-power-in-watts]
The HTTP integration of active power sensors uses the following structure:
```
POST /services/gear/DeviceIntegrationService.svc/UpdateActivePowerSensorStatus HTTP/1.1
Host: gear.cloud.studio
Content-Type: application/json
{
"accessToken": "xxxxxxxxxxxxxxxxxxxxxxxxxxxxxxxxxxxxxxxx",
"endpointID": 1,
"activePowerWatts": 18.5,
"timestamp": "2021-02-23T14:55:03"
}
```
Parameters [#parameters]
| Name | Description | Data Type |
| ---------------- | ---------------------------------------------------------------------------------------------------------------------------------------------------------------------------------------------------------------------------------------------------------------------------- | --------- |
| accessToken | Access token with permissions to update endpoint information. See this page for more information. | text |
| endpointID | Unique endpoint identifier or combination of device address and endpoint address in format \[deviceAddress]:endpointAddress (e.g.: \[device-1234]:1). These values can be found on the endpoint management page. | numeric |
| activePowerWatts | Active power, expressed in Watts. | numeric |
| timestamp | Optional value indicating the UTC date and time corresponding to the measurement. The date format must match one of those specified in the date formats section. If the field is omitted, the platform will assume the measurement corresponds to the current date and time. | text |
Reporting Active Power in "raw" Format [#reporting-active-power-in-raw-format]
Active power can be reported as a **raw value** using the [expression converter](/docs/configuracion-del-cliente/dispositivos-y-endpoints/endpoints/conversion-de-datos-crudos-raw). This option is convenient when the device is unable to perform conversions and emits values that need to be transformed before being injected into the platform.
Below is an example of a raw format request:
```
POST /services/gear/DeviceIntegrationService.svc/UpdateActivePowerSensorStatusRaw HTTP/1.1
Host: gear.cloud.studio
Content-Type: application/json
{
"accessToken": "xxxxxxxxxxxxxxxxxxxxxxxxxxxxxxxxxxxxxxxx",
"endpointID": 1,
"rawData": "18.5",
"timestamp": "2021-02-23T14:55:03"
}
```
Parameters [#parameters-1]
| Name | Description | Data Type |
| ----------- | ---------------------------------------------------------------------------------------------------------------------------------------------------------------------------------------------------------------------------------------------------------------------------- | --------- |
| accessToken | Access token with permissions to update endpoint information. See this page for more information. | text |
| endpointID | Unique endpoint identifier, which can be found on the endpoint management page. | numeric |
| rawData | Value reported by the sensor, as text. An expression must be specified in the expression converter. The expression must return a numeric value indicating the measured active power, expressed in Watts. | text |
| timestamp | Optional value indicating the UTC date and time corresponding to the measurement. The date format must match one of those specified in the date formats section. If the field is omitted, the platform will assume the measurement corresponds to the current date and time. | text |
# Apparent Power Sensors
Reporting Apparent Power in VA [#reporting-apparent-power-in-va]
The integration de sensores de [potencia aparente](https://es.wikipedia.org/wiki/Potencia_el%C3%A9ctrica) por HTTP uses the following structure:
```
POST /services/gear/DeviceIntegrationService.svc/UpdateApparentPowerSensorStatus HTTP/1.1
Host: gear.cloud.studio
Content-Type: application/json
{
"accessToken": "xxxxxxxxxxxxxxxxxxxxxxxxxxxxxxxxxxxxxxxx",
"endpointID": 1,
"apparentPowerVA": 2850.5,
"timestamp": "2021-02-23T14:55:03"
}
```
Parameters [#parameters]
| Name | Description | Data Type |
| --------------- | ---------------------------------------------------------------------------------------------------------------------------------------------------------------------------------------------------------------------------------------------------------------------------- | --------- |
| accessToken | Access token with permissions to update endpoint information. See this page for more information. | text |
| endpointID | Unique endpoint identifier or combination of device address and endpoint address in format \[deviceAddress]:endpointAddress (e.g.: \[device-1234]:1). These values can be found on the endpoint management page. | numeric |
| apparentPowerVA | Apparent power, expressed in VA. | numeric |
| timestamp | Optional value indicating the UTC date and time corresponding to the measurement. The date format must match one of those specified in the date formats section. If the field is omitted, the platform will assume the measurement corresponds to the current date and time. | text |
Reporting Apparent Power in "raw" Format [#reporting-apparent-power-in-raw-format]
Apparent power can be reported as a **raw value** using the [expression converter](/docs/configuracion-del-cliente/dispositivos-y-endpoints/endpoints/conversion-de-datos-crudos-raw). This option is convenient when the device is unable to perform conversions and emits values that need to be transformed before being injected into the platform.
Below is an example of a raw format request:
```
POST /services/gear/DeviceIntegrationService.svc/UpdateApparentPowerSensorStatusRaw HTTP/1.1
Host: gear.cloud.studio
Content-Type: application/json
{
"accessToken": "xxxxxxxxxxxxxxxxxxxxxxxxxxxxxxxxxxxxxxxx",
"endpointID": 1,
"rawData": "2850.5",
"timestamp": "2021-02-23T14:55:03"
}
```
Parameters [#parameters-1]
| Name | Description | Data Type |
| ----------- | ---------------------------------------------------------------------------------------------------------------------------------------------------------------------------------------------------------------------------------------------------------------------------- | --------- |
| accessToken | Access token with permissions to update endpoint information. See this page for more information. | text |
| endpointID | Unique endpoint identifier, which can be found on the endpoint management page. | numeric |
| rawData | Value reported by the sensor, as text. An expression must be specified in the expression converter. La expresión debe devolver un valor numérico indicando la potencia aparente, expresada en VA. | text |
| timestamp | Optional value indicating the UTC date and time corresponding to the measurement. The date format must match one of those specified in the date formats section. If the field is omitted, the platform will assume the measurement corresponds to the current date and time. | text |
# Reactive Power Sensors
Reporting Reactive Power in VAR [#reporting-reactive-power-in-var]
The integration de sensores de [potencia reactiva](https://es.wikipedia.org/wiki/Potencia_el%C3%A9ctrica) por HTTP uses the following structure:
```
POST /services/gear/DeviceIntegrationService.svc/UpdateReactivePowerSensorStatus HTTP/1.1
Host: gear.cloud.studio
Content-Type: application/json
{
"accessToken": "xxxxxxxxxxxxxxxxxxxxxxxxxxxxxxxxxxxxxxxx",
"endpointID": 1,
"reactivePowerVAR": 2850.5,
"timestamp": "2021-02-23T14:55:03"
}
```
Parameters [#parameters]
| Name | Description | Data Type |
| ---------------- | ---------------------------------------------------------------------------------------------------------------------------------------------------------------------------------------------------------------------------------------------------------------------------- | --------- |
| accessToken | Access token with permissions to update endpoint information. See this page for more information. | text |
| endpointID | Unique endpoint identifier or combination of device address and endpoint address in format \[deviceAddress]:endpointAddress (e.g.: \[device-1234]:1). These values can be found on the endpoint management page. | numeric |
| reactivePowerVAR | Reactive power, expressed in VAR. | numeric |
| timestamp | Optional value indicating the UTC date and time corresponding to the measurement. The date format must match one of those specified in the date formats section. If the field is omitted, the platform will assume the measurement corresponds to the current date and time. | text |
Reporting Reactive Power in "raw" Format [#reporting-reactive-power-in-raw-format]
Reactive power can be reported as a **raw value** using the [expression converter](/docs/configuracion-del-cliente/dispositivos-y-endpoints/endpoints/conversion-de-datos-crudos-raw). This option is convenient when the device is unable to perform conversions and emits values that need to be transformed before being injected into the platform.
Below is an example of a raw format request:
```
POST /services/gear/DeviceIntegrationService.svc/UpdateReactivePowerSensorStatusRaw HTTP/1.1
Host: gear.cloud.studio
Content-Type: application/json
{
"accessToken": "xxxxxxxxxxxxxxxxxxxxxxxxxxxxxxxxxxxxxxxx",
"endpointID": 1,
"rawData": "2850.5",
"timestamp": "2021-02-23T14:55:03"
}
```
Parameters [#parameters-1]
| Name | Description | Data Type |
| ----------- | ---------------------------------------------------------------------------------------------------------------------------------------------------------------------------------------------------------------------------------------------------------------------------- | --------- |
| accessToken | Access token with permissions to update endpoint information. See this page for more information. | text |
| endpointID | Unique endpoint identifier, which can be found on the endpoint management page. | numeric |
| rawData | Value reported by the sensor, as text. An expression must be specified in the expression converter. La expresión debe devolver un valor numérico indicando la potencia reactiva, expresada en VAR. | text |
| timestamp | Optional value indicating the UTC date and time corresponding to the measurement. The date format must match one of those specified in the date formats section. If the field is omitted, the platform will assume the measurement corresponds to the current date and time. | text |
# Pressure Sensors
Reporting Pressure in Pascals [#reporting-pressure-in-pascals]
The HTTP integration of pressure sensors uses the following structure:
```
POST /services/gear/DeviceIntegrationService.svc/UpdatePressureSensorStatus HTTP/1.1
Host: gear.cloud.studio
Content-Type: application/json
{
"accessToken": "xxxxxxxxxxxxxxxxxxxxxxxxxxxxxxxxxxxxxxxx",
"endpointID": 1,
"pressurePascals": 101300,
"timestamp": "2021-02-23T14:55:03"
}
```
Parameters [#parameters]
| Name | Description | Data Type |
| --------------- | ---------------------------------------------------------------------------------------------------------------------------------------------------------------------------------------------------------------------------------------------------------------------------- | --------- |
| accessToken | Access token with permissions to update endpoint information. See this page for more information. | text |
| endpointID | Unique endpoint identifier or combination of device address and endpoint address in format \[deviceAddress]:endpointAddress (e.g.: \[device-1234]:1). These values can be found on the endpoint management page. | text |
| pressurePascals | Pressure, expressed in Pascals. | numeric |
| timestamp | Optional value indicating the UTC date and time corresponding to the measurement. The date format must match one of those specified in the date formats section. If the field is omitted, the platform will assume the measurement corresponds to the current date and time. | text |
Reporting Pressure in "raw" Format [#reporting-pressure-in-raw-format]
Pressure can be reported as a **raw value** using the [expression converter](/docs/configuracion-del-cliente/dispositivos-y-endpoints/endpoints/conversion-de-datos-crudos-raw). This option is convenient when the device is unable to perform conversions and emits values that need to be transformed before being injected into the platform.
Below is an example of a raw format request:
```
POST /services/gear/DeviceIntegrationService.svc/UpdatePressureSensorStatusRaw HTTP/1.1
Host: gear.cloud.studio
Content-Type: application/json
{
"accessToken": "xxxxxxxxxxxxxxxxxxxxxxxxxxxxxxxxxxxxxxxx",
"endpointID": 1,
"rawData": "101300",
"timestamp": "2021-02-23T14:55:03"
}
```
Parameters [#parameters-1]
| Name | Description | Data Type |
| ----------- | ---------------------------------------------------------------------------------------------------------------------------------------------------------------------------------------------------------------------------------------------------------------------------- | --------- |
| accessToken | Access token with permissions to update endpoint information. See this page for more information. | text |
| endpointID | Unique endpoint identifier, which can be found on the endpoint management page. | numeric |
| rawData | Value reported by the sensor, as text. An expression must be specified in the expression converter. The expression must return a numeric value indicating the measured pressure, expressed in Pascals. | text |
| timestamp | Optional value indicating the UTC date and time corresponding to the measurement. The date format must match one of those specified in the date formats section. If the field is omitted, the platform will assume the measurement corresponds to the current date and time. | text |
# Temperature Sensors
Reporting Temperature in Degrees Celsius [#reporting-temperature-in-degrees-celsius]
The HTTP integration of temperature sensors uses the following structure:
```
POST /services/gear/DeviceIntegrationService.svc/UpdateTemperatureSensorStatus HTTP/1.1
Host: gear-dev.cloud.studio
Content-Type: application/json
{
"accessToken": "xxxxxxxxxxxxxxxxxxxxxxxxxxxxxxxxxxxxxxxx",
"endpointID": 1,
"temperatureCelsius": 45,
"timestamp": "2021-02-23T14:55:03"
}
```
Parameters [#parameters]
| Name | Description | Data Type |
| ------------------ | ---------------------------------------------------------------------------------------------------------------------------------------------------------------------------------------------------------------------------------------------------------------------------- | --------- |
| accessToken | Access token with permissions to update endpoint information. See this page for more information. | text |
| endpointID | Unique endpoint identifier or combination of device address and endpoint address in format \[deviceAddress]:endpointAddress (e.g.: \[device-1234]:1). These values can be found on the endpoint management page. | numeric |
| temperatureCelsius | Measured temperature, numeric value greater than or equal to -273.15, indicating the measured temperature in degrees Celsius (C). | numeric |
| timestamp | Optional value indicating the UTC date and time corresponding to the measurement. The date format must match one of those specified in the date formats section. If the field is omitted, the platform will assume the measurement corresponds to the current date and time. | text |
Reporting Temperature in "raw" Format [#reporting-temperature-in-raw-format]
Temperature can be reported as a **raw value** using the [expression converter](/docs/configuracion-del-cliente/dispositivos-y-endpoints/endpoints/conversion-de-datos-crudos-raw). This option is convenient when the device is unable to perform conversions and emits values that need to be transformed before being injected into the platform.
Below is an example of a raw format request:
```
POST /services/gear/DeviceIntegrationService.svc/UpdateTemperatureSensorStatusRaw HTTP/1.1
Host: gear-dev.cloud.studio
Content-Type: application/json
{
"accessToken": "xxxxxxxxxxxxxxxxxxxxxxxxxxxxxxxxxxxxxxxx",
"endpointID": 1,
"rawData": "45",
"timestamp": "2021-02-23T14:55:03"
}
```
Parameters [#parameters-1]
| Name | Description | Data Type |
| ----------- | ---------------------------------------------------------------------------------------------------------------------------------------------------------------------------------------------------------------------------------------------------------------------------- | --------- |
| accessToken | Access token with permissions to update endpoint information. See this page for more information. | text |
| endpointID | Unique endpoint identifier, which can be found on the endpoint management page. | numeric |
| rawData | Value reported by the sensor, as text. An expression must be specified in the expression converter. The expression must return a numeric value greater than or equal to -273.15, indicating the measured temperature in degrees Celsius (C). | text |
| timestamp | Optional value indicating the UTC date and time corresponding to the measurement. The date format must match one of those specified in the date formats section. If the field is omitted, the platform will assume the measurement corresponds to the current date and time. | text |
# Text Sensors
Storing Text [#storing-text]
The HTTP integration of text allows storing text up to 255 characters in length using the following structure:
```
POST /services/gear/DeviceIntegrationService.svc/UpdateTextContainerStatus HTTP/1.1
Host: gear.cloud.studio
Content-Type: application/json
{
"accessToken": "xxxxxxxxxxxxxxxxxxxxxxxxxxxxxxxxxxxxxxxx",
"endpointID": 1,
"text": "Sample text...",
"timestamp": "2024-02-23T14:55:03"
}
```
Parameters [#parameters]
| Name | Description | Data Type |
| ----------- | ----------------------------------------------------------------------------------------------------------------------------------------------------------------------------------------------------------------------------------------------------------- | --------- |
| accessToken | Access token with permissions to update endpoint information. See this page for more information. | text |
| endpointID | Unique endpoint identifier or combination of device address and endpoint address in format \[deviceAddress]:endpointAddress (e.g.: \[device-1234]:1). These values can be found on the endpoint management page. | numeric |
| text | Contenido de texto que se desea almacenar | text |
| timestamp | Optional value indicating the UTC date and time of the snapshot. The date format must match one of those specified in the date formats section. If the field is omitted, the platform will assume the measurement corresponds to the current date and time. | text |
# Voltage Sensors
Reporting Voltage in Volts [#reporting-voltage-in-volts]
The HTTP integration of voltage sensors uses the following structure:
```
POST /services/gear/DeviceIntegrationService.svc/UpdateVoltageSensorStatus HTTP/1.1
Host: gear.cloud.studio
Content-Type: application/json
{
"accessToken": "xxxxxxxxxxxxxxxxxxxxxxxxxxxxxxxxxxxxxxxx",
"endpointID": 1,
"voltageVolts": 45,
"timestamp": "2021-02-23T14:55:03"
}
```
Parameters [#parameters]
| Name | Description | Data Type |
| ------------ | ---------------------------------------------------------------------------------------------------------------------------------------------------------------------------------------------------------------------------------------------------------------------------- | --------- |
| accessToken | Access token with permissions to update endpoint information. See this page for more information. | text |
| endpointID | Unique endpoint identifier or combination of device address and endpoint address in format \[deviceAddress]:endpointAddress (e.g.: \[device-1234]:1). These values can be found on the endpoint management page. | numeric |
| voltageVolts | Voltage expressed in volts. | numeric |
| timestamp | Optional value indicating the UTC date and time corresponding to the measurement. The date format must match one of those specified in the date formats section. If the field is omitted, the platform will assume the measurement corresponds to the current date and time. | text |
Reporting Voltage in "raw" Format [#reporting-voltage-in-raw-format]
Voltage can be reported as a **raw value** using the [expression converter](/docs/configuracion-del-cliente/dispositivos-y-endpoints/endpoints/conversion-de-datos-crudos-raw). This option is convenient when the device is unable to perform conversions and emits values that need to be transformed before being injected into the platform.
Below is an example of a raw format request:
```
POST /services/gear/DeviceIntegrationService.svc/UpdateVoltageSensorStatusRaw HTTP/1.1
Host: gear.cloud.studio
Content-Type: application/json
{
"accessToken": "xxxxxxxxxxxxxxxxxxxxxxxxxxxxxxxxxxxxxxxx",
"endpointID": 1,
"rawData": "45",
"timestamp": "2021-02-23T14:55:03"
}
```
Parameters [#parameters-1]
| Name | Description | Data Type |
| ----------- | ---------------------------------------------------------------------------------------------------------------------------------------------------------------------------------------------------------------------------------------------------------------------------- | --------- |
| accessToken | Access token with permissions to update endpoint information. See this page for more information. | text |
| endpointID | Unique endpoint identifier, which can be found on the endpoint management page. | numeric |
| rawData | Value reported by the sensor, as text. An expression must be specified in the expression converter. The expression must return a numeric value indicating voltage, expressed in volts. | text |
| timestamp | Optional value indicating the UTC date and time corresponding to the measurement. The date format must match one of those specified in the date formats section. If the field is omitted, the platform will assume the measurement corresponds to the current date and time. | text |
# Volume Sensors
Reporting Volume in Liters [#reporting-volume-in-liters]
The HTTP integration of volume sensors uses the following structure:
```
POST /services/gear/DeviceIntegrationService.svc/UpdateVolumeSensorStatus HTTP/1.1
Host: gear.cloud.studio
Content-Type: application/json
{
"accessToken": "xxxxxxxxxxxxxxxxxxxxxxxxxxxxxxxxxxxxxxxx",
"endpointID": 1,
"volumeLiters": 45,
"timestamp": "2021-02-23T14:55:03"
}
```
Parameters [#parameters]
| Name | Description | Data Type |
| ------------ | ---------------------------------------------------------------------------------------------------------------------------------------------------------------------------------------------------------------------------------------------------------------------------- | --------- |
| accessToken | Access token with permissions to update endpoint information. See this page for more information. | text |
| endpointID | Unique endpoint identifier or combination of device address and endpoint address in format \[deviceAddress]:endpointAddress (e.g.: \[device-1234]:1). These values can be found on the endpoint management page. | text |
| volumeLiters | Volume expressed in liters. | numeric |
| timestamp | Optional value indicating the UTC date and time corresponding to the measurement. The date format must match one of those specified in the date formats section. If the field is omitted, the platform will assume the measurement corresponds to the current date and time. | text |
Reporting Volume in "raw" Format [#reporting-volume-in-raw-format]
Volume can be reported as a **raw value** using the [expression converter](/docs/configuracion-del-cliente/dispositivos-y-endpoints/endpoints/conversion-de-datos-crudos-raw). This option is convenient when the device is unable to perform conversions and emits values that need to be transformed before being injected into the platform.
Below is an example of a raw format request:
```
POST /services/gear/DeviceIntegrationService.svc/UpdateVolumeSensorStatusRaw HTTP/1.1
Host: gear.cloud.studio
Content-Type: application/json
{
"accessToken": "xxxxxxxxxxxxxxxxxxxxxxxxxxxxxxxxxxxxxxxx",
"endpointID": 1,
"rawData": "45",
"timestamp": "2021-02-23T14:55:03"
}
```
Parameters [#parameters-1]
| Name | Description | Data Type |
| ----------- | ---------------------------------------------------------------------------------------------------------------------------------------------------------------------------------------------------------------------------------------------------------------------------- | --------- |
| accessToken | Access token with permissions to update endpoint information. See this page for more information. | text |
| endpointID | Unique endpoint identifier, which can be found on the endpoint management page. | numeric |
| rawData | Value reported by the sensor, as text. An expression must be specified in the expression converter. The expression must return a numeric value indicating the measured volume, expressed in liters. | text |
| timestamp | Optional value indicating the UTC date and time corresponding to the measurement. The date format must match one of those specified in the date formats section. If the field is omitted, the platform will assume the measurement corresponds to the current date and time. | text |
# Generic Sensors de flujo
> The integration de sensores de flujo genéricos utiliza la misma API que los sensores de flujo no-genéricos. La única diferencia es que los sensores genéricos deben informar el flujo utilizando la unidad de medida correspondiente a la variable genérica asociada al sensor.
Reporte de flujo acumulado en unidades [#reporte-de-flujo-acumulado-en-unidades]
The integration de sensores genéricos de flujo por HTTP uses the following structure, que es idéntica a la de los sensores de flujo no-genéricos:
```
POST /services/gear/DeviceIntegrationService.svc/UpdateFlowSensorValueSummation HTTP/1.1
Host: gear.cloud.studio
Content-Type: application/json
{
"accessToken": "xxxxxxxxxxxxxxxxxxxxxxxxxxxxxxxxxxxxxxxx",
"endpointID": 1,
"summationValue": 112685,
"timestamp": "2021-02-23T14:55:03"
}
```
Parameters [#parameters]
| Name | Description | Data Type |
| -------------- | ---------------------------------------------------------------------------------------------------------------------------------------------------------------------------------------------------------------------------------------------------------------------------- | --------- |
| accessToken | Access token with permissions to update endpoint information. See this page for more information. | text |
| endpointID | Unique endpoint identifier or combination of device address and endpoint address in format \[deviceAddress]:endpointAddress (e.g.: \[device-1234]:1). These values can be found on the endpoint management page. | numeric |
| summationValue | Valor acumulado de flujo informado por el sensor. Las unidades son las mismas que las elegidas para la variable genérica asociada al sensor. | numeric |
| timestamp | Optional value indicating the UTC date and time corresponding to the measurement. The date format must match one of those specified in the date formats section. If the field is omitted, the platform will assume the measurement corresponds to the current date and time. | text |
Reporting Accumulated Flow in "raw" Format [#reporting-accumulated-flow-in-raw-format]
Flow can be reported as a **raw value** using the [expression converter](/docs/configuracion-del-cliente/dispositivos-y-endpoints/endpoints/conversion-de-datos-crudos-raw). This option is convenient when the device is unable to perform conversions and emits values that need to be transformed before being injected into the platform.
Below is an example of a raw format request:
```
POST /services/gear/DeviceIntegrationService.svc/UpdateFlowSensorValueSummationRaw HTTP/1.1
Host: gear.cloud.studio
Content-Type: application/json
{
"accessToken": "xxxxxxxxxxxxxxxxxxxxxxxxxxxxxxxxxxxxxxxx",
"endpointID": 1,
"rawData": "112685",
"timestamp": "2021-02-23T14:55:03"
}
```
Parameters [#parameters-1]
| Name | Description | Data Type |
| ----------- | ------------------------------------------------------------------------------------------------------------------------------------------------------------------------------------------------------------------------------------------------------------------------------------- | --------- |
| accessToken | Access token with permissions to update endpoint information. See this page for more information. | text |
| endpointID | Unique endpoint identifier, which can be found on the endpoint management page. | numeric |
| rawData | Value reported by the sensor, as text. An expression must be specified in the expression converter. La expresión debe devolver un valor numérico indicando el valor acumulado de flujo informado por el sensor, expresado en las unidades de la variable genérica asociada al sensor. | text |
| timestamp | Optional value indicating the UTC date and time corresponding to the measurement. The date format must match one of those specified in the date formats section. If the field is omitted, the platform will assume the measurement corresponds to the current date and time. | text |
# Generic Sensors
Reporting Generic Sensor Value [#reporting-generic-sensor-value]
The HTTP integration of generic sensors uses the following structure:
```
POST /services/gear/DeviceIntegrationService.svc/UpdateGenericSensorStatus HTTP/1.1
Host: gear.cloud.studio
Content-Type: application/json
{
"accessToken": "xxxxxxxxxxxxxxxxxxxxxxxxxxxxxxxxxxxxxxxx",
"endpointID": 1,
"value": 45,
"timestamp": "2021-02-23T14:55:03"
}
```
Parameters [#parameters]
| Name | Description | Data Type |
| ----------- | ---------------------------------------------------------------------------------------------------------------------------------------------------------------------------------------------------------------------------------------------------------------------------- | --------- |
| accessToken | Access token with permissions to update endpoint information. See this page for more information. | text |
| endpointID | Unique endpoint identifier or combination of device address and endpoint address in format \[deviceAddress]:endpointAddress (e.g.: \[device-1234]:1). These values can be found on the endpoint management page. | numeric |
| value | Valor genérico. La unidad de medida dependerá de lo que se establezca en la configuración del tipo de variable correspondiente al endpoint. | numeric |
| timestamp | Optional value indicating the UTC date and time corresponding to the measurement. The date format must match one of those specified in the date formats section. If the field is omitted, the platform will assume the measurement corresponds to the current date and time. | text |
Reporte de valor en formato "raw" [#reporte-de-valor-en-formato-raw]
The generic sensor value can be reported as a **raw value** using the [expression converter](/docs/configuracion-del-cliente/dispositivos-y-endpoints/endpoints/conversion-de-datos-crudos-raw). This option is convenient when the device is unable to perform conversions and emits values that need to be transformed before being injected into the platform.
Below is an example of a raw format request:
```
POST /services/gear/DeviceIntegrationService.svc/UpdateGenericSensorStatusRaw HTTP/1.1
Host: gear.cloud.studio
Content-Type: application/json
{
"accessToken": "xxxxxxxxxxxxxxxxxxxxxxxxxxxxxxxxxxxxxxxx",
"endpointID": 1,
"rawData": "45",
"timestamp": "2021-02-23T14:55:03"
}
```
Parameters [#parameters-1]
| Name | Description | Data Type |
| ----------- | ----------------------------------------------------------------------------------------------------------------------------------------------------------------------------------------------------------------------------------------------------------------------------- | --------- |
| accessToken | Access token with permissions to update endpoint information. See this page for more information. | text |
| endpointID | Unique endpoint identifier, which can be found on the endpoint management page. | numeric |
| rawData | Value reported by the sensor, as text. An expression must be specified in the expression converter. La expresión debe devolver un valor numérico. La unidad de medida dependerá de lo que se establezca en la configuración del tipo de variable correspondiente al endpoint. | text |
| timestamp | Optional value indicating the UTC date and time corresponding to the measurement. The date format must match one of those specified in the date formats section. If the field is omitted, the platform will assume the measurement corresponds to the current date and time. | text |
# IAS Sensors (Motion, Occupancy, and Binary Sensors)
Reporting Sensor Status [#reporting-sensor-status]
The HTTP integration of IAS sensors uses the following structure:
```
POST /services/gear/DeviceIntegrationService.svc/UpdateIASSensorStatus HTTP/1.1
Host: gear.cloud.studio
Content-Type: application/json
{
"accessToken": "xxxxxxxxxxxxxxxxxxxxxxxxxxxxxxxxxxxxxxxx",
"endpointID": 1,
"state": 2,
"timestamp": "2021-02-23T14:55:03"
}
```
Parameters [#parameters]
| Name | Description | Data Type |
| ----------- | -------------------------------------------------------------------------------------------------------------------------------------------------------------------------------------------------------------------------------------------------------------------------------------------------------------------------------------------------------------------------------------------------------------------------------------------------------------------------------------------------------------------------------------------------------------------------------------------------------------------------------------------------------------------------------------------------------------------------------------------------- | --------- |
| accessToken | Access token with permissions to update endpoint information. See this page for more information. | text |
| endpointID | Unique endpoint identifier or combination of device address and endpoint address in format \[deviceAddress]:endpointAddress (e.g.: \[device-1234]:1). These values can be found on the endpoint management page. | text |
| state | Indicates the sensor status. The possible states are as follows:0: Unknown. The sensor status is not known1: Inactive. The sensor detects no activity.2: Active. The sensor detects activity.3: Cleaning. The space associated with the sensor is being cleaned.4: Needs cleaning. The space associated with the sensor needs cleaning.5: Test mode. The sensor is currently in test mode.6: Tampered. The sensor has been tampered with and may not be working correctly.7: In maintenance. The sensor requires maintenance and may not be working correctly.8: The sensor detects a vehicle entering the parking space.9: The sensor detects a vehicle leaving the parking space.10: The sensor reports the parking space is in violation state. | numeric |
| timestamp | Optional value indicating the UTC date and time corresponding to the measurement. The date format must match one of those specified in the date formats section. If the field is omitted, the platform will assume the measurement corresponds to the current date and time. | text |
Reporting Status in "raw" Format [#reporting-status-in-raw-format]
El estado del sensor can be reported as a **raw value** using the [expression converter](/docs/configuracion-del-cliente/dispositivos-y-endpoints/endpoints/conversion-de-datos-crudos-raw). This option is convenient when the device is unable to perform conversions and emits values that need to be transformed before being injected into the platform.
Below is an example of a raw format request:
```
POST /services/gear/DeviceIntegrationService.svc/UpdateIASSensorStatusRaw HTTP/1.1
Host: gear.cloud.studio
Content-Type: application/json
{
"accessToken": "xxxxxxxxxxxxxxxxxxxxxxxxxxxxxxxxxxxxxxxx",
"endpointID": 1,
"rawData": "2",
"timestamp": "2021-02-23T14:55:03"
}
```
Parameters [#parameters-1]
| Name | Description | Data Type |
| ----------- | ---------------------------------------------------------------------------------------------------------------------------------------------------------------------------------------------------------------------------------------------------------------------------- | --------- |
| accessToken | Access token with permissions to update endpoint information. See this page for more information. | text |
| endpointID | Unique endpoint identifier, which can be found on the endpoint management page. | numeric |
| rawData | Value reported by the sensor, as text. An expression must be specified in the expression converter. The expression must return a numeric value corresponding to the states in the table shown above. | text |
| timestamp | Optional value indicating the UTC date and time corresponding to the measurement. The date format must match one of those specified in the date formats section. If the field is omitted, the platform will assume the measurement corresponds to the current date and time. | text |
# CelsiusToFahrenheit
The **CelsiusToFahrenheit** function converts a value from degrees **Celsius** to **Fahrenheit**.
Definition: [#definition]
```
CelsiusToFahrenheit(valor)
```
Parameters [#parameters]
| Name | Description | Data type |
| ----- | ------------------------------------------------------------- | --------- |
| valor | Celsius value provided, which will be converted to Fahrenheit | numeric |
Example: [#example]
The following example converts 30 degrees Celsius to Fahrenheit:
```
CelsiusToFahrenheit(30)
```
The result is 86 (numeric value).
More information [#more-information]
More information about the Celsius to Fahrenheit conversion can be found on [Wikipedia](https://es.wikipedia.org/wiki/Grado_Fahrenheit#Conversi%C3%B3n_a_otras_unidades).
# FahrenheitToCelsius
The **FahrenheitToCelsius** function converts a value from degrees **Fahrenheit** to **Celsius**.
Definition [#definition]
```
FahrenheitToCelsius(valor)
```
Parameters [#parameters]
| Name | Description | Data type |
| ----- | ------------------------------------------------------------- | --------- |
| valor | Fahrenheit value provided, which will be converted to Celsius | numeric |
Example [#example]
The following example converts 86 degrees Fahrenheit to Celsius:
```
FahrenheitToCelsius(86)
```
The result is 30 (numeric value).
More information [#more-information]
More information about the Fahrenheit to Celsius conversion can be found on [Wikipedia](https://es.wikipedia.org/wiki/Grado_Fahrenheit#Conversi%C3%B3n_a_otras_unidades).
# Mathematical Functions
| Function | Comments |
| ------------------- | ---------------------------------------------------------------- |
| CelsiusToFahrenheit | Converts a temperature in degrees Celsius to degrees Fahrenheit. |
| FahrenheitToCelsius | Converts a temperature in degrees Fahrenheit to degrees Celsius. |
| Max | Returns the maximum value among a series of values. |
| Min | Returns the minimum value among a series of values. |
| Power | Returns the result of raising a given number to a given power. |
| Round | Rounds a number to the specified number of decimal places. |
| Sqrt | Calculates the square root of a number. |
| Trunc | Truncates a number, removing all decimals without rounding. |
# Max
The **Max** function returns the maximum value among a series of values.
Definition [#definition]
```
Max(v1, [v2, v3, ..., vn])
```
Parameters [#parameters]
| Name | Description | Data type |
| ------- | -------------------------------------------------------------------------------------------------------- | --------- |
| v1...vn | List of provided values, all values must be numbers. The function is limited to a maximum of 100 values. | numeric |
Example [#example]
The following example obtains the largest value from the following list of numbers: 2, -5, 4, 10:
```
Max(2, -5, 4, 10)
```
The result is 10 (numeric value).
# Min
The **Min** function returns the minimum value among a series of values.
Definition [#definition]
```
Min(v1, [v2, v3, ..., vn])
```
Parameters [#parameters]
| Name | Description | Data type |
| ------ | -------------------------------------------------------------------------------------------------------- | --------- |
| v1..vn | List of provided values, all values must be numbers. The function is limited to a maximum of 100 values. | numeric |
Example: [#example]
The following example obtains the smallest value from the following list of numbers: 2, -5, 4, 10:
```
Min(2, -5, 4, 10)
```
The result is -5 (numeric value).
# Power
The **Power** function returns the result of raising a given number to a given power.
Definition [#definition]
```
Power(valor, potencia)
```
Parameters [#parameters]
| Name | Description | Data type |
| -------- | ----------------------------------------------------------------------------------------- | --------- |
| valor | Provided number, integers or decimals are allowed. | numeric |
| potencia | Indicates the power to which the number will be raised, integers or decimals are allowed. | numeric |
Example [#example]
The following example squares the provided value 25:
```
Power(25, 2)
```
The result is 625 (numeric value).
More information [#more-information]
More information about exponentiation can be found on [Wikipedia](https://es.wikipedia.org/wiki/Potenciaci%C3%B3n#:~:text=La%20potenciaciaci%C3%B3n%20es%20una%20operaci%C3%B3n,n%C3%BAmero%20que%20se%20llama%20exponente.).
# Round
The **Round** function rounds a number to the specified number of decimal places.
Definition [#definition]
```
Round(valor, [decimales])
```
Parameters [#parameters]
| Name | Description | Data type |
| --------- | ------------------------------------------------------------------------------------------------------------------------------- | --------- |
| valor | Value to be rounded | numeric |
| decimales | Optional parameter indicating how many decimal places to use for rounding. If not specified, rounding is done without decimals. | numeric |
Examples [#examples]
Rounding without decimals [#rounding-without-decimals]
In this example, we will round a given value, removing all decimals:
```
Round(25.65)
```
The result is 26 (numeric).
Rounding to one decimal place [#rounding-to-one-decimal-place]
In this example, we will round a given value, leaving one decimal place:
```
Round(25.66, 1)
```
The result is 25.7 (numeric).
More information [#more-information]
More information about number rounding can be found on [Wikipedia](https://es.wikipedia.org/wiki/Redondeo).
# Sqrt
The **Sqrt** function calculates the square root of a number.
Definition [#definition]
```
Sqrt(valor)
```
Parameters [#parameters]
| Name | Description | Data type |
| ----- | -------------------------------------- | --------- |
| valor | Provided number, decimals are allowed. | numeric |
Example [#example]
The following example obtains the square root of the number 1288.56:
```
Sqrt(1288.56)
```
The result is 35.896517936981 (numeric value).
More information [#more-information]
More information about square roots can be found on [Wikipedia](https://es.wikipedia.org/wiki/Ra%C3%ADz_cuadrada).
# Trunc
The **Trunc** function truncates a number, removing the fractional part.
Definition [#definition]
```
Trunc(valor)
```
Parameters [#parameters]
| Name | Description | Data type |
| ----- | ----------------- | --------- |
| valor | Value to truncate | numeric |
Example [#example]
In this example, the truncated value of 24.899 is obtained:
```
Trunc(24.899)
```
The result is 24 (numeric value).
# Interpolation Functions
| Function | Comments |
| ------------------- | ----------------------------------------------------------------- |
| LinearInterpolation | Performs a linear interpolation between a series of given points. |
# LinearInterpolation
The **LinearInterpolation** function obtains a value by performing a [linear interpolation](https://es.wikipedia.org/wiki/Interpolaci%C3%B3n_lineal) between a set of values given as reference.
Definition [#definition]
```
LinearInterpolation(valor, x1, y1, x2, y2, ..., xn, yn)
```
Parameters [#parameters]
| Name | Description | Data type |
| ------------------- | ------------------------------------------------------------------------------------------------------------------------------------------------ | --------- |
| valor | Value for which a linear interpolation is desired. | numeric |
| x1, y1, ..., xn, yn | Set of (x, y) points from the reference table used for linear interpolation. The function is limited to a maximum of 20 points (40 x, y values). | numeric |
Example [#example]
In the following example, the table below is used to calculate the interpolated value corresponding to x = 2.5.
| X | Y |
| --- | - |
| 2 | 3 |
| 2.5 | ? |
| 4 | 6 |
Get the value for x = 2.5 [#get-the-value-for-x--25]
The interpolation result for x = 2.5 can be obtained using the following expression:
```
LinearInterpolation(2.5, 2, 3, 4, 6)
```
The result is 3.75 (numeric value).
More information [#more-information]
More information about linear interpolations can be found on [Wikipedia](https://es.wikipedia.org/wiki/Interpolaci%C3%B3n_lineal).
# JSON Handling Functions
| Function | Comments |
| --------- | ----------------------------------------------------------------- |
| JsonField | Gets the value of a field within a text expressed in JSON format. |
# JsonField
The **JsonField** function is used to extract the value of an element within a data structure in [JSON](https://es.wikipedia.org/wiki/JSON) format.
Definition [#definition]
```
JsonField(texto, elemento)
```
Parameters [#parameters]
| Name | Description | Data type |
| -------- | --------------------------------------------------------------------------------------------------------------------------------------------------------------------------------------------------------------------------------------------------------------- | --------- |
| texto | The first parameter contains the text, in JSON format, that contains the data to be extracted. | string |
| elemento | The second parameter identifies what to extract from the structure provided in the first parameter. This parameter uses JsonPath format, whose structure can be consulted here. An online evaluator for testing JsonPath expressions can also be accessed here. | string |
Example [#example]
The following example shows the use of the JsonField function to extract the "loginCount" field from a JSON structure:
**JSON**:
```
{
"firstName":"Thomas",
"lastName":"Brown",
"loginCount":4,
"devices":[
{
"name":"Cold chamber",
"type":"Temperature sensor"
},
{
"name":"Cold room door",
"type":"Door sensor"
}
]
}
```
Get the value of the "loginCount" field [#get-the-value-of-the-logincount-field]
Assuming the JSON text shown in the previous section is loaded in a variable named "Json", to get the value of the "loginCount" field, use the following expression:
```
JsonField(Json, '$.loginCount')
```
The result is 4 (numeric value).
Get the value of the "name" field of the second device [#get-the-value-of-the-name-field-of-the-second-device]
Assuming the JSON text shown in the previous section is loaded in a variable named "Json", to get the value of the "name" field of the second device, use the following expression:
```
JsonField(Json, '$.devices[1].name')
```
The result is "Cold room door" (string).
More information [#more-information]
For more information about JSON structured data, consult [this page](https://es.wikipedia.org/wiki/JSON).
For more information about the usage possibilities of the function's second parameter (JsonPath), review the following page [https://goessner.net/articles/JsonPath/index.html#e2](https://goessner.net/articles/JsonPath/index.html#e2,), or use the following online evaluator: [https://jsonpath.com/](https://jsonpath.com/)
# String Handling Functions
| Function | Comments |
| ----------- | ----------------------------------------------------- |
| LowerCase | Converts all characters in a string to lowercase. |
| StringClean | Cleans a string by removing all unwanted characters. |
| StringPart | Returns a part of a string that contains sub-strings. |
| UpperCase | Converts all characters in a string to uppercase. |
# LowerCase
The **LowerCase** function converts all characters in a string to lowercase.
Definition [#definition]
```
LowerCase(texto)
```
Parameters [#parameters]
| Name | Description | Data type |
| ----- | --------------------------------------------------- | --------- |
| texto | Provided text, which will be converted to lowercase | string |
Example [#example]
The following example converts the word 'PASSWORD' to lowercase.
```
LowerCase('PASSWORD')
```
The result is "password" (string).
Other uses [#other-uses]
In the following example, the value 1 should be returned if the provided text matches the text 'dispositivo', regardless of whether it is written in uppercase, lowercase, or a mix of both. This can be achieved by converting the text to lowercase:
```
If(LowerCase('DISPOsitiVo') = 'dispositivo', 1, 0)
```
The result is 1 (numeric value).
# StringClean
The **StringClean** function cleans a character string by removing all unwanted characters.
Definition [#definition]
```
StringClean(texto, v1, v2, ..., v3)
```
Parameters [#parameters]
| Name | Description | Data type |
| ------- | -------------------------------------------------------------------------------------------------------- | --------- |
| texto | The first parameter refers to the text string to be cleaned. | string |
| v1...vn | Set of values to be removed from the text string. The function is limited to a maximum of 40 parameters. | string |
Example [#example]
The following example shows the use of the StringClean function to remove brackets, parentheses, asterisks, dots, and the letter 's' from the text **'(Dev.ic\[e]s\*)'**
```
StringClean('(Dev.ic[e]s*)', '[', ']', '(', ')', '*', '.', 's')
```
The result is "Device" (string).
# StringPart
The **StringPart** function returns a part of a string that contains sub-strings.
Definition [#definition]
```
StringPart(texto, posicion, separador)
```
Parameters [#parameters]
| Name | Description | Data type |
| --------- | ----------------------------------------------------------------- | --------- |
| texto | The first parameter refers to the text string. | string |
| posicion | Position of the element to obtain within the text, starting at 1. | numeric |
| separador | Separator used to distinguish the parts of the text. | string |
Example [#example]
The following example shows how to get the third element from the text 'Temperatura/exterior/33', where the parts are separated by '/'.
```
StringPart('Temperatura/exterior/33', 3, '/')
```
The result is '33' (string).
Additional notes [#additional-notes]
If the function is used to obtain a part that does not exist (i.e., when the text contains fewer parts), the function returns an empty string. For example, in the following case, the result of the function is an empty string.
```
StringPart('Temperatura/exterior/33', 6, '/')
```
The result is an empty string ('') because the sixth part is requested, but the string contains only 3 parts.
# UpperCase
The **UpperCase** function converts all characters in a string to uppercase.
Definition [#definition]
```
UpperCase(texto)
```
Parameters [#parameters]
| Name | Description | Data type |
| ----- | ---------------------------- | --------- |
| texto | Text to convert to uppercase | string |
Example [#example]
The following example converts the word 'password' to uppercase.
```
UpperCase('password')
```
The result is 'PASSWORD' (string).
Other uses [#other-uses]
In the following example, the value 1 should be returned if the provided text matches the text 'temperatura', regardless of whether it is written in uppercase, lowercase, or a mix of both. This can be done by converting the text to uppercase:
```
If(UpperCase('tempErAtura') = 'TEMPERATURA', 1, 0)
```
The result is 1 (numeric value).
# Error
The **Error** function generates an error condition containing the specified message.
Definition [#definition]
```
Error(texto)
```
Parameters [#parameters]
| Name | Description | Data type |
| ----- | --------------------------------------------------- | --------- |
| texto | Contains the message text to be used for the error. | string |
Example [#example]
The following expression returns the value of variable x divided by 50, except if x is greater than 50, in which case it produces an error.
```
If(x > 50, Error('El resultado no es el esperado'), x / 50)
```
The result is "El resultado no es el esperado" (string).
# HexToNumber
The **HexToNumber** function converts a number in hexadecimal format (string) to a number.
Definition [#definition]
```
HexToNumber(valor)
```
Parameters [#parameters]
| Name | Description | Data type |
| ----- | ------------------------------------------------------ | --------- |
| valor | Text containing the hexadecimal value to be converted. | string |
Example [#example]
The following example converts the hexadecimal value '144e' to a number:
```
HexToNumber('144e')
```
The result is 5198 (numeric value).
More information [#more-information]
More information about the hexadecimal system can be found on [Wikipedia](https://es.wikipedia.org/wiki/Sistema_hexadecimal).
# If
The **If** function returns a value, between two given values, based on a condition.
Definition [#definition]
```
If(condicion, v1, v2)
```
Parameters [#parameters]
| Name | Description | Data type |
| --------- | ------------------------------------------ | --------- |
| condicion | Logical condition to be evaluated. | boolean |
| v1 | Value to return if the condition is true. | any |
| v2 | Value to return if the condition is false. | any |
Examples [#examples]
Conditional division example [#conditional-division-example]
The following example uses the **If** function to check whether variable x has a value of zero, in which case it reports an error. Otherwise, it returns the result of dividing 150 by the value of x:
```
If(x = 0, Error('El valor no puede ser cero'), 150 / x)
```
For a value of x equal to zero, an error will be obtained. For any other value, the result of dividing 150 by the value of x will be returned.
Example to get the maximum of two numbers [#example-to-get-the-maximum-of-two-numbers]
The following example uses the **If** function to return the maximum value between two variables x1 and x2. Note that for this particular case, it would be simpler to use the [Max](/docs/configuracion-del-cliente/dispositivos-y-endpoints/endpoints/conversion-de-datos-crudos-raw/expresiones/funciones/funciones-matematicas/max) function.
```
If(x1 > x2, x1, x2)
```
This example will always return the maximum between the two values passed in x1 and x2.
# Other Functions
| Function | Comments |
| ----------- | ---------------------------------------------------------------- |
| Error | Generates an error condition containing the specified text. |
| HexToNumber | Converts a number in hexadecimal format (string) to a number. |
| If | Returns a value, between two given values, based on a condition. |
| ToBoolean | Converts a value of any type to boolean. |
| ToNumber | Converts a value of any type to numeric. |
| ToString | Converts a value of any type to string. |
# ToBoolean
The **ToBoolean** function converts a value of any type to boolean.
Definition [#definition]
```
ToBoolean(valor)
```
Parameters [#parameters]
| Name | Description | Data type |
| ----- | -------------------------------------------------------------------------------------------------------------------------------------------------------------------------------------------------------------------------------------------------------------------------------------------------------------------------------------------------------------------------------------------------- | --------- |
| valor | Value to convert to boolean. If the value is numeric, it will be converted to false when the value is zero, and to true in any other case. If the value is a string, it will be converted to false when the text is 'false' or '0', and to true when the text is 'true' or '1'. The function will produce an error in any other case. If the value is already boolean, the same value is returned. | any |
Examples [#examples]
Numeric value conversion [#numeric-value-conversion]
In the following example, 'false' should be displayed if the received value is zero and 'true' if the received value is not zero. This example uses the If function for the comparison; for more information about this function [go here](/docs/configuracion-del-cliente/dispositivos-y-endpoints/endpoints/conversion-de-datos-crudos-raw/expresiones/funciones/otras-funciones/if).
```
ToBoolean(125)
```
The result of this expression is true (boolean).
String value conversion [#string-value-conversion]
```
ToBoolean('0')
```
The result is **false** (bool).
# ToNumber
The **ToNumber** function converts a value of any type to numeric.
Definition [#definition]
```
ToNumber(valor)
```
Parameters [#parameters]
| Name | Description | Data type |
| ----- | ------------------------------------------------------------------------------------------------------------------------------------------------------------------------------------------------------------------------------------------------------------------------------------------------------------------------------------------------ | --------- |
| valor | Value to convert to numeric. If the value is a string, it will be converted to the equivalent number. If the string contains decimals, the separator must always be a period. If the value is boolean, 1 will be returned when the value is true, and 0 when the value is false. If the value is already numeric, it will be returned unchanged. | any |
String to number conversion example [#string-to-number-conversion-example]
The following example converts a text value to a number.
```
ToNumber('-123.45')
```
The result is -123.45 (numeric).
Boolean to number conversion example [#boolean-to-number-conversion-example]
```
ToNumber(true)
```
The result is 1 (numeric).
# ToString
The ToString function converts a value of any type to string.
Definition [#definition]
```
ToString(valor)
```
Parameters [#parameters]
| Name | Description | Data type |
| ----- | ----------------------------------------------------------------------------------------------------------------------------------------------------------------------------------------------------------------------------------------------------------------------------------------------------------------------------- | --------- |
| valor | Value to convert to string. If the value is boolean, 'true' will be returned when the value is true, and 'false' when the value is false. If the value is numeric, it will be converted to string, always using a period to separate decimal places, if any. If the value is already a string, it will be returned unchanged. | any |
Numeric to string conversion example [#numeric-to-string-conversion-example]
In this example, a numeric expression is converted to a string.
```
ToString(10 / 4)
```
The result will be '2.5' (string)
Boolean to string conversion example [#boolean-to-string-conversion-example]
In this example, a boolean expression is converted to a string.
```
ToString(20 < 100)
```
The result will be 'true' (string)
# Conceptos fundamentales
Aquí es donde desentrañaremos los términos claves que te convertirán en un maestro de nuestra plataforma. Sabemos que ya eres un experto, pero incluso los genios necesitan una base sólida. 😉

Instancia [#instancia]
Una instancia es un servidor virtual que brinda servicios en línea. A diferencia de mantener su propio servidor físico, que es costoso y poco eficiente, los proveedores de la nube mantienen el hardware en sus centros de datos y brindan acceso virtual a los recursos a través de una instancia en la nube. Estos recursos pueden utilizarse para ejecutar tareas que requieren mucho poder de cómputo, como contenedores, bases de datos, microservicios y máquinas virtuales.

Clientes [#clientes]
La plataforma es multi-tenant, es decir que permite la coexistencia de múltiples clientes, cada uno monitoreando su propia infraestructura, en instalaciones virtualmente independientes. Sin embargo, con los permisos apropiados, es posible que el operador tenga acceso a las instalaciones de diferentes clientes, para facilitar el soporte, la configuración, y el mantenimiento de la plataforma.
La arquitectura multi-tenant permite también maximizar la infraestructura de datacenter, alojando múltiples clientes en los mismos servidores, y minimizando las tareas de mantenimiento asociadas.
Encuentra más información sobre como administrar tus clientes por [acá](/docs/configuracion-del-cliente/cliente).
Para utilizar la funcionalidad de marca blanca, sigue los pasos descriptos en esta [sección](/docs/configuracion-global/marca-blanca).

Instalaciones [#instalaciones]
Cada cliente puede tener sus propias instalaciones (sucursales, edificios, etc.), los cuales a su vez pueden agruparse en tipos de instalación (comercios, residencias, o cualquier otra categorización). La clasificación en tipos puede utilizarse para presentar información en Dashboards. Es posible asociar una imagen para cada tipo de instalación, estas imágenes se verán reflejadas en la lista de la derecha del mapa del monitor.
¿Quieres comenzar a crear instalaciones en la plataforma? Mira esta sección. (A crear)

Dispositivos [#dispositivos]
En el ecosistema de IoT, un dispositivo se refiere a cualquier objeto o cosa que tenga la capacidad de conectarse a internet y comunicarse con otros dispositivos o sistemas. Los dispositivos IoT pueden ser dispositivos físicos como sensores, cámaras, luces inteligentes, electrodomésticos, vehículos, dispositivos médicos, etc., o dispositivos virtuales como aplicaciones y servicios en línea.
Conoce todo el proceso de integración de dispositivos por [acá](/docs/configuracion-del-cliente/dispositivos-y-endpoints).

Endpoints [#endpoints]
Son las variables asociadas a un determinado dispositivo. Un dispositivo puede tener uno o muchos endpoints los cuales puede reportar de forma conjunta o independiente a la plataforma.
Ampliamos la información sobre los endpoints en esta [página](/docs/configuracion-del-cliente/dispositivos-y-endpoints/endpoints).

Tanques [#tanques]
Los tanques son entidades dentro de la plataforma que se utilizan para representar de forma rápida, sencilla y precisa el funcionamiento de este tipo de activos en el campo. Dicha entidad tiene asociados sensores de volumen, peso, caudal, y permite definir el material contenido, capacidad total así como también los umbrales de alerta.
Conoce más sobre los tanques [aquí](/docs/configuracion-del-cliente/verticales/monitoreo-de-tanques).
_e5fc.png)
Dashboards [#dashboards]
Un dashboard se refiere a una interfaz visual que muestra información en tiempo real sobre el rendimiento y el estado de los dispositivos y sistemas IoT. Este puede proporcionar información sobre una variedad de métricas, como el consumo de energía, la temperatura, la humedad, la presión, la velocidad, la ubicación, entre otras.
Generalmente se presentan en forma de gráficos, tablas, mapas y otros elementos visuales, que permiten a los usuarios comprender y analizar la información de manera rápida y efectiva. Algunos dashboards también pueden incluir alertas y notificaciones para indicar problemas o anomalías en el rendimiento del sistema, lo que permite a los usuarios tomar medidas correctivas oportunas.
Utilizan comúnmente en una variedad de aplicaciones, como en la gestión de edificios inteligentes, en la supervisión de la producción industrial, en la gestión de flotas de vehículos, en la agricultura inteligente, entre otras. En resumen, un dashboard en IoT es una herramienta valiosa para visualizar y analizar la información recopilada por los dispositivos y sistemas IoT en tiempo real.
_60d3.png)
Ingresa a esta [página](/docs/monitor/dashboards) para explorar más sobre los dashboards.

Vistas tipo SCADA [#vistas-tipo-scada]
Son visualizaciones del tipo **SCADA** que permiten utilizar una imagen en el background para luego insertar datos, elementos gráficos, alertas y otros para obtener una herramienta visual de suma utilidad para la supervisión y control de una operación o proceso productivo.
¿Tienes dudas sobre como utilizar las vistas tipo SCADA? Revisa esta [sección](/docs/monitor/vistas).

Alertas y Alarmas [#alertas-y-alarmas]
La plataforma es capaz de recibir cualquier aperturas y cierres de alarmas. Además, la plataforma permite la creación de alertas, que pueden configurarse para el envío de notificaciones cuando la variable en cuestión esté por fuera de los parámetros establecidos.
El sistema cuenta con distintos tipos de alarmas para sus dispositivos, estas se pueden configurar para recibir notificaciones por correo electrónico, SMS y llamadas de voz.
Cabe señalar que el módulo de alarmas puede aprovechar toda la funcionalidad relacionada con Geozonas, los datos de geolocalización y de velocidad instantánea de los vehículos que tengan un tracker instalado y el factor tiempo/duración para generar alertas específicas para cada caso de uso que sea necesario.
Conoce más sobre esta función [acá](/docs/configuracion-del-cliente/alertas-y-alarmas).

Acciones [#acciones]
La plataforma permite la aplicación de reglas de automatización para la optimización procesos y uso de recursos. Las mismas se aplican modificando el estado de un dispositivo frente a un evento. Los eventos pueden ser de calendario (hora, día, mes) o pueden ser variaciones de temperatura, humedad, nivel de luz, prendido / apagado de un dispositivo o cualquier otra variable que se esté reportando a la plataforma. El motor puede utilizarse para administrar modos de energía, lanzar acciones, o disparar alertas.
Permite ejecutar acciones complejas con código completamente definible por el usuario.
Acceso a todos los dispositivos, endpoints, etc., de acuerdo con los derechos de cada usuario.
Aprende a configurar acciones desde [acá](/docs/configuracion-del-cliente/acciones).
Scripting [#scripting]
La plataforma cuenta con un motor de scripting interno que permite extender la funcionalidad existente, así como modificar su comportamiento, cuando es necesario agregar soporte para dispositivos no soportados, o crear reglas de negocios complejas. (Sí, puedes crear tus propias reglas)
Accede a todos los recursos disponibles de scripting por [aquí](/docs/herramientas-low-code-scripting).
Notificaciones [#notificaciones]
La plataforma cuenta con un módulo que se encarga de la configuración y emisión de notificaciones, tales como emails y mensajes de texto. Es el encargado de enviar notificaciones por email a usuarios por distintas causas, tales como alarmas abiertas o cerradas, reportes programados, etc.
Access tokens [#access-tokens]
Cuando se requiere la integración de servicios de la plataforma por aplicaciones externas a ella, el acceso a los servicios requiere de la obtención de un token conocido como Access Token. Es posible generar tantos tokens como sea necesario, y asociar los permisos necesarios a cada uno de ellos. Así como también, es posible establecer el tiempo de duración de los Access tokens y eliminarlos en caso de ser necesario.
Revisa esta [página](/docs/configuracion-del-cliente/tokens-de-acceso-access-tokens) para aprender a crear Access tokens.

Geozonas [#geozonas]
Este módulo permite la creación y administración de geozonas desde la herramienta del mapa o utilizando las coordenadas (o ambas para darle mayor precisión). La geozona tiene asociada una descripción, un código, un color, grosor y opacidad para el borde y color y opacidad para el relleno. La geozona puede ser editada posteriormente.
Es posible crear geozonas “anidadas” dentro de geozonas más grandes, o generar geozonas “traslapadas” y contemplar reglas de alertas que toman en consideración la zona traslapada.
Ingresa a esta [página](/docs/apis-de-extraccion-de-datos/geozonas) para conocer más sobre las geozonas.

Mapas [#mapas]
Nuestra plataforma aprovecha la poderosa interfaz de Google Maps para brindarte una experiencia de localización sin igual. Te ofrecemos tres tipos de mapas distintos:
* **Mapa de Dispositivos:** Aquí podrás visualizar de manera intuitiva la ubicación de los dispositivos que están conectados a nuestra plataforma. Esta vista te proporcionará una instantánea clara de cómo se distribuyen tus dispositivos en el terreno.
* **Mapa de Instalaciones:** Este mapa te permitirá explorar la ubicación e información en tiempo real de las instalaciones de manera detallada.
* **Mapa de Seguimiento en Tiempo Real:** Con esta función, podrás rastrear cualquier tipo de activos en movimiento en tiempo real.
Estos mapas, integrados con la funcionalidad de Google Maps, no solo son informativos, sino también altamente funcionales, permitiéndote interactuar con tus datos de manera eficiente y precisa.

Reportes [#reportes]
A nivel de Core, la plataforma dispone de una serie de reportes básicos, que luego pueden extenderse en cada vertical. En Cloud Studio, en particular, se agrega una gran cantidad de reportes relacionados con energía, inventario, etc. El módulo de reportes core ofrece toda la funcionalidad básica de, paginado server-side, descargas de información tabular, conversión a PDF, programación horaria (reportes automáticos programados), y mucho más.
Aprende más sobre los reportes [aquí](/docs/monitor/reportes).
Usuarios y permisos [#usuarios-y-permisos]
Los usuarios pertenecen a uno o más grupos los cuales tienen permisos asociados. De esta manera se pueden crear grupos que tengan acceso exclusivo a ciertas secciones y a otras no. Estos mismos permisos pueden ser otorgados de manera individual a cada usuario.
Conoce más sobre los permisos por [aquí](/docs/configuracion-del-cliente/seguridad/usuarios/permisos). Para entender la creación de usuario, puedes ingresar a este apartado. (Crear)
Para auditar la actividad de tus usuarios, puedes usar esta herramienta.(Crear **User activity log)**
¿Necesitas que le llegue un reporte a alguien que no es usuario? Ingresá por [acá](https://www.cloud.studio/contact/).
Aprende a crear una libreta de direcciones de contactos en esta [página](/docs/configuracion-del-cliente/libreta-de-direcciones).
*¿No encontraste la información que necesitabas?* [*Contáctanos*](https://www.cloud.studio/contact-us/)
# Inicio Rapido
Si has llegado hasta aquí, es porque entiendes el poder de la transformación digital en tu industria. ¿Te gustaría descubrir cómo **Cloud Studio**, a través de su plataforma Gear, está liderando la transformación digital en el ámbito del IoT y optimizando al máximo el valor de los datos?
¡Siéntete como en tu hogar! Te explicamos todo lo que necesitas saber por acá
Sobre la Plataforma Gear [#sobre-la-plataforma-gear]

En **Cloud Studio**, nuestra máxima prioridad reside en catalizar la innovación dentro del ámbito del **IoT**, a través de una perspectiva focalizada en la capa de aplicación dentro del complejo **ecosistema IoT**. Reconocemos que la auténtica metamorfosis digital emerge cuando los datos recopilados se transforman en acciones concretas y de alto valor. Por ende, nuestra misión primordial consiste en proporcionar una solución integral y especializada que se dedique a optimizar al extremo estos datos, desde la ingesta y procesamiento hasta la visualización y la toma de decisiones.
Nuestra plataforma asume la responsabilidad de orquestar el procesamiento de datos desde el momento mismo en que son publicados en la nube o en el servidor seleccionado por nuestros clientes, garantizando la fiabilidad y la seguridad en cada etapa.
En **Cloud Studio** combinamos el mundo físico y digital utilizando nuestra plataforma de IoT para crear casos de uso escalables que abordan verticales de la vida real, ofreciendo soluciones de extremo a extremo que son innovadoras y flexibles. Estamos comprometidos a mejorar procesos de negocio, optimizando el uso de recursos y generando un impacto positivo en el medio ambiente.\
Características Principales de Gear [#características-principales-de-gear]
_29e0.png)
La plataforma Gear ofrece un conjunto robusto de funcionalidades diseñadas para potenciar su estrategia IoT:
* **Ingesta de Datos Avanzada:** Con nuestro potente **Gateway MQTT** y parsers flexibles, garantizamos la recepción y decodificación eficiente de datos de cualquier dispositivo, sin importar su protocolo o formato.
* **Visualización Intuitiva (SCADA Web):** Transforme datos complejos en información accionable con nuestros dashboards personalizables y vistas tipo SCADA, adaptadas a las necesidades de cada rol.
* **Sistema de Notificaciones Integral:** Manténgase informado con nuestro sistema de notificaciones multi-canal (email, SMS, voz, WhatsApp), completamente personalizable y adaptable a sus flujos de trabajo.
* **Gestión Multi-Tenant:** Administre múltiples clientes e instalaciones desde una única instancia, con control granular de permisos y personalización a nivel de cliente.
* **Simulación de Dispositivos (Confiana):** Acelere el desarrollo y las pruebas con nuestro simulador Confiana, que permite emular el comportamiento de miles de dispositivos virtuales y validar la ingesta de datos en un entorno controlado.
* **Diseño Low-Code:** Empodere a sus equipos para crear y personalizar soluciones con una mínima necesidad de programación, fomentando la colaboración multidisciplinar.
* **Seguridad Robusta:** Implementamos las mejores prácticas de seguridad, incluyendo encriptación SSL, autenticación granular, Single Sign-On y escaneos de vulnerabilidades continuos.
Arquitectura de Vanguardia [#arquitectura-de-vanguardia]
La plataforma utiliza tecnologías abiertas y probadas, diseñadas para la eficiencia, escalabilidad y adaptabilidad. Nuestra arquitectura se basa en principios modernos:
* **Backend Monolito Modular:** Un backend .NET robusto, organizado en módulos de negocio desacoplados (como \`CloudStudio.Core\` y \`CloudStudio.Core.Gear\`), que ofrece la simplicidad de despliegue de un monolito con la flexibilidad de una arquitectura distribuida.
* **Micro-Frontends Basados en Librerías:** El frontend Angular se compone de una "cáscara" ligera y librerías de funcionalidades compiladas de forma independiente (\`common-gear\`, \`common-cloudstudio\`), permitiendo desarrollo autónomo y ensamblaje dinámico.
* **Base de Datos por Módulo (SQL Server):** Utilizamos SQL Server con una estrategia de "Base de Datos por Módulo", aislando los dominios de negocio para mejorar la mantenibilidad y escalabilidad.
* **Comunicación IoT (MQTT):** La ingesta de datos se realiza exclusivamente a través de MQTT, gestionada por nuestro servicio \`MQTTGateway\` y parsers especializados que decodifican los payloads de los dispositivos.
La arquitectura de Cloud Studio está pensada para poder ser utilizada en cualquier tipo de infraestructura de sistemas según requerimientos del cliente.
Hay dos modalidades de deployment:
* ***On-Premise***
* ***Cloud-Hosted (PaaS)***
Todas las instalaciones **Cloud Studio** toman en cuenta las siguientes mejores prácticas respecto de estándares de seguridad y desarrollo:
* **VPN:** El acceso remoto a los servidores donde se encuentra la plataforma son accesibles únicamente mediante una Red privada virtual, proporcionando así mayor seguridad.
* **Servidores separados:** Está preparado para ser instalado en una infraestructura con balanceador de carga, con servidor web y de base de datos por separado, entre otras.
* **Estándares de desarrollo:** Todo el sistema está desarrollado en base a buenas prácticas que cumplen con los estándares de OWASP.
* **Scan de vulnerabilidades:** Para garantizar la seguridad del sistema se han realizado escaneos externos de vulnerabilidades, los cuales se han cumplido exitosamente. Cloud Studio cuenta con certificación contra vulnerabilidades, entre las más importantes: Cross site scripting, SQL Injection, y Sensitive Data Exposure.


Multi-Tenancy [#multi-tenancy]
La plataforma está concebida desde sus inicios como una plataforma **multi-tenant.** Este módulo es el encargado del manejo de clientes, sus instalaciones (sucursales, edificios, etc.), y la administración de todos los permisos asociados, permitiendo: \
• Un operador, múltiples clientes.\
• Múltiples facilities por cliente (sucursales, edificios, complejos, fábricas, etc.)\
• Múltiples áreas o ambientes por sitio.\
• Soporte y mantenimiento unificado.\
• Permisos de acceso para cada usuario del operador y de cada tenant.\
• Interfaces para facturación individual de cada tenant.\
• Interfaces para administración de cuentas de tenants desde sistemas externos (enrolamiento de nuevos tenants, suspensión en caso de deudas, etc.)
SCADA Web [#scada-web]
Creemos que una visión clara de sus procesos es esencial para tomar mejores decisiones. Es por eso que hemos creado una plataforma para ayudarlo a derribar las barreras entre los sistemas **SCADA** y crear su propia representación de procesos, una que se adapte a sus necesidades y a la forma en que piensa sobre su negocio.
Con nuestro sistema, puede crear fácilmente diferentes vistas de la misma información dependiendo del rol y el enfoque de la persona que la mira. ¿El resultado? Información que es más fácil de entender y es más probable que conduzca a ideas que mejoren su negocio.


*Revisa todas estas vistas tipo **SCADA** en nuestro **Demo en vivo**. Ingresá por* [*acá*](https://gear.cloud.studio/gear/common/sign-up)*.*
Escalabilidad [#escalabilidad]
La estrategia fundamental de la plataforma es escalamiento horizontal:
• A **nivel de servidores de aplicaciones**, mediante el uso de balanceadores de carga y múltiples servidores idénticos. El código de la plataforma permite el crecimiento horizontal en forma transparente, asegurando además que ciertos procesos ejecuten en un único servidor por vez, en caso de que sea necesario.\
• A **nivel de servidores de cacheo remoto**, mediante el uso de Redis en modo cluster. El software de los servidores de aplicaciones está preparado para esta modalidad en forma nativa.\
• A **nivel de servidor de bases de datos**, mediante el uso de réplicas de SQL Server, en particular para reportes y análisis de datos.
El hosting de los servidores de aplicaciones, cache remoto y base de datos se realiza mediante IIS, en configuraciones estándar disponibles en *AWS, Microsoft Azure y Google Cloud*, pero puede utilizarse sin cambios en cualquier otro datacenter o hosting on-premise.
Extensibilidad [#extensibilidad]
Plataforma completamente extensible, basada en un sistema de plugins o "capas".\
• Permite crear nuevos verticales sin afectar la funcionalidad core.\
• Permite realizar customizaciones en cada proyecto sin afectar la funcionalidad core ni de los verticales.\
• Ejemplos de esto pueden ser reportes, formularios específicos para clientes, interfaces externas, etc.\
• La API permite no sólo la inyección/extracción de datos, sino también la creación de apps externas (misma API utilizada por las propias aplicaciones de la plataforma).\
• Diseñado para la integración de CRM/ERP.\
Agnóstica [#agnóstica]
La plataforma se caracteriza por ser independiente tanto en términos de conectividad como de hardware, lo que posibilita la creación de casos de éxito excepcionales al fusionar diversas tecnologías. Esto permite la integración fluida de una amplia gama de dispositivos, incluyendo aquellos compatibles con LoRaWAN, así como sistemas heredados en funcionamiento, como los controladores lógicos programables (PLCs), por citar un ejemplo.
**Ejemplo de arquitectura de una solución para Industria 4.0:**
_93d8.png)
Marca blanca de instancia y cliente [#marca-blanca-de-instancia-y-cliente]
Con nuestra funcionalidad de **marca blanca**, proporcionamos una plataforma personalizable diseñada para crear una experiencia de usuario única que refleje la identidad de su marca. Esta característica proporciona la capacidad de adaptar la plataforma a sus necesidades específicas al permitir la personalización de su logotipo, paleta de colores, imagen de fondo y más.
Para las empresas que necesitan proporcionar una experiencia de plataforma personalizada para diferentes clientes dentro de la misma instancia, estamos orgullosos de ofrecer dos niveles de personalización. El primer nivel permite la personalización de toda la instancia, mientras que el segundo nivel proporciona opciones de personalización a nivel de cliente.


Broker MQTT [#broker-mqtt]
Nuestra plataforma ofrece un **broker MQTT** embebido que le permite integrar fácilmente dispositivos y controlarlos con una interfaz simple que permite decodificadores de carga útil y enlaces de bajada.
Low code [#low-code]
La plataforma se destaca por ser completamente "low code". La capacidad "low code" de la plataforma garantiza que el desarrollo y la personalización de las soluciones sean accesibles para diferentes perfiles de usuarios, sin requerir un profundo conocimiento en programación. Esto fomenta la colaboración entre equipos multidisciplinarios, permitiendo que profesionales de varios ámbitos puedan contribuir activamente en el diseño y la configuración de las soluciones.
Responsive [#responsive]
Es altamente responsive, lo que significa que puede ser accesible tanto desde la web como desde una aplicación móvil. Los usuarios pueden acceder a la plataforma desde cualquier dispositivo con conexión a internet, ya sea una computadora de escritorio, una tablet o un smartphone. Esto brinda flexibilidad y conveniencia a los usuarios, permitiéndoles acceder a la plataforma y gestionar los datos desde cualquier lugar y en cualquier momento.
Los navegadores soportados son: Microsoft Edge, Google Chrome, Mozilla Firefox y Safari.
Para descargas de la aplicación móvil revisa esta [página](https://www.cloud.studio/downloads/).
Seguridad e identidades [#seguridad-e-identidades]
La seguridad es una prioridad al momento de desarrollar proyectos de internet de las cosas y es por eso por lo que la plataforma contempla:\
• Máxima granularidad de permisos de usuario.\
• Encriptación de todas las comunicaciones mediante SSL 2048-bits.\
• Single sign-on, con identificación a través de terceras partes.\
• APIs seguras y abiertas con permisos individuales para cada aplicación.\
• LDAP: Autenticación con credenciales (usuario y contraseña, email y contraseña, etc.) propias de cada empresa.
¡Llegamos al final de la introducción! Te estarás preguntando, ¿y ahora como sigo? [#llegamos-al-final-de-la-introducción-te-estarás-preguntando-y-ahora-como-sigo]
> Si aún no eres cliente nuestro te pueden servir estos enlaces
>
> [Ingreso a Demos en vivo](https://gear.cloud.studio/gear/common/sign-up)
>
> [Información sobre licencias](https://www.cloud.studio/precios/)
>
> [Información sobre planes de soporte](https://www.cloud.studio/support/)
>
> [Agendar una videollamada con nosotros](https://calendly.com/joaquincervera)
>
> [Requisitos y buenas prácticas](/docs/requisitos-y-buenas-practicas)
>
> Si eres cliente, te recomendamos comenzar por la página de conceptos fundamentales de nuestra plataforma, [aquí](/docs/conceptos-fundamentales).
*¿No encontraste la información que necesitabas?* [*Contáctanos*](https://www.cloud.studio/contact/)
# Requisitos y buenas practicas
Esta sección aplica únicamente para los casos donde la plataforma requiere ser instalada en servidores de terceros (On-Premises)
Requerimientos mínimos de la infraestructura [#requerimientos-mínimos-de-la-infraestructura]
\- Equivalente a t3.xlarge AWS.\
\- 4 vCPUs - 2.5 GHz a 3.1 GHz\
\- Memoria RAM: 16 GB\
\- Espacio en disco: Al menos 500GB\
\- Sistema Operativo: Windows Server 2019 o superior (64 bits)\
\- Base de Datos: SQL Server 2019 o superior (Web or Standard) (64 bits)\
Prácticas recomendadas de AWS [#prácticas-recomendadas-de-aws]
* IP Elástica;
* Firewall correctamente configurado, tanto en AWS como Windows Firewall / Windows Defender (**Nunca deshabilitar**):
* Las reglas generales deben ser configuradas por el cliente, Cloud Studio agregará las reglas específicas;
* No se recomienda usar una red predeterminada;
* AWS VPN;
* SQL Server: Se recomienda un servidor dedicado. En todos los casos debe ser Web o Enterprise, nunca Express.
* Instalación de IIS: .Net 4.7, activación HTTP, HTTP redirección y reescritura de URL.
# Access Tokens Persistentes
Esta API permite obtener un token que tendrá permisos de administrador, definiendo el tiempo de vida del mismo.
Estos tokens una vez generados permiten la invocacion de distintas APIs de servicios del Back End de la Plataforma permitiendo su uso durante el tiempo de validez del token obtenido.
Teoría de operación [#teoría-de-operación]
Cuando se requiere la integración de servicios de la plataforma por aplicaciones externas a ella, el acceso a los servicios requiere de la obtencion de un token conocido como **Access Token .**
El acceso y uso de los servicios de la Plataforma puede necesitarse en forma permanente o temporal.
El servicio de Autorizacion de la Plataforma incluye para estos esenarios de integracion dos API para la obtención y eliminación de Tokens persistentes que se detallan a continuación.
Creación de un Access Token [#creación-de-un-access-token]
Request [#request]
```
POST /services/gear/AuthorizationService.svc/CreateClientAccessTokenAllIntegrations
Host: gear.cloud.studio
```
Request Body [#request-body]
El cuerpo del request sera un objeto JSON con el formato que se detalla a continuáción.
En este ejemplo se solicita la creación y persistencia de un Access Token sin especificar su fecha de expiración la cual en este caso será equivalente a la fecha 01/01/2099
```
}
"clientAccessToken": {
"Description": "Testing 10",
"ClientID": 79
},
"login": {
"LoginType": 1,
"Email": "xxxxx.xxxxxxx@cloud.studio",
"Password": "xxxxxxxxxxx"
}
}
```
En cambio, para los casos en dónde se desee determinar una fecha de expiración el cuerpo del request debe ser segun se detalla a continuación en donde se agrega un campo de nombre expiration que representa el momento en que se desea que el Access Token expire.
```
{
"clientAccessToken": {
"Description": "Testing 10",
"ClientID": 79
},
"login": {
"LoginType": 1,
"Email": "xxxxxx.xxxxxx@cloud.studio",
"Password": "xxxxxxxxx"
},
"expiration": 3600
}
```
Request Body Fields [#request-body-fields]
| Nombre | Descripción | Mandatorio |
| ----------- | ---------------------------------------------------------------------------------------------------------------------------------------------------------------------------- | ---------- |
| Description | Descripción definida por el usuario para detallar generalmente para que se utilizara el Access Token que se desea crear con un máximo de 255 caracteres, se soporta Unicode. | Si |
| clientID | Corresponde al identificador del cliente para el cual se creará el token | Si |
| LoginType | Este campo debe contener el valor 1, obligatoriamente | Si |
| EMail | Corresponde al e-mail de la cuenta con la que se solicitará la creación del Access Token (\*) | Si |
| Password | Corresponde a la contraseña de la cuenta que se utilizará en la creación del Access Token | Si |
| expiration | Corresponde al tiempo en minutos que se desea el Access Token sea válido a partir del momento de su creación | Si |
**(\*) Los permisos y privelegios que el Access Token creado posea son heredados de los permisos y privilegios del usuario cuyas credenciales se incluyen en el request por lo que si se desea que el Acess Token tenga los mismos permisos que un administrador de la plataforma el usurio a utilizarse en la ejecución de la API deberá tener tales privilegios.**
Response [#response]
La respuesta en el caso de un correcto procesamiento del request retornará un código de estado de HTTP 200 y contiene el **Access Token** creado como asi tambien datos adicionales sobre la expiración del mismo el **identificador de cliente asociado (ver Eliminación de un Access Token)** y la descripción enviada.
```
{
"CreateClientAccessTokenAllIntegrationsResult": {
"AccessToken": "8e15e6d1-821a-4b71-a78d-8338e3307d2b",
"ClientAccessTokenID": 214,
"ClientID": 79,
"DateTimeCreated": {
"Date": {
"Day": 16,
"Month": 12,
"Year": 2022
},
"Time": {
"Hour": 18,
"Millisecond": 660,
"Minute": 38,
"Second": 33
}
},
"Description": "German Prueba 1",
"ExpirationDateTime": {
"Date": {
"Day": 1,
"Month": 1,
"Year": 2099
},
"Time": {
"Hour": 0,
"Millisecond": 0,
"Minute": 0,
"Second": 0
}
}
}
}
```
Consideraciones Importantes [#consideraciones-importantes]
Los siguentes escenarios de excepción pueden presentarse en el uso de la API en función de las siguentes y posibles condiciones de uso.
Descripción ya existente [#descripción-ya-existente]
Dos request consecutivos de creación de Access Token **con idéntico contenido en el campo Description** del objeto JSON enviado en el request provocara que este falle.
Repetición de credenciales incorrectas [#repetición-de-credenciales-incorrectas]
En el caso de que se envien en los request de la API de creación de Access Tokens tres veces consecutivas credenciales y estas sean incorrectas para el par E-mail / Password el request fallará y en la respuesta se obtendrá el mensaje de error “*Please complete the captcha*”.
De producirse esta situación se la puede resolver ingresando al front-end de la Plataforma y realizar la operación de log-in con la combinación de E-mail y Password correcto. En este caso se se solicitará que se valide el Captcha.
Una vez validado correctamente el Captcha y de ingresar correctamente a la plataforma se podrá reintentar el uso de la API.
Eliminación de un Access Token [#eliminación-de-un-access-token]
Request [#request-1]
```
POST /services/gear/AuthorizationService.svc/DeleteClientAccessToken
Host: gear.cloud.studio
```
Request Body [#request-body-1]
```
{
"accessToken": "99a4d0a4-932d-468b-9c17-49b5afdffb0d",
"clientAccessTokenID": 14
}
```
Request Body Fields [#request-body-fields-1]
| Nombre | Descripción | Mandatorio |
| ------------------- | ------------------------------------------------------------------------ | ---------- |
| accessToken | Access Token previamente creado que se desea eliminar | Si |
| clientAccessTokenID | Identificador asociado al cliente del Access Token que se desea eliminar | Si |
Response [#response-1]
La respuesta en el caso de un correcto procesamiento del request de eliminación retornará un código de estado HTTP 200 y un body vacio, una respuesta con código de estado HTTP 500 debe considerarse como un request fallado a su vez contendra un body como se detalla a continuacion.
Body de la respuesta de la correcta ejecución de un request de eliminacion para un Access Token y body de la respuesta en el caso de un request fallido
```
{}
```
```
{
"Exception": {
"ClassName": "ServiceException",
"FaultCode": "8001",
"FaultData": "",
"Message": "The access token is invalid or it doesn't have sufficient permissions to execute the requested operation"
}
}
```
Servicios y respectivas API de la Plataforma que se pueden utilizar con los Access Token persistentes [#servicios-y-respectivas-api-de-la-plataforma-que-se-pueden-utilizar-con-los-access-token-persistentes]
A modo de ejemplo se enumeran a continuacion algunos de los servicios que se pueden utilizar contando con un Access Token creado por esta API
1-/services/gear/DashboardService.svc/GetDashboard
2-/services/core/AlarmService.svc/GetAlert
3-/services/gear/DeviceService.svc/CreateDeviceModel
4-/services/gear/DeviceService.svc/EditDeviceModel
5-/services/gear/DeviceService.svc/DeleteDeviceMod
# API de Mapeo de Instancia
API de Mapeo de Instancia [#api-de-mapeo-de-instancia]
**La API permitirá mapear las siguientes variables dentro del entorno:**
Client ID / Client Description / Facility ID / Facility Description / Device ID / Device Description / Address / Endpoint ID / Endpoint Description.
Nota:
La API tiene una limitación de un máximo de 500 registros (si no se especifica, utilizará 100) para no afectar la performance de entorno con lo cual se deberá ejecutar varias veces para mapear la totalidad de la instancia.
El usuario puede ejecutar el servicio de la siguiente manera:
GET/api/v2/instance/mapping/\{SequenceNumber}?accessToken=\{accessToken}
Parámetros [#parámetros]
1. ***SequenceNumber*** = Numero de secuencia. Comienza en 0.
2. ***accessToken*** = Access Token de Administrador Global
3. ***MaxFetchItems*** = Cantidad máxima de elementos a obtener (Opcional. Default 100, Máximo 500)
**Observaciones:**
La cantidad de elementos que se obtenga podrá ser mayor ya que la Api devolverá las entidades dueñas de cada entidad, en el orden (Client, Facility, Device, `Enpoint)` y, debido a esto, los elementos pueden repetirse entre ejecuciones.
**Teoría de operación**
Para obtener una lista de detalle de la instancia (Endpoint, Device, Facility, Client) en forma incremental, se utiliza el campo SequenceNumber. Este campo es de tipo monotónico ascendente es decir que, al darse cambios en alguna de las entidades, su campo SequenceNumber cambiará a un valor mayor al de cualquier otra Entidad. Esto permite obtener datos basados en el SequenceNumber, en pequeños lotes, hasta que no se obtengan más datos, y luego continuar periódicamente, para obtener actualizaciones. Cuando el resultado de esta API es una lista vacía, esto significa que por el momento no existen actualizaciones.
**Típicamente, una aplicación que consume esta API utiliza el siguiente flujo:**
1. La aplicación comienza utilizando un SequenceNumber almacenado (típicamente en almacenamiento no volátil). En la primera ejecución, este valor es 0.
2. La aplicación ejecuta la API utilizando el (SequenceNumber almacenado 0).
3. La aplicación recibe una lista de entidades, y el ultimo SequenceNumber.
4. Si la lista recibida está vacía, la aplicación espera algunos segundos, y vuelve al paso 2.
5. Si la lista recibida no es vacía, la aplicación almacena el SequenceNumber recibido.
6. La aplicación vuelve inmediatamente al paso 2.
7. Cuando se crea una nueva entidad, o una existente es modificada, su SequenceNumber cambiará inmediatamente a un valor más alto que el último recibido, por lo cual su información será recibida inmediatamente en la próxima ejecución.
**Request:**
GET:/api/v2/instance/mapping/{SequenceNumber}?accessToken={accessToken}&maxCount={MaxFetchItems} [#getapiv2instancemappingsequencenumberaccesstokenaccesstokenmaxcountmaxfetchitems]
Parámetros [#parámetros-1]
| Es obligatorio incluir los siguientes parámetros “SequenceNumber” y “accessToken”. El “AccessToken” debe ser generado por un administrador global y el “SequenceNumber” va a variar en cada ejecución. |
| ------------------------------------------------------------------------------------------------------------------------------------------------------------------------------------------------------ |
**Response vacío de entidades:** cuando retorna vacío luego de recorrer todas las entidades dentro de un entorno el usuario puede volver a hacer la consulta utilizando 0 **“*****SequenceNumber*****”**.


**Nota:**
**Definiciones importantes.**
No se obtendrá el árbol completo hasta que no termine de mapear toda la instancia.
No se visualizara ordenado pero si jerarquizado
Donde no haya un endpoint, no va a traer nada. Solo va a traer la rama completa.
**Response:** La respuesta contiene la lista de variables, como se muestra en este ejemplo:


# API's de Extracción de datos
Introducción [#introducción]
Esta sección explica cómo extraer datos de la plataforma Gear Studio utilizando la API HTTP, como por ejemplo:
* [Alertas](/docs/apis-de-extraccion-de-datos/alertas): la API permite extraer la definición de todas las alertas creadas en la plataforma, filtrándolas de diferentes formas.
* [Alarmas](/docs/apis-de-extraccion-de-datos/alarmas): la API permite extraer todas las alarmas registradas en la plataforma, en forma histórica, filtrándolas de diferentes formas.
* [Datos de endpoints](/docs/apis-de-extraccion-de-datos/datos-de-endpoints): la API permite extraer toda la información asociada a los endpoints, en forma histórica, filtrándola de diferentes formas.
* [Geozonas](/docs/apis-de-extraccion-de-datos/geozonas): la API permite extraer la lista de geozonas configuradas para cada cliente, incluyendo la lista de vehículos contenidos en ellas.
Primeros pasos [#primeros-pasos]
Creación de un access token [#creación-de-un-access-token]
Al igual que con cualquier otra integración por HTTP, será necesario crear un token de acceso (access token). [Esta página](/docs/configuracion-del-cliente/tokens-de-acceso-access-tokens) contiene más información sobre la administración de tokens de acceso. Los access tokens permiten controlar el acceso y los permisos utilizados para cualquier operación.
Autentificación mediante un access token [#autentificación-mediante-un-access-token]
En todas las APIs es posible enviar el access token como parte del encabezado, utilizando un encabezado Authorization, como se ve a continuación:
```
Authorization: Bearer e54e0911-ece3-4b7a-b84d-afc01dfa81f1
```
Alternativamente, cuando no es posible enviar el token a través del encabezado Authorization, el access token puede enviarse como parte de la url, a través del parámetro “accessToken”, como en el siguiente ejemplo:
```
https://gear.cloud.studio/api/v2/alarms?accessToken=e54e0911-ece3-4b7a-b84d-afc01dfa81f1&clientID=4&maxCount=10
```
Ejecución de la API [#ejecución-de-la-api]
Para ejecutar la API, revise cada una de las secciones siguientes, que contienen la información relacionada:
* [Extracción de alertas](/docs/apis-de-extraccion-de-datos/alertas).
* [Extracción de alarmas](/docs/apis-de-extraccion-de-datos/alarmas).
* [Extracción de datos de endpoints](/docs/apis-de-extraccion-de-datos/datos-de-endpoints).
* [Extracción de datos de geozonas](/docs/apis-de-extraccion-de-datos/geozonas).
# Configuración del Cliente
En las secciones siguientes se presentan tutoriales para las configuraciones que ofrece la plataforma Cloud Studio a nivel de cliente
# Tokens de acceso (access tokens)
El token de acceso nos permite realizar peticiones tanto en [HTTP](/docs/configuracion-del-cliente/dispositivos-y-endpoints/dispositivos/integracion-de-dispositivos/http) como [MQTT](/docs/configuracion-del-cliente/dispositivos-y-endpoints/dispositivos/integracion-de-dispositivos/mqtt), así como integrar otras interfaces, tales como [The Things Network](/docs/configuracion-del-cliente/dispositivos-y-endpoints/dispositivos/integracion-de-dispositivos/lorawan-network-servers-lns/the-things-stack-ttn-tts). Es posible generar tantos tokens como sea necesario, y asociar los permisos necesarios a cada uno de ellos.
Para generar el token de acceso a través del manager, podemos dirigirnos al menú lateral y seleccionar tokens de acceso, donde nos aparecerá la ventana administrar tokens de acceso- cliente, la cual nos mostrara el listado de tokens que hayamos creado en ese cliente, por el momento no tenemos un token creado por lo que presionamos el botón agregar con el cual crearemos nuestro token.

Una vez dentro debemos completar el campo **Descripción** donde agregamos el nombre deseado, en los campos **Email** y **Contraseña** ingresamos los de nuestro correspondiente usuario, seguidamente presionamos **Guardar**.
Para poder administrar los permisos del token en forma más granular, se recomienda crear un usuario solo para el uso de APIs, o incluso un usuario diferente para cada token creado.

Luego nos aparecerá el cuadro de dialogo en modo de aviso si queremos crear el token con el usuario y contraseña actual, presionamos confirmar.

Una vez confirmado se habrá generado nuestro token, presionamos **Volver** para regresar a ver los detalles del token creado.
Seleccionar el token agregado y seleccionar la opcion Ver Token

Ingresar el usuario y contraseña

El Token es mostrado y ya puedo ser copiado

# Características adicionales
Introducción [#introducción]
Las **Características Adicionales**, son funcionalidades avanzadas del sistema especialmente diseñados para incrementar el alcance de la herramienta y brindar mayor personalización de la plataforma y su uso.
> Estos complementos se pueden solicitar haciendo click en el botón de “Request” debajo de cada funcionalidad.

Marca Blanca a nivel de Instancia [#marca-blanca-a-nivel-de-instancia]
La funcionalidad de **Marca Blanca** brinda la posibilidad a los usuarios de personalizar la plataforma creando una experiencia única de uso que se adapta a su identidad de marca. Desde esta sección se habilita la personalización del logotipo en menú, reportes, notificaciones y pantalla de inicio de sesión. Así como también se facilita la selección de una paleta de colores, la imagen de fondo de la pantalla de inicio de sesión y las características del chat y página de ayuda.
Desde esta opción se permite habilitar *Marca Blanca a nivel de instancia.* Conozca más sobre su funcionamiento en esta [página.](/docs/configuracion-global/marca-blanca)

Marca Blanca a nivel de Clientes [#marca-blanca-a-nivel-de-clientes]
Esta funcionalidad avanzada de Marca Blanca, habilita la personalización de la plataforma para distintos clientes dentro de una misma instancia. Conozca más sobre su funcionamiento en esta [página.](/docs/configuracion-global/marca-blanca)
> **Aclaraciones:**
>
> * La funcionalidad de Marca Blanca para clientes no se encuentra incluida en todos los planes de suscripción, consulte por cotización y habilitación a nuestro equipo de [ventas](https://bit.ly/3Oc8zpg).
> * Para poder solicitar la habilitación de esta funcionalidad debe estar habilitada Marca Blanca de instancia.
_ba2c.png)
Soporte al usuario [#soporte-al-usuario]
Esta función permite la integración con Tawk.to, facilitando también la personalización del menú de ayuda. Una vez habilitada se puede hacer uso de la misma desde el menú de [Marca Blanca.](/docs/configuracion-global/marca-blanca)
En esta opción el usuario podrá configurar la apariencia, disponibilidad y opciones del chat de ayuda de la aplicación.
> **Nota:** es importante recordar que la configuración del plugin es customizable para que así el usuario puede crear su propia aplicación de plugin y con el id del propietario del chat, reemplazarlo para verlo tanto en inglés como en español. Allí también se mostrarán los colores y textos que haya customizado el usuario desde Tawk To.
>
> Cuando el usuario no ingrese datos del mismo, el botón de soporte al usuario no se esta visible.
>
> * Para poder solicitar la habilitación de esta funcionalidad debe estar habilitada Marca Blanca de instancia.

[Tawk.to](https://www.tawk.to/software/chat-pages/)

Mapeo [#mapeo]
Esta funcionalidad habilita la visualización en el monitor de los mapas de Instalaciones y Dispositivos.
***Mapa de instalaciones***
Para conocer más información sobre el *mapa de instalaciones*, revise esta [página.](/docs/monitor/mapa-de-instalaciones)

***Mapa de Dispositivos***
Para conocer más información sobre el *mapa de dispositivos*, revise esta [página.](/docs/monitor/mapa-de-dispositivos)

¿Cómo habilitar y deshabilitar los mapas? [#cómo-habilitar-y-deshabilitar-los-mapas]
Una vez que la funcionalidad se encuentre habilitada desde **Características adicionales**, para modificar la vista de los mapas debe dirigirse a **Clientes** en el menú de *Configuraciones Globales.*
Elija el cliente en el que desea modificar la vistas de los mapas.
_7ad8.png)
Busque la solapa de **Configuraciones de mapas** y verifique las casillas de *Habilitar mapa de instalaciones* y *Habilitar mapa de dispositivos*. Seleccione las casillas si desea mostrar los mapas y deseleccione las mismas en caso contrario, presione el botón de *Guardar*.
***Mapas habilitados***

***Mapas deshabilitados***

> **Aclaración:** En el caso de que la funcionalidad se encuentre deshabilitada, no podrá modificar las casillas y visualizará el título de Mapeo con un ícono arriba de las mismas.

¿Cómo modificar la ubicación de Instalaciones y Dispositivos en los mapas? [#cómo-modificar-la-ubicación-de-instalaciones-y-dispositivos-en-los-mapas]
***Instalaciones***
La ubicación de las Instalaciones puede especificarse de la siguiente manera:
1\. Diríjase a al menú *Configuración del cliente,* busque la opción **Instalaciones** y seleccione la *Instalación* que desea editar.

2\. Una vez dentro de la configuración de la *Instalación* puede indicar las coordenadas de ubicación en las casillas de *Latitud* y *Longitud.*

3\. Presione el botón *Guardar* para visualizar el cambio de ubicación en el mapa.
***Dispositivos***
Puede conocer como modificar la ubicación de un dispositivo en la siguiente [página](/docs/herramientas-low-code-scripting/referencia-de-objetos-disponibles-para-scripting/device).
Iconos del Mapa [#iconos-del-mapa]
Esta característica habilita la personalización de los íconos de **Instalaciones**, **Dispositivos, Tanques** y **Vehículos** en los mapas.
¿Cómo elegir los íconos? [#cómo-elegir-los-íconos]
Tendrá a su disposición varios grupos de íconos para seleccionar por instalación, dispositivo y vehículo. Desde la configuración de los mismos puede elegir el grupo de ícono que más se adecúe a su instancia.
***Configuración de íconos en instalaciones***
Diríjase a al menú *Configuración del cliente,* busque la opción **Instalaciones** y seleccione la *Instalación* a editar.
_eb5b.png)
Seleccione el grupo de íconos que desea y presione *Guardar* para que se visualice en el mapa.
_b32d.png)
***Configuración de íconos en dispositivos***
Diríjase a al menú *Configuración del cliente,* busque la opción **Modelos de Dispositivos** y seleccione el dispositivo a editar.
_9bd2.png)
Seleccione el grupo de íconos que desea y presione *Guardar* para que se visualice en el mapa.

Seleccione el grupo de íconos que desea y presione *Guardar* para que se visualice en el mapa.
***Configuración de íconos en vehículos***
Diríjase a al menú *Configuración del cliente,* busque la opción **Seguimiento de flotas,** ingrese a *Vehículos* y seleccione el vehículo a editar.
Seleccione el grupo de íconos que desea y presione *Guardar* para que se visualice en el mapa.
_4f46.png)
***Configuración de íconos en tanques***
Diríjase a al menú *Configuración del cliente,* busque la opción **Tanques,** y seleccione el tanque a editar.
Seleccione el grupo de íconos que desea y presione *Guardar* para que se visualice en el mapa.
_ea5d.png)
Autenticación extendida [#autenticación-extendida]
Esta característica habilita la autenticación de usuarios en el proceso de Log In a través de proveedores externos como Auth0. Para conocer como funciona el proceso de Log In, ingrese a esta [página](/docs/configuracion-global).
> * La configuración de esta funcionalidad requiere disponer de una instancia de Auth0
> * Esta instancia puede ser provista por Cloud Studio o propia de un cliente, para mas información consultar a [contacto@cloud.studio](mailto:contacto@cloud.studio)
# Clientes
En las secciones siguientes se indica cómo administrar clientes, incluyendo su creación, modificación, y eliminación.

Para acceder a la configuración específica de un cliente, lo deberá hacer dentro del menú de [Cliente](/docs/configuracion-del-cliente/cliente).
# Configuración Global
En las secciones siguientes se presentan tutoriales para las configuraciones que ofrece la plataforma Cloud Studio a nivel de instancia. Esta sección estará disponible únicamente para los administradores del entorno.
# Parámetros Generales
Desde esta sección se podrán definir y modificar los parámetros generales. Esta parametrización se aplicará en todos los clientes existentes dentro de la instancia en cuestión.
Los parámetros que se pueden configurar son:
* Período de retención de histórico de acciones (en días)
* Agregación automática: máxima cantidad de endpoints por ronda
* Captcha: Cantidad de intentos antes de mostrarlo
* Intervalo de fechas predeterminado para tableros. Por ejemplo: "now-1h" o una hora hacia atrás
* Reportes: imagen de pie de página por defecto
* Zona horaria por defecto (Buenos Aires, Argentina)
* Dirección de email del Administrador de Cuenta. Por ejemplo: [info@cloud.studio](mailto:info@cloud.studio)
* Dirección de email de soporte. Por ejemplo: [support@cloud.studio](mailto:support@cloud.studio)
* Prefijar nombres de dispositivos a los endpoints. Esta opción agrega el nombre del dispositivo antes del endpoint para evitar tener que modificar el nombre del endpoint manualmente y diferenciarlo con facilidad del resto de los endpoints. La opción es “True” or “False”.
* Geocodificación: sufijo para resolución de direcciones
* Aceptar valores timestamp futuros hasta (minutos): Ejemplo: 5
* Dirección utilizada para enviar notificaciones por email: [notifications@cloud.studio](mailto:notifications@cloud.studio)
* Nombre utilizado para enviar notificaciones por email: Cloud Studio Gear notifications
* Notificaciones: Firma de las notificaciones de Email (EN). Ejemplo: Cloud Studio's team
* Notificaciones: Firma de las notificaciones de Email (ES). Ejemplo: El equipo de Cloud Studio
* Cantidad de cuentas SMTP para envío de mails. Ejemplo: 1
* Contraseña del servidor SMTP utilizado para enviar notificaciones por email. La contraseña se debe escribir en formato base/64
* Puerto del servidor SMTP utilizado para enviar notificaciones por email. Por ejemplo: 587
* Servidor SMTP utilizado para enviar notificaciones por email. Por ejemplo: smtp.gmail.com
* Usuario del servidor SMTP utilizado para enviar notificaciones por email. Por ejemplo: [notifications@cloud.studio](mailto:notifications@cloud.studio)
* Reglas de contraseña: longitud mínima (caracteres). Por ejemplo: 6
* Reglas de contraseña: requerir caracteres en minúsculas. Por ejemplo: False
* Reglas de contraseña: requerir números. Por ejemplo: False
* Reglas de contraseña: requerir símbolos. Por ejemplo: False
* Reglas de contraseña: requerir caracteres en mayúsculas. Por ejemplo: False
* Validez de links de recuperación de contraseña (horas). Por ejemplo: 24
* Vista de endpoints: agrupamiento por defecto. Por grupo = 1, por categoría = 2 (default), por dispositivo = 3
# Herramientas Low-Code (Scripting)
Introducción [#introducción]
¿Qué son los scripts? [#qué-son-los-scripts]
Los scripts son fragmentos de código, escritos en JavaScript, que permiten extender la funcionalidad de la plataforma, especialmente para el procesamiento de datos de dispositivos, la ejecución de acciones complejas, o la definición de dispositivos definidos por el usuario para los que no exista soporte nativo en la plataforma.
¿En qué lenguajes es posible escribir scripts? [#en-qué-lenguajes-es-posible-escribir-scripts]
Actualmente, la plataforma Gear Studio permite escribir scripts en JavaScript, que es un lenguaje maduro y ampliamente conocido, pero está previsto agregar soporte para otros lenguajes en el futuro.
¿Cuáles son las limitaciones de los scripts? [#cuáles-son-las-limitaciones-de-los-scripts]
Los scripts son extremadamente flexibles y permiten extender la plataforma fácilmente. Sin embargo, para evitar que un script mal escrito o malicioso tenga efectos negativos en la performance de la plataforma, se les aplican las siguientes restricciones:
* Los scripts están limitados a un tiempo de ejecución máximo de 10 segundos.
* Están limitados en el uso de memoria, para evitar problemas de recursión.
* Sólo pueden utilizar los objetos descriptos en la documentación.
Usos de scripting [#usos-de-scripting]
Acciones [#acciones]
Para agilizar la ejecución de una lógica de negocios específica o realizar acciones personalizadas, nuestra plataforma ofrece la capacidad de utilizar scripts que pueden recopilar, procesar y almacenar datos, así como activar otras acciones dentro del entorno de la plataforma. Estos scripts proporcionan una flexibilidad extraordinaria para automatizar tareas específicas, lo que permite una mayor eficiencia y adaptabilidad en la gestión de procesos y operaciones. Ya sea para realizar análisis de datos avanzados, desencadenar eventos específicos o simplemente para personalizar la experiencia del usuario, los scripts se convierten en una herramienta esencial para optimizar sus operaciones en nuestra plataforma.
Configuración de dispositivos [#configuración-de-dispositivos]
Al crear un nuevo modelo para un dispositivo que no está soportado nativamente por la plataforma, es conveniente definir algunos scripts que mejoran la experiencia del usuario, y aportan más funcionalidad. Los scripts serán utilizados luego por todos los dispositivos de ese modelo, lo cual permite además ahorrar mucho trabajo, dado que es algo que hay que hacer por única vez.
Para más información, consultar [esta sección](/docs/configuracion-del-cliente/dispositivos-y-endpoints/dispositivos/modelos-de-dispositivo/configuracion).
Conversión de datos para dispositivos LoRaWAN y MQTT [#conversión-de-datos-para-dispositivos-lorawan-y-mqtt]
Como parte de la configuración de un modelo de dispositivo, es posible crear un script para el procesamiento de los datos que se reciben de él a través de LoRaWAN o MQTT. Esto permite:
* Procesar cada payload recibido (**uplink**)
* Actualizar la información de los endpoints asociados al dispositivo, aplicando funciones para convertir los datos en caso de que sea necesario.
* Actualizar información del propio dispositivo, tales como niveles de RSSI, batería, etc., aplicando funciones para convertir los datos en caso de que sea necesario.
* Crear payloads específicos destinados al dispositivo (**downlink**)
* Procesar comandos estándar o customizados definidos en la plataforma Gear, y generar con ellos un payload con el formato esperado por el dispositivo.
Para más información, consultar [esta sección](/docs/configuracion-del-cliente/dispositivos-y-endpoints/dispositivos/modelos-de-dispositivo/procesamiento-de-datos).
# 04/04/2022
Resumen de cambios [#resumen-de-cambios]
* API para informar la geolocation de un devices [#](/docs/configuracion-del-cliente/dispositivos-y-endpoints/dispositivos)
* Mapas
* Mapas de dispositivos [#](/docs/monitor/mapa-de-dispositivos)
* Mapas de instalaciones [#](/docs/monitor/mapa-de-instalaciones)
* Severidad de alertas [#](/docs/configuracion-del-cliente/alertas-y-alarmas)
* Reporte de notificaciones [#](/docs/monitor/reportes/listado-de-notificaciones)
# 07/03/2022
Resumen de cambios [#resumen-de-cambios]
* Concepto de Actions [#](/docs/configuracion-del-cliente/acciones)
* ABM de Actions
* Alta de Actions
* Edición de Actions
* Concepto de tags en Endpoints [#](/docs/configuracion-del-cliente/dispositivos-y-endpoints/endpoints/endpoint-tagging)
# 08-07-2022
Para este deploy a producción se ingresaron las siguientes mejoras y/o correcciones sugeridas por el cliente:
* Cambio de dirección de un dispositivo.
* En el listado de dispositivos del manager se encuentra la acción en los tres puntos que se llama "Cambiar dirección".

* Debe abrir un modal, con un sólo campo de texto, que permitirá cambiar la dirección del dispositivo. En caso de que el cambio se efectúe correctamente, se debe cerrar el modal automáticamente y refrescar la lista de endpoints.
* En caso de error, debe mostrarse dentro del modal.

* Otra manera para realizar el cambio de "Dirección" es mediante el scripts, ubicado en Dispositivo-Modelos de Dispositivos.

* Una vez estemos dentro de "Editar script" procedemos a modificar la dirección como se muestra a continuación:

* Podemos elegir cambiar la dirección tanto en inglés como español, dependiendo del idioma que tengan configurado en la plataforma.

* Procedemos a guardar los cambios realizados, se requiere refrescar la lista de endpoints y poder visualizar la nueva dirección.

* Alarmas de tipo Informativas.
* Los niveles de severidad en las alertas permiten indicar cuál es la criticidad asociada a las alarmas. Y se definen en los siguientes niveles de seguridad:
* Existen 4 niveles de severidad definidos para las alarmas: **Info**, **baja**, **media** y **alta**.
En el ABM de alertas, se puede definir el nivel de severidad al momento de crear una alerta, debido a esto en todos los lugares donde se represente la alerta, por ejemplo los reportes de alarmas activas, ó el histórico de alarmas, esta va a estar representada según su nivel de la severidad con la que se creó dicha alerta.

* Los niveles de severidad identificados con colores son los siguientes:
* Nivel de severidad “Información” se identifica con el color **azul**.
* Nivel de severidad “Baja” se identifica con el color **amarillo**.
* Nivel de severidad “Media” se identifica con el color **naranja**.
* Nivel de severidad “Alta” se identifica con el color **rojo**.

# 18-07-2022
Para este deploy a producción se ingresaron las siguientes mejoras y/o correcciones sugeridas por el cliente:
* Mostrar los ID's de las vistas en la pantalla de configuración de las vistas:
* Se implementa un nuevo campo ID dentro de la pantalla de configuración\
de las "Vistas" para mantenerlos edificados, facilitando la búsqueda de cada uno de ellos.

* Unidades de Medida para la funcionalidad de Alertas:
* Las unidades la podemos definir desde las instalaciones, los valores de las unidades son las que se van a mostrar al momento de crear una alerta, por ejemplo en Temperatura, seleccionamos ([ºC](https://www.e-medida.es/numero-2/oc-significa-grado-celsius-y-no-grado-centigrado/)).

* Al agregar una alerta , comenzamos seleccionando el Endpoint correspondiente a\
a la instalación y al valor que buscamos en este caso. Podemos tomar como ejemplo grados de ([ºF](https://www.e-medida.es/numero-2/oc-significa-grado-celsius-y-no-grado-centigrado/)) a ([ºC](https://www.e-medida.es/numero-2/oc-significa-grado-celsius-y-no-grado-centigrado/)) agregamos el valor y seleccionamos guardar.

* El siguiente para comprobar que realmente hizo la conversión correspondiente es editando esa misma alerta y verificando el valor.

De igual manera podemos crear una alerta con todas las unidades, dependiendo de su requerimiento personal.
* Ajuste en Monitor sobre Dashboard:
* Se ajusto en los casos que un dispositivo que tenga un endpoint que no esta recibiendo datos, este no muestre ninguna información en los gráficos.
* Se modifico el tooltip del grafico del comparativo de históricos, mostrando ahora solo en endpoint sombreado para ver la información detallada de este.

* Ajuste en reporte de Endpoints data history
* Se configuraron los multiselect para que carguen deseleccionados, y sea necesario ir seleccionando cada select. Al cargar la pagina mostrara todos los multiselect deseleccionados:

Cuando seleccionamos, en este caso un cliente y procedemos hacer click fuera del multiselect vemos como se guardan los cambios.

# 21/02/2022
Resumen de cambios [#resumen-de-cambios]
* Acción clonar a tipo de variable [#](/docs/configuracion-del-cliente/dispositivos-y-endpoints/dispositivos/tipos-de-variables/clonar-tipos-de-variables)
* Al exportar reportes como CSV, se usa un separador según la configuración del facility
* Elemento Multi-Lenguaje
* Elemento Multi-Lenguaje en ABM de Dashboards
* Elemento Multi-Lenguaje en la descripción de Endpoints
* File Assets cacheables
* Márgenes en Grupo de Widgets [#](/docs/monitor/dashboards/editar-grupos-y-widgets)
* Márgenes en Widgets [#](/docs/monitor/dashboards/editar-grupos-y-widgets)
* Radio para mapas desde Back-End
* Radio mínimo para mapas a nivel de cliente [#](/docs/configuracion-del-cliente/cliente/configuracion-de-mapas)
* Separador de miles en Widgets (Por ejemplo, métricas), pantalla de endpoint, vistas, etc [#](/docs/monitor/reportes/exportar-reportes-como-csv-usando-el-separador-correspondiente-al-facility)
* Variables discretas en estados de Endpoints con imagen, en Vistas [#](/docs/monitor/vistas/estados-de-endpoints-con-imagen-asociado-a-variables-discretas)
# Implementaciones
Registro de implementaciones y releases de la plataforma Gear de Cloud Studio IoT.
# Mantenimiento general
La sección **Mantenimiento General** del módulo de *Settings* brinda un conjunto de herramientas de diagnóstico y supervisión que permiten al administrador obtener una visión general del estado operativo de la instancia. Incluye:
**Resumen de endpoints** registrados en la instancia.
**Estado actual de los servicios** de la plataforma.
**Log de actividad de usuarios**, útil para auditoría y trazabilidad.
**Información del sistema**, como recursos del servidor y variables del entorno.
**Tareas programadas** activas y su estado.
**Cola de notificaciones** pendientes de envío.
**Listado de destinatarios** de notificaciones activas.
**Verificaciones de sanidad (health checks)** para asegurar la integridad operativa de la plataforma.
Esta sección es fundamental para mantener el control operativo de la plataforma y anticipar posibles incidencias técnicas.
# Log de Actividad de los Usuarios
El reporte de log de actividad de los usuarios ( **User Activity Log**) permite visualizar de forma clara y concisa, la interacción de los usuarios dentro de la plataforma. Proporciona visibilidad detallada sobre las acciones realizadas por los usuarios con las diferentes aplicaciones y entornos disponibles, siendo una herramienta clave para auditoría, control y análisis operativo.
Para ejecutar este reporte se debe indicar los parámetros de **fecha de actividades**, que -como en todos los reportes puede optarse por una fecha desde y otra hasta, para el día, el día anterior, los últimos 7 días, los últimos 14 días, los últimos 30 días o el mes en curso) y las **actividades** que se quieren listar.

Una vez ejecutada la consulta, los resultados se muestran en forma de tabla con la siguiente información:
**Fecha/Hora**: Momento en que el evento fue registrado.
**Usuario**: identificador del usuario que ejecutó la acción.
**Aplicación**: Módulo o aplicación donde se realizó la acción.
**Cliente**: Identificación del cliente donde se realizó la acción.
**Instalación**: Identificación de la Instalación del cliente donde se realizó la acción.
**Categoría**: el evento realizado
Los resultados del informe, pueden ser exportados, ya sea en formato
* Excel (.xlsx)
* PDF (.pdf)

además, de configurarse un encabezado y pie de página del reporte, así como el nombre del archivo


# Monitor
Este módulo de la plataforma permitirá utilizar herramientas para la visualización, análisis y operación de los dispositivos conectados a la plataforma. La plataforma ofrece diferentes formas de visualizar los datos como por ejemplo dashboards, mapas, y vistas de tipo SCADA.
# Mapa de dispositivos
En el mapa de dispositivos es posible visualizar todos los dispositivos del cliente a los que el usuario tenga permisos.
Para activar la funcionalidad y poder visualizar en el monitor la pantalla de dispositivos, se tiene que configurar el permiso tildando la opción "Habilitar mapa de dispositivos" como en la siguiente imagen.
{/* Imagen pendiente */}
En el listado lateral se pueden ver todos los dispositivos de los clientes y conocer el status de cada dispositivo en base de las alarmas. Permite un acceso rápido a las vistas, dashboard, endpoints y alarmas del facility donde se encuentra dicho dispositivo.
{/* Imagen pendiente */}
# Mapa de instalaciones
Introducción [#introducción]
En el mapa de instalaciones es posible visualizar todas las instalaciones del cliente a los que el usuario tenga permisos.
Activación del mapa de instalaciones [#activación-del-mapa-de-instalaciones]
Para activar la funcionalidad y poder visualizar en el monitor la pantalla de instalaciones, se tiene que configurar el permiso del cliente tildando la opción "Habilitar mapa de instalaciones" como en la siguiente imagen.

En el listado lateral se pueden ver todas las instalaciones del cliente y conocer el status de cada instalación en base de las alarmas. Permite un acceso rápido a las vistas, dashboard, endpoints y alarmas de las instalaciones
{/* Imagen pendiente */}
# Alarmas
Introducción [#introducción]
Esta sección explica cómo extraer la definición de las alarmas generadas a partir de alertas de la plataforma Gear Studio, utilizando la API de extracción de datos. Estas alarmas son generadas al cumplirse determinadas condiciones predefinidas de alertas. Cuando se vuelve a los valores normales, la alarmas se cierran en forma automática.
Para consultar alarmas se utiliza el tipo de datos alarm, cuya documentación puede verse [aquí](/docs/apis-de-extraccion-de-datos/alarmas/tipo-de-datos-alarm).
Existen tres mecanismos para obtener información de alarmas:
* Obtener datos de una alerta específica, dado su ID, como se explica [aquí](/docs/apis-de-extraccion-de-datos/alarmas/obtener-una-alarma-dado-su-id).
* Obtener información de todas las alertas asociadas a un endpoint, dispositivo, facility, o cliente. La documentación puede verse [aquí](/docs/apis-de-extraccion-de-datos/alarmas/obtener-una-lista-de-alarmas-utilizando-parametros).
* Obtener información de todas las alertas asociadas a un endpoint, dispositivo, facility, o cliente, en forma incremental. La documentación puede verse [aquí](/docs/apis-de-extraccion-de-datos/alarmas/obtener-una-lista-de-alarmas-en-forma-incremental).
# Obtener una alarma dado su ID
Esta API permite obtener un alarma dado su ID.
Request [#request]
```
GET /api/v2/alarms/{alarmID} HTTP/1.1
Host: gear.cloud.studio
Authorization: Bearer {accessToken}
```
Parámetros [#parámetros]
| Nombre | Descripción |
| ----------- | --------------------------------------------------------------------------------------------------------------------------------------------------------------------------------------------------------------- |
| accessToken | Token de acceso con permisos para leer información de alarmas. Vea esta página para más información. El access token también puede enviarse como parte del query string, utilizando el parámetro “accessToken”. |
| alarmID | Identificador único de la alarma para la que desea obtenerse información. |
Response [#response]
La respuesta contiene la alarma indicada, como se muestra en este ejemplo:
```
{
"AlarmID": 1266896,
"DeviceID": 7370,
"DeviceDescription": "Controlador RUPANCO",
"EndpointID": 0,
"AlarmTypeID": 1,
"AlarmTypeDescription": "Dispositivo fuera de línea",
"AlarmSeverityID": 3,
"AlarmSeverityDescription": "Alta",
"Details": "",
"DateTimeCreated_UTC": "2021-10-15T17:34:35",
"DateTimeClosed_UTC": "2021-10-15T18:21:39",
"SequenceNumber": 28885207,
"MTTRMinutes": 47.0
}
```
# Obtener una lista de alarmas en forma incremental
Esta API permite obtener una lista de alarmas, en forma incremental. Esto permite obtener actualizaciones rápidas de las alarmas a medida que son abiertas o cerradas sin necesidad de obtener la lista completa.
Teoría de operación [#teoría-de-operación]
Para obtener una lista de alarmas en forma incremental, se utiliza el campo SequenceNumber. Este campo es de tipo monotónico ascendente, es decir que al darse cambios en una alarma, su campo SequenceNumber cambiará a un valor mayor al de cualquier otra alarma. Esto permite obtener datos basados en el SequenceNumber, en pequeños lotes, hasta que no se obtengan más datos, y luego continuar periódicamente, para obtener actualizaciones. Cuando el resultado de esta API es una lista vacía, esto significa que por el momento no existen actualizaciones.
Típicamente, una aplicación que consume esta API utiliza el siguiente flujo:
1. La aplicación comienza utilizando un SequenceNumber almacenado (típicamente en almacenamiento no volátil). En la primera ejecución, este valor es 1.
2. La aplicación ejecuta la API utilizando el (SequenceNumber almacenado + 1).
3. La aplicación recibe una lista de alarmas, ordenadas por SequenceNumber.
4. Si la lista recibida está vacía, la aplicación espera algunos segundos, y vuelve al paso 2.
5. Si la lista recibida no es vacía, la aplicación almacena el mayor SequenceNumber recibido.
6. La aplicación vuelve inmediatamente al paso 2.
7. Cuando se abre una nueva alarma, o una existente es modificada, su SequenceNumber cambiará inmediatamente a un valor más alto que el último recibido, por lo cual su información será recibida inmediatamente en la próxima ejecución.
8. Cualquier elemento que se reciba con la propiedad DateTimeClosed\_UTC con valor no nulo ni vacio, indica que esa alarma ya ha sido cerrada.
| En el flujo anterior, se asume que la aplicación siempre ejecuta la API con el mismo conjunto de parámetros clientID, facilityID, deviceID, y endpointID. Si se desea usar parámetros diferentes, la búsqueda debe comenzar desde cero. |
| --------------------------------------------------------------------------------------------------------------------------------------------------------------------------------------------------------------------------------------- |
| Para hacer debugging de cualquier aplicación que utilice esta API, se recomienda usar maxCount = 1, para recibir las actualizaciones de a una por vez. Este parámetro puede luego ser cambiado a un valor más práctico para producción, como 50. |
| ------------------------------------------------------------------------------------------------------------------------------------------------------------------------------------------------------------------------------------------------ |
Request [#request]
```
GET /api/v2/alarms/incremental/{sequenceNumber}?clientID={clientID}&facilityID={facilityID}&deviceID={deviceID}&endpointID={endpointID}&maxCount={maxCount} HTTP/1.1
Host: gear.cloud.studio
Authorization: Bearer {accessToken}
```
Parámetros [#parámetros]
| Nombre | Descripción |
| -------------- | --------------------------------------------------------------------------------------------------------------------------------------------------------------------------------------------------------------- |
| accessToken | Token de acceso con permisos para leer información de alarmas. Vea esta página para más información. El access token también puede enviarse como parte del query string, utilizando el parámetro “accessToken”. |
| sequenceNumber | Valor del campo SequenceNumber de la última alarma recibida. Puede indicarse 0 para comenzar desde el inicio. |
| clientID | Identificador opcional indicando que sólo se desea obtener la lista de alarmas para el cliente dado. |
| facilityID | Identificador opcional indicando que sólo se desea obtener la lista de alarmas para el facility dado. |
| deviceID | Identificador opcional indicando que sólo se desea obtener la lista de alarmas para el dispositivo dado. |
| endpointID | Identificador opcional indicando que sólo se desea obtener la lista de alarmas para el endpoint dado. |
| maxCount | Parámetro opcional indicando la cantidad máxima de registros a incluir en el resultado, valores superiores a 500 se limitan a 500 independientemente del valor enviado en el request. |
| Es obligatorio incluir uno (y sólo uno) de los parámetros “clientID”, “facilityID”, “deviceID”, o “endpointID”. |
| --------------------------------------------------------------------------------------------------------------- |
Response [#response]
La respuesta contiene la lista de alarmas buscadas, como se muestra en este ejemplo:
```
[
{
"AlarmID": 1266896,
"DeviceID": 7370,
"DeviceDescription": "Controlador RUPANCO",
"AlarmTypeID": 1,
"AlarmTypeDescription": "Dispositivo fuera de línea",
"AlarmSeverityID": 3,
"AlarmSeverityDescription": "Alta",
"DateTimeCreated_UTC": "2021-10-15T17:34:35",
"DateTimeClosed_UTC": "2021-10-15T18:21:39",
"SequenceNumber": 28885207,
"MTTRMinutes": 47.0
},
{
"AlarmID": 1266922,
"DeviceID": 7370,
"DeviceDescription": "Controlador RUPANCO",
"AlarmTypeID": 1,
"AlarmTypeDescription": "Dispositivo fuera de línea",
"AlarmSeverityID": 3,
"AlarmSeverityDescription": "Alta",
"DateTimeCreated_UTC": "2021-10-15T19:36:41",
"DateTimeClosed_UTC": "2021-10-15T19:37:23",
"SequenceNumber": 28885384,
"MTTRMinutes": 47.0
},
{
"AlarmID": 1266950,
"DeviceID": 7370,
"DeviceDescription": "Controlador RUPANCO",
"AlarmTypeID": 1,
"AlarmTypeDescription": "Dispositivo fuera de línea",
"AlarmSeverityID": 3,
"AlarmSeverityDescription": "Alta",
"DateTimeCreated_UTC": "2021-11-16T19:49:35",
"DateTimeClosed_UTC": "2021-11-16T19:49:46",
"SequenceNumber": 28948817,
"MTTRMinutes": 47.0
}
]
```
# Obtener una lista de alarmas utilizando parámetros
Esta API permite obtener una lista de alarmas, utilizando parámetros.
Request [#request]
```
GET /api/v2/alarms?clientID={clientID}&facilityID={facilityID}&deviceID={deviceID}&endpointID={deviceID}&maxCount={maxCount} HTTP/1.1
Host: gear.cloud.studio
Authorization: Bearer {accessToken}
```
Parámetros [#parámetros]
| Nombre | Descripción |
| ----------- | --------------------------------------------------------------------------------------------------------------------------------------------------------------------------------------------------------------- |
| accessToken | Token de acceso con permisos para leer información de alarmas. Vea esta página para más información. El access token también puede enviarse como parte del query string, utilizando el parámetro “accessToken”. |
| clientID | Identificador opcional indicando que sólo se desea obtener la lista de alarmas para el cliente dado. |
| facilityID | Identificador opcional indicando que sólo se desea obtener la lista de alarmas para el facility dado. |
| deviceID | Identificador opcional indicando que sólo se desea obtener la lista de alarmas para el dispositivo dado. |
| dateFrom | Fecha a partir de la cual se desea obtener la lista de alarmas para el dispositivo dado. |
| dateTo | Fecha hasta la cual se desea obtener la lista de alarmas para el dispositivo dado. |
| endpointID | Identificador opcional indicando que sólo se desea obtener la lista de alertas para el endpoint dado. |
| state | Identificador del estado de la alarma. Los valores posibles son “open”, “closed” y “all”. |
| maxCount | Parámetro opcional indicando la cantidad máxima de registros a incluir en el resultado, valores superiores a 500 se limitan a 500 independientemente del valor enviado en el request. |
| Es obligatorio incluir uno (y sólo uno) de los parámetros “clientID”, “facilityID”, “deviceID”, o “endpointID”. |
| --------------------------------------------------------------------------------------------------------------- |
Response [#response]
La respuesta contiene la lista de alarmas buscadas, como se muestra en este ejemplo:
```
[
{
"AlarmID":1266896,
"DeviceID":7370,
"DeviceDescription":"Controlador RUPANCO",
"EndpointID":0,
"AlarmTypeID":1,
"AlarmTypeDescription":"Dispositivo fuera de línea",
"AlarmSeverityID":3,
"AlarmSeverityDescription":"Alta",
"Details":"",
"DateTimeCreated_UTC":"2021-10-15T17:34:35",
"DateTimeClosed_UTC":"2021-10-15T18:21:39",
"SequenceNumber":28885207,
"MTTRMinutes":47.0
},
{
"AlarmID":1266922,
"DeviceID":7370,
"DeviceDescription":"Controlador RUPANCO",
"EndpointID":0,
"AlarmTypeID":1,
"AlarmTypeDescription":"Dispositivo fuera de línea",
"AlarmSeverityID":3,
"AlarmSeverityDescription":"Alta",
"Details":"",
"DateTimeCreated_UTC":"2021-10-15T19:36:41",
"DateTimeClosed_UTC":"2021-10-15T19:37:23",
"SequenceNumber":28885384,
"MTTRMinutes":47.0
}
]
```
# Tipo de datos alarm
Introducción [#introducción]
El tipo de datos alarm permite obtener la información de una alerta. A continuación se describen todas las propiedades del tipo de datos alarm.
Propiedades [#propiedades]
\### AlarmID (int) La propiedad AlarmID representa el identificador único de la alarma en la plataforma. Este identificador es asignado automáticamente cuando se crea una alarma. ### DeviceID (int) La propiedad DeviceID representa el identificador único del dispositivo que dispara la alarma. ### EndpointID (int) Identificador único del endpoint al que corresponde la alerta. ### AlarmTypeID (int) La propiedad AlarmTypeID indica el tipo de alarma. ### AlarmTypeDescription (string) Descripción del tipo de alarma. Se utiliza únicamente para listar o enumerar. ### AlarmSeverityID (int)
Indica la gravedad de la alarma. Corresponde a uno de los valores siguientes:
* **Information = 0:** Informativo, sin gravedad;
* **Low = 1:** Baja gravedad de alarma;
* **Medium = 2:** Gravedad media;
* **High = 3:** Alarma critica, gravedad alta.
\### AlarmSeverityDescription (string) Descripción de la gravedad de la alarma. ### Details (string) Detalles asociados a la alarma. ### DateTimeCreated\_UTC (string) Fecha y hora de creación de la alarma (UTC) en formato String. ### DateTimeClosed\_UTC (string) Fecha y hora de cierre de la alarma (UTC) en formato String. ### SequenceNumber (long) Número de secuencia asociado a la alarma. El número de secuencia se actualiza con un número mayor cada vez que la alarma se modifica de cualquier manera, incluso cuando se cierra. Se garantiza que cada alarma recibirá un número mayor al de cualquier otra.
# Alertas
Introducción [#introducción]
Esta sección explica cómo extraer la definición de las alertas creadas en la plataforma Gear Studio utilizando la API de extracción de datos. Las alertas permiten definir condiciones que una vez cumplidas generan las respectivas alarmas. Cuando se vuelve a los valores normales, la alarmas creadas anteriormente se cierran en forma automática.
Para informar alertas, se utiliza el tipo de datos alert, cuya documentación puede verse [aquí](/docs/apis-de-extraccion-de-datos/alertas/tipo-de-datos-alert).
Existen tres mecanismos para obtener información de alertas:
* Obtener datos de una alerta específica, dado su ID, como se explica [aquí](/docs/apis-de-extraccion-de-datos/alertas/obtener-una-alerta-dado-su-id).
* Obtener información de todas las alertas asociadas a un endpoint, dispositivo, facility, o cliente. La documentación puede verse [aquí](/docs/apis-de-extraccion-de-datos/alertas/obtener-una-lista-de-alertas-utilizando-parametros).
* Obtener información de todas las alertas asociadas a un endpoint, dispositivo, facility, o cliente, en forma incremental. La documentación puede verse [aquí](/docs/apis-de-extraccion-de-datos/alertas/obtener-una-lista-de-alertas-en-forma-incremental).
# Obtener una alerta dado su ID
Esta API permite obtener un alerta dado su ID.
Request [#request]
```
GET /api/v2/alerts/{alertID} HTTP/1.1
Host: gear.cloud.studio
Authorization: Bearer {accessToken}
```
Parámetros [#parámetros]
| Nombre | Descripción |
| ----------- | --------------------------------------------------------------------------------------------------------------------------------------------------------------------------------------------------------------- |
| accessToken | Token de acceso con permisos para leer información de alertas. Vea esta página para más información. El access token también puede enviarse como parte del query string, utilizando el parámetro “accessToken”. |
| alertID | Identificador único de la alerta para la que desea obtenerse información. |
Response [#response]
La respuesta contiene la alerta indicada, como se muestra en este ejemplo:
```
{
"AlertID": 211,
"VariableTypeID": 1,
"EndpointID": 114092,
"ConditionType": 3,
"Threshold": 25,
"ClientID": 4,
"FacilityID": 184,
"NormalConditionType": 6,
"NormalThreshold": 24,
"MinimumDurationSeconds": 300,
"NotificationEmails": [
"someone@somewhere.com"
],
"NotificationSMSNumbers": [
"+1123456789"
],
"NotificationVoiceNumbers": [
"+1123456789"
],
"Tags": [
"default",
"gateway-default"
],
"SequenceNumber": 45701485,
"Enabled": true,
"Schedules": [
{
"Days": [
1,
2,
4,
5
],
"StartTime": {
"Hour": 0,
"Millisecond": 0,
"Minute": 0,
"Second": 0
},
"EndTime": {
"Hour": 23,
"Millisecond": 999,
"Minute": 0,
"Second": 59
}
}
],
"Timezone": {
"CurrentOffsetMinutes": -180,
"TimeZoneCode": "america/argentina/buenos_aires"
}
}
```
# Obtener una lista de alertas en forma incremental
Esta API permite obtener una lista de alertas, en forma incremental. Esto permite obtener actualizaciones rápidas de las alertas a medida que son creadas, modificadas, o eliminadas, sin necesidad de obtener la lista completa.
Teoría de operación [#teoría-de-operación]
Para obtener una lista de alertas en forma incremental, se utiliza el campo SequenceNumber. Este campo es de tipo monotónico ascendente, es decir que al crear, modificar, o eliminar una alerta, su campo SequenceNumber cambiará a un valor mayor al de cualquier otra alerta. Esto permite obtener datos basados en el SequenceNumber, en pequeños lotes, hasta que no se obtengan más datos, y luego continuar periódicamente, para obtener actualizaciones. Cuando el resultado de esta API es una lista vacía, esto significa que por el momento no existen actualizaciones.
Típicamente, una aplicación que consume esta API utiliza el siguiente flujo:
1. La aplicación comienza utilizando un SequenceNumber almacenado (típicamente en almacenamiento no volátil). En la primera ejecución, este valor es 1.
2. La aplicación ejecuta la API utilizando el (SequenceNumber almacenado + 1).
3. La aplicación recibe una lista de alertas, ordenadas por SequenceNumber.
4. Si la lista recibida vacía, la aplicación espera algunos segundos, y vuelve al paso 2.
5. Si la lista recibida no es vacía, la aplicación almacena el mayor SequenceNumber recibido.
6. La aplicación vuelve inmediatamente al paso 2.
7. Cuando se crea una nueva alerta, o una existente es modificada, su SequenceNumber cambiará inmediatamente a un valor más alto que el último recibido, por lo cual su información será recibida inmediatamente en la próxima ejecución.
8. Cualquier elemento que se reciba con la propiedad Enabled con valor false, indica que ese elemento ha sido eliminado. Si la propiedad Enabled tiene valor true, indica que el elemento acaba de ser creado o modificado.
| En el flujo anterior, se asume que la aplicación siempre ejecuta la API con el mismo conjunto de parámetros clientID, facilityID, deviceID, y endpointID. Si se desea usar parámetros diferentes, la búsqueda debe comenzar desde cero. |
| --------------------------------------------------------------------------------------------------------------------------------------------------------------------------------------------------------------------------------------- |
| Para hacer debugging de cualquier aplicación que utilice esta API, se recomienda usar maxCount = 1, para recibir las actualizaciones de a una por vez. Este parámetro puede luego ser cambiado a un valor más práctico para producción, como 50. |
| ------------------------------------------------------------------------------------------------------------------------------------------------------------------------------------------------------------------------------------------------ |
Request [#request]
```
GET /api/v2/alerts/incremental/{sequenceNumber}?clientID={clientID}&facilityID={facilityID}&deviceID={deviceID}&endpointID={endpointID}&maxCount={maxCount} HTTP/1.1
Host: gear.cloud.studio
Authorization: Bearer {accessToken}
```
Parámetros [#parámetros]
| Nombre | Descripción |
| -------------- | --------------------------------------------------------------------------------------------------------------------------------------------------------------------------------------------------------------- |
| accessToken | Token de acceso con permisos para leer información de alertas. Vea esta página para más información. El access token también puede enviarse como parte del query string, utilizando el parámetro “accessToken”. |
| sequenceNumber | Valor del campo SequenceNumber de la última alerta recibida. Puede indicarse 0 para comenzar desde el inicio. |
| clientID | Identificador opcional indicando que sólo se desea obtener la lista de alertas para el cliente dado. |
| facilityID | Identificador opcional indicando que sólo se desea obtener la lista de alertas para el facility dado. |
| deviceID | Identificador opcional indicando que sólo se desea obtener la lista de alertas para el dispositivo dado. |
| endpointID | Identificador opcional indicando que sólo se desea obtener la lista de alertas para el endpoint dado. |
| maxCount | Parámetro opcional indicando la cantidad máxima de alertas a incluir en el resultado. |
| Es obligatorio incluir uno (y sólo uno) de los parámetros “clientID”, “facilityID”, “deviceID”, o “endpointID”. |
| --------------------------------------------------------------------------------------------------------------- |
Response [#response]
La respuesta contiene la lista de alertas buscada, como se muestra en este ejemplo:
```
[
{
"AlertID": 211,
"VariableTypeID": 1,
"EndpointID": 114092,
"ConditionType": 3,
"Threshold": 25,
"ClientID": 4,
"FacilityID": 184,
"NormalConditionType": 6,
"NormalThreshold": 24,
"MinimumDurationSeconds": 300,
"NotificationEmails": ["someone@somewhere.com"],
"NotificationSMSNumbers": ["+1123456789"],
"NotificationVoiceNumbers": ["+1123456789"],
"Tags": ["default", "gateway-default"],
"SequenceNumber": 45701485,
"Enabled": true,
"Schedules": [],
"Timezone": {
"CurrentOffsetMinutes": -180,
"TimeZoneCode": "america/argentina/buenos_aires"
}
},
{
"AlertID": 212,
"VariableTypeID": 1,
"EndpointID": 114092,
"ConditionType": 5,
"Threshold": 20,
"ClientID": 4,
"FacilityID": 184,
"NormalConditionType": 3,
"NormalThreshold": 22,
"MinimumDurationSeconds": 300,
"NotificationEmails": ["someone@somewhere.com"],
"NotificationSMSNumbers": ["+1123456789"],
"NotificationVoiceNumbers": ["+1123456789"],
"Tags": ["default", "gateway-default"],
"SequenceNumber": 45701485,
"Enabled": true,
"Schedules": [
{
"Days": [
1,
2,
4,
5
],
"StartTime": {
"Hour": 0,
"Millisecond": 0,
"Minute": 0,
"Second": 0
},
"EndTime": {
"Hour": 23,
"Millisecond": 999,
"Minute": 0,
"Second": 59
}
}
],
"Timezone": {
"CurrentOffsetMinutes": -180,
"TimeZoneCode": "america/argentina/buenos_aires"
}
}
]
```
# Obtener una lista de alertas utilizando parámetros
Esta API permite obtener una lista de alertas, utilizando parámetros.
Request [#request]
```
GET /api/v2/alerts?clientID={clientID}&facilityID={facilityID}&deviceID={deviceID}&endpointID={endpointID}&maxCount={maxCount} HTTP/1.1
Host: gear.cloud.studio
Authorization: Bearer {accessToken}
```
Parámetros [#parámetros]
| Nombre | Descripción |
| ----------- | --------------------------------------------------------------------------------------------------------------------------------------------------------------------------------------------------------------- |
| accessToken | Token de acceso con permisos para leer información de alertas. Vea esta página para más información. El access token también puede enviarse como parte del query string, utilizando el parámetro “accessToken”. |
| clientID | Identificador opcional indicando que sólo se desea obtener la lista de alertas para el cliente dado. |
| facilityID | Identificador opcional indicando que sólo se desea obtener la lista de alertas para el facility dado. |
| deviceID | Identificador opcional indicando que sólo se desea obtener la lista de alertas para el dispositivo dado. |
| endpointID | Identificador opcional indicando que sólo se desea obtener la lista de alertas para el endpoint dado. |
| maxCount | Parámetro opcional indicando la cantidad máxima de alertas a incluir en el resultado. |
| Es obligatorio incluir uno (y sólo uno) de los parámetros “clientID”, “facilityID”, “deviceID”, o “endpointID”. |
| --------------------------------------------------------------------------------------------------------------- |
Response [#response]
La respuesta contiene la lista de alertas buscada, como se muestra en este ejemplo:
```
[
{
"AlertID": 211,
"VariableTypeID": 1,
"EndpointID": 114092,
"ConditionType": 3,
"Threshold": 25,
"ClientID": 4,
"FacilityID": 184,
"NormalConditionType": 6,
"NormalThreshold": 24,
"MinimumDurationSeconds": 300,
"NotificationEmails": ["someone@somewhere.com"],
"NotificationSMSNumbers": ["+1123456789"],
"NotificationVoiceNumbers": ["+1123456789"],
"Tags": ["default", "gateway-default"],
"SequenceNumber": 45701485,
"Enabled": true,
"Schedules": [],
"Timezone": {
"CurrentOffsetMinutes": -180,
"TimeZoneCode": "america/argentina/buenos_aires"
}
},
{
"AlertID": 212,
"VariableTypeID": 1,
"EndpointID": 114092,
"ConditionType": 5,
"Threshold": 20,
"ClientID": 4,
"FacilityID": 184,
"NormalConditionType": 3,
"NormalThreshold": 22,
"MinimumDurationSeconds": 300,
"NotificationEmails": ["someone@somewhere.com"],
"NotificationSMSNumbers": ["+1123456789"],
"NotificationVoiceNumbers": ["+1123456789"],
"Tags": ["default", "gateway-default"],
"SequenceNumber": 45701485,
"Enabled": true,
"Schedules": [
{
"Days": [
1,
2,
4,
5
],
"StartTime": {
"Hour": 0,
"Millisecond": 0,
"Minute": 0,
"Second": 0
},
"EndTime": {
"Hour": 23,
"Millisecond": 999,
"Minute": 0,
"Second": 59
}
}
],
"Timezone": {
"CurrentOffsetMinutes": -180,
"TimeZoneCode": "america/argentina/buenos_aires"
}
}
]
```
# Tipo de datos alert
Introducción [#introducción]
El tipo de datos alert permite obtener la configuración de una alerta. A continuación se describen todas las propiedades del tipo de datos alert.
Propiedades [#propiedades]
\### AlertID (int) La propiedad AlertID representa el identificador único de la alerta en la plataforma. Este identificador es asignado automáticamente cuando se crea una alerta. ### VariableTypeID (int enum)
La propiedad VariableTypeID indica el tipo de variable asociado con la alerta. Para variables definidas por el usuario, el ID es siempre igual o mayor a 1000. Para los tipos de variable predefinidos en la plataforma, los valores son los siguientes:
* Temperature = 1
* Humidity = 2,
* Light level = 3
* Setpoint = 4
* Volume = 5
* Active energy = 6
* Run time = 7
* Discrete sensor state = 8
* Dimmerization = 9
* Weight = 10
* Flow = 11
* Voltage = 12
* Current = 13
* Active power = 14
* Reactive power = 15
* Apparent power = 16
* Power factor = 17
* Pressure = 18
* Frequency = 19
* Ppm concentration = 20
* Mass/volume concentration = 21
* AQI = 22
* People flow = 23
* People count = 24
* Reactive energy = 25
* Apparent energy = 26
* Location = 27
\### EndpointID (int) Identificador único del endpoint al que corresponde la alerta. ### FacilityID (int) Identificador único del facility al que corresponde la alerta. ### ClientID (int) Identificador único del cliente al que corresponde la alerta. ### ConditionType (int enum)
La propiedad ConditionType indica el tipo de condición que se aplica para comparar con el valor del campo Threshold para disparar la alerta. Los valores posibles son los siguientes:
* **Equal = 1**: la alerta se disparará cuando el valor reportado sea igual al indicado en el campo Threshold.
* **NotEqual = 2**: la alerta se disparará cuando el valor reportado sea diferente al indicado en el campo Threshold.
* **Greater = 3**: la alerta se disparará cuando el valor reportado sea mayor al indicado en el campo Threshold.
* **GreaterOrEqual = 4**: la alerta se disparará cuando el valor reportado sea mayor o igual al indicado en el campo Threshold.
* **Lower = 5**: la alerta se disparará cuando el valor reportado sea menor al indicado en el campo Threshold.
* **LowerOrEqual = 6**: la alerta se disparará cuando el valor reportado sea menor o igual al indicado en el campo Threshold.
\### Threshold (double) Umbral utilizado para activar la alerta y generar la alarma asociada. Se utiliza junto con el campo ConditionType. ### NormalConditionType (int enum)
La propiedad NormalConditionType indica el tipo de condición que se aplica para comparar con el valor del campo NormalThreshold para cerrar la alerta. Los valores posibles son los siguientes:
* **Equal = 1**: la alerta se cerrará cuando el valor reportado sea igual al indicado en el campo NormalThreshold.
* **NotEqual = 2**: la alerta se cerrará cuando el valor reportado sea diferente al indicado en el campo NormalThreshold.
* **Greater = 3**: la alerta se cerrará cuando el valor reportado sea mayor al indicado en el campo NormalThreshold.
* **GreaterOrEqual = 4**: la alerta se cerrará cuando el valor reportado sea mayor o igual al indicado en el campo NormalThreshold.
* **Lower = 5**: la alerta se cerrará cuando el valor reportado sea menor al indicado en el campo NormalThreshold.
* **LowerOrEqual = 6**: la alerta se cerrará cuando el valor reportado sea menor o igual al indicado en el campo NormalThreshold.
\### NormalThreshold (double) Umbral utilizado para volver a la condición normal y desactivar la alerta. Se utiliza junto con el campo NormalConditionType. ### MinimumDurationSeconds (int) Cantidad mínima de tiempo (en segundos) que debe mantenerse la condición antes de activar la alerta. ### NotificationEmails (array of string) Lista de direcciones de e-mail a las que se enviarán notificaciones cuando la alerta se active o desactive. ### NotificationSMSNumbers (array of string) Lista de números de teléfono a los que se enviarán notificaciones por SMS cuando la alerta se active o desactive. ### NotificationVoiceNumbers (array of string) Lista de números de teléfono a los que se enviarán notificaciones de voz cuando la alerta se active o desactive. ### Tags (array of string) Lista de tags asociadas a la alerta. ### SequenceNumber (int64) Número de secuencia asociado a la alerta. El número de secuencia se actualiza con un número mayor cada vez que la alerta se modifica de cualquier manera, incluso cuando la alerta se elimina. Se garantiza que cada alerta creada o modificada recibirá un número mayor al de cualquier otra alerta existente. ### Enabled (bool) Indica si la alerta puede utilizarse, o si ha sido eliminada. El valor false indica que la alerta ha sido eliminada. Sólo es posible acceder a alertas eliminadas a través de la API para [obtener una lista de alertas en forma incremental](/docs/apis-de-extraccion-de-datos/alertas/obtener-una-lista-de-alertas-en-forma-incremental).
# Datos de endpoints
Introducción [#introducción]
Esta sección explica cómo extraer los datos de los Endpoints creados en la plataforma Gear Studio utilizando la API de extracción de datos.
Para consultar datos de Endpoints, se utiliza el tipo de datos EndpointData, cuya documentación puede verse [aquí](/docs/apis-de-extraccion-de-datos/datos-de-endpoints/tipo-de-datos-endpointdata).
Existen dos mecanismos para obtener información de Endpoints:
* Obtener la información de un Endpoint específico, dado su ID y un rango de fechas, como se explica [aquí](/docs/apis-de-extraccion-de-datos/datos-de-endpoints/obtener-datos-de-un-endpoint-utilizando-su-id-y-parametros).
* Obtener información de todos los Endpoint asociados a un endpoint, dispositivo, facility, o cliente, en forma incremental. La documentación puede verse [aquí](/docs/apis-de-extraccion-de-datos/datos-de-endpoints/obtener-datos-de-endpoints-en-forma-incremental).
# Obtener datos de un endpoint utilizando su ID y parámetros
Esta API permite obtene los datos de un Endpoint utilizando su ID y parámetros.
Request [#request]
```
GET /api/v2/endpointData/?endpointID={endpointID}&dateFrom={dateFrom}&dateTo={dateTo}&maxCount={maxCount} HTTP/1.1
Host: gear.cloud.studio
Authorization: Bearer {accessToken}
```
Parámetros [#parámetros]
| Nombre | Descripción |
| ----------- | ----------------------------------------------------------------------------------------------------------------------------------------------------------------------------------------------------------------- |
| accessToken | Token de acceso con permisos para leer información de endpoints. Vea esta página para más información. El access token también puede enviarse como parte del query string, utilizando el parámetro “accessToken”. |
| endpointID | Identificador obligatorio indicando el endpoint del cual se desea extraer los datos. |
| dateFrom | Fecha a partir de la cual se desea obtener los datos de un Endpoint. |
| dateTo | Fecha hasta la cual se desea obtener los datos de un Endpoint. |
| maxCount | Parámetro opcional indicando la cantidad máxima de registros a incluir en el resultado, valores superiores a 500 se limitan a 500 independientemente del valor enviado en el request |
| Es opcional incluir el parámetro “endpointID”. |
| ---------------------------------------------- |
Response [#response]
La respuesta contiene la lista de EndpointData buscados, como se muestra en este ejemplo:
```
[
{
"EndpointID": 113653,
"Timestamp_UTC": "2021-10-15T22:51:19",
"Value": 18.91,
"SequenceNumber": 6683839
},
{
"EndpointID": 113653,
"Timestamp_UTC": "2021-10-15T23:01:25",
"Value": 16.93,
"SequenceNumber": 6683852
},
{
"EndpointID": 113653,
"Timestamp_UTC": "2021-10-15T23:11:28",
"Value": 16.97,
"SequenceNumber": 6683864
},
{
"EndpointID": 113653,
"Timestamp_UTC": "2021-10-15T23:41:36",
"Value": 16.93,
"SequenceNumber": 6683874
}
]
```
# Obtener el último dato de múltiples Endpoints
Este servicio permite consultar **los últimos datos registrados** de hasta **5 dispositivos al mismo tiempo**, usando una única llamada.
Su uso es principalmente recomendado cuando se precisa mostrar información en tiempo real de varios sensores en simultáneo, evitando hacer una llamada específica para cada uno, lo que redunda en un **ahorro de tiempo** y **reduce el tráfico de red**.
Para usar esta función se debe realizar una llamada a la Api a través de una dirección específica y se realiza a través del método GET
`GET /api/v2/endpointData/multiple`
por un tema de seguridad. para poder realizar el acceso se debe contar con una llave de acceso, que identifique al usuario que realiza la petición. Esta llave es el [Access Token](/docs/apis-de-extraccion-de-datos/access-tokens-persistentes) y se debe incluir en como parte de la dirección
```
GET https://gear-dev.cloud.studio/api/v2/endpointData/multiple?accessToken=123456789-1110-0022-3333-987654321012&endpointIds=351031,151040,252340,511088,720510
```
⚠️ En caso que no se falte la llave de acceso o que la misma sea inválida, la API devolverá como resultado un error.\
Este error es el **401** que indica **acceso no autorizado**
Los parámetros que se precisan recibir son:
* LLave de Acceso (Access Token): Clave que indica usuario autorizado.
* Es de tipo String y es Obligatorio
* EndpointsIDs: ID de los sensores de los dispositivos separados por coma, para los cuales se quiere recobrar los datos.
* Es de tipo Lista y es obligatorio
* **NOTA**: El límite de endpoints a solicitar por llamado es de 5 (cinco).
⚠️️ Cuando se envían más de 5 endpointIds en la solicitud, se va a recibir un error **400** que indica **Bad Request** que significa que se sobrepasó el límite de endpoints
Una vez realizada de forma correcta la solicitud se recibe una **lista de objetos** (JSON). Cada objeto de la lista representará la información de uno de los sensores solicitados.

La información de la lista es la siguiente:
* **EndpointID**: Número de Identificación del sensor consultado
* **Description**: Nombre del Sensor consultado
* **SequenceNumber**: número secuencial que indica el orden en que se registraron los datos (de utilidad para seguimiento/históricos)
* **TimeStamp\_UTC**: fecha y hora exacta de registro del lastValue
* **Value**: último valor reportado por el sensor
⚠️ Si un endpoint no tiene datos, los campos **Value y timeStamp** vendrán *nulos.*
**️A tener en cuenta**:️ La incorporación de esta funcionalidad afecta a todos los métodos de consulta de datos de endpoint ya que ahora incluyen el campo *description*
Está excluído el endpoint de Cámara
# Tipo de datos EndpointData
Introducción [#introducción]
El tipo de datos EndpointData permite obtener la configuración de un Endpoint. A continuación se describen todas las propiedades del tipo de datos EndpointData.
Propiedades [#propiedades]
\### EndpointID (int) La propiedad EndpointID representa el identificador único del Endpoint en la plataforma. Este identificador es asignado automáticamente cuando se crea un Endpoint. ### Timestamp\_UTC (string) Marca de tiempo UTC correspondiente al valor, en formato String. ### Value (double) Representación numérica del valor. Válido para todos los Endpoints escalares, así como para las Zonas IAS. ### IsOn (bool) Booleano que indica si el Endpoint está activado. Válido para electrodomésticos y dimmers. ### IsMoving (bool) Booleano que indica si el cierre se está moviendo. Válido para cierres. ### DimLevel (int) Nivel dim. Solo válido para dimmers. ### Position (int) Posición. Solo válido para controladores de cierre. ### ActiveEnergy (double) Entrega de energía activa. Solo válido para medidores de potencia. ### ReactiveEnergy (double) Entrega de energía reactiva. Solo válido para medidores de potencia. ### ApparentEnergy (double) Energía aparente entregada. Solo válido para medidores de potencia. ### SequenceNumber (int64) Número de secuencia asociado a la alerta. El número de secuencia se actualiza con un número mayor cada vez que la alerta se modifica de cualquier manera, incluso cuando la alerta se elimina. Se garantiza que cada alerta creada o modificada recibirá un número mayor al de cualquier otra alerta existente.
# Geozonas
Introducción [#introducción]
Esta sección explica cómo extraer la definición de las geozonas creadas en la plataforma Gear Studio utilizando la API de extracción de datos. Las geozonas permiten definir un polígono que puede ser utilizado para crear alertas cuando cualquier tracker de ubicación entra o sale de ellas.
La información de las geozonas utiliza el tipo de datos geozone, cuya documentación puede verse [aquí](/docs/apis-de-extraccion-de-datos/geozonas/tipo-de-datos-geozone).
Existen tres mecanismos para obtener información de geozonas:
* Obtener datos de una geozona específica, dado su ID, como se explica [aquí](/docs/apis-de-extraccion-de-datos/geozonas/obtener-una-geozona-dado-su-id).
* Obtener información de todas las geozonas asociadas a un cliente. La documentación puede verse [aquí](/docs/apis-de-extraccion-de-datos/geozonas/obtener-una-lista-de-geozonas-utilizando-parametros).
* Obtener información de todas las geozonas asociadas a un cliente, en forma incremental. La documentación puede verse [aquí](/docs/apis-de-extraccion-de-datos/geozonas/obtener-una-lista-de-geozonas-en-forma-incremental).
# Obtener una geozona dado su ID
Esta API permite obtener un geozona dado su ID.
Request [#request]
```
GET /api/v2/geozones/{geozoneID} HTTP/1.1
Host: gear.cloud.studio
Authorization: Bearer {accessToken}
```
Parámetros [#parámetros]
| Nombre | Descripción |
| ----------- | ---------------------------------------------------------------------------------------------------------------------------------------------------------------------------------------------------------- |
| accessToken | Token de acceso con permisos para leer datos de geozonas. Vea esta página para más información. El access token también puede enviarse como parte del query string, utilizando el parámetro “accessToken”. |
| geozoneID | Identificador único de la geozona para la que desea obtenerse información. |
Response [#response]
La respuesta contiene la geozona indicada, como se muestra en este ejemplo:
```
{
"GeozoneID":35,
"ClientID":79,
"Description":"Hokkaido",
"ExternalCode":"3424",
"Polygon":{
"PolygonID":35,
"Points":[
[
43.93935551,
142.57453478
],
[
43.49469073,
143.60724962
],
[
43.06278289,
143.49738634
],
[
42.9020392,
142.92609728
],
[
42.96638711,
142.6624254
],
[
42.96638711,
142.17902696
],
[
42.9020392,
141.80549181
],
[
42.88594172,
141.49787462
],
[
43.06278289,
141.34406603
],
[
43.19107519,
141.6077379
],
[
43.36703768,
141.93732775
],
[
43.669774,
141.82746446
],
[
43.82849869,
142.02521837
],
[
43.90770318,
142.37678087
]
],
"BorderColor":0,
"BorderWidth":3,
"BorderOpacity":100.0,
"FillColor":0,
"FillOpacity":50.0
},
"Vehicles":[
{
"VehicleID":133,
"Description":"Asset 70",
"LicensePlate":"XD1320070"
},
{
"VehicleID":134,
"Description":"Asset 71",
"LicensePlate":"XD1320071"
},
{
"VehicleID":135,
"Description":"Asset 72",
"LicensePlate":"XD1320072"
},
{
"VehicleID":136,
"Description":"Asset 73",
"LicensePlate":"XD1320073"
},
{
"VehicleID":138,
"Description":"Asset 75",
"LicensePlate":"XD1320075"
},
{
"VehicleID":139,
"Description":"Asset 76",
"LicensePlate":"XD1320076"
},
{
"VehicleID":140,
"Description":"Asset 77",
"LicensePlate":"XD1320077"
},
{
"VehicleID":141,
"Description":"Asset 78",
"LicensePlate":"XD1320078"
},
{
"VehicleID":142,
"Description":"Asset 79",
"LicensePlate":"XD1320079"
}
],
"SequenceNumber":74017203,
"Enabled":true
}
```
# Obtener una lista de geozonas en forma incremental
Esta API permite obtener una lista de geozonas, en forma incremental. Esto permite obtener actualizaciones rápidas de las geozonas a medida que son creadas, modificadas, o eliminadas, sin necesidad de obtener la lista completa.
Teoría de operación [#teoría-de-operación]
Para obtener una lista de geozonas en forma incremental, se utiliza el campo SequenceNumber. Este campo es de tipo monotónico ascendente, es decir que al crear, modificar, o eliminar una geozona, su campo SequenceNumber cambiará a un valor mayor al de cualquier otra geozona. Esto permite obtener datos basados en el SequenceNumber, en pequeños lotes, hasta que no se obtengan más datos, y luego continuar periódicamente, para obtener actualizaciones. Cuando el resultado de esta API es una lista vacía, esto significa que por el momento no existen actualizaciones.
Típicamente, una aplicación que consume esta API utiliza el siguiente flujo:
1. La aplicación comienza utilizando un SequenceNumber almacenado (típicamente en almacenamiento no volátil). En la primera ejecución, este valor es 1.
2. La aplicación ejecuta la API utilizando el (SequenceNumber almacenado + 1).
3. La aplicación recibe una lista de geozonas, ordenadas por SequenceNumber.
4. Si la lista recibida vacía, la aplicación espera algunos segundos, y vuelve al paso 2.
5. Si la lista recibida no es vacía, la aplicación almacena el mayor SequenceNumber recibido.
6. La aplicación vuelve inmediatamente al paso 2.
7. Cuando se crea una nueva geozona, o una existente es modificada, su SequenceNumber cambiará inmediatamente a un valor más alto que el último recibido, por lo cual su información será recibida inmediatamente en la próxima ejecución.
8. Cualquier elemento que se reciba con la propiedad Enabled con valor false, indica que ese elemento ha sido eliminado. Si la propiedad Enabled tiene valor true, indica que el elemento acaba de ser creado o modificado.
| En el flujo anterior, se asume que la aplicación siempre ejecuta la API con el mismo clientID. Si se desea usar parámetros diferentes, la búsqueda debe comenzar desde cero. |
| ---------------------------------------------------------------------------------------------------------------------------------------------------------------------------- |
| Para hacer debugging de cualquier aplicación que utilice esta API, se recomienda usar maxCount = 1, para recibir las actualizaciones de a una por vez. Este parámetro puede luego ser cambiado a un valor más práctico para producción, como 50. |
| ------------------------------------------------------------------------------------------------------------------------------------------------------------------------------------------------------------------------------------------------ |
| Importante: la propiedad SequenceNumber de las geozonas no se modifica cuando los vehículos ingresan o egresan de la geozona, sino sólo cuando cambia la configuración de la geozona, o cuando es eliminada. Por lo tanto, este método no puede emplearse para conocer incrementalmente los eventos de ingreso o egreso a la geozona. |
| ------------------------------------------------------------------------------------------------------------------------------------------------------------------------------------------------------------------------------------------------------------------------------------------------------------------------------------- |
Request [#request]
```
GET /api/v2/geozones/incremental/{sequenceNumber}?clientID={clientID}&maxCount={maxCount} HTTP/1.1
Host: gear.cloud.studio
Authorization: Bearer {accessToken}
```
Parámetros [#parámetros]
| Nombre | Descripción |
| -------------- | ---------------------------------------------------------------------------------------------------------------------------------------------------------------------------------------------------------------- |
| accessToken | Token de acceso con permisos para leer información de geozonas. Vea esta página para más información. El access token también puede enviarse como parte del query string, utilizando el parámetro “accessToken”. |
| sequenceNumber | Valor del campo SequenceNumber de la última geozona recibida. Puede indicarse 0 para comenzar desde el inicio. |
| clientID | Identificador del cliente para el cual se desea obtener la lista de geozonas. |
| maxCount | Parámetro opcional indicando la cantidad máxima de geozonas a incluir en el resultado. |
Response [#response]
La respuesta contiene la lista de geozonas buscada, como se muestra en este ejemplo:
```
[
{
"GeozoneID":35,
"ClientID":79,
"Description":"Hokkaido",
"ExternalCode":"3424",
"Polygon":{
"PolygonID":35,
"Points":[
[
43.93935551,
142.57453478
],
[
43.49469073,
143.60724962
],
[
43.06278289,
143.49738634
],
[
42.9020392,
142.92609728
],
[
42.96638711,
142.6624254
],
[
42.96638711,
142.17902696
],
[
42.9020392,
141.80549181
],
[
42.88594172,
141.49787462
],
[
43.06278289,
141.34406603
],
[
43.19107519,
141.6077379
],
[
43.36703768,
141.93732775
],
[
43.669774,
141.82746446
],
[
43.82849869,
142.02521837
],
[
43.90770318,
142.37678087
]
],
"BorderColor":0,
"BorderWidth":3,
"BorderOpacity":100.0,
"FillColor":0,
"FillOpacity":50.0
},
"Vehicles":[
{
"VehicleID":133,
"Description":"Asset 70",
"LicensePlate":"XD1320070"
},
{
"VehicleID":134,
"Description":"Asset 71",
"LicensePlate":"XD1320071"
},
{
"VehicleID":135,
"Description":"Asset 72",
"LicensePlate":"XD1320072"
},
{
"VehicleID":136,
"Description":"Asset 73",
"LicensePlate":"XD1320073"
},
{
"VehicleID":138,
"Description":"Asset 75",
"LicensePlate":"XD1320075"
},
{
"VehicleID":139,
"Description":"Asset 76",
"LicensePlate":"XD1320076"
},
{
"VehicleID":140,
"Description":"Asset 77",
"LicensePlate":"XD1320077"
},
{
"VehicleID":141,
"Description":"Asset 78",
"LicensePlate":"XD1320078"
},
{
"VehicleID":142,
"Description":"Asset 79",
"LicensePlate":"XD1320079"
}
],
"SequenceNumber":74017203,
"Enabled":true
},
{
"GeozoneID":36,
"ClientID":79,
"Description":"1",
"ExternalCode":null,
"Polygon":{
"PolygonID":36,
"Points":[
[
0.870633,
177.7532959
],
[
0.62895465,
178.34655762
],
[
1.34295563,
177.84118652
]
],
"BorderColor":0,
"BorderWidth":3,
"BorderOpacity":100.0,
"FillColor":0,
"FillOpacity":50.0
},
"Vehicles":[
],
"SequenceNumber":74017204,
"Enabled":true
},
{
"GeozoneID":37,
"ClientID":79,
"Description":"2",
"ExternalCode":null,
"Polygon":{
"PolygonID":37,
"Points":[
[
-1.26057944,
178.3026123
],
[
-0.35979988,
179.63195801
],
[
-0.62346182,
-179.34631348
]
],
"BorderColor":0,
"BorderWidth":3,
"BorderOpacity":100.0,
"FillColor":0,
"FillOpacity":50.0
},
"Vehicles":[
],
"SequenceNumber":74017205,
"Enabled":true
}
]
```
# Obtener una lista de geozonas utilizando parámetros
Esta API permite obtener una lista de geozonas, utilizando parámetros.
Request [#request]
```
GET /api/v2/geozones?clientID={clientID}&maxCount={maxCount} HTTP/1.1
Host: gear.cloud.studio
Authorization: Bearer {accessToken}
```
Parámetros [#parámetros]
| Nombre | Descripción |
| ----------- | ---------------------------------------------------------------------------------------------------------------------------------------------------------------------------------------------------------------- |
| accessToken | Token de acceso con permisos para leer información de geozonas. Vea esta página para más información. El access token también puede enviarse como parte del query string, utilizando el parámetro “accessToken”. |
| clientID | Identificador del cliente para el cual se desea obtener la lista de geozonas. |
| maxCount | Parámetro opcional indicando la cantidad máxima de geozonas a incluir en el resultado. |
Response [#response]
La respuesta contiene la lista de geozonas buscada, como se muestra en este ejemplo:
```
[
{
"GeozoneID":35,
"ClientID":79,
"Description":"Hokkaido",
"ExternalCode":"3424",
"Polygon":{
"PolygonID":35,
"Points":[
[
43.93935551,
142.57453478
],
[
43.49469073,
143.60724962
],
[
43.06278289,
143.49738634
],
[
42.9020392,
142.92609728
],
[
42.96638711,
142.6624254
],
[
42.96638711,
142.17902696
],
[
42.9020392,
141.80549181
],
[
42.88594172,
141.49787462
],
[
43.06278289,
141.34406603
],
[
43.19107519,
141.6077379
],
[
43.36703768,
141.93732775
],
[
43.669774,
141.82746446
],
[
43.82849869,
142.02521837
],
[
43.90770318,
142.37678087
]
],
"BorderColor":0,
"BorderWidth":3,
"BorderOpacity":100.0,
"FillColor":0,
"FillOpacity":50.0
},
"Vehicles":[
{
"VehicleID":133,
"Description":"Asset 70",
"LicensePlate":"XD1320070"
},
{
"VehicleID":134,
"Description":"Asset 71",
"LicensePlate":"XD1320071"
},
{
"VehicleID":135,
"Description":"Asset 72",
"LicensePlate":"XD1320072"
},
{
"VehicleID":136,
"Description":"Asset 73",
"LicensePlate":"XD1320073"
},
{
"VehicleID":138,
"Description":"Asset 75",
"LicensePlate":"XD1320075"
},
{
"VehicleID":139,
"Description":"Asset 76",
"LicensePlate":"XD1320076"
},
{
"VehicleID":140,
"Description":"Asset 77",
"LicensePlate":"XD1320077"
},
{
"VehicleID":141,
"Description":"Asset 78",
"LicensePlate":"XD1320078"
},
{
"VehicleID":142,
"Description":"Asset 79",
"LicensePlate":"XD1320079"
}
],
"SequenceNumber":74017203,
"Enabled":true
},
{
"GeozoneID":36,
"ClientID":79,
"Description":"1",
"ExternalCode":null,
"Polygon":{
"PolygonID":36,
"Points":[
[
0.870633,
177.7532959
],
[
0.62895465,
178.34655762
],
[
1.34295563,
177.84118652
]
],
"BorderColor":0,
"BorderWidth":3,
"BorderOpacity":100.0,
"FillColor":0,
"FillOpacity":50.0
},
"Vehicles":[
],
"SequenceNumber":74017204,
"Enabled":true
},
{
"GeozoneID":37,
"ClientID":79,
"Description":"2",
"ExternalCode":null,
"Polygon":{
"PolygonID":37,
"Points":[
[
-1.26057944,
178.3026123
],
[
-0.35979988,
179.63195801
],
[
-0.62346182,
-179.34631348
]
],
"BorderColor":0,
"BorderWidth":3,
"BorderOpacity":100.0,
"FillColor":0,
"FillOpacity":50.0
},
"Vehicles":[
],
"SequenceNumber":74017205,
"Enabled":true
}
]
```
# Tipo de datos geozone
Introducción [#introducción]
El tipo de datos geozone permite obtener la configuración de una geozona. A continuación se describen todas las propiedades del tipo de datos geozone.
Propiedades [#propiedades]
\### GeozoneID (int) La propiedad GeozoneID representa el identificador único de la geozona en la plataforma. Este identificador es asignado automáticamente cuando se crea una geozona. ### ClientID (int) Identificador único del cliente al que corresponde la geozona. ### Description (string) Indica la descripción de la geozona. ### ExternalCode (string) Indica un código externo, opcional, para la geozona. ### Polygon (object)
Contiene la información del polígono asociado a la geozona. Las propiedades del polígono son:
* **PolygonID** (int): identificador único del polígono.
* **Points** (number\[]\[]): array de coordenadas, donde cada elemento del array es una coordenada, con su latitud y longitud.
* **BorderColor** (int): color empleado para el borde del polígono. Se emplea al representar el polígono en mapas. Se utiliza la codificación de RGB 24 bits.
* **BorderWidth** (int): ancho del borde del polígono, en pixels.
* **BorderOpacity** (number): opacidad del borde del polígono, donde 1 es completamente opaco, y 0 es completamente transparente.
* **FillColor** (int): color empleado para el relleno del polígono. Se emplea al representar el polígono en mapas. Se utiliza la codificación de RGB 24 bits.
* **FillOpacity** (number): opacidad del borde del polígono, donde 1 es completamente opaco, y 0 es completamente transparente.
\### Vehicles (object array)
Contiene la información de los vehículos actualmente ubicados dentro de la geozona. En caso de de que ningún vehículo esté dentro de la geozona, el array devuelto estará vacío. Para cada vehículo incluido en el array, se indican los siguientes datos:
* **VehicleID** (int): identificador único del vehículo.
* **Description** (string): descripción del vehículo.
* **LicensePlate** (string): número de placa patente del vehículo.
\### SequenceNumber (int64) Número de secuencia asociado a la geozona. El número de secuencia se actualiza con un número mayor cada vez que se modifica la configuración de la geozona, y cuando la geozona se elimina. Se garantiza que cada geozona creada o modificada recibirá un número mayor al de cualquier otra geozona existente. ### Enabled (bool) Indica si la geozona puede utilizarse, o si ha sido eliminada. El valor false indica que la geozona ha sido eliminada. Sólo es posible acceder a geozonas eliminadas a través de la API para [obtener una lista de geozonas en forma incremental](/docs/apis-de-extraccion-de-datos/geozonas/obtener-una-lista-de-geozonas-en-forma-incremental).
# Disparadores
Se permitirá crear disparadores para acciones a partir de cualquier evento, incluyendo los eventos de ***Calendario y Estado***. Para cada disparador, la interfaz de usuario típicamente deberá ofrecer dos opciones:

**Calendario**: En este caso se presentará la lista de días de la semana en los que se activará el evento, y el horario correspondiente.

**Estado:** Esta opción es básicamente la misma que se utiliza para la definición del umbral de disparo en el caso de las alertas.

> **Una acción puede tener múltiples disparadores, lo cual hará que su ejecución comience al ejecutarse cualquiera de estos disparadores.**
Deshabilitar disparadores [#deshabilitar-disparadores]
Existe un atributo a nivel de acción que permite habilitar o deshabilitar todos los disparadores. Cuando el atributo se encuentra **activado**, la ejecución de los disparadores **NO dispara la ejecución de la acción**, por lo cual la acción sólo puede ejecutarse manualmente o como consecuencia de alertas, si corresponde.

Frecuencia de repetición del Disparador en minutos
Desde la pantalla de Acciones, en el menú principal, al configurar un acción podremos acceder a la creación/edición de un disparador. Si el disparador lo seleccionamos para que sea del tipo “*Calendario*”, se podrá configurar que dicho disparador se repita en un intervalo de minutos (*configurable*) hasta el final del día.

**Un ejemplo de esto seria**: Configurar para que se ejecute los días Sábados a las 10:30pm, donde luego configuramos que se repita en un intervalo de 30min, de manera que se ejecutara en los siguientes horarios: 10:30pm, 11:00pm y 11:30pm.
# Ejecución de Acciones
La ejecución de acciones se basa en pasos y el conjunto de estos constituye el total de las actividades que se desencadenan cuando la acción se ejecuta, independientemente de si la acción se inicia manualmente o a raíz de cualquiera de sus disparadores.
Los pasos se ejecutan en orden, uno tras otro, hasta que se complete el último.
> Independientemente del tipo de paso, para cada uno de ellos es posible indicar si se debe continuar en caso de error, mediante el siguiente atributo:
>
> **Continuar en caso de error:** este campo indica si en caso de que ocurran errores al ejecutar el paso, la acción debe detenerse o continuar en el paso siguiente. Si este campo se encuentra **activado**, el error se registra, pero **la acción continúa** con la ejecución del paso siguiente. Si el campo se encuentra **desactivado**, el error se registra y **la acción se detiene** inmediatamente.

# Acciones
Las ***acciones*** son conjuntos de **pasos** que pueden ejecutarse manualmente o como consecuencia de eventos configurados para ello.
Una vez que una acción comienza a iniciarse, se ejecutan todos los pasos asociados, uno tras otro, en el orden establecido hasta que la secuencia se termina.

Acciones y scripting [#acciones-y-scripting]
Para comenzar creando **acciones** en la plataforma se comenzará mediante el menú **Acciones y scripting** para activar el módulo de gestión de acciones.

Este módulo permitirá crear nuevas acciones, sus pasos, disparadores y también editar las mismas

Detalles [#detalles]
**Descripción**: Este campo permite ingresar una descripción que será con la que se identificará la nueva acción en el sistema, este campo es obligatorio.
**Número máximo de instancias**: Este valor ***númerico*** permite indicar cuántas instancias de la acción pueden ejecutarse simultáneamente.
Esto puede ocurrir cuando cualquiera de los disparadores se inicia (o se inicia la acción manualmente, o de cualquiera otra forma), mientras la acción ya está ejecutándose. El valor por defecto para este atributo es 1, indicando que si la acción ya está ejecutándose, no es posible iniciarla nuevamente.
**Habilitar disparadores**: Determina si **todos** los disparadores de la acción estan habilitados o deshabilitados.
Pasos [#pasos]
Los tipos de paso que se permiten en las acciones son los siguientes:
* **Set value**: Permite cambiar el valor de una variable a un valor dado.
* **Add value**: Permite incrementar el valor de una variable.
* **Subtract value**: Permite decrementar una variable por un valor dado.
* **Turn On**: Permite cambiar el estado de un sensor a encendido.
* **Turn Off**: Permite cambiar el estado de un sensor a apagado.
* **Toggle**: Permite cambiar el estado de un sensor de ON a OFF o viceversa.
* **Notificaciones** **vía Email**: Permite enviar mensajes vía correo electrónico a un mail o lista de mails.
* **Notificaciones vía SMS**: Permite enviar mensajes vía SMS a un numero o lista de números de teléfono.
* **Notificaciones** **vía Voz**: Permite enviar llamadas de voz a un numero o lista de números de teléfono.
* **Scripting**: Permite escribir un fragmento de código en un lenguaje interpretado (*Javascript*) de fácil comprensión, que permite ampliar el abanico de posibilidades a la hora de procesar una lógica de negocio determinada, los scripts además:
* Pueden relacionarse entre si para aprovechar la reutilización de código.
* Pueden acceder a todos los dispositivos del cliente en el cual se encuentran ejecutándose.
* Puede ejecutarse pruebas para verificar el correcto funcionamiento antes de ponerlos en funcionamiento.
Para más información sobre la configuración de pasos contínue leyendo [Pasos](/docs/configuracion-del-cliente/acciones/pasos)
Disparadores [#disparadores]
Los disparadores permiten definir eventos que se utilizan para disparar la acción. Una acción puede tener múltiples disparadores. Cuando uno cualquiera de ellos se dispara, la acción comienza a ejecutarse. Se prevé permitir cualquier disparador que pueda ser modelado como evento, incluyendo los eventos de calendario.
> ***No es necesario que las acciones tengan disparadores asociados. Sin embargo, las acciones sin disparadores pueden ejecutarse únicamente en forma manual, o al dispararse alertas.***
Para más información continúe leyendo [Disparadores](/docs/configuracion-del-cliente/acciones/disparadores)
Cola de ejecución [#cola-de-ejecución]
Al ejecutarse un disparador asociado con una acción, o al iniciarse manualmente, o como consecuencia de cualquier otra condición, se creará un registro en la cola de acciones (tabla “ActionInstances”). Esta tabla contiene todas las instancias de acciones actualmente en ejecución.
Existirá una Scheduled job (implementado como ejecutable externo) que será el encargado de revisar periódicamente esta tabla, actualizar el estado de la acción en la misma, y ejecutar los pasos de la acción, utilizando un thread separado para cada acción.
# Alertas
Las alertas se aplican a endpoints, y permiten definir rangos de valores aceptables, de manera que se generen alarmas automáticamente cuando los valores están fuera de estos umbrales. Para establecer una alerta, se utiliza la pantalla de alertas, donde se elije el tipo de alerta, el endpoint al cual aplicará, el valor del umbral, y opcionalmente, un tiempo mínimo durante el cual debe mantenerse la condición para que la alerta genere la respectiva alarma.
El usuario puede hacer uso de todas las variables disponibles que se hayan habilitado en su instancia y también puede personalizar los asuntos de las alertas.
[**Para más información sobre la variables permitidas para el asunto, revise la** **documentación**](/docs/configuracion-del-cliente/alertas-y-alarmas/variables-para-notificaciones-de-alertas)

Estos son los parámetros permitidos (Variables):
| Variable | Comentarios |
| ----------------------------- | ----------------------------------------------------------------------------------------------- |
| \{CLIENT\_ID} | Identificados único de cliente |
| \{CLIENT\_NAME} | Nombre/Descripción del cliente |
| \{FACILITY\_ID} | Identificados único de Instalación |
| \{FACILITY\_NAME} | Descripción de la Instalación |
| \{DEVICE\_ID} | Identificados único de Dispositivo |
| \{DEVICE\_NAME} | Descripción del dispositivo |
| \{ENDPOINT\_ID} | Identificados único de Endpoint |
| \{ENDPOINT\_NAME} | Descripción del Endpoint |
| \{DEVICE\_OR\_ENDPOINT\_NAME} | Descripción del Endpoint. Si el mismo no es valido, se mostrará la descripción del Dispositivo. |
| \{ALARM\_TEXT} | Descripción de la alarma |
| \{ALARM\_DETAILS} | Detalle de la Alarma |
# Configuración contactos para notificaciones
Para cada Alerta el sistema permite seleccionar los contactos o grupos de contactos a los cuales debería llegarles las notificaciones. Los datos que se pueden ingresar son:
* [Contacto precargado](/docs/configuracion-del-cliente/libreta-de-direcciones/crear-un-nuevo-contacto)
* [Grupos de direcciones precargadas](/docs/configuracion-del-cliente/libreta-de-direcciones/crear-un-nuevo-grupo-de-contacto)
* Correo/s electrónico/s (no es necesario contar con el contacto en libreta de direcciones)
* Número de teléfono para notificaciones por SMS. (no es necesario contar con el contacto en libreta de direcciones)
* Número de teléfono para notificaciones de voz. (no es necesario contar con el contacto en libreta de direcciones)
> Los servicios de notificaciones por voz y sms deben estar habilitados a nivel de cliente y facility para ser enviados, para más informacion o para conocer si estos servicios estan habilitados para un cliente y facility consulte esta [página](/docs/configuracion-del-cliente/alertas-y-alarmas/servicios-de-voz-y-sms)
Editar notificaciones [#editar-notificaciones]
Para editar las notificaciones de las alertas ingrese a *Configuración del cliente **> Alarmas** > **Alertas.***

Seleccione la alerta a modificar desde los tres puntos al costado derecho y presione **Editar**.

Busque la opción *Notificaciones.*
En *E-mails* puede simplemente escribir el o los correos que desee agregar a las notificaciones, también puede escribir el nombre del **contacto** o **grupo** precargado en la [***Libreta de direcciones***](/docs/configuracion-del-cliente/libreta-de-direcciones) de la plataforma. En el caso de los números de teléfono puede seguir el mismo procedimiento, escribir el número o los nombres de contacto y/o grupos precargados en el sistema.

_853d.png)
> ***Aclaración importante:*** Para que los contactos, correos electrónicos y teléfonos se guarden debe presionar la tecla **Enter** al finalizar de escribir y asegurarse de que se encuentren resaltados en un recuadro.
***Ejemplo de grupo precargado en Libreta de direcciones***


# Alertas y alarmas
La plataforma Gear Studio permite definir alertas que se disparen cuando los valores de ciertas variables exceden los umbrales definidos. Las alarmas, por otra parte, son condiciones que indican algún problema, y pueden darse por diferentes razones, entre ellas, las alertas. En otras palabras, las alertas generan alarmas cuando los valores medidos están fuera de los umbrales establecidos, pero las alarmas pueden también generarse por otras razones, tales como fallas en el funcionamiento de un dispositivo, errores de conexión, etc.
Alertas [#alertas]
Las alertas se aplican a endpoints, y permiten definir rangos de valores aceptables, de manera que se generen alarmas automáticamente cuando los valores están fuera de estos umbrales. Para establecer una alerta, se utiliza la pantalla de alertas, donde se elije el tipo de alerta, el endpoint al cual aplicará, el valor del umbral, y opcionalmente, un tiempo mínimo durante el cual debe mantenerse la condición para que la alerta genere la respectiva alarma.
Valor Normal [#valor-normal]
Es posible además definir un segundo umbral para que la alerta desaparezca. Esto permite establecer un valor de histéresis para evitar que la alerta se dispare frecuentemente cuando el valor del endpoint se mueve frecuentemente cerca del umbral. Por ejemplo, puede establecerse una alerta por temperatura elevada, estableciendo el umbral en 60 grados, y un umbral normal de 55. Esto hará que la alerta se dispare cuando el valor supere los 60 grados, y desaparezca recién cuando la temperatura llegue a los 55 grados. La alerta se mantendrá activa, entonces, desde que la temperatura supere los 60 grados, hasta que baje a 55.
Severidad de Alerta [#severidad-de-alerta]
Los niveles de severidad en las alertas permiten indicar cuál es la criticidad asociada a las alarmas. Los niveles de severidad pueden ser información, baja, media o alta como se muestra en la siguiente imagen:

**Importante**
Por defecto una alarma se creara con el valor “Bajo”. Si se crea una alerta con un nivel de severidad por ejemplo “Alto”, y luego se activa emite dicha alerta, en el reporte de Histórico de alarmas va a permanecer la severidad con la que fue creada aunque luego de haberse emitido se haya modificado el nivel de severidad desde la modificación de alertas.
Tipos de alerta disponibles [#tipos-de-alerta-disponibles]
Los siguientes son los tipos de alerta disponibles en la plataforma, con una breve explicación de cada uno.
| Variable | Condición | Admite umbral normal | Admite duración mínima |
| -------------------- | ---------------------- | -------------------- | ---------------------- |
| Temperatura | Alto o bajo | Sí | Sí |
| Humedad | Alto o bajo | Sí | Sí |
| Nivel de iluminación | Alto o bajo | Sí | Sí |
| Volumen | Alto o bajo | Sí | Sí |
| Peso | Alto o bajo | Sí | Sí |
| Presión | Alto o bajo | Sí | Sí |
| Voltaje | Alto o bajo | Sí | Sí |
| Corriente | Alto o bajo | Sí | Sí |
| Potencia activa | Alto o bajo | Sí | Sí |
| Potencia reactiva | Alto o bajo | Sí | Sí |
| Potencia aparente | Alto o bajo | Sí | Sí |
| Coseno fi | Alto o bajo | Sí | Sí |
| Sensor IAS | Activado o desactivado | No | Sí |
| Variable genérica | Alto o bajo | Sí | Sí |
Configuración de Alertas [#configuración-de-alertas]
Las alertas se aplican a endpoints, y permiten definir rangos de valores aceptables, de manera que se generen alarmas automáticamente cuando los valores están fuera de estos umbrales. Para establecer una alerta, se utiliza la pantalla de alertas, donde se elije el tipo de alerta, el endpoint al cual aplicará, el valor del umbral, y opcionalmente, un tiempo mínimo durante el cual debe mantenerse la condición para que la alerta genere la respectiva alarma.
El usuario puede hacer uso de todas las variables disponibles que se hayan habilitado en su instancia y también puede personalizar los asuntos de las alertas.
**Para ver información extra acerca de las variables permitidas, ingrese** [**aqui**](/docs/configuracion-del-cliente/alertas-y-alarmas/variables-para-notificaciones-de-alertas)

Estos son los parámetros permitidos (Variables):
| Variable | Comentarios |
| ----------------------------- | ----------------------------------------------------------------------------------------------- |
| \{CLIENT\_ID} | Identificados único de cliente |
| \{CLIENT\_NAME} | Nombre/Descripción del cliente |
| \{FACILITY\_ID} | Identificados único de Instalación |
| \{FACILITY\_NAME} | Descripción de la Instalación |
| \{DEVICE\_ID} | Identificados único de Dispositivo |
| \{DEVICE\_NAME} | Descripción del dispositivo |
| \{ENDPOINT\_ID} | Identificados único de Endpoint |
| \{ENDPOINT\_NAME} | Descripción del Endpoint |
| \{DEVICE\_OR\_ENDPOINT\_NAME} | Descripción del Endpoint. Si el mismo no es valido, se mostrará la descripción del Dispositivo. |
| \{ALARM\_TEXT} | Descripción de la alarma |
| \{ALARM\_DETAILS} | Detalle de la Alarma |
Alarmas [#alarmas]
Las alarmas se disparan en forma automática cuando se detectan problemas con dispositivos, endpoints, alertas, o cualquier otra situación anómala. A continuación se muestran los tipos de alarma más comunes.
| Tipo de alarma | Comentarios |
| ----------------------------------------------------------- | ------------------------------------------------------------------------------------------------------------------------------------------------------------------------------------------------------------------------------------------------------------- |
| Dispositivo fuera de línea | Se dispara cuando un dispositivo no se comunica con la plataforma luego de cierto tiempo. El tiempo máximo que un dispositivo puede pasar sin enviar información a la plataforma se establece en cada modelo de dispositivo. |
| Alerta | Se dispara cuando una alerta indica que el valor de un endpoint está fuera de los umbrales definidos. Para cada tipo de alerta, existe el correspondiente tipo de alarma, por ejemplo, alarma por temperatura alta, alarma por activación de sensor IAS, etc. |
| Batería baja | Se dispara cuando el nivel de batería de un dispositivo es bajo. |
| Batería crítica | Se dispara cuando el nivel de batería de un dispositivo es crítico. |
| Condición de sobrecalentamiento. Todas las salidas apagadas | Aún no se encuentra implementada éste tipo alarma |
| Condición de baja temperatura | Aún no se encuentra implementada éste tipo alarma |
| Falla de carga | Aún no se encuentra implementada éste tipo alarma |
| Mensaje informativo | Aún no se encuentra implementada éste tipo alarma |
| Mensaje no especificado o genérico | Aún no se encuentra implementada éste tipo alarma |
# Severidad de alarmas
Introducción [#introducción]
Los niveles de severidad en las alertas permiten indicar cuál es la criticidad asociada a las alarmas. Los niveles de severidad pueden ser bajo, medio o alto como se muestra en la siguiente imagen

Importante [#importante]
Por defecto una alarma se creara con el valor “Bajo”. Si se crea una alerta con un nivel de severidad por ejemplo “Alto”, y luego se activa emite dicha alerta, en el reporte de Histórico de alarmas va a permanecer la severidad con la que fue creada aunque luego de haberse emitido se haya modificado el nivel de severidad desde el ABM de alertas.
# Variables para notificaciones de alertas
Las alertas se aplican a endpoints, y permiten definir rangos de valores aceptables, de manera que se generen alarmas automáticamente cuando los valores están fuera de estos umbrales. Para establecer una alerta, se utiliza la pantalla de alertas, donde se elije:
* Tipo de alerta.
* Endpoint al cual aplicará.
* Valor del umbral.
* Opcionalmente, un tiempo mínimo durante el cual debe mantenerse la condición para que la alerta genere la respectiva alarma.
Como usuario puede:
* Tipear las variables disponibles que se hayan habilitado y las que puede ver dentro de la plataforma.
* Dejar el asunto en esta caja de texto.

Estos son los parámetros permitidos (Variables):
| Variable | Comentarios |
| ----------------------------- | --------------------------------------------------------------------------------------------------------------------------------------------------------------------------------------------- |
| \{CLIENT\_ID} | Contiene el identificador del cliente en el que se generó la alarma. |
| \{CLIENT\_NAME} | Contiene el nombre/descripción del cliente en el que se generó la alarma. |
| \{FACILITY\_ID} | Contiene el identificador del facility en el que se generó la alarma. |
| \{FACILITY\_NAME} | Contiene el nombre/descripción del facility en el que se generó la alarma. |
| \{DEVICE\_ID} | Contiene el identificador del dispositivo en el que se generó la alarma. |
| \{DEVICE\_NAME} | Contiene el nombre/descripción del dispositivo en el que se generó la alarma. |
| \{ENDPOINT\_ID} | Contiene el identificador del endpoint en el que se generó la alarma, o cero si la alarma no corresponde a un endpoint específico. |
| \{ENDPOINT\_NAME} | Contiene el nombre/descripción del endpoint en el que se generó la alarma, o un valor vacío si la alarma no corresponde a un endpoint específico. |
| \{DEVICE\_OR\_ENDPOINT\_NAME} | Contiene el nombre/descripción del endpoint en el que se generó la alarma, en caso de que sea una alarma a nivel de endpoint, o bien el nombre/descripción del dispositivo en caso contrario. |
| \{ALARM\_TEXT} | Contiene el texto completo de la alarma que se ha generado. |
| \{ALARM\_DETAILS} | Contiene los detalles de la alarma, tales como, en el caso de alertas, el umbral utilizado. |
| \{ALARM\_DETAILS\_DISPLAY} | Contiene el valor "inline" si existen datos adicionales, o "none" si no existen datos adicionales. Sólo se debe utilizar en templates HTML. |
# Configuración de mapas
Dentro de la configuración de clientes existe un campo que hace referencia al radio mínimo para mapas.
La misma contempla una distancia en **metros** a la cual se ajustaran los mapas al Norte, Sur, Este y Oeste.
Si bien la configuración hace referencia a **Radio**, en realidad se refiere al **rectángulo** que compone el mapa.
*La configuración del cliente se inicializa a un radio de 1000 metros pero posteriormente puede ser modificado, utilizando ese nuevo valor.*
**Ejemplo**
Por defecto un cliente va a tener un radio mínimo para mapas de 1000 metros, como en la siguiente imagen:

Se visualizara así:

# Cliente
Introducción [#introducción]
En las secciones siguientes se indica cómo administrar clientes, incluyendo su creación, modificación, y otros conceptos relacionados.

Para Editar el Cliente

# Términos y condiciones
Introducción [#introducción]
La plataforma permite crear términos y condiciones con un texto opcional para cada cliente, se indica los términos y condiciones que los usuarios deben aceptar para utilizar las aplicaciones con cada cliente.
En caso de que no se especifique un texto de términos y condiciones para un cliente, cualquier usuario podrá utilizar el cliente sin necesidad de leer ni aceptar un texto.
Para aplicar dicha funcionalidad en la solapa “ Términos y condiciones ” de clientes, elegimos un texto que vamos a utilizar.

Una vez creado el cliente, cuando utilice la plataforma deberá aceptar los “ Términos y condiciones ”.

# Dispositivos y endpoints
En Gear Studio, la infraestructura de cada instalación está organizada jerárquicamente en dispositivos y endpoints.
Dispositivos [#dispositivos]
Los dispositivos constituyen el primer nivel de la infraestructura de una instalación. Normalmente corresponden a dispositivos físicos, tales como sensores, gateways, dimmers, actuadores, termostatos, etc. Los dispositivos tienen las siguientes características:
* Tienen un modelo (o una combinación de marca y modelo)
* Tienen un identificador único, tal como una dirección MAC, o un número de serie.
* Tienen algún tipo de interfaz de comunicaciones (MQTT, HTTP, NB-IoT, ZigBee, LoRaWAN, etc.)
* Tienen una descripción que se utiliza en Gear para identificar el dispositivo con más facilidad.
Endpoints [#endpoints]
Un mismo dispositivo puede tener múltiples sensores, funciones, o canales. Por ejemplo, en el caso de in dimmer que es capaz de controlar cuatro circuitos de luz, se puede decir que tiene cuatro funciones distintas o “canales”. Cuando un usuario interactúe con el dispositivo, en realidad estará interactuando con uno de esos canales, y no con todo el dispositivo entero.
A cada una de estas funciones o canales, en la terminología de Gear Studio, se la denomina un “**endpoint**”. Los endpoints tienen las siguientes características:
* Tienen un identificador único, dentro del dispositivo.
* Tienen un tipo de sensor (sensor de temperatura, luz, energía, volumen, etc.)
* Tienen una descripción que se utiliza en Gear para identificar el endpoint con más facilidad.
* Tienen un sector asociado, que indica dónde están instalados, o dónde operan (en qué lugar dentro de la instalación).
* De acuerdo al tipo de sensor, pueden tener otras características específicas.
Más información [#más-información]
Para más información sobre la administración de dispositivos y endpoints, puede ver los siguientes tutoriales:
* [Dispositivos](/docs/configuracion-del-cliente/dispositivos-y-endpoints/dispositivos)
* [Endpoints](/docs/configuracion-del-cliente/dispositivos-y-endpoints)
* [Integración de dispositivos](/docs/configuracion-del-cliente/dispositivos-y-endpoints/dispositivos/integracion-de-dispositivos)
* [Administración de dispositivos](/docs/configuracion-del-cliente/dispositivos-y-endpoints/dispositivos/dispositivos)
* [Administración de endpoints](/docs/configuracion-del-cliente/dispositivos-y-endpoints/endpoints/crear-un-endpoint)
# Instalaciones
Una instalación dentro del ámbito IoT se define como el entorno físico donde se implementan dispositivos y gateways interconectados. Ejemplos de tipos de instalaciones incluyen fábricas, edificios, depósitos y centros logísticos entre otros. La función principal de las instalaciones es proporcionar una capa de abstracción que posibilite el análisis de datos desde una perspectiva más amplia que la de los dispositivos individuales.
Características Clave: [#características-clave]
**Diversidad de Instalaciones:** Cada cliente puede tener sus propias instalaciones, como sucursales y edificios. Estas instalaciones pueden categorizarse en diferentes tipos, como comercios o residencias, facilitando la organización y gestión de datos.
**Agrupación Jerárquica:** Las instalaciones permiten agrupar jerárquicamente los dispositivos, permitiendo una clasificación eficiente para presentar información en dashboards. Esta clasificación proporciona una visión estructurada y contextualizada de los datos.
**Asociación Visual:** Cada tipo de instalación puede asociarse con una imagen, lo que se reflejará en la lista lateral del mapa del monitor. Esta característica visual mejora la identificación y navegación intuitiva a través de las instalaciones.
En resumen, las instalaciones en el contexto IoT son entornos físicos clave que facilitan la recopilación y análisis de datos a nivel macro, permitiendo una comprensión más completa y estratégica de la red de dispositivos conectados.
# Instalaciones
En la sección de facilities o instalaciones de la plataforma, se ofrece una completa suite de herramientas para una gestión detallada y personalizada.

Aquí hay una descripción detallada de las capacidades:
Detalles [#detalles]
**Creación, Edición y Eliminación:** En esta sección, el usuario podrá la crear, editar y eliminar instalaciones, brindando flexibilidad en la administración del entorno.
**Configuración Detallada:** Se pueden definir detalles clave, como descripción, tipo de instalación, país, localidad y dirección, proporcionando información contextual y geográfica esencial.
**Ubicación Personalizable:** La ubicación de la instalación puede ser establecida mediante dirección (por ejemplo, Google Maps) o latitud y longitud, ofreciendo opciones versátiles para su georreferenciación.
**Responsable y Contacto:** Asignación de un responsable de la instalación con su respectivo número de contacto, facilitando la comunicación y la gestión operativa.
**Datos Energéticos:** Posibilidad de asignar la empresa proveedora de energía y tarifas asociadas, permitiendo el monitoreo y análisis detallado de consumos energéticos.
**Cámara por Default:** La opción de asignar una cámara por default al facility, mejorando la seguridad y proporcionando una visión en tiempo real.
**Configuración Personalizada:** Selección de zona horaria, idioma preferido y set de íconos para representar la instalación en el mapa, ofreciendo una experiencia visual y configurativa personalizada.
**Imágenes Representativas:** Carga de una imagen principal de la instalación, enriqueciendo la representación visual y facilitando la identificación.
**Configuración de Notificaciones:** En caso de haber habilitado SMS y mensajes de voz a nivel de cliente, la plataforma permite habilitar/deshabilitar estas funcionalidades a nivel de cada instalación, otorgando un control preciso sobre las notificaciones.
Esta robusta funcionalidad optimiza la gestión y monitorización de instalaciones, proporcionando una experiencia personalizada y eficiente.


Objetivos de Consumo [#objetivos-de-consumo]
Dentro de esta subsección, la plataforma permite la definición de objetivos de consumo, brindando un conjunto de parámetros clave para la gestión eficiente de la energía. Aquí están los elementos que se pueden configurar:
**Fecha de Inicio:** Permite seleccionar la fecha desde la cual se aplicarán los objetivos de consumo, brindando flexibilidad en la planificación temporal.
**Objetivo de Consumo de Energía:** Se puede establecer un objetivo cuantitativo para el consumo de energía, proporcionando una meta específica a alcanzar.
**Objetivo de Potencia:** Define un objetivo específico para la potencia eléctrica, contribuyendo a la gestión y control de la capacidad instalada.
**Objetivo de Costo:** Permite establecer un objetivo financiero para el costo asociado al consumo de energía, facilitando la planificación presupuestaria.
**Costo Fijo Prorrateado por kWh:** Esta configuración permite asignar un costo fijo que se prorrateará por cada kWh consumido, brindando una estructura de costos detallada.
**COS(Φ) Mínimo:** Establece un valor mínimo para el factor de potencia (COS(Φ)), contribuyendo a optimizar la eficiencia energética y evitar penalizaciones por bajo factor de potencia.
Estos parámetros ofrecen una herramienta integral para la gestión estratégica del consumo energético, permitiendo establecer metas específicas y monitorear el desempeño en función de estos objetivos.

Dashboards y Vistas [#dashboards-y-vistas]
Dentro de la subsección de dashboards y vistas, se ofrece una funcionalidad clave para personalizar la experiencia del usuario en la plataforma. Aquí se detallan las opciones disponibles:
**Selección de Dashboards:** Los usuarios tienen la capacidad de seleccionar los dashboards específicos que serán accesibles desde la instalación en cuestión. Esto permite adaptar la información visualizada a las necesidades particulares de cada instalación.
**Asignación de Dashboard y Vista por Default:** Además, se ofrece la posibilidad de asignar un dashboard y una vista por default. Esto implica que al acceder al menú lateral del mapa de instalaciones, los usuarios serán redirigidos automáticamente al dashboard y la vista predeterminados, agilizando el acceso a la información relevante.
Esta funcionalidad proporciona flexibilidad y personalización, permitiendo a los usuarios definir su punto de inicio preferido y simplificando el acceso a la información clave.

Unidades de Medida [#unidades-de-medida]
Dentro de la subsección de unidades de medida, se brinda a los usuarios una herramienta esencial para personalizar la visualización de datos en los dashboards y vistas. Aquí se describen las características clave de esta funcionalidad:
**Selección de Unidades de Medida:** Los usuarios tienen la capacidad de seleccionar las unidades de medida deseadas a nivel de cada instalación. Esto permite adaptar la presentación de datos según preferencias locales o estándares específicos.
**Conversión Automática de Unidades:** La plataforma incorpora una funcionalidad de conversión automática de unidades. Esta característica garantiza que los datos reportados en diferentes unidades sean visualizados de manera coherente en los dashboards y vistas, mejorando la comprensión y la comparabilidad de la información.
**Limitaciones en los Requerimientos de Reporte:** Es importante destacar que la selección de unidades en esta subsección no modifica los requisitos fundamentales de las unidades en las que deben reportarse los datos a la plataforma. Por ejemplo, ciertos parámetros, como la temperatura, deben ser reportados en unidades específicas (por ejemplo, ºC), independientemente de la selección de unidades de visualización.
**Tipos de Variables Configurables:** Se ofrecen opciones de configuración para diversos tipos de variables, entre ellos, densidad, presión, temperatura, volumen, peso y tiempo de ejecución. Esta flexibilidad garantiza que la plataforma pueda adaptarse a una variedad de contextos y necesidades.
La configuración de unidades de medida en la subsección de instalaciones mejora la versatilidad y la utilidad de la plataforma, permitiendo a los usuarios personalizar la presentación de datos de manera efectiva.


# Sectores
En el contexto de la plataforma, los sectores desempeñan un papel crucial al delinear distintos ambientes dentro de una instalación. La funcionalidad clave asociada a los sectores es la capacidad de configurar reglas de automatización específicas para cada uno de estos ambientes. Aquí se detallan los aspectos relevantes de esta configuración:
**Definición de Sectores:** Los sectores se utilizan para delimitar y organizar los distintos ambientes o áreas dentro de una instalación. Estos pueden representar zonas geográficas, departamentos o cualquier categorización relevante.
**Configuración de Reglas de Automatización:** Cada sector ofrece la posibilidad de establecer reglas de automatización exclusivas. Estas reglas permiten definir comportamientos automáticos asociados a eventos específicos que ocurran dentro de ese sector.
**Personalización por Ambiente:** Al poder configurar reglas a nivel de sector, se logra una personalización efectiva. Cada área puede tener requisitos y condiciones únicas, y las reglas de automatización permiten adaptar la respuesta del sistema según las características específicas de cada sector.
**Eventos Disparadores:** Las reglas de automatización pueden asociarse a diversos eventos, como cambios en la telemetría, activación de dispositivos o cualquier otro acontecimiento relevante. Esto permite una respuesta dinámica y contextualizada.
La capacidad de configurar reglas de automatización a nivel de sectores mejora la eficiencia operativa y permite una gestión más precisa de los ambientes dentro de una instalación. Esto es esencial para adaptarse a las necesidades particulares de cada sector y maximizar la utilidad de la plataforma.

# Tipos de Instalación
Los tipos de instalaciones en el contexto de IoT son categorías que permiten diferenciar y agrupar datos según la naturaleza y función de los entornos físicos donde se despliegan dispositivos y gateways conectados. Este parámetro es esencial para analizar la información de manera diferenciada y estratégica. Cada tipo de instalación tiene la capacidad de asociarse con un icono representativo, lo cual se reflejará visualmente en el dashboard.


# Crear un nuevo contacto
Para crear un nuevo contacto en la Libreta de direcciones basta con hacer clic en el botón “Agregar” que aparece en la pantalla de creación de contactos.
También es posible agregar contactos teniendo activo el filtro del cuadro de texto. Al borrar los caracteres escritos en dicho cuadro de texto, el contacto agregado aparecerá en el listado junto al resto de contactos existentes.

La Libreta de direcciones **permite incluir los siguientes datos** en cada registro:
* Nombre completo (***requerido***)
* Empresa
* Puesto
* Email
* Número de teléfono
* Número de teléfono para notificaciones vía SMS
1- En la solapa de Información Personal, el usuario podrá completar los datos personales del contacto.

**IMPORTANTE:** No dejar vacíos los campos obligatorios.
Una vez se hayan introducido los datos deseados, sin olvidar que el campo “Nombre completo” es obligatorio, hacemos “clic” en el botón “**Guardar**” o pulsamos la tecla “**Intro**” del teclado para que el contacto quede guardado en nuestro listado.
2- En la solapa de horario laboral el usuario podrá configurar la zona horaria que corresponda a la ubicación del contacto.

Luego, los días y rangos horarios en los cuales desea recibir el alerta.

El usuario podrá editar o eliminar los días previamente configurados.

El usuario podrá activar la opción de “Habilitar fecha fuera de disponibilidad” para indicar períodos vacacionales o de inactividad del contacto.

3- En la solapa de Notificaciones el usuario podrá;
* Configurar que dispositivo o dispositivos asignar > **Nivel**\

* Configurar la severidad de las notificaciones que se quieren recibir > **Nivel de Severidad**\

* Configurar los canales en donde se enviarán las notificaciones > **Canales**\

A continuación se detalla un ejemplo de un contacto generado.

Más información [#más-información]
[Libreta de direcciones](/docs/configuracion-del-cliente/libreta-de-direcciones)
[Editar un nuevo elemento en la libreta de direcciones](/docs/configuracion-del-cliente/libreta-de-direcciones/editar-un-contacto)
# Crear un nuevo grupo de contacto
Para crear un nuevo grupo de contacto en la ***Libreta de direcciones***, ingrese a *Configuración de cliente >* Libreta de direcciones > **Grupo de contactos**.
_fe2d.png)
Presione agregar y se abrirá la siguiente pantalla:

La ***Libreta de grupos de direcciones*** permite incluir los siguientes datos en cada registro:
* Nombre del grupo (***requerido***)
* Contactos
Escriba el nombre del grupo en ***Nombre.*** Para agregar los contactos, estos deben encontrarse cargados con anterioridad en la plataforma, puede conocer más sobre la creación de contactos en este [apartado](/docs/configuracion-del-cliente/libreta-de-direcciones/crear-un-nuevo-contacto). Seleccione el contacto que desee incorporar en la lista desplegable y haga click en **Agregar**.
_2b25.png)

> **IMPORTANTE:**
>
> * No dejar vacíos los campos obligatorios, entre ellos el campo “**Nombre**” para el grupo, los campos.
> * Una vez seleccionado el contacto siempre se debe presionar “**Agregar**” o no se sumará a la lista.
Una vez se hayan introducido los datos deseados, presionar el botón “**Guardar**” o pulsar la tecla “**Intro**” del teclado para que la lista quede actualizada.
2- En la solapa de *Horas Laborales*, se deberá agregar la zona horaria, asi como también los días y horas en los cuales desea recibir el alerta


El usuario podrá activar la opción de *Habilitar fecha fuera de disponibilidad*

3- En la solapa de *Notificaciones* el usuario podrá;
* Configurar que dispositivo o dispositivos asignar > **Nivel**

* Configurar la severidad de las notificaciones que se quieren recibir > **Nivel de Severidad**

* Configurar los canales en donde se enviarán las notificaciones > **Canales**

A continuación se detalla un ejemplo de un grupo de contacto generado.

Más información [#más-información]
[Libreta de direcciones](/docs/configuracion-del-cliente/libreta-de-direcciones)
[Crear un nuevo grupo de direcciones](/docs/configuracion-del-cliente/libreta-de-direcciones/crear-un-nuevo-contacto)
# Editar un contacto
Para **EDITAR** un contacto de la libreta de direcciones hay que desplegar el menú con tres puntitos que aparece a la derecha del contacto a editar. En dicho menú aparecen dos opciones: *Editar* y *Eliminar*.

Al hacer “clic” sobre la opción **EDITAR** del menú y se abrirá una pantalla con los datos del contacto a editar para poder cambiar o añadir los datos deseados.

**IMPORTANTE:** No dejar vacíos los campos obligatorios.
Una vez hechos los cambios oportunos y tras guardar los cambios haciendo “clic” en el botón “**Guardar**”, el contacto aparecerá en el listado de la libreta de direcciones con las correcciones aplicadas.
Si el fin es **ELIMINAR** el contacto seleccionado, al pulsar sobre “Eliminar” el servidor devolverá un mensaje de confirmación antes de eliminar el contacto de manera definitiva.

Al hacer “clic” en el botón “**Confirmar**” el contacto se eliminará definitivamente sin posibilidad de recuperarlo.
Al hacer “clic” en el botón “**Cancelar**" el contacto permanecerá sin ninguna modificación.
Más información [#más-información]
[Libreta de direcciones](/docs/configuracion-del-cliente/libreta-de-direcciones)
[Crear un nuevo elemento en la libreta de direcciones](/docs/configuracion-del-cliente/libreta-de-direcciones/crear-un-nuevo-contacto)
# Editar un grupo de contactos
Para **Editar** un contacto de la libreta de direcciones hay que desplegar el menú con tres puntitos que aparece a la derecha del contacto a editar. En dicho menú aparecen dos opciones: *Editar* y *Eliminar*.

Al hacer click sobre la opción ***Editar*** del menú, se abrirá una pantalla con los datos de la lista a editar.

> **IMPORTANTE:** No dejar vacíos los campos obligatorios.
Agregar más contactos [#agregar-más-contactos]
La ***Libreta de grupos de direcciones*** permite incluir los siguientes datos en cada registro:
* Nombre del grupo (***requerido***)
* Contactos
Escriba el nombre del grupo en ***Nombre.*** Para agregar los contactos, estos deben encontrarse cargados en la plataforma, puede conocer más sobre la creación de contactos en este [apartado](/docs/configuracion-del-cliente/libreta-de-direcciones/crear-un-nuevo-contacto). Seleccione el contacto que desee incorporar en la lista desplegable y haga click en **Agregar**.
_2b25.png)
_2bc7.png)
Eliminar contactos [#eliminar-contactos]
Si el fin es **Eliminar** el contacto seleccionado, al pulsar sobre el icono con la imagen de un *Tacho de basura* y el servidor devolverá un mensaje de confirmación antes de eliminar el contacto de manera definitiva.

Presionar el botón **Confirmar** para eliminar el contacto definitivamente sin posibilidad de recuperarlo. Puede hacer click en el botón **Cancelar** el para no realizar modificaciones en el contacto.
Más información [#más-información]
[Libreta de direcciones](/docs/configuracion-del-cliente/libreta-de-direcciones)
[Crear un nuevo grupo de direcciones](/docs/configuracion-del-cliente/libreta-de-direcciones/crear-un-nuevo-contacto)
# Libreta de direcciones
La Libreta de direcciones es una lista que permite centralizar la información de contacto para notificaciones, incluyendo SMS, Email, y llamadas de voz. Para cada contacto, la Libreta de direcciones **permite incluir los siguientes datos**:
* Nombre completo (requerido)
* Empresa
* Puesto
* Email
* Número de teléfono
* Número de teléfono para notificaciones vía SMS
Es posible **ordenar los datos** por las diferentes columnas en orden ascendente o descendente según la preferencia del usuario. Por defecto la visualización sería según el orden de entrada de registros en orden ascendente y la apariencia es la siguiente:

Mediante el botón "[Agregar](/docs/configuracion-del-cliente/libreta-de-direcciones/crear-un-nuevo-contacto)" que aparece en la pantalla de visualización de la Libreta de direcciones es posible añadir contactos nuevos con los datos deseados, teniendo en cuenta que el Nombre completo es un campo obligatorio que siempre debe aparecer para poder incluir el nuevo contacto en la lista.
Junto a cada registro de la Libreta de direcciones se presenta un icono con tres puntos que permite acceder a un menú contextual para ese registro con las siguientes opciones:
* [Editar](/docs/configuracion-del-cliente/libreta-de-direcciones/editar-un-contacto): para editar el registro o contacto.
* **Eliminar**: para eliminar el registro o contacto. El sistema solicita confirmación antes de borrar un registro para no eliminar datos de manera accidental.


Ampliación del menú
Es posible **filtrar** el contenido de la lista mediante un cuadro de texto para encontrar el contacto deseado simplemente con escribir parte del nombre, del número de teléfono o de cualquier otro dato. En el siguiente ejemplo buscábamos a Juan Pérez y no existía ningún otro contacto con los caracteres “ju”:

Puede accederse a la Libreta de direcciones **desde cualquier dispositivo con acceso a Internet**. Se puede visualizar y modificar en cualquier browser y en cualquier dispositivo (ordenador, tableta o teléfono móvil).
La Libreta de direcciones es la mejor manera de tener en un mismo lugar todos los contactos necesarios para enviar las notificaciones referentes a la aplicación, pudiendo **enviar dichas notificaciones de forma automatizada.**
La Libreta de direcciones permite la comunicación y el envío de avisos a los contactos seleccionados y/o a otros dispositivos propios a través del sistema de forma rápida y eficiente para **estar informado en todo momento del estado de los dispositivos incluidos en la aplicación.**
Más información [#más-información]
[Crear un nuevo elemento en la libreta de direcciones](/docs/configuracion-del-cliente/libreta-de-direcciones/crear-un-nuevo-contacto)
[Editar un elemento en la libreta de direcciones](/docs/configuracion-del-cliente/libreta-de-direcciones/editar-un-contacto)
# Seguridad
Dentro de “Configuración del Cliente" en el panel de Manager, se encuentra la opción de Seguridad. En ella se podrán agregar usuarios, editarlos, establecer una contraseña. eliminarlos y también suspenderlos.
**Pantalla de Seguridad**

Al **Agregar** un usuario, se podrá asignar a éste un Grupo de Usuarios en particular, asignándole roles especiales de Administrador, función de solo Operar, y función de solo Visualizar, entre otras opciones pre configurables.
**Pantalla de Grupos de Usuarios**

En la subopción de Grupos de Usuarios, se podrá agregar nuevos grupos específicos para después poder asignar usuarios que este grupo asignado.
Los mismos podrán Editarse y/o Eliminarse desde la pantalla principal, presionando los tres puntos de un grupo.
**Pantalla para crear nuevos Grupos de Usuarios**

Luego por debajo se encuentra la opción de Permisos. Aquí los usuarios podrán asignar permisos a funcionalidades especiales
**Pantalla de Permisos**

Se podrán asignar usuarios individuales o un grupo de usuarios que están asignados en un Grupo de Usuarios como vimos más arriba.
**Pantalla de Asignación de Permisos Individuales y de Grupos de Usuarios**

# Verticales
La plataforma Gear Studio contiene una serie de verticales que pueden aprovecharse en forma directa, aplicando conocimiento existente sobre los casos de uso más importantes.
Los verticales implementados actualmente, son:
* [Monitoreo de energía eléctrica](/docs/configuracion-del-cliente/verticales/monitoreo-de-energia).
* [Monitoreo de tanques](/docs/configuracion-del-cliente/verticales/monitoreo-de-tanques).
* [Seguimiento de activos](/docs/configuracion-del-cliente/verticales/seguimiento-de-activos).
# Monitoreo de tanques
La funcionalidad de monitoreo de tanques ayuda a prevenir problemas costosos y peligrosos al detectar fallas de forma temprana. Cubriendo lecturas en tiempo real, temperatura del tanque y sistema de alarma, proporcionan a los usuarios una representación visual del contenido del tanque, la temperatura del mismo y el volumen total presente, entre otras variables disponibles.
Los sistemas de monitoreo de tanques brindan a los operadores, gerentes y técnicos de tanques acceso a información en tiempo real.
**Para agregar tanques**

**Para gestionar los tanques en Material de contenido**

# Marca blanca
Introducción [#introducción]
La funcionalidad de **Marca Blanca** brinda la posibilidad a los usuarios de personalizar la plataforma creando una experiencia única de uso que se adapta a su identidad de marca. Desde esta sección se habilita la personalización del logotipo en menú, reportes, notificaciones y pantalla de inicio de sesión. Así como también se facilita la selección de una paleta de colores, la imagen de fondo de la pantalla de inicio de sesión y las características del chat y página de ayuda.
Para aquellas situaciones dónde se presente la necesidad de personalizar la plataforma para distintos clientes dentro de la misma instancia, se ofrece la opción de Marca Blanca en dos niveles. En un primer nivel se podrá personalizar la instancia y en un segundo nivel se encuentra la opción de personalizar la experiencia de estos usuarios, a los que llamaremos clientes.
> Aclaración importante: La funcionalidad de Marca Blanca para clientes no se encuentra incluida en todos los planes de suscripción, consulte por cotización y habilitación a nuestro equipo de [ventas](https://bit.ly/3Oc8zpg).
!\[]\(/images/wiki/image\_bbf3.png)
Marca Blanca a nivel de Instancia [#marca-blanca-a-nivel-de-instancia]
Para comenzar a utilizar la funcionalidad, ingrese a **Ajustes** y en el menú de *Configuración Global* seleccione **Marca Blanca**:
!\[]\(/images/wiki/5\_78b4.png)
!\[]\(/images/wiki/6\_6dfe.png)
Logo del Menú [#logo-del-menú]
Esta opción permite al usuario modificar el logo que se visualiza en el menú de la plataforma.
Presione **Cambiar** y luego seleccione el archivo de imagen desde su ordenador. Para que los cambios se reflejen en la plataforma, debe presionar **Guardar** al final de la página.
> **Requerimientos de imagen:**
>
> \* La extensión permitida es .png\
> \* Las dimensiones requeridas son 449x115 pixels
!\[]\(/images/wiki/7\_360d.png)
!\[]\(/images/wiki/image\_bbf3.png)
Logo de reportes [#logo-de-reportes]
Esta opción se utiliza para personalizar el logo que se emitirá en los reportes de la aplicación al exportarlos en PDF.
Presione **Cambiar** y luego seleccione el archivo de imagen desde su ordenador. Para que los cambios se reflejen en la plataforma, debe presionar **Guardar** al final de la página.
> **Requerimientos de imagen:**
>
> \* La extensión permitida es .png\
> \* Las dimensiones requeridas son 449x115 pixels
!\[]\(/images/wiki/8\_224f.png)
Logo de notificaciones [#logo-de-notificaciones]
Desde esta opción puede seleccionar el logo de las notificaciones enviadas por correo electrónico.
Presione **Cambiar** y luego seleccione el archivo de imagen desde su ordenador. Para que los cambios se reflejen en la plataforma, debe presionar **Guardar** al final de la página.
> **Requerimientos de imagen:**
>
> \* La extensión permitida es .png\
> \* Las dimensiones requeridas son 449x115 pixels
!\[]\(/images/wiki/9\_7872.png)
Logo de la pantalla de inicio de sesión [#logo-de-la-pantalla-de-inicio-de-sesión]
Esta opción permite personalizar el logo la pantalla de inicio de sesión de la plataforma.
> Aclaración: La pantalla de inicio de sesión es la primer pantalla que se visualiza al ingresar al dominio de su instancia.
!\[]\(/images/wiki/image\_650a.png)
Presione **Cambiar** y luego seleccione el archivo de imagen desde su ordenador. Para que los cambios se reflejen en la plataforma, debe presionar **Guardar** al final de la página.
> **Requerimientos de imagen:**
>
> \* La extensión permitida es .png\
> \* Las dimensiones requeridas son 449x115 pixels
!\[]\(/images/wiki/10\_562c.png)
Imagen de fondo de la pantalla de inicio de sesión [#imagen-de-fondo-de-la-pantalla-de-inicio-de-sesión]
Habilita predefinir la imagen de fondo en la pantalla de inicio de sesión.
Presione **Cambiar** y luego seleccione el archivo de imagen desde su ordenador. Para que los cambios se reflejen en la plataforma, debe presionar **Guardar** al final de la página.
> **Requerimientos de imagen:**
>
> \* La extensión permitida es .png\
> \* Las dimensiones requeridas son 1600x900 pixels
!\[]\(/images/wiki/11\_4757.png)
Favicon [#favicon]
En esta opción se puede customizar el logo que queda asociado al dominio de la plataforma y se visualiza en la parte superior de las pestañas de los navegadores.
Presione **Cambiar** y luego seleccione el archivo de imagen desde su ordenador. Para que los cambios se reflejen en la plataforma, debe presionar **Guardar** al final de la página.
> **Requerimientos de imagen:**
>
> \* La extensión permitida es .png\
> \* Las dimensiones requeridas son 192x192 pixels
!\[]\(/images/wiki/12\_f933.png)
Configuración de colores [#configuración-de-colores]
Esta opción facilita la selección de la paleta de colores de la plataforma. Se permite elegir dos colores, un color principal y uno secundario. Como ejemplo, el color principal se visualiza como fondo en el menú y el color secundario se visualiza en iconos y palabras del menú. De misma forma permite modificar el color principal del texto y el color secundario el cual se visualiza en el texto de los botones de la plataforma.
La plataforma cuenta con un selector de colores hexadecimal por lo que es posible configurar cualquier color que sea necesario.
!\[]\(/images/wiki/image\_33da.png)
Herramienta de Chat de Soporte al usuario [#herramienta-de-chat-de-soporte-al-usuario]
En esta opción el usuario podrá configurar la apariencia, disponibilidad y opciones del chat de ayuda de la aplicación.
!\[]\(/images/wiki/image\_bb21.png)
> **Nota:** es importante destacar que esta funcionalidad permite la configuración del plugin de Tawk.to con lo cual es requisito indispensable tener previamente una cuenta creada en Tawk.to. De esta forma, el usuario podrá crear su propia aplicación de plugin y con el id del propietario del chat, reemplazarlo para verlo tanto en inglés como en español. Allí también se mostrarán los colores y textos que haya customizado el usuario desde Tawk To.
>
> Cuando el usuario no ingrese datos del mismo, el botón de soporte al usuario no quedará visible.
Configuración de menú de ayuda [#configuración-de-menú-de-ayuda]
En esta opción se podrá personalizar el menú de ayuda. Se puede establecer un email de contacto y una URL de destino que quiera definir el dueño de la instancia con el manual de uso de la plataforma. Así como también se puede elegir **Deshabilitar** estas opciones o **Resetearlas**.
!\[]\(/images/wiki/image\_420a.png)
**Algunas consideraciones del Menú de Ayuda**
*Manual de usuario:*
Este campo permite al usuario visualizar o no según corresponda el manual del usuario de la aplicación.
* Si se deshabilita, no se mostrará opción en el menú de ayuda.
* Si se ingresa una URL, aparecerá la opción “Manual de usuario” que redireccionará a la Url que se haya ingresado;
* Si se resetea, se limpiara la URL y se mostrará el menú de ayuda predeterminado ("Introducción a Gear Studio", "Guía para integradores", "Manual del usuario", "Implementaciones", etc.).
*Email de contacto:*
Este campo permite al usuario visualizar o no según corresponda el manual del usuario de la aplicación.
* Si se deshabilita, no se mostrará opción en el menú de ayuda.
* Si se ingresa un email, aparecerá la opción “Enviar comentarios” y lo cargado por el usuario se enviará a la casilla ingresada en el menú de ayuda.
* Si se resetea, se mostrará la opción “Enviar comentarios”, enviando los correos a la casilla de soporte.
!\[]\(/images/wiki/image\_fffd.png)
!\[]\(/images/wiki/image\_e772.png)
!\[]\(/images/wiki/image\_da53.png)
Marca Blanca - Nivel Cliente [#marca-blanca---nivel-cliente]
Esta funcionalidad avanzada de Marca Blanca, habilita la personalización de la plataforma para distintos clientes dentro de una misma instancia.
> Aclaración importante: La funcionalidad de Marca Blanca para clientes no se encuentra incluida en todos los planes de suscripción, consulte por cotización y habilitación a nuestro equipo de [ventas](https://bit.ly/3Oc8zpg).
Para ingresar a la personalización de la plataforma para clientes, seleccione **Cliente** en el menú de *Configuración* *del Cliente* y busque la opción **Marca Blanca.**
!\[]\(/images/wiki/Dise%C3%B1o%20sin%20t%C3%ADtulo%20(63)\_ba2c.png)
Logo del Menú [#logo-del-menú-1]
Esta opción permite al usuario modificar el logo que se visualiza en el menú de la plataforma.
Presione **Cambiar** y luego seleccione el archivo de imagen desde su ordenador. Para que los cambios se reflejen en la plataforma, debe presionar **Guardar** al final de la página.
> **Requerimientos de imagen:**
>
> \* La extensión permitida es .png\
> \* Las dimensiones requeridas son 449x115 pixels
!\[]\(/images/wiki/15\_1f8c.png)
Logo de la pantalla de inicio de sesión [#logo-de-la-pantalla-de-inicio-de-sesión-1]
Esta opción permite personalizar el logo la pantalla de inicio de sesión de la plataforma.
Presione **Cambiar** y luego seleccione el archivo de imagen desde su ordenador. Para que los cambios se reflejen en la plataforma, debe presionar **Guardar** al final de la página.
> **Requerimientos de imagen:**
>
> \* La extensión permitida es .png\
> \* Las dimensiones requeridas son 449x115 pixels
!\[]\(/images/wiki/16\_8d45.png)
Imagen de fondo de la pantalla de inicio de sesión [#imagen-de-fondo-de-la-pantalla-de-inicio-de-sesión-1]
Habilita predefinir la imagen de fondo en la pantalla de inicio de sesión.
Presione **Cambiar** y luego seleccione el archivo de imagen desde su ordenador. Para que los cambios se reflejen en la plataforma, debe presionar **Guardar** al final de la página.
> **Requerimientos de imagen:**
>
> \* La extensión permitida es .png\
> \* Las dimensiones requeridas son 1600x900 pixels
!\[]\(/images/wiki/17\_3d4f.png)
Configuración de colores [#configuración-de-colores-1]
Esta opción facilita la selección de la paleta de colores de la plataforma. Se permite elegir dos colores, un color principal y uno secundario. Como ejemplo, el color principal se visualiza como fondo en el menú y el color secundario se visualiza en iconos y palabras del menú. De misma forma permite modificar el color principal del texto y el color secundario el cual se visualiza en el texto de los botones de la plataforma.
La plataforma cuenta con un selector de colores hexadecimal por lo que es posible configurar cualquier color que sea necesario.
!\[]\(/images/wiki/image\_ec9d.png)
Soporte al usuario [#soporte-al-usuario]
En esta opción el usuario podrá configurar la apariencia, disponibilidad y opciones del chat de ayuda de la aplicación.
!\[]\(/images/wiki/image\_bb21.png)
> **Nota:** es importante recordar que la configuración del plugin es customizable para que así el usuario puede crear si propia aplicación de plugin y con el id del propietario del chat, reemplazarlo para verlo tanto en inglés como en español. Allí también se mostrarán los colores y textos que haya customizado el usuario desde Tawk To.
>
> Cuando el usuario no ingrese datos del mismo, el botón de soporte al usuario no se esta visible.
**Configuración de menú de ayuda**
En esta opción se podrá personalizar el menú de ayuda. Se puede establecer un email de contacto y una URL personalizada al manual de usuario. Así como también se puede elegir **Deshabilitar** estas opciones o **Resetearlas**.
!\[]\(/images/wiki/image\_420a.png)
**Algunas consideraciones del Menú de Ayuda**
*Manual de usuario:*
Este campo permite al usuario visualizar o no según corresponda el manual del usuario de la aplicación.
* Si se deshabilita, no se mostrará opción en el menú de ayuda.
* Si se ingresa una URL, aparecerá la opción “Manual de usuario” que redireccionará a la Url que se haya ingresado;
* Si se resetea, se limpiara la URL y se mostrará el menú de ayuda predeterminado ("Introducción a Gear Studio", "Guía para integradores", "Manual del usuario", "Implementaciones", etc.).
*Email de contacto:*
Este campo permite al usuario visualizar o no según corresponda el manual del usuario de la aplicación.
* Si se deshabilita, no se mostrará opción en el menú de ayuda.
* Si se ingresa un email, aparecerá la opción “Enviar comentarios” y lo cargado por el usuario se enviará a la casilla ingresada en el menú de ayuda.
* Si se resetea, se mostrará la opción “Enviar comentarios”, enviando los correos a la casilla de soporte.
!\[]\(/images/wiki/image\_fffd.png)
!\[]\(/images/wiki/image\_e772.png)
!\[]\(/images/wiki/image\_da53.png)
Marca Blanca: habilitar y deshabilitar [#marca-blanca-habilitar-y-deshabilitar]
Las opciones de habilitar y deshabilitar la funcionalidad de **Marca Blanca de instancia** y **Marca Blanca de clientes** se encuentran visibles sólo para usuarios administradores de la plataforma. Esta funcionalidad se puede habilitar desde la sección **Características adicionales**, ubicada en el menú *Configuraciones globales*.
!\[]\(/images/wiki/Dise%C3%B1o%20sin%20t%C3%ADtulo%20(66)\_968a.png)
En el caso de que **Marca Blanca de instancia** se encuentre deshabilitada se verá un ícono al lado de su nombre en el menú y al ingresar a la sección.
!\[]\(/images/wiki/19\_cdc4.png)
> **Aclaraciones:**
>
> * Si Marca Blanca de instancias se encuentra deshabilitada, no va a ser posible habilitar Marca Blanca de clientes. Es necesario que se habilite en un primer momento Marca Blanca.
> * Si Marca Blanca de instancias no se encuentra habilitada, la plataforma establecerá colores, logos e imágenes por default correspondientes a la marca de Cloud Studio.
**Pedido de habilitación**
Cuando la opción no se encuentra habilitada, el usuario puede pedirle al administrador que la habilite, eso se le informa mediante el siguiente mensaje: Esta funcionalidad es un complemento, para habilitarla, comuníquese con su administrador.
!\[]\(/images/wiki/20\_9e55.png)
**Mensaje de validación de Marca blanca**
Los valores configurados a nivel Marca Blanca de clientes tendrán prioridad y se mantendrán por sobre los configurados a nivel Marca Blanca de instancias. Cuando un usuario desee modificar Marca Blanca de instancias se le avisará mediante mediante un mensaje informativo el mismo tiene configurado distintas opciones a nivel de cliente. De la misma forma si el cliente no tiene aplicadas configuraciones a nivel cliente, la plataforma mantendrá la configuraciones aplicadas a nivel instancia.
!\[]\(/images/wiki/Dise%C3%B1o%20sin%20t%C3%ADtulo%20(67)\_db26.png)
> Revise nuestro [tutorial](https://youtu.be/4E3pYdhg8Vc) en YouTube
Marca Blanca - Nivel Usuario [#marca-blanca---nivel-usuario]
Así como existe la [marca blanca a nivel Instancia](/docs/configuracion-global/marca-blanca) y la [marca blanca a nivel Cliente](/docs/configuracion-global/marca-blanca), cada usuario puede modificar el logo, los colores de fondo y texto para adaptar la interfaz a las preferencias personales, mejorando la visibilidad y creando un ambiente más agradable y apropiado para cada usuario. Estos cambios solo aplican en la sesión del usuario activo y no son visibles para otros usuarios.
Logo del Menú [#logo-del-menú-2]
Esta opción permite al usuario modificar el Logo que se visualiza en el menú de la plataforma para el usuario que lo configuró, cuando se ingrese con dicho perfil y mantener el look and feel configurado a nivel Instancia para los demás usuarios. .
Presione **Cambiar** y luego seleccione el archivo de imagen desde su ordenador. Para que los cambios se reflejen en la plataforma, debe presionar **Guardar** al final de la página.
> ***Requerimientos de imagen:***
>
> *\* La extensión permitida es .png*\
> *\* Las dimensiones requeridas son 449x115 pixels*
# Marca Blanca - Nivel Usuario
Así como existe la [marca blanca a nivel Instancia](/docs/configuracion-global/marca-blanca) y la [marca blanca a nivel Cliente](/docs/configuracion-global/marca-blanca), cada usuario puede modificar el logo, los colores de fondo y texto para adaptar la interfaz a las preferencias personales, mejorando la visibilidad y creando un ambiente más agradable y apropiado para cada usuario. Estos cambios solo aplican en la sesión del usuario activo y no son visibles para otros usuarios.
Logo del Menú [#logo-del-menú]
Esta opción permite al usuario modificar el Logo que se visualiza en el menú de la plataforma para el usuario que lo configuró, cuando se ingrese con dicho perfil y mantener el look and feel configurado a nivel Instancia para los demás usuarios. .
Presione **Cambiar** y luego seleccione el archivo de imagen desde su ordenador. Para que los cambios se reflejen en la plataforma, debe presionar **Guardar** al final de la página.
> ***Requerimientos de imagen:***
>
> *\* La extensión permitida es .png*\
> *\* Las dimensiones requeridas son 449x115 pixels*

Configuración de colores [#configuración-de-colores]
Esta opción facilita la selección de la paleta de colores de la plataforma para el usuario particular. Permite la selección de dos colores (principal y secundario). Como ejemplo, el color principal se visualiza como fondo en el menú y el color secundario se visualiza en iconos y palabras del menú. De misma forma permite modificar el color principal del texto y el color secundario el cual se visualiza en el texto de los botones de la plataforma.
La plataforma cuenta con un selector de colores hexadecimal por lo que es posible configurar cualquier color que sea necesario.

# Agregar Script Global
Seleccionar la opción correspondiente a Scripts Comunes desde el menú

Al seleccionar **Agregar** el usuario podrá incluir una descripción, seleccionar una dependencia y debajo ingresar el código en JS

# Editar Script Global
En la sección general de Scripts Comunes, seleccionar los tres puntos a la derecha de la pantalla

# Eliminar Script Global
En la sección general de Scripts Comunes Globales, seleccionar los tres puntos a la derecha de la pantalla

El usuario deberá **Confirmar** o **Cancelar** la accion requerida

Al Confirmar el Script Común es eliminado y el usuario redirigido a la pantalla general de dicha opción.

# Scripting Comunes Globales
El siguiente Modulo permite trabajar con los **“****Scripting Comunes Globales****”, para todos los clientes**, para cumplir la función de reutilizar, simplificar y reducir el código de los Script para Dispositivos y Acciones.
Un Script es un fragmentos de código en un lenguaje interpretado (*JavaScript*) de fácil comprensión, que permitirá ampliar el abanico de herramientas a disposición, a la hora de procesar una lógica de negocio determinada.
> Los Scripts Comunes Globales serán utilizados como librerías de funcionalidades comunes. \
> Los Scripts Comunes Globales, serán utilizados como dependencia en otros scripts.
El Modulo permitirá, visualizar el listado de Scripts Comunes Globales generados para todos los clientes, también permitirá crear, editar o eliminar dichos scripts. Los scripts podrán:
relacionarse entre si para aprovechar la reutilización de código.
acceder a todos los dispositivos del cliente en el cual se encuentran ejecutando.
**Desde la siguiente opción del menú**

# Grupos Globales
Los **grupos globales** permitirán asignar permisos de forma rápida asociando los **permisos globales** a los mismos y luego asociando los **usuarios globales** a dichos grupos y heredando automáticamente los **permisos globales** del grupo en cuestión.
# Seguridad Global
Dentro de “Configuración Global" en el panel de Manager, se encuentra la opción de Seguridad Global. En ella se podrán agregar usuarios globales, editarlos, establecer una contraseña. eliminarlos y también suspenderlos.
# Battery status
El objeto battery status representa el estado de una batería de un dispositivo. Este objeto normalmente se utiliza para actualizar el nivel de batería a través del método `updateDeviceBattery` del objeto [device](/docs/herramientas-low-code-scripting/referencia-de-objetos-disponibles-para-scripting/device), usualmente como parte de un script de [conversión de datos LoRaWAN o MQTT](/docs/configuracion-del-cliente/dispositivos-y-endpoints/dispositivos/modelos-de-dispositivo/procesamiento-de-datos).
Propiedades [#propiedades]
\### type (int enum)
La propiedad type indica el tipo de batería. Los valores posibles para esta propiedad, son los siguientes:
* **batteryType.default (1)**: es el valor por defecto para esta propiedad, normalmente utilizado cuando el dispositivo tiene una única batería.
* **batteryType.primary (2)**: cuando el dispositivo tiene más de una batería, este valor indica que se trata de la batería principal.
* **batteryType.secondary (3)**: cuando el dispositivo tiene más de una batería, este valor indica que se trata de la batería secundaria.
* **batteryType.backup (4)**: cuando el dispositivo tiene más de una batería, este valor indica que se trata de la batería de respaldo.
**Ejemplos**
Este ejemplo muestra cómo informar un nivel de batería del 72% para la batería principal, y del 68% para la batería secundaria, en un dispositivo que dispone de batería primaria y secundaria.
```javascript
myDevice.updateDeviceBattery
(
[
{ type: batterytype.primary, percentage: 72 },
{ type: batteryType.secondary, percentage: 68}
]
);
```
\### percentage (int) La propiedad percentage indica el porcentaje de carga de la batería (0-100%).
**Ejemplos**
Este ejemplo muestra cómo informar un nivel de batería del 72% para la batería principal, y del 68% para la batería secundaria, en un dispositivo que dispone de batería primaria y secundaria.
```javascript
myDevice.updateDeviceBattery
(
[
{ type: batterytype.primary, percentage: 72 },
{ type: batteryType.secondary, percentage: 68}
]
);
```
\### voltage (double) La propiedad voltage permite indicar el voltaje de la batería.
**Ejemplos**
Este ejemplo muestra cómo informar un voltaje de batería de 2.95V para un dispositivo que tiene una única batería.
```javascript
myDevice.updateDeviceBattery({ voltage: 2.95 });
```
\### state (int enum)
La propiedad state permite indicar el estado de la batería. Los valores posibles para esta propiedad son los siguientes:
* **batteryState.ok (1)**: indica que la carga de batería permite que el dispositivo funcione normalmente.
* **batteryState.low (2)**: indica que la carga de batería es baja y debería ser reemplazada.
Si no se informa el estado de batería, la plataforma asumirá el estado **ok**.
**Ejemplos**
Este ejemplo muestra cómo informar un estado de batería baja para un dispositivo que tiene una única batería.
```javascript
myDevice.updateDeviceBattery({ voltage: 2.95, state: batteryState.low });
```
# Command
El objeto command representa un comando que debe ser enviado a un dispositivo o endpoint. Este objeto normalmente se recibe como parámetro en el método `buildDownlink` como parte de un script de [conversión de datos LoRaWAN o MQTT](/docs/configuracion-del-cliente/dispositivos-y-endpoints/dispositivos/modelos-de-dispositivo/procesamiento-de-datos).
Propiedades [#propiedades]
\### commandId (int) La propiedad **commandId** indica un número interno que identifica al comando en forma única. Si el dispositivo es capaz de contestar al comando, la respuesta debe contener el mismo **commandId**.
**Ejemplos**
El siguiente es un ejemplo basado en la documentación del método `buildDownlink` en la sección de [conversión de datos LoRaWAN o MQTT](/docs/configuracion-del-cliente/dispositivos-y-endpoints/dispositivos/modelos-de-dispositivo/procesamiento-de-datos).
```javascript
function buildDownlink(device, endpoint, command, payload)
{
payload.port = 25; // This device receives commands on LoRaWAN port 25
payload.buildResult = downlinkBuildResult.ok;
switch (command.type) {
case commandType.onOff:
switch (command.onOff.type) {
case onOffCommandType.turnOn:
payload.setAsBytes([30]); // Command ID 30 is "turn on"
break;
case onOffCommandType.turnOff:
payload.setAsBytes([31]); // Command ID 31 is "turn off"
break;
case onOffCommandType.toggle:
payload.setAsBytes([32]); // Command ID 32 is "toggle"
break;
default:
payload.buildResult = downlinkBuildResult.unsupported;
break;
}
break;
default:
payload.buildResult = downlinkBuildResult.unsupported;
break;
}
}
```
\### type (int, enum)
La propiedad type indica el tipo de comando. Los valores posibles son los siguientes:
* **commandType.onOff (1)**: indica que el comando es de tipo on/off, es decir que es para encender, apagar, o hacer toggle de un endpoint.
* **commandType.dimmer (2)**: indica que el comando es para alterar el nivel de un dimmer.
* **commandType.closure (3)**: indica que el comando es para controlar un cerramiento (closure), tal como una cortina o persiana.
* **commandType.thermostat (4)**: indica que el comando es para controlar un termostato.
* **commandType.management (5)**: indica que el comando es para administrar el dispositivo (reboot, firmware upgrade, etc.).
* **commandType.custom (6)**: indica que se trata de un comando definido por el usuario.
**Ejemplos**
Se presenta un ejemplo completo al comienzo de esta sección.
\### onOff (objeto)
La propiedad **onOff** es un objeto que contiene los parámetros del comando, cuando es de tipo **commandType.onOff**. El objeto tiene las siguientes propiedades:
* **type (int enum)**: indica el tipo de comando on/off, entre los siguientes:
* **onOffCommandType.turnOn (0)**: indica que el comando es para encender el endpoint.
* **onOffCommandType.turnOff (1)**: indica que el comando es para apagar el endpoint.
* **onOffCommandType.toggle (2)**: indica que el comando es para alternar el endpoint (toggle).
**Ejemplos**
Se presenta un ejemplo completo al comienzo de esta sección.
\### dimmer (objeto)
La propiedad **dimmer** es un objeto que contiene los parámetros del comando, cuando es de tipo **commandType.dimmer**. El objeto tiene las siguientes propiedades:
* **level (double)**: indica el nivel de dimerización como porcentaje, de cero a 100%.
**Ejemplos**
Se presenta un ejemplo completo al comienzo de esta sección.
\### thermostat (objeto)
La propiedad **thermostat** es un objeto que contiene los parámetros del comando, cuando es de tipo **commandType.thermostat**. El objeto tiene las siguientes propiedades:
* **type (int enum)**: indica el tipo de comando que se ha enviado al termostato, entre los siguientes:
* **thermostatCommandType.setMode (0)**: el comando es para cambiar el modo del termostato.
* **thermostatCommandType.setFanMode (1)**: el comando es para cambiar el modo del ventilador del termostato.
* **thermostatCommandType.setSetpoint (2)**: el comando es para cambiar el setpoint.
* **thermostatCommandType.setAll (3)**: el comando es para cambiar todos los parámetros simultáneamente.
* **mode (int enum)**: indica el modo al que debe pasar el termostato, cuando el tipo type es **thermostatCommandType.setMode**, o **thermostatCommandType.setAll**. Los valores posibles son los siguientes:
* **thermostatMode.off (1)**: el termostato debe ser apagado.
* **thermostatMode.auto (2)**: el termostato debe pasar a modo auto.
* **thermostatMode.heat (3)**: el termostato debe pasar a modo calor.
* **thermostatMode.cool (4)**: el termostato debe pasar a modo frío.
* **thermostatMode.dry (5)**: el termostato debe pasar a modo deshumidificación (dry).
* **thermostatMode.fan (6)**: el termostato debe pasar a modo ventilador.
* **fanMode (int enum)**: indica el modo de ventilador al que debe pasar el termostato, cuando el tipo type es **thermostatCommandType.setFanMode**, o **thermostatCommandType.setAll**. Los valores posibles son los siguientes:
* **thermostatFanMode.auto (1)**: el ventilador debe pasar a modo auto.
* **thermostatFanMode.low (2)**: el ventilador debe pasar a modo low.
* **thermostatFanMode.mid (3)**: el ventilador debe pasar a modo mid.
* **thermostatFamMode.high (4)**: el ventilador debe pasar a modo high.
* **setpoint (double)**: indica el setpoint, en grados Celsius, cuando el tipo type es **thermostatCommandType.setSetpoint**, o **thermostatCommandType.setAll**.
**Ejemplos**
Se presenta un ejemplo completo al comienzo de esta sección.
\### closure (objeto)
La propiedad **closure** es un objeto que contiene los parámetros del comando, cuando es de tipo **commandType.closure**. El objeto tiene las siguientes propiedades:
* **type (int enum)**: indica el tipo de comando que se ha enviado al cerramiento, entre los siguientes:
* **closureCommandType.open (0)**: el comando es para que el cerramiento se abra.
* **closureCommandType.close (1)**: el comando es para que el cerramiento se cierre.
* **closureCommandType.position (2)**: el comando es para cambiar la posición del cerramiento.
* **closureCommandType.stop (3)**: el comando es para detener el movimiento del cerramiento.
* **closureCommandType.openStop (4)**: el comando es para abrir el cerramiento, o detenerlo si se está moviendo.
* **closureCommandType.closeStop (5)**: el comando es para cerrar el cerramiento, o detenerlo si se está moviendo.
* **position (int)**: indica la posición a la cual debe moverse el cerramiento, cuando el tipo type es **closureCommandType.position**, como un porcentaje, entre 0% (cerrado), y 100% (abierto).
**Ejemplos**
Se presenta un ejemplo completo al comienzo de esta sección.
\### management (objeto)
La propiedad **management** es un objeto que contiene los parámetros del comando, cuando es de tipo **commandType.management**. El objeto tiene las siguientes propiedades:
* **type (int enum)**: indica el tipo de comando que se ha enviado al cerramiento, entre los siguientes:
* **managementCommandType.identify (0)**: solicita al dispositivo que se identifique. Esto se utiliza en algunos dispositivos para que el dispositivo encienda algún indicador visual o sonoro.
* **managementCommandType.reboot (1)**: solicita al dispositivo que se reinicie.
* **managementCommandType.powerOff (2)**: solicita al dispositivo que se apague.
* **managementCommandType.poll (3)**: solicita al dispositivo que envíe información actualizada lo antes posible.
* **managementCommandType.updateFirmware (4)**: solicita al dispositivo que actualice su firmware.
* **managementCommandType.setValue (5)**: solicita al dispositivo que cambie un valor.
* **updateFirmware (object)**: indica los parámetros de la actualización de firmware, cuando el valor del campo **type** es **managementCommandType.updateFirmware**. Las propiedades de este objeto son las siguientes:
* **downloadUrl (string)**: indica la URL desde la que el dispositivo debe descargar la actualización de firmware.
* **setValue (object)**: el objeto setValue contiene la información necesaria para cambiar el valor, cuando valor del campo **type** es **managementCommandType.setValue**. Las propiedades de este objeto son las siguientes:
* **newValue (double)**: indica el nuevo valor que debe asignarse.
**Ejemplos**
Se presenta un ejemplo completo al comienzo de esta sección.
\### custom (objeto)
La propiedad **custom** es un objeto que contiene los parámetros del comando, cuando es de tipo **commandType.custom**. El objeto tiene las siguientes propiedades:
* **type (int)**: valor arbitrario indicando el tipo de comando custom.
* **data (string)**: valor arbitrario que se desea enviar al dispositivo.
**Ejemplos**
Se presenta un ejemplo completo al comienzo de esta sección.
# Data payload
El objeto data payload representa un payload recibido desde un dispositivo, por ejemplo un dispositivo con conectividad MQTT, HTTP, o LoRaWAN. El objeto permite acceder a los datos recibidos en forma binaria, como texto, como objeto Json, y de otras formas. Este objeto se recibe usualmente como parámetro en ciertos scripts, como los de [conversión de datos MQTT, HTTP, o LoRaWAN](/docs/configuracion-del-cliente/dispositivos-y-endpoints/dispositivos/modelos-de-dispositivo/procesamiento-de-datos).
Propiedades [#propiedades]
\### port (int, sólo disponible para paquetes LoRaWAN) La propiedad port indica el puerto LoRaWAN al cual el dispositivo envió el payload. Esta propiedad sólo tiene valor para payloads recibidos a través de una red LoRaWAN. Para los demás medios de comunicaciones, el valor es siempre cero.
**Ejemplos**
Este ejemplo muestra el puerto del payload en la consola de log.
```javascript
env.log('Payload port: ', payload.port);
```
\### topic (string, sólo disponible para paquetes MQTT) La propiedad topic indica el topic de MQTT al cual el dispositivo envió el payload. Esta propiedad sólo tiene valor para payloads recibidos a través de MQTT. Para los demás medios de comunicaciones, el valor es siempre un string vacío.
**Ejemplos**
Este ejemplo muestra el topic del payload en la consola de log.
```javascript
env.log('Payload topic: ', payload.topic);
```
\### buildResult (enum, sólo para downlinks)
La propiedad buildResult permite indicar el resultado de la construcción de un payload para downlinks. Esto es típicamente utilizado en la función buildDownlink() del [script de procesamiento de datos](/docs/configuracion-del-cliente/dispositivos-y-endpoints/dispositivos/modelos-de-dispositivo/procesamiento-de-datos) para LoRaWAN y MQTT. Los valores posibles para esta propiedad, son los siguientes:
* **downlinkBuildResult.ok (0)**: .
* **downlinkBuildResult.error (1)**: .
* **downlinkBuildResult.unsupported (2)**: .
**Ejemplos**
Este ejemplo muestra un fragmento de código en el que se indica un mensaje de error durante la creación de un payload de downlink.
```javascript
payload.buildResult = downlinkBuildResult.error;
payload.errorMessage = { en: "Invalid parameter", es: "Parámetro no válido" };
```
\### errorMessage (string o multi-language literal, sólo para downlinks) La propiedad errorMessage permite indicar un mensaje de error durante la construcción de un payload para downlinks. Esto es típicamente utilizado en la función buildDownlink() del [script de procesamiento de datos](/docs/configuracion-del-cliente/dispositivos-y-endpoints/dispositivos/modelos-de-dispositivo/procesamiento-de-datos) para LoRaWAN y MQTT, cuando se utiliza el valor **downlinkBuildResult.error** en la propiedad **buildResult**. El valor asignado a esta propiedad puede ser un string, o un objeto [multi-language literal](/docs/herramientas-low-code-scripting/referencia-de-objetos-disponibles-para-scripting/multi-language-literal).
**Ejemplos**
Este ejemplo muestra un fragmento de código en el que se indica un mensaje de error durante la creación de un payload de downlink.
```javascript
payload.buildResult = downlinkBuildResult.error;
payload.errorMessage = { en: "Invalid parameter", es: "Parámetro no válido" };
```
\### requiresResponse (boolean, sólo para downlinks)
La propiedad **requiresResponse** permite indicar si el mensaje que se está construyendo necesita una respuesta por parte del dispositivo, o si debe considerarse que el comando se completó correctamente tan pronto como el comando es enviado.
* Si la propiedad tiene valor **false** (valor por defecto), se considerará que el comando ha sido enviado, tan pronto como el payload es enviado al broker MQTT (en el caso de dispositivos MQTT), o el payload sea encolado en el gateway LoRaWAN (en el caso de dispositivos LoRaWAN).
* Si la propiedad tiene valor **true**, el comando quedará abierto hasta que el propio dispositivo envíe una respuesta al comando.
El valor por defecto de esta propiedad es **false**.
**Ejemplos**
Este ejemplo muestra un fragmento de código en el que se indica que el payload no requiere respuesta del dispositivo.
```javascript
payload.requiresResponse = false;
```
\### latitude (double, sólo para uplinks) La propiedad **latitude** permite conocer la latitud en la que se encuentra el dispositivo que ha enviado datos. Esta propiedad sólo está disponible si el proveedor de la información ha podido calcular la ubicación del dispositivo mediante triangulación o algún método equivalente.
**Ejemplos**
Este ejemplo muestra un fragmento de código que muestra la latitud del dispositivo.
```javascript
env.log("Latitude: ", payload.latitude);
```
\### longitude (double, sólo para uplinks) La propiedad **longitude** permite conocer la longitud en la que se encuentra el dispositivo que ha enviado datos. Esta propiedad sólo está disponible si el proveedor de la información ha podido calcular la ubicación del dispositivo mediante triangulación o algún método equivalente.
**Ejemplos**
Este ejemplo muestra un fragmento de código que muestra la longitud del dispositivo.
```javascript
env.log("Longitude: ", payload.longitude);
```
\### altitude (double, sólo para uplinks) La propiedad **altitude** permite conocer la altitud en la que se encuentra el dispositivo que ha enviado datos. Esta propiedad sólo está disponible si el proveedor de la información ha podido calcular la ubicación del dispositivo mediante triangulación o algún método equivalente.
**Ejemplos**
Este ejemplo muestra un fragmento de código que muestra la altitud del dispositivo.
```javascript
env.log("Altitude: ", payload.altitude);
```
Métodos [#métodos]
\### asBytes() El método asBytes() permite obtener el contenido del payload como un array de bytes. Esto se utiliza principalmente cuando el payload debe ser procesado en forma binaria.
**Ejemplo 1**
Este ejemplo muestra el contenido del payload como bytes, a través de la consola de log.
```javascript
payload.asBytes().forEach(element => env.log(element));
```
\### asString() El método asString() permite obtener el contenido del payload como un string, convirtiendo el contenido binario a string, y asumiendo una codificación UTF-8. Esto se utiliza principalmente cuando el payload debe ser procesado como texto.
**Ejemplo 1**
Este ejemplo muestra el contenido del payload como string, a través de la consola de log.
```javascript
env.log(payload.asString());
```
\### asJsonObject() El método asJsonObject() permite obtener el contenido del payload como un objeto, asumiendo que el payload es un texto codificado en formato Json. Esto se utiliza principalmente cuando el payload debe ser procesado como texto Json.
**Ejemplo 1**
Este ejemplo muestra el contenido del payload como objeto Json, a través de la consola de log.
```javascript
env.log(payload.asJsonObject());
```
\### asParsedObject() El método asParsedObject() permite obtener la versión parsed del payload, tal como fue enviada a la plataforma. Algunas plataformas de comunicaciones, tales como Actility y The Things Stack, son capaces de enviar una versión procesada de la información del payload, además de los datos binarios. Este método permite acceder a la información enviada por dichas plataformas, en forma directa. Nótese que el resultado puede ser null si no se han recibido datos procesados.
**Ejemplo 1**
Este ejemplo muestra el contenido del payload procesado por la plataforma de comunicaciones, a través de la consola de log.
```javascript
env.log(payload.asParsedObject());
```
\### setAsBytes(bytesContent) El método setAsBytes() permite establecer el contenido del payload como un array de bytes. Este método se utiliza normalmente en la creación de downlinks.
**Parámetros**
* **bytesContent** (array of bytes): nuevo contenido del payload, expresado como byte array.
**Ejemplo 1**
Este ejemplo muestra el cómo establecer el payload como un array de cinco bytes.
```javascript
payload.setAsBytes([9, 8, 7, 6, 5]);
```
\### setAsString(stringContent) El método setAsString() permite establecer el contenido del payload como texto. Este método se utiliza normalmente en la creación de downlinks.
**Parámetros**
* **stringContent** (string): nuevo contenido del payload, expresado como texto.
**Ejemplo 1**
Este ejemplo muestra el cómo establecer el payload como texto.
```javascript
payload.setAsString("Some text");
```
\### setAsJsonObject(objectContent) El método setAsJsonObject() permite establecer el contenido del payload como un objeto, que será convertido a su representación en formato Json. Este método se utiliza normalmente en la creación de downlinks.
**Parámetros**
* **objectContent** (object): nuevo contenido del payload, expresado como objeto.
**Ejemplo 1**
Este ejemplo muestra el cómo establecer el payload como objeto.
```javascript
payload.setAsJsonObject({ on: true, dimLevel: 65 });
```
\_\_\_\_\_\_\_\_\_\_\_\_\_\_\_\_\_\_\_\_\_\_\_\_\_\_\_\_\_\_\_\_\_\_\_\_\_\_\_\_\_\_\_\_\_\_\_\_\_\_\_\_\_\_\_\_\_\_\_\_\_\_\_\_\_\_\_\_\_\_\_\_\_\_\_\_\_\_\_\_\_\_\_\_\_\_\_\_\_\_\_\_\_\_\_\_\_\_\_\_\_\_\_\_\_\_\_\_\_\_\_\_\_\_\_\_\_\_\_\_\_\_\_\_
**Señal de Red**
`payload.rssi.quality`
Mide la calidad de la señal con la que se recibe el mensaje. Es un porcentaje y su valor puede variar entre 0 y 100
```
Javascript
var rssiQuality = payload.rssi.quality;
env.log("Quality:", rssiQuality);
Ejemplo:
Json
"rssi":
{
"quality": 87
}
```
**Fuerza de la Señal**
`payload.rssi.strength`
Es la fuerza de la señal. Mide la potencia, generalmente en decibeles. Es mejor cuando el número es menor.
```
Javascript
var rssiStrength = payload.rssi.strength;
env.log("Strength:", rssiStrength);
Ejemplo:
Json
"rssi": {
"strength": 8
}
```
**Tipo de Señal**
`payload.rssi.type`
Referencia el tipo de método de comunicación utilizado por el dispositivo para el envío del mensaje. Por ejemplo: LoRaWAN, Nbiot, lte, etc
```
Javascript
var rssiType = payload.rssi.type;
env.log("Type:", rssiType);
Json
Ejemplo:
"rssi":
{
"type": "lora"
}
```
**PUERTO**
`payload.port`
El puerto lógico utilizado por el dispositivo que sirve para identificar el tipo de formato o su formato
```
Javascript
var port = payload.port;
env.log("Port:", port);
Json
"port": 1
```
**TÓPICO**
`payload.topic`
El canal por donde se recibió el mensaje. Útiles para arquitecturas con múltiples rutas o tipo MQTT
```
javascript
var topic = payload.topic;
env.log("Topic:", topic);
Json
"topic": "uplink/temperature"
```
**LATITUD**
`payload.latitude`
Indica la posición norte/sur desde donde se envió el mensaje.
`var latitude = payload.latitude; env.log("Latitude:", latitude);`
```
javascript
var latitude = payload.latitude;
env.log("Latitude:", latitude);
Json
"latitude": 19.4326
```
LONGITUD [#longitud]
`payload.longitude`
Indica la posición este/oeste de donde provino el mensaje.
```
Javascript
var longitude = payload.longitude;
env.log("Longitude:", longitude);
Ejemplo:
"longitude": -99.1332
```
Altitud [#altitud]
`payload.altitude`
Representa la altura en metros sobre el nivel del mar donde se encuentra el dispositivo que realizó la transmisión
```
javascript
var altitude = payload.altitude;
env.log("Altitude:", altitude);
Json
"altitude": 2250
```
# DataPoint
El objeto DataPoint representa un valor, que normalmente se utiliza para representar el estado de un endpoint en un momento determinado.
Propiedades [#propiedades]
\### value (number) La propiedad value representa el valor del endpoint, como número. Vea la tabla al final de esta sección para conocer los tipos de endpoint a los que aplica esta propiedad, y su significado.
**Ejemplos**
Este ejemplo muestra el valor actual del primer endpoint de un dispositivo, a través de la consola de log.
```javascript
env.log('Endoint value: ', myDevice.endpoints.byIndex(0).getCurrentValue().value);
```
\### isOn (boolean) La propiedad isOn indica si el endpoint está actualmente encendido. Vea la tabla al final de esta sección para conocer los tipos de endpoint a los que aplica esta propiedad, y su significado.
**Ejemplos**
Este ejemplo muestra el estado actual del primer endpoint de un dispositivo, a través de la consola de log.
```javascript
env.log('Endoint state: ', myDevice.endpoints.byIndex(0).getCurrentValue().isOn);
```
\### state (number) La propiedad state indica el estado actual del endpoint. Esta propiedad aplica a los endpoints de tipo IAS Sensor.
**Ejemplos**
Este ejemplo muestra el estado actual del primer endpoint de un dispositivo, a través de la consola de log.
```javascript
env.log('Endoint state: ', myDevice.endpoints.byIndex(0).getCurrentValue().state);
```
\### position (number) La propiedad position indica la posición actual, para los endpoints de tipo Closure.
**Ejemplos**
Este ejemplo muestra la posición actual del primer endpoint de un dispositivo, a través de la consola de log.
```javascript
env.log('Endoint position: ', myDevice.endpoints.byIndex(0).getCurrentValue().position);
```
\### mode (number) La propiedad mode indica el modo actual de un endpoint de tipo Thermostat.
**Ejemplos**
Este ejemplo muestra el modo actual del primer endpoint de un dispositivo, a través de la consola de log.
```javascript
env.log('Thermostat mode: ', myDevice.endpoints.byIndex(0).getCurrentValue().mode);
```
\### fanMode (number) La propiedad fanMode indica el modo actual del ventilador de un endpoint de tipo Thermostat.
**Ejemplos**
Este ejemplo muestra el modo actual del ventilador del primer endpoint de un dispositivo, a través de la consola de log.
```javascript
env.log('Fan mode: ', myDevice.endpoints.byIndex(0).getCurrentValue().fanMode);
```
\### setpoint (number) La propiedad setpoint indica la temperatura deseada en un endpoint de tipo Thermostat.
**Ejemplos**
Este ejemplo muestra la temperatura deseada del primer endpoint de un dispositivo, a través de la consola de log.
```javascript
env.log('Setpoint: ', myDevice.endpoints.byIndex(0).getCurrentValue().setpoint);
```
\### ambientTemperature (number) La propiedad ambientTemperature indica la temperatura ambiente actual de un endpoint de tipo Thermostat.
**Ejemplos**
Este ejemplo muestra la temperatura ambiente actual del primer endpoint de un dispositivo, a través de la consola de log.
```javascript
env.log('Ambient temperature: ', myDevice.endpoints.byIndex(0).getCurrentValue().ambientTemperature);
```
\### latitude (number) La propiedad latitude indica la latitud para un endpoint de tipo Location Tracker.
**Ejemplos**
Este ejemplo muestra las coordenadas actuales del primer endpoint de un dispositivo, a través de la consola de log.
```javascript
var v = myDevice.endpoints.byIndex(0).getCurrentValue();
env.log('Coordinates: ', v.latitude, ' - ', v.longitude);
```
\### longitude (number) La propiedad longitude indica la longitud para un endpoint de tipo Location Tracker.
**Ejemplos**
Este ejemplo muestra las coordenadas actuales del primer endpoint de un dispositivo, a través de la consola de log.
```javascript
var v = myDevice.endpoints.byIndex(0).getCurrentValue();
env.log('Coordinates: ', v.latitude, ' - ', v.longitude);
```
\### flags (number) La propiedad flags indica las condiciones especiales de un endpoint de tipo Location Tracker.
**Ejemplos**
Este ejemplo muestra los flags del primer endpoint de un dispositivo, a través de la consola de log.
```javascript
env.log('Flags: ', myDevice.endpoints.byIndex(0).getCurrentValue().flags);
```
\### activeEnergy (number) La propiedad activeEnergy indica la energía activa de un endpoint de tipo Energy Meter.
**Ejemplos**
Este ejemplo muestra la energía activa, reactiva, y aparente del primer endpoint de un dispositivo, a través de la consola de log.
```javascript
var v = myDevice.endpoints.byIndex(0).getCurrentValue();
env.log('Energy (active / reactive / apparent): ', v.activeEnergy, '/', v.reactiveEnergy, '/', v.apparentEnergy);
```
\### reactiveEnergy (number) La propiedad reactiveEnergy indica la energía reactiva de un endpoint de tipo Energy Meter.
**Ejemplos**
Este ejemplo muestra la energía activa, reactiva, y aparente del primer endpoint de un dispositivo, a través de la consola de log.
```javascript
var v = myDevice.endpoints.byIndex(0).getCurrentValue();
env.log('Energy (active / reactive / apparent): ', v.activeEnergy, '/', v.reactiveEnergy, '/', v.apparentEnergy);
```
\### apparentEnergy (number) La propiedad apparentEnergy indica la energía aparente de un endpoint de tipo Energy Meter.
**Ejemplos**
Este ejemplo muestra la energía activa, reactiva, y aparente del primer endpoint de un dispositivo, a través de la consola de log.
```javascript
var v = myDevice.endpoints.byIndex(0).getCurrentValue();
env.log('Energy (active / reactive / apparent): ', v.activeEnergy, '/', v.reactiveEnergy, '/', v.apparentEnergy);
```
\### text (string) La propiedad text indica el texto asociado a un endpoint de tipo Text Container.
**Ejemplos**
Este ejemplo muestra el texto asociado al primer endpoint de un dispositivo, a través de la consola de log.
```javascript
env.log('Text: ', myDevice.endpoints.byIndex(0).getCurrentValue().text);
```
Propiedades del objeto DataPoint para cada tipo de endpoint [#propiedades-del-objeto-datapoint-para-cada-tipo-de-endpoint]
| Propiedad | Tipo de endpoint | Significado |
| ------------------ | ------------------------------------------------ | ----------------------------- |
| value | Endpoints numéricos (escalares, discretos, etc.) | Valor actual |
| Appliance | Apagado: 0Encendido: 1 | |
| Dimmer | Apagado: 0Encendido: nivel actual | |
| Closure | Posición actual | |
| IAS Sensor | Estado actual | |
| isOn | Appliance / Dimmer / Thermostat | Apagado: falseEncendido: true |
| Closure | Detenido: falseEn movimiento: true | |
| state | IAS Sensor | Estado actual |
| position | Closure | Posición actual |
| mode | Thermostat | Modo actual |
| fanMode | Thermostat | Modo actual del ventilador |
| setpoint | Thermostat | Temperatura deseada |
| ambientTemperature | Thermostat | Temperatura ambiente |
| latitude | Location tracker | Latitud |
| longitude | Location tracker | Longitud |
| flags | Location tracker | Location flags |
| activeEnergy | Energy Meter | Energía activa |
| reactiveEnergy | Energy Meter | Energía reactiva |
| apparentEnergy | Energy Meter | Energía aparente |
| text | Text container | Texto actual |
# Device address validation result
El objeto device address validation result representa el resultado de la validación de una dirección de dispositivo, típicamente empleado en los scripts de [configuración de un modelo de dispositivo](/docs/configuracion-del-cliente/dispositivos-y-endpoints/dispositivos/modelos-de-dispositivo/configuracion).
La función `validateDeviceAddress` recibe como parámetro un objeto de este tipo, que permite validar la dirección dada como parámetro, e indicar el resultado de la validación.
Propiedades [#propiedades]
\### ok (boolean) La propiedad **ok** indica si la validación fue correcta. El valor true indica que la dirección indicada es correcta, mientras que el valor false indica que la dirección no puede ser aceptada. En caso de devolver el valor true, es posible además asignar un valor a la propiedad **updatedAddress**, opcionalmente, si se desea modificar la dirección indicada. En ese caso, la plataforma utilizará el valor de la propiedad **updatedAddress** para el dispositivo.
**Ejemplos**
Este ejemplo permite validar la dirección de un dispositivo, verificando que tenga 10 caracteres. En caso de que la validación sea correcta, se pasa además la dirección a minúsculas. En caso de que la validación no sea correcta, se indica un mensaje de error.
```javascript
function validateDeviceAddress(address, result)
{
result.ok = address.length == 10;
if (result.ok)
{
result.updatedAddress = address.toLowerCase();
}
else
{
result.errorMessage = {
en: "The address must be exactly 10 characters long",
es: "La dirección debe tener exactamente 10 caracteres"
};
}
}
```
\### updatedAddress (string) La propiedad updatedAddress permite modificar la dirección que se está validando, de manera que si la validación es correcta, pueda utilizarse una dirección diferente. Por defecto, el valor de esta propiedad es igual al de la dirección pasada como parámetro a la función `validateDeviceAddress`. Normalmente, la dirección puede cambiarse para darle un formato consistente.
**Ejemplos**
Puede verse un ejemplo completo en la documentación de la propiedad **ok**, más arriba.
\### errorMessage (string o multi-language literal) La propiedad errorMessage permite indicar un mensaje de error, en caso de que la propiedad **ok** tenga valor false. Para indicar un mensaje de error, puede indicarse un valor de tipo string o [multi language literal](/docs/herramientas-low-code-scripting/referencia-de-objetos-disponibles-para-scripting/multi-language-literal). Si se utiliza un objeto [multi language literal](/docs/herramientas-low-code-scripting/referencia-de-objetos-disponibles-para-scripting/multi-language-literal), es posible indicar mensajes en diferentes idiomas.
**Ejemplos**
Puede verse un ejemplo completo en la documentación de la propiedad **ok**, más arriba.
# Device model configuration
El objeto device model configuration permite establecer la configuración básica para un modelo de dispositivo, típicamente empleado en los scripts de [configuración de un modelo de dispositivo](/docs/configuracion-del-cliente/dispositivos-y-endpoints/dispositivos/modelos-de-dispositivo/configuracion).
La función `getConfiguration` recibe como parámetro un objeto de este tipo, que permite establecer la configuración básica del modelo de dispositivo para el que se ha escrito el script.
Propiedades [#propiedades]
\### addressLabel (string o multi-language literal) La propiedad **addressLabel** permite establecer el texto que desea mostrarse en la interfaz de usuario para el campo “address”. Por ejemplo, si se trata de un dispositivo LoRaWAN, será preferible utilizar el nombre “DEVEUI” en lugar de “dirección”, o utilizar “MAC address” si se trata de un dispositivo Wi-Fi. En caso de que esta propiedad no se establezca, el valor por defecto será “Dirección”. Si se asigna un valor string, este string será utilizado en la UI independientemente del idioma preferido por el usuario. En caso de que se especifique un literal multi-idioma (como en el ejemplo a continuación), la plataforma utilizará el texto correspondiente al idioma preferido por el usuario.
**Ejemplos**
Este ejemplo muestra la dirección del primer endpoint de un dispositivo, a través de la consola de log.
```javascript
config.addressLabel = {en: "MAC address", es: "Dirección MAC"};
```
# Device UI rules
El objeto device UI rules representa las reglas de interfaz de usuario que se aplican a un dispositivo, típicamente empleado en los scripts de [configuración de un modelo de dispositivo](/docs/configuracion-del-cliente/dispositivos-y-endpoints/dispositivos/modelos-de-dispositivo/configuracion).
La función `updateDeviceUIRules` recibe como parámetro un objeto de este tipo, que permite establecer las reglas de interfaz de usuario para el dispositivo dado como parámetro en el script.
Propiedades [#propiedades]
\### canCreateEndpoints (boolean) La propiedad canCreateEndpoints indica si es posible crear endpoints en el dispositivo dado como parámetro. El valor true indica que es posible crear endpoints, mientras que el valor false impide crear nuevos endpoints.
**Ejemplos**
Este ejemplo impide crear nuevos endpoints en un dispositivo.
```javascript
function updateDeviceUIRules(device, rules)
{
rules.canCreateEndpoints = false;
}
```
# Device
El objeto device representa un dispositivo instalado en la plataforma. Ciertos scripts, como los de conversión de datos LoRaWAN o MQTT, reciben como parámetro un objeto device que representa el dispositivo al cual están destinados los datos. En los scripts ejecutados desde acciones, es posible acceder a la lista de dispositivos a través de la propiedad devices de la variable global **env**, que representa el entorno de ejecución.
Propiedades [#propiedades]
\### address (string) La propiedad address representa la dirección del dispositivo, como texto.
**Ejemplos**
Este ejemplo muestra la dirección de un dispositivo en la consola de log.
```javascript
env.log('Device address: ', myDevice.address);
```
\### endpoints (endpoint collection) La propiedad endpoints representa la lista de endpoints contenidos dentro del dispositivo. Esta lista es un objeto de tipo [endpoint collection](/docs/herramientas-low-code-scripting/referencia-de-objetos-disponibles-para-scripting/endpoint-collection).
**Ejemplos**
Este ejemplo muestra la cantidad de endpoints de un dispositivo en la consola de log.
```javascript
env.log('Endpoint count: ', myDevice.endpoints.count);
```
\### description (string) La propiedad description representa la descripción del dispositivo.
**Ejemplos**
Este ejemplo muestra la descripción de un dispositivo en la consola de log.
```javascript
env.log('Device description: ', myDevice.description);
```
Métodos [#métodos]
\### updateDeviceBattery(battery) El método updateDeviceBattery() permite actualizar el estado de la batería del dispositivo, incluso en dispositivos que contengan más de una batería (por ejemplo, batería principal y de backup).
**Parámetros**
* battery (objeto [battery status](/docs/herramientas-low-code-scripting/referencia-de-objetos-disponibles-para-scripting/battery-status), o array de objetos [battery status](/docs/herramientas-low-code-scripting/referencia-de-objetos-disponibles-para-scripting/battery-status)): este parámetro indica el estado de la batería. Si el dispositivo contiene una única batería, debe pasarse un objeto de tipo [battery status](/docs/herramientas-low-code-scripting/referencia-de-objetos-disponibles-para-scripting/battery-status). En caso de que el dispositivo contenga más de una batería, debe pasarse un array de objetos [battery status](/docs/herramientas-low-code-scripting/referencia-de-objetos-disponibles-para-scripting/battery-status), conteniendo el estado de todas las baterías. Para cada objeto pasado como parámetro, debe indicarse al menos la propiedad [percentage](/docs/herramientas-low-code-scripting/referencia-de-objetos-disponibles-para-scripting/battery-status) (en caso de que el porcentaje de carga esté disponible), o la propiedad [voltage](/docs/herramientas-low-code-scripting/referencia-de-objetos-disponibles-para-scripting/battery-status) (en caso de que el voltage esté disponible), o ambos. Si se omite la propiedad [type](/docs/herramientas-low-code-scripting/referencia-de-objetos-disponibles-para-scripting/battery-status), se asumirá el tipo [batteryType.default](/docs/herramientas-low-code-scripting/referencia-de-objetos-disponibles-para-scripting/battery-status). Cuando se informa el estado de múltiples baterías, es obligatorio informar la propiedad [type](/docs/herramientas-low-code-scripting/referencia-de-objetos-disponibles-para-scripting/battery-status) en cada una de ellas.
**Ejemplo 1**
Este ejemplo muestra cómo informar un nivel de batería del 45% en un dispositivo que tiene una única batería.
```javascript
myDevice.updateDeviceBattery({ percentage: 45 });
```
**Ejemplo 2**
Este ejemplo muestra cómo informar un nivel de batería del 72% para la batería principal, y del 68% para la batería secundaria, en un dispositivo que dispone de batería primaria y secundaria.
```javascript
myDevice.updateDeviceBattery
(
[
{ type: batteryType.primary, percentage: 72 },
{ type: batteryType.secondary, percentage: 68}
]
);
```
**Ejemplo 3**
Este ejemplo muestra cómo informar un nivel de batería de 2.92 volts, en un dispositivo con una única batería, pero que informa voltage en lugar de porcentaje de carga restante.
```javascript
myDevice.updateDeviceBattery({ voltage: 2.92 });
```
\### updateDeviceFirmwareVersion(version) El método updateDeviceFirmwareVersion() permite indicar la versión de firmware instalada actualmente en el dispositivo.
**Parámetros**
* version (string): este parámetro indica la versión de firmware actual del dispositivo, utilizando uno de los siguientes formatos:
* “X”, donde X es un número entre 0 y 65535.
* “X.Y”, donde X e Y son números entre 0 y 65535.
* “X.Y.Z”, donde X, Y, y Z son números entre 0 y 65535.
* “X.Y.Z.W”, donde X, Y, Z, y W son números entre 0 y 65535.
Para más información sobre números de versión, visite [esta página](https://wikipedia.org/wiki/Software_versioning).
**Ejemplo 1**
Este ejemplo muestra cómo indicar que un dispositivo tiene la versión de firmware “1.2.3”.
```javascript
myDevice.updateDeviceFirmwareVersion("1.2.3");
```
\### updateDeviceRssi(rssi) El método updateDeviceRssi() permite actualizar el nivel de señal (rssi) del dispositivo, incluso en dispositivos que contentan múltiples interfaces de comunicaciones inalámbricas.
**Parámetros**
* rssi (objeto [rssi status](/docs/herramientas-low-code-scripting/referencia-de-objetos-disponibles-para-scripting/rssi-status), o array de objetos [rssi status](/docs/herramientas-low-code-scripting/referencia-de-objetos-disponibles-para-scripting/rssi-status)): este parámetro indica el nivel de señal. Si el dispositivo contiene una única interfaz inalámbrica, debe pasarse un objeto de tipo [rssi status](/docs/herramientas-low-code-scripting/referencia-de-objetos-disponibles-para-scripting/rssi-status). En caso de que el dispositivo contenga más de una interfaz inalámbrica (por ejemplo, celular y Wi-Fi), debe pasarse un array de objetos [rssi status](/docs/herramientas-low-code-scripting/referencia-de-objetos-disponibles-para-scripting/rssi-status), conteniendo el nivel de señal de cada interfaz. Para cada objeto pasado como parámetro, debe indicarse al menos la propiedad [quality](/docs/herramientas-low-code-scripting/referencia-de-objetos-disponibles-para-scripting/rssi-status) (en caso de que el porcentaje de señal esté disponible), o la propiedad [strength](/docs/herramientas-low-code-scripting/referencia-de-objetos-disponibles-para-scripting/rssi-status) (en caso de que el nivel de atenuación esté disponible), o ambos. Si se omite la propiedad [type](/docs/herramientas-low-code-scripting/referencia-de-objetos-disponibles-para-scripting/rssi-status), se asumirá el tipo [rssiType.default](/docs/herramientas-low-code-scripting/referencia-de-objetos-disponibles-para-scripting/rssi-status). Cuando se informa el estado de múltiples interfaces, es obligatorio informar la propiedad [type](/docs/herramientas-low-code-scripting/referencia-de-objetos-disponibles-para-scripting/rssi-status) en cada una de ellas.
**Ejemplo 1**
Este ejemplo muestra cómo informar un nivel de señal del 68% en un dispositivo que tiene una única interfaz de comunicaciones.
```javascript
myDevice.updateDeviceRssi({ quality: 68 });
```
**Ejemplo 2**
Este ejemplo muestra cómo informar un nivel de señal del 72% para la interfaz celular, y del 68% para la interfaz WI-Fi, en un dispositivo que dispone de ambos tipos de interfaz.
```javascript
myDevice.updateDeviceRssi
(
[
{ type: rssiType.cellular, quality: 72 },
{ type: rssiType.wiFi, quality: 68 }
]
);
```
**Ejemplo 3**
Este ejemplo muestra cómo informar un nivel de señal con una atenuación de -68 dBm, en un dispositivo con una única interfaz de comunicaciones.
```javascript
myDevice.updateDeviceRssi({ strength: -68 });
```
\### updateDeviceGeolocation(latitude, longitude) El método updateDeviceGeolocation() permite indicar la ubicación del dispositivo, indicando latitud y longitud.
**Parámetros**
* **latitude** (double): indica la latitud de la ubicación actual del dispositivo.
* **longitude** (double): indica la longitud de la ubicación actual del dispositivo.
**Ejemplo 1**
Este ejemplo muestra cómo indicar que un dispositivo está ubicado en las coordenadas (40.4052, -3.87699).
```javascript
myDevice.updateDeviceGeolocation(40.4052, -3.87699);
```
# Endpoint collection
El objeto endpoint collection representa una colección de endpoints contenidos en un dispositivo. Usualmente se accede a la lista de endpoints a través de la propiedad **endpoints** del objeto [device](/docs/herramientas-low-code-scripting/referencia-de-objetos-disponibles-para-scripting/device).
Propiedades [#propiedades]
\### count (integer) La propiedad count indica la cantidad de endpoints incluidos en la colección.
**Ejemplos**
Este ejemplo muestra la cantidad de endpoints de un dispositivo en la consola de log.
```javascript
env.log('Endpoint count: ', myDevice.endpoints.count);
```
Métodos [#métodos]
\### byAddress(address) El método byAddress() permite encontrar un endpoint dentro de la colección, indicando su dirección.
**Parámetros**
* **address** (string): este parámetro indica la dirección del endpoint buscado. La búsqueda es de tipo case insensitive, es decir que no distingue entre mayúsculas y minúsculas.
**Resultado**
Si el método encuentra un endpoint con la dirección indicada, se devolverá un objeto de tipo [endpoint](/docs/herramientas-low-code-scripting/referencia-de-objetos-disponibles-para-scripting/endpoint), que representa ese endpoint. Si no es posible encontrar ningún endpoint con la dirección indicada, se devolverá el valor **null**.
**Ejemplo 1**
Este ejemplo muestra la descripción del endpoint con dirección “1” en un dispositivo, utilizando la consola de log.
```javascript
env.log(myDevice.endpoints.byAddress("1").description);
```
\### byIndex(index) El método byIndex() permite encontrar un endpoint dentro de la colección, indicando su posición en la colección.
**Parámetros**
* **index** (integer): este parámetro indica la posición del endpoint dentro de la colección. El primer endpoint de la colección tiene el índice 0 (cero).
**Resultado**
Si el método encuentra un endpoint con el índice dado, se devolverá un objeto de tipo [endpoint](/docs/herramientas-low-code-scripting/referencia-de-objetos-disponibles-para-scripting/endpoint), que representa ese endpoint. Si no es posible encontrar ningún endpoint con la dirección indicada, se devolverá el valor **null**.
**Ejemplo 1**
Este ejemplo muestra la descripción del cuarto endpoint de un dispositivo, utilizando la consola de log.
```javascript
env.log(myDevice.endpoints.byIndex(3).description);
```
\### byType(type \[, subType]) El método byType() permite encontrar el primer endpoint de un tipo dado (y opcionalmente de un subtipo), dentro de la colección.
**Parámetros**
* **type** (integer): este parámetro indica el tipo de endpoint que se busca. Los valores posibles para el parámetro type pueden verse en la explicación de la propiedad **endpointType** del objeto [endpoint](/docs/herramientas-low-code-scripting/referencia-de-objetos-disponibles-para-scripting/endpoint).
* **subType** (opcional, integer): en caso de incluir este parámetro, el método buscará el primer endpoint que sea del tipo especificado en el parámetro type, y que además sea del subtipo indicado en el parámetro subType. Los valores posibles para el parámetro subType pueden verse en la explicación de la propiedad endpointSubType del objeto [endpoint](/docs/herramientas-low-code-scripting/referencia-de-objetos-disponibles-para-scripting/endpoint).
**Resultado**
Si el método encuentra un endpoint con el tipo y subtipo indicados, se devolverá un objeto de tipo [endpoint](/docs/herramientas-low-code-scripting/referencia-de-objetos-disponibles-para-scripting/endpoint), que representa ese endpoint. Si no es posible encontrar ningún endpoint con el tipo y subtipo dados, se devolverá el valor **null**.
**Ejemplo 1**
Este ejemplo muestra la descripción del primer sensor de temperatura contenido en un dispositivo, utilizando la consola de log.
```javascript
env.log(myDevice.endpoints.byType(endpointType.temperatureSensor).description);
```
**Ejemplo 2**
Este ejemplo muestra la descripción del primer sensor de concentración de CO₂ contenido en un dispositivo, utilizando la consola de log.
```javascript
env.log
(
myDevice.endpoints.byType
(
endpointType.ppmConcentrationSensor,
ppmConcentrationSensorSubType.carbonDioxide
)
.description
);
```
\### allByType(type \[, subType]) El método AllByType() funciona similar al método byType(), pero permite obtener un array con todos los endpoints que cumplan el criterio indicado.
**Parámetros**
* **type** (integer): este parámetro indica el tipo de endpoint que se busca. Los valores posibles para el parámetro type pueden verse en la explicación de la propiedad **endpointType** del objeto [endpoint](/docs/herramientas-low-code-scripting/referencia-de-objetos-disponibles-para-scripting/endpoint).
* **subType** (opcional, integer): en caso de incluir este parámetro, el método buscará sólo endpoints que sean del tipo especificado en el parámetro type, y que además sean del subtipo indicado en el parámetro subType. Los valores posibles para el parámetro subType pueden verse en la explicación de la propiedad endpointSubType del objeto [endpoint](/docs/herramientas-low-code-scripting/referencia-de-objetos-disponibles-para-scripting/endpoint).
**Resultado**
El método devuelve un array con todos los endpoints que cumplan el criterio indicado. Si no se encuentra ningún endpoint, el método devolverá un array vacío.
**Ejemplo 1**
Este ejemplo muestra las descripciones de todos los sensor de temperatura contenidos en un dispositivo, utilizando la consola de log.
```javascript
myDevice.endpoints.allByType(endpointType.temperatureSensor).forEach((item) => env.log(item.description));
```
\### byTag(tag) El método byTag() permite encontrar el primer endpoint que contenga el tag indicado, dentro de la colección.
**Parámetros**
* **tag** (string): este parámetro indica el tag que se está buscando. La búsqueda no distingue entre mayúsculas y minúsculas.
**Resultado**
Si el método encuentra un endpoint con el tag indicado, se devolverá un objeto de tipo [endpoint](/docs/herramientas-low-code-scripting/referencia-de-objetos-disponibles-para-scripting/endpoint), que representa ese endpoint. Si no es posible encontrar ningún endpoint con el tag indicado, se devolverá el valor **null**.
**Ejemplo 1**
Este ejemplo muestra la descripción del primer endpoint con el tag “SomeTag”.
```javascript
env.log(myDevice.endpoints.byTag("SomeTag").description);
```
\### allByTag(tag) El método AllByTag() funciona similar al método byTag(), pero permite obtener un array con todos los endpoints que cumplan el criterio indicado.
**Parámetros**
* **tag** (string): este parámetro indica el tag que se está buscando. La búsqueda no distingue entre mayúsculas y minúsculas.
**Resultado**
El método devuelve un array con todos los endpoints que cumplan el criterio indicado. Si no se encuentra ningún endpoint, el método devolverá un array vacío.
**Ejemplo 1**
Este ejemplo muestra las descripciones de todos los endpoints que contengan el tag “SomeTag”.
```javascript
myDevice.endpoints.allByTag("SomeTag").forEach((item) => env.log(item.description));
```
\### toArray() El método toArray() permite convertir la colección de endpoints a un array conteniendo todos los endpoints en la colección.
**Ejemplo 1**
Este ejemplo muestra la descripción de todos los endpoints de un dispositivo, utilizando la consola de log.
```javascript
myDevice.endpoints.toArray().forEach(element => env.log(element.description));
```
# Endpoint configuration collection
El objeto endpoint configuration collection representa una colección de endpoints para los cuales se busca establecer la configuración inicial, típicamente en el script de [configuración de un modelo de dispositivo](/docs/configuracion-del-cliente/dispositivos-y-endpoints/dispositivos/modelos-de-dispositivo/configuracion).
La función `getEndpoints` recibe como parámetro un objeto de este tipo, que permite establecer la lista de endpoints que deben ser incluidos dentro de un dispositivo recién creado, así como su configuración básica inicial. Esta función se incluye en el script del modelo de dispositivo que se está creando.
Métodos [#métodos]
\### addEndpoint(address, description, endpointType \[, endpointSubType]) El método `addEndpoint` permite agregar un nuevo endpoint a la colección.
**Parámetros**
* **address** (string): indica la dirección del endpoint dentro del dispositivo. El address debe ser único dentro del dispositivo, aunque pueden existir endpoints con la misma dirección en dispositivos diferentes.
* **description** (string): indica la descripción que desea utilizarse en este endpoint.
* **endpointType** (enum): indica el tipo del endpoint que se está agregando. Para conocer más sobre los tipos de endpoint, consulte la referencia del objeto [endpoint](/docs/herramientas-low-code-scripting/referencia-de-objetos-disponibles-para-scripting/endpoint), en especial la propiedad endpointType.
* **endpointSubType** (enum, opcional): este parámetro indica el subtipo de endpoint, y puede indicarse opcionalmente, sólo para ciertos tipos de endpoint. Para conocer más sobre los tipos y subtipos de endpoint, consulte la referencia del objeto [endpoint](/docs/herramientas-low-code-scripting/referencia-de-objetos-disponibles-para-scripting/endpoint), en especial la propiedad endpointSubType.
**Valor devuelto**
El método `addEndpoint` devuelve un objeto [endpoint configuration](/docs/herramientas-low-code-scripting/referencia-de-objetos-disponibles-para-scripting/endpoint-configuration), que representa el endpoint que se acaba de agregar a la colección.
**Ejemplo 1**
Este ejemplo muestra cómo crear 2 endpoints dentro del dispositivo, uno de tipo sensor de temperatura, con address “1”, y otro de tipo sensor de dióxido de carbono, con address “2”.
```javascript
function getEndpoints(deviceAddress, endpoints)
{
endpoints.addEndpoint("1", "Temperature sensor", endpointType.TemperatureSensor);
endpoints.addEndpoint("2", "CO2 sensor", endpointType.PpmConcentrationSensor, ppmConcentrationSensorSubType.CarbonDioxide);
}
```
# Endpoint configuration
El objeto endpoint configuration la configuración inicial de un endpoint, típicamente en el script de [configuración de un modelo de dispositivo](/docs/configuracion-del-cliente/dispositivos-y-endpoints/dispositivos/modelos-de-dispositivo/configuracion).
Los objetos de este tipo son creados a través del método `add()` del objeto [endpoint configuration collection](/docs/herramientas-low-code-scripting/referencia-de-objetos-disponibles-para-scripting/endpoint-configuration-collection).
Propiedades [#propiedades]
\### address (string) La propiedad address representa la dirección del endpoint, como texto.
**Ejemplos**
Este ejemplo muestra la dirección de un endpoint, a través de la consola de log.
```javascript
env.log('Endoint address: ', endpoint.address);
```
\### defaultDescription (string o multi-language literal) La propiedad defaultDescription representa la descripción que se utilizará al crear el endpoint. Puede ser un string, o bien un objeto [multi-language literal](/docs/herramientas-low-code-scripting/referencia-de-objetos-disponibles-para-scripting/multi-language-literal).
**Ejemplos**
Este ejemplo muestra la descripción de un endpoint, a través de la consola de log.
```javascript
env.log('Endoint description: ', endpoint.defaultDescription);
```
\### endpointType (int enum) La propiedad endpointType indica el tipo de endpoint. Los valores posibles para esta propiedad, son los mismos que los de la propiedad **endpointType** del objeto [endpoint](/docs/herramientas-low-code-scripting/referencia-de-objetos-disponibles-para-scripting/endpoint).
**Ejemplos**
Este ejemplo muestra el tipo de un endpoint, a través de la consola de log.
```javascript
env.log('Endoint type: ', endpoint.endpointType);
```
\### endpointSubType (int enum) La propiedad endpointSubType indica el subtipo de endpoint. Los valores posibles para esta propiedad, son los mismos que los de la propiedad **endpointSubType** del objeto [endpoint](/docs/herramientas-low-code-scripting/referencia-de-objetos-disponibles-para-scripting/endpoint).
**Ejemplos**
Este ejemplo muestra el subtipo de un endpoint, a través de la consola de log.
```javascript
env.log('Endoint subtype: ', endpoint.endpointSubType);
```
\### variableTypeId (int enum) La propiedad variableTypeId indica el tipo de variable custom que está asociada al endpoint. Esta propiedad aplica únicamente a los endpoints de tipo **endpointType.genericSensor**, y **endpointType.genericFlowSensor**.
**Ejemplos**
Este ejemplo crea un endpoint de tipo sensor de flujo, y le asigna la variable con ID 1071.
```javascript
var e = endpoints.addEndpoint("1", "My generic sensor", endpointType.genericSensor);
e.variableTypeId = 1071;
```
\### accessType (int enum) La propiedad accessType indica el tipo de acceso que se aplica al endpoint. Por defecto, el acceso será **read only**. Los valores posibles para esta propiedad, son los mismos que los de la propiedad accessType del objeto [endpoint](/docs/herramientas-low-code-scripting/referencia-de-objetos-disponibles-para-scripting/endpoint).
**Ejemplos**
Este ejemplo crea un endpoint de tipo sensor genérico, y le asigna acceso read-write.
```javascript
var e = endpoints.addEndpoint("1", "My generic sensor", endpointType.genericSensor);
e.accessType = endpointAccessType.readWrite;
```
\### operationSecurityLevel (int enum) La propiedad operationSecurityLevel indica el nivel de seguridad asociado a la operación del endpoint. Por defecto, el nivel de seguridad será **simple**. Los valores posibles para esta propiedad, son los mismos que los de la propiedad operationSecurityLevel del objeto [endpoint](/docs/herramientas-low-code-scripting/referencia-de-objetos-disponibles-para-scripting/endpoint).
**Ejemplos**
Este ejemplo crea un endpoint de tipo sensor genérico, y le asigna nivel de seguridad medium.
```javascript
var e = endpoints.addEndpoint("1", "My generic sensor", endpointType.genericSensor);
e.operationSecurityLevel = endpointOperationSecurityLevel.medium;
```
\### operationWarningMessage (string o multi-language literal) La propiedad operationWarningMessage representa el mensaje de advertencia que se mostrará cuando se intente operar el dispositivo manualmente, si el nivel de seguridad en la propiedad operationSecurityLevel es medium o high. Puede ser un string, o bien un objeto [multi-language literal](/docs/herramientas-low-code-scripting/referencia-de-objetos-disponibles-para-scripting/multi-language-literal).
**Ejemplos**
Este ejemplo crea un endpoint de tipo sensor genérico, y le asigna un mensaje de advertencia multi idioma.
```javascript
var e = endpoints.addEndpoint("1", "My generic sensor", endpointType.genericSensor);
e.operationWarningMessage = {en: "This is a critical operation. Continue?", es: "Esta es una operación crítica. ¿Continuar?"};
```
\### range (endpoint range) La propiedad range permite indicar el rango de valores permitido para un endpoint. Sólo es aplicable a los endpoints de tipo escalar. El rango se expresa como un objeto de tipo [endpoint range](/docs/herramientas-low-code-scripting/referencia-de-objetos-disponibles-para-scripting/endpoint-range). El valor por defecto para esta propiedad es null, indicando que cualquier valor es aceptable.
**Ejemplos**
Este ejemplo crea un endpoint de tipo sensor genérico, y le asigna un rango de valores que va desde -100 hasta +100.
```javascript
var e = endpoints.addEndpoint("1", "My generic sensor", endpointType.genericSensor);
e.range = {lowestValue: -100, highestValue: 100};
```
\### summationAutoResetThreshold (int or null)
La propiedad summationAutoResetThreshold controla el comportamiento del endpoint en caso de recibir un valor acumulado inferior al último recibido. Esta propiedad aplica únicamente a los endpoints de tipo **endpointType.flowSensor**, **endpointType.genericFlowSensor**, **endpointType.peopleFlowSensor**, y **endpointType.energyMeter**.
Al recibirse un valor acumulado inferior al anterior, la plataforma debe decidir cómo interpretar el nuevo valor. Típicamente, algunos dispositivos pueden enviar un valor inferior si realmente ha habido un consumo “negativo”, por ejemplo:
* Cuando un sensor de flujo es capaz de medir flujo en el sentido contrario al normal.
* Cuando un medidor de energía es capaz de medir energía generada, en lugar de medir únicamente energía consumida.
Sin embargo, muchos otros dispositivos informan un valor inferior al último al ser reiniciados o apagados, porque sólo conservan el valor acumulado en memoria volátil. Al ser reiniciados o apagados, pierden la cuenta acumulada, volviendo ésta a cero.
La propiedad summationAutoResetThreshold puede tomar cualquiera de los siguientes valores:
* **null**: indica que no se utiliza un umbral para el valor acumulado. Si se recibe un valor inferior al último, se considerará que ha existido un consumo “negativo”.
* **0 (cero)**: indica que cuando se reciba un valor inferior al último, debe considerarse que el dispositivo ha reiniciado el valor acumulado, porque ha perdido el valor anterior. El nuevo valor es entonces considerado como un valor de consumo positivo.
* **Cualquier valor mayor a cero**: al recibir un acumulado inferior al último recibido, la plataforma considerará que se ha reiniciado el acumulado sólo si la diferencia entre el valor anterior y el nuevo valor es mayor o igual al umbral indicado. Si la diferencia es menor a este umbral, se considerará que ha ocurrido un consumo negativo.
Se recomienda que para todos los dispositivos que no son capaces de medir flujos negativos, el valor de esta propiedad se establezca en **cero**.
**Ejemplos**
Este ejemplo crea un endpoint de tipo sensor genérico, y le asigna el valor cero a la propiedad summationAutoResetThreshold.
```javascript
var e = endpoints.addEndpoint("1", "My flow sensor", endpointType.flowSensor);
e.summationAutoResetThreshold = 0;
```
\### tags (array) La propiedad tags indica el conjunto de tags que se aplica al endpoint. Esta propiedad es un array de strings, cada uno de los cuales indica un tag.
**Ejemplos**
Este ejemplo crea un endpoint de tipo sensor genérico, y le asigna tres tags correspondientes a los textos "sensor", "generic", y "customer1".
```javascript
var e = endpoints.addEndpoint("1", "My generic sensor", endpointType.genericSensor);
e.tags = ["sensor", "generic", "customer1"];
```
\### requiresElectricalCircuit (boolean)
La propiedad **requiresElectricalCircuit** indica si el endpoint debe crear automáticamente un **circuito eléctrico** asociado al registrarse el dispositivo en la plataforma.
Esta propiedad **solo aplica a endpoints del tipo** `**endpointType.voltageSensor**`.\
Para todos los demás tipos de endpoints, la propiedad se ignora y su comportamiento permanece sin cambios.
El valor predeterminado de esta propiedad es **false**, lo que significa que no se creará un circuito eléctrico a menos que se indique explícitamente.
**Ejemplos**
Este ejemplo crea un endpoint de tipo sensor de voltaje y configura la propiedad para que se cree automáticamente un circuito eléctrico en la plataforma:
```javascript
var voltageSensor = endpoints.addEndpoint("2", "Battery", endpointType.voltageSensor);
voltageSensor.requiresElectricalCircuit = true;
```
Métodos [#métodos]
\### addAlert() El método addAlert() permite crear una nueva alerta relacionada con el endpoint. El método devuelve un objeto alert que debe ser configurado con los parámetros correspondientes.
**Resultado**
El resultado de este método es un objeto alert, que debe ser configurado a través de las siguientes propiedades:
* **variableTypeId (int)**: indica el tipo de variable asociado a la alerta. Debe corresponder a un tipo de variable soportado por el endpoint. Puede utilizarse el identificador de cualquier variable custom, o cualquiera de los tipos de variable predefinidos, siempre que sean soportados por el endpoint. Los valores correspondientes a los tipos de variable predefinidos son los siguientes:
* **variableType.temperature (1)**
* **variableType.humidity (2)**
* **variableType.lightLevel (3)**
* **variableType.setPoint (4)**
* **variableType.volume (5)**
* **variableType.activeEnergy (6)**
* **variableType.runTime (7)**
* **variableType.discreteSensorState (8)**
* **variableType.dimmerization (9)**
* **variableType.weight (10)**
* **variableType.flow (11)**
* **variableType.voltage (12)**
* **variableType.current (13)**
* **variableType.activePower (14)**
* **variableType.reactivePower (15)**
* **variableType.apparentPower (16)**
* **variableType.cosPhi (17)**
* **variableType.pressure (18)**
* **variableType.frequency (19)**
* **variableType.ppmConcentration (20)**
* **variableType.mvConcentration (21)**
* **variableType.aqi (22)**
* **variableType.peopleFlow (23)**
* **variableType.peopleCount (24)**
* **variableType.reactiveEnergy (25)**
* **variableType.apparentEnergy (26)**
* **variableType.location (27)**
* **conditionType (enum)**: indica el tipo de condición que se utiliza para disparar la alerta. Puede ser uno de los valores siguientes:
* **conditionType.equal (1)**: indica que el valor debe ser igual al indicado.
* **conditionType.notEqual (2)**: indica que el valor debe ser distinto del indicado.
* **conditionType.greater (3)**: indica que el valor debe ser mayor al indicado.
* **conditionType.greaterOrEqual (4)**: indica que el valor debe ser mayor o igual al indicado.
* **conditionType.lower (5)**: indica que el valor debe ser menor al indicado.
* **conditionType.lowerOrEqual (6)**: indica que el valor debe ser menor o igual al indicado.
* **threshold (double)**: indica el valor que se utiliza para disparar la alerta, de acuerdo al tipo de condición.
* **normalConditionType (enum)**: indica el tipo de condición que se utiliza para cerrar la alerta. Los valores son los mismos que los del campo **conditionType**.
* **normalThreshold (double)**: indica el valor que se utiliza para cerrar la alerta, de acuerdo al tipo de condición normal.
* **minimumDurationSeconds (int)**: indica que es necesario que la condición de disparo se mantenga durante un cierto tiempo, especificado en segundos, para que la alerta se dispare. El valor por defecto es cero, indicando que la alerta se dispara inmediatamente.
* **severity (enum)**: indica la severidad de la alerta. Puede ser uno de los valores siguientes:
* **alarmSeverity.Information (0)**: alerta informativa.
* **alarmSeverity.low (1)**: alerta de severidad baja.
* **alarmSeverity.medium (2)**: alerta de severidad media.
* **alarmSeverity.high (3)**: alerta de severidad alta.
* **geoZoneId (int)**: identificador de la geo zona, en caso de que la alerta se refiera al ingreso o egreso de una geo zona.
* **notificationEmails (string\[])**: array de strings indicando las direcciones de email de las personas que deben ser notificadas cuando la alerta se dispara o se cierra. Es posible indicar contactos utilizando la forma “@ab:id” donde “id” indica el identificador del contacto en la libreta de direcciones.
* **notificationSmsNumbers (string\[])**: array de strings indicando los números de teléfono de las personas que deben ser notificadas por SMS cuando la alerta se dispara o se cierra. Es posible indicar contactos utilizando la forma “@ab:id” donde “id” indica el identificador del contacto en la libreta de direcciones.
* **notificationVoiceNumbers (string\[])**: array de strings indicando los números de teléfono de las personas que deben ser notificadas por llamada de voz cuando la alerta se dispara o se cierra. Es posible indicar contactos utilizando la forma “@ab:id” donde “id” indica el identificador del contacto en la libreta de direcciones.
* **emailTemplates (object)**: objeto opcional que indica el template utilizado para email, tanto para la apertura como para el cierre de la alerta. \
Permite el uso de [variables](/docs/configuracion-del-cliente/alertas-y-alarmas/alertas) y tiene las siguientes propiedades:
* **openSubjectTemplate (string)**: template a utilizar para el subject para la apertura de la alerta. Si se deja en blanco, o se utiliza el valor null, se utilizará el subject por defecto.
* **openTemplate (string)**: template para la apertura de la alerta. Si se deja en blanco, o se utiliza el valor null, se utilizará el template por defecto.
* **closeSubjectTemplate (string)**: template a utilizar para el subject para el cierre de la alerta. Si se deja en blanco, o se utiliza el valor null, se utilizará el subject por defecto.
* **closeTemplate (string)**: template para el cierre de la alerta. Si se deja en blanco, o se utiliza el valor null, se utilizará el template por defecto.
* **smsTemplates (object)**: objeto opcional que indica el template utilizado para mensajes de texto, tanto para la apertura como para el cierre de la alerta. Tiene las mismas propiedades que el objeto **emailTemplates**. Las propiedades openSubjectTemplate y closeSubjectTemplate serán ignoradas.
* **voiceTemplates (object)**: objeto opcional que indica el template utilizado para llamadas de voz, tanto para la apertura como para el cierre de la alerta. Tiene las mismas propiedades que el objeto **emailTemplates**. Las propiedades openSubjectTemplate y closeSubjectTemplate serán ignoradas.
* **tags (string\[])**: array de strings indicando opcionalmente tags para la alerta.
**Ejemplo 1**
Este ejemplo muestra la creación de una alerta para un endpoint.
```javascript
var alert = myEndpoint.addAlert();
alert.variableTypeId = variableType.temperature;
alert.conditionType = conditionType.greater;
alert.threshold = 25;
alert.normalConditionType = conditionType.lowerOrEqual;
alert.normalThreshold = 20;
alert.severity = alarmSeverity.medium;
alert.notificationEmails = ['someone@somedomain.com', 'someone_else@somedomain.com'];
alert.tags = ['alert', 'test'];
alert.emailTemplates = [ openTemplate: "correo@email.com", closeTemplate: "correo2@email.com" ];
```
# Endpoint range
El objeto endpoint range permite indicar un rango de valores aceptable para un endpoint.
Propiedades [#propiedades]
\### lowestValue (double) La propiedad lowestValue indica el valor mínimo aceptable para el endpoint. Si esta propiedad se omite, o se especifica con valor null, se asume que no existe un valor mínimo.
**Ejemplos**
Este ejemplo muestra cómo armar un objeto range que tiene un valor mínimo de 18, y un máximo de 200.
```javascript
var myRange = { lowestValue: 18, highestValue: 200 };
```
\### highestValue (double) La propiedad highestValue indica el valor máximo aceptable para el endpoint. Si esta propiedad se omite, o se especifica con valor null, se asume que no existe un valor máximo.
**Ejemplos**
Este ejemplo muestra cómo armar un objeto range que tiene un valor mínimo de 18, y un máximo de 200.
```javascript
var myRange = { lowestValue: 18, highestValue: 200 };
```
# Endpoint Scripting Utils
Métodos [#métodos]
| (DataPoint\[]) getDataPoints(Date fromUTCDatetime) |
| ----------------------------------------------------------------------------------------------------------------------------------------------------------------------------------------------------------------------------------------------------------------------------------------------------------------------------------------------------------------------------------------------------------------------- |
| El método getDataPoints() permite conocer los diferentes estados de un endpoint a partir del momento indicado como fromUTCDateTime El objeto retornado DataPoint es polimórfico, es decir, dependiendo del tipo de endpoint sobre el cual se desea conocer su estado sus propiedades son diferentes.Para más información sobre DataPoint consulte esta página |
| Ejemplos |
| const subtractHours = (date, hours) => \{ const result = new Date(date); result.setHours(result.getHours() - hours); return result; }; let endpoints = env.facility.endpoints; let myendPointsArray = endpoints.toArray(); myendPointsArray.forEach((ep)=> \{ let dataPoints = ep.getDataPoints(subtractHours(utils.utcNow, 10)); env.log(dataPoints); }); |
| |
| (DataPoint\[]) - Local Time getDataPoints(Date from LocalTime Datetime) |
| --------------------------------------------------------------------------------------------------------------------------------------------------------------------------------------------------------------------------------------------------------------------------------------------------------------------------------------------------------------------------------------------------------------------------------------------------------------------------------------------------------------- |
| El método getDataPoints() permite conocer los diferentes estados de un endpoint a partir del momento indicado como from local Time El objeto retornado DataPoint es polimórfico, es decir, dependiendo del tipo de endpoint sobre el cual se desea conocer su estado sus propiedades son diferentes.Para más información sobre DataPoint consulte esta página |
| Ejemplos |
| const subtractHours = (date, hours) => \{ const result = new Date("2024-07-01"); result.setHours(result.getHours() - hours); return result; }; var epAddr = "Add1"; var ep = env.facility.endpoints.byAddress(epAddr); let endpoints = env.facility.endpoints; let myendPointsArray = endpoints.toArray(); myendPointsArray.forEach((ep)=> \{ let dataPoints = ep.getDataPoints(subtractHours(utils.ltNow, 1)); env.log(dataPoints); }); |
| |
| (double) getDataPointsAvg(Date fromUTCDatetime, Date toUTCDateTime) |
| -------------------------------------------------------------------------------------------------------------------------------------------------------------------------------------------------------------------------------------------------------------------------------------------------------------------------------------------------------------------------------------------------------------------------- |
| El método getDataPointsAvg() permite conocer el promedio aritmético de los estados de un endpoint a partir del momento indicado como fromUTCDateTime y hasta el momento indicado en el parámetro toUTCDateTimePara más información sobre DataPoint consulte esta página |
| Ejemplos |
| const subtractHours = (date, hours) => \{ const result = new Date(date); result.setHours(result.getHours() - hours); return result; }; let endpoints = env.facility.endpoints; let myendPointsArray = endpoints.toArray(); myendPointsArray.forEach((ep)=> \{ let avg = ep.getDataPointsAvg(subtractHours(utils.utcNow, 10), utils.utcNow); env.log(avg); }); |
| |
| (double) getDataPointsAvg(Date from local Time Datetime, Date to local Time DateTime) |
| ------------------------------------------------------------------------------------------------------------------------------------------------------------------------------------------------------------------------------------------------------------------------------------------------------------------------------------------------------------------------------------------------------------------ |
| El método getDataPointsAvg() permite conocer el promedio aritmético de los estados de un endpoint a partir del momento indicado como from localTime DateTime y hasta el momento indicado en el parámetro to localDateTimePara más información sobre DataPoint consulte esta página |
| Ejemplos |
| const subtractHours = (date, hours) => \{ const result = new Date("2024-05-10"); result.setHours(result.getHours() - hours); return result; }; let endpoints = env.facility.endpoints; let myendPointsArray = endpoints.toArray(); myendPointsArray.forEach((ep)=> \{ let avg = ep.getDataPointsAvg(subtractHours(utils.ltNow, 2)); env.log(avg); }); |
| |
| (double) getDataPointsMax(Date fromUTCDatetime) |
| ------------------------------------------------------------------------------------------------------------------------------------------------------------------------------------------------------------------------------------------------------------------------------------------------------------------------------------------------------------------------------------------------------------ |
| El método getDataPointsMax() permite conocer el valor maxímo de los estados de un endpoint a partir del momento indicado como fromUTCDateTime Para más información sobre DataPoint consulte esta página |
| Ejemplos |
| const subtractHours = (date, hours) => \{ const result = new Date(date); result.setHours(result.getHours() - hours); return result; }; let endpoints = env.facility.endpoints; let myendPointsArray = endpoints.toArray(); myendPointsArray.forEach((ep)=> \{ let avg = ep.getDataPointsMax(subtractHours(utils.utcNow, 10)); env.log(avg); }); |
| |
| (double) getDataPointsMax(Date fromUTCDatetime, Date toUTCDateTime) |
| -------------------------------------------------------------------------------------------------------------------------------------------------------------------------------------------------------------------------------------------------------------------------------------------------------------------------------------------------------------------------------------------------------------------------- |
| El método getDataPointsMax() permite conocer el valor máximo de los estados de un endpoint a partir del momento indicado como fromUTCDateTime y hasta el momento indicado en el parámetro toUTCDateTimePara más información sobre DataPoint consulte esta página |
| Ejemplos |
| const subtractHours = (date, hours) => \{ const result = new Date(date); result.setHours(result.getHours() - hours); return result; }; let endpoints = env.facility.endpoints; let myendPointsArray = endpoints.toArray(); myendPointsArray.forEach((ep)=> \{ let avg = ep.getDataPointsMax(subtractHours(utils.utcNow, 10), utils.utcNow); env.log(avg); }); |
| |
| (double) getDataPointsMin(Date fromUTCDatetime) |
| ------------------------------------------------------------------------------------------------------------------------------------------------------------------------------------------------------------------------------------------------------------------------------------------------------------------------------------------------------------------------------------------------------------ |
| El método getDataPointsMin() permite conocer el valor mínimo de los estados de un endpoint a partir del momento indicado como fromUTCDateTime Para más información sobre DataPoint consulte esta página |
| Ejemplos |
| const subtractHours = (date, hours) => \{ const result = new Date(date); result.setHours(result.getHours() - hours); return result; }; let endpoints = env.facility.endpoints; let myendPointsArray = endpoints.toArray(); myendPointsArray.forEach((ep)=> \{ let avg = ep.getDataPointsMin(subtractHours(utils.utcNow, 10)); env.log(avg); }); |
| |
| (double) getDataPointsMin(Date fromUTCDatetime, Date toUTCDateTime) |
| -------------------------------------------------------------------------------------------------------------------------------------------------------------------------------------------------------------------------------------------------------------------------------------------------------------------------------------------------------------------------------------------------------------------------- |
| El método getDataPointsMin() permite conocer valor mínimo de los estados de un endpoint a partir del momento indicado como fromUTCDateTime y hasta el momento indicado en el parámetro toUTCDateTimePara más información sobre DataPoint consulte esta página |
| Ejemplos |
| const subtractHours = (date, hours) => \{ const result = new Date(date); result.setHours(result.getHours() - hours); return result; }; let endpoints = env.facility.endpoints; let myendPointsArray = endpoints.toArray(); myendPointsArray.forEach((ep)=> \{ let avg = ep.getDataPointsMin(subtractHours(utils.utcNow, 10), utils.utcNow); env.log(avg); }); |
| |
| (double) getDataPointsSum(Date fromUTCDatetime) |
| ------------------------------------------------------------------------------------------------------------------------------------------------------------------------------------------------------------------------------------------------------------------------------------------------------------------------------------------------------------------------------------------------------------ |
| El método getDataPointsSum permite conocer la suma de los valores de los estados de un endpoint a partir del momento indicado como fromUTCDateTime Para más información sobre DataPoint consulte esta página |
| Ejemplos |
| const subtractHours = (date, hours) => \{ const result = new Date(date); result.setHours(result.getHours() - hours); return result; }; let endpoints = env.facility.endpoints; let myendPointsArray = endpoints.toArray(); myendPointsArray.forEach((ep)=> \{ let avg = ep.getDataPointsSum(subtractHours(utils.utcNow, 10)); env.log(avg); }); |
| |
| (double) getDataPointsSum(Date fromUTCDatetime, Date toUTCDateTime) |
| -------------------------------------------------------------------------------------------------------------------------------------------------------------------------------------------------------------------------------------------------------------------------------------------------------------------------------------------------------------------------------------------------------------------------- |
| El método getDataPointsMax() conocer la suma de los valores de los estados de un endpoint a partir del momento indicado como parámetro fromUTCDateTime y hasta el momento indicado en el parámetro toUTCDateTimePara más información sobre DataPoint consulte esta página |
| Ejemplos |
| const subtractHours = (date, hours) => \{ const result = new Date(date); result.setHours(result.getHours() - hours); return result; }; let endpoints = env.facility.endpoints; let myendPointsArray = endpoints.toArray(); myendPointsArray.forEach((ep)=> \{ let avg = ep.getDataPointsSum(subtractHours(utils.utcNow, 10), utils.utcNow); env.log(avg); }); |
| |
\=====
Métodos hora Local [#métodos-hora-local]
| (DataPoint\[]) getDataPointsLT(DateTime from ) |
| ---------------------------------------------------------------------------------------------------------------------------------------------------------------------------------------------------------------------------------------------------------------------------------------------------------------------------------------------------------------------------------------------------------------------------------- |
| El método getDataPointsLT() permite conocer los diferentes estados de un endpoint a partir del momento indicado como 'from Local Time' El objeto retornado DataPoint es polimórfico, es decir, dependiendo del tipo de endpoint sobre el cual se desea conocer su estado sus propiedades son diferentes.Para más información sobre DataPoint consulte esta página |
| Ejemplos |
| const subtractHours = (date, hours) => \{ const result = new Date(date); result.setHours(result.getHours() - hours); return result; }; let endpoints = env.facility.endpoints; let myendPointsArray = endpoints.toArray(); myendPointsArray.forEach((ep)=> \{ let dataPoints = ep.getDataPoints(subtractHours(utils.localTime, 10)); env.log(dataPoints); }); |
| |
| (double) getDataPointsAvg(Date from local Time) |
| ------------------------------------------------------------------------------------------------------------------------------------------------------------------------------------------------------------------------------------------------------------------------------------------------------------------------------------------------------------------------------------------------------------------ |
| El método getDataPointsAvg() permite conocer el promedio aritmético de los estados de un endpoint a partir del momento indicado como ‘from local time’Para más información sobre DataPoint consulte esta página |
| Ejemplos |
| const subtractHours = (date, hours) => \{ const result = new Date(date); result.setHours(result.getHours() - hours); return result; }; let endpoints = env.facility.endpoints; let myendPointsArray = endpoints.toArray(); myendPointsArray.forEach((ep)=> \{ let avg = ep.getDataPointsAvg(subtractHours(utils.localTimeNow, 10)); env.log(avg); }); |
| |
| (double) getDataPointsAvg(Date from LocalTime, LocalTime) |
| -------------------------------------------------------------------------------------------------------------------------------------------------------------------------------------------------------------------------------------------------------------------------------------------------------------------------------------------------------------------------------------------------------------------------------------- |
| El método getDataPointsAvg() permite conocer el promedio aritmético de los estados de un endpoint a partir del momento indicado como from Local Time y hasta el momento indicado en el parámetro to Local TimePara más información sobre DataPoint consulte esta página |
| Ejemplos |
| const subtractHours = (date, hours) => \{ const result = new Date(date); result.setHours(result.getHours() - hours); return result; }; let endpoints = env.facility.endpoints; let myendPointsArray = endpoints.toArray(); myendPointsArray.forEach((ep)=> \{ let avg = ep.getDataPointsAvg(subtractHours(utils.localTimeNow, 10), utils.localTimeNow); env.log(avg); }); |
| |
| (double) getDataPointsMax(Date from localTime) |
| ------------------------------------------------------------------------------------------------------------------------------------------------------------------------------------------------------------------------------------------------------------------------------------------------------------------------------------------------------------------------------------------------------------------ |
| El método getDataPointsMax() permite conocer el valor máximo de los estados de un endpoint a partir del momento indicado como from localTime Para más información sobre DataPoint consulte esta página |
| Ejemplos |
| const subtractHours = (date, hours) => \{ const result = new Date(date); result.setHours(result.getHours() - hours); return result; }; let endpoints = env.facility.endpoints; let myendPointsArray = endpoints.toArray(); myendPointsArray.forEach((ep)=> \{ let avg = ep.getDataPointsMax(subtractHours(utils.localTimeNow, 10)); env.log(avg); }); |
| |
| (double) getDataPointsMax(Date from localTime Datetime, Date to localTime DateTime) |
| ----------------------------------------------------------------------------------------------------------------------------------------------------------------------------------------------------------------------------------------------------------------------------------------------------------------------------------------------------------------------------------------------------------------------- |
| El método getDataPointsMax() permite conocer el valor máximo de los estados de un endpoint a partir del momento indicado como ‘from localTime DateTime’ y hasta el momento indicado en el parámetro 'to localTime DateTimePara más información sobre DataPoint consulte esta página |
| Ejemplos |
| const subtractHours = (date, hours) => \{ const result = new Date(date); result.setHours(result.getHours() - hours); return result; }; let endpoints = env.facility.endpoints; let myendPointsArray = endpoints.toArray(); myendPointsArray.forEach((ep)=> \{ let avg = ep.getDataPointsMax(subtractHours(utils.Now, 10), utils.utcNow); env.log(avg); }); |
| |
| (double) getDataPointsMin(Date from localTime Datetime) |
| ------------------------------------------------------------------------------------------------------------------------------------------------------------------------------------------------------------------------------------------------------------------------------------------------------------------------------------------------------------------------------------------------------------------ |
| El método getDataPointsMin() permite conocer el valor mínimo de los estados de un endpoint a partir del momento indicado como ‘from LocalTime’ Para más información sobre DataPoint consulte esta página |
| Ejemplos |
| const subtractHours = (date, hours) => \{ const result = new Date(date); result.setHours(result.getHours() - hours); return result; }; let endpoints = env.facility.endpoints; let myendPointsArray = endpoints.toArray(); myendPointsArray.forEach((ep)=> \{ let avg = ep.getDataPointsMin(subtractHours(utils.localTimeNow, 10)); env.log(avg); }); |
| |
| (double) getDataPointsMin(Date from localTime Datetime, Date to localTime DateTime) |
| -------------------------------------------------------------------------------------------------------------------------------------------------------------------------------------------------------------------------------------------------------------------------------------------------------------------------------------------------------------------------------------------------------------------------------------- |
| El método getDataPointsMin() permite conocer valor mínimo de los estados de un endpoint a partir del momento indicado como ‘from localTime DateTime’ y hasta el momento indicado en el parámetro' to localTime DateTimePara más información sobre DataPoint consulte esta página |
| Ejemplos |
| const subtractHours = (date, hours) => \{ const result = new Date(date); result.setHours(result.getHours() - hours); return result; }; let endpoints = env.facility.endpoints; let myendPointsArray = endpoints.toArray(); myendPointsArray.forEach((ep)=> \{ let avg = ep.getDataPointsMin(subtractHours(utils.localTimeNow, 10), utils.localTimeNow); env.log(avg); }); |
| |
| (double) getDataPointsSum(Date from localTime Datetime) |
| ------------------------------------------------------------------------------------------------------------------------------------------------------------------------------------------------------------------------------------------------------------------------------------------------------------------------------------------------------------------------------------------------------------------ |
| El método getDataPointsSum permite conocer la suma de los valores de los estados de un endpoint a partir del momento indicado como from localTime DateTime Para más información sobre DataPoint consulte esta página |
| Ejemplos |
| const subtractHours = (date, hours) => \{ const result = new Date(date); result.setHours(result.getHours() - hours); return result; }; let endpoints = env.facility.endpoints; let myendPointsArray = endpoints.toArray(); myendPointsArray.forEach((ep)=> \{ let avg = ep.getDataPointsSum(subtractHours(utils.localTimeNow, 10)); env.log(avg); }); |
| |
| (double) getDataPointsSum(Date from localTime Datetime, Date to localTime DateTime) |
| -------------------------------------------------------------------------------------------------------------------------------------------------------------------------------------------------------------------------------------------------------------------------------------------------------------------------------------------------------------------------------------------------------------------------------------- |
| El método getDataPointsMax() conocer la suma de los valores de los estados de un endpoint a partir del momento indicado como parámetro from ‘localTime DateTime’ y hasta el momento indicado en el parámetro ‘to localTime DateTime’Para más información sobre DataPoint consulte esta página |
| Ejemplos |
| const subtractHours = (date, hours) => \{ const result = new Date(date); result.setHours(result.getHours() - hours); return result; }; let endpoints = env.facility.endpoints; let myendPointsArray = endpoints.toArray(); myendPointsArray.forEach((ep)=> \{ let avg = ep.getDataPointsSum(subtractHours(utils.localTimeNow, 10), utils.localTimeNow); env.log(avg); }); |
| |
# Endpoint UI rules
El objeto endpoint UI rules representa las reglas de interfaz de usuario que se aplican a un dispositivo, típicamente empleado en los scripts de [configuración de un modelo de dispositivo](/docs/configuracion-del-cliente/dispositivos-y-endpoints/dispositivos/modelos-de-dispositivo/configuracion).
La función `updateEndpointUIRules` recibe como parámetro un objeto de este tipo, que permite establecer las reglas de interfaz de usuario para el endpoint dado como parámetro en el script.
Propiedades [#propiedades]
\### canDelete (boolean) La propiedad canDelete indica si es posible eliminar el endpoint dado como parámetro. El valor true indica que es posible eliminar el endpoint, mientras que el valor false impide su eliminación.
**Ejemplos**
Este ejemplo permite eliminar cualquier endpoint, excepto si su dirección es “1”.
```javascript
function updateEndpointUIRules(endpoint, rules)
{
rules.canDelete = (endpoint.address != "1");
}
```
\### canEditSubType (boolean) La propiedad canEditSubType indica si es posible cambiar el subtipo de endpoint, correspondiente a la propiedad [endpointSubType](/docs/herramientas-low-code-scripting/referencia-de-objetos-disponibles-para-scripting/endpoint-configuration). El valor true indica que es posible editar el subtipo, mientras que el valor false lo impide.
**Ejemplos**
Este ejemplo permite modificar el subtipo de cualquier endpoint, pero sólo si es de tipo appliance.
```javascript
function updateEndpointUIRules(endpoint, rules)
{
rules.canEditSubType = (endpoint.endpointType == endpointType.appliance);
}
```
\### canEditAccessType (boolean) La propiedad canEditAccessType indica si es posible editar la propiedad [accessType](/docs/herramientas-low-code-scripting/referencia-de-objetos-disponibles-para-scripting/endpoint-configuration) del endpoint. El valor true indica que es posible editarlo, mientras que el valor false lo impide. El valor por defecto para esta propiedad es false. Para más información sobre la propiedad accessType, vea [esta sección](/docs/herramientas-low-code-scripting/referencia-de-objetos-disponibles-para-scripting/endpoint).
**Ejemplos**
Este ejemplo permite modificar la propiedad accessType de cualquier endpoint.
```javascript
function updateEndpointUIRules(endpoint, rules)
{
rules.canEditAccessType = true;
}
```
\### canEditOperationSecurityLevel (boolean) La propiedad canEditOperationSecurityLevel indica si es posible editar la propiedad [operationSecurityLevel](/docs/herramientas-low-code-scripting/referencia-de-objetos-disponibles-para-scripting/endpoint-configuration) del endpoint. El valor true indica que es posible editarlo, mientras que el valor false lo impide. El valor por defecto para esta propiedad es false. Para más información sobre la propiedad operationSecurityLevel, vea [esta sección](/docs/herramientas-low-code-scripting/referencia-de-objetos-disponibles-para-scripting/endpoint).
**Ejemplos**
Este ejemplo permite modificar la propiedad operationSecurityLevel de cualquier endpoint.
```javascript
function updateEndpointUIRules(endpoint, rules)
{
rules.canEditOperationSecurityLevel = true;
}
```
\### canEditRange (boolean) La propiedad canEditRange indica si es posible editar la propiedad [range](/docs/herramientas-low-code-scripting/referencia-de-objetos-disponibles-para-scripting/endpoint-configuration) del endpoint. El valor true indica que es posible editarlo, mientras que el valor false lo impide. El valor por defecto para esta propiedad es false. Para más información sobre la propiedad range, vea [esta sección](/docs/herramientas-low-code-scripting/referencia-de-objetos-disponibles-para-scripting/endpoint-configuration).
**Ejemplos**
Este ejemplo permite modificar la propiedad range de cualquier endpoint.
```javascript
function updateEndpointUIRules(endpoint, rules)
{
rules.canEditRange = false;
}
```
\### canEditSummationAutoReset (boolean) La propiedad canEditSummationAutoReset indica si es posible cambiar el valor de la propiedad [summationAutoResetThreshold](/docs/herramientas-low-code-scripting/referencia-de-objetos-disponibles-para-scripting/endpoint-configuration). El valor true indica que es posible editarlo, mientras que el valor false lo impide.
**Ejemplos**
Este ejemplo permite modificar la propiedad “summation auto reset” de cualquier endpoint, pero sólo si es de tipo energy meter.
```javascript
function updateEndpointUIRules(endpoint, rules)
{
rules.canEditSummationAutoReset = (endpoint.endpointType == endpointType.energyMeter);
}
```
\### canEditElectricalCircuit (boolean) La propiedad canEditElectricalCircuit indica si es posible editar el circuito eléctrico asociado al endpoint. El valor true indica que es posible editarlo, mientras que el valor false lo impide.
**Ejemplos**
Este ejemplo permite modificar el circuito eléctrico de cualquier endpoint, pero sólo si es de tipo energy meter.
```javascript
function updateEndpointUIRules(endpoint, rules)
{
rules.canEditElectricalCircuit = (endpoint.endpointType == endpointType.energyMeter);
}
```
# Environment
Environment es un objeto global que está siempre disponible en todos los scripts. Contiene algunas funciones básicas, que se detallan a continuación. Para acceder al objeto global Environment, se debe utilizar la variable global **env**. Esta variable está siempre disponible, automáticamente, en todos los scripts.
Métodos [#métodos]
\### log(p1, ….., pn) La función log() permite escribir información en la ventana de log. La ventana de log sólo está disponible cuando un script se ejecuta en modo test. Cuando el script se ejecuta en su forma normal (fuera del modo test), esta función es ignorada.
**Parámetros**
* **p1..pn** (cualquier cantidad y tipo): La función log puede recibir cualquier cantidad de parámetros, de cualquier tipo. El texto enviado a la consola de logs es la concatenación de todos los parámetros pasados.
**Ejemplos**
Este ejemplo muestra un valor numérico en la consola de log.
```javascript
env.log('Value: ', 25);
```
Este ejemplo muestra un texto fijo y una variable en la consola de log, para mostrar la dirección de un dispositivo.
```javascript
env.log('Device address: ', myDevice.address);
```
# HttpResponse
El objeto HttpResponse permite devolver datos cuando se envían datos de [uplink](/docs/configuracion-del-cliente/dispositivos-y-endpoints/dispositivos/modelos-de-dispositivo/procesamiento-de-datos) a través de [HTTP](/docs/configuracion-del-cliente/dispositivos-y-endpoints/dispositivos/integracion-de-dispositivos/http/intercambio-de-datos-flexible).
Propiedades [#propiedades]
\### statusCode (int) La propiedad statusCode permite indicar el código de respuesta de la solicitud HTTP. El valor por defecto para esta propiedad es 200 (OK).
**Ejemplos**
Este ejemplo muestra la creación de una respuesta HTTP con estado 200, y un contenido json.
```javascript
var httpResponse = new HttpReponse();
httpResponse.statusCode = 200;
httpResponse.contentType = "application/json";
httpResponse.content.setAsJson({ result: ultimo });
```
\### contentType (string) La propiedad contentType indica el tipo de contenido que será devuelto en la solicitud HTTP.
**Ejemplos**
Este ejemplo muestra la creación de una respuesta HTTP con estado 200, y un contenido json.
```javascript
var httpResponse = new HttpReponse();
httpResponse.statusCode = 200;
httpResponse.contentType = "application/json";
httpResponse.content.setAsJson({ result: ultimo });
```
Métodos [#métodos]
\### content.setAsJson(object) El método content.setAsJson() permite establecer el contenido de la respuesta en formato json, con los datos del objeto dado como parámetro.
**Parámetros**
* **object** (object): este parámetro contiene el objeto que se desea enviar como respuesta. El objeto será convertido a formato json.
**Ejemplo**
Este ejemplo muestra la creación de una respuesta HTTP con estado 200, y un contenido json.
```javascript
var httpResponse = new HttpReponse();
httpResponse.statusCode = 200;
httpResponse.contentType = "application/json";
httpResponse.content.setAsJson({ result: ultimo });
```
\### content.setAsString(text) El método content.setAsString() permite establecer el contenido de la respuesta utilizando el texto dado como parámetro.
**Parámetros**
* **text** (string): este parámetro contiene el texto que se desea enviar como respuesta.
**Ejemplo**
Este ejemplo muestra la creación de una respuesta HTTP con estado 200, y un contenido de texto.
```javascript
var httpResponse = new HttpReponse();
httpResponse.statusCode = 200;
httpResponse.contentType = "text/plain";
httpResponse.content.setAsString("This is some text");
```
\### content.setAsBytes(bytes) El método content.setAsBytes() permite establecer el contenido de la respuesta en forma binaria, utilizando los datos dados como parámetro.
**Parámetros**
* **bytes** (int\[]): este parámetro contiene el array de bytes que se desea enviar como respuesta.
**Ejemplo**
Este ejemplo muestra la creación de una respuesta HTTP con estado 200, y un contenido binario de 5 bytes.
```javascript
var httpResponse = new HttpReponse();
httpResponse.statusCode = 200;
httpResponse.contentType = "application/octet-stream";
httpResponse.content.setAsBytes([1, 2, 3, 4, 5]);
```
# Referencia de objetos disponibles para scripting
Esta sección contiene información sobre los objetos disponibles para [scripting](/docs/herramientas-low-code-scripting). Vea las sub-secciones para más información sobre cada tipo de objeto.
# Multi-language literal
El objeto multi-language literal permite construir mensajes en múltiples idiomas, especialmente en mensajes de error o informativos.
Propiedades [#propiedades]
\### en (string) Esta propiedad indica el contenido del mensaje en idioma inglés.
**Ejemplos**
Este ejemplo muestra cómo armar un mensaje multi-idioma.
```javascript
var myMessage = { en: "This is a message", es: "Este es un mensaje", pt: "Esta é uma mensagem" };
```
\### es (string) Esta propiedad indica el contenido del mensaje en idioma castellano.
**Ejemplos**
Este ejemplo muestra cómo armar un mensaje multi-idioma.
```javascript
var myMessage = { en: "This is a message", es: "Este es un mensaje", pt: "Esta é uma mensagem" };
```
\### pt (string) Esta propiedad indica el contenido del mensaje en idioma portugués.
**Ejemplos**
Este ejemplo muestra cómo armar un mensaje multi-idioma.
```javascript
var myMessage = { en: "This is a message", es: "Este es un mensaje", pt: "Esta é uma mensagem" };
```
# RSSI status
El objeto RSSI status representa nivel de señal de una conexión inalámbrica de un dispositivo. Este objeto normalmente se utiliza para actualizar el nivel de señal a través del método `updateDeviceRssi` del objeto [device](/docs/herramientas-low-code-scripting/referencia-de-objetos-disponibles-para-scripting/device), usualmente como parte de un script de [conversión de datos LoRaWAN o MQTT](/docs/configuracion-del-cliente/dispositivos-y-endpoints/dispositivos/modelos-de-dispositivo/procesamiento-de-datos).
Propiedades [#propiedades]
\### type (int enum)
La propiedad type indica el tipo de batería. Los valores posibles para esta propiedad, son los siguientes:
* **rssiType.default (1)**: es el valor por defecto para esta propiedad, normalmente utilizado cuando el dispositivo tiene un único tipo de conexión inalámbrica.
* **rssiType.wiFi (2)**: indica que el tipo de conexión es Wi-Fi.
* **rssiType.loRaWan (3)**: indica que el tipo de conexión es LoRaWAN.
* **rssiType.cellular (4)**: indica que el tipo de conexión es celular.
* **rssiType.zigBee (5)**: indica que el tipo de conexión es ZigBee.
* **rssiType.rF (1)**: indica que el tipo de conexión es de algún otro tipo.
**Ejemplos**
Este ejemplo muestra cómo informar un nivel de señal del 72% para la interfaz celular, y del 68% para la interfaz WI-Fi, en un dispositivo que dispone de ambos tipos de interfaz.
```javascript
myDevice.updateDeviceRssi
(
[
{ type: rssiType.cellular, quality: 72 },
{ type: rssiType.wiFi, quality: 68 }
]
);
```
\### quality (int) La propiedad percentage indica la calidad de la conexión, como porcentaje (0-100%).
**Ejemplos**
Este ejemplo muestra cómo informar un nivel de señal del 72% para la interfaz celular, y del 68% para la interfaz WI-Fi, en un dispositivo que dispone de ambos tipos de interfaz.
```javascript
myDevice.updateDeviceRssi
(
[
{ type: rssiType.cellular, quality: 72 },
{ type: rssiType.wiFi, quality: 68 }
]
);
```
\### strength (int) La propiedad strength permite indicar el nivel de señal como atenuación, en dBm.
**Ejemplos**
Este ejemplo muestra cómo informar un nivel de señal con una atenuación de -68 dBm, en un dispositivo con una única interfaz de comunicaciones.
```javascript
myDevice.updateDeviceRssi({ strength: -68 });
```
# Crear Dashboards
Para crear un nuevo dashboard se debe ingresar al menú de ***Dashboards*** en el Monitor y presionar el botón de *Añadir Dashboard*.

El usuario podrá agregar en la solapa **Detalles**, la Descripción y los Comentarios que considere necesarios.
> La descripción funcionará como el nombre identificador del dashboard.

Podrá también decidir si la creación será de tipo **Global**. En el caso de decidir lo contrario, el dashboard se visualizará sólo en la instancia del **Cliente**.

La solapa de **Visualización de Instalaciones**, permite seleccionar si desea que sea visible en alguna en particular, en todas, o en ninguna. Esta opción no es mandatoria.

La solapa de **Navegación** habilita la opción de que el usuario defina si al visualizar el dashboard, se desea redirigir a otro. Esta opción no es mandatoria.

# Crear Grupos y Widgets
La plataforma cuenta con **widgets** predefinidos que facilitan la presentación de la información en los dashboards. Algunos de los widgets disponibles son:
* **Alarmas activas:** muestra un gráfico de pastel con la distribución de los tipos de alarma actualmente activos.
* **Contador de Alarmas:** Muestra un contador de alarmas activas, permitiendo indicar jerarquía
* **Contador de Alarmas Individuales:** Muestra un contador de alarmas activas, permitiendo indicar severidad y jerarquía
* **Consumo de energía pasado y proyectado:** muestra el consumo de energía pasado y los objetivos, así como una proyección del consumo y los objetivos para los próximos días.
* **Consumo de energía por categoría:** muestra el consumo de energía para las categorías seleccionadas.
* **Consumo de energía por fase:** gráfico de torta que muestra el consumo de energía por fase.
* **Consumo diario de energía por categoría:** muestra el consumo diario de energía para las categorías seleccionadas.
* **Consumo diario por fase:** muestra el consumo diario por fase, para categorías seleccionadas.
* **Costo de energía por categoría:** muestra el costo de energía para categorías seleccionadas.
* **Costos de energía pasados y proyectados:** muestra objetivos y costos de energía pasados, así como una proyección de costos y objetivos para los próximos días.
* **Estado meteorológico:** muestra el estado meteorológico de la instalación actual.
* **Factor de potencia diario:** muestra la evolución diaria del factor de potencia.
* **Infraestructura:** muestra la disponibilidad actual de la infraestructura.
* **Mapa de instalación:** muestra un mapa que contiene la ubicación de la instalación actual.
* **Objetivos de consumo de energía:** muestra información de consumo de energía en relación con los objetivos definidos.
* **Potencia diaria máxima:** muestra la potencia diaria máxima utilizada en un período de 15 minutos.
* **Potencia media diaria:** Muestra la evolución diaria de la potencia utilizada.
* **Resumen de la instalación:** muestra información de resumen de la instalación actual.
* **Resumen global:** muestra información resumida para todas las instalaciones.
* **Últimos eventos:** Muestra una lista de los eventos más recientes.
* **Histórico de endpoint:** gráfico de líneas que muestra la variación de un tipo de variable final a lo largo del tiempo.
* **Comparativo histórico de endpoints:** gráfico de líneas que muestra la variación comparativa de dos tipos de variables finales a lo largo del tiempo.
* **Métrica:** Muestra el valor de una variable en tiempo real.
* **Vista:** Muestra una vista tipo SCADA, diseñada en la sección de vistas.
Estos widgets se pueden trabajar y editar de forma individual, o se pueden agrupar.
Ya sea que se desee crear un widget o un grupo de los mismos, se debe dirigir al botón de *Añadir elemento* que se encuentra en la pantalla de **Dashboards**.


Si se selecciona la opción de *Añadir widget*, se desplegará una pantalla con los widgets disponibles.

Cada widget posee una pantalla de configuración distinta, dependiendo de los datos que necesite recolectar.
Ejemplo de widget de *Comparativo histórico de endpoints:*


En todos los widgets será posible definir un nombre, las medidas (alto y ancho), y si al presionar se desea ser redirigido a otro dashboard (navegación). El nombre y la opción de navegación, no son mandatorios.
Para agregar un nuevo **grupo,** se debe seguir el mismo procedimiento, pero seleccionando el botón de *Añadir grupo*. Se desplegará esta pantalla:

New Group Addition
Y una vez presionado el botón de *Guardar*\*\*,\*\* ya se encontrará visible el grupo en el dashboard.

New Group Addition
Para agregar widgets dentro del grupo creado, se debe buscar la opción de *Añadir widget* en los 3 puntos que se encuentran en la esquina superior derecha del grupo.

Ejemplo de widget dentro de un grupo.

New Widget into a Group
# Editar Grupos y Widgets
La edición del *Diseño* de los Dashboard queda asociado a los permisos del cada usuario. En el caso de que el usuario posea el permiso, al ingresar a la opción de **Dashboards** en el menú del Monitor podrá utilizar el botón de edición que se encuentra en la esquina superior derecha de los dashboards.


Con el sistema de Drag and Drop, se podrá mover y modificar el tamaño de widgets y grupos a gusto. De la siguiente manera:
_f58e.gif)
Cada **Widget** tendrá sus propias opciones en el modo de edición. Dependiendo del tipo de widget el usuario podrá acceder a la configuración, clonar el widget, eliminarlo, exportarlo en formato JPG, exportarlo en formato CSV y resetear el zoom en un widget de grafica.
Algunos widgets permiten al ingresar a settings, elegir cualquier color que se desee para la visualización de los datos. Así como también se pueden establecer rangos de colores de acuerdo a los valores de las variables. En el caso de los gráficos, el usuarios podrá elegir distintos formatos como de líneas o barras.

Cada **Grupo** tendrá sus propias opciones de edición. El usuario podrá configurar el grupo, clonarlo hacia uno idéntico, eliminarlo, compactar los widgets que en su interior se encuentren eliminando los espacios vacíos, y podrá también agregar nuevos widgets dentro.

# Filtros
El usuario podrá mediante el icono correspondiente a filtros realizar una búsqueda específica en un periodo de tiempo determinado, para obtener de esta manera los datos que los dispositivos registraron en las fechas seleccionadas.


> Recordar presionar el botón de “Aplicar” antes de cerrar el menú de filtro para que aplique correctamente las fechas seleccionadas.
# Dashboards
Un **Dashboard** es una pantalla gráfica diseñada para presentar datos e información de manera visual, rápida y clara. Los Dashboards ayudan a los usuarios a tomar decisiones basadas en los datos de múltiples fuentes.
La plataforma de Cloud Studio introduce una serie de widgets específicos para el monitoreo de sucursales, consumo de energía, históricos de variables, métricas en tiempo real, datos del tiempo, etc., para su uso en dashboards customizables por el usuario final.
Desde la versión 1.2.20 de la plataforma todas la funcionalidades de dashboards se han reubicado y unificado en la aplicación Monitor.
> Para conocer más sobre la creación de dahsboards y las nuevas características de drag & drop comience por [aquí](/docs/monitor/dashboards/crear-dashboards) o revise este [vídeo](https://youtu.be/cYEkFLk_QVE) en youtube.


# Lista de Dashboards
El usuario podrá desde esta sección administrar todos los dashboards que haya creado.
Desde la opción **Dashboards** y seleccionando el icono que se muestra debajo, se podrá acceder al listado de Dashboards.


El usuario tendrá permitido **Crear** dashboards, **Editar** dashboards, y **Eliminar** los dashboards que ya no desee.
# Selección de períodos de tiempo
Introducción [#introducción]
La plataforma permite la selección de períodos de tiempo en diferentes situaciones, tales como:
* Dashboards
* Widgets
* Visualización de datos históricos
* Reportes
En todos los casos, la interfaz de usuario presenta un componente como el siguiente:

Elección de períodos de tiempo absolutos y relativos [#elección-de-períodos-de-tiempo-absolutos-y-relativos]
Este componente permite seleccionar un rango de fechas (incluyendo la hora, si corresponde), tanto en forma absoluta como relativa. A continuación se indica cómo se utiliza esta funcionalidad.
Períodos de tiempo absoluto [#períodos-de-tiempo-absoluto]
Para indicar un período de tiempo absoluto, pueden utilizarse los botones para introducir fechas. Al hacerlo, puede elegirse una fecha y hora inicial, así como una fecha y hora final.

Al presionar el botón “Aplicar”, el selector mostrará el período seleccionado:

Períodos de tiempo relativos [#períodos-de-tiempo-relativos]
Para elegir períodos de tiempo relativos, es posible utilizar la barra de opciones de la derecha, como se muestra aquí, así como introducir expresiones arbitrarias de tiempo relativo. La siguiente imagen muestra la lista de opciones de tiempo relativo predefinidas:

Sin embargo, también es posible ingresar cualquier período de tiempo relativo, escribiéndolo en los respectivos campos “Desde” y “Hasta”, como se muestra en el siguiente ejemplo:

La sintaxis para las expresiones relativas es la siguiente:
* **now** representa siempre la fecha y hora actual.
* Luego, es posible sumar o restar una cantidad arbitraria de segundos, minutos, horas, días, meses, o años.
* **s** representa segundos
* **m** representa minutos
* **h** representa horas
* **d** representa días
* **M** representa meses
* **y** representa años
* Opcionalmente, es posible “redondear” la fecha hacia el comienzo del día, del mes, o del año, agregando cualquiera de los siguientes modificadores:
* **/d** representa el comienzo del día
* **/M** representa el comienzo del mes
* **/y** representa el comienzo del año
Ejemplos de expresiones relativas:
| Expresión inicial | Expresión final | Significado |
| ----------------- | --------------- | ---------------------------------------------- |
| now/d | now | Desde el comienzo del día de hoy, hasta ahora. |
| now/M | now | Desde el comienzo del mes, hasta ahora |
| now-1d/d | now/d | El día de ayer. |
| now-6h | now | Las últimas 6 horas |
| now-30m | now | Los últimos 30 minutos |
| now-14/d | now | Los últimos 15 días (incluyendo el día de hoy) |
Períodos de tiempo mixtos [#períodos-de-tiempo-mixtos]
Es posible utilizar además una combinación de períodos fijos y relativos. Por ejemplo, para indicar el período de tiempo “desde el 1 de enero de 2021 hasta ahora”, puede ingresarse la fecha absoluta “1 de enero de 2021” en el campo “desde”, y luego la expresión relativa “now” en el campo “hasta”.
# Exportar reportes como CSV, usando el separador correspondiente al facility
Esta sección permite exportar el histórico de alarmas en un documento de Microsoft Excel.

# Reportes
En la sección de Reportes el usuario podrá visualizar diferentes tipos de opciones los cuales podrá descargar un reporte.
Los reportes disponibles para visualizar información y descargar son los siguientes
**Catalogo de Dispositivos**

**Catalogo de Endpoints**

**Alarmas Activas >** Para mas detalle respecto de los filtros para incluir Endpoints ocultos **aquí**

**Histórico de Alarmas**

**Reporte de Dashboard**

**Datos Historicos de Endpoints**

**Listado de Notificaciones**

**Consumo de Energía Detallado**

**Consumo de Energía Resumido**

Cada una de las opciones podrán configurarse para realizar el reporte especifico necesario y éste se descargará en formato PDF o Excel
# Listado de Notificaciones
Introducción [#introducción]
En el listado de notificaciones permite visualizar el reporte filtrando por Fecha de creación, Instalación, tipo de notificación, canal y el Cliente. Un administrador con usuario global puede filtrar por varios clientes. La plataforma permite descargar el reporte en PDF/Excel.

# Personalización de Exportación de Reportes
Esta funcionalidad permite personalizar el asunto y el cuerpo del mail que se envía al programar un reporte. A su vez, se pemite ajustar el nombre del documento adjunto, el encabezado y el pié de página.
Configuración de exportación [#configuración-de-exportación]
En el dropdown de descarga de cada reporte aparecerá una nueva opción que se llama “configuración de exportación”

Esta opción abrirá un modal que permitirá personalizar el header, el footer y el nombre del archivo generado. Además, mediante un checkbox, permitirá habilitar o deshabilitar cada una de estas configuraciones. Por ejemplo, se puede desactivar la visualización del header y el footer:

Header y Footer [#header-y-footer]
Al habilitar alguna de las dos opciones mediante el checkbox, se mostrará debajo de cada uno un editor de código para ingresar el HTML del template que se quiera utilizar para el header o footer del reporte.
Nombre del archivo [#nombre-del-archivo]
Al habilitar el checkbox de personalizar, se mostrará un campo de texto donde se podrá escribir el nombre personalizado del archivo que se generará en la exportación. Solo se permiten valores alfanuméricos y guiones medios.
Guardado de favorito [#guardado-de-favorito]
Al guardar el reporte como favorito, también se guardará la configuración de exportación (Header, footer y nombre de archivo). Y posteriormente se puede editar desde la edición del favorito:

Al presionar el botón de configuración, se mostrará el mismo modal mencionado antes con las configuraciones de exportación.
Vale destacar que si el reporte está programado, también se generará con la configuración guardada.
Personalización de email de notificación [#personalización-de-email-de-notificación]
Al guardar el reporte favorito se puede programar para que se envíe según los criterios establecidos. Debajo de la programación, se agregó un botón con el texto de “personalizar contenido del E-mail” que permite personalizar el asunto y el contenido del email que se envía al programar un reporte:

Al presionar este botón, se abrirá un modal con un editor de código y un checkbox que permite habilitar o no la personalización del asunto:

Asunto [#asunto]
Mediante un checkbox se podrá habilitar o deshabilitar la personalización del asunto. Si se habilita el checkbox, se mostrará un campo de texto que permitirá ingresar el texto del asunto personalizado.
Cuerpo [#cuerpo]
Debajo del asunto, se mostrará un campo de edición de código que, por defecto, mostrará el template que se utiliza actualmente en Gear Studio.
Para guardar los cambios hechos en la personalización de un favorito (tanto de email como de la configuración de exportación), se debe guardar el favorito. Es decir, presionar el botón “confirmar” en la pantalla de edición del reporte favorito:

# Reporte de notificaciones configuradas por instancia
Este reporte listará las notificaciones configuradas a nivel de instancia considerando a todos los *Clientes* y *Facilities* que posea.
**Filtros**:
* **Cliente** (*todos o lista de seleccionados*)
* **Facility** (*todas o lista de selección*)
* **Canal** (*todos o lista de seleccionados*)
* **Medios de contacto (recipients):** permite ingresar total o parcialmente un número de teléfono o dirección de e-mail una vez que el reporte se haya ejecutado con los filtros anteriores (Cliente, Facility y Canal)
Esta último filtro puede componerse con una dirección de e-mail y/o número de teléfono que el usuario ingresa de forma manual con el fin de encontrar en que cliente de la instancia o en que configuración (tipos de alarma o alerta) se encuentra el medio de contacto ingresado configurado para una notificación.
* El usuario podrá descargar el reporte en formatos PDF y Excel.\

# Endpoints Operables
La siguiente tabla detalla los tipos de endpoint que permiten operación, es decir aquellos tipos de endpoint que soportan la actualización del estado de un endpoint desde una vista
| Tipo de Endpoints | Operable |
| -------------------------------------------------------------- | -------- |
| Sensores de Temperatura | Sí |
| Sensores de Humedad | Sí |
| Sensores de nivel de iluminación (sensor de luz) | Sí |
| Sensores de Peso | Sí |
| Sensores de Volumen | Sí |
| Sensores de Presión | Sí |
| Sensores IAS (sensores binarios, de ocupación y de movimiento) | Sí |
| Sensores de Voltaje | Sí |
| Sensores de Corriente | Sí |
| Sensores de potencia activa | Sí |
| Sensores de potencia reactiva | Sí |
| Sensores de potencia aparente | Sí |
| Sensor de factor de potencia (CosPhiSensor) | Sí |
| Medidores de frecuencia | Sí |
| Sensores de consumo de energía | Sí |
| Sensores de flujo | No |
| Sensores genéricos | Sí |
| Sensores de caudal genéricos | Sí |
| Appliances y otros dispositivos de encendido y apagado | Sí |
| Atenuadores | Sí |
| Controladores de cortinas y cierres | Sí |
| Contadores de tiempo de ejecución | No |
| Rastreadores de ubicación | No |
| Sensores de concentración (ppm) | Sí |
| Sensores de concentración (masa/volumen) | Sí |
| Sensores de índice de calidad del aire (AQI) | Sí |
| Sensores de flujo de personas | Sí |
| Contadores de personas | Sí |
| HVAC / termostatos | Sí |
| Cámaras | No |
# Estados de endpoints con imágen, asociado a variables discretas
Es posible asociar variables discretas a los estados de un Endpoint Custom. para posteriormente asociar dichos Endpoints al elemento Imagen de estado de un endpoint. En caso que no exista imagen para ese valor se mostrara una imagen default.
**Ejemplo**
Al endpoint elegimos las imágenes que queremos pasarlas a esos estados. En este caso 0 Apagado, 1 Encendido y una imagen por defecto para cualquier otro numero


Y se puede modificar los estados con imágenes como apagado/encendido

# Vistas
Las vistas permiten diseñar visualizaciones SCADA dónde es posible insertar imágenes para posteriormente superponer datos que, a diferencia de lo que se puede lograr utilizando dashboards, en las vistas los datos se actualizarán en tiempo cercano al real.
En las vistas la inserción de datos de los sensores (endpoints) de los dispositivos se realiza mediante una herramienta de diseño WYSIWYG mediante la utilización de objetos visuales que se llaman elementos.
Las vistas estan implementadas en dos aplicaciones:
1. El sub-módulo mantenedor de vistas, que incluye el diseñador y que se encuentra en el Manager
2. El sub-modulo de visualización, que permite seleccionar una vista en ejecución y que se encuentra en el Monitor.
Creación de vistas [#creación-de-vistas]
Para crear una nueva vista o modificar una existente desde la aplicación Manager ingresaremos a al menú vistas.

Una vez creada, se abrirá un canvas con el fondo elegido por el usuario. En las vistas se pueden realizar las siguientes acciones listadas
* [Añadir elementos de texto estático](/docs/monitor/vistas/elementos/texto)
* [Añadir elementos de imágen estática y predefinida](/docs/monitor/vistas/elementos/imagen)
* [Añadir elementos de estado de endpoint en tiempo real en formato texto](/docs/monitor/vistas/elementos/endpoint-status-text)
* [Añadir elementos de estado de endpoint en tiempo real con imágenes predefinidas de acuerdo al tipo de variable.](/docs/monitor/vistas/elementos/endpoint-status-image)
* [Añadir elementos de ocupación.](/docs/monitor/vistas/elementos/elementos-de-ocupacion)
* [Añadir elementos de alarmas.](/docs/monitor/vistas/elementos/elementos-de-alarmas)
* [Añadir snapshots de endpoints del tipo cámara](/docs/monitor/vistas/elementos/elementos-de-snapshot)\
**Tips:**
> * La medida recomendada para las vistas es de 1600px x 900px. Sin embargo se puede personalizar a las necesidades del usuario.
> * Recomendamos un formato .PNG para las imágenes con fondo transparente.
> * Revisa nuestro [vídeo](https://youtu.be/0P7CbN4bvVA) de YouTube para conocer más de las vistas tipo SCADA.
Una vez configurada la vista, el usuario podrá visualizarlos desde el *Monitor* como lo muestra la siguiente imagen

# Obtener datos de endpoints en forma incremental
Esta API permite obtener una lista de Endpoints, en forma incremental. Esto permite obtener actualizaciones rápidas de los Endpoints sin necesidad de obtener la lista completa.
Teoría de operación [#teoría-de-operación]
Para obtener una lista de Endpoints en forma incremental, se utiliza el campo SequenceNumber. Este campo es de tipo monotónico ascendente, es decir que al darse cambios en EndpointData, su campo SequenceNumber cambiará a un valor mayor al de cualquier otro. Esto permite obtener datos basados en el SequenceNumber, en pequeños lotes, hasta que no se obtengan más datos, y luego continuar periódicamente, para obtener actualizaciones. Cuando el resultado de esta API es una lista vacía, esto significa que por el momento no existen actualizaciones.
Típicamente, una aplicación que consume esta API utiliza el siguiente flujo:
1. La aplicación comienza utilizando un SequenceNumber almacenado (típicamente en almacenamiento no volátil). En la primera ejecución, este valor es 1.
2. La aplicación ejecuta la API utilizando el (SequenceNumber almacenado + 1).
3. La aplicación recibe una lista de datos de Endpoints, ordenados por SequenceNumber.
4. Si la lista recibida está vacía, la aplicación espera algunos segundos, y vuelve al paso 2.
5. Si la lista recibida no es vacía, la aplicación almacena el mayor SequenceNumber recibido.
6. La aplicación vuelve inmediatamente al paso 2.
7. Cuando hay una nueva lectura de datos de un Endpoint, su SequenceNumber cambiará inmediatamente a un valor más alto que el último recibido, por lo cual su información será recibida inmediatamente en la próxima ejecución.
| En el flujo anterior, se asume que la aplicación siempre ejecuta la API con el mismo conjunto de parámetros clientID, facilityID, deviceID, y endpointID. Si se desea usar parámetros diferentes, la búsqueda debe comenzar desde cero. |
| --------------------------------------------------------------------------------------------------------------------------------------------------------------------------------------------------------------------------------------- |
| Para hacer debugging de cualquier aplicación que utilice esta API, se recomienda usar maxCount = 1, para recibir las actualizaciones de a una por vez. Este parámetro puede luego ser cambiado a un valor más práctico para producción, como 50. |
| ------------------------------------------------------------------------------------------------------------------------------------------------------------------------------------------------------------------------------------------------ |
Request [#request]
```
GET /api/v2/endpointData/incremental/{sequenceNumber}?clientID={clientID}&facilityID={facilityID}&deviceID={deviceID}&endpointID={endpointID}&maxCount={maxCount} HTTP/1.1
Host: gear.cloud.studio
Authorization: Bearer {accessToken}
```
Parámetros [#parámetros]
| Nombre | Descripción |
| -------------- | ----------------------------------------------------------------------------------------------------------------------------------------------------------------------------------------------------------------- |
| accessToken | Token de acceso con permisos para leer información de endpoints. Vea esta página para más información. El access token también puede enviarse como parte del query string, utilizando el parámetro “accessToken”. |
| sequenceNumber | Valor del campo SequenceNumber del último EndpointData recibido. Puede indicarse 0 para comenzar desde el inicio. |
| clientID | Identificador opcional indicando que sólo se desea obtener la lista de EndpointData para el cliente dado. |
| facilityID | Identificador opcional indicando que sólo se desea obtener la lista de EndpointData para el facility dado. |
| deviceID | Identificador opcional indicando que sólo se desea obtener la lista de EndpointData para el dispositivo dado. |
| endpointID | Identificador opcional indicando que sólo se desea obtener la lista de EndpointData para el endpoint dado. |
| maxCount | Parámetro opcional indicando la cantidad máxima de registros a incluir en el resultado, valores superiores a 500 se limitan a 500 independientemente del valor enviado en el request. |
| Es obligatorio incluir uno (y sólo uno) de los parámetros “clientID”, “facilityID”, “deviceID”, o “endpointID”. |
| --------------------------------------------------------------------------------------------------------------- |
Response [#response]
La respuesta contiene la lista de EndpointData buscados, como se muestra en este ejemplo:
```
[
{
"EndpointID": 113653,
"Timestamp_UTC": "2021-10-15T23:01:25",
"Value": 16.93,
"SequenceNumber": 6683852
},
{
"EndpointID": 113653,
"Timestamp_UTC": "2021-10-15T23:11:28",
"Value": 16.97,
"SequenceNumber": 6683864
},
{
"EndpointID": 113653,
"Timestamp_UTC": "2021-10-15T23:41:36",
"Value": 16.93,
"SequenceNumber": 6683874
},
{
"EndpointID": 113653,
"Timestamp_UTC": "2021-10-16T00:01:44",
"Value": 16.99,
"SequenceNumber": 6683887
},
{
"EndpointID": 113653,
"Timestamp_UTC": "2021-10-16T00:11:48",
"Value": 15.93,
"SequenceNumber": 6683900
}
]
```
# Pasos
Al crear un nuevo paso, será necesario indicar el tipo de paso y si queremos que continúe al siguiente paso en caso de error. Además se deberán completar atributos necesarios para cada tipo en particular.
Independientemente del tipo de paso, para cada uno de ellos es posible indicar si se debe continuar en caso de error, mediante el atributo **Continuar en caso de error:** este campo indica si en caso de que ocurran errores al ejecutar el paso, la acción debe detenerse o continuar en el paso siguiente. Si este campo se encuentra **activado**, el error se registra, pero **la acción continúa** con la ejecución del paso siguiente. Si el campo se encuentra **desactivado**, el error se registra y **la acción se detiene** inmediatamente.
**Los pasos se dividen en los siguientes tipos:**
Set, Sumar y Restar [#set-sumar-y-restar]
Estos tres tipos de paso serán representados con una misma interfaz de usuario, en la que se podrá seleccionar **1** Endpoint sobre el cual accionar, **1** variable asociada al Endpoint y **1** valor numérico el cual, modificara el estado de este Endpoint.


Add value

Subtract value
> * **Los Endpoints que se encuentren con el acceso en modo Solo Lectura, no serán visibles para su selección para este tipo de paso.**
> * **Por defecto los Endpoints se encuentran con el acceso en modo Solo Lectura y hay casos donde esto no se puede modificar debido al tipo de Endpoints con el que se creo.**
> * **En caso de que el tipo de Endpoint permita modificar el acceso, esto lo podremos realizar accediendo a la pestaña de seguridad dentro de la configuración del Endpoint.**
Encender, Apagar y Alternar [#encender-apagar-y-alternar]
Estos tres tipos de paso serán representados con una misma interfaz de usuario, en la que se podrá seleccionar **1** Endpoint sobre el cual accionar para cambiar su estado. Solo se podrá utilizar para los Endpoints de tipo **Electrodomésticos, Dimmer y Termostato.**

Turn On


Toggle
> **Para el tipo “Alternar”, el funcionamiento será el de alternar el estado, si se encontraba “on”, al accionarse este paso cambiará off y viceversa.**
Email, SMS y Mensaje de Voz [#email-sms-y-mensaje-de-voz]
Estos tres tipos de paso permiten enviar una notificación vía e-mail, SMS, o voz.


SMS Notification

Voice notification
Script [#script]
Es un fragmento de código en un lenguaje interpretado (*JavaScript*) de fácil comprensión, que permitirá ampliar el abanico de herramientas a disposición, a la hora de procesar una lógica de negocio determinada.
* **Solapa Code:** Permite editar el código javascript que ejecutará el paso de la acción, estos scripts además pueden incluir métodos de la [libreria de útiles](/docs/configuracion-del-cliente/acciones/pasos/scripting-utils) de Cloud Studio para javascript.
* **Solapa Test**: Permite probar la ejecución del script del paso de la acción permitiendo modificar el [evento recibido por la acción a los fines de la prueba](/docs/configuracion-del-cliente/acciones/pasos)
* **Dependencies:** Permite seleccionar scripts desde la libreria de scripts comunes y globales que serán dependencias para el script del paso de la acción.\

Scripting
# Scripting utils
Scripting utils es una librería complementaria de funciones javascript que forma parte de la plataforma de Cloud Studio y cuyos métodos pueden ser invocados desde scripts javascript construidos por el usuario en las acciones.
Propiedades
| utcNow (DateTime) |
| ------------------------------------------------------------ |
| La propiedad utcNow representa la fecha y hora actual en UTC |
| Ejemplos |
| let now = utils.utcNow; |
Funciones de fecha y hora
| DateTime addDays (double days, DateTime dateTime) |
| ---------------------------------------------------------------------------------------------------------------------------- |
| La función addDays permite sumar y tambien restar dias a una fecha |
| EjemplosEste ejemplo suma y resta dos dias a la fecha y hora actual UTC |
| //Add two days let date = utils.addDays(2, utils.utcNow); // Subtract two days let date = utils.addDays(-2, utils.utcNow); |
| DateTime addHours(double hours, DateTime dateTime) |
| -------------------------------------------------------------------------------------------------------------------------------- |
| La función addHours permite sumar y tambien restar horas una fecha |
| EjemplosEn este este ejemplo se muestra como sumar una hora a la fecha y hora actual y como restar una hora a la hora actual UTC |
| //Add one hour let date = utils.addHours(1, utils.utcNow); //Subtract one hour let date = utils.addHours(-1, utils.utcNow); |
| DateTime addMinutes(double minutes, DateTime dateTime) |
| ----------------------------------------------------------------------------------------------------------------------------- |
| La función addMinutes permite sumar y tambien restar minutos a una fecha |
| EjemplosEste ejemplo suma un minuto a la fecha y hora actual UTC y resta un un minuto a la hora actual UTC |
| //Add one minute let date = utils.addMinutes(1, datetime); // Subtract one minute let date = utils.addMinutes(-1, datetime); |
| DateTime addMonths(double months, DateTime dateTime) |
| ------------------------------------------------------------------------------------------------------------------------- |
| La función addMonths permite sumar y tambien restar meses a una fecha |
| EjemplosEste ejemplo suma y resta seis meses a la fecha y hora actual |
| //Add six months let date = utils.addMonths(6, datetime); //Subtract six months let date = utils.addMonths(-6, datetime); |
| DateTime addSeconds(double seconds, DateTime dateTime) |
| -------------------------------------------------------------------------------------------------------------------------- |
| La función addSeconds permite sumar y restar segundos a una fecha |
| EjemplosEste ejemplo suma y resta 25 segundos a la fecha y hora actual |
| // Add seconds let date = utils.addSeconds(25, datetime); // Subtract seconds let date = utils.addSeconds(-25, datetime); |
| DateTime addYears(double years, DateTime dateTime) |
| --------------------------------------------------------------------------------------------------------------- |
| La función addYears permite sumar y restar años a una fecha |
| EjemplosEste ejemplo suma y resta 3 años a la fecha y hora actual |
| // Add years let date = utils.addYears(3, datetime); // Subtract years let date = utils.addYears(3, datetime); |
| DateTime getLastMonday(\*DateTime) |
| -------------------------------------------------------------------------------------------------------------------------------------------------------- |
| La función getLastModay() permite obtener el lunes anterior a la fecha y hora UTC actual |
| EjemplosEste ejemplo obtiene el lunes anterior a la fecha y hora UTC actual o el lunes anterior a la fecha y hora parámetro opcional |
| let date = utils.getLastMonday(); env.log(date); let myDate = new Date('2024-06-16T03:24:00'); let mondate = utils.getLastMonday(myDate); env.log(date); |
| DateTime getNextMonday(\*DateTime) |
| ----------------------------------------------------------------------------------------------------------------------------------------------------------- |
| La función getNextMonday() permite obtener el lunes siguiente a la fecha y hora UTC actual |
| EjemplosEste ejemplo obtiene el lunes siguiente a la fecha y hora UTC actual o el lunes siguiente a la fecha y hora parámetro opcional |
| let date = utils.getNextMonday(); env.log(date); let myDate = new Date('2024-06-16T03:24:00'); let mondate = utils.getNextMonday(myDate); env.log(mondate); |
| DateTime getLastSunday(\*DateTime) |
| -------------------------------------------------------------------------------------------------------------------------------------------------------- |
| La función getLastSunday() permite obtener último domingo a la fecha y hora UTC actual |
| EjemplosEste ejemplo obtiene el último domingo a la fecha y hora UTC actual o el último domingo la fecha y hora parámetro opcional |
| let date = utils.getLastSunday(); env.log(date); let myDate = new Date('2024-06-16T03:24:00'); let mydate= utils.getLastSunday(myDate); env.log(mydate); |
| DateTime getNextSunday(\*DateTime) |
| -------------------------------------------------------------------------------------------------------------------------------------------------------- |
| La función getNextSunday() permite obtener el domingo siguiente a la fecha y hora UTC actual |
| EjemplosEste ejemplo obtiene el domingo siguiente a la fecha y hora UTC actual o el domingo siguiente a la fecha y hora parámetro opcional |
| let date = utils.getNextSunday(); env.log(date); let myDate = new Date('2024-06-16T03:24:00'); let mydate= utils.getNextSunday(myDate); env.log(mydate); |
| DateTime getFirstDayOfMonth(\*DateTime) |
| ------------------------------------------------------------------------------------------------------------------------------------------------------------------ |
| La función getFirstDayOfMonth() permite obtener el primer día del mes de la fecha y hora UTC actual |
| EjemplosEste ejemplo obtiene el primer día del mes de la fecha y hora UTC actual o el primer día del mes de la fecha y hora parámetro opcional |
| let date = utils.getFirstDayOfMonth(); env.log(date); let myDate = new Date('2024-06-16T03:24:00'); let mydate= utils.getFirstDayOfMonth(myDate); env.log(mydate); |
| DateTime getLastDayOfMonth(\*DateTime) |
| ---------------------------------------------------------------------------------------------------------------------------------------------------------------- |
| La función getFirstDayOfMonth() permite obtener el último día del mes de la fecha y hora UTC actual |
| EjemplosEste ejemplo obtiene el último día del mes de la fecha y hora UTC actual o el último día del mes de la fecha y hora parámetro opcional |
| let date = utils.getLastDayOfMonth(); env.log(date); let myDate = new Date('2024-06-16T03:24:00'); let mydate= utils.getLastDayOfMonth(myDate); env.log(mydate); |
| DateTime getFirstDayOfYear(\*DateTime) |
| ---------------------------------------------------------------------------------------------------------------------------------------------------------------- |
| La función getFirstDayOfYear() permite obtener el primer día del año de la fecha y hora UTC actual |
| EjemplosEste ejemplo obtiene el primer día del año de la fecha y hora UTC actual o el primer día del año de la fecha y hora parámetro opcional |
| let date = utils.getFirstDayOfYear(); env.log(date); let myDate = new Date('2024-06-16T03:24:00'); let mydate= utils.getFirstDayOfYear(myDate); env.log(mydate); |
| DateTime getLastDayOfYear(\*DateTime) |
| -------------------------------------------------------------------------------------------------------------------------------------------------------------- |
| La función getLastDayOfYear() permite obtener el último día del año de la fecha y hora UTC actual |
| EjemplosEste ejemplo obtiene el último día del año de la fecha y hora UTC actual o el último día del año de la fecha y hora parámetro opcional |
| let date = utils.getLastDayOfYear(); env.log(date); let myDate = new Date('2024-06-16T03:24:00'); let mydate= utils.getLastDayOfYear(myDate); env.log(mydate); |
| DateTime getFirstDayOfQuarter(\*DateTime) |
| ---------------------------------------------------------------------------------------------------------------------------------------------------------------------- |
| La función getLastDayOfYear() permite obtener el primer día del trimestre de la fecha y hora UTC actual |
| EjemplosEste ejemplo obtiene el primer día del trimestre de la fecha y hora UTC actual o el primer día del trimestre de la fecha y hora parámetro opcional |
| let date = utils.getFirstDayOfQuarter(); env.log(date); let myDate = new Date('2024-06-16T03:24:00'); let mydate= utils.getFirstDayOfQuarter(myDate); env.log(mydate); |
| DateTime getLastDayOfQuarter(\*DateTime) |
| -------------------------------------------------------------------------------------------------------------------------------------------------------------------- |
| La función getLastDayOfYear() permite obtener el último día del trimestre de la fecha y hora UTC actual |
| EjemplosEste ejemplo obtiene el último día del trimestre de la fecha y hora UTC actual o el último día del trimestre de la fecha y hora parámetro opcional |
| let date = utils.getLastDayOfQuarter(); env.log(date); let myDate = new Date('2024-06-16T03:24:00'); let mydate= utils.getLastDayOfQuarter(myDate); env.log(mydate); |
Funciones de interpolación
| double linearInterpolation(params double\[] values) |
| -------------------------------------------------------------------------------------------------------------------------------------------------------------------------------------------- |
| El primer parámetro es el valor a interpolar, los parámetros restantesson puntos (x, y), con un mínimo de 2 puntos (5 parámetros en total),y un máximo de 20 puntos (41 parámetros en total) |
| EjemplosEste ejemplo interpola el valor 1.5 a los valores 1.1, 2.3 y 3 |
| const parameters = \[]; parameters.push(1.5, 1.1, 2.3 , 3) let interpolated = utils.linearInterpolation(parameters); |
# Agregar Script Común
Seleccionar la opción correspondiente a Scripts Comunes desde el menú

Al seleccionar **Agregar** el usuario podrá incluir una descripción, seleccionar una dependencia y debajo ingresar el código en JS

# Editar Script Comun
En la sección general de Scripts Comunes, seleccionar los tres puntos a la derecha de la pantalla

# Eliminar Script Comun
En la sección general de Scripts Comunes, seleccionar los tres puntos a la derecha de la pantalla

El usuario deberá **Confirmar** o **Cancelar** la accion requerida

Al Confirmar el Script Común es eliminado y el usuario redirigido a la pantalla general de dicha opción.

# Scripts Comunes
El siguiente Modulo permite trabajar con los “**Scripts Comunes**\*\*”\*\* **dentro del cliente seleccionado**, para cumplir la función de reutilizar, simplificar y reducir el código de los Script para Dispositivos y Acciones.
Un Script es un fragmentos de código en un lenguaje interpretado (*JavaScript*) de fácil comprensión, que permitirá ampliar el abanico de herramientas a disposición, a la hora de procesar una lógica de negocio determinada.
> Los Scripts Comunes serán utilizados como librerías de funcionalidades comunes. \
> Los Scripts Comunes serán utilizados como dependencia en otros scripts.
El Modulo permitirá, visualizar el listado de Scripts Comunes generados por el cliente, también permitirá crear, editar o eliminar dichos scripts. Los scripts podrán *relacionarse entre si para aprovechar la reutilización de código y acceder a todos los dispositivos del cliente en el cual se encuentran ejecutando.*
**Desde la siguiente opción del menú**

# Alertas - Contactos y Grupo de Contactos
El usuario podrá desde la siguiente imagen, crear una alerta en base a los *Contactos* o *Grupo de Contactos* creados
1- En la solapa *Detalles* deberá configurar el Sensor, la Condición en la cual se disparará la notificación y la Condición normal por la que la notificación no se ejecutaría.

2- En la solapa de *Notificaciones* se completarán los medios por los cuales se recibirán las notificaciones. Podrán utilizarse correos y teléfonos aislados o correos y teléfonos creados en Contactos y Grupos de Contactos, los cuales estos últimos serán de fácil visualización al escribir sus nombres en los campos correspondientes

3- En la solapa de *Tags* el usuario podrá crear una serie Tags

3- En la *Plantillas* el usuario podrá crear los formatos de las notificaciones que se desean enviar

# Alarmas Flexibles
Esta funcionalidad busca flexibilizar el envío de notificaciones a los contactos permitiendo configurar *zona horaria*, *días* y *horarios* *laborales*, y *períodos de vacaciones o fuera de oficina*. Esta configuración se puede aplicar a nivel de contacto o grupos de contacto.\
De esta manera se busca dar la posibilidad de realizar una configuración más precisa que ayude a que sean mas efectivas las notificaciones/alertas generadas a los contactos específicos.
Modificar alarmas por contacto [#modificar-alarmas-por-contacto]
Para modificar el envío de notificaciones a un contacto, se debe ingresar a la siguiente ruta:
**Menú de navegación > Directorio > Contactos > Horas laborales**


Modificar alarmas por grupo de contactos [#modificar-alarmas-por-grupo-de-contactos]
En el caso de necesitar modificar las notificaciones de un grupo de contactos, se debe ingresar a:
**Menú de navegación > Directorio > Grupo de Contactos > Horas laborales**


# Servicios de voz y SMS
Los servicios de Voz y SMS para notificaciones tienen costo asociado.
El usuario podrá visualizar en la solapa de notificaciones dentro de *Alertas* y *Tipos de Alertas*, mensajes que advierten sobre el estado de la configuración de estos servicios en la plataforma.
En el caso de estar habilitados a nivel de *Cliente*, un usuario con permisos de administrador podrá a nivel de *Instancia* habilitar o deshabilirar el envío de notificaciones de tipo SMS, Voz decidiendo cuales estarán activas.
Si a nivel *Cliente* las opciones no están **habilitadas**, a nivel de *Instancia* el usuario visualizará las opciones **deshabilitadas, es decir, para poder habilitar las notificaciones de voz y SMS a nivel de instancia primero deben estar habilitadas a nivel del cliente.**\
> **Por defecto, las alertas para todos los Clientes e Instancias son únicamente de tipo e-mail y no tienen costo.**
1. **MENSAJES DE ALERTAS PARA SMS Y VOZ**
**Clientes** > Deshabilitar los servicios de SMS y Voz

**Instalaciones** > El usuario no podrá seleccionar la instancia si la configuración Global no esta previamente habilitada

**Alarmas** > Alertas

**Alarmas** > Tipo de Alertas

2. **MENSAJES DE ALERTAS PARA VOZ**
**Clientes** > Quitar la selección de Voz y seleccionar la de SMS

**Instalaciones** > El usuario podrá seleccionar la instancia de SMS y visualizara inhabilitada la de Voz

**Alarmas** > Alertas

**Alarmas** > Tipo de Alertas

3. **MENSAJES DE ALERTAS PARA SMS**
**Clientes** > Quitar la selección de SMS y seleccionar la de Voz

**Instalaciones** > El usuario podrá seleccionar la instancia de Voz y visualizara inhabilitada la de SMS

**Alarmas** > Alertas

**Alarmas** > Tipo de Alertas

4. **MENSAJES DE ALERTAS SIN MOSTRAR**
**Clientes** > Seleccionar la opción de SMS y Voz

**Instalaciones** > El usuario podrá seleccionar la instancia de Voz y SMS

**Alarmas** > Alertas

**Alarmas** > Tipo de Alertas

# Servicios de voz, SMS y Whatsapp
Los servicios de Voz, SMS y Whatsapp para notificaciones tienen costo asociado.
El usuario podrá visualizar en la solapa de notificaciones dentro de *Alertas* y *Tipos de Alertas*, mensajes que advierten sobre el estado de la configuración de estos servicios en la plataforma.
En el caso de estar habilitados a nivel de *Cliente*, un usuario con permisos de administrador podrá a nivel de *Instancia* habilitar o deshabilitar el envío de notificaciones de tipo SMS, Voz y Whatsapp decidiendo cuales estarán activas.
Si a nivel *Cliente* las opciones no están **habilitadas**, a nivel de *Instancia* el usuario visualizará las opciones **deshabilitadas, es decir, para poder habilitar las notificaciones de voz, SMS y Whatsapp a nivel de Instancia primero deben estar habilitadas a nivel del cliente.**
**Por defecto, las alertas para todos los Clientes e Instancias son únicamente de tipo e-mail y no tienen costo.**
1. **MENSAJES DE ALERTAS PARA SMS, Whatsapp**
**Clientes** > Habilitar los servicios de SMS, Voz y Whatsapp

**Instalaciones** > El usuario no podrá seleccionar la instancia si la configuración Global no esta previamente habilitada

**Alarmas** > Alertas
Cuando está habilitado, en la sección de Notificaciones de las Alertas, se verán los campos para indicar los datos de contacto. Tanto el email, como el número telefónico que podrá ser el mismo o variar de acuerdo al tipo de notificación (SMS, Mensaje de Voz, Whatsapp)

**Alarmas** > Tipo de Alertas\
La configuración de los tipos de Notificación también están disponibles, para los Tipos de Alerta. Se puede indicar las notificaciones tanto por Emails (sin costos adicionales), así como también por mensajes de texto (SMS), mensajes de voz y por Whatsapp, con costo adicional

**Acciones & Scripting** > Notificaciones
En los pasos de las Acciones y las Notificaciones, también se accede a la configuración de envío de Notificaciones.\
Se visualizan los canales de Notificación habilitados para la Instalación\
- Por email\

\- Por SMS\

\- Por Voz\

Por Whatsapp
**Clientes** > Eliminar los contactos en los diferentes canales de las Notificaciones\

**Clientes** > Deshabilitar los Canales de Notificaciones
Se puede quitar el medio de notificación, a través de quitar su habilitación en la configuración de la Instalación. Una vez hecho esto, no se visualizará el canal para configurarlo en la Notificación

# Control de dispositivos
Gear Studio permite el control de dispositivos que permitan actuación, tales como artefactos, dimmers, termostatos, controladores de cortinas, y mucho más.
Control de dispositivos desde la app [#control-de-dispositivos-desde-la-app]
La app de Gear Studio permite visualizar el estado de todos los dispositivos, y además permite actuar directamente sobre ellos, si el usuario tiene los permisos necesarios.
| | | |
| - | - | - |
Control de dispositivos desde el monitor [#control-de-dispositivos-desde-el-monitor]
La sección “Dispositivos” del monitor permite la visualización de toda la infraestructura de dispositivos de una instalación, así como eventualmente la operación manual en caso de ser necesario. Para cada dispositivo con capacidad de control, la lista presenta todas las acciones posibles para su estado actual.
# Dispositivos
Los dispositivos constituyen el primer nivel de la infraestructura de una instalación. Normalmente corresponden a dispositivos físicos, tales como sensores, gateways, dimmers, actuadores, termostatos, etc. Los dispositivos tienen las siguientes características:
* Tienen un modelo (o una combinación de marca y modelo)
* Tienen un identificador único, tal como una dirección MAC, o un número de serie.
* Tienen algún tipo de interfaz de comunicaciones (MQTT, HTTP, NB-IoT, ZigBee, LoRaWAN, etc.)
* Tienen una descripción que se utiliza en Gear para identificar el dispositivo con más facilidad.
* Tienen ciertos atributos asociados, que pueden actualizarse durante la operación.
Atributos de los dispositivos [#atributos-de-los-dispositivos]
Los dispositivos pueden tener atributos asociados, que pueden cambiar durante su funcionamiento. Ejemplos de estos atributos, son:
* **Nivel de batería**. Gear Studio permite informar el nivel de batería de los dispositivos, para los dispositivos que cuenten con una o más baterías. Para los dispositivos que tengan más de una batería, se permite informar separadamente el estado de cada una.
* **Nivel de señal**. La plataforma permite informar el nivel de señal, para aquellos dispositivos que utilicen comunicación inalámbrica. En los dispositivos que soportan más de un medio de comunicación inalámbrica, es posible informar separadamente el estado de cada una (por ejemplo, celular, Wi-Fi, LoRaWAN, ZigBee, etc.)
* **Versión de firmware**. Se permite informar la versión de firmware instalada en el dispositivo, en caso de disponer de ella. Esto permite aprovechar la funcionalidad de control de versiones, para conocer rápidamente los dispositivos que necesitan ser actualizados.
Más información [#más-información]
Para más información sobre la administración de dispositivos y endpoints, puede ver los siguientes tutoriales:
* [Integración de dispositivos](/docs/configuracion-del-cliente/dispositivos-y-endpoints/dispositivos/integracion-de-dispositivos)
* [Administración de dispositivos](/docs/configuracion-del-cliente/dispositivos-y-endpoints/dispositivos/dispositivos)
* [Administración de endpoints](/docs/configuracion-del-cliente/dispositivos-y-endpoints/endpoints/crear-un-endpoint)
# Crear un endpoint
> **IMPORTANTE**: como regla general, los endpoints sólo pueden crearse en dispositivos que correspondan a [modelos de dispositivo](/docs/configuracion-del-cliente/dispositivos-y-endpoints/dispositivos/modelos-de-dispositivo) definidos por el usuario. Esto es porque al crear dispositivos que corresponden a modelos integrados dentro de Gear Studio, la plataforma crea automáticamente todos los endpoints necesarios.
Al agregar un nuevo **endpoint** se deberán completar los siguientes datos.
* **Descripcion**: Definida por el usuario, representa una descripción con la cual se nombrará al endpoint que se esta creando.
* **Dirección**: Definida por el usuario, representa el identificador único del endpoint
* **Tipo**: Lista desplegable de selección del tipo de dispositivo al que se le esta creando un enpoint
* **Subtipo**: En función del tipo de dispositivo seleccionado, esta lista desplegable permite la seleccion del subtipo correspondiente

Finalizada la creación de un endpoint del modelo de dispositivo definido por el usuarios se podra encontrar el **endpoint** creado con sus detalles, dándonos la posibilidad de editarlo y eliminalo de ser necesario

Al editarlo tenemos la posibilidad de cambiar la **Descripción** y en el caso de éste **endpoint** modificar el **Subtipo de endpoint** con el que lo creamos anteriormente.
# Endpoint tagging
Introducción [#introducción]
El objetivo de la nueva característica es permitir la definición de dashboards que puedan utilizarse en múltiples facilities, o incluso en diferentes clientes, sin la necesidad de crear copias independientes. Para conseguir este objetivo, se propone utilizar tags de los endpoints, o de los dispositivos que los contienen para poder referenciar los endpoints en forma indirecta. Se desea mantener la opción actual (referencia a un endpoint específico), y agregar la opción de referenciar endpoints o grupos de endpoints en forma indirecta a través de tags.
**Lo que se busca es permitir la definición de dashboards que puedan utilizarse en múltiples facilities, o incluso en diferentes clientes, sin la necesidad de crear copias que involucran esfuerzo adicional y luego son difíciles de mantener.**
Selección de un endpoint [#selección-de-un-endpoint]
Para poder seleccionar un endpoint en un widget, se propone permitir los siguientes métodos:
* **Selección de un endpoint individual** (método actual). En este caso, se elije un endpoint puntual de la lista, tal como se hace actualmente. El widget queda unido al endpoint al momento de diseñar el dashboard, y en todo momento se referirá al endpoint indicado. Este tipo de selección no debe permitirse en dashboards globales.
* **Selección indirecta por tags** (método adicional nuevo). En este caso, se introduce una lista de uno o más tags, y el endpoint elegido será determinado en tiempo de ejecución en el back-end (al visualizar el dashboard) en función del facility seleccionado. El algoritmo para elegir el endpoint a utilizar será el siguiente:
1. Primer endpoint que contenga el tag indicado, sea del tipo apropiado, y pertenezca al facility actual.
2. Primer endpoint que contenga el tag indicado, sea del tipo apropiado, y pertenezca a cualquier facility del cliente actual al que el usuario tenga permiso.
3. Primer endpoint que contenga el tag indicado, sea del tipo apropiado, y pertenezca a cualquier cliente al que el usuario tenga permiso.
**NOTA: Cuando se dice “primer endpoint” en los párrafos anteriores, se refiere al primero que cumpla la condición, ordenando por Endpoint ID.**
Ejemplo [#ejemplo]
1. Dashboard 1 (cualquier facility)
2. Widget 1 - Sensor que contenga el tag “temperature-sensor”.
3. Widget 2 - Sensor que contenga el tag “humidity-sensor”
4. Widget 3 - Sensor que contenga el tag “people-counter”
2. Luego, en cada facility, sólo es necesario colocar los tags apropiados:
* Colocar el tag “temperature-sensor” a los sensores de temperatura de los 3 facilities.
* Colocar el tag “humidity-sensor” a los sensores de humedad de los 3 facilities.
* Colocar el tag “people-counter” a los contadores de personas de los 3 facilities.
Implementando el dashboard de esta forma, es posible utilizar el mismo dashboard en cualquier facility, y el contenido del dashboard se adaptará automáticamente al cambiar de un facility a otro. Adicionalmente, si se elimina un endpoint y se lo reemplaza por otro, en cualquier facility, el dashboard continuará funcionando normalmente siempre que el nuevo endpoint reciba los tags apropiados.
# Endpoints
*Un dispositivo puede tener múltiples sensores, funciones, o canales. Por ejemplo, en el caso de in dimmer que es capaz de controlar cuatro circuitos de luz, se puede decir que tiene cuatro funciones distintas o “canales”. Cuando un usuario interactúe con el dispositivo, en realidad estará interactuando con uno de esos canales, y no con todo el dispositivo entero.*
A cada una de estas funciones o canales, en la terminología de Gear Studio, se la denomina un “**endpoint**”. Los endpoints tienen las siguientes características:
* Tienen un identificador único, dentro del dispositivo.
* Tienen un tipo de sensor (sensor de temperatura, luz, energía, volumen, etc.)
* Tienen una descripción que se utiliza en Gear para identificar el endpoint con más facilidad.
* Tienen un sector asociado, que indica dónde están instalados, o dónde operan (en qué lugar dentro de la instalación).
* De acuerdo al tipo de sensor, pueden tener otras características específicas.
A continuación se presentan algunos ejemplos de endpoints en dispositivos de uso común.
| Dispositivo | Endpoints |
| --------------------------------- | --------------------------------------------------------------------------------------------------------------------------------------------------------------------------------------------- |
| Sensor de temperatura y humedad | Endpoint 1: temperaturaEndpoint 2: humedad |
| Dimmer de 2 canales | Endpoint 1: dimmer canal 1Endpoint 2: dimmer canal 2 |
| Medidor de consumo eléctrico | Endpoint 1: medidor de energía activa y reactivaEndpoint 2: medidor de voltajeEndpoint 3: medidor de corrienteEndpoint 4: medidor de potencia activaEndpoint 5: medidor de factor de potencia |
| Sensor 5-en-1 (ejemplo: HPA-4416) | Endpoint 1: sensor de temperaturaEndpoint 2: sensor de humedadEndpoint 3: sensor de luzEndpoint 4: detector de movimientoEndpoint 5: detector de apertura de puerta / ventana |
Más información [#más-información]
Para más información sobre la administración de dispositivos y endpoints, puede ver los siguientes tutoriales:
* [Administración de dispositivos](/docs/configuracion-del-cliente/dispositivos-y-endpoints/dispositivos/dispositivos)
* [Administración de endpoints](/docs/configuracion-del-cliente/dispositivos-y-endpoints/endpoints/crear-un-endpoint)
# Usuarios
Los **usuarios** pertenecen a uno o más **grupos** los cuales tienen **permisos** asociados. De esta manera se pueden crear grupos que tengan acceso exclusivo a ciertas secciones y a otras no. Estos mismos permisos pueden ser otorgados de manera individual a cada usuario.
# Permisos
Cloud Studio cuenta con un sistema de permisos que permite establecer, para cada usuario o grupo de usuarios, el conjunto de funcionalidades al que tiene acceso. Para acceder a la lista de permisos, se utiliza el módulo de permisos del Manager, que permite:
* Permitir o denegar permisos a nivel de usuario.
* Permitir o denegar permisos a nivel de grupo de usuarios.
Globales [#globales]
El acceso se realiza desde Configuración Global > Seguridad Global > Permisos globales. En esta sección, se tendrá acceso a las siguientes categorías:
* **Generales**
* Permisos de administrador global: Habilita la gestión (creación, edición o eliminación) de Dashboards Globales y Scripts para modelos de dispositivos, edición de clientes, configuración de la marca blanca y eliminación de links compartidos. A su vez, es permiso padre de todos los de la categoría Generales, por lo que aquel usuario que posea esté, también tendrá acceso a los demás.
* Cambiar contraseñas de cuentas: *Aun no implementado.*
* Administrar tablas maestras: Permite gestionar (crear, editar o eliminar) fuentes de alarmas externas y contratistas de mantenimiento y ver los permisos de acceso.
* Administrar aplicaciones: *Aun no implementado.*
* Administrar parámetros generales: Permite modificar los parámetros generales de la aplicación.
* Administrar tipos de alarmas: *Aun no implementado.*
* Administrar direcciones externas: *Aun no implementado.*
* Administrar grupos de usuarios: *Aun no implementado.*
* Administrar usuarios de sistema: Permite ver los usuarios del sistema. Es permiso padre de la creación, edición y eliminación de usuarios.
* Asignar permisos de usuario: Permite asignar o desasignar la cuenta de un grupo y modificar los permisos de acceso del usuario.
* **Gear**
* **Reportes**
* Catálogo de dispositivos: Permite acceso al reporte *Catálogo de dispositivos*.
* Resumen de endpoints: Permite acceso al reporte del Manager, *Resumen de endpoints*.
* Catálogo de endpoints: Permite acceso al reporte *Catálogo de endpoints*.
* Alarmas activas: Permite acceso al reporte *Alarmas activas*.
* Histórico de alarmas: Permite acceso al reporte *Histórico de alarmas*.
* Datos brutos de endpoints: Permite acceso al reporte *Datos brutos de endpoints.*
* Consumo de energía (detallado): Permite acceso al reporte *Consumo de energía (detallado)*.
* Consumo de energía (resumen): Permite acceso al reporte *Consumo de energía (resumen)*.
* Estado de tanques: Permite acceso al reporte *Estado de tanques*.
* Log de actividad de los usuarios: Permite acceso al reporte del Manager, *Log de actividad de los usuarios*.
* Información del sistema: Permite acceso al reporte del Manager, *Información del sistema*.
* Tareas programadas: Permite acceso al reporte de *Tareas programadas*.
* Cola de notificaciones: Permite a la *Cola de notificaciones*.
* Verificaciones de sanidad: Permite acceso a los reportes *Verificaciones de sanidad*.
* **Dashboards**
* Global summary: Permite acceso al Dashboard #1 *Global summary*.
* Facility summary: Permite acceso al Dashboard #2 *Facility summary*.
* Global energy: Permite acceso al Dashboard #3 *Global energy*.
* Facility energy: Permite acceso al Dashboard #4 *Facility energy*.
Cliente [#cliente]
El acceso se realiza desde Configuración del cliente > Seguridad > Permisos. Dentro, tendremos los siguientes:
* **Generales**
* Permisos de administrador sobre este cliente: Permite la gestión (Creación, edición o eliminación) de firmware de dispositivos del cliente, geozonas, agenda de contactos, usuarios (Como así también los permisos de dicho usuario), instalaciones del cliente, tipos de Endpoints y Scripts para modelos de dispositivos y expirar enlaces compartidos.
* Acceder a todas las instalaciones: Hereda el permiso de administrar cada instalación del cliente.
* Operar todas las instalaciones: Hereda el permiso de operar cada instalación del cliente.
* Acceder al monitor: Permite acceder al monitor.
* Acceder a la configuración: Permite acceder a los ajustes del administrador.
* Aplicación móvil: *Aun no implementado.*
* **Instalaciones**
* **Instalación**: Estos permisos serán por cada instalación, en esta instancia se mostrará el nombre.
* Administrador: Permite enumerar las instalaciones del cliente y gestionar (creación, edición o eliminación) circuitos eléctricos de una instalación del cliente.
* Acceder: Da permiso de acceso a la instalación y permite ver detalles de tanques.
* Operar: Permite acceso a la información de energía activa y vincular cuentas de Google Home.
* **Reportes**
* Catálogo de dispositivos: Permite acceso al reporte *Catálogo de dispositivos*.
* Resumen de endpoints: Permite acceso al reporte del Manager, *Resumen de endpoints*.
* Catálogo de endpoints: Permite acceso al reporte *Catálogo de endpoints*.
* Alarmas activas: Permite acceso al reporte *Alarmas activas*.
* Histórico de alarmas: Permite acceso al reporte *Histórico de alarmas*.
* Datos brutos de endpoints: Permite acceso al reporte *Datos brutos de endpoints.*
* Consumo de energía (detallado): Permite acceso al reporte *Consumo de energía (detallado)*.
* Consumo de energía (resumen): Permite acceso al reporte *Consumo de energía (resumen)*.
* Estado de tanques: Permite acceso al reporte *Estado de tanques*.
* **Dashboards**
* Global summary: Permite acceso al Dashboard #1 *Global summary*.
* Facility summary: Permite acceso al Dashboard #2 *Facility summary*.
* Global energy: Permite acceso al Dashboard #3 *Global energy*.
* Facility energy: Permite acceso al Dashboard #4 *Facility energy*.
* Dashboards adicionales del cliente aparecerán aquí, para poder permitir o restringir su acceso.
| Cabe destacar que en ambas divisiones, la informacion de la sección “Dashboards” es dinamica. Es decir, variable según los tableros que existan y estén activos en ese momento. A nivel global los maneja el administrador de la instancia y a nivel cliente los usuarios que tengan permisos para crear. |
| --------------------------------------------------------------------------------------------------------------------------------------------------------------------------------------------------------------------------------------------------------------------------------------------------------- |
# Monitoreo de energía
El vertical de monitoreo de energía está diseñado para permitir el acceso a información relativa al uso de energía eléctrica, incluyendo:
* La definición de circuitos eléctricos con su representación jerárquica, tipo de fase, y categoría de consumo.
* La creación de dispositivos para medición de consumo (energy meters).
* La creación de dispositivos para la medición de otras variables eléctricas (tensión, corriente, potencia, coseno fi, etc.)
* La visualización de esta información en dashboards.
* La visualización de información instantánea en el monitor de dispositivos.
* La creación de [alertas](/docs/configuracion-del-cliente/alertas-y-alarmas) cuando los parámetros eléctricos quedan fuera de los límites definidos.
# Filtros de Seguimiento de Activos
En Filtros el usuario podrá filtrar la visualización

**Nota importante sobre visualización de filtros:**
Dependiendo de las opciones de configuración de cada instancia, algunas de estas opciones pueden no estar disponibles".
Visualización de Botones en la pantalla de Asset tracking.
**Filter/Configurations/share asset tracking.**

Descripción [#descripción]
Al cargar la pantalla se muestran todos los filtros seleccionados con la fecha actual.
Al no tener ningún filtro seleccionado y/o no exista información(Asset), el mapa se sitúa en el facility.
El "mostrar ruta" estará tildado para fechas previas en la solapa Configuraciones.


Los días posteriores en el filtro de fechas están deshabilitados.

El orden de los filtros es el siguiente:
**Solapa Filter:**
* Fecha
* Vehículos
* Conductores
* Alertas

**Alertas:**
Filtro de “Alertas“ tiene la siguiente funcionalidad:
Se pueden listaran todos los “TAGS” que estén asociados a alertas de los Vehículos del cliente, junto con las opciones para mostrar aquellos que no tienen alarmas activas o que no están asociadas a ningún “TAG”.
Por ejemplo: Se tienen 2 alertas donde cada una de ellas tienen los siguientes tags asociados:
* Alerta 1 → Tags : Taxi, Pánico, Emergencia
* Alerta 2 → Tags : Patrulla, Emergencia
En el filtro de alertas se mostraran distintos ítems según las necesidades de cada cliente comenzando inicialmente por:
**\*Sin alarmas activas.**
**\*Alarmas sin etiqueta.**

**Nota:** Esto quiere decir que para que el filtro de alertas tenga más de un ítem en la lista, será necesario se configuren los tags para cada alerta que se desea mostrar en el filtro de “Alertas“.
**Esta configuración de TAGS de alertas también puede realizarse mediante Scripting con las funcionalidades actuales.**
**Solapa Configuración:**
* Mostrar Ruta
* Geozonas

**Filtros por default modificable.**
* Fecha
* Vehículos

**Seguimiento de ruta:** En esta opción el usuario podrá visualizar la ruta del activo, en la misma tambien puede ver el inicio y fin de la ruta del mismo(A,B).

**Seguimiento de ruta Inicio y fin:** En esta opción el usuario podrá visualizar la ruta del activo, en la misma el usuario puede visualizar el inicio y fin de la ruta de los vehículos filtrados (A,B).

# Seguimiento de Activos
Introducción [#introducción]
El seguimiento de activos le permite acceder a datos en tiempo real de su flota utilizando análisis detallados, que se pueden compartir con sus empleados. Esto significa que tendrá plena confianza en que sus recursos están siendo bien utilizados y distribuidos.
En la pantalla Seguimiento de Activos se puede dar seguimiento a los vehículos (tiempo real o con una fecha diferida), la misma es dinámica, permitiéndole así al cliente mostrar y ocultar los distintos filtros según lo que cada clientes necesiten.
# Permisos Globales
Cloud Studio cuenta con un sistema de permisos globales que permite establecer, para cada usuario o grupo de usuarios, el conjunto de funcionalidades al que tiene acceso a nivel de instancia. Para acceder a la lista de permisos, se utiliza el módulo de permisos globales del Manager, que permite:
* Permitir o denegar permisos a nivel de usuario globales.
* Permitir o denegar permisos a nivel de grupo de usuarios globales.
Globales [#globales]
El acceso se realiza desde Configuración Global > Seguridad Global > Permisos globales. En esta sección, se tendrá acceso a las siguientes categorías:
* **Generales**
* Permisos de administrador global: Habilita la gestión (creación, edición o eliminación) de Dashboards Globales y Scripts para modelos de dispositivos, edición de clientes, configuración de la marca blanca y eliminación de links compartidos. A su vez, es permiso padre de todos los de la categoría Generales, por lo que aquel usuario que posea esté, también tendrá acceso a los demás.
* Cambiar contraseñas de cuentas: *Aun no implementado.*
* Administrar tablas maestras: Permite gestionar (crear, editar o eliminar) fuentes de alarmas externas y contratistas de mantenimiento y ver los permisos de acceso.
* Administrar aplicaciones: *Aun no implementado.*
* Administrar parámetros generales: Permite modificar los parámetros generales de la aplicación.
* Administrar tipos de alarmas: *Aun no implementado.*
* Administrar direcciones externas: *Aun no implementado.*
* Administrar grupos de usuarios: *Aun no implementado.*
* Administrar usuarios de sistema: Permite ver los usuarios del sistema. Es permiso padre de la creación, edición y eliminación de usuarios.
* Asignar permisos de usuario: Permite asignar o desasignar la cuenta de un grupo y modificar los permisos de acceso del usuario.
* **Gear**
* **Reportes**
* Catálogo de dispositivos: Permite acceso al reporte *Catálogo de dispositivos*.
* Resumen de endpoints: Permite acceso al reporte del Manager, *Resumen de endpoints*.
* Catálogo de endpoints: Permite acceso al reporte *Catálogo de endpoints*.
* Alarmas activas: Permite acceso al reporte *Alarmas activas*.
* Histórico de alarmas: Permite acceso al reporte *Histórico de alarmas*.
* Datos brutos de endpoints: Permite acceso al reporte *Datos brutos de endpoints.*
* Consumo de energía (detallado): Permite acceso al reporte *Consumo de energía (detallado)*.
* Consumo de energía (resumen): Permite acceso al reporte *Consumo de energía (resumen)*.
* Estado de tanques: Permite acceso al reporte *Estado de tanques*.
* Log de actividad de los usuarios: Permite acceso al reporte del Manager, *Log de actividad de los usuarios*.
* Información del sistema: Permite acceso al reporte del Manager, *Información del sistema*.
* Tareas programadas: Permite acceso al reporte de *Tareas programadas*.
* Cola de notificaciones: Permite a la *Cola de notificaciones*.
* Verificaciones de sanidad: Permite acceso a los reportes *Verificaciones de sanidad*.
* **Dashboards**
* Global summary: Permite acceso al Dashboard #1 *Global summary*.
* Facility summary: Permite acceso al Dashboard #2 *Facility summary*.
* Global energy: Permite acceso al Dashboard #3 *Global energy*.
* Facility energy: Permite acceso al Dashboard #4 *Facility energy.*
# Usuarios Globales
Los **usuarios globales** podrán tener acceso a las opciones de configuración a nivel de instancia y cliente. A su vez, pueden pertenecen a uno o más **grupos globales** los cuales tienen **permisos globales** asociados. De esta manera se pueden crear grupos que tengan acceso exclusivo a ciertas secciones. Estos mismos permisos pueden ser otorgados de manera individual a cada usuario.
# Endpoint
El objeto endpoint representa un endpoint dentro de un dispositivo instalado en la plataforma. Normalmente se accede a los endpoints a través de la propiedad **endpoints** del objeto [device](/docs/herramientas-low-code-scripting/referencia-de-objetos-disponibles-para-scripting/device).
Propiedades [#propiedades]
\### address (string) La propiedad address representa la dirección del endpoint, como texto.
**Ejemplos**
Este ejemplo muestra la dirección del primer endpoint de un dispositivo, a través de la consola de log.
```javascript
env.log('Endoint address: ', myDevice.endpoints.byIndex(0).address);
```
\### description (string) La propiedad description representa la descripción del endpoint.
**Ejemplos**
Este ejemplo muestra la descripción del primer endpoint de un dispositivo, a través de la consola de log.
```javascript
env.log('Endoint description: ', myDevice.endpoints.byIndex(0).description);
```
\### endpointType (int enum)
La propiedad endpointType indica el tipo de endpoint. Los valores posibles para esta propiedad, son los siguientes:
* **endpointType.appliance (1)**: el endpoint es de tipo on/off, es decir que puede encenderse y apagarse, como puede ser una lámpara sin regulación de brillo, una válvula, una bomba de agua, etc.
* **endpointType.dimmer (2)**: el endpoint puede encenderse y apagarse, pero también se puede controlar su brillo.
* **endpointType.lightSensor (4)**: el endpoint es un sensor de luz.
* **endpointType.colorDimmer (7)**: el endpoint es capaz de controlar luz cromática (RGB o similar).
* **endpointType.closureController (10)**: el endpoint es un controlador de válvulas, cortinas o cerramientos, que pueden abrirse, cerrarse, y posicionarse.
* **endpointType.curtainController (10)**: equivalente a endpointType.closureController. Este valor existe por compatibilidad con versiones anteriores.
* **endpointType.thermostat (12)**: el endpoint es un termostato.
* **endpointType.camera (13)**: el endpoint es una cámara.
* **endpointType.temperatureSensor (14)**: el endpoint es un sensor de temperatura.
* **endpointType.energyMeter (17)**: el endpoint es un medidor de energía.
* **endpointType.doorLock (19)**: el endpoint es una cerradura electrónica.
* **endpointType.iasSensor (20)**: el endpoint es un sensor de intrusión, presencia, movimiento, o cualquier otro que se utilice para seguridad, y que tenga una cantidad discreta de estados.
* **endpointType.locationTracker (22)**: el endpoint es un tracker de posición (GPS).
* **endpointType.humiditySensor (23)**: el endpoint es un sensor de humedad.
* **endpointType.volumeSensor (24)**: el endpoint es un sensor de volumen.
* **endpointType.weightSensor (25)**: el endpoint es un sensor de peso.
* **endpointType.pressureSensor (26)**: el endpoint es un sensor de presión.
* **endpointType.flowSensor (27)**: el endpoint es un sensor de flujo para líquidos o gases, es decir que la unidad de flujo es un volumen.
* **endpointType.genericSensor (28)**: el endpoint es un sensor escalar genérico, para el cual pueden elegirse las unidades arbitrariamente.
* **endpointType.genericFlowSensor (29)**: el endpoint es un sensor de flujo genérico, de algún otro tipo, para el cual pueden elegirse las unidades arbitrariamente.
* **endpointType.voltageSensor (30)**: el endpoint es un sensor de voltaje (voltímetro).
* **endpointType.currentSensor (31)**: el endpoint es un sensor de corriente (amperímetro).
* **endpointType.activePowerSensor (32)**: el endpoint es un sensor de potencia activa.
* **endpointType.reactivePowerSensor (33)**: el endpoint es un sensor de potencia reactiva.
* **endpointType.apparentPowerSensor (34)**: el endpoint es un sensor de potencia aparente.
* **endpointType.cosPhiSensor (35)**: el endpoint es un sensor de factor de potencia.
* **endpointType.frequencyMeter (36)**: el endpoint es un sensor de frecuencia (frequencímetro).
* **endpointType.runTimeMeter (37)**: el endpoint es un medidor de tiempo de uso (horómetro / run time meter).
* **endpointType.ppmConcentrationSensor (38)**: el endpoint es un sensor de concentración, expresado en partes por millón (ppm).
* **endpointType.mvConcentrationSensor (39)**: el endpoint es un sensor de concentración, expresado en unidades de masa por unidades de volumen.
* **endpointType.airQualityIndexSensor**: el endpoint es un sensor de calidad de aire ([AQI](https://en.wikipedia.org/wiki/Air_quality_index)).
* **endpointType.peopleFlowSensor (41)**: el endpoint es un sensor de flujo de personas, es decir que puede detectar el ingreso y/o egreso de personas.
* **endpointType.peopleCounter (42)**: el endpoint es un sensor de cantidad de personas, es decir que puede detectar cuántas personas están presentes en un área determinada.
* **endpointType.textContainer (43)**: el endpoint es un sensor de texto, es decir que puede almacenar cualquier texto hasta 255 caracteres de longitud
**Ejemplos**
Este ejemplo muestra el tipo de endpoint del primer endpoint de un dispositivo, a través de la consola de log.
```javascript
env.log('Endoint type: ', myDevice.endpoints.byIndex(0).endpointType);
```
\### endpointSubType (int enum)
La propiedad endpointSubType indica el subtipo de endpoint. El subtipo puede indicarse solamente para ciertos tipos de endpoint, como se indica a continuación. Los valores posibles para esta propiedad, son los siguientes:
Para endpoints de tipo **endpointType.appliance**:
* **applianceEndpointSubType.lamp (1)**: indica que el endpoint es una lámpara.
* **applianceEndpointSubType.valve (2)**: indica que el endpoint es una válvula.
* **applianceEndpointSubType.socket (3)**: indica que el endpoint es un socket, o interruptor enchufable.
* **applianceEndpointSubType.pump (4)**: indica que el endpoint es un bomba de agua u otro líquido.
* **applianceEndpointSubType.sprinkler (5)**: indica que el endpoint es un regador o circuito de riego.
* **applianceEndpointSubType.fan (6)**: indica que el endpoint es un ventilador.
Para endpoints de tipo **endpointType.iasSensor**:
* **iasEndpointSubType.motionSensor (1)**: indica que el endpoint es un sensor de movimiento.
* **iasEndpointSubType.doorSensor (2)**: indica que el endpoint es un sensor de puerta o ventana.
* **iasEndpointSubType.floodSensor (3)**: indica que el endpoint es un detector de inundación.
* **iasEndpointSubType.presenceSensor (4)**: indica que el endpoint es un sensor de presencia.
* **iasEndpointSubType.alarmInput (5)**: indica que el endpoint es un sensor de alarma.
* **iasEndpointSubType.coSensor (6)**: indica que el endpoint es un sensor de monóxido de carbono.
* **iasEndpointSubType.co2Sensor (7)**: indica que el endpoint es un sensor de dióxido de carbono.
* **iasEndpointSubType.gasSensor (8)**: indica que el endpoint es un sensor de gases de otro tipo.
* **iasEndpointSubType.smokeDetector (9)**: indica que el endpoint es un sensor de humo.
* **iasEndpointSubType.parkingSensor (10)**: indica que el endpoint es un sensor vehicular de estacionamiento.
Para endpoints de tipo **endpointType.ppmConcentrationSensor**:
* **ppmConcentrationSensorSubType.ammonia (1)**: indica que el endpoint es un sensor de amoníaco.
* **ppmConcentrationSensorSubType.Ozone (2)**: indica que el endpoint es un sensor de ozono.
* **ppmConcentrationSensorSubType.nitricOxide (3)**: indica que el endpoint es un sensor de óxido nítrico.
* **ppmConcentrationSensorSubType.nitrogenDioxide (4)**: indica que el endpoint es un sensor de dióxido de nitrógeno.
* **ppmConcentrationSensorSubType.sulfurDioxide (5)**: indica que el endpoint es un sensor de dióxido de azufre.
* **ppmConcentrationSensorSubType.carbonMonoxide (6)**: indica que el endpoint es un sensor de monóxido de carbono.
* **ppmConcentrationSensorSubType.carbonDioxide (7)**: indica que el endpoint es un sensor de dióxido de carbono.
* **ppmConcentrationSensorSubType.voc (8)**: indica que el endpoint es un sensor de componentes orgánicos volátiles.
Para endpoints de tipo **endpointType.mvConcentrationSensor**:
* **mvConcentrationSensorSubType.lead (1)**: indica que el endpoint es un sensor de plomo.
* **mvConcentrationSensorSubType.pm2\_5 (2)**: indica que el endpoint detecta materia particulada de hasta 2.5 micrones.
* **mvConcentrationSensorSubType.pm10 (3)**: indica que el endpoint detecta materia particulada de hasta 10 micrones.
**Ejemplos**
Este ejemplo muestra el subtipo de endpoint del primer endpoint de un dispositivo, a través de la consola de log.
```javascript
env.log('Endoint subtype: ', myDevice.endpoints.byIndex(0).endpointSubType);
```
\### accessType (int enum)
La propiedad accessType indica el tipo de acceso que se aplica al endpoint. Los valores posibles para esta propiedad son los siguientes:
* **endpointAccessType.readOnly (1)**: indica que el valor asociado al endpoint no puede modificarse manualmente.
* **endpointAccessType.readWrite (2)**: indica que el valor asociado al endpoint puede modificarse manualmente. Al hacerlo, el nuevo valor se registrará inmediatamente, sin interactuar con el dispositivo.
* **endpointAccessType.readWriteCommand (3)**: indica que el valor asociado al endpoint puede modificarse manualmente. Al hacerlo, se enviará un comando al dispositivo para cambiar el valor. Es responsabilidad del dispositivo reportar el nuevo valor al aceptar el comando.
**Ejemplos**
Este ejemplo muestra el valor de la propiedad accessType del primer endpoint de un dispositivo, a través de la consola de log.
```javascript
env.log('Endoint access type: ', myDevice.endpoints.byIndex(0).accessType);
```
\### operationSecurityLevel (int enum)
La propiedad operationSecurityLevel indica el nivel de seguridad asociado a la operación del endpoint. Los valores posibles para esta propiedad son los siguientes:
* **endpointOperationSecurityLevel.simple (1)**: indica que el endpoint puede operarse directamente. No es necesario un mensaje de advertencia ni una confirmación por parte del usuario. En las interfaces de usuario, al operar el endpoint, el correspondiente comando se envía inmediatamente.
* **endpointOperationSecurityLevel.medium (2)**: indica que para operar el endpoint, es necesario mostrar antes un mensaje de confirmación, y las opciones correspondientes para aceptar o cancelar la operación. El mensaje es configurable a nivel de endpoint individual, pero es opcional. En caso de no especificarse un mensaje, se utilizará un mensaje de confirmación por defecto.
* **endpointOperationSecurityLevel.high (3)**: indica que para operar el endpoint, es necesaria la confirmación correspondiente al nivel de seguridad **medium**, pero además se solicita que el usuario reingrese su contraseña.
**Ejemplos**
Este ejemplo muestra el valor de la propiedad operationSecurityLevel del primer endpoint de un dispositivo, a través de la consola de log.
```javascript
env.log('Endoint access type: ', myDevice.endpoints.byIndex(0).operationSecurityLevel);
```
\### tags (array) La propiedad tags indica el conjunto de tags que se aplica al endpoint. Esta propiedad es un array de strings, cada uno de los cuales indica un tag.
**Ejemplos**
Este ejemplo muestra la lista de tags del primer endpoint de un device.
```javascript
myDevice.endpoints.byIndex(0).tags.forEach(item => env.log(item));
```
Métodos [#métodos]
\### getCurrentState() El método getCurrentState() permite obtener el estado actual del endpoint.
**Parámetros**
Este método no tiene parámetros.
**Resultado**
El valor devuelto por el método es un objeto [DataPoint](/docs/herramientas-low-code-scripting/referencia-de-objetos-disponibles-para-scripting/datapoint) que representa el estado actual del endpoint. Si aún no se ha establecido el estado actual del endpoint, el valor devuelto es null.
**Ejemplo 1**
Este ejemplo muestra la temperatura actual en un endpoint.
```javascript
env.log(myDevice.endpoints.byIndex(0).getCurrentState().value);
```
\### updateTemperatureSensorStatus(temperature \[, utcDateTime]) El método updateTemperatureSensorStatus() permite actualizar el valor de un sensor de temperatura, opcionalmente indicando la fecha y hora de la actualización.
**Parámetros**
* **temperature** (double): este parámetro indica la temperatura medida, en grados Celsius.
* **utcDateTime** (date, opcional): este parámetro indica la fecha y hora UTC de la muestra. Si se omite el parámetro, se asumirá la fecha y hora actual.
**Ejemplo 1**
Este ejemplo muestra cómo informar una temperatura de 32 grados Celsius en el primer endpoint de un dispositivo.
```javascript
myDevice.endpoints.byIndex(0).updateTemperatureSensorStatus(32);
```
\### updateHumiditySensorStatus(humidity \[, utcDateTime]) El método updateHumiditySensorStatus() permite actualizar el valor de un sensor de humedad, opcionalmente indicando la fecha y hora de la actualización.
**Parámetros**
* **humidity** (double): este parámetro indica la humedad medida, en porcentaje.
* **utcDateTime** (date, opcional): este parámetro indica la fecha y hora UTC de la muestra. Si se omite el parámetro, se asumirá la fecha y hora actual.
**Ejemplo 1**
Este ejemplo muestra cómo informar una humedad del 47% en el primer endpoint de un dispositivo.
```javascript
myDevice.endpoints.byIndex(0).updateHumiditySensorStatus(47);
```
\### updateLightSensorStatus(lightIntensity \[, utcDateTime]) El método updateLightSensorStatus() permite actualizar el valor de un sensor de iluminación, opcionalmente indicando la fecha y hora de la actualización.
**Parámetros**
* **lightIntensity** (double): este parámetro indica la intensidad luminosa medida, expresada en lux.
* **utcDateTime** (date, opcional): este parámetro indica la fecha y hora UTC de la muestra. Si se omite el parámetro, se asumirá la fecha y hora actual.
**Ejemplo 1**
Este ejemplo muestra cómo informar una intensidad luminosa de 7550 lux en el primer endpoint de un dispositivo.
```javascript
myDevice.endpoints.byIndex(0).updateLightSensorStatus(7550);
```
\### updateWeightSensorStatus(weightGrams \[, utcDateTime]) El método updateWeightSensorStatus() permite actualizar el valor de un sensor de peso, opcionalmente indicando la fecha y hora de la actualización.
**Parámetros**
* **weightGrams** (double): este parámetro indica el peso medido, en gramos.
* **utcDateTime** (date, opcional): este parámetro indica la fecha y hora UTC de la muestra. Si se omite el parámetro, se asumirá la fecha y hora actual.
**Ejemplo 1**
Este ejemplo muestra cómo informar un peso de 72.5 kg en el primer endpoint de un dispositivo.
```javascript
myDevice.endpoints.byIndex(0).updateWeightSensorStatus(72500);
```
\### updateVolumeSensorStatus(volumeLiters \[, utcDateTime]) El método updateVolumeSensorStatus() permite actualizar el valor de un sensor de volumen, opcionalmente indicando la fecha y hora de la actualización.
**Parámetros**
* **volumeLiters** (double): este parámetro indica el volumen medido, en litros.
* **utcDateTime** (date, opcional): este parámetro indica la fecha y hora UTC de la muestra. Si se omite el parámetro, se asumirá la fecha y hora actual.
**Ejemplo 1**
Este ejemplo muestra cómo informar un volumen de 15.000 litros en el primer endpoint de un dispositivo.
```javascript
myDevice.endpoints.byIndex(0).updateVolumeSensorStatus(15000);
```
\### updatePressureSensorStatus(pressurePascals \[, utcDateTime]) El método updatePressureSensorStatus() permite actualizar el valor de un sensor de volumen, opcionalmente indicando la fecha y hora de la actualización.
**Parámetros**
* **pressurePascals** (double): este parámetro indica la presión medida, en Pascales.
* **utcDateTime** (date, opcional): este parámetro indica la fecha y hora UTC de la muestra. Si se omite el parámetro, se asumirá la fecha y hora actual.
**Ejemplo 1**
Este ejemplo muestra cómo informar una presión de 1013 hectopascales (101300 pascales) en el primer endpoint de un dispositivo.
```javascript
myDevice.endpoints.byIndex(0).updatePressureSensorStatus(101300);
```
\### updateIASSensorStatus(state \[, utcDateTime]) El método updateIASSensorStatus() permite actualizar el estado de un sensor IAS, opcionalmente indicando la fecha y hora de la actualización.
**Parámetros**
* **state** (int): este parámetro indica el estado del sensor, entre los siguientes:
* **iasSensorState.Unknown (0)**: Desconocido. No se conoce el estado del sensor.
* **iasSensorState.idle (1)**: Inactivo. El sensor no registra actividad.
* **iasSensorState.active (2)**: Activo. El sensor registra actividad.
* **iasSensorState.cleaning (3)**: En limpieza. El espacio asociado al sensor está siendo limpiado.
* **iasSensorState.cleaningNeeded (4)**: Necesita limpieza. El espacio asociado al sensor necesita limpieza.
* **iasSensorState.testMode (5)**: En modo test. El sensor está actualmente en modo de prueba.
* **iasSensorState.tampered (6)**: El sensor ha sido manipulado y puede no estar funcionando correctamente.
* **iasSensorState.maintenanceNeeded (7)**: El sensor requiere mantenimiento y puede no estar funcionando correctamente.
* **iasSensorState.entering (8)**: El sensor detecta que un vehículo está entrando a la plaza de estacionamiento.
* **iasSensorState.leaving(9)**: El sensor detecta que un vehículo está saliendo de la plaza de estacionamiento.
* **iasSensorState.violation(10)**: El sensor informa que la plaza de estacionamiento se encuentra en estado de infracción.
* **utcDateTime** (date, opcional): este parámetro indica la fecha y hora UTC de la muestra. Si se omite el parámetro, se asumirá la fecha y hora actual.
**Ejemplo 1**
Este ejemplo muestra cómo informar el estado inactivo en el primer endpoint de un dispositivo.
```javascript
myDevice.endpoints.byIndex(0).updateIASSensorStatus(1);
```
\### updateVoltageSensorStatus(voltageVolts \[, utcDateTime]) El método updateVoltageSensorStatus() permite actualizar el estado de un sensor de voltaje, opcionalmente indicando la fecha y hora de la actualización.
**Parámetros**
* **voltageVolts** (double): este parámetro indica el voltaje medido, en Volts.
* **utcDateTime** (date, opcional): este parámetro indica la fecha y hora UTC de la muestra. Si se omite el parámetro, se asumirá la fecha y hora actual.
**Ejemplo 1**
Este ejemplo muestra cómo informar una medición de 235V en el primer endpoint de un dispositivo.
```javascript
myDevice.endpoints.byIndex(0).updateVoltageSensorStatus(235);
```
\### updateCurrentSensorStatus(currentAmps \[, utcDateTime]) El método updateCurrentSensorStatus() permite actualizar el estado de un sensor de voltaje, opcionalmente indicando la fecha y hora de la actualización.
**Parámetros**
* **currentAmps** (double): este parámetro indica la corrriente medida, en Amperes.
* **utcDateTime** (date, opcional): este parámetro indica la fecha y hora UTC de la muestra. Si se omite el parámetro, se asumirá la fecha y hora actual.
**Ejemplo 1**
Este ejemplo muestra cómo informar una medición de 19.5A en el primer endpoint de un dispositivo.
```javascript
myDevice.endpoints.byIndex(0).updateCurrentSensorStatus(19.5);
```
\### updateActivePowerSensorStatus(activePowerWatts \[, utcDateTime]) El método updateActivePowerSensorStatus() permite actualizar el estado de un sensor de potencia activa, opcionalmente indicando la fecha y hora de la actualización.
**Parámetros**
* **activePowerWatts** (double): este parámetro indica la potencia activa medida, en Watts.
* **utcDateTime** (date, opcional): este parámetro indica la fecha y hora UTC de la muestra. Si se omite el parámetro, se asumirá la fecha y hora actual.
**Ejemplo 1**
Este ejemplo muestra cómo informar una medición de 1250W en el primer endpoint de un dispositivo.
```javascript
myDevice.endpoints.byIndex(0).updateActivePowerSensorStatus(1250);
```
\### updateReactivePowerSensorStatus(reactivePowerVAR \[, utcDateTime]) El método updateReactivePowerSensorStatus() permite actualizar el estado de un sensor de potencia activa, opcionalmente indicando la fecha y hora de la actualización.
**Parámetros**
* **reactivePowerVAR** (double): este parámetro indica la potencia reactiva medida, en Volt-Ampere-Reactivo (VAR).
* **utcDateTime** (date, opcional): este parámetro indica la fecha y hora UTC de la muestra. Si se omite el parámetro, se asumirá la fecha y hora actual.
**Ejemplo 1**
Este ejemplo muestra cómo informar una medición de 750VAR en el primer endpoint de un dispositivo.
```javascript
myDevice.endpoints.byIndex(0).updateReactivePowerSensorStatus(750);
```
\### updateApparentPowerSensorStatus(apparentPowerVA \[, utcDateTime]) El método updateApparentPowerSensorStatus() permite actualizar el estado de un sensor de potencia aparente, opcionalmente indicando la fecha y hora de la actualización.
**Parámetros**
* **apparentPowerVA** (double): este parámetro indica la potencia aparente medida, en Volt-Ampere (VA).
* **utcDateTime** (date, opcional): este parámetro indica la fecha y hora UTC de la muestra. Si se omite el parámetro, se asumirá la fecha y hora actual.
**Ejemplo 1**
Este ejemplo muestra cómo informar una medición de 1300VA en el primer endpoint de un dispositivo.
```javascript
myDevice.endpoints.byIndex(0).updateApparentPowerSensorStatus(1300);
```
\### updateCosPhiSensorStatus(cosPhi \[, utcDateTime]) El método updateCosPhiSensorStatus() permite actualizar el estado de un sensor de coseno fi (factor de potencia), opcionalmente indicando la fecha y hora de la actualización.
**Parámetros**
* **cosPhi** (double): este parámetro indica el coseno fi medido.
* **utcDateTime** (date, opcional): este parámetro indica la fecha y hora UTC de la muestra. Si se omite el parámetro, se asumirá la fecha y hora actual.
**Ejemplo 1**
Este ejemplo muestra cómo informar una medición de coseno fi de 0.98 en el primer endpoint de un dispositivo.
```javascript
myDevice.endpoints.byIndex(0).updateCosPhiSensorStatus(0.98);
```
\### updateFrequencySensorStatus(frequencyHz \[, utcDateTime]) El método updateFrequencySensorStatus() permite actualizar el estado de un sensor de frecuencia (frecuencímetro), opcionalmente indicando la fecha y hora de la actualización.
**Parámetros**
* **frequencyHz** (double): este parámetro indica la frecuencia medida, en Hz.
* **utcDateTime** (date, opcional): este parámetro indica la fecha y hora UTC de la muestra. Si se omite el parámetro, se asumirá la fecha y hora actual.
**Ejemplo 1**
Este ejemplo muestra cómo informar una medición de frecuencia de 60Hz en el primer endpoint de un dispositivo.
```javascript
myDevice.endpoints.byIndex(0).updateFrequencySensorStatus(60);
```
\### updateGenericSensorStatus(value \[, utcDateTime]) El método updateGenericSensorStatus() permite actualizar el estado de un sensor escalar genérico, opcionalmente indicando la fecha y hora de la actualización.
**Parámetros**
* **value** (double): este parámetro indica el valor medido, en las unidades que se hayan seleccionado para el endpoint.
* **utcDateTime** (date, opcional): este parámetro indica la fecha y hora UTC de la muestra. Si se omite el parámetro, se asumirá la fecha y hora actual.
**Ejemplo 1**
Este ejemplo muestra cómo informar una medición de valor 1234 en el primer endpoint de un dispositivo.
```javascript
myDevice.endpoints.byIndex(0).updateGenericSensorStatus(1234);
```
\### updatePpmConcentrationSensorStatus(value \[, utcDateTime]) El método updatePpmConcentrationSensorStatus() permite actualizar el estado de un sensor de medición de concentración, opcionalmente indicando la fecha y hora de la actualización. Esta función sólo es válida para sensores de concentración expresada como partes por millón (ppm).
**Parámetros**
* **value** (double): este parámetro indica el valor medido, en partes por millón (ppm).
* **utcDateTime** (date, opcional): este parámetro indica la fecha y hora UTC de la muestra. Si se omite el parámetro, se asumirá la fecha y hora actual.
**Ejemplo 1**
Este ejemplo muestra cómo informar una medición de valor 1234 ppm en el primer endpoint de un dispositivo.
```javascript
myDevice.endpoints.byIndex(0).updatePpmConcentrationSensorStatus(1234);
```
\### updateMvConcentrationSensorStatus(value \[, utcDateTime]) El método updateMvConcentrationSensorStatus() permite actualizar el estado de un sensor de medición de concentración, opcionalmente indicando la fecha y hora de la actualización. Esta función sólo es válida para sensores de concentración expresada como relación entre masa y volumen (m/v).
**Parámetros**
* **value** (double): este parámetro indica el valor medido, microgramos por metro cúbico (μg/m³).
* **utcDateTime** (date, opcional): este parámetro indica la fecha y hora UTC de la muestra. Si se omite el parámetro, se asumirá la fecha y hora actual.
**Ejemplo 1**
Este ejemplo muestra cómo informar una medición de valor 1234 μg/m³ en el primer endpoint de un dispositivo.
```javascript
myDevice.endpoints.byIndex(0).updateMvConcentrationSensorStatus(1234);
```
\### updateAqiSensorStatus(value \[, utcDateTime]) El método updateAqiSensorStatus() permite actualizar el estado de un sensor de calidad de aire, opcionalmente indicando la fecha y hora de la actualización.
**Parámetros**
* **value** (double): este parámetro indica el valor medido, indicado de acuerdo a la [escala AQI](https://en.wikipedia.org/wiki/Air_quality_index) (0-500).
* **utcDateTime** (date, opcional): este parámetro indica la fecha y hora UTC de la muestra. Si se omite el parámetro, se asumirá la fecha y hora actual.
**Ejemplo 1**
Este ejemplo muestra cómo informar una medición de valor 123 en el primer endpoint de un dispositivo.
```javascript
myDevice.endpoints.byIndex(0).updateAqiSensorStatus(123);
```
\### updateApplianceStatus(turnedOn\[, utcDateTime]) El método updateApplianceStatus() permite actualizar el estado de un endpoint de tipo on-off (appliance), opcionalmente indicando la fecha y hora de la actualización.
**Parámetros**
* **turnedOn** (boolean): este parámetro indica si el endpoint está encendido (true) o apagado (false).
* **utcDateTime** (date, opcional): este parámetro indica la fecha y hora UTC de la actualización. Si se omite el parámetro, se asumirá la fecha y hora actual.
**Ejemplo 1**
Este ejemplo muestra cómo informar que el primer endpoint de un dispositivo está encendido.
```javascript
myDevice.endpoints.byIndex(0).updateApplianceStatus(true);
```
\### updateDimmerStatus(turnedOn, level\[, utcDateTime]) El método updateDimmerStatus() permite actualizar el estado de un endpoint de tipo dimmer, opcionalmente indicando la fecha y hora de la actualización.
**Parámetros**
* **turnedOn** (boolean): este parámetro indica si el endpoint está encendido (true) o apagado (false).
* **level** (int): este parámetro indica el nivel de brillo, entre 1% (mínimo) y 100% (máximo), independientemente de si el dimmer está encendido o apagado.
* **utcDateTime** (date, opcional): este parámetro indica la fecha y hora UTC de la actualización. Si se omite el parámetro, se asumirá la fecha y hora actual.
**Ejemplo 1**
Este ejemplo muestra cómo informar que el primer endpoint de un dispositivo está encendido al 75%.
```javascript
myDevice.endpoints.byIndex(0).updateDimmerStatus(true, 75);
```
\### updateClosureControllerStatus(moving, position\[, utcDateTime]) El método updateApplianceStatus() permite actualizar el estado de un endpoint de tipo cerramiento (cortina, portón motorizado, etc.), opcionalmente indicando la fecha y hora de la actualización.
**Parámetros**
* **moving** (boolean): este parámetro indica si el cerramiento está actualmente en movimiento (abriendo o cerrando). El valor **true** indica que está en movimiento, mientras que el valor **false** indica que está detenido.
* **position** (int): este parámetro indica la posición actual, desde 0% (cerrado) hasta 100% (abierto).
* **utcDateTime** (date, opcional): este parámetro indica la fecha y hora UTC de la actualización. Si se omite el parámetro, se asumirá la fecha y hora actual.
**Ejemplo 1**
Este ejemplo muestra cómo informar que el primer endpoint de un dispositivo está detenido en la posición “abierto”.
```javascript
myDevice.endpoints.byIndex(0).updateClosureControllerStatus(false, 100);
```
\### updateHVACStatus(mode, fanMode, setpoint, ambientTemperature\[, utcDateTime]) El método updateHVACStatus() permite actualizar el estado de un dispositivo HVAC, tal como un termostato, opcionalmente indicando la fecha y hora de la actualización.
**Parámetros**
* **mode** (enum): modo actual del dispositivo:
* **thermostatMode.off = 1**: el dispositivo está apagado.
* **thermostatMode.auto = 2**: el dispositivo está encendido en modo automático.
* **thermostatMode.heat = 3**: el dispositivo está encendido en modo calor.
* **thermostatMode.cool = 4**: el dispositivo está encendido en modo frío.
* **thermostatMode.dry = 5**: el dispositivo está encendido en modo deshumidificación.
* **thermostatMode.fan = 6**: el dispositivo está encendido en modo ventilador.
* **fanMode** (enum): indica el modo actual del ventilador:
* **thermostatFanMode.auto = 1**: el ventilador está en modo automático.
* **thermostatFanMode.low = 2**: el ventilador está en velocidad baja.
* **thermostatFanMode.mid = 3**: el ventilador está en velocidad media.
* **thermostatFanMode.high = 4**: el ventilador está en velocidad alta.
* **setpoint** (number): indica el valor de temperatura deseado, en grados Celsius.
* **ambientTemperature** (number): indica el valor de la temperatura ambiente, en grados Celsius.
* **utcDateTime** (date, opcional): este parámetro indica la fecha y hora UTC de la actualización. Si se omite el parámetro, se asumirá la fecha y hora actual.
**Ejemplo 1**
Este ejemplo muestra cómo informar que el primer endpoint de un dispositivo está encendido en modo frío, con el ventilador en velocidad automática, una temperatura deseada de 25 grados Celsius, y una temperatura ambiente de 26 grados Celsius.
```javascript
myDevice.endpoints.byIndex(0).updateHVACStatus(thermostatMode.cool, thermostatFanMode.auto, 25, 27);
```
\### updateLocationTrackerStatus(latitude, longitude \[, altitude, flags, utcDateTime]) El método updateLocationTrackerStatus() permite actualizar el estado de un rastreador de ubicación, opcionalmente indicando la fecha y hora de la actualización.
**Parámetros**
* **latitude** (double): Indica la latitud. El valor debe ser entre -90 y 90. El separador para los decimales es el punto
* **longitude** (double): Indica la longitud. El valor debe ser entre -180 y 180. El separador para los decimales es el punto
* **altitude** (double): Indica la altura. Valor numérico. El separador para los decimales es el punto
* **flags** (int, opcional): Indica información extra para la posición. Es un valor entero que representa una suma bit a bit. Los estados disponibles son:
* **locationTrackerFlags.none (0):** Nada en especial
* **locationTrackerFlags.moving (1):** La posición del sensor está cambiando
* **locationTrackerFlags.noPosition (2):** El sensor no puede adquirir la posición
* **locationTrackerFlags.malfunctioning (4):** El sensor no funciona correctamente. La posición informada puede ser incorrecta
* **locationTrackerFlags.lowPrecision (8):** La posición informada tiene baja precisión
Los valores pueden combinarse a través de la operación OR. Por ejemplo, para indicar que la posición informada tiene baja precisión, y la posición está cambiando, debe utilizarse (**8 OR 1**) = **9**.
* **utcDateTime** (date, opcional): este parámetro indica la fecha y hora UTC de la muestra. Si se omite el parámetro, se asumirá la fecha y hora actual.
**Ejemplo 1**
Este ejemplo muestra cómo informar una ubicación con latitud -13.9957594 y longitud 48.933938 en el primer endpoint de un dispositivo.
```javascript
myDevice.endpoints.byIndex(0).updateLocationTrackerStatus(-13.9957594, 48.933938);
```
**Ejemplo 2**
Este ejemplo muestra cómo informar una ubicación con latitud -13.9957594, longitud 48.933938 y altura 123 en el primer endpoint de un dispositivo.
```javascript
myDevice.endpoints.byIndex(0).updateLocationTrackerStatus(-13.9957594, 48.933938, 123);
```
**Ejemplo 3**
Este ejemplo muestra cómo informar una ubicación con latitud -13.9957594, longitud 48.933938, altura 123 y flag 1 (La posición del sensor está cambiando) en el primer endpoint de un dispositivo.
```javascript
myDevice.endpoints.byIndex(0).updateLocationTrackerStatus(-13.9957594, 48.933938, 123, locationTrackerFlags.moving);
```
**Ejemplo 4**
Este ejemplo muestra cómo informar una ubicación con latitud -13.9957594, longitud 48.933938 y un timestamp específico en el primer endpoint de un dispositivo.
```javascript
myDevice.endpoints.byIndex(0).updateLocationTrackerStatus(-13.9957594, 48.933938, 0, locationTrackerFlags.none, '2021-02-23T14:55:03');
```
\### updateEnergySensorValueSummation(activeEnergySummationWh, reactiveEnergySummationVARh \[, utcDateTime]) El método updateEnergySensorValueSummation() permite actualizar la sumatoria de energía activa y reactiva de un sensor de energía, opcionalmente indicando la fecha y hora de la actualización.
**Parámetros**
* **activeEnergySummationWh** (double): Indica el valor actual de la sumatoria de energía activa, expresada en Wh.
* **reactiveEnergySummationVARh** (double): Indica el valor actual de la sumatoria de energía reactiva, expresada en VARh.
* **utcDateTime** (date, opcional): este parámetro indica la fecha y hora UTC de la muestra. Si se omite el parámetro, se asumirá la fecha y hora actual.
**Ejemplo 1**
Este ejemplo muestra cómo informar un acumulado de energía activa y reactiva de 14650 Wh y 1280 VARh respectivamente, en el primer endpoint de un dispositivo.
```javascript
myDevice.endpoints.byIndex(0).updateEnergySensorValueSummation(14650, 1280);
```
\### updateEnergySensorValueUnits(activeEnergyWh, reactiveEnergyVARh \[, utcDateTime]) El método updateEnergySensorValueUnits() permite agregar un valor de consumo de energía activa y reactiva de un sensor de energía, opcionalmente indicando la fecha y hora de la actualización.
**Parámetros**
* **activeEnergyWh** (double): indica la cantidad de energía activa consumida, expresada en Wh. Este valor se sumará al consumo de energía activa registrado anteriormente.
* **reactiveEnergyVARh** (double): Indica la cantidad de energía reactiva consumida, expresada en VARh. Este valor se sumará al consumo de energía reactiva registrado anteriormente.
* **utcDateTime** (date, opcional): este parámetro indica la fecha y hora UTC de la muestra. Si se omite el parámetro, se asumirá la fecha y hora actual.
**Ejemplo 1**
Este ejemplo muestra cómo informar un consumo de 160 Wh y 22 VARh respectivamente, en el primer endpoint de un dispositivo.
```javascript
myDevice.endpoints.byIndex(0).updateEnergySensorValueUnits(160, 22);
```
\### updateFlowSensorValueSummation(summationValue, \[, utcDateTime]) El método updateFlowSensorValueSummation() permite actualizar la sumatoria de flujo de un sensor de flujo, sensor de flujo genérico, o sensor de flujo de personas, opcionalmente indicando la fecha y hora de la actualización.
**Parámetros**
* **summationValue** (double): Indica el valor actual de la sumatoria de flujo.
* Para los sensores de flujo, el valor indicado debe estar expresado en litros.
* Para los sensores de flujo genéricos, el valor indicado debe estar expresado en la unidad asociada a la variable elegida para el sensor.
* Para los sensores de flujo de personas, el valor está indicado en personas.
* **utcDateTime** (date, opcional): este parámetro indica la fecha y hora UTC de la muestra. Si se omite el parámetro, se asumirá la fecha y hora actual.
**Ejemplo 1**
Este ejemplo muestra cómo informar un acumulado de flujo de 14650 litros en el primer endpoint de un dispositivo.
```javascript
myDevice.endpoints.byIndex(0).updateFlowSensorValueSummation(14650);
```
\### updateFlowSensorValueUnits(value, \[, utcDateTime]) El método updateFlowSensorValueUnits() permite agregar un valor al flujo registrado por un sensor de flujo, sensor de flujo genérico, o sensor de flujo de personas, opcionalmente indicando la fecha y hora de la actualización.
**Parámetros**
* value (double): indica el valor de flujo registrado. Este valor se sumará al valor registrado anteriormente.
* Para los sensores de flujo, el valor indicado debe estar expresado en litros.
* Para los sensores de flujo genéricos, el valor indicado debe estar expresado en la unidad asociada a la variable elegida para el sensor.
* Para los sensores de flujo de personas, el valor está indicado en personas.
* **utcDateTime** (date, opcional): este parámetro indica la fecha y hora UTC de la muestra. Si se omite el parámetro, se asumirá la fecha y hora actual.
**Ejemplo 1**
Este ejemplo muestra cómo informar un flujo de 182 litros en el primer endpoint de un dispositivo.
```javascript
myDevice.endpoints.byIndex(0).updateFlowSensorValueUnits(182);
```
\### updateTextContainerStatus(text, \[, utcDateTime]) El método updateTextContainerStatus() permite agregar texto hasta 255 caracteres de longitud
**Parámetros**
* **text** : Indica el texto que se desea agregar
* **utcDateTime** (date, opcional): este parámetro indica la fecha y hora UTC de la muestra. Si se omite el parámetro, se asumirá la fecha y hora actual.
**Ejemplo 1**
Este ejemplo muestra cómo agregar texto
```javascript
myDevice.endpoints.byIndex(0).updateTextContainerStatus("Sample text for text container endpoint");
```
\### uploadCameraSnapshot(base64Content, fileType, \[, utcDateTime]) El método uploadCameraSnapshot() permite almacenar una imagen obtenida de una cámara.
**Parámetros**
* **base64Content**: es el texto, en formato base/64, correspondiente al contenido binario de la imagen.
* **fileType**: indica el tipo de imagen. Los valores aceptados son “jpg” y “png”.
* **utcDateTime** (date, opcional): este parámetro indica la fecha y hora UTC en que se tomó la imagen. Si se omite el parámetro, se asumirá la fecha y hora actual.
**Ejemplo 1**
Este ejemplo muestra cómo agregar texto
```javascript
myDevice.endpoints.byIndex(0).uploadCameraSnapshot("VGhpcyBpcyBzb21lIHRleHQ....[more text].....", "jpg");
```
# Compartir Dashboard - App Mobile
El usuario podrá mediante el icono correspondiente compartir el Dashboard.
> *Cuando se ingrese al Dashboard desde la **Lista de Dashboards** y se requiera editarlo, la opción de Compartir no estará habilitada hasta cerrar el modo de edición.*
**1- Compartir Dashboard:** Seleccionar la opción Compartir Dashboard

esto abre el mensaje indicando que se genera un link único que puede ser accedido sin necesidad de credenciales. Y una descripción opcional sobre el mismo.

Una vez presionado el botón de Obtener Enlace, se genera un link de acceso al dashboard que desea compartir.
El mismo puede abrirse y visualizarse en un browser sin necesidad de tener acceso a la plataforma.\
**2- Compartir Dashboard - Mobile:** Seleccionar la opción Compartir Dashboard\

esto abre el mensaje indicando que se genera un link único que puede ser accedido sin necesidad de credenciales. Y una descripción opcional sobre el mismo.

para tenerlo disponible en la versión mobile, se debe marcar la opción ‘*Disponible para la aplicación móvil*’
Una vez presionado el botón de Obtener Enlace, se genera un link de acceso al dashboard que desea compartir.
El mismo puede abrirse y visualizarse en un browser sin necesidad de tener acceso a la plataforma, así como también en un dispositivo móvil
3- **Acceso a los links compartidos**\
Se puede acceder a gestionar a los links compartidos. Para ello, se accede a través del manager, con los permisos indicados. Y en la sección Seguridad > Enlaces Compartidos

una vez allí se visualizan todos los enlaces previamente compartidos con la información de :\
Descripción, Instalación, link, usuario que compartió, fecha de creación y de último uso y fecha de expiración.

y a través del menú contextual, se puede o bien abrir el enlace previamente creado o bien expirarlo, contando con los permisos para realizar esta acción.
# Compartir Dashboard
El usuario podrá mediante el icono correspondiente compartir el Dashboard y/o descargarlo en dos formatos.
> Cuando se ingrese al Dashboard desde la ***Lista de Dashboards*** y se requiera editarlo, la opcion de Compartir no estará habilitada hasta cerrar el modo de edición.
**1- Compartir Dashboard:** Al seleccionar el botón de *Get Link* el usuario generara un link de acceso al dashboard que desea compartir. El mismo puede abrirse y visualizarse en un browser sin necesidad de tener acceso a la plataforma.


**2- Exportar PDF:** Aquí el usuario podrá descargar el dashboard en formato Portable Document Format (PDF) y de acuerdo al filtro aplicado


**3- Exportar PNG:** El podrá descargar el dashboard en formato Portable Network Graphic (PNG) y de acuerdo al filtro aplicado.


# Metricas
Una métrica es una medida cuantitativa que se utiliza para evaluar y monitorear el rendimiento de un sistema o dispositivo IoT en tiempo real. Las métricas se utilizan para recopilar datos que se pueden analizar para obtener información valiosa sobre el comportamiento y la eficacia del dispositivo IoT.
En un sistema de monitoreo ambiental, las métricas podrían incluir la temperatura, la humedad y la calidad del aire. En un dispositivo de seguimiento de activos, las métricas podrían incluir la ubicación, la velocidad y la dirección del objeto en tiempo real. Estas métricas se utilizan para medir el rendimiento del dispositivo y proporcionar información valiosa que se puede utilizar para mejorar su eficiencia y efectividad.
# Widgets
La plataforma de Cloud Studio cuenta con una serie de widgets específicos para el monitoreo de sucursales, consumo de energía, históricos de potencia, consumo, datos del tiempo, etc., para su uso en dashboards customizables por el usuario final.


* Alarmas activas (Muestra un gráfico de torta con la distribución de los tipos de alarma actualmente activos)
* Consumo de energía pasado y proyectado (Muestra objetivos y consumo de energía pasados, así como una proyección de consumo y objetivos para los próximos días)
* Consumo de energía por categoría (Muestra el consumo de energía para las categorías seleccionadas)
* Consumo de energía por fase (Gráfico de torta mostrando el consumo de energía por fase)
* Consumo diario de energía por categoría (Muestra el consumo diario de energía para las categorías seleccionadas)
* Consumo diario por fase (Muestra el consumo diario por fase, para las categorías seleccionadas)
* Costo de energía por categoría (Muestra el costo de energía para las categorías seleccionadas)
* Costos de energía pasados y proyectados (Muestra objetivos y costos de energía pasados, así como una proyección de costos y objetivos para los próximos días)
* Estado del tiempo (Muestra el estado del tiempo en la instalación actual)
* Factor de potencia diario (Muestra la evolución diaria del factor de potencia)
* Infraestructura (Muestra la disponibilidad actual de la infraestructura)
* Mapa de la instalación (Muestra un mapa conteniendo la ubicación de la instalación actual)
* Objetivos de consumo de energía (Muestra información de consumo de energía en relación con los objetivos definidos)
* Potencia máxima diaria (Muestra la máxima potencia diaria utilizada en un período de 15 minutos)
* Potencia media diaria (Muestra la evolución diaria de la potencia utilizada)
* Resumen de la instalación (Muestra información de resumen de la instalación actual)
* Resumen global (Muestra información de resumen de todas las instalaciones)
* Últimos eventos (Muestra una lista con los últimos eventos)
* Instantáneas de la cámara(Muestra las instantáneas tomadas por una cámara)
* Histórico de endpoints (Gráfico de líneas que muestra la variación de un tipo de variable de punto final a lo largo del tiempo)
* Histórico de endpoints comparativo (Gráfico de líneas que muestra la variación comparativa de dos tipos de variables de punto final a lo largo del tiempo)
* Lista de instalaciones (Muestra una lista que contiene la información de las instalaciones)
* Resumen Mundial (Muestra información resumida de todas las instalaciones)
* Infraestructura (Muestra la disponibilidad actual de la infraestructura)
* Últimos Eventos(Muestra la lista que contiene los últimos elementos)
* Galga lineal para variable (Muestra el valor de una variable en tiempo real en formato de gráfico lineal)
* Métrico (Muestra el valor de una variable en tiempo real)
* Ocupación (Muestra la ocupación)
* Texto sin formato (Muestra texto con colores y formato personalizados)
* Calibre redondeado para variable (Muestra el valor de una variable en tiempo real en formato de grafico semicircular)
* Cronología estatal (Línea de tiempo estatal que muestra cómo uno o más puntos finales cambiaron su estado a lo largo del tiempo.)
* Imagen estática(Muestra una imagen estática)
* Indicador lineal vertical para variable (Muestra el valor de una variable en tiempo real en formato de gráfico lineal vertical)
* Vista (Muestra una vista en un widget, diseñado en la sección de vistas)
* Información meteorológica (Muestra la información meteorológica actual en la instalación actual)
**Alarmar Activas:**
El usuario puede utilizar este Widget para armar un gráfico de torta con la distribución de los tipos de alarma actualmente activos.


**Instantáneas de la cámara:**
El usuario puede utilizar este Widget para visualizar las instantáneas tomadas por una cámara.


**Potencia media diaria:**
El usuario puede utilizar este Widget para visualizar la evolución diaria de la potencia utilizada.


**Consumo diario de energía por categoría:**
El usuario puede utilizar este Widget para visualizar el consumo diario de energía para las categorías seleccionadas.

**Consumo diario de energía por fase:**
El usuario puede utilizar este Widget para visualizar la energía diaria utilizada para las categorías seleccionadas


**Potencia máxima diaria:**
El usuario puede utilizar este Widget para visualizar la máxima potencia diaria utilizada en un período de 15 minutos.


**Factor de potencia diario:**
El usuario puede utilizar este Widget para visualizar la evolución diaria del factor de potencia.

**Factor de potencia diario:**
El usuario puede utilizar este Widget para visualizar la evolución diaria del factor de potencia.

**Historial de terminales:**
El usuario puede utilizar este Widget para generar un gráfico de líneas que muestra la variación de un tipo de variable de punto final a lo largo del tiempo.


**Historial de terminales comparativo:**
El usuario puede utilizar este Widget para generar un gráfico de líneas que muestra la variación comparativa de dos tipos de variables de punto final a lo largo del tiempo.


**Objetivos de consumo de energía** **:**
El usuario puede utilizar este Widget para visualizar los datos actuales de consumo de energía en relación con los objetivos definidos.


**Objetivos de consumo de energía** **:**
El usuario puede utilizar este Widget para visualizar el costo de energía para las categorías seleccionadas.


**Consumo de energía por categoría** **:**
El usuario puede utilizar este Widget para visualizar el consumo de energía para las categorías seleccionadas.


**Consumo de energía por fase** **:**
El usuario puede utilizar este Widget para visualizar un gráfico circular que muestra el uso de energía por fase.


**Consumo de energía por fase** **:**
El usuario puede utilizar este Widget para visualizar una lista que contiene la información de las instalaciones.


**Mapa de instalaciones** **:**
El usuario puede utilizar este Widget para visualizar un mapa que contiene la ubicación de la instalación actual.


**Resumen de instalaciones** **:**
El usuario puede utilizar este Widget para visualizar la información resumida de la instalación actual.


**Resumen mundial** **:**
El usuario puede utilizar este Widget para visualizar la información resumida de todas las instalaciones.


**Infraestructura** **:**
El usuario puede utilizar este Widget para visualizar la disponibilidad actual de la infraestructura.


**Últimos eventos** **:**
El usuario puede utilizar este Widget para visualizar una lista que contiene los últimos eventos.


**Galga lineal para variable** **:**
El usuario puede utilizar este Widget para visualizar el valor de una variable en tiempo real en formato de gráfico lineal.


**Métrica** **:**
El usuario puede utilizar este Widget para visualizar el valor de una variable en tiempo real.


**Ocupación** **:**
El usuario puede utilizar este Widget para visualizar la ocupación.


**Costos de energía pasados y proyectados** **:**
El usuario puede utilizar este Widget para visualizar costos y objetivos de energía pasados, y una proyección de costos y objetivos para los próximos días.


**Costos de energía pasado y proyectado:**
El usuario puede utilizar este Widget para visualizar el consumo de energía y los objetivos pasados, y una proyección del consumo y los objetivos para los próximos días.


**Texto sin formato:**
El usuario puede utilizar este Widget para ingresar texto con color y tamaños personalizados.


**Cronología estatal:**
El usuario puede utilizar este Widget para visualizar línea de tiempo estatal que muestra cómo uno o más puntos finales cambiaron su estado a lo largo del tiempo.


**Imagen estática:**
El usuario puede utilizar este Widget para visualizar una imagen estática.


**Indicador lineal vertical para variable:**
El usuario puede utilizar este Widget para visualizar el valor de una variable en tiempo real en formato de gráfico lineal vertical.


**Vistas:**
El usuario puede utilizar este Widget para visualizar una vista en un widget, diseñado en la sección de vistas.


**Información meteorológica:**
El usuario puede utilizar este Widget para visualizar la información meteorológica actual en la instalación actual.


Widgets de dashboard (Monitor) [#widgets-de-dashboard-monitor]
En el monitor se puede configurar el dashboard a necesidad del cliente, utilizando cualquier combinación de los [**widgets disponibles**](/docs/monitor/dashboards/widgets):
**Widget Histórico de Endpoints:**
Gráfico de líneas que muestra la variación de un tipo de variable de punto final a lo largo del tiempo, en gráficos históricos de endpoints, el usuario puede ingresar los valores mínimos y máximos con lo que se representarán los rangos del eje Y de los gráficos, además de poder modificar el nombre de las variables asociadas a los títulos de los ejes Y.
Dashboard

* *El usuario puede editar los valores mínimos y máximos con lo que se representarán los rangos del eje Y de los gráficos.*
!\[Interfaz de usuario gráfica, Texto, Aplicación, Correo electrónico
Descripción generada automáticamente]\(/images/wiki/dashboards/widgets/index/image\_272e.png)
* *El usuario puede modificar los títulos de los ejes Y (en lugar de mostrar los nombres de los tipos de variables).*


* *El usuario puede visualizar los tooltips de los gráficos de históricos*, *los cuales muestran todos los puntos asociados a una posición X.*
!\[Gráfico, Gráfico de líneas
Descripción generada automáticamente]\(/images/wiki/dashboards/widgets/index/image\_c4df.png)
**Widget Histórico de Endpoints Comparativo:**
Gráficos históricos de endpoints, el usuario puede ingresar los valores mínimos y máximos con lo que se representarán los rangos del eje Y de los gráficos, además de poder modificar el nombre de las variables asociadas a los títulos de los ejes Y.

*El usuario puede editar los valores mínimos y máximos con lo que se representarán los rangos del eje Y de los gráficos.*

*El usuario puede modificar los títulos de los ejes Y (en lugar de mostrar los nombres de los tipos de variables).*


*El usuario puede visualizar los tooltips de los gráficos de históricos*, *los cuales muestran todos los puntos asociados a una posición X.*

# Títulos dinámicos de widgets
Los widgets con títulos dinámicos permiten personalizar la información mostrada en el dashboard mediante el uso de variables como `**{facility_desc}**`, `**{device_desc}**`, y `**{endpoint_desc}**`. Para utilizarlas, debes incluirlas en el campo de “Título” al crear tu widget y marcar la casilla “Título” para activar esta función.
Para saber cómo crear un Widget y cómo agregarle un título, sugerimos visitar nuestra página [Crear Grupos y Widgets](/docs/monitor/dashboards/crear-grupos-y-widgets).

Las variables introducidas en el título se reemplazan automáticamente por el nombre de la instalación, el dispositivo o el endpoint seleccionado, haciendo que el título cambie de forma autónoma. Esto ayuda a evitar la repetición de información genérica y proporciona un contexto más claro y relevante para los datos mostrados.
| Variable | Descripción |
| ----------------- | ---------------------------------------------------------------------------------------------------------------------------------------------------------------------------------------- |
| \{facility\_desk} | Se sustituye por el nombre de la instalación que el usuario ha seleccionado al iniciar sesión. |
| \{device\_desk} | Se reemplaza por el nombre del dispositivo que se está utilizando en el widget. Si no hay un dispositivo seleccionado, se tomará el dispositivo asociado al endpoint que se esté usando. |
| \{endpoint\_desk} | Se cambia por el nombre del endpoint seleccionado en el widget. Si hay más de un endpoint, se mostrará el primero de la lista por defecto. |
Estas variables ayudan a mostrar información personalizada y relevante en el dashboard de forma limpia y automatizada, recuerda utilizar un Widget compatible con tu variable deseada.
Ejemplo de creación de un widget que utiliza todas las variables disponibles, combinándolas en el título con espacios o caracteres especiales opcionales, como el guion “-” en este caso, para mejorar la legibilidad:

Y como se visualizan dichas variables una vez aplicamos los cambios:

Visualización del widget con títulos dinámicos.
Widgets que soportan esta funcionalidad [#widgets-que-soportan-esta-funcionalidad]
| Tipo de widget | Soporta variable descripción de instalación - \{facility\_desc} | Soporta variable descripción de dispositivo - \{device\_desc} | Soporta variable descripción de endpoint - \{endpoint\_desc} | Notas |
| --------------------------------------- | --------------------------------------------------------------- | ------------------------------------------------------------- | ------------------------------------------------------------ | --------------------------------------------------------------------------------------------------------------------------------------------- |
| Costos de energía pasados y proyectados | SI | NO | NO | |
| Consumo de energía pasado y proyectado | SI | NO | NO | |
| Alarmas activas | SI | NO | NO | |
| Contador de alarmas | SI | NO | NO | |
| Objetivos de consumo de energía | SI | NO | NO | |
| Dispositivo | SI | SI | SI | |
| Histórico de endpoints comparativo | SI | SI | SI | Si en el eje izquierdo no hay endpoints seleccionados, buscará el primer endpoint seleccionado en el eje derecho |
| Histórico de endpoints | SI | SI | SI | |
| Consumo de energía por categoría | SI | NO | NO | |
| Costo de energía por categoría | SI | NO | NO | |
| Consumo diario de energía por categoría | SI | NO | NO | |
| Consumo de energía por fase | SI | NO | NO | |
| Consumo diario por fase | SI | NO | NO | |
| Últimos eventos | SI | NO | NO | |
| Lista de las instalaciones | SI | NO | NO | No se tienen en cuenta las instalaciones seleccionadas en el widget, sino la instalación actual seleccionada por el usuario que inició sesión |
| Mapa de la instalación | SI | NO | NO | No se tienen en cuenta las instalaciones seleccionadas en el widget, sino la instalación actual seleccionada por el usuario que inició sesión |
| Resumen de la instalación | SI | NO | NO | |
| Estado del tiempo | SI | NO | NO | |
| Resumen global | NO | NO | NO | |
| Infraestructura | SI | NO | NO | |
| Potencia máxima diaria | SI | NO | NO | |
| Ocupación | SI | SI | SI | |
| Texto plano | SI | NO | NO | |
| Vista | SI | NO | NO | |
| Factor de potencia diario | SI | NO | NO | |
| Potencia promedio diaria | SI | NO | NO | |
| Contador de alarmas individuales | SI | NO | NO | |
| Snapshots de cámara | SI | SI | SI | |
| Línea de tiempo de estado | SI | SI | SI | |
| Imágen estática | SI | NO | NO | |
| Medidor lineal de variable | SI | SI | SI | |
| Métricas | SI | SI | SI | |
| Medidor redondeado de variable | SI | SI | SI | |
| Medidor lineal vertical de variable | SI | SI | SI | |
# Widget de Dispositivos
El usuario puede utilizar este Widget para visualizar información relevante de un dispositivo en particular, así como también datos de hasta 2 endpoints del mismo.

La información que se puede visualizar - de forma optativa - de acuerdo a la configuración de este Widget, son:
* Imagen: imagen del dispositivo
* Estado: estado del/los ep seleccionado/s
* Modelo de dispositivo
* Nivel de batería.
* *Para este Widget, el tipo de batería del dispositivo que se utiliza es la **primera***
* Versión del firmware
* Localización del dispositivo
* Nivel de señal de RSSI
* Fecha y hora de última actualización

# Elementos de Alarmas

# Elementos de Ocupación

# Elementos de Snapshot

# Endpoint Status Image
El usuario podrá desde la sección de *Vistas* en el panel de *Monitor,* visualizar estados de una variable discreta o *escalar asociada a un endpoint. El elemento imagen de estado de endpoint* mostrará la imagen preconfigurada en base al estado que el endpoint ha reportado.
Si el valor ingresado por el usuario no corresponde a los valores de la variable, el Endpoint mostrará la imagen por defecto preconfigurada en la edición del elemento.\
\
> ***Esta funcionalidad soporta un listado de sensores operables que se encuentra disponible*** ***aquí***
* Agregar Elemento Nuevo:
* **Manager >** **Vistas** > Agregar un elemento del tipo **Imagen de estado de en** **Endpoint.**

* Seleccipon de Enpoint & Carga de Imágenes:
* **Solapa de Propiedades** > Seleccionar el EndPoint > Solamente serán seleccionables los EndPoints de tipo: *Sensores IAS (movimiento, ocupación, y sensores binarios),* *Appliances* & *EndPoints que posean asociadas variables de tipo discreta.*\

* Hacer Operable el Endpoint:
* **Solapa de Eventos de clic**, dentro del listado de **Tipos de eventos de clic,** se mostrará una opción denominada **Operar,** la cual permitirá al usuario modificar posteriormente el EndPoint desde *Monitor*
* Esta opción será visible si en la seccion de Seguridad del Endpoint se encuentran seleccionadas las opciones de ***Leer escribir** o **Leer escribir comando***\

* Editar, Clonar o Eliminar Elemento:
* El usuario podrá haciendo clic derecho modificar el tamaño, Editar, Clonar o Eliminar el elemento seleccionado\

* Modificar Valores del Elemento:
* **Panel Monitor >** **Vistas** > **Seleccionar Vista** > El usuario visualizara el o los sensores agregados y pueden ser modificados desde aquí haciendo clic en el elemento de tipo imagen agregado.
**Appliances & ON-OFF devices**


**Cortinas & Control de Cierre**

**Actualizar Dimmer**

**Actualizar Termostato**


* Cuando el nivel de seguridad del sensor es **Medio >** El usuario podrá configurar un *mensaje de alerta* de cracter opconal\
* Cuando el nivel de seguridad del sensor es **Alta >** El usuario podrá:
* Configurar un mensaje de alerta (*Opcional*)
* El usuario deberá el editar el Endpoint ingresar la contraseña para confirmar el nuevo valor.

# Endpoint Status Text
El usuario podrá desde la sección de *Vistas* en el panel de *Monitor,* visualizar estados de una variable discreta o *escalar asociada a un endpoint. El elemento Texto de estado de endpoint* mostrará el valor preconfigurado en base al estado que el endpoint ha reportado.
> ***Esta funcionalidad soporta un listado de sensores operables que se encuentra disponible*** [***aqu***](/docs/monitor/vistas/endpoints-operables)***í***
* Agregar Elemento Nuevo:
* **Manager >** **Vistas** > Agregar un elemento del tipo **Texto de estado de en** **Endpoint.**\

* Seleccipon de Enpoint & Carga de Imágenes:
* **Solapa de Propiedades** > Seleccionar el EndPoint > Solamente serán seleccionables los EndPoints de tipo: *Sensor de Corriente, Sensor de Flujo* & *Sensor de Flujo Genérico*

* Hacer Operable el Endpoint:
* **Solapa de Eventos de clic**, dentro del listado de **Tipos de eventos de clic,** se mostrará una opción denominada **Operar,** la cual permitirá al usuario modificar posteriormente el EndPoint desde *Monitor*
* Esta opción será visible si en la seccion de Seguridad del Endpoint se encuentran seleccionadas las opciones de ***Leer escribir** o **Leer escribir comando***

Definir EndPoint como Operable
* Editar, Clonar o Eliminar Elemento:
* El usuario podrá haciendo clic derecho modificar el tamaño, Editar, Clonar o Eliminar el elemento seleccionado

* Modificar Valores del Elemento:
* Modificar Valores del Elemento:
* **Panel Monitor >** **Vistas** > **Seleccionar Vista** > El usuario visualizara el o los sensores agregados y pueden ser modificados desde aquí haciendo clic en el elemento de tipo texto agregado y “Cambiar Valor”


* **Valor >** Si el tipo de variable del endpoint es ***escalar***, se muestra un input con el valor del estado del endpoint que se desea modificar.\

* Si el tipo de variable del endpoint seleccionado es ***discreta***, se muestra un listado de los estados de dicha variable.\

* **Unidad >** Si el tipo de variable del endpoint es ***escalar***\*\*,\*\* se muestra un listado con las unidades de medida en base a la magnitud que representa el estado del endpoint.\

* Cuando el nivel de seguridad del sensor es **Medio >** El usuario podrá configurar un *mensaje de alerta* de cracter opconal\
* Cuando el nivel de seguridad del sensor es **Alta >** El usuario podrá:
* Configurar un mensaje de alerta (*Opcional*)
* El usuario deberá el editar el Endpoint ingresar la contraseña para confirmar el nuevo valor.

# Imagen
# Elementos
# Texto
El elemento texto permite insertar elemento que contiene un texto fijo y predeterminado, es decir, un texto que es definido por el usuario que no cambiará una vez que haya sido configurado.

# Environment
El objeto environment (env) es el punto de entrada al contexto en el que existen otros objetos que representan entidades de negocio en la plataforma tales como el facility, dispositivos y endpoints para de esta forma poder acceder a sus métodos y propiedades en el desarrollo de scripts de acciones.
Propiedades
| (integer) clientID |
| --------------------------------------------------------------------------------------------------------- |
| La propiedad clientID permite obtener el identificador único de cliente al que que pertenece el facility. |
| Ejemplos |
| let client= env.clientID env.log(client) |
| (object) facility |
| ----------------------------------------------------------------------------------- |
| La propiedad facility retorna un objeto facility, vea facility para más información |
| Ejemplos |
| let facility = env.facility env.log(facility) |
| facility\[] facilities |
| ----------------------------------------------------------------------------------------------- |
| La propiedad facilities retorna un array de objetos facility, vea facility para más información |
| Ejemplos |
| let facilities = env.facilities env.log(facilities ) |
| (integer) facilityID |
| --------------------------------------------------------------------------- |
| La propiedad facilityID permite obtener el identificador único del facility |
| Ejemplos |
| let facilityId = env.facilityID env.log(facilityId) |
| (bool) testMode |
| ----------------------------------------------------------------------------- |
| La propiedad testMode indica si el script esta ejecutando en modo prueba o no |
| Ejemplos |
| let test = env.testMode env.log(test) |
# Facility
Propiedades
| (string) description |
| -------------------------------------------------------------------------------------------------------------- |
| La propiedad description permite obtener la descripción que se haya definido en la configuración del facility. |
| Ejemplos |
| let facilityDescription= env.facility.description env.log(facilityDescription) |
| (object) devices |
| ------------------------------------------------------------------------------------- |
| La propiedad devices retorna un objeto devices, consulte devices para más información |
| Ejemplos |
| let devices= env.facility.devices env.log(devices) |
| (object) endpoints |
| -------------------------------------------------------------------------------------------- |
| La propiedad endpoints retorna un objeto endpoints, consulte endpoints para más información. |
| Ejemplos |
| let endpoints= env.facility.endpoints env.log(endpoints) |
| (integer) facilityID |
| ------------------------------------------------------------------- |
| La propiedad facilityID retorna el identificador único del facility |
| Ejemplos |
| let facilityID= env.facility.facilityID env.log(facilityID) |
# Scripting objects, methods and properties
En estas páginas encontrará la guía de los objetos, sus propiedades y métodos que se encuentran disponibles para el desarrollo de scripts de acciones.
Se recomienda comenzar la lectura desde [aquí](/docs/configuracion-del-cliente/acciones/pasos/scripting-objects-methods-and-properties/environment), cualquier necesidad o consulta sobre el desarrollo de acciones puede solicitar soporte desde [aquí](https://www.cloud.studio/support/) en todo momento.
# Creación Masiva de Dispositivos (Batch)
La funcionalidad de **creación de dispositivos en batch** permite a los usuarios cargar múltiples dispositivos de forma eficiente mediante un archivo CSV. Esta herramienta resulta especialmente útil para instalaciones a gran escala, ya que evita el ingreso manual uno a uno, permitiendo incluso combinar diferentes modelos de dispositivos en un solo archivo.

Archivo de Referencia [#archivo-de-referencia]
Antes de realizar la carga, la plataforma ofrece la descarga de un archivo CSV de ejemplo. Este archivo contiene la estructura y columnas necesarias para facilitar el correcto ingreso de dispositivos. Se genera un archivo de ejemplo para cada modelo de dispositivo registrado, aunque luego se permite incluir dispositivos de diferentes modelos en un mismo archivo.
Cada fila del archivo representa un dispositivo, y cada columna, un atributo. A continuación, se describen los campos requeridos:
**Descripción**: el nombre con el que se identifica al dispositivo\
**Dirección**: el address (dirección lógica) del dispositivo\
**Modelo de dispositivo:** el tipo de dispositivo, creado en la sección de Modelo de Dispositivos, que indica las características del mismo, como por ejemplo: los endpoints, lapsos para ir fuera de línea, etc.\
**Id del modelo de dispositivo**: un identificador unívoco para la identificación del modelo de dispositivo\
**Latitud**: una de las dos coordenadas para geolocalizar el dispositivo (ubicación en relación a la línea del ecuador)\
**Longitud**: una de las dos coordenadas para geolocalizar el dispositivo (orientación este-oeste, relativa dependiendo de los meridianos)\
**Id del ícono**: identificador del ícono de la imagen del dispositivo\
**id del dashboard predeterminado**: identificador del dashboard predeterminado para ese dispositivo\
**id de la vista predeterminada**: identificador de la vista predeterminada para ese dispositivo\
**Interfaz de Comunicación:** nombre con el que se identifica al dispositivo en el Device Gateway
Proceso de Carga [#proceso-de-carga]
Una vez preparado el archivo CSV, puede subirse fácilmente desde la funcionalidad correspondiente, mediante exploración o arrastrando el archivo al área designada.\

Tras seleccionar el archivo y hacer clic en **Siguiente**, se accede a una **vista previa en modo edición** que muestra todos los dispositivos incluidos. En esta etapa:
El sistema valida los datos automáticamente.
Se destacan los errores detectados para facilitar su corrección en línea.
Se permite editar los valores directamente desde la vista previa.
Cuando el archivo no presenta errores y los datos han sido verificados, se puede presionar **Confirmar** para ejecutar la creación masiva.

Confirmación y Visualización [#confirmación-y-visualización]
Finalizado el proceso, el sistema muestra un resumen indicando:
* Qué dispositivos fueron creados exitosamente.
* Cuáles no pudieron crearse (por ejemplo, si ya existían en la instancia).

Al hacer clic en **Guardar**, los nuevos dispositivos se integran al listado general de la instancia correspondiente.

# Dispositivos
Al crear un dispositivo en Gear Studio, es posible elegir su modelo. Gear Studio soporta dos tipos de modelo de dispositivo:
* **Modelos integrados en Gear Studio**. Se trata de modelos nativos, homologados en la plataforma, que son soportados sin necesidad de ninguna integración. Para estos modelos de dispositivo, generalmente sólo es necesario configurar cada dispositivo para que reporte a la plataforma, y la plataforma luego es capaz de recibir y procesar la información automáticamente. Al crear un dispositivo correspondiente a un modelo soportado nativamente, se crearán todos los endpoints necesarios automáticamente.
* **Modelos definidos por el usuario**. Estos modelos se administran desde la página de [modelos de dispositivo](/docs/configuracion-del-cliente/dispositivos-y-endpoints/dispositivos/modelos-de-dispositivo). Los modelos definidos por el usuario se utilizan para crear dispositivos que la plataforma no soporta en forma nativa.
Cuando es necesario crear un dispositivo correspondiente a un modelo definido por el usuario, el modelo debe estar creado previamente, utilizando la página de [modelos de dispositivo](/docs/configuracion-del-cliente/dispositivos-y-endpoints/dispositivos/modelos-de-dispositivo).
Para comenzar con la creación de nuestro dispositivo nos dirigimos al menú lateral y seleccionamos **Dispositivos**. Esta página nos muestra la lista de dispositivos actualmente disponibles en la instalación, y además la lista de endpoints definidos en cada uno de ellos. Si necesita más información sobre la diferencia entre dispositivos y endpoints, recomendamos consultar [esta página](/docs/configuracion-del-cliente/dispositivos-y-endpoints).
Para crear un nuevo dispositivo, elegimos la opción **Agregar**.

A continuación se nos presentan algunos campos a llenar, en este caso la **Descripción** del dispositivo en el cual agregaremos un nombre que podamos identificar, lo nombraremos **Dispositivo customizable**, seguidamente desplegaremos los **Modelos** que nos ofrece la plataforma y seleccionamos el deseado. En nuestro caso seleccionamos nuestro **Modelo de Prueba**.

Además debemos agregar una dirección única para el dispositivo. Recomendamos **utilizar una dirección MAC o una nomenclatura con un mismo patrón** para simplificar su administración, siempre que sea posible.
> Para ciertos modelos de dispositivo, la plataforma validará automáticamente el formato de la dirección. Esto ocurre típicamente en dispositivos nativos para los cuales la plataforma ya conoce que la dirección debe ser una MAC válida.
En nuestro caso como nuestro dispositivo tiene un modelo creado por nosotros, agregamos la que deseamos, luego presionamos **Guardar**.

Hemos vuelto al listado de nuestros dispositivos creados donde podemos ver nuestro dispositivo customizable, el cual posee cero endpoinds, sin embargo tenemos la posibilidad de agregar y eliminar la cantidad que necesitemos.
> Como se mencionó anteriormente, en caso de haber creado un dispositivo correspondiente a un modelo soportado nativamente en la plataforma, se crearán además automáticamente todos los endpoints correspondientes.

Más información [#más-información]
Para más información sobre las diferencias entre dispositivos y endpoints, recomendamos leer [dispositivos y endpoints](/docs/configuracion-del-cliente/dispositivos-y-endpoints). Para aprender a administrar endpoints, leer la sección [endpoints](/docs/configuracion-del-cliente/dispositivos-y-endpoints/endpoints/crear-un-endpoint) en la lista de tutoriales.
# Promoción de Modelo de Dispositivo
En la plataforma, los modelos de dispositivos pueden existir a nivel **local** (específicos de un cliente) o a nivel **global** (disponibles para todos los clientes de la instancia). Esta funcionalidad permite **promover un modelo de dispositivo local a modelo global**, con el objetivo de reutilizar configuraciones entre distintos clientes.
Al promover un modelo local a global:
Se **elimina del listado de modelos locales** del cliente original.
Se **agrega al listado de modelos globales**, accesible por todos los clientes de la instancia.
Pasa a estar **disponible para la creación de nuevos dispositivos** a nivel global.
⚠️ **Importante:** Este proceso es **no reversible**.
¿Cómo promover un modelo de dispositivo? [#cómo-promover-un-modelo-de-dispositivo]
Ir a la sección **Modelos de Dispositivo** del cliente original.
Hacer clic derecho sobre el modelo deseado para abrir el **menú contextual**.
Seleccionar la opción **Promover a Global**.

Confirmación de la acción
Al seleccionar esta opción, se mostrará un mensaje solicitando la confirmación de la acción.\

[#-1]
Resultado de la promoción
* El modelo **dejará de estar disponible** en el listado de modelos locales del cliente.

* Se visualizará en el **listado de Modelos de Dispositivo Globales**.

* Estará disponible para **todos los clientes de la instancia** al momento de crear nuevos dispositivos.
Esta acción puede realizarse sobre **cualquier modelo de dispositivo** perteneciente a un cliente.
# Ejemplo integración Raspberry Pi Pico W
By [Humai](https://ihum.ai/)
**Cloud Studio** cuenta con todos los recursos necesarios para ofrecer una solución integral a los profesionales que trabajan en el ámbito de **IoT**, permitiendo la creación de notificaciones y alarmas, y la elaboración de paneles de visualización para mostrar información en tiempo real sobre el rendimiento y estado de los **dispositivos IoT** que deseen vincularse con ella.
Para ilustrar esto, mostraremos un ejemplo práctico con la placa de desarrollo **Raspberry Pi Pico W (RPico W)**, monitoreando la temperatura interna de la misma y realizando el envío de datos correspondientes a la plataforma **Cloud Studio** a través del protocolo **HTTP**. Esto nos permitirá generar gráficos que representen los valores históricos y actuales de la variable que estamos monitoreando.
Comenzaremos por incluir las líneas de código necesarias para establecer la conexión de la **RPico W** a una red **WiFi**. Para ello, necesitaremos utilizar la librería *network*, que nos proporciona las herramientas necesarias para la configuración y gestión de redes en dispositivos que ejecutan **MicroPython**.
Para organizar los pasos de manera eficiente, definiremos una función llamada *connect()* para manejar la conexión a la red **WiFi**, e implementaremos una estructura de manejo de excepciones *try/except* para gestionar posibles errores.
También incluiremos la configuración del **Convertidor Analógico a Digital** (*ADC*, por sus siglas en inglés, *Analogic-to-Digital Converter*) que se encuentra conectado al sensor de temperatura interno de la **RPico W**, junto con un *factor de conversión* que establece una forma matemática de convertir el número que arroja el **ADC** en una aproximación justa del voltaje real que representa. Posteriormente, agregaremos las líneas de código necesarias para realizar la lectura efectiva del sensor. Tengamos en cuenta que esta configuración debe ajustarse de acuerdo al sensor que estemos utilizando para nuestro proyecto **IoT**.
Esta primera parte del código completo queda entonces de la siguiente manera:
```
import network
from machine import Pin, ADC
from utime import sleep
ssid = 'CAMBIA POR TU SSID'
password = 'TU PASSWORD'
sensor_temp = ADC(4)
factor_conversion = 3.3 / (65535)
def connect():
red = network.WLAN(network.STA_IF)
red.active(True)
red.connect(ssid,password)
while red.isconnected() == False :
print("Estableciendo conexión..")
sleep(1)
ip = red.ifconfig()[0]
print("Conexión Establecida")
print(red.ifconfig())
return ip
try:
ip = connect()
except KeyboardInterrupt:
machine.reset()
```
Por otro lado, en **MicroPython**, la librería *urequests* es utilizada para realizar solicitudes HTTP a través de internet. Esta librería permite a dispositivos que utilizan **MicroPython**, como la **RPico W**, interactuar con servicios web y acceder a recursos remotos, como **Cloud Studio** en este caso.
La librería *urequests* simplifica el proceso de envío de solicitudes GET, POST, PUT o DELETE a URLs específicas, así como el manejo de respuestas y datos recibidos. Al utilizar *urequests*, los dispositivos con recursos limitados pueden aprovechar la funcionalidad de comunicación con servicios web de manera eficiente y efectiva.
Para comenzar, importaremos la librería *urequests* junto con las librerías cargadas anteriormente:
```
import network
import urequests as req
from machine import Pin, ADC
from utime import sleep
```
Ahora procederemos a integrar nuestro código con la plataforma **Cloud Studio**. Para ello, comenzaremos por utilizar dos datos que son fundamentales para interactuar con una **plataforma IoT** y acceder a sus servicios: el *access\_token* y los *endpointID*.
El *access\_token* es una credencial de seguridad que se utiliza para autenticar y autorizar el acceso a la **plataforma IoT**. Por otro lado, los *endpoints* son las direcciones a través de las cuales le podemos enviar solicitudes a la API de la **plataforma IoT**. Estos *endpoints* se representan como URLs específicas que indican la ubicación de un servicio o recurso en la plataforma.
Recordemos que previamente debemos crear nuestro dispositivo en la plataforma (en nuestro caso la **RPico W**) y el/los endpopints correspondientes a la variable que deseamos monitorear (en nuestro caso la temperatura interna).
En este caso, para monitorear la temperatura de nuestra **RPico W**, definiremos lo siguiente:
```
# Esto se obtiene de la wiki de Cloud Studio
temperature_url = 'https://gear.cloud.studio/services/gear/DeviceIntegrationService.svc/UpdateTemperatureSensorStatus'
# Esto se obtiene de la platafroma de Cloud Studio
access_token = 'COLOCA TU ACCESS TOKEN'
internal_temperature = 'COLOCA EL ENDPOINT ID CORRESPONDIENTE AL SENSOR INTERNO DE TEMPERATURA'
```
Ingresa a la información sobre Access tokens [aquí](/docs/configuracion-del-cliente/tokens-de-acceso-access-tokens).
A continuación, crearemos el *payload*, que representa el conjunto de datos que se envían en una solicitud **HTTP**. En este caso, se estructurará de la siguiente manera:
```
payload_temperature = {
'accessToken': access_token, # Se repite en todos los payloads que realicemos
'endpointID': internal_temperature, # Es un numero entero y se modifica de acuerdo al sensor que utilicemos
'temperatureCelsius': 30 # Valor inicial aleatorio
}
```
Y ahora definiremos una función *enviar\_datos()* que realice efectivamente la transmisión de los datos a la plataforma **Cloud Studio**:
```
def enviar_datos(ip):
while True:
# Realizo la lectura correspondiente
lectura = sensor_temp.read_u16() * factor_conversion
temperature = 27 - (lectura - 0.706) / 0.001721
# La agrega el dato al payload
payload_temperature['temperatureCelsius'] = temperature
print('Tomando temperatura del sensor interno', payload_temperature['temperatureCelsius'])
# Le envío al servidor y aguardo la respuesta del servidor (200)
response = req.post(temperature_url, json = payload_temperature)
print('Respuesta del servidor: ', response.status_code)
response.close()
sleep(1)
```
Además, incorporaremos la función *enviar\_datos()* dentro de la estructura de manejo de excepciones *try/except* para gestionar posibles errores.
```
try:
ip = connect()
enviar_datos(ip)
except KeyboardInterrupt:
machine.reset()
```
El código completo queda de la siguiente manera:
```
import network
import urequests as req
from machine import Pin, ADC
from utime import sleep
ssid = 'CAMBIA POR TU SSID'
password = 'TU PASSWORD'
sensor_temp = ADC(4)
factor_conversion = 3.3 / (65535)
# Esto se obtiene de la wiki de Cloud Studio
temperature_url = 'https://gear.cloud.studio/services/gear/DeviceIntegrationService.svc/UpdateTemperatureSensorStatus'
access_token = 'COLOCA TU ACCESS TOKEN'
internal_temperature = 'COLOCA EL ENDPOINT ID CORRESPONDIENTE AL SENSOR INTERNO DE TEMPERATURA'
payload_temperature = {
'accessToken': access_token, # Se repite en todos los payloads que realicemos
'endpointID': internal_temperature, # Es un numero entero y se modifica de acuerdo al sensor que utilicemos
'temperatureCelsius': 30 # Valor inicial aleatorio
}
def connect():
red = network.WLAN(network.STA_IF)
red.active(True)
red.connect(ssid,password)
while red.isconnected() == False :
print("Estableciendo conexión..")
sleep(1)
ip = red.ifconfig()[0]
print("Conexión Establecida")
print(red.ifconfig())
return ip
def enviar_datos(ip):
while True:
# Realizo la lectura correspondiente
lectura = sensor_temp.read_u16() * factor_conversion
temperature = 27 - (lectura - 0.706) / 0.001721
# La agrega el dato al payload
payload_temperature['temperatureCelsius'] = temperature
print('Tomando temperatura del sensor interno', payload_temperature['temperatureCelsius'])
# Le envío al servidor y aguardo la respuesta del servidor (200)
response = req.post(temperature_url, json = payload_temperature)
print('Respuesta del servidor: ', response.status_code)
response.close()
sleep(1)
try:
ip = connect()
enviar_datos(ip)
except KeyboardInterrupt:
machine.reset()
```
Si el dato se envió correctamente, deberíamos ver el código HTTP *200* en la consola de nuestro compilador, como se muestra la **Figura 01**. Esto confirma una comunicación adecuada con la plataforma.

*Figura 01 - Comunicación efectiva de los datos a Cloud Studio*
Concluido esto, ya tenemos todo listo para comenzar a desarrollar nuestros [dashboards](/docs/monitor/dashboards) en **Cloud Studio**.
# Helium
La integración con [**Helium**](https://www.helium.com/) permite a la **Plataforma IoT de Cloud Studio** comunicarse con dispositivos **LoRaWAN** utilizando una variedad de modelos de dispositivos disponibles en el mercado. Este artículo describe los pasos necesarios para completar la integración. \
Requisitos [#requisitos]
Previamente a la integración el usuario debe disponer de:
* Un identificador de instancia. Dependiendo de su suscripción a Gear Studio, los nombres de instancia más comunes son:
* **gear.cloud.studio**. Este nombre de instancia corresponde a una instancia común de Gear Studio, incluida la versión gratuita.
* **xxxx.cloud.studio**. Este nombre de instancia corresponde a instancias Flex en las que el hosting es provisto por Cloud Studio, pero el cliente puede elegir el subdominio empleado (xxxx).
* **Otros**. Para clientes Enterprise que utilicen su propio dominio, se debe utilizar el nombre de dominio elegido.
* Un [Access Token](/docs/configuracion-del-cliente/tokens-de-acceso-access-tokens). Los datos enviados desde [Helium Console](https://console.helium.com/) utilizarán este token de acceso para acceder a la plataforma, y por lo tanto, Helium tendrá los permisos asociados a este access token. Se aconseja crear un nuevo token de acceso específicamente para la integración con Helium, para simplificar el control de seguridad.\
Creación de una conexión con UI [#creación-de-una-conexión-con-ui]
Ingrese a [console.helium.com](https://console.helium.com/) e inicie sesión. A continuación, siga estos pasos:
1. Haga clic en Integraciones -> Agregar Nueva Integración -> HTTP\*\*.\*\*

2. A continuación, se abrirá una nueva página. Deberá actualizar la información dentro de la sección: "Actualice sus detalles de conexión".

Los campos a actualizar son:
* **Endpoint URL (Required):** Se deberá completar con la URL de la instancia adicionando al final “/service/helium”. Por ejemplo para el caso de utilizar la instancia general de Gear.cloud.studio, la URL a completar será [https://gear.cloud.studio/services/helium](https://gear.cloud.studio/services/helium).
* **HTTP Headers (Optional usage for payload interpolation): tiene la variable “Key” la cual se** deberá completar con la palabra “Authorization” y la variable “Value” la cual se deberá completar con la palabra “Bearer” y luego el access token generado anteriormente separado por un espacio.
Finalmente, deberá adicionar el nombre seleccionado para la integración y hacer click en “Agregar la integración”.
3\. Dentro del menú principal, ir a la opción de **Flow**, agregar los dispositivos (previamente conectados), agregar la integración creada en el punto anterior y luego conectar ambos nodos.

4. Podrá verificar el correcto envío de datos presionando sobre el dispositivo y haciendo click en la solapa de “Debug”.

Visualización de información en la plataforma IoT de Cloud Studio [#visualización-de-información-en-la-plataforma-iot-de-cloud-studio]
Conéctese a su instancia de **Gear Studio**, y navega hasta la configuración.
1\. Ingresa a la sección **Dispositivos** y hace clic en el botón **Añadir** para [crear un nuevo Dispositivo](/docs/configuracion-del-cliente/dispositivos-y-endpoints/dispositivos/dispositivos).

2\. Rellene el formulario utilizando el **Modelo de Dispositivo** creado anteriormente (o utilizando los drivers disponibles), seleccione la interfaz de comunicación de “**Helium interface**”, el campo **Dirección** corresponde a su **DevEUI** (encuéntrelo en la lista de dispositivos de **Helium**).

3\. Luego de creado el dispositivo, los datos reportados a la plataforma se mostrarán en la sección **Endpoints** en el menú izquierdo del **Monitor**. Tenga en cuenta que los dispositivos **LoRaWAN** pueden reportar cada 5 a 15 minutos por lo que la visualización dependerá de este intervalo.

4\. Una vez que los dispositivos están conectados correctamente, puede crear un **Dashboard** personalizado utilizando una amplia variedad de **Widgets** para mostrar los datos que están siendo enviados por el dispositivo.

# Integración de dispositivos
Introducción [#introducción]
Esta sección explica cómo integrar dispositivos en la plataforma Gear Studio, es decir:
* Cómo conseguir que los dispositivos envíen datos a la plataforma.
* Cómo conseguir que la plataforma envíe datos hacia los dispositivos, en caso de que los dispositivos lo permitan.
Una vez que un dispositivo está integrado en la plataforma, es posible conseguir lo siguiente:
* Crear dashboards que muestren el estado de los dispositivos en tiempo real.
* Observar la información en una variedad de reportes.
* Crear alertas configurables, con notificaciones vía e-mail y SMS.
* Exportar la información utilizando APIs.
* Monitorear y controlar los dispositivos desde las aplicaciones web de Gear Studio.
* Monitorear y controlar los dispositivos desde iOS y Android utilizando la app de Gear Studio.
**Importante**: la integración de dispositivos no sólo está disponible para dispositivos comerciales, sino que también permite conectar dispositivos hechos a medida basados en [Arduino](https://www.arduino.cc/), [nodeMCU](https://www.nodemcu.com/), [Raspberry Pi](https://www.raspberrypi.org/) y muchos más.
Si no estás seguro de qué es exactamente un “dispositivo”, puedes utiliza esta página para aprender más sobre [dispositivos y endpoints](/docs/configuracion-del-cliente/dispositivos-y-endpoints).
Conceptos principales [#conceptos-principales]
Mensajes de datos [#mensajes-de-datos]
Las integraciones se encargan principalmente de procesar los mensajes recibidos desde los dispositivos de manera que puedan ser procesados por la plataforma, así como de convertir comandos enviados por la plataforma a un formato que los dispositivos puedan procesar. Se consideran dos tipos de mensaje:
* **Uplink**: los mensajes de uplink son todos aquellos enviados desde los dispositivos hacia la plataforma. La plataforma debe ser capaz de procesar los mensajes de uplink para almacenar la información relevante, y procesarla.
* **Downlink**: los mensajes de downlink son aquellos enviados desde la plataforma hacia los dispositivos, típicamente en la forma de comandos. Algunos dispositivos no soportan mensajes de uplink, mientras que otros sólo los soportan para operaciones específicas de configuración.
Muchos dispositivos disponen de una integración nativa en la plataforma Gear Studio, y no es necesario hacer más que conectarlos y configurarlos correctamente. Para los dispositivos no soportados nativamente, la integración consiste en definir cómo se procesan los mensajes de uplink, y cómo se construyen los mensajes de downlink.
Modelos de dispositivo [#modelos-de-dispositivo]
El procesamiento de mensajes de uplink y downlink se realiza por cada [modelo de dispositivo](/docs/configuracion-del-cliente/dispositivos-y-endpoints/dispositivos/modelos-de-dispositivo). Para los dispositivos soportados nativamente, la integración ya está disponible sin necesidad de trabajo adicional.
Cuando un dispositivo no está soportado nativamente, la integración consiste, mayormente, en crear un modelo de dispositivo que lo represente correctamente, e indicar cómo se procesan los mensajes de uplink, y cómo se construyen los mensajes de downlink. En estos casos es posible utilizar scripts que hagan automáticamente todo el trabajo, de modo que esos modelos de dispositivo se comporten de la misma forma que si fueran soportados nativamente.
Primeros pasos [#primeros-pasos]
Creación de un access token [#creación-de-un-access-token]
Para las integraciones que se realicen a través de HTTP, MQTT, o LoRaWAN, es primero necesario crear un token de accesso (access token). [Esta página](/docs/configuracion-del-cliente/tokens-de-acceso-access-tokens) contiene más información sobre la administración de tokens de acceso. Los access tokens permiten controlar el acceso y los permisos utilizados para cualquier operación.
Selección de un modelo de dispositivo [#selección-de-un-modelo-de-dispositivo]
Es importante comprender si el dispositivo a integrar está soportado nativamente en la plataforma. Si es así, no es necesario ningún trabajo adicional. Sin embargo, si el modelo de dispositivo no está soportado, será necesario crear un nuevo modelo de dispositivo. Puede verse [esta referencia](/docs/configuracion-del-cliente/dispositivos-y-endpoints/dispositivos/modelos-de-dispositivo) para más información sobre este tema.
Creación de un dispositivo [#creación-de-un-dispositivo]
Una vez que se cuenta con un access token, y la plataforma contiene el modelo de dispositivo a integrar, sólo resta crearlo en la plataforma, para que pueda conectarse. Esto puede lograrse siguiendo [esta guía](/docs/configuracion-del-cliente/dispositivos-y-endpoints/dispositivos/dispositivos). Si no estás seguro de qué es exactamente un “dispositivo”, puedes utiliza esta página para aprender más sobre [dispositivos y endpoints](/docs/configuracion-del-cliente/dispositivos-y-endpoints).
Si el modelo de dispositivo está soportado nativamente, o bien se ha creado un modelo de dispositivo que lo represente, y un script que defina los endpoints que contiene, no es necesario ningún otro paso. Sin embargo, en algunos casos, puede ser necesario que crees endpoints dentro del dispositivo en forma manual. En ese caso, puedes hacerlo siguiendo [esta guía](/docs/configuracion-del-cliente/dispositivos-y-endpoints/endpoints/crear-un-endpoint). Si no estás seguro de qué es exactamente un “endpoint”, puedes utilizar esta página para aprender más sobre [dispositivos y endpoints](/docs/configuracion-del-cliente/dispositivos-y-endpoints).
Opciones de integración [#opciones-de-integración]
Actualmente, existen tres alternativas de integración, que se detallan a continuación.
| Integración | Referencia / ayuda |
| ----------- | ------------------------------------------------------------------------------------------------------- |
| MQTT | Integración de dispositivos por MQTT |
| HTTP | Integración de dispositivos por HTTP |
| LoRaWAN | Integración a través de The Things StackIntegración a través de ThingParkIntegración a través de Helium |
# Configuración
| Nota: La plataforma Gear Studio soporta nativamente una gran variedad de dispositivos de diferentes tecnologías. Esos dispositivos no requieren el uso de scripting. La información que se presenta en esta página es útil para la configuración de nuevos modelos de dispositivo que no estén soportados nativamente por la plataforma. |
| ---------------------------------------------------------------------------------------------------------------------------------------------------------------------------------------------------------------------------------------------------------------------------------------------------------------------------------------- |
Introducción [#introducción]
Al crear un nuevo modelo para un dispositivo que no está soportado nativamente por la plataforma, es conveniente definir algunos scripts que mejoran la experiencia del usuario, y aportan más funcionalidad. Los scripts serán utilizados luego por todos los dispositivos de ese modelo, lo cual permite además ahorrar mucho trabajo, dado que es algo que hay que hacer por única vez.
Definir un script para la configuración inicial de un modelo de dispositivo, permite:
* Indicar la estructura del dispositivo, es decir, qué endpoints contiene, y de qué tipos y subtipos.
* Definir reglas de validación para la dirección del dispositivo (por ejemplo, verificar que la dirección tenga un formato específico).
* Definir reglas de interfaz de usuario:
* Nombre del campo address, para utilizar un texto más apropiado para el dispositivo (por ejemplo, “DEVEUI” si se trata de un dispositivo LoRaWAN, o “MAC address” si se trata de un dispositivo Wi-Fi).
* Indicar si el dispositivo permite el agregado manual de endpoints.
* Indicar si el dispositivo permite la eliminación manual de endpoints.
* Indicar si se permite editar manualmente datos de los endpoints, tales como el subtipo, etc.
Definición de información básica de un modelo de dispositivo [#definición-de-información-básica-de-un-modelo-de-dispositivo]
Es posible definir aspectos básicos del modelo de dispositivo que son útiles para mejorar la experiencia de usuario. Esta información básica, actualmente, incluye el nombre que se desea utilizar para el campo “address”. Por ejemplo, si se trata de un dispositivo LoRaWAN, será preferible utilizar el nombre “DEVEUI” en lugar de “dirección”, o utilizar “MAC address” si se trata de un dispositivo Wi-Fi.
Para esta configuración básica se utiliza la función `getConfiguration`, como se muestra a continuación.
```javascript
function getConfiguration(config)
{
config.addressLabel = {en: "DevEUI", es: "DevEUI"};
}
```
En el ejemplo anterior se puede observar una función `getConfiguration` que cambia el nombre del campo dirección (addressLabel), para que el usuario final vea en su lugar
La función `getConfiguration` es ejecutada automáticamente por la plataforma cuando es necesario conocer información básica del modelo de dispositivo. La función recibe un único parámetro:
* **config**: este parámetro es de tipo [device model configuration](/docs/herramientas-low-code-scripting/referencia-de-objetos-disponibles-para-scripting/device-model-configuration), y el código de la función debe modificar las propiedades de este objeto como sea necesario. En caso de que no se modifique ninguna propiedad del objeto, se utilizarán los valores por defecto.
Si el script no incluye la función `getConfiguration`, se utilizarán los valores por defecto. Para más información, vea [device model configuration](/docs/herramientas-low-code-scripting/referencia-de-objetos-disponibles-para-scripting/device-model-configuration).
Definición de la estructura del dispositivo [#definición-de-la-estructura-del-dispositivo]
Para mejorar la experiencia de los usuarios al momento de crear un dispositivo, es posible indicar la estructura (es decir, la lista de endpoints) que deberían ser creados al crear un dispositivo de este modelo. Esto simplifica el proceso de creación de dispositivos, minimiza la posibilidad de cometer errores, y habilita una experiencia idéntica a la que puede conseguirse para cualquier modelo de dispositivo soportado nativamente por la plataforma.
Para obtener la lista de endpoints que deben crearse al crear un dispositivo de este modelo, se utiliza la función `getEndpoints`, como se muestra a continuación.
```javascript
function getEndpoints(deviceAddress, endpoints)
{
endpoints.addEndpoint("1", "Temperature sensor", endpointType.TemperatureSensor);
endpoints.addEndpoint("2", "CO2 sensor", endpointType.PpmConcentrationSensor, ppmConcentrationSensorSubType.CarbonDioxide);
}
```
La función `getEndpoints` es ejecutada automáticamente por la plataforma antes de crear un dispositivo utilizando este modelo. La plataforma utilizará luego el valor del parámetro endpoints, para crear los endpoints dentro del dispositivo. La función recibe los siguientes parámetros:
* **deviceAddress**: este parámetro es de tipo string, y contiene la dirección del dispositivo que va a ser creado. El parámetro puede utilizarse, por ejemplo, para incluirlo en la descripción de los endpoints que se vayan a crear dentro del dispositivo.
* **endpoints**: este parámetro es de tipo [endpoint collection configuration](/docs/herramientas-low-code-scripting/referencia-de-objetos-disponibles-para-scripting/endpoint-configuration-collection), y contiene la colección de endpoints en la que el script deberá agregar la lista de endpoints. Este se consigue a través del método `addEndpoint()`, como puede verse en el código de ejemplo. Para cada endpoint agregado a la colección, será posible indicar lo siguiente:
* Una **dirección**, que es única para cada endpoint incluido en el dispositivo, pero que por supuesto puede repetirse en otros endpoints de otros dispositivos)
* Una **descripción**.
* Un **tipo de endpoint**.
* Opcionalmente, un **subtipo** de endpoint, si aplica (ver [aquí](/docs/herramientas-low-code-scripting/referencia-de-objetos-disponibles-para-scripting/endpoint) para más detalles).
Si el script no incluye la función `getEndpoints`, se creará un dispositivo que no contiene endpoints.
Para más información, vea [endpoint configuration](/docs/herramientas-low-code-scripting/referencia-de-objetos-disponibles-para-scripting/endpoint-configuration).
Validación de la dirección de un dispositivo [#validación-de-la-dirección-de-un-dispositivo]
Es posible incluir la función `validateDeviceAddress` en el script de configuración para validar las direcciones de dispositivo que se utilizan para todos los dispositivos de este modelo. Esto permite evitar que los usuarios ingresen direcciones erróneas, así como mostrar un mensaje claro al respecto cuando lo hagan. A continuación, se muestra un ejemplo de implementación de la función `validateDeviceAddress`.
```javascript
function validateDeviceAddress(address, result)
{
address = address.toLowerCase();
result.ok = true;
if (address.length == 12) {
var validchars = ['0', '1', '2', '3', '4', '5', '6', '7', '8', '9', 'a', 'b', '', 'c', 'd', 'e', 'f'];
for (var i = 0; i < address.length; i++) {
if (!validchars.includes(address.charAt(i))) {
result.ok = false;
break;
}
}
}
else {
result.ok = false;
}
if (!result.ok)
result.errorMessage = {
en: "The address must be 12 characters long and only have hexadecimal characters",
es: "La dirección debe tener 12 caracteres y tener sólo caracteres hexadecimales"
};
}
```
La función `validateDeviceAddress` es ejecutada automáticamente por la plataforma antes de crear un dispositivo utilizando este modelo. La función recibe los siguientes parámetros:
* **address**: este parámetro es de tipo string, y contiene la dirección del dispositivo que va a ser creado. La función debe verificar la validez de esta dirección.
* **result**: este parámetro es de tipo [device address validation result](/docs/herramientas-low-code-scripting/referencia-de-objetos-disponibles-para-scripting/device-address-validation-result), y se utiliza para indicar el resultado de la validación. Normalmente, la función modificará las siguientes propiedades:
* **ok**: esta propiedad de tipo booleano indica si la dirección fue verificada correctamente.
* **errorMessage**: esta propiedad, que puede ser de tipo string o [multi language literal](/docs/herramientas-low-code-scripting/referencia-de-objetos-disponibles-para-scripting/multi-language-literal), permite indicar un mensaje de error, en caso de que la validación sea incorrecta. Si se utiliza un objeto [multi language literal](/docs/herramientas-low-code-scripting/referencia-de-objetos-disponibles-para-scripting/multi-language-literal), es posible indicar mensajes en diferentes idiomas.
Si el script no incluye la función `validateDeviceAddress`, se considerará que cualquier dirección es válida.
Para más información, vea [device address validation result](/docs/herramientas-low-code-scripting/referencia-de-objetos-disponibles-para-scripting/device-address-validation-result).
Definir reglas de interfaz de usuario a nivel de dispositivo [#definir-reglas-de-interfaz-de-usuario-a-nivel-de-dispositivo]
Es posible incluir la función `updateDeviceUIRules` en el script de configuración para establecer reglas de interfaz de usuario para los dispositivos de este modelo, indicando, por ejemplo, si pueden crearse endpoints manualmente. A continuación se muestra una función de ejemplo:
```javascript
function updateDeviceUIRules(device, rules)
{
rules.canCreateEndpoints = true;
}
```
La función `updateDeviceUIRules` es ejecutada automáticamente por la plataforma antes de presentar opciones en la pantalla de creación de dispositivos y endpoints. De acuerdo a los valores devueltos por esta función, se presentarán u ocultarán opciones como crear endpoints dentro del dispositivo. La función recibe los siguientes parámetros:
* **device**: este parámetro es de tipo [device](/docs/herramientas-low-code-scripting/referencia-de-objetos-disponibles-para-scripting/device), y contiene los datos del dispositivo sobre el cual se desean conocer las reglas de interfaz de usuario. La función puede utilizar este parámetro en caso de que las reglas dependan de alguna particularidad del dispositivo.
* **rules**: este parámetro es de tipo [device UI rules](/docs/herramientas-low-code-scripting/referencia-de-objetos-disponibles-para-scripting/device-ui-rules), y se utiliza para indicar las reglas. Normalmente, la función modificará las siguientes propiedades:
* **canCreateEndpoints**: esta propiedad de tipo booleano indica si debe permitirse la creación manual de endpoints. Si el valor devuelto es false, la interfaz de usuario de la plataforma no permitirá la creación de endpoints adicionales dentro del dispositivo.
Si el script no incluye la función `updateDeviceUIRules`, se utilizarán las reglas de interfaz de usuario por defecto.
Para más información, vea [device UI rules](/docs/herramientas-low-code-scripting/referencia-de-objetos-disponibles-para-scripting/device-ui-rules).
Definir reglas de interfaz de usuario a nivel de endpoint [#definir-reglas-de-interfaz-de-usuario-a-nivel-de-endpoint]
Es posible incluir la función `updateEndpointUIRules` en el script de configuración para establecer reglas de interfaz de usuario para cada endpoint contenido en un dispositivo de este modelo, indicando, por ejemplo, si el endpoint puede eliminarse, o si es posible cambiar su subtipo. A continuación se muestra una función de ejemplo:
```javascript
function updateEndpointUIRules(endpoint, rules)
{
rules.canDelete = false;
rules.canEditSubtype = (endpoint.address == "2");
}
```
La función `updateEndpointUIRules` es ejecutada automáticamente por la plataforma antes de presentar opciones en la pantalla de creación de dispositivos y endpoints, así como en la pantalla de edición de endpoints. De acuerdo a los valores devueltos por esta función, se presentarán u ocultarán opciones como eliminar endpoints, o modificar su subtipo de endpoint. La función recibe los siguientes parámetros:
* **endpoint**: este parámetro es de tipo [endpoint](/docs/herramientas-low-code-scripting/referencia-de-objetos-disponibles-para-scripting/endpoint), y contiene los datos del endpoint sobre el cual se desean conocer las reglas de interfaz de usuario. La función puede utilizar este parámetro en caso de que las reglas dependan de alguna particularidad del endpoint.
* **rules**: este parámetro es de tipo [endpoint UI rules](/docs/herramientas-low-code-scripting/referencia-de-objetos-disponibles-para-scripting/endpoint-ui-rules), y se utiliza para indicar las reglas. Normalmente, la función modificará las siguientes propiedades:
* **canDelete**: esta propiedad de tipo booleano indica si el endpoint puede eliminarse manualmente.
* **canEditSubtype**: esta propiedad de tipo booleano indica si se permite cambiar el subtipo de endpoint. Esta propiedad sólo es relevante para ciertos tipos de endpoint, como puede verse [aquí](/docs/herramientas-low-code-scripting/referencia-de-objetos-disponibles-para-scripting/endpoint).
* **canEditSummationAutoReset**: esta propiedad de tipo booleano indica si se permite cambiar manualmente el comportamiento de “summation auto reset” del endpoint. Esta propiedad sólo es relevante para endpoints medidores de energía y sensores de flujo.
* **canEditElectricalCircuit**: esta propiedad de tipo booleano indica si se permite cambiar manualmente el circuito eléctrico asociado al endpoint. Esta propiedad sólo es relevante para endpoints relacionados con energía eléctrica (medidores de energía, voltímetros, amperímetros, etc.).
Si el script no incluye la función `updateEndpointUIRules`, se utilizarán las reglas de interfaz de usuario por defecto.
Para más información, vea [endpoint UI rules](/docs/herramientas-low-code-scripting/referencia-de-objetos-disponibles-para-scripting/endpoint-ui-rules).
# Modelos de dispositivo
Introducción [#introducción]
Para facilitar la creación de dispositivos, la plataforma Gear Studio permite crear modelos de dispositivo. Los modelos de dispositivos se utilizan principalmente para describir en forma automática la estructura de cada dispositivo, sus endpoints, sus propiedades básicas, sus reglas de validación de números de serie, entre muchas otras cosas. Una vez que se a ha creado un modelo de dispositivo, pueden crearse tantos dispositivos como sea necesario, de ese mismo modelo. Gear Studio soporta dos tipos de modelo de dispositivo:
* **Modelos integrados en Gear Studio (built-in)**. Se trata de modelos nativos o drivers, homologados en la plataforma, que son soportados sin necesidad de ninguna integración. Para estos modelos de dispositivo, generalmente sólo es necesario configurar cada dispositivo para que reporte a la plataforma, y la plataforma luego es capaz de recibir y procesar la información automáticamente. Al crear un dispositivo correspondiente a un modelo soportado nativamente, se crearán además todos los endpoints necesarios automáticamente.
* **Modelos definidos por el usuario (custom)**. Estos modelos se administran desde la página de modelos de dispositivo, tal como se describe aquí. Los modelos definidos por el usuario se utilizan para crear dispositivos que la plataforma no soporta en forma nativa. Opcionalmente, los modelos de dispositivo custom pueden contener scripts que ayuden a la plataforma a procesar los datos recibidos, como se describe en la siguiente sección de [scripting](/docs/herramientas-low-code-scripting).
Creación de un nuevo modelo de dispositivo [#creación-de-un-nuevo-modelo-de-dispositivo]
Administración de modelos de dispositivo [#administración-de-modelos-de-dispositivo]
Para la creación de un modelo de dispositivo definido por el usuario se utiliza el [Manager](https://gear.cloud.studio/gear/manager/login). Debe elegirse la opción **Modelos de dispositivo**, dentro de la sección **Dispositivos**.
Esta pantalla contiene la lista de todos los modelos de dispositivo custom creados anteriormente, con la posibilidad de editar su configuración, eliminarlos, etc. Para crear un modelo nuevo, debe elegirse la opción “Agregar”.

Para crear un nuevo modelo, es necesario completar cierta información:
* **Descripción**: este campo contiene el nombre descriptivo que usaremos para el nuevo modelo.
* **Código de modelo**: este campo no puede modificarse luego de la creación, y se utiliza para identificar internamente al modelo de dispositivo. Se recomienda utilizar siempre un mismo patrón para los códigos de modelo de dispositivo.
Además es posible definir el **tiempo de espera para offline**. Este campo permite asociar un tiempo máximo de inactividad, de forma que cualquier dispositivo de este modelo sea considerado offline luego de que se cumpla este tiempo sin haber recibido información del dispositivo. En caso de utilizar esta opción, si un dispositivo permanece desconectado de la plataforma durante un tiempo mayor al indicado, la plataforma generará automáticamente una alarma de **dispositivo fuera de línea**. La alarma se cerrará automáticamente cuando el dispositivo transmita cualquier dato a la plataforma.

Una vez creado un dispositivo, es posible editarlo o eliminarlo utilizando la opción “Editar” y “Eliminar”.

Al editar un modelo de dispositivo, es posible además editar y probar el [script de configuración](/docs/configuracion-del-cliente/dispositivos-y-endpoints/dispositivos/modelos-de-dispositivo/configuracion) del modelo, y el [script de conversión de datos](/docs/configuracion-del-cliente/dispositivos-y-endpoints/dispositivos/modelos-de-dispositivo/procesamiento-de-datos).

Para más información sobre los scripts de configuración y conversión de datos, vea la siguiente sobre [scripting](/docs/herramientas-low-code-scripting).
# Procesamiento de Datos
| Nota: La plataforma Gear Studio soporta nativamente una gran variedad de dispositivos de diferentes tecnologías. Esos dispositivos no requieren el uso de scripting. La información que se presenta en esta página es útil para la configuración de nuevos modelos de dispositivo que no estén soportados nativamente por la plataforma. |
| ---------------------------------------------------------------------------------------------------------------------------------------------------------------------------------------------------------------------------------------------------------------------------------------------------------------------------------------- |
Introducción [#introducción]
Como parte de la configuración de un modelo de dispositivo, es posible crear un script para el procesamiento de los datos que se reciben de él a través de MQTT, HTTP, o LoRaWAN. Esto permite:
* Procesar cada payload recibido (**uplink**)
* Actualizar la información de los endpoints asociados al dispositivo, aplicando funciones para convertir los datos en caso de que sea necesario.
* Actualizar información del propio dispositivo, tales como niveles de RSSI, batería, etc., aplicando funciones para convertir los datos en caso de que sea necesario.
* Crear payloads específicos destinados al dispositivo (**downlink**)
* Procesar comandos estándar o customizados definidos en la plataforma Gear, y generar con ellos un payload con el formato esperado por el dispositivo.
Procesamiento de payloads recibidos (uplink) [#procesamiento-de-payloads-recibidos-uplink]
Para procesar cada payload recibido del dispositivo (sin importar si es recibido por HTTP, MQTT, o LoRaWAN), es posible crear una función `parseUplink`, como la que se muestra como ejemplo a continuación. Este ejemplo está escrito asumiendo un sensor de temperatura y humedad que informa la temperatura en el primer byte del payload, la humedad en el segundo byte, y el porcentaje de batería en el tercer byte.
```javascript
function parseUplink(device, payload)
{
// Payload is binary, so it's easier to handle as an array of bytes
var bytes = payload.asBytes();
// Verify payload contains exactly 3 bytes
if (bytes.length != 3)
return;
// Parse and store temperature
var temperatureSensor = device.endpoints.byType(endpointType.temperatureSensor);
if (temperatureSensor != null)
{
var temperature = bytes[0] & 0x7f;
if (bytes[0] & 0x80) // Negative temperature?
temperature -= 128;
temperatureSensor.updateTemperatureSensorStatus(temperature);
}
// Parse and store humidity
var humiditySensor = device.endpoints.byType(endpointType.humiditySensor);
if (humiditySensor != null)
{
var humidity = bytes[1];
humiditySensor.updateHumiditySensorStatus(humidity);
}
// Parse and store battery percentage
var batteryPercentage = bytes[2];
device.updateDeviceBattery({ percentage: batteryPercentage });
}
```
En el ejemplo anterior se puede observar una función `parseUplink` que procesa un payload de 3 bytes, y luego utiliza esa información para actualizar el estado de los endpoints del dispositivo (sensor de temperatura y sensor de humedad), así como el nivel de batería del dispositivo.
La función `parseUplink` es ejecutada automáticamente por la plataforma cada vez que se recibe un payload para el dispositivo. La función recibe los siguientes parámetros:
* **device**: este parámetro es de tipo [device](/docs/herramientas-low-code-scripting/referencia-de-objetos-disponibles-para-scripting/device), y contiene toda la información del dispositivo que envió el payload, incluyendo la lista de endpoints asociados. Para más información, puede verse la referencia del objeto [device](/docs/herramientas-low-code-scripting/referencia-de-objetos-disponibles-para-scripting/device).
* **payload**: este parámetro es de tipo [data payload](/docs/herramientas-low-code-scripting/referencia-de-objetos-disponibles-para-scripting/data-payload), y contiene el payload recibido del dispositivo. El objeto payload dispone de una serie de métodos que permiten acceder al contenido del payload con facilidad, tales como:
* asBytes() permite leer el contenido del payload como un array de bytes, y es útil cuando el payload es binario.
* asString() permite leer el contenido del payload como texto, y es útil cuando el payload es ASCII.
* asJsonObject() permite leer el contenido del payload como un objeto Json, y es útil cuando el payload tiene formato Json.
* asParsedObject() permite acceder a los datos pre-parseados por una plataforma externa. Esta opción está disponible para plataformas como Actility y The Things Stack, que permiten el parseo de datos antes del envío a la plataforma Gear Studio.
El objeto payload tiene además una propiedad **port**, disponible para datos recibidos desde redes LoRaWAN, que refleja el número de puerto LoRaWAN al que fueron enviados los datos. En forma similar, para datos recibidos por MQTT, existe una propiedad **topic**, que refleja el topic al cual fueron enviados los datos.
La función `parseUplink` se ejecuta atómicamente, es decir que los datos sólo se actualizan si el script se ejecuta en forma exitosa. En caso de errores en la ejecución del script, todos los cambios serán revertidos, como si el payload no se hubiera recibido. Por esta razón, es importante que el script maneje las condiciones de error correctamente.
Si el script no incluye la función `parseUplink`, el paquete recibido será ignorado.
Respuestas para envío de uplinks por HTTP [#respuestas-para-envío-de-uplinks-por-http]
En el caso de que el envío de uplinks se haga por HTTP, la plataforma normalmente devolverá un status code 200, y un cuerpo vacío. Sin embargo, es posible cambiar este comportamiento devolviendo un objeto [HttpResponse](/docs/herramientas-low-code-scripting/referencia-de-objetos-disponibles-para-scripting/httpresponse), indicando en él la información a retornar, incluyendo:
* Status code
* Content type
* Contenido
A continuación se muestra un ejemplo de esto.
```javascript
function parseUplink(device, payload)
{
[...]
[ More code ]
[...]
var httpResponse = new HttpReponse();
httpResponse.statusCode = 200;
httpResponse.contentType = "application/json";
httpResponse.content.setAsJson({ textField: "some text", aNumber: 25 });
return httpResponse;
}
```
Para más información, consultar la referencia del objeto [HttpResponse](/docs/herramientas-low-code-scripting/referencia-de-objetos-disponibles-para-scripting/httpresponse).
Construcción de payloads para el dispositivo (downlink) [#construcción-de-payloads-para-el-dispositivo-downlink]
Para enviar datos hacia el dispositivo (típicamente comandos), es posible crear una función `buildDownlink`, como la que se muestra como ejemplo a continuación. Este ejemplo está escrito asumiendo un dispositivo que contiene un único endpoint, de tipo appliance, que puede encenderse, apagarse, y alternarse (toggle). Se asume que recibe en el payload debe enviarse un único byte, que indica el tipo de operación.
```javascript
function buildDownlink(device, endpoint, command, payload)
{
payload.port = 25; // This device receives commands on LoRaWAN port 25
payload.buildResult = downlinkBuildResult.ok;
switch (command.type) {
case commandType.onOff:
switch (command.onOff.type) {
case onOffCommandType.turnOn:
payload.setAsBytes([30]); // Command ID 30 is "turn on"
break;
case onOffCommandType.turnOff:
payload.setAsBytes([31]); // Command ID 31 is "turn off"
break;
case onOffCommandType.toggle:
payload.setAsBytes([32]); // Command ID 32 is "toggle"
break;
default:
payload.buildResult = downlinkBuildResult.unsupported;
break;
}
break;
default:
payload.buildResult = downlinkBuildResult.unsupported;
break;
}
}
```
En el ejemplo anterior se puede observar una función `buildDownlink` que procesa un comando de la plataforma, y crea con él un payload de 1 byte. El script sólo soporta comandos para endpoints de tipo on/off, y por lo tanto muestra un error si se intenta enviar comandos de cualquier otro tipo.
La función `buildDownlink` es ejecutada automáticamente por la plataforma cada vez que se intenta enviar cualquier comando al dispositivo, independientemente de si el comando se envía desde una app, una acción programada, etc. La función recibe los siguientes parámetros:
* **device**: este parámetro es de tipo [device](/docs/herramientas-low-code-scripting/referencia-de-objetos-disponibles-para-scripting/device), y contiene toda la información del dispositivo al que se va a enviar el comando, incluyendo la lista de endpoints asociados. Para más información, puede verse la referencia del objeto [device](/docs/herramientas-low-code-scripting/referencia-de-objetos-disponibles-para-scripting/device).
* **endpoint**: este parámetro es de tipo [endpoint](/docs/herramientas-low-code-scripting/referencia-de-objetos-disponibles-para-scripting/endpoint), y contiene los datos del endpoint al que se va a enviar el comando. Este campo puede tener valor null si el comando se está enviando al dispositivo, y no a un endpoint en particular. Por ejemplo, si se intenta enviar un comando de “reboot”, este comando será enviado al dispositivo, pues no tiene sentido reiniciar un endpoint individual.
* **command**: este parámetro es de tipo [command](/docs/herramientas-low-code-scripting/referencia-de-objetos-disponibles-para-scripting/command), y contiene el comando que la plataforma va a enviar. El código de la función normalmente utiliza la información en este objeto para construir el payload que se debe enviar al dispositivo. Para más información sobre la información contenida en el comando, revisar [esta sección](/docs/herramientas-low-code-scripting/referencia-de-objetos-disponibles-para-scripting/command).
* **payload**: este parámetro es de tipo [data payload](/docs/herramientas-low-code-scripting/referencia-de-objetos-disponibles-para-scripting/data-payload), y sirve para crear el payload que se enviará finalmente al dispositivo. El objeto payload dispone de una serie de métodos que permiten modificar su contenido, tales como:
* setAsBytes() permite escribir el contenido del payload utilizando un array de bytes.
* setAsString() permite escribir el contenido del payload como texto, y es útil cuando el payload es ASCII.
* setAsJsonObject() permite escribir el contenido del payload como un objeto Json, y es útil cuando el payload tiene formato Json.
El objeto payload tiene además una propiedad **port**, disponible para dispositivos con conectividad LoRaWAN, que refleja el número de puerto LoRaWAN al que serán enviados los datos. En forma similar, para dispositivos con comunicación MQTT, existe una propiedad **topic**, que permite indicar el topic al cual serán enviados los datos.
Si el script no incluye la función `buildDownlink`, el comando será rechazado indicando que no está soportado.
# Real Time Log Broker
**Real Time Log Broker** es un servicio que permite conocer en tiempo real los eventos que ocurren en la plataforma en función del procesamiento de los datos que envían los dispositivos (Uplink) como así tambien el envío de comandos desde la plataforma hacia los dispositivos (Downlink) en forma de registros de log abarcando las integraciones que implementan MQTT o API HTTP.

Al acceder al Real Time Log Broker se iniciará automaticamente una nueva sesión que será accesible desde un nuevo tab del navegador de manera automática pudiendo visualizar los eventos anteriormente descriptos en tiempo real. Es importante destacar que este log no quedará guardado en la plataforma y se elimina al cerrar la ventana.

# Opciones de menú
**El usuario podrá también una vez abierta la sesión y mediante la botonera de control acceder a las siguientes funciones**

**LIMPIAR**\*\*:\*\* El comportamiento estará dado por *limpiar* la grilla y el *contenido,* dejando que nuevas entradas en cola comiencen a loguear.
**PAUSAR**\*\*:\*\* El comportamiento estará dado por *pausar* el ingreso de información en la grilla y su contenido. *Nota:* Los 120 segundos no se pausarán. Solo la recepción de información.
**EXPORTAR**\*\*:\*\* El comportamiento estará dado por la *descarga* del contenido de un Source específico y seleccionado en la grilla. El formato descargable es .TXT y el formato del mismo será: *AAAAMMDD-HHMMSS.*
**LOG OUT:** El Log in automático se dará cuando se acceda se abra una sesión de Real Time Log. Este ocurrirá en un pestaña nueva del navegador y allí se visualizará la interface de usuario para que se pueda disponer de tantas ventanas (sesiones de RTL) que se deseen y además poder seguir operando con la plataforma.
Cuando el usuario acceda por primera vez el usuario ya estará *conectado* y comenzando a recibir información en el la grilla y con su descripción en el Contenido (*Log*).
> ***ACLARACION**: Durante la sesión el usuario podrá desde el campo “**Filtro**” acotar su búsqueda para una mejor visualización.*
>
> *Se podrá filtrar por;* *Source, Client ID, Facility ID, Device ID, Device Address, Endpoint ID, Endpoint Address.*
**Cuando la sesión haya finalizado o el usuario haya cerrado la sesión, el usuario podrá realizar las siguientes funciones;**

**LIMPIAR** > El comportamiento estará dado por *limpiar* la grilla y el *contenido,* impidiendo esta vez que nuevos registros queden registrados. El usuario deberá volver a conectarse.
**EXPORTAR** **>** El comportamiento estará dado por la *descarga* del contenido de un Source específico y seleccionado en la grilla. Al haber finalizado la sesión se descargará solamente la información que al momento de desconexión se encontraba en la grilla cargada.
**LOG IN** > Una vez que la sesión caduca o es finalizada por el usuario, deberá seleccionar el botón de Log In para nuevamente comenzar a registrar información
> ***ACLARACION**: Mientras la sesión esta pausada o apagada, el usuario podrá desde el campo “**Filtro**” acotar su búsqueda para una mejor visualización.*
>
> *Se podrá filtrar por;* *Source, Client ID, Facility ID, Device ID, Device Address, Endpoint ID, Endpoint Address.*
# Roles
Cuando el usuario que acceda a la plataforma posea permisos ***Globales*** y decida abrir la aplicación de Real Time Log Broker podrá visualizar los registros monitoreados de la instancia.
**Real Time Log Broker se vera con el siguiente título.**

Cuando el usuario ***no posea permisos Globales*** podrá acceder a la opción solamente cuando tenga otorgado permisos para acceder a ella.
**Real Time Log Broker se vera con el siguiente título.**

# Clonar tipos de variables
Introducción [#introducción]
Las variables nos permiten definir y determinar conteos o mediciones de múltiples estados, como por ejemplo, temperatura, tiempo, ocupación, flujo de personas, entre otros. Debido a los diversos usos de las variables dentro de la plataforma, se creo el clonado de variables.
**Ejemplo**
Click en los tres puntos de la derecha y elegir opción “Clonar” como muestra la imagen.

Agregar la descripción y finalmente Guardar.

# Crear un Tipo de Variable
Ir al cliente, configuración de dispositivos y dentro de ellos seleccionar la opción ‘Tipos de Variables’

y allí presionar el botón Agregar para poder configurar la variable\

Una vez presionado el botón "Agregar", se visualizará un formulario donde completar la información de la variable.

En el campo **"Descripción"**, ingresar un nombre representativo para identificar la variable creada y qué tipo de sensor estará midiendo. \
En el campo "**Tipo de Variable"** seleccionar del listado el subtipo que representa la medición recibida.\
Existen varios subtipos disponibles en la plataforma:
* **Escalar:** para variables que pueden tomar cualquier valor dentro de un rango determinado. Ejemplo: temperatura, presión, etc.
* **Discreto:** para variables que solo pueden tomar valores específicos, a menudo representando categorías o estados fijos. Ejemplo: encendido/apagado, activo/inactivo, etc.
* **De Flujo:** para variables que miden el flujo de algo que se mueve a través de un sistema. Ejemplo: flujo de agua, de gas, etc.
* **De Fecha:** para variables que miden una fecha específica (sin considerar la hora exacta). Ejemplo: fecha de un evento.
* **De Hora:** para ser usadas en variables que miden un rango de tiempo o una hora exacta (sin asociarse a una fecha). Ejemplo: hora del sistema.
* **De Fecha y Hora:** para variables que reciben tanto la fecha como la hora exacta de un evento. Ejemplo: timestamp de un sensor.
y por último definir la Unidad de media con la cual se van a registrar los estados en esa variable. Es importante que esta unidad esté alineada con el tipo de variable seleccionada.
Algunas unidades comunes incluyen:
**Escalar:** Grados Celsius (°C), Pasuales (Pa), metros (m), etc.
**Discreto:** se definen estados (encendido/apagado, positivo/negativo/neutro).
**De Flujo:** Litros por minuto (L/min), metros cúbicos por hora (m³/h), etc.
**De Fecha:** Fecha en formato (DD/MM/AAAA).
**De Hora:** Hora en formato (HH:MM).
**De Fecha y Hora:** Fecha y hora en formato (DD/MM/AAAA HH:MM).
Para definir los valores de las variables discretas, se deben crear Estados.
Los estados son *valores fijos* que describen diferentes condiciones o categorías en las que puede estar la variable.
Para cada estado, se debe completar los siguientes campos:
**Valor:**\
Este campo indica el valor asociado al estado (por ejemplo, 1 para "encendido" o 0 para "apagado").
**Color:**\
Cada estado puede tener un color asociado para una visualización rápida y clara. Por ejemplo, el color verde para "activo" y rojo para "inactivo".
**Texto Explicativo del Estado:**\
Proporciona una breve descripción o explicación para cada estado. Por ejemplo, si el valor es 1 y el estado es "Encendido", el texto explicativo podría ser: "Activo".
Por último, presionar el botón Guardar para crear la variable\

La misma quedará disponible en el listado de variables para el cliente.

Estas variables estarán disponibles posteriormente para ser utilizadas en la configuración de cualquiera de los dispositivos del cliente, a través del [script](/docs/herramientas-low-code-scripting) de configuración del modelo de dispositivo.
Para crear una Variable Custom [#para-crear-una-variable-custom]
Se precisa:
* Declararla en el método `**getEndpoints()**` para lo cual es necesario contar con un tipo genérico (`endpointType.genericSensor`) y una identficación de la variable a través del `variableTypeId`.
**´Puede actualizarse su valor utilizando el método** `**parseUplink()**`, extrayéndol los valores del payload.
Ejemplo: Variable Custom para SNR [#ejemplo-variable-custom-para-snr]
En este ejemplo se crea una variable de tipo custom SNR (Signal-to-Noise Ratio) llamada **SNR\_FT**, que corresponde al valor de recibido a travès del payload.
Paso 1: Definir el endpoint en `getEndpoints()`
javascript
```
function getEndpoints(deviceAddress, endpoints)
{
var snr = endpoints.addEndpoint("3", "SNR_FT", endpointType.genericSensor);
snr.variableTypeId = 1433;
}
```
Con este código:
* Se agrega un nuevo endpoint con ID `"3"`
* se le da el nombre de `"SNR_FT"`.
* El tipo de endpoint es `genericSensor` para cualqier variables que no pueda definirse dentro de los sensores predefinidos.
* Se asigna un identficador único - el `variableTypeId = 1433` que tiene que coincidir con el tipo de variable configurado en la plataforma (por ejemplo, un tipo de dato genérico, numérico o específico de SNR).
Paso 2: Procesar el payload en parseUplink() [#paso-2-procesar-el-payload-en-parseuplink]
javascript
```
function parseUplink(device, payload) {
var parsed = payload.asParsedObject();
if (parsed.snr != 0) {
device.endpoints.byIndex(2).updateGenericSensorStatus(parsed.snr);
} else {
device.endpoints.byIndex(2).updateGenericSensorStatus(null);
}
}
```
Con este código:
* Se convierte al payload en un objeto accesible (`asParsedObject()`).
* Verifica si el valor de `snr` recibido es distinto de 0.
* Si lo es, actualiza el valor del endpoint correspondiente con ese dato.
* Cuando el valor es 0, actualiza el sensor como nulo (lo deja sin datos)
Recomendaciones [#recomendaciones]
* el `device.endpoints.byIndex(2)` refiere al tercer endpoint agregado (índice base 0). Es primordial aseguraste de que el orden de creación de endpoints coincida con el índice que se estás utilizando.
* Verificar que el `variableTypeId` esté correctamente configurado (coincida el tipo) y dsté disponible en la plataforma.
* Usar nombres descriptivos para las variables custom (por ejemplo, `SNR_FT`, `VoltajeBateria`, etc.).
* Para el caso de múltiples variables Custom, es fundamental documentar bien los índices (`byIndex(n)`) para un mapeo correcto de la información.
# Tipos de Variables
Introducción [#introducción]
Los tipos de variables definen las unidades de medida y el comportamiento esperado de una variable reportada a la plataforma. Existen determinados tipos de variable considerados como standard los cuales se encuentran definidos por default en la plataforma tales como temperatura, humedad, presión. Para aquellos tipos de variable “custom”, existe la posibilidad de crearlos en la plataforma definiendo las unidades a utilizar y el tipo que aplica (escalar, discreta, flujo, etc).
Click en [Crear Tipos de Variables](/docs/configuracion-del-cliente/dispositivos-y-endpoints/dispositivos/tipos-de-variables/crear-un-tipo-de-variable) para saber como crear un tipo de variable custom
# Promoción de Variables Locales
En la plataforma, las variables pueden definirse a nivel de cliente (locales) o a nivel global (compartidas por todos los clientes de una instancia). Esta funcionalidad permite **promover una variable local a variable global**, facilitando su reutilización en múltiples contextos dentro de la plataforma.
Cuando una variable es promovida:
* Se **elimina del listado de variables locales** del cliente que la definió originalmente.
* Se **agrega al listado de variables globales**, disponible para todos los clientes dentro de la instancia.
* Se habilita su uso en la configuración de dispositivos de cualquier cliente.
> ⚠️ **Importante:** Esta acción es **no reversible**.
¿Cómo promover una variable? [#cómo-promover-una-variable]
* Ir al listado de **Tipos de Variables** del cliente.
* Hacer clic en el **menú contextual** de la variable deseada.
* Seleccionar la opción **Promover a Global**.\

Confirmación de la promoción [#confirmación-de-la-promoción]
Al seleccionar la opción, la plataforma muestra una advertencia indicando que la variable pasará del ámbito local al global.

Una vez confirmada la acción:
* La variable **ya no estará disponible exclusivamente para el cliente original**.
* Se incluirá en el **listado de variables globales**.\

Administración posterior [#administración-posterior]
Las variables promovidas pueden ser **administradas** (editar, clonar o eliminar) de la misma forma que aquellas creadas originalmente como globales.
# Reemplazo de Variable Global
Es el proceso mediante el cual una **variable local (definida por un cliente)** es eliminada y sustituida por una [**Variable global**](/docs/configuracion-del-cliente/dispositivos-y-endpoints/dispositivos/tipos-de-variables), Realizando esta alteración en todos los dispositivos, modelos o entornos donde haya sido previamente configurada.
Esta acción permite, unificar y evitar variables redundantes o duplicadas. Centralizar la gestión de la configuración del entorno y simplificar su mantenimiento.
⚠️ **Importante:** Este proceso es **no reversible**.
Para realizar esta acción:\
1. Ir a la configuración del cliente → Dispositivos → Tipos de Variables

2\. Click en el menú contextual y seleccionar la opción Reemplazar con Variable Global

3. Una vez seleccionada esta opción, aparece un mensaje informativo, para la confirmación del reemplazo de la variable local y selector donde figuran todas las variables globales existentes en la instancia.\

⚠️ **Importante:** El listado de variables globales que se muestran para el reemplazo son **únicamente** las del **mismo tipo** que la variable local (Ej. una variable local discreta, solo puede ser reemplazada por una variable global discreta)
⚠️ **Importante:** Este proceso es **no reversible**.
Una vez realizada esta acción, la variable local deja de existir en el listado de tipos de variables. A la vez, es reemplazada en Modelos de Dispositivos, dispositivos, scripts y todo sitio donde la variable local existía.
# Conversión de datos crudos (raw)
La conversión de datos crudos realizar cálculos sobre los datos obtenidos de un dispositivo, y adaptarlos a los valores necesarios para introducirlos en la plataforma. Esto permite utilizar dispositivos de prácticamente cualquier marca y modelo, con sólo crear expresiones que permitan convertir los valores entregados por el dispositivo.
¿Cómo puedo inyectar datos crudos en la plataforma? [#cómo-puedo-inyectar-datos-crudos-en-la-plataforma]
El envío de datos crudos se realiza, tanto por HTTP como por MQTT, utilizando las APIs terminadas en “Raw”. Por ejemplo, para alimentar la plataforma con información sobre un sensor de temperatura, pero utilizando datos “crudos”, deberá utilizarse la API “**UpdateTemperatureSensorStatusRaw**”. Se recomienda consultar [la siguiente tabla](/docs/configuracion-del-cliente/dispositivos-y-endpoints/dispositivos/integracion-de-dispositivos/matriz-de-metodos-para-actualizacion-de-sensores) para conocer los métodos disponibles para inyectar datos crudos para cada tipo de endpoint.
Uso de expresiones y la variable “RawData” [#uso-de-expresiones-y-la-variable-rawdata]
Todas las APIs terminadas en “Raw” tienen un parámetro “rawData” en el que el dispositivo debe informar el valor medido. Este valor se convierte internamente en una variable denominada “**RawData**”, que puede utilizarse en el evaluador de expresiones.
Como ejemplo para una conversión, utilizaremos un sensor de temperatura con las siguientes características:
* Unidades: el dispositivo informa la temperatura en grados Fahrenheit
* Rango de medición: de -30 grados Fahrenheit hasta +140 grados Fahrenheit.
* La temperatura es informada en décimas de grado Fahrenheit (es decir, no tiene decimales, pero está multiplicada por 10).
La plataforma Gear, sin embargo, precisa que las temperaturas sean informadas en grados Celsius, lo cual requiere entonces una conversión. Para lograr esta conversión, será necesario realizar los siguientes pasos:
* Dividir el valor obtenido por 10.
* Y convertir la temperatura recibida de grados Fahrenheit a Celsius.
Para conseguir esto, debería utilizarse la siguiente expresión:
```
FahrenheitToCelsius(ToNumber(RawData) / 10)
```
Esta expresión hace lo siguiente:
* Utiliza la variable RawData, que es una variable implícita que existe en todas las operaciones de conversión de datos crudos, y representa el contenido del dato crudo como [string](/docs/configuracion-del-cliente/dispositivos-y-endpoints/endpoints/conversion-de-datos-crudos-raw/expresiones).
* Utiliza la función [ToNumber](/docs/configuracion-del-cliente/dispositivos-y-endpoints/endpoints/conversion-de-datos-crudos-raw/expresiones/funciones/otras-funciones/tonumber) para convertir la variable RawData a un valor numérico equivalente.
* Divide el valor obtenido por 10.
* Finalmente, utiliza la función [FahrenheitToCelsius](/docs/configuracion-del-cliente/dispositivos-y-endpoints/endpoints/conversion-de-datos-crudos-raw/expresiones/funciones/funciones-matematicas/fahrenheittocelsius) para convertir este valor a grados Celsius.
Más información [#más-información]
Para más información sobre el uso de expresiones, ver la sección [Expresiones](/docs/configuracion-del-cliente/dispositivos-y-endpoints/endpoints/conversion-de-datos-crudos-raw/expresiones), que contiene una descripción más detallada del motor de expresiones, los tipos de datos, operadores, funciones, y ejemplos de cada uno.
# Filtros Personalizados
Dentro del Widget de Históricos, es posible utilizar la opción de **Filtros personalizados** para adaptar la vista de acuerdo a las necesidades. \
Esta función permite seleccionar entre diferentes filtros precargados y aplicarlos para refinar la información a ser mostrada.
Los Filtros precargados, son un conjuntos de criterios de filtrado configurados previamente, que facilitan la selección y aplicación rápida de filtros específicos, sin tener que configurar cada criterio manualmente.
En el Widget de Históricos, marcar la opción ‘habilitar filtros personalizados’\

se habilita la sección para elegir los filtros.\

Una vez elegidos, se visualizan de la siguiente forma dentro del widget

La vista del widget se actualizará automáticamente, mostrando solo la información que cumple con los filtros seleccionados.
Entre sus beneficios están:
* Una visualización de información más relevante
* Combinación de filtros para para resultados más específicos
* de fácil aplicación
# Históricos - Agregación
Otra de las características de los **widgets** de históricos e históricos es la posibilidad de visualización de las mediciones agregadas (es decir, agrupadas) a través de diferentes cálculos.

Las opciones disponibles para los cálculos de la agregación son:
* por defecto
* mínimo: el valor resultante es el **mínimo** de todos los estados o mediciones registradas en un intervalo de tiempo específico
* máximo: el valor **más alto** de todos los estados o mediciones durante un período de tiempo.
* media (promedio): se calcula el **promedio** de todos los valores de medición registrados en un intervalo determinado.
La agregación de estados es una herramienta de suma utilidad para sintetizar y presentar los datos de dispositivos de manera más comprensible y útil. Los diferentes métodos de agregación permiten a los usuarios elegir la estrategia que mejor se adapte a sus necesidades de análisis y toma de decisiones. Esta funcionalidad optimiza el monitoreo y facilita la detección de patrones y eventos importantes en sistemas complejos.
# Históricos - Granularidad
La **granularidad de estados** es una funcionalidad que permite a los usuarios ajustar el nivel de detalle con el que se presentan las mediciones de los estados de un dispositivo.\
Este control sobre la granularidad permite una flexibilidad crucial para el monitoreo, ya que los usuarios pueden elegir la forma en que los datos son presentados según el contexto y las necesidades de análisis.\
Esta característica está presente en los **widgets** de históricos e históricos.
Entre los rangos de tiempos disponibles están:
* predeterminada
* 5 minutos
* 15 minuto
* 1 hora
* 3 horas
* 12 horas
* día
* semana
* Quincena
* Mes

Estas mediciones se irán mostrando de acuerdo al rango de tiempo elegido, para el período indicado en el filtro si está seleccionada la opción para visualizarse Dashboard en el selector de Tipo de Rango de tiempo o de acuerdo al período indicado en caso de que la opción seleccionada para el período sea Time Offset\

La funcionalidad de granularidad de estados ofrece un control esencial sobre la presentación de los datos en sistemas de monitoreo. Los usuarios pueden ajustar la granularidad según el nivel de detalle que necesiten para realizar un análisis eficiente. Esta flexibilidad facilita la interpretación de grandes volúmenes de datos y optimiza la toma de decisiones en función de las necesidades específicas de monitoreo o análisis de cada usuario.
# Históricos - Grilla
La plataforma cuenta con **widgets** predefinidos que facilitan la presentación de la información en los dashboards. Entre ellos están los widgets históricos e históricos comparativos.
En ellos se puede visualizar la evolución en el tiempo de las mediciones de un Endpoint.

entre las opciones de visualización de este widget, se puede seleccionar el tipo de gráfico para la visualización de los datos ya sea en formato de línea, de barra o de área.

además de Tipo de Forma de Punto de Datos, entre las opciones de Círculo, Triángulo, Cuadrado o ninguno.\

así como también la orientación de las líneas de la grilla del gráfico. Entre las opciones disponibles están la Horizontal, la vertical o ambas\

estas características están disponibles, tanto para el widget de Históricos, como también para el de Comparativo de históricos. En este último, en la misma gráfica se podrán visualizar, las mediciones para dos diferentes tipos de variables, una por cada eje.
# Históricos - Tiempo de desconexión
Existen ocasiones, en la que un dispositivo se desconecta, pero las mediciones siguen generándose. Cuando el dispositivo se reconecta, las mediciones almacenadas de ese dispositivo se sincronizan automáticamente con el sistema, permitiendo que el usuario vea la secuencia completa de datos sin necesidad de intervención manual.
Estas mediciones se pueden ver en el Widget de Históricos y en el Widget de Históricos comparativos. La selección de mostrar o no las mediciones fuera de línea se puede realizar de manera individual para cada Endpoint. Estas mediciones, se muestran a través de líneas punteadas en el Widget para distinguirse de las mediciones recibidas.

La configuración de la opción de visualizar las mediciones sin conexión es a través de los Ajustes del Widget, en la configuración de cada Endpoint marcando o desmarcando el campo ‘Mostrar períodos sin conexión’

De la misma forma se puede configurar para las distintas variables en ambos ejes, en el Widget de histórico de comparativos, para cada Endpoint de forma individual.
# Históricos
Gráfico de líneas que muestra la variación de un tipo de variable de punto final a lo largo del tiempo, en gráficos históricos de endpoints, el usuario puede ingresar los valores mínimos y máximos con lo que se representarán los rangos del eje Y de los gráficos, además de poder modificar el nombre de las variables asociadas a los títulos de los ejes Y.


Se puede visualizar la información correspondiente a estados donde el Endpoint estuvo conectado, como cuando estuvo desconectado. Se puede optar por visualizar la dirección de las líneas de la grilla, las etiquetas de los endpoints, mínimos/máximos/promedios, utilizar colores personalizados así como también optar por los filtros disponibles.

El usuario puede organizar la información y la visualización de estos gráficos a través de diferentes criterios dentro del Widget:
* [Orientación de las líneas de la grilla](/docs/monitor/dashboards/widgets/historicos/historicos-grilla): Horizontal/Vertical/Ambas
* Etiquetas para nombrar las series
* Mostrar o no Máximos/Mínimos/Promedios
* Colores personalizados
* [Filtros personalizados](/docs/monitor/dashboards/widgets/historicos/filtros-personalizados)
* [Granularidad](/docs/monitor/dashboards/widgets/historicos/historicos-granularidad)
* [Agregación](/docs/monitor/dashboards/widgets/historicos/historicos-agregacion)
* [Tiempo de Desconexión](/docs/monitor/dashboards/widgets/historicos/historicos-tiempo-de-desconexion)
* Rango de tiempo: este puede ser coincidente con el del dashboad o un rango de tiempo diferente, indicando las fechas a ser vistas en este widget.
Puede optar por mostrar la información ya sea a través de identificar uno o más endpoints del mismo tipo, así como también por etiquetas que asociadas a dichos endpoints.

Además, cuenta con la opción de definir diferentes [Zonas de Confort](/docs/monitor/dashboards/widgets/widgets-beta/widgets-con-zona-de-confort) dentro de los rangos de valore permitidos para el endpoint.

# Widgets con Zona de Confort
La plataforma de Cloud Studio cuenta con una serie de widgets específicos para el monitoreo de sucursales, consumo de energía, históricos de potencia, consumo, datos del tiempo, etc., para su uso en dashboards configurables por el usuario final.


* Alarmas activas (Muestra un gráfico de torta con la distribución de los tipos de alarma actualmente activos)
* Consumo de energía pasado y proyectado (Muestra objetivos y consumo de energía pasados, así como una proyección de consumo y objetivos para los próximos días)
* Consumo de energía por categoría (Muestra el consumo de energía para las categorías seleccionadas)
* Consumo de energía por fase (Gráfico de torta mostrando el consumo de energía por fase)
* Consumo diario de energía por categoría (Muestra el consumo diario de energía para las categorías seleccionadas)
* Consumo diario por fase (Muestra el consumo diario por fase, para las categorías seleccionadas)
* Costo de energía por categoría (Muestra el costo de energía para las categorías seleccionadas)
* Costos de energía pasados y proyectados (Muestra objetivos y costos de energía pasados, así como una proyección de costos y objetivos para los próximos días)
* Estado del tiempo (Muestra el estado del tiempo en la instalación actual)
* Factor de potencia diario (Muestra la evolución diaria del factor de potencia)
* Infraestructura (Muestra la disponibilidad actual de la infraestructura)
* Mapa de la instalación (Muestra un mapa conteniendo la ubicación de la instalación actual)
* Objetivos de consumo de energía (Muestra información de consumo de energía en relación con los objetivos definidos)
* Potencia máxima diaria (Muestra la máxima potencia diaria utilizada en un período de 15 minutos)
* Potencia media diaria (Muestra la evolución diaria de la potencia utilizada)
* Resumen de la instalación (Muestra información de resumen de la instalación actual)
* Resumen global (Muestra información de resumen de todas las instalaciones)
* Últimos eventos (Muestra una lista con los últimos eventos)
* Instantáneas de la cámara(Muestra las instantáneas tomadas por una cámara)
* Histórico de endpoints (Gráfico de líneas que muestra la variación de un tipo de variable de punto final a lo largo del tiempo)
* Histórico de endpoints comparativo (Gráfico de líneas que muestra la variación comparativa de dos tipos de variables de punto final a lo largo del tiempo)
* Lista de instalaciones (Muestra una lista que contiene la información de las instalaciones)
* Resumen Mundial (Muestra información resumida de todas las instalaciones)
* Infraestructura (Muestra la disponibilidad actual de la infraestructura)
* Últimos Eventos(Muestra la lista que contiene los últimos elementos)
* Galga lineal para variable (Muestra el valor de una variable en tiempo real en formato de gráfico lineal)
* Métrico (Muestra el valor de una variable en tiempo real)
* Ocupación (Muestra la ocupación)
* Texto sin formato (Muestra texto con colores y formato personalizados)
* Calibre redondeado para variable (Muestra el valor de una variable en tiempo real en formato de grafico semicircular)
* Cronología estatal (Línea de tiempo estatal que muestra cómo uno o más puntos finales cambiaron su estado a lo largo del tiempo.)
* Imagen estática(Muestra una imagen estática)
* Indicador lineal vertical para variable (Muestra el valor de una variable en tiempo real en formato de gráfico lineal vertical)
* Vista (Muestra una vista en un widget, diseñado en la sección de vistas)
* Información meteorológica (Muestra la información meteorológica actual en la instalación actual)
**Alarmar Activas:**
El usuario puede utilizar este Widget para armar un gráfico de torta con la distribución de los tipos de alarma actualmente activos.


**Instantáneas de la cámara:**
El usuario puede utilizar este Widget para visualizar las instantáneas tomadas por una cámara.


**Potencia media diaria:**
El usuario puede utilizar este Widget para visualizar la evolución diaria de la potencia utilizada.


**Consumo diario de energía por categoría:**
El usuario puede utilizar este Widget para visualizar el consumo diario de energía para las categorías seleccionadas.


**Consumo diario de energía por fase:**
El usuario puede utilizar este Widget para visualizar la energía diaria utilizada para las categorías seleccionadas


**Potencia máxima diaria:**
El usuario puede utilizar este Widget para visualizar la máxima potencia diaria utilizada en un período de 15 minutos.


**Factor de potencia diario:**
El usuario puede utilizar este Widget para visualizar la evolución diaria del factor de potencia.

**Factor de potencia diario:**
El usuario puede utilizar este Widget para visualizar la evolución diaria del factor de potencia.

**Historial de terminales:**
El usuario puede utilizar este Widget para generar un gráfico de líneas que muestra la variación de un tipo de variable de punto final a lo largo del tiempo.


**Historial de terminales comparativo:**
El usuario puede utilizar este Widget para generar un gráfico de líneas que muestra la variación comparativa de dos tipos de variables de punto final a lo largo del tiempo.


**Objetivos de consumo de energía** **:**
El usuario puede utilizar este Widget para visualizar los datos actuales de consumo de energía en relación con los objetivos definidos.


**Objetivos de consumo de energía** **:**
El usuario puede utilizar este Widget para visualizar el costo de energía para las categorías seleccionadas.


**Consumo de energía por categoría** **:**
El usuario puede utilizar este Widget para visualizar el consumo de energía para las categorías seleccionadas.


**Consumo de energía por fase** **:**
El usuario puede utilizar este Widget para visualizar un gráfico circular que muestra el uso de energía por fase.


**Consumo de energía por fase** **:**
El usuario puede utilizar este Widget para visualizar una lista que contiene la información de las instalaciones.


**Mapa de instalaciones** **:**
El usuario puede utilizar este Widget para visualizar un mapa que contiene la ubicación de la instalación actual.


**Resumen de instalaciones** **:**
El usuario puede utilizar este Widget para visualizar la información resumida de la instalación actual.


**Resumen mundial** **:**
El usuario puede utilizar este Widget para visualizar la información resumida de todas las instalaciones.


**Infraestructura** **:**
El usuario puede utilizar este Widget para visualizar la disponibilidad actual de la infraestructura.


**Últimos eventos** **:**
El usuario puede utilizar este Widget para visualizar una lista que contiene los últimos eventos.


**Galga lineal para variable** **:**
El usuario puede utilizar este Widget para visualizar el valor de una variable en tiempo real en formato de gráfico lineal.


**Métrica** **:**
El usuario puede utilizar este Widget para visualizar el valor de una variable en tiempo real.


**Ocupación** **:**
El usuario puede utilizar este Widget para visualizar la ocupación.


**Costos de energía pasados y proyectados** **:**
El usuario puede utilizar este Widget para visualizar costos y objetivos de energía pasados, y una proyección de costos y objetivos para los próximos días.


**Costos de energía pasado y proyectado:**
El usuario puede utilizar este Widget para visualizar el consumo de energía y los objetivos pasados, y una proyección del consumo y los objetivos para los próximos días.


**Texto sin formato:**
El usuario puede utilizar este Widget para ingresar texto con color y tamaños personalizados.


**Calibre redondeado para variable:**
El usuario puede utilizar este Widget para visualizar el valor de una variable en tiempo real en formato de gráfico semicircular.


**Cronología estatal:**
El usuario puede utilizar este Widget para visualizar línea de tiempo estatal que muestra cómo uno o más puntos finales cambiaron su estado a lo largo del tiempo.


**Imagen estática:**
El usuario puede utilizar este Widget para visualizar una imagen estática.


**Indicador lineal vertical para variable:**
El usuario puede utilizar este Widget para visualizar el valor de una variable en tiempo real en formato de gráfico lineal vertical.


**Vistas:**
El usuario puede utilizar este Widget para visualizar una vista en un widget, diseñado en la sección de vistas.


**Información meteorológica:**
El usuario puede utilizar este Widget para visualizar la información meteorológica actual en la instalación actual.


Widgets de dashboard (Monitor) [#widgets-de-dashboard-monitor]
En el monitor se puede configurar el dashboard a necesidad del cliente, utilizando cualquier combinación de los [**widgets disponibles**](/docs/monitor/dashboards/widgets):
**Widget Histórico de Endpoints:**
Gráfico de líneas que muestra la variación de un tipo de variable de punto final a lo largo del tiempo, en gráficos históricos de endpoints, el usuario puede ingresar los valores mínimos y máximos con lo que se representarán los rangos del eje Y de los gráficos, además de poder modificar el nombre de las variables asociadas a los títulos de los ejes Y.
Dashboard

* *El usuario puede editar los valores mínimos y máximos con lo que se representarán los rangos del eje Y de los gráficos.*
!\[Interfaz de usuario gráfica, Texto, Aplicación, Correo electrónico
Descripción generada automáticamente]\(/images/wiki/dashboards/widgets/widgets-beta/widgets-con-zona-de-confort/image\_272e.png)
*Es una visualización los valores mínimos y máximos con lo que se representarán los rangos del eje Y de los gráficos.*
* *El usuario puede definir **Zonas de Confort** para los históricos. Permite la configuración de rangos de valores en donde las mediciones son esperables. Es a fines de visualización y pueden configurarse varias zonas para el mismo gráfico.*\

El usuario también puede definir Zonas de Confort para el Widget de Histórico Comparativo\

* *El usuario puede modificar los títulos de los ejes Y (en lugar de mostrar los nombres de los tipos de variables).*


* *El usuario puede visualizar los tooltips de los gráficos de históricos*, *los cuales muestran todos los puntos asociados a una posición X.*
!\[Gráfico, Gráfico de líneas
Descripción generada automáticamente]\(/images/wiki/dashboards/widgets/widgets-beta/widgets-con-zona-de-confort/image\_c4df.png)
**Widget Histórico de Endpoints Comparativo:**
Gráficos históricos de endpoints, el usuario puede ingresar los valores mínimos y máximos con lo que se representarán los rangos del eje Y de los gráficos, además de poder modificar el nombre de las variables asociadas a los títulos de los ejes Y.

*El usuario puede editar los valores mínimos y máximos con lo que se representarán los rangos del eje Y de los gráficos.*

*El usuario puede modificar los títulos de los ejes Y (en lugar de mostrar los nombres de los tipos de variables).*


*El usuario puede visualizar los tooltips de los gráficos de históricos*, *los cuales muestran todos los puntos asociados a una posición X.*

# Device
Propiedades
| address(string) - read only |
| -------------------------------------------------------------------------------------------------------------------------------------------- |
| La propiedad address permite obtener la dirección de un dispositivo |
| Ejemplos |
| let devices = env.facility.devices; let mydevices = devices.toArray() mydevices.forEach((device)=> \{ env.log(device.address) }); |
| |
| description (string) - read only |
| ------------------------------------------------------------------------------------------------------------------------------------------------ |
| La propiedad description permite obtener la descripción de un dispositivo |
| Ejemplos |
| let devices = env.facility.devices; let mydevices = devices.toArray() mydevices.forEach((device)=> \{ env.log(device.description) }); |
| endpoints - read only |
| ---------------------------------------------------------------------------------------------------------------------------------------------------------------------------------------- |
| La propiedad address permite obtener un objeto endpoints, para mas información consulte endpoints |
| Ejemplos |
| let devices = env.facility.devices; let mydevices = devices.toArray() mydevices.forEach((device)=> \{ let endpoints = device.endpoints env.log(device.endpoints) }); |
| isOnline (boolean)- read only |
| ------------------------------------------------------------------------------------------------------------------------------------------------------------------------------- |
| La propiedad isOnline permite cononer si el dispositivo se encuentra en línea o fuera de línea.Nota: Esta propiedad esta dispoible a partir de la versión 1.5 de la plataforma. |
| Ejemplos |
| let devices = env.facility.devices; let mydevices = devices.toArray() mydevices.forEach((dev)=> \{ let online= dev.isOnline; env.log(dev.online) }); |
Métodos [#métodos]
Para más información consulte esta [página](/docs/herramientas-low-code-scripting/referencia-de-objetos-disponibles-para-scripting/device)
# Devices
Propiedades
| facilityID (integer) - read only |
| --------------------------------------------------------------------------------------------------------------- |
| La propiedad facilityID permite obtener el identificador único del facility en la cual pertenece el dispositivo |
| Ejemplos |
| let devices = env.facility.devices; env.log(devices.facilityID) |
| count (integer) - read only |
| ------------------------------------------------------------------------------------ |
| La propiedad count permite obtener la cantidad de devices que existen en el facility |
| Ejemplos |
| let devices = env.facility.devices; env.log(devices.count) |
Métodos [#métodos]
| byAddress(string deviceAddress ) |
| -------------------------------------------------------------------------------------------------------------------------------------------------------------------------------------------------------------------------------- |
| El método byAddress retorna un objeto device cuya dirección sea la indicada en el parametro deviceAddress. Si no se encuentra un device con la dirección indicada el método retornará null. Para más información consulte device |
| Ejemplos |
| let devices = env.facility.devices; let device = devices.byAddress('1') env.log(device) |
| byIndex(integer index) |
| ------------------------------------------------------------------------------------------------------------------------------------------------------------------------------------------------------------------------------------------------------------------ |
| El método byIndex retorna un objeto device cuya indice sea el indicado en el parametro index. El valor cero es equivalente al primer dispositivo.Si no se encuentra un device con el índice indicado el método retornará null.Para más información consulte device |
| Ejemplos |
| let devices = env.facility.devices; let device = devices.byIndex(0) env.log(device) |
| toArray() |
| ----------------------------------------------------------------------------------------- |
| El método toArray retorna un array de objetos device Para más información consulte device |
| Ejemplos |
| let devices = env.facility.devices; let deviceArr = devices.toArray() env.log(deviceArr) |
# Endpoint
Propiedades [#propiedades]
| (EndPointAccessType) accessType |
| ---------------------------------------------------------------------------------------------------------------------------------------------------------------------------------------- |
| La propiedad accessType permite conocer el tipo de acceso que se aplica a un endpoint. Para más información sobre los tipos de acceso de un endpoint consulte esta página |
| Ejemplos |
| let endpoints = env.facility.endpoints; let myendPointsArray = endpoints.toArray(); myendPointsArray.forEach((ep)=> \{ let aType = ep.accessType; env.log(aType); }); |
| |
| (string) address |
| ----------------------------------------------------------------------------------------------------------------------------------------------------------------------------------- |
| La propiedad address permite obtener la dirección de un endpoint. Para más información sobre endpoint consulte esta página |
| Ejemplos |
| let endpoints = env.facility.endpoints; let myendPointsArray = endpoints.toArray(); myendPointsArray.forEach((ep)=> \{ let addr = ep.address; env.log(addr); }); |
| |
| (string) description |
| ----------------------------------------------------------------------------------------------------------------------------------------------------------------------------------- |
| La propiedad description permite obtener la descripción que se definió para un endpoint cuando éste fué creado. Para más información sobre endpoint consulte esta página |
| Ejemplos |
| let endpoints = env.facility.endpoints; let myendPointsArray = endpoints.toArray(); myendPointsArray.forEach((ep)=> \{ let addr = ep.address; env.log(addr); }); |
| |
| (integer) endpointID |
| -------------------------------------------------------------------------------------------------------------------------------------------------------------------------------- |
| La propiedad endpointID permite obtener el identificador único de un endpoint. Para más información sobre endpoint consulte esta página |
| Ejemplos |
| let endpoints = env.facility.endpoints; let myendPointsArray = endpoints.toArray(); myendPointsArray.forEach((ep)=> \{ let id= ep.endpointID; env.log(id); }); |
| |
| (integer) endpointSubType |
| ------------------------------------------------------------------------------------------------------------------------------------------------------------------------------------------------------------------ |
| La propiedad endpointSubType permite obtener el subtipo de endpoint de un endpoint. Si el endpoint no tiene subtipo definido se retornará nullPara más información sobre subtipos de endpoint consulte esta página |
| Ejemplos |
| let endpoints = env.facility.endpoints; let myendPointsArray = endpoints.toArray(); myendPointsArray.forEach((ep)=> \{ let st = ep.endpointSubtype; env.log(st); }); |
| |
| (integer) operationSecurityLevel |
| --------------------------------------------------------------------------------------------------------------------------------------------------------------------------------------------------------------------------------- |
| La propiedad operationSecurityLevent permite obtener el tipo de seguridad que se ha definido cuando se opere sobre un endpoint.Para más información sobre los niveles de seguridad de operación de endpoints consulte esta página |
| Ejemplos |
| let endpoints = env.facility.endpoints; let myendPointsArray = endpoints.toArray(); myendPointsArray.forEach((ep)=> \{ let osl = ep.operationSecurityLevel; env.log(osl); }); |
| |
| string\[] tags |
| --------------------------------------------------------------------------------------------------------------------------------------------------------------------------------------------------------------------- |
| La propiedad tags permite obtener todos los tags que se hayan definido para un endpoint.Para más información endpoints consulte esta página |
| Ejemplos |
| let endpoints = env.facility.endpoints; let myendPointsArray = endpoints.toArray(); myendPointsArray.forEach((ep)=> \{ let tags= ep.tags; tags.forEach((tag)=>\{ env.log(tag); }); }); |
| |
| (Device) device |
| -------------------------------------------------------------------------------------------------------------------------------------------------------------------------------- |
| La propiedad device permite obtener el objeto device al que pertenece un endpoint.Para más información endpoints consulte esta página |
| Ejemplos |
| let endpoints = env.facility.endpoints; let myendPointsArray = endpoints.toArray(); myendPointsArray.forEach((ep)=> \{ let device = ep.device; env.log(device); }); |
| |
Métodos [#métodos]
| (DataPoint) getCurrentState() |
| ----------------------------------------------------------------------------------------------------------------------------------------------------------------------------------------------------------------------------------------------------------------------------------------------------------------------------------------------------------------------------------------------------------------------------------------------------------------------------------------------------------------------- |
| El método getCurrentState() permite conocer el estado actual de un endpoint para todos los tipos de endpoint que poseen un estado.En el caso que el tipo de endpoint no posea un estado el metodo retornará un error con la descripción “Unsupported endpoint type in method getCurrentState”El objeto retornado DataPoint es polimórfico, es decir, dependiendo del tipo de endpoint sobre el cual se desea conocer su estado sus propiedades son diferentes.Para más información sobre DataPoint consulte esta página |
| Ejemplos |
| let endpoints = env.facility.endpoints; let myendPoint = endpoints.byTag('vitrina'); let status = myendPoint.getCurrentState(); let value = status.value; env.log(value); |
| |
| (DataPoint\[]) getDataPoints(Date fromUTCDatetime) |
| ----------------------------------------------------------------------------------------------------------------------------------------------------------------------------------------------------------------------------------------------------------------------------------------------------------------------------------------------------------------------------------------------------------------------- |
| El método getDataPoints() permite conocer los diferentes estados de un endpoint a partir del momento indicado como fromUTCDateTime El objeto retornado DataPoint es polimórfico, es decir, dependiendo del tipo de endpoint sobre el cual se desea conocer su estado sus propiedades son diferentes.Para más información sobre DataPoint consulte esta página |
| Ejemplos |
| const subtractHours = (date, hours) => \{ const result = new Date(date); result.setHours(result.getHours() - hours); return result; }; let endpoints = env.facility.endpoints; let myendPointsArray = endpoints.toArray(); myendPointsArray.forEach((ep)=> \{ let dataPoints = ep.getDataPoints(subtractHours(utils.utcNow, 10)); env.log(dataPoints); }); |
| |
| (double) getDataPointsAvg(Date fromUTCDatetime) |
| ------------------------------------------------------------------------------------------------------------------------------------------------------------------------------------------------------------------------------------------------------------------------------------------------------------------------------------------------------------------------------------------------------------ |
| El método getDataPointsAvg() permite conocer el promedio aritmético de los estados de un endpoint a partir del momento indicado como fromUTCDateTime Para más información sobre DataPoint consulte esta página |
| Ejemplos |
| const subtractHours = (date, hours) => \{ const result = new Date(date); result.setHours(result.getHours() - hours); return result; }; let endpoints = env.facility.endpoints; let myendPointsArray = endpoints.toArray(); myendPointsArray.forEach((ep)=> \{ let avg = ep.getDataPointsAvg(subtractHours(utils.utcNow, 10)); env.log(avg); }); |
| |
| (double) getDataPointsAvg(Date fromUTCDatetime, Date toUTCDateTime) |
| -------------------------------------------------------------------------------------------------------------------------------------------------------------------------------------------------------------------------------------------------------------------------------------------------------------------------------------------------------------------------------------------------------------------------- |
| El método getDataPointsAvg() permite conocer el promedio aritmético de los estados de un endpoint a partir del momento indicado como fromUTCDateTime y hasta el momento indicado en el parámetro toUTCDateTimePara más información sobre DataPoint consulte esta página |
| Ejemplos |
| const subtractHours = (date, hours) => \{ const result = new Date(date); result.setHours(result.getHours() - hours); return result; }; let endpoints = env.facility.endpoints; let myendPointsArray = endpoints.toArray(); myendPointsArray.forEach((ep)=> \{ let avg = ep.getDataPointsAvg(subtractHours(utils.utcNow, 10), utils.utcNow); env.log(avg); }); |
| |
| (double) getDataPointsMax(Date fromUTCDatetime) |
| ------------------------------------------------------------------------------------------------------------------------------------------------------------------------------------------------------------------------------------------------------------------------------------------------------------------------------------------------------------------------------------------------------------ |
| El método getDataPointsMax() permite conocer el valor maxímo de los estados de un endpoint a partir del momento indicado como fromUTCDateTime Para más información sobre DataPoint consulte esta página |
| Ejemplos |
| const subtractHours = (date, hours) => \{ const result = new Date(date); result.setHours(result.getHours() - hours); return result; }; let endpoints = env.facility.endpoints; let myendPointsArray = endpoints.toArray(); myendPointsArray.forEach((ep)=> \{ let avg = ep.getDataPointsMax(subtractHours(utils.utcNow, 10)); env.log(avg); }); |
| |
| (double) getDataPointsMax(Date fromUTCDatetime, Date toUTCDateTime) |
| -------------------------------------------------------------------------------------------------------------------------------------------------------------------------------------------------------------------------------------------------------------------------------------------------------------------------------------------------------------------------------------------------------------------------- |
| El método getDataPointsMax() permite conocer el valor máximo de los estados de un endpoint a partir del momento indicado como fromUTCDateTime y hasta el momento indicado en el parámetro toUTCDateTimePara más información sobre DataPoint consulte esta página |
| Ejemplos |
| const subtractHours = (date, hours) => \{ const result = new Date(date); result.setHours(result.getHours() - hours); return result; }; let endpoints = env.facility.endpoints; let myendPointsArray = endpoints.toArray(); myendPointsArray.forEach((ep)=> \{ let avg = ep.getDataPointsMax(subtractHours(utils.utcNow, 10), utils.utcNow); env.log(avg); }); |
| |
| (double) getDataPointsMin(Date fromUTCDatetime) |
| ------------------------------------------------------------------------------------------------------------------------------------------------------------------------------------------------------------------------------------------------------------------------------------------------------------------------------------------------------------------------------------------------------------ |
| El método getDataPointsMin() permite conocer el valor mínimo de los estados de un endpoint a partir del momento indicado como fromUTCDateTime Para más información sobre DataPoint consulte esta página |
| Ejemplos |
| const subtractHours = (date, hours) => \{ const result = new Date(date); result.setHours(result.getHours() - hours); return result; }; let endpoints = env.facility.endpoints; let myendPointsArray = endpoints.toArray(); myendPointsArray.forEach((ep)=> \{ let avg = ep.getDataPointsMin(subtractHours(utils.utcNow, 10)); env.log(avg); }); |
| |
| (double) getDataPointsMin(Date fromUTCDatetime, Date toUTCDateTime) |
| -------------------------------------------------------------------------------------------------------------------------------------------------------------------------------------------------------------------------------------------------------------------------------------------------------------------------------------------------------------------------------------------------------------------------- |
| El método getDataPointsMin() permite conocer valor mínimo de los estados de un endpoint a partir del momento indicado como fromUTCDateTime y hasta el momento indicado en el parámetro toUTCDateTimePara más información sobre DataPoint consulte esta página |
| Ejemplos |
| const subtractHours = (date, hours) => \{ const result = new Date(date); result.setHours(result.getHours() - hours); return result; }; let endpoints = env.facility.endpoints; let myendPointsArray = endpoints.toArray(); myendPointsArray.forEach((ep)=> \{ let avg = ep.getDataPointsMin(subtractHours(utils.utcNow, 10), utils.utcNow); env.log(avg); }); |
| |
| (double) getDataPointsSum(Date fromUTCDatetime) |
| ------------------------------------------------------------------------------------------------------------------------------------------------------------------------------------------------------------------------------------------------------------------------------------------------------------------------------------------------------------------------------------------------------------ |
| El método getDataPointsSum permite conocer la suma de los valores de los estados de un endpoint a partir del momento indicado como fromUTCDateTime Para más información sobre DataPoint consulte esta página |
| Ejemplos |
| const subtractHours = (date, hours) => \{ const result = new Date(date); result.setHours(result.getHours() - hours); return result; }; let endpoints = env.facility.endpoints; let myendPointsArray = endpoints.toArray(); myendPointsArray.forEach((ep)=> \{ let avg = ep.getDataPointsSum(subtractHours(utils.utcNow, 10)); env.log(avg); }); |
| |
| (double) getDataPointsSum(Date fromUTCDatetime, Date toUTCDateTime) |
| -------------------------------------------------------------------------------------------------------------------------------------------------------------------------------------------------------------------------------------------------------------------------------------------------------------------------------------------------------------------------------------------------------------------------- |
| El método getDataPointsMax() conocer la suma de los valores de los estados de un endpoint a partir del momento indicado como parámetro fromUTCDateTime y hasta el momento indicado en el parámetro toUTCDateTimePara más información sobre DataPoint consulte esta página |
| Ejemplos |
| const subtractHours = (date, hours) => \{ const result = new Date(date); result.setHours(result.getHours() - hours); return result; }; let endpoints = env.facility.endpoints; let myendPointsArray = endpoints.toArray(); myendPointsArray.forEach((ep)=> \{ let avg = ep.getDataPointsSum(subtractHours(utils.utcNow, 10), utils.utcNow); env.log(avg); }); |
| |
| (DataPoint\[]) getDataPointsLT(Date fromUTCDatetime, Date toUTCDateTime\*) |
| ------------------------------------------------------------------------------------------------------------------------------------------------------------------------------------------------------------------------------------------------------------------------------------------------------------------------------------------------------------------------------------------------------------------------- |
| El método getDataPointsLT() conocer los estados de un endpoint a partir del momento indicado como parámetro fromUTCDateTime y hasta el momento indicado en el parámetro toUTCDateTime en la hora local del facility al que pertenecen.Para más información sobre DataPoint consulte esta página |
| Ejemplos |
| const subtractHours = (date, hours) => \{ const result = new Date(date); result.setHours(result.getHours() - hours); return result; }; let endpoints = env.facility.endpoints; let myendPointsArray = endpoints.toArray(); myendPointsArray.forEach((ep)=> \{ let avg = ep.getDataPointsLT(subtractHours(utils.utcNow, 10), utils.utcNow); env.log(avg); }); |
| |
| (double) getDataPointsMaxLT(Date fromUTCDatetime, Date toUTCDateTime\*) |
| ---------------------------------------------------------------------------------------------------------------------------------------------------------------------------------------------------------------------------------------------------------------------------------------------------------------------------------------------------------------------------------------------------------------------------- |
| El método getDataPointsLT() conocer el valor máximo de un endpoint a partir del momento indicado como parámetro fromUTCDateTime y hasta el momento indicado en el parámetro toUTCDateTime en la hora local del facility al que pertenecen.Para más información sobre DataPoint consulte esta página |
| Ejemplos |
| const subtractHours = (date, hours) => \{ const result = new Date(date); result.setHours(result.getHours() - hours); return result; }; let endpoints = env.facility.endpoints; let myendPointsArray = endpoints.toArray(); myendPointsArray.forEach((ep)=> \{ let avg = ep.getDataPointsMaxLT(subtractHours(utils.utcNow, 10), utils.utcNow); env.log(avg); }); |
| |
| (double) getDataPointsMinLT(Date fromUTCDatetime, Date toUTCDateTime\*) |
| ---------------------------------------------------------------------------------------------------------------------------------------------------------------------------------------------------------------------------------------------------------------------------------------------------------------------------------------------------------------------------------------------------------------------------- |
| El método getDataPointsMinLT() conocer el valor máximo de un endpoint a partir del momento indicado como parámetro fromUTCDateTime y hasta el momento indicado en el parámetro toUTCDateTime en la hora local del facility al que pertenecen.Para más información sobre DataPoint consulte esta página |
| Ejemplos |
| const subtractHours = (date, hours) => \{ const result = new Date(date); result.setHours(result.getHours() - hours); return result; }; let endpoints = env.facility.endpoints; let myendPointsArray = endpoints.toArray(); myendPointsArray.forEach((ep)=> \{ let avg = ep.getDataPointsMinLT(subtractHours(utils.utcNow, 10), utils.utcNow); env.log(avg); }); |
| |
| (double) getDataPointsSumLT(Date fromUTCDatetime, Date toUTCDateTime\*) |
| ---------------------------------------------------------------------------------------------------------------------------------------------------------------------------------------------------------------------------------------------------------------------------------------------------------------------------------------------------------------------------------------------------------------------------- |
| El método getDataPointsMinLT() conocer la suma de los estados de un endpoint a partir del momento indicado como parámetro fromUTCDateTime y hasta el momento indicado en el parámetro toUTCDateTime en la hora local del facility al que pertenecen.Para más información sobre DataPoint consulte esta página |
| Ejemplos |
| const subtractHours = (date, hours) => \{ const result = new Date(date); result.setHours(result.getHours() - hours); return result; }; let endpoints = env.facility.endpoints; let myendPointsArray = endpoints.toArray(); myendPointsArray.forEach((ep)=> \{ let avg = ep.getDataPointsSumLT(subtractHours(utils.utcNow, 10), utils.utcNow); env.log(avg); }); |
| |
# Endpoints
Propiedades [#propiedades]
| (integer) count |
| ----------------------------------------------------------------------------------------------------------------------------------------------------------------------------- |
| La propiedad count permite conocer la cantidad de endpoints que posee un dispositivo |
| Ejemplos |
| devices = env.facility.devices; mydevices = devices.toArray() mydevices.forEach((dev)=> \{ totalEndpoints = dev.endpoints.count env.log(totalEndpoints) }); |
| |
| (integer) deviceID |
| ------------------------------------------------------------------------------------------------------------------------------------------------------------------------------ |
| La propiedad deviceID permite conocer el identificador único de dispositivo al que pertenece un endpoint |
| Ejemplos |
| let devices = env.facility.devices; let mydevices = devices.toArray() mydevices.forEach((dev)=> \{ let deviceId = dev.endpoints.deviceID env.log(deviceId) }); |
| |
| (integer) facilityID |
| -------------------------------------------------------------------------------------------------------------------------------------------------------------------------- |
| La propiedad facilityID permite conocer el identificador único de facility al que pertenece un endpoint |
| Ejemplos |
| let devices = env.facility.devices; let mydevices = devices.toArray() mydevices.forEach((dev)=> \{ let facilityId = dev.endpoints.facilityID env.log(facilityId) }); |
| |
Métodos [#métodos]
| (object) byTag(string tag) |
| --------------------------------------------------------------------------------------------------------------------- |
| La propiedad byTag permite obtener un objeto endpoint dado un determinado Tag, para mas información consulte endpoint |
| Ejemplos |
| let endpoints = env.facility.endpoints; let myendPoint = endpoints.byTag("My test endpoint tag") env.log(myendPoint) |
| |
| (object\[]) allByTag(string tag) |
| ------------------------------------------------------------------------------------------------------------------------------------------------- |
| La propiedad allByTag permite obtener todos los objetos endpoint como array que posean un determinado Tag, para mas información consulte endpoint |
| Ejemplos |
| let endpoints = env.facility.endpoints; let myendPoints = endpoints.allByTag("Head office endpoint") env.log(myendPoints) |
| |
| (object) byType(EndpointType type) |
| ------------------------------------------------------------------------------------------------------------------------------------------------------- |
| La propiedad byType permite obtener un objeto endpoint dado un tipo de endpoint, para mas información sobre los tipos de endpoint consulte esta página |
| Ejemplos |
| let endpoints = env.facility.endpoints; let myendPoint = endpoints.byType(endpointType.locationTracker) env.log(myendPoint) |
| |
| (object) byType(EndpointType type EndPointSubType subtype) |
| ---------------------------------------------------------------------------------------------------------------------------------------------------------------------------- |
| La propiedad byType permite obtener un objeto endpoint dado un tipo y subtipo de endpoint, para más información sobre los tipos y subtipos de endpoint consulte esta página |
| Ejemplos |
| let endpoints = env.facility.endpoints; let myendPoint = endpoints.byType(endpointType.appliance, applianceEndpointSubType.lamp) env.log(myendPoint) |
| |
| (object\[]) AllByType(EndpointType type) |
| ----------------------------------------------------------------------------------------------------------------------------------------------------------------------------- |
| La propiedad AllbyType permite obtener todos los objetos endpoint dado un tipo de endpoint, para más información sobre los tipos y subtipos de endpoint consulte esta página |
| Ejemplos |
| let endpoints = env.facility.endpoints; let myendPointsArrray = endpoints.AllByType(endpointType.appliance, applianceEndpointSubType.lamp) env.log(myendPointsArray) |
| |
| (object\[]) AllByType(EndpointType type EndPointSubType subtype) |
| ---------------------------------------------------------------------------------------------------------------------------------------------------------------------------------------------------------------- |
| La propiedad AllByType permite obtener todos los objetos endpoint como array y que sean de un tipo y subtipo de endpoint dado, para más información sobre los tipos y subtipos de endpoint consulte esta página |
| Ejemplos |
| let endpoints = env.facility.endpoints; let myendPointsArray = endpoints.AllByType(endpointType.appliance, applianceEndpointSubType.lamp) env.log(myendPointsArray) |
| |
| (object) ByAddress(string endpointaddress) |
| ---------------------------------------------------------------------------------------------------------------------- |
| La propiedad ByAddress permite obtener un objeto endpoint dada su dirección, para más información consulte esta página |
| Ejemplos |
| let endpoints = env.facility.endpoints; let myendPoint = endpoints.byAddress('16785349') env.log(myendPoint) |
| |
| (object) byIndex(integer index) |
| --------------------------------------------------------------------------------------------------------------------------------------------------------------------------- |
| La propiedad byIndex permite obtener un objeto endpoint existente en el facility dado su índice dónde cero es el primer elemento, para más información consulte esta página |
| Ejemplos |
| let endpoints = env.facility.endpoints; let myendPoint = endpoints.byIndex(0); env.log(myendPoint) |
| |
| object\[] toArray() |
| ------------------------------------------------------------------------------------------------------------------------------------------------- |
| La propiedad toArray() permite obtener todos los objetos endpoint existentes en el facility como array, para más información consulte esta página |
| Ejemplos |
| let endpoints = env.facility.endpoints; let myendPointsArray = endpoints.toArray(); env.log(myendPointsArray) |
| |
# HTTP
Introducción [#introducción]
Esta sección describe la integración con la plataforma Gear Studio utilizando HTTP. Esta funcionalidad está orientada a permitir la integración con dispositivos de una variedad de fabricantes, así como dispositivos desarrollados a medida con Arduino, nodeMCU, Raspberry Pi y cualquier otra plataforma que soporte comunicación a través de HTTP.
Alternativas de integración [#alternativas-de-integración]
Existen dos alternativas de integración por HTTP:
* [Intercambio de datos flexible](/docs/configuracion-del-cliente/dispositivos-y-endpoints/dispositivos/integracion-de-dispositivos/http/intercambio-de-datos-flexible): El intercambio flexible permite el envío de datos desde los dispositivos (uplink), y su procesamiento con scripting para interpretar y almacenar la información. Es sumamente flexible y puede implementarse con facilidad si se tienen conocimientos de scripting. Se recomienda el uso del intercambio de datos flexible cuando no sea posible adaptar el formato de los datos enviados por el dispositivo para utilizar la API HTTP.
* [API HTTP](/docs/configuracion-del-cliente/dispositivos-y-endpoints/dispositivos/integracion-de-dispositivos/http/api-http): la API HTTP permite que los dispositivos se comuniquen con la plataforma utilizando un formato de mensaje específico, documentado en las siguientes secciones, lo que permite:
* Subir datos de los dispositivos hacia la plataforma. [Esta página](/docs/configuracion-del-cliente/dispositivos-y-endpoints/dispositivos/integracion-de-dispositivos/http/api-http/almacenamiento-de-datos-de-sensores) muestra la referencia de todo lo necesario para cada tipo de sensor.
* Actualizar datos propios del dispositivo, tales como el nivel de batería y de RSSI. Siga [esta referencia](/docs/configuracion-del-cliente/dispositivos-y-endpoints/dispositivos/integracion-de-dispositivos/http/api-http/actualizacion-de-datos-del-dispositivo/estado-de-bateria-y-rssi) para más información.
* Recibir y contestar comandos enviados desde la plataforma. En [esta página](/docs/configuracion-del-cliente/dispositivos-y-endpoints/dispositivos/integracion-de-dispositivos/http/api-http/recepcion-y-confirmacion-de-comandos) puede encontrarse más información sobre este tema.
**Importante**: si no es posible modificar el formato de los datos enviados por el dispositivo, entonces se recomienda utilizar el [intercambio de datos flexible](/docs/configuracion-del-cliente/dispositivos-y-endpoints/dispositivos/integracion-de-dispositivos/http/intercambio-de-datos-flexible). Esto hace posible el envío de datos en cualquier formato, y su procesamiento en la plataforma utilizando scripting.
# Intercambio de datos flexible
Introducción [#introducción]
El intercambio de datos flexible es la forma de integración por HTTP recomendada cuando no es posible modificar el formato de los datos enviados por el dispositivo.
El intercambio flexible de datos soporta únicamente mensajes de **Uplink**. Los mensajes de uplink son todos aquellos enviados desde los dispositivos hacia la plataforma. La plataforma debe ser capaz de procesar los mensajes de uplink para almacenar la información relevante, y procesarla. Esto se logra utilizando [scripting](/docs/configuracion-del-cliente/dispositivos-y-endpoints/dispositivos/modelos-de-dispositivo/procesamiento-de-datos) para interpretar el contenido de los mensajes y almacenar la información en la plataforma.
No es posible enviar mensajes de **Downlink** (es decir, desde la plataforma hacia el dispositivo) utilizando el intercambio flexible de datos por HTTP.
Pasos a seguir [#pasos-a-seguir]
Configuración de la URL de envío de datos a la plataforma [#configuración-de-la-url-de-envío-de-datos-a-la-plataforma]
Para que la plataforma pueda recibir los datos del dispositivo, será necesario configurarlo para hacer POST de mensajes HTTP a la siguiente URL:
```
https://gear.cloud.studio/api/v2/uplink/{DeviceAddress}
```
Donde:
* **DeviceAddress** es la dirección del dispositivo, tal como ha sido ingresada al crear el dispositivo en la plataforma.
Por ejemplo, si la dirección del dispositivo es ***06A022B39C14***, entonces deberá ser configurado para hacer POST a la siguiente URL:
```
https://gear.cloud.studio/api/v2/uplink/06A022B39C14
```
Configuración del access token [#configuración-del-access-token]
Es necesario además enviar el access token como parte del encabezado, utilizando un encabezado Authorization, como se ve a continuación:
```
Authorization: Bearer e54e0911-ece3-4b7a-b84d-afc01dfa81f1
```
Alternativamente, cuando no es posible enviar el token a través del encabezado Authorization, el access token puede enviarse como parte de la url, a través del parámetro “accessToken”, como en el siguiente ejemplo:
```
https://gear.cloud.studio/api/v2/uplink/06A022B39C14?accessToken=e54e0911-ece3-4b7a-b84d-afc01dfa81f1
```
Una vez completados estos pasos, la plataforma comenzará a recibir y procesar la información del dispositivo. Si se trata de un dispositivo de un modelo no soportado nativamente por la plataforma, será necesario además definir los [scripts de procesamiento de datos](/docs/configuracion-del-cliente/dispositivos-y-endpoints/dispositivos/modelos-de-dispositivo/procesamiento-de-datos), como se describe en [esta sección](/docs/configuracion-del-cliente/dispositivos-y-endpoints/dispositivos/modelos-de-dispositivo/procesamiento-de-datos).
# LoRaWAN Network Servers (LNS)
En esta sección se detallan los procesos de integración con diferentes LoRaWAN Network Servers
# LORIOT
La integración con [LORIOT](https://loriot.io/) permite que la plataforma tenga una comunicación sólida entre un proveedor de conectividad y una Plataforma IoT de calidad como Cloud Studio IoT
Requisitos [#requisitos]
La integración es fácil, y requiere sólo lo siguiente:
* Un identificador de instancia. Dependiendo de su suscripción a Gear Studio, los nombres de instancia más comunes son:
* **gear.cloud.studio**. Este nombre de instancia corresponde a una instancia común de Gear Studio, incluida la versión gratuita.
* **xxxx.cloud.studio**. Este nombre de instancia corresponde a instancias Flex en las que el hosting es provisto por Cloud Studio, pero el cliente puede elegir el subdominio empleado (xxxx).
* **Otros**. En el caso de los clientes Enterprise que utilicen su propio dominio, deberá utilizarse el nombre de dominio elegido.
* Un [Access Token](/docs/configuracion-del-cliente/tokens-de-acceso-access-tokens). Los datos que son enviados a la plataforma Gear de Cloud Studio IoT desde LORIOT utilizarán este access token para acceder y por ende, LORIOT tendrá los permisos asociados a este access token. Se aconseja crear un nuevo access token específicamente para la integración de LORIOT, para simplificar el control de seguridad.
**Configuración en LORIOT**
Una vez tengamos todos los permisos y requisitos necesarios para la integración, es hora de crear nuestra primera aplicación en LORIOT. Iniciamos sesión y accedemos con nuestras credenciales, después accederemos a **Applications**:

Dentro de **Applications** entraremos en **Output**: **Applications → Output**

Dentro de las opciones de **Output** tendremos que agregar un nuevo tipo de **Output** que se dirija específicamente a la plataforma de Cloud Studio IoT, este tipo de **Output** deberá de ser de tipo **HTTP Push**, para ello pulsaremos en el botón “**Add new output**”:
**Output** → **Add new output** → **HTTP Push**

Dentro de las opciones de HTTP Push identificamos tres campos clave a rellenar:
* **Output Name:** Este campo es opcional y completamente personalizable, nos ayudará a identificar el Output más tarde. Por ejemplo “Cloud Studio IoT - Integration”.
* **Target URL for POSTs:** En este campo debemos introducir el enlace predefinido a nuestra Plataforma IoT, Cloud Studio IoT:\
[https://gear.cloud.studio/services/loriot](https://gear.cloud.studio/services/loriot)
* Nota: Si tu instancia es personalizada, deberás de introducir el enlace de tu instancia de esta forma: [https://XXXXX/services/loriot](https://XXXXX/services/loriot)
Siendo XXXXX la dirección de tu instancia personalizada de Cloud Studio IoT.
* **"Authorization" header value (Optional):** Aquí deberemos de introducir el **Access Token** que generamos anteriormente en la Plataforma Cloud Studio IoT antes de comenzar con la guía. \
Es importante tener en cuenta que el campo se tiene que completar con este formato: "**Bearer \{AccessToken}**". Es importante el "**Bearer**" (con mayúscula y espacio antes del propio Access Token). Por ejemplo:\
Bearer A823h0HSUBDmnmbcu9ae2nskdn.
Para finalizar simplemente pulsaremos en “Add Output” para terminar con la integración.
**Output Name** + **Target URL for POSTs** + **"Authorization" header value (Optional)** → **Add Output**


Como último paso y como medida de seguridad, recomendamos visitar la herramienta de “**Log**” **dentro de LORIOT** para comprobar que todas las conexiones salientes están resultando correctas hacia la plataforma Cloud Studio IoT.


# The Things Stack (TTN / TTS)
La integración con [The Things Stack](https://www.thethingsindustries.com/stack) permite que la plataforma se comunique con dispositivos LoRaWAN utilizando una variedad de gateways disponibles en el mercado. Este artículo describe los pasos necesarios para completar la integración.
Requisitos [#requisitos]
La integración es muy sencilla, y requiere sólo lo siguiente:
* Un identificador de instancia. Dependiendo de su suscripción a Gear Studio, los nombres de instancia más comunes son:
* **gear.cloud.studio**. Este nombre de instancia corresponde a una instancia común de Gear Studio, incluida la versión gratuita.
* **xxxx.cloud.studio**. Este nombre de instancia corresponde a instancias Flex en las que el hosting es provisto por Cloud Studio, pero el cliente puede elegir el subdominio empleado (xxxx).
* **Otros**. En el caso de los clientes Enterprise que utilicen su propio dominio, deberá utilizarse el nombre de dominio elegido.
* Un [Access Token](/docs/configuracion-del-cliente/tokens-de-acceso-access-tokens). Los datos enviados desde TTN utilizarán este access token para acceder a la plataforma, y por ende, TTN tendrá los permisos asociados a este access token. Se aconseja crear un nuevo access token específicamente para la integración de TTN, para simplificar el control de seguridad.
Configuración en TTN [#configuración-en-ttn]
Para configurar la integración en TTN, es necesario seguir los siguientes pasos:
* Crear una aplicación (en caso de que no se tenga una)
* Configurar la integración por webhooks con la plataforma Gear Studio.
* Conectar los dispositivos a esta aplicación y verificar que la información se reciba correctamente.
* Dar de alta los dispositivos en la plataforma Gear Studio
Creación de una aplicación [#creación-de-una-aplicación]
En caso de que no se disponga previamente de una aplicación en TTN, será necesario crear una. Para esto, siga los tutoriales y vídeos disponibles en línea, tales como:
* [Adding Applications | The Things Stack for LoRaWAN (thethingsindustries.com)](https://www.thethingsindustries.com/docs/integrations/adding-applications/)
* [Creating applications and adding devices to The Things Stack - YouTube](https://www.youtube.com/watch?v=PpbkBgz1CbI)
A continuación se muestra un ejemplo de cómo se ve la ventana de creación de una aplicación:

Configuración de webhooks en TTN [#configuración-de-webhooks-en-ttn]
Para hacer posible que TTN intercambie información con la plataforma Gear Studio, debe utilizarse una integración por webhooks. Para ello puede utilizarse el webhook de Cloud Studio.
Integrations > Webhooks > Add webhook

Al utilizar el webhook, utilizar los siguientes valores:
* Webhook ID: puede elegirse cualquiera libremente, por ejemplo “cloud-studio”. El nombre no puede contener espacios y otros caracteres especiales, pero puede incluir guiones.
* Access token: token de acceso con permisos para actualizar información en los dispositivos. Vea [esta página](/docs/configuracion-del-cliente/tokens-de-acceso-access-tokens) para más información.
A continuación se muestra un ejemplo del webhook de Cloud Studio apuntado a la plataforma Gear Studio, utilizando la instancia por defecto.

Instalación de dispositivos en TTN [#instalación-de-dispositivos-en-ttn]
En caso de que no lo haya hecho previamente, instale además los dispositivos en The Things Network. Para esto, puede seguir los tutoriales disponibles en línea, tales como los siguientes:
* [Adding Devices | The Things Stack for LoRaWAN (thethingsindustries.com)](https://www.thethingsindustries.com/docs/devices/adding-devices/)
* [Creating applications and adding devices to The Things Stack - YouTube](https://www.youtube.com/watch?v=PpbkBgz1CbI)
Una vez creados los dispositivos, verifique que The Things Network recibe los datos de los dispositivos correctamente.
Instalación de dispositivos en la plataforma Gear Studio [#instalación-de-dispositivos-en-la-plataforma-gear-studio]
Finalmente para que la plataforma Gear Studio acepte los datos registrados en la plataforma Gear Studio, es necesario agregar los dispositivos. Este proceso dependerá de si el dispositivo ya está soportado en la plataforma, ya sea nativamente, o habiendo creado manualmente un modelo de dispositivo apropiado.
Si el dispositivo es de un modelo no soportado nativamente [#si-el-dispositivo-es-de-un-modelo-no-soportado-nativamente]
En caso de que el modelo de dispositivo no esté soportado nativamente por la plataforma, será necesario crear primero un modelo de dispositivo en la plataforma, siguiendo [estos pasos](/docs/configuracion-del-cliente/dispositivos-y-endpoints/dispositivos/modelos-de-dispositivo). Una vez creado el modelo de dispositivo, será posible crear tantos dispositivos como sea necesario utilizando este modelo.
Para poder procesar correctamente los datos del dispositivo, será necesario, como parte de la configuración del modelo, especificar al menos un [script para definir la estructura del dispositivo](/docs/configuracion-del-cliente/dispositivos-y-endpoints/dispositivos/modelos-de-dispositivo/configuracion), y un script para [procesar los datos recibidos desde la red LoRaWAN](/docs/configuracion-del-cliente/dispositivos-y-endpoints/dispositivos/modelos-de-dispositivo/procesamiento-de-datos) (payload).
Creación del dispositivo en Gear Studio [#creación-del-dispositivo-en-gear-studio]
Finalmente, el dispositivo puede instalarse siguiendo estos pasos:
* Ingrese a la pantalla de administración de dispositivos.
* Haga click en el botón “Agregar”.
* Ingrese una descripción para el nuevo dispositivo.
* Seleccione el modelo desde la lista desplegable.
* Ingrese la interfaz de comunicación.
* Ingrese el identificador único del dispositivo (DevEUI)
* Haga click en “Guardar”.

En este punto, el dispositivo estará listo y comenzará a recibir datos inmediatamente. Opcionalmente, puede revisar la configuración de cada endpoint del dispositivo, en caso de que sea necesario.
# ThingPark X IoT Flow (Actility)
La integración con [**ThingPark X IoT Flow**](https://community.thingpark.io) permite a la **Plataforma IoT de Cloud Studio** comunicarse con dispositivos **LoRaWAN** utilizando una variedad de pasarelas disponibles en el mercado. Este artículo describe los pasos necesarios para completar la integración. \
Requisitos [#requisitos]
Previamente a la integración el usuario debe disponer de:
* Un identificador de instancia. Dependiendo de su suscripción a Gear Studio, los nombres de instancia más comunes son:
* **gear.cloud.studio**. Este nombre de instancia corresponde a una instancia común de Gear Studio, incluida la versión gratuita.
* **xxxx.cloud.studio**. Este nombre de instancia corresponde a instancias Flex en las que el hosting es provisto por Cloud Studio, pero el cliente puede elegir el subdominio empleado (xxxx).
* **Otros**. Para clientes Enterprise que utilicen su propio dominio, se debe utilizar el nombre de dominio elegido.
* Un [Access Token](/docs/configuracion-del-cliente/tokens-de-acceso-access-tokens). Los datos enviados desde TPX utilizarán este token de acceso para acceder a la plataforma, y por lo tanto, TPX tendrá los permisos asociados a este access token. Se aconseja crear un nuevo token de acceso específicamente para la integración TPX, para simplificar el control de seguridad.\
Creación de una conexión con UI
Ingrese a [**community.thingpark.io**](https://community.thingpark.io) e inicie sesión. A continuación, siga estos pasos:
1. Haga clic en Conexiones -> Crear -> **ThingPark X IoT Flow.**

2. A continuación, se abrirá una nueva página. Seleccione el tipo de conexión: **Gear Studio**.

3. Complete el formulario como se muestra en el siguiente ejemplo y haga clic en **Crear**.

> Nota
>
> Los parámetros marcados con \* son obligatorios.
4. Aparecerá una notificación en la parte superior derecha de su pantalla para confirmar que la aplicación ha sido creada.
5. Después de crear la aplicación, será redirigido a los detalles de conexión.
Visualización de información en la plataforma IoT de Cloud Studio [#visualización-de-información-en-la-plataforma-iot-de-cloud-studio]
Conéctese a su instancia de **Gear Studio**, y navega hasta la configuración.
1\. Ingresa a la sección **Dispositivos** y hace clic en el botón **Añadir** para [crear un nuevo Dispositivo](/docs/configuracion-del-cliente/dispositivos-y-endpoints/dispositivos/dispositivos).
_bc3f.png)
2\. Rellene el formulario utilizando el **Modelo de Dispositivo** creado anteriormente, el campo **Dirección** corresponde a su **Dispositivo EUI** (encuéntrelo en la lista de dispositivos de **ThingPark**).

3\. Luego de creado el dispositivo, los datos reportados a la plataforma se mostrarán en la sección **Endpoints** en el menú izquierdo del **Monitor**. Tenga en cuenta que los dispositivos **LoRaWAN** pueden reportar cada 5 a 15 minutos por lo que la visualización dependerá de este intervalo.

4\. Una vez que los dispositivos están conectados correctamente, puede crear un **Dashboard** personalizado utilizando una amplia variedad de **Widgets** para mostrar los datos que están siendo enviados por el dispositivo.

> Revise nuestro [tutorial](https://www.youtube.com/watch?v=OmJ1RJ4tGKY) en YouTube
# Matriz de métodos para actualización de sensores
Actualización de datos a nivel de dispositivo [#actualización-de-datos-a-nivel-de-dispositivo]
Esta tabla contiene los métodos disponibles para actualizar los datos de dispositivos.
| Propiedad del dispositivo | Método de scripting | Método http | Método http RAW |
| -------------------------------- | ----------------------- | ----------------------- | --------------- |
| Ubicación del dispositivo | updateDeviceGeolocation | UpdateDeviceGeolocation | - |
| Nivel de RSSI del dispositivo | updateDeviceRssi | UpdateDeviceStatus | - |
| Nivel de batería del dispositivo | updateDeviceBattery | UpdateDeviceStatus | - |
Actualización de datos a nivel de endpoint [#actualización-de-datos-a-nivel-de-endpoint]
Esta tabla contiene los métodos disponibles para actualizar los datos de endpoints.
| Tipo de sensor | Método de scripting | Método http | Método http RAW |
| ---------------------------------------------------------------------------------- | -------------------------------------------------------------- | -------------------------------- | ----------------------------------- |
| Sensores de temperatura | updateTemperatureSensorStatus | UpdateTemperatureSensorStatus | UpdateTemperatureSensorStatusRaw |
| Sensores de humedad | updateHumiditySensorStatus | UpdateHumiditySensorStatus | UpdateHumiditySensorStatusRaw |
| Artefactos y dispositivos on/off | updateApplianceStatus | UpdateApplianceStatus | UpdateApplianceStatusRaw |
| Sensores de nivel de iluminación | updateLightSensorStatus | UpdateLightSensorStatus | UpdateLightSensorStatusRaw |
| Sensores IAS, binarios, contactos, etc. | updateIASSensorStatus | UpdateIASSensorStatus | UpdateIASSensorStatusRaw |
| Sensores de peso | updateWeightSensorStatus | UpdateWeightSensorStatus | UpdateWeightSensorStatusRaw |
| Sensores de presión | updatePressureSensorStatus | UpdatePressureSensorStatus | UpdatePressureSensorStatusRaw |
| Sensores de volumen | updateVolumeSensorStatus | UpdateVolumeSensorStatus | UpdateVolumeSensorStatusRaw |
| Sensores genéricos | updateGenericSensorStatus | UpdateGenericSensorStatus | UpdateGenericSensorStatusRaw |
| Sensores de voltaje | updateVoltageSensorStatus | UpdateVoltageSensorStatus | UpdateVoltageSensorStatusRaw |
| Sensores de corriente | updateCurrentSensorStatus | UpdateCurrentSensorStatus | UpdateCurrentSensorStatusRaw |
| Sensores de potencia activa | updateActivePowerSensorStatus | UpdateActivePowerSensorStatus | UpdateActivePowerSensorStatusRaw |
| Sensores de potencia reactiva | updateReactivePowerSensorStatus | UpdateReactivePowerSensorStatus | UpdateReactivePowerSensorStatusRaw |
| Sensores de potencia aparente | updateApparentPowerSensorStatus | UpdateApparentPowerSensorStatus | UpdateApparentPowerSensorStatusRaw |
| Sensores de coseno fi / factor de potencia | updateCosPhiSensorStatus | UpdateCosPhiSensorStatus | UpdateCosPhiSensorStatusRaw |
| Medidores de consumo de energía | updateEnergySensorValueSummation, updateEnergySensorValueUnits | UpdateEnergySensorValueSummation | UpdateEnergySensorValueSummationRaw |
| Medidores de flujo, medidores de flujo genéricos, y medidores de flujo de personas | updateFlowSensorValueSummation, updateFlowSensorValueUnits | UpdateFlowSensorValueSummation | UpdateFlowSensorValueSummationRaw |
| Frecuencímetros | updateFrequencySensorStatus | UpdateFrequencySensorStatus | UpdateFrequencyMeterStatusRaw |
| Dimmers | updateDimmerStatus | UpdateDimmerStatus | UpdateDimmerStatus |
| Cortinas y otros cerramientos | updateClosureControllerStatus | UpdateClosureControllerStatus | UpdateClosureControllerStatusRaw |
| Sensores de concentración en ppm | updatePpmConcentrationSensorStatus | UpdateConcentrationSensorStatus | UpdateConcentrationSensorStatusRaw |
| Sensores de concentración en masa/volumen | updateMvConcentrationSensorStatus | UpdateConcentrationSensorStatus | UpdateConcentrationSensorStatusRaw |
| Sensores de calidad del aire (AQI) | updateAqiSensorStatus | UpdateAirQualitySensorStatus | UpdateAirQualitySensorStatusRaw |
| Location trackers (sensores de ubicación) | updateLocationTrackerStatus | UpdateLocationTrackerStatus | UpdateLocationTrackerStatusRaw |
| Contadores de personas | updatePeopleCounterStatus | UpdatePeopleCounterStatus | UpdatePeopleCounterStatusRaw |
| HVAC/Termostatos | updateHVACStatus | updateHVACStatus | - |
| Cámaras | - | UploadCameraSnapshot | - |
| Texto | updateTextContainerStatus | UpdateTextContainerStatus | - |
# MQTT
Introducción [#introducción]
Esta sección describe la integración con la plataforma Gear Studio utilizando MQTT. Esta funcionalidad está orientada a permitir la integración con dispositivos de una variedad de fabricantes, así como dispositivos desarrollados a medida con Arduino, nodeMCU, Raspberry Pi y cualquier otra plataforma que soporte comunicación a través de MQTT con seguridad TLS.
Alternativas de integración [#alternativas-de-integración]
Existen dos alternativas de integración por MQTT:
* [Intercambio de datos flexible](/docs/configuracion-del-cliente/dispositivos-y-endpoints/dispositivos/integracion-de-dispositivos/mqtt/intercambio-de-datos-flexible) (**recomendado**): El intercambio flexible permite la recepción de datos desde los dispositivos (uplink), así como el envío de datos hacia los dispositivos (downlink). Es sumamente flexible y puede implementarse con facilidad.
* [Puente HTTP](/docs/configuracion-del-cliente/dispositivos-y-endpoints/dispositivos/integracion-de-dispositivos/mqtt/puente-http) (**para migración de dispositivos**): el puente HTTP permite migrar dispositivos que utilizan la interfaz HTTP, de manera que en su lugar utilicen MQTT.
**Importante**: el puente HTTP está diseñado principalmente para la migración de dispositivos desde HTTP hacia MQTT, pero para dispositivos nuevos, es conveniente utilizar el [intercambio de datos flexible](/docs/configuracion-del-cliente/dispositivos-y-endpoints/dispositivos/integracion-de-dispositivos/mqtt/intercambio-de-datos-flexible), que puede verse [aquí](/docs/configuracion-del-cliente/dispositivos-y-endpoints/dispositivos/integracion-de-dispositivos/mqtt/intercambio-de-datos-flexible). El intercambio de datos flexible permite representar los datos con mucha más flexibilidad, y generalmente de una forma más compacta.
Autenticación y seguridad [#autenticación-y-seguridad]
Cada instancia de Gear Studio tiene su propio servidor MQTT dedicado, usualmente preparado para conexiones seguras con TLS en el puerto 8883. La conexión al servidor MQTT requiere:
* **Usuario y contraseña**, que pueden gestionarse a través de la opción “Configuración MQTT” dentro de la sección “Seguridad” de la aplicación Gear Manager. El id de usuario se utiliza también como sufijo de todos los topics de MQTT.
* **Certificado** TLS, que se utiliza para que el dispositivo pueda verificar que está conectado al servidor correcto.
Uso de un Client ID [#uso-de-un-client-id]
Algunos clientes MQTT requieren que se defina un “Client ID” previo a la conexión, y otros permiten que se utilice uno al azar. En caso de que sea necesario definir un Client ID en forma explícita, recomendamos utilizar un string que contenga el usuario, y luego algún sufijo único. Por ejemplo, puede seguirse una nomenclatura como la siguiente:
\{**client-secure-id**}\{**valor-generico**}
Ej: **16SAD5656S\*\*\*\*01**
Dónde:
* 16SAD5656S es el usuario que se utiliza en la conexión, y
* 01 es el "valor genérico", que debería ser diferente para cada conexión.
# Intercambio de datos flexible
Introducción [#introducción]
El intercambio de datos flexible es la forma de integración por MQTT recomendada en la plataforma Gear Studio. Todos los dispositivos MQTT soportados nativamente por la plataforma utilizan el intercambio de datos flexible, pero esta forma de intercambio de datos está recomendada también para modelos de dispositivo no soportados nativamente.
El intercambio flexible de datos se basa en dos tipos de mensaje:
* **Uplink**: los mensajes de uplink son todos aquellos enviados desde los dispositivos hacia la plataforma. La plataforma debe ser capaz de procesar los mensajes de uplink para almacenar la información relevante, y procesarla.
* **Downlink**: los mensajes de downlink son aquellos enviados desde la plataforma hacia los dispositivos, típicamente en la forma de comandos. Algunos dispositivos no soportan mensajes de uplink, mientras que otros sólo los soportan para operaciones específicas de configuración.
Para los modelos de dispositivo no soportados nativamente por la plataforma, el intercambio flexible de datos permite utilizar scripts con los cuales se define el procesamiento de los mensajes de uplink, así como la creación de mensajes de downlink, fácilmente.
Pasos a seguir [#pasos-a-seguir]
Configuración del topic para envío de datos a la plataforma [#configuración-del-topic-para-envío-de-datos-a-la-plataforma]
Para que la plataforma pueda recibir los datos del dispositivo, será necesario configurarlo para publicar en el topic `{**MQTTUserID**}/uplink/{**DeviceAddress**}`, donde:
* **MQTTUserID** es el identificador del usuario MQTT elegido para el dispositivo. Más información [aquí](/docs/configuracion-del-cliente/dispositivos-y-endpoints/dispositivos/integracion-de-dispositivos/mqtt).
* **DeviceAddress** es la dirección del dispositivo, tal como ha sido ingresada al crear el dispositivo en la plataforma.
Por ejemplo, si el dispositivo utiliza el usuario de MQTT ***JH529LQK91G7*** y la dirección del dispositivo es ***06A022B39C14***, entonces deberá ser configurado para publicar información en el siguiente topic:
`JH529LQK91G7/uplink/06A022B39C14`
Configuración del topic para recepción de datos desde la plataforma (opcional) [#configuración-del-topic-para-recepción-de-datos-desde-la-plataforma-opcional]
Para que la plataforma pueda enviar datos los al dispositivo, será necesario configurarlo para suscribirse al topic `{**MQTTUserID**}/downlink/{**DeviceAddress**}`, donde:
* **MQTTUserID** es el identificador del usuario MQTT elegido para el dispositivo. Más información [aquí](/docs/configuracion-del-cliente/dispositivos-y-endpoints/dispositivos/integracion-de-dispositivos/mqtt).
* **DeviceAddress** es la dirección del dispositivo, tal como ha sido ingresada al crear el dispositivo en la plataforma.
Por ejemplo, si el dispositivo utiliza el usuario de MQTT ***JH529LQK91G7*** y la dirección del dispositivo es ***06A022B39C14***, entonces deberá ser configurado para suscribirse al siguiente topic:
`JH529LQK91G7/downlink/06A022B39C14`
Una vez completados estos pasos, la plataforma comenzará a recibir y procesar la información del dispositivo. Si se trata de un dispositivo de un modelo no soportado nativamente por la plataforma, será necesario además definir los [scripts de procesamiento de datos](/docs/configuracion-del-cliente/dispositivos-y-endpoints/dispositivos/modelos-de-dispositivo/procesamiento-de-datos), como se describe en [esta sección](/docs/configuracion-del-cliente/dispositivos-y-endpoints/dispositivos/modelos-de-dispositivo/procesamiento-de-datos).
# Expresiones
Las expresiones permiten realizar cálculos, principalmente para la [conversión de datos crudos](/docs/configuracion-del-cliente/dispositivos-y-endpoints/endpoints/conversion-de-datos-crudos-raw) en dispositivos.
¿Qué son las expresiones? [#qué-son-las-expresiones]
Las expresiones son textos que permiten evaluar datos, realizar cálculos, y finalmente devolver un único valor. Las expresiones pueden incluir variables, de manera tal que el valor de esas variables se utilice para los cálculos.
Tipos de dato [#tipos-de-dato]
El motor de expresiones integrado en Gear Studio permite tres tipos de dato: number, string, y boolean, como se muestra a continuación:
| Tipo de datos | Comentarios |
| ------------- | ---------------------------------------------------------------------------------------------------------------------------------------------------------------------------------------------------------------------------------------------------------- |
| Number | Los datos de tipo number representan números, ya sea enteros, o de punto flotante (con decimales). |
| String | Representan textos, y en caso de querer escribirlos como constantes, deben encerrarse utilizando comillas simples ('). Cuando un texto debe contener una comilla simple, puede representarse como constante utilizando dos comillas simples seguidas (''). |
| Boolean | Representa una condición booleana (lógica), que puede valer únicamente true (verdadero) o false (falso). |
Variables [#variables]
Cuando las expresiones se utilizan para la [conversión de datos crudos](/docs/configuracion-del-cliente/dispositivos-y-endpoints/endpoints/conversion-de-datos-crudos-raw) en dispositivos, existe una variable implícita [RawData](/docs/configuracion-del-cliente/dispositivos-y-endpoints/endpoints/conversion-de-datos-crudos-raw), que contiene el valor crudo enviado por el dispositivo. Esta variable puede utilizarse en forma directa en cualquier expresión de conversión de datos, pero es necesario tener en cuenta que la variable es de tipo string. Habitualmente es necesario convertir la variable a número (utilizando la función [ToNumber](/docs/configuracion-del-cliente/dispositivos-y-endpoints/endpoints/conversion-de-datos-crudos-raw/expresiones/funciones/otras-funciones/tonumber)), y aplicar otras funciones de conversión en caso de ser necesario.
Algunos ejemplos de expresiones [#algunos-ejemplos-de-expresiones]
| Expresión | Comentarios |
| ------------------------------------- | -------------------------------------------------------------------------------------------------------------------------------------------------------------- |
| 25 | Constante, con valor 25 (number) |
| ‘Hola, mundo’ | Constante, con valor “Hola, mundo” (string) |
| False | Constante, con valor false (boolean) |
| 'I''m happy with expressions' | Constante con valor “I'm happy with expressions” (string). Nótese el uso de doble comilla simple para la comilla simple luego de “I”. |
| 5 \* 6 | Expresión con valor 30 (number), correspondiente a la multiplicación de 5 por 6. |
| (2 + 3) \* 6 | Expresión con valor 30 (number), correspondiente a una suma y una multiplicación. |
| ‘Tengo ’ + ToString(6 \* 5) + ‘ años’ | Expresión con valor “Tengo 30 años” (string), utilizando una multiplicación y una conversión de number a string utilizando la función ToString. |
| 25 \< 8 | Expresión con valor false (boolean), correspondiente a una comparación por menor. |
| not (25 \< 8) | Expresión con valor true (boolean), correspondiente a una negación de una comparación por menor. |
| Sqrt(81) | Expresión con valor 9 (number), calculado como raíz cuadrada de 81 usando la función Sqrt. |
| ToNumber(RawData) / 10 | Expresión numérica cuyo valor depende de la variable especial RawData. La expresión toma el valor de RawData, lo convierte a número, y luego lo divide por 10. |
¿Qué efecto tienen las mayúsculas y minúsculas en las expresiones? [#qué-efecto-tienen-las-mayúsculas-y-minúsculas-en-las-expresiones]
En el motor de expresiones de la plataforma Cloud Studio, los nombres de variables, funciones, etc., no son case-sensitive, es decir que da lo mismo escribirlas en mayúsculas, minúsculas, o mezclando ambas. Por ejemplo, todas las siguientes expresiones son equivalentes:
```
ToString(NOT (valor < 25))
tostring(not (valor < 25))
TOSTRING(not (VALOR< 25))
```
¿Dónde es posible utilizar expresiones? [#dónde-es-posible-utilizar-expresiones]
Actualmente, las expresiones pueden utilizarse para la [conversión de datos crudos](/docs/configuracion-del-cliente/dispositivos-y-endpoints/endpoints/conversion-de-datos-crudos-raw) en dispositivos. Esto permite obtener información cruda de ciertos dispositivos (típicamente sensores), y utilizar expresiones para convertir esos datos a valores que puedan inyectarse en la plataforma.
¿Se puede programar usando expresiones? [#se-puede-programar-usando-expresiones]
No, las expresiones no son una herramienta de programación, sino de cálculo. Las expresiones no tienen estructuras de control tales como for, while, etc., y no están diseñadas con ese propósito.
¿Cómo puedo probar mis expresiones? [#cómo-puedo-probar-mis-expresiones]
En general, toda funcionalidad que permite el uso de expresiones tiene la posibilidad de probar allí mismo cada expresión con valores de prueba. Como ejemplo puede consultarse la referencia de [conversión de datos crudos](/docs/configuracion-del-cliente/dispositivos-y-endpoints/endpoints/conversion-de-datos-crudos-raw) en dispositivos.
¿Cómo puedo representar números hexadecimales? [#cómo-puedo-representar-números-hexadecimales]
El motor de expresiones permite representar números hexadecimales anteponiendo el prefijo “0x”, o, alternativamente, el prefijo “$” (ambos métodos son equivalentes). Por ejemplo, el valor 0x100 (o alternativamente, $100), representa el número hexadecimal 100, equivalente al decimal 256.
Más información [#más-información]
Para más información sobre expresiones, consultar la referencia de [operadores](/docs/configuracion-del-cliente/dispositivos-y-endpoints/endpoints/conversion-de-datos-crudos-raw/expresiones/operadores), y [funciones](/docs/configuracion-del-cliente/dispositivos-y-endpoints/endpoints/conversion-de-datos-crudos-raw/expresiones/funciones).
# API HTTP
Introducción [#introducción]
[API HTTP](/docs/configuracion-del-cliente/dispositivos-y-endpoints/dispositivos/integracion-de-dispositivos/http/api-http/almacenamiento-de-datos-de-sensores): la API HTTP permite que los dispositivos se comuniquen con la plataforma utilizando un formato de mensaje específico, documentado en las siguientes secciones, lo que permite:
* Subir datos de los dispositivos hacia la plataforma. [Esta página](/docs/configuracion-del-cliente/dispositivos-y-endpoints/dispositivos/integracion-de-dispositivos/http/api-http/almacenamiento-de-datos-de-sensores) muestra la referencia de todo lo necesario para cada tipo de sensor.
* Actualizar datos propios del dispositivo, tales como el nivel de batería y de RSSI. Siga [esta referencia](/docs/configuracion-del-cliente/dispositivos-y-endpoints/dispositivos/integracion-de-dispositivos/http/api-http/actualizacion-de-datos-del-dispositivo) para más información.
* Recibir y contestar comandos enviados desde la plataforma. En [esta página](/docs/configuracion-del-cliente/dispositivos-y-endpoints/dispositivos/integracion-de-dispositivos/http/api-http/recepcion-y-confirmacion-de-comandos) puede encontrarse más información sobre este tema.
# Recepción y confirmación de comandos
Flujo básico de integración de comandos [#flujo-básico-de-integración-de-comandos]

Basic command integration flow
El gateway, dispositivo o endpoint deberá estar escuchando comandos ejecutando el método correspondiente. Para esto se utiliza un mecanismo de long polling, donde el request permanecerá del lado del servidor por una cantidad de tiempo definido y volverá con la respuesta en caso de que el tiempo especificado se haya cumplido o que se haya detectado la ejecución de un comando.
Esta respuesta deberá ser interpretada por el dispositivo, realizar las acciones correspondientes y responder a través del método de respuesta de comandos para informar si la ejecución del mismo fue correcta o no.
En caso de ser correcta, se deberá ejecutar el método para actualizar el estado del dispositivo según corresponda.
Por último, asegurarse de seguir escuchando comandos con el primer método mencionado.
1. Esperar por comandos [#1-esperar-por-comandos]
Los comandos pueden ser escuchados a 3 niveles:
1. A nivel de Gateway
2. A nivel de Device
3. A nivel de Endpoint
Estos comandos deben llamarse de manera cíclica para escuchar constantemente los comandos ejecutados.
Comandos para endpoints [#comandos-para-endpoints]
Se deberá llamar al método `WaitForCommand_Endpoint` mediante http POST:
```
POST /services/gear/DeviceIntegrationService.svc/WaitForCommand_Endpoint HTTP/1.1
Host: gear-dev.cloud.studio
Content-Type: application/json
{
"accessToken": "",
"endpointID": 1,
"timeoutSeconds": 60
}
```
Parámetros [#parámetros]
| Nombre | Descripción | Tipo de datos |
| -------------- | -------------------------------------------------------------------------------------------------------------------------- | ------------- |
| accessToken | Access Token único | texto |
| endpointID | Identificador único del endpoint, obtenido desde el Manager | numérico |
| timeoutSeconds | Tiempo en segundos que el servidor esperará antes de volver con la respuesta en caso de que no se hayan detectado comandos | numérico |
**Respuesta**
La respuesta es una lista dentro de la propiedad `WaitForCommand_EndpointResult` que tendrá cada uno de los comandos correspondientes:
```
{
"WaitForCommand_EndpointResult":[
{
"Closure":null,
"CommandID":1120907993,
"CommandType":1,
"Custom":null,
"DeviceID":7246,
"Dimmer":null,
"EndpointID":113139,
"Management":null,
"OnOff":{
"AutomaticOverrideMinutes":0,
"CommandType":1
},
"Thermostat":null
}
]
}
```
Para mas información acerca de las propiedades de la respuesta [ver la documentación](https://www.cloud.studio/developers/gear/api/html/T_CloudStudio_Services_Types_DeviceCommand.htm)
Según el tipo de comando que se haya ejecutado, se deberá tener en cuenta la propiedad correspondiente para conocer la acción a realizar.
Por ejemplo, si el `CommandType` es 1, quiere decir que es un comando para un endpoint tipo "Appliance". Por lo que se deberá tener en cuenta lo que se informe en la propiedad `OnOff`
Los distintos command types se pueden [ver en esta documentación](https://www.cloud.studio/developers/gear/api/html/T_CloudStudio_Services_Types_DeviceCommandType.htm).
2. Responder un comando [#2-responder-un-comando]
En caso de haber recibido un comando con alguno de los métodos de `WaitForCommands_*` y luego de ejecutar las acciones correspondientes en el endpoint (hardware) se deberá responder el comando ya sea en caso de éxito o error.
Para informar que el comando ha sido ejecutado, se debe llamar al siguiente método:
```
POST /services/gear/DeviceIntegrationService.svc/RespondCommand HTTP/1.1
Host: gear-dev.cloud.studio
Content-Type: application/json
{
"accessToken": "",
"response":{
"CommandID": 1120907993,
"ResponseType": 0,
"ErrorCode": "",
"ErrorMessage": "",
"ResponseData": "ok"
}
}
```
El `CommandID` debe corresponder al obtenido en el método de espera de comandos correspondiente. El `ResponseType` debe ser [alguno de los del enum](https://www.cloud.studio/developers/gear/api/html/T_CloudStudio_Services_Types_CommandResponseType.htm), según corresponda. En este caso es 0, que significa ***"success".***
3. Actualizar estado del endpoint [#3-actualizar-estado-del-endpoint]
En caso de que la ejecución del comando haya sido exitosa, se deberá informar el nuevo estado del endpoint. Para esto se deberá utilizar el [método correspondiente](/docs/configuracion-del-cliente/dispositivos-y-endpoints/dispositivos/integracion-de-dispositivos/http) al tipo de endpoint.
Siguiendo el ejemplo de appliance, se deberá llamar al siguiente método:
```
POST /services/gear/DeviceIntegrationService.svc/UpdateApplianceStatus HTTP/1.1
Host: gear-dev.cloud.studio
Content-Type: application/json
{
"accessToken": "",
"endpointID": 1,
"isOn": true
}
```
Para más información acerca de este método ver la sección de [artefactos on/off](/docs/configuracion-del-cliente/dispositivos-y-endpoints/dispositivos/integracion-de-dispositivos/http/api-http/almacenamiento-de-datos-de-sensores/appliances-y-otros-dispositivos-on-off)
# Actualizar estado de RRSI y nivel de batería
Reportar el estado de RRSI y/o nivel de batería de un dispositivo [#reportar-el-estado-de-rrsi-yo-nivel-de-batería-de-un-dispositivo]
Este método no almacena un histórico del estado, solamente toma el último reportado y lo muestra en la plataforma. Es decir, si en un primer request se reportaron 3 baterías, y en el segundo request se reporta solo una, entonces se asume que el dispositivo ahora tiene una sola batería. Lo mismo ocurre con los RRSI. Si se envían arrays vacíos, entonces se asumirá que no hay registro de nivel de batería ni de RSSI y se borrará lo reportado anteriormente.
La integración por MQTT de estado de RRSI y nivel de batería lleva la siguiente estructura:
```
{
"accessToken": "xxxxxxxxxxxxxxxxxxxxxxxxxxxxxxxxxxxxxxxx",
"deviceID": 1,
"battery": [
{
"type": 2,
"percentage": 30,
"voltage": 3.5
},
{
"type": 3,
"percentage": 100,
"voltage": 5
}
],
"rssi": [
{
"type": 2,
"quality": 100,
"strength": -40
}
],
"mqttMethod": "UpdateDeviceStatus",
"mqttRID": "tkrs34"
}
```
Más información acerca de las peticiones y topics en la sección de [integración por MQTT](/docs/configuracion-del-cliente/dispositivos-y-endpoints/dispositivos/integracion-de-dispositivos/mqtt)
Parámetros [#parámetros]
| Nombre | Descripción | Tipo de datos |
| ----------- | ---------------------------------------------------------------------------------------------------------------------------------------------------------------------------------------------------- | ------------- |
| accessToken | Token de acceso con permisos para actualizar información del endpoint. Vea esta página para más información. | text |
| deviceID | Identificador único del dispositivo o dirección del dispositivo con formato \[deviceAddress] (Ej: \[device-1234]). Estos valores pueden verse en la página de administración de dispositivos. | number |
| battery | Lista de los estados de las distintas baterías que tiene el dispositivo. Se pueden enviar 1 o varias. Puede encontrar la descripción de las propiedades de este parámetros más abajo. | array |
| rssi | Lista de los estados de las distintas conexiones inalámbricas que tiene el dispositivo. Se pueden enviar 1 o varias. Puede encontrar la descripción de las propiedades de este parámetros más abajo. | array |
| mqttMethod | Método correspondiente del servicio, en este caso UpdateDeviceStatus | text |
| mqttRID | Identificador opcional para la petición, en caso de que se desee obtener una respuesta de confirmación. | text |
Parámetro array “battery” [#parámetro-array-battery]
En cada uno de los elementos de este array se debe reportar, al menos, “percentage” o “voltage”. Type es obligatorio.
| Nombre | Descripción | Tipo de datos |
| ---------- | ------------------------------------------------------------------------------------------------------------------------------------------------------------------------------------------------------------------------------------ | ------------- |
| type | Tipo de batería que se está reportando. Los tipos permitidos son:0: Desconocido. Si se envía este valor, se cambiará automáticamente a 11: Por defecto2: Primaria3: Secundaria4: BackupNo se pueden repetir tipos en un mismo array. | number |
| percentage | Valor numérico del porcentaje restante de la batería. | number |
| voltage | Valor numérico del voltaje actual de la batería. | number |
Parámetro array “rssi” [#parámetro-array-rssi]
En cada uno de los elementos de este array se debe reportar, al menos, “quality” o “strength”. Type es obligatorio.
| Nombre | Descripción | Tipo de datos |
| -------- | ------------------------------------------------------------------------------------------------------------------------------------------------------------------------------------------------------------------------------------------------------------------------------------------------------------------------- | ------------- |
| type | Representa un tipo de tecnología inalámbrica en la que se puede medir RSSI. Los valores permitidos son:0: Desconocido. Si se envía este valor, se cambiará automáticamente a 11: Por defecto2: WiFi3: LoRaWAN4: Cellular (2G/3G/4G/5G/Cat-M/NB-IoT/etc)5: ZigBee6: Custom RFNo se pueden repetir tipos en un mismo array. | number |
| quality | Valor numérico que representa la calidad de la señal. De 0 a 100. Si este valor no es informado, pero el parámetro “strength” si, el valor de este parámetro será auto calculado | number |
| strength | Valor numérico que representa la intensidad de la señal en dBm (negativo). Si el valor informado es positivo, se cambiará su signo. Si este valor no es informado, pero el parámetro “quality” si, el valor de este parámetro será auto calculado. | number |
# Actualizar ubicación de un dispositivo
Reportar la ubicación geográfica de un dispositivo [#reportar-la-ubicación-geográfica-de-un-dispositivo]
La actualización de la ubicación del dispositivo por MQTT lleva la siguiente estructura:
```
{
"accessToken": "xxxxxxxxxxxxxxxxxxxxxxxxxxxxxxxxxxxxxxxx",
"deviceID": 1,
"latitude": 40.4052,
"longitude": -3.87699,
"mqttMethod": "UpdateDeviceGeolocation",
"mqttRID": "tkrs34"
}
```
Parámetros [#parámetros]
| Nombre | Descripción | Tipo de datos |
| ----------- | --------------------------------------------------------------------------------------------------------------------------------------------------------------------------------------------- | ------------- |
| accessToken | Token de acceso con permisos para actualizar información del endpoint. Vea esta página para más información. | text |
| deviceID | Identificador único del dispositivo o dirección del dispositivo con formato \[deviceAddress] (Ej: \[device-1234]). Estos valores pueden verse en la página de administración de dispositivos. | number |
| latitude | Indica la latitud de la ubicación actual del dispositivo. | number |
| longitude | Indica la longitud de la ubicación actual del dispositivo. | number |
| mqttMethod | Método correspondiente del servicio, en este caso UpdateDeviceGeolocation. | text |
| mqttRID | Identificador opcional para la petición, en caso de que se desee obtener una respuesta de confirmación. | text |
# Appliances y otros dispositivos on-off
Reporte de estado del endpoint [#reporte-de-estado-del-endpoint]
La integración de appliances y otros dispositivos on-off (válvulas, lámparas, motores, etc.) por MQTT lleva la siguiente estructura:
```
{
"accessToken": "xxxxxxxxxxxxxxxxxxxxxxxxxxxxxxxxxxxxxxxx",
"endpointID": 1,
"isOn": true,
"timestamp": "2021-02-23T14:55:03",
"mqttMethod": "UpdateApplianceStatus",
"mqttRID": "tkrs34"
}
```
Parámetros [#parámetros]
| Nombre | Descripción | Tipo de datos |
| ----------- | ------------------------------------------------------------------------------------------------------------------------------------------------------------------------------------------------------------------------------------------------------------------------------------------------------------------ | ------------- |
| accessToken | Token de acceso con permisos para actualizar información del endpoint. Vea esta página para más información. | texto |
| endpointID | Identificador único del endpoint o combinación de dirección del dispositivo y dirección del endpoint con formato \[deviceAddress]:endpointAddress (Ej: \[device-1234]:1). Estos valores pueden verse en la página de administración de endpoints. | texto |
| isOn | Indica si el artefacto está encendido (true) o apagado (false) | bool |
| timestamp | Valor opcional indicando la fecha y hora UTC correspondiente a la medición. El formato en que se indique esta fecha debe coincidir con alguno de los indicados en la sección formatos de fecha. En caso de que el campo sea omitido, la plataforma asumirá que la medición corresponde a la fecha y hora actuales. | text |
| mqttMethod | Método correspondiente del servicio, en este caso UpdateApplianceStatus | string |
| mqttRID | Identificador opcional para la petición, en caso de que se desee obtener una respuesta de confirmación. | string |
Reporte de estado en formato "raw" [#reporte-de-estado-en-formato-raw]
El estado del endpoint puede ser reportado como un **valor crudo (raw),** utilizando el [conversor de expresiones](/docs/configuracion-del-cliente/dispositivos-y-endpoints/endpoints/conversion-de-datos-crudos-raw). Esta opción es conveniente cuando el dispositivo no es capaz de realizar conversiones, y emite valores que necesitan ser transformados antes de inyectarse en la plataforma.
A continuación, se muestra un ejemplo de una petición en formato raw:
```
{
"accessToken": "xxxxxxxxxxxxxxxxxxxxxxxxxxxxxxxxxxxxxxxx",
"endpointID": 1,
"rawData": "true",
"timestamp": "2021-02-23T14:55:03",
"mqttMethod": "UpdateApplianceStatusRaw",
"mqttRID": "tkrs34"
}
```
Parámetros [#parámetros-1]
| Nombre | Descripción | Tipo de datos |
| ----------- | ------------------------------------------------------------------------------------------------------------------------------------------------------------------------------------------------------------------------------------------------------------------------------------------------------------------ | ------------- |
| accessToken | Token de acceso con permisos para actualizar información del endpoint. Vea esta página para más información. | texto |
| endpointID | Identificador único del endpoint, que puede verse en la página de administración de endpoints. | numérico |
| rawData | Valor reportado por el sensor, como texto. Debe indicarse una expresión en el conversor de expresiones. La expresión debe devolver un valor booleano indicando si el artefacto está encendido (true) o apagado (false). | texto |
| timestamp | Valor opcional indicando la fecha y hora UTC correspondiente a la medición. El formato en que se indique esta fecha debe coincidir con alguno de los indicados en la sección formatos de fecha. En caso de que el campo sea omitido, la plataforma asumirá que la medición corresponde a la fecha y hora actuales. | text |
| mqttMethod | Método correspondiente del servicio, en este caso UpdateApplianceStatusRaw | string |
| mqttRID | Identificador opcional para la petición, en caso de que se desee obtener una respuesta de confirmación. | string |
# Contadores de personas
Reporte de estado del endpoint [#reporte-de-estado-del-endpoint]
La integración de sensores de contadores de personas por MQTT lleva la siguiente estructura:
```
{
"accessToken": "xxxxxxxxxxxxxxxxxxxxxxxxxxxxxxxxxxxxxxxx",
"endpointID": 1,
"peopleCount": 30,
"timestamp": "2021-02-23T14:55:03",
"mqttMethod": "UpdatePeopleCounterStatus",
"mqttRID": "tkrs34"
}
```
Parámetros [#parámetros]
| Nombre | Descripción | Tipo de datos |
| ----------- | ------------------------------------------------------------------------------------------------------------------------------------------------------------------------------------------------------------------------------------------------------------------------------------------------------------------ | ------------- |
| accessToken | Token de acceso con permisos para actualizar información del endpoint. Vea esta página para más información. | texto |
| endpointID | Identificador único del endpoint o combinación de dirección del dispositivo y dirección del endpoint con formato \[deviceAddress]:endpointAddress (Ej: \[device-1234]:1). Estos valores pueden verse en la página de administración de endpoints. | texto |
| peopleCount | Indica la cantidad de personas detectadas por el sensor. | numérico |
| timestamp | Valor opcional indicando la fecha y hora UTC correspondiente a la medición. El formato en que se indique esta fecha debe coincidir con alguno de los indicados en la sección formatos de fecha. En caso de que el campo sea omitido, la plataforma asumirá que la medición corresponde a la fecha y hora actuales. | text |
| mqttMethod | Método correspondiente del servicio, en este caso UpdatePeopleCounterStatus | string |
| mqttRID | Identificador opcional para la petición, en caso de que se desee obtener una respuesta de confirmación. | string |
Reporte de estado en formato "raw" [#reporte-de-estado-en-formato-raw]
El estado del endpoint puede ser reportado como un **valor crudo (raw),** utilizando el [conversor de expresiones](/docs/configuracion-del-cliente/dispositivos-y-endpoints/endpoints/conversion-de-datos-crudos-raw). Esta opción es conveniente cuando el dispositivo no es capaz de realizar conversiones, y emite valores que necesitan ser transformados antes de inyectarse en la plataforma.
A continuación, se muestra un ejemplo de una petición en formato raw:
```
{
"accessToken": "xxxxxxxxxxxxxxxxxxxxxxxxxxxxxxxxxxxxxxxx",
"endpointID": 1,
"rawData": 30,
"timestamp": "2021-02-23T14:55:03",
"mqttMethod": "UpdatePeopleCounterStatusRaw",
"mqttRID": "tkrs34"
}
```
Parámetros [#parámetros-1]
| Nombre | Descripción | Tipo de datos |
| ----------- | ------------------------------------------------------------------------------------------------------------------------------------------------------------------------------------------------------------------------------------------------------------------------------------------------------------------ | ------------- |
| accessToken | Token de acceso con permisos para actualizar información del endpoint. Vea esta página para más información. | texto |
| endpointID | Identificador único del endpoint, que puede verse en la página de administración de endpoints. | numérico |
| rawData | Valor reportado por el sensor, como texto. Debe indicarse una expresión en el conversor de expresiones. La expresión debe devolver un valor numérico indicando la cantidad de personas detectadas por el sensor. | texto |
| timestamp | Valor opcional indicando la fecha y hora UTC correspondiente a la medición. El formato en que se indique esta fecha debe coincidir con alguno de los indicados en la sección formatos de fecha. En caso de que el campo sea omitido, la plataforma asumirá que la medición corresponde a la fecha y hora actuales. | texto |
| mqttMethod | Método correspondiente del servicio, en este caso UpdatePeopleCounterStatusRaw | string |
| mqttRID | Identificador opcional para la petición, en caso de que se desee obtener una respuesta de confirmación. | string |
# Controladores de cortinas y cerramientos
Reporte de estado del endpoint [#reporte-de-estado-del-endpoint]
La integración por MQTT de controladores de cortinas y otros cerramientos lleva la siguiente estructura:
```
{
"accessToken": "xxxxxxxxxxxxxxxxxxxxxxxxxxxxxxxxxxxxxxxx",
"endpointID": 1,
"position": 75,
"isMoving": true,
"timestamp": "2021-02-23T14:55:03",
"mqttMethod": "UpdateClosureControllerStatus",
"mqttRID": "tkrs34"
}
```
Parámetros [#parámetros]
| Nombre | Descripción | Tipo de datos |
| ----------- | ------------------------------------------------------------------------------------------------------------------------------------------------------------------------------------------------------------------------------------------------------------------------------------------------------------------ | ------------- |
| accessToken | Token de acceso con permisos para actualizar información del endpoint. Vea esta página para más información. | texto |
| endpointID | Identificador único del endpoint o combinación de dirección del dispositivo y dirección del endpoint con formato \[deviceAddress]:endpointAddress (Ej: \[device-1234]:1). Estos valores pueden verse en la página de administración de endpoints. | texto |
| position | Indica la posición actual del cerramiento como porcentaje, entre 0 (completamente cerrado) y 100 (completamente abierto). | bool |
| isMoving | Indica si el cerramiento está actualmente en movimiento. El valor true indica que el cerramiento está siendo cerrado o abierto, mientras que el valor false indica que está detenido. | numérico |
| timestamp | Valor opcional indicando la fecha y hora UTC correspondiente a la medición. El formato en que se indique esta fecha debe coincidir con alguno de los indicados en la sección formatos de fecha. En caso de que el campo sea omitido, la plataforma asumirá que la medición corresponde a la fecha y hora actuales. | text |
| mqttMethod | Corresponding method of the service, in this case UpdateClosureControllerStatus | string |
| mqttRID | Optional identifier for the request, in case you want to get a confirmation response. | string |
Reporte de estado en formato "raw" [#reporte-de-estado-en-formato-raw]
El estado del endpoint puede ser reportado como un **valor crudo (raw),** utilizando el [conversor de expresiones](/docs/configuracion-del-cliente/dispositivos-y-endpoints/endpoints/conversion-de-datos-crudos-raw). Esta opción es conveniente cuando el dispositivo no es capaz de realizar conversiones, y emite valores que necesitan ser transformados antes de inyectarse en la plataforma.
A continuación, se muestra un ejemplo de una petición en formato raw:
```
{
"accessToken": "xxxxxxxxxxxxxxxxxxxxxxxxxxxxxxxxxxxxxxxx",
"endpointID": 1,
"rawData": "75,true",
"timestamp": "2021-02-23T14:55:03",
"mqttMethod": "UpdateClosureControllerStatusRaw",
"mqttRID": "tkrs34"
}
```
Parámetros [#parámetros-1]
| Nombre | Descripción | Tipo de datos |
| ----------- | ---------------------------------------------------------------------------------------------------------------------------------------------------------------------------------------------------------------------------------------------------------------------------------------------------------------------------------------------------------------------------------------------------------------------------------------------------------------------------------------------------------------------------------------- | ------------- |
| accessToken | Token de acceso con permisos para actualizar información del endpoint. Vea esta página para más información. | texto |
| endpointID | Identificador único del endpoint, que puede verse en la página de administración de endpoints. | numérico |
| rawData | Valor reportado por el sensor, como texto. Deben indicarse dos expresiones en el conversor de expresiones:La primera expresión debe devolver un valor numérico indicando la posición actual del cerramiento como porcentaje, entre 0 (completamente cerrado) y 100 (completamente abierto).La segunda expresión debe devolver un valor booleano indicando si el cerramiento está actualmente en movimiento. El valor true indica que el cerramiento está siendo cerrado o abierto, mientras que el valor false indica que está detenido. | texto |
| timestamp | Valor opcional indicando la fecha y hora UTC correspondiente a la medición. El formato en que se indique esta fecha debe coincidir con alguno de los indicados en la sección formatos de fecha. En caso de que el campo sea omitido, la plataforma asumirá que la medición corresponde a la fecha y hora actuales. | text |
| mqttMethod | Corresponding method of the service, in this case UpdateClosureControllerStatusRaw | string |
| mqttRID | Optional identifier for the request, in case you want to get a confirmation response. | string |
# Dimmers
Reporte de estado del endpoint [#reporte-de-estado-del-endpoint]
La integración por MQTT de dimmers y otros dispositivos similares (variadores de velocidad, etc.) lleva la siguiente estructura:
```
{
"accessToken": "xxxxxxxxxxxxxxxxxxxxxxxxxxxxxxxxxxxxxxxx",
"endpointID": 1,
"isOn": true,
"dimValue"; 75,
"timestamp": "2021-02-23T14:55:03",
"mqttMethod": "UpdateDimmerStatus",
"mqttRID": "tkrs34"
}
```
Parámetros [#parámetros]
| Nombre | Descripción | Tipo de datos |
| ----------- | ------------------------------------------------------------------------------------------------------------------------------------------------------------------------------------------------------------------------------------------------------------------------------------------------------------------ | ------------- |
| accessToken | Token de acceso con permisos para actualizar información del endpoint. Vea esta página para más información. | texto |
| endpointID | Identificador único del endpoint o combinación de dirección del dispositivo y dirección del endpoint con formato \[deviceAddress]:endpointAddress (Ej: \[device-1234]:1). Estos valores pueden verse en la página de administración de endpoints. | texto |
| isOn | Indica si el artefacto está encendido (true) o apagado (false) | bool |
| dimValue | Indica el nivel de dimerización, como porcentaje entre 1 y 100. | numérico |
| timestamp | Valor opcional indicando la fecha y hora UTC correspondiente a la medición. El formato en que se indique esta fecha debe coincidir con alguno de los indicados en la sección formatos de fecha. En caso de que el campo sea omitido, la plataforma asumirá que la medición corresponde a la fecha y hora actuales. | text |
| mqttMethod | Corresponding method of the service, in this case UpdateDimmerStatus | string |
| mqttRID | Optional identifier for the request, in case you want to get a confirmation response. | string |
Reporte de estado en formato "raw" [#reporte-de-estado-en-formato-raw]
El estado del endpoint puede ser reportado como un **valor crudo (raw),** utilizando el [conversor de expresiones](/docs/configuracion-del-cliente/dispositivos-y-endpoints/endpoints/conversion-de-datos-crudos-raw). Esta opción es conveniente cuando el dispositivo no es capaz de realizar conversiones, y emite valores que necesitan ser transformados antes de inyectarse en la plataforma.
A continuación, se muestra un ejemplo de una petición en formato raw:
```
{
"accessToken": "xxxxxxxxxxxxxxxxxxxxxxxxxxxxxxxxxxxxxxxx",
"endpointID": 1,
"rawData": "true/75",
"timestamp": "2021-02-23T14:55:03",
"mqttMethod": "UpdateDimmerStatusRaw",
"mqttRID": "tkrs34"
}
```
Parámetros [#parámetros-1]
| Nombre | Descripción | Tipo de datos |
| ----------- | -------------------------------------------------------------------------------------------------------------------------------------------------------------------------------------------------------------------------------------------------------------------------------------------------------------------------------------------------------------------- | ------------- |
| accessToken | Token de acceso con permisos para actualizar información del endpoint. Vea esta página para más información. | texto |
| endpointID | Identificador único del endpoint, que puede verse en la página de administración de endpoints. | numérico |
| rawData | Valor reportado por el sensor, como texto. Deben indicarse dos expresiones en el conversor de expresiones:La primera expresión debe devolver un valor booleano indicando si el artefacto está encendido (true) o apagado (false).La segunda expresión debe devolver un valor numérico indicando el nivel de dimerización del aparato, como porcentaje entre 1 y 100. | texto |
| timestamp | Valor opcional indicando la fecha y hora UTC correspondiente a la medición. El formato en que se indique esta fecha debe coincidir con alguno de los indicados en la sección formatos de fecha. En caso de que el campo sea omitido, la plataforma asumirá que la medición corresponde a la fecha y hora actuales. | text |
| mqttMethod | Corresponding method of the service, in this case UpdateDimmerStatusRaw | string |
| mqttRID | Optional identifier for the request, in case you want to get a confirmation response. | string |
# Frecuencímetros
Reporte de frecuencia en Hertz [#reporte-de-frecuencia-en-hertz]
La integración de frecuencímetros por MQTT lleva la siguiente estructura:
```
{
"accessToken": "xxxxxxxxxxxxxxxxxxxxxxxxxxxxxxxxxxxxxxxx",
"endpointID": 1,
"frequency": 45,
"timestamp": "2021-02-23T14:55:03",
"mqttMethod": "UpdateFrequencySensorStatus",
"mqttRID": "tkrs34"
}
```
Parámetros [#parámetros]
| Nombre | Descripción | Tipo de datos |
| ----------- | ------------------------------------------------------------------------------------------------------------------------------------------------------------------------------------------------------------------------------------------------------------------------------------------------------------------ | ------------- |
| accessToken | Token de acceso con permisos para actualizar información del endpoint. Vea esta página para más información. | texto |
| endpointID | Identificador único del endpoint o combinación de dirección del dispositivo y dirección del endpoint con formato \[deviceAddress]:endpointAddress (Ej: \[device-1234]:1). Estos valores pueden verse en la página de administración de endpoints. | texto |
| frequency | Frecuencia expresada en Hertz. | numérico |
| timestamp | Valor opcional indicando la fecha y hora UTC correspondiente a la medición. El formato en que se indique esta fecha debe coincidir con alguno de los indicados en la sección formatos de fecha. En caso de que el campo sea omitido, la plataforma asumirá que la medición corresponde a la fecha y hora actuales. | text |
| mqttMethod | Método correspondiente del servicio, en este caso UpdateFrequencySensorStatus | string |
| mqttRID | Identificador opcional para la petición, en caso de que se desee obtener una respuesta de confirmación. | string |
Reporte de frecuencia en formato "raw" [#reporte-de-frecuencia-en-formato-raw]
La frecuencia puede ser reportada como un **valor crudo (raw),** utilizando el [conversor de expresiones](/docs/configuracion-del-cliente/dispositivos-y-endpoints/endpoints/conversion-de-datos-crudos-raw). Esta opción es conveniente cuando el dispositivo no es capaz de realizar conversiones, y emite valores que necesitan ser transformados antes de inyectarse en la plataforma.
A continuación, se muestra un ejemplo de una petición en formato raw:
```
{
"accessToken": "xxxxxxxxxxxxxxxxxxxxxxxxxxxxxxxxxxxxxxxx",
"endpointID": 1,
"rawData": "45",
"timestamp": "2021-02-23T14:55:03",
"mqttMethod": "UpdateFrequencySensorStatusRaw",
"mqttRID": "tkrs34"
}
```
Parámetros [#parámetros-1]
| Nombre | Descripción | Tipo de datos |
| ----------- | ------------------------------------------------------------------------------------------------------------------------------------------------------------------------------------------------------------------------------------------------------------------------------------------------------------------ | ------------- |
| accessToken | Token de acceso con permisos para actualizar información del endpoint. Vea esta página para más información. | texto |
| endpointID | Identificador único del endpoint, que puede verse en la página de administración de endpoints. | numérico |
| rawData | Valor reportado por el sensor, como texto. Debe indicarse una expresión en el conversor de expresiones. La expresión debe devolver un valor numérico indicando la frecuencia, expresada en Hertz. | texto |
| timestamp | Valor opcional indicando la fecha y hora UTC correspondiente a la medición. El formato en que se indique esta fecha debe coincidir con alguno de los indicados en la sección formatos de fecha. En caso de que el campo sea omitido, la plataforma asumirá que la medición corresponde a la fecha y hora actuales. | text |
| mqttMethod | Método correspondiente del servicio, en este caso UpdateFrequencySensorStatusRaw | string |
| mqttRID | Identificador opcional para la petición, en caso de que se desee obtener una respuesta de confirmación. | string |
# HVAC / termostatos
Reporte de estado del endpoint [#reporte-de-estado-del-endpoint]
La integración de sensores de contadores de personas por MQTT lleva la siguiente estructura:
```
{
"accessToken": "xxxxxxxxxxxxxxxxxxxxxxxxxxxxxxxxxxxxxxxx",
"endpointID": 1,
"mode": 4,
"fanMode": 1,
"setpoint": 21,
"ambientTemperature": 21.5,
"timestamp": "2021-02-23T14:55:03",
"mqttMethod": "UpdateHVACStatus",
"mqttRID": "tkrs34"
}
```
Parámetros [#parámetros]
| Nombre | Descripción | Tipo de datos |
| ------------------ | --------------------------------------------------------------------------------------------------------------------------------------------------------------------------------------------------------------------------------------------------------------------------------------------------------------------------- | ------------- |
| accessToken | Token de acceso con permisos para actualizar información del endpoint. Vea esta página para más información. | texto |
| endpointID | Identificador único del endpoint o combinación de dirección del dispositivo y dirección del endpoint con formato \[deviceAddress]:endpointAddress (Ej: \[device-1234]:1). Estos valores pueden verse en la página de administración de endpoints. | texto |
| mode | Modo actual del dispositivo:1: el dispositivo está apagado.2: el dispositivo está encendido en modo automático.3: el dispositivo está encendido en modo calor.4: el dispositivo está encendido en modo frío.5: el dispositivo está encendido en modo deshumidificación.6: el dispositivo está encendido en modo ventilador. | numeric |
| fanMode | Modo actual del ventilador:1: el ventilador está en modo automático.2: el ventilador está en velocidad baja.3: el ventilador está en velocidad media.4: el ventilador está en velocidad alta. | numeric |
| setpoint | Indica el valor de temperatura deseado, en grados Celsius. | numeric |
| ambientTemperature | Indica el valor de la temperatura ambiente, en grados Celsius. | numeric |
| timestamp | Valor opcional indicando la fecha y hora UTC correspondiente a la medición. El formato en que se indique esta fecha debe coincidir con alguno de los indicados en la sección formatos de fecha. En caso de que el campo sea omitido, la plataforma asumirá que la medición corresponde a la fecha y hora actuales. | text |
| mqttMethod | Método correspondiente del servicio, en este caso UpdateHVACStatus | string |
| mqttRID | Identificador opcional para la petición, en caso de que se desee obtener una respuesta de confirmación. | string |
# Puente HTTP
Introducción [#introducción]
El puente HTTP es una característica de la plataforma Gear Studio, que permite realizar la integración de dispositivos utilizando la HTTP a través de MQTT. De esta forma, es posible migrar dispositivos que utilizan la interfaz HTTP para que utilicen MQTT, con pocos cambios.
**Importante**: el puente HTTP está diseñado principalmente para la migración de dispositivos desde HTTP hacia MQTT, pero para dispositivos nuevos, es conveniente utilizar el [intercambio de datos flexible](/docs/configuracion-del-cliente/dispositivos-y-endpoints/dispositivos/integracion-de-dispositivos/mqtt/intercambio-de-datos-flexible), que puede verse [aquí](/docs/configuracion-del-cliente/dispositivos-y-endpoints/dispositivos/integracion-de-dispositivos/mqtt/intercambio-de-datos-flexible). El intercambio de datos flexible permite representar los datos con mucha más flexibilidad, y generalmente de una forma más compacta.
Peticiones [#peticiones]
Para enviar un request por el puente HTTP, deberá utilizarse la siguiente estructura de topics:
**\{client-secure-id}/HttpApi/DeviceIntegration**
Donde cliente-secure-id es el usuario utilizado en la conexión. La estructura de topics incluye el id de usuario como primer elemento, dado que cada usuario tiene permiso únicamente para los topics que comiencen con ese ID.
Cada request deberá contener un mensaje json, cuya estructura depende del tipo de mensaje. Sin embargo, algunos campos son comunes a todos los tipos de mensaje:
* **accessToken**: este campo indica el access token que debe utilizarse para autentificar y autorizar el request.
* **mqttMethod**: este campo indica el tipo de petición. Por ejemplo, para reportar un valor de temperatura, se utiliza el valor "UpdateTemperatureSensorStatus".
* **mqttRID**: este es un campo opcional que puede tomar un valor cualquiera, típicamente elegido al azar. En caso de que este campo sea informado, la plataforma generará automáticamente una respuesta al comando enviado, e incluirá el mismo mqttRID en esa respuesta, lo que permite que el cliente pueda vincular la respuesta con el request original.
Opcionalmente, se puede especificar un subtopic de respuesta, concatenando una barra y un valor al inicio del mqttRID. Es decir, **\{subtopic}/\{valor aleatorio}**
Por ejemplo usando el subtopic **/device1** y el RID **1238j9**. El mqttRID completo sería **device1/1238j9**
Peticiones simples y múltiples [#peticiones-simples-y-múltiples]
Peticiones simples [#peticiones-simples]
Las peticiones simples permiten enviar un único dato por vez a la plataforma. Son utilizadas generalmente para reportar el estado de un único endpoint.
**Ejemplo de petición simple:**
```
{
"accessToken": "xxxxxxxxxxxxxxxxxxxxxxxxxxxxxxxxxxxxxxxx",
"endpointID": 1,
"temperatureCelsius": 25,
"timestamp": "2021-02-23T14:55:03",
"mqttMethod": "UpdateTemperatureSensorStatus",
"mqttRID": "RXmp123"
}
```
Peticiones múltiples (arrays) [#peticiones-múltiples-arrays]
Las peticiones múltiples permiten enviar varios datos en un único mensaje MQTT. La sintaxis utilizada es la de un array JSON. Es decir, se deben usar corchetes al principio y al final, insertando adentro los datos, separados por comas. Las peticiones múltiples se utilizan normalmente para reportar el estado de múltiples endpoints en un único mensaje. También son útiles para que un dispositivo pueda enviar datos que se hayan almacenado durante un período son comunicación. En cualquier caso, los datos pueden incluir endpoints diferentes de un mismo dispositivo, o incluso endpoints de distintos dispositivos.
**Ejemplo de petición múltiple:**
```
[
{
"accessToken": "xxxxxxxxxxxxxxxxxxxxxxxxxxxxxxxxxxxxxxxx",
"endpointID": 1,
"temperatureCelsius": 25,
"timestamp": "2021-02-23T14:55:03",
"mqttMethod": "UpdateTemperatureSensorStatus",
"mqttRID": "RXmp123"
},
{
"accessToken": "xxxxxxxxxxxxxxxxxxxxxxxxxxxxxxxxxxxxxxxx",
"endpointID": 2,
"humidityPercentage": 30,
"timestamp": "2021-02-23T15:55:03",
"mqttMethod": "UpdateHumiditySensorStatus",
"mqttRID": "xQzt395"
}
]
```
Respuestas [#respuestas]
En caso de que se informe un valor en el campo **mqttRID**, la plataforma creará un mensaje de respuesta en el topic
**\{client-secure-id}/HttpApi/DeviceIntegrationResponse**
Si se concatena al inicio del **mqttRID** un **subtopic,** al topic de respuesta se le concatenará el subtopic:
**\{client-secure-id}/HttpApi/DeviceIntegrationResponse/\{subtopic}**
Esto permite conocer el estado final del request, y eventualmente obtener información de respuesta en caso de que el comando lo requiera.
El payload de las respuestas tiene típicamente el siguiente formato:
```
{
"mqttRID":"RXmp123",
"mqttStatus":200,
"mqttData":"{}"
}
```
| Nombre | Descripción | Tipo |
| ---------- | ----------------------------------------------------------------------------------------------------------------------------------------------------------------------------- | ------- |
| mqttRID | Identificador único para cada petición | string |
| mqttStatus | Devuelve el código de estado del servidor (200, 500, 400, etc). Si la petición se ejecutó correctamente, será 200. En caso de error, puede traer cualquier código (400 o 500) | integer |
| mqttData | Es el cuerpo de la respuesta del servidor. Es un string con un JSON. | string |
Integración por tipo de sensor [#integración-por-tipo-de-sensor]
[Sensores de temperatura](/docs/configuracion-del-cliente/dispositivos-y-endpoints/dispositivos/integracion-de-dispositivos/mqtt/puente-http/sensores-de-temperatura)
[Sensores de humedad](/docs/configuracion-del-cliente/dispositivos-y-endpoints/dispositivos/integracion-de-dispositivos/mqtt/puente-http/sensores-de-humedad)
[Sensores de nivel de iluminación](/docs/configuracion-del-cliente/dispositivos-y-endpoints/dispositivos/integracion-de-dispositivos/mqtt/puente-http/sensores-de-nivel-de-iluminacion)
[Sensores de peso](/docs/configuracion-del-cliente/dispositivos-y-endpoints/dispositivos/integracion-de-dispositivos/mqtt/puente-http/sensores-de-peso)
[Sensores de volumen](/docs/configuracion-del-cliente/dispositivos-y-endpoints/dispositivos/integracion-de-dispositivos/mqtt/puente-http/sensores-de-volumen)
[Sensores de presión](/docs/configuracion-del-cliente/dispositivos-y-endpoints/dispositivos/integracion-de-dispositivos/mqtt/puente-http/sensores-de-presion)
[Sensores IAS (movimiento, ocupación, y sensores binarios)](/docs/configuracion-del-cliente/dispositivos-y-endpoints/dispositivos/integracion-de-dispositivos/mqtt/puente-http/sensores-ias-movimiento-ocupacion-y-sensores-binarios)
[Sensores de voltaje](/docs/configuracion-del-cliente/dispositivos-y-endpoints/dispositivos/integracion-de-dispositivos/mqtt/puente-http/sensores-de-voltaje)
[Sensores de corriente](/docs/configuracion-del-cliente/dispositivos-y-endpoints/dispositivos/integracion-de-dispositivos/mqtt/puente-http/sensores-de-corriente)
[Sensores de potencia activa](/docs/configuracion-del-cliente/dispositivos-y-endpoints/dispositivos/integracion-de-dispositivos/mqtt/puente-http/sensores-de-potencia-activa)
[Sensores de potencia reactiva](/docs/configuracion-del-cliente/dispositivos-y-endpoints/dispositivos/integracion-de-dispositivos/mqtt/puente-http/sensores-de-potencia-reactiva)
[Sensores de potencia aparente](/docs/configuracion-del-cliente/dispositivos-y-endpoints/dispositivos/integracion-de-dispositivos/mqtt/puente-http/sensores-de-potencia-aparente)
[Sensores de coseno fi](/docs/configuracion-del-cliente/dispositivos-y-endpoints/dispositivos/integracion-de-dispositivos/mqtt/puente-http/sensores-de-coseno-fi)
[Frecuencímetros](/docs/configuracion-del-cliente/dispositivos-y-endpoints/dispositivos/integracion-de-dispositivos/mqtt/puente-http/frecuencimetros)
[Sensores de consumo de energía](/docs/configuracion-del-cliente/dispositivos-y-endpoints/dispositivos/integracion-de-dispositivos/mqtt/puente-http/sensores-de-consumo-de-energia)
[Sensores de flujo](/docs/configuracion-del-cliente/dispositivos-y-endpoints/dispositivos/integracion-de-dispositivos/mqtt/puente-http/sensores-de-flujo)
[Sensores genéricos](/docs/configuracion-del-cliente/dispositivos-y-endpoints/dispositivos/integracion-de-dispositivos/mqtt/puente-http/sensores-genericos)
[Sensores genéricos de flujo](/docs/configuracion-del-cliente/dispositivos-y-endpoints/dispositivos/integracion-de-dispositivos/mqtt/puente-http/sensores-genericos-de-flujo)
[Appliances y otros dispositivos on-off](/docs/configuracion-del-cliente/dispositivos-y-endpoints/dispositivos/integracion-de-dispositivos/mqtt/puente-http/appliances-y-otros-dispositivos-on-off)
[Dimmers](/docs/configuracion-del-cliente/dispositivos-y-endpoints/dispositivos/integracion-de-dispositivos/mqtt/puente-http/dimmers)
[Controladores de cortinas y cerramientos](/docs/configuracion-del-cliente/dispositivos-y-endpoints/dispositivos/integracion-de-dispositivos/mqtt/puente-http/controladores-de-cortinas-y-cerramientos)
[Run-time meters (horómetros)](/docs/configuracion-del-cliente/dispositivos-y-endpoints/dispositivos/integracion-de-dispositivos/mqtt/puente-http/run-time-meters-horometros)
[Rastreadores de ubicación](/docs/configuracion-del-cliente/dispositivos-y-endpoints/dispositivos/integracion-de-dispositivos/mqtt/puente-http/rastreadores-de-ubicacion)
[Sensores de concentración (ppm)](/docs/configuracion-del-cliente/dispositivos-y-endpoints/dispositivos/integracion-de-dispositivos/mqtt/puente-http/sensores-de-concentracion-ppm)
[Sensores de concentración (masa/volumen)](/docs/configuracion-del-cliente/dispositivos-y-endpoints/dispositivos/integracion-de-dispositivos/mqtt/puente-http/sensores-de-concentracion-masavolumen)
[Sensores de calidad de aire (AQI)](/docs/configuracion-del-cliente/dispositivos-y-endpoints/dispositivos/integracion-de-dispositivos/mqtt/puente-http/sensores-de-calidad-de-aire-aqi)
[Sensores de flujo de personas](/docs/configuracion-del-cliente/dispositivos-y-endpoints/dispositivos/integracion-de-dispositivos/mqtt/puente-http/sensores-de-flujo-de-personas)
[Contadores de personas](/docs/configuracion-del-cliente/dispositivos-y-endpoints/dispositivos/integracion-de-dispositivos/mqtt/puente-http/contadores-de-personas)
Comandos [#comandos]
[Recibir comandos](/docs/configuracion-del-cliente/dispositivos-y-endpoints/dispositivos/integracion-de-dispositivos/mqtt/puente-http/recibir-comandos)
# Rastreadores de ubicación
Reporte de estado del endpoint [#reporte-de-estado-del-endpoint]
La integración por MQTT de rastreadores de ubicación lleva la siguiente estructura:
```
{
"accessToken": "xxxxxxxxxxxxxxxxxxxxxxxxxxxxxxxxxxxxxxxx",
"endpointID": 1,
"latitude": -13.9957594,
"longitude": 48.9339384,
"flags": 0,
"timestamp": "2021-02-23T14:55:03"
"mqttMethod": "UpdateLocationTrackerStatus",
"mqttRID": "tkrs34"
}
```
Parámetros [#parámetros]
| Nombre | Descripción | Tipo de datos |
| ----------- | ----------------------------------------------------------------------------------------------------------------------------------------------------------------------------------------------------------------------------------------------------------------------------------------------------------------------------------------------------------------------------------------------------------------------------------------------------------------------------------------------------------------------------------------------------------------------- | ------------- |
| accessToken | Token de acceso con permisos para actualizar información del endpoint. Vea esta página para más información. | texto |
| endpointID | Identificador único del endpoint o combinación de dirección del dispositivo y dirección del endpoint con formato \[deviceAddress]:endpointAddress (Ej: \[device-1234]:1). Estos valores pueden verse en la página de administración de endpoints. | texto |
| latitude | Indica la latitud. El valor debe ser entre -90 y 90. El separador para los decimales es el punto | numérico |
| longitude | Indica la longitud. El valor debe ser entre -180 y 180. El separador para los decimales es el punto | numérico |
| flags | Indica información extra para la posición. Es un valor entero que representa una suma bit a bit. Los estados disponibles son: 0 = Nada en especial1 = La posición del sensor está cambiando2 = El sensor no puede adquirir la posición4 = El sensor no funciona correctamente. La posición informada puede ser incorrecta8 = La posición informada tiene baja precisiónLos valores pueden combinarse a través de la operación OR. Por ejemplo, para indicar que la posición informada tiene baja precisión, y la posición está cambiando, debe utilizarse (8 OR 1) = 9. | numérico |
| timestamp | Valor opcional indicando la fecha y hora UTC correspondiente a la medición. El formato en que se indique esta fecha debe coincidir con alguno de los indicados en la sección formatos de fecha. En caso de que el campo sea omitido, la plataforma asumirá que la medición corresponde a la fecha y hora actuales. | text |
| mqttMethod | Método correspondiente del servicio, en este caso UpdateLocationTrackerStatus | string |
| mqttRID | Identificador opcional para la petición, en caso de que se desee obtener una respuesta de confirmación. | string |
Reporte de estado en formato "raw" [#reporte-de-estado-en-formato-raw]
El estado del endpoint puede ser reportado como un **valor crudo (raw),** utilizando el [conversor de expresiones](/docs/configuracion-del-cliente/dispositivos-y-endpoints/endpoints/conversion-de-datos-crudos-raw). Esta opción es conveniente cuando el dispositivo no es capaz de realizar conversiones, y emite valores que necesitan ser transformados antes de inyectarse en la plataforma.
A continuación, se muestra un ejemplo de una petición en formato raw:
```
{
"accessToken": "xxxxxxxxxxxxxxxxxxxxxxxxxxxxxxxxxxxxxxxx",
"endpointID": 1,
"rawData": "-13.9957594,48.933938,0",
"timestamp": "2021-02-23T14:55:03"
"mqttMethod": "UpdateLocationTrackerStatusRaw",
"mqttRID": "RXmp123"
}
```
Parámetros [#parámetros-1]
| Nombre | Descripción | Tipo de datos |
| ----------- | ------------------------------------------------------------------------------------------------------------------------------------------------------------------------------------------------------------------------------------------------------------------------------------------------------------------------------------------------------------------------------------------------------------------------------------------------------------------------------------------------------------------------------------------------------------------------------------------------------------------------------------------------------------------------------------------------------------------------------------------------------------------------------------------------------------------------------------------------------------------------------------------------------------------------------------------------------------------------------------------------------------------------------------------------------- | ------------- |
| accessToken | Token de acceso con permisos para actualizar información del endpoint. Vea esta página para más información. | texto |
| endpointID | Identificador único del endpoint, que puede verse en la página de administración de endpoints. | numérico |
| rawData | Valor reportado por el sensor, como texto. Deben indicarse dos expresiones en el conversor de expresiones:La primera expresión debe devolver un valor numérico indicando la longitud. El valor debe ser entre -90 y 90. El separador para los decimales es el puntoLa segunda expresión debe devolver un valor numérico indicando la longitud. El valor debe ser entre -180 y 180. El separador para los decimales es el puntoLa tercera expresión debe devolver un valor entero indicando detalles de la posición (flags). Es un valor entero que representa una suma bit a bit. Los estados disponibles son:0 = Nada en especial1 = La posición del sensor está cambiando2 = El sensor no puede adquirir la posición4 = El sensor no funciona correctamente. La posición informada puede ser incorrecta8 = La posición informada tiene baja precisiónLos valores pueden combinarse a través de la operación OR. Por ejemplo, para indicar que la posición informada tiene baja precisión, y la posición está cambiando, debe utilizarse (8 OR 1) = 9. | texto |
| timestamp | Valor opcional indicando la fecha y hora UTC correspondiente a la medición. El formato en que se indique esta fecha debe coincidir con alguno de los indicados en la sección formatos de fecha. En caso de que el campo sea omitido, la plataforma asumirá que la medición corresponde a la fecha y hora actuales. | text |
| mqttMethod | Método correspondiente del servicio, en este caso UpdateLocationTrackerStatusRaw | string |
| mqttRID | Identificador opcional para la petición, en caso de que se desee obtener una respuesta de confirmación. | string |
# Recibir comandos
Comandos [#comandos]
Flujo básico de integración de comandos [#flujo-básico-de-integración-de-comandos]

El gateway, dispositivo o endpoint deberá estar escuchando por comandos suscribiendose al siguiente topic:\
`**{client-secure-id}/commands/requests/{device-address}**`
* **cliente-secure-id:** es el usuario utilizado en la conexión. La estructura de topics incluye el id de usuario como primer elemento, dado que cada usuario tiene permiso únicamente para los topics que comiencen con ese ID.
* **device-address**: Es el ingresado en el campo “address” al crear el dispositivo.
Esta respuesta deberá ser interpretada por el dispositivo, realizar las acciones correspondientes y responder a través del método de respuesta de comandos para informar si la ejecución del mismo fue correcta o no.
En caso de ser correcta, se deberá ejecutar el método para actualizar el estado del dispositivo según corresponda.
Por último, asegurarse de seguir escuchando comandos con el primer método mencionado.
1. Esperar por comandos [#1-esperar-por-comandos]
Para que un dispositivo esté escuchando por comandos debe suscribirse al topic: `{client-secure-id}/commands/requests/{device-address}`
* **cliente-secure-id:** es el usuario utilizado en la conexión. La estructura de topics incluye el id de usuario como primer elemento, dado que cada usuario tiene permiso únicamente para los topics que comiencen con ese ID. Este valor se puede consultar en la sección de [seguridad > configuración MQTT](https://gear.cloud.studio/gear/manager/master-tables/mqtt-configuration)
* **device-address**: Es el ingresado en el campo “address” al crear el dispositivo. Si es un dispositivo ya creado, este valor se puede obtener desde el [listado](https://gear.cloud.studio/gear/manager/master-tables/endpoints):

**Respuesta**
La respuesta es una lista dentro de la propiedad `WaitForCommand_EndpointResult` que tendrá cada uno de los comandos correspondientes:
```
{
"Closure":null,
"CommandID":1120907993,
"CommandType":1,
"Custom":null,
"DeviceID":7246,
"Dimmer":null,
"EndpointID":113139,
"Management":null,
"OnOff":{
"AutomaticOverrideMinutes":0,
"CommandType":0
},
"Thermostat":null
}
```
Para mas información acerca de las propiedades de la respuesta [ver la documentación](https://www.cloud.studio/developers/gear/api/html/T_CloudStudio_Services_Types_DeviceCommand.htm)
Según el tipo de comando que se haya ejecutado, se deberá tener en cuenta la propiedad correspondiente para conocer la acción a realizar.
Por ejemplo, si el `CommandType` es 1, quiere decir que es un comando para un endpoint tipo "Appliance". Por lo que se deberá tener en cuenta lo que se informe en la propiedad `OnOff`
Los distintos command types se pueden [ver en esta documentación](https://www.cloud.studio/developers/gear/api/html/T_CloudStudio_Services_Types_DeviceCommandType.htm).
2. Responder un comando [#2-responder-un-comando]
En caso de haber recibido un comando y luego de ejecutar las acciones correspondientes en el dispositivo(hardware) se deberá responder el comando ya sea en caso de éxito o error.
Para informar que el comando ha sido ejecutado, se debe hacer un publish al topic `{client-secure-id}/HttpApi/DeviceIntegration` con el siguiente payload:
```
{
"accessToken":"xxxxxxxxxxxxxxxxxxxxxxxxxxxxxxxxxxxxxxxx",
"mqttMethod":"RespondCommand",
"mqttRID":"c392",
"response":{
"CommandID":1120907993,
"ResponseType":0,
"ResponseData":"ok",
"ErrorCode":"1",
"ErrorMessage":""
}
}
```
Descripción de los campos del payload:
| Nombre | Descripción | Tipo de dato |
| ----------- | ------------------------------------------------------------------------------------------------------------ | ------------ |
| accessToken | Token de acceso con permisos para actualizar información del endpoint. Vea esta página para más información. | text |
| mqttMethod | Método correspondiente del servicio. Para comandos debe ser siempre RespondCommand | string |
| mqttRID | Identificador opcional para la petición, en caso de que se desee obtener una respuesta de confirmación. | string |
| response | Objeto con la respuesta del comando | object |
Descripción de los campos del sub objeto “response”:
| Nombre | Descripción | Tipo de dato |
| ------------ | ----------------------------------------------------------------------------------------------------------------- | ------------ |
| CommandID | Debe corresponder al obtenido en la suscripción del topic \{client-secure-id}/HttpApi/DeviceIntegration (paso 1). | integer |
| ResponseType | Debe ser alguno de los del enum, según corresponda. En este caso es 0, que significa "success". | integer |
| ResponseData | Texto informativo acerca del comando | string |
| ErrorCode | Código de error, solo válido si ResponseType es Error. | string |
| ErrorMessage | Mensaje de error, solo válido si ResponseType es Error. | string |
Para mas información acerca del objeto “response” [ver la documentación](https://www.cloud.studio/developers/gear/api/html/T_CloudStudio_Services_Types_DeviceCommandResponse.htm).
3. Actualizar estado del endpoint [#3-actualizar-estado-del-endpoint]
En caso de que la ejecución del comando haya sido exitosa, se deberá informar el nuevo estado del endpoint. Para esto se deberá utilizar el [método correspondiente](/docs/configuracion-del-cliente/dispositivos-y-endpoints/dispositivos/integracion-de-dispositivos/mqtt) al tipo de endpoint (ver “Integración por tipo de sensor”).
Siguiendo el ejemplo de appliance, se debe hacer un publish al topic `{client-secure-id}/HttpApi/DeviceIntegration` con el siguiente payload:
```
{
"accessToken": "xxxxxxxxxxxxxxxxxxxxxxxxxxxxxxxxxxxxxxxx",
"endpointID": 113139,
"isOn": true,
"mqttMethod": "UpdateApplianceStatus",
"mqttRID": "tkrs34"
}
```
Para más información acerca de este método ver la sección de [artefactos on/off](/docs/configuracion-del-cliente/dispositivos-y-endpoints/dispositivos/integracion-de-dispositivos/mqtt/puente-http/appliances-y-otros-dispositivos-on-off)
# Run-time meters (horómetros)
> La integración de run-time meters utiliza la misma API que los sensores de flujo no-genéricos. La única diferencia es que los run time meters deben informar el flujo de tiempo **en segundos**.
Reporte de tiempo acumulado en segundos [#reporte-de-tiempo-acumulado-en-segundos]
La integración de run time meters por MQTT lleva la siguiente estructura, que es idéntica a la de cualquier sensor de flujo:
```
{
"accessToken": "xxxxxxxxxxxxxxxxxxxxxxxxxxxxxxxxxxxxxxxx",
"endpointID": 1,
"summationValue": 112685,
"timestamp": "2021-02-23T14:55:03",
"mqttMethod": "UpdateFlowSensorValueSummation",
"mqttRID": "tkrs34"
}
```
Parámetros [#parámetros]
| Nombre | Descripción | Tipo de datos |
| -------------- | ------------------------------------------------------------------------------------------------------------------------------------------------------------------------------------------------------------------------------------------------------------------------------------------------------------------ | ------------- |
| accessToken | Token de acceso con permisos para actualizar información del endpoint. Vea esta página para más información. | texto |
| endpointID | Identificador único del endpoint o combinación de dirección del dispositivo y dirección del endpoint con formato \[deviceAddress]:endpointAddress (Ej: \[device-1234]:1). Estos valores pueden verse en la página de administración de endpoints. | texto |
| summationValue | Valor acumulado de tiempo informado por el sensor, expresado en segundos. | numérico |
| timestamp | Valor opcional indicando la fecha y hora UTC correspondiente a la medición. El formato en que se indique esta fecha debe coincidir con alguno de los indicados en la sección formatos de fecha. En caso de que el campo sea omitido, la plataforma asumirá que la medición corresponde a la fecha y hora actuales. | text |
| mqttMethod | Corresponding method of the service, in this case UpdateFlowSensorValueSummation | string |
| mqttRID | Optional identifier for the request, in case you want to get a confirmation response. | string |
Reporte de tiempo acumulado en formato "raw" [#reporte-de-tiempo-acumulado-en-formato-raw]
El tiempo acumulado puede ser reportado como un **valor crudo (raw),** utilizando el [conversor de expresiones](/docs/configuracion-del-cliente/dispositivos-y-endpoints/endpoints/conversion-de-datos-crudos-raw). Esta opción es conveniente cuando el dispositivo no es capaz de realizar conversiones, y emite valores que necesitan ser transformados antes de inyectarse en la plataforma.
A continuación, se muestra un ejemplo de una petición en formato raw:
```
{
"accessToken": "xxxxxxxxxxxxxxxxxxxxxxxxxxxxxxxxxxxxxxxx",
"endpointID": 1,
"rawData": "112685",
"timestamp": "2021-02-23T14:55:03",
"mqttMethod": "UpdateFlowSensorValueSummationRaw",
"mqttRID": "tkrs34"
}
```
Parámetros [#parámetros-1]
| Nombre | Descripción | Tipo de datos |
| ----------- | ------------------------------------------------------------------------------------------------------------------------------------------------------------------------------------------------------------------------------------------------------------------------------------------------------------------ | ------------- |
| accessToken | Token de acceso con permisos para actualizar información del endpoint. Vea esta página para más información. | texto |
| endpointID | Identificador único del endpoint, que puede verse en la página de administración de endpoints. | numérico |
| rawData | Valor reportado por el sensor, como texto. Debe indicarse una expresión en el conversor de expresiones. La expresión debe devolver un valor numérico indicando el tiempo acumulado informado por el sensor, expresado en segundos. | texto |
| timestamp | Valor opcional indicando la fecha y hora UTC correspondiente a la medición. El formato en que se indique esta fecha debe coincidir con alguno de los indicados en la sección formatos de fecha. En caso de que el campo sea omitido, la plataforma asumirá que la medición corresponde a la fecha y hora actuales. | text |
| mqttMethod | Corresponding method of the service, in this case UpdateFlowSensorValueSummationRaw | string |
| mqttRID | Optional identifier for the request, in case you want to get a confirmation response. | string |
# Sensores de calidad de aire (AQI)
Reporte de estado del endpoint [#reporte-de-estado-del-endpoint]
La integración de sensores de calidad de aire (AQI) por MQTT lleva la siguiente estructura:
```
{
"accessToken": "xxxxxxxxxxxxxxxxxxxxxxxxxxxxxxxxxxxxxxxx",
"endpointID": 1,
"index": 500,
"timestamp": "2021-02-23T14:55:03",
"mqttMethod": "UpdateAirQualitySensorStatus",
"mqttRID": "tkrs34"
}
```
Parámetros [#parámetros]
| Nombre | Descripción | Tipo de datos |
| ----------- | ------------------------------------------------------------------------------------------------------------------------------------------------------------------------------------------------------------------------------------------------------------------------------------------------------------------ | ------------- |
| accessToken | Token de acceso con permisos para actualizar información del endpoint. Vea esta página para más información. | texto |
| endpointID | Identificador único del endpoint o combinación de dirección del dispositivo y dirección del endpoint con formato \[deviceAddress]:endpointAddress (Ej: \[device-1234]:1). Estos valores pueden verse en la página de administración de endpoints. | texto |
| index | Indica el valor del índice de calidad del aire, el valor deber ser entre 0 a 500, expresada en AQI:0-50: Buena51-100: Moderada101-150: Insalubre para grupos sensibles151-200: Insalubre201-300: Muy insalubre301-500: Peligrosa | numérico |
| timestamp | Valor opcional indicando la fecha y hora UTC correspondiente a la medición. El formato en que se indique esta fecha debe coincidir con alguno de los indicados en la sección formatos de fecha. En caso de que el campo sea omitido, la plataforma asumirá que la medición corresponde a la fecha y hora actuales. | text |
| mqttMethod | Método correspondiente del servicio, en este caso UpdateAirQualitySensorStatus | string |
| mqttRID | Identificador opcional para la petición, en caso de que se desee obtener una respuesta de confirmación. | string |
Reporte de estado en formato "raw" [#reporte-de-estado-en-formato-raw]
El estado del endpoint puede ser reportado como un **valor crudo (raw),** utilizando el [conversor de expresiones](/docs/configuracion-del-cliente/dispositivos-y-endpoints/endpoints/conversion-de-datos-crudos-raw). Esta opción es conveniente cuando el dispositivo no es capaz de realizar conversiones, y emite valores que necesitan ser transformados antes de inyectarse en la plataforma.
A continuación, se muestra un ejemplo de una petición en formato raw:
```
{
"accessToken": "xxxxxxxxxxxxxxxxxxxxxxxxxxxxxxxxxxxxxxxx",
"endpointID": 1,
"rawData": "500",
"timestamp": "2021-02-23T14:55:03",
"mqttMethod": "UpdateAirQualitySensorStatusRaw",
"mqttRID": "RXmp123"
}
```
Parámetros [#parámetros-1]
| Nombre | Descripción | Tipo de datos |
| ----------- | -------------------------------------------------------------------------------------------------------------------------------------------------------------------------------------------------------------------------------------------------------------------------------------------------------------------------------------------------- | ------------- |
| accessToken | Token de acceso con permisos para actualizar información del endpoint. Vea esta página para más información. | texto |
| endpointID | Identificador único del endpoint, que puede verse en la página de administración de endpoints. | numérico |
| rawData | Valor reportado por el sensor, como texto. Debe indicarse una expresión en el conversor de expresiones. La expresión debe devolver un valor numérico indicando la calidad del aire (entre 0 a 500), expresada en AQI.0-50: Buena51-100: Moderada101-150: Insalubre para grupos sensibles151-200: Insalubre201-300: Muy insalubre301-500: Peligrosa | texto |
| timestamp | Valor opcional indicando la fecha y hora UTC correspondiente a la medición. El formato en que se indique esta fecha debe coincidir con alguno de los indicados en la sección formatos de fecha. En caso de que el campo sea omitido, la plataforma asumirá que la medición corresponde a la fecha y hora actuales. | texto |
| mqttMethod | Método correspondiente del servicio, en este caso UpdateAirQualitySensorStatusRaw | string |
| mqttRID | Identificador opcional para la petición, en caso de que se desee obtener una respuesta de confirmación. | string |
# Sensores de concentración (masa/volumen)
Reporte de estado del endpoint [#reporte-de-estado-del-endpoint]
La integración de sensores de concentración (masa/volumen) por MQTT lleva la siguiente estructura:
```
{
"accessToken": "xxxxxxxxxxxxxxxxxxxxxxxxxxxxxxxxxxxxxxxx",
"endpointID": 1,
"concentration": 17.9,
"timestamp": "2021-02-23T14:55:03",
"mqttMethod": "UpdateConcentrationSensorStatus",
"mqttRID": "tkrs34"
}
```
Parámetros [#parámetros]
| Nombre | Descripción | Tipo de datos |
| ------------- | ------------------------------------------------------------------------------------------------------------------------------------------------------------------------------------------------------------------------------------------------------------------------------------------------------------------ | ------------- |
| accessToken | Token de acceso con permisos para actualizar información del endpoint. Vea esta página para más información. | texto |
| endpointID | Identificador único del endpoint o combinación de dirección del dispositivo y dirección del endpoint con formato \[deviceAddress]:endpointAddress (Ej: \[device-1234]:1). Estos valores pueden verse en la página de administración de endpoints. | texto |
| concentration | Indica la concentración de materia (masa/volumen), expresada en microgramos/metro cúbico (μg/m³). El separador para los decimales es el punto. | numérico |
| timestamp | Valor opcional indicando la fecha y hora UTC correspondiente a la medición. El formato en que se indique esta fecha debe coincidir con alguno de los indicados en la sección formatos de fecha. En caso de que el campo sea omitido, la plataforma asumirá que la medición corresponde a la fecha y hora actuales. | text |
| mqttMethod | Método correspondiente del servicio, en este caso UpdateConcentrationSensorStatus | string |
| mqttRID | Identificador opcional para la petición, en caso de que se desee obtener una respuesta de confirmación. | string |
Reporte de estado en formato "raw" [#reporte-de-estado-en-formato-raw]
La concentración puede ser reportada como un **valor crudo (raw),** utilizando el [conversor de expresiones](/docs/configuracion-del-cliente/dispositivos-y-endpoints/endpoints/conversion-de-datos-crudos-raw). Esta opción es conveniente cuando el dispositivo no es capaz de realizar conversiones, y emite valores que necesitan ser transformados antes de inyectarse en la plataforma.
A continuación, se muestra un ejemplo de una petición en formato raw:
```
{
"accessToken": "xxxxxxxxxxxxxxxxxxxxxxxxxxxxxxxxxxxxxxxx",
"endpointID": 1,
"rawData": "17.9",
"timestamp": "2021-02-23T14:55:03",
"mqttMethod": "UpdateConcentrationSensorStatusRaw",
"mqttRID": "RXmp123"
}
```
Parámetros [#parámetros-1]
| Nombre | Descripción | Tipo de datos |
| ----------- | ------------------------------------------------------------------------------------------------------------------------------------------------------------------------------------------------------------------------------------------------------------------------------------------------------------------ | ------------- |
| accessToken | Token de acceso con permisos para actualizar información del endpoint. Vea esta página para más información. | texto |
| endpointID | Identificador único del endpoint, que puede verse en la página de administración de endpoints. | numérico |
| rawData | Valor reportado por el sensor, como texto. Debe indicarse una expresión en el conversor de expresiones. La expresión debe devolver un valor numérico indicando la concentración de materia (masa/volumen), expresada en microgramos/metro cúbico (μg/m³). | texto |
| timestamp | Valor opcional indicando la fecha y hora UTC correspondiente a la medición. El formato en que se indique esta fecha debe coincidir con alguno de los indicados en la sección formatos de fecha. En caso de que el campo sea omitido, la plataforma asumirá que la medición corresponde a la fecha y hora actuales. | texto |
| mqttMethod | Método correspondiente del servicio, en este caso UpdateConcentrationSensorStatusRaw | string |
| mqttRID | Identificador opcional para la petición, en caso de que se desee obtener una respuesta de confirmación. | string |
# Sensores de concentración (ppm)
Reporte de estado del endpoint [#reporte-de-estado-del-endpoint]
La integración de sensores de concentración (ppm) por MQTT lleva la siguiente estructura:
```
{
"accessToken": "xxxxxxxxxxxxxxxxxxxxxxxxxxxxxxxxxxxxxxxx",
"endpointID": 1,
"concentration": 15.3,
"timestamp": "2021-02-23T14:55:03",
"mqttMethod": "UpdateConcentrationSensorStatus",
"mqttRID": "tkrs34"
}
```
Parámetros [#parámetros]
| Nombre | Descripción | Tipo de datos |
| ------------- | ------------------------------------------------------------------------------------------------------------------------------------------------------------------------------------------------------------------------------------------------------------------------------------------------------------------ | ------------- |
| accessToken | Token de acceso con permisos para actualizar información del endpoint. Vea esta página para más información. | texto |
| endpointID | Identificador único del endpoint o combinación de dirección del dispositivo y dirección del endpoint con formato \[deviceAddress]:endpointAddress (Ej: \[device-1234]:1). Estos valores pueden verse en la página de administración de endpoints. | texto |
| concentration | Indica la concentración expresada en partes por millón (ppm). El separador para los decimales es el punto. | numérico |
| timestamp | Valor opcional indicando la fecha y hora UTC correspondiente a la medición. El formato en que se indique esta fecha debe coincidir con alguno de los indicados en la sección formatos de fecha. En caso de que el campo sea omitido, la plataforma asumirá que la medición corresponde a la fecha y hora actuales. | text |
| mqttMethod | Método correspondiente del servicio, en este caso UpdateConcentrationSensorStatus | string |
| mqttRID | Identificador opcional para la petición, en caso de que se desee obtener una respuesta de confirmación. | string |
Reporte de estado en formato "raw" [#reporte-de-estado-en-formato-raw]
La concentración puede ser reportada como un **valor crudo (raw),** utilizando el [conversor de expresiones](/docs/configuracion-del-cliente/dispositivos-y-endpoints/endpoints/conversion-de-datos-crudos-raw). Esta opción es conveniente cuando el dispositivo no es capaz de realizar conversiones, y emite valores que necesitan ser transformados antes de inyectarse en la plataforma.
A continuación, se muestra un ejemplo de una petición en formato raw:
```
{
"accessToken": "xxxxxxxxxxxxxxxxxxxxxxxxxxxxxxxxxxxxxxxx",
"endpointID": 1,
"rawData": "15.3",
"timestamp": "2021-02-23T14:55:03",
"mqttMethod": "UpdateConcentrationSensorStatusRaw",
"mqttRID": "RXmp123"
}
```
Parámetros [#parámetros-1]
| Nombre | Descripción | Tipo de datos |
| ----------- | ------------------------------------------------------------------------------------------------------------------------------------------------------------------------------------------------------------------------------------------------------------------------------------------------------------------ | ------------- |
| accessToken | Token de acceso con permisos para actualizar información del endpoint. Vea esta página para más información. | texto |
| endpointID | Identificador único del endpoint, que puede verse en la página de administración de endpoints. | numérico |
| rawData | Valor reportado por el sensor, como texto. Debe indicarse una expresión en el conversor de expresiones. La expresión debe devolver un valor numérico indicando la concentración, expresada partes por millón (ppm). | texto |
| timestamp | Valor opcional indicando la fecha y hora UTC correspondiente a la medición. El formato en que se indique esta fecha debe coincidir con alguno de los indicados en la sección formatos de fecha. En caso de que el campo sea omitido, la plataforma asumirá que la medición corresponde a la fecha y hora actuales. | texto |
| mqttMethod | Método correspondiente del servicio, en este caso UpdateConcentrationSensorStatusRaw | string |
| mqttRID | Identificador opcional para la petición, en caso de que se desee obtener una respuesta de confirmación. | string |
# Sensores de consumo de energía
Reporte de energía acumulada en Wh y VARh [#reporte-de-energía-acumulada-en-wh-y-varh]
La integración de sensores de energía por MQTT lleva la siguiente estructura:
```
{
"accessToken": "xxxxxxxxxxxxxxxxxxxxxxxxxxxxxxxxxxxxxxxx",
"endpointID": 1,
"activeEnergySummationWh": 112685.9,
"reactiveEnergySummationVARh": 18973.4,
"timestamp": "2021-02-23T14:55:03",
"mqttMethod": "UpdateEnergySensorValueSummation",
"mqttRID": "tkrs34"
}
```
Parámetros [#parámetros]
| Nombre | Descripción | Tipo de datos |
| --------------------------- | ------------------------------------------------------------------------------------------------------------------------------------------------------------------------------------------------------------------------------------------------------------------------------------------------------------------ | ------------- |
| accessToken | Token de acceso con permisos para actualizar información del endpoint. Vea esta página para más información. | texto |
| endpointID | Identificador único del endpoint o combinación de dirección del dispositivo y dirección del endpoint con formato \[deviceAddress]:endpointAddress (Ej: \[device-1234]:1). Estos valores pueden verse en la página de administración de endpoints. | texto |
| activeEnergySummationWh | Valor acumulado de energía activa informado por el sensor, expresado en watt-hora (Wh). | numérico |
| reactiveEnergySummationVARh | Valor acumulado de energía reactiva informado por el sensor, expresado en volt-ampere-reactivo-hora (VARh). | numérico |
| timestamp | Valor opcional indicando la fecha y hora UTC correspondiente a la medición. El formato en que se indique esta fecha debe coincidir con alguno de los indicados en la sección formatos de fecha. En caso de que el campo sea omitido, la plataforma asumirá que la medición corresponde a la fecha y hora actuales. | text |
| mqttMethod | Método correspondiente del servicio, en este caso UpdateEnergySensorValueSummation | string |
| mqttRID | Identificador opcional para la petición, en caso de que se desee obtener una respuesta de confirmación. | string |
Reporte de energía acumulada en formato "raw" [#reporte-de-energía-acumulada-en-formato-raw]
La energía acumulada puede ser reportada como un **valor crudo (raw),** utilizando el [conversor de expresiones](/docs/configuracion-del-cliente/dispositivos-y-endpoints/endpoints/conversion-de-datos-crudos-raw). Esta opción es conveniente cuando el dispositivo no es capaz de realizar conversiones, y emite valores que necesitan ser transformados antes de inyectarse en la plataforma.
A continuación, se muestra un ejemplo de una petición en formato raw:
```
{
"accessToken": "xxxxxxxxxxxxxxxxxxxxxxxxxxxxxxxxxxxxxxxx",
"endpointID": 1,
"rawData": "112685.9/18973.4",
"timestamp": "2021-02-23T14:55:03",
"mqttMethod": "UpdateEnergySensorValueSummationRaw",
"mqttRID": "tkrs34"
}
```
Como puede verse en este ejemplo, el campo RawData combina el acumulado de energía activa y el acumulado de energía reactiva en un único string, en el que ambos valores están separados por una coma.
Parámetros [#parámetros-1]
| Nombre | Descripción | Tipo de datos |
| ----------- | -------------------------------------------------------------------------------------------------------------------------------------------------------------------------------------------------------------------------------------------------------------------------------------------------------------------------------------------------------------------------------------------------------------------------------------------------------------------------------------------------------------------------------------------------------------------------------------------------------------------------------------------------------------------------------------------------------------------------------------------------------------- | ------------- |
| accessToken | Token de acceso con permisos para actualizar información del endpoint. Vea esta página para más información. | texto |
| endpointID | Identificador único del endpoint, que puede verse en la página de administración de endpoints. | numérico |
| rawData | Valor reportado por el sensor, como texto. Deben indicarse dos expresiones en el conversor de expresiones. La primera expresión se utiliza para obtener la energía activa acumulada a partir de la variable rawData. La expresión debe devolver un valor numérico indicando expresado en expresado en watt-hora (Wh). En el ejemplo anterior, podría utilizarse la siguiente expresión:ToNumber(StringPart(rawData, 1, ','))La segunda expresión se utiliza para obtener la energía reactiva acumulada a partir de la variable rawData. La expresión debe devolver un valor numérico indicando expresado en expresado volt-ampere-reactivo-hora (VARh). En el ejemplo anterior, podría utilizarse la siguiente expresión:ToNumber(StringPart(rawData, 2, ',')) | texto |
| timestamp | Valor opcional indicando la fecha y hora UTC correspondiente a la medición. El formato en que se indique esta fecha debe coincidir con alguno de los indicados en la sección formatos de fecha. En caso de que el campo sea omitido, la plataforma asumirá que la medición corresponde a la fecha y hora actuales. | text |
| mqttMethod | Método correspondiente del servicio, en este caso UpdateEnergySensorValueSummationRaw | string |
| mqttRID | Identificador opcional para la petición, en caso de que se desee obtener una respuesta de confirmación. | string |
# Sensores de corriente
Reporte de corriente en Amperes [#reporte-de-corriente-en-amperes]
La integración de sensores de corriente por MQTT lleva la siguiente estructura:
```
{
"accessToken": "xxxxxxxxxxxxxxxxxxxxxxxxxxxxxxxxxxxxxxxx",
"endpointID": 1,
"currentAmperes": 18.5,
"timestamp": "2021-02-23T14:55:03",
"mqttMethod": "UpdateCurrentSensorStatus",
"mqttRID": "tkrs34"
}
```
Parámetros [#parámetros]
| Nombre | Descripción | Tipo de datos |
| -------------- | ------------------------------------------------------------------------------------------------------------------------------------------------------------------------------------------------------------------------------------------------------------------------------------------------------------------ | ------------- |
| accessToken | Token de acceso con permisos para actualizar información del endpoint. Vea esta página para más información. | texto |
| endpointID | Identificador único del endpoint o combinación de dirección del dispositivo y dirección del endpoint con formato \[deviceAddress]:endpointAddress (Ej: \[device-1234]:1). Estos valores pueden verse en la página de administración de endpoints. | texto |
| currentAmperes | Corriente, expresada en Amperes. | numérico |
| timestamp | Valor opcional indicando la fecha y hora UTC correspondiente a la medición. El formato en que se indique esta fecha debe coincidir con alguno de los indicados en la sección formatos de fecha. En caso de que el campo sea omitido, la plataforma asumirá que la medición corresponde a la fecha y hora actuales. | text |
| mqttMethod | Método correspondiente del servicio, en este caso UpdateCurrentSensorStatus | string |
| mqttRID | Identificador opcional para la petición, en caso de que se desee obtener una respuesta de confirmación. | string |
Reporte de corriente en formato "raw" [#reporte-de-corriente-en-formato-raw]
La corriente puede ser reportada como un **valor crudo (raw),** utilizando el [conversor de expresiones](/docs/configuracion-del-cliente/dispositivos-y-endpoints/endpoints/conversion-de-datos-crudos-raw). Esta opción es conveniente cuando el dispositivo no es capaz de realizar conversiones, y emite valores que necesitan ser transformados antes de inyectarse en la plataforma.
A continuación, se muestra un ejemplo de una petición en formato raw:
```
{
"accessToken": "xxxxxxxxxxxxxxxxxxxxxxxxxxxxxxxxxxxxxxxx",
"endpointID": 1,
"rawData": "233",
"timestamp": "2021-02-23T14:55:03",
"mqttMethod": "UpdateCurrentSensorStatusRaw",
"mqttRID": "tkrs34"
}
```
Parámetros [#parámetros-1]
| Nombre | Descripción | Tipo de datos |
| ----------- | ------------------------------------------------------------------------------------------------------------------------------------------------------------------------------------------------------------------------------------------------------------------------------------------------------------------ | ------------- |
| accessToken | Token de acceso con permisos para actualizar información del endpoint. Vea esta página para más información. | texto |
| endpointID | Identificador único del endpoint, que puede verse en la página de administración de endpoints. | numérico |
| rawData | Valor reportado por el sensor, como texto. Debe indicarse una expresión en el conversor de expresiones. La expresión debe devolver un valor numérico indicando la corriente, expresada en Amperes. | texto |
| timestamp | Valor opcional indicando la fecha y hora UTC correspondiente a la medición. El formato en que se indique esta fecha debe coincidir con alguno de los indicados en la sección formatos de fecha. En caso de que el campo sea omitido, la plataforma asumirá que la medición corresponde a la fecha y hora actuales. | text |
| mqttMethod | Método correspondiente del servicio, en este caso UpdateCurrentSensorStatusRaw | string |
| mqttRID | Identificador opcional para la petición, en caso de que se desee obtener una respuesta de confirmación. | string |
# Sensores de coseno fi
Reporte de coseno fi [#reporte-de-coseno-fi]
La integración de sensores de [coseno fi](https://es.wikipedia.org/wiki/Factor_de_potencia) por MQTT lleva la siguiente estructura:
```
{
"accessToken": "xxxxxxxxxxxxxxxxxxxxxxxxxxxxxxxxxxxxxxxx",
"endpointID": 1,
"cosPhi": 0.96,
"timestamp": "2021-02-23T14:55:03",
"mqttMethod": "UpdateCosPhiSensorStatus",
"mqttRID": "tkrs34"
}
```
Parámetros [#parámetros]
| Nombre | Descripción | Tipo de datos |
| ----------- | ------------------------------------------------------------------------------------------------------------------------------------------------------------------------------------------------------------------------------------------------------------------------------------------------------------------ | ------------- |
| accessToken | Token de acceso con permisos para actualizar información del endpoint. Vea esta página para más información. | texto |
| endpointID | Identificador único del endpoint o combinación de dirección del dispositivo y dirección del endpoint con formato \[deviceAddress]:endpointAddress (Ej: \[device-1234]:1). Estos valores pueden verse en la página de administración de endpoints. | texto |
| cosPhi | Coseno fi, en el rango de -1 a 1. | numérico |
| timestamp | Valor opcional indicando la fecha y hora UTC correspondiente a la medición. El formato en que se indique esta fecha debe coincidir con alguno de los indicados en la sección formatos de fecha. En caso de que el campo sea omitido, la plataforma asumirá que la medición corresponde a la fecha y hora actuales. | text |
| mqttMethod | Método correspondiente del servicio, en este caso UpdateCosPhiSensorStatus | string |
| mqttRID | Identificador opcional para la petición, en caso de que se desee obtener una respuesta de confirmación. | string |
Reporte de coseno fi en formato "raw" [#reporte-de-coseno-fi-en-formato-raw]
El coseno fi puede ser reportado como un **valor crudo (raw),** utilizando el [conversor de expresiones](/docs/configuracion-del-cliente/dispositivos-y-endpoints/endpoints/conversion-de-datos-crudos-raw). Esta opción es conveniente cuando el dispositivo no es capaz de realizar conversiones, y emite valores que necesitan ser transformados antes de inyectarse en la plataforma.
A continuación, se muestra un ejemplo de una petición en formato raw:
```
{
"accessToken": "xxxxxxxxxxxxxxxxxxxxxxxxxxxxxxxxxxxxxxxx",
"endpointID": 1,
"rawData": "0.96",
"timestamp": "2021-02-23T14:55:03",
"mqttMethod": "UpdateCosPhiSensorStatusRaw",
"mqttRID": "tkrs34"
}
```
Parámetros [#parámetros-1]
| Nombre | Descripción | Tipo de datos |
| ----------- | ------------------------------------------------------------------------------------------------------------------------------------------------------------------------------------------------------------------------------------------------------------------------------------------------------------------ | ------------- |
| accessToken | Token de acceso con permisos para actualizar información del endpoint. Vea esta página para más información. | texto |
| endpointID | Identificador único del endpoint, que puede verse en la página de administración de endpoints. | numérico |
| rawData | Valor reportado por el sensor, como texto. Debe indicarse una expresión en el conversor de expresiones. La expresión debe devolver un valor numérico indicando el coseno fi, en el rango de -1 a 1. | texto |
| timestamp | Valor opcional indicando la fecha y hora UTC correspondiente a la medición. El formato en que se indique esta fecha debe coincidir con alguno de los indicados en la sección formatos de fecha. En caso de que el campo sea omitido, la plataforma asumirá que la medición corresponde a la fecha y hora actuales. | text |
| mqttMethod | Método correspondiente del servicio, en este caso UpdateCosPhiSensorStatusRaw | string |
| mqttRID | Identificador opcional para la petición, en caso de que se desee obtener una respuesta de confirmación. | string |
# Sensores de flujo de personas
Reporte de estado del endpoint [#reporte-de-estado-del-endpoint]
La integración de sensores de flujo de personas por MQTT lleva la siguiente estructura:
```
{
"accessToken": "xxxxxxxxxxxxxxxxxxxxxxxxxxxxxxxxxxxxxxxx",
"endpointID": 1,
"summationValue": 25,
"timestamp": "2021-02-23T14:55:03",
"mqttMethod": "UpdateFlowSensorValueSummation",
"mqttRID": "tkrs34"
}
```
Parámetros [#parámetros]
| Nombre | Descripción | Tipo de datos |
| -------------- | ------------------------------------------------------------------------------------------------------------------------------------------------------------------------------------------------------------------------------------------------------------------------------------------------------------------ | ------------- |
| accessToken | Token de acceso con permisos para actualizar información del endpoint. Vea esta página para más información. | texto |
| endpointID | Identificador único del endpoint o combinación de dirección del dispositivo y dirección del endpoint con formato \[deviceAddress]:endpointAddress (Ej: \[device-1234]:1). Estos valores pueden verse en la página de administración de endpoints. | texto |
| summationValue | Valor acumulado de flujo informado por el sensor, expresado en personas. | numérico |
| timestamp | Valor opcional indicando la fecha y hora UTC correspondiente a la medición. El formato en que se indique esta fecha debe coincidir con alguno de los indicados en la sección formatos de fecha. En caso de que el campo sea omitido, la plataforma asumirá que la medición corresponde a la fecha y hora actuales. | texto |
| mqttMethod | Método correspondiente del servicio, en este caso UpdateFlowSensorValueSummation | string |
| mqttRID | Identificador opcional para la petición, en caso de que se desee obtener una respuesta de confirmación. | string |
Reporte de estado en formato "raw" [#reporte-de-estado-en-formato-raw]
El estado del endpoint puede ser reportado como un **valor crudo (raw),** utilizando el [conversor de expresiones](/docs/configuracion-del-cliente/dispositivos-y-endpoints/endpoints/conversion-de-datos-crudos-raw). Esta opción es conveniente cuando el dispositivo no es capaz de realizar conversiones, y emite valores que necesitan ser transformados antes de inyectarse en la plataforma.
A continuación, se muestra un ejemplo de una petición en formato raw:
```
{
"accessToken": "xxxxxxxxxxxxxxxxxxxxxxxxxxxxxxxxxxxxxxxx",
"endpointID": 1,
"rawData": 25,
"timestamp": "2021-02-23T14:55:03",
"mqttMethod": "UpdateFlowSensorValueSummationRaw",
"mqttRID": "tkrs34"
}
```
Parámetros [#parámetros-1]
| Nombre | Descripción | Tipo de datos |
| ----------- | ------------------------------------------------------------------------------------------------------------------------------------------------------------------------------------------------------------------------------------------------------------------------------------------------------------------ | ------------- |
| accessToken | Token de acceso con permisos para actualizar información del endpoint. Vea esta página para más información. | texto |
| endpointID | Identificador único del endpoint, que puede verse en la página de administración de endpoints. | numérico |
| rawData | Valor reportado por el sensor, como texto. Debe indicarse una expresión en el conversor de expresiones. La expresión debe devolver un valor numérico indicando el valor acumulado de flujo informado por el sensor, expresado en personas. | texto |
| timestamp | Valor opcional indicando la fecha y hora UTC correspondiente a la medición. El formato en que se indique esta fecha debe coincidir con alguno de los indicados en la sección formatos de fecha. En caso de que el campo sea omitido, la plataforma asumirá que la medición corresponde a la fecha y hora actuales. | texto |
| mqttMethod | Método correspondiente del servicio, en este caso UpdateFlowSensorValueSummationRaw | string |
| mqttRID | Identificador opcional para la petición, en caso de que se desee obtener una respuesta de confirmación. | string |
# Sensores de flujo
Reporte de flujo acumulado en litros [#reporte-de-flujo-acumulado-en-litros]
La integración de sensores de flujo por MQTT lleva la siguiente estructura:
```
{
"accessToken": "xxxxxxxxxxxxxxxxxxxxxxxxxxxxxxxxxxxxxxxx",
"endpointID": 1,
"summationValue": 112685,
"timestamp": "2021-02-23T14:55:03",
"mqttMethod": "UpdateFlowSensorValueSummation",
"mqttRID": "tkrs34"
}
```
Parámetros [#parámetros]
| Nombre | Descripción | Tipo de datos |
| -------------- | ------------------------------------------------------------------------------------------------------------------------------------------------------------------------------------------------------------------------------------------------------------------------------------------------------------------ | ------------- |
| accessToken | Token de acceso con permisos para actualizar información del endpoint. Vea esta página para más información. | texto |
| endpointID | Identificador único del endpoint o combinación de dirección del dispositivo y dirección del endpoint con formato \[deviceAddress]:endpointAddress (Ej: \[device-1234]:1). Estos valores pueden verse en la página de administración de endpoints. | texto |
| summationValue | Valor acumulado de flujo informado por el sensor, expresado en litros. | numérico |
| timestamp | Valor opcional indicando la fecha y hora UTC correspondiente a la medición. El formato en que se indique esta fecha debe coincidir con alguno de los indicados en la sección formatos de fecha. En caso de que el campo sea omitido, la plataforma asumirá que la medición corresponde a la fecha y hora actuales. | text |
| mqttMethod | Método correspondiente del servicio, en este caso UpdateFlowSensorValueSummation | string |
| mqttRID | Identificador opcional para la petición, en caso de que se desee obtener una respuesta de confirmación. | string |
Reporte de flujo acumulado en formato "raw" [#reporte-de-flujo-acumulado-en-formato-raw]
El flujo puede ser reportado como un **valor crudo (raw),** utilizando el [conversor de expresiones](/docs/configuracion-del-cliente/dispositivos-y-endpoints/endpoints/conversion-de-datos-crudos-raw). Esta opción es conveniente cuando el dispositivo no es capaz de realizar conversiones, y emite valores que necesitan ser transformados antes de inyectarse en la plataforma.
A continuación, se muestra un ejemplo de una petición en formato raw:
```
{
"accessToken": "xxxxxxxxxxxxxxxxxxxxxxxxxxxxxxxxxxxxxxxx",
"endpointID": 1,
"rawData": "112685",
"timestamp": "2021-02-23T14:55:03",
"mqttMethod": "UpdateFlowSensorValueSummationRaw",
"mqttRID": "tkrs34"
}
```
Parámetros [#parámetros-1]
| Nombre | Descripción | Tipo de datos |
| ----------- | ------------------------------------------------------------------------------------------------------------------------------------------------------------------------------------------------------------------------------------------------------------------------------------------------------------------ | ------------- |
| accessToken | Token de acceso con permisos para actualizar información del endpoint. Vea esta página para más información. | texto |
| endpointID | Identificador único del endpoint, que puede verse en la página de administración de endpoints. | numérico |
| rawData | Valor reportado por el sensor, como texto. Debe indicarse una expresión en el conversor de expresiones. La expresión debe devolver un valor numérico indicando el valor acumulado de flujo informado por el sensor, expresado en litros. | texto |
| timestamp | Valor opcional indicando la fecha y hora UTC correspondiente a la medición. El formato en que se indique esta fecha debe coincidir con alguno de los indicados en la sección formatos de fecha. En caso de que el campo sea omitido, la plataforma asumirá que la medición corresponde a la fecha y hora actuales. | text |
| mqttMethod | Método correspondiente del servicio, en este caso UpdateFlowSensorValueSummationRaw | string |
| mqttRID | Identificador opcional para la petición, en caso de que se desee obtener una respuesta de confirmación. | string |
# Sensores de humedad
Reporte de humedad como porcentaje [#reporte-de-humedad-como-porcentaje]
La integración de sensores de humedad por MQTT lleva la siguiente estructura:
```
{
"accessToken": "xxxxxxxxxxxxxxxxxxxxxxxxxxxxxxxxxxxxxxxx",
"endpointID": 1,
"humidityPercentage": 20,
"timestamp": "2021-02-23T14:55:03",
"mqttMethod": "UpdateHumiditySensorStatus",
"mqttRID": "RXmp123"
}
```
Parámetros [#parámetros]
| Nombre | Descripción | Tipo de datos |
| ------------------ | ------------------------------------------------------------------------------------------------------------------------------------------------------------------------------------------------------------------------------------------------------------------------------------------------------------------ | ------------- |
| accessToken | Token de acceso con permisos para actualizar información del endpoint. Vea esta página para más información. | texto |
| endpointID | Identificador único del endpoint o combinación de dirección del dispositivo y dirección del endpoint con formato \[deviceAddress]:endpointAddress (Ej: \[device-1234]:1). Estos valores pueden verse en la página de administración de endpoints. | texto |
| humidityPercentage | Porcentaje de humedad, de 0 a 100. | texto |
| timestamp | Valor opcional indicando la fecha y hora UTC correspondiente a la medición. El formato en que se indique esta fecha debe coincidir con alguno de los indicados en la sección formatos de fecha. En caso de que el campo sea omitido, la plataforma asumirá que la medición corresponde a la fecha y hora actuales. | text |
| mqttMethod | Método correspondiente del servicio, en este caso UpdateHumiditySensorStatus | string |
| mqttRID | Identificador opcional para la petición, en caso de que se desee obtener una respuesta de confirmación. | string |
Reporte de humedad en formato "raw" [#reporte-de-humedad-en-formato-raw]
La humedad puede ser reportada como un **valor crudo (raw),** utilizando el [conversor de expresiones](/docs/configuracion-del-cliente/dispositivos-y-endpoints/endpoints/conversion-de-datos-crudos-raw). Esta opción es conveniente cuando el dispositivo no es capaz de realizar conversiones, y emite valores que necesitan ser transformados antes de inyectarse en la plataforma.
A continuación, se muestra un ejemplo de una petición en formato raw:
```
{
"accessToken": "xxxxxxxxxxxxxxxxxxxxxxxxxxxxxxxxxxxxxxxx",
"endpointID": 1,
"rawData": "25",
"timestamp": "2021-02-23T14:55:03",
"mqttMethod": "UpdateHumiditySensorStatusRaw",
"mqttRID": "RXmp123"
}
```
Parámetros [#parámetros-1]
| Nombre | Descripción | Tipo de datos |
| ----------- | ------------------------------------------------------------------------------------------------------------------------------------------------------------------------------------------------------------------------------------------------------------------------------------------------------------------ | ------------- |
| accessToken | Token de acceso con permisos para actualizar información del endpoint. Vea esta página para más información. | texto |
| endpointID | Identificador único del endpoint, que puede verse en la página de administración de endpoints. | numérico |
| rawData | Valor reportado por el sensor, como texto. Debe indicarse una expresión en el conversor de expresiones. La expresión debe devolver un valor numérico entre 0 y 100. | texto |
| timestamp | Valor opcional indicando la fecha y hora UTC correspondiente a la medición. El formato en que se indique esta fecha debe coincidir con alguno de los indicados en la sección formatos de fecha. En caso de que el campo sea omitido, la plataforma asumirá que la medición corresponde a la fecha y hora actuales. | text |
| mqttMethod | Método correspondiente del servicio, en este caso UpdateHumiditySensorStatusRaw | string |
| mqttRID | Identificador opcional para la petición, en caso de que se desee obtener una respuesta de confirmación. | string |
# Sensores de nivel de iluminación
Reporte de nivel de iluminación como porcentaje [#reporte-de-nivel-de-iluminación-como-porcentaje]
La integración de sensores de iluminación por MQTT lleva la siguiente estructura:
```
{
"accessToken": "xxxxxxxxxxxxxxxxxxxxxxxxxxxxxxxxxxxxxxxx",
"endpointID": 1,
"lightIntensity": 7550,
"timestamp": "2021-02-23T14:55:03",
"mqttMethod": "UpdateLightSensorStatus",
"mqttRID": "Ht4jk"
}
```
Parámetros [#parámetros]
| Nombre | Descripción | Tipo de datos |
| -------------- | ------------------------------------------------------------------------------------------------------------------------------------------------------------------------------------------------------------------------------------------------------------------------------------------------------------------ | ------------- |
| accessToken | Token de acceso con permisos para actualizar información del endpoint. Vea esta página para más información. | texto |
| endpointID | Identificador único del endpoint o combinación de dirección del dispositivo y dirección del endpoint con formato \[deviceAddress]:endpointAddress (Ej: \[device-1234]:1). Estos valores pueden verse en la página de administración de endpoints. | texto |
| lightIntensity | Intensidad luminosa expresada en lux. | texto |
| timestamp | Valor opcional indicando la fecha y hora UTC correspondiente a la medición. El formato en que se indique esta fecha debe coincidir con alguno de los indicados en la sección formatos de fecha. En caso de que el campo sea omitido, la plataforma asumirá que la medición corresponde a la fecha y hora actuales. | text |
| mqttMethod | Método correspondiente del servicio, en este caso UpdateLightSensorStatus | string |
| mqttRID | Identificador opcional para la petición, en caso de que se desee obtener una respuesta de confirmación. | string |
Reporte de nivel de iluminación en formato "raw" [#reporte-de-nivel-de-iluminación-en-formato-raw]
El nivel de iluminación puede ser reportado como un **valor crudo (raw),** utilizando el [conversor de expresiones](/docs/configuracion-del-cliente/dispositivos-y-endpoints/endpoints/conversion-de-datos-crudos-raw). Esta opción es conveniente cuando el dispositivo no es capaz de realizar conversiones, y emite valores que necesitan ser transformados antes de inyectarse en la plataforma.
A continuación, se muestra un ejemplo de una petición en formato raw:
```
{
"accessToken": "xxxxxxxxxxxxxxxxxxxxxxxxxxxxxxxxxxxxxxxx",
"endpointID": 1,
"rawData": "7550",
"timestamp": "2021-02-23T14:55:03",
"mqttMethod": "UpdateLightSensorStatusRaw",
"mqttRID": "RXmp123"
}
```
Parámetros [#parámetros-1]
| Nombre | Descripción | Tipo de datos |
| ----------- | ------------------------------------------------------------------------------------------------------------------------------------------------------------------------------------------------------------------------------------------------------------------------------------------------------------------ | ------------- |
| accessToken | Token de acceso con permisos para actualizar información del endpoint. Vea esta página para más información. | texto |
| endpointID | Identificador único del endpoint, que puede verse en la página de administración de endpoints. | numérico |
| rawData | Valor reportado por el sensor, como texto. Debe indicarse una expresión en el conversor de expresiones. La expresión debe devolver un valor numérico indicando la intensidad luminosa expresada en lux. | texto |
| timestamp | Valor opcional indicando la fecha y hora UTC correspondiente a la medición. El formato en que se indique esta fecha debe coincidir con alguno de los indicados en la sección formatos de fecha. En caso de que el campo sea omitido, la plataforma asumirá que la medición corresponde a la fecha y hora actuales. | text |
| mqttMethod | Método correspondiente del servicio, en este caso UpdateLightSensorStatusRaw | string |
| mqttRID | Identificador opcional para la petición, en caso de que se desee obtener una respuesta de confirmación. | string |
# Sensores de peso
Reporte de peso en gramos [#reporte-de-peso-en-gramos]
La integración de sensores de peso por MQTT lleva la siguiente estructura:
```
{
"accessToken": "xxxxxxxxxxxxxxxxxxxxxxxxxxxxxxxxxxxxxxxx",
"endpointID": 1,
"weightGrams": 45,
"timestamp": "2021-02-23T14:55:03",
"mqttMethod": "UpdateWeightSensorStatus",
"mqttRID": "tkrs34"
}
```
Parámetros [#parámetros]
| Nombre | Descripción | Tipo de datos |
| ----------- | ------------------------------------------------------------------------------------------------------------------------------------------------------------------------------------------------------------------------------------------------------------------------------------------------------------------ | ------------- |
| accessToken | Token de acceso con permisos para actualizar información del endpoint. Vea esta página para más información. | texto |
| endpointID | Identificador único del endpoint o combinación de dirección del dispositivo y dirección del endpoint con formato \[deviceAddress]:endpointAddress (Ej: \[device-1234]:1). Estos valores pueden verse en la página de administración de endpoints. | texto |
| weightGrams | Peso, expresado en gramos. | numérico |
| timestamp | Valor opcional indicando la fecha y hora UTC correspondiente a la medición. El formato en que se indique esta fecha debe coincidir con alguno de los indicados en la sección formatos de fecha. En caso de que el campo sea omitido, la plataforma asumirá que la medición corresponde a la fecha y hora actuales. | text |
| mqttMethod | Método correspondiente del servicio, en este caso UpdateWeightSensorStatus | string |
| mqttRID | Identificador opcional para la petición, en caso de que se desee obtener una respuesta de confirmación. | string |
Reporte de peso en formato "raw" [#reporte-de-peso-en-formato-raw]
El peso puede ser reportado como un **valor crudo (raw),** utilizando el [conversor de expresiones](/docs/configuracion-del-cliente/dispositivos-y-endpoints/endpoints/conversion-de-datos-crudos-raw). Esta opción es conveniente cuando el dispositivo no es capaz de realizar conversiones, y emite valores que necesitan ser transformados antes de inyectarse en la plataforma.
A continuación, se muestra un ejemplo de una petición en formato raw:
```
{
"accessToken": "xxxxxxxxxxxxxxxxxxxxxxxxxxxxxxxxxxxxxxxx",
"endpointID": 1,
"rawData": "25",
"timestamp": "2021-02-23T14:55:03",
"mqttMethod": "UpdateWeightSensorStatusRaw",
"mqttRID": "RXmp123"
}
```
Parámetros [#parámetros-1]
| Nombre | Descripción | Tipo de datos |
| ----------- | ------------------------------------------------------------------------------------------------------------------------------------------------------------------------------------------------------------------------------------------------------------------------------------------------------------------ | ------------- |
| accessToken | Token de acceso con permisos para actualizar información del endpoint. Vea esta página para más información. | texto |
| endpointID | Identificador único del endpoint, que puede verse en la página de administración de endpoints. | numérico |
| rawData | Valor reportado por el sensor, como texto. Debe indicarse una expresión en el conversor de expresiones. La expresión debe devolver un valor numérico indicando el peso, expresado en gramos. | texto |
| timestamp | Valor opcional indicando la fecha y hora UTC correspondiente a la medición. El formato en que se indique esta fecha debe coincidir con alguno de los indicados en la sección formatos de fecha. En caso de que el campo sea omitido, la plataforma asumirá que la medición corresponde a la fecha y hora actuales. | text |
| mqttMethod | Método correspondiente del servicio, en este caso UpdateWeightSensorStatusRaw | string |
| mqttRID | Identificador opcional para la petición, en caso de que se desee obtener una respuesta de confirmación. | string |
# Sensores de potencia activa
Reporte de potencia activa en Watts [#reporte-de-potencia-activa-en-watts]
La integración de sensores de potencia activa por MQTT lleva la siguiente estructura:
```
{
"accessToken": "xxxxxxxxxxxxxxxxxxxxxxxxxxxxxxxxxxxxxxxx",
"endpointID": 1,
"activePowerWatts": 18.5,
"timestamp": "2021-02-23T14:55:03",
"mqttMethod": "UpdateActivePowerSensorStatus",
"mqttRID": "tkrs34"
}
```
Parámetros [#parámetros]
| Nombre | Descripción | Tipo de datos |
| ---------------- | ------------------------------------------------------------------------------------------------------------------------------------------------------------------------------------------------------------------------------------------------------------------------------------------------------------------ | ------------- |
| accessToken | Token de acceso con permisos para actualizar información del endpoint. Vea esta página para más información. | texto |
| endpointID | Identificador único del endpoint o combinación de dirección del dispositivo y dirección del endpoint con formato \[deviceAddress]:endpointAddress (Ej: \[device-1234]:1). Estos valores pueden verse en la página de administración de endpoints. | texto |
| activePowerWatts | Potencia activa, expresada en Watts. | numérico |
| timestamp | Valor opcional indicando la fecha y hora UTC correspondiente a la medición. El formato en que se indique esta fecha debe coincidir con alguno de los indicados en la sección formatos de fecha. En caso de que el campo sea omitido, la plataforma asumirá que la medición corresponde a la fecha y hora actuales. | text |
| mqttMethod | Método correspondiente del servicio, en este caso UpdateActivePowerSensorStatus | string |
| mqttRID | Identificador opcional para la petición, en caso de que se desee obtener una respuesta de confirmación. | string |
Reporte de potencia activa en formato "raw" [#reporte-de-potencia-activa-en-formato-raw]
La potencia activa puede ser reportada como un **valor crudo (raw),** utilizando el [conversor de expresiones](/docs/configuracion-del-cliente/dispositivos-y-endpoints/endpoints/conversion-de-datos-crudos-raw). Esta opción es conveniente cuando el dispositivo no es capaz de realizar conversiones, y emite valores que necesitan ser transformados antes de inyectarse en la plataforma.
A continuación, se muestra un ejemplo de una petición en formato raw:
```
{
"accessToken": "xxxxxxxxxxxxxxxxxxxxxxxxxxxxxxxxxxxxxxxx",
"endpointID": 1,
"rawData": "18.5",
"timestamp": "2021-02-23T14:55:03",
"mqttMethod": "UpdateActivePowerSensorStatusRaw",
"mqttRID": "tkrs34"
}
```
Parámetros [#parámetros-1]
| Nombre | Descripción | Tipo de datos |
| ----------- | ------------------------------------------------------------------------------------------------------------------------------------------------------------------------------------------------------------------------------------------------------------------------------------------------------------------ | ------------- |
| accessToken | Token de acceso con permisos para actualizar información del endpoint. Vea esta página para más información. | texto |
| endpointID | Identificador único del endpoint, que puede verse en la página de administración de endpoints. | numérico |
| rawData | Valor reportado por el sensor, como texto. Debe indicarse una expresión en el conversor de expresiones. La expresión debe devolver un valor numérico indicando la potencia activa medida, expresada en Watts. | texto |
| timestamp | Valor opcional indicando la fecha y hora UTC correspondiente a la medición. El formato en que se indique esta fecha debe coincidir con alguno de los indicados en la sección formatos de fecha. En caso de que el campo sea omitido, la plataforma asumirá que la medición corresponde a la fecha y hora actuales. | text |
| mqttMethod | Método correspondiente del servicio, en este caso UpdateActivePowerSensorStatusRaw | string |
| mqttRID | Identificador opcional para la petición, en caso de que se desee obtener una respuesta de confirmación. | string |
# Sensores de potencia aparente
Reporte de potencia aparente en VA [#reporte-de-potencia-aparente-en-va]
La integración de sensores de [potencia aparente](https://es.wikipedia.org/wiki/Potencia_el%C3%A9ctrica) por MQTT lleva la siguiente estructura:
```
{
"accessToken": "xxxxxxxxxxxxxxxxxxxxxxxxxxxxxxxxxxxxxxxx",
"endpointID": 1,
"apparentPowerVA": 2850.5,
"timestamp": "2021-02-23T14:55:03",
"mqttMethod": "UpdateApparentPowerSensorStatus",
"mqttRID": "tkrs34"
}
```
Parámetros [#parámetros]
| Nombre | Descripción | Tipo de datos |
| --------------- | ------------------------------------------------------------------------------------------------------------------------------------------------------------------------------------------------------------------------------------------------------------------------------------------------------------------ | ------------- |
| accessToken | Token de acceso con permisos para actualizar información del endpoint. Vea esta página para más información. | texto |
| endpointID | Identificador único del endpoint o combinación de dirección del dispositivo y dirección del endpoint con formato \[deviceAddress]:endpointAddress (Ej: \[device-1234]:1). Estos valores pueden verse en la página de administración de endpoints. | texto |
| apparentPowerVA | Potencia aparente, expresada en VA. | numérico |
| timestamp | Valor opcional indicando la fecha y hora UTC correspondiente a la medición. El formato en que se indique esta fecha debe coincidir con alguno de los indicados en la sección formatos de fecha. En caso de que el campo sea omitido, la plataforma asumirá que la medición corresponde a la fecha y hora actuales. | text |
| mqttMethod | Método correspondiente del servicio, en este caso UpdateApparentPowerSensorStatus | string |
| mqttRID | Identificador opcional para la petición, en caso de que se desee obtener una respuesta de confirmación. | string |
Reporte de potencia aparente en formato "raw" [#reporte-de-potencia-aparente-en-formato-raw]
La potencia aparente puede ser reportado como un **valor crudo (raw),** utilizando el [conversor de expresiones](/docs/configuracion-del-cliente/dispositivos-y-endpoints/endpoints/conversion-de-datos-crudos-raw). Esta opción es conveniente cuando el dispositivo no es capaz de realizar conversiones, y emite valores que necesitan ser transformados antes de inyectarse en la plataforma.
A continuación, se muestra un ejemplo de una petición en formato raw:
```
{
"accessToken": "xxxxxxxxxxxxxxxxxxxxxxxxxxxxxxxxxxxxxxxx",
"endpointID": 1,
"rawData": "2850.5",
"timestamp": "2021-02-23T14:55:03",
"mqttMethod": "UpdateApparentPowerSensorStatusRaw",
"mqttRID": "tkrs34"
}
```
Parámetros [#parámetros-1]
| Nombre | Descripción | Tipo de datos |
| ----------- | ------------------------------------------------------------------------------------------------------------------------------------------------------------------------------------------------------------------------------------------------------------------------------------------------------------------ | ------------- |
| accessToken | Token de acceso con permisos para actualizar información del endpoint. Vea esta página para más información. | texto |
| endpointID | Identificador único del endpoint, que puede verse en la página de administración de endpoints. | numérico |
| rawData | Valor reportado por el sensor, como texto. Debe indicarse una expresión en el conversor de expresiones. La expresión debe devolver un valor numérico indicando la potencia aparente, expresada en VA. | texto |
| timestamp | Valor opcional indicando la fecha y hora UTC correspondiente a la medición. El formato en que se indique esta fecha debe coincidir con alguno de los indicados en la sección formatos de fecha. En caso de que el campo sea omitido, la plataforma asumirá que la medición corresponde a la fecha y hora actuales. | text |
| mqttMethod | Método correspondiente del servicio, en este caso UpdateApparentPowerSensorStatusRaw | string |
| mqttRID | Identificador opcional para la petición, en caso de que se desee obtener una respuesta de confirmación. | string |
# Sensores de potencia reactiva
Reporte de potencia reactiva en VAR [#reporte-de-potencia-reactiva-en-var]
La integración de sensores de [potencia reactiva](https://es.wikipedia.org/wiki/Potencia_el%C3%A9ctrica) por MQTT lleva la siguiente estructura:
```
{
"accessToken": "xxxxxxxxxxxxxxxxxxxxxxxxxxxxxxxxxxxxxxxx",
"endpointID": 1,
"reactivePowerVAR": 2850.5,
"timestamp": "2021-02-23T14:55:03",
"mqttMethod": "UpdateReactivePowerSensorStatus",
"mqttRID": "tkrs34"
}
```
Parámetros [#parámetros]
| Nombre | Descripción | Tipo de datos |
| ---------------- | ------------------------------------------------------------------------------------------------------------------------------------------------------------------------------------------------------------------------------------------------------------------------------------------------------------------ | ------------- |
| accessToken | Token de acceso con permisos para actualizar información del endpoint. Vea esta página para más información. | texto |
| endpointID | Identificador único del endpoint o combinación de dirección del dispositivo y dirección del endpoint con formato \[deviceAddress]:endpointAddress (Ej: \[device-1234]:1). Estos valores pueden verse en la página de administración de endpoints. | texto |
| reactivePowerVAR | Potencia reactiva, expresada en VAR. | numérico |
| timestamp | Valor opcional indicando la fecha y hora UTC correspondiente a la medición. El formato en que se indique esta fecha debe coincidir con alguno de los indicados en la sección formatos de fecha. En caso de que el campo sea omitido, la plataforma asumirá que la medición corresponde a la fecha y hora actuales. | text |
| mqttMethod | Método correspondiente del servicio, en este caso UpdateReactivePowerSensorStatus | string |
| mqttRID | Identificador opcional para la petición, en caso de que se desee obtener una respuesta de confirmación. | string |
Reporte de potencia reactiva en formato "raw" [#reporte-de-potencia-reactiva-en-formato-raw]
La potencia reactiva puede ser reportado como un **valor crudo (raw),** utilizando el [conversor de expresiones](/docs/configuracion-del-cliente/dispositivos-y-endpoints/endpoints/conversion-de-datos-crudos-raw). Esta opción es conveniente cuando el dispositivo no es capaz de realizar conversiones, y emite valores que necesitan ser transformados antes de inyectarse en la plataforma.
A continuación, se muestra un ejemplo de una petición en formato raw:
```
{
"accessToken": "xxxxxxxxxxxxxxxxxxxxxxxxxxxxxxxxxxxxxxxx",
"endpointID": 1,
"rawData": "2850.5",
"timestamp": "2021-02-23T14:55:03",
"mqttMethod": "UpdateReactivePowerSensorStatusRaw",
"mqttRID": "tkrs34"
}
```
Parámetros [#parámetros-1]
| Nombre | Descripción | Tipo de datos |
| ----------- | ------------------------------------------------------------------------------------------------------------------------------------------------------------------------------------------------------------------------------------------------------------------------------------------------------------------ | ------------- |
| accessToken | Token de acceso con permisos para actualizar información del endpoint. Vea esta página para más información. | texto |
| endpointID | Identificador único del endpoint, que puede verse en la página de administración de endpoints. | numérico |
| rawData | Valor reportado por el sensor, como texto. Debe indicarse una expresión en el conversor de expresiones. La expresión debe devolver un valor numérico indicando la potencia reactiva, expresada en VAR. | texto |
| timestamp | Valor opcional indicando la fecha y hora UTC correspondiente a la medición. El formato en que se indique esta fecha debe coincidir con alguno de los indicados en la sección formatos de fecha. En caso de que el campo sea omitido, la plataforma asumirá que la medición corresponde a la fecha y hora actuales. | text |
| mqttMethod | Método correspondiente del servicio, en este caso UpdateReactivePowerSensorStatusRaw | string |
| mqttRID | Identificador opcional para la petición, en caso de que se desee obtener una respuesta de confirmación. | string |
# Sensores de presión
Reporte de presión en Pascales [#reporte-de-presión-en-pascales]
La integración de sensores de presión por MQTT lleva la siguiente estructura:
```
{
"accessToken": "xxxxxxxxxxxxxxxxxxxxxxxxxxxxxxxxxxxxxxxx",
"endpointID": 1,
"pressurePascals": 101300,
"timestamp": "2021-02-23T14:55:03"
"mqttMethod": "UpdatePressureSensorStatus",
"mqttRID": "Prafw6H"
}
```
Parámetros [#parámetros]
| Nombre | Descripción | Tipo de datos |
| --------------- | ------------------------------------------------------------------------------------------------------------------------------------------------------------------------------------------------------------------------------------------------------------------------------------------------------------------ | ------------- |
| accessToken | Token de acceso con permisos para actualizar información del endpoint. Vea esta página para más información. | texto |
| endpointID | Identificador único del endpoint o combinación de dirección del dispositivo y dirección del endpoint con formato \[deviceAddress]:endpointAddress (Ej: \[device-1234]:1). Estos valores pueden verse en la página de administración de endpoints. | texto |
| pressurePascals | Presión, expresada en Pascales. | numérico |
| timestamp | Valor opcional indicando la fecha y hora UTC correspondiente a la medición. El formato en que se indique esta fecha debe coincidir con alguno de los indicados en la sección formatos de fecha. En caso de que el campo sea omitido, la plataforma asumirá que la medición corresponde a la fecha y hora actuales. | text |
| mqttMethod | Método correspondiente del servicio, en este caso UpdatePressureSensorStatus | string |
| mqttRID | Identificador opcional para la petición, en caso de que se desee obtener una respuesta de confirmación. | string |
Reporte de presión en formato "raw" [#reporte-de-presión-en-formato-raw]
La presión puede ser reportada como un **valor crudo (raw),** utilizando el [conversor de expresiones](/docs/configuracion-del-cliente/dispositivos-y-endpoints/endpoints/conversion-de-datos-crudos-raw). Esta opción es conveniente cuando el dispositivo no es capaz de realizar conversiones, y emite valores que necesitan ser transformados antes de inyectarse en la plataforma.
A continuación, se muestra un ejemplo de una petición en formato raw:
```
{
"accessToken": "xxxxxxxxxxxxxxxxxxxxxxxxxxxxxxxxxxxxxxxx",
"endpointID": 1,
"rawData": "101300",
"timestamp": "2021-02-23T14:55:03"
"mqttMethod": "UpdatePressureSensorStatusRaw",
"mqttRID": "Prafw6H"
}
```
Parámetros [#parámetros-1]
| Nombre | Descripción | Tipo de datos |
| ----------- | ------------------------------------------------------------------------------------------------------------------------------------------------------------------------------------------------------------------------------------------------------------------------------------------------------------------ | ------------- |
| accessToken | Token de acceso con permisos para actualizar información del endpoint. Vea esta página para más información. | texto |
| endpointID | Identificador único del endpoint, que puede verse en la página de administración de endpoints. | numérico |
| rawData | Valor reportado por el sensor, como texto. Debe indicarse una expresión en el conversor de expresiones. La expresión debe devolver un valor numérico indicando la presión medida, expresada en Pascales. | texto |
| timestamp | Valor opcional indicando la fecha y hora UTC correspondiente a la medición. El formato en que se indique esta fecha debe coincidir con alguno de los indicados en la sección formatos de fecha. En caso de que el campo sea omitido, la plataforma asumirá que la medición corresponde a la fecha y hora actuales. | text |
| mqttMethod | Método correspondiente del servicio, en este caso UpdatePressureSensorStatusRaw | string |
| mqttRID | Identificador opcional para la petición, en caso de que se desee obtener una respuesta de confirmación. | string |
# Sensores de temperatura
Reporte de temperatura en grados Celsius [#reporte-de-temperatura-en-grados-celsius]
La integración de sensores de temperatura por MQTT lleva la siguiente estructura:
```
{
"accessToken": "xxxxxxxxxxxxxxxxxxxxxxxxxxxxxxxxxxxxxxxx",
"endpointID": 1,
"temperatureCelsius": 25,
"timestamp": "2021-02-23T14:55:03",
"mqttMethod": "UpdateTemperatureSensorStatus",
"mqttRID": "RXmp123"
}
```
Parámetros [#parámetros]
| Nombre | Descripción | Tipo de dato |
| ------------------ | ------------------------------------------------------------------------------------------------------------------------------------------------------------------------------------------------------------------------------------------------------------------------------------------------------------------ | ------------ |
| accessToken | Token de acceso con permisos para actualizar información del endpoint. Vea esta página para más información. | text |
| endpointID | Identificador único del endpoint o combinación de dirección del dispositivo y dirección del endpoint con formato \[deviceAddress]:endpointAddress (Ej: \[device-1234]:1). Estos valores pueden verse en la página de administración de endpoints. | texto |
| temperatureCelsius | Temperatura medida, valor numérico mayor o igual a -273.15, indicando la temperatura medida, en grados Celsius (ºC). | numeric |
| timestamp | Valor opcional indicando la fecha y hora UTC correspondiente a la medición. El formato en que se indique esta fecha debe coincidir con alguno de los indicados en la sección formatos de fecha. En caso de que el campo sea omitido, la plataforma asumirá que la medición corresponde a la fecha y hora actuales. | text |
| mqttMethod | Método correspondiente del servicio, en este caso UpdateTemperatureSensorStatus | string |
| mqttRID | Identificador opcional para la petición, en caso de que se desee obtener una respuesta de confirmación. | string |
Reporte de temperatura en formato "raw" [#reporte-de-temperatura-en-formato-raw]
La temperatura puede ser reportada como un **valor crudo (raw),** utilizando el [conversor de expresiones](/docs/configuracion-del-cliente/dispositivos-y-endpoints/endpoints/conversion-de-datos-crudos-raw). Esta opción es conveniente cuando el dispositivo no es capaz de realizar conversiones, y emite valores que necesitan ser transformados antes de inyectarse en la plataforma.
A continuación, se muestra un ejemplo de una petición en formato raw:
```
{
"accessToken": "xxxxxxxxxxxxxxxxxxxxxxxxxxxxxxxxxxxxxxxx",
"endpointID": 1,
"rawData": "45",
"timestamp": "2021-02-23T14:55:03",
"mqttMethod": "UpdateTemperatureSensorStatusRaw",
"mqttRID": "RXmp123"
}
```
Parámetros [#parámetros-1]
| Nombre | Descripción | Tipo de dato |
| ----------- | ------------------------------------------------------------------------------------------------------------------------------------------------------------------------------------------------------------------------------------------------------------------------------------------------------------------ | ------------ |
| accessToken | Token de acceso con permisos para actualizar información del endpoint. Vea esta página para más información. | text |
| endpointID | Identificador único del endpoint, que puede verse en la página de administración de endpoints. | numeric |
| rawData | Valor reportado por el sensor, como texto. Debe indicarse una expresión en el conversor de expresiones. La expresión debe devolver un valor numérico mayor o igual a -273.15, indicando la temperatura medida, en grados Celsius (ºC). | text |
| timestamp | Valor opcional indicando la fecha y hora UTC correspondiente a la medición. El formato en que se indique esta fecha debe coincidir con alguno de los indicados en la sección formatos de fecha. En caso de que el campo sea omitido, la plataforma asumirá que la medición corresponde a la fecha y hora actuales. | text |
| mqttMethod | Método correspondiente del servicio, en éste caso UpdateTemperatureSensorStatusRaw | string |
| mqttRID | Identificador opcional para la petición, en caso de que se desee obtener una respuesta de confirmación. | string |
# Sensores de voltaje
Reporte de voltaje en voltios [#reporte-de-voltaje-en-voltios]
La integración de sensores de voltaje por MQTT lleva la siguiente estructura:
```
{
"accessToken": "xxxxxxxxxxxxxxxxxxxxxxxxxxxxxxxxxxxxxxxx",
"endpointID": 1,
"voltageVolts": 233,
"timestamp": "2021-02-23T14:55:03",
"mqttMethod": "UpdateVoltageSensorStatus",
"mqttRID": "tkrs34"
}
```
Parámetros [#parámetros]
| Nombre | Descripción | Tipo de datos |
| ------------ | ------------------------------------------------------------------------------------------------------------------------------------------------------------------------------------------------------------------------------------------------------------------------------------------------------------------ | ------------- |
| accessToken | Token de acceso con permisos para actualizar información del endpoint. Vea esta página para más información. | texto |
| endpointID | Identificador único del endpoint o combinación de dirección del dispositivo y dirección del endpoint con formato \[deviceAddress]:endpointAddress (Ej: \[device-1234]:1). Estos valores pueden verse en la página de administración de endpoints. | texto |
| voltageVolts | Voltaje expresado en voltios. | numérico |
| timestamp | Valor opcional indicando la fecha y hora UTC correspondiente a la medición. El formato en que se indique esta fecha debe coincidir con alguno de los indicados en la sección formatos de fecha. En caso de que el campo sea omitido, la plataforma asumirá que la medición corresponde a la fecha y hora actuales. | text |
| mqttMethod | Método correspondiente del servicio, en este caso UpdateVoltageSensorStatus | string |
| mqttRID | Identificador opcional para la petición, en caso de que se desee obtener una respuesta de confirmación. | string |
Reporte de voltaje en formato "raw" [#reporte-de-voltaje-en-formato-raw]
El voltaje puede ser reportado como un **valor crudo (raw),** utilizando el [conversor de expresiones](/docs/configuracion-del-cliente/dispositivos-y-endpoints/endpoints/conversion-de-datos-crudos-raw). Esta opción es conveniente cuando el dispositivo no es capaz de realizar conversiones, y emite valores que necesitan ser transformados antes de inyectarse en la plataforma.
A continuación, se muestra un ejemplo de una petición en formato raw:
```
{
"accessToken": "xxxxxxxxxxxxxxxxxxxxxxxxxxxxxxxxxxxxxxxx",
"endpointID": 1,
"rawData": "233",
"timestamp": "2021-02-23T14:55:03",
"mqttMethod": "UpdateVoltageSensorStatusRaw",
"mqttRID": "tkrs34"
}
```
Parámetros [#parámetros-1]
| Nombre | Descripción | Tipo de datos |
| ----------- | ------------------------------------------------------------------------------------------------------------------------------------------------------------------------------------------------------------------------------------------------------------------------------------------------------------------ | ------------- |
| accessToken | Token de acceso con permisos para actualizar información del endpoint. Vea esta página para más información. | texto |
| endpointID | Identificador único del endpoint, que puede verse en la página de administración de endpoints. | numérico |
| rawData | Valor reportado por el sensor, como texto. Debe indicarse una expresión en el conversor de expresiones. La expresión debe devolver un valor numérico indicando el voltaje, expresado en voltios. | texto |
| timestamp | Valor opcional indicando la fecha y hora UTC correspondiente a la medición. El formato en que se indique esta fecha debe coincidir con alguno de los indicados en la sección formatos de fecha. En caso de que el campo sea omitido, la plataforma asumirá que la medición corresponde a la fecha y hora actuales. | text |
| mqttMethod | Método correspondiente del servicio, en este caso UpdateVoltageSensorStatusRaw | string |
| mqttRID | Identificador opcional para la petición, en caso de que se desee obtener una respuesta de confirmación. | string |
# Sensores de volumen
Reporte de volumen en litros [#reporte-de-volumen-en-litros]
La integración de sensores de volumen por MQTT lleva la siguiente estructura:
```
{
"accessToken": "xxxxxxxxxxxxxxxxxxxxxxxxxxxxxxxxxxxxxxxx",
"endpointID": 1,
"volumeLiters": 45,
"timestamp": "2021-02-23T14:55:03",
"mqttMethod": "UpdateVolumeSensorStatus",
"mqttRID": "tkrs34"
}
```
Parámetros [#parámetros]
| Nombre | Descripción | Tipo de datos |
| ------------ | ------------------------------------------------------------------------------------------------------------------------------------------------------------------------------------------------------------------------------------------------------------------------------------------------------------------ | ------------- |
| accessToken | Token de acceso con permisos para actualizar información del endpoint. Vea esta página para más información. | texto |
| endpointID | Identificador único del endpoint o combinación de dirección del dispositivo y dirección del endpoint con formato \[deviceAddress]:endpointAddress (Ej: \[device-1234]:1). Estos valores pueden verse en la página de administración de endpoints. | texto |
| volumeLiters | Volumen expresado en en litros. | numérico |
| timestamp | Valor opcional indicando la fecha y hora UTC correspondiente a la medición. El formato en que se indique esta fecha debe coincidir con alguno de los indicados en la sección formatos de fecha. En caso de que el campo sea omitido, la plataforma asumirá que la medición corresponde a la fecha y hora actuales. | text |
| mqttMethod | Método correspondiente del servicio, en este caso UpdateVolumeSensorStatus | string |
| mqttRID | Identificador opcional para la petición, en caso de que se desee obtener una respuesta de confirmación. | string |
Reporte de volumen en formato "raw" [#reporte-de-volumen-en-formato-raw]
El volumen puede ser reportado como un **valor crudo (raw),** utilizando el [conversor de expresiones](/docs/configuracion-del-cliente/dispositivos-y-endpoints/endpoints/conversion-de-datos-crudos-raw). Esta opción es conveniente cuando el dispositivo no es capaz de realizar conversiones, y emite valores que necesitan ser transformados antes de inyectarse en la plataforma.
A continuación, se muestra un ejemplo de una petición en formato raw:
```
{
"accessToken": "xxxxxxxxxxxxxxxxxxxxxxxxxxxxxxxxxxxxxxxx",
"endpointID": 1,
"rawData": "25",
"timestamp": "2021-02-23T14:55:03",
"mqttMethod": "UpdateVolumeSensorStatusRaw",
"mqttRID": "RXmp123"
}
```
Parámetros [#parámetros-1]
| Nombre | Descripción | Tipo de datos |
| ----------- | ------------------------------------------------------------------------------------------------------------------------------------------------------------------------------------------------------------------------------------------------------------------------------------------------------------------ | ------------- |
| accessToken | Token de acceso con permisos para actualizar información del endpoint. Vea esta página para más información. | texto |
| endpointID | Identificador único del endpoint, que puede verse en la página de administración de endpoints. | numérico |
| rawData | Valor reportado por el sensor, como texto. Debe indicarse una expresión en el conversor de expresiones. La expresión debe devolver un valor numérico indicando el volumen medido, expresado en litros. | texto |
| timestamp | Valor opcional indicando la fecha y hora UTC correspondiente a la medición. El formato en que se indique esta fecha debe coincidir con alguno de los indicados en la sección formatos de fecha. En caso de que el campo sea omitido, la plataforma asumirá que la medición corresponde a la fecha y hora actuales. | text |
| mqttMethod | Método correspondiente del servicio, en este caso UpdateVolumeSensorStatusRaw | string |
| mqttRID | Identificador opcional para la petición, en caso de que se desee obtener una respuesta de confirmación. | string |
# Sensores genéricos de flujo
> La integración de sensores de flujo genéricos utiliza la misma API que los sensores de flujo no-genéricos. La única diferencia es que los sensores genéricos deben informar el flujo utilizando la unidad de medida correspondiente a la variable genérica asociada al sensor.
Reporte de flujo acumulado en unidades [#reporte-de-flujo-acumulado-en-unidades]
La integración de sensores genéricos de flujo por MQTT lleva la siguiente estructura, que es idéntica a la de los sensores de flujo no-genéricos:
```
{
"accessToken": "xxxxxxxxxxxxxxxxxxxxxxxxxxxxxxxxxxxxxxxx",
"endpointID": 1,
"summationValue": 112685,
"timestamp": "2021-02-23T14:55:03",
"mqttMethod": "UpdateFlowSensorValueSummation",
"mqttRID": "tkrs34"
}
```
Parámetros [#parámetros]
| Nombre | Descripción | Tipo de datos |
| -------------- | ------------------------------------------------------------------------------------------------------------------------------------------------------------------------------------------------------------------------------------------------------------------------------------------------------------------ | ------------- |
| accessToken | Token de acceso con permisos para actualizar información del endpoint. Vea esta página para más información. | texto |
| endpointID | Identificador único del endpoint o combinación de dirección del dispositivo y dirección del endpoint con formato \[deviceAddress]:endpointAddress (Ej: \[device-1234]:1). Estos valores pueden verse en la página de administración de endpoints. | texto |
| summationValue | Valor acumulado de flujo informado por el sensor. Las unidades son las mismas que las elegidas para la variable genérica asociada al sensor. | numérico |
| timestamp | Valor opcional indicando la fecha y hora UTC correspondiente a la medición. El formato en que se indique esta fecha debe coincidir con alguno de los indicados en la sección formatos de fecha. En caso de que el campo sea omitido, la plataforma asumirá que la medición corresponde a la fecha y hora actuales. | text |
| mqttMethod | Método correspondiente del servicio, en este caso UpdateFlowSensorValueSummation | string |
| mqttRID | Identificador opcional para la petición, en caso de que se desee obtener una respuesta de confirmación. | string |
Reporte de flujo acumulado en formato "raw" [#reporte-de-flujo-acumulado-en-formato-raw]
El flujo puede ser reportado como un **valor crudo (raw),** utilizando el [conversor de expresiones](/docs/configuracion-del-cliente/dispositivos-y-endpoints/endpoints/conversion-de-datos-crudos-raw). Esta opción es conveniente cuando el dispositivo no es capaz de realizar conversiones, y emite valores que necesitan ser transformados antes de inyectarse en la plataforma.
A continuación, se muestra un ejemplo de una petición en formato raw:
```
{
"accessToken": "xxxxxxxxxxxxxxxxxxxxxxxxxxxxxxxxxxxxxxxx",
"endpointID": 1,
"rawData": "112685",
"timestamp": "2021-02-23T14:55:03",
"mqttMethod": "UpdateFlowSensorValueSummationRaw",
"mqttRID": "tkrs34"
}
```
Parámetros [#parámetros-1]
| Nombre | Descripción | Tipo de datos |
| ----------- | ------------------------------------------------------------------------------------------------------------------------------------------------------------------------------------------------------------------------------------------------------------------------------------------------------------------ | ------------- |
| accessToken | Token de acceso con permisos para actualizar información del endpoint. Vea esta página para más información. | texto |
| endpointID | Identificador único del endpoint, que puede verse en la página de administración de endpoints. | numérico |
| rawData | Valor reportado por el sensor, como texto. Debe indicarse una expresión en el conversor de expresiones. La expresión debe devolver un valor numérico indicando el valor acumulado de flujo informado por el sensor, expresado en las unidades de la variable genérica asociada al sensor. | texto |
| timestamp | Valor opcional indicando la fecha y hora UTC correspondiente a la medición. El formato en que se indique esta fecha debe coincidir con alguno de los indicados en la sección formatos de fecha. En caso de que el campo sea omitido, la plataforma asumirá que la medición corresponde a la fecha y hora actuales. | text |
| mqttMethod | Método correspondiente del servicio, en este caso UpdateFlowSensorValueSummationRaw | string |
| mqttRID | Identificador opcional para la petición, en caso de que se desee obtener una respuesta de confirmación. | string |
# Sensores genéricos
Reporte de valor del sensor genérico [#reporte-de-valor-del-sensor-genérico]
La integración de sensores genéricos por MQTT lleva la siguiente estructura:
```
{
"accessToken": "xxxxxxxxxxxxxxxxxxxxxxxxxxxxxxxxxxxxxxxx",
"endpointID": 1,
"value": 45,
"timestamp": "2021-02-23T14:55:03",
"mqttMethod": "UpdateGenericSensorStatus",
"mqttRID": "tkrs34"
}
```
Parámetros [#parámetros]
| Nombre | Descripción | Tipo de datos |
| ----------- | ------------------------------------------------------------------------------------------------------------------------------------------------------------------------------------------------------------------------------------------------------------------------------------------------------------------ | ------------- |
| accessToken | Token de acceso con permisos para actualizar información del endpoint. Vea esta página para más información. | texto |
| endpointID | Identificador único del endpoint o combinación de dirección del dispositivo y dirección del endpoint con formato \[deviceAddress]:endpointAddress (Ej: \[device-1234]:1). Estos valores pueden verse en la página de administración de endpoints. | texto |
| value | Valor genérico. La unidad de medida dependerá de lo que se establezca en la configuración del tipo de variable correspondiente al endpoint. | numérico |
| timestamp | Valor opcional indicando la fecha y hora UTC correspondiente a la medición. El formato en que se indique esta fecha debe coincidir con alguno de los indicados en la sección formatos de fecha. En caso de que el campo sea omitido, la plataforma asumirá que la medición corresponde a la fecha y hora actuales. | text |
| mqttMethod | Método correspondiente del servicio, en este caso UpdateGenericSensorStatus | string |
| mqttRID | Identificador opcional para la petición, en caso de que se desee obtener una respuesta de confirmación. | string |
Reporte de valor en formato "raw" [#reporte-de-valor-en-formato-raw]
El valor del sensor genérico puede ser reportado como un **valor crudo (raw),** utilizando el [conversor de expresiones](/docs/configuracion-del-cliente/dispositivos-y-endpoints/endpoints/conversion-de-datos-crudos-raw). Esta opción es conveniente cuando el dispositivo no es capaz de realizar conversiones, y emite valores que necesitan ser transformados antes de inyectarse en la plataforma.
A continuación, se muestra un ejemplo de una petición en formato raw:
```
{
"accessToken": "xxxxxxxxxxxxxxxxxxxxxxxxxxxxxxxxxxxxxxxx",
"endpointID": 1,
"rawData": "45",
"timestamp": "2021-02-23T14:55:03",
"mqttMethod": "UpdateGenericSensorStatusRaw",
"mqttRID": "tkrs34"
}
```
Parámetros [#parámetros-1]
| Nombre | Descripción | Tipo de datos |
| ----------- | ------------------------------------------------------------------------------------------------------------------------------------------------------------------------------------------------------------------------------------------------------------------------------------------------------------------ | ------------- |
| accessToken | Token de acceso con permisos para actualizar información del endpoint. Vea esta página para más información. | texto |
| endpointID | Identificador único del endpoint, que puede verse en la página de administración de endpoints. | numérico |
| rawData | Valor reportado por el sensor, como texto. Debe indicarse una expresión en el conversor de expresiones. La expresión debe devolver un valor numérico. La unidad de medida dependerá de lo que se establezca en la configuración del tipo de variable correspondiente al endpoint. | texto |
| timestamp | Valor opcional indicando la fecha y hora UTC correspondiente a la medición. El formato en que se indique esta fecha debe coincidir con alguno de los indicados en la sección formatos de fecha. En caso de que el campo sea omitido, la plataforma asumirá que la medición corresponde a la fecha y hora actuales. | text |
| mqttMethod | Método correspondiente del servicio, en este caso UpdateGenericSensorStatusRaw | string |
| mqttRID | Identificador opcional para la petición, en caso de que se desee obtener una respuesta de confirmación. | string |
# Sensores IAS (movimiento, ocupación, y sensores binarios)
Reporte estado del sensor [#reporte-estado-del-sensor]
La integración de sensores IAS MQTT lleva la siguiente estructura:
```
{
"accessToken": "xxxxxxxxxxxxxxxxxxxxxxxxxxxxxxxxxxxxxxxx",
"endpointID": 1,
"state": 2,
"timestamp": "2021-02-23T14:55:03",
"mqttMethod": "UpdateIASSensorStatus",
"mqttRID": "Prafw6H"
}
```
Parámetros [#parámetros]
| Nombre | Descripción | Tipo de datos |
| ----------- | ----------------------------------------------------------------------------------------------------------------------------------------------------------------------------------------------------------------------------------------------------------------------------------------------------------------------------------------------------------------------------------------------------------------------------------------------------------------------------------------------------------------------------------------------------------------------------------------------------------------------------------------------------------------------------------------------------------------------------------------------------------------------------------------------------------------------- | ------------- |
| accessToken | Token de acceso con permisos para actualizar información del endpoint. Vea esta página para más información. | texto |
| endpointID | Identificador único del endpoint o combinación de dirección del dispositivo y dirección del endpoint con formato \[deviceAddress]:endpointAddress (Ej: \[device-1234]:1). Estos valores pueden verse en la página de administración de endpoints. | texto |
| state | Indica el estado del sensor. Los estados posibles son los siguientes:1: Inactivo. El sensor no registra actividad.2: Activo. El sensor registra actividad.3: En limpieza. El espacio asociado al sensor está siendo limpiado.4: Necesita limpieza. El espacio asociado al sensor necesita limpieza.5: En modo test. El sensor está actualmente en modo de prueba.6: Manipulado. El sensor ha sido manipulado y puede no estar funcionando correctamente.7: En mantenimiento. El sensor requiere mantenimiento y puede no estar funcionando correctamente.8: El sensor detecta que un vehículo está entrando a la plaza de estacionamiento.9: El sensor detecta que un vehículo está saliendo de la plaza de estacionamiento.10: El sensor informa que la plaza de estacionamiento se encuentra en estado de infracción. | numérico |
| timestamp | Valor opcional indicando la fecha y hora UTC correspondiente a la medición. El formato en que se indique esta fecha debe coincidir con alguno de los indicados en la sección formatos de fecha. En caso de que el campo sea omitido, la plataforma asumirá que la medición corresponde a la fecha y hora actuales. | text |
| mqttMethod | Método correspondiente del servicio, en este caso UpdateIASSensorStatus | string |
| mqttRID | Identificador opcional para la petición, en caso de que se desee obtener una respuesta de confirmación. | string |
Reporte de estado en formato "raw" [#reporte-de-estado-en-formato-raw]
El estado del sensor puede ser reportado como un **valor crudo (raw),** utilizando el [conversor de expresiones](/docs/configuracion-del-cliente/dispositivos-y-endpoints/endpoints/conversion-de-datos-crudos-raw). Esta opción es conveniente cuando el dispositivo no es capaz de realizar conversiones, y emite valores que necesitan ser transformados antes de inyectarse en la plataforma.
A continuación, se muestra un ejemplo de una petición en formato raw:
```
{
"accessToken": "xxxxxxxxxxxxxxxxxxxxxxxxxxxxxxxxxxxxxxxx",
"endpointID": 1,
"rawData": "2",
"timestamp": "2021-02-23T14:55:03",
"mqttMethod": "UpdateIASSensorStatusRaw",
"mqttRID": "RXmp123"
}
```
Parámetros [#parámetros-1]
| Nombre | Descripción | Tipo de datos |
| ----------- | ------------------------------------------------------------------------------------------------------------------------------------------------------------------------------------------------------------------------------------------------------------------------------------------------------------------ | ------------- |
| accessToken | Token de acceso con permisos para actualizar información del endpoint. Vea esta página para más información. | texto |
| endpointID | Identificador único del endpoint, que puede verse en la página de administración de endpoints. | numérico |
| rawData | Valor reportado por el sensor, como texto. Debe indicarse una expresión en el conversor de expresiones. La expresión debe devolver un valor numérico que corresponda a los estados de la tabla que puede verse más arriba. | texto |
| timestamp | Valor opcional indicando la fecha y hora UTC correspondiente a la medición. El formato en que se indique esta fecha debe coincidir con alguno de los indicados en la sección formatos de fecha. En caso de que el campo sea omitido, la plataforma asumirá que la medición corresponde a la fecha y hora actuales. | text |
| mqttMethod | Método correspondiente del servicio, en este caso UpdateIASSensorStatusRaw | string |
| mqttRID | Identificador opcional para la petición, en caso de que se desee obtener una respuesta de confirmación. | string |
# Formatos de fechas
La plataforma permite cierta flexibilidad en el uso de campos de fecha / hora en la API HTTP y MQTT. Los campos son siempre de tipo string, pero el contenido puede ser especificado utilizando los siguientes formatos descriptos aquí. En esta sección se describen además las características relacionadas con tratamiento UTC, conversión de zonas horarias, y otros detalles.
Separadores [#separadores]
Separador de fecha [#separador-de-fecha]
Como separador de fecha, se admiten los caracteres “/”, y “-”, indistintamente.
Separador de hora [#separador-de-hora]
El separador de hora debe ser siempre “:”.
Separador entre fecha y hora [#separador-entre-fecha-y-hora]
Opcionalmente, puede indicarse utilizarse un carácter “**T**” para separar la fecha y la hora. Las dos fechas siguientes, por ejemplo, son equivalentes:
```
2020-02-25 14:35:18
2020-02-25T14:35:18
```
Formatos [#formatos]
Formatos para fecha (sin hora) [#formatos-para-fecha-sin-hora]
La plataforma soporta los siguientes formatos para indicar una fecha.
| Formato | Comentarios |
| ---------- | --------------------------------------------------------------------------------------------------------------------------------------------------------------------- |
| yyyy/M/d | Especifica el año de 4 dígitos, seguido del mes y del día, sin utilizar ceros para completar mes y día. El separador de fecha puede ser cualquiera de los soportados. |
| yyyy/MM/dd | Especifica el año de 4 dígitos, seguido del mes y del día, utilizando ceros para completar mes y día. El separador de fecha puede ser cualquiera de los soportados. |
Formatos para hora [#formatos-para-hora]
La plataforma soporta los siguientes formatos para la hora.
| Formato | Comentarios |
| -------- | ------------------------------------------------------------------------------------------------------------------------------------------------ |
| H:m | La hora se especifica en formato de 24 horas, informando hora y minutos, sin completar con ceros, y utilizando el separador de horas. |
| H:m:s | La hora se especifica en formato de 24 horas, informando hora, minutos, y segundos, sin completar con ceros, y utilizando el separador de horas. |
| HH:mm | La hora se especifica en formato de 24 horas, informando hora y minutos, completando con ceros, y utilizando el separador de horas. |
| HH:mm:ss | La hora se especifica en formato de 24 horas, informando hora, minutos, y segundos, completando con ceros, y utilizando el separador de horas. |
Formato epoch [#formato-epoch]
Es posible indicar una fecha y hora en formato [epoch](https://en.wikipedia.org/wiki/Unix_time), es decir como cantidad de segundos desde las cero horas del 1 de enero de 1970, UTC. El formato epoch está expresado siempre en UTC, y por lo tanto, no permite indicación de zona horaria.
| Formato | Comentarios |
| ---------- | ----------------------------------------------------------------------------------------------------------------------------------------------------------------------------------------------------------------------------- |
| nnnnnnnnnn | Formato epoch. En este formato, la fecha y hora se informa como una cantidad de segundos a partir de las cero horas del 1 de enero de 1970, UTC. Por ejemplo, la fecha “2010/10/23 02:47:25” corresponde al valor 1287802045. |
Indicación de zona horaria (opcional) [#indicación-de-zona-horaria-opcional]
Todas las APIs requieren el uso de fechas y horas UTC. Sin embargo, se permite que las horas informadas sean locales, siempre y cuando contengan la indicación del desplazamiento horario.
* Para todas las fechas y horas que no contengan un desplazamiento horario (o que contengan el sufijo “Z”), se asumirá que están expresadas en UTC.
* En caso de que se informe un desplazamiento horario, deberá estar compuesto por un signo “+” o “-”, seguido de hora y minutos utilizando entre ellos el separador de hora.
* Los desplazamientos horarios no son compatibles con el formato epoch. El formato epoch debe informarse siempre en UTC.
A continuación se presentan algunos ejemplos.
| Ejemplo | Valor UTC utilizado | Comentarios |
| -------------------------- | ------------------------------ | ------------------------------------------------------------------------------------------------------------------------------------ |
| 2020-02-21 03:37:14 | 2020-02-21 03:37:14 (el mismo) | Sin indicación de hora, por lo cual se asume UTC. Corresponde a las 03:37:14 del 21 de febrero de 2020, hora UTC. |
| 2020-02-21 03:37:14Z | 2020-02-21 03:37:14 (el mismo) | El sufijo Z indica que la hora está expresada en UTC, de modo que este ejemplo es equivalente al anterior. |
| 2020-02-21 20:30:25 -05:00 | 2020/02/22 01:30:25 | Indica un desplazamiento de 5 horas hacia el oeste. Nótese que en horario UTC, la fecha se adelanta 5 horas y pasa al día siguiente. |
| 2020-02-21 20:30:25 +05:00 | 2020-02-21 15:30:25 | Indica un desplazamiento de 5 horas hacia el este. |
# Formatos de datos
Al utilizar las API por HTTP y MQTT, es necesario respetar algunos formatos de datos, como se describe a continuación.
[Formatos de fechas](/docs/configuracion-del-cliente/dispositivos-y-endpoints/endpoints/conversion-de-datos-crudos-raw/expresiones/formatos-de-datos/formatos-de-fechas)
# Funciones
Las funciones permiten obtener valores a través de la transformación de otros. La siguiente es una lista de funciones divididas en categorías, de acuerdo a su uso típico.
Funciones matemáticas [#funciones-matemáticas]
| Función | Comentarios |
| ------------------- | ------------------------------------------------------------------- |
| CelsiusToFahrenheit | Convierte una temperatura en grados Celsius a grados Fahrenheit. |
| FahrenheitToCelsius | Convierte una temperatura en grados Fahrenheit a grados Celsius. |
| Max | Devuelve el valor máximo entre una serie de valores. |
| Min | Devuelve el valor mínimo entre una serie de valores. |
| Power | Devuelve el resultado de elevar un número dado a una potencia dada. |
| Round | Redondea un número a la cantidad indicada de posiciones decimales. |
| Sqrt | Calcula la raíz cuadrada de un número. |
| Trunc | Trunca un número, quitando la parte fraccionaria. |
Funciones para manejo de strings [#funciones-para-manejo-de-strings]
| Función | Comentarios |
| ----------- | ----------------------------------------------------------- |
| LowerCase | Convierte todos los caracteres de un string a minúsculas. |
| StringClean | Limpia un string quitando todos los caracteres no deseados. |
| StringPart | Devuelve una parte de un string que contiene sub-strings. |
| UpperCase | Convierte todos los caracteres de un string a mayúsculas. |
Funciones para interpolaciones [#funciones-para-interpolaciones]
| Función | Comentarios |
| ------------------- | ----------------------------------------------------------------- |
| LinearInterpolation | Realiza una interpolación lineal entre una serie de puntos dados. |
Funciones para manejo de Json [#funciones-para-manejo-de-json]
| Función | Comentarios |
| --------- | -------------------------------------------------------------------------- |
| JsonField | Obtiene el valor de un campo dentro de un texto expresado en formato Json. |
Otras funciones [#otras-funciones]
| Función | Comentarios |
| ----------- | ----------------------------------------------------------------------- |
| Error | Permite generar una condición de error conteniendo el mensaje indicado. |
| HexToNumber | Permite convertir un número en formato hexadecimal (string) a número. |
| If | Permite devolver un valor, entre dos dados, de acuerdo a una condición. |
| ToBoolean | Permite convertir un valor de cualquier tipo a booleano. |
| ToNumber | Permite convertir un valor de cualquier tipo a numérico. |
| ToString | Permite convertir un valor de cualquier tipo a string. |
# Operadores
Los [operadores](https://en.wikipedia.org/wiki/Operator_\(computer_programming\)) permiten crear expresiones modificando o calculando valores de otros, conocidos como "operandos".
Según el tipo de operación a realizar, y/o el tipo de datos a los que se aplican, los operadores pueden clasificarse como:
* **Operadores aritméticos**. Se aplican en operaciones matemáticas, y el resultado de su aplicación es siempre un número.
* **Operadores lógicos**. Se aplican en operaciones lógicas y el resultado de su aplicación siempre es un valor booleano (true / false).
* **Operadores para strings**. Se aplican a strings y el resultado de su aplicación siempre es un valor string.
* **Operadores relacionales**. Se aplican en las operaciones de comparación y el resultado de su aplicación siempre es un valor booleano (true / false).
Además, según el número de operandos en los que actúa el operador, se pueden clasificar como:
* **Operadores unarios**. Estos operadores actúan en un solo operando.
* **Operadores binarios**. Estos operadores actúan sobre dos operandos.
En la tabla siguiente se resume la lista de todos los operadores disponibles en la plataforma Gear Studio, clasificados según el tipo de operación. En cada caso, se puede obtener información adicional haciendo clic en el operador respectivo.
Operadores aritméticos [#operadores-aritméticos]
Los operadores aritméticos se aplican en operaciones matemáticas, y el resultado de su aplicación siempre es un número.
| Operador | Explicación | Unary / binario |
| -------- | ----------------------------------------------------------------------------------------------------------------------------------------------------------------------------------------------------- | --------------- |
| + | Agregue los dos números a cada lado del operador. | Binario |
| - | Toma el número a la izquierda del operador y resta el número a la derecha del operador. | Binario |
| \* | Multiplique los dos números situados a ambos lados del operador. | Binario |
| / | Toma el número a la izquierda del operador y lo divide por el número a la derecha del operador. | Binario |
| MOD | Toma el número a la izquierda del operador, lo divide por el número a la derecha del operador y devuelve el resto de la división. | Binario |
| - | Cambio de signo. Este operador unario cambia el signo del operando ubicado a su derecha. | Unario |
| NOT | Toma el número dado como parámetro, considerado como un entero de 32 bits, e invierte todos los bits. Se conoce comúnmente como "bitwise NOT". | Unario |
| AND | Toma los operandos en ambos lados del operador, considerados como enteros de 32 bits, y realiza una operación AND lógica para cada bit de ambos operandos. Es comúnmente conocido como "bitwise AND". | Binario |
| OR | Toma los operandos en ambos lados del operador, considerados como enteros de 32 bits, y realiza una operación OR lógica para cada bit de ambos operandos. Se conoce comúnmente como “bitwise OR”. | Binario |
| XOR | Toma los operandos en ambos lados del operador, considerados como enteros de 32 bits, y realiza una operación XOR lógica para cada bit de ambos operandos. Es comúnmente conocido como “bitwise XOR”. | Binario |
Operadores lógicos [#operadores-lógicos]
Los operadores lógicos se aplican en operaciones lógicas y el resultado de su aplicación siempre es un valor booleano (true / false).
| Operador | Explicación | Unary / binario |
| -------- | ----------------------------------------------------------------------------------------------------------------------------------------------------------------------------------------------------------------------------- | --------------- |
| NOT | Calcula el complemento del operando a la derecha del operador. Si el operando es true, el resultado es false y viceversa. | Unario |
| AND | Calcula la operación AND lógica entre los operandos ubicados en ambos lados del operador. La operación AND da como resultado un valor true solo cuando ambos operandos tienen un valor true y false en caso contrario. | Binario |
| OR | Calcula la operación OR lógica entre los operandos ubicados en ambos lados del operador. La operación OR da como resultado un valor true si al menos uno de los operandos tiene un valor true y false en cualquier otro caso. | Binario |
| XOR | Calcula la operación XOR lógica entre los operandos ubicados en ambos lados del operador. La operación XOR da como resultado un valor true si solo uno de los operandos tiene un valor true y false en cualquier otro caso. | Binario |
Operadores para strings [#operadores-para-strings]
Los operadores de strings se aplican a cadenas de caracteres, y el resultado de su aplicación siempre es un valor string.
| Operador | Explicación | Unary / binario |
| -------- | ------------------------------------------------------------------------------------------------------------------------------------ | --------------- |
| + | Concatena (une) los operandos en ambos lados del operador, usando el de la izquierda primero, y concatenando luego el de la derecha. | Binario |
Operadores relacionales [#operadores-relacionales]
Los operadores relacionales se aplican en las operaciones de comparación y el resultado de su aplicación siempre es un valor booleano (true / false). Se pueden aplicar en cualquier tipo de datos, pero en todos los casos, ambos operandos deben ser del mismo tipo. Es importante recordar algunas reglas de comparación:
* Al comparar valores booleanos, el valor true se considera mayor que el valor false.
* Para valores string, una string se considera mayor que otro si se ordena alfabéticamente más adelante que el otro.
| Operador | Explicación | Unary / binario |
| -------- | ------------------------------------------------------------------------------------------------------------------------------------------------ | --------------- |
| `>` | Compara los operandos en ambos lados del operador y toma el valor true cuando el operando de la izquierda es mayor que el de la derecha. | Binario |
| `>=` | Compara los operandos en ambos lados del operador y toma el valor true cuando el operando de la izquierda es mayor o igual que el de la derecha. | Binario |
| `<` | Compare los operandos en ambos lados del operador y tome el valor true cuando el operando izquierdo sea menor que el derecho. | Binario |
| `<=` | Compara los operandos en ambos lados del operador y toma el valor true cuando el operando de la izquierda es menor o igual que el de la derecha. | Binario |
| `=` | Compare los operandos en ambos lados del operador y tome el valor true cuando ambos son iguales. | Binario |
| `<>` | Compare los operandos en ambos lados del operador y tome el valor true cuando ambos son diferentes. | Binario |
# Operadores aritméticos
Operadores aritméticos [#operadores-aritméticos]
Los operadores aritméticos se aplican en operaciones matemáticas, y el resultado de su aplicación siempre es un número.
| Operador | Explicación | Unary / binario |
| -------- | ----------------------------------------------------------------------------------------------------------------------------------------------------------------------------------------------------- | --------------- |
| + | Agregue los dos números a cada lado del operador. | Binario |
| - | Toma el número a la izquierda del operador y resta el número a la derecha del operador. | Binario |
| \* | Multiplique los dos números situados a ambos lados del operador. | Binario |
| / | Toma el número a la izquierda del operador y lo divide por el número a la derecha del operador. | Binario |
| MOD | Toma el número a la izquierda del operador, lo divide por el número a la derecha del operador y devuelve el resto de la división. | Binario |
| - | Cambio de signo. Este operador unario cambia el signo del operando ubicado a su derecha. | Unario |
| NOT | Toma el número dado como parámetro, considerado como un entero de 32 bits, e invierte todos los bits. Se conoce comúnmente como "bitwise NOT". | Unario |
| AND | Toma los operandos en ambos lados del operador, considerados como enteros de 32 bits, y realiza una operación AND lógica para cada bit de ambos operandos. Es comúnmente conocido como "bitwise AND". | Binario |
| OR | Toma los operandos en ambos lados del operador, considerados como enteros de 32 bits, y realiza una operación OR lógica para cada bit de ambos operandos. Se conoce comúnmente como “bitwise OR”. | Binario |
| XOR | Toma los operandos en ambos lados del operador, considerados como enteros de 32 bits, y realiza una operación XOR lógica para cada bit de ambos operandos. Es comúnmente conocido como “bitwise XOR”. | Binario |
# Operadores lógicos
Operadores lógicos [#operadores-lógicos]
Los operadores lógicos se aplican en operaciones lógicas y el resultado de su aplicación siempre es un valor booleano (true / false).
| Operador | Explicación | Unary / binario |
| -------- | ----------------------------------------------------------------------------------------------------------------------------------------------------------------------------------------------------------------------------- | --------------- |
| NOT | Calcula el complemento del operando a la derecha del operador. Si el operando es true, el resultado es false y viceversa. | Unario |
| AND | Calcula la operación AND lógica entre los operandos ubicados en ambos lados del operador. La operación AND da como resultado un valor true solo cuando ambos operandos tienen un valor true y false en caso contrario. | Binario |
| OR | Calcula la operación OR lógica entre los operandos ubicados en ambos lados del operador. La operación OR da como resultado un valor true si al menos uno de los operandos tiene un valor true y false en cualquier otro caso. | Binario |
| XOR | Calcula la operación XOR lógica entre los operandos ubicados en ambos lados del operador. La operación XOR da como resultado un valor true si solo uno de los operandos tiene un valor true y false en cualquier otro caso. | Binario |
# Operadores para strings
Operadores para strings [#operadores-para-strings]
Los operadores de strings se aplican a cadenas de caracteres, y el resultado de su aplicación siempre es un valor string.
| Operador | Explicación | Unary / binario |
| -------- | ------------------------------------------------------------------------------------------------------------------------------------ | --------------- |
| + | Concatena (une) los operandos en ambos lados del operador, usando el de la izquierda primero, y concatenando luego el de la derecha. | Binario |
# Operadores relacionales
Operadores relacionales [#operadores-relacionales]
Los operadores relacionales se aplican en las operaciones de comparación y el resultado de su aplicación siempre es un valor booleano (true / false). Se pueden aplicar en cualquier tipo de datos, pero en todos los casos, ambos operandos deben ser del mismo tipo. Es importante recordar algunas reglas de comparación:
* Al comparar valores booleanos, el valor true se considera mayor que el valor false.
* Para valores string, una string se considera mayor que otro si se ordena alfabéticamente más adelante que el otro.
| Operador | Explicación | Unary / binario |
| -------- | ------------------------------------------------------------------------------------------------------------------------------------------------ | --------------- |
| `>` | Compara los operandos en ambos lados del operador y toma el valor true cuando el operando de la izquierda es mayor que el de la derecha. | Binario |
| `>=` | Compara los operandos en ambos lados del operador y toma el valor true cuando el operando de la izquierda es mayor o igual que el de la derecha. | Binario |
| `<` | Compare los operandos en ambos lados del operador y tome el valor true cuando el operando izquierdo sea menor que el derecho. | Binario |
| `<=` | Compara los operandos en ambos lados del operador y toma el valor true cuando el operando de la izquierda es menor o igual que el de la derecha. | Binario |
| `=` | Compare los operandos en ambos lados del operador y tome el valor true cuando ambos son iguales. | Binario |
| `<>` | Compare los operandos en ambos lados del operador y tome el valor true cuando ambos son diferentes. | Binario |
# Estado de batería y RSSI
Reportar el estado de RRSI y/o nivel de batería de un dispositivo [#reportar-el-estado-de-rrsi-yo-nivel-de-batería-de-un-dispositivo]
Este método no almacena un histórico del estado, solamente toma el último reportado y lo muestra en la plataforma. Es decir, si en un primer request se reportaron 3 baterías, y en el segundo request se reporta solo una, entonces se asume que el dispositivo ahora tiene una sola batería. Lo mismo ocurre con los RRSI. Si se envían arrays vacíos, entonces se asumirá que no hay registro de nivel de batería ni de RSSI y se borrará lo reportado anteriormente.
La integración por HTTP de estado de RRSI y nivel de batería lleva la siguiente estructura:
```
POST /services/gear/DeviceIntegrationService.svc/UpdateDeviceStatus HTTP/1.1
Host: gear-dev.cloud.studio
Content-Type: application/json
{
"accessToken": "xxxxxxxxxxxxxxxxxxxxxxxxxxxxxxxxxxxxxxxx",
"deviceID": 1,
"battery": [
{
"type": 2,
"percentage": 30,
"voltage": 3.5
},
{
"type": 3,
"percentage": 100,
"voltage": 5
}
],
"rssi": [
{
"type": 2,
"quality": 100,
"strength": -40
}
]
}
```
Parámetros [#parámetros]
| Nombre | Descripción | Tipo de datos |
| ----------- | ---------------------------------------------------------------------------------------------------------------------------------------------------------------------------------------------------- | ------------- |
| accessToken | Token de acceso con permisos para actualizar información del endpoint. Vea esta página para más información. | text |
| deviceID | Identificador único del dispositivo o dirección del dispositivo con formato \[deviceAddress] (Ej: \[device-1234]). Estos valores pueden verse en la página de administración de dispositivos. | number |
| battery | Lista de los estados de las distintas baterías que tiene el dispositivo. Se pueden enviar 1 o varias. Puede encontrar la descripción de las propiedades de este parámetros más abajo. | array |
| rssi | Lista de los estados de las distintas conexiones inalámbricas que tiene el dispositivo. Se pueden enviar 1 o varias. Puede encontrar la descripción de las propiedades de este parámetros más abajo. | array |
Parámetro array “battery” [#parámetro-array-battery]
En cada uno de los elementos de este array se debe reportar, al menos, “percentage” o “voltage”. Type es obligatorio.
| Nombre | Descripción | Tipo de datos |
| ---------- | ------------------------------------------------------------------------------------------------------------------------------------------------------------------------------------------------------------------------------------ | ------------- |
| type | Tipo de batería que se está reportando. Los tipos permitidos son:0: Desconocido. Si se envía este valor, se cambiará automáticamente a 11: Por defecto2: Primaria3: Secundaria4: BackupNo se pueden repetir tipos en un mismo array. | number |
| percentage | Valor numérico del porcentaje restante de la batería. | number |
| voltage | Valor numérico del voltaje actual de la batería. | number |
Parámetro array “rssi” [#parámetro-array-rssi]
En cada uno de los elementos de este array se debe reportar, al menos, “quality” o “strength”. Type es obligatorio.
| Nombre | Descripción | Tipo de datos |
| -------- | ------------------------------------------------------------------------------------------------------------------------------------------------------------------------------------------------------------------------------------------------------------------------------------------------------------------------- | ------------- |
| type | Representa un tipo de tecnología inalámbrica en la que se puede medir RSSI. Los valores permitidos son:0: Desconocido. Si se envía este valor, se cambiará automáticamente a 11: Por defecto2: WiFi3: LoRaWAN4: Cellular (2G/3G/4G/5G/Cat-M/NB-IoT/etc)5: ZigBee6: Custom RFNo se pueden repetir tipos en un mismo array. | number |
| quality | Valor numérico que representa la calidad de la señal. De 0 a 100. Si este valor no es informado, pero el parámetro “strength” si, el valor de este parámetro será auto calculado | number |
| strength | Valor numérico que representa la intensidad de la señal en dBm (negativo). Si el valor informado es positivo, se cambiará su signo. Si este valor no es informado, pero el parámetro “quality” si, el valor de este parámetro será auto calculado. | number |
# Actualización de datos del dispositivo
Introducción [#introducción]
En esta sección se describen las opciones para actualizar información de los dispositivos, tales como la ubicación geográfica, el nivel de batería, o el nivel de señal. Para más información, vea las secciones siguientes:
[Estado de batería y RSSI](/docs/configuracion-del-cliente/dispositivos-y-endpoints/dispositivos/integracion-de-dispositivos/http/api-http/actualizacion-de-datos-del-dispositivo/estado-de-bateria-y-rssi)
[Ubicación geográfica](/docs/configuracion-del-cliente/dispositivos-y-endpoints/dispositivos/integracion-de-dispositivos/http/api-http/actualizacion-de-datos-del-dispositivo/ubicacion-geografica)
# Ubicación geográfica
Reportar la ubicación geográfica de un dispositivo [#reportar-la-ubicación-geográfica-de-un-dispositivo]
Este método permite actualizar la ubicación actual del dispositivo en la plataforma. No se almacena un histórico de la ubicación.
La actualización de la ubicación del dispositivo por HTTP lleva la siguiente estructura:
```
POST /services/gear/DeviceIntegrationService.svc/UpdateDeviceGeolocation HTTP/1.1
Host: gear.cloud.studio
Content-Type: application/json
{
"accessToken": "xxxxxxxxxxxxxxxxxxxxxxxxxxxxxxxxxxxxxxxx",
"deviceID": 1,
"latitude": 40.4052,
"longitude": -3.87699
}
```
Parámetros [#parámetros]
| Nombre | Descripción | Tipo de datos |
| ----------- | --------------------------------------------------------------------------------------------------------------------------------------------------------------------------------------------- | ------------- |
| accessToken | Token de acceso con permisos para actualizar información del endpoint. Vea esta página para más información. | text |
| deviceID | Identificador único del dispositivo o dirección del dispositivo con formato \[deviceAddress] (Ej: \[device-1234]). Estos valores pueden verse en la página de administración de dispositivos. | number |
| latitude | Indica la latitud de la ubicación actual del dispositivo. | number |
| longitude | Indica la longitud de la ubicación actual del dispositivo. | number |
Ejemplo [#ejemplo]
Elegimos un dispositivo para modificar, en este caso elegimos uno con el nombre “Interwave Tracker Test 1" el parámetro que debemos tomar es el "DeviceID" del dispositivo, en este caso es el “23712”

Abrimos el postman y usamos el método "UpdateDeviceGeolocation", indicamos el accesToken, el DeviceId que en este caso es el 23712 y luego enviamos la longitud y latitud de dicho dispositivo. Una vez que carguemos los datos presionar “ Send ” y el dispositivo cambiara de posición.
_fac2.png)
Dicho cambio en la posición se podrá visualizar en el mapa de dispositivos.

# Air quality index (AQI) sensors
Reporte de estado del endpoint [#reporte-de-estado-del-endpoint]
La integración por HTTP de sensores de concentración de aire (AQI) lleva la siguiente estructura:
```
POST /services/gear/DeviceIntegrationService.svc/UpdateAirQualitySensorStatus HTTP/1.1
Host: gear.cloud.studio
Content-Type: application/json
{
"accessToken": "xxxxxxxxxxxxxxxxxxxxxxxxxxxxxxxxxxxxxxxx",
"endpointID": 1,
"index": 15,
"timestamp": "2021-02-23T14:55:03"
}
```
Parámetros [#parámetros]
| Nombre | Descripción | Tipo de datos |
| ----------- | ------------------------------------------------------------------------------------------------------------------------------------------------------------------------------------------------------------------------------------------------------------------------------------------------------------------ | ------------- |
| accessToken | Token de acceso con permisos para actualizar información del endpoint. Vea esta página para más información. | texto |
| endpointID | Identificador único del endpoint o combinación de dirección del dispositivo y dirección del endpoint con formato \[deviceAddress]:endpointAddress (Ej: \[device-1234]:1). Estos valores pueden verse en la página de administración de endpoints. | numérico |
| index | Indica el valor del índice de calidad del aire, el valor deber ser entre 0 a 500, expresada en AQI:0-50: Buena51-100: Moderada101-150: Insalubre para grupos sensibles151-200: Insalubre201-300: Muy insalubre301-500: Peligrosa | numérico |
| timestamp | Valor opcional indicando la fecha y hora UTC correspondiente a la medición. El formato en que se indique esta fecha debe coincidir con alguno de los indicados en la sección formatos de fecha. En caso de que el campo sea omitido, la plataforma asumirá que la medición corresponde a la fecha y hora actuales. | text |
Reporte de estado en formato "raw" [#reporte-de-estado-en-formato-raw]
El estado del endpoint puede ser reportado como un **valor crudo (raw),** utilizando el [conversor de expresiones](/docs/configuracion-del-cliente/dispositivos-y-endpoints/endpoints/conversion-de-datos-crudos-raw). Esta opción es conveniente cuando el dispositivo no es capaz de realizar conversiones, y emite valores que necesitan ser transformados antes de inyectarse en la plataforma.
A continuación, se muestra un ejemplo de una petición en formato raw:
```
POST /services/gear/DeviceIntegrationService.svc/UpdateAirQualitySensorStatusRaw HTTP/1.1
Host: gear.cloud.studio
Content-Type: application/json
{
"accessToken": "xxxxxxxxxxxxxxxxxxxxxxxxxxxxxxxxxxxxxxxx",
"endpointID": 1,
"rawData": "15",
"timestamp": "2021-02-23T14:55:03"
}
```
Parámetros [#parámetros-1]
| Nombre | Descripción | Tipo de datos |
| ----------- | -------------------------------------------------------------------------------------------------------------------------------------------------------------------------------------------------------------------------------------------------------------------------------------------------------------------------------------------------- | ------------- |
| accessToken | Token de acceso con permisos para actualizar información del endpoint. Vea esta página para más información. | texto |
| endpointID | Identificador único del endpoint, que puede verse en la página de administración de endpoints. | numérico |
| rawData | Valor reportado por el sensor, como texto. Debe indicarse una expresión en el conversor de expresiones. La expresión debe devolver un valor numérico indicando la calidad del aire (entre 0 a 500), expresada en AQI.0-50: Buena51-100: Moderada101-150: Insalubre para grupos sensibles151-200: Insalubre201-300: Muy insalubre301-500: Peligrosa | texto |
| timestamp | Valor opcional indicando la fecha y hora UTC correspondiente a la medición. El formato en que se indique esta fecha debe coincidir con alguno de los indicados en la sección formatos de fecha. En caso de que el campo sea omitido, la plataforma asumirá que la medición corresponde a la fecha y hora actuales. | texto |
# Appliances y otros dispositivos on-off
Reporte de estado del endpoint [#reporte-de-estado-del-endpoint]
La integración de appliances y otros dispositivos on-off (válvulas, lámparas, motores, etc.) por HTTP lleva la siguiente estructura:
```
POST /services/gear/DeviceIntegrationService.svc/UpdateApplianceStatus HTTP/1.1
Host: gear.cloud.studio
Content-Type: application/json
{
"accessToken": "xxxxxxxxxxxxxxxxxxxxxxxxxxxxxxxxxxxxxxxx",
"endpointID": 1,
"isOn": true,
"timestamp": "2021-02-23T14:55:03"
}
```
Parámetros [#parámetros]
| Nombre | Descripción | Tipo de datos |
| ----------- | ------------------------------------------------------------------------------------------------------------------------------------------------------------------------------------------------------------------------------------------------------------------------------------------------------------------ | ------------- |
| accessToken | Token de acceso con permisos para actualizar información del endpoint. Vea esta página para más información. | texto |
| endpointID | Identificador único del endpoint o combinación de dirección del dispositivo y dirección del endpoint con formato \[deviceAddress]:endpointAddress (Ej: \[device-1234]:1). Estos valores pueden verse en la página de administración de endpoints. | numérico |
| isOn | Indica si el artefacto está encendido (true) o apagado (false) | bool |
| timestamp | Valor opcional indicando la fecha y hora UTC correspondiente a la medición. El formato en que se indique esta fecha debe coincidir con alguno de los indicados en la sección formatos de fecha. En caso de que el campo sea omitido, la plataforma asumirá que la medición corresponde a la fecha y hora actuales. | text |
Reporte de estado en formato "raw" [#reporte-de-estado-en-formato-raw]
El estado del endpoint puede ser reportado como un **valor crudo (raw),** utilizando el [conversor de expresiones](/docs/configuracion-del-cliente/dispositivos-y-endpoints/endpoints/conversion-de-datos-crudos-raw). Esta opción es conveniente cuando el dispositivo no es capaz de realizar conversiones, y emite valores que necesitan ser transformados antes de inyectarse en la plataforma.
A continuación, se muestra un ejemplo de una petición en formato raw:
```
POST /services/gear/DeviceIntegrationService.svc/UpdateApplianceStatusRaw HTTP/1.1
Host: gear.cloud.studio
Content-Type: application/json
{
"accessToken": "xxxxxxxxxxxxxxxxxxxxxxxxxxxxxxxxxxxxxxxx",
"endpointID": 1,
"rawData": "true",
"timestamp": "2021-02-23T14:55:03"
}
```
Parámetros [#parámetros-1]
| Nombre | Descripción | Tipo de datos |
| ----------- | ------------------------------------------------------------------------------------------------------------------------------------------------------------------------------------------------------------------------------------------------------------------------------------------------------------------ | ------------- |
| accessToken | Token de acceso con permisos para actualizar información del endpoint. Vea esta página para más información. | texto |
| endpointID | Identificador único del endpoint, que puede verse en la página de administración de endpoints. | numérico |
| rawData | Valor reportado por el sensor, como texto. Debe indicarse una expresión en el conversor de expresiones. La expresión debe devolver un valor booleano indicando si el artefacto está encendido (true) o apagado (false). | texto |
| timestamp | Valor opcional indicando la fecha y hora UTC correspondiente a la medición. El formato en que se indique esta fecha debe coincidir con alguno de los indicados en la sección formatos de fecha. En caso de que el campo sea omitido, la plataforma asumirá que la medición corresponde a la fecha y hora actuales. | text |
# Cámaras
Almacenamiento de snapshots [#almacenamiento-de-snapshots]
La integración por HTTP de cámaras permite almacenar snapshots siguiendo la siguiente estructura:
```
POST /services/gear/DeviceIntegrationService.svc/UploadCameraSnapshot HTTP/1.1
Host: gear.cloud.studio
Content-Type: application/json
{
"accessToken": "xxxxxxxxxxxxxxxxxxxxxxxxxxxxxxxxxxxxxxxx",
"endpointID": 1,
"fileType": "jpg",
"content": "/9j/4QB4RXhpZgAATU0AKgAAAAgABAEAAAQAAAABAAAFAAEBAAQAAAABAAAC0IdpAAQAAAA....[truncated]....",
"timestamp": "2021-02-23T14:55:03"
}
```
Parámetros [#parámetros]
| Nombre | Descripción | Tipo de datos |
| ----------- | ------------------------------------------------------------------------------------------------------------------------------------------------------------------------------------------------------------------------------------------------------------------------------------------------- | ------------- |
| accessToken | Token de acceso con permisos para actualizar información del endpoint. Vea esta página para más información. | texto |
| endpointID | Identificador único del endpoint o combinación de dirección del dispositivo y dirección del endpoint con formato \[deviceAddress]:endpointAddress (Ej: \[device-1234]:1). Estos valores pueden verse en la página de administración de endpoints. | numérico |
| fileType | Tipo de archivo que se está almacenando, por ejemplo “jpg”, o “png”. | texto |
| content | Contenido binario del snapshot, en formato base/64. Nota: en el ejemplo más arriba, el campo “content” está truncado para más legibilidad. | texto |
| timestamp | Valor opcional indicando la fecha y hora UTC del snapshot. El formato en que se indique esta fecha debe coincidir con alguno de los indicados en la sección formatos de fecha. En caso de que el campo sea omitido, la plataforma asumirá que la medición corresponde a la fecha y hora actuales. | texto |
# Contadores de personas
Reporte de estado del endpoint [#reporte-de-estado-del-endpoint]
La integración por HTTP de contadores de personas lleva la siguiente estructura:
```
POST /services/gear/DeviceIntegrationService.svc/UpdatePeopleCounterStatus HTTP/1.1
Host: gear.cloud.studio
Content-Type: application/json
{
"accessToken": "xxxxxxxxxxxxxxxxxxxxxxxxxxxxxxxxxxxxxxxx",
"endpointID": 1,
"peopleCount": 25,
"timestamp": "2021-02-23T14:55:03"
}
```
Parámetros [#parámetros]
| Nombre | Descripción | Tipo de datos |
| ----------- | ------------------------------------------------------------------------------------------------------------------------------------------------------------------------------------------------------------------------------------------------------------------------------------------------------------------ | ------------- |
| accessToken | Token de acceso con permisos para actualizar información del endpoint. Vea esta página para más información. | texto |
| endpointID | Identificador único del endpoint o combinación de dirección del dispositivo y dirección del endpoint con formato \[deviceAddress]:endpointAddress (Ej: \[device-1234]:1). Estos valores pueden verse en la página de administración de endpoints. | numérico |
| peopleCount | Indica la cantidad de personas detectadas por el sensor. | numérico |
| timestamp | Valor opcional indicando la fecha y hora UTC correspondiente a la medición. El formato en que se indique esta fecha debe coincidir con alguno de los indicados en la sección formatos de fecha. En caso de que el campo sea omitido, la plataforma asumirá que la medición corresponde a la fecha y hora actuales. | text |
Reporte de estado en formato "raw" [#reporte-de-estado-en-formato-raw]
El estado del endpoint puede ser reportado como un **valor crudo (raw),** utilizando el [conversor de expresiones](/docs/configuracion-del-cliente/dispositivos-y-endpoints/endpoints/conversion-de-datos-crudos-raw). Esta opción es conveniente cuando el dispositivo no es capaz de realizar conversiones, y emite valores que necesitan ser transformados antes de inyectarse en la plataforma.
A continuación, se muestra un ejemplo de una petición en formato raw:
```
POST /services/gear/DeviceIntegrationService.svc/UpdatePeopleCounterStatusRaw HTTP/1.1
Host: gear.cloud.studio
Content-Type: application/json
{
"accessToken": "xxxxxxxxxxxxxxxxxxxxxxxxxxxxxxxxxxxxxxxx",
"endpointID": 1,
"rawData": "15.3",
"timestamp": "2021-02-23T14:55:03"
}
```
Parámetros [#parámetros-1]
| Nombre | Descripción | Tipo de datos |
| ----------- | ------------------------------------------------------------------------------------------------------------------------------------------------------------------------------------------------------------------------------------------------------------------------------------------------------------------ | ------------- |
| accessToken | Token de acceso con permisos para actualizar información del endpoint. Vea esta página para más información. | texto |
| endpointID | Identificador único del endpoint, que puede verse en la página de administración de endpoints. | numérico |
| rawData | Valor reportado por el sensor, como texto. Debe indicarse una expresión en el conversor de expresiones. La expresión debe devolver un valor numérico indicando la cantidad de personas detectadas por el sensor. | texto |
| timestamp | Valor opcional indicando la fecha y hora UTC correspondiente a la medición. El formato en que se indique esta fecha debe coincidir con alguno de los indicados en la sección formatos de fecha. En caso de que el campo sea omitido, la plataforma asumirá que la medición corresponde a la fecha y hora actuales. | texto |
# Controladores de cortinas y cerramientos
Reporte de estado del endpoint [#reporte-de-estado-del-endpoint]
La integración por HTTP de controladores de cortinas y otros cerramientos lleva la siguiente estructura:
```
POST /services/gear/DeviceIntegrationService.svc/UpdateClosureControllerStatus HTTP/1.1
Host: gear.cloud.studio
Content-Type: application/json
{
"accessToken": "xxxxxxxxxxxxxxxxxxxxxxxxxxxxxxxxxxxxxxxx",
"endpointID": 1,
"position": 75,
"isMoving": true,
"timestamp": "2021-02-23T14:55:03"
}
```
Parámetros [#parámetros]
| Nombre | Descripción | Tipo de datos |
| ----------- | ------------------------------------------------------------------------------------------------------------------------------------------------------------------------------------------------------------------------------------------------------------------------------------------------------------------ | ------------- |
| accessToken | Token de acceso con permisos para actualizar información del endpoint. Vea esta página para más información. | texto |
| endpointID | Identificador único del endpoint o combinación de dirección del dispositivo y dirección del endpoint con formato \[deviceAddress]:endpointAddress (Ej: \[device-1234]:1). Estos valores pueden verse en la página de administración de endpoints. | numérico |
| position | Indica la posición actual del cerramiento como porcentaje, entre 0 (completamente cerrado) y 100 (completamente abierto). | bool |
| isMoving | Indica si el cerramiento está actualmente en movimiento. El valor true indica que el cerramiento está siendo cerrado o abierto, mientras que el valor false indica que está detenido. | numérico |
| timestamp | Valor opcional indicando la fecha y hora UTC correspondiente a la medición. El formato en que se indique esta fecha debe coincidir con alguno de los indicados en la sección formatos de fecha. En caso de que el campo sea omitido, la plataforma asumirá que la medición corresponde a la fecha y hora actuales. | text |
Reporte de estado en formato "raw" [#reporte-de-estado-en-formato-raw]
El estado del endpoint puede ser reportado como un **valor crudo (raw),** utilizando el [conversor de expresiones](/docs/configuracion-del-cliente/dispositivos-y-endpoints/endpoints/conversion-de-datos-crudos-raw). Esta opción es conveniente cuando el dispositivo no es capaz de realizar conversiones, y emite valores que necesitan ser transformados antes de inyectarse en la plataforma.
A continuación, se muestra un ejemplo de una petición en formato raw:
```
POST /services/gear/DeviceIntegrationService.svc/UpdateClosureControllerStatus HTTP/1.1
Host: gear.cloud.studio
Content-Type: application/json
{
"accessToken": "xxxxxxxxxxxxxxxxxxxxxxxxxxxxxxxxxxxxxxxx",
"endpointID": 1,
"rawData": "75/true",
"timestamp": "2021-02-23T14:55:03"
}
```
Parámetros [#parámetros-1]
| Nombre | Descripción | Tipo de datos |
| ----------- | ---------------------------------------------------------------------------------------------------------------------------------------------------------------------------------------------------------------------------------------------------------------------------------------------------------------------------------------------------------------------------------------------------------------------------------------------------------------------------------------------------------------------------------------- | ------------- |
| accessToken | Token de acceso con permisos para actualizar información del endpoint. Vea esta página para más información. | texto |
| endpointID | Identificador único del endpoint, que puede verse en la página de administración de endpoints. | numérico |
| rawData | Valor reportado por el sensor, como texto. Deben indicarse dos expresiones en el conversor de expresiones:La primera expresión debe devolver un valor numérico indicando la posición actual del cerramiento como porcentaje, entre 0 (completamente cerrado) y 100 (completamente abierto).La segunda expresión debe devolver un valor booleano indicando si el cerramiento está actualmente en movimiento. El valor true indica que el cerramiento está siendo cerrado o abierto, mientras que el valor false indica que está detenido. | texto |
| timestamp | Valor opcional indicando la fecha y hora UTC correspondiente a la medición. El formato en que se indique esta fecha debe coincidir con alguno de los indicados en la sección formatos de fecha. En caso de que el campo sea omitido, la plataforma asumirá que la medición corresponde a la fecha y hora actuales. | text |
# Dimmers
Reporte de estado del endpoint [#reporte-de-estado-del-endpoint]
La integración por HTTP de dimmers y otros dispositivos similares (variadores de velocidad, etc.) lleva la siguiente estructura:
```
POST /services/gear/DeviceIntegrationService.svc/UpdateDimmerStatus HTTP/1.1
Host: gear.cloud.studio
Content-Type: application/json
{
"accessToken": "xxxxxxxxxxxxxxxxxxxxxxxxxxxxxxxxxxxxxxxx",
"endpointID": 1,
"isOn": true,
"dimValue": 75,
"timestamp": "2021-02-23T14:55:03"
}
```
Parámetros [#parámetros]
| Nombre | Descripción | Tipo de datos |
| ----------- | ------------------------------------------------------------------------------------------------------------------------------------------------------------------------------------------------------------------------------------------------------------------------------------------------------------------ | ------------- |
| accessToken | Token de acceso con permisos para actualizar información del endpoint. Vea esta página para más información. | texto |
| endpointID | Identificador único del endpoint o combinación de dirección del dispositivo y dirección del endpoint con formato \[deviceAddress]:endpointAddress (Ej: \[device-1234]:1). Estos valores pueden verse en la página de administración de endpoints. | numérico |
| isOn | Indica si el artefacto está encendido (true) o apagado (false) | bool |
| dimValue | Indica el nivel de dimerización, como porcentaje entre 1 y 100. | numérico |
| timestamp | Valor opcional indicando la fecha y hora UTC correspondiente a la medición. El formato en que se indique esta fecha debe coincidir con alguno de los indicados en la sección formatos de fecha. En caso de que el campo sea omitido, la plataforma asumirá que la medición corresponde a la fecha y hora actuales. | text |
Reporte de estado en formato "raw" [#reporte-de-estado-en-formato-raw]
El estado del endpoint puede ser reportado como un **valor crudo (raw),** utilizando el [conversor de expresiones](/docs/configuracion-del-cliente/dispositivos-y-endpoints/endpoints/conversion-de-datos-crudos-raw). Esta opción es conveniente cuando el dispositivo no es capaz de realizar conversiones, y emite valores que necesitan ser transformados antes de inyectarse en la plataforma.
A continuación, se muestra un ejemplo de una petición en formato raw:
```
POST /services/gear/DeviceIntegrationService.svc/UpdateDimmerStatusRaw HTTP/1.1
Host: gear.cloud.studio
Content-Type: application/json
{
"accessToken": "xxxxxxxxxxxxxxxxxxxxxxxxxxxxxxxxxxxxxxxx",
"endpointID": 1,
"rawData": "true/75",
"timestamp": "2021-02-23T14:55:03"
}
```
Parámetros [#parámetros-1]
| Nombre | Descripción | Tipo de datos |
| ----------- | -------------------------------------------------------------------------------------------------------------------------------------------------------------------------------------------------------------------------------------------------------------------------------------------------------------------------------------------------------------------- | ------------- |
| accessToken | Token de acceso con permisos para actualizar información del endpoint. Vea esta página para más información. | texto |
| endpointID | Identificador único del endpoint, que puede verse en la página de administración de endpoints. | numérico |
| rawData | Valor reportado por el sensor, como texto. Deben indicarse dos expresiones en el conversor de expresiones:La primera expresión debe devolver un valor booleano indicando si el artefacto está encendido (true) o apagado (false).La segunda expresión debe devolver un valor numérico indicando el nivel de dimerización del aparato, como porcentaje entre 1 y 100. | texto |
| timestamp | Valor opcional indicando la fecha y hora UTC correspondiente a la medición. El formato en que se indique esta fecha debe coincidir con alguno de los indicados en la sección formatos de fecha. En caso de que el campo sea omitido, la plataforma asumirá que la medición corresponde a la fecha y hora actuales. | text |
# Frecuencímetros
Reporte de frecuencia en Hertz [#reporte-de-frecuencia-en-hertz]
La integración de frecuencímetros por HTTP lleva la siguiente estructura:
```
POST /services/gear/DeviceIntegrationService.svc/UpdateFrequencySensorStatus HTTP/1.1
Host: gear.cloud.studio
Content-Type: application/json
{
"accessToken": "xxxxxxxxxxxxxxxxxxxxxxxxxxxxxxxxxxxxxxxx",
"endpointID": 1,
"frequency": 45,
"timestamp": "2021-02-23T14:55:03"
}
```
Parámetros [#parámetros]
| Nombre | Descripción | Tipo de datos |
| ----------- | ------------------------------------------------------------------------------------------------------------------------------------------------------------------------------------------------------------------------------------------------------------------------------------------------------------------ | ------------- |
| accessToken | Token de acceso con permisos para actualizar información del endpoint. Vea esta página para más información. | texto |
| endpointID | Identificador único del endpoint o combinación de dirección del dispositivo y dirección del endpoint con formato \[deviceAddress]:endpointAddress (Ej: \[device-1234]:1). Estos valores pueden verse en la página de administración de endpoints. | numérico |
| frequency | Frecuencia expresada en Hertz. | numérico |
| timestamp | Valor opcional indicando la fecha y hora UTC correspondiente a la medición. El formato en que se indique esta fecha debe coincidir con alguno de los indicados en la sección formatos de fecha. En caso de que el campo sea omitido, la plataforma asumirá que la medición corresponde a la fecha y hora actuales. | text |
Reporte de frecuencia en formato "raw" [#reporte-de-frecuencia-en-formato-raw]
La frecuencia puede ser reportada como un **valor crudo (raw),** utilizando el [conversor de expresiones](/docs/configuracion-del-cliente/dispositivos-y-endpoints/endpoints/conversion-de-datos-crudos-raw). Esta opción es conveniente cuando el dispositivo no es capaz de realizar conversiones, y emite valores que necesitan ser transformados antes de inyectarse en la plataforma.
A continuación, se muestra un ejemplo de una petición en formato raw:
```
POST /services/gear/DeviceIntegrationService.svc/UpdateFrequencySensorStatusRaw HTTP/1.1
Host: gear.cloud.studio
Content-Type: application/json
{
"accessToken": "xxxxxxxxxxxxxxxxxxxxxxxxxxxxxxxxxxxxxxxx",
"endpointID": 1,
"rawData": "45",
"timestamp": "2021-02-23T14:55:03"
}
```
Parámetros [#parámetros-1]
| Nombre | Descripción | Tipo de datos |
| ----------- | ------------------------------------------------------------------------------------------------------------------------------------------------------------------------------------------------------------------------------------------------------------------------------------------------------------------ | ------------- |
| accessToken | Token de acceso con permisos para actualizar información del endpoint. Vea esta página para más información. | texto |
| endpointID | Identificador único del endpoint, que puede verse en la página de administración de endpoints. | numérico |
| rawData | Valor reportado por el sensor, como texto. Debe indicarse una expresión en el conversor de expresiones. La expresión debe devolver un valor numérico indicando la frecuencia, expresada en Hertz. | texto |
| timestamp | Valor opcional indicando la fecha y hora UTC correspondiente a la medición. El formato en que se indique esta fecha debe coincidir con alguno de los indicados en la sección formatos de fecha. En caso de que el campo sea omitido, la plataforma asumirá que la medición corresponde a la fecha y hora actuales. | text |
# HVAC / termostatos
Reporte de estado del dispositivo HVAC [#reporte-de-estado-del-dispositivo-hvac]
La integración de dispositivos HVAC por HTTP lleva la siguiente estructura:
```
POST /services/gear/DeviceIntegrationService.svc/UpdateHVACStatus HTTP/1.1
Host: gear.cloud.studio
Content-Type: application/json
{
"accessToken": "xxxxxxxxxxxxxxxxxxxxxxxxxxxxxxxxxxxxxxxx",
"endpointID": 1,
"mode": 4,
"fanMode": 1,
"setpoint": 21,
"ambientTemperature": 21.5,
"timestamp": "2021-02-23T14:55:03"
}
```
Parámetros [#parámetros]
| Nombre | Descripción | Tipo de dato |
| ------------------ | --------------------------------------------------------------------------------------------------------------------------------------------------------------------------------------------------------------------------------------------------------------------------------------------------------------------------- | ------------ |
| accessToken | Token de acceso con permisos para actualizar información del endpoint. Vea esta página para más información. | text |
| endpointID | Identificador único del endpoint o combinación de dirección del dispositivo y dirección del endpoint con formato \[deviceAddress]:endpointAddress (Ej: \[device-1234]:1). Estos valores pueden verse en la página de administración de endpoints. | numérico |
| mode | Modo actual del dispositivo:1: el dispositivo está apagado.2: el dispositivo está encendido en modo automático.3: el dispositivo está encendido en modo calor.4: el dispositivo está encendido en modo frío.5: el dispositivo está encendido en modo deshumidificación.6: el dispositivo está encendido en modo ventilador. | numeric |
| fanMode | Modo actual del ventilador:1: el ventilador está en modo automático.2: el ventilador está en velocidad baja.3: el ventilador está en velocidad media.4: el ventilador está en velocidad alta. | numeric |
| setpoint | Indica el valor de temperatura deseado, en grados Celsius. | numeric |
| ambientTemperature | Indica el valor de la temperatura ambiente, en grados Celsius. | numeric |
| timestamp | Valor opcional indicando la fecha y hora UTC correspondiente a la medición. El formato en que se indique esta fecha debe coincidir con alguno de los indicados en la sección formatos de fecha. En caso de que el campo sea omitido, la plataforma asumirá que la medición corresponde a la fecha y hora actuales. | text |
# Almacenamiento de datos de sensores
Introducción [#introducción]
Esta sección contiene información sobre el almacenamiento de datos provenientes de sensores, utilizando la API REST por HTTP/HTTPS. Se presentan ejemplos de integración de todos los tipos de endpoint soportados en la plataforma.
Integración por tipo de sensor [#integración-por-tipo-de-sensor]
[Sensores de temperatura](/docs/configuracion-del-cliente/dispositivos-y-endpoints/dispositivos/integracion-de-dispositivos/http/api-http/almacenamiento-de-datos-de-sensores/sensores-de-temperatura)
[Sensores de humedad](/docs/configuracion-del-cliente/dispositivos-y-endpoints/dispositivos/integracion-de-dispositivos/http/api-http/almacenamiento-de-datos-de-sensores/sensores-de-humedad)
[Sensores de nivel de iluminación](/docs/configuracion-del-cliente/dispositivos-y-endpoints/dispositivos/integracion-de-dispositivos/http/api-http/almacenamiento-de-datos-de-sensores/sensores-de-nivel-de-iluminacion)
[Sensores de peso](/docs/configuracion-del-cliente/dispositivos-y-endpoints/dispositivos/integracion-de-dispositivos/http/api-http/almacenamiento-de-datos-de-sensores/sensores-de-peso)
[Sensores de volumen](/docs/configuracion-del-cliente/dispositivos-y-endpoints/dispositivos/integracion-de-dispositivos/http/api-http/almacenamiento-de-datos-de-sensores/sensores-de-volumen)
[Sensores de presión](/docs/configuracion-del-cliente/dispositivos-y-endpoints/dispositivos/integracion-de-dispositivos/http/api-http/almacenamiento-de-datos-de-sensores/sensores-de-presion)
[Sensores IAS (movimiento, ocupación, y sensores binarios)](/docs/configuracion-del-cliente/dispositivos-y-endpoints/dispositivos/integracion-de-dispositivos/http/api-http/almacenamiento-de-datos-de-sensores/sensores-ias-movimiento-ocupacion-y-sensores-binarios)
[Sensores de voltaje](/docs/configuracion-del-cliente/dispositivos-y-endpoints/dispositivos/integracion-de-dispositivos/http/api-http/almacenamiento-de-datos-de-sensores/sensores-de-voltaje)
[Sensores de corriente](/docs/configuracion-del-cliente/dispositivos-y-endpoints/dispositivos/integracion-de-dispositivos/http/api-http/almacenamiento-de-datos-de-sensores/sensores-de-corriente)
[Sensores de potencia activa](/docs/configuracion-del-cliente/dispositivos-y-endpoints/dispositivos/integracion-de-dispositivos/http/api-http/almacenamiento-de-datos-de-sensores/sensores-de-potencia-activa)
[Sensores de potencia reactiva](/docs/configuracion-del-cliente/dispositivos-y-endpoints/dispositivos/integracion-de-dispositivos/http/api-http/almacenamiento-de-datos-de-sensores/sensores-de-potencia-reactiva)
[Sensores de potencia aparente](/docs/configuracion-del-cliente/dispositivos-y-endpoints/dispositivos/integracion-de-dispositivos/http/api-http/almacenamiento-de-datos-de-sensores/sensores-de-potencia-aparente)
[Sensores de coseno fi](/docs/configuracion-del-cliente/dispositivos-y-endpoints/dispositivos/integracion-de-dispositivos/http/api-http/almacenamiento-de-datos-de-sensores/sensores-de-coseno-fi)
[Frecuencímetros](/docs/configuracion-del-cliente/dispositivos-y-endpoints/dispositivos/integracion-de-dispositivos/http/api-http/almacenamiento-de-datos-de-sensores/frecuencimetros)
[Sensores de consumo de energía](/docs/configuracion-del-cliente/dispositivos-y-endpoints/dispositivos/integracion-de-dispositivos/http/api-http/almacenamiento-de-datos-de-sensores/sensores-de-consumo-de-energia)
[Sensores de flujo](/docs/configuracion-del-cliente/dispositivos-y-endpoints/dispositivos/integracion-de-dispositivos/http/api-http/almacenamiento-de-datos-de-sensores/sensores-de-flujo)
[Sensores genéricos](/docs/configuracion-del-cliente/dispositivos-y-endpoints/dispositivos/integracion-de-dispositivos/http/api-http/almacenamiento-de-datos-de-sensores/sensores-genericos)
[Sensores genéricos de flujo](/docs/configuracion-del-cliente/dispositivos-y-endpoints/dispositivos/integracion-de-dispositivos/http/api-http/almacenamiento-de-datos-de-sensores/sensores-genericos-de-flujo)
[Appliances y otros dispositivos on-off](/docs/configuracion-del-cliente/dispositivos-y-endpoints/dispositivos/integracion-de-dispositivos/http/api-http/almacenamiento-de-datos-de-sensores/appliances-y-otros-dispositivos-on-off)
[Dimmers](/docs/configuracion-del-cliente/dispositivos-y-endpoints/dispositivos/integracion-de-dispositivos/http/api-http/almacenamiento-de-datos-de-sensores/dimmers)
[Controladores de cortinas y cerramientos](/docs/configuracion-del-cliente/dispositivos-y-endpoints/dispositivos/integracion-de-dispositivos/http/api-http/almacenamiento-de-datos-de-sensores/controladores-de-cortinas-y-cerramientos)
[Run-time meters (horómetros)](/docs/configuracion-del-cliente/dispositivos-y-endpoints/dispositivos/integracion-de-dispositivos/http/api-http/almacenamiento-de-datos-de-sensores/run-time-meters-horometros)
[Rastreadores de ubicación](/docs/configuracion-del-cliente/dispositivos-y-endpoints/dispositivos/integracion-de-dispositivos/http/api-http/almacenamiento-de-datos-de-sensores/rastreadores-de-ubicacion)
[Sensores de concentración (ppm)](/docs/configuracion-del-cliente/dispositivos-y-endpoints/dispositivos/integracion-de-dispositivos/http/api-http/almacenamiento-de-datos-de-sensores/sensores-de-concentracion-ppm)
[Sensores de concentración (masa/volumen)](/docs/configuracion-del-cliente/dispositivos-y-endpoints/dispositivos/integracion-de-dispositivos/http/api-http/almacenamiento-de-datos-de-sensores/sensores-de-concentracion-masavolumen)
[Sensores de calidad de aire (AQI)](/docs/configuracion-del-cliente/dispositivos-y-endpoints/dispositivos/integracion-de-dispositivos/http/api-http/almacenamiento-de-datos-de-sensores/air-quality-index-aqi-sensors)
[Sensores de flujo de personas](/docs/configuracion-del-cliente/dispositivos-y-endpoints/dispositivos/integracion-de-dispositivos/http/api-http/almacenamiento-de-datos-de-sensores/sensores-de-flujo-de-personas)
[Contadores de personas](/docs/configuracion-del-cliente/dispositivos-y-endpoints/dispositivos/integracion-de-dispositivos/http/api-http/almacenamiento-de-datos-de-sensores/contadores-de-personas)
[Cámaras](/docs/configuracion-del-cliente/dispositivos-y-endpoints/dispositivos/integracion-de-dispositivos/http/api-http/almacenamiento-de-datos-de-sensores/camaras)
[Texto](/docs/configuracion-del-cliente/dispositivos-y-endpoints/dispositivos/integracion-de-dispositivos/http/api-http/almacenamiento-de-datos-de-sensores/sensores-de-texto)
# Rastreadores de ubicación
Reporte de estado del endpoint [#reporte-de-estado-del-endpoint]
La integración por HTTP de rastreadores de ubicación lleva la siguiente estructura:
```
POST /services/gear/DeviceIntegrationService.svc/UpdateLocationTrackerStatus HTTP/1.1
Host: gear.cloud.studio
Content-Type: application/json
{
"accessToken": "xxxxxxxxxxxxxxxxxxxxxxxxxxxxxxxxxxxxxxxx",
"endpointID": 1,
"latitude": -13.9957594,
"longitude": 48.9339384,
"flags": 0,
"timestamp": "2021-02-23T14:55:03"
}
```
Parámetros [#parámetros]
| Nombre | Descripción | Tipo de datos |
| ----------- | ----------------------------------------------------------------------------------------------------------------------------------------------------------------------------------------------------------------------------------------------------------------------------------------------------------------------------------------------------------------------------------------------------------------------------------------------------------------------------------------------------------------------------------------------------------------------- | ------------- |
| accessToken | Token de acceso con permisos para actualizar información del endpoint. Vea esta página para más información. | texto |
| endpointID | Identificador único del endpoint o combinación de dirección del dispositivo y dirección del endpoint con formato \[deviceAddress]:endpointAddress (Ej: \[device-1234]:1). Estos valores pueden verse en la página de administración de endpoints. | numérico |
| latitude | Indica la latitud. El valor debe ser entre -90 y 90. El separador para los decimales es el punto | numérico |
| longitude | Indica la longitud. El valor debe ser entre -180 y 180. El separador para los decimales es el punto | numérico |
| flags | Indica información extra para la posición. Es un valor entero que representa una suma bit a bit. Los estados disponibles son: 0 = Nada en especial1 = La posición del sensor está cambiando2 = El sensor no puede adquirir la posición4 = El sensor no funciona correctamente. La posición informada puede ser incorrecta8 = La posición informada tiene baja precisiónLos valores pueden combinarse a través de la operación OR. Por ejemplo, para indicar que la posición informada tiene baja precisión, y la posición está cambiando, debe utilizarse (8 OR 1) = 9. | numérico |
| timestamp | Valor opcional indicando la fecha y hora UTC correspondiente a la medición. El formato en que se indique esta fecha debe coincidir con alguno de los indicados en la sección formatos de fecha. En caso de que el campo sea omitido, la plataforma asumirá que la medición corresponde a la fecha y hora actuales. | text |
Reporte de estado en formato "raw" [#reporte-de-estado-en-formato-raw]
El estado del endpoint puede ser reportado como un **valor crudo (raw),** utilizando el [conversor de expresiones](/docs/configuracion-del-cliente/dispositivos-y-endpoints/endpoints/conversion-de-datos-crudos-raw). Esta opción es conveniente cuando el dispositivo no es capaz de realizar conversiones, y emite valores que necesitan ser transformados antes de inyectarse en la plataforma.
A continuación, se muestra un ejemplo de una petición en formato raw:
```
POST /services/gear/DeviceIntegrationService.svc/UpdateLocationTrackerStatusRaw HTTP/1.1
Host: gear.cloud.studio
Content-Type: application/json
{
"accessToken": "xxxxxxxxxxxxxxxxxxxxxxxxxxxxxxxxxxxxxxxx",
"endpointID": 1,
"rawData": "-13.9957594,48.933938,0",
"timestamp": "2021-02-23T14:55:03"
}
```
Parámetros [#parámetros-1]
| Nombre | Descripción | Tipo de datos |
| ----------- | ------------------------------------------------------------------------------------------------------------------------------------------------------------------------------------------------------------------------------------------------------------------------------------------------------------------------------------------------------------------------------------------------------------------------------------------------------------------------------------------------------------------------------------------------------------------------------------------------------------------------------------------------------------------------------------------------------------------------------------------------------------------------------------------------------------------------------------------------------------------------------------------------------------------------------------------------------------------------------------------------------------------------------------------------------- | ------------- |
| accessToken | Token de acceso con permisos para actualizar información del endpoint. Vea esta página para más información. | texto |
| endpointID | Identificador único del endpoint, que puede verse en la página de administración de endpoints. | numérico |
| rawData | Valor reportado por el sensor, como texto. Deben indicarse dos expresiones en el conversor de expresiones:La primera expresión debe devolver un valor numérico indicando la longitud. El valor debe ser entre -90 y 90. El separador para los decimales es el puntoLa segunda expresión debe devolver un valor numérico indicando la longitud. El valor debe ser entre -180 y 180. El separador para los decimales es el puntoLa tercera expresión debe devolver un valor entero indicando detalles de la posición (flags). Es un valor entero que representa una suma bit a bit. Los estados disponibles son:0 = Nada en especial1 = La posición del sensor está cambiando2 = El sensor no puede adquirir la posición4 = El sensor no funciona correctamente. La posición informada puede ser incorrecta8 = La posición informada tiene baja precisiónLos valores pueden combinarse a través de la operación OR. Por ejemplo, para indicar que la posición informada tiene baja precisión, y la posición está cambiando, debe utilizarse (8 OR 1) = 9. | texto |
| timestamp | Valor opcional indicando la fecha y hora UTC correspondiente a la medición. El formato en que se indique esta fecha debe coincidir con alguno de los indicados en la sección formatos de fecha. En caso de que el campo sea omitido, la plataforma asumirá que la medición corresponde a la fecha y hora actuales. | text |
# Run-time meters (horómetros)
> La integración de run-time meters utiliza la misma API que los sensores de flujo no-genéricos. La única diferencia es que los run time meters deben informar el flujo de tiempo **en segundos**.
Reporte de tiempo acumulado en segundos [#reporte-de-tiempo-acumulado-en-segundos]
La integración de run time meters por HTTP lleva la siguiente estructura, que es idéntica a la de cualquier sensor de flujo:
```
POST /services/gear/DeviceIntegrationService.svc/UpdateFlowSensorValueSummation HTTP/1.1
Host: gear.cloud.studio
Content-Type: application/json
{
"accessToken": "xxxxxxxxxxxxxxxxxxxxxxxxxxxxxxxxxxxxxxxx",
"endpointID": 1,
"summationValue": 112685,
"timestamp": "2021-02-23T14:55:03"
}
```
Parámetros [#parámetros]
| Nombre | Descripción | Tipo de datos |
| -------------- | ------------------------------------------------------------------------------------------------------------------------------------------------------------------------------------------------------------------------------------------------------------------------------------------------------------------ | ------------- |
| accessToken | Token de acceso con permisos para actualizar información del endpoint. Vea esta página para más información. | texto |
| endpointID | Identificador único del endpoint o combinación de dirección del dispositivo y dirección del endpoint con formato \[deviceAddress]:endpointAddress (Ej: \[device-1234]:1). Estos valores pueden verse en la página de administración de endpoints. | numérico |
| summationValue | Valor acumulado de tiempo informado por el sensor, expresado en segundos. | numérico |
| timestamp | Valor opcional indicando la fecha y hora UTC correspondiente a la medición. El formato en que se indique esta fecha debe coincidir con alguno de los indicados en la sección formatos de fecha. En caso de que el campo sea omitido, la plataforma asumirá que la medición corresponde a la fecha y hora actuales. | text |
Reporte de tiempo acumulado en formato "raw" [#reporte-de-tiempo-acumulado-en-formato-raw]
El tiempo acumulado puede ser reportado como un **valor crudo (raw),** utilizando el [conversor de expresiones](/docs/configuracion-del-cliente/dispositivos-y-endpoints/endpoints/conversion-de-datos-crudos-raw). Esta opción es conveniente cuando el dispositivo no es capaz de realizar conversiones, y emite valores que necesitan ser transformados antes de inyectarse en la plataforma.
A continuación, se muestra un ejemplo de una petición en formato raw:
```
POST /services/gear/DeviceIntegrationService.svc/UpdateFlowSensorValueSummationRaw HTTP/1.1
Host: gear.cloud.studio
Content-Type: application/json
{
"accessToken": "xxxxxxxxxxxxxxxxxxxxxxxxxxxxxxxxxxxxxxxx",
"endpointID": 1,
"rawData": "112685",
"timestamp": "2021-02-23T14:55:03"
}
```
Parámetros [#parámetros-1]
| Nombre | Descripción | Tipo de datos |
| ----------- | ------------------------------------------------------------------------------------------------------------------------------------------------------------------------------------------------------------------------------------------------------------------------------------------------------------------ | ------------- |
| accessToken | Token de acceso con permisos para actualizar información del endpoint. Vea esta página para más información. | texto |
| endpointID | Identificador único del endpoint, que puede verse en la página de administración de endpoints. | numérico |
| rawData | Valor reportado por el sensor, como texto. Debe indicarse una expresión en el conversor de expresiones. La expresión debe devolver un valor numérico indicando el tiempo acumulado informado por el sensor, expresado en segundos. | texto |
| timestamp | Valor opcional indicando la fecha y hora UTC correspondiente a la medición. El formato en que se indique esta fecha debe coincidir con alguno de los indicados en la sección formatos de fecha. En caso de que el campo sea omitido, la plataforma asumirá que la medición corresponde a la fecha y hora actuales. | text |
# Sensores de concentración (masa/volumen)
Reporte de estado del endpoint [#reporte-de-estado-del-endpoint]
La integración por HTTP de sensores de concentración (masa/volumen) lleva la siguiente estructura:
```
POST /services/gear/DeviceIntegrationService.svc/UpdateConcentrationSensorStatus HTTP/1.1
Host: gear.cloud.studio
Content-Type: application/json
{
"accessToken": "xxxxxxxxxxxxxxxxxxxxxxxxxxxxxxxxxxxxxxxx",
"endpointID": 1,
"concentration": 17.9,
"timestamp": "2021-02-23T14:55:03"
}
```
Parámetros [#parámetros]
| Nombre | Descripción | Tipo de datos |
| ------------- | ------------------------------------------------------------------------------------------------------------------------------------------------------------------------------------------------------------------------------------------------------------------------------------------------------------------ | ------------- |
| accessToken | Token de acceso con permisos para actualizar información del endpoint. Vea esta página para más información. | texto |
| endpointID | Identificador único del endpoint o combinación de dirección del dispositivo y dirección del endpoint con formato \[deviceAddress]:endpointAddress (Ej: \[device-1234]:1). Estos valores pueden verse en la página de administración de endpoints. | numérico |
| concentration | Indica la concentración de materia (masa/volumen), expresada en microgramos/metro cúbico (μg/m³). El separador para los decimales es el punto. | numérico |
| timestamp | Valor opcional indicando la fecha y hora UTC correspondiente a la medición. El formato en que se indique esta fecha debe coincidir con alguno de los indicados en la sección formatos de fecha. En caso de que el campo sea omitido, la plataforma asumirá que la medición corresponde a la fecha y hora actuales. | text |
Reporte de estado en formato "raw" [#reporte-de-estado-en-formato-raw]
El estado del endpoint puede ser reportado como un **valor crudo (raw),** utilizando el [conversor de expresiones](/docs/configuracion-del-cliente/dispositivos-y-endpoints/endpoints/conversion-de-datos-crudos-raw). Esta opción es conveniente cuando el dispositivo no es capaz de realizar conversiones, y emite valores que necesitan ser transformados antes de inyectarse en la plataforma.
A continuación, se muestra un ejemplo de una petición en formato raw:
```
POST /services/gear/DeviceIntegrationService.svc/UpdateConcentrationSensorStatusRaw HTTP/1.1
Host: gear.cloud.studio
Content-Type: application/json
{
"accessToken": "xxxxxxxxxxxxxxxxxxxxxxxxxxxxxxxxxxxxxxxx",
"endpointID": 1,
"rawData": "17.9",
"timestamp": "2021-02-23T14:55:03"
}
```
Parámetros [#parámetros-1]
| Nombre | Descripción | Tipo de datos |
| ----------- | ------------------------------------------------------------------------------------------------------------------------------------------------------------------------------------------------------------------------------------------------------------------------------------------------------------------ | ------------- |
| accessToken | Token de acceso con permisos para actualizar información del endpoint. Vea esta página para más información. | texto |
| endpointID | Identificador único del endpoint, que puede verse en la página de administración de endpoints. | numérico |
| rawData | Valor reportado por el sensor, como texto. Debe indicarse una expresión en el conversor de expresiones. La expresión debe devolver un valor numérico indicando la concentración de materia (masa/volumen), expresada en microgramos/metro cúbico (μg/m³). | texto |
| timestamp | Valor opcional indicando la fecha y hora UTC correspondiente a la medición. El formato en que se indique esta fecha debe coincidir con alguno de los indicados en la sección formatos de fecha. En caso de que el campo sea omitido, la plataforma asumirá que la medición corresponde a la fecha y hora actuales. | texto |
# Sensores de concentración (ppm)
Reporte de estado del endpoint [#reporte-de-estado-del-endpoint]
La integración por HTTP de sensores de concentración (ppm) lleva la siguiente estructura:
```
POST /services/gear/DeviceIntegrationService.svc/UpdateConcentrationSensorStatus HTTP/1.1
Host: gear.cloud.studio
Content-Type: application/json
{
"accessToken": "xxxxxxxxxxxxxxxxxxxxxxxxxxxxxxxxxxxxxxxx",
"endpointID": 1,
"concentration": 17.9,
"timestamp": "2021-02-23T14:55:03"
}
```
Parámetros [#parámetros]
| Nombre | Descripción | Tipo de datos |
| ------------- | ------------------------------------------------------------------------------------------------------------------------------------------------------------------------------------------------------------------------------------------------------------------------------------------------------------------ | ------------- |
| accessToken | Token de acceso con permisos para actualizar información del endpoint. Vea esta página para más información. | texto |
| endpointID | Identificador único del endpoint o combinación de dirección del dispositivo y dirección del endpoint con formato \[deviceAddress]:endpointAddress (Ej: \[device-1234]:1). Estos valores pueden verse en la página de administración de endpoints. | numérico |
| concentration | Indica la concentración de materia, expresada en en partes por millón (ppm). El separador para los decimales es el punto. | numérico |
| timestamp | Valor opcional indicando la fecha y hora UTC correspondiente a la medición. El formato en que se indique esta fecha debe coincidir con alguno de los indicados en la sección formatos de fecha. En caso de que el campo sea omitido, la plataforma asumirá que la medición corresponde a la fecha y hora actuales. | text |
Reporte de estado en formato "raw" [#reporte-de-estado-en-formato-raw]
El estado del endpoint puede ser reportado como un **valor crudo (raw),** utilizando el [conversor de expresiones](/docs/configuracion-del-cliente/dispositivos-y-endpoints/endpoints/conversion-de-datos-crudos-raw). Esta opción es conveniente cuando el dispositivo no es capaz de realizar conversiones, y emite valores que necesitan ser transformados antes de inyectarse en la plataforma.
A continuación, se muestra un ejemplo de una petición en formato raw:
```
POST /services/gear/DeviceIntegrationService.svc/UpdateConcentrationSensorStatusRaw HTTP/1.1
Host: gear.cloud.studio
Content-Type: application/json
{
"accessToken": "xxxxxxxxxxxxxxxxxxxxxxxxxxxxxxxxxxxxxxxx",
"endpointID": 1,
"rawData": "17.9",
"timestamp": "2021-02-23T14:55:03"
}
```
Parámetros [#parámetros-1]
| Nombre | Descripción | Tipo de datos |
| ----------- | ------------------------------------------------------------------------------------------------------------------------------------------------------------------------------------------------------------------------------------------------------------------------------------------------------------------ | ------------- |
| accessToken | Token de acceso con permisos para actualizar información del endpoint. Vea esta página para más información. | texto |
| endpointID | Identificador único del endpoint, que puede verse en la página de administración de endpoints. | numérico |
| rawData | Valor reportado por el sensor, como texto. Debe indicarse una expresión en el conversor de expresiones. La expresión debe devolver un valor numérico indicando la concentración de materia en partes por millón (ppm). | texto |
| timestamp | Valor opcional indicando la fecha y hora UTC correspondiente a la medición. El formato en que se indique esta fecha debe coincidir con alguno de los indicados en la sección formatos de fecha. En caso de que el campo sea omitido, la plataforma asumirá que la medición corresponde a la fecha y hora actuales. | texto |
# Sensores de consumo de energía
Reporte de energía acumulada en Wh y VARh [#reporte-de-energía-acumulada-en-wh-y-varh]
La integración de sensores de energía por HTTP lleva la siguiente estructura:
```
POST /services/gear/DeviceIntegrationService.svc/UpdateEnergySensorValueSummation HTTP/1.1
Host: gear.cloud.studio
Content-Type: application/json
{
"accessToken": "xxxxxxxxxxxxxxxxxxxxxxxxxxxxxxxxxxxxxxxx",
"endpointID": 1,
"activeEnergySummationWh": 112685.9,
"reactiveEnergySummationVARh": 18973.4,
"timestamp": "2021-02-23T14:55:03"
}
```
Parámetros [#parámetros]
| Nombre | Descripción | Tipo de datos |
| --------------------------- | ------------------------------------------------------------------------------------------------------------------------------------------------------------------------------------------------------------------------------------------------------------------------------------------------------------------ | ------------- |
| accessToken | Token de acceso con permisos para actualizar información del endpoint. Vea esta página para más información. | texto |
| endpointID | Identificador único del endpoint o combinación de dirección del dispositivo y dirección del endpoint con formato \[deviceAddress]:endpointAddress (Ej: \[device-1234]:1). Estos valores pueden verse en la página de administración de endpoints. | numérico |
| activeEnergySummationWh | Valor acumulado de energía activa informado por el sensor, expresado en watt-hora (Wh). | numérico |
| reactiveEnergySummationVARh | Valor acumulado de energía reactiva informado por el sensor, expresado en volt-ampere-reactivo-hora (VARh). | numérico |
| timestamp | Valor opcional indicando la fecha y hora UTC correspondiente a la medición. El formato en que se indique esta fecha debe coincidir con alguno de los indicados en la sección formatos de fecha. En caso de que el campo sea omitido, la plataforma asumirá que la medición corresponde a la fecha y hora actuales. | text |
Reporte de energía acumulada en formato "raw" [#reporte-de-energía-acumulada-en-formato-raw]
La energía acumulada puede ser reportada como un **valor crudo (raw),** utilizando el [conversor de expresiones](/docs/configuracion-del-cliente/dispositivos-y-endpoints/endpoints/conversion-de-datos-crudos-raw). Esta opción es conveniente cuando el dispositivo no es capaz de realizar conversiones, y emite valores que necesitan ser transformados antes de inyectarse en la plataforma.
A continuación, se muestra un ejemplo de una petición en formato raw:
```
POST /services/gear/DeviceIntegrationService.svc/UpdateFlowSensorValueSummationRaw HTTP/1.1
Host: gear.cloud.studio
Content-Type: application/json
{
"accessToken": "xxxxxxxxxxxxxxxxxxxxxxxxxxxxxxxxxxxxxxxx",
"endpointID": 1,
"rawData": "112685.9,18973.4",
"timestamp": "2021-02-23T14:55:03"
}
```
Como puede verse en este ejemplo, el campo RawData combina el acumulado de energía activa y el acumulado de energía reactiva en un único string, en el que ambos valores están separados por una coma.
Parámetros [#parámetros-1]
| Nombre | Descripción | Tipo de datos |
| ----------- | -------------------------------------------------------------------------------------------------------------------------------------------------------------------------------------------------------------------------------------------------------------------------------------------------------------------------------------------------------------------------------------------------------------------------------------------------------------------------------------------------------------------------------------------------------------------------------------------------------------------------------------------------------------------------------------------------------------------------------------------------------------- | ------------- |
| accessToken | Token de acceso con permisos para actualizar información del endpoint. Vea esta página para más información. | texto |
| endpointID | Identificador único del endpoint, que puede verse en la página de administración de endpoints. | numérico |
| rawData | Valor reportado por el sensor, como texto. Deben indicarse dos expresiones en el conversor de expresiones. La primera expresión se utiliza para obtener la energía activa acumulada a partir de la variable rawData. La expresión debe devolver un valor numérico indicando expresado en expresado en watt-hora (Wh). En el ejemplo anterior, podría utilizarse la siguiente expresión:ToNumber(StringPart(rawData, 1, ','))La segunda expresión se utiliza para obtener la energía reactiva acumulada a partir de la variable rawData. La expresión debe devolver un valor numérico indicando expresado en expresado volt-ampere-reactivo-hora (VARh). En el ejemplo anterior, podría utilizarse la siguiente expresión:ToNumber(StringPart(rawData, 2, ',')) | texto |
| timestamp | Valor opcional indicando la fecha y hora UTC correspondiente a la medición. El formato en que se indique esta fecha debe coincidir con alguno de los indicados en la sección formatos de fecha. En caso de que el campo sea omitido, la plataforma asumirá que la medición corresponde a la fecha y hora actuales. | text |
# Sensores de corriente
Reporte de corriente en Amperes [#reporte-de-corriente-en-amperes]
La integración de sensores de corriente por HTTP lleva la siguiente estructura:
```
POST /services/gear/DeviceIntegrationService.svc/UpdateCurrentSensorStatus HTTP/1.1
Host: gear.cloud.studio
Content-Type: application/json
{
"accessToken": "xxxxxxxxxxxxxxxxxxxxxxxxxxxxxxxxxxxxxxxx",
"endpointID": 1,
"currentAmperes": 18.5,
"timestamp": "2021-02-23T14:55:03"
}
```
Parámetros [#parámetros]
| Nombre | Descripción | Tipo de datos |
| -------------- | ------------------------------------------------------------------------------------------------------------------------------------------------------------------------------------------------------------------------------------------------------------------------------------------------------------------ | ------------- |
| accessToken | Token de acceso con permisos para actualizar información del endpoint. Vea esta página para más información. | texto |
| endpointID | Identificador único del endpoint o combinación de dirección del dispositivo y dirección del endpoint con formato \[deviceAddress]:endpointAddress (Ej: \[device-1234]:1). Estos valores pueden verse en la página de administración de endpoints. | numérico |
| currentAmperes | Corriente, expresada en Amperes. | numérico |
| timestamp | Valor opcional indicando la fecha y hora UTC correspondiente a la medición. El formato en que se indique esta fecha debe coincidir con alguno de los indicados en la sección formatos de fecha. En caso de que el campo sea omitido, la plataforma asumirá que la medición corresponde a la fecha y hora actuales. | text |
Reporte de corriente en formato "raw" [#reporte-de-corriente-en-formato-raw]
La corriente puede ser reportada como un **valor crudo (raw),** utilizando el [conversor de expresiones](/docs/configuracion-del-cliente/dispositivos-y-endpoints/endpoints/conversion-de-datos-crudos-raw). Esta opción es conveniente cuando el dispositivo no es capaz de realizar conversiones, y emite valores que necesitan ser transformados antes de inyectarse en la plataforma.
A continuación, se muestra un ejemplo de una petición en formato raw:
```
POST /services/gear/DeviceIntegrationService.svc/UpdateCurrentSensorStatusRaw HTTP/1.1
Host: gear.cloud.studio
Content-Type: application/json
{
"accessToken": "xxxxxxxxxxxxxxxxxxxxxxxxxxxxxxxxxxxxxxxx",
"endpointID": 1,
"rawData": "18.5",
"timestamp": "2021-02-23T14:55:03"
}
```
Parámetros [#parámetros-1]
| Nombre | Descripción | Tipo de datos |
| ----------- | ------------------------------------------------------------------------------------------------------------------------------------------------------------------------------------------------------------------------------------------------------------------------------------------------------------------ | ------------- |
| accessToken | Token de acceso con permisos para actualizar información del endpoint. Vea esta página para más información. | texto |
| endpointID | Identificador único del endpoint, que puede verse en la página de administración de endpoints. | numérico |
| rawData | Valor reportado por el sensor, como texto. Debe indicarse una expresión en el conversor de expresiones. La expresión debe devolver un valor numérico indicando la corriente, expresada en Amperes. | texto |
| timestamp | Valor opcional indicando la fecha y hora UTC correspondiente a la medición. El formato en que se indique esta fecha debe coincidir con alguno de los indicados en la sección formatos de fecha. En caso de que el campo sea omitido, la plataforma asumirá que la medición corresponde a la fecha y hora actuales. | text |
# Sensores de coseno fi
Reporte de coseno fi [#reporte-de-coseno-fi]
La integración de sensores de [coseno fi](https://es.wikipedia.org/wiki/Factor_de_potencia) por HTTP lleva la siguiente estructura:
```
POST /services/gear/DeviceIntegrationService.svc/UpdateCosPhiSensorStatus HTTP/1.1
Host: gear.cloud.studio
Content-Type: application/json
{
"accessToken": "xxxxxxxxxxxxxxxxxxxxxxxxxxxxxxxxxxxxxxxx",
"endpointID": 1,
"cosPhi": 0.96,
"timestamp": "2021-02-23T14:55:03"
}
```
Parámetros [#parámetros]
| Nombre | Descripción | Tipo de datos |
| ----------- | ------------------------------------------------------------------------------------------------------------------------------------------------------------------------------------------------------------------------------------------------------------------------------------------------------------------ | ------------- |
| accessToken | Token de acceso con permisos para actualizar información del endpoint. Vea esta página para más información. | texto |
| endpointID | Identificador único del endpoint o combinación de dirección del dispositivo y dirección del endpoint con formato \[deviceAddress]:endpointAddress (Ej: \[device-1234]:1). Estos valores pueden verse en la página de administración de endpoints. | numérico |
| cosPhi | Coseno fi, en el rango de -1 a 1. | numérico |
| timestamp | Valor opcional indicando la fecha y hora UTC correspondiente a la medición. El formato en que se indique esta fecha debe coincidir con alguno de los indicados en la sección formatos de fecha. En caso de que el campo sea omitido, la plataforma asumirá que la medición corresponde a la fecha y hora actuales. | text |
Reporte de coseno fi en formato "raw" [#reporte-de-coseno-fi-en-formato-raw]
El coseno fi puede ser reportado como un **valor crudo (raw),** utilizando el [conversor de expresiones](/docs/configuracion-del-cliente/dispositivos-y-endpoints/endpoints/conversion-de-datos-crudos-raw). Esta opción es conveniente cuando el dispositivo no es capaz de realizar conversiones, y emite valores que necesitan ser transformados antes de inyectarse en la plataforma.
A continuación, se muestra un ejemplo de una petición en formato raw:
```
POST /services/gear/DeviceIntegrationService.svc/UpdateCosPhiSensorStatusRaw HTTP/1.1
Host: gear.cloud.studio
Content-Type: application/json
{
"accessToken": "xxxxxxxxxxxxxxxxxxxxxxxxxxxxxxxxxxxxxxxx",
"endpointID": 1,
"rawData": "0.96",
"timestamp": "2021-02-23T14:55:03"
}
```
Parámetros [#parámetros-1]
| Nombre | Descripción | Tipo de datos |
| ----------- | ------------------------------------------------------------------------------------------------------------------------------------------------------------------------------------------------------------------------------------------------------------------------------------------------------------------ | ------------- |
| accessToken | Token de acceso con permisos para actualizar información del endpoint. Vea esta página para más información. | texto |
| endpointID | Identificador único del endpoint, que puede verse en la página de administración de endpoints. | numérico |
| rawData | Valor reportado por el sensor, como texto. Debe indicarse una expresión en el conversor de expresiones. La expresión debe devolver un valor numérico indicando el coseno fi, en el rango de -1 a 1. | texto |
| timestamp | Valor opcional indicando la fecha y hora UTC correspondiente a la medición. El formato en que se indique esta fecha debe coincidir con alguno de los indicados en la sección formatos de fecha. En caso de que el campo sea omitido, la plataforma asumirá que la medición corresponde a la fecha y hora actuales. | text |
# Sensores de flujo de personas
Reporte de estado del endpoint [#reporte-de-estado-del-endpoint]
La integración por HTTP de sensores de flujo de personas lleva la siguiente estructura:
```
POST /services/gear/DeviceIntegrationService.svc/UpdateFlowSensorValueSummation HTTP/1.1
Host: gear.cloud.studio
Content-Type: application/json
{
"accessToken": "xxxxxxxxxxxxxxxxxxxxxxxxxxxxxxxxxxxxxxxx",
"endpointID": 1,
"summationValue": 25,
"timestamp": "2021-02-23T14:55:03"
}
```
Parámetros [#parámetros]
| Nombre | Descripción | Tipo de datos |
| -------------- | ------------------------------------------------------------------------------------------------------------------------------------------------------------------------------------------------------------------------------------------------------------------------------------------------------------------ | ------------- |
| accessToken | Token de acceso con permisos para actualizar información del endpoint. Vea esta página para más información. | texto |
| endpointID | Identificador único del endpoint o combinación de dirección del dispositivo y dirección del endpoint con formato \[deviceAddress]:endpointAddress (Ej: \[device-1234]:1). Estos valores pueden verse en la página de administración de endpoints. | numérico |
| summationValue | Valor acumulado de flujo informado por el sensor, expresado en personas. | numérico |
| timestamp | Valor opcional indicando la fecha y hora UTC correspondiente a la medición. El formato en que se indique esta fecha debe coincidir con alguno de los indicados en la sección formatos de fecha. En caso de que el campo sea omitido, la plataforma asumirá que la medición corresponde a la fecha y hora actuales. | text |
Reporte de estado en formato "raw" [#reporte-de-estado-en-formato-raw]
El estado del endpoint puede ser reportado como un **valor crudo (raw),** utilizando el [conversor de expresiones](/docs/configuracion-del-cliente/dispositivos-y-endpoints/endpoints/conversion-de-datos-crudos-raw). Esta opción es conveniente cuando el dispositivo no es capaz de realizar conversiones, y emite valores que necesitan ser transformados antes de inyectarse en la plataforma.
A continuación, se muestra un ejemplo de una petición en formato raw:
```
POST /services/gear/DeviceIntegrationService.svc/UpdateFlowSensorValueSummationRaw HTTP/1.1
Host: gear.cloud.studio
Content-Type: application/json
{
"accessToken": "xxxxxxxxxxxxxxxxxxxxxxxxxxxxxxxxxxxxxxxx",
"endpointID": 1,
"rawData": "25",
"timestamp": "2021-02-23T14:55:03"
}
```
Parámetros [#parámetros-1]
| Nombre | Descripción | Tipo de datos |
| ----------- | ------------------------------------------------------------------------------------------------------------------------------------------------------------------------------------------------------------------------------------------------------------------------------------------------------------------ | ------------- |
| accessToken | Token de acceso con permisos para actualizar información del endpoint. Vea esta página para más información. | texto |
| endpointID | Identificador único del endpoint, que puede verse en la página de administración de endpoints. | numérico |
| rawData | Valor reportado por el sensor, como texto. Debe indicarse una expresión en el conversor de expresiones. La expresión debe devolver un valor numérico indicando el valor acumulado de flujo informado por el sensor, expresado en personas. | texto |
| timestamp | Valor opcional indicando la fecha y hora UTC correspondiente a la medición. El formato en que se indique esta fecha debe coincidir con alguno de los indicados en la sección formatos de fecha. En caso de que el campo sea omitido, la plataforma asumirá que la medición corresponde a la fecha y hora actuales. | texto |
# Sensores de flujo
Reporte de flujo acumulado en litros [#reporte-de-flujo-acumulado-en-litros]
La integración de sensores de flujo por HTTP lleva la siguiente estructura:
```
POST /services/gear/DeviceIntegrationService.svc/UpdateFlowSensorValueSummation HTTP/1.1
Host: gear.cloud.studio
Content-Type: application/json
{
"accessToken": "xxxxxxxxxxxxxxxxxxxxxxxxxxxxxxxxxxxxxxxx",
"endpointID": 1,
"summationValue": 112685,
"timestamp": "2021-02-23T14:55:03"
}
```
Parámetros [#parámetros]
| Nombre | Descripción | Tipo de datos |
| -------------- | ------------------------------------------------------------------------------------------------------------------------------------------------------------------------------------------------------------------------------------------------------------------------------------------------------------------ | ------------- |
| accessToken | Token de acceso con permisos para actualizar información del endpoint. Vea esta página para más información. | texto |
| endpointID | Identificador único del endpoint o combinación de dirección del dispositivo y dirección del endpoint con formato \[deviceAddress]:endpointAddress (Ej: \[device-1234]:1). Estos valores pueden verse en la página de administración de endpoints. | numérico |
| summationValue | Valor acumulado de flujo informado por el sensor, expresado en litros. | numérico |
| timestamp | Valor opcional indicando la fecha y hora UTC correspondiente a la medición. El formato en que se indique esta fecha debe coincidir con alguno de los indicados en la sección formatos de fecha. En caso de que el campo sea omitido, la plataforma asumirá que la medición corresponde a la fecha y hora actuales. | text |
Reporte de flujo acumulado en formato "raw" [#reporte-de-flujo-acumulado-en-formato-raw]
El flujo puede ser reportado como un **valor crudo (raw),** utilizando el [conversor de expresiones](/docs/configuracion-del-cliente/dispositivos-y-endpoints/endpoints/conversion-de-datos-crudos-raw). Esta opción es conveniente cuando el dispositivo no es capaz de realizar conversiones, y emite valores que necesitan ser transformados antes de inyectarse en la plataforma.
A continuación, se muestra un ejemplo de una petición en formato raw:
```
POST /services/gear/DeviceIntegrationService.svc/UpdateFlowSensorValueSummationRaw HTTP/1.1
Host: gear.cloud.studio
Content-Type: application/json
{
"accessToken": "xxxxxxxxxxxxxxxxxxxxxxxxxxxxxxxxxxxxxxxx",
"endpointID": 1,
"rawData": "112685",
"timestamp": "2021-02-23T14:55:03"
}
```
Parámetros [#parámetros-1]
| Nombre | Descripción | Tipo de datos |
| ----------- | ------------------------------------------------------------------------------------------------------------------------------------------------------------------------------------------------------------------------------------------------------------------------------------------------------------------ | ------------- |
| accessToken | Token de acceso con permisos para actualizar información del endpoint. Vea esta página para más información. | texto |
| endpointID | Identificador único del endpoint, que puede verse en la página de administración de endpoints. | numérico |
| rawData | Valor reportado por el sensor, como texto. Debe indicarse una expresión en el conversor de expresiones. La expresión debe devolver un valor numérico indicando el valor acumulado de flujo informado por el sensor, expresado en litros. | texto |
| timestamp | Valor opcional indicando la fecha y hora UTC correspondiente a la medición. El formato en que se indique esta fecha debe coincidir con alguno de los indicados en la sección formatos de fecha. En caso de que el campo sea omitido, la plataforma asumirá que la medición corresponde a la fecha y hora actuales. | text |
# Sensores de humedad
Reporte de humedad como porcentaje [#reporte-de-humedad-como-porcentaje]
La integración de sensores de humedad por HTTP lleva la siguiente estructura:
```
POST /services/gear/DeviceIntegrationService.svc/UpdateHumiditySensorStatus HTTP/1.1
Host: gear.cloud.studio
Content-Type: application/json
{
"accessToken": "xxxxxxxxxxxxxxxxxxxxxxxxxxxxxxxxxxxxxxxx",
"endpointID": 1,
"humidityPercentage": 49,
"timestamp": "2021-02-23T14:55:03"
}
```
Parámetros [#parámetros]
| Nombre | Descripción | Tipo de datos |
| ------------------ | ------------------------------------------------------------------------------------------------------------------------------------------------------------------------------------------------------------------------------------------------------------------------------------------------------------------ | ------------- |
| accessToken | Token de acceso con permisos para actualizar información del endpoint. Vea esta página para más información. | texto |
| endpointID | Identificador único del endpoint o combinación de dirección del dispositivo y dirección del endpoint con formato \[deviceAddress]:endpointAddress (Ej: \[device-1234]:1). Estos valores pueden verse en la página de administración de endpoints. | texto |
| humidityPercentage | Porcentaje de humedad, de 0 a 100. | texto |
| timestamp | Valor opcional indicando la fecha y hora UTC correspondiente a la medición. El formato en que se indique esta fecha debe coincidir con alguno de los indicados en la sección formatos de fecha. En caso de que el campo sea omitido, la plataforma asumirá que la medición corresponde a la fecha y hora actuales. | text |
Reporte de humedad en formato "raw" [#reporte-de-humedad-en-formato-raw]
La humedad puede ser reportada como un **valor crudo (raw),** utilizando el [conversor de expresiones](/docs/configuracion-del-cliente/dispositivos-y-endpoints/endpoints/conversion-de-datos-crudos-raw). Esta opción es conveniente cuando el dispositivo no es capaz de realizar conversiones, y emite valores que necesitan ser transformados antes de inyectarse en la plataforma.
A continuación, se muestra un ejemplo de una petición en formato raw:
```
POST /services/gear/DeviceIntegrationService.svc/UpdateHumiditySensorStatusRaw HTTP/1.1
Host: gear.cloud.studio
Content-Type: application/json
{
"accessToken": "",
"endpointID": 1,
"rawData": "49",
"timestamp": "2021-02-23T14:55:03"
}
```
Parámetros [#parámetros-1]
| Nombre | Descripción | Tipo de datos |
| ----------- | ------------------------------------------------------------------------------------------------------------------------------------------------------------------------------------------------------------------------------------------------------------------------------------------------------------------ | ------------- |
| accessToken | Token de acceso con permisos para actualizar información del endpoint. Vea esta página para más información. | texto |
| endpointID | Identificador único del endpoint, que puede verse en la página de administración de endpoints. | numérico |
| rawData | Valor reportado por el sensor, como texto. Debe indicarse una expresión en el conversor de expresiones. La expresión debe devolver un valor numérico entre 0 y 100. | texto |
| timestamp | Valor opcional indicando la fecha y hora UTC correspondiente a la medición. El formato en que se indique esta fecha debe coincidir con alguno de los indicados en la sección formatos de fecha. En caso de que el campo sea omitido, la plataforma asumirá que la medición corresponde a la fecha y hora actuales. | text |
# Sensores de nivel de iluminación
Reporte de nivel de iluminación como porcentaje [#reporte-de-nivel-de-iluminación-como-porcentaje]
La integración de sensores de iluminación por HTTP lleva la siguiente estructura:
```
POST /services/gear/DeviceIntegrationService.svc/UpdateLightSensorStatus HTTP/1.1
Host: gear.cloud.studio
Content-Type: application/json
{
"accessToken": "xxxxxxxxxxxxxxxxxxxxxxxxxxxxxxxxxxxxxxxx",
"endpointID": 1,
"lightIntensity": 7550,
"timestamp": "2021-02-23T14:55:03"
}
```
Parámetros [#parámetros]
| Nombre | Descripción | Tipo de datos |
| -------------- | ------------------------------------------------------------------------------------------------------------------------------------------------------------------------------------------------------------------------------------------------------------------------------------------------------------------ | ------------- |
| accessToken | Token de acceso con permisos para actualizar información del endpoint. Vea esta página para más información. | texto |
| endpointID | Identificador único del endpoint o combinación de dirección del dispositivo y dirección del endpoint con formato \[deviceAddress]:endpointAddress (Ej: \[device-1234]:1). Estos valores pueden verse en la página de administración de endpoints. | texto |
| lightIntensity | Intensidad luminosa expresada en lux. | texto |
| timestamp | Valor opcional indicando la fecha y hora UTC correspondiente a la medición. El formato en que se indique esta fecha debe coincidir con alguno de los indicados en la sección formatos de fecha. En caso de que el campo sea omitido, la plataforma asumirá que la medición corresponde a la fecha y hora actuales. | text |
Reporte de nivel de iluminación en formato "raw" [#reporte-de-nivel-de-iluminación-en-formato-raw]
El nivel de iluminación puede ser reportado como un **valor crudo (raw),** utilizando el [conversor de expresiones](/docs/configuracion-del-cliente/dispositivos-y-endpoints/endpoints/conversion-de-datos-crudos-raw). Esta opción es conveniente cuando el dispositivo no es capaz de realizar conversiones, y emite valores que necesitan ser transformados antes de inyectarse en la plataforma.
A continuación, se muestra un ejemplo de una petición en formato raw:
```
POST /services/gear/DeviceIntegrationService.svc/UpdateLightSensorStatusRaw HTTP/1.1
Host: gear.cloud.studio
Content-Type: application/json
{
"accessToken": "xxxxxxxxxxxxxxxxxxxxxxxxxxxxxxxxxxxxxxxx",
"endpointID": 1,
"rawData": "7550",
"timestamp": "2021-02-23T14:55:03"
}
```
Parámetros [#parámetros-1]
| Nombre | Descripción | Tipo de datos |
| ----------- | ------------------------------------------------------------------------------------------------------------------------------------------------------------------------------------------------------------------------------------------------------------------------------------------------------------------ | ------------- |
| accessToken | Token de acceso con permisos para actualizar información del endpoint. Vea esta página para más información. | texto |
| endpointID | Identificador único del endpoint, que puede verse en la página de administración de endpoints. | numérico |
| rawData | Valor reportado por el sensor, como texto. Debe indicarse una expresión en el conversor de expresiones. La expresión debe devolver un valor numérico indicando la intensidad luminosa expresada en lux. | texto |
| timestamp | Valor opcional indicando la fecha y hora UTC correspondiente a la medición. El formato en que se indique esta fecha debe coincidir con alguno de los indicados en la sección formatos de fecha. En caso de que el campo sea omitido, la plataforma asumirá que la medición corresponde a la fecha y hora actuales. | text |
# Sensores de peso
Reporte de peso en gramos [#reporte-de-peso-en-gramos]
La integración de sensores de peso por HTTP lleva la siguiente estructura:
```
POST /services/gear/DeviceIntegrationService.svc/UpdateWeightSensorStatus HTTP/1.1
Host: gear.cloud.studio
Content-Type: application/json
{
"accessToken": "xxxxxxxxxxxxxxxxxxxxxxxxxxxxxxxxxxxxxxxx",
"endpointID": 1,
"weightGrams": 4500,
"timestamp": "2021-02-23T14:55:03"
}
```
Parámetros [#parámetros]
| Nombre | Descripción | Tipo de datos |
| ----------- | ------------------------------------------------------------------------------------------------------------------------------------------------------------------------------------------------------------------------------------------------------------------------------------------------------------------ | ------------- |
| accessToken | Token de acceso con permisos para actualizar información del endpoint. Vea esta página para más información. | texto |
| endpointID | Identificador único del endpoint o combinación de dirección del dispositivo y dirección del endpoint con formato \[deviceAddress]:endpointAddress (Ej: \[device-1234]:1). Estos valores pueden verse en la página de administración de endpoints. | texto |
| weightGrams | Peso, expresado en gramos. | numérico |
| timestamp | Valor opcional indicando la fecha y hora UTC correspondiente a la medición. El formato en que se indique esta fecha debe coincidir con alguno de los indicados en la sección formatos de fecha. En caso de que el campo sea omitido, la plataforma asumirá que la medición corresponde a la fecha y hora actuales. | text |
Reporte de peso en formato "raw" [#reporte-de-peso-en-formato-raw]
El peso puede ser reportado como un **valor crudo (raw),** utilizando el [conversor de expresiones](/docs/configuracion-del-cliente/dispositivos-y-endpoints/endpoints/conversion-de-datos-crudos-raw). Esta opción es conveniente cuando el dispositivo no es capaz de realizar conversiones, y emite valores que necesitan ser transformados antes de inyectarse en la plataforma.
A continuación, se muestra un ejemplo de una petición en formato raw:
```
POST /services/gear/DeviceIntegrationService.svc/UpdateWeightSensorStatusRaw HTTP/1.1
Host: gear.cloud.studio
Content-Type: application/json
{
"accessToken": "xxxxxxxxxxxxxxxxxxxxxxxxxxxxxxxxxxxxxxxx",
"endpointID": 1,
"rawData": "4500",
"timestamp": "2021-02-23T14:55:03"
}
```
Parámetros [#parámetros-1]
| Nombre | Descripción | Tipo de datos |
| ----------- | ------------------------------------------------------------------------------------------------------------------------------------------------------------------------------------------------------------------------------------------------------------------------------------------------------------------ | ------------- |
| accessToken | Token de acceso con permisos para actualizar información del endpoint. Vea esta página para más información. | texto |
| endpointID | Identificador único del endpoint, que puede verse en la página de administración de endpoints. | numérico |
| rawData | Valor reportado por el sensor, como texto. Debe indicarse una expresión en el conversor de expresiones. La expresión debe devolver un valor numérico indicando el peso, expresado en gramos. | texto |
| timestamp | Valor opcional indicando la fecha y hora UTC correspondiente a la medición. El formato en que se indique esta fecha debe coincidir con alguno de los indicados en la sección formatos de fecha. En caso de que el campo sea omitido, la plataforma asumirá que la medición corresponde a la fecha y hora actuales. | text |
# Sensores de potencia activa
Reporte de potencia activa en Watts [#reporte-de-potencia-activa-en-watts]
La integración de sensores de potencia activa por HTTP lleva la siguiente estructura:
```
POST /services/gear/DeviceIntegrationService.svc/UpdateActivePowerSensorStatus HTTP/1.1
Host: gear.cloud.studio
Content-Type: application/json
{
"accessToken": "xxxxxxxxxxxxxxxxxxxxxxxxxxxxxxxxxxxxxxxx",
"endpointID": 1,
"activePowerWatts": 18.5,
"timestamp": "2021-02-23T14:55:03"
}
```
Parámetros [#parámetros]
| Nombre | Descripción | Tipo de datos |
| ---------------- | ------------------------------------------------------------------------------------------------------------------------------------------------------------------------------------------------------------------------------------------------------------------------------------------------------------------ | ------------- |
| accessToken | Token de acceso con permisos para actualizar información del endpoint. Vea esta página para más información. | texto |
| endpointID | Identificador único del endpoint o combinación de dirección del dispositivo y dirección del endpoint con formato \[deviceAddress]:endpointAddress (Ej: \[device-1234]:1). Estos valores pueden verse en la página de administración de endpoints. | numérico |
| activePowerWatts | Potencia activa, expresada en Watts. | numérico |
| timestamp | Valor opcional indicando la fecha y hora UTC correspondiente a la medición. El formato en que se indique esta fecha debe coincidir con alguno de los indicados en la sección formatos de fecha. En caso de que el campo sea omitido, la plataforma asumirá que la medición corresponde a la fecha y hora actuales. | text |
Reporte de potencia activa en formato "raw" [#reporte-de-potencia-activa-en-formato-raw]
La potencia activa puede ser reportada como un **valor crudo (raw),** utilizando el [conversor de expresiones](/docs/configuracion-del-cliente/dispositivos-y-endpoints/endpoints/conversion-de-datos-crudos-raw). Esta opción es conveniente cuando el dispositivo no es capaz de realizar conversiones, y emite valores que necesitan ser transformados antes de inyectarse en la plataforma.
A continuación, se muestra un ejemplo de una petición en formato raw:
```
POST /services/gear/DeviceIntegrationService.svc/UpdateActivePowerSensorStatusRaw HTTP/1.1
Host: gear.cloud.studio
Content-Type: application/json
{
"accessToken": "xxxxxxxxxxxxxxxxxxxxxxxxxxxxxxxxxxxxxxxx",
"endpointID": 1,
"rawData": "18.5",
"timestamp": "2021-02-23T14:55:03"
}
```
Parámetros [#parámetros-1]
| Nombre | Descripción | Tipo de datos |
| ----------- | ------------------------------------------------------------------------------------------------------------------------------------------------------------------------------------------------------------------------------------------------------------------------------------------------------------------ | ------------- |
| accessToken | Token de acceso con permisos para actualizar información del endpoint. Vea esta página para más información. | texto |
| endpointID | Identificador único del endpoint, que puede verse en la página de administración de endpoints. | numérico |
| rawData | Valor reportado por el sensor, como texto. Debe indicarse una expresión en el conversor de expresiones. La expresión debe devolver un valor numérico indicando la potencia activa medida, expresada en Watts. | texto |
| timestamp | Valor opcional indicando la fecha y hora UTC correspondiente a la medición. El formato en que se indique esta fecha debe coincidir con alguno de los indicados en la sección formatos de fecha. En caso de que el campo sea omitido, la plataforma asumirá que la medición corresponde a la fecha y hora actuales. | text |
# Sensores de potencia aparente
Reporte de potencia aparente en VA [#reporte-de-potencia-aparente-en-va]
La integración de sensores de [potencia aparente](https://es.wikipedia.org/wiki/Potencia_el%C3%A9ctrica) por HTTP lleva la siguiente estructura:
```
POST /services/gear/DeviceIntegrationService.svc/UpdateApparentPowerSensorStatus HTTP/1.1
Host: gear.cloud.studio
Content-Type: application/json
{
"accessToken": "xxxxxxxxxxxxxxxxxxxxxxxxxxxxxxxxxxxxxxxx",
"endpointID": 1,
"apparentPowerVA": 2850.5,
"timestamp": "2021-02-23T14:55:03"
}
```
Parámetros [#parámetros]
| Nombre | Descripción | Tipo de datos |
| --------------- | ------------------------------------------------------------------------------------------------------------------------------------------------------------------------------------------------------------------------------------------------------------------------------------------------------------------ | ------------- |
| accessToken | Token de acceso con permisos para actualizar información del endpoint. Vea esta página para más información. | texto |
| endpointID | Identificador único del endpoint o combinación de dirección del dispositivo y dirección del endpoint con formato \[deviceAddress]:endpointAddress (Ej: \[device-1234]:1). Estos valores pueden verse en la página de administración de endpoints. | numérico |
| apparentPowerVA | Potencia aparente, expresada en VA. | numérico |
| timestamp | Valor opcional indicando la fecha y hora UTC correspondiente a la medición. El formato en que se indique esta fecha debe coincidir con alguno de los indicados en la sección formatos de fecha. En caso de que el campo sea omitido, la plataforma asumirá que la medición corresponde a la fecha y hora actuales. | text |
Reporte de potencia aparente en formato "raw" [#reporte-de-potencia-aparente-en-formato-raw]
La potencia aparente puede ser reportado como un **valor crudo (raw),** utilizando el [conversor de expresiones](/docs/configuracion-del-cliente/dispositivos-y-endpoints/endpoints/conversion-de-datos-crudos-raw). Esta opción es conveniente cuando el dispositivo no es capaz de realizar conversiones, y emite valores que necesitan ser transformados antes de inyectarse en la plataforma.
A continuación, se muestra un ejemplo de una petición en formato raw:
```
POST /services/gear/DeviceIntegrationService.svc/UpdateApparentPowerSensorStatusRaw HTTP/1.1
Host: gear.cloud.studio
Content-Type: application/json
{
"accessToken": "xxxxxxxxxxxxxxxxxxxxxxxxxxxxxxxxxxxxxxxx",
"endpointID": 1,
"rawData": "2850.5",
"timestamp": "2021-02-23T14:55:03"
}
```
Parámetros [#parámetros-1]
| Nombre | Descripción | Tipo de datos |
| ----------- | ------------------------------------------------------------------------------------------------------------------------------------------------------------------------------------------------------------------------------------------------------------------------------------------------------------------ | ------------- |
| accessToken | Token de acceso con permisos para actualizar información del endpoint. Vea esta página para más información. | texto |
| endpointID | Identificador único del endpoint, que puede verse en la página de administración de endpoints. | numérico |
| rawData | Valor reportado por el sensor, como texto. Debe indicarse una expresión en el conversor de expresiones. La expresión debe devolver un valor numérico indicando la potencia aparente, expresada en VA. | texto |
| timestamp | Valor opcional indicando la fecha y hora UTC correspondiente a la medición. El formato en que se indique esta fecha debe coincidir con alguno de los indicados en la sección formatos de fecha. En caso de que el campo sea omitido, la plataforma asumirá que la medición corresponde a la fecha y hora actuales. | text |
# Sensores de potencia reactiva
Reporte de potencia reactiva en VAR [#reporte-de-potencia-reactiva-en-var]
La integración de sensores de [potencia reactiva](https://es.wikipedia.org/wiki/Potencia_el%C3%A9ctrica) por HTTP lleva la siguiente estructura:
```
POST /services/gear/DeviceIntegrationService.svc/UpdateReactivePowerSensorStatus HTTP/1.1
Host: gear.cloud.studio
Content-Type: application/json
{
"accessToken": "xxxxxxxxxxxxxxxxxxxxxxxxxxxxxxxxxxxxxxxx",
"endpointID": 1,
"reactivePowerVAR": 2850.5,
"timestamp": "2021-02-23T14:55:03"
}
```
Parámetros [#parámetros]
| Nombre | Descripción | Tipo de datos |
| ---------------- | ------------------------------------------------------------------------------------------------------------------------------------------------------------------------------------------------------------------------------------------------------------------------------------------------------------------ | ------------- |
| accessToken | Token de acceso con permisos para actualizar información del endpoint. Vea esta página para más información. | texto |
| endpointID | Identificador único del endpoint o combinación de dirección del dispositivo y dirección del endpoint con formato \[deviceAddress]:endpointAddress (Ej: \[device-1234]:1). Estos valores pueden verse en la página de administración de endpoints. | numérico |
| reactivePowerVAR | Potencia reactiva, expresada en VAR. | numérico |
| timestamp | Valor opcional indicando la fecha y hora UTC correspondiente a la medición. El formato en que se indique esta fecha debe coincidir con alguno de los indicados en la sección formatos de fecha. En caso de que el campo sea omitido, la plataforma asumirá que la medición corresponde a la fecha y hora actuales. | text |
Reporte de potencia reactiva en formato "raw" [#reporte-de-potencia-reactiva-en-formato-raw]
La potencia reactiva puede ser reportado como un **valor crudo (raw),** utilizando el [conversor de expresiones](/docs/configuracion-del-cliente/dispositivos-y-endpoints/endpoints/conversion-de-datos-crudos-raw). Esta opción es conveniente cuando el dispositivo no es capaz de realizar conversiones, y emite valores que necesitan ser transformados antes de inyectarse en la plataforma.
A continuación, se muestra un ejemplo de una petición en formato raw:
```
POST /services/gear/DeviceIntegrationService.svc/UpdateReactivePowerSensorStatusRaw HTTP/1.1
Host: gear.cloud.studio
Content-Type: application/json
{
"accessToken": "xxxxxxxxxxxxxxxxxxxxxxxxxxxxxxxxxxxxxxxx",
"endpointID": 1,
"rawData": "2850.5",
"timestamp": "2021-02-23T14:55:03"
}
```
Parámetros [#parámetros-1]
| Nombre | Descripción | Tipo de datos |
| ----------- | ------------------------------------------------------------------------------------------------------------------------------------------------------------------------------------------------------------------------------------------------------------------------------------------------------------------ | ------------- |
| accessToken | Token de acceso con permisos para actualizar información del endpoint. Vea esta página para más información. | texto |
| endpointID | Identificador único del endpoint, que puede verse en la página de administración de endpoints. | numérico |
| rawData | Valor reportado por el sensor, como texto. Debe indicarse una expresión en el conversor de expresiones. La expresión debe devolver un valor numérico indicando la potencia reactiva, expresada en VAR. | texto |
| timestamp | Valor opcional indicando la fecha y hora UTC correspondiente a la medición. El formato en que se indique esta fecha debe coincidir con alguno de los indicados en la sección formatos de fecha. En caso de que el campo sea omitido, la plataforma asumirá que la medición corresponde a la fecha y hora actuales. | text |
# Sensores de presión
Reporte de presión en Pascales [#reporte-de-presión-en-pascales]
La integración de sensores de presión por HTTP lleva la siguiente estructura:
```
POST /services/gear/DeviceIntegrationService.svc/UpdatePressureSensorStatus HTTP/1.1
Host: gear.cloud.studio
Content-Type: application/json
{
"accessToken": "xxxxxxxxxxxxxxxxxxxxxxxxxxxxxxxxxxxxxxxx",
"endpointID": 1,
"pressurePascals": 101300,
"timestamp": "2021-02-23T14:55:03"
}
```
Parámetros [#parámetros]
| Nombre | Descripción | Tipo de datos |
| --------------- | ------------------------------------------------------------------------------------------------------------------------------------------------------------------------------------------------------------------------------------------------------------------------------------------------------------------ | ------------- |
| accessToken | Token de acceso con permisos para actualizar información del endpoint. Vea esta página para más información. | texto |
| endpointID | Identificador único del endpoint o combinación de dirección del dispositivo y dirección del endpoint con formato \[deviceAddress]:endpointAddress (Ej: \[device-1234]:1). Estos valores pueden verse en la página de administración de endpoints. | texto |
| pressurePascals | Presión, expresada en Pascales. | numérico |
| timestamp | Valor opcional indicando la fecha y hora UTC correspondiente a la medición. El formato en que se indique esta fecha debe coincidir con alguno de los indicados en la sección formatos de fecha. En caso de que el campo sea omitido, la plataforma asumirá que la medición corresponde a la fecha y hora actuales. | text |
Reporte de presión en formato "raw" [#reporte-de-presión-en-formato-raw]
La presión puede ser reportada como un **valor crudo (raw),** utilizando el [conversor de expresiones](/docs/configuracion-del-cliente/dispositivos-y-endpoints/endpoints/conversion-de-datos-crudos-raw). Esta opción es conveniente cuando el dispositivo no es capaz de realizar conversiones, y emite valores que necesitan ser transformados antes de inyectarse en la plataforma.
A continuación, se muestra un ejemplo de una petición en formato raw:
```
POST /services/gear/DeviceIntegrationService.svc/UpdatePressureSensorStatusRaw HTTP/1.1
Host: gear.cloud.studio
Content-Type: application/json
{
"accessToken": "xxxxxxxxxxxxxxxxxxxxxxxxxxxxxxxxxxxxxxxx",
"endpointID": 1,
"rawData": "101300",
"timestamp": "2021-02-23T14:55:03"
}
```
Parámetros [#parámetros-1]
| Nombre | Descripción | Tipo de datos |
| ----------- | ------------------------------------------------------------------------------------------------------------------------------------------------------------------------------------------------------------------------------------------------------------------------------------------------------------------ | ------------- |
| accessToken | Token de acceso con permisos para actualizar información del endpoint. Vea esta página para más información. | texto |
| endpointID | Identificador único del endpoint, que puede verse en la página de administración de endpoints. | numérico |
| rawData | Valor reportado por el sensor, como texto. Debe indicarse una expresión en el conversor de expresiones. La expresión debe devolver un valor numérico indicando la presión medida, expresada en Pascales. | texto |
| timestamp | Valor opcional indicando la fecha y hora UTC correspondiente a la medición. El formato en que se indique esta fecha debe coincidir con alguno de los indicados en la sección formatos de fecha. En caso de que el campo sea omitido, la plataforma asumirá que la medición corresponde a la fecha y hora actuales. | text |
# Sensores de temperatura
Reporte de temperatura en grados Celsius [#reporte-de-temperatura-en-grados-celsius]
La integración de sensores de temperatura por HTTP lleva la siguiente estructura:
```
POST /services/gear/DeviceIntegrationService.svc/UpdateTemperatureSensorStatus HTTP/1.1
Host: gear-dev.cloud.studio
Content-Type: application/json
{
"accessToken": "xxxxxxxxxxxxxxxxxxxxxxxxxxxxxxxxxxxxxxxx",
"endpointID": 1,
"temperatureCelsius": 45,
"timestamp": "2021-02-23T14:55:03"
}
```
Parámetros [#parámetros]
| Nombre | Descripción | Tipo de dato |
| ------------------ | ------------------------------------------------------------------------------------------------------------------------------------------------------------------------------------------------------------------------------------------------------------------------------------------------------------------ | ------------ |
| accessToken | Token de acceso con permisos para actualizar información del endpoint. Vea esta página para más información. | text |
| endpointID | Identificador único del endpoint o combinación de dirección del dispositivo y dirección del endpoint con formato \[deviceAddress]:endpointAddress (Ej: \[device-1234]:1). Estos valores pueden verse en la página de administración de endpoints. | numeric |
| temperatureCelsius | Temperatura medida, valor numérico mayor o igual a -273.15, indicando la temperatura medida, en grados Celsius (ºC). | numeric |
| timestamp | Valor opcional indicando la fecha y hora UTC correspondiente a la medición. El formato en que se indique esta fecha debe coincidir con alguno de los indicados en la sección formatos de fecha. En caso de que el campo sea omitido, la plataforma asumirá que la medición corresponde a la fecha y hora actuales. | text |
Reporte de temperatura en formato "raw" [#reporte-de-temperatura-en-formato-raw]
La temperatura puede ser reportada como un **valor crudo (raw),** utilizando el [conversor de expresiones](/docs/configuracion-del-cliente/dispositivos-y-endpoints/endpoints/conversion-de-datos-crudos-raw). Esta opción es conveniente cuando el dispositivo no es capaz de realizar conversiones, y emite valores que necesitan ser transformados antes de inyectarse en la plataforma.
A continuación, se muestra un ejemplo de una petición en formato raw:
```
POST /services/gear/DeviceIntegrationService.svc/UpdateTemperatureSensorStatusRaw HTTP/1.1
Host: gear-dev.cloud.studio
Content-Type: application/json
{
"accessToken": "xxxxxxxxxxxxxxxxxxxxxxxxxxxxxxxxxxxxxxxx",
"endpointID": 1,
"rawData": "45",
"timestamp": "2021-02-23T14:55:03"
}
```
Parámetros [#parámetros-1]
| Nombre | Descripción | Tipo de dato |
| ----------- | ------------------------------------------------------------------------------------------------------------------------------------------------------------------------------------------------------------------------------------------------------------------------------------------------------------------ | ------------ |
| accessToken | Token de acceso con permisos para actualizar información del endpoint. Vea esta página para más información. | text |
| endpointID | Identificador único del endpoint, que puede verse en la página de administración de endpoints. | numeric |
| rawData | Valor reportado por el sensor, como texto. Debe indicarse una expresión en el conversor de expresiones. La expresión debe devolver un valor numérico mayor o igual a -273.15, indicando la temperatura medida, en grados Celsius (ºC). | text |
| timestamp | Valor opcional indicando la fecha y hora UTC correspondiente a la medición. El formato en que se indique esta fecha debe coincidir con alguno de los indicados en la sección formatos de fecha. En caso de que el campo sea omitido, la plataforma asumirá que la medición corresponde a la fecha y hora actuales. | text |
# Sensores de texto
Almacenamiento de texto [#almacenamiento-de-texto]
La integración por HTTP de texto permite almacenar texto hasta 255 caracteres de longitud siguiendo la siguiente estructura:
```
POST /services/gear/DeviceIntegrationService.svc/UpdateTextContainerStatus HTTP/1.1
Host: gear.cloud.studio
Content-Type: application/json
{
"accessToken": "xxxxxxxxxxxxxxxxxxxxxxxxxxxxxxxxxxxxxxxx",
"endpointID": 1,
"text": "Sample text...",
"timestamp": "2024-02-23T14:55:03"
}
```
Parámetros [#parámetros]
| Nombre | Descripción | Tipo de datos |
| ----------- | ------------------------------------------------------------------------------------------------------------------------------------------------------------------------------------------------------------------------------------------------------------------------------------------------- | ------------- |
| accessToken | Token de acceso con permisos para actualizar información del endpoint. Vea esta página para más información. | texto |
| endpointID | Identificador único del endpoint o combinación de dirección del dispositivo y dirección del endpoint con formato \[deviceAddress]:endpointAddress (Ej: \[device-1234]:1). Estos valores pueden verse en la página de administración de endpoints. | numérico |
| text | Contenido de texto que se desea almacenar | texto |
| timestamp | Valor opcional indicando la fecha y hora UTC del snapshot. El formato en que se indique esta fecha debe coincidir con alguno de los indicados en la sección formatos de fecha. En caso de que el campo sea omitido, la plataforma asumirá que la medición corresponde a la fecha y hora actuales. | texto |
# Sensores de voltaje
Reporte de voltaje en voltios [#reporte-de-voltaje-en-voltios]
La integración de sensores de voltaje por HTTP lleva la siguiente estructura:
```
POST /services/gear/DeviceIntegrationService.svc/UpdateVoltageSensorStatus HTTP/1.1
Host: gear.cloud.studio
Content-Type: application/json
{
"accessToken": "xxxxxxxxxxxxxxxxxxxxxxxxxxxxxxxxxxxxxxxx",
"endpointID": 1,
"voltageVolts": 45,
"timestamp": "2021-02-23T14:55:03"
}
```
Parámetros [#parámetros]
| Nombre | Descripción | Tipo de datos |
| ------------ | ------------------------------------------------------------------------------------------------------------------------------------------------------------------------------------------------------------------------------------------------------------------------------------------------------------------ | ------------- |
| accessToken | Token de acceso con permisos para actualizar información del endpoint. Vea esta página para más información. | texto |
| endpointID | Identificador único del endpoint o combinación de dirección del dispositivo y dirección del endpoint con formato \[deviceAddress]:endpointAddress (Ej: \[device-1234]:1). Estos valores pueden verse en la página de administración de endpoints. | numérico |
| voltageVolts | Voltaje expresado en voltios. | numérico |
| timestamp | Valor opcional indicando la fecha y hora UTC correspondiente a la medición. El formato en que se indique esta fecha debe coincidir con alguno de los indicados en la sección formatos de fecha. En caso de que el campo sea omitido, la plataforma asumirá que la medición corresponde a la fecha y hora actuales. | text |
Reporte de voltaje en formato "raw" [#reporte-de-voltaje-en-formato-raw]
El voltaje puede ser reportado como un **valor crudo (raw),** utilizando el [conversor de expresiones](/docs/configuracion-del-cliente/dispositivos-y-endpoints/endpoints/conversion-de-datos-crudos-raw). Esta opción es conveniente cuando el dispositivo no es capaz de realizar conversiones, y emite valores que necesitan ser transformados antes de inyectarse en la plataforma.
A continuación, se muestra un ejemplo de una petición en formato raw:
```
POST /services/gear/DeviceIntegrationService.svc/UpdateVoltageSensorStatusRaw HTTP/1.1
Host: gear.cloud.studio
Content-Type: application/json
{
"accessToken": "xxxxxxxxxxxxxxxxxxxxxxxxxxxxxxxxxxxxxxxx",
"endpointID": 1,
"rawData": "45",
"timestamp": "2021-02-23T14:55:03"
}
```
Parámetros [#parámetros-1]
| Nombre | Descripción | Tipo de datos |
| ----------- | ------------------------------------------------------------------------------------------------------------------------------------------------------------------------------------------------------------------------------------------------------------------------------------------------------------------ | ------------- |
| accessToken | Token de acceso con permisos para actualizar información del endpoint. Vea esta página para más información. | texto |
| endpointID | Identificador único del endpoint, que puede verse en la página de administración de endpoints. | numérico |
| rawData | Valor reportado por el sensor, como texto. Debe indicarse una expresión en el conversor de expresiones. La expresión debe devolver un valor numérico indicando el voltaje, expresado en voltios. | texto |
| timestamp | Valor opcional indicando la fecha y hora UTC correspondiente a la medición. El formato en que se indique esta fecha debe coincidir con alguno de los indicados en la sección formatos de fecha. En caso de que el campo sea omitido, la plataforma asumirá que la medición corresponde a la fecha y hora actuales. | text |
# Sensores de volumen
Reporte de volumen en litros [#reporte-de-volumen-en-litros]
La integración de sensores de volumen por HTTP lleva la siguiente estructura:
```
POST /services/gear/DeviceIntegrationService.svc/UpdateVolumeSensorStatus HTTP/1.1
Host: gear.cloud.studio
Content-Type: application/json
{
"accessToken": "xxxxxxxxxxxxxxxxxxxxxxxxxxxxxxxxxxxxxxxx",
"endpointID": 1,
"volumeLiters": 45,
"timestamp": "2021-02-23T14:55:03"
}
```
Parámetros [#parámetros]
| Nombre | Descripción | Tipo de datos |
| ------------ | ------------------------------------------------------------------------------------------------------------------------------------------------------------------------------------------------------------------------------------------------------------------------------------------------------------------ | ------------- |
| accessToken | Token de acceso con permisos para actualizar información del endpoint. Vea esta página para más información. | texto |
| endpointID | Identificador único del endpoint o combinación de dirección del dispositivo y dirección del endpoint con formato \[deviceAddress]:endpointAddress (Ej: \[device-1234]:1). Estos valores pueden verse en la página de administración de endpoints. | texto |
| volumeLiters | Volumen expresado en en litros. | numérico |
| timestamp | Valor opcional indicando la fecha y hora UTC correspondiente a la medición. El formato en que se indique esta fecha debe coincidir con alguno de los indicados en la sección formatos de fecha. En caso de que el campo sea omitido, la plataforma asumirá que la medición corresponde a la fecha y hora actuales. | text |
Reporte de volumen en formato "raw" [#reporte-de-volumen-en-formato-raw]
El volumen puede ser reportado como un **valor crudo (raw),** utilizando el [conversor de expresiones](/docs/configuracion-del-cliente/dispositivos-y-endpoints/endpoints/conversion-de-datos-crudos-raw). Esta opción es conveniente cuando el dispositivo no es capaz de realizar conversiones, y emite valores que necesitan ser transformados antes de inyectarse en la plataforma.
A continuación, se muestra un ejemplo de una petición en formato raw:
```
POST /services/gear/DeviceIntegrationService.svc/UpdateVolumeSensorStatusRaw HTTP/1.1
Host: gear.cloud.studio
Content-Type: application/json
{
"accessToken": "xxxxxxxxxxxxxxxxxxxxxxxxxxxxxxxxxxxxxxxx",
"endpointID": 1,
"rawData": "45",
"timestamp": "2021-02-23T14:55:03"
}
```
Parámetros [#parámetros-1]
| Nombre | Descripción | Tipo de datos |
| ----------- | ------------------------------------------------------------------------------------------------------------------------------------------------------------------------------------------------------------------------------------------------------------------------------------------------------------------ | ------------- |
| accessToken | Token de acceso con permisos para actualizar información del endpoint. Vea esta página para más información. | texto |
| endpointID | Identificador único del endpoint, que puede verse en la página de administración de endpoints. | numérico |
| rawData | Valor reportado por el sensor, como texto. Debe indicarse una expresión en el conversor de expresiones. La expresión debe devolver un valor numérico indicando el volumen medido, expresado en litros. | texto |
| timestamp | Valor opcional indicando la fecha y hora UTC correspondiente a la medición. El formato en que se indique esta fecha debe coincidir con alguno de los indicados en la sección formatos de fecha. En caso de que el campo sea omitido, la plataforma asumirá que la medición corresponde a la fecha y hora actuales. | text |
# Sensores genéricos de flujo
> La integración de sensores de flujo genéricos utiliza la misma API que los sensores de flujo no-genéricos. La única diferencia es que los sensores genéricos deben informar el flujo utilizando la unidad de medida correspondiente a la variable genérica asociada al sensor.
Reporte de flujo acumulado en unidades [#reporte-de-flujo-acumulado-en-unidades]
La integración de sensores genéricos de flujo por HTTP lleva la siguiente estructura, que es idéntica a la de los sensores de flujo no-genéricos:
```
POST /services/gear/DeviceIntegrationService.svc/UpdateFlowSensorValueSummation HTTP/1.1
Host: gear.cloud.studio
Content-Type: application/json
{
"accessToken": "xxxxxxxxxxxxxxxxxxxxxxxxxxxxxxxxxxxxxxxx",
"endpointID": 1,
"summationValue": 112685,
"timestamp": "2021-02-23T14:55:03"
}
```
Parámetros [#parámetros]
| Nombre | Descripción | Tipo de datos |
| -------------- | ------------------------------------------------------------------------------------------------------------------------------------------------------------------------------------------------------------------------------------------------------------------------------------------------------------------ | ------------- |
| accessToken | Token de acceso con permisos para actualizar información del endpoint. Vea esta página para más información. | texto |
| endpointID | Identificador único del endpoint o combinación de dirección del dispositivo y dirección del endpoint con formato \[deviceAddress]:endpointAddress (Ej: \[device-1234]:1). Estos valores pueden verse en la página de administración de endpoints. | numérico |
| summationValue | Valor acumulado de flujo informado por el sensor. Las unidades son las mismas que las elegidas para la variable genérica asociada al sensor. | numérico |
| timestamp | Valor opcional indicando la fecha y hora UTC correspondiente a la medición. El formato en que se indique esta fecha debe coincidir con alguno de los indicados en la sección formatos de fecha. En caso de que el campo sea omitido, la plataforma asumirá que la medición corresponde a la fecha y hora actuales. | text |
Reporte de flujo acumulado en formato "raw" [#reporte-de-flujo-acumulado-en-formato-raw]
El flujo puede ser reportado como un **valor crudo (raw),** utilizando el [conversor de expresiones](/docs/configuracion-del-cliente/dispositivos-y-endpoints/endpoints/conversion-de-datos-crudos-raw). Esta opción es conveniente cuando el dispositivo no es capaz de realizar conversiones, y emite valores que necesitan ser transformados antes de inyectarse en la plataforma.
A continuación, se muestra un ejemplo de una petición en formato raw:
```
POST /services/gear/DeviceIntegrationService.svc/UpdateFlowSensorValueSummationRaw HTTP/1.1
Host: gear.cloud.studio
Content-Type: application/json
{
"accessToken": "xxxxxxxxxxxxxxxxxxxxxxxxxxxxxxxxxxxxxxxx",
"endpointID": 1,
"rawData": "112685",
"timestamp": "2021-02-23T14:55:03"
}
```
Parámetros [#parámetros-1]
| Nombre | Descripción | Tipo de datos |
| ----------- | ------------------------------------------------------------------------------------------------------------------------------------------------------------------------------------------------------------------------------------------------------------------------------------------------------------------ | ------------- |
| accessToken | Token de acceso con permisos para actualizar información del endpoint. Vea esta página para más información. | texto |
| endpointID | Identificador único del endpoint, que puede verse en la página de administración de endpoints. | numérico |
| rawData | Valor reportado por el sensor, como texto. Debe indicarse una expresión en el conversor de expresiones. La expresión debe devolver un valor numérico indicando el valor acumulado de flujo informado por el sensor, expresado en las unidades de la variable genérica asociada al sensor. | texto |
| timestamp | Valor opcional indicando la fecha y hora UTC correspondiente a la medición. El formato en que se indique esta fecha debe coincidir con alguno de los indicados en la sección formatos de fecha. En caso de que el campo sea omitido, la plataforma asumirá que la medición corresponde a la fecha y hora actuales. | text |
# Sensores genéricos
Reporte de valor del sensor genérico [#reporte-de-valor-del-sensor-genérico]
La integración de sensores genéricos por HTTP lleva la siguiente estructura:
```
POST /services/gear/DeviceIntegrationService.svc/UpdateGenericSensorStatus HTTP/1.1
Host: gear.cloud.studio
Content-Type: application/json
{
"accessToken": "xxxxxxxxxxxxxxxxxxxxxxxxxxxxxxxxxxxxxxxx",
"endpointID": 1,
"value": 45,
"timestamp": "2021-02-23T14:55:03"
}
```
Parámetros [#parámetros]
| Nombre | Descripción | Tipo de datos |
| ----------- | ------------------------------------------------------------------------------------------------------------------------------------------------------------------------------------------------------------------------------------------------------------------------------------------------------------------ | ------------- |
| accessToken | Token de acceso con permisos para actualizar información del endpoint. Vea esta página para más información. | texto |
| endpointID | Identificador único del endpoint o combinación de dirección del dispositivo y dirección del endpoint con formato \[deviceAddress]:endpointAddress (Ej: \[device-1234]:1). Estos valores pueden verse en la página de administración de endpoints. | numérico |
| value | Valor genérico. La unidad de medida dependerá de lo que se establezca en la configuración del tipo de variable correspondiente al endpoint. | numérico |
| timestamp | Valor opcional indicando la fecha y hora UTC correspondiente a la medición. El formato en que se indique esta fecha debe coincidir con alguno de los indicados en la sección formatos de fecha. En caso de que el campo sea omitido, la plataforma asumirá que la medición corresponde a la fecha y hora actuales. | text |
Reporte de valor en formato "raw" [#reporte-de-valor-en-formato-raw]
El valor del sensor genérico puede ser reportado como un **valor crudo (raw),** utilizando el [conversor de expresiones](/docs/configuracion-del-cliente/dispositivos-y-endpoints/endpoints/conversion-de-datos-crudos-raw). Esta opción es conveniente cuando el dispositivo no es capaz de realizar conversiones, y emite valores que necesitan ser transformados antes de inyectarse en la plataforma.
A continuación, se muestra un ejemplo de una petición en formato raw:
```
POST /services/gear/DeviceIntegrationService.svc/UpdateGenericSensorStatusRaw HTTP/1.1
Host: gear.cloud.studio
Content-Type: application/json
{
"accessToken": "xxxxxxxxxxxxxxxxxxxxxxxxxxxxxxxxxxxxxxxx",
"endpointID": 1,
"rawData": "45",
"timestamp": "2021-02-23T14:55:03"
}
```
Parámetros [#parámetros-1]
| Nombre | Descripción | Tipo de datos |
| ----------- | ------------------------------------------------------------------------------------------------------------------------------------------------------------------------------------------------------------------------------------------------------------------------------------------------------------------ | ------------- |
| accessToken | Token de acceso con permisos para actualizar información del endpoint. Vea esta página para más información. | texto |
| endpointID | Identificador único del endpoint, que puede verse en la página de administración de endpoints. | numérico |
| rawData | Valor reportado por el sensor, como texto. Debe indicarse una expresión en el conversor de expresiones. La expresión debe devolver un valor numérico. La unidad de medida dependerá de lo que se establezca en la configuración del tipo de variable correspondiente al endpoint. | texto |
| timestamp | Valor opcional indicando la fecha y hora UTC correspondiente a la medición. El formato en que se indique esta fecha debe coincidir con alguno de los indicados en la sección formatos de fecha. En caso de que el campo sea omitido, la plataforma asumirá que la medición corresponde a la fecha y hora actuales. | text |
# Sensores IAS (movimiento, ocupación, y sensores binarios)
Reporte estado del sensor [#reporte-estado-del-sensor]
La integración de sensores IAS HTTP lleva la siguiente estructura:
```
POST /services/gear/DeviceIntegrationService.svc/UpdateIASSensorStatus HTTP/1.1
Host: gear.cloud.studio
Content-Type: application/json
{
"accessToken": "xxxxxxxxxxxxxxxxxxxxxxxxxxxxxxxxxxxxxxxx",
"endpointID": 1,
"state": 2,
"timestamp": "2021-02-23T14:55:03"
}
```
Parámetros [#parámetros]
| Nombre | Descripción | Tipo de datos |
| ----------- | ------------------------------------------------------------------------------------------------------------------------------------------------------------------------------------------------------------------------------------------------------------------------------------------------------------------------------------------------------------------------------------------------------------------------------------------------------------------------------------------------------------------------------------------------------------------------------------------------------------------------------------------------------------------------------------------------------------------------------------------------------------------------------------------------------------------------------------------------------------------------ | ------------- |
| accessToken | Token de acceso con permisos para actualizar información del endpoint. Vea esta página para más información. | texto |
| endpointID | Identificador único del endpoint o combinación de dirección del dispositivo y dirección del endpoint con formato \[deviceAddress]:endpointAddress (Ej: \[device-1234]:1). Estos valores pueden verse en la página de administración de endpoints. | texto |
| state | Indica el estado del sensor. Los estados posibles son los siguientes:0: Desconocido. No se conoce el estado del sensor1: Inactivo. El sensor no registra actividad.2: Activo. El sensor registra actividad.3: En limpieza. El espacio asociado al sensor está siendo limpiado.4: Necesita limpieza. El espacio asociado al sensor necesita limpieza.5: En modo test. El sensor está actualmente en modo de prueba.6: Manipulado. El sensor ha sido manipulado y puede no estar funcionando correctamente.7: En mantenimiento. El sensor requiere mantenimiento y puede no estar funcionando correctamente.8: El sensor detecta que un vehículo está entrando a la plaza de estacionamiento.9: El sensor detecta que un vehículo está saliendo de la plaza de estacionamiento.10: El sensor informa que la plaza de estacionamiento se encuentra en estado de infracción. | numérico |
| timestamp | Valor opcional indicando la fecha y hora UTC correspondiente a la medición. El formato en que se indique esta fecha debe coincidir con alguno de los indicados en la sección formatos de fecha. En caso de que el campo sea omitido, la plataforma asumirá que la medición corresponde a la fecha y hora actuales. | text |
Reporte de estado en formato "raw" [#reporte-de-estado-en-formato-raw]
El estado del sensor puede ser reportado como un **valor crudo (raw),** utilizando el [conversor de expresiones](/docs/configuracion-del-cliente/dispositivos-y-endpoints/endpoints/conversion-de-datos-crudos-raw). Esta opción es conveniente cuando el dispositivo no es capaz de realizar conversiones, y emite valores que necesitan ser transformados antes de inyectarse en la plataforma.
A continuación, se muestra un ejemplo de una petición en formato raw:
```
POST /services/gear/DeviceIntegrationService.svc/UpdateIASSensorStatusRaw HTTP/1.1
Host: gear.cloud.studio
Content-Type: application/json
{
"accessToken": "xxxxxxxxxxxxxxxxxxxxxxxxxxxxxxxxxxxxxxxx",
"endpointID": 1,
"rawData": "2",
"timestamp": "2021-02-23T14:55:03"
}
```
Parámetros [#parámetros-1]
| Nombre | Descripción | Tipo de datos |
| ----------- | ------------------------------------------------------------------------------------------------------------------------------------------------------------------------------------------------------------------------------------------------------------------------------------------------------------------ | ------------- |
| accessToken | Token de acceso con permisos para actualizar información del endpoint. Vea esta página para más información. | texto |
| endpointID | Identificador único del endpoint, que puede verse en la página de administración de endpoints. | numérico |
| rawData | Valor reportado por el sensor, como texto. Debe indicarse una expresión en el conversor de expresiones. La expresión debe devolver un valor numérico que corresponda a los estados de la tabla que puede verse más arriba. | texto |
| timestamp | Valor opcional indicando la fecha y hora UTC correspondiente a la medición. El formato en que se indique esta fecha debe coincidir con alguno de los indicados en la sección formatos de fecha. En caso de que el campo sea omitido, la plataforma asumirá que la medición corresponde a la fecha y hora actuales. | text |
# CelsiusToFahrenheit
La función **CelsiusToFahrenheit** permite convertir un valor de grados **Celsius** a **Fahrenheit**.
Definición: [#definición]
```
CelsiusToFahrenheit(valor)
```
Parámetros [#parámetros]
| Nombre | Descripción | Tipo de datos |
| ------ | ----------------------------------------------------------- | ------------- |
| valor | Valor Celsius informado, el cual se convertirá a Fahrenheit | numérico |
Ejemplo: [#ejemplo]
En el siguiente ejemplo se realiza una conversión de 30 grados Celsius a Fahrenheit:
```
CelsiusToFahrenheit(30)
```
El resultado es 86 (valor numérico).
Más información [#más-información]
Puede obtenerse más información sobre la conversión de Celsius a Fahrenheit en [Wikipedia](https://es.wikipedia.org/wiki/Grado_Fahrenheit#Conversi%C3%B3n_a_otras_unidades).
# FahrenheitToCelsius
La función **FahrenheitToCelsius** permite convertir un valor de grados **Fahrenheit** a **Celsius**.
Definición [#definición]
```
FahrenheitToCelsius(valor)
```
Parámetros [#parámetros]
| Nombre | Descripción | Tipo de datos |
| ------ | ----------------------------------------------------------- | ------------- |
| valor | Valor Fahrenheit informado, el cual se convertirá a Celsius | numérico |
Ejemplo [#ejemplo]
En el siguiente ejemplo se realiza una conversión de 86 grados Fahrenheit a Celsius:
```
FahrenheitToCelsius(86)
```
El resultado es 30 (valor numérico).
Más información [#más-información]
Puede obtenerse más información sobre la conversión de Fahrenheit a Celsius en [Wikipedia](https://es.wikipedia.org/wiki/Grado_Fahrenheit#Conversi%C3%B3n_a_otras_unidades).
# Funciones matemáticas
| Función | Comentarios |
| ------------------- | ------------------------------------------------------------------- |
| CelsiusToFahrenheit | Convierte una temperatura en grados Celsius a grados Fahrenheit. |
| FahrenheitToCelsius | Convierte una temperatura en grados Fahrenheit a grados Celsius. |
| Max | Devuelve el valor máximo entre una serie de valores. |
| Min | Devuelve el valor mínimo entre una serie de valores. |
| Power | Devuelve el resultado de elevar un número dado a una potencia dada. |
| Round | Redondea un número a la cantidad indicada de posiciones decimales. |
| Sqrt | Calcula la raíz cuadrada de un número. |
| Trunc | Trunca un número, quitando todos los decimales, sin redondear. |
# Max
La función **Max** devuelve el valor máximo entre una serie de valores.
Definición [#definición]
```
Max(v1, [v2, v3, ..., vn])
```
Parámetros [#parámetros]
| Nombre | Descripción | Tipo de datos |
| ------ | ---------------------------------------------------------------------------------------------------------------------- | ------------- |
| v1…vn | Lista de valores informados, todos los valores deben ser números. La función está limitada a un máximo de 100 valores. | numérico |
Ejemplo [#ejemplo]
En el siguiente ejemplo se debe obtener el mayor valor de la siguiente lista de números: 2, -5, 4, 10:
```
Max(2, -5, 4, 10)
```
El resultado es 10 (valor numérico).
# Min
La función **Min** devuelve el valor mínimo entre una serie de valores.
Definición [#definición]
```
Min(v1, [v2, v3, ..., vn])
```
Parámetros [#parámetros]
| Nombre | Descripción | Tipo de datos |
| ------ | ---------------------------------------------------------------------------------------------------------------------- | ------------- |
| v1..vn | Lista de valores informados, todos los valores deben ser números. La función está limitada a un máximo de 100 valores. | numérico |
Ejemplo: [#ejemplo]
En el siguiente ejemplo se debe obtener el menor valor de la siguiente lista de números: 2, -5, 4, 10:
```
Min(2, -5, 4, 10)
```
El resultado es -5 (valor numérico).
# Power
La función **Power** devuelve el resultado de elevar un número dado a una potencia dada.
Definición [#definición]
```
Power(valor, potencia)
```
Parámetros [#parámetros]
| Nombre | Descripción | Tipo de datos |
| -------- | --------------------------------------------------------------------------------------- | ------------- |
| valor | Número informado, se permiten enteros o con decimales. | numérico |
| potencia | Indica la potencia a la cual se elevara el numero, se permiten enteros o con decimales. | numérico |
Ejemplo [#ejemplo]
En el siguiente ejemplo se debe elevar al cuadrado el valor informado 25:
```
Power(25, 2)
```
El resultado es 625 (valor numérico).
Más información [#más-información]
Puede obtenerse más información sobre las potencias en [Wikipedia](https://es.wikipedia.org/wiki/Potenciaci%C3%B3n#:~:text=La%20potenciaciaci%C3%B3n%20es%20una%20operaci%C3%B3n,n%C3%BAmero%20que%20se%20llama%20exponente.).
# Round
La función **Round** redondea un número a la cantidad indicada de posiciones decimales.
Definición [#definición]
```
Round(valor, [decimales])
```
Parámetros [#parámetros]
| Nombre | Descripción | Tipo de datos |
| --------- | ------------------------------------------------------------------------------------------------------------------------------------------- | ------------- |
| valor | Valor informado a redondear | numérico |
| decimales | Parámetro opcional que indica cuántos decimales utilizar para el redondeo. Si no se indica, se asume que el redondeo se hace sin decimales. | numérico |
Ejemplos [#ejemplos]
Redondear sin decimales [#redondear-sin-decimales]
En este ejemplo, redondearemos un valor dado, quitándole todos los decimales
```
Round(25.65)
```
El resultado es 26 ( numérico).
Redondear dejando un solo decimal [#redondear-dejando-un-solo-decimal]
En este ejemplo, redondearemos un valor dado, dejando un solo decimal.
```
Round(25.66, 1)
```
El resultado es 25.7 (numérico).
Más información [#más-información]
Puede obtenerse más información sobre redondeo de números en [Wikipedia](https://es.wikipedia.org/wiki/Redondeo).
# Sqrt
La función **Sqrt** calcula la raíz cuadrada de un número.
Definición [#definición]
```
Sqrt(valor)
```
Parámetros [#parámetros]
| Nombre | Descripción | Tipo de datos |
| ------ | --------------------------------------- | ------------- |
| valor | Número informado, pueden ser decimales. | numérico |
Ejemplo [#ejemplo]
En el siguiente ejemplo se obtiene la raíz cuadrada del número 1288.56:
```
Sqrt(1288.56)
```
El resultado es 35.896517936981 (valor numérico).
Más información [#más-información]
Puede obtenerse más información sobre la raíz cuadrada en [Wikipedia](https://es.wikipedia.org/wiki/Ra%C3%ADz_cuadrada).
# Trunc
La función **Trunc** trunca un número, quitando la parte fraccionaria.
Definición [#definición]
```
Trunc(valor)
```
Parámetros [#parámetros]
| Nombre | Descripción | Tipo de datos |
| ------ | --------------- | ------------- |
| valor | Valor a truncar | numérico |
Ejemplo [#ejemplo]
En este ejemplo, se obtiene el valor truncado de 24.899:
```
Trunc(24.899)
```
El resultado es 24 (valor numérico).
# Funciones para interpolaciones
| Función | Comentarios |
| ------------------- | ----------------------------------------------------------------- |
| LinearInterpolation | Realiza una interpolación lineal entre una serie de puntos dados. |
# LinearInterpolation
La función **LinearInterpolation** permite obtener un valor realizando una [interpolación lineal](https://es.wikipedia.org/wiki/Interpolaci%C3%B3n_lineal) entre un conjunto de valores dados como referencia.
Definición [#definición]
```
LinearInterpolation(valor, x1, y1, x2, y2, ..., xn, yn)
```
Parámetros [#parámetros]
| Nombre | Descripción | Tipo de datos |
| ----------------- | --------------------------------------------------------------------------------------------------------------------------------------------------------------------- | ------------- |
| valor | Valor para el que se desea obtener una interpolación lineal. | numérico |
| x1, y1, …, xn, yn | Conjunto de puntos (x, y) de la tabla de referencia que se utiliza para la interpolación lineal. La función está limitada a un máximo de 20 puntos (40 valores x, y). | numérico |
Ejemplo [#ejemplo]
En el siguiente ejemplo, se desea utilizar la tabla a continuación para calcular el valor interpolado correspondiente a x = 2.5.
| X | Y |
| --- | - |
| 2 | 3 |
| 2.5 | ? |
| 4 | 6 |
Obtener el valor para x = 2.5 [#obtener-el-valor-para-x--25]
El resultado de la interpolación para x = 2.5 puede obtenerse utilizando la siguiente expresión:
```
LinearInterpolation(2.5, 2, 3, 4, 6)
```
El resultado es 3.75 (valor numérico).
Más información [#más-información]
Puede obtenerse más información sobre las interpolaciones lineales en [Wikipedia](https://es.wikipedia.org/wiki/Interpolaci%C3%B3n_lineal).
# Funciones para manejo de Json
| Función | Comentarios |
| --------- | -------------------------------------------------------------------------- |
| JsonField | Obtiene el valor de un campo dentro de un texto expresado en formato Json. |
# JsonField
La función **JsonField** se utiliza para extraer el valor de un elemento dentro de una estructura de datos en formato [Json](https://es.wikipedia.org/wiki/JSON).
Definición [#definición]
```
JsonField(texto, elemento)
```
Parámetros [#parámetros]
| Nombre | Descripción | Tipo de datos |
| -------- | --------------------------------------------------------------------------------------------------------------------------------------------------------------------------------------------------------------------------------------------------------------------------------------------- | ------------- |
| texto | El primer parámetro contiene el texto, en formato Json, que contiene el dato que se desea extraer. | string |
| elemento | El segundo parámetro permite identificar qué se desea extraer, dentro de la estructura provista en el primer parámetro. Este parámetro tiene formato JsonPath, cuya estructura puede consultarse aquí. También puede accederse aquí a un evaluador en línea para probar expresiones JsonPath. | string |
Ejemplo [#ejemplo]
En el siguiente ejemplo se muestra el uso de la función JsonField para extraer el campo “loginCount”, de una estructura Json:
**Json**:
```
{
"firstName":"Thomas",
"lastName":"Brown",
"loginCount":4,
"devices":[
{
"name":"Cold chamber",
"type":"Temperature sensor"
},
{
"name":"Cold room door",
"type":"Door sensor"
}
]
}
```
Obtener el valor del campo “loginCount” [#obtener-el-valor-del-campo-logincount]
Asumiendo que el texto Json que se muestra en la sección anterior esté cargado en una variable con nombre “Json”, para obtener el valor del campo “loginCount”, se debe utilizar la siguiente expresión:
```
JsonField(Json, ‘$.loginCount’)
```
El resultado es 4 (valor numérico).
Obtener el valor del campo “name” del segundo dispositivo [#obtener-el-valor-del-campo-name-del-segundo-dispositivo]
Asumiendo que el texto Json que se muestra en la sección anterior esté cargado en una variable con nombre “Json”, para obtener el valor del campo “name” del segundo dispositivo, se debe utilizar la siguiente expresión:
```
JsonField(Json, ‘$.devices[1].name’)
```
El resultado es “Cold room door” (string).
Mas información [#mas-información]
Para obtener más información sobre los datos estructurados en formato Json, consultar [esta página](https://es.wikipedia.org/wiki/JSON).
Para obtener más información sobre las posibilidades de uso del segundo parámetro de la función (JsonPath), revisar la siguiente página [https://goessner.net/articles/JsonPath/index.html#e2](https://goessner.net/articles/JsonPath/index.html#e2,), o utilizar el siguiente evaluador en línea: [https://jsonpath.com/](https://jsonpath.com/)
# Funciones para manejo de strings
| Función | Comentarios |
| ----------- | ----------------------------------------------------------- |
| LowerCase | Convierte todos los caracteres de un string a minúsculas. |
| StringClean | Limpia un string quitando todos los caracteres no deseados. |
| StringPart | Devuelve una parte de un string que contiene sub-strings. |
| UpperCase | Convierte todos los caracteres de un string a mayúsculas. |
# LowerCase
La función **LowerCase** convierte todos los caracteres de un string a minúsculas.
Definición [#definición]
```
LowerCase(texto)
```
Parámetros [#parámetros]
| Nombre | Descripción | Tipo de datos |
| ------ | -------------------------------------------- | ------------- |
| texto | Texto informado, este se pasara a minúsculas | string |
Ejemplo [#ejemplo]
En el siguiente ejemplo, se convierte la palabra ‘PASSWORD’ a minúsculas.
```
LowerCase('PASSWORD')
```
El resultado es “password” (string).
Otros usos [#otros-usos]
En el siguiente ejemplo se debe mostrar el valor 1 si el texto informado coincide con el texto 'dispositivo', aunque esté escrito en mayúsculas, minúsculas, o mezcla de ambas. Esto puede conseguirse convirtiendo el texto a minúsculas:
```
If(LowerCase('DISPOsitiVo') = 'dispositivo', 1, 0)
```
El resultado es 1 (valor numérico).
# StringClean
La función **StringClean** limpia una cadena de caracteres quitando todos los caracteres no deseados.
Definición [#definición]
```
StringClean(texto, v1, v2, ..., v3)
```
Parámetros [#parámetros]
| Nombre | Descripción | Tipo de datos |
| ------ | ----------------------------------------------------------------------------------------------------------------------- | ------------- |
| texto | El primer parámetro hace referencia a la cadena de texto que se quiere limpiar. | string |
| v1…vn | Conjunto de valores que se desea eliminar de la cadena de texto. La función está limitada a un máximo de 40 parámetros. | string |
Ejemplo [#ejemplo]
En el siguiente ejemplo se muestra el uso de la función StringClean para eliminar corchetes, paréntesis, asteriscos, puntos y letras ‘s’ del texto **'(Dev.ic\[e]s\*)'**
```
StringClean('(Dev.ic[e]s*)', '[', ']', '(', ')', '*', '.', 's')
```
El resultado es “Device” (string).
# StringPart
La función **StringPart** devuelve una parte de un string que contiene sub-strings.
Definición [#definición]
```
StringPart(texto, posición, separador)
```
Parámetros [#parámetros]
| Nombre | Descripción | Tipo de datos |
| --------- | ----------------------------------------------------------------- | ------------- |
| texto | El primer parámetro hace referencia a la cadena de texto. | string |
| posición | Posición del elemento a obtener dentro del texto, iniciando en 1. | numérico |
| separador | Separador utilizado para distinguir las partes del texto. | string |
Ejemplo [#ejemplo]
El siguiente ejemplo muestra cómo obtener el tercer elemento del un texto 'Temperatura/exterior/33', en el que las partes están separados por '/'.
```
StringPart('Temperatura/exterior/33', 3, '/')
```
El resultado es '33' (string).
Notas adicionales [#notas-adicionales]
Si la función se utiliza para obtener una parte que no existe (es decir, cuando el texto contiene menos partes), la función devuelve un string vacío. Por ejemplo, en el siguiente caso, el resultado de la función es un string vacío.
```
StringPart('Temperatura/exterior/33', 6, '/')
```
El resultado es un string vacío ('') porque se pide la sexta parte, pero el string contiene sólo 3 partes.
# UpperCase
La función **UpperCase** convierte todos los caracteres de un string a mayúsculas.
Definición [#definición]
```
UpperCase(texto)
```
Parámetros [#parámetros]
| Nombre | Descripción | Tipo de datos |
| ------ | ----------------------------- | ------------- |
| texto | Texto para pasar a mayúsculas | string |
Ejemplo [#ejemplo]
El siguiente ejemplo convierte la palabra 'password' a mayúsculas.
```
UpperCase('password')
```
El resultado es 'PASSWORD' (string).
Otros usos [#otros-usos]
En el siguiente ejemplo se debe mostrar el valor 1 si el texto informado coincide con el texto 'temperatura', aunque esté escrito en mayúsculas, minúsculas, o mezcla de ambas. Esto se puede hacer convirtiendo el texto a mayúsculas:
```
If(UpperCase('tempErAtura') = 'TEMPERATURA', 1, 0)
```
El resultado es 1 (valor numérico).
# Error
La función **Error** permite generar una condición de error conteniendo el mensaje indicado.
Definición [#definición]
```
Error(texto)
```
Parámetros [#parámetros]
| Nombre | Descripción | Tipo de datos |
| ------ | ----------------------------------------------------------------- | ------------- |
| texto | Contiene el texto del mensaje que desea utilizarse para el error. | string |
Ejemplo [#ejemplo]
La siguiente expresión devuelve el valor de la variable x dividido por 50, excepto si x es mayor que 50, en cuyo caso produce un error.
```
If(x > 50, Error('El resultado no es el esperado'), x / 50)
```
El resultado es “El resultado no es el esperado”. (string).
# HexToNumber
La función **HexToNumber** permite convertir un número en formato hexadecimal (string) a número.
Definición [#definición]
```
HexToNumber(valor)
```
Parámetros [#parámetros]
| Nombre | Descripción | Tipo de datos |
| ------ | -------------------------------------------------------------- | ------------- |
| valor | Texto conteniendo el valor hexadecimal que se desea convertir. | string |
Ejemplo [#ejemplo]
En el siguiente ejemplo se desea convertir el valor hexadecimal '144e' a número:
```
HexToNumber('144e')
```
El resultado es 5198 (valor numérico).
Más información [#más-información]
Puede obtenerse más información sobre el sistema hexadecimal en [Wikipedia](https://es.wikipedia.org/wiki/Sistema_hexadecimal).
# If
La función **If** Permite devolver un valor, entre dos dados, de acuerdo a una condición.
Definición [#definición]
```
If(condición, v1, v2)
```
Parámetros [#parámetros]
| Nombre | Descripción | Tipo de datos |
| --------- | --------------------------------------------------- | ------------- |
| condición | Condición lógica que se desea analizar. | booleano |
| v1 | Valor a devolver si la condición resulta verdadera. | cualquiera |
| v2 | Valor a devolver si la condición resulta falsa. | cualquiera |
Ejemplos [#ejemplos]
Ejemplo de división condicional [#ejemplo-de-división-condicional]
El siguiente ejemplo utiliza la función **If** para verificar si la variable x tiene valor cero, en cuyo caso informa un error. De lo contrario, devuelve el resultado de dividir 150 por el valor de x:
```
If(x = 0, Error('El valor no puede ser cero'), 150 / x)
```
Para un valor de x igual a cero, se obtendrá un error. Para cualquier otro valor, se obtendrá el resultado de dividir 150 por el valor de x.
Ejemplo para obtener el máximo de dos números [#ejemplo-para-obtener-el-máximo-de-dos-números]
El siguiente ejemplo utiliza la función **If** para devolver el valor máximo entre dos variables x1 y x2. Nótese que para este caso particular, sería más sencillo utilizar la función [Max](/docs/configuracion-del-cliente/dispositivos-y-endpoints/endpoints/conversion-de-datos-crudos-raw/expresiones/funciones/funciones-matematicas/max).
```
If(x1 > x2, x1, x2)
```
Este ejemplo siempre devolverá el máximo entre los dos valores pasados en x1 y x2.
# Otras funciones
| Función | Comentarios |
| ----------- | ----------------------------------------------------------------------- |
| Error | Permite generar una condición de error conteniendo el texto indicado. |
| HexToNumber | Permite convertir un número en formato hexadecimal (string) a número. |
| If | Permite devolver un valor, entre dos dados, de acuerdo a una condición. |
| ToBoolean | Permite convertir un valor de cualquier tipo a booleano. |
| ToNumber | Permite convertir un valor de cualquier tipo a numérico. |
| ToString | Permite convertir un valor de cualquier tipo a string. |
# ToBoolean
La función **ToBoolean** permite convertir un valor de cualquier tipo a booleano.
Definición [#definición]
```
ToBoolean(valor)
```
Parámetros [#parámetros]
| Nombre | Descripción | Tipo de datos |
| ------ | ----------------------------------------------------------------------------------------------------------------------------------------------------------------------------------------------------------------------------------------------------------------------------------------------------------------------------------------------------------------------------------------------------- | ------------- |
| valor | Valor informado, a convertir en booleano.Si el valor es numérico, será convertido a false cuando el valor sea cero, y a true en cualquier otro caso.Si el valor es string, será convertido a false cuando el texto sea 'false' o '0', y a true cuando el texto sea 'true' o '1'. La función producirá un error en cualquier otro caso.Si el valor ya es de tipo booleano, se devuelve el mismo valor. | cualquiera |
Ejemplos [#ejemplos]
Conversión de valor numérico [#conversión-de-valor-numérico]
En el siguiente ejemplo se necesita mostrar ‘false’ si el valor recibido es cero y ‘true’ si el valor recibido no es cero. En este ejemplo se utiliza la función If para realizar la comparación, para mas información sobre esta función [ir aquí](/docs/configuracion-del-cliente/dispositivos-y-endpoints/endpoints/conversion-de-datos-crudos-raw/expresiones/funciones/otras-funciones/if).
```
ToBoolean(125)
```
El resultado de esta expresión es true (boolean).
Conversión de valor string [#conversión-de-valor-string]
```
ToBoolean('0')
```
El resultado es **false** (bool).
# ToNumber
La función **ToNumber** permite convertir un valor de cualquier tipo a numérico.
Definición [#definición]
```
ToNumber(valor)
```
Parámetros [#parámetros]
| Nombre | Descripción | Tipo de datos |
| ------ | ---------------------------------------------------------------------------------------------------------------------------------------------------------------------------------------------------------------------------------------------------------------------------------------------------------------------------------------------------- | ------------- |
| valor | Valor informado, a convertir en numérico.Si el valor es string, será convertido al número equivalente. Si el string contiene decimales, el separador deberá ser siempre un punto.Si el valor es de tipo booleano, se devolverá 1 cuando el valor sea verdadero, y 0 cuando el valor sea falso.Si el valor ya es numérico, será devuelvo sin cambios. | cualquiera |
Ejemplo de conversión de string a número [#ejemplo-de-conversión-de-string-a-número]
El siguiente ejemplo convierte un valor de texto a número.
```
ToNumber('-123.45')
```
El resultado es -123.45 (numérico).
Ejemplo de conversión de booleano a número [#ejemplo-de-conversión-de-booleano-a-número]
```
ToNumber(true)
```
El resultado es 1 (numérico).
# ToString
La función ToString permite convertir un valor de cualquier tipo a string.
Definición [#definición]
```
ToString(valor)
```
Parámetros [#parámetros]
| Nombre | Descripción | Tipo de datos |
| ------ | ---------------------------------------------------------------------------------------------------------------------------------------------------------------------------------------------------------------------------------------------------------------------------------------------------------------------------------------------------------- | ------------- |
| valor | Valor informado, a convertir en string.Si el valor es de tipo booleano, se devolverá 'true' cuando el valor sea verdadero, y 'false' cuando el valor sea falso.Si el es numérico, será convertido a string, utilizando siempre el punto para separar las posiciones decimales, si las hubiera.Si el valor ya es de tipo string, será devuelto sin cambios. | cualquiera |
Ejemplo de conversión de numérico a string [#ejemplo-de-conversión-de-numérico-a-string]
En este ejemplo se convierte una expresión numérica a string.
```
ToString(10 / 4)
```
El resultado será '2.5' (string)
Ejemplo de conversión de boolean a string [#ejemplo-de-conversión-de-boolean-a-string]
En este ejemplo se convierte una expresión numérica a string.
```
ToString(20 < 100)
```
El resultado será 'true' (string)
# Fundamental Concepts
This is where we'll break down the key terms that will make you a master of our platform. We know you're already an expert, but even geniuses need a solid foundation.

Instance [#instance]
An instance is a virtual server that provides online services. Unlike maintaining your own physical server, which is costly and inefficient, cloud providers maintain the hardware in their data centers and provide virtual access to resources through a cloud instance. These resources can be used to run compute-intensive tasks, such as containers, databases, microservices, and virtual machines.

Clients [#clients]
The platform is multi-tenant, meaning it allows the coexistence of multiple clients, each monitoring their own infrastructure, in virtually independent installations. However, with the appropriate permissions, the operator can access different clients' installations to facilitate support, configuration, and platform maintenance.
The multi-tenant architecture also maximizes data center infrastructure by hosting multiple clients on the same servers and minimizing associated maintenance tasks.
Find more information about how to manage your clients [here](/docs/configuracion-del-cliente/cliente).
To use the white labeling feature, follow the steps described in this [section](/docs/configuracion-global/marca-blanca).

Facilities [#facilities]
Each client can have their own facilities (branches, buildings, etc.), which can in turn be grouped into facility types (stores, residences, or any other categorization). The type classification can be used to present information in Dashboards. It is possible to associate an image for each facility type; these images will be reflected in the list on the right side of the monitor map.
Want to start creating facilities on the platform? Check this section. (To be created)

Devices [#devices]
In the IoT ecosystem, a device refers to any object or thing that has the ability to connect to the internet and communicate with other devices or systems. IoT devices can be physical devices such as sensors, cameras, smart lights, appliances, vehicles, medical devices, etc., or virtual devices such as online applications and services.
Learn about the entire device integration process [here](/docs/configuracion-del-cliente/dispositivos-y-endpoints).

Endpoints [#endpoints]
Endpoints are the variables associated with a specific device. A device can have one or many endpoints, which it can report jointly or independently to the platform.
We expand on endpoint information on this [page](/docs/configuracion-del-cliente/dispositivos-y-endpoints/endpoints).

Tanks [#tanks]
Tanks are entities within the platform used to quickly, simply, and accurately represent the operation of this type of asset in the field. This entity has associated volume, weight, and flow sensors, and allows defining the contained material, total capacity, as well as alert thresholds.
Learn more about tanks [here](/docs/configuracion-del-cliente/verticales/monitoreo-de-tanques).
_e5fc.png)
Dashboards [#dashboards]
A dashboard refers to a visual interface that displays real-time information about the performance and status of IoT devices and systems. It can provide information about a variety of metrics, such as energy consumption, temperature, humidity, pressure, speed, location, among others.
They are typically presented in the form of charts, tables, maps, and other visual elements, allowing users to understand and analyze information quickly and effectively. Some dashboards may also include alerts and notifications to indicate performance issues or anomalies, enabling users to take timely corrective action.
They are commonly used in a variety of applications, such as smart building management, industrial production monitoring, vehicle fleet management, smart agriculture, among others. In summary, an IoT dashboard is a valuable tool for visualizing and analyzing information collected by IoT devices and systems in real time.
_60d3.png)
Go to this [page](/docs/monitor/dashboards) to explore more about dashboards.

SCADA-Type Views [#scada-type-views]
These are **SCADA**-type visualizations that allow using a background image and then inserting data, graphic elements, alerts, and other components to create a highly useful visual tool for supervising and controlling an operation or production process.
Have questions about how to use SCADA-type views? Check this [section](/docs/monitor/vistas).

Alerts and Alarms [#alerts-and-alarms]
The platform is capable of receiving any alarm openings and closures. Additionally, the platform allows the creation of alerts, which can be configured to send notifications when the variable in question is outside the established parameters.
The system has different types of alarms for your devices, which can be configured to receive notifications via email, SMS, and voice calls.
It is worth noting that the alarms module can leverage all functionality related to Geozones, geolocation data, and instantaneous speed of vehicles with an installed tracker, as well as the time/duration factor, to generate specific alerts for each required use case.
Learn more about this feature [here](/docs/configuracion-del-cliente/alertas-y-alarmas).

Actions [#actions]
The platform enables the application of automation rules to optimize processes and resource usage. These are applied by modifying the state of a device in response to an event. Events can be calendar-based (hour, day, month) or variations in temperature, humidity, light level, device on/off, or any other variable being reported to the platform. The engine can be used to manage energy modes, trigger actions, or fire alerts.
It allows executing complex actions with code fully definable by the user.
Access to all devices, endpoints, etc., according to each user's rights.
Learn to configure actions [here](/docs/configuracion-del-cliente/acciones).
Scripting [#scripting]
The platform includes an internal scripting engine that allows extending existing functionality, as well as modifying its behavior, when it is necessary to add support for unsupported devices or create complex business rules. (Yes, you can create your own rules.)
Access all available scripting resources [here](/docs/herramientas-low-code-scripting).
Notifications [#notifications]
The platform includes a module responsible for configuring and sending notifications, such as emails and text messages. It handles sending email notifications to users for various reasons, such as open or closed alarms, scheduled reports, etc.
Access Tokens [#access-tokens]
When integration of platform services by external applications is required, access to the services requires obtaining a token known as an Access Token. It is possible to generate as many tokens as needed and assign the necessary permissions to each one. Likewise, it is possible to set the duration of Access Tokens and delete them if necessary.
Check this [page](/docs/configuracion-del-cliente/tokens-de-acceso-access-tokens) to learn how to create Access Tokens.

Geozones [#geozones]
This module allows the creation and management of geozones from the map tool or using coordinates (or both for greater precision). The geozone has an associated description, code, color, border thickness and opacity, and fill color and opacity. The geozone can be edited later.
It is possible to create "nested" geozones within larger geozones, or generate "overlapping" geozones and set alert rules that take into account the overlapping zone.
Go to this [page](/docs/apis-de-extraccion-de-datos/geozonas) to learn more about geozones.

Maps [#maps]
Our platform leverages the powerful Google Maps interface to provide you with an unparalleled location experience. We offer three distinct map types:
* **Device Map:** Here you can intuitively view the location of devices connected to our platform. This view provides a clear snapshot of how your devices are distributed across the terrain.
* **Facility Map:** This map allows you to explore the location and real-time information of facilities in detail.
* **Real-Time Tracking Map:** With this feature, you can track any type of moving assets in real time.
These maps, integrated with Google Maps functionality, are not only informative but also highly functional, allowing you to interact with your data efficiently and precisely.

Reports [#reports]
At the Core level, the platform provides a series of basic reports, which can then be extended in each vertical. In Cloud Studio, in particular, a large number of reports related to energy, inventory, etc. are added. The core reports module offers all the basic functionality of server-side pagination, tabular data downloads, PDF conversion, scheduled reporting (automated scheduled reports), and much more.
Learn more about reports [here](/docs/monitor/reportes).
Users and Permissions [#users-and-permissions]
Users belong to one or more groups that have associated permissions. This way, groups can be created that have exclusive access to certain sections and not others. These same permissions can be granted individually to each user.
Learn more about permissions [here](/docs/configuracion-del-cliente/seguridad/usuarios/permisos). To understand user creation, you can access this section. (To be created)
To audit your users' activity, you can use this tool. (To be created - **User activity log**)
Need a report sent to someone who isn't a user? Go [here](https://www.cloud.studio/contact/).
Learn to create an address book of contacts on this [page](/docs/configuracion-del-cliente/libreta-de-direcciones).
*Couldn't find the information you needed?* [*Contact us*](https://www.cloud.studio/contact-us/)
# Quick Start
If you've made it here, it's because you understand the power of digital transformation in your industry. Would you like to discover how **Cloud Studio**, through its Gear platform, is leading the digital transformation in the IoT space and maximizing the value of data?
Welcome! We'll explain everything you need to know right here.
About the Gear Platform [#about-the-gear-platform]

At **Cloud Studio**, our top priority is to catalyze innovation within the **IoT** space, through a perspective focused on the application layer within the complex **IoT ecosystem**. We recognize that true digital transformation emerges when collected data is transformed into concrete, high-value actions. Therefore, our primary mission is to provide a comprehensive, specialized solution dedicated to maximizing the value of this data, from ingestion and processing to visualization and decision-making.
Our platform takes responsibility for orchestrating data processing from the very moment it is published to the cloud or to the server selected by our clients, ensuring reliability and security at every stage.
At **Cloud Studio**, we combine the physical and digital worlds using our IoT platform to create scalable use cases that address real-life verticals, offering end-to-end solutions that are innovative and flexible. We are committed to improving business processes, optimizing resource usage, and generating a positive environmental impact.
Key Features of Gear [#key-features-of-gear]
_29e0.png)
The Gear platform offers a robust set of features designed to power your IoT strategy:
* **Advanced Data Ingestion:** With our powerful **MQTT Gateway** and flexible parsers, we ensure efficient reception and decoding of data from any device, regardless of its protocol or format.
* **Intuitive Visualization (Web SCADA):** Transform complex data into actionable information with our customizable dashboards and SCADA-type views, tailored to the needs of each role.
* **Comprehensive Notification System:** Stay informed with our multi-channel notification system (email, SMS, voice, WhatsApp), fully customizable and adaptable to your workflows.
* **Multi-Tenant Management:** Manage multiple clients and facilities from a single instance, with granular permission control and client-level customization.
* **Device Simulation (Confiana):** Accelerate development and testing with our Confiana simulator, which allows you to emulate the behavior of thousands of virtual devices and validate data ingestion in a controlled environment.
* **Low-Code Design:** Empower your teams to create and customize solutions with minimal programming, fostering multidisciplinary collaboration.
* **Robust Security:** We implement security best practices, including SSL encryption, granular authentication, Single Sign-On, and continuous vulnerability scanning.
Cutting-Edge Architecture [#cutting-edge-architecture]
The platform uses open, proven technologies designed for efficiency, scalability, and adaptability. Our architecture is based on modern principles:
* **Modular Monolith Backend:** A robust .NET backend, organized into decoupled business modules (such as `CloudStudio.Core` and `CloudStudio.Core.Gear`), offering the deployment simplicity of a monolith with the flexibility of a distributed architecture.
* **Library-Based Micro-Frontends:** The Angular frontend consists of a lightweight "shell" and independently compiled feature libraries (`common-gear`, `common-cloudstudio`), enabling autonomous development and dynamic assembly.
* **Database per Module (SQL Server):** We use SQL Server with a "Database per Module" strategy, isolating business domains to improve maintainability and scalability.
* **IoT Communication (MQTT):** Data ingestion is performed exclusively through MQTT, managed by our `MQTTGateway` service and specialized parsers that decode device payloads.
Cloud Studio's architecture is designed to be used on any type of system infrastructure according to client requirements.
There are two deployment modes:
* ***On-Premise***
* ***Cloud-Hosted (PaaS)***
All **Cloud Studio** installations take into account the following best practices regarding security and development standards:
* **VPN:** Remote access to the servers hosting the platform is only available through a Virtual Private Network, thus providing greater security.
* **Separate Servers:** The platform is prepared to be installed on an infrastructure with a load balancer, with separate web and database servers, among others.
* **Development Standards:** The entire system is developed based on best practices that comply with OWASP standards.
* **Vulnerability Scanning:** To ensure system security, external vulnerability scans have been performed, all of which have been successfully passed. Cloud Studio holds vulnerability certification against, among the most important: Cross-site scripting, SQL Injection, and Sensitive Data Exposure.


Multi-Tenancy [#multi-tenancy]
The platform has been conceived from its inception as a **multi-tenant** platform. This module is responsible for managing clients, their facilities (branches, buildings, etc.), and the administration of all associated permissions, enabling:
* One operator, multiple clients.
* Multiple facilities per client (branches, buildings, complexes, factories, etc.)
* Multiple areas or environments per site.
* Unified support and maintenance.
* Access permissions for each operator user and each tenant.
* Individual billing interfaces for each tenant.
* Interfaces for tenant account management from external systems (onboarding new tenants, suspension in case of debts, etc.)
Web SCADA [#web-scada]
We believe that a clear view of your processes is essential for better decision-making. That is why we have created a platform to help you break down the barriers between **SCADA** systems and create your own process representation, one that adapts to your needs and the way you think about your business.
With our system, you can easily create different views of the same information depending on the role and focus of the person viewing it. The result? Information that is easier to understand and more likely to lead to insights that improve your business.


*Check out all these **SCADA**-type views in our **Live Demo**. Access it* [*here*](https://gear.cloud.studio/gear/common/sign-up)*.*
Scalability [#scalability]
The platform's fundamental strategy is horizontal scaling:
* At the **application server level**, through the use of load balancers and multiple identical servers. The platform's code allows transparent horizontal growth, also ensuring that certain processes run on a single server at a time when necessary.
* At the **remote caching server level**, through the use of Redis in cluster mode. The application server software is natively prepared for this mode.
* At the **database server level**, through the use of SQL Server replicas, particularly for reporting and data analysis.
Application server, remote cache, and database hosting is done through IIS, in standard configurations available on *AWS, Microsoft Azure, and Google Cloud*, but can be used without changes in any other datacenter or on-premise hosting.
Extensibility [#extensibility]
A fully extensible platform, based on a plugin or "layer" system.
* Allows creating new verticals without affecting core functionality.
* Allows customizations in each project without affecting core or vertical functionality.
* Examples include reports, client-specific forms, external interfaces, etc.
* The API allows not only data injection/extraction but also the creation of external apps (the same API used by the platform's own applications).
* Designed for CRM/ERP integration.
Agnostic [#agnostic]
The platform is characterized by being independent in terms of both connectivity and hardware, which enables the creation of exceptional success stories by merging diverse technologies. This allows seamless integration of a wide range of devices, including those compatible with LoRaWAN, as well as legacy systems in operation, such as programmable logic controllers (PLCs), to name one example.
**Example architecture for an Industry 4.0 solution:**
_93d8.png)
Instance and Client White Labeling [#instance-and-client-white-labeling]
With our **white labeling** feature, we provide a customizable platform designed to create a unique user experience that reflects your brand identity. This feature provides the ability to adapt the platform to your specific needs by allowing customization of your logo, color palette, background image, and more.
For businesses that need to provide a customized platform experience for different clients within the same instance, we are proud to offer two levels of customization. The first level allows customization of the entire instance, while the second level provides client-level customization options.


MQTT Broker [#mqtt-broker]
Our platform offers an embedded **MQTT broker** that allows you to easily integrate devices and control them with a simple interface that supports payload decoders and downlinks.
Low Code [#low-code]
The platform stands out for being completely "low code." The platform's low-code capability ensures that solution development and customization are accessible to different user profiles, without requiring deep programming knowledge. This fosters collaboration between multidisciplinary teams, allowing professionals from various fields to actively contribute to the design and configuration of solutions.
Responsive [#responsive]
It is highly responsive, meaning it can be accessed from both the web and a mobile application. Users can access the platform from any device with an internet connection, whether it's a desktop computer, a tablet, or a smartphone. This provides flexibility and convenience to users, allowing them to access the platform and manage data from anywhere at any time.
Supported browsers are: Microsoft Edge, Google Chrome, Mozilla Firefox, and Safari.
For mobile application downloads, check this [page](https://www.cloud.studio/downloads/).
Security and Identities [#security-and-identities]
Security is a priority when developing Internet of Things projects, which is why the platform provides:
* Maximum granularity of user permissions.
* Encryption of all communications using 2048-bit SSL.
* Single sign-on, with third-party identification.
* Secure and open APIs with individual permissions for each application.
* LDAP: Authentication with credentials (username and password, email and password, etc.) specific to each organization.
We've reached the end of the introduction! You're probably wondering, what's next? [#weve-reached-the-end-of-the-introduction-youre-probably-wondering-whats-next]
> If you're not yet a client of ours, these links may be useful
>
> [Access Live Demos](https://gear.cloud.studio/gear/common/sign-up)
>
> [Licensing information](https://www.cloud.studio/precios/)
>
> [Support plan information](https://www.cloud.studio/support/)
>
> [Schedule a video call with us](https://calendly.com/joaquincervera)
>
> [Requirements and best practices](/docs/requisitos-y-buenas-practicas)
>
> If you are a client, we recommend starting with our platform's fundamental concepts page, [here](/docs/conceptos-fundamentales).
*Couldn't find the information you needed?* [*Contact us*](https://www.cloud.studio/contact/)
# Requirements and Best Practices
This section applies only to cases where the platform needs to be installed on third-party servers (On-Premises).
Minimum Infrastructure Requirements [#minimum-infrastructure-requirements]
\- Equivalent to t3.xlarge AWS.
\- 4 vCPUs - 2.5 GHz to 3.1 GHz
\- RAM: 16 GB
\- Disk space: At least 500GB
\- Operating System: Windows Server 2019 or higher (64-bit)
\- Database: SQL Server 2019 or higher (Web or Standard) (64-bit)
AWS Recommended Practices [#aws-recommended-practices]
* Elastic IP;
* Properly configured firewall, both in AWS and Windows Firewall / Windows Defender (**Never disable**):
* General rules should be configured by the client, Cloud Studio will add the specific rules;
* Using a default network is not recommended;
* AWS VPN;
* SQL Server: A dedicated server is recommended. In all cases, it must be Web or Enterprise, never Express.
* IIS installation: .NET 4.7, HTTP activation, HTTP redirection, and URL rewriting.
# Persistent Access Tokens
This API allows obtaining a token with administrator permissions, defining its lifetime.
Once generated, these tokens allow the invocation of various Back End Platform service APIs, enabling their use during the validity period of the obtained token.
Theory of operation [#theory-of-operation]
When integration of platform services is required by external applications, accessing these services requires obtaining a token known as an **Access Token.**
Access to and use of Platform services may be needed on a permanent or temporary basis.
The Platform's Authorization service includes two APIs for obtaining and deleting persistent tokens for these integration scenarios, detailed below.
Creating an Access Token [#creating-an-access-token]
Request [#request]
```
POST /services/gear/AuthorizationService.svc/CreateClientAccessTokenAllIntegrations
Host: gear.cloud.studio
```
Request Body [#request-body]
The request body is a JSON object with the format detailed below.
In this example, the creation and persistence of an Access Token is requested without specifying an expiration date, which in this case will default to 01/01/2099.
```
}
"clientAccessToken": {
"Description": "Testing 10",
"ClientID": 79
},
"login": {
"LoginType": 1,
"Email": "xxxxx.xxxxxxx@cloud.studio",
"Password": "xxxxxxxxxxx"
}
}
```
For cases where an expiration date is desired, the request body should be as detailed below, where an expiration field is added representing the moment when the Access Token should expire.
```
{
"clientAccessToken": {
"Description": "Testing 10",
"ClientID": 79
},
"login": {
"LoginType": 1,
"Email": "xxxxxx.xxxxxx@cloud.studio",
"Password": "xxxxxxxxx"
},
"expiration": 3600
}
```
Request Body Fields [#request-body-fields]
| Name | Description | Mandatory |
| ----------- | --------------------------------------------------------------------------------------------------------------------------------------------------- | --------- |
| Description | User-defined description generally detailing the purpose of the Access Token to be created, with a maximum of 255 characters. Unicode is supported. | Yes |
| clientID | Corresponds to the client identifier for which the token will be created. | Yes |
| LoginType | This field must contain the value 1, mandatorily. | Yes |
| EMail | Corresponds to the email of the account used to request the Access Token creation (\*). | Yes |
| Password | Corresponds to the password of the account used for the Access Token creation. | Yes |
| expiration | Corresponds to the time in minutes that the Access Token should be valid from the moment of its creation. | Yes |
**(\*) The permissions and privileges that the created Access Token possesses are inherited from the permissions and privileges of the user whose credentials are included in the request. Therefore, if the Access Token needs to have the same permissions as a platform administrator, the user used to execute the API must have such privileges.**
Response [#response]
The response for a correctly processed request will return an HTTP status code of 200 and contains the created **Access Token** as well as additional data about its expiration, the **associated client identifier (see Deleting an Access Token)**, and the submitted description.
```
{
"CreateClientAccessTokenAllIntegrationsResult": {
"AccessToken": "8e15e6d1-821a-4b71-a78d-8338e3307d2b",
"ClientAccessTokenID": 214,
"ClientID": 79,
"DateTimeCreated": {
"Date": {
"Day": 16,
"Month": 12,
"Year": 2022
},
"Time": {
"Hour": 18,
"Millisecond": 660,
"Minute": 38,
"Second": 33
}
},
"Description": "German Prueba 1",
"ExpirationDateTime": {
"Date": {
"Day": 1,
"Month": 1,
"Year": 2099
},
"Time": {
"Hour": 0,
"Millisecond": 0,
"Minute": 0,
"Second": 0
}
}
}
}
```
Important Considerations [#important-considerations]
The following exception scenarios may arise when using the API based on the following possible conditions of use.
Duplicate description [#duplicate-description]
Two consecutive Access Token creation requests **with identical content in the Description field** of the JSON object sent in the request will cause the request to fail.
Repeated incorrect credentials [#repeated-incorrect-credentials]
If three consecutive requests to the Access Token creation API are sent with incorrect credentials for the Email / Password pair, the request will fail and the response will contain the error message "*Please complete the captcha*".
If this situation occurs, it can be resolved by logging into the Platform front-end and performing the login operation with the correct Email and Password combination. In this case, Captcha validation will be requested.
Once the Captcha is correctly validated and the platform is successfully accessed, the API can be retried.
Deleting an Access Token [#deleting-an-access-token]
Request [#request-1]
```
POST /services/gear/AuthorizationService.svc/DeleteClientAccessToken
Host: gear.cloud.studio
```
Request Body [#request-body-1]
```
{
"accessToken": "99a4d0a4-932d-468b-9c17-49b5afdffb0d",
"clientAccessTokenID": 14
}
```
Request Body Fields [#request-body-fields-1]
| Name | Description | Mandatory |
| ------------------- | ----------------------------------------------------------------- | --------- |
| accessToken | Previously created Access Token to be deleted. | Yes |
| clientAccessTokenID | Client identifier associated with the Access Token to be deleted. | Yes |
Response [#response-1]
The response for a correctly processed deletion request will return an HTTP status code of 200 and an empty body. A response with an HTTP status code of 500 should be considered a failed request and will contain a body as detailed below.
Response body for a successful deletion request and response body for a failed request:
```
{}
```
```
{
"Exception": {
"ClassName": "ServiceException",
"FaultCode": "8001",
"FaultData": "",
"Message": "The access token is invalid or it doesn't have sufficient permissions to execute the requested operation"
}
}
```
Platform services and their respective APIs that can be used with persistent Access Tokens [#platform-services-and-their-respective-apis-that-can-be-used-with-persistent-access-tokens]
As an example, below are some of the services that can be used with an Access Token created by this API:
1-/services/gear/DashboardService.svc/GetDashboard
2-/services/core/AlarmService.svc/GetAlert
3-/services/gear/DeviceService.svc/CreateDeviceModel
4-/services/gear/DeviceService.svc/EditDeviceModel
5-/services/gear/DeviceService.svc/DeleteDeviceMod
# Instance Mapping API
Instance Mapping API [#instance-mapping-api]
**The API allows mapping the following variables within the environment:**
Client ID / Client Description / Facility ID / Facility Description / Device ID / Device Description / Address / Endpoint ID / Endpoint Description.
Note:
The API has a limitation of a maximum of 500 records (if not specified, it defaults to 100) to avoid impacting the environment's performance. Therefore, it must be executed multiple times to map the entire instance.
The user can execute the service as follows:
GET/api/v2/instance/mapping/\{SequenceNumber}?accessToken=\{accessToken}
Parameters [#parameters]
1. ***SequenceNumber*** = Sequence number. Starts at 0.
2. ***accessToken*** = Global Administrator Access Token
3. ***MaxFetchItems*** = Maximum number of elements to retrieve (Optional. Default 100, Maximum 500)
**Notes:**
The number of elements obtained may be larger since the API will return the owner entities of each entity, in the order (Client, Facility, Device, `Enpoint)` and, because of this, elements may repeat between executions.
**Theory of operation**
To obtain a detailed list of the instance (Endpoint, Device, Facility, Client) incrementally, the SequenceNumber field is used. This field is monotonically ascending, meaning that when changes occur in any entity, its SequenceNumber field will change to a value higher than any other entity. This allows retrieving data based on the SequenceNumber in small batches until no more data is obtained, and then continuing periodically to get updates. When the result of this API is an empty list, it means that there are currently no updates.
**Typically, an application consuming this API uses the following flow:**
1. The application starts using a stored SequenceNumber (typically in non-volatile storage). On the first execution, this value is 0.
2. The application executes the API using (stored SequenceNumber 0).
3. The application receives a list of entities, and the last SequenceNumber.
4. If the received list is empty, the application waits a few seconds and returns to step 2.
5. If the received list is not empty, the application stores the received SequenceNumber.
6. The application immediately returns to step 2.
7. When a new entity is created, or an existing one is modified, its SequenceNumber will immediately change to a value higher than the last received, so its information will be received immediately in the next execution.
**Request:**
GET:/api/v2/instance/mapping/{SequenceNumber}?accessToken={accessToken}&maxCount={MaxFetchItems} [#getapiv2instancemappingsequencenumberaccesstokenaccesstokenmaxcountmaxfetchitems]
Parameters [#parameters-1]
| It is mandatory to include the following parameters "SequenceNumber" and "accessToken". The "AccessToken" must be generated by a global administrator and the "SequenceNumber" will vary with each execution. |
| ------------------------------------------------------------------------------------------------------------------------------------------------------------------------------------------------------------- |
**Empty entity response:** when it returns empty after traversing all entities within an environment, the user can make the query again using 0 **"*****SequenceNumber*****"**.


**Note:**
**Important definitions.**
The complete tree will not be obtained until the entire instance has been mapped.
It will not be displayed sorted but it will be hierarchical.
Where there is no endpoint, nothing will be returned. Only the complete branch will be returned.
**Response:** The response contains the list of variables, as shown in this example:


# Data Extraction APIs
Introduction [#introduction]
This section explains how to extract data from the Gear Studio platform using the HTTP API, such as:
* [Alerts](/docs/apis-de-extraccion-de-datos/alertas): the API allows extracting the definition of all alerts created in the platform, filtering them in different ways.
* [Alarms](/docs/apis-de-extraccion-de-datos/alarmas): the API allows extracting all alarms recorded in the platform, historically, filtering them in different ways.
* [Endpoint data](/docs/apis-de-extraccion-de-datos/datos-de-endpoints): the API allows extracting all information associated with endpoints, historically, filtering it in different ways.
* [Geozones](/docs/apis-de-extraccion-de-datos/geozonas): the API allows extracting the list of geozones configured for each client, including the list of vehicles contained within them.
Getting Started [#getting-started]
Creating an access token [#creating-an-access-token]
As with any other HTTP integration, it is necessary to create an access token. [This page](/docs/configuracion-del-cliente/tokens-de-acceso-access-tokens) contains more information about managing access tokens. Access tokens allow controlling the access and permissions used for any operation.
Authentication using an access token [#authentication-using-an-access-token]
In all APIs, the access token can be sent as part of the header, using an Authorization header, as shown below:
```
Authorization: Bearer e54e0911-ece3-4b7a-b84d-afc01dfa81f1
```
Alternatively, when it is not possible to send the token through the Authorization header, the access token can be sent as part of the URL, through the "accessToken" parameter, as in the following example:
```
https://gear.cloud.studio/api/v2/alarms?accessToken=e54e0911-ece3-4b7a-b84d-afc01dfa81f1&clientID=4&maxCount=10
```
API Execution [#api-execution]
To execute the API, review each of the following sections, which contain the related information:
* [Extracting alerts](/docs/apis-de-extraccion-de-datos/alertas).
* [Extracting alarms](/docs/apis-de-extraccion-de-datos/alarmas).
* [Extracting endpoint data](/docs/apis-de-extraccion-de-datos/datos-de-endpoints).
* [Extracting geozone data](/docs/apis-de-extraccion-de-datos/geozonas).
# Client Configuration
The following sections present tutorials for the configurations offered by the Cloud Studio platform at the client level
# Access Tokens
The access token allows us to make requests via both [HTTP](/docs/configuracion-del-cliente/dispositivos-y-endpoints/dispositivos/integracion-de-dispositivos/http) and [MQTT](/docs/configuracion-del-cliente/dispositivos-y-endpoints/dispositivos/integracion-de-dispositivos/mqtt), as well as integrate other interfaces such as [The Things Network](/docs/configuracion-del-cliente/dispositivos-y-endpoints/dispositivos/integracion-de-dispositivos/lorawan-network-servers-lns/the-things-stack-ttn-tts). It is possible to generate as many tokens as needed and assign the required permissions to each one.
To generate an access token through the manager, navigate to the side menu and select access tokens. The manage access tokens - client window will appear, showing the list of tokens created for that client. Since no tokens have been created yet, press the add button to create a new token.

Once inside, fill in the **Description** field with the desired name. In the **Email** and **Password** fields, enter the credentials of your corresponding user, then press **Save**.
To manage token permissions in a more granular way, it is recommended to create a user exclusively for API usage, or even a different user for each token created.

A confirmation dialog will then appear asking whether you want to create the token with the current username and password. Press confirm.

Once confirmed, the token will be generated. Press **Back** to return and view the details of the created token.
Select the added token and choose the View Token option.

Enter the username and password.

The token is displayed and can now be copied.

# Additional Features
Introduction [#introduction]
**Additional Features** are advanced system functionalities specially designed to extend the tool's reach and provide greater platform customization and usage.
> These add-ons can be requested by clicking the "Request" button below each feature.

Instance-Level White Labeling [#instance-level-white-labeling]
The **White Labeling** feature gives users the ability to customize the platform, creating a unique usage experience that adapts to their brand identity. From this section, you can customize the logo in the menu, reports, notifications, and login screen. It also provides color palette selection, login screen background image, and chat and help page settings.
From this option, you can enable *instance-level White Labeling*. Learn more about how it works on this [page.](/docs/configuracion-global/marca-blanca)

Client-Level White Labeling [#client-level-white-labeling]
This advanced White Labeling feature enables platform customization for different clients within the same instance. Learn more about how it works on this [page.](/docs/configuracion-global/marca-blanca)
> **Notes:**
>
> * The Client White Labeling feature is not included in all subscription plans. Contact our [sales](https://bit.ly/3Oc8zpg) team for pricing and activation.
> * To request activation of this feature, Instance White Labeling must be enabled first.
_ba2c.png)
User Support [#user-support]
This feature enables integration with Tawk.to, also facilitating help menu customization. Once enabled, it can be used from the [White Labeling](/docs/configuracion-global/marca-blanca) menu.
From this option, the user can configure the appearance, availability, and options of the application's help chat.
> **Note:** It is important to remember that the plugin configuration is customizable so the user can create their own plugin application and, with the chat owner's ID, replace it to view it in both English and Spanish. The colors and texts customized by the user from Tawk.to will also be displayed there.
>
> When the user does not enter their own data, the user support button will not be visible.
>
> * To request activation of this feature, Instance White Labeling must be enabled first.

[Tawk.to](https://www.tawk.to/software/chat-pages/)

Mapping [#mapping]
This feature enables the display of Facility and Device maps in the monitor.
***Facility Map***
For more information about the *facility map*, check this [page.](/docs/monitor/mapa-de-instalaciones)

***Device Map***
For more information about the *device map*, check this [page.](/docs/monitor/mapa-de-dispositivos)

How to enable and disable maps? [#how-to-enable-and-disable-maps]
Once the feature is enabled from **Additional Features**, to modify the map views go to **Clients** in the *Global Configuration* menu.
Choose the client for which you want to modify the map views.
_7ad8.png)
Find the **Map Settings** tab and check the *Enable facility map* and *Enable device map* checkboxes. Select the checkboxes to show the maps and deselect them otherwise, then press the *Save* button.
***Maps enabled***

***Maps disabled***

> **Note:** If the feature is disabled, you will not be able to modify the checkboxes and you will see the Mapping title with an icon above them.

How to modify the location of Facilities and Devices on maps? [#how-to-modify-the-location-of-facilities-and-devices-on-maps]
***Facilities***
The location of Facilities can be specified as follows:
1\. Go to the *Client Configuration* menu, find the **Facilities** option, and select the *Facility* you want to edit.

2\. Once inside the *Facility* configuration, you can enter the location coordinates in the *Latitude* and *Longitude* fields.

3\. Press the *Save* button to see the location change on the map.
***Devices***
You can learn how to modify a device's location on the following [page](/docs/herramientas-low-code-scripting/referencia-de-objetos-disponibles-para-scripting/device).
Map Icons [#map-icons]
This feature enables customization of **Facility**, **Device, Tank**, and **Vehicle** icons on maps.
How to choose icons? [#how-to-choose-icons]
You will have several icon groups available to select for facilities, devices, and vehicles. From their configuration, you can choose the icon group that best suits your instance.
***Facility icon configuration***
Go to the *Client Configuration* menu, find the **Facilities** option, and select the *Facility* to edit.
_eb5b.png)
Select the desired icon group and press *Save* to display it on the map.
_b32d.png)
***Device icon configuration***
Go to the *Client Configuration* menu, find the **Device Models** option, and select the device to edit.
_9bd2.png)
Select the desired icon group and press *Save* to display it on the map.

Select the desired icon group and press *Save* to display it on the map.
***Vehicle icon configuration***
Go to the *Client Configuration* menu, find the **Fleet Tracking** option, enter *Vehicles*, and select the vehicle to edit.
Select the desired icon group and press *Save* to display it on the map.
_4f46.png)
***Tank icon configuration***
Go to the *Client Configuration* menu, find the **Tanks** option, and select the tank to edit.
Select the desired icon group and press *Save* to display it on the map.
_ea5d.png)
Extended Authentication [#extended-authentication]
This feature enables user authentication during the login process through external providers such as Auth0. To learn how the login process works, go to this [page](/docs/configuracion-global).
> * Configuring this feature requires having an Auth0 instance.
> * This instance can be provided by Cloud Studio or owned by a client. For more information, contact [contacto@cloud.studio](mailto:contacto@cloud.studio)
# Clients
The following sections describe how to manage clients, including their creation, modification, and deletion.

To access the specific configuration of a client, you can do so from the [Client](/docs/configuracion-del-cliente/cliente) menu.
# Global Configuration
The following sections present tutorials for the configurations offered by the Cloud Studio platform at the instance level. This section will be available only to environment administrators.
# General Parameters
From this section you can define and modify general parameters. This parameterization will apply to all existing clients within the instance in question.
The configurable parameters are:
* Action history retention period (in days)
* Automatic aggregation: maximum number of endpoints per round
* Captcha: Number of attempts before displaying it
* Default date range for dashboards. For example: "now-1h" or one hour ago
* Reports: default footer image
* Default time zone (Buenos Aires, Argentina)
* Account Administrator email address. For example: [info@cloud.studio](mailto:info@cloud.studio)
* Support email address. For example: [support@cloud.studio](mailto:support@cloud.studio)
* Prefix device names to endpoints. This option adds the device name before the endpoint to avoid having to manually modify the endpoint name and easily differentiate it from other endpoints. The option is "True" or "False".
* Geocoding: suffix for address resolution
* Accept future timestamp values up to (minutes): Example: 5
* Address used to send email notifications: [notifications@cloud.studio](mailto:notifications@cloud.studio)
* Name used to send email notifications: Cloud Studio Gear notifications
* Notifications: Email notification signature (EN). Example: Cloud Studio's team
* Notifications: Email notification signature (ES). Example: El equipo de Cloud Studio
* Number of SMTP accounts for sending emails. Example: 1
* SMTP server password used to send email notifications. The password must be written in base64 format
* SMTP server port used to send email notifications. For example: 587
* SMTP server used to send email notifications. For example: smtp.gmail.com
* SMTP server user used to send email notifications. For example: [notifications@cloud.studio](mailto:notifications@cloud.studio)
* Password rules: minimum length (characters). For example: 6
* Password rules: require lowercase characters. For example: False
* Password rules: require numbers. For example: False
* Password rules: require symbols. For example: False
* Password rules: require uppercase characters. For example: False
* Password recovery link validity (hours). For example: 24
* Endpoint view: default grouping. By group = 1, by category = 2 (default), by device = 3
# Low-Code Tools (Scripting)
Introduction [#introduction]
What are scripts? [#what-are-scripts]
Scripts are code snippets, written in JavaScript, that allow extending the platform's functionality, especially for device data processing, executing complex actions, or defining user-defined devices for which there is no native support in the platform.
What languages can scripts be written in? [#what-languages-can-scripts-be-written-in]
Currently, the Gear Studio platform allows writing scripts in JavaScript, which is a mature and widely known language, but support for other languages is planned for the future.
What are the limitations of scripts? [#what-are-the-limitations-of-scripts]
Scripts are extremely flexible and allow extending the platform easily. However, to prevent a poorly written or malicious script from negatively affecting the platform's performance, the following restrictions apply:
* Scripts are limited to a maximum execution time of 10 seconds.
* They are limited in memory usage, to prevent recursion issues.
* They can only use the objects described in the documentation.
Scripting Use Cases [#scripting-use-cases]
Actions [#actions]
To streamline the execution of specific business logic or perform custom actions, our platform offers the ability to use scripts that can collect, process, and store data, as well as trigger other actions within the platform environment. These scripts provide extraordinary flexibility for automating specific tasks, enabling greater efficiency and adaptability in process and operations management. Whether for advanced data analysis, triggering specific events, or simply customizing the user experience, scripts become an essential tool for optimizing your operations on our platform.
Device Configuration [#device-configuration]
When creating a new model for a device that is not natively supported by the platform, it is advisable to define some scripts that enhance the user experience and provide more functionality. The scripts will then be used by all devices of that model, which also saves a great deal of work, since it only needs to be done once.
For more information, see [this section](/docs/configuracion-del-cliente/dispositivos-y-endpoints/dispositivos/modelos-de-dispositivo/configuracion).
Data Conversion for LoRaWAN and MQTT Devices [#data-conversion-for-lorawan-and-mqtt-devices]
As part of a device model configuration, a script can be created for processing data received from it through LoRaWAN or MQTT. This allows:
* Processing each received payload (**uplink**)
* Updating the information of endpoints associated with the device, applying functions to convert data when necessary.
* Updating information about the device itself, such as RSSI levels, battery, etc., applying functions to convert data when necessary.
* Creating specific payloads intended for the device (**downlink**)
* Processing standard or custom commands defined in the Gear platform, and generating a payload with the format expected by the device.
For more information, see [this section](/docs/configuracion-del-cliente/dispositivos-y-endpoints/dispositivos/modelos-de-dispositivo/procesamiento-de-datos).
# 04/04/2022
Change Summary [#change-summary]
* API to report device geolocation [#](/docs/configuracion-del-cliente/dispositivos-y-endpoints/dispositivos)
* Maps
* Device maps [#](/docs/monitor/mapa-de-dispositivos)
* Facility maps [#](/docs/monitor/mapa-de-instalaciones)
* Alert severity [#](/docs/configuracion-del-cliente/alertas-y-alarmas)
* Notification report [#](/docs/monitor/reportes/listado-de-notificaciones)
# 07/03/2022
Change Summary [#change-summary]
* Actions concept [#](/docs/configuracion-del-cliente/acciones)
* Actions CRUD
* Create Actions
* Edit Actions
* Tags concept in Endpoints [#](/docs/configuracion-del-cliente/dispositivos-y-endpoints/endpoints/endpoint-tagging)
# 08-07-2022
For this production deployment, the following improvements and/or corrections suggested by the client were included:
* Device address change.
* In the Manager's device list, you will find the action in the three-dot menu called "Change address".

* A modal should open with a single text field that allows changing the device address. If the change is successful, the modal should close automatically and refresh the endpoint list.
* In case of an error, it should be displayed within the modal.

* Another way to change the "Address" is through scripts, located in Device > Device Models.

* Once inside "Edit script", proceed to modify the address as shown below:

* You can choose to change the address in either English or Spanish, depending on the language configured on the platform.

* Proceed to save the changes. A refresh of the endpoint list is required to view the new address.

* Informational alarms.
* Severity levels in alerts indicate the criticality associated with alarms. They are defined in the following security levels:
* There are 4 severity levels defined for alarms: **Info**, **low**, **medium**, and **high**.
In the alert CRUD, the severity level can be defined when creating an alert. Because of this, everywhere the alert is represented, for example in active alarm reports or alarm history, it will be represented according to the severity level with which the alert was created.

* The severity levels identified by colors are as follows:
* "Information" severity level is identified with the color **blue**.
* "Low" severity level is identified with the color **yellow**.
* "Medium" severity level is identified with the color **orange**.
* "High" severity level is identified with the color **red**.

# 18-07-2022
For this production deployment, the following improvements and/or corrections suggested by the client were included:
* Show view IDs on the views configuration screen:
* A new ID field was implemented within the "Views" configuration screen to keep them identified, making it easier to search for each one.

* Measurement Units for the Alerts feature:
* Units can be defined from the facilities. The unit values are those that will be displayed when creating an alert. For example, for Temperature, we select ([degrees C](https://www.e-medida.es/numero-2/oc-significa-grado-celsius-y-no-grado-centigrado/)).

* When adding an alert, start by selecting the Endpoint corresponding to the facility and the value being monitored. As an example, we can convert from ([degrees F](https://www.e-medida.es/numero-2/oc-significa-grado-celsius-y-no-grado-centigrado/)) to ([degrees C](https://www.e-medida.es/numero-2/oc-significa-grado-celsius-y-no-grado-centigrado/)), add the value, and select save.

* The next step to verify that the conversion was performed correctly is to edit that same alert and check the value.

Similarly, you can create an alert with any units, depending on your specific requirements.
* Monitor Dashboard adjustment:
* Fixed cases where a device that has an endpoint not receiving data no longer shows any information in the charts.
* Modified the historical comparison chart tooltip to now only show the highlighted endpoint for viewing detailed information.

* Endpoint data history report adjustment:
* Multi-select fields were configured to load deselected, requiring each select to be chosen individually. When the page loads, all multi-select fields will appear deselected:

When we select, in this case a client, and click outside the multi-select, we can see how the changes are saved.

# 21/02/2022
Change Summary [#change-summary]
* Clone action to variable type [#](/docs/configuracion-del-cliente/dispositivos-y-endpoints/dispositivos/tipos-de-variables/clonar-tipos-de-variables)
* When exporting reports as CSV, a separator is used based on the facility configuration
* Multi-Language Element
* Multi-Language Element in Dashboard CRUD
* Multi-Language Element in Endpoint descriptions
* Cacheable File Assets
* Margins in Widget Groups [#](/docs/monitor/dashboards/editar-grupos-y-widgets)
* Margins in Widgets [#](/docs/monitor/dashboards/editar-grupos-y-widgets)
* Map radius from Back-End
* Minimum map radius at client level [#](/docs/configuracion-del-cliente/cliente/configuracion-de-mapas)
* Thousands separator in Widgets (e.g., metrics), endpoint screen, views, etc. [#](/docs/monitor/reportes/exportar-reportes-como-csv-usando-el-separador-correspondiente-al-facility)
* Discrete variables in Endpoint states with images, in Views [#](/docs/monitor/vistas/estados-de-endpoints-con-imagen-asociado-a-variables-discretas)
# Deployments
Deployment and release log for the Cloud Studio IoT Gear platform.
# General Maintenance
The **General Maintenance** section of the *Settings* module provides a set of diagnostic and monitoring tools that allow the administrator to obtain an overview of the instance's operational status. It includes:
**Endpoint summary** registered in the instance.
**Current service status** of the platform.
**User activity log**, useful for auditing and traceability.
**System information**, such as server resources and environment variables.
**Scheduled tasks** that are active and their status.
**Notification queue** pending delivery.
**Notification recipient list** of active notifications.
**Health checks** to ensure the platform's operational integrity.
This section is essential for maintaining operational control of the platform and anticipating potential technical incidents.
# User Activity Log
The user activity log report (**User Activity Log**) provides a clear and concise view of user interactions within the platform. It offers detailed visibility into actions performed by users with the different applications and available environments, serving as a key tool for auditing, control, and operational analysis.
To run this report, you must specify the **activity date** parameters, which -- as with all reports -- can be set to a from and to date, for today, the previous day, the last 7 days, the last 14 days, the last 30 days, or the current month) and the **activities** you want to list.

Once the query is executed, results are displayed in a table with the following information:
**Date/Time**: The moment the event was recorded.
**User**: Identifier of the user who performed the action.
**Application**: Module or application where the action was performed.
**Client**: Identification of the client where the action was performed.
**Facility**: Identification of the client's Facility where the action was performed.
**Category**: The event performed.
The report results can be exported in the following formats:
* Excel (.xlsx)
* PDF (.pdf)

Additionally, a report header and footer can be configured, as well as the file name.


# Monitor
This platform module provides tools for visualizing, analyzing, and operating devices connected to the platform. The platform offers different ways to visualize data such as dashboards, maps, and SCADA-type views.
# Device Map
The device map allows you to view all client devices that the user has permissions for.
To enable this feature and display the device screen in the monitor, you need to configure the permission by checking the "Enable device map" option as shown in the following image.
{/* Imagen pendiente */}
The side panel lists all client devices and shows the status of each device based on alarms. It provides quick access to the views, dashboard, endpoints, and alarms of the facility where each device is located.
{/* Imagen pendiente */}
# Facility Map
Introduction [#introduction]
The facility map allows you to view all client facilities that the user has permissions for.
Enabling the facility map [#enabling-the-facility-map]
To enable this feature and display the facility screen in the monitor, you need to configure the client permission by checking the "Enable facility map" option as shown in the following image.

The side panel lists all client facilities and shows the status of each facility based on alarms. It provides quick access to the views, dashboard, endpoints, and alarms for each facility.
{/* Imagen pendiente */}
# Alarms
Introduction [#introduction]
This section explains how to extract the definition of alarms generated from alerts in the Gear Studio platform, using the data extraction API. These alarms are generated when certain predefined alert conditions are met. When values return to normal, the alarms are automatically closed.
To query alarms, the alarm data type is used, whose documentation can be found [here](/docs/apis-de-extraccion-de-datos/alarmas/tipo-de-datos-alarm).
There are three mechanisms for obtaining alarm information:
* Get data for a specific alert by its ID, as explained [here](/docs/apis-de-extraccion-de-datos/alarmas/obtener-una-alarma-dado-su-id).
* Get information for all alerts associated with an endpoint, device, facility, or client. Documentation can be found [here](/docs/apis-de-extraccion-de-datos/alarmas/obtener-una-lista-de-alarmas-utilizando-parametros).
* Get information for all alerts associated with an endpoint, device, facility, or client, incrementally. Documentation can be found [here](/docs/apis-de-extraccion-de-datos/alarmas/obtener-una-lista-de-alarmas-en-forma-incremental).
# Get an alarm by its ID
This API allows retrieving an alarm by its ID.
Request [#request]
```
GET /api/v2/alarms/{alarmID} HTTP/1.1
Host: gear.cloud.studio
Authorization: Bearer {accessToken}
```
Parameters [#parameters]
| Name | Description |
| ----------- | ---------------------------------------------------------------------------------------------------------------------------------------------------------------------------------------------- |
| accessToken | Access token with permissions to read alarm information. See this page for more information. The access token can also be sent as part of the query string, using the "accessToken" parameter. |
| alarmID | Unique identifier of the alarm for which information is requested. |
Response [#response]
The response contains the specified alarm, as shown in this example:
```
{
"AlarmID": 1266896,
"DeviceID": 7370,
"DeviceDescription": "Controlador RUPANCO",
"EndpointID": 0,
"AlarmTypeID": 1,
"AlarmTypeDescription": "Dispositivo fuera de línea",
"AlarmSeverityID": 3,
"AlarmSeverityDescription": "Alta",
"Details": "",
"DateTimeCreated_UTC": "2021-10-15T17:34:35",
"DateTimeClosed_UTC": "2021-10-15T18:21:39",
"SequenceNumber": 28885207,
"MTTRMinutes": 47.0
}
```
# Get a list of alarms incrementally
This API allows retrieving a list of alarms incrementally. This enables fast updates of alarms as they are opened or closed without needing to retrieve the full list.
Theory of operation [#theory-of-operation]
To obtain a list of alarms incrementally, the SequenceNumber field is used. This field is monotonically ascending, meaning that when changes occur in an alarm, its SequenceNumber field will change to a value higher than any other alarm. This allows retrieving data based on the SequenceNumber in small batches until no more data is obtained, and then continuing periodically to get updates. When the result of this API is an empty list, it means that there are currently no updates.
Typically, an application consuming this API uses the following flow:
1. The application starts using a stored SequenceNumber (typically in non-volatile storage). On the first execution, this value is 1.
2. The application executes the API using (stored SequenceNumber + 1).
3. The application receives a list of alarms, sorted by SequenceNumber.
4. If the received list is empty, the application waits a few seconds and returns to step 2.
5. If the received list is not empty, the application stores the highest SequenceNumber received.
6. The application immediately returns to step 2.
7. When a new alarm is opened, or an existing one is modified, its SequenceNumber will immediately change to a value higher than the last received, so its information will be received immediately in the next execution.
8. Any element received with the DateTimeClosed\_UTC property having a non-null and non-empty value indicates that the alarm has already been closed.
| In the flow above, it is assumed that the application always executes the API with the same set of clientID, facilityID, deviceID, and endpointID parameters. If different parameters are desired, the search must start from zero. |
| ----------------------------------------------------------------------------------------------------------------------------------------------------------------------------------------------------------------------------------- |
| For debugging any application using this API, it is recommended to use maxCount = 1, to receive updates one at a time. This parameter can later be changed to a more practical value for production, such as 50. |
| ---------------------------------------------------------------------------------------------------------------------------------------------------------------------------------------------------------------- |
Request [#request]
```
GET /api/v2/alarms/incremental/{sequenceNumber}?clientID={clientID}&facilityID={facilityID}&deviceID={deviceID}&endpointID={endpointID}&maxCount={maxCount} HTTP/1.1
Host: gear.cloud.studio
Authorization: Bearer {accessToken}
```
Parameters [#parameters]
| Name | Description |
| -------------- | ---------------------------------------------------------------------------------------------------------------------------------------------------------------------------------------------- |
| accessToken | Access token with permissions to read alarm information. See this page for more information. The access token can also be sent as part of the query string, using the "accessToken" parameter. |
| sequenceNumber | Value of the SequenceNumber field from the last alarm received. Use 0 to start from the beginning. |
| clientID | Optional identifier indicating that only alarms for the given client should be retrieved. |
| facilityID | Optional identifier indicating that only alarms for the given facility should be retrieved. |
| deviceID | Optional identifier indicating that only alarms for the given device should be retrieved. |
| endpointID | Optional identifier indicating that only alarms for the given endpoint should be retrieved. |
| maxCount | Optional parameter indicating the maximum number of records to include in the result. Values greater than 500 are limited to 500 regardless of the value sent in the request. |
| It is mandatory to include one (and only one) of the parameters "clientID", "facilityID", "deviceID", or "endpointID". |
| ---------------------------------------------------------------------------------------------------------------------- |
Response [#response]
The response contains the list of matching alarms, as shown in this example:
```
[
{
"AlarmID": 1266896,
"DeviceID": 7370,
"DeviceDescription": "Controlador RUPANCO",
"AlarmTypeID": 1,
"AlarmTypeDescription": "Dispositivo fuera de línea",
"AlarmSeverityID": 3,
"AlarmSeverityDescription": "Alta",
"DateTimeCreated_UTC": "2021-10-15T17:34:35",
"DateTimeClosed_UTC": "2021-10-15T18:21:39",
"SequenceNumber": 28885207,
"MTTRMinutes": 47.0
},
{
"AlarmID": 1266922,
"DeviceID": 7370,
"DeviceDescription": "Controlador RUPANCO",
"AlarmTypeID": 1,
"AlarmTypeDescription": "Dispositivo fuera de línea",
"AlarmSeverityID": 3,
"AlarmSeverityDescription": "Alta",
"DateTimeCreated_UTC": "2021-10-15T19:36:41",
"DateTimeClosed_UTC": "2021-10-15T19:37:23",
"SequenceNumber": 28885384,
"MTTRMinutes": 47.0
},
{
"AlarmID": 1266950,
"DeviceID": 7370,
"DeviceDescription": "Controlador RUPANCO",
"AlarmTypeID": 1,
"AlarmTypeDescription": "Dispositivo fuera de línea",
"AlarmSeverityID": 3,
"AlarmSeverityDescription": "Alta",
"DateTimeCreated_UTC": "2021-11-16T19:49:35",
"DateTimeClosed_UTC": "2021-11-16T19:49:46",
"SequenceNumber": 28948817,
"MTTRMinutes": 47.0
}
]
```
# Get a list of alarms using parameters
This API allows retrieving a list of alarms using parameters.
Request [#request]
```
GET /api/v2/alarms?clientID={clientID}&facilityID={facilityID}&deviceID={deviceID}&endpointID={deviceID}&maxCount={maxCount} HTTP/1.1
Host: gear.cloud.studio
Authorization: Bearer {accessToken}
```
Parameters [#parameters]
| Name | Description |
| ----------- | ---------------------------------------------------------------------------------------------------------------------------------------------------------------------------------------------- |
| accessToken | Access token with permissions to read alarm information. See this page for more information. The access token can also be sent as part of the query string, using the "accessToken" parameter. |
| clientID | Optional identifier indicating that only alarms for the given client should be retrieved. |
| facilityID | Optional identifier indicating that only alarms for the given facility should be retrieved. |
| deviceID | Optional identifier indicating that only alarms for the given device should be retrieved. |
| dateFrom | Date from which alarms for the given device should be retrieved. |
| dateTo | Date until which alarms for the given device should be retrieved. |
| endpointID | Optional identifier indicating that only alerts for the given endpoint should be retrieved. |
| state | Alarm state identifier. Possible values are "open", "closed", and "all". |
| maxCount | Optional parameter indicating the maximum number of records to include in the result. Values greater than 500 are limited to 500 regardless of the value sent in the request. |
| It is mandatory to include one (and only one) of the parameters "clientID", "facilityID", "deviceID", or "endpointID". |
| ---------------------------------------------------------------------------------------------------------------------- |
Response [#response]
The response contains the list of matching alarms, as shown in this example:
```
[
{
"AlarmID":1266896,
"DeviceID":7370,
"DeviceDescription":"Controlador RUPANCO",
"EndpointID":0,
"AlarmTypeID":1,
"AlarmTypeDescription":"Dispositivo fuera de línea",
"AlarmSeverityID":3,
"AlarmSeverityDescription":"Alta",
"Details":"",
"DateTimeCreated_UTC":"2021-10-15T17:34:35",
"DateTimeClosed_UTC":"2021-10-15T18:21:39",
"SequenceNumber":28885207,
"MTTRMinutes":47.0
},
{
"AlarmID":1266922,
"DeviceID":7370,
"DeviceDescription":"Controlador RUPANCO",
"EndpointID":0,
"AlarmTypeID":1,
"AlarmTypeDescription":"Dispositivo fuera de línea",
"AlarmSeverityID":3,
"AlarmSeverityDescription":"Alta",
"Details":"",
"DateTimeCreated_UTC":"2021-10-15T19:36:41",
"DateTimeClosed_UTC":"2021-10-15T19:37:23",
"SequenceNumber":28885384,
"MTTRMinutes":47.0
}
]
```
# Alarm data type
Introduction [#introduction]
The alarm data type allows obtaining alarm information. Below are all the properties of the alarm data type.
Properties [#properties]
\### AlarmID (int) The AlarmID property represents the unique identifier of the alarm in the platform. This identifier is automatically assigned when an alarm is created. ### DeviceID (int) The DeviceID property represents the unique identifier of the device that triggers the alarm. ### EndpointID (int) Unique identifier of the endpoint to which the alert corresponds. ### AlarmTypeID (int) The AlarmTypeID property indicates the type of alarm. ### AlarmTypeDescription (string) Description of the alarm type. Used only for listing or enumeration. ### AlarmSeverityID (int)
Indicates the severity of the alarm. Corresponds to one of the following values:
* **Information = 0:** Informational, no severity;
* **Low = 1:** Low alarm severity;
* **Medium = 2:** Medium severity;
* **High = 3:** Critical alarm, high severity.
\### AlarmSeverityDescription (string) Description of the alarm severity. ### Details (string) Details associated with the alarm. ### DateTimeCreated\_UTC (string) Date and time of alarm creation (UTC) in String format. ### DateTimeClosed\_UTC (string) Date and time of alarm closure (UTC) in String format. ### SequenceNumber (long) Sequence number associated with the alarm. The sequence number is updated with a higher number each time the alarm is modified in any way, including when it is closed. Each alarm is guaranteed to receive a number higher than any other.
# Alerts
Introduction [#introduction]
This section explains how to extract the definition of alerts created in the Gear Studio platform using the data extraction API. Alerts allow defining conditions that, once met, generate the corresponding alarms. When values return to normal, previously created alarms are automatically closed.
To report alerts, the alert data type is used, whose documentation can be found [here](/docs/apis-de-extraccion-de-datos/alertas/tipo-de-datos-alert).
There are three mechanisms for obtaining alert information:
* Get data for a specific alert by its ID, as explained [here](/docs/apis-de-extraccion-de-datos/alertas/obtener-una-alerta-dado-su-id).
* Get information for all alerts associated with an endpoint, device, facility, or client. Documentation can be found [here](/docs/apis-de-extraccion-de-datos/alertas/obtener-una-lista-de-alertas-utilizando-parametros).
* Get information for all alerts associated with an endpoint, device, facility, or client, incrementally. Documentation can be found [here](/docs/apis-de-extraccion-de-datos/alertas/obtener-una-lista-de-alertas-en-forma-incremental).
# Get an alert by its ID
This API allows retrieving an alert by its ID.
Request [#request]
```
GET /api/v2/alerts/{alertID} HTTP/1.1
Host: gear.cloud.studio
Authorization: Bearer {accessToken}
```
Parameters [#parameters]
| Name | Description |
| ----------- | ---------------------------------------------------------------------------------------------------------------------------------------------------------------------------------------------- |
| accessToken | Access token with permissions to read alert information. See this page for more information. The access token can also be sent as part of the query string, using the "accessToken" parameter. |
| alertID | Unique identifier of the alert for which information is requested. |
Response [#response]
The response contains the specified alert, as shown in this example:
```
{
"AlertID": 211,
"VariableTypeID": 1,
"EndpointID": 114092,
"ConditionType": 3,
"Threshold": 25,
"ClientID": 4,
"FacilityID": 184,
"NormalConditionType": 6,
"NormalThreshold": 24,
"MinimumDurationSeconds": 300,
"NotificationEmails": [
"someone@somewhere.com"
],
"NotificationSMSNumbers": [
"+1123456789"
],
"NotificationVoiceNumbers": [
"+1123456789"
],
"Tags": [
"default",
"gateway-default"
],
"SequenceNumber": 45701485,
"Enabled": true,
"Schedules": [
{
"Days": [
1,
2,
4,
5
],
"StartTime": {
"Hour": 0,
"Millisecond": 0,
"Minute": 0,
"Second": 0
},
"EndTime": {
"Hour": 23,
"Millisecond": 999,
"Minute": 0,
"Second": 59
}
}
],
"Timezone": {
"CurrentOffsetMinutes": -180,
"TimeZoneCode": "america/argentina/buenos_aires"
}
}
```
# Get a list of alerts incrementally
This API allows retrieving a list of alerts incrementally. This enables fast updates of alerts as they are created, modified, or deleted, without needing to retrieve the full list.
Theory of operation [#theory-of-operation]
To obtain a list of alerts incrementally, the SequenceNumber field is used. This field is monotonically ascending, meaning that when creating, modifying, or deleting an alert, its SequenceNumber field will change to a value higher than any other alert. This allows retrieving data based on the SequenceNumber in small batches until no more data is obtained, and then continuing periodically to get updates. When the result of this API is an empty list, it means that there are currently no updates.
Typically, an application consuming this API uses the following flow:
1. The application starts using a stored SequenceNumber (typically in non-volatile storage). On the first execution, this value is 1.
2. The application executes the API using (stored SequenceNumber + 1).
3. The application receives a list of alerts, sorted by SequenceNumber.
4. If the received list is empty, the application waits a few seconds and returns to step 2.
5. If the received list is not empty, the application stores the highest SequenceNumber received.
6. The application immediately returns to step 2.
7. When a new alert is created, or an existing one is modified, its SequenceNumber will immediately change to a value higher than the last received, so its information will be received immediately in the next execution.
8. Any element received with the Enabled property set to false indicates that the element has been deleted. If the Enabled property is true, it indicates that the element has just been created or modified.
| In the flow above, it is assumed that the application always executes the API with the same set of clientID, facilityID, deviceID, and endpointID parameters. If different parameters are desired, the search must start from zero. |
| ----------------------------------------------------------------------------------------------------------------------------------------------------------------------------------------------------------------------------------- |
| For debugging any application using this API, it is recommended to use maxCount = 1, to receive updates one at a time. This parameter can later be changed to a more practical value for production, such as 50. |
| ---------------------------------------------------------------------------------------------------------------------------------------------------------------------------------------------------------------- |
Request [#request]
```
GET /api/v2/alerts/incremental/{sequenceNumber}?clientID={clientID}&facilityID={facilityID}&deviceID={deviceID}&endpointID={endpointID}&maxCount={maxCount} HTTP/1.1
Host: gear.cloud.studio
Authorization: Bearer {accessToken}
```
Parameters [#parameters]
| Name | Description |
| -------------- | ---------------------------------------------------------------------------------------------------------------------------------------------------------------------------------------------- |
| accessToken | Access token with permissions to read alert information. See this page for more information. The access token can also be sent as part of the query string, using the "accessToken" parameter. |
| sequenceNumber | Value of the SequenceNumber field from the last alert received. Use 0 to start from the beginning. |
| clientID | Optional identifier indicating that only alerts for the given client should be retrieved. |
| facilityID | Optional identifier indicating that only alerts for the given facility should be retrieved. |
| deviceID | Optional identifier indicating that only alerts for the given device should be retrieved. |
| endpointID | Optional identifier indicating that only alerts for the given endpoint should be retrieved. |
| maxCount | Optional parameter indicating the maximum number of alerts to include in the result. |
| It is mandatory to include one (and only one) of the parameters "clientID", "facilityID", "deviceID", or "endpointID". |
| ---------------------------------------------------------------------------------------------------------------------- |
Response [#response]
The response contains the list of matching alerts, as shown in this example:
```
[
{
"AlertID": 211,
"VariableTypeID": 1,
"EndpointID": 114092,
"ConditionType": 3,
"Threshold": 25,
"ClientID": 4,
"FacilityID": 184,
"NormalConditionType": 6,
"NormalThreshold": 24,
"MinimumDurationSeconds": 300,
"NotificationEmails": ["someone@somewhere.com"],
"NotificationSMSNumbers": ["+1123456789"],
"NotificationVoiceNumbers": ["+1123456789"],
"Tags": ["default", "gateway-default"],
"SequenceNumber": 45701485,
"Enabled": true,
"Schedules": [],
"Timezone": {
"CurrentOffsetMinutes": -180,
"TimeZoneCode": "america/argentina/buenos_aires"
}
},
{
"AlertID": 212,
"VariableTypeID": 1,
"EndpointID": 114092,
"ConditionType": 5,
"Threshold": 20,
"ClientID": 4,
"FacilityID": 184,
"NormalConditionType": 3,
"NormalThreshold": 22,
"MinimumDurationSeconds": 300,
"NotificationEmails": ["someone@somewhere.com"],
"NotificationSMSNumbers": ["+1123456789"],
"NotificationVoiceNumbers": ["+1123456789"],
"Tags": ["default", "gateway-default"],
"SequenceNumber": 45701485,
"Enabled": true,
"Schedules": [
{
"Days": [
1,
2,
4,
5
],
"StartTime": {
"Hour": 0,
"Millisecond": 0,
"Minute": 0,
"Second": 0
},
"EndTime": {
"Hour": 23,
"Millisecond": 999,
"Minute": 0,
"Second": 59
}
}
],
"Timezone": {
"CurrentOffsetMinutes": -180,
"TimeZoneCode": "america/argentina/buenos_aires"
}
}
]
```
# Get a list of alerts using parameters
This API allows retrieving a list of alerts using parameters.
Request [#request]
```
GET /api/v2/alerts?clientID={clientID}&facilityID={facilityID}&deviceID={deviceID}&endpointID={endpointID}&maxCount={maxCount} HTTP/1.1
Host: gear.cloud.studio
Authorization: Bearer {accessToken}
```
Parameters [#parameters]
| Name | Description |
| ----------- | ---------------------------------------------------------------------------------------------------------------------------------------------------------------------------------------------- |
| accessToken | Access token with permissions to read alert information. See this page for more information. The access token can also be sent as part of the query string, using the "accessToken" parameter. |
| clientID | Optional identifier indicating that only alerts for the given client should be retrieved. |
| facilityID | Optional identifier indicating that only alerts for the given facility should be retrieved. |
| deviceID | Optional identifier indicating that only alerts for the given device should be retrieved. |
| endpointID | Optional identifier indicating that only alerts for the given endpoint should be retrieved. |
| maxCount | Optional parameter indicating the maximum number of alerts to include in the result. |
| It is mandatory to include one (and only one) of the parameters "clientID", "facilityID", "deviceID", or "endpointID". |
| ---------------------------------------------------------------------------------------------------------------------- |
Response [#response]
The response contains the list of matching alerts, as shown in this example:
```
[
{
"AlertID": 211,
"VariableTypeID": 1,
"EndpointID": 114092,
"ConditionType": 3,
"Threshold": 25,
"ClientID": 4,
"FacilityID": 184,
"NormalConditionType": 6,
"NormalThreshold": 24,
"MinimumDurationSeconds": 300,
"NotificationEmails": ["someone@somewhere.com"],
"NotificationSMSNumbers": ["+1123456789"],
"NotificationVoiceNumbers": ["+1123456789"],
"Tags": ["default", "gateway-default"],
"SequenceNumber": 45701485,
"Enabled": true,
"Schedules": [],
"Timezone": {
"CurrentOffsetMinutes": -180,
"TimeZoneCode": "america/argentina/buenos_aires"
}
},
{
"AlertID": 212,
"VariableTypeID": 1,
"EndpointID": 114092,
"ConditionType": 5,
"Threshold": 20,
"ClientID": 4,
"FacilityID": 184,
"NormalConditionType": 3,
"NormalThreshold": 22,
"MinimumDurationSeconds": 300,
"NotificationEmails": ["someone@somewhere.com"],
"NotificationSMSNumbers": ["+1123456789"],
"NotificationVoiceNumbers": ["+1123456789"],
"Tags": ["default", "gateway-default"],
"SequenceNumber": 45701485,
"Enabled": true,
"Schedules": [
{
"Days": [
1,
2,
4,
5
],
"StartTime": {
"Hour": 0,
"Millisecond": 0,
"Minute": 0,
"Second": 0
},
"EndTime": {
"Hour": 23,
"Millisecond": 999,
"Minute": 0,
"Second": 59
}
}
],
"Timezone": {
"CurrentOffsetMinutes": -180,
"TimeZoneCode": "america/argentina/buenos_aires"
}
}
]
```
# Alert data type
Introduction [#introduction]
The alert data type allows obtaining the configuration of an alert. Below are all the properties of the alert data type.
Properties [#properties]
\### AlertID (int) The AlertID property represents the unique identifier of the alert in the platform. This identifier is automatically assigned when an alert is created. ### VariableTypeID (int enum)
The VariableTypeID property indicates the type of variable associated with the alert. For user-defined variables, the ID is always equal to or greater than 1000. For the predefined variable types in the platform, the values are as follows:
* Temperature = 1
* Humidity = 2,
* Light level = 3
* Setpoint = 4
* Volume = 5
* Active energy = 6
* Run time = 7
* Discrete sensor state = 8
* Dimmerization = 9
* Weight = 10
* Flow = 11
* Voltage = 12
* Current = 13
* Active power = 14
* Reactive power = 15
* Apparent power = 16
* Power factor = 17
* Pressure = 18
* Frequency = 19
* Ppm concentration = 20
* Mass/volume concentration = 21
* AQI = 22
* People flow = 23
* People count = 24
* Reactive energy = 25
* Apparent energy = 26
* Location = 27
\### EndpointID (int) Unique identifier of the endpoint to which the alert corresponds. ### FacilityID (int) Unique identifier of the facility to which the alert corresponds. ### ClientID (int) Unique identifier of the client to which the alert corresponds. ### ConditionType (int enum)
The ConditionType property indicates the type of condition applied for comparison with the Threshold field value to trigger the alert. The possible values are as follows:
* **Equal = 1**: the alert will trigger when the reported value equals the value specified in the Threshold field.
* **NotEqual = 2**: the alert will trigger when the reported value differs from the value specified in the Threshold field.
* **Greater = 3**: the alert will trigger when the reported value is greater than the value specified in the Threshold field.
* **GreaterOrEqual = 4**: the alert will trigger when the reported value is greater than or equal to the value specified in the Threshold field.
* **Lower = 5**: the alert will trigger when the reported value is less than the value specified in the Threshold field.
* **LowerOrEqual = 6**: the alert will trigger when the reported value is less than or equal to the value specified in the Threshold field.
\### Threshold (double) Threshold used to activate the alert and generate the associated alarm. Used in conjunction with the ConditionType field. ### NormalConditionType (int enum)
The NormalConditionType property indicates the type of condition applied for comparison with the NormalThreshold field value to close the alert. The possible values are as follows:
* **Equal = 1**: the alert will close when the reported value equals the value specified in the NormalThreshold field.
* **NotEqual = 2**: the alert will close when the reported value differs from the value specified in the NormalThreshold field.
* **Greater = 3**: the alert will close when the reported value is greater than the value specified in the NormalThreshold field.
* **GreaterOrEqual = 4**: the alert will close when the reported value is greater than or equal to the value specified in the NormalThreshold field.
* **Lower = 5**: the alert will close when the reported value is less than the value specified in the NormalThreshold field.
* **LowerOrEqual = 6**: the alert will close when the reported value is less than or equal to the value specified in the NormalThreshold field.
\### NormalThreshold (double) Threshold used to return to the normal condition and deactivate the alert. Used in conjunction with the NormalConditionType field. ### MinimumDurationSeconds (int) Minimum amount of time (in seconds) that the condition must be maintained before activating the alert. ### NotificationEmails (array of string) List of email addresses to which notifications will be sent when the alert is activated or deactivated. ### NotificationSMSNumbers (array of string) List of phone numbers to which SMS notifications will be sent when the alert is activated or deactivated. ### NotificationVoiceNumbers (array of string) List of phone numbers to which voice notifications will be sent when the alert is activated or deactivated. ### Tags (array of string) List of tags associated with the alert. ### SequenceNumber (int64) Sequence number associated with the alert. The sequence number is updated with a higher number each time the alert is modified in any way, including when the alert is deleted. Each created or modified alert is guaranteed to receive a number higher than any other existing alert. ### Enabled (bool) Indicates whether the alert can be used, or if it has been deleted. The value false indicates that the alert has been deleted. Deleted alerts can only be accessed through the API for [getting a list of alerts incrementally](/docs/apis-de-extraccion-de-datos/alertas/obtener-una-lista-de-alertas-en-forma-incremental).
# Endpoint Data
Introduction [#introduction]
This section explains how to extract endpoint data created in the Gear Studio platform using the data extraction API.
To query endpoint data, the EndpointData data type is used, whose documentation can be found [here](/docs/apis-de-extraccion-de-datos/datos-de-endpoints/tipo-de-datos-endpointdata).
There are two mechanisms for obtaining endpoint information:
* Get the information of a specific endpoint by its ID and a date range, as explained [here](/docs/apis-de-extraccion-de-datos/datos-de-endpoints/obtener-datos-de-un-endpoint-utilizando-su-id-y-parametros).
* Get information of all endpoints associated with an endpoint, device, facility, or client, incrementally. Documentation can be found [here](/docs/apis-de-extraccion-de-datos/datos-de-endpoints/obtener-datos-de-endpoints-en-forma-incremental).
# Get endpoint data using its ID and parameters
This API allows retrieving endpoint data using its ID and parameters.
Request [#request]
```
GET /api/v2/endpointData/?endpointID={endpointID}&dateFrom={dateFrom}&dateTo={dateTo}&maxCount={maxCount} HTTP/1.1
Host: gear.cloud.studio
Authorization: Bearer {accessToken}
```
Parameters [#parameters]
| Name | Description |
| ----------- | ------------------------------------------------------------------------------------------------------------------------------------------------------------------------------------------------- |
| accessToken | Access token with permissions to read endpoint information. See this page for more information. The access token can also be sent as part of the query string, using the "accessToken" parameter. |
| endpointID | Mandatory identifier indicating the endpoint from which data should be extracted. |
| dateFrom | Date from which endpoint data should be retrieved. |
| dateTo | Date until which endpoint data should be retrieved. |
| maxCount | Optional parameter indicating the maximum number of records to include in the result. Values greater than 500 are limited to 500 regardless of the value sent in the request. |
| The "endpointID" parameter is optional. |
| --------------------------------------- |
Response [#response]
The response contains the list of matching EndpointData, as shown in this example:
```
[
{
"EndpointID": 113653,
"Timestamp_UTC": "2021-10-15T22:51:19",
"Value": 18.91,
"SequenceNumber": 6683839
},
{
"EndpointID": 113653,
"Timestamp_UTC": "2021-10-15T23:01:25",
"Value": 16.93,
"SequenceNumber": 6683852
},
{
"EndpointID": 113653,
"Timestamp_UTC": "2021-10-15T23:11:28",
"Value": 16.97,
"SequenceNumber": 6683864
},
{
"EndpointID": 113653,
"Timestamp_UTC": "2021-10-15T23:41:36",
"Value": 16.93,
"SequenceNumber": 6683874
}
]
```
# Get the latest data from multiple Endpoints
This service allows querying **the latest recorded data** from up to **5 devices at the same time**, using a single call.
Its use is primarily recommended when you need to display real-time information from multiple sensors simultaneously, avoiding a specific call for each one, resulting in **time savings** and **reduced network traffic**.
To use this function, make a call to the API through a specific address using the GET method.
`GET /api/v2/endpointData/multiple`
For security purposes, an access key identifying the requesting user is required. This key is the [Access Token](/docs/apis-de-extraccion-de-datos/access-tokens-persistentes) and must be included as part of the address.
```
GET https://gear-dev.cloud.studio/api/v2/endpointData/multiple?accessToken=123456789-1110-0022-3333-987654321012&endpointIds=351031,151040,252340,511088,720510
```
If the access key is missing or invalid, the API will return an error.
This error is **401**, indicating **unauthorized access**.
The required parameters are:
* Access Key (Access Token): Key identifying an authorized user.
* It is a String type and is mandatory.
* EndpointsIDs: IDs of the device sensors separated by commas, for which data should be retrieved.
* It is a List type and is mandatory.
* **NOTE**: The limit of endpoints per call is 5 (five).
When more than 5 endpointIds are sent in the request, a **400** error will be received, indicating **Bad Request**, meaning the endpoint limit has been exceeded.
Once the request is correctly made, a **list of objects** (JSON) is received. Each object in the list will represent the information of one of the requested sensors.

The information in the list is as follows:
* **EndpointID**: Identification number of the queried sensor
* **Description**: Name of the queried sensor
* **SequenceNumber**: Sequential number indicating the order in which data was recorded (useful for tracking/history)
* **TimeStamp\_UTC**: Exact date and time of the lastValue recording
* **Value**: Last value reported by the sensor
If an endpoint has no data, the **Value and timeStamp** fields will be *null*.
**Note**: The addition of this functionality affects all endpoint data query methods, as they now include the *description* field.
The Camera endpoint is excluded.
# EndpointData data type
Introduction [#introduction]
The EndpointData data type allows obtaining the configuration of an Endpoint. Below are all the properties of the EndpointData data type.
Properties [#properties]
\### EndpointID (int) The EndpointID property represents the unique identifier of the Endpoint in the platform. This identifier is automatically assigned when an Endpoint is created. ### Timestamp\_UTC (string) UTC timestamp corresponding to the value, in String format. ### Value (double) Numeric representation of the value. Valid for all scalar Endpoints, as well as IAS Zones. ### IsOn (bool) Boolean indicating whether the Endpoint is turned on. Valid for appliances and dimmers. ### IsMoving (bool) Boolean indicating whether the closure is moving. Valid for closures. ### DimLevel (int) Dim level. Only valid for dimmers. ### Position (int) Position. Only valid for closure controllers. ### ActiveEnergy (double) Active energy delivery. Only valid for power meters. ### ReactiveEnergy (double) Reactive energy delivery. Only valid for power meters. ### ApparentEnergy (double) Apparent energy delivered. Only valid for power meters. ### SequenceNumber (int64) Sequence number associated with the alert. The sequence number is updated with a higher number each time the alert is modified in any way, including when the alert is deleted. Each created or modified alert is guaranteed to receive a number higher than any other existing alert.
# Geozones
Introduction [#introduction]
This section explains how to extract the definition of geozones created in the Gear Studio platform using the data extraction API. Geozones allow defining a polygon that can be used to create alerts when any location tracker enters or exits them.
Geozone information uses the geozone data type, whose documentation can be found [here](/docs/apis-de-extraccion-de-datos/geozonas/tipo-de-datos-geozone).
There are three mechanisms for obtaining geozone information:
* Get data for a specific geozone by its ID, as explained [here](/docs/apis-de-extraccion-de-datos/geozonas/obtener-una-geozona-dado-su-id).
* Get information for all geozones associated with a client. Documentation can be found [here](/docs/apis-de-extraccion-de-datos/geozonas/obtener-una-lista-de-geozonas-utilizando-parametros).
* Get information for all geozones associated with a client, incrementally. Documentation can be found [here](/docs/apis-de-extraccion-de-datos/geozonas/obtener-una-lista-de-geozonas-en-forma-incremental).
# Get a geozone by its ID
This API allows retrieving a geozone by its ID.
Request [#request]
```
GET /api/v2/geozones/{geozoneID} HTTP/1.1
Host: gear.cloud.studio
Authorization: Bearer {accessToken}
```
Parameters [#parameters]
| Name | Description |
| ----------- | ----------------------------------------------------------------------------------------------------------------------------------------------------------------------------------------- |
| accessToken | Access token with permissions to read geozone data. See this page for more information. The access token can also be sent as part of the query string, using the "accessToken" parameter. |
| geozoneID | Unique identifier of the geozone for which information is requested. |
Response [#response]
The response contains the specified geozone, as shown in this example:
```
{
"GeozoneID":35,
"ClientID":79,
"Description":"Hokkaido",
"ExternalCode":"3424",
"Polygon":{
"PolygonID":35,
"Points":[
[
43.93935551,
142.57453478
],
[
43.49469073,
143.60724962
],
[
43.06278289,
143.49738634
],
[
42.9020392,
142.92609728
],
[
42.96638711,
142.6624254
],
[
42.96638711,
142.17902696
],
[
42.9020392,
141.80549181
],
[
42.88594172,
141.49787462
],
[
43.06278289,
141.34406603
],
[
43.19107519,
141.6077379
],
[
43.36703768,
141.93732775
],
[
43.669774,
141.82746446
],
[
43.82849869,
142.02521837
],
[
43.90770318,
142.37678087
]
],
"BorderColor":0,
"BorderWidth":3,
"BorderOpacity":100.0,
"FillColor":0,
"FillOpacity":50.0
},
"Vehicles":[
{
"VehicleID":133,
"Description":"Asset 70",
"LicensePlate":"XD1320070"
},
{
"VehicleID":134,
"Description":"Asset 71",
"LicensePlate":"XD1320071"
},
{
"VehicleID":135,
"Description":"Asset 72",
"LicensePlate":"XD1320072"
},
{
"VehicleID":136,
"Description":"Asset 73",
"LicensePlate":"XD1320073"
},
{
"VehicleID":138,
"Description":"Asset 75",
"LicensePlate":"XD1320075"
},
{
"VehicleID":139,
"Description":"Asset 76",
"LicensePlate":"XD1320076"
},
{
"VehicleID":140,
"Description":"Asset 77",
"LicensePlate":"XD1320077"
},
{
"VehicleID":141,
"Description":"Asset 78",
"LicensePlate":"XD1320078"
},
{
"VehicleID":142,
"Description":"Asset 79",
"LicensePlate":"XD1320079"
}
],
"SequenceNumber":74017203,
"Enabled":true
}
```
# Get a list of geozones incrementally
This API allows retrieving a list of geozones incrementally. This enables fast updates of geozones as they are created, modified, or deleted, without needing to retrieve the full list.
Theory of operation [#theory-of-operation]
To obtain a list of geozones incrementally, the SequenceNumber field is used. This field is monotonically ascending, meaning that when creating, modifying, or deleting a geozone, its SequenceNumber field will change to a value higher than any other geozone. This allows retrieving data based on the SequenceNumber in small batches until no more data is obtained, and then continuing periodically to get updates. When the result of this API is an empty list, it means that there are currently no updates.
Typically, an application consuming this API uses the following flow:
1. The application starts using a stored SequenceNumber (typically in non-volatile storage). On the first execution, this value is 1.
2. The application executes the API using (stored SequenceNumber + 1).
3. The application receives a list of geozones, sorted by SequenceNumber.
4. If the received list is empty, the application waits a few seconds and returns to step 2.
5. If the received list is not empty, the application stores the highest SequenceNumber received.
6. The application immediately returns to step 2.
7. When a new geozone is created, or an existing one is modified, its SequenceNumber will immediately change to a value higher than the last received, so its information will be received immediately in the next execution.
8. Any element received with the Enabled property set to false indicates that the element has been deleted. If the Enabled property is true, it indicates that the element has just been created or modified.
| In the flow above, it is assumed that the application always executes the API with the same clientID. If different parameters are desired, the search must start from zero. |
| --------------------------------------------------------------------------------------------------------------------------------------------------------------------------- |
| For debugging any application using this API, it is recommended to use maxCount = 1, to receive updates one at a time. This parameter can later be changed to a more practical value for production, such as 50. |
| ---------------------------------------------------------------------------------------------------------------------------------------------------------------------------------------------------------------- |
| Important: the SequenceNumber property of geozones is not modified when vehicles enter or exit the geozone, but only when the geozone configuration changes, or when it is deleted. Therefore, this method cannot be used to incrementally track entry or exit events for the geozone. |
| -------------------------------------------------------------------------------------------------------------------------------------------------------------------------------------------------------------------------------------------------------------------------------------- |
Request [#request]
```
GET /api/v2/geozones/incremental/{sequenceNumber}?clientID={clientID}&maxCount={maxCount} HTTP/1.1
Host: gear.cloud.studio
Authorization: Bearer {accessToken}
```
Parameters [#parameters]
| Name | Description |
| -------------- | ------------------------------------------------------------------------------------------------------------------------------------------------------------------------------------------------ |
| accessToken | Access token with permissions to read geozone information. See this page for more information. The access token can also be sent as part of the query string, using the "accessToken" parameter. |
| sequenceNumber | Value of the SequenceNumber field from the last geozone received. Use 0 to start from the beginning. |
| clientID | Client identifier for which the list of geozones should be retrieved. |
| maxCount | Optional parameter indicating the maximum number of geozones to include in the result. |
Response [#response]
The response contains the list of matching geozones, as shown in this example:
```
[
{
"GeozoneID":35,
"ClientID":79,
"Description":"Hokkaido",
"ExternalCode":"3424",
"Polygon":{
"PolygonID":35,
"Points":[
[
43.93935551,
142.57453478
],
[
43.49469073,
143.60724962
],
[
43.06278289,
143.49738634
],
[
42.9020392,
142.92609728
],
[
42.96638711,
142.6624254
],
[
42.96638711,
142.17902696
],
[
42.9020392,
141.80549181
],
[
42.88594172,
141.49787462
],
[
43.06278289,
141.34406603
],
[
43.19107519,
141.6077379
],
[
43.36703768,
141.93732775
],
[
43.669774,
141.82746446
],
[
43.82849869,
142.02521837
],
[
43.90770318,
142.37678087
]
],
"BorderColor":0,
"BorderWidth":3,
"BorderOpacity":100.0,
"FillColor":0,
"FillOpacity":50.0
},
"Vehicles":[
{
"VehicleID":133,
"Description":"Asset 70",
"LicensePlate":"XD1320070"
},
{
"VehicleID":134,
"Description":"Asset 71",
"LicensePlate":"XD1320071"
},
{
"VehicleID":135,
"Description":"Asset 72",
"LicensePlate":"XD1320072"
},
{
"VehicleID":136,
"Description":"Asset 73",
"LicensePlate":"XD1320073"
},
{
"VehicleID":138,
"Description":"Asset 75",
"LicensePlate":"XD1320075"
},
{
"VehicleID":139,
"Description":"Asset 76",
"LicensePlate":"XD1320076"
},
{
"VehicleID":140,
"Description":"Asset 77",
"LicensePlate":"XD1320077"
},
{
"VehicleID":141,
"Description":"Asset 78",
"LicensePlate":"XD1320078"
},
{
"VehicleID":142,
"Description":"Asset 79",
"LicensePlate":"XD1320079"
}
],
"SequenceNumber":74017203,
"Enabled":true
},
{
"GeozoneID":36,
"ClientID":79,
"Description":"1",
"ExternalCode":null,
"Polygon":{
"PolygonID":36,
"Points":[
[
0.870633,
177.7532959
],
[
0.62895465,
178.34655762
],
[
1.34295563,
177.84118652
]
],
"BorderColor":0,
"BorderWidth":3,
"BorderOpacity":100.0,
"FillColor":0,
"FillOpacity":50.0
},
"Vehicles":[
],
"SequenceNumber":74017204,
"Enabled":true
},
{
"GeozoneID":37,
"ClientID":79,
"Description":"2",
"ExternalCode":null,
"Polygon":{
"PolygonID":37,
"Points":[
[
-1.26057944,
178.3026123
],
[
-0.35979988,
179.63195801
],
[
-0.62346182,
-179.34631348
]
],
"BorderColor":0,
"BorderWidth":3,
"BorderOpacity":100.0,
"FillColor":0,
"FillOpacity":50.0
},
"Vehicles":[
],
"SequenceNumber":74017205,
"Enabled":true
}
]
```
# Get a list of geozones using parameters
This API allows retrieving a list of geozones using parameters.
Request [#request]
```
GET /api/v2/geozones?clientID={clientID}&maxCount={maxCount} HTTP/1.1
Host: gear.cloud.studio
Authorization: Bearer {accessToken}
```
Parameters [#parameters]
| Name | Description |
| ----------- | ------------------------------------------------------------------------------------------------------------------------------------------------------------------------------------------------ |
| accessToken | Access token with permissions to read geozone information. See this page for more information. The access token can also be sent as part of the query string, using the "accessToken" parameter. |
| clientID | Client identifier for which the list of geozones should be retrieved. |
| maxCount | Optional parameter indicating the maximum number of geozones to include in the result. |
Response [#response]
The response contains the list of matching geozones, as shown in this example:
```
[
{
"GeozoneID":35,
"ClientID":79,
"Description":"Hokkaido",
"ExternalCode":"3424",
"Polygon":{
"PolygonID":35,
"Points":[
[
43.93935551,
142.57453478
],
[
43.49469073,
143.60724962
],
[
43.06278289,
143.49738634
],
[
42.9020392,
142.92609728
],
[
42.96638711,
142.6624254
],
[
42.96638711,
142.17902696
],
[
42.9020392,
141.80549181
],
[
42.88594172,
141.49787462
],
[
43.06278289,
141.34406603
],
[
43.19107519,
141.6077379
],
[
43.36703768,
141.93732775
],
[
43.669774,
141.82746446
],
[
43.82849869,
142.02521837
],
[
43.90770318,
142.37678087
]
],
"BorderColor":0,
"BorderWidth":3,
"BorderOpacity":100.0,
"FillColor":0,
"FillOpacity":50.0
},
"Vehicles":[
{
"VehicleID":133,
"Description":"Asset 70",
"LicensePlate":"XD1320070"
},
{
"VehicleID":134,
"Description":"Asset 71",
"LicensePlate":"XD1320071"
},
{
"VehicleID":135,
"Description":"Asset 72",
"LicensePlate":"XD1320072"
},
{
"VehicleID":136,
"Description":"Asset 73",
"LicensePlate":"XD1320073"
},
{
"VehicleID":138,
"Description":"Asset 75",
"LicensePlate":"XD1320075"
},
{
"VehicleID":139,
"Description":"Asset 76",
"LicensePlate":"XD1320076"
},
{
"VehicleID":140,
"Description":"Asset 77",
"LicensePlate":"XD1320077"
},
{
"VehicleID":141,
"Description":"Asset 78",
"LicensePlate":"XD1320078"
},
{
"VehicleID":142,
"Description":"Asset 79",
"LicensePlate":"XD1320079"
}
],
"SequenceNumber":74017203,
"Enabled":true
},
{
"GeozoneID":36,
"ClientID":79,
"Description":"1",
"ExternalCode":null,
"Polygon":{
"PolygonID":36,
"Points":[
[
0.870633,
177.7532959
],
[
0.62895465,
178.34655762
],
[
1.34295563,
177.84118652
]
],
"BorderColor":0,
"BorderWidth":3,
"BorderOpacity":100.0,
"FillColor":0,
"FillOpacity":50.0
},
"Vehicles":[
],
"SequenceNumber":74017204,
"Enabled":true
},
{
"GeozoneID":37,
"ClientID":79,
"Description":"2",
"ExternalCode":null,
"Polygon":{
"PolygonID":37,
"Points":[
[
-1.26057944,
178.3026123
],
[
-0.35979988,
179.63195801
],
[
-0.62346182,
-179.34631348
]
],
"BorderColor":0,
"BorderWidth":3,
"BorderOpacity":100.0,
"FillColor":0,
"FillOpacity":50.0
},
"Vehicles":[
],
"SequenceNumber":74017205,
"Enabled":true
}
]
```
# Geozone data type
Introduction [#introduction]
The geozone data type allows obtaining the configuration of a geozone. Below are all the properties of the geozone data type.
Properties [#properties]
\### GeozoneID (int) The GeozoneID property represents the unique identifier of the geozone in the platform. This identifier is automatically assigned when a geozone is created. ### ClientID (int) Unique identifier of the client to which the geozone corresponds. ### Description (string) Indicates the description of the geozone. ### ExternalCode (string) Indicates an optional external code for the geozone. ### Polygon (object)
Contains the information of the polygon associated with the geozone. The polygon properties are:
* **PolygonID** (int): unique identifier of the polygon.
* **Points** (number\[]\[]): array of coordinates, where each element of the array is a coordinate with its latitude and longitude.
* **BorderColor** (int): color used for the polygon border. Used when rendering the polygon on maps. Uses 24-bit RGB encoding.
* **BorderWidth** (int): width of the polygon border, in pixels.
* **BorderOpacity** (number): opacity of the polygon border, where 1 is completely opaque and 0 is completely transparent.
* **FillColor** (int): color used for the polygon fill. Used when rendering the polygon on maps. Uses 24-bit RGB encoding.
* **FillOpacity** (number): opacity of the polygon fill, where 1 is completely opaque and 0 is completely transparent.
\### Vehicles (object array)
Contains the information of vehicles currently located within the geozone. If no vehicle is within the geozone, the returned array will be empty. For each vehicle included in the array, the following data is provided:
* **VehicleID** (int): unique identifier of the vehicle.
* **Description** (string): description of the vehicle.
* **LicensePlate** (string): license plate number of the vehicle.
\### SequenceNumber (int64) Sequence number associated with the geozone. The sequence number is updated with a higher number each time the geozone configuration is modified, and when the geozone is deleted. Each created or modified geozone is guaranteed to receive a number higher than any other existing geozone. ### Enabled (bool) Indicates whether the geozone can be used, or if it has been deleted. The value false indicates that the geozone has been deleted. Deleted geozones can only be accessed through the API for [getting a list of geozones incrementally](/docs/apis-de-extraccion-de-datos/geozonas/obtener-una-lista-de-geozonas-en-forma-incremental).
# Triggers
Triggers can be created for actions based on any event, including ***Calendar and State*** events. For each trigger, the user interface typically offers two options:

**Calendar**: In this case, the list of days of the week on which the event will be activated is presented, along with the corresponding time.

**State:** This option is basically the same as the one used for defining the firing threshold in the case of alerts.

> **An action can have multiple triggers, which means its execution will begin when any of these triggers fires.**
Disabling triggers [#disabling-triggers]
There is an action-level attribute that allows enabling or disabling all triggers. When the attribute is **activated**, trigger execution **does NOT fire the action execution**, so the action can only be executed manually or as a consequence of alerts, if applicable.

Trigger repetition frequency in minutes
From the Actions screen, in the main menu, when configuring an action you can access the creation/editing of a trigger. If the trigger is selected to be of type "*Calendar*", you can configure it to repeat at a configurable interval of minutes until the end of the day.

**An example of this would be**: Configure it to run on Saturdays at 10:30pm, then set it to repeat at a 30-minute interval, so it will execute at the following times: 10:30pm, 11:00pm, and 11:30pm.
# Action Execution
Action execution is based on steps, and the set of these constitutes all the activities that are triggered when the action runs, regardless of whether the action is started manually or by any of its triggers.
Steps are executed in order, one after another, until the last one is completed.
> Regardless of the step type, for each step it is possible to indicate whether execution should continue in case of error, using the following attribute:
>
> **Continue on error:** this field indicates whether, in case errors occur when executing the step, the action should stop or continue to the next step. If this field is **enabled**, the error is logged, but **the action continues** with the execution of the next step. If the field is **disabled**, the error is logged and **the action stops** immediately.

# Actions
***Actions*** are sets of **steps** that can be executed manually or as a consequence of configured events.
Once an action starts, all associated steps are executed one after another in the established order until the sequence is completed.

Actions and scripting [#actions-and-scripting]
To begin creating **actions** on the platform, use the **Actions and scripting** menu to activate the action management module.

This module allows creating new actions, their steps, triggers, and also editing them.

Details [#details]
**Description**: This field allows entering a description that will be used to identify the new action in the system. This field is required.
**Maximum number of instances**: This ***numeric*** value indicates how many instances of the action can run simultaneously.
This can occur when any of the triggers fires (or the action is started manually, or in any other way) while the action is already running. The default value for this attribute is 1, indicating that if the action is already running, it cannot be started again.
**Enable triggers**: Determines whether **all** triggers for the action are enabled or disabled.
Steps [#steps]
The step types allowed in actions are the following:
* **Set value**: Allows changing the value of a variable to a given value.
* **Add value**: Allows incrementing the value of a variable.
* **Subtract value**: Allows decrementing a variable by a given value.
* **Turn On**: Allows changing the state of a sensor to on.
* **Turn Off**: Allows changing the state of a sensor to off.
* **Toggle**: Allows changing the state of a sensor from ON to OFF or vice versa.
* **Email notifications**: Allows sending messages via email to an address or list of addresses.
* **SMS notifications**: Allows sending messages via SMS to a phone number or list of phone numbers.
* **Voice notifications**: Allows sending voice calls to a phone number or list of phone numbers.
* **Scripting**: Allows writing a code fragment in an interpreted language (*Javascript*) that is easy to understand, expanding the range of possibilities when processing a specific business logic. Scripts also:
* Can be related to each other to leverage code reuse.
* Can access all devices of the client in which they are running.
* Can be tested to verify correct operation before deployment.
For more information about step configuration, continue reading [Steps](/docs/configuracion-del-cliente/acciones/pasos)
Triggers [#triggers]
Triggers allow defining events that are used to fire the action. An action can have multiple triggers. When any one of them fires, the action begins executing. Any trigger that can be modeled as an event is supported, including calendar events.
> ***Actions do not need to have associated triggers. However, actions without triggers can only be executed manually or when alerts are triggered.***
For more information, continue reading [Triggers](/docs/configuracion-del-cliente/acciones/disparadores)
Execution queue [#execution-queue]
When a trigger associated with an action fires, or when started manually, or as a consequence of any other condition, a record will be created in the action queue (table "ActionInstances"). This table contains all action instances currently running.
A scheduled job (implemented as an external executable) will be responsible for periodically reviewing this table, updating the action's status, and executing the action's steps, using a separate thread for each action.
# Alerts
Alerts are applied to endpoints and allow you to define acceptable value ranges so that alarms are automatically generated when values fall outside these thresholds. To set up an alert, use the alerts screen, where you select the alert type, the endpoint it will apply to, the threshold value, and optionally, a minimum duration the condition must persist before the alert generates the corresponding alarm.
Users can use all available variables that have been enabled in their instance and can also customize alert subjects.
[**For more information about the allowed subject variables, review the documentation**](/docs/configuracion-del-cliente/alertas-y-alarmas/variables-para-notificaciones-de-alertas)

These are the allowed parameters (Variables):
| Variable | Comments |
| ----------------------------- | ------------------------------------------------------------------------- |
| \{CLIENT\_ID} | Unique client identifier |
| \{CLIENT\_NAME} | Client name/description |
| \{FACILITY\_ID} | Unique facility identifier |
| \{FACILITY\_NAME} | Facility description |
| \{DEVICE\_ID} | Unique device identifier |
| \{DEVICE\_NAME} | Device description |
| \{ENDPOINT\_ID} | Unique endpoint identifier |
| \{ENDPOINT\_NAME} | Endpoint description |
| \{DEVICE\_OR\_ENDPOINT\_NAME} | Endpoint description. If not valid, the device description will be shown. |
| \{ALARM\_TEXT} | Alarm description |
| \{ALARM\_DETAILS} | Alarm details |
# Configuring Contacts for Notifications
For each Alert, the system allows selecting the contacts or contact groups that should receive the notifications. The data that can be entered includes:
* [Preloaded contact](/docs/configuracion-del-cliente/libreta-de-direcciones/crear-un-nuevo-contacto)
* [Preloaded address groups](/docs/configuracion-del-cliente/libreta-de-direcciones/crear-un-nuevo-grupo-de-contacto)
* Email address(es) (the contact does not need to exist in the address book)
* Phone number for SMS notifications (the contact does not need to exist in the address book)
* Phone number for voice notifications (the contact does not need to exist in the address book)
> Voice and SMS notification services must be enabled at the client and facility level to be sent. For more information or to check whether these services are enabled for a client and facility, see this [page](/docs/configuracion-del-cliente/alertas-y-alarmas/servicios-de-voz-y-sms)
Edit Notifications [#edit-notifications]
To edit alert notifications, go to *Client Configuration **> Alarms** > **Alerts.***

Select the alert to modify using the three dots on the right side and press **Edit**.

Look for the *Notifications* option.
In *E-mails*, you can simply type the email address(es) you wish to add to the notifications. You can also type the name of a **contact** or **group** preloaded in the platform's [***Address Book***](/docs/configuracion-del-cliente/libreta-de-direcciones). For phone numbers, you can follow the same procedure: type the number or the names of contacts and/or groups preloaded in the system.

_853d.png)
> ***Important note:*** For contacts, email addresses, and phone numbers to be saved, you must press the **Enter** key after typing and ensure they appear highlighted in a box.
***Example of a group preloaded in the Address Book***


# Alerts and Alarms
The Gear Studio platform allows you to define alerts that trigger when the values of certain variables exceed defined thresholds. Alarms, on the other hand, are conditions that indicate a problem and can occur for different reasons, including alerts. In other words, alerts generate alarms when measured values fall outside established thresholds, but alarms can also be generated for other reasons, such as device malfunctions, connection errors, etc.
Alerts [#alerts]
Alerts are applied to endpoints and allow you to define acceptable value ranges so that alarms are automatically generated when values fall outside these thresholds. To set up an alert, use the alerts screen, where you select the alert type, the endpoint it will apply to, the threshold value, and optionally, a minimum duration the condition must persist before the alert generates the corresponding alarm.
Normal Value [#normal-value]
It is also possible to define a second threshold for the alert to clear. This allows establishing a hysteresis value to prevent the alert from triggering frequently when the endpoint value fluctuates near the threshold. For example, you can set a high temperature alert with the threshold at 60 degrees and a normal threshold of 55. This will cause the alert to trigger when the value exceeds 60 degrees and clear only when the temperature drops to 55 degrees. The alert will remain active from the time the temperature exceeds 60 degrees until it drops to 55.
Alert Severity [#alert-severity]
Severity levels in alerts indicate the criticality associated with alarms. Severity levels can be information, low, medium, or high as shown in the following image:

**Important**
By default, an alarm will be created with the "Low" value. If an alert is created with a severity level of "High", for example, and that alert is subsequently triggered, the alarm history report will retain the severity level with which it was created, even if the severity level was later modified through the alert settings.
Available Alert Types [#available-alert-types]
The following are the alert types available on the platform, with a brief explanation of each.
| Variable | Condition | Supports normal threshold | Supports minimum duration |
| ---------------- | ------------------------ | ------------------------- | ------------------------- |
| Temperature | High or low | Yes | Yes |
| Humidity | High or low | Yes | Yes |
| Light level | High or low | Yes | Yes |
| Volume | High or low | Yes | Yes |
| Weight | High or low | Yes | Yes |
| Pressure | High or low | Yes | Yes |
| Voltage | High or low | Yes | Yes |
| Current | High or low | Yes | Yes |
| Active power | High or low | Yes | Yes |
| Reactive power | High or low | Yes | Yes |
| Apparent power | High or low | Yes | Yes |
| Cosine phi | High or low | Yes | Yes |
| IAS sensor | Activated or deactivated | No | Yes |
| Generic variable | High or low | Yes | Yes |
Alert Configuration [#alert-configuration]
Alerts are applied to endpoints and allow you to define acceptable value ranges so that alarms are automatically generated when values fall outside these thresholds. To set up an alert, use the alerts screen, where you select the alert type, the endpoint it will apply to, the threshold value, and optionally, a minimum duration the condition must persist before the alert generates the corresponding alarm.
Users can use all available variables that have been enabled in their instance and can also customize alert subjects.
**For additional information about the allowed variables, click** [**here**](/docs/configuracion-del-cliente/alertas-y-alarmas/variables-para-notificaciones-de-alertas)

These are the allowed parameters (Variables):
| Variable | Comments |
| ----------------------------- | ------------------------------------------------------------------------- |
| \{CLIENT\_ID} | Unique client identifier |
| \{CLIENT\_NAME} | Client name/description |
| \{FACILITY\_ID} | Unique facility identifier |
| \{FACILITY\_NAME} | Facility description |
| \{DEVICE\_ID} | Unique device identifier |
| \{DEVICE\_NAME} | Device description |
| \{ENDPOINT\_ID} | Unique endpoint identifier |
| \{ENDPOINT\_NAME} | Endpoint description |
| \{DEVICE\_OR\_ENDPOINT\_NAME} | Endpoint description. If not valid, the device description will be shown. |
| \{ALARM\_TEXT} | Alarm description |
| \{ALARM\_DETAILS} | Alarm details |
Alarms [#alarms]
Alarms are triggered automatically when problems are detected with devices, endpoints, alerts, or any other anomalous situation. The most common alarm types are shown below.
| Alarm type | Comments |
| --------------------------------------------- | ---------------------------------------------------------------------------------------------------------------------------------------------------------------------------------------------------------------------------- |
| Device offline | Triggered when a device does not communicate with the platform after a certain time. The maximum time a device can go without sending information to the platform is set in each device model. |
| Alert | Triggered when an alert indicates that an endpoint value is outside the defined thresholds. For each alert type, there is a corresponding alarm type, for example, high temperature alarm, IAS sensor activation alarm, etc. |
| Low battery | Triggered when a device's battery level is low. |
| Critical battery | Triggered when a device's battery level is critical. |
| Overheating condition. All outputs turned off | This alarm type is not yet implemented |
| Low temperature condition | This alarm type is not yet implemented |
| Charging failure | This alarm type is not yet implemented |
| Informational message | This alarm type is not yet implemented |
| Unspecified or generic message | This alarm type is not yet implemented |
# Alarm Severity
Introduction [#introduction]
Severity levels in alerts indicate the criticality associated with alarms. Severity levels can be low, medium, or high as shown in the following image

Important [#important]
By default, an alarm will be created with the "Low" value. If an alert is created with a severity level of "High", for example, and that alert is subsequently triggered, the alarm history report will retain the severity level with which it was created, even if the severity level was later modified through the alert management screen.
# Variables for Alert Notifications
Alerts are applied to endpoints and allow you to define acceptable value ranges so that alarms are automatically generated when values fall outside these thresholds. To set up an alert, use the alerts screen, where you select:
* Alert type.
* Endpoint it will apply to.
* Threshold value.
* Optionally, a minimum duration the condition must persist before the alert generates the corresponding alarm.
As a user you can:
* Type the available variables that have been enabled and that you can see within the platform.
* Leave the subject in this text box.

These are the allowed parameters (Variables):
| Variable | Comments |
| ----------------------------- | --------------------------------------------------------------------------------------------------------------------------------------------------------------- |
| \{CLIENT\_ID} | Contains the identifier of the client where the alarm was generated. |
| \{CLIENT\_NAME} | Contains the name/description of the client where the alarm was generated. |
| \{FACILITY\_ID} | Contains the identifier of the facility where the alarm was generated. |
| \{FACILITY\_NAME} | Contains the name/description of the facility where the alarm was generated. |
| \{DEVICE\_ID} | Contains the identifier of the device where the alarm was generated. |
| \{DEVICE\_NAME} | Contains the name/description of the device where the alarm was generated. |
| \{ENDPOINT\_ID} | Contains the identifier of the endpoint where the alarm was generated, or zero if the alarm does not correspond to a specific endpoint. |
| \{ENDPOINT\_NAME} | Contains the name/description of the endpoint where the alarm was generated, or an empty value if the alarm does not correspond to a specific endpoint. |
| \{DEVICE\_OR\_ENDPOINT\_NAME} | Contains the name/description of the endpoint where the alarm was generated, if it is an endpoint-level alarm, or the name/description of the device otherwise. |
| \{ALARM\_TEXT} | Contains the full text of the alarm that was generated. |
| \{ALARM\_DETAILS} | Contains the alarm details, such as the threshold used in the case of alerts. |
| \{ALARM\_DETAILS\_DISPLAY} | Contains the value "inline" if additional data exists, or "none" if no additional data exists. Should only be used in HTML templates. |
# Map Configuration
Within the client configuration, there is a field that refers to the minimum radius for maps.
It specifies a distance in **meters** to which the maps will adjust to the North, South, East, and West.
Although the configuration refers to **Radius**, it actually refers to the **rectangle** that composes the map.
*The client configuration is initialized with a radius of 1000 meters but can subsequently be modified, using the new value.*
**Example**
By default, a client will have a minimum map radius of 1000 meters, as shown in the following image:

It will be displayed as follows:

# Client
Introduction [#introduction]
The following sections describe how to manage clients, including creation, modification, and other related concepts.

To Edit the Client

# Terms and Conditions
Introduction [#introduction]
The platform allows creating terms and conditions with optional text for each client, specifying the terms and conditions that users must accept to use the applications with each client.
If no terms and conditions text is specified for a client, any user will be able to use the client without needing to read or accept any text.
To apply this feature, in the "Terms and Conditions" tab of clients, choose a text to use.

Once the client is created, when using the platform, the user must accept the "Terms and Conditions".

# Devices and Endpoints
In Gear Studio, the infrastructure of each facility is organized hierarchically into devices and endpoints.
Devices [#devices]
Devices constitute the first level of a facility's infrastructure. They typically correspond to physical devices such as sensors, gateways, dimmers, actuators, thermostats, etc. Devices have the following characteristics:
* They have a model (or a brand and model combination)
* They have a unique identifier, such as a MAC address or serial number.
* They have some type of communication interface (MQTT, HTTP, NB-IoT, ZigBee, LoRaWAN, etc.)
* They have a description used in Gear to identify the device more easily.
Endpoints [#endpoints]
A single device can have multiple sensors, functions, or channels. For example, in the case of a dimmer capable of controlling four light circuits, it can be said to have four distinct functions or "channels". When a user interacts with the device, they are actually interacting with one of those channels, not the entire device.
Each of these functions or channels, in Gear Studio terminology, is called an "**endpoint**". Endpoints have the following characteristics:
* They have a unique identifier within the device.
* They have a sensor type (temperature sensor, light, energy, volume, etc.)
* They have a description used in Gear to identify the endpoint more easily.
* They have an associated sector, indicating where they are installed or where they operate (the location within the facility).
* Depending on the sensor type, they may have other specific characteristics.
More Information [#more-information]
For more information about device and endpoint management, see the following tutorials:
* [Devices](/docs/configuracion-del-cliente/dispositivos-y-endpoints/dispositivos)
* [Endpoints](/docs/configuracion-del-cliente/dispositivos-y-endpoints)
* [Device Integration](/docs/configuracion-del-cliente/dispositivos-y-endpoints/dispositivos/integracion-de-dispositivos)
* [Device Management](/docs/configuracion-del-cliente/dispositivos-y-endpoints/dispositivos/dispositivos)
* [Endpoint Management](/docs/configuracion-del-cliente/dispositivos-y-endpoints/endpoints/crear-un-endpoint)
# Facilities
A facility within the IoT domain is defined as the physical environment where interconnected devices and gateways are deployed. Examples of facility types include factories, buildings, warehouses, and logistics centers among others. The main function of facilities is to provide an abstraction layer that enables data analysis from a broader perspective than that of individual devices.
Key Characteristics: [#key-characteristics]
**Facility Diversity:** Each client can have its own facilities, such as branches and buildings. These facilities can be categorized into different types, such as retail or residential, facilitating data organization and management.
**Hierarchical Grouping:** Facilities allow hierarchical grouping of devices, enabling efficient classification to present information in dashboards. This classification provides a structured and contextualized view of the data.
**Visual Association:** Each facility type can be associated with an image, which will be reflected in the side list of the monitor map. This visual feature improves identification and intuitive navigation through facilities.
In summary, facilities in the IoT context are key physical environments that facilitate data collection and analysis at the macro level, enabling a more complete and strategic understanding of the connected device network.
# Facilities
In the facilities section of the platform, a complete suite of tools is offered for detailed and customized management.

Here is a detailed description of the capabilities:
Details [#details]
**Creation, Editing, and Deletion:** In this section, the user can create, edit, and delete facilities, providing flexibility in environment management.
**Detailed Configuration:** Key details can be defined, such as description, facility type, country, locality, and address, providing essential contextual and geographic information.
**Customizable Location:** The facility location can be set via address (e.g., Google Maps) or latitude and longitude, offering versatile options for geolocation.
**Manager and Contact:** Assignment of a facility manager with their respective contact number, facilitating communication and operational management.
**Energy Data:** Ability to assign the energy provider company and associated tariffs, enabling detailed monitoring and analysis of energy consumption.
**Default Camera:** The option to assign a default camera to the facility, improving security and providing a real-time view.
**Custom Configuration:** Selection of time zone, preferred language, and icon set to represent the facility on the map, offering a personalized visual and configuration experience.
**Representative Images:** Upload of a main facility image, enriching the visual representation and facilitating identification.
**Notification Configuration:** If SMS and voice messages have been enabled at the client level, the platform allows enabling/disabling these features at each facility level, providing precise control over notifications.
This robust functionality optimizes facility management and monitoring, providing a personalized and efficient experience.


Consumption Targets [#consumption-targets]
Within this subsection, the platform allows defining consumption targets, providing a set of key parameters for efficient energy management. Here are the elements that can be configured:
**Start Date:** Allows selecting the date from which the consumption targets will apply, providing flexibility in time planning.
**Energy Consumption Target:** A quantitative target for energy consumption can be set, providing a specific goal to achieve.
**Power Target:** Defines a specific target for electrical power, contributing to the management and control of installed capacity.
**Cost Target:** Allows setting a financial target for the cost associated with energy consumption, facilitating budget planning.
**Fixed Cost Prorated per kWh:** This configuration allows assigning a fixed cost that will be prorated per kWh consumed, providing a detailed cost structure.
**Minimum COS(phi):** Sets a minimum value for the power factor (COS(phi)), contributing to optimizing energy efficiency and avoiding penalties for low power factor.
These parameters offer a comprehensive tool for strategic energy consumption management, allowing specific goals to be set and performance monitored against these targets.

Dashboards and Views [#dashboards-and-views]
Within the dashboards and views subsection, a key feature is offered to customize the user experience on the platform. The available options are detailed below:
**Dashboard Selection:** Users have the ability to select the specific dashboards that will be accessible from the facility in question. This allows adapting the displayed information to the particular needs of each facility.
**Default Dashboard and View Assignment:** Additionally, the ability to assign a default dashboard and view is offered. This means that when accessing the side menu of the facility map, users will be automatically redirected to the default dashboard and view, speeding up access to relevant information.
This feature provides flexibility and customization, allowing users to define their preferred starting point and simplifying access to key information.

Units of Measurement [#units-of-measurement]
Within the units of measurement subsection, users are provided with an essential tool to customize data display in dashboards and views. The key characteristics of this feature are described below:
**Unit of Measurement Selection:** Users have the ability to select the desired units of measurement at each facility level. This allows adapting data presentation according to local preferences or specific standards.
**Automatic Unit Conversion:** The platform incorporates automatic unit conversion functionality. This feature ensures that data reported in different units is displayed consistently in dashboards and views, improving information comprehension and comparability.
**Reporting Requirement Limitations:** It is important to note that the unit selection in this subsection does not modify the fundamental requirements for the units in which data must be reported to the platform. For example, certain parameters, such as temperature, must be reported in specific units (e.g., degrees C), regardless of the display unit selection.
**Configurable Variable Types:** Configuration options are offered for various variable types, including density, pressure, temperature, volume, weight, and runtime. This flexibility ensures that the platform can adapt to a variety of contexts and needs.
The unit of measurement configuration in the facilities subsection improves the versatility and usefulness of the platform, allowing users to effectively customize data presentation.


# Sectors
In the context of the platform, sectors play a crucial role in delineating different environments within a facility. The key functionality associated with sectors is the ability to configure specific automation rules for each of these environments. The relevant aspects of this configuration are detailed below:
**Sector Definition:** Sectors are used to delimit and organize the different environments or areas within a facility. These can represent geographic zones, departments, or any relevant categorization.
**Automation Rule Configuration:** Each sector offers the ability to establish exclusive automation rules. These rules allow defining automatic behaviors associated with specific events occurring within that sector.
**Per-Environment Customization:** By being able to configure rules at the sector level, effective customization is achieved. Each area can have unique requirements and conditions, and automation rules allow adapting the system response according to the specific characteristics of each sector.
**Trigger Events:** Automation rules can be associated with various events, such as telemetry changes, device activation, or any other relevant occurrence. This allows a dynamic and contextualized response.
The ability to configure automation rules at the sector level improves operational efficiency and allows more precise management of environments within a facility. This is essential for adapting to the particular needs of each sector and maximizing the platform's usefulness.

# Facility Types
Facility types in the IoT context are categories that allow differentiating and grouping data according to the nature and function of the physical environments where connected devices and gateways are deployed. This parameter is essential for analyzing information in a differentiated and strategic manner. Each facility type can be associated with a representative icon, which will be visually reflected in the dashboard.


# Create a New Contact
To create a new contact in the Address Book, simply click the "Add" button that appears on the contact creation screen.
It is also possible to add contacts with the text box filter active. When clearing the characters typed in the text box, the added contact will appear in the list along with the rest of the existing contacts.

The Address Book **allows including the following data** in each record:
* Full name (***required***)
* Company
* Position
* Email
* Phone number
* Phone number for SMS notifications
1- In the Personal Information tab, the user can fill in the contact's personal details.

**IMPORTANT:** Do not leave required fields empty.
Once the desired data has been entered, keeping in mind that the "Full Name" field is required, click the "**Save**" button or press the "**Enter**" key on the keyboard to save the contact to your list.
2- In the Working Hours tab, the user can configure the time zone corresponding to the contact's location.

Then, set the days and time ranges during which they wish to receive alerts.

The user can edit or delete previously configured days.

The user can enable the "Enable out-of-availability date" option to indicate vacation or inactivity periods for the contact.

3- In the Notifications tab, the user can:
* Configure which device or devices to assign > **Level**

* Configure the severity of notifications to receive > **Severity Level**

* Configure the channels through which notifications will be sent > **Channels**

Below is an example of a generated contact.

More Information [#more-information]
[Address Book](/docs/configuracion-del-cliente/libreta-de-direcciones)
[Edit an entry in the address book](/docs/configuracion-del-cliente/libreta-de-direcciones/editar-un-contacto)
# Create a New Contact Group
To create a new contact group in the ***Address Book***, go to *Client Configuration >* Address Book > **Contact Groups**.
_fe2d.png)
Press add and the following screen will open:

The ***Address Group Book*** allows including the following data in each record:
* Group name (***required***)
* Contacts
Type the group name in ***Name.*** To add contacts, they must have been previously loaded in the platform. You can learn more about creating contacts in this [section](/docs/configuracion-del-cliente/libreta-de-direcciones/crear-un-nuevo-contacto). Select the contact you wish to add from the dropdown list and click **Add**.
_2b25.png)

> **IMPORTANT:**
>
> * Do not leave required fields empty, including the "**Name**" field for the group.
> * Once a contact is selected, you must always press "**Add**" or it will not be added to the list.
Once the desired data has been entered, press the "**Save**" button or press the "**Enter**" key on the keyboard to update the list.
2- In the *Working Hours* tab, add the time zone, as well as the days and hours during which you wish to receive alerts.


The user can enable the *Enable out-of-availability date* option.

3- In the *Notifications* tab, the user can:
* Configure which device or devices to assign > **Level**

* Configure the severity of notifications to receive > **Severity Level**

* Configure the channels through which notifications will be sent > **Channels**

Below is an example of a generated contact group.

More Information [#more-information]
[Address Book](/docs/configuracion-del-cliente/libreta-de-direcciones)
[Create a new address group](/docs/configuracion-del-cliente/libreta-de-direcciones/crear-un-nuevo-contacto)
# Edit a Contact
To **EDIT** a contact in the address book, expand the three-dot menu that appears to the right of the contact to edit. This menu shows two options: *Edit* and *Delete*.

Click on the **EDIT** option in the menu and a screen will open with the contact's data ready to be changed or updated.

**IMPORTANT:** Do not leave required fields empty.
Once the necessary changes have been made and saved by clicking the "**Save**" button, the contact will appear in the address book list with the applied corrections.
If the goal is to **DELETE** the selected contact, clicking "Delete" will display a confirmation message before permanently deleting the contact.

Clicking the "**Confirm**" button will permanently delete the contact without the possibility of recovery.
Clicking the "**Cancel**" button will leave the contact unchanged.
More Information [#more-information]
[Address Book](/docs/configuracion-del-cliente/libreta-de-direcciones)
[Create a new entry in the address book](/docs/configuracion-del-cliente/libreta-de-direcciones/crear-un-nuevo-contacto)
# Edit a Contact Group
To **Edit** a contact in the address book, expand the three-dot menu that appears to the right of the contact to edit. This menu shows two options: *Edit* and *Delete*.

Click on the ***Edit*** option in the menu, and a screen will open with the list data ready to be edited.

> **IMPORTANT:** Do not leave required fields empty.
Add More Contacts [#add-more-contacts]
The ***Address Group Book*** allows including the following data in each record:
* Group name (***required***)
* Contacts
Type the group name in ***Name.*** To add contacts, they must be loaded in the platform. You can learn more about creating contacts in this [section](/docs/configuracion-del-cliente/libreta-de-direcciones/crear-un-nuevo-contacto). Select the contact you wish to add from the dropdown list and click **Add**.
_2b25.png)
_2bc7.png)
Delete Contacts [#delete-contacts]
If the goal is to **Delete** the selected contact, clicking the *Trash can* icon will display a confirmation message before permanently deleting the contact.

Press the **Confirm** button to permanently delete the contact without the possibility of recovery. You can click the **Cancel** button to leave the contact unchanged.
More Information [#more-information]
[Address Book](/docs/configuracion-del-cliente/libreta-de-direcciones)
[Create a new address group](/docs/configuracion-del-cliente/libreta-de-direcciones/crear-un-nuevo-contacto)
# Address Book
The Address Book is a list that centralizes contact information for notifications, including SMS, Email, and voice calls. For each contact, the Address Book **allows including the following data**:
* Full name (required)
* Company
* Position
* Email
* Phone number
* Phone number for SMS notifications
Data can be **sorted** by different columns in ascending or descending order according to user preference. By default, the display follows the order of record entry in ascending order, and the appearance is as follows:

Using the "[Add](/docs/configuracion-del-cliente/libreta-de-direcciones/crear-un-nuevo-contacto)" button that appears on the Address Book display screen, new contacts can be added with the desired data, keeping in mind that Full Name is a required field that must always be filled in to include the new contact in the list.
Next to each Address Book record, there is a three-dot icon that provides access to a context menu for that record with the following options:
* [Edit](/docs/configuracion-del-cliente/libreta-de-direcciones/editar-un-contacto): to edit the record or contact.
* **Delete**: to delete the record or contact. The system requests confirmation before deleting a record to prevent accidental data deletion.


Menu expansion
The list content can be **filtered** using a text box to find the desired contact by simply typing part of the name, phone number, or any other data. In the following example, we searched for Juan Perez and there was no other contact with the characters "ju":

The Address Book can be accessed **from any device with Internet access**. It can be viewed and modified in any browser and on any device (computer, tablet, or mobile phone).
The Address Book is the best way to have all the necessary contacts in one place for sending application-related notifications, with the ability to **send those notifications in an automated manner.**
The Address Book enables communication and sending of alerts to selected contacts and/or other devices through the system quickly and efficiently to **stay informed at all times about the status of the devices included in the application.**
More Information [#more-information]
[Create a new entry in the address book](/docs/configuracion-del-cliente/libreta-de-direcciones/crear-un-nuevo-contacto)
[Edit an entry in the address book](/docs/configuracion-del-cliente/libreta-de-direcciones/editar-un-contacto)
# Security
Within "Client Configuration" in the Manager panel, you will find the Security option. Here you can add users, edit them, set a password, delete them, and also suspend them.
**Security Screen**

When **Adding** a user, you can assign them to a particular User Group, assigning them special roles such as Administrator, Operate-only, and View-only functions, among other pre-configurable options.
**User Groups Screen**

In the User Groups sub-option, you can add new specific groups and then assign users to those groups.
Groups can be Edited and/or Deleted from the main screen by clicking the three dots on a group.
**Screen for Creating New User Groups**

Below that is the Permissions option. Here users can assign permissions to special features.
**Permissions Screen**

Individual users or a user group assigned to a User Group (as seen above) can be assigned.
**Individual and User Group Permission Assignment Screen**

# Verticals
The Gear Studio platform contains a series of verticals that can be leveraged directly, applying existing knowledge about the most important use cases.
The currently implemented verticals are:
* [Energy monitoring](/docs/configuracion-del-cliente/verticales/monitoreo-de-energia).
* [Tank monitoring](/docs/configuracion-del-cliente/verticales/monitoreo-de-tanques).
* [Asset tracking](/docs/configuracion-del-cliente/verticales/seguimiento-de-activos).
# Tank Monitoring
The tank monitoring feature helps prevent costly and dangerous problems by detecting failures early. Covering real-time readings, tank temperature, and alarm system, it provides users with a visual representation of tank contents, tank temperature, and total volume present, among other available variables.
Tank monitoring systems give tank operators, managers, and technicians access to real-time information.
**To add tanks**

**To manage tanks in Content Material**

# White Labeling
Introduction [#introduction]
The **White Labeling** feature gives users the ability to customize the platform, creating a unique usage experience that adapts to their brand identity. From this section, you can customize the logo in the menu, reports, notifications, and login screen. It also provides color palette selection, login screen background image, and chat and help page settings.
For situations where there is a need to customize the platform for different clients within the same instance, White Labeling is offered at two levels. The first level allows instance-level customization, and the second level provides the option to customize the experience for these users, whom we call clients.
> Important note: The Client White Labeling feature is not included in all subscription plans. Contact our [sales](https://bit.ly/3Oc8zpg) team for pricing and activation.
!\[]\(/images/wiki/image\_bbf3.png)
Instance-Level White Labeling [#instance-level-white-labeling]
To start using the feature, go to **Settings** and in the *Global Configuration* menu select **White Labeling**:
!\[]\(/images/wiki/5\_78b4.png)
!\[]\(/images/wiki/6\_6dfe.png)
Menu Logo [#menu-logo]
This option allows the user to modify the logo displayed in the platform menu.
Press **Change** and then select the image file from your computer. For the changes to take effect on the platform, press **Save** at the bottom of the page.
> **Image requirements:**
>
> \* The allowed extension is .png\
> \* The required dimensions are 449x115 pixels
!\[]\(/images/wiki/7\_360d.png)
!\[]\(/images/wiki/image\_bbf3.png)
Reports Logo [#reports-logo]
This option is used to customize the logo that will appear in application reports when exported to PDF.
Press **Change** and then select the image file from your computer. For the changes to take effect on the platform, press **Save** at the bottom of the page.
> **Image requirements:**
>
> \* The allowed extension is .png\
> \* The required dimensions are 449x115 pixels
!\[]\(/images/wiki/8\_224f.png)
Notifications Logo [#notifications-logo]
From this option, you can select the logo for email notifications.
Press **Change** and then select the image file from your computer. For the changes to take effect on the platform, press **Save** at the bottom of the page.
> **Image requirements:**
>
> \* The allowed extension is .png\
> \* The required dimensions are 449x115 pixels
!\[]\(/images/wiki/9\_7872.png)
Login Screen Logo [#login-screen-logo]
This option allows customizing the logo on the platform's login screen.
> Note: The login screen is the first screen displayed when accessing your instance's domain.
!\[]\(/images/wiki/image\_650a.png)
Press **Change** and then select the image file from your computer. For the changes to take effect on the platform, press **Save** at the bottom of the page.
> **Image requirements:**
>
> \* The allowed extension is .png\
> \* The required dimensions are 449x115 pixels
!\[]\(/images/wiki/10\_562c.png)
Login Screen Background Image [#login-screen-background-image]
Allows setting a predefined background image on the login screen.
Press **Change** and then select the image file from your computer. For the changes to take effect on the platform, press **Save** at the bottom of the page.
> **Image requirements:**
>
> \* The allowed extension is .png\
> \* The required dimensions are 1600x900 pixels
!\[]\(/images/wiki/11\_4757.png)
Favicon [#favicon]
This option allows customizing the logo associated with the platform's domain, displayed at the top of browser tabs.
Press **Change** and then select the image file from your computer. For the changes to take effect on the platform, press **Save** at the bottom of the page.
> **Image requirements:**
>
> \* The allowed extension is .png\
> \* The required dimensions are 192x192 pixels
!\[]\(/images/wiki/12\_f933.png)
Color Configuration [#color-configuration]
This option provides color palette selection for the platform. Two colors can be chosen: a primary color and a secondary color. For example, the primary color is displayed as the menu background, and the secondary color is displayed on menu icons and text. Similarly, it allows modifying the primary text color and the secondary color displayed on platform button text.
The platform includes a hexadecimal color picker, making it possible to configure any color as needed.
!\[]\(/images/wiki/image\_33da.png)
User Support Chat Tool [#user-support-chat-tool]
In this option, the user can configure the appearance, availability, and options of the application's help chat.
!\[]\(/images/wiki/image\_bb21.png)
> **Note:** It is important to highlight that this feature allows configuring the Tawk.to plugin, so having a previously created Tawk.to account is an essential requirement. This way, the user can create their own plugin application and, with the chat owner's ID, replace it to view it in both English and Spanish. The colors and texts customized by the user from Tawk.to will also be displayed there.
>
> When the user does not enter their own data, the user support button will not be visible.
Help Menu Configuration [#help-menu-configuration]
In this option, you can customize the help menu. You can set a contact email and a destination URL that the instance owner wants to define with the platform's user manual. You can also choose to **Disable** these options or **Reset** them.
!\[]\(/images/wiki/image\_420a.png)
**Help Menu Considerations**
*User manual:*
This field allows the user to show or hide the application's user manual as appropriate.
* If disabled, no option will be shown in the help menu.
* If a URL is entered, the "User manual" option will appear and will redirect to the entered URL;
* If reset, the URL will be cleared and the default help menu will be shown ("Introduction to Gear Studio", "Integrator's Guide", "User Manual", "Deployments", etc.).
*Contact email:*
This field allows the user to show or hide the contact email option as appropriate.
* If disabled, no option will be shown in the help menu.
* If an email is entered, the "Send feedback" option will appear, and user submissions will be sent to the email address entered in the help menu.
* If reset, the "Send feedback" option will be shown, sending emails to the support inbox.
!\[]\(/images/wiki/image\_fffd.png)
!\[]\(/images/wiki/image\_e772.png)
!\[]\(/images/wiki/image\_da53.png)
White Labeling - Client Level [#white-labeling---client-level]
This advanced White Labeling feature enables platform customization for different clients within the same instance.
> Important note: The Client White Labeling feature is not included in all subscription plans. Contact our [sales](https://bit.ly/3Oc8zpg) team for pricing and activation.
To access platform customization for clients, select **Client** in the *Client Configuration* menu and find the **White Labeling** option.
!\[]\(/images/wiki/Dise%C3%B1o%20sin%20t%C3%ADtulo%20(63)\_ba2c.png)
Menu Logo [#menu-logo-1]
This option allows the user to modify the logo displayed in the platform menu.
Press **Change** and then select the image file from your computer. For the changes to take effect on the platform, press **Save** at the bottom of the page.
> **Image requirements:**
>
> \* The allowed extension is .png\
> \* The required dimensions are 449x115 pixels
!\[]\(/images/wiki/15\_1f8c.png)
Login Screen Logo [#login-screen-logo-1]
This option allows customizing the logo on the platform's login screen.
Press **Change** and then select the image file from your computer. For the changes to take effect on the platform, press **Save** at the bottom of the page.
> **Image requirements:**
>
> \* The allowed extension is .png\
> \* The required dimensions are 449x115 pixels
!\[]\(/images/wiki/16\_8d45.png)
Login Screen Background Image [#login-screen-background-image-1]
Allows setting a predefined background image on the login screen.
Press **Change** and then select the image file from your computer. For the changes to take effect on the platform, press **Save** at the bottom of the page.
> **Image requirements:**
>
> \* The allowed extension is .png\
> \* The required dimensions are 1600x900 pixels
!\[]\(/images/wiki/17\_3d4f.png)
Color Configuration [#color-configuration-1]
This option provides color palette selection for the platform. Two colors can be chosen: a primary color and a secondary color. For example, the primary color is displayed as the menu background, and the secondary color is displayed on menu icons and text. Similarly, it allows modifying the primary text color and the secondary color displayed on platform button text.
The platform includes a hexadecimal color picker, making it possible to configure any color as needed.
!\[]\(/images/wiki/image\_ec9d.png)
User Support [#user-support]
In this option, the user can configure the appearance, availability, and options of the application's help chat.
!\[]\(/images/wiki/image\_bb21.png)
> **Note:** It is important to remember that the plugin configuration is customizable so the user can create their own plugin application and, with the chat owner's ID, replace it to view it in both English and Spanish. The colors and texts customized by the user from Tawk.to will also be displayed there.
>
> When the user does not enter their own data, the user support button will not be visible.
**Help Menu Configuration**
In this option, you can customize the help menu. You can set a contact email and a custom URL for the user manual. You can also choose to **Disable** these options or **Reset** them.
!\[]\(/images/wiki/image\_420a.png)
**Help Menu Considerations**
*User manual:*
This field allows the user to show or hide the application's user manual as appropriate.
* If disabled, no option will be shown in the help menu.
* If a URL is entered, the "User manual" option will appear and will redirect to the entered URL;
* If reset, the URL will be cleared and the default help menu will be shown ("Introduction to Gear Studio", "Integrator's Guide", "User Manual", "Deployments", etc.).
*Contact email:*
This field allows the user to show or hide the contact email option as appropriate.
* If disabled, no option will be shown in the help menu.
* If an email is entered, the "Send feedback" option will appear, and user submissions will be sent to the email address entered in the help menu.
* If reset, the "Send feedback" option will be shown, sending emails to the support inbox.
!\[]\(/images/wiki/image\_fffd.png)
!\[]\(/images/wiki/image\_e772.png)
!\[]\(/images/wiki/image\_da53.png)
White Labeling: Enable and Disable [#white-labeling-enable-and-disable]
The options to enable and disable **Instance White Labeling** and **Client White Labeling** are visible only to platform administrator users. This feature can be enabled from the **Additional Features** section, located in the *Global Configuration* menu.
!\[]\(/images/wiki/Dise%C3%B1o%20sin%20t%C3%ADtulo%20(66)\_968a.png)
If **Instance White Labeling** is disabled, an icon will appear next to its name in the menu and when entering the section.
!\[]\(/images/wiki/19\_cdc4.png)
> **Notes:**
>
> * If Instance White Labeling is disabled, it will not be possible to enable Client White Labeling. Instance White Labeling must be enabled first.
> * If Instance White Labeling is not enabled, the platform will display default colors, logos, and images corresponding to the Cloud Studio brand.
**Activation Request**
When the option is not enabled, the user can request the administrator to enable it. This is communicated through the following message: This feature is an add-on. To enable it, contact your administrator.
!\[]\(/images/wiki/20\_9e55.png)
**White Labeling Validation Message**
Values configured at the Client White Labeling level will take priority and be maintained over those configured at the Instance White Labeling level. When a user wants to modify Instance White Labeling, they will be notified through an informational message that different options are configured at the client level. Similarly, if the client does not have client-level configurations applied, the platform will maintain the instance-level configurations.
!\[]\(/images/wiki/Dise%C3%B1o%20sin%20t%C3%ADtulo%20(67)\_db26.png)
> Check out our [tutorial](https://youtu.be/4E3pYdhg8Vc) on YouTube
White Labeling - User Level [#white-labeling---user-level]
Just as there is [instance-level white labeling](/docs/configuracion-global/marca-blanca) and [client-level white labeling](/docs/configuracion-global/marca-blanca), each user can modify the logo, background colors, and text to adapt the interface to personal preferences, improving visibility and creating a more pleasant and appropriate environment for each user. These changes only apply to the active user's session and are not visible to other users.
Menu Logo [#menu-logo-2]
This option allows the user to modify the Logo displayed in the platform menu for the user who configured it, when logging in with that profile, while maintaining the look and feel configured at the Instance level for other users.
Press **Change** and then select the image file from your computer. For the changes to take effect on the platform, press **Save** at the bottom of the page.
> ***Image requirements:***
>
> *\* The allowed extension is .png*\
> *\* The required dimensions are 449x115 pixels*
# White Labeling - User Level
Just as there is [instance-level white labeling](/docs/configuracion-global/marca-blanca) and [client-level white labeling](/docs/configuracion-global/marca-blanca), each user can modify the logo, background colors, and text to adapt the interface to personal preferences, improving visibility and creating a more pleasant and appropriate environment for each user. These changes only apply to the active user's session and are not visible to other users.
Menu Logo [#menu-logo]
This option allows the user to modify the Logo displayed in the platform menu for the user who configured it, when logging in with that profile, while maintaining the look and feel configured at the Instance level for other users.
Press **Change** and then select the image file from your computer. For the changes to take effect on the platform, press **Save** at the bottom of the page.
> ***Image requirements:***
>
> *\* The allowed extension is .png*
> *\* The required dimensions are 449x115 pixels*

Color Configuration [#color-configuration]
This option provides color palette selection for the individual user's platform. It allows selecting two colors (primary and secondary). For example, the primary color is displayed as the menu background, and the secondary color is displayed on menu icons and text. Similarly, it allows modifying the primary text color and the secondary color displayed on platform button text.
The platform includes a hexadecimal color picker, making it possible to configure any color as needed.

# Add Global Script
Select the Common Scripts option from the menu.

When selecting **Add**, the user can include a description, select a dependency, and enter the JS code below.

# Edit Global Script
In the Common Scripts general section, select the three dots on the right side of the screen.

# Delete Global Script
In the Global Common Scripts general section, select the three dots on the right side of the screen.

The user must **Confirm** or **Cancel** the requested action.

Upon confirmation, the Common Script is deleted and the user is redirected to the general screen for that option.

# Global Common Scripts
The following module allows working with **"Global Common Scripts" for all clients**, to reuse, simplify, and reduce the code of Device and Action Scripts.
A Script is a code fragment in an interpreted language (*JavaScript*) that is easy to understand, expanding the range of tools available when processing a specific business logic.
> Global Common Scripts will be used as libraries of common functionalities.
> Global Common Scripts will be used as dependencies in other scripts.
The module allows viewing the list of Global Common Scripts generated for all clients, as well as creating, editing, or deleting those scripts. Scripts can:
relate to each other to leverage code reuse.
access all devices of the client in which they are executing.
**From the following menu option**

# Global Groups
**Global groups** allow quickly assigning permissions by associating **global permissions** to them and then associating **global users** to those groups, automatically inheriting the **global permissions** of the group in question.
# Global Security
Within "Global Configuration" in the Manager panel, you will find the Global Security option. Here you can add global users, edit them, set passwords, delete them, and also suspend them.
# Battery status
The battery status object represents the status of a device battery. This object is normally used to update the battery level through the `updateDeviceBattery` method of the [device](/docs/herramientas-low-code-scripting/referencia-de-objetos-disponibles-para-scripting/device) object, usually as part of a [LoRaWAN or MQTT data conversion](/docs/configuracion-del-cliente/dispositivos-y-endpoints/dispositivos/modelos-de-dispositivo/procesamiento-de-datos) script.
Properties [#properties]
\### type (int enum)
The type property indicates the battery type. The possible values for this property are as follows:
* **batteryType.default (1)**: this is the default value for this property, normally used when the device has a single battery.
* **batteryType.primary (2)**: when the device has more than one battery, this value indicates it is the primary battery.
* **batteryType.secondary (3)**: when the device has more than one battery, this value indicates it is the secondary battery.
* **batteryType.backup (4)**: when the device has more than one battery, this value indicates it is the backup battery.
**Examples**
This example shows how to report a battery level of 72% for the primary battery, and 68% for the secondary battery, on a device that has both primary and secondary batteries.
```javascript
myDevice.updateDeviceBattery
(
[
{ type: batterytype.primary, percentage: 72 },
{ type: batteryType.secondary, percentage: 68}
]
);
```
\### percentage (int) The percentage property indicates the battery charge percentage (0-100%).
**Examples**
This example shows how to report a battery level of 72% for the primary battery, and 68% for the secondary battery, on a device that has both primary and secondary batteries.
```javascript
myDevice.updateDeviceBattery
(
[
{ type: batterytype.primary, percentage: 72 },
{ type: batteryType.secondary, percentage: 68}
]
);
```
\### voltage (double) The voltage property allows indicating the battery voltage.
**Examples**
This example shows how to report a battery voltage of 2.95V for a device that has a single battery.
```javascript
myDevice.updateDeviceBattery({ voltage: 2.95 });
```
\### state (int enum)
The state property allows indicating the battery status. The possible values for this property are as follows:
* **batteryState.ok (1)**: indicates that the battery charge allows the device to function normally.
* **batteryState.low (2)**: indicates that the battery charge is low and should be replaced.
If the battery state is not reported, the platform will assume the **ok** state.
**Examples**
This example shows how to report a low battery state for a device that has a single battery.
```javascript
myDevice.updateDeviceBattery({ voltage: 2.95, state: batteryState.low });
```
# Command
The command object represents a command to be sent to a device or endpoint. This object is normally received as a parameter in the `buildDownlink` method as part of a [LoRaWAN or MQTT data conversion](/docs/configuracion-del-cliente/dispositivos-y-endpoints/dispositivos/modelos-de-dispositivo/procesamiento-de-datos) script.
Properties [#properties]
\### commandId (int) The **commandId** property indicates an internal number that uniquely identifies the command. If the device is capable of responding to the command, the response must contain the same **commandId**.
**Examples**
The following is an example based on the `buildDownlink` method documentation in the [LoRaWAN or MQTT data conversion](/docs/configuracion-del-cliente/dispositivos-y-endpoints/dispositivos/modelos-de-dispositivo/procesamiento-de-datos) section.
```javascript
function buildDownlink(device, endpoint, command, payload)
{
payload.port = 25; // This device receives commands on LoRaWAN port 25
payload.buildResult = downlinkBuildResult.ok;
switch (command.type) {
case commandType.onOff:
switch (command.onOff.type) {
case onOffCommandType.turnOn:
payload.setAsBytes([30]); // Command ID 30 is "turn on"
break;
case onOffCommandType.turnOff:
payload.setAsBytes([31]); // Command ID 31 is "turn off"
break;
case onOffCommandType.toggle:
payload.setAsBytes([32]); // Command ID 32 is "toggle"
break;
default:
payload.buildResult = downlinkBuildResult.unsupported;
break;
}
break;
default:
payload.buildResult = downlinkBuildResult.unsupported;
break;
}
}
```
\### type (int, enum)
The type property indicates the command type. The possible values are as follows:
* **commandType.onOff (1)**: indicates that the command is of on/off type, meaning it is for turning on, turning off, or toggling an endpoint.
* **commandType.dimmer (2)**: indicates that the command is for altering the level of a dimmer.
* **commandType.closure (3)**: indicates that the command is for controlling a closure, such as a curtain or blind.
* **commandType.thermostat (4)**: indicates that the command is for controlling a thermostat.
* **commandType.management (5)**: indicates that the command is for managing the device (reboot, firmware upgrade, etc.).
* **commandType.custom (6)**: indicates that it is a user-defined command.
**Examples**
A complete example is presented at the beginning of this section.
\### onOff (object)
The **onOff** property is an object containing the command parameters when it is of type **commandType.onOff**. The object has the following properties:
* **type (int enum)**: indicates the on/off command type, among the following:
* **onOffCommandType.turnOn (0)**: indicates that the command is to turn on the endpoint.
* **onOffCommandType.turnOff (1)**: indicates that the command is to turn off the endpoint.
* **onOffCommandType.toggle (2)**: indicates that the command is to toggle the endpoint.
**Examples**
A complete example is presented at the beginning of this section.
\### dimmer (object)
The **dimmer** property is an object containing the command parameters when it is of type **commandType.dimmer**. The object has the following properties:
* **level (double)**: indicates the dimming level as a percentage, from zero to 100%.
**Examples**
A complete example is presented at the beginning of this section.
\### thermostat (object)
The **thermostat** property is an object containing the command parameters when it is of type **commandType.thermostat**. The object has the following properties:
* **type (int enum)**: indicates the type of command sent to the thermostat, among the following:
* **thermostatCommandType.setMode (0)**: the command is to change the thermostat mode.
* **thermostatCommandType.setFanMode (1)**: the command is to change the thermostat fan mode.
* **thermostatCommandType.setSetpoint (2)**: the command is to change the setpoint.
* **thermostatCommandType.setAll (3)**: the command is to change all parameters simultaneously.
* **mode (int enum)**: indicates the mode the thermostat should switch to, when the type is **thermostatCommandType.setMode** or **thermostatCommandType.setAll**. The possible values are as follows:
* **thermostatMode.off (1)**: the thermostat should be turned off.
* **thermostatMode.auto (2)**: the thermostat should switch to auto mode.
* **thermostatMode.heat (3)**: the thermostat should switch to heat mode.
* **thermostatMode.cool (4)**: the thermostat should switch to cool mode.
* **thermostatMode.dry (5)**: the thermostat should switch to dehumidification (dry) mode.
* **thermostatMode.fan (6)**: the thermostat should switch to fan mode.
* **fanMode (int enum)**: indicates the fan mode the thermostat should switch to, when the type is **thermostatCommandType.setFanMode** or **thermostatCommandType.setAll**. The possible values are as follows:
* **thermostatFanMode.auto (1)**: the fan should switch to auto mode.
* **thermostatFanMode.low (2)**: the fan should switch to low mode.
* **thermostatFanMode.mid (3)**: the fan should switch to mid mode.
* **thermostatFamMode.high (4)**: the fan should switch to high mode.
* **setpoint (double)**: indicates the setpoint in degrees Celsius, when the type is **thermostatCommandType.setSetpoint** or **thermostatCommandType.setAll**.
**Examples**
A complete example is presented at the beginning of this section.
\### closure (object)
The **closure** property is an object containing the command parameters when it is of type **commandType.closure**. The object has the following properties:
* **type (int enum)**: indicates the type of command sent to the closure, among the following:
* **closureCommandType.open (0)**: the command is for the closure to open.
* **closureCommandType.close (1)**: the command is for the closure to close.
* **closureCommandType.position (2)**: the command is to change the position of the closure.
* **closureCommandType.stop (3)**: the command is to stop the closure movement.
* **closureCommandType.openStop (4)**: the command is to open the closure, or stop it if it is moving.
* **closureCommandType.closeStop (5)**: the command is to close the closure, or stop it if it is moving.
* **position (int)**: indicates the position to which the closure should move, when the type is **closureCommandType.position**, as a percentage, between 0% (closed) and 100% (open).
**Examples**
A complete example is presented at the beginning of this section.
\### management (object)
The **management** property is an object containing the command parameters when it is of type **commandType.management**. The object has the following properties:
* **type (int enum)**: indicates the type of command sent to the device, among the following:
* **managementCommandType.identify (0)**: requests the device to identify itself. This is used on some devices to have the device activate a visual or audible indicator.
* **managementCommandType.reboot (1)**: requests the device to restart.
* **managementCommandType.powerOff (2)**: requests the device to power off.
* **managementCommandType.poll (3)**: requests the device to send updated information as soon as possible.
* **managementCommandType.updateFirmware (4)**: requests the device to update its firmware.
* **managementCommandType.setValue (5)**: requests the device to change a value.
* **updateFirmware (object)**: indicates the firmware update parameters, when the value of the **type** field is **managementCommandType.updateFirmware**. The properties of this object are as follows:
* **downloadUrl (string)**: indicates the URL from which the device should download the firmware update.
* **setValue (object)**: the setValue object contains the necessary information to change the value, when the value of the **type** field is **managementCommandType.setValue**. The properties of this object are as follows:
* **newValue (double)**: indicates the new value to be assigned.
**Examples**
A complete example is presented at the beginning of this section.
\### custom (object)
The **custom** property is an object containing the command parameters when it is of type **commandType.custom**. The object has the following properties:
* **type (int)**: arbitrary value indicating the custom command type.
* **data (string)**: arbitrary value to be sent to the device.
**Examples**
A complete example is presented at the beginning of this section.
# Data payload
The data payload object represents a payload received from a device, for example a device with MQTT, HTTP, or LoRaWAN connectivity. The object allows accessing received data in binary form, as text, as a JSON object, and in other ways. This object is usually received as a parameter in certain scripts, such as [MQTT, HTTP, or LoRaWAN data conversion](/docs/configuracion-del-cliente/dispositivos-y-endpoints/dispositivos/modelos-de-dispositivo/procesamiento-de-datos) scripts.
Properties [#properties]
\### port (int, only available for LoRaWAN packets) The port property indicates the LoRaWAN port to which the device sent the payload. This property only has a value for payloads received through a LoRaWAN network. For other communication methods, the value is always zero.
**Examples**
This example shows the payload port in the log console.
```javascript
env.log('Payload port: ', payload.port);
```
\### topic (string, only available for MQTT packets) The topic property indicates the MQTT topic to which the device sent the payload. This property only has a value for payloads received through MQTT. For other communication methods, the value is always an empty string.
**Examples**
This example shows the payload topic in the log console.
```javascript
env.log('Payload topic: ', payload.topic);
```
\### buildResult (enum, only for downlinks)
The buildResult property allows indicating the result of building a payload for downlinks. This is typically used in the buildDownlink() function of the [data processing script](/docs/configuracion-del-cliente/dispositivos-y-endpoints/dispositivos/modelos-de-dispositivo/procesamiento-de-datos) for LoRaWAN and MQTT. The possible values for this property are as follows:
* **downlinkBuildResult.ok (0)**: .
* **downlinkBuildResult.error (1)**: .
* **downlinkBuildResult.unsupported (2)**: .
**Examples**
This example shows a code snippet indicating an error message during the creation of a downlink payload.
```javascript
payload.buildResult = downlinkBuildResult.error;
payload.errorMessage = { en: "Invalid parameter", es: "Parámetro no válido" };
```
\### errorMessage (string or multi-language literal, only for downlinks) The errorMessage property allows indicating an error message during the construction of a payload for downlinks. This is typically used in the buildDownlink() function of the [data processing script](/docs/configuracion-del-cliente/dispositivos-y-endpoints/dispositivos/modelos-de-dispositivo/procesamiento-de-datos) for LoRaWAN and MQTT, when using the value **downlinkBuildResult.error** in the **buildResult** property. The value assigned to this property can be a string, or a [multi-language literal](/docs/herramientas-low-code-scripting/referencia-de-objetos-disponibles-para-scripting/multi-language-literal) object.
**Examples**
This example shows a code snippet indicating an error message during the creation of a downlink payload.
```javascript
payload.buildResult = downlinkBuildResult.error;
payload.errorMessage = { en: "Invalid parameter", es: "Parámetro no válido" };
```
\### requiresResponse (boolean, only for downlinks)
The **requiresResponse** property allows indicating whether the message being built requires a response from the device, or whether the command should be considered successfully completed as soon as it is sent.
* If the property has the value **false** (default value), the command will be considered sent as soon as the payload is sent to the MQTT broker (for MQTT devices), or the payload is queued at the LoRaWAN gateway (for LoRaWAN devices).
* If the property has the value **true**, the command will remain open until the device itself sends a response to the command.
The default value of this property is **false**.
**Examples**
This example shows a code snippet indicating that the payload does not require a response from the device.
```javascript
payload.requiresResponse = false;
```
\### latitude (double, only for uplinks) The **latitude** property allows knowing the latitude of the device that sent data. This property is only available if the information provider was able to calculate the device's location through triangulation or an equivalent method.
**Examples**
This example shows a code snippet that displays the device's latitude.
```javascript
env.log("Latitude: ", payload.latitude);
```
\### longitude (double, only for uplinks) The **longitude** property allows knowing the longitude of the device that sent data. This property is only available if the information provider was able to calculate the device's location through triangulation or an equivalent method.
**Examples**
This example shows a code snippet that displays the device's longitude.
```javascript
env.log("Longitude: ", payload.longitude);
```
\### altitude (double, only for uplinks) The **altitude** property allows knowing the altitude of the device that sent data. This property is only available if the information provider was able to calculate the device's location through triangulation or an equivalent method.
**Examples**
This example shows a code snippet that displays the device's altitude.
```javascript
env.log("Altitude: ", payload.altitude);
```
Methods [#methods]
\### asBytes() The asBytes() method allows obtaining the payload content as a byte array. This is primarily used when the payload needs to be processed in binary form.
**Example 1**
This example shows the payload content as bytes, through the log console.
```javascript
payload.asBytes().forEach(element => env.log(element));
```
\### asString() The asString() method allows obtaining the payload content as a string, converting the binary content to a string and assuming UTF-8 encoding. This is primarily used when the payload needs to be processed as text.
**Example 1**
This example shows the payload content as a string, through the log console.
```javascript
env.log(payload.asString());
```
\### asJsonObject() The asJsonObject() method allows obtaining the payload content as an object, assuming the payload is text encoded in JSON format. This is primarily used when the payload needs to be processed as JSON text.
**Example 1**
This example shows the payload content as a JSON object, through the log console.
```javascript
env.log(payload.asJsonObject());
```
\### asParsedObject() The asParsedObject() method allows obtaining the parsed version of the payload, as sent to the platform. Some communication platforms, such as Actility and The Things Stack, are capable of sending a processed version of the payload information, in addition to the binary data. This method allows accessing the information sent by these platforms directly. Note that the result may be null if no processed data was received.
**Example 1**
This example shows the payload content processed by the communication platform, through the log console.
```javascript
env.log(payload.asParsedObject());
```
\### setAsBytes(bytesContent) The setAsBytes() method allows setting the payload content as a byte array. This method is normally used when creating downlinks.
**Parameters**
* **bytesContent** (array of bytes): new payload content, expressed as a byte array.
**Example 1**
This example shows how to set the payload as a five-byte array.
```javascript
payload.setAsBytes([9, 8, 7, 6, 5]);
```
\### setAsString(stringContent) The setAsString() method allows setting the payload content as text. This method is normally used when creating downlinks.
**Parameters**
* **stringContent** (string): new payload content, expressed as text.
**Example 1**
This example shows how to set the payload as text.
```javascript
payload.setAsString("Some text");
```
\### setAsJsonObject(objectContent) The setAsJsonObject() method allows setting the payload content as an object, which will be converted to its JSON format representation. This method is normally used when creating downlinks.
**Parameters**
* **objectContent** (object): new payload content, expressed as an object.
**Example 1**
This example shows how to set the payload as an object.
```javascript
payload.setAsJsonObject({ on: true, dimLevel: 65 });
```
\_\_\_\_\_\_\_\_\_\_\_\_\_\_\_\_\_\_\_\_\_\_\_\_\_\_\_\_\_\_\_\_\_\_\_\_\_\_\_\_\_\_\_\_\_\_\_\_\_\_\_\_\_\_\_\_\_\_\_\_\_\_\_\_\_\_\_\_\_\_\_\_\_\_\_\_\_\_\_\_\_\_\_\_\_\_\_\_\_\_\_\_\_\_\_\_\_\_\_\_\_\_\_\_\_\_\_\_\_\_\_\_\_\_\_\_\_\_\_\_\_\_\_\_
**Network Signal**
`payload.rssi.quality`
Measures the quality of the signal with which the message is received. It is a percentage and its value can range between 0 and 100.
```
Javascript
var rssiQuality = payload.rssi.quality;
env.log("Quality:", rssiQuality);
Ejemplo:
Json
"rssi":
{
"quality": 87
}
```
**Signal Strength**
`payload.rssi.strength`
Is the signal strength. Measures the power, generally in decibels. It is better when the number is lower.
```
Javascript
var rssiStrength = payload.rssi.strength;
env.log("Strength:", rssiStrength);
Ejemplo:
Json
"rssi": {
"strength": 8
}
```
**Signal Type**
`payload.rssi.type`
References the communication method type used by the device to send the message. For example: LoRaWAN, NbIoT, LTE, etc.
```
Javascript
var rssiType = payload.rssi.type;
env.log("Type:", rssiType);
Json
Ejemplo:
"rssi":
{
"type": "lora"
}
```
**PORT**
`payload.port`
The logical port used by the device that serves to identify the data type or format.
```
Javascript
var port = payload.port;
env.log("Port:", port);
Json
"port": 1
```
**TOPIC**
`payload.topic`
The channel through which the message was received. Useful for architectures with multiple routes or MQTT type.
```
javascript
var topic = payload.topic;
env.log("Topic:", topic);
Json
"topic": "uplink/temperature"
```
**LATITUDE**
`payload.latitude`
Indicates the north/south position from where the message was sent.
`var latitude = payload.latitude; env.log("Latitude:", latitude);`
```
javascript
var latitude = payload.latitude;
env.log("Latitude:", latitude);
Json
"latitude": 19.4326
```
LONGITUDE [#longitude]
`payload.longitude`
Indicates the east/west position from where the message originated.
```
Javascript
var longitude = payload.longitude;
env.log("Longitude:", longitude);
Ejemplo:
"longitude": -99.1332
```
Altitude [#altitude]
`payload.altitude`
Represents the height in meters above sea level where the device that made the transmission is located.
```
javascript
var altitude = payload.altitude;
env.log("Altitude:", altitude);
Json
"altitude": 2250
```
# DataPoint
The DataPoint object represents a value, typically used to represent the state of an endpoint at a given moment.
Properties [#properties]
\### value (number) The value property represents the endpoint value as a number. See the table at the end of this section for the endpoint types to which this property applies and its meaning.
**Examples**
This example shows the current value of the first endpoint of a device, through the log console.
```javascript
env.log('Endoint value: ', myDevice.endpoints.byIndex(0).getCurrentValue().value);
```
\### isOn (boolean) The isOn property indicates whether the endpoint is currently turned on. See the table at the end of this section for the endpoint types to which this property applies and its meaning.
**Examples**
This example shows the current state of the first endpoint of a device, through the log console.
```javascript
env.log('Endoint state: ', myDevice.endpoints.byIndex(0).getCurrentValue().isOn);
```
\### state (number) The state property indicates the current state of the endpoint. This property applies to IAS Sensor type endpoints.
**Examples**
This example shows the current state of the first endpoint of a device, through the log console.
```javascript
env.log('Endoint state: ', myDevice.endpoints.byIndex(0).getCurrentValue().state);
```
\### position (number) The position property indicates the current position, for Closure type endpoints.
**Examples**
This example shows the current position of the first endpoint of a device, through the log console.
```javascript
env.log('Endoint position: ', myDevice.endpoints.byIndex(0).getCurrentValue().position);
```
\### mode (number) The mode property indicates the current mode of a Thermostat type endpoint.
**Examples**
This example shows the current mode of the first endpoint of a device, through the log console.
```javascript
env.log('Thermostat mode: ', myDevice.endpoints.byIndex(0).getCurrentValue().mode);
```
\### fanMode (number) The fanMode property indicates the current fan mode of a Thermostat type endpoint.
**Examples**
This example shows the current fan mode of the first endpoint of a device, through the log console.
```javascript
env.log('Fan mode: ', myDevice.endpoints.byIndex(0).getCurrentValue().fanMode);
```
\### setpoint (number) The setpoint property indicates the desired temperature for a Thermostat type endpoint.
**Examples**
This example shows the desired temperature of the first endpoint of a device, through the log console.
```javascript
env.log('Setpoint: ', myDevice.endpoints.byIndex(0).getCurrentValue().setpoint);
```
\### ambientTemperature (number) The ambientTemperature property indicates the current ambient temperature of a Thermostat type endpoint.
**Examples**
This example shows the current ambient temperature of the first endpoint of a device, through the log console.
```javascript
env.log('Ambient temperature: ', myDevice.endpoints.byIndex(0).getCurrentValue().ambientTemperature);
```
\### latitude (number) The latitude property indicates the latitude for a Location Tracker type endpoint.
**Examples**
This example shows the current coordinates of the first endpoint of a device, through the log console.
```javascript
var v = myDevice.endpoints.byIndex(0).getCurrentValue();
env.log('Coordinates: ', v.latitude, ' - ', v.longitude);
```
\### longitude (number) The longitude property indicates the longitude for a Location Tracker type endpoint.
**Examples**
This example shows the current coordinates of the first endpoint of a device, through the log console.
```javascript
var v = myDevice.endpoints.byIndex(0).getCurrentValue();
env.log('Coordinates: ', v.latitude, ' - ', v.longitude);
```
\### flags (number) The flags property indicates the special conditions of a Location Tracker type endpoint.
**Examples**
This example shows the flags of the first endpoint of a device, through the log console.
```javascript
env.log('Flags: ', myDevice.endpoints.byIndex(0).getCurrentValue().flags);
```
\### activeEnergy (number) The activeEnergy property indicates the active energy of an Energy Meter type endpoint.
**Examples**
This example shows the active, reactive, and apparent energy of the first endpoint of a device, through the log console.
```javascript
var v = myDevice.endpoints.byIndex(0).getCurrentValue();
env.log('Energy (active / reactive / apparent): ', v.activeEnergy, '/', v.reactiveEnergy, '/', v.apparentEnergy);
```
\### reactiveEnergy (number) The reactiveEnergy property indicates the reactive energy of an Energy Meter type endpoint.
**Examples**
This example shows the active, reactive, and apparent energy of the first endpoint of a device, through the log console.
```javascript
var v = myDevice.endpoints.byIndex(0).getCurrentValue();
env.log('Energy (active / reactive / apparent): ', v.activeEnergy, '/', v.reactiveEnergy, '/', v.apparentEnergy);
```
\### apparentEnergy (number) The apparentEnergy property indicates the apparent energy of an Energy Meter type endpoint.
**Examples**
This example shows the active, reactive, and apparent energy of the first endpoint of a device, through the log console.
```javascript
var v = myDevice.endpoints.byIndex(0).getCurrentValue();
env.log('Energy (active / reactive / apparent): ', v.activeEnergy, '/', v.reactiveEnergy, '/', v.apparentEnergy);
```
\### text (string) The text property indicates the text associated with a Text Container type endpoint.
**Examples**
This example shows the text associated with the first endpoint of a device, through the log console.
```javascript
env.log('Text: ', myDevice.endpoints.byIndex(0).getCurrentValue().text);
```
DataPoint object properties for each endpoint type [#datapoint-object-properties-for-each-endpoint-type]
| Property | Endpoint type | Meaning |
| ------------------ | ------------------------------------------ | ------------------- |
| value | Numeric endpoints (scalar, discrete, etc.) | Current value |
| Appliance | Off: 0On: 1 | |
| Dimmer | Off: 0On: current level | |
| Closure | Current position | |
| IAS Sensor | Current state | |
| isOn | Appliance / Dimmer / Thermostat | Off: falseOn: true |
| Closure | Stopped: falseMoving: true | |
| state | IAS Sensor | Current state |
| position | Closure | Current position |
| mode | Thermostat | Current mode |
| fanMode | Thermostat | Current fan mode |
| setpoint | Thermostat | Desired temperature |
| ambientTemperature | Thermostat | Ambient temperature |
| latitude | Location tracker | Latitude |
| longitude | Location tracker | Longitude |
| flags | Location tracker | Location flags |
| activeEnergy | Energy Meter | Active energy |
| reactiveEnergy | Energy Meter | Reactive energy |
| apparentEnergy | Energy Meter | Apparent energy |
| text | Text container | Current text |
# Device address validation result
The device address validation result object represents the result of a device address validation, typically used in [device model configuration](/docs/configuracion-del-cliente/dispositivos-y-endpoints/dispositivos/modelos-de-dispositivo/configuracion) scripts.
The `validateDeviceAddress` function receives an object of this type as a parameter, which allows validating the given address and indicating the validation result.
Properties [#properties]
\### ok (boolean) The **ok** property indicates whether the validation was successful. The value true indicates that the specified address is correct, while the value false indicates that the address cannot be accepted. When returning the value true, it is also possible to optionally assign a value to the **updatedAddress** property, if the specified address needs to be modified. In that case, the platform will use the **updatedAddress** property value for the device.
**Examples**
This example validates a device address, verifying that it has 10 characters. If the validation is successful, the address is also converted to lowercase. If the validation is not successful, an error message is indicated.
```javascript
function validateDeviceAddress(address, result)
{
result.ok = address.length == 10;
if (result.ok)
{
result.updatedAddress = address.toLowerCase();
}
else
{
result.errorMessage = {
en: "The address must be exactly 10 characters long",
es: "La dirección debe tener exactamente 10 caracteres"
};
}
}
```
\### updatedAddress (string) The updatedAddress property allows modifying the address being validated, so that if the validation is successful, a different address can be used. By default, the value of this property is equal to the address passed as a parameter to the `validateDeviceAddress` function. Typically, the address can be changed to give it a consistent format.
**Examples**
A complete example can be found in the documentation of the **ok** property above.
\### errorMessage (string or multi-language literal) The errorMessage property allows indicating an error message when the **ok** property has the value false. To indicate an error message, a string or [multi language literal](/docs/herramientas-low-code-scripting/referencia-de-objetos-disponibles-para-scripting/multi-language-literal) value can be specified. If a [multi language literal](/docs/herramientas-low-code-scripting/referencia-de-objetos-disponibles-para-scripting/multi-language-literal) object is used, it is possible to indicate messages in different languages.
**Examples**
A complete example can be found in the documentation of the **ok** property above.
# Device model configuration
The device model configuration object allows establishing the basic configuration for a device model, typically used in [device model configuration](/docs/configuracion-del-cliente/dispositivos-y-endpoints/dispositivos/modelos-de-dispositivo/configuracion) scripts.
The `getConfiguration` function receives an object of this type as a parameter, which allows establishing the basic configuration of the device model for which the script has been written.
Properties [#properties]
\### addressLabel (string or multi-language literal) The **addressLabel** property allows setting the text to be displayed in the user interface for the "address" field. For example, if it is a LoRaWAN device, it would be preferable to use the name "DEVEUI" instead of "address", or use "MAC address" if it is a Wi-Fi device. If this property is not set, the default value will be "Address". If a string value is assigned, this string will be used in the UI regardless of the user's preferred language. If a multi-language literal is specified (as in the example below), the platform will use the text corresponding to the user's preferred language.
**Examples**
This example shows the address of the first endpoint of a device, through the log console.
```javascript
config.addressLabel = {en: "MAC address", es: "Dirección MAC"};
```
# Device UI rules
The device UI rules object represents the user interface rules applied to a device, typically used in [device model configuration](/docs/configuracion-del-cliente/dispositivos-y-endpoints/dispositivos/modelos-de-dispositivo/configuracion) scripts.
The `updateDeviceUIRules` function receives an object of this type as a parameter, which allows establishing the user interface rules for the device given as a parameter in the script.
Properties [#properties]
\### canCreateEndpoints (boolean) The canCreateEndpoints property indicates whether it is possible to create endpoints on the device given as a parameter. The value true indicates that creating endpoints is allowed, while the value false prevents the creation of new endpoints.
**Examples**
This example prevents creating new endpoints on a device.
```javascript
function updateDeviceUIRules(device, rules)
{
rules.canCreateEndpoints = false;
}
```
# Device
The device object represents a device installed in the platform. Certain scripts, such as LoRaWAN or MQTT data conversion scripts, receive a device object as a parameter representing the device to which the data is destined. In scripts executed from actions, it is possible to access the list of devices through the devices property of the global variable **env**, which represents the execution environment.
Properties [#properties]
\### address (string) The address property represents the address of the device, as text.
**Examples**
This example shows the address of a device in the log console.
```javascript
env.log('Device address: ', myDevice.address);
```
\### endpoints (endpoint collection) The endpoints property represents the list of endpoints contained within the device. This list is an object of type [endpoint collection](/docs/herramientas-low-code-scripting/referencia-de-objetos-disponibles-para-scripting/endpoint-collection).
**Examples**
This example shows the number of endpoints of a device in the log console.
```javascript
env.log('Endpoint count: ', myDevice.endpoints.count);
```
\### description (string) The description property represents the description of the device.
**Examples**
This example shows the description of a device in the log console.
```javascript
env.log('Device description: ', myDevice.description);
```
Methods [#methods]
\### updateDeviceBattery(battery) The updateDeviceBattery() method allows updating the battery status of the device, including for devices that contain more than one battery (for example, main and backup battery).
**Parameters**
* battery ([battery status](/docs/herramientas-low-code-scripting/referencia-de-objetos-disponibles-para-scripting/battery-status) object, or array of [battery status](/docs/herramientas-low-code-scripting/referencia-de-objetos-disponibles-para-scripting/battery-status) objects): this parameter indicates the battery status. If the device contains a single battery, a [battery status](/docs/herramientas-low-code-scripting/referencia-de-objetos-disponibles-para-scripting/battery-status) object should be passed. If the device contains more than one battery, an array of [battery status](/docs/herramientas-low-code-scripting/referencia-de-objetos-disponibles-para-scripting/battery-status) objects should be passed, containing the status of all batteries. For each object passed as a parameter, at least the [percentage](/docs/herramientas-low-code-scripting/referencia-de-objetos-disponibles-para-scripting/battery-status) property (if the charge percentage is available), or the [voltage](/docs/herramientas-low-code-scripting/referencia-de-objetos-disponibles-para-scripting/battery-status) property (if the voltage is available), or both, should be specified. If the [type](/docs/herramientas-low-code-scripting/referencia-de-objetos-disponibles-para-scripting/battery-status) property is omitted, the [batteryType.default](/docs/herramientas-low-code-scripting/referencia-de-objetos-disponibles-para-scripting/battery-status) type will be assumed. When reporting the status of multiple batteries, it is mandatory to report the [type](/docs/herramientas-low-code-scripting/referencia-de-objetos-disponibles-para-scripting/battery-status) property for each one.
**Example 1**
This example shows how to report a battery level of 45% on a device that has a single battery.
```javascript
myDevice.updateDeviceBattery({ percentage: 45 });
```
**Example 2**
This example shows how to report a battery level of 72% for the primary battery, and 68% for the secondary battery, on a device that has both primary and secondary batteries.
```javascript
myDevice.updateDeviceBattery
(
[
{ type: batteryType.primary, percentage: 72 },
{ type: batteryType.secondary, percentage: 68}
]
);
```
**Example 3**
This example shows how to report a battery level of 2.92 volts, on a device with a single battery that reports voltage instead of remaining charge percentage.
```javascript
myDevice.updateDeviceBattery({ voltage: 2.92 });
```
\### updateDeviceFirmwareVersion(version) The updateDeviceFirmwareVersion() method allows indicating the firmware version currently installed on the device.
**Parameters**
* version (string): this parameter indicates the current firmware version of the device, using one of the following formats:
* "X", where X is a number between 0 and 65535.
* "X.Y", where X and Y are numbers between 0 and 65535.
* "X.Y.Z", where X, Y, and Z are numbers between 0 and 65535.
* "X.Y.Z.W", where X, Y, Z, and W are numbers between 0 and 65535.
For more information about version numbers, visit [this page](https://wikipedia.org/wiki/Software_versioning).
**Example 1**
This example shows how to indicate that a device has firmware version "1.2.3".
```javascript
myDevice.updateDeviceFirmwareVersion("1.2.3");
```
\### updateDeviceRssi(rssi) The updateDeviceRssi() method allows updating the signal level (RSSI) of the device, including for devices that contain multiple wireless communication interfaces.
**Parameters**
* rssi ([rssi status](/docs/herramientas-low-code-scripting/referencia-de-objetos-disponibles-para-scripting/rssi-status) object, or array of [rssi status](/docs/herramientas-low-code-scripting/referencia-de-objetos-disponibles-para-scripting/rssi-status) objects): this parameter indicates the signal level. If the device contains a single wireless interface, an [rssi status](/docs/herramientas-low-code-scripting/referencia-de-objetos-disponibles-para-scripting/rssi-status) object should be passed. If the device contains more than one wireless interface (for example, cellular and Wi-Fi), an array of [rssi status](/docs/herramientas-low-code-scripting/referencia-de-objetos-disponibles-para-scripting/rssi-status) objects should be passed, containing the signal level of each interface. For each object passed as a parameter, at least the [quality](/docs/herramientas-low-code-scripting/referencia-de-objetos-disponibles-para-scripting/rssi-status) property (if the signal percentage is available), or the [strength](/docs/herramientas-low-code-scripting/referencia-de-objetos-disponibles-para-scripting/rssi-status) property (if the attenuation level is available), or both, should be specified. If the [type](/docs/herramientas-low-code-scripting/referencia-de-objetos-disponibles-para-scripting/rssi-status) property is omitted, the [rssiType.default](/docs/herramientas-low-code-scripting/referencia-de-objetos-disponibles-para-scripting/rssi-status) type will be assumed. When reporting the status of multiple interfaces, it is mandatory to report the [type](/docs/herramientas-low-code-scripting/referencia-de-objetos-disponibles-para-scripting/rssi-status) property for each one.
**Example 1**
This example shows how to report a signal level of 68% on a device that has a single communication interface.
```javascript
myDevice.updateDeviceRssi({ quality: 68 });
```
**Example 2**
This example shows how to report a signal level of 72% for the cellular interface, and 68% for the Wi-Fi interface, on a device that has both interface types.
```javascript
myDevice.updateDeviceRssi
(
[
{ type: rssiType.cellular, quality: 72 },
{ type: rssiType.wiFi, quality: 68 }
]
);
```
**Example 3**
This example shows how to report a signal level with an attenuation of -68 dBm, on a device with a single communication interface.
```javascript
myDevice.updateDeviceRssi({ strength: -68 });
```
\### updateDeviceGeolocation(latitude, longitude) The updateDeviceGeolocation() method allows indicating the device's location, specifying latitude and longitude.
**Parameters**
* **latitude** (double): indicates the latitude of the device's current location.
* **longitude** (double): indicates the longitude of the device's current location.
**Example 1**
This example shows how to indicate that a device is located at coordinates (40.4052, -3.87699).
```javascript
myDevice.updateDeviceGeolocation(40.4052, -3.87699);
```
# Endpoint collection
The endpoint collection object represents a collection of endpoints contained within a device. Typically, the list of endpoints is accessed through the **endpoints** property of the [device](/docs/herramientas-low-code-scripting/referencia-de-objetos-disponibles-para-scripting/device) object.
Properties [#properties]
\### count (integer) The count property indicates the number of endpoints included in the collection.
**Examples**
This example shows the number of endpoints of a device in the log console.
```javascript
env.log('Endpoint count: ', myDevice.endpoints.count);
```
Methods [#methods]
\### byAddress(address) The byAddress() method allows finding an endpoint within the collection by specifying its address.
**Parameters**
* **address** (string): this parameter indicates the address of the endpoint being searched. The search is case insensitive.
**Result**
If the method finds an endpoint with the specified address, an [endpoint](/docs/herramientas-low-code-scripting/referencia-de-objetos-disponibles-para-scripting/endpoint) object representing that endpoint will be returned. If no endpoint with the specified address can be found, the value **null** will be returned.
**Example 1**
This example shows the description of the endpoint with address "1" in a device, using the log console.
```javascript
env.log(myDevice.endpoints.byAddress("1").description);
```
\### byIndex(index) The byIndex() method allows finding an endpoint within the collection by specifying its position in the collection.
**Parameters**
* **index** (integer): this parameter indicates the position of the endpoint within the collection. The first endpoint in the collection has index 0 (zero).
**Result**
If the method finds an endpoint with the given index, an [endpoint](/docs/herramientas-low-code-scripting/referencia-de-objetos-disponibles-para-scripting/endpoint) object representing that endpoint will be returned. If no endpoint with the specified index can be found, the value **null** will be returned.
**Example 1**
This example shows the description of the fourth endpoint of a device, using the log console.
```javascript
env.log(myDevice.endpoints.byIndex(3).description);
```
\### byType(type \[, subType]) The byType() method allows finding the first endpoint of a given type (and optionally of a subtype) within the collection.
**Parameters**
* **type** (integer): this parameter indicates the endpoint type being searched. The possible values for the type parameter can be found in the explanation of the **endpointType** property of the [endpoint](/docs/herramientas-low-code-scripting/referencia-de-objetos-disponibles-para-scripting/endpoint) object.
* **subType** (optional, integer): if this parameter is included, the method will search for the first endpoint that is of the type specified in the type parameter, and that is also of the subtype specified in the subType parameter. The possible values for the subType parameter can be found in the explanation of the endpointSubType property of the [endpoint](/docs/herramientas-low-code-scripting/referencia-de-objetos-disponibles-para-scripting/endpoint) object.
**Result**
If the method finds an endpoint with the specified type and subtype, an [endpoint](/docs/herramientas-low-code-scripting/referencia-de-objetos-disponibles-para-scripting/endpoint) object representing that endpoint will be returned. If no endpoint with the given type and subtype can be found, the value **null** will be returned.
**Example 1**
This example shows the description of the first temperature sensor contained in a device, using the log console.
```javascript
env.log(myDevice.endpoints.byType(endpointType.temperatureSensor).description);
```
**Example 2**
This example shows the description of the first CO2 concentration sensor contained in a device, using the log console.
```javascript
env.log
(
myDevice.endpoints.byType
(
endpointType.ppmConcentrationSensor,
ppmConcentrationSensorSubType.carbonDioxide
)
.description
);
```
\### allByType(type \[, subType]) The AllByType() method works similarly to the byType() method, but returns an array with all endpoints that match the specified criteria.
**Parameters**
* **type** (integer): this parameter indicates the endpoint type being searched. The possible values for the type parameter can be found in the explanation of the **endpointType** property of the [endpoint](/docs/herramientas-low-code-scripting/referencia-de-objetos-disponibles-para-scripting/endpoint) object.
* **subType** (optional, integer): if this parameter is included, the method will search only for endpoints that are of the type specified in the type parameter, and that are also of the subtype specified in the subType parameter. The possible values for the subType parameter can be found in the explanation of the endpointSubType property of the [endpoint](/docs/herramientas-low-code-scripting/referencia-de-objetos-disponibles-para-scripting/endpoint) object.
**Result**
The method returns an array with all endpoints that match the specified criteria. If no endpoint is found, the method will return an empty array.
**Example 1**
This example shows the descriptions of all temperature sensors contained in a device, using the log console.
```javascript
myDevice.endpoints.allByType(endpointType.temperatureSensor).forEach((item) => env.log(item.description));
```
\### byTag(tag) The byTag() method allows finding the first endpoint that contains the specified tag within the collection.
**Parameters**
* **tag** (string): this parameter indicates the tag being searched. The search is case insensitive.
**Result**
If the method finds an endpoint with the specified tag, an [endpoint](/docs/herramientas-low-code-scripting/referencia-de-objetos-disponibles-para-scripting/endpoint) object representing that endpoint will be returned. If no endpoint with the specified tag can be found, the value **null** will be returned.
**Example 1**
This example shows the description of the first endpoint with the tag "SomeTag".
```javascript
env.log(myDevice.endpoints.byTag("SomeTag").description);
```
\### allByTag(tag) The AllByTag() method works similarly to the byTag() method, but returns an array with all endpoints that match the specified criteria.
**Parameters**
* **tag** (string): this parameter indicates the tag being searched. The search is case insensitive.
**Result**
The method returns an array with all endpoints that match the specified criteria. If no endpoint is found, the method will return an empty array.
**Example 1**
This example shows the descriptions of all endpoints that contain the tag "SomeTag".
```javascript
myDevice.endpoints.allByTag("SomeTag").forEach((item) => env.log(item.description));
```
\### toArray() The toArray() method allows converting the endpoint collection to an array containing all endpoints in the collection.
**Example 1**
This example shows the description of all endpoints of a device, using the log console.
```javascript
myDevice.endpoints.toArray().forEach(element => env.log(element.description));
```
# Endpoint configuration collection
The endpoint configuration collection object represents a collection of endpoints for which initial configuration is to be established, typically in [device model configuration](/docs/configuracion-del-cliente/dispositivos-y-endpoints/dispositivos/modelos-de-dispositivo/configuracion) scripts.
The `getEndpoints` function receives an object of this type as a parameter, which allows establishing the list of endpoints that should be included within a newly created device, as well as their basic initial configuration. This function is included in the device model script being created.
Methods [#methods]
\### addEndpoint(address, description, endpointType \[, endpointSubType]) The `addEndpoint` method allows adding a new endpoint to the collection.
**Parameters**
* **address** (string): indicates the address of the endpoint within the device. The address must be unique within the device, although endpoints with the same address can exist in different devices.
* **description** (string): indicates the description to be used for this endpoint.
* **endpointType** (enum): indicates the type of the endpoint being added. To learn more about endpoint types, see the [endpoint](/docs/herramientas-low-code-scripting/referencia-de-objetos-disponibles-para-scripting/endpoint) object reference, especially the endpointType property.
* **endpointSubType** (enum, optional): this parameter indicates the endpoint subtype, and can be optionally specified only for certain endpoint types. To learn more about endpoint types and subtypes, see the [endpoint](/docs/herramientas-low-code-scripting/referencia-de-objetos-disponibles-para-scripting/endpoint) object reference, especially the endpointSubType property.
**Return value**
The `addEndpoint` method returns an [endpoint configuration](/docs/herramientas-low-code-scripting/referencia-de-objetos-disponibles-para-scripting/endpoint-configuration) object, which represents the endpoint that was just added to the collection.
**Example 1**
This example shows how to create 2 endpoints within the device, one of temperature sensor type with address "1", and another of carbon dioxide sensor type with address "2".
```javascript
function getEndpoints(deviceAddress, endpoints)
{
endpoints.addEndpoint("1", "Temperature sensor", endpointType.TemperatureSensor);
endpoints.addEndpoint("2", "CO2 sensor", endpointType.PpmConcentrationSensor, ppmConcentrationSensorSubType.CarbonDioxide);
}
```
# Endpoint configuration
The endpoint configuration object represents the initial configuration of an endpoint, typically in [device model configuration](/docs/configuracion-del-cliente/dispositivos-y-endpoints/dispositivos/modelos-de-dispositivo/configuracion) scripts.
Objects of this type are created through the `add()` method of the [endpoint configuration collection](/docs/herramientas-low-code-scripting/referencia-de-objetos-disponibles-para-scripting/endpoint-configuration-collection) object.
Properties [#properties]
\### address (string) The address property represents the address of the endpoint, as text.
**Examples**
This example shows the address of an endpoint, through the log console.
```javascript
env.log('Endoint address: ', endpoint.address);
```
\### defaultDescription (string or multi-language literal) The defaultDescription property represents the description that will be used when creating the endpoint. It can be a string, or a [multi-language literal](/docs/herramientas-low-code-scripting/referencia-de-objetos-disponibles-para-scripting/multi-language-literal) object.
**Examples**
This example shows the description of an endpoint, through the log console.
```javascript
env.log('Endoint description: ', endpoint.defaultDescription);
```
\### endpointType (int enum) The endpointType property indicates the endpoint type. The possible values for this property are the same as those of the **endpointType** property of the [endpoint](/docs/herramientas-low-code-scripting/referencia-de-objetos-disponibles-para-scripting/endpoint) object.
**Examples**
This example shows the type of an endpoint, through the log console.
```javascript
env.log('Endoint type: ', endpoint.endpointType);
```
\### endpointSubType (int enum) The endpointSubType property indicates the endpoint subtype. The possible values for this property are the same as those of the **endpointSubType** property of the [endpoint](/docs/herramientas-low-code-scripting/referencia-de-objetos-disponibles-para-scripting/endpoint) object.
**Examples**
This example shows the subtype of an endpoint, through the log console.
```javascript
env.log('Endoint subtype: ', endpoint.endpointSubType);
```
\### variableTypeId (int enum) The variableTypeId property indicates the custom variable type associated with the endpoint. This property applies only to endpoints of type **endpointType.genericSensor** and **endpointType.genericFlowSensor**.
**Examples**
This example creates a flow sensor type endpoint and assigns it the variable with ID 1071.
```javascript
var e = endpoints.addEndpoint("1", "My generic sensor", endpointType.genericSensor);
e.variableTypeId = 1071;
```
\### accessType (int enum) The accessType property indicates the type of access applied to the endpoint. By default, access will be **read only**. The possible values for this property are the same as those of the accessType property of the [endpoint](/docs/herramientas-low-code-scripting/referencia-de-objetos-disponibles-para-scripting/endpoint) object.
**Examples**
This example creates a generic sensor type endpoint and assigns it read-write access.
```javascript
var e = endpoints.addEndpoint("1", "My generic sensor", endpointType.genericSensor);
e.accessType = endpointAccessType.readWrite;
```
\### operationSecurityLevel (int enum) The operationSecurityLevel property indicates the security level associated with the endpoint operation. By default, the security level will be **simple**. The possible values for this property are the same as those of the operationSecurityLevel property of the [endpoint](/docs/herramientas-low-code-scripting/referencia-de-objetos-disponibles-para-scripting/endpoint) object.
**Examples**
This example creates a generic sensor type endpoint and assigns it a medium security level.
```javascript
var e = endpoints.addEndpoint("1", "My generic sensor", endpointType.genericSensor);
e.operationSecurityLevel = endpointOperationSecurityLevel.medium;
```
\### operationWarningMessage (string or multi-language literal) The operationWarningMessage property represents the warning message that will be displayed when attempting to manually operate the device, if the security level in the operationSecurityLevel property is medium or high. It can be a string, or a [multi-language literal](/docs/herramientas-low-code-scripting/referencia-de-objetos-disponibles-para-scripting/multi-language-literal) object.
**Examples**
This example creates a generic sensor type endpoint and assigns it a multi-language warning message.
```javascript
var e = endpoints.addEndpoint("1", "My generic sensor", endpointType.genericSensor);
e.operationWarningMessage = {en: "This is a critical operation. Continue?", es: "Esta es una operación crítica. ¿Continuar?"};
```
\### range (endpoint range) The range property allows indicating the range of allowed values for an endpoint. It is only applicable to scalar type endpoints. The range is expressed as an [endpoint range](/docs/herramientas-low-code-scripting/referencia-de-objetos-disponibles-para-scripting/endpoint-range) type object. The default value for this property is null, indicating that any value is acceptable.
**Examples**
This example creates a generic sensor type endpoint and assigns it a value range from -100 to +100.
```javascript
var e = endpoints.addEndpoint("1", "My generic sensor", endpointType.genericSensor);
e.range = {lowestValue: -100, highestValue: 100};
```
\### summationAutoResetThreshold (int or null)
The summationAutoResetThreshold property controls the endpoint behavior when a cumulative value lower than the last received one is received. This property applies only to endpoints of type **endpointType.flowSensor**, **endpointType.genericFlowSensor**, **endpointType.peopleFlowSensor**, and **endpointType.energyMeter**.
When a cumulative value lower than the previous one is received, the platform must decide how to interpret the new value. Typically, some devices may send a lower value if there has actually been "negative" consumption, for example:
* When a flow sensor is capable of measuring flow in the opposite direction to normal.
* When an energy meter is capable of measuring generated energy, rather than only measuring consumed energy.
However, many other devices report a value lower than the last when they are restarted or powered off, because they only maintain the cumulative value in volatile memory. When restarted or powered off, they lose the accumulated count, resetting it to zero.
The summationAutoResetThreshold property can take any of the following values:
* **null**: indicates that a threshold for the cumulative value is not used. If a value lower than the last is received, it will be considered as "negative" consumption.
* **0 (zero)**: indicates that when a value lower than the last is received, it should be considered that the device has reset the cumulative value, because it has lost the previous value. The new value is then considered as a positive consumption value.
* **Any value greater than zero**: when receiving a cumulative value lower than the last received, the platform will consider that the cumulative has been reset only if the difference between the previous value and the new value is greater than or equal to the specified threshold. If the difference is less than this threshold, it will be considered as negative consumption.
It is recommended that for all devices that are not capable of measuring negative flows, the value of this property be set to **zero**.
**Examples**
This example creates a generic sensor type endpoint and assigns the value zero to the summationAutoResetThreshold property.
```javascript
var e = endpoints.addEndpoint("1", "My flow sensor", endpointType.flowSensor);
e.summationAutoResetThreshold = 0;
```
\### tags (array) The tags property indicates the set of tags applied to the endpoint. This property is an array of strings, each of which indicates a tag.
**Examples**
This example creates a generic sensor type endpoint and assigns three tags corresponding to the texts "sensor", "generic", and "customer1".
```javascript
var e = endpoints.addEndpoint("1", "My generic sensor", endpointType.genericSensor);
e.tags = ["sensor", "generic", "customer1"];
```
\### requiresElectricalCircuit (boolean)
The **requiresElectricalCircuit** property indicates whether the endpoint should automatically create an associated **electrical circuit** when the device is registered in the platform.
This property **only applies to endpoints of type** `**endpointType.voltageSensor**`.
For all other endpoint types, the property is ignored and its behavior remains unchanged.
The default value of this property is **false**, meaning no electrical circuit will be created unless explicitly indicated.
**Examples**
This example creates a voltage sensor type endpoint and configures the property so that an electrical circuit is automatically created in the platform:
```javascript
var voltageSensor = endpoints.addEndpoint("2", "Battery", endpointType.voltageSensor);
voltageSensor.requiresElectricalCircuit = true;
```
Methods [#methods]
\### addAlert() The addAlert() method allows creating a new alert related to the endpoint. The method returns an alert object that must be configured with the corresponding parameters.
**Result**
The result of this method is an alert object, which must be configured through the following properties:
* **variableTypeId (int)**: indicates the variable type associated with the alert. It must correspond to a variable type supported by the endpoint. The identifier of any custom variable, or any of the predefined variable types, can be used, as long as they are supported by the endpoint. The values corresponding to predefined variable types are as follows:
* **variableType.temperature (1)**
* **variableType.humidity (2)**
* **variableType.lightLevel (3)**
* **variableType.setPoint (4)**
* **variableType.volume (5)**
* **variableType.activeEnergy (6)**
* **variableType.runTime (7)**
* **variableType.discreteSensorState (8)**
* **variableType.dimmerization (9)**
* **variableType.weight (10)**
* **variableType.flow (11)**
* **variableType.voltage (12)**
* **variableType.current (13)**
* **variableType.activePower (14)**
* **variableType.reactivePower (15)**
* **variableType.apparentPower (16)**
* **variableType.cosPhi (17)**
* **variableType.pressure (18)**
* **variableType.frequency (19)**
* **variableType.ppmConcentration (20)**
* **variableType.mvConcentration (21)**
* **variableType.aqi (22)**
* **variableType.peopleFlow (23)**
* **variableType.peopleCount (24)**
* **variableType.reactiveEnergy (25)**
* **variableType.apparentEnergy (26)**
* **variableType.location (27)**
* **conditionType (enum)**: indicates the condition type used to trigger the alert. It can be one of the following values:
* **conditionType.equal (1)**: indicates that the value must equal the specified value.
* **conditionType.notEqual (2)**: indicates that the value must differ from the specified value.
* **conditionType.greater (3)**: indicates that the value must be greater than the specified value.
* **conditionType.greaterOrEqual (4)**: indicates that the value must be greater than or equal to the specified value.
* **conditionType.lower (5)**: indicates that the value must be less than the specified value.
* **conditionType.lowerOrEqual (6)**: indicates that the value must be less than or equal to the specified value.
* **threshold (double)**: indicates the value used to trigger the alert, according to the condition type.
* **normalConditionType (enum)**: indicates the condition type used to close the alert. The values are the same as those of the **conditionType** field.
* **normalThreshold (double)**: indicates the value used to close the alert, according to the normal condition type.
* **minimumDurationSeconds (int)**: indicates that the trigger condition must be maintained for a certain time, specified in seconds, for the alert to trigger. The default value is zero, indicating that the alert triggers immediately.
* **severity (enum)**: indicates the alert severity. It can be one of the following values:
* **alarmSeverity.Information (0)**: informational alert.
* **alarmSeverity.low (1)**: low severity alert.
* **alarmSeverity.medium (2)**: medium severity alert.
* **alarmSeverity.high (3)**: high severity alert.
* **geoZoneId (int)**: geozone identifier, in case the alert refers to entry or exit of a geozone.
* **notificationEmails (string\[])**: array of strings indicating the email addresses of people who should be notified when the alert triggers or closes. Contacts can be specified using the form "@ab:id" where "id" indicates the contact identifier in the address book.
* **notificationSmsNumbers (string\[])**: array of strings indicating the phone numbers of people who should be notified by SMS when the alert triggers or closes. Contacts can be specified using the form "@ab:id" where "id" indicates the contact identifier in the address book.
* **notificationVoiceNumbers (string\[])**: array of strings indicating the phone numbers of people who should be notified by voice call when the alert triggers or closes. Contacts can be specified using the form "@ab:id" where "id" indicates the contact identifier in the address book.
* **emailTemplates (object)**: optional object indicating the template used for email, both for opening and closing the alert.
Allows the use of [variables](/docs/configuracion-del-cliente/alertas-y-alarmas/alertas) and has the following properties:
* **openSubjectTemplate (string)**: template to use for the subject when opening the alert. If left blank or set to null, the default subject will be used.
* **openTemplate (string)**: template for opening the alert. If left blank or set to null, the default template will be used.
* **closeSubjectTemplate (string)**: template to use for the subject when closing the alert. If left blank or set to null, the default subject will be used.
* **closeTemplate (string)**: template for closing the alert. If left blank or set to null, the default template will be used.
* **smsTemplates (object)**: optional object indicating the template used for text messages, both for opening and closing the alert. It has the same properties as the **emailTemplates** object. The openSubjectTemplate and closeSubjectTemplate properties will be ignored.
* **voiceTemplates (object)**: optional object indicating the template used for voice calls, both for opening and closing the alert. It has the same properties as the **emailTemplates** object. The openSubjectTemplate and closeSubjectTemplate properties will be ignored.
* **tags (string\[])**: array of strings optionally indicating tags for the alert.
**Example 1**
This example shows the creation of an alert for an endpoint.
```javascript
var alert = myEndpoint.addAlert();
alert.variableTypeId = variableType.temperature;
alert.conditionType = conditionType.greater;
alert.threshold = 25;
alert.normalConditionType = conditionType.lowerOrEqual;
alert.normalThreshold = 20;
alert.severity = alarmSeverity.medium;
alert.notificationEmails = ['someone@somedomain.com', 'someone_else@somedomain.com'];
alert.tags = ['alert', 'test'];
alert.emailTemplates = [ openTemplate: "correo@email.com", closeTemplate: "correo2@email.com" ];
```
# Endpoint range
The endpoint range object allows indicating an acceptable range of values for an endpoint.
Properties [#properties]
\### lowestValue (double) The lowestValue property indicates the minimum acceptable value for the endpoint. If this property is omitted or specified with a null value, it is assumed that there is no minimum value.
**Examples**
This example shows how to build a range object that has a minimum value of 18 and a maximum of 200.
```javascript
var myRange = { lowestValue: 18, highestValue: 200 };
```
\### highestValue (double) The highestValue property indicates the maximum acceptable value for the endpoint. If this property is omitted or specified with a null value, it is assumed that there is no maximum value.
**Examples**
This example shows how to build a range object that has a minimum value of 18 and a maximum of 200.
```javascript
var myRange = { lowestValue: 18, highestValue: 200 };
```
# Endpoint Scripting Utils
Methods [#methods]
| (DataPoint\[]) getDataPoints(Date fromUTCDatetime) |
| ----------------------------------------------------------------------------------------------------------------------------------------------------------------------------------------------------------------------------------------------------------------------------------------------------------------------------------------------------------------------------------------------------------------------- |
| The getDataPoints() method allows knowing the different states of an endpoint from the moment specified as fromUTCDateTime. The returned DataPoint object is polymorphic, meaning that depending on the endpoint type whose state is to be known, its properties are different. For more information about DataPoint see this page |
| Examples |
| const subtractHours = (date, hours) => \{ const result = new Date(date); result.setHours(result.getHours() - hours); return result; }; let endpoints = env.facility.endpoints; let myendPointsArray = endpoints.toArray(); myendPointsArray.forEach((ep)=> \{ let dataPoints = ep.getDataPoints(subtractHours(utils.utcNow, 10)); env.log(dataPoints); }); |
| |
| (DataPoint\[]) - Local Time getDataPoints(Date from LocalTime Datetime) |
| --------------------------------------------------------------------------------------------------------------------------------------------------------------------------------------------------------------------------------------------------------------------------------------------------------------------------------------------------------------------------------------------------------------------------------------------------------------------------------------------------------------- |
| The getDataPoints() method allows knowing the different states of an endpoint from the moment specified as from local Time. The returned DataPoint object is polymorphic, meaning that depending on the endpoint type whose state is to be known, its properties are different. For more information about DataPoint see this page |
| Examples |
| const subtractHours = (date, hours) => \{ const result = new Date("2024-07-01"); result.setHours(result.getHours() - hours); return result; }; var epAddr = "Add1"; var ep = env.facility.endpoints.byAddress(epAddr); let endpoints = env.facility.endpoints; let myendPointsArray = endpoints.toArray(); myendPointsArray.forEach((ep)=> \{ let dataPoints = ep.getDataPoints(subtractHours(utils.ltNow, 1)); env.log(dataPoints); }); |
| |
| (double) getDataPointsAvg(Date fromUTCDatetime, Date toUTCDateTime) |
| -------------------------------------------------------------------------------------------------------------------------------------------------------------------------------------------------------------------------------------------------------------------------------------------------------------------------------------------------------------------------------------------------------------------------- |
| The getDataPointsAvg() method allows knowing the arithmetic average of the states of an endpoint from the moment specified as fromUTCDateTime until the moment specified in the toUTCDateTime parameter. For more information about DataPoint see this page |
| Examples |
| const subtractHours = (date, hours) => \{ const result = new Date(date); result.setHours(result.getHours() - hours); return result; }; let endpoints = env.facility.endpoints; let myendPointsArray = endpoints.toArray(); myendPointsArray.forEach((ep)=> \{ let avg = ep.getDataPointsAvg(subtractHours(utils.utcNow, 10), utils.utcNow); env.log(avg); }); |
| |
| (double) getDataPointsAvg(Date from local Time Datetime, Date to local Time DateTime) |
| ------------------------------------------------------------------------------------------------------------------------------------------------------------------------------------------------------------------------------------------------------------------------------------------------------------------------------------------------------------------------------------------------------------------ |
| The getDataPointsAvg() method allows knowing the arithmetic average of the states of an endpoint from the moment specified as from localTime DateTime until the moment specified in the to localDateTime parameter. For more information about DataPoint see this page |
| Examples |
| const subtractHours = (date, hours) => \{ const result = new Date("2024-05-10"); result.setHours(result.getHours() - hours); return result; }; let endpoints = env.facility.endpoints; let myendPointsArray = endpoints.toArray(); myendPointsArray.forEach((ep)=> \{ let avg = ep.getDataPointsAvg(subtractHours(utils.ltNow, 2)); env.log(avg); }); |
| |
| (double) getDataPointsMax(Date fromUTCDatetime) |
| ------------------------------------------------------------------------------------------------------------------------------------------------------------------------------------------------------------------------------------------------------------------------------------------------------------------------------------------------------------------------------------------------------------ |
| The getDataPointsMax() method allows knowing the maximum value of the states of an endpoint from the moment specified as fromUTCDateTime. For more information about DataPoint see this page |
| Examples |
| const subtractHours = (date, hours) => \{ const result = new Date(date); result.setHours(result.getHours() - hours); return result; }; let endpoints = env.facility.endpoints; let myendPointsArray = endpoints.toArray(); myendPointsArray.forEach((ep)=> \{ let avg = ep.getDataPointsMax(subtractHours(utils.utcNow, 10)); env.log(avg); }); |
| |
| (double) getDataPointsMax(Date fromUTCDatetime, Date toUTCDateTime) |
| -------------------------------------------------------------------------------------------------------------------------------------------------------------------------------------------------------------------------------------------------------------------------------------------------------------------------------------------------------------------------------------------------------------------------- |
| The getDataPointsMax() method allows knowing the maximum value of the states of an endpoint from the moment specified as fromUTCDateTime until the moment specified in the toUTCDateTime parameter. For more information about DataPoint see this page |
| Examples |
| const subtractHours = (date, hours) => \{ const result = new Date(date); result.setHours(result.getHours() - hours); return result; }; let endpoints = env.facility.endpoints; let myendPointsArray = endpoints.toArray(); myendPointsArray.forEach((ep)=> \{ let avg = ep.getDataPointsMax(subtractHours(utils.utcNow, 10), utils.utcNow); env.log(avg); }); |
| |
| (double) getDataPointsMin(Date fromUTCDatetime) |
| ------------------------------------------------------------------------------------------------------------------------------------------------------------------------------------------------------------------------------------------------------------------------------------------------------------------------------------------------------------------------------------------------------------ |
| The getDataPointsMin() method allows knowing the minimum value of the states of an endpoint from the moment specified as fromUTCDateTime. For more information about DataPoint see this page |
| Examples |
| const subtractHours = (date, hours) => \{ const result = new Date(date); result.setHours(result.getHours() - hours); return result; }; let endpoints = env.facility.endpoints; let myendPointsArray = endpoints.toArray(); myendPointsArray.forEach((ep)=> \{ let avg = ep.getDataPointsMin(subtractHours(utils.utcNow, 10)); env.log(avg); }); |
| |
| (double) getDataPointsMin(Date fromUTCDatetime, Date toUTCDateTime) |
| -------------------------------------------------------------------------------------------------------------------------------------------------------------------------------------------------------------------------------------------------------------------------------------------------------------------------------------------------------------------------------------------------------------------------- |
| The getDataPointsMin() method allows knowing the minimum value of the states of an endpoint from the moment specified as fromUTCDateTime until the moment specified in the toUTCDateTime parameter. For more information about DataPoint see this page |
| Examples |
| const subtractHours = (date, hours) => \{ const result = new Date(date); result.setHours(result.getHours() - hours); return result; }; let endpoints = env.facility.endpoints; let myendPointsArray = endpoints.toArray(); myendPointsArray.forEach((ep)=> \{ let avg = ep.getDataPointsMin(subtractHours(utils.utcNow, 10), utils.utcNow); env.log(avg); }); |
| |
| (double) getDataPointsSum(Date fromUTCDatetime) |
| ------------------------------------------------------------------------------------------------------------------------------------------------------------------------------------------------------------------------------------------------------------------------------------------------------------------------------------------------------------------------------------------------------------ |
| The getDataPointsSum method allows knowing the sum of the state values of an endpoint from the moment specified as fromUTCDateTime. For more information about DataPoint see this page |
| Examples |
| const subtractHours = (date, hours) => \{ const result = new Date(date); result.setHours(result.getHours() - hours); return result; }; let endpoints = env.facility.endpoints; let myendPointsArray = endpoints.toArray(); myendPointsArray.forEach((ep)=> \{ let avg = ep.getDataPointsSum(subtractHours(utils.utcNow, 10)); env.log(avg); }); |
| |
| (double) getDataPointsSum(Date fromUTCDatetime, Date toUTCDateTime) |
| -------------------------------------------------------------------------------------------------------------------------------------------------------------------------------------------------------------------------------------------------------------------------------------------------------------------------------------------------------------------------------------------------------------------------- |
| The getDataPointsSum() method allows knowing the sum of the state values of an endpoint from the moment specified as the fromUTCDateTime parameter until the moment specified in the toUTCDateTime parameter. For more information about DataPoint see this page |
| Examples |
| const subtractHours = (date, hours) => \{ const result = new Date(date); result.setHours(result.getHours() - hours); return result; }; let endpoints = env.facility.endpoints; let myendPointsArray = endpoints.toArray(); myendPointsArray.forEach((ep)=> \{ let avg = ep.getDataPointsSum(subtractHours(utils.utcNow, 10), utils.utcNow); env.log(avg); }); |
| |
\=====
Local Time Methods [#local-time-methods]
| (DataPoint\[]) getDataPointsLT(DateTime from ) |
| ---------------------------------------------------------------------------------------------------------------------------------------------------------------------------------------------------------------------------------------------------------------------------------------------------------------------------------------------------------------------------------------------------------------------------------- |
| The getDataPointsLT() method allows knowing the different states of an endpoint from the moment specified as 'from Local Time'. The returned DataPoint object is polymorphic, meaning that depending on the endpoint type whose state is to be known, its properties are different. For more information about DataPoint see this page |
| Examples |
| const subtractHours = (date, hours) => \{ const result = new Date(date); result.setHours(result.getHours() - hours); return result; }; let endpoints = env.facility.endpoints; let myendPointsArray = endpoints.toArray(); myendPointsArray.forEach((ep)=> \{ let dataPoints = ep.getDataPoints(subtractHours(utils.localTime, 10)); env.log(dataPoints); }); |
| |
| (double) getDataPointsAvg(Date from local Time) |
| ------------------------------------------------------------------------------------------------------------------------------------------------------------------------------------------------------------------------------------------------------------------------------------------------------------------------------------------------------------------------------------------------------------------ |
| The getDataPointsAvg() method allows knowing the arithmetic average of the states of an endpoint from the moment specified as 'from local time'. For more information about DataPoint see this page |
| Examples |
| const subtractHours = (date, hours) => \{ const result = new Date(date); result.setHours(result.getHours() - hours); return result; }; let endpoints = env.facility.endpoints; let myendPointsArray = endpoints.toArray(); myendPointsArray.forEach((ep)=> \{ let avg = ep.getDataPointsAvg(subtractHours(utils.localTimeNow, 10)); env.log(avg); }); |
| |
| (double) getDataPointsAvg(Date from LocalTime, LocalTime) |
| -------------------------------------------------------------------------------------------------------------------------------------------------------------------------------------------------------------------------------------------------------------------------------------------------------------------------------------------------------------------------------------------------------------------------------------- |
| The getDataPointsAvg() method allows knowing the arithmetic average of the states of an endpoint from the moment specified as from Local Time until the moment specified in the to Local Time parameter. For more information about DataPoint see this page |
| Examples |
| const subtractHours = (date, hours) => \{ const result = new Date(date); result.setHours(result.getHours() - hours); return result; }; let endpoints = env.facility.endpoints; let myendPointsArray = endpoints.toArray(); myendPointsArray.forEach((ep)=> \{ let avg = ep.getDataPointsAvg(subtractHours(utils.localTimeNow, 10), utils.localTimeNow); env.log(avg); }); |
| |
| (double) getDataPointsMax(Date from localTime) |
| ------------------------------------------------------------------------------------------------------------------------------------------------------------------------------------------------------------------------------------------------------------------------------------------------------------------------------------------------------------------------------------------------------------------ |
| The getDataPointsMax() method allows knowing the maximum value of the states of an endpoint from the moment specified as from localTime. For more information about DataPoint see this page |
| Examples |
| const subtractHours = (date, hours) => \{ const result = new Date(date); result.setHours(result.getHours() - hours); return result; }; let endpoints = env.facility.endpoints; let myendPointsArray = endpoints.toArray(); myendPointsArray.forEach((ep)=> \{ let avg = ep.getDataPointsMax(subtractHours(utils.localTimeNow, 10)); env.log(avg); }); |
| |
| (double) getDataPointsMax(Date from localTime Datetime, Date to localTime DateTime) |
| ----------------------------------------------------------------------------------------------------------------------------------------------------------------------------------------------------------------------------------------------------------------------------------------------------------------------------------------------------------------------------------------------------------------------- |
| The getDataPointsMax() method allows knowing the maximum value of the states of an endpoint from the moment specified as 'from localTime DateTime' until the moment specified in the 'to localTime DateTime' parameter. For more information about DataPoint see this page |
| Examples |
| const subtractHours = (date, hours) => \{ const result = new Date(date); result.setHours(result.getHours() - hours); return result; }; let endpoints = env.facility.endpoints; let myendPointsArray = endpoints.toArray(); myendPointsArray.forEach((ep)=> \{ let avg = ep.getDataPointsMax(subtractHours(utils.Now, 10), utils.utcNow); env.log(avg); }); |
| |
| (double) getDataPointsMin(Date from localTime Datetime) |
| ------------------------------------------------------------------------------------------------------------------------------------------------------------------------------------------------------------------------------------------------------------------------------------------------------------------------------------------------------------------------------------------------------------------ |
| The getDataPointsMin() method allows knowing the minimum value of the states of an endpoint from the moment specified as 'from LocalTime'. For more information about DataPoint see this page |
| Examples |
| const subtractHours = (date, hours) => \{ const result = new Date(date); result.setHours(result.getHours() - hours); return result; }; let endpoints = env.facility.endpoints; let myendPointsArray = endpoints.toArray(); myendPointsArray.forEach((ep)=> \{ let avg = ep.getDataPointsMin(subtractHours(utils.localTimeNow, 10)); env.log(avg); }); |
| |
| (double) getDataPointsMin(Date from localTime Datetime, Date to localTime DateTime) |
| -------------------------------------------------------------------------------------------------------------------------------------------------------------------------------------------------------------------------------------------------------------------------------------------------------------------------------------------------------------------------------------------------------------------------------------- |
| The getDataPointsMin() method allows knowing the minimum value of the states of an endpoint from the moment specified as 'from localTime DateTime' until the moment specified in the 'to localTime DateTime' parameter. For more information about DataPoint see this page |
| Examples |
| const subtractHours = (date, hours) => \{ const result = new Date(date); result.setHours(result.getHours() - hours); return result; }; let endpoints = env.facility.endpoints; let myendPointsArray = endpoints.toArray(); myendPointsArray.forEach((ep)=> \{ let avg = ep.getDataPointsMin(subtractHours(utils.localTimeNow, 10), utils.localTimeNow); env.log(avg); }); |
| |
| (double) getDataPointsSum(Date from localTime Datetime) |
| ------------------------------------------------------------------------------------------------------------------------------------------------------------------------------------------------------------------------------------------------------------------------------------------------------------------------------------------------------------------------------------------------------------------ |
| The getDataPointsSum method allows knowing the sum of the state values of an endpoint from the moment specified as from localTime DateTime. For more information about DataPoint see this page |
| Examples |
| const subtractHours = (date, hours) => \{ const result = new Date(date); result.setHours(result.getHours() - hours); return result; }; let endpoints = env.facility.endpoints; let myendPointsArray = endpoints.toArray(); myendPointsArray.forEach((ep)=> \{ let avg = ep.getDataPointsSum(subtractHours(utils.localTimeNow, 10)); env.log(avg); }); |
| |
| (double) getDataPointsSum(Date from localTime Datetime, Date to localTime DateTime) |
| -------------------------------------------------------------------------------------------------------------------------------------------------------------------------------------------------------------------------------------------------------------------------------------------------------------------------------------------------------------------------------------------------------------------------------------- |
| The getDataPointsSum() method allows knowing the sum of the state values of an endpoint from the moment specified as the 'localTime DateTime' parameter until the moment specified in the 'to localTime DateTime' parameter. For more information about DataPoint see this page |
| Examples |
| const subtractHours = (date, hours) => \{ const result = new Date(date); result.setHours(result.getHours() - hours); return result; }; let endpoints = env.facility.endpoints; let myendPointsArray = endpoints.toArray(); myendPointsArray.forEach((ep)=> \{ let avg = ep.getDataPointsSum(subtractHours(utils.localTimeNow, 10), utils.localTimeNow); env.log(avg); }); |
| |
# Endpoint UI rules
The endpoint UI rules object represents the user interface rules applied to a device, typically used in [device model configuration](/docs/configuracion-del-cliente/dispositivos-y-endpoints/dispositivos/modelos-de-dispositivo/configuracion) scripts.
The `updateEndpointUIRules` function receives an object of this type as a parameter, which allows establishing the user interface rules for the endpoint given as a parameter in the script.
Properties [#properties]
\### canDelete (boolean) The canDelete property indicates whether it is possible to delete the endpoint given as a parameter. The value true indicates that deleting the endpoint is allowed, while the value false prevents its deletion.
**Examples**
This example allows deleting any endpoint, except if its address is "1".
```javascript
function updateEndpointUIRules(endpoint, rules)
{
rules.canDelete = (endpoint.address != "1");
}
```
\### canEditSubType (boolean) The canEditSubType property indicates whether it is possible to change the endpoint subtype, corresponding to the [endpointSubType](/docs/herramientas-low-code-scripting/referencia-de-objetos-disponibles-para-scripting/endpoint-configuration) property. The value true indicates that editing the subtype is allowed, while the value false prevents it.
**Examples**
This example allows modifying the subtype of any endpoint, but only if it is of appliance type.
```javascript
function updateEndpointUIRules(endpoint, rules)
{
rules.canEditSubType = (endpoint.endpointType == endpointType.appliance);
}
```
\### canEditAccessType (boolean) The canEditAccessType property indicates whether it is possible to edit the [accessType](/docs/herramientas-low-code-scripting/referencia-de-objetos-disponibles-para-scripting/endpoint-configuration) property of the endpoint. The value true indicates that editing is allowed, while the value false prevents it. The default value for this property is false. For more information about the accessType property, see [this section](/docs/herramientas-low-code-scripting/referencia-de-objetos-disponibles-para-scripting/endpoint).
**Examples**
This example allows modifying the accessType property of any endpoint.
```javascript
function updateEndpointUIRules(endpoint, rules)
{
rules.canEditAccessType = true;
}
```
\### canEditOperationSecurityLevel (boolean) The canEditOperationSecurityLevel property indicates whether it is possible to edit the [operationSecurityLevel](/docs/herramientas-low-code-scripting/referencia-de-objetos-disponibles-para-scripting/endpoint-configuration) property of the endpoint. The value true indicates that editing is allowed, while the value false prevents it. The default value for this property is false. For more information about the operationSecurityLevel property, see [this section](/docs/herramientas-low-code-scripting/referencia-de-objetos-disponibles-para-scripting/endpoint).
**Examples**
This example allows modifying the operationSecurityLevel property of any endpoint.
```javascript
function updateEndpointUIRules(endpoint, rules)
{
rules.canEditOperationSecurityLevel = true;
}
```
\### canEditRange (boolean) The canEditRange property indicates whether it is possible to edit the [range](/docs/herramientas-low-code-scripting/referencia-de-objetos-disponibles-para-scripting/endpoint-configuration) property of the endpoint. The value true indicates that editing is allowed, while the value false prevents it. The default value for this property is false. For more information about the range property, see [this section](/docs/herramientas-low-code-scripting/referencia-de-objetos-disponibles-para-scripting/endpoint-configuration).
**Examples**
This example allows modifying the range property of any endpoint.
```javascript
function updateEndpointUIRules(endpoint, rules)
{
rules.canEditRange = false;
}
```
\### canEditSummationAutoReset (boolean) The canEditSummationAutoReset property indicates whether it is possible to change the value of the [summationAutoResetThreshold](/docs/herramientas-low-code-scripting/referencia-de-objetos-disponibles-para-scripting/endpoint-configuration) property. The value true indicates that editing is allowed, while the value false prevents it.
**Examples**
This example allows modifying the "summation auto reset" property of any endpoint, but only if it is of energy meter type.
```javascript
function updateEndpointUIRules(endpoint, rules)
{
rules.canEditSummationAutoReset = (endpoint.endpointType == endpointType.energyMeter);
}
```
\### canEditElectricalCircuit (boolean) The canEditElectricalCircuit property indicates whether it is possible to edit the electrical circuit associated with the endpoint. The value true indicates that editing is allowed, while the value false prevents it.
**Examples**
This example allows modifying the electrical circuit of any endpoint, but only if it is of energy meter type.
```javascript
function updateEndpointUIRules(endpoint, rules)
{
rules.canEditElectricalCircuit = (endpoint.endpointType == endpointType.energyMeter);
}
```
# Environment
Environment is a global object that is always available in all scripts. It contains some basic functions, which are detailed below. To access the global Environment object, use the global variable **env**. This variable is always available, automatically, in all scripts.
Methods [#methods]
\### log(p1, ....., pn) The log() function allows writing information to the log window. The log window is only available when a script is executed in test mode. When the script runs in its normal form (outside of test mode), this function is ignored.
**Parameters**
* **p1..pn** (any quantity and type): The log function can receive any number of parameters, of any type. The text sent to the log console is the concatenation of all parameters passed.
**Examples**
This example shows a numeric value in the log console.
```javascript
env.log('Value: ', 25);
```
This example shows a fixed text and a variable in the log console, to display a device address.
```javascript
env.log('Device address: ', myDevice.address);
```
# HttpResponse
The HttpResponse object allows returning data when sending [uplink](/docs/configuracion-del-cliente/dispositivos-y-endpoints/dispositivos/modelos-de-dispositivo/procesamiento-de-datos) data through [HTTP](/docs/configuracion-del-cliente/dispositivos-y-endpoints/dispositivos/integracion-de-dispositivos/http/intercambio-de-datos-flexible).
Properties [#properties]
\### statusCode (int) The statusCode property allows indicating the HTTP response status code. The default value for this property is 200 (OK).
**Examples**
This example shows the creation of an HTTP response with status 200 and JSON content.
```javascript
var httpResponse = new HttpReponse();
httpResponse.statusCode = 200;
httpResponse.contentType = "application/json";
httpResponse.content.setAsJson({ result: ultimo });
```
\### contentType (string) The contentType property indicates the type of content that will be returned in the HTTP request.
**Examples**
This example shows the creation of an HTTP response with status 200 and JSON content.
```javascript
var httpResponse = new HttpReponse();
httpResponse.statusCode = 200;
httpResponse.contentType = "application/json";
httpResponse.content.setAsJson({ result: ultimo });
```
Methods [#methods]
\### content.setAsJson(object) The content.setAsJson() method allows setting the response content in JSON format, with the data of the given object as parameter.
**Parameters**
* **object** (object): this parameter contains the object to be sent as a response. The object will be converted to JSON format.
**Example**
This example shows the creation of an HTTP response with status 200 and JSON content.
```javascript
var httpResponse = new HttpReponse();
httpResponse.statusCode = 200;
httpResponse.contentType = "application/json";
httpResponse.content.setAsJson({ result: ultimo });
```
\### content.setAsString(text) The content.setAsString() method allows setting the response content using the given text as parameter.
**Parameters**
* **text** (string): this parameter contains the text to be sent as a response.
**Example**
This example shows the creation of an HTTP response with status 200 and text content.
```javascript
var httpResponse = new HttpReponse();
httpResponse.statusCode = 200;
httpResponse.contentType = "text/plain";
httpResponse.content.setAsString("This is some text");
```
\### content.setAsBytes(bytes) The content.setAsBytes() method allows setting the response content in binary form, using the given data as parameter.
**Parameters**
* **bytes** (int\[]): this parameter contains the byte array to be sent as a response.
**Example**
This example shows the creation of an HTTP response with status 200 and binary content of 5 bytes.
```javascript
var httpResponse = new HttpReponse();
httpResponse.statusCode = 200;
httpResponse.contentType = "application/octet-stream";
httpResponse.content.setAsBytes([1, 2, 3, 4, 5]);
```
# Scripting Object Reference
This section contains information about the objects available for [scripting](/docs/herramientas-low-code-scripting). See the sub-sections for more information about each object type.
# Multi-language literal
The multi-language literal object allows constructing messages in multiple languages, especially for error or informational messages.
Properties [#properties]
\### en (string) This property indicates the content of the message in English.
**Examples**
This example shows how to construct a multi-language message.
```javascript
var myMessage = { en: "This is a message", es: "Este es un mensaje", pt: "Esta é uma mensagem" };
```
\### es (string) This property indicates the content of the message in Spanish.
**Examples**
This example shows how to construct a multi-language message.
```javascript
var myMessage = { en: "This is a message", es: "Este es un mensaje", pt: "Esta é uma mensagem" };
```
\### pt (string) This property indicates the content of the message in Portuguese.
**Examples**
This example shows how to construct a multi-language message.
```javascript
var myMessage = { en: "This is a message", es: "Este es un mensaje", pt: "Esta é uma mensagem" };
```
# RSSI status
The RSSI status object represents the signal level of a wireless connection of a device. This object is normally used to update the signal level through the `updateDeviceRssi` method of the [device](/docs/herramientas-low-code-scripting/referencia-de-objetos-disponibles-para-scripting/device) object, usually as part of a [LoRaWAN or MQTT data conversion](/docs/configuracion-del-cliente/dispositivos-y-endpoints/dispositivos/modelos-de-dispositivo/procesamiento-de-datos) script.
Properties [#properties]
\### type (int enum)
The type property indicates the connection type. The possible values for this property are as follows:
* **rssiType.default (1)**: this is the default value for this property, normally used when the device has a single type of wireless connection.
* **rssiType.wiFi (2)**: indicates that the connection type is Wi-Fi.
* **rssiType.loRaWan (3)**: indicates that the connection type is LoRaWAN.
* **rssiType.cellular (4)**: indicates that the connection type is cellular.
* **rssiType.zigBee (5)**: indicates that the connection type is ZigBee.
* **rssiType.rF (1)**: indicates that the connection type is some other type.
**Examples**
This example shows how to report a signal level of 72% for the cellular interface, and 68% for the Wi-Fi interface, on a device that has both interface types.
```javascript
myDevice.updateDeviceRssi
(
[
{ type: rssiType.cellular, quality: 72 },
{ type: rssiType.wiFi, quality: 68 }
]
);
```
\### quality (int) The quality property indicates the connection quality, as a percentage (0-100%).
**Examples**
This example shows how to report a signal level of 72% for the cellular interface, and 68% for the Wi-Fi interface, on a device that has both interface types.
```javascript
myDevice.updateDeviceRssi
(
[
{ type: rssiType.cellular, quality: 72 },
{ type: rssiType.wiFi, quality: 68 }
]
);
```
\### strength (int) The strength property allows indicating the signal level as attenuation, in dBm.
**Examples**
This example shows how to report a signal level with an attenuation of -68 dBm, on a device with a single communication interface.
```javascript
myDevice.updateDeviceRssi({ strength: -68 });
```
# Create Dashboards
To create a new dashboard, navigate to the ***Dashboards*** menu in the Monitor and press the *Add Dashboard* button.

The user can add a Description and Comments in the **Details** tab as needed.
> The description will serve as the dashboard's identifying name.

You can also decide whether to create it as **Global**. If not, the dashboard will only be visible in the **Client** instance.

The **Facility Display** tab allows you to select whether it should be visible in a specific facility, all facilities, or none. This option is not mandatory.

The **Navigation** tab enables the option for the user to define whether viewing the dashboard should redirect to another one. This option is not mandatory.

# Create Groups and Widgets
The platform includes predefined **widgets** that facilitate data presentation in dashboards. Some of the available widgets are:
* **Active alarms:** displays a pie chart with the distribution of currently active alarm types.
* **Alarm counter:** Displays a counter of active alarms, allowing hierarchy indication.
* **Individual alarm counter:** Displays a counter of active alarms, allowing severity and hierarchy indication.
* **Past and projected energy consumption:** shows past energy consumption and targets, as well as a projection of consumption and targets for the coming days.
* **Energy consumption by category:** shows energy consumption for selected categories.
* **Energy consumption by phase:** pie chart showing energy consumption by phase.
* **Daily energy consumption by category:** shows daily energy consumption for selected categories.
* **Daily consumption by phase:** shows daily consumption by phase for selected categories.
* **Energy cost by category:** shows the energy cost for selected categories.
* **Past and projected energy costs:** shows past energy costs and targets, as well as a projection of costs and targets for the coming days.
* **Weather status:** shows the current weather status of the facility.
* **Daily power factor:** shows the daily evolution of the power factor.
* **Infrastructure:** shows the current availability of the infrastructure.
* **Facility map:** shows a map containing the location of the current facility.
* **Energy consumption targets:** shows energy consumption information relative to defined targets.
* **Daily maximum power:** shows the maximum daily power used in a 15-minute period.
* **Daily average power:** Shows the daily evolution of the power used.
* **Facility summary:** shows summary information for the current facility.
* **Global summary:** shows summary information for all facilities.
* **Latest events:** Displays a list of the most recent events.
* **Endpoint history:** line chart showing the variation of an endpoint variable type over time.
* **Comparative endpoint history:** line chart showing the comparative variation of two endpoint variable types over time.
* **Metric:** Displays the value of a variable in real time.
* **View:** Displays a SCADA-type view designed in the views section.
These widgets can be edited individually or grouped together.
Whether you want to create a widget or a group of widgets, navigate to the *Add element* button found on the **Dashboards** screen.


If you select the *Add widget* option, a screen with the available widgets will appear.

Each widget has a different configuration screen depending on the data it needs to collect.
Example of a *Comparative endpoint history* widget:


For all widgets, you can define a name, dimensions (height and width), and whether clicking should redirect to another dashboard (navigation). The name and navigation option are not mandatory.
To add a new **group**, follow the same procedure but select the *Add group* button. The following screen will appear:

New Group Addition
Once the *Save* button is pressed, the group will be visible in the dashboard.

New Group Addition
To add widgets inside the created group, look for the *Add widget* option in the three dots located in the upper right corner of the group.

Example of a widget inside a group.

New Widget into a Group
# Edit Groups and Widgets
Dashboard *Design* editing is tied to each user's permissions. If the user has the required permission, they can use the edit button located in the upper right corner of the dashboards when entering the **Dashboards** option in the Monitor menu.


With the Drag and Drop system, you can move and resize widgets and groups as desired. As shown below:
_f58e.gif)
Each **Widget** has its own options in edit mode. Depending on the widget type, the user can access configuration, clone the widget, delete it, export it in JPG format, export it in CSV format, and reset the zoom on a chart widget.
Some widgets allow you to choose any color for data visualization when accessing settings. Color ranges can also be set according to variable values. For charts, users can choose different formats such as lines or bars.

Each **Group** has its own editing options. The user can configure the group, clone it into an identical one, delete it, compact the widgets inside by removing empty spaces, and add new widgets within it.

# Filters
The user can use the filter icon to perform a specific search within a defined time period, in order to obtain the data that devices recorded during the selected dates.


> Remember to press the "Apply" button before closing the filter menu so that the selected dates are applied correctly.
# Dashboards
A **Dashboard** is a graphical screen designed to present data and information in a visual, quick, and clear manner. Dashboards help users make data-driven decisions from multiple sources.
The Cloud Studio platform features a series of specific widgets for branch monitoring, energy consumption, variable history, real-time metrics, weather data, and more, for use in dashboards customizable by the end user.
Since platform version 1.2.20, all dashboard features have been relocated and unified in the Monitor application.
> To learn more about creating dashboards and the new drag & drop features, start [here](/docs/monitor/dashboards/crear-dashboards) or watch this [video](https://youtu.be/cYEkFLk_QVE) on YouTube.


# Dashboard List
From this section, the user can manage all dashboards they have created.
From the **Dashboards** option and selecting the icon shown below, the dashboard list can be accessed.


The user can **Create** dashboards, **Edit** dashboards, and **Delete** dashboards that are no longer needed.
# Time Period Selection
Introduction [#introduction]
The platform allows time period selection in various situations, such as:
* Dashboards
* Widgets
* Historical data visualization
* Reports
In all cases, the user interface presents a component like the following:

Choosing absolute and relative time periods [#choosing-absolute-and-relative-time-periods]
This component allows selecting a date range (including time, if applicable), both in absolute and relative form. Below is how this feature is used.
Absolute time periods [#absolute-time-periods]
To specify an absolute time period, use the buttons to enter dates. You can choose a start date and time, as well as an end date and time.

When pressing the "Apply" button, the selector will display the selected period:

Relative time periods [#relative-time-periods]
To choose relative time periods, you can use the options bar on the right, as shown here, as well as enter arbitrary relative time expressions. The following image shows the list of predefined relative time options:

However, you can also enter any relative time period by typing it in the respective "From" and "To" fields, as shown in the following example:

The syntax for relative expressions is as follows:
* **now** always represents the current date and time.
* Then, you can add or subtract an arbitrary amount of seconds, minutes, hours, days, months, or years.
* **s** represents seconds
* **m** represents minutes
* **h** represents hours
* **d** represents days
* **M** represents months
* **y** represents years
* Optionally, you can "round" the date to the beginning of the day, month, or year by adding any of the following modifiers:
* **/d** represents the beginning of the day
* **/M** represents the beginning of the month
* **/y** represents the beginning of the year
Examples of relative expressions:
| Start expression | End expression | Meaning |
| ---------------- | -------------- | ------------------------------------------ |
| now/d | now | From the beginning of today until now. |
| now/M | now | From the beginning of the month until now. |
| now-1d/d | now/d | Yesterday. |
| now-6h | now | The last 6 hours. |
| now-30m | now | The last 30 minutes. |
| now-14/d | now | The last 15 days (including today). |
Mixed time periods [#mixed-time-periods]
You can also use a combination of fixed and relative periods. For example, to indicate the time period "from January 1, 2021 until now", you can enter the absolute date "January 1, 2021" in the "from" field, and then the relative expression "now" in the "to" field.
# Export reports as CSV using the facility-specific separator
This section allows exporting the alarm history to a Microsoft Excel document.

# Reports
In the Reports section, the user can view different types of options from which to download a report.
The available reports for viewing and downloading are the following:
**Device Catalog**

**Endpoint Catalog**

**Active Alarms >** For more details on filters to include hidden Endpoints, click **here**

**Alarm History**

**Dashboard Report**

**Endpoint Historical Data**

**Notification List**

**Detailed Energy Consumption**

**Summary Energy Consumption**

Each option can be configured to generate the specific report needed, and it will be downloaded in PDF or Excel format.
# Notification List
Introduction [#introduction]
The notification list allows viewing the report filtered by Creation date, Facility, notification type, channel, and Client. An administrator with a global user can filter by multiple clients. The platform allows downloading the report in PDF/Excel.

# Report Export Customization
This feature allows customizing the subject and body of the email sent when scheduling a report. Additionally, it allows adjusting the name of the attached document, the header, and the footer.
Export configuration [#export-configuration]
In the download dropdown of each report, a new option called "export configuration" will appear.

This option will open a modal that allows customizing the header, footer, and generated file name. Additionally, through a checkbox, it allows enabling or disabling each of these settings. For example, you can deactivate the display of the header and footer:

Header and Footer [#header-and-footer]
When enabling either option via the checkbox, a code editor will appear below each one to enter the HTML template you want to use for the report's header or footer.
File name [#file-name]
When enabling the customize checkbox, a text field will appear where you can type the custom name for the file that will be generated during export. Only alphanumeric values and hyphens are allowed.
Save as favorite [#save-as-favorite]
When saving the report as a favorite, the export configuration (header, footer, and file name) will also be saved. It can subsequently be edited from the favorite editing view:

When pressing the configuration button, the same modal mentioned above will appear with the export settings.
It is worth noting that if the report is scheduled, it will also be generated with the saved configuration.
Notification email customization [#notification-email-customization]
When saving a favorite report, it can be scheduled to be sent according to the established criteria. Below the scheduling options, a button with the text "customize E-mail content" has been added, which allows customizing the subject and content of the email sent when scheduling a report:

When pressing this button, a modal will open with a code editor and a checkbox to enable or disable subject customization:

Subject [#subject]
Through a checkbox, you can enable or disable subject customization. If the checkbox is enabled, a text field will appear allowing you to enter the custom subject text.
Body [#body]
Below the subject, a code editor field will appear that, by default, shows the template currently used in Gear Studio.
To save changes made to a favorite's customization (both email and export configuration), you must save the favorite. That is, press the "confirm" button on the favorite report editing screen:

# Configured Notifications Report by Instance
This report lists the notifications configured at the instance level, considering all *Clients* and *Facilities* it contains.
**Filters**:
* **Client** (*all or selected list*)
* **Facility** (*all or selected list*)
* **Channel** (*all or selected list*)
* **Contact methods (recipients):** allows entering a full or partial phone number or email address once the report has been run with the previous filters (Client, Facility, and Channel)
This last filter can consist of an email address and/or phone number that the user manually enters in order to find which instance client or which configuration (alarm or alert types) contains the entered contact method configured for a notification.
* The user can download the report in PDF and Excel formats.

# Operable Endpoints
The following table details the endpoint types that allow operation, meaning those endpoint types that support updating an endpoint's state from a view.
| Endpoint Type | Operable |
| --------------------------------------------------- | -------- |
| Temperature Sensors | Yes |
| Humidity Sensors | Yes |
| Light Level Sensors (light sensor) | Yes |
| Weight Sensors | Yes |
| Volume Sensors | Yes |
| Pressure Sensors | Yes |
| IAS Sensors (binary, occupancy, and motion sensors) | Yes |
| Voltage Sensors | Yes |
| Current Sensors | Yes |
| Active Power Sensors | Yes |
| Reactive Power Sensors | Yes |
| Apparent Power Sensors | Yes |
| Power Factor Sensor (CosPhiSensor) | Yes |
| Frequency Meters | Yes |
| Energy Consumption Sensors | Yes |
| Flow Sensors | No |
| Generic Sensors | Yes |
| Generic Flow Rate Sensors | Yes |
| Appliances and other on/off devices | Yes |
| Dimmers | Yes |
| Curtain and closure controllers | Yes |
| Runtime counters | No |
| Location trackers | No |
| Concentration Sensors (ppm) | Yes |
| Concentration Sensors (mass/volume) | Yes |
| Air Quality Index (AQI) Sensors | Yes |
| People Flow Sensors | Yes |
| People Counters | Yes |
| HVAC / Thermostats | Yes |
| Cameras | No |
# Endpoint States with Image Associated to Discrete Variables
It is possible to associate discrete variables to the states of a Custom Endpoint, to subsequently associate those Endpoints to the Endpoint status image element. If no image exists for a value, a default image will be displayed.
**Example**
For the endpoint, we choose the images we want to assign to those states. In this case: 0 Off, 1 On, and a default image for any other number.


The states can be modified with images such as off/on.

# Views
Views allow designing SCADA visualizations where images can be inserted and then overlaid with data that, unlike what can be achieved with dashboards, updates in near real-time.
In views, sensor (endpoint) data from devices is inserted using a WYSIWYG design tool through the use of visual objects called elements.
Views are implemented in two applications:
1. The view manager sub-module, which includes the designer and is found in the Manager.
2. The visualization sub-module, which allows selecting a running view and is found in the Monitor.
Creating views [#creating-views]
To create a new view or modify an existing one, go to the views menu in the Manager application.

Once created, a canvas with the background chosen by the user will open. In views, the following actions can be performed:
* [Add static text elements](/docs/monitor/vistas/elementos/texto)
* [Add static and predefined image elements](/docs/monitor/vistas/elementos/imagen)
* [Add real-time endpoint status elements in text format](/docs/monitor/vistas/elementos/endpoint-status-text)
* [Add real-time endpoint status elements with predefined images based on the variable type.](/docs/monitor/vistas/elementos/endpoint-status-image)
* [Add occupancy elements.](/docs/monitor/vistas/elementos/elementos-de-ocupacion)
* [Add alarm elements.](/docs/monitor/vistas/elementos/elementos-de-alarmas)
* [Add camera-type endpoint snapshots](/docs/monitor/vistas/elementos/elementos-de-snapshot)
**Tips:**
> * The recommended size for views is 1600px x 900px. However, it can be customized to the user's needs.
> * We recommend .PNG format for images with transparent backgrounds.
> * Watch our [video](https://youtu.be/0P7CbN4bvVA) on YouTube to learn more about SCADA-type views.
Once the view is configured, the user can view it from the *Monitor* as shown in the following image:

# Get endpoint data incrementally
This API allows retrieving a list of Endpoints incrementally. This enables fast updates of Endpoints without needing to retrieve the full list.
Theory of operation [#theory-of-operation]
To obtain a list of Endpoints incrementally, the SequenceNumber field is used. This field is monotonically ascending, meaning that when changes occur in EndpointData, its SequenceNumber field will change to a value higher than any other. This allows retrieving data based on the SequenceNumber in small batches until no more data is obtained, and then continuing periodically to get updates. When the result of this API is an empty list, it means that there are currently no updates.
Typically, an application consuming this API uses the following flow:
1. The application starts using a stored SequenceNumber (typically in non-volatile storage). On the first execution, this value is 1.
2. The application executes the API using (stored SequenceNumber + 1).
3. The application receives a list of Endpoint data, sorted by SequenceNumber.
4. If the received list is empty, the application waits a few seconds and returns to step 2.
5. If the received list is not empty, the application stores the highest SequenceNumber received.
6. The application immediately returns to step 2.
7. When there is a new data reading from an Endpoint, its SequenceNumber will immediately change to a value higher than the last received, so its information will be received immediately in the next execution.
| In the flow above, it is assumed that the application always executes the API with the same set of clientID, facilityID, deviceID, and endpointID parameters. If different parameters are desired, the search must start from zero. |
| ----------------------------------------------------------------------------------------------------------------------------------------------------------------------------------------------------------------------------------- |
| For debugging any application using this API, it is recommended to use maxCount = 1, to receive updates one at a time. This parameter can later be changed to a more practical value for production, such as 50. |
| ---------------------------------------------------------------------------------------------------------------------------------------------------------------------------------------------------------------- |
Request [#request]
```
GET /api/v2/endpointData/incremental/{sequenceNumber}?clientID={clientID}&facilityID={facilityID}&deviceID={deviceID}&endpointID={endpointID}&maxCount={maxCount} HTTP/1.1
Host: gear.cloud.studio
Authorization: Bearer {accessToken}
```
Parameters [#parameters]
| Name | Description |
| -------------- | ------------------------------------------------------------------------------------------------------------------------------------------------------------------------------------------------- |
| accessToken | Access token with permissions to read endpoint information. See this page for more information. The access token can also be sent as part of the query string, using the "accessToken" parameter. |
| sequenceNumber | Value of the SequenceNumber field from the last EndpointData received. Use 0 to start from the beginning. |
| clientID | Optional identifier indicating that only EndpointData for the given client should be retrieved. |
| facilityID | Optional identifier indicating that only EndpointData for the given facility should be retrieved. |
| deviceID | Optional identifier indicating that only EndpointData for the given device should be retrieved. |
| endpointID | Optional identifier indicating that only EndpointData for the given endpoint should be retrieved. |
| maxCount | Optional parameter indicating the maximum number of records to include in the result. Values greater than 500 are limited to 500 regardless of the value sent in the request. |
| It is mandatory to include one (and only one) of the parameters "clientID", "facilityID", "deviceID", or "endpointID". |
| ---------------------------------------------------------------------------------------------------------------------- |
Response [#response]
The response contains the list of matching EndpointData, as shown in this example:
```
[
{
"EndpointID": 113653,
"Timestamp_UTC": "2021-10-15T23:01:25",
"Value": 16.93,
"SequenceNumber": 6683852
},
{
"EndpointID": 113653,
"Timestamp_UTC": "2021-10-15T23:11:28",
"Value": 16.97,
"SequenceNumber": 6683864
},
{
"EndpointID": 113653,
"Timestamp_UTC": "2021-10-15T23:41:36",
"Value": 16.93,
"SequenceNumber": 6683874
},
{
"EndpointID": 113653,
"Timestamp_UTC": "2021-10-16T00:01:44",
"Value": 16.99,
"SequenceNumber": 6683887
},
{
"EndpointID": 113653,
"Timestamp_UTC": "2021-10-16T00:11:48",
"Value": 15.93,
"SequenceNumber": 6683900
}
]
```
# Steps
When creating a new step, it is necessary to indicate the step type and whether it should continue to the next step in case of error. Additionally, the required attributes for each particular type must be completed.
Regardless of the step type, for each step it is possible to indicate whether execution should continue in case of error, using the **Continue on error** attribute: this field indicates whether, in case errors occur when executing the step, the action should stop or continue to the next step. If this field is **enabled**, the error is logged, but **the action continues** with the execution of the next step. If the field is **disabled**, the error is logged and **the action stops** immediately.
**Steps are divided into the following types:**
Set, Add and Subtract [#set-add-and-subtract]
These three step types are represented with the same user interface, where you can select **1** Endpoint to act on, **1** variable associated with the Endpoint, and **1** numeric value which will modify the state of this Endpoint.


Add value

Subtract value
> * **Endpoints that have access set to Read Only mode will not be visible for selection for this step type.**
> * **By default, Endpoints have access set to Read Only mode, and there are cases where this cannot be modified due to the Endpoint type with which it was created.**
> * **If the Endpoint type allows modifying access, this can be done by accessing the security tab within the Endpoint configuration.**
Turn On, Turn Off and Toggle [#turn-on-turn-off-and-toggle]
These three step types are represented with the same user interface, where you can select **1** Endpoint to act on to change its state. They can only be used for Endpoints of type **Appliances, Dimmer, and Thermostat.**

Turn On


Toggle
> **For the "Toggle" type, the behavior will be to toggle the state: if it was "on", this step will change it to off and vice versa.**
Email, SMS and Voice Message [#email-sms-and-voice-message]
These three step types allow sending a notification via e-mail, SMS, or voice.


SMS Notification

Voice notification
Script [#script]
A code fragment in an interpreted language (*JavaScript*) that is easy to understand, expanding the range of tools available when processing a specific business logic.
* **Code tab:** Allows editing the JavaScript code that the action step will execute. These scripts can also include methods from the Cloud Studio [utility library](/docs/configuracion-del-cliente/acciones/pasos/scripting-utils) for JavaScript.
* **Test tab**: Allows testing the execution of the action step's script, allowing modification of the [event received by the action for testing purposes](/docs/configuracion-del-cliente/acciones/pasos).
* **Dependencies:** Allows selecting scripts from the common and global script library that will be dependencies for the action step's script.

Scripting
# Scripting utils
Scripting utils is a complementary library of JavaScript functions that is part of the Cloud Studio platform and whose methods can be invoked from user-built JavaScript scripts in actions.
Properties
| utcNow (DateTime) |
| --------------------------------------------------------------- |
| The utcNow property represents the current date and time in UTC |
| Examples |
| let now = utils.utcNow; |
Date and time functions
| DateTime addDays (double days, DateTime dateTime) |
| ---------------------------------------------------------------------------------------------------------------------------- |
| The addDays function allows adding and also subtracting days from a date |
| ExamplesThis example adds and subtracts two days from the current UTC date and time |
| //Add two days let date = utils.addDays(2, utils.utcNow); // Subtract two days let date = utils.addDays(-2, utils.utcNow); |
| DateTime addHours(double hours, DateTime dateTime) |
| ---------------------------------------------------------------------------------------------------------------------------------- |
| The addHours function allows adding and also subtracting hours from a date |
| ExamplesThis example shows how to add one hour to the current date and time and how to subtract one hour from the current UTC time |
| //Add one hour let date = utils.addHours(1, utils.utcNow); //Subtract one hour let date = utils.addHours(-1, utils.utcNow); |
| DateTime addMinutes(double minutes, DateTime dateTime) |
| ----------------------------------------------------------------------------------------------------------------------------- |
| The addMinutes function allows adding and also subtracting minutes from a date |
| ExamplesThis example adds one minute to the current UTC date and time and subtracts one minute from the current UTC time |
| //Add one minute let date = utils.addMinutes(1, datetime); // Subtract one minute let date = utils.addMinutes(-1, datetime); |
| DateTime addMonths(double months, DateTime dateTime) |
| ------------------------------------------------------------------------------------------------------------------------- |
| The addMonths function allows adding and also subtracting months from a date |
| ExamplesThis example adds and subtracts six months from the current date and time |
| //Add six months let date = utils.addMonths(6, datetime); //Subtract six months let date = utils.addMonths(-6, datetime); |
| DateTime addSeconds(double seconds, DateTime dateTime) |
| -------------------------------------------------------------------------------------------------------------------------- |
| The addSeconds function allows adding and subtracting seconds from a date |
| ExamplesThis example adds and subtracts 25 seconds from the current date and time |
| // Add seconds let date = utils.addSeconds(25, datetime); // Subtract seconds let date = utils.addSeconds(-25, datetime); |
| DateTime addYears(double years, DateTime dateTime) |
| --------------------------------------------------------------------------------------------------------------- |
| The addYears function allows adding and subtracting years from a date |
| ExamplesThis example adds and subtracts 3 years from the current date and time |
| // Add years let date = utils.addYears(3, datetime); // Subtract years let date = utils.addYears(3, datetime); |
| DateTime getLastMonday(\*DateTime) |
| -------------------------------------------------------------------------------------------------------------------------------------------------------- |
| The getLastMonday() function gets the Monday before the current UTC date and time |
| ExamplesThis example gets the Monday before the current UTC date and time or the Monday before the optional date and time parameter |
| let date = utils.getLastMonday(); env.log(date); let myDate = new Date('2024-06-16T03:24:00'); let mondate = utils.getLastMonday(myDate); env.log(date); |
| DateTime getNextMonday(\*DateTime) |
| ----------------------------------------------------------------------------------------------------------------------------------------------------------- |
| The getNextMonday() function gets the Monday after the current UTC date and time |
| ExamplesThis example gets the Monday after the current UTC date and time or the Monday after the optional date and time parameter |
| let date = utils.getNextMonday(); env.log(date); let myDate = new Date('2024-06-16T03:24:00'); let mondate = utils.getNextMonday(myDate); env.log(mondate); |
| DateTime getLastSunday(\*DateTime) |
| -------------------------------------------------------------------------------------------------------------------------------------------------------- |
| The getLastSunday() function gets the last Sunday before the current UTC date and time |
| ExamplesThis example gets the last Sunday before the current UTC date and time or the last Sunday before the optional date and time parameter |
| let date = utils.getLastSunday(); env.log(date); let myDate = new Date('2024-06-16T03:24:00'); let mydate= utils.getLastSunday(myDate); env.log(mydate); |
| DateTime getNextSunday(\*DateTime) |
| -------------------------------------------------------------------------------------------------------------------------------------------------------- |
| The getNextSunday() function gets the Sunday after the current UTC date and time |
| ExamplesThis example gets the Sunday after the current UTC date and time or the Sunday after the optional date and time parameter |
| let date = utils.getNextSunday(); env.log(date); let myDate = new Date('2024-06-16T03:24:00'); let mydate= utils.getNextSunday(myDate); env.log(mydate); |
| DateTime getFirstDayOfMonth(\*DateTime) |
| ------------------------------------------------------------------------------------------------------------------------------------------------------------------ |
| The getFirstDayOfMonth() function gets the first day of the month of the current UTC date and time |
| ExamplesThis example gets the first day of the month of the current UTC date and time or the first day of the month of the optional date and time parameter |
| let date = utils.getFirstDayOfMonth(); env.log(date); let myDate = new Date('2024-06-16T03:24:00'); let mydate= utils.getFirstDayOfMonth(myDate); env.log(mydate); |
| DateTime getLastDayOfMonth(\*DateTime) |
| ---------------------------------------------------------------------------------------------------------------------------------------------------------------- |
| The getLastDayOfMonth() function gets the last day of the month of the current UTC date and time |
| ExamplesThis example gets the last day of the month of the current UTC date and time or the last day of the month of the optional date and time parameter |
| let date = utils.getLastDayOfMonth(); env.log(date); let myDate = new Date('2024-06-16T03:24:00'); let mydate= utils.getLastDayOfMonth(myDate); env.log(mydate); |
| DateTime getFirstDayOfYear(\*DateTime) |
| ---------------------------------------------------------------------------------------------------------------------------------------------------------------- |
| The getFirstDayOfYear() function gets the first day of the year of the current UTC date and time |
| ExamplesThis example gets the first day of the year of the current UTC date and time or the first day of the year of the optional date and time parameter |
| let date = utils.getFirstDayOfYear(); env.log(date); let myDate = new Date('2024-06-16T03:24:00'); let mydate= utils.getFirstDayOfYear(myDate); env.log(mydate); |
| DateTime getLastDayOfYear(\*DateTime) |
| -------------------------------------------------------------------------------------------------------------------------------------------------------------- |
| The getLastDayOfYear() function gets the last day of the year of the current UTC date and time |
| ExamplesThis example gets the last day of the year of the current UTC date and time or the last day of the year of the optional date and time parameter |
| let date = utils.getLastDayOfYear(); env.log(date); let myDate = new Date('2024-06-16T03:24:00'); let mydate= utils.getLastDayOfYear(myDate); env.log(mydate); |
| DateTime getFirstDayOfQuarter(\*DateTime) |
| ---------------------------------------------------------------------------------------------------------------------------------------------------------------------- |
| The getFirstDayOfQuarter() function gets the first day of the quarter of the current UTC date and time |
| ExamplesThis example gets the first day of the quarter of the current UTC date and time or the first day of the quarter of the optional date and time parameter |
| let date = utils.getFirstDayOfQuarter(); env.log(date); let myDate = new Date('2024-06-16T03:24:00'); let mydate= utils.getFirstDayOfQuarter(myDate); env.log(mydate); |
| DateTime getLastDayOfQuarter(\*DateTime) |
| -------------------------------------------------------------------------------------------------------------------------------------------------------------------- |
| The getLastDayOfQuarter() function gets the last day of the quarter of the current UTC date and time |
| ExamplesThis example gets the last day of the quarter of the current UTC date and time or the last day of the quarter of the optional date and time parameter |
| let date = utils.getLastDayOfQuarter(); env.log(date); let myDate = new Date('2024-06-16T03:24:00'); let mydate= utils.getLastDayOfQuarter(myDate); env.log(mydate); |
Interpolation functions
| double linearInterpolation(params double\[] values) |
| --------------------------------------------------------------------------------------------------------------------------------------------------------------------------------------------- |
| The first parameter is the value to interpolate, the remaining parameters are points (x, y), with a minimum of 2 points (5 parameters total) and a maximum of 20 points (41 parameters total) |
| ExamplesThis example interpolates the value 1.5 to the values 1.1, 2.3, and 3 |
| const parameters = \[]; parameters.push(1.5, 1.1, 2.3 , 3) let interpolated = utils.linearInterpolation(parameters); |
# Add Common Script
Select the Common Scripts option from the menu

When selecting **Add**, the user can include a description, select a dependency, and enter the JS code below

# Edit Common Script
In the Common Scripts general section, select the three dots on the right side of the screen

# Delete Common Script
In the Common Scripts general section, select the three dots on the right side of the screen

The user must **Confirm** or **Cancel** the requested action

Upon confirming, the Common Script is deleted and the user is redirected to the general screen of that option.

# Common Scripts
This module allows working with "**Common Scripts**" **within the selected client**, to fulfill the function of reusing, simplifying, and reducing the code of Scripts for Devices and Actions.
A Script is a code fragment in an interpreted language (*JavaScript*) that is easy to understand, expanding the range of tools available when processing a specific business logic.
> Common Scripts will be used as libraries of common functionalities.
> Common Scripts will be used as dependencies in other scripts.
The module allows viewing the list of Common Scripts generated by the client, as well as creating, editing, or deleting those scripts. Scripts can *be related to each other to leverage code reuse and access all devices of the client in which they are running.*
**From the following menu option**

# Alerts - Contacts and Contact Groups
From the following screen, the user can create an alert based on the created *Contacts* or *Contact Groups*.
1- In the *Details* tab, configure the Sensor, the Condition that will trigger the notification, and the Normal Condition under which the notification will not be triggered.

2- In the *Notifications* tab, fill in the channels through which notifications will be received. You can use standalone emails and phone numbers, or emails and phone numbers created in Contacts and Contact Groups, which will be easily visible when typing their names in the corresponding fields.

3- In the *Tags* tab, the user can create a set of Tags.

3- In *Templates*, the user can create the notification formats to be sent.

# Flexible Alarms
This feature aims to make notification delivery to contacts more flexible by allowing configuration of *time zone*, *working days* and *hours*, and *vacation or out-of-office periods*. This configuration can be applied at the contact or contact group level.
This provides the ability to perform more precise configuration that helps make the notifications/alerts generated to specific contacts more effective.
Modify alarms by contact [#modify-alarms-by-contact]
To modify notification delivery to a contact, navigate to the following path:
**Navigation menu > Directory > Contacts > Working hours**


Modify alarms by contact group [#modify-alarms-by-contact-group]
If you need to modify notifications for a contact group, navigate to:
**Navigation menu > Directory > Contact Groups > Working hours**


# Voice and SMS Services
Voice and SMS notification services have an associated cost.
The user can view messages in the notifications tab within *Alerts* and *Alert Types* that warn about the configuration status of these services on the platform.
If enabled at the *Client* level, a user with administrator permissions can enable or disable SMS and Voice notification delivery at the *Facility* level, deciding which ones will be active.
If the options are not **enabled** at the *Client* level, the user will see the options as **disabled at the *Facility* level. That is, to enable voice and SMS notifications at the facility level, they must first be enabled at the client level.**
> **By default, alerts for all Clients and Facilities are email-only and have no cost.**
1. **ALERT MESSAGES FOR SMS AND VOICE**
**Clients** > Disable SMS and Voice services

**Facilities** > The user will not be able to select the facility if the Global configuration is not previously enabled

**Alarms** > Alerts

**Alarms** > Alert Types

2. **ALERT MESSAGES FOR VOICE**
**Clients** > Uncheck Voice and select SMS

**Facilities** > The user can select the SMS facility and will see the Voice option as disabled

**Alarms** > Alerts

**Alarms** > Alert Types

3. **ALERT MESSAGES FOR SMS**
**Clients** > Uncheck SMS and select Voice

**Facilities** > The user can select the Voice facility and will see the SMS option as disabled

**Alarms** > Alerts

**Alarms** > Alert Types

4. **ALERT MESSAGES WITHOUT DISPLAY**
**Clients** > Select the SMS and Voice option

**Facilities** > The user can select the Voice and SMS facility

**Alarms** > Alerts

**Alarms** > Alert Types

# Voice, SMS, and WhatsApp Services
Voice, SMS, and WhatsApp notification services have an associated cost.
The user can view messages in the notifications tab within *Alerts* and *Alert Types* that warn about the configuration status of these services on the platform.
If enabled at the *Client* level, a user with administrator permissions can enable or disable SMS, Voice, and WhatsApp notification delivery at the *Facility* level, deciding which ones will be active.
If the options are not **enabled** at the *Client* level, the user will see the options as **disabled at the *Facility* level. That is, to enable voice, SMS, and WhatsApp notifications at the Facility level, they must first be enabled at the client level.**
**By default, alerts for all Clients and Facilities are email-only and have no cost.**
1. **ALERT MESSAGES FOR SMS, WhatsApp**
**Clients** > Enable SMS, Voice, and WhatsApp services

**Facilities** > The user will not be able to select the facility if the Global configuration is not previously enabled

**Alarms** > Alerts
When enabled, the Notifications section of Alerts will display the fields for entering contact information. Both the email and the phone number can be the same or vary depending on the notification type (SMS, Voice Message, WhatsApp)

**Alarms** > Alert Types
The Notification type configuration is also available for Alert Types. You can configure notifications via Email (no additional cost), as well as via text messages (SMS), voice messages, and WhatsApp, with additional cost

**Actions & Scripting** > Notifications
In the Actions and Notifications steps, you can also access the Notification delivery configuration.
The enabled Notification channels for the Facility are displayed
* By email

\- By SMS

\- By Voice

By WhatsApp
**Clients** > Remove contacts from the different Notification channels

**Clients** > Disable Notification Channels
You can remove a notification channel by disabling it in the Facility configuration. Once done, the channel will no longer be visible for configuration in the Notification settings

# Device Control
Gear Studio allows controlling devices that support actuation, such as appliances, dimmers, thermostats, curtain controllers, and much more.
Device Control from the App [#device-control-from-the-app]
The Gear Studio app allows viewing the status of all devices, and also allows acting directly on them, if the user has the necessary permissions.
| | | |
| - | - | - |
Device Control from the Monitor [#device-control-from-the-monitor]
The "Devices" section of the monitor allows viewing the entire device infrastructure of a facility, as well as manual operation when necessary. For each device with control capability, the list displays all possible actions for its current state.
# Devices
Devices are the first level of a facility's infrastructure. They typically correspond to physical devices such as sensors, gateways, dimmers, actuators, thermostats, etc. Devices have the following characteristics:
* They have a model (or a brand and model combination)
* They have a unique identifier, such as a MAC address or a serial number.
* They have some type of communication interface (MQTT, HTTP, NB-IoT, ZigBee, LoRaWAN, etc.)
* They have a description used in Gear to more easily identify the device.
* They have certain associated attributes that can be updated during operation.
Device Attributes [#device-attributes]
Devices can have associated attributes that may change during operation. Examples of these attributes include:
* **Battery level**. Gear Studio allows reporting the battery level of devices that have one or more batteries. For devices with more than one battery, it is possible to report the status of each one separately.
* **Signal level**. The platform allows reporting the signal level for devices that use wireless communication. For devices that support more than one wireless communication medium, it is possible to report the status of each one separately (e.g., cellular, Wi-Fi, LoRaWAN, ZigBee, etc.)
* **Firmware version**. The firmware version installed on the device can be reported, if available. This enables the version control functionality, to quickly identify devices that need to be updated.
More Information [#more-information]
For more information about device and endpoint management, see the following tutorials:
* [Device Integration](/docs/configuracion-del-cliente/dispositivos-y-endpoints/dispositivos/integracion-de-dispositivos)
* [Device Management](/docs/configuracion-del-cliente/dispositivos-y-endpoints/dispositivos/dispositivos)
* [Endpoint Management](/docs/configuracion-del-cliente/dispositivos-y-endpoints/endpoints/crear-un-endpoint)
# Create an endpoint
> **IMPORTANT**: as a general rule, endpoints can only be created on devices that correspond to user-defined [device models](/docs/configuracion-del-cliente/dispositivos-y-endpoints/dispositivos/modelos-de-dispositivo). This is because when creating devices that correspond to models built into Gear Studio, the platform automatically creates all necessary endpoints.
When adding a new **endpoint**, the following fields must be completed.
* **Description**: Defined by the user, represents a description used to name the endpoint being created.
* **Address**: Defined by the user, represents the unique identifier of the endpoint.
* **Type**: Dropdown list for selecting the device type for which the endpoint is being created.
* **Subtype**: Based on the selected device type, this dropdown list allows selection of the corresponding subtype.

Once the endpoint has been created for the user-defined device model, the created **endpoint** can be found with its details, giving you the option to edit or delete it as needed.

When editing it, you can change the **Description** and, in the case of this **endpoint**, modify the **Endpoint subtype** with which it was originally created.
# Endpoint tagging
Introduction [#introduction]
The goal of this feature is to allow dashboard definitions that can be used across multiple facilities, or even different clients, without the need to create independent copies. To achieve this, endpoint tags, or tags on the devices that contain them, are used to reference endpoints indirectly. The current option (reference to a specific endpoint) is maintained, and the ability to reference endpoints or groups of endpoints indirectly through tags is added.
**The goal is to allow dashboard definitions that can be used across multiple facilities, or even different clients, without the need to create copies that involve additional effort and are then difficult to maintain.**
Selecting an endpoint [#selecting-an-endpoint]
To select an endpoint in a widget, the following methods are available:
* **Individual endpoint selection** (current method). In this case, a specific endpoint is chosen from the list, as is currently done. The widget is bound to the endpoint at dashboard design time, and will always refer to the specified endpoint. This type of selection must not be allowed in global dashboards.
* **Indirect selection by tags** (additional new method). In this case, a list of one or more tags is entered, and the chosen endpoint is determined at runtime on the back-end (when viewing the dashboard) based on the selected facility. The algorithm for choosing the endpoint to use is as follows:
1. First endpoint containing the specified tag, of the appropriate type, belonging to the current facility.
2. First endpoint containing the specified tag, of the appropriate type, belonging to any facility of the current client that the user has permission to access.
3. First endpoint containing the specified tag, of the appropriate type, belonging to any client that the user has permission to access.
**NOTE: When "first endpoint" is mentioned in the paragraphs above, it refers to the first one meeting the condition, sorted by Endpoint ID.**
Example [#example]
1. Dashboard 1 (any facility)
2. Widget 1 - Sensor containing the tag "temperature-sensor".
3. Widget 2 - Sensor containing the tag "humidity-sensor"
4. Widget 3 - Sensor containing the tag "people-counter"
2. Then, in each facility, only the appropriate tags need to be assigned:
* Assign the tag "temperature-sensor" to the temperature sensors in all 3 facilities.
* Assign the tag "humidity-sensor" to the humidity sensors in all 3 facilities.
* Assign the tag "people-counter" to the people counters in all 3 facilities.
By implementing the dashboard this way, the same dashboard can be used in any facility, and the dashboard content will automatically adapt when switching from one facility to another. Additionally, if an endpoint is removed and replaced by another in any facility, the dashboard will continue to work normally as long as the new endpoint receives the appropriate tags.
# Endpoints
*A device can have multiple sensors, functions, or channels. For example, a dimmer capable of controlling four light circuits can be said to have four distinct functions or "channels". When a user interacts with the device, they are actually interacting with one of those channels, not the entire device.*
Each of these functions or channels, in Gear Studio terminology, is called an "**endpoint**". Endpoints have the following characteristics:
* They have a unique identifier within the device.
* They have a sensor type (temperature sensor, light, energy, volume, etc.)
* They have a description used in Gear to identify the endpoint more easily.
* They have an associated sector, indicating where they are installed or where they operate (their location within the facility).
* Depending on the sensor type, they may have other specific characteristics.
Below are some examples of endpoints in commonly used devices.
| Device | Endpoints |
| --------------------------------- | ---------------------------------------------------------------------------------------------------------------------------------------------------------- |
| Temperature and humidity sensor | Endpoint 1: temperatureEndpoint 2: humidity |
| 2-channel dimmer | Endpoint 1: dimmer channel 1Endpoint 2: dimmer channel 2 |
| Electrical consumption meter | Endpoint 1: active and reactive energy meterEndpoint 2: voltage meterEndpoint 3: current meterEndpoint 4: active power meterEndpoint 5: power factor meter |
| 5-in-1 sensor (example: HPA-4416) | Endpoint 1: temperature sensorEndpoint 2: humidity sensorEndpoint 3: light sensorEndpoint 4: motion detectorEndpoint 5: door/window opening detector |
More information [#more-information]
For more information about device and endpoint management, see the following tutorials:
* [Device management](/docs/configuracion-del-cliente/dispositivos-y-endpoints/dispositivos/dispositivos)
* [Endpoint management](/docs/configuracion-del-cliente/dispositivos-y-endpoints/endpoints/crear-un-endpoint)
# Users
**Users** belong to one or more **groups** which have associated **permissions**. This way, groups can be created that have exclusive access to certain sections and not to others. These same permissions can be granted individually to each user.
# Permissions
Cloud Studio has a permissions system that allows establishing, for each user or user group, the set of features they have access to. To access the permissions list, use the Manager permissions module, which allows:
* Granting or denying permissions at the user level.
* Granting or denying permissions at the user group level.
Global [#global]
Access is through Global Configuration > Global Security > Global Permissions. In this section, the following categories are available:
* **General**
* Global administrator permissions: Enables management (creation, editing, or deletion) of Global Dashboards and Scripts for device models, client editing, white-label configuration, and deletion of shared links. Additionally, it is the parent permission of all permissions in the General category, so any user who has this permission will also have access to the others.
* Change account passwords: *Not yet implemented.*
* Manage master tables: Allows managing (creating, editing, or deleting) external alarm sources and maintenance contractors, and viewing access permissions.
* Manage applications: *Not yet implemented.*
* Manage general parameters: Allows modifying the general application parameters.
* Manage alarm types: *Not yet implemented.*
* Manage external addresses: *Not yet implemented.*
* Manage user groups: *Not yet implemented.*
* Manage system users: Allows viewing system users. It is the parent permission for user creation, editing, and deletion.
* Assign user permissions: Allows assigning or unassigning an account from a group and modifying the user's access permissions.
* **Gear**
* **Reports**
* Device catalog: Grants access to the *Device catalog* report.
* Endpoint summary: Grants access to the Manager report, *Endpoint summary*.
* Endpoint catalog: Grants access to the *Endpoint catalog* report.
* Active alarms: Grants access to the *Active alarms* report.
* Alarm history: Grants access to the *Alarm history* report.
* Raw endpoint data: Grants access to the *Raw endpoint data* report.
* Energy consumption (detailed): Grants access to the *Energy consumption (detailed)* report.
* Energy consumption (summary): Grants access to the *Energy consumption (summary)* report.
* Tank status: Grants access to the *Tank status* report.
* User activity log: Grants access to the Manager report, *User activity log*.
* System information: Grants access to the Manager report, *System information*.
* Scheduled tasks: Grants access to the *Scheduled tasks* report.
* Notification queue: Grants access to the *Notification queue*.
* Health checks: Grants access to the *Health checks* reports.
* **Dashboards**
* Global summary: Grants access to Dashboard #1 *Global summary*.
* Facility summary: Grants access to Dashboard #2 *Facility summary*.
* Global energy: Grants access to Dashboard #3 *Global energy*.
* Facility energy: Grants access to Dashboard #4 *Facility energy*.
Client [#client]
Access is through Client Configuration > Security > Permissions. Within, the following are available:
* **General**
* Administrator permissions for this client: Allows management (creation, editing, or deletion) of client device firmware, geozones, address book, users (as well as said user's permissions), client facilities, Endpoint types, and Scripts for device models, and expiring shared links.
* Access all facilities: Inherits the permission to manage each client facility.
* Operate all facilities: Inherits the permission to operate each client facility.
* Access the monitor: Allows accessing the monitor.
* Access configuration: Allows accessing the administrator settings.
* Mobile application: *Not yet implemented.*
* **Facilities**
* **Facility**: These permissions are per facility; the facility name will be shown at this level.
* Administrator: Allows listing client facilities and managing (creating, editing, or deleting) electrical circuits for a client facility.
* Access: Grants access permission to the facility and allows viewing tank details.
* Operate: Grants access to active energy information and linking Google Home accounts.
* **Reports**
* Device catalog: Grants access to the *Device catalog* report.
* Endpoint summary: Grants access to the Manager report, *Endpoint summary*.
* Endpoint catalog: Grants access to the *Endpoint catalog* report.
* Active alarms: Grants access to the *Active alarms* report.
* Alarm history: Grants access to the *Alarm history* report.
* Raw endpoint data: Grants access to the *Raw endpoint data* report.
* Energy consumption (detailed): Grants access to the *Energy consumption (detailed)* report.
* Energy consumption (summary): Grants access to the *Energy consumption (summary)* report.
* Tank status: Grants access to the *Tank status* report.
* **Dashboards**
* Global summary: Grants access to Dashboard #1 *Global summary*.
* Facility summary: Grants access to Dashboard #2 *Facility summary*.
* Global energy: Grants access to Dashboard #3 *Global energy*.
* Facility energy: Grants access to Dashboard #4 *Facility energy*.
* Additional client dashboards will appear here, to allow or restrict access.
| It should be noted that in both divisions, the information in the "Dashboards" section is dynamic. That is, it varies according to the dashboards that exist and are active at the time. At the global level, they are managed by the instance administrator, and at the client level, by users who have creation permissions. |
| ------------------------------------------------------------------------------------------------------------------------------------------------------------------------------------------------------------------------------------------------------------------------------------------------------------------------------ |
# Energy Monitoring
The energy monitoring vertical is designed to provide access to information related to electrical energy usage, including:
* The definition of electrical circuits with their hierarchical representation, phase type, and consumption category.
* The creation of devices for consumption measurement (energy meters).
* The creation of devices for measuring other electrical variables (voltage, current, power, cosine phi, etc.)
* The visualization of this information in dashboards.
* The visualization of real-time information in the device monitor.
* The creation of [alerts](/docs/configuracion-del-cliente/alertas-y-alarmas) when electrical parameters fall outside defined limits.
# Asset Tracking Filters
In Filters, the user can filter the display.

**Important note about filter display:**
Depending on each instance's configuration options, some of these options may not be available.
Button display on the Asset tracking screen.
**Filter/Configurations/share asset tracking.**

Description [#description]
When the screen loads, all selected filters are displayed with the current date.
When no filter is selected and/or no information (Asset) exists, the map centers on the facility.
The "show route" option will be checked for previous dates in the Configurations tab.


Future dates in the date filter are disabled.

The filter order is as follows:
**Filter tab:**
* Date
* Vehicles
* Drivers
* Alerts

**Alerts:**
The "Alerts" filter has the following functionality:
All "TAGS" associated with alerts for the client's Vehicles will be listed, along with options to show those that have no active alarms or that are not associated with any "TAG".
For example: There are 2 alerts where each has the following associated tags:
* Alert 1 -> Tags: Taxi, Panic, Emergency
* Alert 2 -> Tags: Patrol, Emergency
The alerts filter will show different items according to each client's needs, initially starting with:
**\*No active alarms.**
**\*Alarms without tags.**

**Note:** This means that for the alerts filter to have more than one item in the list, tags must be configured for each alert that should be displayed in the "Alerts" filter.
**This alert TAG configuration can also be done via Scripting with the current features.**
**Configuration tab:**
* Show Route
* Geozones

**Modifiable default filters.**
* Date
* Vehicles

**Route tracking:** In this option, the user can view the asset's route. The route start and end points (A, B) can also be seen.

**Route tracking start and end:** In this option, the user can view the asset's route. The user can see the start and end points of the filtered vehicles' routes (A, B).

# Asset Tracking
Introduction [#introduction]
Asset tracking allows you to access real-time data from your fleet using detailed analytics that can be shared with your employees. This means you will have full confidence that your resources are being well utilized and distributed.
On the Asset Tracking screen, you can track vehicles (in real time or with a deferred date). The screen is dynamic, allowing the client to show and hide different filters according to each client's needs.
# Global Permissions
Cloud Studio has a global permissions system that allows establishing, for each user or group of users, the set of functionalities they have access to at the instance level. To access the permissions list, the Manager's global permissions module is used, which allows:
* Allowing or denying permissions at the global user level.
* Allowing or denying permissions at the global user group level.
Global [#global]
Access is from Global Configuration > Global Security > Global Permissions. In this section, you will have access to the following categories:
* **General**
* Global administrator permissions: Enables management (creation, editing, or deletion) of Global Dashboards and Scripts for device models, client editing, white labeling configuration, and deletion of shared links. It is also the parent permission of all permissions in the General category, so any user who has this permission will also have access to the others.
* Change account passwords: *Not yet implemented.*
* Manage master tables: Allows managing (creating, editing, or deleting) external alarm sources and maintenance contractors, and viewing access permissions.
* Manage applications: *Not yet implemented.*
* Manage general parameters: Allows modifying the application's general parameters.
* Manage alarm types: *Not yet implemented.*
* Manage external addresses: *Not yet implemented.*
* Manage user groups: *Not yet implemented.*
* Manage system users: Allows viewing system users. It is the parent permission for user creation, editing, and deletion.
* Assign user permissions: Allows assigning or unassigning an account from a group and modifying user access permissions.
* **Gear**
* **Reports**
* Device catalog: Grants access to the *Device catalog* report.
* Endpoint summary: Grants access to the Manager's *Endpoint summary* report.
* Endpoint catalog: Grants access to the *Endpoint catalog* report.
* Active alarms: Grants access to the *Active alarms* report.
* Alarm history: Grants access to the *Alarm history* report.
* Endpoint raw data: Grants access to the *Endpoint raw data* report.
* Energy consumption (detailed): Grants access to the *Energy consumption (detailed)* report.
* Energy consumption (summary): Grants access to the *Energy consumption (summary)* report.
* Tank status: Grants access to the *Tank status* report.
* User activity log: Grants access to the Manager's *User activity log* report.
* System information: Grants access to the Manager's *System information* report.
* Scheduled tasks: Grants access to the *Scheduled tasks* report.
* Notification queue: Grants access to the *Notification queue*.
* Health checks: Grants access to the *Health checks* reports.
* **Dashboards**
* Global summary: Grants access to Dashboard #1 *Global summary*.
* Facility summary: Grants access to Dashboard #2 *Facility summary*.
* Global energy: Grants access to Dashboard #3 *Global energy*.
* Facility energy: Grants access to Dashboard #4 *Facility energy.*
# Global Users
**Global users** can have access to configuration options at the instance and client level. They can also belong to one or more **global groups** that have associated **global permissions**. This way, groups can be created that have exclusive access to certain sections. These same permissions can be granted individually to each user.
# Endpoint
The endpoint object represents an endpoint within a device installed in the platform. Endpoints are normally accessed through the **endpoints** property of the [device](/docs/herramientas-low-code-scripting/referencia-de-objetos-disponibles-para-scripting/device) object.
Properties [#properties]
\### address (string) The address property represents the address of the endpoint, as text.
**Examples**
This example shows the address of the first endpoint of a device, through the log console.
```javascript
env.log('Endoint address: ', myDevice.endpoints.byIndex(0).address);
```
\### description (string) The description property represents the description of the endpoint.
**Examples**
This example shows the description of the first endpoint of a device, through the log console.
```javascript
env.log('Endoint description: ', myDevice.endpoints.byIndex(0).description);
```
\### endpointType (int enum)
The endpointType property indicates the endpoint type. The possible values for this property are as follows:
* **endpointType.appliance (1)**: the endpoint is of on/off type, meaning it can be turned on and off, such as a lamp without brightness control, a valve, a water pump, etc.
* **endpointType.dimmer (2)**: the endpoint can be turned on and off, but its brightness can also be controlled.
* **endpointType.lightSensor (4)**: the endpoint is a light sensor.
* **endpointType.colorDimmer (7)**: the endpoint is capable of controlling chromatic light (RGB or similar).
* **endpointType.closureController (10)**: the endpoint is a valve, curtain, or closure controller that can be opened, closed, and positioned.
* **endpointType.curtainController (10)**: equivalent to endpointType.closureController. This value exists for backward compatibility.
* **endpointType.thermostat (12)**: the endpoint is a thermostat.
* **endpointType.camera (13)**: the endpoint is a camera.
* **endpointType.temperatureSensor (14)**: the endpoint is a temperature sensor.
* **endpointType.energyMeter (17)**: the endpoint is an energy meter.
* **endpointType.doorLock (19)**: the endpoint is an electronic lock.
* **endpointType.iasSensor (20)**: the endpoint is an intrusion, presence, motion, or any other security sensor that has a discrete number of states.
* **endpointType.locationTracker (22)**: the endpoint is a position tracker (GPS).
* **endpointType.humiditySensor (23)**: the endpoint is a humidity sensor.
* **endpointType.volumeSensor (24)**: the endpoint is a volume sensor.
* **endpointType.weightSensor (25)**: the endpoint is a weight sensor.
* **endpointType.pressureSensor (26)**: the endpoint is a pressure sensor.
* **endpointType.flowSensor (27)**: the endpoint is a flow sensor for liquids or gases, meaning the flow unit is a volume.
* **endpointType.genericSensor (28)**: the endpoint is a generic scalar sensor, for which units can be chosen arbitrarily.
* **endpointType.genericFlowSensor (29)**: the endpoint is a generic flow sensor of some other type, for which units can be chosen arbitrarily.
* **endpointType.voltageSensor (30)**: the endpoint is a voltage sensor (voltmeter).
* **endpointType.currentSensor (31)**: the endpoint is a current sensor (ammeter).
* **endpointType.activePowerSensor (32)**: the endpoint is an active power sensor.
* **endpointType.reactivePowerSensor (33)**: the endpoint is a reactive power sensor.
* **endpointType.apparentPowerSensor (34)**: the endpoint is an apparent power sensor.
* **endpointType.cosPhiSensor (35)**: the endpoint is a power factor sensor.
* **endpointType.frequencyMeter (36)**: the endpoint is a frequency sensor (frequency meter).
* **endpointType.runTimeMeter (37)**: the endpoint is a usage time meter (hour meter / run time meter).
* **endpointType.ppmConcentrationSensor (38)**: the endpoint is a concentration sensor, expressed in parts per million (ppm).
* **endpointType.mvConcentrationSensor (39)**: the endpoint is a concentration sensor, expressed in mass per volume units.
* **endpointType.airQualityIndexSensor**: the endpoint is an air quality sensor ([AQI](https://en.wikipedia.org/wiki/Air_quality_index)).
* **endpointType.peopleFlowSensor (41)**: the endpoint is a people flow sensor, meaning it can detect the entry and/or exit of people.
* **endpointType.peopleCounter (42)**: the endpoint is a people count sensor, meaning it can detect how many people are present in a given area.
* **endpointType.textContainer (43)**: the endpoint is a text sensor, meaning it can store any text up to 255 characters in length.
**Examples**
This example shows the endpoint type of the first endpoint of a device, through the log console.
```javascript
env.log('Endoint type: ', myDevice.endpoints.byIndex(0).endpointType);
```
\### endpointSubType (int enum)
The endpointSubType property indicates the endpoint subtype. The subtype can only be specified for certain endpoint types, as indicated below. The possible values for this property are as follows:
For endpoints of type **endpointType.appliance**:
* **applianceEndpointSubType.lamp (1)**: indicates that the endpoint is a lamp.
* **applianceEndpointSubType.valve (2)**: indicates that the endpoint is a valve.
* **applianceEndpointSubType.socket (3)**: indicates that the endpoint is a socket or plug-in switch.
* **applianceEndpointSubType.pump (4)**: indicates that the endpoint is a water or other liquid pump.
* **applianceEndpointSubType.sprinkler (5)**: indicates that the endpoint is a sprinkler or irrigation circuit.
* **applianceEndpointSubType.fan (6)**: indicates that the endpoint is a fan.
For endpoints of type **endpointType.iasSensor**:
* **iasEndpointSubType.motionSensor (1)**: indicates that the endpoint is a motion sensor.
* **iasEndpointSubType.doorSensor (2)**: indicates that the endpoint is a door or window sensor.
* **iasEndpointSubType.floodSensor (3)**: indicates that the endpoint is a flood detector.
* **iasEndpointSubType.presenceSensor (4)**: indicates that the endpoint is a presence sensor.
* **iasEndpointSubType.alarmInput (5)**: indicates that the endpoint is an alarm sensor.
* **iasEndpointSubType.coSensor (6)**: indicates that the endpoint is a carbon monoxide sensor.
* **iasEndpointSubType.co2Sensor (7)**: indicates that the endpoint is a carbon dioxide sensor.
* **iasEndpointSubType.gasSensor (8)**: indicates that the endpoint is a sensor for other types of gases.
* **iasEndpointSubType.smokeDetector (9)**: indicates that the endpoint is a smoke sensor.
* **iasEndpointSubType.parkingSensor (10)**: indicates that the endpoint is a vehicular parking sensor.
For endpoints of type **endpointType.ppmConcentrationSensor**:
* **ppmConcentrationSensorSubType.ammonia (1)**: indicates that the endpoint is an ammonia sensor.
* **ppmConcentrationSensorSubType.Ozone (2)**: indicates that the endpoint is an ozone sensor.
* **ppmConcentrationSensorSubType.nitricOxide (3)**: indicates that the endpoint is a nitric oxide sensor.
* **ppmConcentrationSensorSubType.nitrogenDioxide (4)**: indicates that the endpoint is a nitrogen dioxide sensor.
* **ppmConcentrationSensorSubType.sulfurDioxide (5)**: indicates that the endpoint is a sulfur dioxide sensor.
* **ppmConcentrationSensorSubType.carbonMonoxide (6)**: indicates that the endpoint is a carbon monoxide sensor.
* **ppmConcentrationSensorSubType.carbonDioxide (7)**: indicates that the endpoint is a carbon dioxide sensor.
* **ppmConcentrationSensorSubType.voc (8)**: indicates that the endpoint is a volatile organic compounds sensor.
For endpoints of type **endpointType.mvConcentrationSensor**:
* **mvConcentrationSensorSubType.lead (1)**: indicates that the endpoint is a lead sensor.
* **mvConcentrationSensorSubType.pm2\_5 (2)**: indicates that the endpoint detects particulate matter up to 2.5 microns.
* **mvConcentrationSensorSubType.pm10 (3)**: indicates that the endpoint detects particulate matter up to 10 microns.
**Examples**
This example shows the endpoint subtype of the first endpoint of a device, through the log console.
```javascript
env.log('Endoint subtype: ', myDevice.endpoints.byIndex(0).endpointSubType);
```
\### accessType (int enum)
The accessType property indicates the type of access applied to the endpoint. The possible values for this property are as follows:
* **endpointAccessType.readOnly (1)**: indicates that the value associated with the endpoint cannot be modified manually.
* **endpointAccessType.readWrite (2)**: indicates that the value associated with the endpoint can be modified manually. When doing so, the new value will be recorded immediately, without interacting with the device.
* **endpointAccessType.readWriteCommand (3)**: indicates that the value associated with the endpoint can be modified manually. When doing so, a command will be sent to the device to change the value. It is the device's responsibility to report the new value upon accepting the command.
**Examples**
This example shows the accessType property value of the first endpoint of a device, through the log console.
```javascript
env.log('Endoint access type: ', myDevice.endpoints.byIndex(0).accessType);
```
\### operationSecurityLevel (int enum)
The operationSecurityLevel property indicates the security level associated with the endpoint operation. The possible values for this property are as follows:
* **endpointOperationSecurityLevel.simple (1)**: indicates that the endpoint can be operated directly. No warning message or user confirmation is required. In user interfaces, when operating the endpoint, the corresponding command is sent immediately.
* **endpointOperationSecurityLevel.medium (2)**: indicates that to operate the endpoint, a confirmation message must first be displayed, along with the corresponding options to accept or cancel the operation. The message is configurable at the individual endpoint level, but is optional. If no message is specified, a default confirmation message will be used.
* **endpointOperationSecurityLevel.high (3)**: indicates that to operate the endpoint, the confirmation corresponding to the **medium** security level is required, but additionally the user is asked to re-enter their password.
**Examples**
This example shows the operationSecurityLevel property value of the first endpoint of a device, through the log console.
```javascript
env.log('Endoint access type: ', myDevice.endpoints.byIndex(0).operationSecurityLevel);
```
\### tags (array) The tags property indicates the set of tags applied to the endpoint. This property is an array of strings, each of which indicates a tag.
**Examples**
This example shows the list of tags of the first endpoint of a device.
```javascript
myDevice.endpoints.byIndex(0).tags.forEach(item => env.log(item));
```
Methods [#methods]
\### getCurrentState() The getCurrentState() method allows obtaining the current state of the endpoint.
**Parameters**
This method has no parameters.
**Result**
The value returned by the method is a [DataPoint](/docs/herramientas-low-code-scripting/referencia-de-objetos-disponibles-para-scripting/datapoint) object that represents the current state of the endpoint. If the current state of the endpoint has not yet been established, the returned value is null.
**Example 1**
This example shows the current temperature at an endpoint.
```javascript
env.log(myDevice.endpoints.byIndex(0).getCurrentState().value);
```
\### updateTemperatureSensorStatus(temperature \[, utcDateTime]) The updateTemperatureSensorStatus() method allows updating the value of a temperature sensor, optionally specifying the date and time of the update.
**Parameters**
* **temperature** (double): this parameter indicates the measured temperature, in degrees Celsius.
* **utcDateTime** (date, optional): this parameter indicates the UTC date and time of the sample. If the parameter is omitted, the current date and time will be assumed.
**Example 1**
This example shows how to report a temperature of 32 degrees Celsius on the first endpoint of a device.
```javascript
myDevice.endpoints.byIndex(0).updateTemperatureSensorStatus(32);
```
\### updateHumiditySensorStatus(humidity \[, utcDateTime]) The updateHumiditySensorStatus() method allows updating the value of a humidity sensor, optionally specifying the date and time of the update.
**Parameters**
* **humidity** (double): this parameter indicates the measured humidity, as a percentage.
* **utcDateTime** (date, optional): this parameter indicates the UTC date and time of the sample. If the parameter is omitted, the current date and time will be assumed.
**Example 1**
This example shows how to report a humidity of 47% on the first endpoint of a device.
```javascript
myDevice.endpoints.byIndex(0).updateHumiditySensorStatus(47);
```
\### updateLightSensorStatus(lightIntensity \[, utcDateTime]) The updateLightSensorStatus() method allows updating the value of a light sensor, optionally specifying the date and time of the update.
**Parameters**
* **lightIntensity** (double): this parameter indicates the measured light intensity, expressed in lux.
* **utcDateTime** (date, optional): this parameter indicates the UTC date and time of the sample. If the parameter is omitted, the current date and time will be assumed.
**Example 1**
This example shows how to report a light intensity of 7550 lux on the first endpoint of a device.
```javascript
myDevice.endpoints.byIndex(0).updateLightSensorStatus(7550);
```
\### updateWeightSensorStatus(weightGrams \[, utcDateTime]) The updateWeightSensorStatus() method allows updating the value of a weight sensor, optionally specifying the date and time of the update.
**Parameters**
* **weightGrams** (double): this parameter indicates the measured weight, in grams.
* **utcDateTime** (date, optional): this parameter indicates the UTC date and time of the sample. If the parameter is omitted, the current date and time will be assumed.
**Example 1**
This example shows how to report a weight of 72.5 kg on the first endpoint of a device.
```javascript
myDevice.endpoints.byIndex(0).updateWeightSensorStatus(72500);
```
\### updateVolumeSensorStatus(volumeLiters \[, utcDateTime]) The updateVolumeSensorStatus() method allows updating the value of a volume sensor, optionally specifying the date and time of the update.
**Parameters**
* **volumeLiters** (double): this parameter indicates the measured volume, in liters.
* **utcDateTime** (date, optional): this parameter indicates the UTC date and time of the sample. If the parameter is omitted, the current date and time will be assumed.
**Example 1**
This example shows how to report a volume of 15,000 liters on the first endpoint of a device.
```javascript
myDevice.endpoints.byIndex(0).updateVolumeSensorStatus(15000);
```
\### updatePressureSensorStatus(pressurePascals \[, utcDateTime]) The updatePressureSensorStatus() method allows updating the value of a pressure sensor, optionally specifying the date and time of the update.
**Parameters**
* **pressurePascals** (double): this parameter indicates the measured pressure, in Pascals.
* **utcDateTime** (date, optional): this parameter indicates the UTC date and time of the sample. If the parameter is omitted, the current date and time will be assumed.
**Example 1**
This example shows how to report a pressure of 1013 hectopascals (101300 pascals) on the first endpoint of a device.
```javascript
myDevice.endpoints.byIndex(0).updatePressureSensorStatus(101300);
```
\### updateIASSensorStatus(state \[, utcDateTime]) The updateIASSensorStatus() method allows updating the state of an IAS sensor, optionally specifying the date and time of the update.
**Parameters**
* **state** (int): this parameter indicates the sensor state, among the following:
* **iasSensorState.Unknown (0)**: Unknown. The sensor state is not known.
* **iasSensorState.idle (1)**: Idle. The sensor registers no activity.
* **iasSensorState.active (2)**: Active. The sensor registers activity.
* **iasSensorState.cleaning (3)**: Cleaning. The space associated with the sensor is being cleaned.
* **iasSensorState.cleaningNeeded (4)**: Cleaning needed. The space associated with the sensor needs cleaning.
* **iasSensorState.testMode (5)**: Test mode. The sensor is currently in test mode.
* **iasSensorState.tampered (6)**: The sensor has been tampered with and may not be functioning correctly.
* **iasSensorState.maintenanceNeeded (7)**: The sensor requires maintenance and may not be functioning correctly.
* **iasSensorState.entering (8)**: The sensor detects that a vehicle is entering the parking space.
* **iasSensorState.leaving(9)**: The sensor detects that a vehicle is leaving the parking space.
* **iasSensorState.violation(10)**: The sensor reports that the parking space is in violation.
* **utcDateTime** (date, optional): this parameter indicates the UTC date and time of the sample. If the parameter is omitted, the current date and time will be assumed.
**Example 1**
This example shows how to report the idle state on the first endpoint of a device.
```javascript
myDevice.endpoints.byIndex(0).updateIASSensorStatus(1);
```
\### updateVoltageSensorStatus(voltageVolts \[, utcDateTime]) The updateVoltageSensorStatus() method allows updating the state of a voltage sensor, optionally specifying the date and time of the update.
**Parameters**
* **voltageVolts** (double): this parameter indicates the measured voltage, in Volts.
* **utcDateTime** (date, optional): this parameter indicates the UTC date and time of the sample. If the parameter is omitted, the current date and time will be assumed.
**Example 1**
This example shows how to report a measurement of 235V on the first endpoint of a device.
```javascript
myDevice.endpoints.byIndex(0).updateVoltageSensorStatus(235);
```
\### updateCurrentSensorStatus(currentAmps \[, utcDateTime]) The updateCurrentSensorStatus() method allows updating the state of a current sensor, optionally specifying the date and time of the update.
**Parameters**
* **currentAmps** (double): this parameter indicates the measured current, in Amperes.
* **utcDateTime** (date, optional): this parameter indicates the UTC date and time of the sample. If the parameter is omitted, the current date and time will be assumed.
**Example 1**
This example shows how to report a measurement of 19.5A on the first endpoint of a device.
```javascript
myDevice.endpoints.byIndex(0).updateCurrentSensorStatus(19.5);
```
\### updateActivePowerSensorStatus(activePowerWatts \[, utcDateTime]) The updateActivePowerSensorStatus() method allows updating the state of an active power sensor, optionally specifying the date and time of the update.
**Parameters**
* **activePowerWatts** (double): this parameter indicates the measured active power, in Watts.
* **utcDateTime** (date, optional): this parameter indicates the UTC date and time of the sample. If the parameter is omitted, the current date and time will be assumed.
**Example 1**
This example shows how to report a measurement of 1250W on the first endpoint of a device.
```javascript
myDevice.endpoints.byIndex(0).updateActivePowerSensorStatus(1250);
```
\### updateReactivePowerSensorStatus(reactivePowerVAR \[, utcDateTime]) The updateReactivePowerSensorStatus() method allows updating the state of a reactive power sensor, optionally specifying the date and time of the update.
**Parameters**
* **reactivePowerVAR** (double): this parameter indicates the measured reactive power, in Volt-Ampere-Reactive (VAR).
* **utcDateTime** (date, optional): this parameter indicates the UTC date and time of the sample. If the parameter is omitted, the current date and time will be assumed.
**Example 1**
This example shows how to report a measurement of 750VAR on the first endpoint of a device.
```javascript
myDevice.endpoints.byIndex(0).updateReactivePowerSensorStatus(750);
```
\### updateApparentPowerSensorStatus(apparentPowerVA \[, utcDateTime]) The updateApparentPowerSensorStatus() method allows updating the state of an apparent power sensor, optionally specifying the date and time of the update.
**Parameters**
* **apparentPowerVA** (double): this parameter indicates the measured apparent power, in Volt-Ampere (VA).
* **utcDateTime** (date, optional): this parameter indicates the UTC date and time of the sample. If the parameter is omitted, the current date and time will be assumed.
**Example 1**
This example shows how to report a measurement of 1300VA on the first endpoint of a device.
```javascript
myDevice.endpoints.byIndex(0).updateApparentPowerSensorStatus(1300);
```
\### updateCosPhiSensorStatus(cosPhi \[, utcDateTime]) The updateCosPhiSensorStatus() method allows updating the state of a cosine phi (power factor) sensor, optionally specifying the date and time of the update.
**Parameters**
* **cosPhi** (double): this parameter indicates the measured cosine phi.
* **utcDateTime** (date, optional): this parameter indicates the UTC date and time of the sample. If the parameter is omitted, the current date and time will be assumed.
**Example 1**
This example shows how to report a cosine phi measurement of 0.98 on the first endpoint of a device.
```javascript
myDevice.endpoints.byIndex(0).updateCosPhiSensorStatus(0.98);
```
\### updateFrequencySensorStatus(frequencyHz \[, utcDateTime]) The updateFrequencySensorStatus() method allows updating the state of a frequency sensor (frequency meter), optionally specifying the date and time of the update.
**Parameters**
* **frequencyHz** (double): this parameter indicates the measured frequency, in Hz.
* **utcDateTime** (date, optional): this parameter indicates the UTC date and time of the sample. If the parameter is omitted, the current date and time will be assumed.
**Example 1**
This example shows how to report a frequency measurement of 60Hz on the first endpoint of a device.
```javascript
myDevice.endpoints.byIndex(0).updateFrequencySensorStatus(60);
```
\### updateGenericSensorStatus(value \[, utcDateTime]) The updateGenericSensorStatus() method allows updating the state of a generic scalar sensor, optionally specifying the date and time of the update.
**Parameters**
* **value** (double): this parameter indicates the measured value, in the units selected for the endpoint.
* **utcDateTime** (date, optional): this parameter indicates the UTC date and time of the sample. If the parameter is omitted, the current date and time will be assumed.
**Example 1**
This example shows how to report a measurement of value 1234 on the first endpoint of a device.
```javascript
myDevice.endpoints.byIndex(0).updateGenericSensorStatus(1234);
```
\### updatePpmConcentrationSensorStatus(value \[, utcDateTime]) The updatePpmConcentrationSensorStatus() method allows updating the state of a concentration measurement sensor, optionally specifying the date and time of the update. This function is only valid for concentration sensors expressed as parts per million (ppm).
**Parameters**
* **value** (double): this parameter indicates the measured value, in parts per million (ppm).
* **utcDateTime** (date, optional): this parameter indicates the UTC date and time of the sample. If the parameter is omitted, the current date and time will be assumed.
**Example 1**
This example shows how to report a measurement of value 1234 ppm on the first endpoint of a device.
```javascript
myDevice.endpoints.byIndex(0).updatePpmConcentrationSensorStatus(1234);
```
\### updateMvConcentrationSensorStatus(value \[, utcDateTime]) The updateMvConcentrationSensorStatus() method allows updating the state of a concentration measurement sensor, optionally specifying the date and time of the update. This function is only valid for concentration sensors expressed as mass per volume ratio (m/v).
**Parameters**
* **value** (double): this parameter indicates the measured value, in micrograms per cubic meter (ug/m3).
* **utcDateTime** (date, optional): this parameter indicates the UTC date and time of the sample. If the parameter is omitted, the current date and time will be assumed.
**Example 1**
This example shows how to report a measurement of value 1234 ug/m3 on the first endpoint of a device.
```javascript
myDevice.endpoints.byIndex(0).updateMvConcentrationSensorStatus(1234);
```
\### updateAqiSensorStatus(value \[, utcDateTime]) The updateAqiSensorStatus() method allows updating the state of an air quality sensor, optionally specifying the date and time of the update.
**Parameters**
* **value** (double): this parameter indicates the measured value, according to the [AQI scale](https://en.wikipedia.org/wiki/Air_quality_index) (0-500).
* **utcDateTime** (date, optional): this parameter indicates the UTC date and time of the sample. If the parameter is omitted, the current date and time will be assumed.
**Example 1**
This example shows how to report a measurement of value 123 on the first endpoint of a device.
```javascript
myDevice.endpoints.byIndex(0).updateAqiSensorStatus(123);
```
\### updateApplianceStatus(turnedOn\[, utcDateTime]) The updateApplianceStatus() method allows updating the state of an on-off type endpoint (appliance), optionally specifying the date and time of the update.
**Parameters**
* **turnedOn** (boolean): this parameter indicates whether the endpoint is turned on (true) or off (false).
* **utcDateTime** (date, optional): this parameter indicates the UTC date and time of the update. If the parameter is omitted, the current date and time will be assumed.
**Example 1**
This example shows how to report that the first endpoint of a device is turned on.
```javascript
myDevice.endpoints.byIndex(0).updateApplianceStatus(true);
```
\### updateDimmerStatus(turnedOn, level\[, utcDateTime]) The updateDimmerStatus() method allows updating the state of a dimmer type endpoint, optionally specifying the date and time of the update.
**Parameters**
* **turnedOn** (boolean): this parameter indicates whether the endpoint is turned on (true) or off (false).
* **level** (int): this parameter indicates the brightness level, between 1% (minimum) and 100% (maximum), regardless of whether the dimmer is turned on or off.
* **utcDateTime** (date, optional): this parameter indicates the UTC date and time of the update. If the parameter is omitted, the current date and time will be assumed.
**Example 1**
This example shows how to report that the first endpoint of a device is turned on at 75%.
```javascript
myDevice.endpoints.byIndex(0).updateDimmerStatus(true, 75);
```
\### updateClosureControllerStatus(moving, position\[, utcDateTime]) The updateClosureControllerStatus() method allows updating the state of a closure type endpoint (curtain, motorized gate, etc.), optionally specifying the date and time of the update.
**Parameters**
* **moving** (boolean): this parameter indicates whether the closure is currently in motion (opening or closing). The value **true** indicates it is moving, while the value **false** indicates it is stopped.
* **position** (int): this parameter indicates the current position, from 0% (closed) to 100% (open).
* **utcDateTime** (date, optional): this parameter indicates the UTC date and time of the update. If the parameter is omitted, the current date and time will be assumed.
**Example 1**
This example shows how to report that the first endpoint of a device is stopped in the "open" position.
```javascript
myDevice.endpoints.byIndex(0).updateClosureControllerStatus(false, 100);
```
\### updateHVACStatus(mode, fanMode, setpoint, ambientTemperature\[, utcDateTime]) The updateHVACStatus() method allows updating the state of an HVAC device, such as a thermostat, optionally specifying the date and time of the update.
**Parameters**
* **mode** (enum): current mode of the device:
* **thermostatMode.off = 1**: the device is off.
* **thermostatMode.auto = 2**: the device is on in automatic mode.
* **thermostatMode.heat = 3**: the device is on in heat mode.
* **thermostatMode.cool = 4**: the device is on in cool mode.
* **thermostatMode.dry = 5**: the device is on in dehumidification mode.
* **thermostatMode.fan = 6**: the device is on in fan mode.
* **fanMode** (enum): indicates the current fan mode:
* **thermostatFanMode.auto = 1**: the fan is in auto mode.
* **thermostatFanMode.low = 2**: the fan is at low speed.
* **thermostatFanMode.mid = 3**: the fan is at medium speed.
* **thermostatFanMode.high = 4**: the fan is at high speed.
* **setpoint** (number): indicates the desired temperature value, in degrees Celsius.
* **ambientTemperature** (number): indicates the ambient temperature value, in degrees Celsius.
* **utcDateTime** (date, optional): this parameter indicates the UTC date and time of the update. If the parameter is omitted, the current date and time will be assumed.
**Example 1**
This example shows how to report that the first endpoint of a device is on in cool mode, with the fan at automatic speed, a desired temperature of 25 degrees Celsius, and an ambient temperature of 26 degrees Celsius.
```javascript
myDevice.endpoints.byIndex(0).updateHVACStatus(thermostatMode.cool, thermostatFanMode.auto, 25, 27);
```
\### updateLocationTrackerStatus(latitude, longitude \[, altitude, flags, utcDateTime]) The updateLocationTrackerStatus() method allows updating the state of a location tracker, optionally specifying the date and time of the update.
**Parameters**
* **latitude** (double): Indicates the latitude. The value must be between -90 and 90. The decimal separator is a period.
* **longitude** (double): Indicates the longitude. The value must be between -180 and 180. The decimal separator is a period.
* **altitude** (double): Indicates the altitude. Numeric value. The decimal separator is a period.
* **flags** (int, optional): Indicates extra information for the position. It is an integer value representing a bitwise sum. The available states are:
* **locationTrackerFlags.none (0):** Nothing special
* **locationTrackerFlags.moving (1):** The sensor position is changing
* **locationTrackerFlags.noPosition (2):** The sensor cannot acquire the position
* **locationTrackerFlags.malfunctioning (4):** The sensor is not functioning correctly. The reported position may be incorrect
* **locationTrackerFlags.lowPrecision (8):** The reported position has low precision
Values can be combined through the OR operation. For example, to indicate that the reported position has low precision and the position is changing, use (**8 OR 1**) = **9**.
* **utcDateTime** (date, optional): this parameter indicates the UTC date and time of the sample. If the parameter is omitted, the current date and time will be assumed.
**Example 1**
This example shows how to report a location with latitude -13.9957594 and longitude 48.933938 on the first endpoint of a device.
```javascript
myDevice.endpoints.byIndex(0).updateLocationTrackerStatus(-13.9957594, 48.933938);
```
**Example 2**
This example shows how to report a location with latitude -13.9957594, longitude 48.933938, and altitude 123 on the first endpoint of a device.
```javascript
myDevice.endpoints.byIndex(0).updateLocationTrackerStatus(-13.9957594, 48.933938, 123);
```
**Example 3**
This example shows how to report a location with latitude -13.9957594, longitude 48.933938, altitude 123, and flag 1 (the sensor position is changing) on the first endpoint of a device.
```javascript
myDevice.endpoints.byIndex(0).updateLocationTrackerStatus(-13.9957594, 48.933938, 123, locationTrackerFlags.moving);
```
**Example 4**
This example shows how to report a location with latitude -13.9957594, longitude 48.933938, and a specific timestamp on the first endpoint of a device.
```javascript
myDevice.endpoints.byIndex(0).updateLocationTrackerStatus(-13.9957594, 48.933938, 0, locationTrackerFlags.none, '2021-02-23T14:55:03');
```
\### updateEnergySensorValueSummation(activeEnergySummationWh, reactiveEnergySummationVARh \[, utcDateTime]) The updateEnergySensorValueSummation() method allows updating the active and reactive energy summation of an energy sensor, optionally specifying the date and time of the update.
**Parameters**
* **activeEnergySummationWh** (double): Indicates the current value of the active energy summation, expressed in Wh.
* **reactiveEnergySummationVARh** (double): Indicates the current value of the reactive energy summation, expressed in VARh.
* **utcDateTime** (date, optional): this parameter indicates the UTC date and time of the sample. If the parameter is omitted, the current date and time will be assumed.
**Example 1**
This example shows how to report a cumulative active and reactive energy of 14650 Wh and 1280 VARh respectively, on the first endpoint of a device.
```javascript
myDevice.endpoints.byIndex(0).updateEnergySensorValueSummation(14650, 1280);
```
\### updateEnergySensorValueUnits(activeEnergyWh, reactiveEnergyVARh \[, utcDateTime]) The updateEnergySensorValueUnits() method allows adding an active and reactive energy consumption value from an energy sensor, optionally specifying the date and time of the update.
**Parameters**
* **activeEnergyWh** (double): indicates the amount of active energy consumed, expressed in Wh. This value will be added to the previously recorded active energy consumption.
* **reactiveEnergyVARh** (double): Indicates the amount of reactive energy consumed, expressed in VARh. This value will be added to the previously recorded reactive energy consumption.
* **utcDateTime** (date, optional): this parameter indicates the UTC date and time of the sample. If the parameter is omitted, the current date and time will be assumed.
**Example 1**
This example shows how to report a consumption of 160 Wh and 22 VARh respectively, on the first endpoint of a device.
```javascript
myDevice.endpoints.byIndex(0).updateEnergySensorValueUnits(160, 22);
```
\### updateFlowSensorValueSummation(summationValue, \[, utcDateTime]) The updateFlowSensorValueSummation() method allows updating the flow summation of a flow sensor, generic flow sensor, or people flow sensor, optionally specifying the date and time of the update.
**Parameters**
* **summationValue** (double): Indicates the current value of the flow summation.
* For flow sensors, the value must be expressed in liters.
* For generic flow sensors, the value must be expressed in the unit associated with the variable chosen for the sensor.
* For people flow sensors, the value is indicated in people.
* **utcDateTime** (date, optional): this parameter indicates the UTC date and time of the sample. If the parameter is omitted, the current date and time will be assumed.
**Example 1**
This example shows how to report a cumulative flow of 14650 liters on the first endpoint of a device.
```javascript
myDevice.endpoints.byIndex(0).updateFlowSensorValueSummation(14650);
```
\### updateFlowSensorValueUnits(value, \[, utcDateTime]) The updateFlowSensorValueUnits() method allows adding a value to the flow recorded by a flow sensor, generic flow sensor, or people flow sensor, optionally specifying the date and time of the update.
**Parameters**
* value (double): indicates the recorded flow value. This value will be added to the previously recorded value.
* For flow sensors, the value must be expressed in liters.
* For generic flow sensors, the value must be expressed in the unit associated with the variable chosen for the sensor.
* For people flow sensors, the value is indicated in people.
* **utcDateTime** (date, optional): this parameter indicates the UTC date and time of the sample. If the parameter is omitted, the current date and time will be assumed.
**Example 1**
This example shows how to report a flow of 182 liters on the first endpoint of a device.
```javascript
myDevice.endpoints.byIndex(0).updateFlowSensorValueUnits(182);
```
\### updateTextContainerStatus(text, \[, utcDateTime]) The updateTextContainerStatus() method allows adding text up to 255 characters in length.
**Parameters**
* **text**: Indicates the text to be added.
* **utcDateTime** (date, optional): this parameter indicates the UTC date and time of the sample. If the parameter is omitted, the current date and time will be assumed.
**Example 1**
This example shows how to add text.
```javascript
myDevice.endpoints.byIndex(0).updateTextContainerStatus("Sample text for text container endpoint");
```
\### uploadCameraSnapshot(base64Content, fileType, \[, utcDateTime]) The uploadCameraSnapshot() method allows storing an image obtained from a camera.
**Parameters**
* **base64Content**: the text, in base64 format, corresponding to the binary content of the image.
* **fileType**: indicates the image type. Accepted values are "jpg" and "png".
* **utcDateTime** (date, optional): this parameter indicates the UTC date and time when the image was taken. If the parameter is omitted, the current date and time will be assumed.
**Example 1**
This example shows how to upload a camera snapshot.
```javascript
myDevice.endpoints.byIndex(0).uploadCameraSnapshot("VGhpcyBpcyBzb21lIHRleHQ....[more text].....", "jpg");
```
# Share Dashboard - Mobile App
The user can use the corresponding icon to share the Dashboard.
> *When accessing the Dashboard from the **Dashboard List** and editing is required, the Share option will not be enabled until edit mode is closed.*
**1- Share Dashboard:** Select the Share Dashboard option.

This opens a message indicating that a unique link is generated that can be accessed without credentials. An optional description can also be provided.

Once the Get Link button is pressed, an access link to the dashboard you want to share is generated.
The link can be opened and viewed in a browser without needing access to the platform.
**2- Share Dashboard - Mobile:** Select the Share Dashboard option.

This opens a message indicating that a unique link is generated that can be accessed without credentials. An optional description can also be provided.

To make it available in the mobile version, check the '*Available for the mobile application*' option.
Once the Get Link button is pressed, an access link to the dashboard you want to share is generated.
The link can be opened and viewed in a browser without needing access to the platform, as well as on a mobile device.
3- **Access to shared links**
You can access and manage shared links. To do this, go through the manager with the required permissions. Navigate to Security > Shared Links.

Once there, all previously shared links are displayed with the following information:
Description, Facility, link, user who shared it, creation date, last used date, and expiration date.

Through the context menu, you can either open the previously created link or expire it, provided you have the necessary permissions.
# Share Dashboard
The user can use the corresponding icon to share the Dashboard and/or download it in two formats.
> When accessing the Dashboard from the ***Dashboard List*** and editing is required, the Share option will not be enabled until edit mode is closed.
**1- Share Dashboard:** By selecting the *Get Link* button, the user will generate an access link to the dashboard they want to share. This link can be opened and viewed in a browser without needing access to the platform.


**2- Export PDF:** Here the user can download the dashboard in Portable Document Format (PDF) according to the applied filter.


**3- Export PNG:** The user can download the dashboard in Portable Network Graphic (PNG) format according to the applied filter.


# Metrics
A metric is a quantitative measure used to evaluate and monitor the performance of an IoT system or device in real time. Metrics are used to collect data that can be analyzed to gain valuable insights into the behavior and effectiveness of the IoT device.
In an environmental monitoring system, metrics could include temperature, humidity, and air quality. In an asset tracking device, metrics could include the location, speed, and direction of the object in real time. These metrics are used to measure device performance and provide valuable information that can be used to improve its efficiency and effectiveness.
# Widgets
The Cloud Studio platform features a series of specific widgets for branch monitoring, energy consumption, power history, consumption, weather data, and more, for use in dashboards customizable by the end user.


* Active alarms (Displays a pie chart with the distribution of currently active alarm types)
* Past and projected energy consumption (Displays past energy consumption and targets, as well as a projection of consumption and targets for the coming days)
* Energy consumption by category (Displays energy consumption for selected categories)
* Energy consumption by phase (Pie chart showing energy consumption by phase)
* Daily energy consumption by category (Displays daily energy consumption for selected categories)
* Daily consumption by phase (Displays daily consumption by phase for selected categories)
* Energy cost by category (Displays energy cost for selected categories)
* Past and projected energy costs (Displays past energy costs and targets, as well as a projection of costs and targets for the coming days)
* Weather status (Displays the weather status at the current facility)
* Daily power factor (Displays the daily evolution of the power factor)
* Infrastructure (Displays the current availability of the infrastructure)
* Facility map (Displays a map containing the location of the current facility)
* Energy consumption targets (Displays energy consumption information relative to defined targets)
* Daily maximum power (Displays the maximum daily power used in a 15-minute period)
* Daily average power (Displays the daily evolution of the power used)
* Facility summary (Displays summary information for the current facility)
* Global summary (Displays summary information for all facilities)
* Latest events (Displays a list with the latest events)
* Camera snapshots (Displays snapshots taken by a camera)
* Endpoint history (Line chart showing the variation of an endpoint variable type over time)
* Comparative endpoint history (Line chart showing the comparative variation of two endpoint variable types over time)
* Facility list (Displays a list containing facility information)
* World summary (Displays summary information for all facilities)
* Infrastructure (Displays the current availability of the infrastructure)
* Latest events (Displays a list containing the latest items)
* Linear gauge for variable (Displays the value of a variable in real time as a linear chart)
* Metric (Displays the value of a variable in real time)
* Occupancy (Displays the occupancy)
* Plain text (Displays text with custom colors and formatting)
* Rounded gauge for variable (Displays the value of a variable in real time as a semicircular chart)
* State timeline (State timeline showing how one or more endpoints changed their state over time.)
* Static image (Displays a static image)
* Vertical linear indicator for variable (Displays the value of a variable in real time as a vertical linear chart)
* View (Displays a view in a widget, designed in the views section)
* Weather information (Displays the current weather information at the current facility)
**Active Alarms:**
The user can use this Widget to create a pie chart with the distribution of currently active alarm types.


**Camera Snapshots:**
The user can use this Widget to view snapshots taken by a camera.


**Daily Average Power:**
The user can use this Widget to view the daily evolution of the power used.


**Daily Energy Consumption by Category:**
The user can use this Widget to view the daily energy consumption for selected categories.

**Daily Energy Consumption by Phase:**
The user can use this Widget to view the daily energy used for selected categories.


**Daily Maximum Power:**
The user can use this Widget to view the maximum daily power used in a 15-minute period.


**Daily Power Factor:**
The user can use this Widget to view the daily evolution of the power factor.

**Daily Power Factor:**
The user can use this Widget to view the daily evolution of the power factor.

**Endpoint History:**
The user can use this Widget to generate a line chart showing the variation of an endpoint variable type over time.


**Comparative Endpoint History:**
The user can use this Widget to generate a line chart showing the comparative variation of two endpoint variable types over time.


**Energy Consumption Targets:**
The user can use this Widget to view current energy consumption data relative to defined targets.


**Energy Consumption Targets:**
The user can use this Widget to view the energy cost for selected categories.


**Energy Consumption by Category:**
The user can use this Widget to view energy consumption for selected categories.


**Energy Consumption by Phase:**
The user can use this Widget to view a pie chart showing energy usage by phase.


**Energy Consumption by Phase:**
The user can use this Widget to view a list containing facility information.


**Facility Map:**
The user can use this Widget to view a map containing the location of the current facility.


**Facility Summary:**
The user can use this Widget to view summary information for the current facility.


**World Summary:**
The user can use this Widget to view summary information for all facilities.


**Infrastructure:**
The user can use this Widget to view the current availability of the infrastructure.


**Latest Events:**
The user can use this Widget to view a list containing the latest events.


**Linear Gauge for Variable:**
The user can use this Widget to view the value of a variable in real time as a linear chart.


**Metric:**
The user can use this Widget to view the value of a variable in real time.


**Occupancy:**
The user can use this Widget to view the occupancy.


**Past and Projected Energy Costs:**
The user can use this Widget to view past energy costs and targets, and a projection of costs and targets for the coming days.


**Past and Projected Energy Consumption:**
The user can use this Widget to view past energy consumption and targets, and a projection of consumption and targets for the coming days.


**Plain Text:**
The user can use this Widget to enter text with custom colors and sizes.


**State Timeline:**
The user can use this Widget to view a state timeline showing how one or more endpoints changed their state over time.


**Static Image:**
The user can use this Widget to view a static image.


**Vertical Linear Indicator for Variable:**
The user can use this Widget to view the value of a variable in real time as a vertical linear chart.


**Views:**
The user can use this Widget to view a view in a widget, designed in the views section.


**Weather Information:**
The user can use this Widget to view the current weather information at the current facility.


Dashboard Widgets (Monitor) [#dashboard-widgets-monitor]
In the monitor, the dashboard can be configured to the client's needs using any combination of the [**available widgets**](/docs/monitor/dashboards/widgets):
**Endpoint History Widget:**
Line chart showing the variation of an endpoint variable type over time. In endpoint history charts, the user can enter minimum and maximum values to define the Y-axis ranges, as well as modify the variable names associated with the Y-axis titles.
Dashboard

* *The user can edit the minimum and maximum values that define the Y-axis ranges of the charts.*
!\[Graphical user interface, Text, Application, Email
Automatically generated description]\(/images/wiki/dashboards/widgets/index/image\_272e.png)
* *The user can modify the Y-axis titles (instead of displaying the variable type names).*


* *The user can view the tooltips of history charts*, *which display all data points associated with an X position.*
!\[Chart, Line chart
Automatically generated description]\(/images/wiki/dashboards/widgets/index/image\_c4df.png)
**Comparative Endpoint History Widget:**
Endpoint history charts where the user can enter minimum and maximum values to define the Y-axis ranges, as well as modify the variable names associated with the Y-axis titles.

*The user can edit the minimum and maximum values that define the Y-axis ranges of the charts.*

*The user can modify the Y-axis titles (instead of displaying the variable type names).*


*The user can view the tooltips of history charts*, *which display all data points associated with an X position.*

# Dynamic Widget Titles
Widgets with dynamic titles allow customizing the information displayed on the dashboard by using variables such as `**{facility_desc}**`, `**{device_desc}**`, and `**{endpoint_desc}**`. To use them, include them in the "Title" field when creating your widget and check the "Title" checkbox to enable this feature.
To learn how to create a Widget and add a title, we suggest visiting our [Create Groups and Widgets](/docs/monitor/dashboards/crear-grupos-y-widgets) page.

The variables entered in the title are automatically replaced with the name of the selected facility, device, or endpoint, making the title change dynamically. This helps avoid repeating generic information and provides a clearer, more relevant context for the displayed data.
| Variable | Description |
| ----------------- | ---------------------------------------------------------------------------------------------------------------------------------------------------- |
| \{facility\_desk} | Replaced with the name of the facility selected by the user upon logging in. |
| \{device\_desk} | Replaced with the name of the device being used in the widget. If no device is selected, it will use the device associated with the endpoint in use. |
| \{endpoint\_desk} | Replaced with the name of the endpoint selected in the widget. If there is more than one endpoint, the first one in the list is shown by default. |
These variables help display personalized and relevant information on the dashboard in a clean and automated way. Remember to use a Widget compatible with your desired variable.
Example of creating a widget that uses all available variables, combining them in the title with spaces or optional special characters, such as the hyphen "-" in this case, to improve readability:

And how the variables appear once the changes are applied:

Widget display with dynamic titles.
Widgets that support this feature [#widgets-that-support-this-feature]
| Widget type | Supports facility description variable - \{facility\_desc} | Supports device description variable - \{device\_desc} | Supports endpoint description variable - \{endpoint\_desc} | Notes |
| ------------------------------------- | ---------------------------------------------------------- | ------------------------------------------------------ | ---------------------------------------------------------- | ------------------------------------------------------------------------------------------------------------------------------ |
| Past and projected energy costs | YES | NO | NO | |
| Past and projected energy consumption | YES | NO | NO | |
| Active alarms | YES | NO | NO | |
| Alarm counter | YES | NO | NO | |
| Energy consumption targets | YES | NO | NO | |
| Device | YES | YES | YES | |
| Comparative endpoint history | YES | YES | YES | If there are no endpoints selected on the left axis, it will look for the first selected endpoint on the right axis |
| Endpoint history | YES | YES | YES | |
| Energy consumption by category | YES | NO | NO | |
| Energy cost by category | YES | NO | NO | |
| Daily energy consumption by category | YES | NO | NO | |
| Energy consumption by phase | YES | NO | NO | |
| Daily consumption by phase | YES | NO | NO | |
| Latest events | YES | NO | NO | |
| Facility list | YES | NO | NO | The facilities selected in the widget are not considered; instead, the current facility selected by the logged-in user is used |
| Facility map | YES | NO | NO | The facilities selected in the widget are not considered; instead, the current facility selected by the logged-in user is used |
| Facility summary | YES | NO | NO | |
| Weather status | YES | NO | NO | |
| Global summary | NO | NO | NO | |
| Infrastructure | YES | NO | NO | |
| Daily maximum power | YES | NO | NO | |
| Occupancy | YES | YES | YES | |
| Plain text | YES | NO | NO | |
| View | YES | NO | NO | |
| Daily power factor | YES | NO | NO | |
| Daily average power | YES | NO | NO | |
| Individual alarm counter | YES | NO | NO | |
| Camera snapshots | YES | YES | YES | |
| State timeline | YES | YES | YES | |
| Static image | YES | NO | NO | |
| Linear variable gauge | YES | YES | YES | |
| Metrics | YES | YES | YES | |
| Rounded variable gauge | YES | YES | YES | |
| Vertical linear variable gauge | YES | YES | YES | |
# Device Widget
The user can use this Widget to view relevant information about a specific device, as well as data from up to 2 of its endpoints.

The information that can be optionally displayed according to the configuration of this Widget includes:
* Image: device image
* Status: status of the selected endpoint(s)
* Device model
* Battery level.
* *For this Widget, the device battery type used is the **first** one*
* Firmware version
* Device location
* RSSI signal level
* Last update date and time

# Alarm Elements

# Occupancy Elements

# Snapshot Elements

# Endpoint Status Image
From the *Views* section in the *Monitor* panel, the user can view the states of a discrete or scalar variable associated with an endpoint. The *Endpoint status image* element will display the preconfigured image based on the state reported by the endpoint.
If the value entered by the user does not correspond to the variable's values, the Endpoint will display the default image preconfigured in the element editing.
> ***This feature supports a list of operable sensors available*** ***here***
* Add New Element:
* **Manager >** **Views** > Add an element of type **Endpoint Status Image.**

* Endpoint Selection & Image Upload:
* **Properties Tab** > Select the Endpoint > Only Endpoints of the following types will be selectable: *IAS Sensors (motion, occupancy, and binary sensors),* *Appliances* & *Endpoints that have associated discrete variable types.*

* Make Endpoint Operable:
* **Click Events Tab**, within the **Click Event Types** list, an option called **Operate** will appear, which will allow the user to subsequently modify the Endpoint from *Monitor*
* This option will be visible if the Endpoint's Security section has the ***Read Write** or **Read Write Command*** options selected

* Edit, Clone, or Delete Element:
* The user can right-click to resize, Edit, Clone, or Delete the selected element

* Modify Element Values:
* **Monitor Panel >** **Views** > **Select View** > The user will see the added sensor(s), which can be modified from here by clicking on the added image element.
**Appliances & ON-OFF devices**


**Curtains & Closure Control**

**Update Dimmer**

**Update Thermostat**


* When the sensor's security level is **Medium >** The user can configure an optional *alert message*.
* When the sensor's security level is **High >** The user can:
* Configure an alert message (*Optional*)
* The user must enter the password when editing the Endpoint to confirm the new value.

# Endpoint Status Text
From the *Views* section in the *Monitor* panel, the user can view the states of a discrete or scalar variable associated with an endpoint. The *Endpoint status text* element will display the preconfigured value based on the state reported by the endpoint.
> ***This feature supports a list of operable sensors available*** [***here***](/docs/monitor/vistas/endpoints-operables)
* Add New Element:
* **Manager >** **Views** > Add an element of type **Endpoint Status Text.**

* Endpoint Selection & Image Upload:
* **Properties Tab** > Select the Endpoint > Only Endpoints of the following types will be selectable: *Current Sensor, Flow Sensor* & *Generic Flow Sensor*

* Make Endpoint Operable:
* **Click Events Tab**, within the **Click Event Types** list, an option called **Operate** will appear, which will allow the user to subsequently modify the Endpoint from *Monitor*
* This option will be visible if the Endpoint's Security section has the ***Read Write** or **Read Write Command*** options selected

Define Endpoint as Operable
* Edit, Clone, or Delete Element:
* The user can right-click to resize, Edit, Clone, or Delete the selected element

* Modify Element Values:
* Modify Element Values:
* **Monitor Panel >** **Views** > **Select View** > The user will see the added sensor(s), which can be modified from here by clicking on the added text element and selecting "Change Value"


* **Value >** If the endpoint's variable type is ***scalar***, an input field is displayed with the endpoint's state value that you want to modify.

* If the selected endpoint's variable type is ***discrete***, a list of that variable's states is displayed.

* **Unit >** If the endpoint's variable type is ***scalar***, a list of measurement units based on the magnitude represented by the endpoint's state is displayed.

* When the sensor's security level is **Medium >** The user can configure an optional *alert message*.
* When the sensor's security level is **High >** The user can:
* Configure an alert message (*Optional*)
* The user must enter the password when editing the Endpoint to confirm the new value.

# Image
# Elements
# Text
The text element allows inserting an element that contains a fixed and predefined text, meaning a text defined by the user that will not change once it has been configured.

# Environment
The environment (env) object is the entry point to the context in which other objects exist that represent business entities in the platform such as the facility, devices and endpoints, allowing access to their methods and properties in action script development.
Properties
| (integer) clientID |
| -------------------------------------------------------------------------------------- |
| The clientID property gets the unique client identifier to which the facility belongs. |
| Examples |
| let client= env.clientID env.log(client) |
| (object) facility |
| ---------------------------------------------------------------------------------- |
| The facility property returns a facility object, see facility for more information |
| Examples |
| let facility = env.facility env.log(facility) |
| facility\[] facilities |
| ----------------------------------------------------------------------------------------------- |
| The facilities property returns an array of facility objects, see facility for more information |
| Examples |
| let facilities = env.facilities env.log(facilities ) |
| (integer) facilityID |
| ------------------------------------------------------------------ |
| The facilityID property gets the unique identifier of the facility |
| Examples |
| let facilityId = env.facilityID env.log(facilityId) |
| (bool) testMode |
| --------------------------------------------------------------------------------- |
| The testMode property indicates whether the script is running in test mode or not |
| Examples |
| let test = env.testMode env.log(test) |
# Facility
Properties
| (string) description |
| -------------------------------------------------------------------------------------------------- |
| The description property gets the description that has been defined in the facility configuration. |
| Examples |
| let facilityDescription= env.facility.description env.log(facilityDescription) |
| (object) devices |
| ------------------------------------------------------------------------------- |
| The devices property returns a devices object, see devices for more information |
| Examples |
| let devices= env.facility.devices env.log(devices) |
| (object) endpoints |
| --------------------------------------------------------------------------------------- |
| The endpoints property returns an endpoints object, see endpoints for more information. |
| Examples |
| let endpoints= env.facility.endpoints env.log(endpoints) |
| (integer) facilityID |
| --------------------------------------------------------------------- |
| The facilityID property returns the unique identifier of the facility |
| Examples |
| let facilityID= env.facility.facilityID env.log(facilityID) |
# Scripting objects, methods and properties
In these pages you will find the guide to the objects, their properties and methods that are available for developing action scripts.
It is recommended to start reading from [here](/docs/configuracion-del-cliente/acciones/pasos/scripting-objects-methods-and-properties/environment). For any needs or questions about action development, you can request support [here](https://www.cloud.studio/support/) at any time.
# Batch Device Creation
The **batch device creation** feature allows users to efficiently load multiple devices using a CSV file. This tool is especially useful for large-scale installations, as it avoids manual entry one by one, even allowing you to combine different device models in a single file.

Reference File [#reference-file]
Before uploading, the platform offers a sample CSV file for download. This file contains the structure and columns needed to facilitate correct device entry. A sample file is generated for each registered device model, although you can later include devices of different models in the same file.
Each row in the file represents a device, and each column represents an attribute. The required fields are described below:
**Description**: the name used to identify the device
**Address**: the device's address (logical address)
**Device model**: the device type, created in the Device Models section, that indicates its characteristics, such as: endpoints, offline timeout periods, etc.
**Device model ID**: a unique identifier for the device model
**Latitude**: one of the two coordinates for geolocating the device (position relative to the equator line)
**Longitude**: one of the two coordinates for geolocating the device (east-west orientation, relative to meridians)
**Icon ID**: identifier for the device's image icon
**Default dashboard ID**: identifier for the default dashboard for that device
**Default view ID**: identifier for the default view for that device
**Communication Interface**: name used to identify the device in the Device Gateway
Upload Process [#upload-process]
Once the CSV file is prepared, it can be easily uploaded from the corresponding feature, either by browsing or dragging the file to the designated area.

After selecting the file and clicking **Next**, you access an **editable preview** showing all included devices. At this stage:
The system validates the data automatically.
Detected errors are highlighted for easy inline correction.
Values can be edited directly from the preview.
When the file has no errors and the data has been verified, press **Confirm** to execute the batch creation.

Confirmation and Display [#confirmation-and-display]
Once the process is complete, the system shows a summary indicating:
* Which devices were created successfully.
* Which could not be created (for example, if they already existed in the instance).

By clicking **Save**, the new devices are integrated into the general list of the corresponding instance.

# Devices
When creating a device in Gear Studio, you can choose its model. Gear Studio supports two types of device models:
* **Models built into Gear Studio**. These are native, platform-certified models that are supported without any integration. For these device models, you generally only need to configure each device to report to the platform, and the platform will then automatically receive and process the information. When creating a device corresponding to a natively supported model, all necessary endpoints will be created automatically.
* **User-defined models**. These models are managed from the [device models](/docs/configuracion-del-cliente/dispositivos-y-endpoints/dispositivos/modelos-de-dispositivo) page. User-defined models are used to create devices that the platform does not natively support.
When you need to create a device corresponding to a user-defined model, the model must be created beforehand using the [device models](/docs/configuracion-del-cliente/dispositivos-y-endpoints/dispositivos/modelos-de-dispositivo) page.
To begin creating a device, navigate to the side menu and select **Devices**. This page shows the list of devices currently available in the facility, along with the list of endpoints defined for each one. If you need more information about the difference between devices and endpoints, we recommend consulting [this page](/docs/configuracion-del-cliente/dispositivos-y-endpoints).
To create a new device, choose the **Add** option.

Next, you will be presented with some fields to fill in. In the **Description** field, add a name to easily identify the device -- we will name it **Custom Device**. Then expand the **Models** dropdown offered by the platform and select the desired one. In our case, we select our **Test Model**.

You must also add a unique address for the device. We recommend **using a MAC address or a naming convention with a consistent pattern** to simplify management, whenever possible.
> For certain device models, the platform will automatically validate the address format. This typically occurs for native devices where the platform already knows the address must be a valid MAC.
In our case, since our device has a model created by us, we add the address we want, then press **Save**.

We have returned to the list of created devices where we can see our custom device, which has zero endpoints. However, we have the ability to add and remove as many as needed.
> As mentioned earlier, if you created a device corresponding to a natively supported model on the platform, all corresponding endpoints will also be created automatically.

More Information [#more-information]
For more information about the differences between devices and endpoints, we recommend reading [devices and endpoints](/docs/configuracion-del-cliente/dispositivos-y-endpoints). To learn how to manage endpoints, read the [endpoints](/docs/configuracion-del-cliente/dispositivos-y-endpoints/endpoints/crear-un-endpoint) section in the tutorials list.
# Device Model Promotion
On the platform, device models can exist at the **local** level (specific to a client) or at the **global** level (available to all clients in the instance). This feature allows **promoting a local device model to a global model**, with the goal of reusing configurations across different clients.
When promoting a local model to global:
It is **removed from the local models list** of the original client.
It is **added to the global models list**, accessible by all clients in the instance.
It becomes **available for creating new devices** at the global level.
Warning: This process is **not reversible**.
How to Promote a Device Model [#how-to-promote-a-device-model]
Go to the **Device Models** section of the original client.
Right-click on the desired model to open the **context menu**.
Select the **Promote to Global** option.

Action Confirmation
When selecting this option, a message will be displayed requesting confirmation of the action.

[#-1]
Promotion Result
* The model **will no longer be available** in the client's local models list.

* It will be visible in the **Global Device Models list**.

* It will be available to **all clients in the instance** when creating new devices.
This action can be performed on **any device model** belonging to a client.
# Raspberry Pi Pico W Integration Example
By [Humai](https://ihum.ai/)
**Cloud Studio** has all the necessary resources to offer a comprehensive solution to professionals working in the **IoT** field, enabling the creation of notifications and alarms, and the development of visualization panels to display real-time information about the performance and status of the **IoT devices** they wish to connect.
To illustrate this, we will show a practical example with the **Raspberry Pi Pico W (RPico W)** development board, monitoring its internal temperature and sending the corresponding data to the **Cloud Studio** platform via the **HTTP** protocol. This will allow us to generate charts representing the historical and current values of the variable we are monitoring.
We will start by including the necessary lines of code to establish the **RPico W** connection to a **WiFi** network. To do this, we will need to use the *network* library, which provides the necessary tools for network configuration and management on devices running **MicroPython**.
To organize the steps efficiently, we will define a function called *connect()* to handle the **WiFi** network connection, and implement a *try/except* exception handling structure to manage possible errors.
We will also include the configuration of the **Analog-to-Digital Converter** (*ADC*) connected to the **RPico W** internal temperature sensor, along with a *conversion factor* that establishes a mathematical way to convert the number produced by the **ADC** into a fair approximation of the actual voltage it represents. Subsequently, we will add the necessary lines of code to perform the actual sensor reading. Keep in mind that this configuration must be adjusted according to the sensor being used for your **IoT** project.
This first part of the complete code is as follows:
```
import network
from machine import Pin, ADC
from utime import sleep
ssid = 'CAMBIA POR TU SSID'
password = 'TU PASSWORD'
sensor_temp = ADC(4)
factor_conversion = 3.3 / (65535)
def connect():
red = network.WLAN(network.STA_IF)
red.active(True)
red.connect(ssid,password)
while red.isconnected() == False :
print("Estableciendo conexión..")
sleep(1)
ip = red.ifconfig()[0]
print("Conexión Establecida")
print(red.ifconfig())
return ip
try:
ip = connect()
except KeyboardInterrupt:
machine.reset()
```
On the other hand, in **MicroPython**, the *urequests* library is used to make HTTP requests over the internet. This library allows devices using **MicroPython**, such as the **RPico W**, to interact with web services and access remote resources, such as **Cloud Studio** in this case.
The *urequests* library simplifies the process of sending GET, POST, PUT, or DELETE requests to specific URLs, as well as handling responses and received data. By using *urequests*, resource-constrained devices can take advantage of web service communication functionality efficiently and effectively.
To begin, we will import the *urequests* library along with the previously loaded libraries:
```
import network
import urequests as req
from machine import Pin, ADC
from utime import sleep
```
Now we will proceed to integrate our code with the **Cloud Studio** platform. To do this, we will start by using two pieces of data that are fundamental for interacting with an **IoT platform** and accessing its services: the *access\_token* and the *endpointID*.
The *access\_token* is a security credential used to authenticate and authorize access to the **IoT platform**. On the other hand, *endpoints* are the addresses through which we can send requests to the **IoT platform** API. These *endpoints* are represented as specific URLs indicating the location of a service or resource on the platform.
Remember that we must first create our device on the platform (in our case the **RPico W**) and the corresponding endpoint(s) for the variable we want to monitor (in our case the internal temperature).
In this case, to monitor the temperature of our **RPico W**, we will define the following:
```
# Esto se obtiene de la wiki de Cloud Studio
temperature_url = 'https://gear.cloud.studio/services/gear/DeviceIntegrationService.svc/UpdateTemperatureSensorStatus'
# Esto se obtiene de la platafroma de Cloud Studio
access_token = 'COLOCA TU ACCESS TOKEN'
internal_temperature = 'COLOCA EL ENDPOINT ID CORRESPONDIENTE AL SENSOR INTERNO DE TEMPERATURA'
```
Access the information about Access tokens [here](/docs/configuracion-del-cliente/tokens-de-acceso-access-tokens).
Next, we will create the *payload*, which represents the set of data sent in an **HTTP** request. In this case, it will be structured as follows:
```
payload_temperature = {
'accessToken': access_token, # Se repite en todos los payloads que realicemos
'endpointID': internal_temperature, # Es un numero entero y se modifica de acuerdo al sensor que utilicemos
'temperatureCelsius': 30 # Valor inicial aleatorio
}
```
And now we will define a *enviar\_datos()* function that effectively transmits the data to the **Cloud Studio** platform:
```
def enviar_datos(ip):
while True:
# Realizo la lectura correspondiente
lectura = sensor_temp.read_u16() * factor_conversion
temperature = 27 - (lectura - 0.706) / 0.001721
# La agrega el dato al payload
payload_temperature['temperatureCelsius'] = temperature
print('Tomando temperatura del sensor interno', payload_temperature['temperatureCelsius'])
# Le envío al servidor y aguardo la respuesta del servidor (200)
response = req.post(temperature_url, json = payload_temperature)
print('Respuesta del servidor: ', response.status_code)
response.close()
sleep(1)
```
Additionally, we will incorporate the *enviar\_datos()* function within the *try/except* exception handling structure to manage possible errors.
```
try:
ip = connect()
enviar_datos(ip)
except KeyboardInterrupt:
machine.reset()
```
The complete code is as follows:
```
import network
import urequests as req
from machine import Pin, ADC
from utime import sleep
ssid = 'CAMBIA POR TU SSID'
password = 'TU PASSWORD'
sensor_temp = ADC(4)
factor_conversion = 3.3 / (65535)
# Esto se obtiene de la wiki de Cloud Studio
temperature_url = 'https://gear.cloud.studio/services/gear/DeviceIntegrationService.svc/UpdateTemperatureSensorStatus'
access_token = 'COLOCA TU ACCESS TOKEN'
internal_temperature = 'COLOCA EL ENDPOINT ID CORRESPONDIENTE AL SENSOR INTERNO DE TEMPERATURA'
payload_temperature = {
'accessToken': access_token, # Se repite en todos los payloads que realicemos
'endpointID': internal_temperature, # Es un numero entero y se modifica de acuerdo al sensor que utilicemos
'temperatureCelsius': 30 # Valor inicial aleatorio
}
def connect():
red = network.WLAN(network.STA_IF)
red.active(True)
red.connect(ssid,password)
while red.isconnected() == False :
print("Estableciendo conexión..")
sleep(1)
ip = red.ifconfig()[0]
print("Conexión Establecida")
print(red.ifconfig())
return ip
def enviar_datos(ip):
while True:
# Realizo la lectura correspondiente
lectura = sensor_temp.read_u16() * factor_conversion
temperature = 27 - (lectura - 0.706) / 0.001721
# La agrega el dato al payload
payload_temperature['temperatureCelsius'] = temperature
print('Tomando temperatura del sensor interno', payload_temperature['temperatureCelsius'])
# Le envío al servidor y aguardo la respuesta del servidor (200)
response = req.post(temperature_url, json = payload_temperature)
print('Respuesta del servidor: ', response.status_code)
response.close()
sleep(1)
try:
ip = connect()
enviar_datos(ip)
except KeyboardInterrupt:
machine.reset()
```
If the data was sent successfully, you should see the HTTP *200* code in your compiler console, as shown in **Figure 01**. This confirms proper communication with the platform.

*Figure 01 - Successful data communication to Cloud Studio*
With this completed, everything is ready to start developing our [dashboards](/docs/monitor/dashboards) in **Cloud Studio**.
# Helium
The integration with [**Helium**](https://www.helium.com/) allows the **Cloud Studio IoT Platform** to communicate with **LoRaWAN** devices using a variety of device models available on the market. This article describes the steps necessary to complete the integration.
Requirements [#requirements]
Prior to integration, the user must have:
* An instance identifier. Depending on your Gear Studio subscription, the most common instance names are:
* **gear.cloud.studio**. This instance name corresponds to a common Gear Studio instance, including the free version.
* **xxxx.cloud.studio**. This instance name corresponds to Flex instances where hosting is provided by Cloud Studio, but the client can choose the subdomain used (xxxx).
* **Other**. For Enterprise clients using their own domain, the chosen domain name should be used.
* An [Access Token](/docs/configuracion-del-cliente/tokens-de-acceso-access-tokens). Data sent from [Helium Console](https://console.helium.com/) will use this access token to access the platform, and therefore Helium will have the permissions associated with this access token. It is recommended to create a new access token specifically for the Helium integration to simplify security control.
Creating a Connection with UI [#creating-a-connection-with-ui]
Log in to [console.helium.com](https://console.helium.com/). Then follow these steps:
1. Click on Integrations -> Add New Integration -> HTTP\*\*.\*\*

2. A new page will open. You will need to update the information within the section: "Update your connection details".

The fields to update are:
* **Endpoint URL (Required):** Must be filled with the instance URL followed by "/service/helium". For example, when using the general Gear.cloud.studio instance, the URL to enter would be [https://gear.cloud.studio/services/helium](https://gear.cloud.studio/services/helium).
* **HTTP Headers (Optional usage for payload interpolation):** The "Key" variable must be filled with the word "Authorization" and the "Value" variable must be filled with the word "Bearer" followed by the previously generated access token, separated by a space.
Finally, add the selected name for the integration and click "Add the integration".
3\. Within the main menu, go to the **Flow** option, add the devices (previously connected), add the integration created in the previous step, and then connect both nodes.

4. You can verify the correct data delivery by clicking on the device and then clicking on the "Debug" tab.

Viewing Information on the Cloud Studio IoT Platform [#viewing-information-on-the-cloud-studio-iot-platform]
Connect to your **Gear Studio** instance and navigate to the configuration.
1\. Go to the **Devices** section and click the **Add** button to [create a new Device](/docs/configuracion-del-cliente/dispositivos-y-endpoints/dispositivos/dispositivos).

2\. Fill in the form using the **Device Model** created earlier (or using the available drivers), select the "**Helium interface**" communication interface, and the **Address** field corresponds to your **DevEUI** (find it in the **Helium** device list).

3\. After the device is created, data reported to the platform will be displayed in the **Endpoints** section in the left menu of the **Monitor**. Note that **LoRaWAN** devices may report every 5 to 15 minutes, so the display will depend on this interval.

4\. Once the devices are correctly connected, you can create a custom **Dashboard** using a wide variety of **Widgets** to display the data being sent by the device.

# Device Integration
Introduction [#introduction]
This section explains how to integrate devices into the Gear Studio platform, that is:
* How to get devices to send data to the platform.
* How to get the platform to send data to devices, if the devices support it.
Once a device is integrated into the platform, the following is possible:
* Create dashboards that display device status in real time.
* View information in a variety of reports.
* Create configurable alerts with email and SMS notifications.
* Export information using APIs.
* Monitor and control devices from Gear Studio web applications.
* Monitor and control devices from iOS and Android using the Gear Studio app.
**Important**: device integration is not only available for commercial devices, but also allows connecting custom-made devices based on [Arduino](https://www.arduino.cc/), [nodeMCU](https://www.nodemcu.com/), [Raspberry Pi](https://www.raspberrypi.org/) and many more.
If you are not sure what exactly a "device" is, you can use this page to learn more about [devices and endpoints](/docs/configuracion-del-cliente/dispositivos-y-endpoints).
Key Concepts [#key-concepts]
Data Messages [#data-messages]
Integrations are primarily responsible for processing messages received from devices so they can be processed by the platform, as well as converting commands sent by the platform into a format that devices can process. Two types of messages are considered:
* **Uplink**: uplink messages are all those sent from devices to the platform. The platform must be able to process uplink messages to store the relevant information and process it.
* **Downlink**: downlink messages are those sent from the platform to devices, typically in the form of commands. Some devices do not support downlink messages, while others only support them for specific configuration operations.
Many devices have a native integration in the Gear Studio platform, and all that is needed is to connect and configure them correctly. For devices not natively supported, integration consists of defining how uplink messages are processed and how downlink messages are built.
Device Models [#device-models]
Uplink and downlink message processing is performed per [device model](/docs/configuracion-del-cliente/dispositivos-y-endpoints/dispositivos/modelos-de-dispositivo). For natively supported devices, the integration is already available without additional work.
When a device is not natively supported, integration mostly consists of creating a device model that correctly represents it, and specifying how uplink messages are processed and how downlink messages are built. In these cases, scripts can be used to automatically handle all the work, so that these device models behave the same way as if they were natively supported.
Getting Started [#getting-started]
Creating an Access Token [#creating-an-access-token]
For integrations performed via HTTP, MQTT, or LoRaWAN, it is first necessary to create an access token. [This page](/docs/configuracion-del-cliente/tokens-de-acceso-access-tokens) contains more information about access token management. Access tokens allow controlling the access and permissions used for any operation.
Selecting a Device Model [#selecting-a-device-model]
It is important to understand whether the device to integrate is natively supported on the platform. If so, no additional work is needed. However, if the device model is not supported, you will need to create a new device model. See [this reference](/docs/configuracion-del-cliente/dispositivos-y-endpoints/dispositivos/modelos-de-dispositivo) for more information on this topic.
Creating a Device [#creating-a-device]
Once you have an access token and the platform contains the device model to integrate, all that remains is to create it on the platform so it can connect. This can be accomplished by following [this guide](/docs/configuracion-del-cliente/dispositivos-y-endpoints/dispositivos/dispositivos). If you are not sure what exactly a "device" is, you can use this page to learn more about [devices and endpoints](/docs/configuracion-del-cliente/dispositivos-y-endpoints).
If the device model is natively supported, or if a device model has been created to represent it along with a script that defines the endpoints it contains, no other steps are necessary. However, in some cases, you may need to manually create endpoints within the device. In that case, you can do so by following [this guide](/docs/configuracion-del-cliente/dispositivos-y-endpoints/endpoints/crear-un-endpoint). If you are not sure what exactly an "endpoint" is, you can use this page to learn more about [devices and endpoints](/docs/configuracion-del-cliente/dispositivos-y-endpoints).
Integration Options [#integration-options]
Currently, there are three integration alternatives, detailed below.
| Integration | Reference / Help |
| ----------- | ----------------------------------------------------------------------------------------------- |
| MQTT | Device integration via MQTT |
| HTTP | Device integration via HTTP |
| LoRaWAN | Integration through The Things Stack, Integration through ThingPark, Integration through Helium |
# Configuration
| Note: The Gear Studio platform natively supports a wide variety of devices from different technologies. These devices do not require the use of scripting. The information on this page is useful for configuring new device models that are not natively supported by the platform. |
| ------------------------------------------------------------------------------------------------------------------------------------------------------------------------------------------------------------------------------------------------------------------------------------ |
Introduction [#introduction]
When creating a new model for a device that is not natively supported by the platform, it is advisable to define some scripts that improve the user experience and add more functionality. The scripts will then be used by all devices of that model, which also saves considerable work since it only needs to be done once.
Defining a script for the initial configuration of a device model allows you to:
* Specify the device structure, i.e., which endpoints it contains and their types and subtypes.
* Define validation rules for the device address (for example, verifying that the address has a specific format).
* Define user interface rules:
* Address field name, to use more appropriate text for the device (for example, "DEVEUI" for a LoRaWAN device, or "MAC address" for a Wi-Fi device).
* Indicate whether the device allows manual endpoint creation.
* Indicate whether the device allows manual endpoint deletion.
* Indicate whether manually editing endpoint data, such as the subtype, is allowed.
Defining Basic Device Model Information [#defining-basic-device-model-information]
You can define basic aspects of the device model that are useful for improving the user experience. This basic information currently includes the name you want to use for the "address" field. For example, for a LoRaWAN device, it is preferable to use the name "DEVEUI" instead of "address", or use "MAC address" for a Wi-Fi device.
The `getConfiguration` function is used for this basic configuration, as shown below.
```javascript
function getConfiguration(config)
{
config.addressLabel = {en: "DevEUI", es: "DevEUI"};
}
```
In the example above, you can see a `getConfiguration` function that changes the address field name (addressLabel), so that the end user sees it instead.
The `getConfiguration` function is automatically executed by the platform when it needs to retrieve basic device model information. The function receives a single parameter:
* **config**: this parameter is of type [device model configuration](/docs/herramientas-low-code-scripting/referencia-de-objetos-disponibles-para-scripting/device-model-configuration), and the function code must modify the properties of this object as needed. If no properties of the object are modified, the default values will be used.
If the script does not include the `getConfiguration` function, the default values will be used. For more information, see [device model configuration](/docs/herramientas-low-code-scripting/referencia-de-objetos-disponibles-para-scripting/device-model-configuration).
Defining the Device Structure [#defining-the-device-structure]
To improve the user experience when creating a device, you can specify the structure (i.e., the list of endpoints) that should be created when creating a device of this model. This simplifies the device creation process, minimizes the possibility of errors, and enables an experience identical to what can be achieved with any natively supported device model.
The `getEndpoints` function is used to obtain the list of endpoints that should be created when creating a device of this model, as shown below.
```javascript
function getEndpoints(deviceAddress, endpoints)
{
endpoints.addEndpoint("1", "Temperature sensor", endpointType.TemperatureSensor);
endpoints.addEndpoint("2", "CO2 sensor", endpointType.PpmConcentrationSensor, ppmConcentrationSensorSubType.CarbonDioxide);
}
```
The `getEndpoints` function is automatically executed by the platform before creating a device using this model. The platform will then use the value of the endpoints parameter to create the endpoints within the device. The function receives the following parameters:
* **deviceAddress**: this parameter is of type string and contains the address of the device that will be created. The parameter can be used, for example, to include it in the description of the endpoints that will be created within the device.
* **endpoints**: this parameter is of type [endpoint collection configuration](/docs/herramientas-low-code-scripting/referencia-de-objetos-disponibles-para-scripting/endpoint-configuration-collection) and contains the endpoint collection to which the script must add the endpoint list. This is achieved through the `addEndpoint()` method, as shown in the example code. For each endpoint added to the collection, you can specify the following:
* An **address**, which is unique for each endpoint within the device (but can of course be repeated in other endpoints of other devices).
* A **description**.
* An **endpoint type**.
* Optionally, an endpoint **subtype**, if applicable (see [here](/docs/herramientas-low-code-scripting/referencia-de-objetos-disponibles-para-scripting/endpoint) for more details).
If the script does not include the `getEndpoints` function, a device with no endpoints will be created.
For more information, see [endpoint configuration](/docs/herramientas-low-code-scripting/referencia-de-objetos-disponibles-para-scripting/endpoint-configuration).
Device Address Validation [#device-address-validation]
You can include the `validateDeviceAddress` function in the configuration script to validate device addresses used for all devices of this model. This prevents users from entering incorrect addresses and displays a clear message when they do. Below is an example implementation of the `validateDeviceAddress` function.
```javascript
function validateDeviceAddress(address, result)
{
address = address.toLowerCase();
result.ok = true;
if (address.length == 12) {
var validchars = ['0', '1', '2', '3', '4', '5', '6', '7', '8', '9', 'a', 'b', '', 'c', 'd', 'e', 'f'];
for (var i = 0; i < address.length; i++) {
if (!validchars.includes(address.charAt(i))) {
result.ok = false;
break;
}
}
}
else {
result.ok = false;
}
if (!result.ok)
result.errorMessage = {
en: "The address must be 12 characters long and only have hexadecimal characters",
es: "La dirección debe tener 12 caracteres y tener sólo caracteres hexadecimales"
};
}
```
The `validateDeviceAddress` function is automatically executed by the platform before creating a device using this model. The function receives the following parameters:
* **address**: this parameter is of type string and contains the address of the device that will be created. The function must verify the validity of this address.
* **result**: this parameter is of type [device address validation result](/docs/herramientas-low-code-scripting/referencia-de-objetos-disponibles-para-scripting/device-address-validation-result) and is used to indicate the validation result. Typically, the function will modify the following properties:
* **ok**: this boolean property indicates whether the address was verified correctly.
* **errorMessage**: this property, which can be of type string or [multi language literal](/docs/herramientas-low-code-scripting/referencia-de-objetos-disponibles-para-scripting/multi-language-literal), allows specifying an error message if the validation fails. If a [multi language literal](/docs/herramientas-low-code-scripting/referencia-de-objetos-disponibles-para-scripting/multi-language-literal) object is used, messages in different languages can be specified.
If the script does not include the `validateDeviceAddress` function, any address will be considered valid.
For more information, see [device address validation result](/docs/herramientas-low-code-scripting/referencia-de-objetos-disponibles-para-scripting/device-address-validation-result).
Defining Device-Level User Interface Rules [#defining-device-level-user-interface-rules]
You can include the `updateDeviceUIRules` function in the configuration script to set user interface rules for devices of this model, specifying, for example, whether endpoints can be created manually. Below is an example function:
```javascript
function updateDeviceUIRules(device, rules)
{
rules.canCreateEndpoints = true;
}
```
The `updateDeviceUIRules` function is automatically executed by the platform before presenting options on the device and endpoint creation screen. Based on the values returned by this function, options such as creating endpoints within the device will be shown or hidden. The function receives the following parameters:
* **device**: this parameter is of type [device](/docs/herramientas-low-code-scripting/referencia-de-objetos-disponibles-para-scripting/device) and contains the data of the device for which the user interface rules are needed. The function can use this parameter if the rules depend on some specific characteristic of the device.
* **rules**: this parameter is of type [device UI rules](/docs/herramientas-low-code-scripting/referencia-de-objetos-disponibles-para-scripting/device-ui-rules) and is used to specify the rules. Typically, the function will modify the following properties:
* **canCreateEndpoints**: this boolean property indicates whether manual endpoint creation should be allowed. If the returned value is false, the platform's user interface will not allow creating additional endpoints within the device.
If the script does not include the `updateDeviceUIRules` function, the default user interface rules will be used.
For more information, see [device UI rules](/docs/herramientas-low-code-scripting/referencia-de-objetos-disponibles-para-scripting/device-ui-rules).
Defining Endpoint-Level User Interface Rules [#defining-endpoint-level-user-interface-rules]
You can include the `updateEndpointUIRules` function in the configuration script to set user interface rules for each endpoint contained in a device of this model, specifying, for example, whether the endpoint can be deleted or whether its subtype can be changed. Below is an example function:
```javascript
function updateEndpointUIRules(endpoint, rules)
{
rules.canDelete = false;
rules.canEditSubtype = (endpoint.address == "2");
}
```
The `updateEndpointUIRules` function is automatically executed by the platform before presenting options on the device and endpoint creation screen, as well as on the endpoint editing screen. Based on the values returned by this function, options such as deleting endpoints or modifying their endpoint subtype will be shown or hidden. The function receives the following parameters:
* **endpoint**: this parameter is of type [endpoint](/docs/herramientas-low-code-scripting/referencia-de-objetos-disponibles-para-scripting/endpoint) and contains the data of the endpoint for which the user interface rules are needed. The function can use this parameter if the rules depend on some specific characteristic of the endpoint.
* **rules**: this parameter is of type [endpoint UI rules](/docs/herramientas-low-code-scripting/referencia-de-objetos-disponibles-para-scripting/endpoint-ui-rules) and is used to specify the rules. Typically, the function will modify the following properties:
* **canDelete**: this boolean property indicates whether the endpoint can be manually deleted.
* **canEditSubtype**: this boolean property indicates whether changing the endpoint subtype is allowed. This property is only relevant for certain endpoint types, as can be seen [here](/docs/herramientas-low-code-scripting/referencia-de-objetos-disponibles-para-scripting/endpoint).
* **canEditSummationAutoReset**: this boolean property indicates whether manually changing the "summation auto reset" behavior of the endpoint is allowed. This property is only relevant for energy meter and flow sensor endpoints.
* **canEditElectricalCircuit**: this boolean property indicates whether manually changing the electrical circuit associated with the endpoint is allowed. This property is only relevant for electrical energy-related endpoints (energy meters, voltmeters, ammeters, etc.).
If the script does not include the `updateEndpointUIRules` function, the default user interface rules will be used.
For more information, see [endpoint UI rules](/docs/herramientas-low-code-scripting/referencia-de-objetos-disponibles-para-scripting/endpoint-ui-rules).
# Device Models
Introduction [#introduction]
To facilitate device creation, the Gear Studio platform allows creating device models. Device models are primarily used to automatically describe each device's structure, its endpoints, basic properties, serial number validation rules, among many other things. Once a device model has been created, as many devices as needed can be created using that same model. Gear Studio supports two types of device models:
* **Models built into Gear Studio (built-in)**. These are native models or drivers, certified on the platform, that are supported without any integration. For these device models, you generally only need to configure each device to report to the platform, and the platform will then automatically receive and process the information. When creating a device corresponding to a natively supported model, all necessary endpoints will also be created automatically.
* **User-defined models (custom)**. These models are managed from the device models page, as described here. User-defined models are used to create devices that the platform does not natively support. Optionally, custom device models can contain scripts that help the platform process received data, as described in the [scripting](/docs/herramientas-low-code-scripting) section.
Creating a New Device Model [#creating-a-new-device-model]
Device Model Management [#device-model-management]
To create a user-defined device model, use the [Manager](https://gear.cloud.studio/gear/manager/login). Select the **Device Models** option within the **Devices** section.
This screen contains the list of all previously created custom device models, with the ability to edit their configuration, delete them, etc. To create a new model, select the "Add" option.

To create a new model, certain information must be completed:
* **Description**: this field contains the descriptive name for the new model.
* **Model code**: this field cannot be modified after creation and is used to internally identify the device model. It is recommended to always use a consistent pattern for device model codes.
Additionally, you can define the **offline timeout**. This field allows associating a maximum inactivity time, so that any device of this model is considered offline after this period elapses without receiving information from the device. When using this option, if a device remains disconnected from the platform for longer than the specified time, the platform will automatically generate a **device offline** alarm. The alarm will automatically close when the device transmits any data to the platform.

Once a device has been created, it can be edited or deleted using the "Edit" and "Delete" options.

When editing a device model, you can also edit and test the model's [configuration script](/docs/configuracion-del-cliente/dispositivos-y-endpoints/dispositivos/modelos-de-dispositivo/configuracion) and the [data conversion script](/docs/configuracion-del-cliente/dispositivos-y-endpoints/dispositivos/modelos-de-dispositivo/procesamiento-de-datos).

For more information about configuration and data conversion scripts, see the [scripting](/docs/herramientas-low-code-scripting) section.
# Data Processing
| Note: The Gear Studio platform natively supports a wide variety of devices from different technologies. These devices do not require the use of scripting. The information on this page is useful for configuring new device models that are not natively supported by the platform. |
| ------------------------------------------------------------------------------------------------------------------------------------------------------------------------------------------------------------------------------------------------------------------------------------ |
Introduction [#introduction]
As part of a device model configuration, you can create a script for processing data received from the device via MQTT, HTTP, or LoRaWAN. This allows:
* Processing each received payload (**uplink**)
* Updating the information of endpoints associated with the device, applying conversion functions to the data when necessary.
* Updating information about the device itself, such as RSSI levels, battery, etc., applying conversion functions to the data when necessary.
* Creating specific payloads destined for the device (**downlink**)
* Processing standard or custom commands defined in the Gear platform, and generating a payload with the format expected by the device.
Processing Received Payloads (Uplink) [#processing-received-payloads-uplink]
To process each payload received from the device (regardless of whether it is received via HTTP, MQTT, or LoRaWAN), you can create a `parseUplink` function, as shown in the example below. This example is written assuming a temperature and humidity sensor that reports the temperature in the first byte of the payload, the humidity in the second byte, and the battery percentage in the third byte.
```javascript
function parseUplink(device, payload)
{
// Payload is binary, so it's easier to handle as an array of bytes
var bytes = payload.asBytes();
// Verify payload contains exactly 3 bytes
if (bytes.length != 3)
return;
// Parse and store temperature
var temperatureSensor = device.endpoints.byType(endpointType.temperatureSensor);
if (temperatureSensor != null)
{
var temperature = bytes[0] & 0x7f;
if (bytes[0] & 0x80) // Negative temperature?
temperature -= 128;
temperatureSensor.updateTemperatureSensorStatus(temperature);
}
// Parse and store humidity
var humiditySensor = device.endpoints.byType(endpointType.humiditySensor);
if (humiditySensor != null)
{
var humidity = bytes[1];
humiditySensor.updateHumiditySensorStatus(humidity);
}
// Parse and store battery percentage
var batteryPercentage = bytes[2];
device.updateDeviceBattery({ percentage: batteryPercentage });
}
```
In the example above, you can see a `parseUplink` function that processes a 3-byte payload and then uses that information to update the status of the device's endpoints (temperature sensor and humidity sensor), as well as the device's battery level.
The `parseUplink` function is automatically executed by the platform each time a payload is received for the device. The function receives the following parameters:
* **device**: this parameter is of type [device](/docs/herramientas-low-code-scripting/referencia-de-objetos-disponibles-para-scripting/device) and contains all information about the device that sent the payload, including the list of associated endpoints. For more information, see the [device](/docs/herramientas-low-code-scripting/referencia-de-objetos-disponibles-para-scripting/device) object reference.
* **payload**: this parameter is of type [data payload](/docs/herramientas-low-code-scripting/referencia-de-objetos-disponibles-para-scripting/data-payload) and contains the payload received from the device. The payload object provides a series of methods that allow easy access to the payload content, such as:
* asBytes() reads the payload content as a byte array and is useful when the payload is binary.
* asString() reads the payload content as text and is useful when the payload is ASCII.
* asJsonObject() reads the payload content as a JSON object and is useful when the payload is in JSON format.
* asParsedObject() accesses data pre-parsed by an external platform. This option is available for platforms like Actility and The Things Stack, which allow data parsing before sending to the Gear Studio platform.
The payload object also has a **port** property, available for data received from LoRaWAN networks, which reflects the LoRaWAN port number to which the data was sent. Similarly, for data received via MQTT, there is a **topic** property that reflects the topic to which the data was sent.
The `parseUplink` function executes atomically, meaning data is only updated if the script executes successfully. In case of script execution errors, all changes will be reverted as if the payload had not been received. For this reason, it is important that the script handles error conditions correctly.
If the script does not include the `parseUplink` function, the received packet will be ignored.
Responses for HTTP Uplink Submissions [#responses-for-http-uplink-submissions]
When uplinks are sent via HTTP, the platform will normally return a 200 status code and an empty body. However, this behavior can be changed by returning an [HttpResponse](/docs/herramientas-low-code-scripting/referencia-de-objetos-disponibles-para-scripting/httpresponse) object, specifying the information to return, including:
* Status code
* Content type
* Content
Below is an example of this.
```javascript
function parseUplink(device, payload)
{
[...]
[ More code ]
[...]
var httpResponse = new HttpReponse();
httpResponse.statusCode = 200;
httpResponse.contentType = "application/json";
httpResponse.content.setAsJson({ textField: "some text", aNumber: 25 });
return httpResponse;
}
```
For more information, see the [HttpResponse](/docs/herramientas-low-code-scripting/referencia-de-objetos-disponibles-para-scripting/httpresponse) object reference.
Building Payloads for the Device (Downlink) [#building-payloads-for-the-device-downlink]
To send data to the device (typically commands), you can create a `buildDownlink` function, as shown in the example below. This example is written assuming a device that contains a single endpoint of type appliance that can be turned on, turned off, and toggled. It is assumed that a single byte must be sent in the payload indicating the operation type.
```javascript
function buildDownlink(device, endpoint, command, payload)
{
payload.port = 25; // This device receives commands on LoRaWAN port 25
payload.buildResult = downlinkBuildResult.ok;
switch (command.type) {
case commandType.onOff:
switch (command.onOff.type) {
case onOffCommandType.turnOn:
payload.setAsBytes([30]); // Command ID 30 is "turn on"
break;
case onOffCommandType.turnOff:
payload.setAsBytes([31]); // Command ID 31 is "turn off"
break;
case onOffCommandType.toggle:
payload.setAsBytes([32]); // Command ID 32 is "toggle"
break;
default:
payload.buildResult = downlinkBuildResult.unsupported;
break;
}
break;
default:
payload.buildResult = downlinkBuildResult.unsupported;
break;
}
}
```
In the example above, you can see a `buildDownlink` function that processes a platform command and creates a 1-byte payload from it. The script only supports commands for on/off type endpoints, and therefore shows an error if any other type of command is attempted.
The `buildDownlink` function is automatically executed by the platform each time any command is sent to the device, regardless of whether the command is sent from an app, a scheduled action, etc. The function receives the following parameters:
* **device**: this parameter is of type [device](/docs/herramientas-low-code-scripting/referencia-de-objetos-disponibles-para-scripting/device) and contains all information about the device to which the command will be sent, including the list of associated endpoints. For more information, see the [device](/docs/herramientas-low-code-scripting/referencia-de-objetos-disponibles-para-scripting/device) object reference.
* **endpoint**: this parameter is of type [endpoint](/docs/herramientas-low-code-scripting/referencia-de-objetos-disponibles-para-scripting/endpoint) and contains the data of the endpoint to which the command will be sent. This field can be null if the command is being sent to the device rather than a specific endpoint. For example, when sending a "reboot" command, the command is sent to the device since restarting an individual endpoint does not make sense.
* **command**: this parameter is of type [command](/docs/herramientas-low-code-scripting/referencia-de-objetos-disponibles-para-scripting/command) and contains the command that the platform will send. The function code normally uses the information in this object to build the payload that must be sent to the device. For more information about the command content, see [this section](/docs/herramientas-low-code-scripting/referencia-de-objetos-disponibles-para-scripting/command).
* **payload**: this parameter is of type [data payload](/docs/herramientas-low-code-scripting/referencia-de-objetos-disponibles-para-scripting/data-payload) and is used to create the payload that will ultimately be sent to the device. The payload object provides a series of methods that allow modifying its content, such as:
* setAsBytes() writes the payload content using a byte array.
* setAsString() writes the payload content as text and is useful when the payload is ASCII.
* setAsJsonObject() writes the payload content as a JSON object and is useful when the payload is in JSON format.
The payload object also has a **port** property, available for devices with LoRaWAN connectivity, which reflects the LoRaWAN port number to which the data will be sent. Similarly, for devices with MQTT communication, there is a **topic** property that allows specifying the topic to which the data will be sent.
If the script does not include the `buildDownlink` function, the command will be rejected indicating that it is not supported.
# Real Time Log Broker
**Real Time Log Broker** is a service that provides real-time visibility into platform events related to data processing from devices (Uplink) as well as command delivery from the platform to devices (Downlink) in the form of log entries covering integrations that implement MQTT or HTTP API.

When accessing the Real Time Log Broker, a new session will automatically start and open in a new browser tab, allowing you to view the previously described events in real time. It is important to note that this log is not saved on the platform and is deleted when the window is closed.

# Menu Options
**Once the session is open, the user can access the following functions through the control panel**

**CLEAR**: Clears the grid and its *content*, allowing new queued entries to begin logging.
**PAUSE**: *Pauses* the incoming information in the grid and its content. *Note:* The 120-second timer will not be paused. Only the reception of information is paused.
**EXPORT**: *Downloads* the content of a specific Source selected in the grid. The downloadable format is .TXT and the file name format is: *YYYYMMDD-HHMMSS.*
**LOG OUT:** Automatic login occurs when a Real Time Log session is opened. This happens in a new browser tab where the user interface is displayed, allowing you to have as many windows (RTL sessions) as desired while continuing to operate the platform.
When the user accesses for the first time, they will already be *connected* and will begin receiving information in the grid with its description in the Content (*Log*).
> ***NOTE**: During the session, the user can narrow their search using the "**Filter**" field for better visualization.*
>
> *Filtering is available by: Source, Client ID, Facility ID, Device ID, Device Address, Endpoint ID, Endpoint Address.*
**When the session has ended or the user has logged out, the following functions are available:**

**CLEAR** > Clears the grid and its *content*, this time preventing new entries from being recorded. The user must reconnect.
**EXPORT** **>** *Downloads* the content of a specific Source selected in the grid. Since the session has ended, only the information that was loaded in the grid at the time of disconnection will be downloaded.
**LOG IN** > Once the session expires or is ended by the user, the Log In button must be selected to start recording information again.
> ***NOTE**: While the session is paused or off, the user can narrow their search using the "**Filter**" field for better visualization.*
>
> *Filtering is available by: Source, Client ID, Facility ID, Device ID, Device Address, Endpoint ID, Endpoint Address.*
# Roles
When a user with ***Global*** permissions accesses the platform and opens the Real Time Log Broker application, they will be able to view the monitored records of the instance.
**Real Time Log Broker will display with the following title.**

When a user ***does not have Global permissions***, they can only access this option if they have been granted the necessary permissions.
**Real Time Log Broker will display with the following title.**

# Clone Variable Types
Introduction [#introduction]
Variables allow us to define and determine counts or measurements of multiple states, such as temperature, time, occupancy, people flow, among others. Due to the diverse uses of variables within the platform, variable cloning was created.
**Example**
Click on the three dots on the right and choose the "Clone" option as shown in the image.

Add the description and finally click Save.

# Create a Variable Type
Go to the client, device configuration, and within it select the 'Variable Types' option.

Then press the Add button to configure the variable.

Once the "Add" button is pressed, a form will be displayed where you can fill in the variable information.

In the **"Description"** field, enter a representative name to identify the created variable and what type of sensor it will be measuring.
In the **"Variable Type"** field, select from the list the subtype that represents the received measurement.
There are several subtypes available on the platform:
* **Scalar:** for variables that can take any value within a given range. Example: temperature, pressure, etc.
* **Discrete:** for variables that can only take specific values, often representing categories or fixed states. Example: on/off, active/inactive, etc.
* **Flow:** for variables that measure the flow of something moving through a system. Example: water flow, gas flow, etc.
* **Date:** for variables that measure a specific date (without considering the exact time). Example: event date.
* **Time:** for variables that measure a time range or exact time (without being associated with a date). Example: system time.
* **Date and Time:** for variables that receive both the date and exact time of an event. Example: sensor timestamp.
Finally, define the unit of measurement with which states will be recorded in that variable. It is important that this unit is aligned with the selected variable type.
Some common units include:
**Scalar:** Degrees Celsius (C), Pascals (Pa), meters (m), etc.
**Discrete:** states are defined (on/off, positive/negative/neutral).
**Flow:** Liters per minute (L/min), cubic meters per hour (m3/h), etc.
**Date:** Date in format (DD/MM/YYYY).
**Time:** Time in format (HH:MM).
**Date and Time:** Date and time in format (DD/MM/YYYY HH:MM).
To define the values of discrete variables, States must be created.
States are *fixed values* that describe different conditions or categories in which the variable can be.
For each state, the following fields must be completed:
**Value:**
This field indicates the value associated with the state (for example, 1 for "on" or 0 for "off").
**Color:**
Each state can have an associated color for quick and clear visualization. For example, green for "active" and red for "inactive".
**State Description Text:**
Provides a brief description or explanation for each state. For example, if the value is 1 and the state is "On", the description text could be: "Active".
Finally, press the Save button to create the variable.

The variable will then be available in the client's variable list.

These variables will subsequently be available for use in the configuration of any of the client's devices, through the device model [configuration script](/docs/herramientas-low-code-scripting).
Creating a Custom Variable [#creating-a-custom-variable]
Requirements:
* Declare it in the `**getEndpoints()**` method, which requires a generic type (`endpointType.genericSensor`) and a variable identification through the `variableTypeId`.
**You can update its value using the** `**parseUplink()**` method, extracting values from the payload.
Example: Custom Variable for SNR [#example-custom-variable-for-snr]
In this example, a custom SNR (Signal-to-Noise Ratio) variable called **SNR\_FT** is created, corresponding to the value received through the payload.
Step 1: Define the endpoint in `getEndpoints()`
javascript
```
function getEndpoints(deviceAddress, endpoints)
{
var snr = endpoints.addEndpoint("3", "SNR_FT", endpointType.genericSensor);
snr.variableTypeId = 1433;
}
```
With this code:
* A new endpoint with ID `"3"` is added.
* It is named `"SNR_FT"`.
* The endpoint type is `genericSensor` for any variables that cannot be defined within the predefined sensors.
* A unique identifier is assigned -- the `variableTypeId = 1433` which must match the variable type configured on the platform (for example, a generic, numeric, or SNR-specific data type).
Step 2: Process the payload in parseUplink() [#step-2-process-the-payload-in-parseuplink]
javascript
```
function parseUplink(device, payload) {
var parsed = payload.asParsedObject();
if (parsed.snr != 0) {
device.endpoints.byIndex(2).updateGenericSensorStatus(parsed.snr);
} else {
device.endpoints.byIndex(2).updateGenericSensorStatus(null);
}
}
```
With this code:
* The payload is converted to an accessible object (`asParsedObject()`).
* It checks whether the received `snr` value is different from 0.
* If it is, the corresponding endpoint value is updated with that data.
* When the value is 0, the sensor is updated as null (left without data).
Recommendations [#recommendations]
* `device.endpoints.byIndex(2)` refers to the third added endpoint (zero-based index). It is essential to ensure that the endpoint creation order matches the index being used.
* Verify that the `variableTypeId` is correctly configured (type matches) and is available on the platform.
* Use descriptive names for custom variables (for example, `SNR_FT`, `BatteryVoltage`, etc.).
* For multiple custom variables, it is critical to properly document the indices (`byIndex(n)`) for correct information mapping.
# Variable Types
Introduction [#introduction]
Variable types define the units of measurement and expected behavior of a variable reported to the platform. There are certain standard variable types defined by default on the platform, such as temperature, humidity, and pressure. For "custom" variable types, you can create them on the platform by defining the units to use and the applicable type (scalar, discrete, flow, etc.).
Click on [Create Variable Types](/docs/configuracion-del-cliente/dispositivos-y-endpoints/dispositivos/tipos-de-variables/crear-un-tipo-de-variable) to learn how to create a custom variable type.
# Local Variable Promotion
On the platform, variables can be defined at the client level (local) or at the global level (shared by all clients in an instance). This feature allows **promoting a local variable to a global variable**, facilitating its reuse across multiple contexts within the platform.
When a variable is promoted:
* It is **removed from the local variables list** of the client that originally defined it.
* It is **added to the global variables list**, available to all clients within the instance.
* It becomes available for use in device configuration for any client.
> Warning: This action is **not reversible**.
How to Promote a Variable [#how-to-promote-a-variable]
* Go to the client's **Variable Types** list.
* Click on the **context menu** of the desired variable.
* Select the **Promote to Global** option.

Promotion Confirmation [#promotion-confirmation]
When selecting the option, the platform displays a warning indicating that the variable will move from the local scope to the global scope.

Once the action is confirmed:
* The variable **will no longer be available exclusively to the original client**.
* It will be included in the **global variables list**.

Post-Promotion Management [#post-promotion-management]
Promoted variables can be **managed** (edited, cloned, or deleted) in the same way as those originally created as global variables.
# Global Variable Replacement
This is the process by which a **local variable (defined by a client)** is removed and replaced by a [**global variable**](/docs/configuracion-del-cliente/dispositivos-y-endpoints/dispositivos/tipos-de-variables), applying this change across all devices, models, or environments where it was previously configured.
This action allows unifying and avoiding redundant or duplicate variables, centralizing environment configuration management, and simplifying maintenance.
Warning: This process is **not reversible**.
To perform this action:
1. Go to client configuration -> Devices -> Variable Types

2\. Click on the context menu and select the Replace with Global Variable option.

3. Once this option is selected, an informational message appears for confirmation of the local variable replacement, along with a selector showing all existing global variables in the instance.

Warning: The global variables shown for replacement are **only** those of the **same type** as the local variable (e.g., a discrete local variable can only be replaced by a discrete global variable).
Warning: This process is **not reversible**.
Once this action is performed, the local variable ceases to exist in the variable types list. At the same time, it is replaced in Device Models, devices, scripts, and every location where the local variable previously existed.
# Raw Data Conversion
Raw data conversion performs calculations on data obtained from a device and adapts it to the values needed for input into the platform. This allows the use of devices from virtually any brand and model, simply by creating expressions that convert the values delivered by the device.
How can I inject raw data into the platform? [#how-can-i-inject-raw-data-into-the-platform]
Raw data is sent, both via HTTP and MQTT, using APIs ending in "Raw". For example, to feed the platform with information from a temperature sensor using "raw" data, the "**UpdateTemperatureSensorStatusRaw**" API must be used. It is recommended to consult [the following table](/docs/configuracion-del-cliente/dispositivos-y-endpoints/dispositivos/integracion-de-dispositivos/matriz-de-metodos-para-actualizacion-de-sensores) to learn about the available methods for injecting raw data for each endpoint type.
Using expressions and the "RawData" variable [#using-expressions-and-the-rawdata-variable]
All APIs ending in "Raw" have a "rawData" parameter where the device must report the measured value. This value is internally converted into a variable called "**RawData**", which can be used in the expression evaluator.
As an example conversion, we will use a temperature sensor with the following characteristics:
* Units: the device reports temperature in degrees Fahrenheit.
* Measurement range: from -30 degrees Fahrenheit to +140 degrees Fahrenheit.
* Temperature is reported in tenths of a degree Fahrenheit (meaning it has no decimals, but is multiplied by 10).
The Gear platform, however, requires temperatures to be reported in degrees Celsius, which therefore requires a conversion. To achieve this conversion, the following steps are necessary:
* Divide the obtained value by 10.
* Convert the received temperature from degrees Fahrenheit to Celsius.
To accomplish this, the following expression should be used:
```
FahrenheitToCelsius(ToNumber(RawData) / 10)
```
This expression does the following:
* Uses the RawData variable, which is an implicit variable that exists in all raw data conversion operations, and represents the raw data content as a [string](/docs/configuracion-del-cliente/dispositivos-y-endpoints/endpoints/conversion-de-datos-crudos-raw/expresiones).
* Uses the [ToNumber](/docs/configuracion-del-cliente/dispositivos-y-endpoints/endpoints/conversion-de-datos-crudos-raw/expresiones/funciones/otras-funciones/tonumber) function to convert the RawData variable to an equivalent numeric value.
* Divides the obtained value by 10.
* Finally, uses the [FahrenheitToCelsius](/docs/configuracion-del-cliente/dispositivos-y-endpoints/endpoints/conversion-de-datos-crudos-raw/expresiones/funciones/funciones-matematicas/fahrenheittocelsius) function to convert this value to degrees Celsius.
More information [#more-information]
For more information about using expressions, see the [Expressions](/docs/configuracion-del-cliente/dispositivos-y-endpoints/endpoints/conversion-de-datos-crudos-raw/expresiones) section, which contains a more detailed description of the expression engine, data types, operators, functions, and examples of each.
# Custom Filters
Within the History Widget, you can use the **Custom Filters** option to adapt the view according to your needs.
This feature allows you to select from different preloaded filters and apply them to refine the displayed information.
Preloaded Filters are preconfigured sets of filtering criteria that facilitate the quick selection and application of specific filters without having to configure each criterion manually.
In the History Widget, check the 'enable custom filters' option.

This enables the section to choose filters.

Once selected, they are displayed as follows within the widget:

The widget view will update automatically, showing only the information that meets the selected filter criteria.
Its benefits include:
* More relevant information visualization
* Combination of filters for more specific results
* Easy to apply
# History - Aggregation
Another feature of the history and comparative history **widgets** is the ability to view aggregated (grouped) measurements through different calculations.

The available options for aggregation calculations are:
* Default
* Minimum: the resulting value is the **minimum** of all states or measurements recorded in a specific time interval.
* Maximum: the **highest** value of all states or measurements during a time period.
* Average (mean): the **average** of all measurement values recorded in a given interval is calculated.
State aggregation is an extremely useful tool for synthesizing and presenting device data in a more understandable and useful way. The different aggregation methods allow users to choose the strategy that best suits their analysis and decision-making needs. This functionality optimizes monitoring and facilitates the detection of patterns and important events in complex systems.
# History - Granularity
**State granularity** is a feature that allows users to adjust the level of detail at which device state measurements are presented.
This control over granularity provides crucial flexibility for monitoring, as users can choose how data is presented based on the context and analysis needs.
This feature is available in the history and comparative history **widgets**.
The available time ranges are:
* Default
* 5 minutes
* 15 minutes
* 1 hour
* 3 hours
* 12 hours
* Day
* Week
* Biweekly
* Month

These measurements will be displayed according to the selected time range, for the period indicated in the filter if the Dashboard option is selected in the Time Range Type selector, or according to the period indicated if the Time Offset option is selected.

The state granularity feature provides essential control over data presentation in monitoring systems. Users can adjust the granularity according to the level of detail they need for efficient analysis. This flexibility facilitates the interpretation of large volumes of data and optimizes decision-making based on the specific monitoring or analysis needs of each user.
# History - Grid
The platform includes predefined **widgets** that facilitate data presentation in dashboards. Among them are the history and comparative history widgets.
They allow viewing the evolution of Endpoint measurements over time.

Among the display options for this widget, you can select the chart type for data visualization: line, bar, or area format.

You can also choose the Data Point Shape Type from the following options: Circle, Triangle, Square, or none.

Additionally, you can set the orientation of the chart grid lines. Available options include Horizontal, Vertical, or Both.

These features are available for both the History widget and the Comparative History widget. In the latter, the same chart can display measurements for two different variable types, one per axis.
# History - Disconnection Time
There are occasions when a device disconnects but measurements continue to be generated. When the device reconnects, the stored measurements from that device are automatically synchronized with the system, allowing the user to see the complete data sequence without manual intervention.
These measurements can be viewed in the History Widget and the Comparative History Widget. The selection to show or hide offline measurements can be made individually for each Endpoint. These measurements are displayed as dashed lines in the Widget to distinguish them from received measurements.

The configuration for displaying offline measurements is done through the Widget Settings, in each Endpoint's configuration by checking or unchecking the 'Show offline periods' field.

Similarly, this can be configured for different variables on both axes in the Comparative History Widget, individually for each Endpoint.
# History
Line chart showing the variation of an endpoint variable type over time. In endpoint history charts, the user can enter minimum and maximum values to define the Y-axis ranges, as well as modify the variable names associated with the Y-axis titles.


You can view information corresponding to states when the Endpoint was connected, as well as when it was disconnected. You can choose to display the grid line direction, endpoint labels, minimum/maximum/average values, use custom colors, and apply the available filters.

The user can organize the information and visualization of these charts through different criteria within the Widget:
* [Grid line orientation](/docs/monitor/dashboards/widgets/historicos/historicos-grilla): Horizontal/Vertical/Both
* Labels for naming series
* Show or hide Maximum/Minimum/Average values
* Custom colors
* [Custom filters](/docs/monitor/dashboards/widgets/historicos/filtros-personalizados)
* [Granularity](/docs/monitor/dashboards/widgets/historicos/historicos-granularidad)
* [Aggregation](/docs/monitor/dashboards/widgets/historicos/historicos-agregacion)
* [Disconnection Time](/docs/monitor/dashboards/widgets/historicos/historicos-tiempo-de-desconexion)
* Time range: this can match the dashboard's time range or be a different time range, specifying the dates to be viewed in this widget.
You can choose to display information either by identifying one or more endpoints of the same type, or by labels associated with those endpoints.

Additionally, there is an option to define different [Comfort Zones](/docs/monitor/dashboards/widgets/widgets-beta/widgets-con-zona-de-confort) within the allowed value ranges for the endpoint.

# Widgets with Comfort Zone
The Cloud Studio platform features a series of specific widgets for branch monitoring, energy consumption, power history, consumption, weather data, and more, for use in dashboards configurable by the end user.


* Active alarms (Displays a pie chart with the distribution of currently active alarm types)
* Past and projected energy consumption (Displays past energy consumption and targets, as well as a projection of consumption and targets for the coming days)
* Energy consumption by category (Displays energy consumption for selected categories)
* Energy consumption by phase (Pie chart showing energy consumption by phase)
* Daily energy consumption by category (Displays daily energy consumption for selected categories)
* Daily consumption by phase (Displays daily consumption by phase for selected categories)
* Energy cost by category (Displays energy cost for selected categories)
* Past and projected energy costs (Displays past energy costs and targets, as well as a projection of costs and targets for the coming days)
* Weather status (Displays the weather status at the current facility)
* Daily power factor (Displays the daily evolution of the power factor)
* Infrastructure (Displays the current availability of the infrastructure)
* Facility map (Displays a map containing the location of the current facility)
* Energy consumption targets (Displays energy consumption information relative to defined targets)
* Daily maximum power (Displays the maximum daily power used in a 15-minute period)
* Daily average power (Displays the daily evolution of the power used)
* Facility summary (Displays summary information for the current facility)
* Global summary (Displays summary information for all facilities)
* Latest events (Displays a list with the latest events)
* Camera snapshots (Displays snapshots taken by a camera)
* Endpoint history (Line chart showing the variation of an endpoint variable type over time)
* Comparative endpoint history (Line chart showing the comparative variation of two endpoint variable types over time)
* Facility list (Displays a list containing facility information)
* World summary (Displays summary information for all facilities)
* Infrastructure (Displays the current availability of the infrastructure)
* Latest events (Displays a list containing the latest items)
* Linear gauge for variable (Displays the value of a variable in real time as a linear chart)
* Metric (Displays the value of a variable in real time)
* Occupancy (Displays the occupancy)
* Plain text (Displays text with custom colors and formatting)
* Rounded gauge for variable (Displays the value of a variable in real time as a semicircular chart)
* State timeline (State timeline showing how one or more endpoints changed their state over time.)
* Static image (Displays a static image)
* Vertical linear indicator for variable (Displays the value of a variable in real time as a vertical linear chart)
* View (Displays a view in a widget, designed in the views section)
* Weather information (Displays the current weather information at the current facility)
**Active Alarms:**
The user can use this Widget to create a pie chart with the distribution of currently active alarm types.


**Camera Snapshots:**
The user can use this Widget to view snapshots taken by a camera.


**Daily Average Power:**
The user can use this Widget to view the daily evolution of the power used.


**Daily Energy Consumption by Category:**
The user can use this Widget to view the daily energy consumption for selected categories.


**Daily Energy Consumption by Phase:**
The user can use this Widget to view the daily energy used for selected categories.


**Daily Maximum Power:**
The user can use this Widget to view the maximum daily power used in a 15-minute period.


**Daily Power Factor:**
The user can use this Widget to view the daily evolution of the power factor.

**Daily Power Factor:**
The user can use this Widget to view the daily evolution of the power factor.

**Endpoint History:**
The user can use this Widget to generate a line chart showing the variation of an endpoint variable type over time.


**Comparative Endpoint History:**
The user can use this Widget to generate a line chart showing the comparative variation of two endpoint variable types over time.


**Energy Consumption Targets:**
The user can use this Widget to view current energy consumption data relative to defined targets.


**Energy Consumption Targets:**
The user can use this Widget to view the energy cost for selected categories.


**Energy Consumption by Category:**
The user can use this Widget to view energy consumption for selected categories.


**Energy Consumption by Phase:**
The user can use this Widget to view a pie chart showing energy usage by phase.


**Energy Consumption by Phase:**
The user can use this Widget to view a list containing facility information.


**Facility Map:**
The user can use this Widget to view a map containing the location of the current facility.


**Facility Summary:**
The user can use this Widget to view summary information for the current facility.


**World Summary:**
The user can use this Widget to view summary information for all facilities.


**Infrastructure:**
The user can use this Widget to view the current availability of the infrastructure.


**Latest Events:**
The user can use this Widget to view a list containing the latest events.


**Linear Gauge for Variable:**
The user can use this Widget to view the value of a variable in real time as a linear chart.


**Metric:**
The user can use this Widget to view the value of a variable in real time.


**Occupancy:**
The user can use this Widget to view the occupancy.


**Past and Projected Energy Costs:**
The user can use this Widget to view past energy costs and targets, and a projection of costs and targets for the coming days.


**Past and Projected Energy Consumption:**
The user can use this Widget to view past energy consumption and targets, and a projection of consumption and targets for the coming days.


**Plain Text:**
The user can use this Widget to enter text with custom colors and sizes.


**Rounded Gauge for Variable:**
The user can use this Widget to view the value of a variable in real time as a semicircular chart.


**State Timeline:**
The user can use this Widget to view a state timeline showing how one or more endpoints changed their state over time.


**Static Image:**
The user can use this Widget to view a static image.


**Vertical Linear Indicator for Variable:**
The user can use this Widget to view the value of a variable in real time as a vertical linear chart.


**Views:**
The user can use this Widget to view a view in a widget, designed in the views section.


**Weather Information:**
The user can use this Widget to view the current weather information at the current facility.


Dashboard Widgets (Monitor) [#dashboard-widgets-monitor]
In the monitor, the dashboard can be configured to the client's needs using any combination of the [**available widgets**](/docs/monitor/dashboards/widgets):
**Endpoint History Widget:**
Line chart showing the variation of an endpoint variable type over time. In endpoint history charts, the user can enter minimum and maximum values to define the Y-axis ranges, as well as modify the variable names associated with the Y-axis titles.
Dashboard

* *The user can edit the minimum and maximum values that define the Y-axis ranges of the charts.*
!\[Graphical user interface, Text, Application, Email
Automatically generated description]\(/images/wiki/dashboards/widgets/widgets-beta/widgets-con-zona-de-confort/image\_272e.png)
*This is a visualization of the minimum and maximum values that define the Y-axis ranges of the charts.*
* *The user can define **Comfort Zones** for history charts. This allows configuring value ranges where measurements are expected. It is for visualization purposes and multiple zones can be configured for the same chart.*

The user can also define Comfort Zones for the Comparative History Widget.

* *The user can modify the Y-axis titles (instead of displaying the variable type names).*


* *The user can view the tooltips of history charts*, *which display all data points associated with an X position.*
!\[Chart, Line chart
Automatically generated description]\(/images/wiki/dashboards/widgets/widgets-beta/widgets-con-zona-de-confort/image\_c4df.png)
**Comparative Endpoint History Widget:**
Endpoint history charts where the user can enter minimum and maximum values to define the Y-axis ranges, as well as modify the variable names associated with the Y-axis titles.

*The user can edit the minimum and maximum values that define the Y-axis ranges of the charts.*

*The user can modify the Y-axis titles (instead of displaying the variable type names).*


*The user can view the tooltips of history charts*, *which display all data points associated with an X position.*

# Device
Properties
| address(string) - read only |
| -------------------------------------------------------------------------------------------------------------------------------------------- |
| The address property gets the address of a device |
| Examples |
| let devices = env.facility.devices; let mydevices = devices.toArray() mydevices.forEach((device)=> \{ env.log(device.address) }); |
| |
| description (string) - read only |
| ------------------------------------------------------------------------------------------------------------------------------------------------ |
| The description property gets the description of a device |
| Examples |
| let devices = env.facility.devices; let mydevices = devices.toArray() mydevices.forEach((device)=> \{ env.log(device.description) }); |
| endpoints - read only |
| ---------------------------------------------------------------------------------------------------------------------------------------------------------------------------------------- |
| The endpoints property gets an endpoints object, for more information see endpoints |
| Examples |
| let devices = env.facility.devices; let mydevices = devices.toArray() mydevices.forEach((device)=> \{ let endpoints = device.endpoints env.log(device.endpoints) }); |
| isOnline (boolean)- read only |
| ------------------------------------------------------------------------------------------------------------------------------------------------------------------------ |
| The isOnline property allows knowing whether the device is online or offline. Note: This property is available starting from platform version 1.5. |
| Examples |
| let devices = env.facility.devices; let mydevices = devices.toArray() mydevices.forEach((dev)=> \{ let online= dev.isOnline; env.log(dev.online) }); |
Methods [#methods]
For more information see this [page](/docs/herramientas-low-code-scripting/referencia-de-objetos-disponibles-para-scripting/device)
# Devices
Properties
| facilityID (integer) - read only |
| ---------------------------------------------------------------------------------------------- |
| The facilityID property gets the unique identifier of the facility to which the device belongs |
| Examples |
| let devices = env.facility.devices; env.log(devices.facilityID) |
| count (integer) - read only |
| ------------------------------------------------------------------------ |
| The count property gets the number of devices that exist in the facility |
| Examples |
| let devices = env.facility.devices; env.log(devices.count) |
Methods [#methods]
| byAddress(string deviceAddress ) |
| ------------------------------------------------------------------------------------------------------------------------------------------------------------------------------------------------------------------------------- |
| The byAddress method returns a device object whose address matches the one specified in the deviceAddress parameter. If no device is found with the specified address, the method returns null. For more information see device |
| Examples |
| let devices = env.facility.devices; let device = devices.byAddress('1') env.log(device) |
| byIndex(integer index) |
| -------------------------------------------------------------------------------------------------------------------------------------------------------------------------------------------------------------------------------------------------------------------- |
| The byIndex method returns a device object whose index matches the one specified in the index parameter. A value of zero is equivalent to the first device. If no device is found with the specified index, the method returns null. For more information see device |
| Examples |
| let devices = env.facility.devices; let device = devices.byIndex(0) env.log(device) |
| toArray() |
| ----------------------------------------------------------------------------------------- |
| The toArray method returns an array of device objects. For more information see device |
| Examples |
| let devices = env.facility.devices; let deviceArr = devices.toArray() env.log(deviceArr) |
# Endpoint
Properties [#properties]
| (EndPointAccessType) accessType |
| ---------------------------------------------------------------------------------------------------------------------------------------------------------------------------------------- |
| The accessType property gets the type of access applied to an endpoint. For more information about endpoint access types see this page |
| Examples |
| let endpoints = env.facility.endpoints; let myendPointsArray = endpoints.toArray(); myendPointsArray.forEach((ep)=> \{ let aType = ep.accessType; env.log(aType); }); |
| |
| (string) address |
| ----------------------------------------------------------------------------------------------------------------------------------------------------------------------------------- |
| The address property gets the address of an endpoint. For more information about endpoints see this page |
| Examples |
| let endpoints = env.facility.endpoints; let myendPointsArray = endpoints.toArray(); myendPointsArray.forEach((ep)=> \{ let addr = ep.address; env.log(addr); }); |
| |
| (string) description |
| ----------------------------------------------------------------------------------------------------------------------------------------------------------------------------------- |
| The description property gets the description that was defined for an endpoint when it was created. For more information about endpoints see this page |
| Examples |
| let endpoints = env.facility.endpoints; let myendPointsArray = endpoints.toArray(); myendPointsArray.forEach((ep)=> \{ let addr = ep.address; env.log(addr); }); |
| |
| (integer) endpointID |
| -------------------------------------------------------------------------------------------------------------------------------------------------------------------------------- |
| The endpointID property gets the unique identifier of an endpoint. For more information about endpoints see this page |
| Examples |
| let endpoints = env.facility.endpoints; let myendPointsArray = endpoints.toArray(); myendPointsArray.forEach((ep)=> \{ let id= ep.endpointID; env.log(id); }); |
| |
| (integer) endpointSubType |
| ------------------------------------------------------------------------------------------------------------------------------------------------------------------------------------------------ |
| The endpointSubType property gets the endpoint subtype of an endpoint. If the endpoint has no defined subtype, null will be returned. For more information about endpoint subtypes see this page |
| Examples |
| let endpoints = env.facility.endpoints; let myendPointsArray = endpoints.toArray(); myendPointsArray.forEach((ep)=> \{ let st = ep.endpointSubtype; env.log(st); }); |
| |
| (integer) operationSecurityLevel |
| ----------------------------------------------------------------------------------------------------------------------------------------------------------------------------------------------- |
| The operationSecurityLevel property gets the type of security that has been defined when operating on an endpoint. For more information about endpoint operation security levels see this page |
| Examples |
| let endpoints = env.facility.endpoints; let myendPointsArray = endpoints.toArray(); myendPointsArray.forEach((ep)=> \{ let osl = ep.operationSecurityLevel; env.log(osl); }); |
| |
| string\[] tags |
| --------------------------------------------------------------------------------------------------------------------------------------------------------------------------------------------------------------------- |
| The tags property gets all tags that have been defined for an endpoint. For more information about endpoints see this page |
| Examples |
| let endpoints = env.facility.endpoints; let myendPointsArray = endpoints.toArray(); myendPointsArray.forEach((ep)=> \{ let tags= ep.tags; tags.forEach((tag)=>\{ env.log(tag); }); }); |
| |
| (Device) device |
| -------------------------------------------------------------------------------------------------------------------------------------------------------------------------------- |
| The device property gets the device object to which an endpoint belongs. For more information about endpoints see this page |
| Examples |
| let endpoints = env.facility.endpoints; let myendPointsArray = endpoints.toArray(); myendPointsArray.forEach((ep)=> \{ let device = ep.device; env.log(device); }); |
| |
Methods [#methods]
| (DataPoint) getCurrentState() |
| ----------------------------------------------------------------------------------------------------------------------------------------------------------------------------------------------------------------------------------------------------------------------------------------------------------------------------------------------------------------------------------------------------------------------------------------------------------------------------- |
| The getCurrentState() method gets the current state of an endpoint for all endpoint types that have a state. If the endpoint type does not have a state, the method will return an error with the description "Unsupported endpoint type in method getCurrentState". The returned DataPoint object is polymorphic, meaning that depending on the endpoint type whose state is being queried, its properties are different. For more information about DataPoint see this page |
| Examples |
| let endpoints = env.facility.endpoints; let myendPoint = endpoints.byTag('vitrina'); let status = myendPoint.getCurrentState(); let value = status.value; env.log(value); |
| |
| (DataPoint\[]) getDataPoints(Date fromUTCDatetime) |
| ----------------------------------------------------------------------------------------------------------------------------------------------------------------------------------------------------------------------------------------------------------------------------------------------------------------------------------------------------------------------------------------------------------------------- |
| The getDataPoints() method gets the different states of an endpoint from the moment indicated as fromUTCDateTime. The returned DataPoint object is polymorphic, meaning that depending on the endpoint type whose state is being queried, its properties are different. For more information about DataPoint see this page |
| Examples |
| const subtractHours = (date, hours) => \{ const result = new Date(date); result.setHours(result.getHours() - hours); return result; }; let endpoints = env.facility.endpoints; let myendPointsArray = endpoints.toArray(); myendPointsArray.forEach((ep)=> \{ let dataPoints = ep.getDataPoints(subtractHours(utils.utcNow, 10)); env.log(dataPoints); }); |
| |
| (double) getDataPointsAvg(Date fromUTCDatetime) |
| ------------------------------------------------------------------------------------------------------------------------------------------------------------------------------------------------------------------------------------------------------------------------------------------------------------------------------------------------------------------------------------------------------------ |
| The getDataPointsAvg() method gets the arithmetic average of an endpoint's states from the moment indicated as fromUTCDateTime. For more information about DataPoint see this page |
| Examples |
| const subtractHours = (date, hours) => \{ const result = new Date(date); result.setHours(result.getHours() - hours); return result; }; let endpoints = env.facility.endpoints; let myendPointsArray = endpoints.toArray(); myendPointsArray.forEach((ep)=> \{ let avg = ep.getDataPointsAvg(subtractHours(utils.utcNow, 10)); env.log(avg); }); |
| |
| (double) getDataPointsAvg(Date fromUTCDatetime, Date toUTCDateTime) |
| -------------------------------------------------------------------------------------------------------------------------------------------------------------------------------------------------------------------------------------------------------------------------------------------------------------------------------------------------------------------------------------------------------------------------- |
| The getDataPointsAvg() method gets the arithmetic average of an endpoint's states from the moment indicated as fromUTCDateTime up to the moment indicated in the toUTCDateTime parameter. For more information about DataPoint see this page |
| Examples |
| const subtractHours = (date, hours) => \{ const result = new Date(date); result.setHours(result.getHours() - hours); return result; }; let endpoints = env.facility.endpoints; let myendPointsArray = endpoints.toArray(); myendPointsArray.forEach((ep)=> \{ let avg = ep.getDataPointsAvg(subtractHours(utils.utcNow, 10), utils.utcNow); env.log(avg); }); |
| |
| (double) getDataPointsMax(Date fromUTCDatetime) |
| ------------------------------------------------------------------------------------------------------------------------------------------------------------------------------------------------------------------------------------------------------------------------------------------------------------------------------------------------------------------------------------------------------------ |
| The getDataPointsMax() method gets the maximum value of an endpoint's states from the moment indicated as fromUTCDateTime. For more information about DataPoint see this page |
| Examples |
| const subtractHours = (date, hours) => \{ const result = new Date(date); result.setHours(result.getHours() - hours); return result; }; let endpoints = env.facility.endpoints; let myendPointsArray = endpoints.toArray(); myendPointsArray.forEach((ep)=> \{ let avg = ep.getDataPointsMax(subtractHours(utils.utcNow, 10)); env.log(avg); }); |
| |
| (double) getDataPointsMax(Date fromUTCDatetime, Date toUTCDateTime) |
| -------------------------------------------------------------------------------------------------------------------------------------------------------------------------------------------------------------------------------------------------------------------------------------------------------------------------------------------------------------------------------------------------------------------------- |
| The getDataPointsMax() method gets the maximum value of an endpoint's states from the moment indicated as fromUTCDateTime up to the moment indicated in the toUTCDateTime parameter. For more information about DataPoint see this page |
| Examples |
| const subtractHours = (date, hours) => \{ const result = new Date(date); result.setHours(result.getHours() - hours); return result; }; let endpoints = env.facility.endpoints; let myendPointsArray = endpoints.toArray(); myendPointsArray.forEach((ep)=> \{ let avg = ep.getDataPointsMax(subtractHours(utils.utcNow, 10), utils.utcNow); env.log(avg); }); |
| |
| (double) getDataPointsMin(Date fromUTCDatetime) |
| ------------------------------------------------------------------------------------------------------------------------------------------------------------------------------------------------------------------------------------------------------------------------------------------------------------------------------------------------------------------------------------------------------------ |
| The getDataPointsMin() method gets the minimum value of an endpoint's states from the moment indicated as fromUTCDateTime. For more information about DataPoint see this page |
| Examples |
| const subtractHours = (date, hours) => \{ const result = new Date(date); result.setHours(result.getHours() - hours); return result; }; let endpoints = env.facility.endpoints; let myendPointsArray = endpoints.toArray(); myendPointsArray.forEach((ep)=> \{ let avg = ep.getDataPointsMin(subtractHours(utils.utcNow, 10)); env.log(avg); }); |
| |
| (double) getDataPointsMin(Date fromUTCDatetime, Date toUTCDateTime) |
| -------------------------------------------------------------------------------------------------------------------------------------------------------------------------------------------------------------------------------------------------------------------------------------------------------------------------------------------------------------------------------------------------------------------------- |
| The getDataPointsMin() method gets the minimum value of an endpoint's states from the moment indicated as fromUTCDateTime up to the moment indicated in the toUTCDateTime parameter. For more information about DataPoint see this page |
| Examples |
| const subtractHours = (date, hours) => \{ const result = new Date(date); result.setHours(result.getHours() - hours); return result; }; let endpoints = env.facility.endpoints; let myendPointsArray = endpoints.toArray(); myendPointsArray.forEach((ep)=> \{ let avg = ep.getDataPointsMin(subtractHours(utils.utcNow, 10), utils.utcNow); env.log(avg); }); |
| |
| (double) getDataPointsSum(Date fromUTCDatetime) |
| ------------------------------------------------------------------------------------------------------------------------------------------------------------------------------------------------------------------------------------------------------------------------------------------------------------------------------------------------------------------------------------------------------------ |
| The getDataPointsSum method gets the sum of the values of an endpoint's states from the moment indicated as fromUTCDateTime. For more information about DataPoint see this page |
| Examples |
| const subtractHours = (date, hours) => \{ const result = new Date(date); result.setHours(result.getHours() - hours); return result; }; let endpoints = env.facility.endpoints; let myendPointsArray = endpoints.toArray(); myendPointsArray.forEach((ep)=> \{ let avg = ep.getDataPointsSum(subtractHours(utils.utcNow, 10)); env.log(avg); }); |
| |
| (double) getDataPointsSum(Date fromUTCDatetime, Date toUTCDateTime) |
| -------------------------------------------------------------------------------------------------------------------------------------------------------------------------------------------------------------------------------------------------------------------------------------------------------------------------------------------------------------------------------------------------------------------------- |
| The getDataPointsSum() method gets the sum of the values of an endpoint's states from the moment indicated as the fromUTCDateTime parameter up to the moment indicated in the toUTCDateTime parameter. For more information about DataPoint see this page |
| Examples |
| const subtractHours = (date, hours) => \{ const result = new Date(date); result.setHours(result.getHours() - hours); return result; }; let endpoints = env.facility.endpoints; let myendPointsArray = endpoints.toArray(); myendPointsArray.forEach((ep)=> \{ let avg = ep.getDataPointsSum(subtractHours(utils.utcNow, 10), utils.utcNow); env.log(avg); }); |
| |
| (DataPoint\[]) getDataPointsLT(Date fromUTCDatetime, Date toUTCDateTime\*) |
| ------------------------------------------------------------------------------------------------------------------------------------------------------------------------------------------------------------------------------------------------------------------------------------------------------------------------------------------------------------------------------------------------------------------------- |
| The getDataPointsLT() method gets the states of an endpoint from the moment indicated as the fromUTCDateTime parameter up to the moment indicated in the toUTCDateTime parameter in the local time of the facility to which they belong. For more information about DataPoint see this page |
| Examples |
| const subtractHours = (date, hours) => \{ const result = new Date(date); result.setHours(result.getHours() - hours); return result; }; let endpoints = env.facility.endpoints; let myendPointsArray = endpoints.toArray(); myendPointsArray.forEach((ep)=> \{ let avg = ep.getDataPointsLT(subtractHours(utils.utcNow, 10), utils.utcNow); env.log(avg); }); |
| |
| (double) getDataPointsMaxLT(Date fromUTCDatetime, Date toUTCDateTime\*) |
| ---------------------------------------------------------------------------------------------------------------------------------------------------------------------------------------------------------------------------------------------------------------------------------------------------------------------------------------------------------------------------------------------------------------------------- |
| The getDataPointsMaxLT() method gets the maximum value of an endpoint from the moment indicated as the fromUTCDateTime parameter up to the moment indicated in the toUTCDateTime parameter in the local time of the facility to which they belong. For more information about DataPoint see this page |
| Examples |
| const subtractHours = (date, hours) => \{ const result = new Date(date); result.setHours(result.getHours() - hours); return result; }; let endpoints = env.facility.endpoints; let myendPointsArray = endpoints.toArray(); myendPointsArray.forEach((ep)=> \{ let avg = ep.getDataPointsMaxLT(subtractHours(utils.utcNow, 10), utils.utcNow); env.log(avg); }); |
| |
| (double) getDataPointsMinLT(Date fromUTCDatetime, Date toUTCDateTime\*) |
| ---------------------------------------------------------------------------------------------------------------------------------------------------------------------------------------------------------------------------------------------------------------------------------------------------------------------------------------------------------------------------------------------------------------------------- |
| The getDataPointsMinLT() method gets the minimum value of an endpoint from the moment indicated as the fromUTCDateTime parameter up to the moment indicated in the toUTCDateTime parameter in the local time of the facility to which they belong. For more information about DataPoint see this page |
| Examples |
| const subtractHours = (date, hours) => \{ const result = new Date(date); result.setHours(result.getHours() - hours); return result; }; let endpoints = env.facility.endpoints; let myendPointsArray = endpoints.toArray(); myendPointsArray.forEach((ep)=> \{ let avg = ep.getDataPointsMinLT(subtractHours(utils.utcNow, 10), utils.utcNow); env.log(avg); }); |
| |
| (double) getDataPointsSumLT(Date fromUTCDatetime, Date toUTCDateTime\*) |
| ---------------------------------------------------------------------------------------------------------------------------------------------------------------------------------------------------------------------------------------------------------------------------------------------------------------------------------------------------------------------------------------------------------------------------- |
| The getDataPointsSumLT() method gets the sum of the states of an endpoint from the moment indicated as the fromUTCDateTime parameter up to the moment indicated in the toUTCDateTime parameter in the local time of the facility to which they belong. For more information about DataPoint see this page |
| Examples |
| const subtractHours = (date, hours) => \{ const result = new Date(date); result.setHours(result.getHours() - hours); return result; }; let endpoints = env.facility.endpoints; let myendPointsArray = endpoints.toArray(); myendPointsArray.forEach((ep)=> \{ let avg = ep.getDataPointsSumLT(subtractHours(utils.utcNow, 10), utils.utcNow); env.log(avg); }); |
| |
# Endpoints
Properties [#properties]
| (integer) count |
| ----------------------------------------------------------------------------------------------------------------------------------------------------------------------------- |
| The count property gets the number of endpoints that a device has |
| Examples |
| devices = env.facility.devices; mydevices = devices.toArray() mydevices.forEach((dev)=> \{ totalEndpoints = dev.endpoints.count env.log(totalEndpoints) }); |
| |
| (integer) deviceID |
| ------------------------------------------------------------------------------------------------------------------------------------------------------------------------------ |
| The deviceID property gets the unique device identifier to which an endpoint belongs |
| Examples |
| let devices = env.facility.devices; let mydevices = devices.toArray() mydevices.forEach((dev)=> \{ let deviceId = dev.endpoints.deviceID env.log(deviceId) }); |
| |
| (integer) facilityID |
| -------------------------------------------------------------------------------------------------------------------------------------------------------------------------- |
| The facilityID property gets the unique facility identifier to which an endpoint belongs |
| Examples |
| let devices = env.facility.devices; let mydevices = devices.toArray() mydevices.forEach((dev)=> \{ let facilityId = dev.endpoints.facilityID env.log(facilityId) }); |
| |
Methods [#methods]
| (object) byTag(string tag) |
| -------------------------------------------------------------------------------------------------------------------- |
| The byTag method gets an endpoint object given a specific tag, for more information see endpoint |
| Examples |
| let endpoints = env.facility.endpoints; let myendPoint = endpoints.byTag("My test endpoint tag") env.log(myendPoint) |
| |
| (object\[]) allByTag(string tag) |
| ------------------------------------------------------------------------------------------------------------------------- |
| The allByTag method gets all endpoint objects as an array that have a specific tag, for more information see endpoint |
| Examples |
| let endpoints = env.facility.endpoints; let myendPoints = endpoints.allByTag("Head office endpoint") env.log(myendPoints) |
| |
| (object) byType(EndpointType type) |
| ----------------------------------------------------------------------------------------------------------------------------- |
| The byType method gets an endpoint object given an endpoint type, for more information about endpoint types see this page |
| Examples |
| let endpoints = env.facility.endpoints; let myendPoint = endpoints.byType(endpointType.locationTracker) env.log(myendPoint) |
| |
| (object) byType(EndpointType type EndPointSubType subtype) |
| ------------------------------------------------------------------------------------------------------------------------------------------------------- |
| The byType method gets an endpoint object given an endpoint type and subtype, for more information about endpoint types and subtypes see this page |
| Examples |
| let endpoints = env.facility.endpoints; let myendPoint = endpoints.byType(endpointType.appliance, applianceEndpointSubType.lamp) env.log(myendPoint) |
| |
| (object\[]) AllByType(EndpointType type) |
| ---------------------------------------------------------------------------------------------------------------------------------------------------------------------- |
| The AllByType method gets all endpoint objects given an endpoint type, for more information about endpoint types and subtypes see this page |
| Examples |
| let endpoints = env.facility.endpoints; let myendPointsArrray = endpoints.AllByType(endpointType.appliance, applianceEndpointSubType.lamp) env.log(myendPointsArray) |
| |
| (object\[]) AllByType(EndpointType type EndPointSubType subtype) |
| ----------------------------------------------------------------------------------------------------------------------------------------------------------------------------- |
| The AllByType method gets all endpoint objects as an array that match a given endpoint type and subtype, for more information about endpoint types and subtypes see this page |
| Examples |
| let endpoints = env.facility.endpoints; let myendPointsArray = endpoints.AllByType(endpointType.appliance, applianceEndpointSubType.lamp) env.log(myendPointsArray) |
| |
| (object) ByAddress(string endpointaddress) |
| ------------------------------------------------------------------------------------------------------------ |
| The ByAddress method gets an endpoint object given its address, for more information see this page |
| Examples |
| let endpoints = env.facility.endpoints; let myendPoint = endpoints.byAddress('16785349') env.log(myendPoint) |
| |
| (object) byIndex(integer index) |
| ------------------------------------------------------------------------------------------------------------------------------------------------------- |
| The byIndex method gets an existing endpoint object in the facility given its index where zero is the first element, for more information see this page |
| Examples |
| let endpoints = env.facility.endpoints; let myendPoint = endpoints.byIndex(0); env.log(myendPoint) |
| |
| object\[] toArray() |
| ----------------------------------------------------------------------------------------------------------------------- |
| The toArray() method gets all existing endpoint objects in the facility as an array, for more information see this page |
| Examples |
| let endpoints = env.facility.endpoints; let myendPointsArray = endpoints.toArray(); env.log(myendPointsArray) |
| |
# HTTP
Introduction [#introduction]
This section describes integration with the Gear Studio platform using HTTP. This functionality is designed to allow integration with devices from a variety of manufacturers, as well as custom-built devices with Arduino, nodeMCU, Raspberry Pi, and any other platform that supports HTTP communication.
Integration Alternatives [#integration-alternatives]
There are two HTTP integration alternatives:
* [Flexible data exchange](/docs/configuracion-del-cliente/dispositivos-y-endpoints/dispositivos/integracion-de-dispositivos/http/intercambio-de-datos-flexible): Flexible data exchange allows sending data from devices (uplink) and processing it with scripting to interpret and store the information. It is extremely flexible and can be easily implemented with scripting knowledge. Using flexible data exchange is recommended when it is not possible to adapt the data format sent by the device to use the HTTP API.
* [HTTP API](/docs/configuracion-del-cliente/dispositivos-y-endpoints/dispositivos/integracion-de-dispositivos/http/api-http): The HTTP API allows devices to communicate with the platform using a specific message format, documented in the following sections, which enables:
* Uploading device data to the platform. [This page](/docs/configuracion-del-cliente/dispositivos-y-endpoints/dispositivos/integracion-de-dispositivos/http/api-http/almacenamiento-de-datos-de-sensores) shows the reference for everything needed for each sensor type.
* Updating device-specific data, such as battery and RSSI levels. Follow [this reference](/docs/configuracion-del-cliente/dispositivos-y-endpoints/dispositivos/integracion-de-dispositivos/http/api-http/actualizacion-de-datos-del-dispositivo/estado-de-bateria-y-rssi) for more information.
* Receiving and responding to commands sent from the platform. More information on this topic can be found on [this page](/docs/configuracion-del-cliente/dispositivos-y-endpoints/dispositivos/integracion-de-dispositivos/http/api-http/recepcion-y-confirmacion-de-comandos).
**Important**: if it is not possible to modify the data format sent by the device, then using [flexible data exchange](/docs/configuracion-del-cliente/dispositivos-y-endpoints/dispositivos/integracion-de-dispositivos/http/intercambio-de-datos-flexible) is recommended. This makes it possible to send data in any format and process it on the platform using scripting.
# Flexible Data Exchange
Introduction [#introduction]
Flexible data exchange is the recommended HTTP integration method when it is not possible to modify the data format sent by the device.
Flexible data exchange supports only **Uplink** messages. Uplink messages are all those sent from devices to the platform. The platform must be able to process uplink messages to store the relevant information and process it. This is achieved using [scripting](/docs/configuracion-del-cliente/dispositivos-y-endpoints/dispositivos/modelos-de-dispositivo/procesamiento-de-datos) to interpret message content and store the information on the platform.
It is not possible to send **Downlink** messages (i.e., from the platform to the device) using flexible HTTP data exchange.
Steps to Follow [#steps-to-follow]
Configuring the Data Upload URL [#configuring-the-data-upload-url]
For the platform to receive device data, you need to configure the device to POST HTTP messages to the following URL:
```
https://gear.cloud.studio/api/v2/uplink/{DeviceAddress}
```
Where:
* **DeviceAddress** is the device address, as entered when creating the device on the platform.
For example, if the device address is ***06A022B39C14***, then the device should be configured to POST to the following URL:
```
https://gear.cloud.studio/api/v2/uplink/06A022B39C14
```
Configuring the Access Token [#configuring-the-access-token]
The access token must also be sent as part of the header, using an Authorization header, as shown below:
```
Authorization: Bearer e54e0911-ece3-4b7a-b84d-afc01dfa81f1
```
Alternatively, when it is not possible to send the token through the Authorization header, the access token can be sent as part of the URL via the "accessToken" parameter, as in the following example:
```
https://gear.cloud.studio/api/v2/uplink/06A022B39C14?accessToken=e54e0911-ece3-4b7a-b84d-afc01dfa81f1
```
Once these steps are completed, the platform will begin receiving and processing device information. If the device uses a model not natively supported by the platform, you will also need to define the [data processing scripts](/docs/configuracion-del-cliente/dispositivos-y-endpoints/dispositivos/modelos-de-dispositivo/procesamiento-de-datos), as described in [this section](/docs/configuracion-del-cliente/dispositivos-y-endpoints/dispositivos/modelos-de-dispositivo/procesamiento-de-datos).
# LoRaWAN Network Servers (LNS)
This section details the integration processes with different LoRaWAN Network Servers.
# LORIOT
The integration with [LORIOT](https://loriot.io/) enables the platform to have solid communication between a connectivity provider and a quality IoT Platform like Cloud Studio IoT.
Requirements [#requirements]
The integration is easy and only requires the following:
* An instance identifier. Depending on your Gear Studio subscription, the most common instance names are:
* **gear.cloud.studio**. This instance name corresponds to a common Gear Studio instance, including the free version.
* **xxxx.cloud.studio**. This instance name corresponds to Flex instances where hosting is provided by Cloud Studio, but the client can choose the subdomain used (xxxx).
* **Other**. For Enterprise clients using their own domain, the chosen domain name should be used.
* An [Access Token](/docs/configuracion-del-cliente/tokens-de-acceso-access-tokens). Data sent to the Cloud Studio IoT Gear platform from LORIOT will use this access token for access, and therefore LORIOT will have the permissions associated with this access token. It is recommended to create a new access token specifically for the LORIOT integration to simplify security control.
**Configuration in LORIOT**
Once we have all the necessary permissions and requirements for the integration, it is time to create our first application in LORIOT. Log in and access with your credentials, then go to **Applications**:

Within **Applications**, go to **Output**: **Applications -> Output**

Within the **Output** options, we need to add a new **Output** type that is directed specifically to the Cloud Studio IoT platform. This **Output** type must be **HTTP Push**. To do this, click the "**Add new output**" button:
**Output** -> **Add new output** -> **HTTP Push**

Within the HTTP Push options, we identify three key fields to fill in:
* **Output Name:** This field is optional and fully customizable; it will help identify the Output later. For example, "Cloud Studio IoT - Integration".
* **Target URL for POSTs:** In this field, you must enter the predefined link to our IoT Platform, Cloud Studio IoT:
[https://gear.cloud.studio/services/loriot](https://gear.cloud.studio/services/loriot)
* Note: If your instance is customized, you must enter your instance link in this format: [https://XXXXX/services/loriot](https://XXXXX/services/loriot)
Where XXXXX is the address of your customized Cloud Studio IoT instance.
* **"Authorization" header value (Optional):** Here you must enter the **Access Token** generated earlier on the Cloud Studio IoT Platform before starting with the guide.
It is important to note that the field must be completed in this format: "**Bearer \{AccessToken}**". The "**Bearer**" is important (capitalized and with a space before the actual Access Token). For example:
Bearer A823h0HSUBDmnmbcu9ae2nskdn.
To finish, simply click "Add Output" to complete the integration.
**Output Name** + **Target URL for POSTs** + **"Authorization" header value (Optional)** -> **Add Output**


As a final step and as a security measure, we recommend visiting the "**Log**" tool **within LORIOT** to verify that all outgoing connections are succeeding toward the Cloud Studio IoT platform.


# The Things Stack (TTN / TTS)
The integration with [The Things Stack](https://www.thethingsindustries.com/stack) allows the platform to communicate with LoRaWAN devices using a variety of gateways available on the market. This article describes the steps necessary to complete the integration.
Requirements [#requirements]
The integration is very straightforward and only requires the following:
* An instance identifier. Depending on your Gear Studio subscription, the most common instance names are:
* **gear.cloud.studio**. This instance name corresponds to a common Gear Studio instance, including the free version.
* **xxxx.cloud.studio**. This instance name corresponds to Flex instances where hosting is provided by Cloud Studio, but the client can choose the subdomain used (xxxx).
* **Other**. For Enterprise clients using their own domain, the chosen domain name should be used.
* An [Access Token](/docs/configuracion-del-cliente/tokens-de-acceso-access-tokens). Data sent from TTN will use this access token to access the platform, and therefore TTN will have the permissions associated with this access token. It is recommended to create a new access token specifically for the TTN integration to simplify security control.
Configuration in TTN [#configuration-in-ttn]
To configure the integration in TTN, follow these steps:
* Create an application (if you do not already have one)
* Configure the webhook integration with the Gear Studio platform.
* Connect devices to this application and verify that information is received correctly.
* Register the devices on the Gear Studio platform.
Creating an Application [#creating-an-application]
If you do not already have an application in TTN, you will need to create one. To do this, follow the online tutorials and videos available, such as:
* [Adding Applications | The Things Stack for LoRaWAN (thethingsindustries.com)](https://www.thethingsindustries.com/docs/integrations/adding-applications/)
* [Creating applications and adding devices to The Things Stack - YouTube](https://www.youtube.com/watch?v=PpbkBgz1CbI)
Below is an example of what the application creation window looks like:

Configuring Webhooks in TTN [#configuring-webhooks-in-ttn]
To enable TTN to exchange information with the Gear Studio platform, a webhook integration must be used. The Cloud Studio webhook can be used for this purpose.
Integrations > Webhooks > Add webhook

When using the webhook, use the following values:
* Webhook ID: any name can be freely chosen, for example "cloud-studio". The name cannot contain spaces and other special characters, but can include hyphens.
* Access token: an access token with permissions to update device information. See [this page](/docs/configuracion-del-cliente/tokens-de-acceso-access-tokens) for more information.
Below is an example of the Cloud Studio webhook pointing to the Gear Studio platform, using the default instance.

Installing Devices in TTN [#installing-devices-in-ttn]
If you have not done so already, also install the devices in The Things Network. To do this, you can follow the online tutorials available, such as:
* [Adding Devices | The Things Stack for LoRaWAN (thethingsindustries.com)](https://www.thethingsindustries.com/docs/devices/adding-devices/)
* [Creating applications and adding devices to The Things Stack - YouTube](https://www.youtube.com/watch?v=PpbkBgz1CbI)
Once the devices are created, verify that The Things Network receives device data correctly.
Installing Devices on the Gear Studio Platform [#installing-devices-on-the-gear-studio-platform]
Finally, for the Gear Studio platform to accept the registered data, the devices need to be added. This process will depend on whether the device is already supported on the platform, either natively or by having manually created an appropriate device model.
If the Device Model Is Not Natively Supported [#if-the-device-model-is-not-natively-supported]
If the device model is not natively supported by the platform, you will first need to create a device model on the platform by following [these steps](/docs/configuracion-del-cliente/dispositivos-y-endpoints/dispositivos/modelos-de-dispositivo). Once the device model is created, you can create as many devices as needed using this model.
To correctly process device data, it will be necessary, as part of the model configuration, to specify at least a [script to define the device structure](/docs/configuracion-del-cliente/dispositivos-y-endpoints/dispositivos/modelos-de-dispositivo/configuracion), and a script to [process data received from the LoRaWAN network](/docs/configuracion-del-cliente/dispositivos-y-endpoints/dispositivos/modelos-de-dispositivo/procesamiento-de-datos) (payload).
Creating the Device in Gear Studio [#creating-the-device-in-gear-studio]
Finally, the device can be installed by following these steps:
* Navigate to the device management screen.
* Click the "Add" button.
* Enter a description for the new device.
* Select the model from the dropdown list.
* Enter the communication interface.
* Enter the unique device identifier (DevEUI).
* Click "Save".

At this point, the device will be ready and will start receiving data immediately. Optionally, you can review the configuration of each device endpoint if necessary.
# ThingPark X IoT Flow (Actility)
The integration with [**ThingPark X IoT Flow**](https://community.thingpark.io) allows the **Cloud Studio IoT Platform** to communicate with **LoRaWAN** devices using a variety of gateways available on the market. This article describes the steps necessary to complete the integration.
Requirements [#requirements]
Prior to integration, the user must have:
* An instance identifier. Depending on your Gear Studio subscription, the most common instance names are:
* **gear.cloud.studio**. This instance name corresponds to a common Gear Studio instance, including the free version.
* **xxxx.cloud.studio**. This instance name corresponds to Flex instances where hosting is provided by Cloud Studio, but the client can choose the subdomain used (xxxx).
* **Other**. For Enterprise clients using their own domain, the chosen domain name should be used.
* An [Access Token](/docs/configuracion-del-cliente/tokens-de-acceso-access-tokens). Data sent from TPX will use this access token to access the platform, and therefore TPX will have the permissions associated with this access token. It is recommended to create a new access token specifically for the TPX integration to simplify security control.
Creating a Connection with UI
Log in to [**community.thingpark.io**](https://community.thingpark.io). Then follow these steps:
1. Click on Connections -> Create -> **ThingPark X IoT Flow.**

2. A new page will open. Select the connection type: **Gear Studio**.

3. Complete the form as shown in the following example and click **Create**.

> Note
>
> Parameters marked with \* are mandatory.
4. A notification will appear in the upper right corner of your screen to confirm that the application has been created.
5. After creating the application, you will be redirected to the connection details.
Viewing Information on the Cloud Studio IoT Platform [#viewing-information-on-the-cloud-studio-iot-platform]
Connect to your **Gear Studio** instance and navigate to the configuration.
1\. Go to the **Devices** section and click the **Add** button to [create a new Device](/docs/configuracion-del-cliente/dispositivos-y-endpoints/dispositivos/dispositivos).
_bc3f.png)
2\. Fill in the form using the **Device Model** created earlier. The **Address** field corresponds to your **Device EUI** (find it in the **ThingPark** device list).

3\. After the device is created, data reported to the platform will be displayed in the **Endpoints** section in the left menu of the **Monitor**. Note that **LoRaWAN** devices may report every 5 to 15 minutes, so the display will depend on this interval.

4\. Once the devices are correctly connected, you can create a custom **Dashboard** using a wide variety of **Widgets** to display the data being sent by the device.

> Check out our [tutorial](https://www.youtube.com/watch?v=OmJ1RJ4tGKY) on YouTube
# Sensor Update Methods Matrix
Device-Level Data Update [#device-level-data-update]
This table contains the available methods for updating device data.
| Device Property | Scripting Method | HTTP Method | HTTP RAW Method |
| -------------------- | ----------------------- | ----------------------- | --------------- |
| Device location | updateDeviceGeolocation | UpdateDeviceGeolocation | - |
| Device RSSI level | updateDeviceRssi | UpdateDeviceStatus | - |
| Device battery level | updateDeviceBattery | UpdateDeviceStatus | - |
Endpoint-Level Data Update [#endpoint-level-data-update]
This table contains the available methods for updating endpoint data.
| Sensor Type | Scripting Method | HTTP Method | HTTP RAW Method |
| -------------------------------------------------------- | -------------------------------------------------------------- | -------------------------------- | ----------------------------------- |
| Temperature sensors | updateTemperatureSensorStatus | UpdateTemperatureSensorStatus | UpdateTemperatureSensorStatusRaw |
| Humidity sensors | updateHumiditySensorStatus | UpdateHumiditySensorStatus | UpdateHumiditySensorStatusRaw |
| Appliances and on/off devices | updateApplianceStatus | UpdateApplianceStatus | UpdateApplianceStatusRaw |
| Light level sensors | updateLightSensorStatus | UpdateLightSensorStatus | UpdateLightSensorStatusRaw |
| IAS sensors, binary, contacts, etc. | updateIASSensorStatus | UpdateIASSensorStatus | UpdateIASSensorStatusRaw |
| Weight sensors | updateWeightSensorStatus | UpdateWeightSensorStatus | UpdateWeightSensorStatusRaw |
| Pressure sensors | updatePressureSensorStatus | UpdatePressureSensorStatus | UpdatePressureSensorStatusRaw |
| Volume sensors | updateVolumeSensorStatus | UpdateVolumeSensorStatus | UpdateVolumeSensorStatusRaw |
| Generic sensors | updateGenericSensorStatus | UpdateGenericSensorStatus | UpdateGenericSensorStatusRaw |
| Voltage sensors | updateVoltageSensorStatus | UpdateVoltageSensorStatus | UpdateVoltageSensorStatusRaw |
| Current sensors | updateCurrentSensorStatus | UpdateCurrentSensorStatus | UpdateCurrentSensorStatusRaw |
| Active power sensors | updateActivePowerSensorStatus | UpdateActivePowerSensorStatus | UpdateActivePowerSensorStatusRaw |
| Reactive power sensors | updateReactivePowerSensorStatus | UpdateReactivePowerSensorStatus | UpdateReactivePowerSensorStatusRaw |
| Apparent power sensors | updateApparentPowerSensorStatus | UpdateApparentPowerSensorStatus | UpdateApparentPowerSensorStatusRaw |
| Cos phi / power factor sensors | updateCosPhiSensorStatus | UpdateCosPhiSensorStatus | UpdateCosPhiSensorStatusRaw |
| Energy consumption meters | updateEnergySensorValueSummation, updateEnergySensorValueUnits | UpdateEnergySensorValueSummation | UpdateEnergySensorValueSummationRaw |
| Flow meters, generic flow meters, and people flow meters | updateFlowSensorValueSummation, updateFlowSensorValueUnits | UpdateFlowSensorValueSummation | UpdateFlowSensorValueSummationRaw |
| Frequency meters | updateFrequencySensorStatus | UpdateFrequencySensorStatus | UpdateFrequencyMeterStatusRaw |
| Dimmers | updateDimmerStatus | UpdateDimmerStatus | UpdateDimmerStatus |
| Curtains and other closures | updateClosureControllerStatus | UpdateClosureControllerStatus | UpdateClosureControllerStatusRaw |
| PPM concentration sensors | updatePpmConcentrationSensorStatus | UpdateConcentrationSensorStatus | UpdateConcentrationSensorStatusRaw |
| Mass/volume concentration sensors | updateMvConcentrationSensorStatus | UpdateConcentrationSensorStatus | UpdateConcentrationSensorStatusRaw |
| Air quality sensors (AQI) | updateAqiSensorStatus | UpdateAirQualitySensorStatus | UpdateAirQualitySensorStatusRaw |
| Location trackers | updateLocationTrackerStatus | UpdateLocationTrackerStatus | UpdateLocationTrackerStatusRaw |
| People counters | updatePeopleCounterStatus | UpdatePeopleCounterStatus | UpdatePeopleCounterStatusRaw |
| HVAC/Thermostats | updateHVACStatus | updateHVACStatus | - |
| Cameras | - | UploadCameraSnapshot | - |
| Text | updateTextContainerStatus | UpdateTextContainerStatus | - |
# MQTT
Introduction [#introduction]
This section describes integration with the Gear Studio platform using MQTT. This functionality is designed to allow integration with devices from a variety of manufacturers, as well as custom-built devices with Arduino, nodeMCU, Raspberry Pi, and any other platform that supports MQTT communication with TLS security.
Integration Alternatives [#integration-alternatives]
There are two MQTT integration alternatives:
* [Flexible data exchange](/docs/configuracion-del-cliente/dispositivos-y-endpoints/dispositivos/integracion-de-dispositivos/mqtt/intercambio-de-datos-flexible) (**recommended**): Flexible data exchange allows receiving data from devices (uplink) as well as sending data to devices (downlink). It is extremely flexible and can be easily implemented.
* [HTTP Bridge](/docs/configuracion-del-cliente/dispositivos-y-endpoints/dispositivos/integracion-de-dispositivos/mqtt/puente-http) (**for device migration**): The HTTP bridge allows migrating devices that use the HTTP interface so they use MQTT instead.
**Important**: The HTTP bridge is primarily designed for migrating devices from HTTP to MQTT, but for new devices, it is recommended to use [flexible data exchange](/docs/configuracion-del-cliente/dispositivos-y-endpoints/dispositivos/integracion-de-dispositivos/mqtt/intercambio-de-datos-flexible), which can be found [here](/docs/configuracion-del-cliente/dispositivos-y-endpoints/dispositivos/integracion-de-dispositivos/mqtt/intercambio-de-datos-flexible). Flexible data exchange allows representing data with much more flexibility, and generally in a more compact form.
Authentication and Security [#authentication-and-security]
Each Gear Studio instance has its own dedicated MQTT server, usually set up for secure TLS connections on port 8883. The MQTT server connection requires:
* **Username and password**, which can be managed through the "MQTT Configuration" option within the "Security" section of the Gear Manager application. The user ID is also used as a suffix for all MQTT topics.
* **TLS certificate**, used so the device can verify it is connected to the correct server.
Using a Client ID [#using-a-client-id]
Some MQTT clients require defining a "Client ID" before connecting, while others allow using a random one. If you need to explicitly define a Client ID, we recommend using a string that contains the username followed by a unique suffix. For example, you can follow a naming convention like this:
\{**client-secure-id**}\{**generic-value**}
E.g.: **16SAD5656S\*\*\*\*01**
Where:
* 16SAD5656S is the username used in the connection, and
* 01 is the "generic value", which should be different for each connection.
# Flexible Data Exchange
Introduction [#introduction]
Flexible data exchange is the recommended MQTT integration method on the Gear Studio platform. All MQTT devices natively supported by the platform use flexible data exchange, but this method is also recommended for non-natively supported device models.
Flexible data exchange is based on two types of messages:
* **Uplink**: uplink messages are all those sent from devices to the platform. The platform must be able to process uplink messages to store the relevant information and process it.
* **Downlink**: downlink messages are those sent from the platform to devices, typically in the form of commands. Some devices do not support downlink messages, while others only support them for specific configuration operations.
For device models not natively supported by the platform, flexible data exchange allows using scripts to easily define uplink message processing and downlink message creation.
Steps to Follow [#steps-to-follow]
Configuring the Topic for Sending Data to the Platform [#configuring-the-topic-for-sending-data-to-the-platform]
For the platform to receive device data, you need to configure the device to publish to the topic `{**MQTTUserID**}/uplink/{**DeviceAddress**}`, where:
* **MQTTUserID** is the MQTT user identifier chosen for the device. More information [here](/docs/configuracion-del-cliente/dispositivos-y-endpoints/dispositivos/integracion-de-dispositivos/mqtt).
* **DeviceAddress** is the device address, as entered when creating the device on the platform.
For example, if the device uses the MQTT user ***JH529LQK91G7*** and the device address is ***06A022B39C14***, then it should be configured to publish information to the following topic:
`JH529LQK91G7/uplink/06A022B39C14`
Configuring the Topic for Receiving Data from the Platform (Optional) [#configuring-the-topic-for-receiving-data-from-the-platform-optional]
For the platform to send data to the device, you need to configure the device to subscribe to the topic `{**MQTTUserID**}/downlink/{**DeviceAddress**}`, where:
* **MQTTUserID** is the MQTT user identifier chosen for the device. More information [here](/docs/configuracion-del-cliente/dispositivos-y-endpoints/dispositivos/integracion-de-dispositivos/mqtt).
* **DeviceAddress** is the device address, as entered when creating the device on the platform.
For example, if the device uses the MQTT user ***JH529LQK91G7*** and the device address is ***06A022B39C14***, then it should be configured to subscribe to the following topic:
`JH529LQK91G7/downlink/06A022B39C14`
Once these steps are completed, the platform will begin receiving and processing device information. If the device uses a model not natively supported by the platform, you will also need to define the [data processing scripts](/docs/configuracion-del-cliente/dispositivos-y-endpoints/dispositivos/modelos-de-dispositivo/procesamiento-de-datos), as described in [this section](/docs/configuracion-del-cliente/dispositivos-y-endpoints/dispositivos/modelos-de-dispositivo/procesamiento-de-datos).
# Expressions
Expressions allow performing calculations, primarily for [raw data conversion](/docs/configuracion-del-cliente/dispositivos-y-endpoints/endpoints/conversion-de-datos-crudos-raw) in devices.
What are expressions? [#what-are-expressions]
Expressions are texts that allow evaluating data, performing calculations, and ultimately returning a single value. Expressions can include variables, so that the values of those variables are used in the calculations.
Data types [#data-types]
The expression engine built into Gear Studio supports three data types: number, string, and boolean, as shown below:
| Data type | Comments |
| --------- | --------------------------------------------------------------------------------------------------------------------------------------------------------------------------------------------------------------------- |
| Number | Number data types represent numbers, either integers or floating-point (with decimals). |
| String | Represent texts, and when written as constants, they must be enclosed using single quotes ('). When a text must contain a single quote, it can be represented as a constant using two consecutive single quotes (''). |
| Boolean | Represents a boolean (logical) condition, which can only be true or false. |
Variables [#variables]
When expressions are used for [raw data conversion](/docs/configuracion-del-cliente/dispositivos-y-endpoints/endpoints/conversion-de-datos-crudos-raw) in devices, there is an implicit variable [RawData](/docs/configuracion-del-cliente/dispositivos-y-endpoints/endpoints/conversion-de-datos-crudos-raw), which contains the raw value sent by the device. This variable can be used directly in any data conversion expression, but it is important to note that the variable is of type string. It is usually necessary to convert the variable to a number (using the [ToNumber](/docs/configuracion-del-cliente/dispositivos-y-endpoints/endpoints/conversion-de-datos-crudos-raw/expresiones/funciones/otras-funciones/tonumber) function), and apply other conversion functions as needed.
Some expression examples [#some-expression-examples]
| Expression | Comments |
| ------------------------------------- | ---------------------------------------------------------------------------------------------------------------------------------------------------------------------- |
| 25 | Constant, with value 25 (number) |
| 'Hola, mundo' | Constant, with value "Hola, mundo" (string) |
| False | Constant, with value false (boolean) |
| 'I''m happy with expressions' | Constant with value "I'm happy with expressions" (string). Note the use of double single quotes for the single quote after "I". |
| 5 \* 6 | Expression with value 30 (number), corresponding to the multiplication of 5 by 6. |
| (2 + 3) \* 6 | Expression with value 30 (number), corresponding to an addition and a multiplication. |
| 'Tengo ' + ToString(6 \* 5) + ' anos' | Expression with value "Tengo 30 anos" (string), using a multiplication and a number-to-string conversion using the ToString function. |
| 25 \< 8 | Expression with value false (boolean), corresponding to a less-than comparison. |
| not (25 \< 8) | Expression with value true (boolean), corresponding to the negation of a less-than comparison. |
| Sqrt(81) | Expression with value 9 (number), calculated as the square root of 81 using the Sqrt function. |
| ToNumber(RawData) / 10 | Numeric expression whose value depends on the special RawData variable. The expression takes the value of RawData, converts it to a number, and then divides it by 10. |
What effect do uppercase and lowercase have on expressions? [#what-effect-do-uppercase-and-lowercase-have-on-expressions]
In the Cloud Studio platform expression engine, variable names, functions, etc., are not case-sensitive, meaning it does not matter whether they are written in uppercase, lowercase, or a mix of both. For example, all of the following expressions are equivalent:
```
ToString(NOT (valor < 25))
tostring(not (valor < 25))
TOSTRING(not (VALOR< 25))
```
Where can expressions be used? [#where-can-expressions-be-used]
Currently, expressions can be used for [raw data conversion](/docs/configuracion-del-cliente/dispositivos-y-endpoints/endpoints/conversion-de-datos-crudos-raw) in devices. This allows obtaining raw information from certain devices (typically sensors), and using expressions to convert that data to values that can be injected into the platform.
Can I program using expressions? [#can-i-program-using-expressions]
No, expressions are not a programming tool, but a calculation tool. Expressions do not have control structures such as for, while, etc., and are not designed for that purpose.
How can I test my expressions? [#how-can-i-test-my-expressions]
In general, any functionality that allows the use of expressions has the ability to test each expression right there with test values. As an example, you can consult the [raw data conversion](/docs/configuracion-del-cliente/dispositivos-y-endpoints/endpoints/conversion-de-datos-crudos-raw) reference for devices.
How can I represent hexadecimal numbers? [#how-can-i-represent-hexadecimal-numbers]
The expression engine allows representing hexadecimal numbers by prepending the prefix "0x", or alternatively, the prefix "$" (both methods are equivalent). For example, the value 0x100 (or alternatively, $100), represents the hexadecimal number 100, equivalent to decimal 256.
More information [#more-information]
For more information about expressions, consult the [operators](/docs/configuracion-del-cliente/dispositivos-y-endpoints/endpoints/conversion-de-datos-crudos-raw/expresiones/operadores) and [functions](/docs/configuracion-del-cliente/dispositivos-y-endpoints/endpoints/conversion-de-datos-crudos-raw/expresiones/funciones) reference.
# HTTP API
Introduction [#introduction]
[HTTP API](/docs/configuracion-del-cliente/dispositivos-y-endpoints/dispositivos/integracion-de-dispositivos/http/api-http/almacenamiento-de-datos-de-sensores): The HTTP API allows devices to communicate with the platform using a specific message format, documented in the following sections, which enables:
* Uploading device data to the platform. [This page](/docs/configuracion-del-cliente/dispositivos-y-endpoints/dispositivos/integracion-de-dispositivos/http/api-http/almacenamiento-de-datos-de-sensores) shows the reference for everything needed for each sensor type.
* Updating device-specific data, such as battery and RSSI levels. Follow [this reference](/docs/configuracion-del-cliente/dispositivos-y-endpoints/dispositivos/integracion-de-dispositivos/http/api-http/actualizacion-de-datos-del-dispositivo) for more information.
* Receiving and responding to commands sent from the platform. More information on this topic can be found on [this page](/docs/configuracion-del-cliente/dispositivos-y-endpoints/dispositivos/integracion-de-dispositivos/http/api-http/recepcion-y-confirmacion-de-comandos).
# Command Reception and Confirmation
Basic Command Integration Flow [#basic-command-integration-flow]

Basic command integration flow
The gateway, device, or endpoint must be listening for commands by executing the corresponding method. A long polling mechanism is used for this, where the request remains on the server side for a defined amount of time and returns with the response either when the specified time has elapsed or when a command execution has been detected.
This response must be interpreted by the device, the corresponding actions must be performed, and a response must be sent through the command response method to report whether the execution was successful or not.
If successful, the method to update the device status must be executed accordingly.
Finally, ensure that command listening continues with the first method mentioned.
1. Wait for Commands [#1-wait-for-commands]
Commands can be listened to at 3 levels:
1. At the Gateway level
2. At the Device level
3. At the Endpoint level
These commands must be called cyclically to constantly listen for executed commands.
Endpoint Commands [#endpoint-commands]
The `WaitForCommand_Endpoint` method must be called via HTTP POST:
```
POST /services/gear/DeviceIntegrationService.svc/WaitForCommand_Endpoint HTTP/1.1
Host: gear-dev.cloud.studio
Content-Type: application/json
{
"accessToken": "",
"endpointID": 1,
"timeoutSeconds": 60
}
```
Parameters [#parameters]
| Name | Description | Data Type |
| -------------- | ---------------------------------------------------------------------------------------------------- | --------- |
| accessToken | Unique Access Token | text |
| endpointID | Unique endpoint identifier, obtained from the Manager | numeric |
| timeoutSeconds | Time in seconds the server will wait before returning the response if no commands have been detected | numeric |
**Response**
The response is a list within the `WaitForCommand_EndpointResult` property that will contain each of the corresponding commands:
```
{
"WaitForCommand_EndpointResult":[
{
"Closure":null,
"CommandID":1120907993,
"CommandType":1,
"Custom":null,
"DeviceID":7246,
"Dimmer":null,
"EndpointID":113139,
"Management":null,
"OnOff":{
"AutomaticOverrideMinutes":0,
"CommandType":1
},
"Thermostat":null
}
]
}
```
For more information about the response properties, [see the documentation](https://www.cloud.studio/developers/gear/api/html/T_CloudStudio_Services_Types_DeviceCommand.htm).
Depending on the type of command executed, the corresponding property must be considered to determine the action to perform.
For example, if the `CommandType` is 1, it means it is a command for an "Appliance" type endpoint. Therefore, the information in the `OnOff` property must be considered.
The different command types can be [found in this documentation](https://www.cloud.studio/developers/gear/api/html/T_CloudStudio_Services_Types_DeviceCommandType.htm).
2. Respond to a Command [#2-respond-to-a-command]
If a command has been received with any of the `WaitForCommands_*` methods and after executing the corresponding actions on the endpoint (hardware), the command must be responded to whether it succeeded or failed.
To report that the command has been executed, call the following method:
```
POST /services/gear/DeviceIntegrationService.svc/RespondCommand HTTP/1.1
Host: gear-dev.cloud.studio
Content-Type: application/json
{
"accessToken": "",
"response":{
"CommandID": 1120907993,
"ResponseType": 0,
"ErrorCode": "",
"ErrorMessage": "",
"ResponseData": "ok"
}
}
```
The `CommandID` must correspond to the one obtained from the corresponding command wait method. The `ResponseType` must be [one of the enum values](https://www.cloud.studio/developers/gear/api/html/T_CloudStudio_Services_Types_CommandResponseType.htm), as appropriate. In this case it is 0, which means ***"success".***
3. Update Endpoint Status [#3-update-endpoint-status]
If the command execution was successful, the new endpoint status must be reported. To do this, use the [corresponding method](/docs/configuracion-del-cliente/dispositivos-y-endpoints/dispositivos/integracion-de-dispositivos/http) for the endpoint type.
Following the appliance example, call the following method:
```
POST /services/gear/DeviceIntegrationService.svc/UpdateApplianceStatus HTTP/1.1
Host: gear-dev.cloud.studio
Content-Type: application/json
{
"accessToken": "",
"endpointID": 1,
"isOn": true
}
```
For more information about this method, see the [on/off appliances](/docs/configuracion-del-cliente/dispositivos-y-endpoints/dispositivos/integracion-de-dispositivos/http/api-http/almacenamiento-de-datos-de-sensores/appliances-y-otros-dispositivos-on-off) section.
# Update RSSI Status and Battery Level
Reportar el estado de RRSI y/o nivel de batería de un dispositivo [#reportar-el-estado-de-rrsi-yo-nivel-de-batería-de-un-dispositivo]
Este método no almacena un histórico del estado, solamente toma el último reportado y lo muestra en la plataforma. Es decir, si en un primer request se reportaron 3 baterías, y en el segundo request se reporta solo una, entonces se asume que el dispositivo ahora tiene una sola batería. Lo mismo ocurre con los RRSI. Si se envían arrays vacíos, entonces se asumirá que no hay registro de nivel de batería ni de RSSI y se borrará lo reportado anteriormente.
The integration por MQTT de estado de RRSI y nivel de batería uses the following structure:
```
{
"accessToken": "xxxxxxxxxxxxxxxxxxxxxxxxxxxxxxxxxxxxxxxx",
"deviceID": 1,
"battery": [
{
"type": 2,
"percentage": 30,
"voltage": 3.5
},
{
"type": 3,
"percentage": 100,
"voltage": 5
}
],
"rssi": [
{
"type": 2,
"quality": 100,
"strength": -40
}
],
"mqttMethod": "UpdateDeviceStatus",
"mqttRID": "tkrs34"
}
```
Más información acerca de las peticiones y topics en la sección de [integración por MQTT](/docs/configuracion-del-cliente/dispositivos-y-endpoints/dispositivos/integracion-de-dispositivos/mqtt)
Parameters [#parameters]
| Name | Description | Data Type |
| ----------- | ---------------------------------------------------------------------------------------------------------------------------------------------------------------------------------------------------- | --------- |
| accessToken | Access token with permissions to update endpoint information. See this page for more information. | text |
| deviceID | Unique device identifier or device address in format \[deviceAddress] (e.g.: \[device-1234]). These values can be found on the device management page. | number |
| battery | Lista de los estados de las distintas baterías que tiene el dispositivo. Se pueden enviar 1 o varias. Puede encontrar la descripción de las propiedades de este parámetros más abajo. | array |
| rssi | Lista de los estados de las distintas conexiones inalámbricas que tiene el dispositivo. Se pueden enviar 1 o varias. Puede encontrar la descripción de las propiedades de este parámetros más abajo. | array |
| mqttMethod | Método correspondiente del servicio, en este caso UpdateDeviceStatus | text |
| mqttRID | Identificador opcional para la petición, en caso de que se desee obtener una respuesta de confirmación. | text |
Parámetro array “battery” [#parámetro-array-battery]
En cada uno de los elementos de este array se debe reportar, al menos, “percentage” o “voltage”. Type es obligatorio.
| Name | Description | Data Type |
| ---------- | ------------------------------------------------------------------------------------------------------------------------------------------------------------------------------------------------------------------------------------ | --------- |
| type | Tipo de batería que se está reportando. Los tipos permitidos son:0: Desconocido. Si se envía este valor, se cambiará automáticamente a 11: Por defecto2: Primaria3: Secundaria4: BackupNo se pueden repetir tipos en un mismo array. | number |
| percentage | Valor numérico del porcentaje restante de la batería. | number |
| voltage | Valor numérico del voltaje actual de la batería. | number |
Parámetro array “rssi” [#parámetro-array-rssi]
En cada uno de los elementos de este array se debe reportar, al menos, “quality” o “strength”. Type es obligatorio.
| Name | Description | Data Type |
| -------- | ------------------------------------------------------------------------------------------------------------------------------------------------------------------------------------------------------------------------------------------------------------------------------------------------------------------------- | --------- |
| type | Representa un tipo de tecnología inalámbrica en la que se puede medir RSSI. Los valores permitidos son:0: Desconocido. Si se envía este valor, se cambiará automáticamente a 11: Por defecto2: WiFi3: LoRaWAN4: Cellular (2G/3G/4G/5G/Cat-M/NB-IoT/etc)5: ZigBee6: Custom RFNo se pueden repetir tipos en un mismo array. | number |
| quality | Valor numérico que representa la calidad de la señal. De 0 a 100. Si este valor no es informado, pero el parámetro “strength” si, el valor de este parámetro será auto calculado | number |
| strength | Valor numérico que representa la intensidad de la señal en dBm (negativo). Si el valor informado es positivo, se cambiará su signo. Si este valor no es informado, pero el parámetro “quality” si, el valor de este parámetro será auto calculado. | number |
# Update Device Location
Reportar la ubicación geográfica de un dispositivo [#reportar-la-ubicación-geográfica-de-un-dispositivo]
La actualización de la ubicación del dispositivo por MQTT uses the following structure:
```
{
"accessToken": "xxxxxxxxxxxxxxxxxxxxxxxxxxxxxxxxxxxxxxxx",
"deviceID": 1,
"latitude": 40.4052,
"longitude": -3.87699,
"mqttMethod": "UpdateDeviceGeolocation",
"mqttRID": "tkrs34"
}
```
Parameters [#parameters]
| Name | Description | Data Type |
| ----------- | ------------------------------------------------------------------------------------------------------------------------------------------------------ | --------- |
| accessToken | Access token with permissions to update endpoint information. See this page for more information. | text |
| deviceID | Unique device identifier or device address in format \[deviceAddress] (e.g.: \[device-1234]). These values can be found on the device management page. | number |
| latitude | Indica la latitud de la ubicación actual del dispositivo. | number |
| longitude | Indica la longitud de la ubicación actual del dispositivo. | number |
| mqttMethod | Método correspondiente del servicio, en este caso UpdateDeviceGeolocation. | text |
| mqttRID | Identificador opcional para la petición, en caso de que se desee obtener una respuesta de confirmación. | text |
# Appliances and Other On/Off Devices
Reporting Endpoint Status [#reporting-endpoint-status]
The integration de appliances y otros dispositivos on-off (válvulas, lámparas, motores, etc.) por MQTT uses the following structure:
```
{
"accessToken": "xxxxxxxxxxxxxxxxxxxxxxxxxxxxxxxxxxxxxxxx",
"endpointID": 1,
"isOn": true,
"timestamp": "2021-02-23T14:55:03",
"mqttMethod": "UpdateApplianceStatus",
"mqttRID": "tkrs34"
}
```
Parameters [#parameters]
| Name | Description | Data Type |
| ----------- | ---------------------------------------------------------------------------------------------------------------------------------------------------------------------------------------------------------------------------------------------------------------------------- | --------- |
| accessToken | Access token with permissions to update endpoint information. See this page for more information. | text |
| endpointID | Unique endpoint identifier or combination of device address and endpoint address in format \[deviceAddress]:endpointAddress (e.g.: \[device-1234]:1). These values can be found on the endpoint management page. | text |
| isOn | Indica si el artefacto está encendido (true) o apagado (false) | bool |
| timestamp | Optional value indicating the UTC date and time corresponding to the measurement. The date format must match one of those specified in the date formats section. If the field is omitted, the platform will assume the measurement corresponds to the current date and time. | text |
| mqttMethod | Método correspondiente del servicio, en este caso UpdateApplianceStatus | string |
| mqttRID | Identificador opcional para la petición, en caso de que se desee obtener una respuesta de confirmación. | string |
Reporte de estado en formato "raw" [#reporte-de-estado-en-formato-raw]
El estado del endpoint puede ser reportado como un **valor crudo (raw),** utilizando el [conversor de expresiones](/docs/configuracion-del-cliente/dispositivos-y-endpoints/endpoints/conversion-de-datos-crudos-raw). Esta opción es conveniente cuando el dispositivo no es capaz de realizar conversiones, y emite valores que necesitan ser transformados antes de inyectarse en la plataforma.
A continuación, se muestra un ejemplo de una petición en formato raw:
```
{
"accessToken": "xxxxxxxxxxxxxxxxxxxxxxxxxxxxxxxxxxxxxxxx",
"endpointID": 1,
"rawData": "true",
"timestamp": "2021-02-23T14:55:03",
"mqttMethod": "UpdateApplianceStatusRaw",
"mqttRID": "tkrs34"
}
```
Parameters [#parameters-1]
| Name | Description | Data Type |
| ----------- | ---------------------------------------------------------------------------------------------------------------------------------------------------------------------------------------------------------------------------------------------------------------------------- | --------- |
| accessToken | Access token with permissions to update endpoint information. See this page for more information. | text |
| endpointID | Unique endpoint identifier, which can be found on the endpoint management page. | numeric |
| rawData | Valor reportado por el sensor, como texto. Debe indicarse una expresión en el conversor de expresiones. La expresión debe devolver un valor booleano indicando si el artefacto está encendido (true) o apagado (false). | text |
| timestamp | Optional value indicating the UTC date and time corresponding to the measurement. The date format must match one of those specified in the date formats section. If the field is omitted, the platform will assume the measurement corresponds to the current date and time. | text |
| mqttMethod | Método correspondiente del servicio, en este caso UpdateApplianceStatusRaw | string |
| mqttRID | Identificador opcional para la petición, en caso de que se desee obtener una respuesta de confirmación. | string |
# People Counters
Reporting Endpoint Status [#reporting-endpoint-status]
The integration de sensores de contadores de personas por MQTT uses the following structure:
```
{
"accessToken": "xxxxxxxxxxxxxxxxxxxxxxxxxxxxxxxxxxxxxxxx",
"endpointID": 1,
"peopleCount": 30,
"timestamp": "2021-02-23T14:55:03",
"mqttMethod": "UpdatePeopleCounterStatus",
"mqttRID": "tkrs34"
}
```
Parameters [#parameters]
| Name | Description | Data Type |
| ----------- | ---------------------------------------------------------------------------------------------------------------------------------------------------------------------------------------------------------------------------------------------------------------------------- | --------- |
| accessToken | Access token with permissions to update endpoint information. See this page for more information. | text |
| endpointID | Unique endpoint identifier or combination of device address and endpoint address in format \[deviceAddress]:endpointAddress (e.g.: \[device-1234]:1). These values can be found on the endpoint management page. | text |
| peopleCount | Indica la cantidad de personas detectadas por el sensor. | numeric |
| timestamp | Optional value indicating the UTC date and time corresponding to the measurement. The date format must match one of those specified in the date formats section. If the field is omitted, the platform will assume the measurement corresponds to the current date and time. | text |
| mqttMethod | Método correspondiente del servicio, en este caso UpdatePeopleCounterStatus | string |
| mqttRID | Identificador opcional para la petición, en caso de que se desee obtener una respuesta de confirmación. | string |
Reporte de estado en formato "raw" [#reporte-de-estado-en-formato-raw]
El estado del endpoint puede ser reportado como un **valor crudo (raw),** utilizando el [conversor de expresiones](/docs/configuracion-del-cliente/dispositivos-y-endpoints/endpoints/conversion-de-datos-crudos-raw). Esta opción es conveniente cuando el dispositivo no es capaz de realizar conversiones, y emite valores que necesitan ser transformados antes de inyectarse en la plataforma.
A continuación, se muestra un ejemplo de una petición en formato raw:
```
{
"accessToken": "xxxxxxxxxxxxxxxxxxxxxxxxxxxxxxxxxxxxxxxx",
"endpointID": 1,
"rawData": 30,
"timestamp": "2021-02-23T14:55:03",
"mqttMethod": "UpdatePeopleCounterStatusRaw",
"mqttRID": "tkrs34"
}
```
Parameters [#parameters-1]
| Name | Description | Data Type |
| ----------- | ---------------------------------------------------------------------------------------------------------------------------------------------------------------------------------------------------------------------------------------------------------------------------- | --------- |
| accessToken | Access token with permissions to update endpoint information. See this page for more information. | text |
| endpointID | Unique endpoint identifier, which can be found on the endpoint management page. | numeric |
| rawData | Valor reportado por el sensor, como texto. Debe indicarse una expresión en el conversor de expresiones. La expresión debe devolver un valor numérico indicando la cantidad de personas detectadas por el sensor. | text |
| timestamp | Optional value indicating the UTC date and time corresponding to the measurement. The date format must match one of those specified in the date formats section. If the field is omitted, the platform will assume the measurement corresponds to the current date and time. | text |
| mqttMethod | Método correspondiente del servicio, en este caso UpdatePeopleCounterStatusRaw | string |
| mqttRID | Identificador opcional para la petición, en caso de que se desee obtener una respuesta de confirmación. | string |
# Curtain and Closure Controllers
Reporting Endpoint Status [#reporting-endpoint-status]
The integration por MQTT de controladores de cortinas y otros cerramientos uses the following structure:
```
{
"accessToken": "xxxxxxxxxxxxxxxxxxxxxxxxxxxxxxxxxxxxxxxx",
"endpointID": 1,
"position": 75,
"isMoving": true,
"timestamp": "2021-02-23T14:55:03",
"mqttMethod": "UpdateClosureControllerStatus",
"mqttRID": "tkrs34"
}
```
Parameters [#parameters]
| Name | Description | Data Type |
| ----------- | ---------------------------------------------------------------------------------------------------------------------------------------------------------------------------------------------------------------------------------------------------------------------------- | --------- |
| accessToken | Access token with permissions to update endpoint information. See this page for more information. | text |
| endpointID | Unique endpoint identifier or combination of device address and endpoint address in format \[deviceAddress]:endpointAddress (e.g.: \[device-1234]:1). These values can be found on the endpoint management page. | text |
| position | Indica la posición actual del cerramiento como porcentaje, entre 0 (completamente cerrado) y 100 (completamente abierto). | bool |
| isMoving | Indica si el cerramiento está actualmente en movimiento. El valor true indica que el cerramiento está siendo cerrado o abierto, mientras que el valor false indica que está detenido. | numeric |
| timestamp | Optional value indicating the UTC date and time corresponding to the measurement. The date format must match one of those specified in the date formats section. If the field is omitted, the platform will assume the measurement corresponds to the current date and time. | text |
| mqttMethod | Corresponding method of the service, in this case UpdateClosureControllerStatus | string |
| mqttRID | Optional identifier for the request, in case you want to get a confirmation response. | string |
Reporte de estado en formato "raw" [#reporte-de-estado-en-formato-raw]
El estado del endpoint puede ser reportado como un **valor crudo (raw),** utilizando el [conversor de expresiones](/docs/configuracion-del-cliente/dispositivos-y-endpoints/endpoints/conversion-de-datos-crudos-raw). Esta opción es conveniente cuando el dispositivo no es capaz de realizar conversiones, y emite valores que necesitan ser transformados antes de inyectarse en la plataforma.
A continuación, se muestra un ejemplo de una petición en formato raw:
```
{
"accessToken": "xxxxxxxxxxxxxxxxxxxxxxxxxxxxxxxxxxxxxxxx",
"endpointID": 1,
"rawData": "75,true",
"timestamp": "2021-02-23T14:55:03",
"mqttMethod": "UpdateClosureControllerStatusRaw",
"mqttRID": "tkrs34"
}
```
Parameters [#parameters-1]
| Name | Description | Data Type |
| ----------- | ---------------------------------------------------------------------------------------------------------------------------------------------------------------------------------------------------------------------------------------------------------------------------------------------------------------------------------------------------------------------------------------------------------------------------------------------------------------------------------------------------------------------------------------- | --------- |
| accessToken | Access token with permissions to update endpoint information. See this page for more information. | text |
| endpointID | Unique endpoint identifier, which can be found on the endpoint management page. | numeric |
| rawData | Valor reportado por el sensor, como texto. Deben indicarse dos expresiones en el conversor de expresiones:La primera expresión debe devolver un valor numérico indicando la posición actual del cerramiento como porcentaje, entre 0 (completamente cerrado) y 100 (completamente abierto).La segunda expresión debe devolver un valor booleano indicando si el cerramiento está actualmente en movimiento. El valor true indica que el cerramiento está siendo cerrado o abierto, mientras que el valor false indica que está detenido. | text |
| timestamp | Optional value indicating the UTC date and time corresponding to the measurement. The date format must match one of those specified in the date formats section. If the field is omitted, the platform will assume the measurement corresponds to the current date and time. | text |
| mqttMethod | Corresponding method of the service, in this case UpdateClosureControllerStatusRaw | string |
| mqttRID | Optional identifier for the request, in case you want to get a confirmation response. | string |
# Dimmers
Reporting Endpoint Status [#reporting-endpoint-status]
The integration por MQTT de dimmers y otros dispositivos similares (variadores de velocidad, etc.) uses the following structure:
```
{
"accessToken": "xxxxxxxxxxxxxxxxxxxxxxxxxxxxxxxxxxxxxxxx",
"endpointID": 1,
"isOn": true,
"dimValue"; 75,
"timestamp": "2021-02-23T14:55:03",
"mqttMethod": "UpdateDimmerStatus",
"mqttRID": "tkrs34"
}
```
Parameters [#parameters]
| Name | Description | Data Type |
| ----------- | ---------------------------------------------------------------------------------------------------------------------------------------------------------------------------------------------------------------------------------------------------------------------------- | --------- |
| accessToken | Access token with permissions to update endpoint information. See this page for more information. | text |
| endpointID | Unique endpoint identifier or combination of device address and endpoint address in format \[deviceAddress]:endpointAddress (e.g.: \[device-1234]:1). These values can be found on the endpoint management page. | text |
| isOn | Indica si el artefacto está encendido (true) o apagado (false) | bool |
| dimValue | Indica el nivel de dimerización, como porcentaje entre 1 y 100. | numeric |
| timestamp | Optional value indicating the UTC date and time corresponding to the measurement. The date format must match one of those specified in the date formats section. If the field is omitted, the platform will assume the measurement corresponds to the current date and time. | text |
| mqttMethod | Corresponding method of the service, in this case UpdateDimmerStatus | string |
| mqttRID | Optional identifier for the request, in case you want to get a confirmation response. | string |
Reporte de estado en formato "raw" [#reporte-de-estado-en-formato-raw]
El estado del endpoint puede ser reportado como un **valor crudo (raw),** utilizando el [conversor de expresiones](/docs/configuracion-del-cliente/dispositivos-y-endpoints/endpoints/conversion-de-datos-crudos-raw). Esta opción es conveniente cuando el dispositivo no es capaz de realizar conversiones, y emite valores que necesitan ser transformados antes de inyectarse en la plataforma.
A continuación, se muestra un ejemplo de una petición en formato raw:
```
{
"accessToken": "xxxxxxxxxxxxxxxxxxxxxxxxxxxxxxxxxxxxxxxx",
"endpointID": 1,
"rawData": "true/75",
"timestamp": "2021-02-23T14:55:03",
"mqttMethod": "UpdateDimmerStatusRaw",
"mqttRID": "tkrs34"
}
```
Parameters [#parameters-1]
| Name | Description | Data Type |
| ----------- | -------------------------------------------------------------------------------------------------------------------------------------------------------------------------------------------------------------------------------------------------------------------------------------------------------------------------------------------------------------------- | --------- |
| accessToken | Access token with permissions to update endpoint information. See this page for more information. | text |
| endpointID | Unique endpoint identifier, which can be found on the endpoint management page. | numeric |
| rawData | Valor reportado por el sensor, como texto. Deben indicarse dos expresiones en el conversor de expresiones:La primera expresión debe devolver un valor booleano indicando si el artefacto está encendido (true) o apagado (false).La segunda expresión debe devolver un valor numérico indicando el nivel de dimerización del aparato, como porcentaje entre 1 y 100. | text |
| timestamp | Optional value indicating the UTC date and time corresponding to the measurement. The date format must match one of those specified in the date formats section. If the field is omitted, the platform will assume the measurement corresponds to the current date and time. | text |
| mqttMethod | Corresponding method of the service, in this case UpdateDimmerStatusRaw | string |
| mqttRID | Optional identifier for the request, in case you want to get a confirmation response. | string |
# Frequency Meters
Reporting Frequency in Hertz [#reporting-frequency-in-hertz]
The integration de frecuencímetros por MQTT uses the following structure:
```
{
"accessToken": "xxxxxxxxxxxxxxxxxxxxxxxxxxxxxxxxxxxxxxxx",
"endpointID": 1,
"frequency": 45,
"timestamp": "2021-02-23T14:55:03",
"mqttMethod": "UpdateFrequencySensorStatus",
"mqttRID": "tkrs34"
}
```
Parameters [#parameters]
| Name | Description | Data Type |
| ----------- | ---------------------------------------------------------------------------------------------------------------------------------------------------------------------------------------------------------------------------------------------------------------------------- | --------- |
| accessToken | Access token with permissions to update endpoint information. See this page for more information. | text |
| endpointID | Unique endpoint identifier or combination of device address and endpoint address in format \[deviceAddress]:endpointAddress (e.g.: \[device-1234]:1). These values can be found on the endpoint management page. | text |
| frequency | Frecuencia expresada en Hertz. | numeric |
| timestamp | Optional value indicating the UTC date and time corresponding to the measurement. The date format must match one of those specified in the date formats section. If the field is omitted, the platform will assume the measurement corresponds to the current date and time. | text |
| mqttMethod | Método correspondiente del servicio, en este caso UpdateFrequencySensorStatus | string |
| mqttRID | Identificador opcional para la petición, en caso de que se desee obtener una respuesta de confirmación. | string |
Reporte de frecuencia en formato "raw" [#reporte-de-frecuencia-en-formato-raw]
La frecuencia puede ser reportada como un **valor crudo (raw),** utilizando el [conversor de expresiones](/docs/configuracion-del-cliente/dispositivos-y-endpoints/endpoints/conversion-de-datos-crudos-raw). Esta opción es conveniente cuando el dispositivo no es capaz de realizar conversiones, y emite valores que necesitan ser transformados antes de inyectarse en la plataforma.
A continuación, se muestra un ejemplo de una petición en formato raw:
```
{
"accessToken": "xxxxxxxxxxxxxxxxxxxxxxxxxxxxxxxxxxxxxxxx",
"endpointID": 1,
"rawData": "45",
"timestamp": "2021-02-23T14:55:03",
"mqttMethod": "UpdateFrequencySensorStatusRaw",
"mqttRID": "tkrs34"
}
```
Parameters [#parameters-1]
| Name | Description | Data Type |
| ----------- | ---------------------------------------------------------------------------------------------------------------------------------------------------------------------------------------------------------------------------------------------------------------------------- | --------- |
| accessToken | Access token with permissions to update endpoint information. See this page for more information. | text |
| endpointID | Unique endpoint identifier, which can be found on the endpoint management page. | numeric |
| rawData | Valor reportado por el sensor, como texto. Debe indicarse una expresión en el conversor de expresiones. La expresión debe devolver un valor numérico indicando la frecuencia, expresada en Hertz. | text |
| timestamp | Optional value indicating the UTC date and time corresponding to the measurement. The date format must match one of those specified in the date formats section. If the field is omitted, the platform will assume the measurement corresponds to the current date and time. | text |
| mqttMethod | Método correspondiente del servicio, en este caso UpdateFrequencySensorStatusRaw | string |
| mqttRID | Identificador opcional para la petición, en caso de que se desee obtener una respuesta de confirmación. | string |
# HVAC / Thermostats
Reporting Endpoint Status [#reporting-endpoint-status]
The integration de sensores de contadores de personas por MQTT uses the following structure:
```
{
"accessToken": "xxxxxxxxxxxxxxxxxxxxxxxxxxxxxxxxxxxxxxxx",
"endpointID": 1,
"mode": 4,
"fanMode": 1,
"setpoint": 21,
"ambientTemperature": 21.5,
"timestamp": "2021-02-23T14:55:03",
"mqttMethod": "UpdateHVACStatus",
"mqttRID": "tkrs34"
}
```
Parameters [#parameters]
| Name | Description | Data Type |
| ------------------ | --------------------------------------------------------------------------------------------------------------------------------------------------------------------------------------------------------------------------------------------------------------------------------------------------------------------------- | --------- |
| accessToken | Access token with permissions to update endpoint information. See this page for more information. | text |
| endpointID | Unique endpoint identifier or combination of device address and endpoint address in format \[deviceAddress]:endpointAddress (e.g.: \[device-1234]:1). These values can be found on the endpoint management page. | text |
| mode | Modo actual del dispositivo:1: el dispositivo está apagado.2: el dispositivo está encendido en modo automático.3: el dispositivo está encendido en modo calor.4: el dispositivo está encendido en modo frío.5: el dispositivo está encendido en modo deshumidificación.6: el dispositivo está encendido en modo ventilador. | numeric |
| fanMode | Modo actual del ventilador:1: el ventilador está en modo automático.2: el ventilador está en velocidad baja.3: el ventilador está en velocidad media.4: el ventilador está en velocidad alta. | numeric |
| setpoint | Indica el valor de temperatura deseado, en grados Celsius. | numeric |
| ambientTemperature | Indica el valor de la temperatura ambiente, en grados Celsius. | numeric |
| timestamp | Optional value indicating the UTC date and time corresponding to the measurement. The date format must match one of those specified in the date formats section. If the field is omitted, the platform will assume the measurement corresponds to the current date and time. | text |
| mqttMethod | Método correspondiente del servicio, en este caso UpdateHVACStatus | string |
| mqttRID | Identificador opcional para la petición, en caso de que se desee obtener una respuesta de confirmación. | string |
# HTTP Bridge
Introduction [#introduction]
The HTTP bridge is a feature of the Gear Studio platform that allows device integration using the HTTP API through MQTT. This makes it possible to migrate devices that use the HTTP interface to use MQTT instead, with minimal changes.
**Important**: The HTTP bridge is primarily designed for migrating devices from HTTP to MQTT, but for new devices, it is recommended to use [flexible data exchange](/docs/configuracion-del-cliente/dispositivos-y-endpoints/dispositivos/integracion-de-dispositivos/mqtt/intercambio-de-datos-flexible), which can be found [here](/docs/configuracion-del-cliente/dispositivos-y-endpoints/dispositivos/integracion-de-dispositivos/mqtt/intercambio-de-datos-flexible). Flexible data exchange allows representing data with much more flexibility, and generally in a more compact form.
Requests [#requests]
To send a request through the HTTP bridge, the following topic structure must be used:
**\{client-secure-id}/HttpApi/DeviceIntegration**
Where client-secure-id is the username used in the connection. The topic structure includes the user ID as the first element, since each user only has permission for topics that start with that ID.
Each request must contain a JSON message, whose structure depends on the message type. However, some fields are common to all message types:
* **accessToken**: this field indicates the access token that must be used to authenticate and authorize the request.
* **mqttMethod**: this field indicates the request type. For example, to report a temperature value, the value "UpdateTemperatureSensorStatus" is used.
* **mqttRID**: this is an optional field that can take any value, typically chosen at random. If this field is provided, the platform will automatically generate a response to the sent command and include the same mqttRID in that response, allowing the client to link the response with the original request.
Optionally, a response subtopic can be specified by concatenating a slash and a value at the beginning of the mqttRID. That is, **\{subtopic}/\{random value}**
For example, using the subtopic **/device1** and the RID **1238j9**. The complete mqttRID would be **device1/1238j9**
Simple and Multiple Requests [#simple-and-multiple-requests]
Simple Requests [#simple-requests]
Simple requests allow sending a single piece of data at a time to the platform. They are generally used to report the status of a single endpoint.
**Simple request example:**
```
{
"accessToken": "xxxxxxxxxxxxxxxxxxxxxxxxxxxxxxxxxxxxxxxx",
"endpointID": 1,
"temperatureCelsius": 25,
"timestamp": "2021-02-23T14:55:03",
"mqttMethod": "UpdateTemperatureSensorStatus",
"mqttRID": "RXmp123"
}
```
Multiple Requests (Arrays) [#multiple-requests-arrays]
Multiple requests allow sending several pieces of data in a single MQTT message. JSON array syntax is used, with brackets at the beginning and end, containing the data separated by commas. Multiple requests are normally used to report the status of multiple endpoints in a single message. They are also useful for a device to send data that was stored during a period without communication. In any case, the data can include different endpoints from the same device, or even endpoints from different devices.
**Multiple request example:**
```
[
{
"accessToken": "xxxxxxxxxxxxxxxxxxxxxxxxxxxxxxxxxxxxxxxx",
"endpointID": 1,
"temperatureCelsius": 25,
"timestamp": "2021-02-23T14:55:03",
"mqttMethod": "UpdateTemperatureSensorStatus",
"mqttRID": "RXmp123"
},
{
"accessToken": "xxxxxxxxxxxxxxxxxxxxxxxxxxxxxxxxxxxxxxxx",
"endpointID": 2,
"humidityPercentage": 30,
"timestamp": "2021-02-23T15:55:03",
"mqttMethod": "UpdateHumiditySensorStatus",
"mqttRID": "xQzt395"
}
]
```
Responses [#responses]
If a value is provided in the **mqttRID** field, the platform will create a response message in the topic
**\{client-secure-id}/HttpApi/DeviceIntegrationResponse**
If a **subtopic** is concatenated at the beginning of the **mqttRID**, it will be appended to the response topic:
**\{client-secure-id}/HttpApi/DeviceIntegrationResponse/\{subtopic}**
This allows knowing the final status of the request and optionally obtaining response information if the command requires it.
The response payload typically has the following format:
```
{
"mqttRID":"RXmp123",
"mqttStatus":200,
"mqttData":"{}"
}
```
| Name | Description | Type |
| ---------- | ---------------------------------------------------------------------------------------------------------------------------------------------------------------- | ------- |
| mqttRID | Unique identifier for each request | string |
| mqttStatus | Returns the server status code (200, 500, 400, etc). If the request executed successfully, it will be 200. In case of error, it can return any code (400 or 500) | integer |
| mqttData | The body of the server response. It is a string containing JSON. | string |
Integration by Sensor Type [#integration-by-sensor-type]
[Temperature Sensors](/docs/configuracion-del-cliente/dispositivos-y-endpoints/dispositivos/integracion-de-dispositivos/mqtt/puente-http/sensores-de-temperatura)
[Humidity Sensors](/docs/configuracion-del-cliente/dispositivos-y-endpoints/dispositivos/integracion-de-dispositivos/mqtt/puente-http/sensores-de-humedad)
[Light Level Sensors](/docs/configuracion-del-cliente/dispositivos-y-endpoints/dispositivos/integracion-de-dispositivos/mqtt/puente-http/sensores-de-nivel-de-iluminacion)
[Weight Sensors](/docs/configuracion-del-cliente/dispositivos-y-endpoints/dispositivos/integracion-de-dispositivos/mqtt/puente-http/sensores-de-peso)
[Volume Sensors](/docs/configuracion-del-cliente/dispositivos-y-endpoints/dispositivos/integracion-de-dispositivos/mqtt/puente-http/sensores-de-volumen)
[Pressure Sensors](/docs/configuracion-del-cliente/dispositivos-y-endpoints/dispositivos/integracion-de-dispositivos/mqtt/puente-http/sensores-de-presion)
[IAS Sensors (Motion, Occupancy, and Binary Sensors)](/docs/configuracion-del-cliente/dispositivos-y-endpoints/dispositivos/integracion-de-dispositivos/mqtt/puente-http/sensores-ias-movimiento-ocupacion-y-sensores-binarios)
[Voltage Sensors](/docs/configuracion-del-cliente/dispositivos-y-endpoints/dispositivos/integracion-de-dispositivos/mqtt/puente-http/sensores-de-voltaje)
[Current Sensors](/docs/configuracion-del-cliente/dispositivos-y-endpoints/dispositivos/integracion-de-dispositivos/mqtt/puente-http/sensores-de-corriente)
[Active Power Sensors](/docs/configuracion-del-cliente/dispositivos-y-endpoints/dispositivos/integracion-de-dispositivos/mqtt/puente-http/sensores-de-potencia-activa)
[Reactive Power Sensors](/docs/configuracion-del-cliente/dispositivos-y-endpoints/dispositivos/integracion-de-dispositivos/mqtt/puente-http/sensores-de-potencia-reactiva)
[Apparent Power Sensors](/docs/configuracion-del-cliente/dispositivos-y-endpoints/dispositivos/integracion-de-dispositivos/mqtt/puente-http/sensores-de-potencia-aparente)
[Cos Phi Sensors](/docs/configuracion-del-cliente/dispositivos-y-endpoints/dispositivos/integracion-de-dispositivos/mqtt/puente-http/sensores-de-coseno-fi)
[Frequency Meters](/docs/configuracion-del-cliente/dispositivos-y-endpoints/dispositivos/integracion-de-dispositivos/mqtt/puente-http/frecuencimetros)
[Energy Consumption Sensors](/docs/configuracion-del-cliente/dispositivos-y-endpoints/dispositivos/integracion-de-dispositivos/mqtt/puente-http/sensores-de-consumo-de-energia)
[Flow Sensors](/docs/configuracion-del-cliente/dispositivos-y-endpoints/dispositivos/integracion-de-dispositivos/mqtt/puente-http/sensores-de-flujo)
[Generic Sensors](/docs/configuracion-del-cliente/dispositivos-y-endpoints/dispositivos/integracion-de-dispositivos/mqtt/puente-http/sensores-genericos)
[Generic Flow Sensors](/docs/configuracion-del-cliente/dispositivos-y-endpoints/dispositivos/integracion-de-dispositivos/mqtt/puente-http/sensores-genericos-de-flujo)
[Appliances and Other On/Off Devices](/docs/configuracion-del-cliente/dispositivos-y-endpoints/dispositivos/integracion-de-dispositivos/mqtt/puente-http/appliances-y-otros-dispositivos-on-off)
[Dimmers](/docs/configuracion-del-cliente/dispositivos-y-endpoints/dispositivos/integracion-de-dispositivos/mqtt/puente-http/dimmers)
[Curtain and Closure Controllers](/docs/configuracion-del-cliente/dispositivos-y-endpoints/dispositivos/integracion-de-dispositivos/mqtt/puente-http/controladores-de-cortinas-y-cerramientos)
[Run-time Meters (Hour Meters)](/docs/configuracion-del-cliente/dispositivos-y-endpoints/dispositivos/integracion-de-dispositivos/mqtt/puente-http/run-time-meters-horometros)
[Location Trackers](/docs/configuracion-del-cliente/dispositivos-y-endpoints/dispositivos/integracion-de-dispositivos/mqtt/puente-http/rastreadores-de-ubicacion)
[PPM Concentration Sensors](/docs/configuracion-del-cliente/dispositivos-y-endpoints/dispositivos/integracion-de-dispositivos/mqtt/puente-http/sensores-de-concentracion-ppm)
[Mass/Volume Concentration Sensors](/docs/configuracion-del-cliente/dispositivos-y-endpoints/dispositivos/integracion-de-dispositivos/mqtt/puente-http/sensores-de-concentracion-masavolumen)
[Air Quality Sensors (AQI)](/docs/configuracion-del-cliente/dispositivos-y-endpoints/dispositivos/integracion-de-dispositivos/mqtt/puente-http/sensores-de-calidad-de-aire-aqi)
[People Flow Sensors](/docs/configuracion-del-cliente/dispositivos-y-endpoints/dispositivos/integracion-de-dispositivos/mqtt/puente-http/sensores-de-flujo-de-personas)
[People Counters](/docs/configuracion-del-cliente/dispositivos-y-endpoints/dispositivos/integracion-de-dispositivos/mqtt/puente-http/contadores-de-personas)
Commands [#commands]
[Receiving Commands](/docs/configuracion-del-cliente/dispositivos-y-endpoints/dispositivos/integracion-de-dispositivos/mqtt/puente-http/recibir-comandos)
# Location Trackers
Reporting Endpoint Status [#reporting-endpoint-status]
The integration por MQTT de rastreadores de ubicación uses the following structure:
```
{
"accessToken": "xxxxxxxxxxxxxxxxxxxxxxxxxxxxxxxxxxxxxxxx",
"endpointID": 1,
"latitude": -13.9957594,
"longitude": 48.9339384,
"flags": 0,
"timestamp": "2021-02-23T14:55:03"
"mqttMethod": "UpdateLocationTrackerStatus",
"mqttRID": "tkrs34"
}
```
Parameters [#parameters]
| Name | Description | Data Type |
| ----------- | ----------------------------------------------------------------------------------------------------------------------------------------------------------------------------------------------------------------------------------------------------------------------------------------------------------------------------------------------------------------------------------------------------------------------------------------------------------------------------------------------------------------------------------------------------------------------- | --------- |
| accessToken | Access token with permissions to update endpoint information. See this page for more information. | text |
| endpointID | Unique endpoint identifier or combination of device address and endpoint address in format \[deviceAddress]:endpointAddress (e.g.: \[device-1234]:1). These values can be found on the endpoint management page. | text |
| latitude | Indica la latitud. El valor debe ser entre -90 y 90. El separador para los decimales es el punto | numeric |
| longitude | Indica la longitud. El valor debe ser entre -180 y 180. El separador para los decimales es el punto | numeric |
| flags | Indica información extra para la posición. Es un valor entero que representa una suma bit a bit. Los estados disponibles son: 0 = Nada en especial1 = La posición del sensor está cambiando2 = El sensor no puede adquirir la posición4 = El sensor no funciona correctamente. La posición informada puede ser incorrecta8 = La posición informada tiene baja precisiónLos valores pueden combinarse a través de la operación OR. Por ejemplo, para indicar que la posición informada tiene baja precisión, y la posición está cambiando, debe utilizarse (8 OR 1) = 9. | numeric |
| timestamp | Optional value indicating the UTC date and time corresponding to the measurement. The date format must match one of those specified in the date formats section. If the field is omitted, the platform will assume the measurement corresponds to the current date and time. | text |
| mqttMethod | Método correspondiente del servicio, en este caso UpdateLocationTrackerStatus | string |
| mqttRID | Identificador opcional para la petición, en caso de que se desee obtener una respuesta de confirmación. | string |
Reporte de estado en formato "raw" [#reporte-de-estado-en-formato-raw]
El estado del endpoint puede ser reportado como un **valor crudo (raw),** utilizando el [conversor de expresiones](/docs/configuracion-del-cliente/dispositivos-y-endpoints/endpoints/conversion-de-datos-crudos-raw). Esta opción es conveniente cuando el dispositivo no es capaz de realizar conversiones, y emite valores que necesitan ser transformados antes de inyectarse en la plataforma.
A continuación, se muestra un ejemplo de una petición en formato raw:
```
{
"accessToken": "xxxxxxxxxxxxxxxxxxxxxxxxxxxxxxxxxxxxxxxx",
"endpointID": 1,
"rawData": "-13.9957594,48.933938,0",
"timestamp": "2021-02-23T14:55:03"
"mqttMethod": "UpdateLocationTrackerStatusRaw",
"mqttRID": "RXmp123"
}
```
Parameters [#parameters-1]
| Name | Description | Data Type |
| ----------- | ------------------------------------------------------------------------------------------------------------------------------------------------------------------------------------------------------------------------------------------------------------------------------------------------------------------------------------------------------------------------------------------------------------------------------------------------------------------------------------------------------------------------------------------------------------------------------------------------------------------------------------------------------------------------------------------------------------------------------------------------------------------------------------------------------------------------------------------------------------------------------------------------------------------------------------------------------------------------------------------------------------------------------------------------------- | --------- |
| accessToken | Access token with permissions to update endpoint information. See this page for more information. | text |
| endpointID | Unique endpoint identifier, which can be found on the endpoint management page. | numeric |
| rawData | Valor reportado por el sensor, como texto. Deben indicarse dos expresiones en el conversor de expresiones:La primera expresión debe devolver un valor numérico indicando la longitud. El valor debe ser entre -90 y 90. El separador para los decimales es el puntoLa segunda expresión debe devolver un valor numérico indicando la longitud. El valor debe ser entre -180 y 180. El separador para los decimales es el puntoLa tercera expresión debe devolver un valor entero indicando detalles de la posición (flags). Es un valor entero que representa una suma bit a bit. Los estados disponibles son:0 = Nada en especial1 = La posición del sensor está cambiando2 = El sensor no puede adquirir la posición4 = El sensor no funciona correctamente. La posición informada puede ser incorrecta8 = La posición informada tiene baja precisiónLos valores pueden combinarse a través de la operación OR. Por ejemplo, para indicar que la posición informada tiene baja precisión, y la posición está cambiando, debe utilizarse (8 OR 1) = 9. | text |
| timestamp | Optional value indicating the UTC date and time corresponding to the measurement. The date format must match one of those specified in the date formats section. If the field is omitted, the platform will assume the measurement corresponds to the current date and time. | text |
| mqttMethod | Método correspondiente del servicio, en este caso UpdateLocationTrackerStatusRaw | string |
| mqttRID | Identificador opcional para la petición, en caso de que se desee obtener una respuesta de confirmación. | string |
# Receiving Commands
Comandos [#comandos]
Flujo básico de integración de comandos [#flujo-básico-de-integración-de-comandos]

El gateway, dispositivo o endpoint deberá estar escuchando por comandos suscribiendose al siguiente topic:\
`**{client-secure-id}/commands/requests/{device-address}**`
* **cliente-secure-id:** es el usuario utilizado en la conexión. La estructura de topics incluye el id de usuario como primer elemento, dado que cada usuario tiene permiso únicamente para los topics que comiencen con ese ID.
* **device-address**: Es el ingresado en el campo “address” al crear el dispositivo.
Esta respuesta deberá ser interpretada por el dispositivo, realizar las acciones correspondientes y responder a través del método de respuesta de comandos para informar si la ejecución del mismo fue correcta o no.
En caso de ser correcta, se deberá ejecutar el método para actualizar el estado del dispositivo según corresponda.
Por último, asegurarse de seguir escuchando comandos con el primer método mencionado.
1. Esperar por comandos [#1-esperar-por-comandos]
Para que un dispositivo esté escuchando por comandos debe suscribirse al topic: `{client-secure-id}/commands/requests/{device-address}`
* **cliente-secure-id:** es el usuario utilizado en la conexión. La estructura de topics incluye el id de usuario como primer elemento, dado que cada usuario tiene permiso únicamente para los topics que comiencen con ese ID. Este valor se puede consultar en la sección de [seguridad > configuración MQTT](https://gear.cloud.studio/gear/manager/master-tables/mqtt-configuration)
* **device-address**: Es el ingresado en el campo “address” al crear el dispositivo. Si es un dispositivo ya creado, este valor se puede obtener desde el [listado](https://gear.cloud.studio/gear/manager/master-tables/endpoints):

**Respuesta**
La respuesta es una lista dentro de la propiedad `WaitForCommand_EndpointResult` que tendrá cada uno de los comandos correspondientes:
```
{
"Closure":null,
"CommandID":1120907993,
"CommandType":1,
"Custom":null,
"DeviceID":7246,
"Dimmer":null,
"EndpointID":113139,
"Management":null,
"OnOff":{
"AutomaticOverrideMinutes":0,
"CommandType":0
},
"Thermostat":null
}
```
Para mas información acerca de las propiedades de la respuesta [ver la documentación](https://www.cloud.studio/developers/gear/api/html/T_CloudStudio_Services_Types_DeviceCommand.htm)
Según el tipo de comando que se haya ejecutado, se deberá tener en cuenta la propiedad correspondiente para conocer la acción a realizar.
Por ejemplo, si el `CommandType` es 1, quiere decir que es un comando para un endpoint tipo "Appliance". Por lo que se deberá tener en cuenta lo que se informe en la propiedad `OnOff`
Los distintos command types se pueden [ver en esta documentación](https://www.cloud.studio/developers/gear/api/html/T_CloudStudio_Services_Types_DeviceCommandType.htm).
2. Responder un comando [#2-responder-un-comando]
En caso de haber recibido un comando y luego de ejecutar las acciones correspondientes en el dispositivo(hardware) se deberá responder el comando ya sea en caso de éxito o error.
Para informar que el comando ha sido ejecutado, se debe hacer un publish al topic `{client-secure-id}/HttpApi/DeviceIntegration` con el siguiente payload:
```
{
"accessToken":"xxxxxxxxxxxxxxxxxxxxxxxxxxxxxxxxxxxxxxxx",
"mqttMethod":"RespondCommand",
"mqttRID":"c392",
"response":{
"CommandID":1120907993,
"ResponseType":0,
"ResponseData":"ok",
"ErrorCode":"1",
"ErrorMessage":""
}
}
```
Descripción de los campos del payload:
| Name | Description | Data Type |
| ----------- | ------------------------------------------------------------------------------------------------------- | --------- |
| accessToken | Access token with permissions to update endpoint information. See this page for more information. | text |
| mqttMethod | Método correspondiente del servicio. Para comandos debe ser siempre RespondCommand | string |
| mqttRID | Identificador opcional para la petición, en caso de que se desee obtener una respuesta de confirmación. | string |
| response | Objeto con la respuesta del comando | object |
Descripción de los campos del sub objeto “response”:
| Name | Description | Data Type |
| ------------ | ----------------------------------------------------------------------------------------------------------------- | --------- |
| CommandID | Debe corresponder al obtenido en la suscripción del topic \{client-secure-id}/HttpApi/DeviceIntegration (paso 1). | integer |
| ResponseType | Debe ser alguno de los del enum, según corresponda. En este caso es 0, que significa "success". | integer |
| ResponseData | Texto informativo acerca del comando | string |
| ErrorCode | Código de error, solo válido si ResponseType es Error. | string |
| ErrorMessage | Mensaje de error, solo válido si ResponseType es Error. | string |
Para mas información acerca del objeto “response” [ver la documentación](https://www.cloud.studio/developers/gear/api/html/T_CloudStudio_Services_Types_DeviceCommandResponse.htm).
3. Actualizar estado del endpoint [#3-actualizar-estado-del-endpoint]
En caso de que la ejecución del comando haya sido exitosa, se deberá informar el nuevo estado del endpoint. Para esto se deberá utilizar el [método correspondiente](/docs/configuracion-del-cliente/dispositivos-y-endpoints/dispositivos/integracion-de-dispositivos/mqtt) al tipo de endpoint (ver “Integración por tipo de sensor”).
Siguiendo el ejemplo de appliance, se debe hacer un publish al topic `{client-secure-id}/HttpApi/DeviceIntegration` con el siguiente payload:
```
{
"accessToken": "xxxxxxxxxxxxxxxxxxxxxxxxxxxxxxxxxxxxxxxx",
"endpointID": 113139,
"isOn": true,
"mqttMethod": "UpdateApplianceStatus",
"mqttRID": "tkrs34"
}
```
Para más información acerca de este método ver la sección de [artefactos on/off](/docs/configuracion-del-cliente/dispositivos-y-endpoints/dispositivos/integracion-de-dispositivos/mqtt/puente-http/appliances-y-otros-dispositivos-on-off)
# Run-time Meters (Hour Meters)
> The integration de run-time meters utiliza la misma API que los sensores de flujo no-genéricos. La única diferencia es que los run time meters deben informar el flujo de tiempo **en segundos**.
Reporte de tiempo acumulado en segundos [#reporte-de-tiempo-acumulado-en-segundos]
The integration de run time meters por MQTT lleva la siguiente estructura, que es idéntica a la de cualquier sensor de flujo:
```
{
"accessToken": "xxxxxxxxxxxxxxxxxxxxxxxxxxxxxxxxxxxxxxxx",
"endpointID": 1,
"summationValue": 112685,
"timestamp": "2021-02-23T14:55:03",
"mqttMethod": "UpdateFlowSensorValueSummation",
"mqttRID": "tkrs34"
}
```
Parameters [#parameters]
| Name | Description | Data Type |
| -------------- | ---------------------------------------------------------------------------------------------------------------------------------------------------------------------------------------------------------------------------------------------------------------------------- | --------- |
| accessToken | Access token with permissions to update endpoint information. See this page for more information. | text |
| endpointID | Unique endpoint identifier or combination of device address and endpoint address in format \[deviceAddress]:endpointAddress (e.g.: \[device-1234]:1). These values can be found on the endpoint management page. | text |
| summationValue | Valor acumulado de tiempo informado por el sensor, expresado en segundos. | numeric |
| timestamp | Optional value indicating the UTC date and time corresponding to the measurement. The date format must match one of those specified in the date formats section. If the field is omitted, the platform will assume the measurement corresponds to the current date and time. | text |
| mqttMethod | Corresponding method of the service, in this case UpdateFlowSensorValueSummation | string |
| mqttRID | Optional identifier for the request, in case you want to get a confirmation response. | string |
Reporte de tiempo acumulado en formato "raw" [#reporte-de-tiempo-acumulado-en-formato-raw]
El tiempo acumulado puede ser reportado como un **valor crudo (raw),** utilizando el [conversor de expresiones](/docs/configuracion-del-cliente/dispositivos-y-endpoints/endpoints/conversion-de-datos-crudos-raw). Esta opción es conveniente cuando el dispositivo no es capaz de realizar conversiones, y emite valores que necesitan ser transformados antes de inyectarse en la plataforma.
A continuación, se muestra un ejemplo de una petición en formato raw:
```
{
"accessToken": "xxxxxxxxxxxxxxxxxxxxxxxxxxxxxxxxxxxxxxxx",
"endpointID": 1,
"rawData": "112685",
"timestamp": "2021-02-23T14:55:03",
"mqttMethod": "UpdateFlowSensorValueSummationRaw",
"mqttRID": "tkrs34"
}
```
Parameters [#parameters-1]
| Name | Description | Data Type |
| ----------- | ---------------------------------------------------------------------------------------------------------------------------------------------------------------------------------------------------------------------------------------------------------------------------- | --------- |
| accessToken | Access token with permissions to update endpoint information. See this page for more information. | text |
| endpointID | Unique endpoint identifier, which can be found on the endpoint management page. | numeric |
| rawData | Valor reportado por el sensor, como texto. Debe indicarse una expresión en el conversor de expresiones. La expresión debe devolver un valor numérico indicando el tiempo acumulado informado por el sensor, expresado en segundos. | text |
| timestamp | Optional value indicating the UTC date and time corresponding to the measurement. The date format must match one of those specified in the date formats section. If the field is omitted, the platform will assume the measurement corresponds to the current date and time. | text |
| mqttMethod | Corresponding method of the service, in this case UpdateFlowSensorValueSummationRaw | string |
| mqttRID | Optional identifier for the request, in case you want to get a confirmation response. | string |
# Air Quality Sensors (AQI)
Reporting Endpoint Status [#reporting-endpoint-status]
The integration de sensores de calidad de aire (AQI) por MQTT uses the following structure:
```
{
"accessToken": "xxxxxxxxxxxxxxxxxxxxxxxxxxxxxxxxxxxxxxxx",
"endpointID": 1,
"index": 500,
"timestamp": "2021-02-23T14:55:03",
"mqttMethod": "UpdateAirQualitySensorStatus",
"mqttRID": "tkrs34"
}
```
Parameters [#parameters]
| Name | Description | Data Type |
| ----------- | ---------------------------------------------------------------------------------------------------------------------------------------------------------------------------------------------------------------------------------------------------------------------------- | --------- |
| accessToken | Access token with permissions to update endpoint information. See this page for more information. | text |
| endpointID | Unique endpoint identifier or combination of device address and endpoint address in format \[deviceAddress]:endpointAddress (e.g.: \[device-1234]:1). These values can be found on the endpoint management page. | text |
| index | Indica el valor del índice de calidad del aire, el valor deber ser entre 0 a 500, expresada en AQI:0-50: Buena51-100: Moderada101-150: Insalubre para grupos sensibles151-200: Insalubre201-300: Muy insalubre301-500: Peligrosa | numeric |
| timestamp | Optional value indicating the UTC date and time corresponding to the measurement. The date format must match one of those specified in the date formats section. If the field is omitted, the platform will assume the measurement corresponds to the current date and time. | text |
| mqttMethod | Método correspondiente del servicio, en este caso UpdateAirQualitySensorStatus | string |
| mqttRID | Identificador opcional para la petición, en caso de que se desee obtener una respuesta de confirmación. | string |
Reporte de estado en formato "raw" [#reporte-de-estado-en-formato-raw]
El estado del endpoint puede ser reportado como un **valor crudo (raw),** utilizando el [conversor de expresiones](/docs/configuracion-del-cliente/dispositivos-y-endpoints/endpoints/conversion-de-datos-crudos-raw). Esta opción es conveniente cuando el dispositivo no es capaz de realizar conversiones, y emite valores que necesitan ser transformados antes de inyectarse en la plataforma.
A continuación, se muestra un ejemplo de una petición en formato raw:
```
{
"accessToken": "xxxxxxxxxxxxxxxxxxxxxxxxxxxxxxxxxxxxxxxx",
"endpointID": 1,
"rawData": "500",
"timestamp": "2021-02-23T14:55:03",
"mqttMethod": "UpdateAirQualitySensorStatusRaw",
"mqttRID": "RXmp123"
}
```
Parameters [#parameters-1]
| Name | Description | Data Type |
| ----------- | -------------------------------------------------------------------------------------------------------------------------------------------------------------------------------------------------------------------------------------------------------------------------------------------------------------------------------------------------- | --------- |
| accessToken | Access token with permissions to update endpoint information. See this page for more information. | text |
| endpointID | Unique endpoint identifier, which can be found on the endpoint management page. | numeric |
| rawData | Valor reportado por el sensor, como texto. Debe indicarse una expresión en el conversor de expresiones. La expresión debe devolver un valor numérico indicando la calidad del aire (entre 0 a 500), expresada en AQI.0-50: Buena51-100: Moderada101-150: Insalubre para grupos sensibles151-200: Insalubre201-300: Muy insalubre301-500: Peligrosa | text |
| timestamp | Optional value indicating the UTC date and time corresponding to the measurement. The date format must match one of those specified in the date formats section. If the field is omitted, the platform will assume the measurement corresponds to the current date and time. | text |
| mqttMethod | Método correspondiente del servicio, en este caso UpdateAirQualitySensorStatusRaw | string |
| mqttRID | Identificador opcional para la petición, en caso de que se desee obtener una respuesta de confirmación. | string |
# Mass/Volume Concentration Sensors
Reporting Endpoint Status [#reporting-endpoint-status]
The integration de sensores de concentración (masa/volumen) por MQTT uses the following structure:
```
{
"accessToken": "xxxxxxxxxxxxxxxxxxxxxxxxxxxxxxxxxxxxxxxx",
"endpointID": 1,
"concentration": 17.9,
"timestamp": "2021-02-23T14:55:03",
"mqttMethod": "UpdateConcentrationSensorStatus",
"mqttRID": "tkrs34"
}
```
Parameters [#parameters]
| Name | Description | Data Type |
| ------------- | ---------------------------------------------------------------------------------------------------------------------------------------------------------------------------------------------------------------------------------------------------------------------------- | --------- |
| accessToken | Access token with permissions to update endpoint information. See this page for more information. | text |
| endpointID | Unique endpoint identifier or combination of device address and endpoint address in format \[deviceAddress]:endpointAddress (e.g.: \[device-1234]:1). These values can be found on the endpoint management page. | text |
| concentration | Indica la concentración de materia (masa/volumen), expresada en microgramos/metro cúbico (μg/m³). El separador para los decimales es el punto. | numeric |
| timestamp | Optional value indicating the UTC date and time corresponding to the measurement. The date format must match one of those specified in the date formats section. If the field is omitted, the platform will assume the measurement corresponds to the current date and time. | text |
| mqttMethod | Método correspondiente del servicio, en este caso UpdateConcentrationSensorStatus | string |
| mqttRID | Identificador opcional para la petición, en caso de que se desee obtener una respuesta de confirmación. | string |
Reporte de estado en formato "raw" [#reporte-de-estado-en-formato-raw]
La concentración puede ser reportada como un **valor crudo (raw),** utilizando el [conversor de expresiones](/docs/configuracion-del-cliente/dispositivos-y-endpoints/endpoints/conversion-de-datos-crudos-raw). Esta opción es conveniente cuando el dispositivo no es capaz de realizar conversiones, y emite valores que necesitan ser transformados antes de inyectarse en la plataforma.
A continuación, se muestra un ejemplo de una petición en formato raw:
```
{
"accessToken": "xxxxxxxxxxxxxxxxxxxxxxxxxxxxxxxxxxxxxxxx",
"endpointID": 1,
"rawData": "17.9",
"timestamp": "2021-02-23T14:55:03",
"mqttMethod": "UpdateConcentrationSensorStatusRaw",
"mqttRID": "RXmp123"
}
```
Parameters [#parameters-1]
| Name | Description | Data Type |
| ----------- | ---------------------------------------------------------------------------------------------------------------------------------------------------------------------------------------------------------------------------------------------------------------------------- | --------- |
| accessToken | Access token with permissions to update endpoint information. See this page for more information. | text |
| endpointID | Unique endpoint identifier, which can be found on the endpoint management page. | numeric |
| rawData | Valor reportado por el sensor, como texto. Debe indicarse una expresión en el conversor de expresiones. La expresión debe devolver un valor numérico indicando la concentración de materia (masa/volumen), expresada en microgramos/metro cúbico (μg/m³). | text |
| timestamp | Optional value indicating the UTC date and time corresponding to the measurement. The date format must match one of those specified in the date formats section. If the field is omitted, the platform will assume the measurement corresponds to the current date and time. | text |
| mqttMethod | Método correspondiente del servicio, en este caso UpdateConcentrationSensorStatusRaw | string |
| mqttRID | Identificador opcional para la petición, en caso de que se desee obtener una respuesta de confirmación. | string |
# PPM Concentration Sensors
Reporting Endpoint Status [#reporting-endpoint-status]
The integration de sensores de concentración (ppm) por MQTT uses the following structure:
```
{
"accessToken": "xxxxxxxxxxxxxxxxxxxxxxxxxxxxxxxxxxxxxxxx",
"endpointID": 1,
"concentration": 15.3,
"timestamp": "2021-02-23T14:55:03",
"mqttMethod": "UpdateConcentrationSensorStatus",
"mqttRID": "tkrs34"
}
```
Parameters [#parameters]
| Name | Description | Data Type |
| ------------- | ---------------------------------------------------------------------------------------------------------------------------------------------------------------------------------------------------------------------------------------------------------------------------- | --------- |
| accessToken | Access token with permissions to update endpoint information. See this page for more information. | text |
| endpointID | Unique endpoint identifier or combination of device address and endpoint address in format \[deviceAddress]:endpointAddress (e.g.: \[device-1234]:1). These values can be found on the endpoint management page. | text |
| concentration | Indica la concentración expresada en partes por millón (ppm). El separador para los decimales es el punto. | numeric |
| timestamp | Optional value indicating the UTC date and time corresponding to the measurement. The date format must match one of those specified in the date formats section. If the field is omitted, the platform will assume the measurement corresponds to the current date and time. | text |
| mqttMethod | Método correspondiente del servicio, en este caso UpdateConcentrationSensorStatus | string |
| mqttRID | Identificador opcional para la petición, en caso de que se desee obtener una respuesta de confirmación. | string |
Reporte de estado en formato "raw" [#reporte-de-estado-en-formato-raw]
La concentración puede ser reportada como un **valor crudo (raw),** utilizando el [conversor de expresiones](/docs/configuracion-del-cliente/dispositivos-y-endpoints/endpoints/conversion-de-datos-crudos-raw). Esta opción es conveniente cuando el dispositivo no es capaz de realizar conversiones, y emite valores que necesitan ser transformados antes de inyectarse en la plataforma.
A continuación, se muestra un ejemplo de una petición en formato raw:
```
{
"accessToken": "xxxxxxxxxxxxxxxxxxxxxxxxxxxxxxxxxxxxxxxx",
"endpointID": 1,
"rawData": "15.3",
"timestamp": "2021-02-23T14:55:03",
"mqttMethod": "UpdateConcentrationSensorStatusRaw",
"mqttRID": "RXmp123"
}
```
Parameters [#parameters-1]
| Name | Description | Data Type |
| ----------- | ---------------------------------------------------------------------------------------------------------------------------------------------------------------------------------------------------------------------------------------------------------------------------- | --------- |
| accessToken | Access token with permissions to update endpoint information. See this page for more information. | text |
| endpointID | Unique endpoint identifier, which can be found on the endpoint management page. | numeric |
| rawData | Valor reportado por el sensor, como texto. Debe indicarse una expresión en el conversor de expresiones. La expresión debe devolver un valor numérico indicando la concentración, expresada partes por millón (ppm). | text |
| timestamp | Optional value indicating the UTC date and time corresponding to the measurement. The date format must match one of those specified in the date formats section. If the field is omitted, the platform will assume the measurement corresponds to the current date and time. | text |
| mqttMethod | Método correspondiente del servicio, en este caso UpdateConcentrationSensorStatusRaw | string |
| mqttRID | Identificador opcional para la petición, en caso de que se desee obtener una respuesta de confirmación. | string |
# Energy Consumption Sensors
Reporting Accumulated Energy in Wh and VARh [#reporting-accumulated-energy-in-wh-and-varh]
The integration de sensores de energía por MQTT uses the following structure:
```
{
"accessToken": "xxxxxxxxxxxxxxxxxxxxxxxxxxxxxxxxxxxxxxxx",
"endpointID": 1,
"activeEnergySummationWh": 112685.9,
"reactiveEnergySummationVARh": 18973.4,
"timestamp": "2021-02-23T14:55:03",
"mqttMethod": "UpdateEnergySensorValueSummation",
"mqttRID": "tkrs34"
}
```
Parameters [#parameters]
| Name | Description | Data Type |
| --------------------------- | ---------------------------------------------------------------------------------------------------------------------------------------------------------------------------------------------------------------------------------------------------------------------------- | --------- |
| accessToken | Access token with permissions to update endpoint information. See this page for more information. | text |
| endpointID | Unique endpoint identifier or combination of device address and endpoint address in format \[deviceAddress]:endpointAddress (e.g.: \[device-1234]:1). These values can be found on the endpoint management page. | text |
| activeEnergySummationWh | Valor acumulado de energía activa informado por el sensor, expresado en watt-hora (Wh). | numeric |
| reactiveEnergySummationVARh | Valor acumulado de energía reactiva informado por el sensor, expresado en volt-ampere-reactivo-hora (VARh). | numeric |
| timestamp | Optional value indicating the UTC date and time corresponding to the measurement. The date format must match one of those specified in the date formats section. If the field is omitted, the platform will assume the measurement corresponds to the current date and time. | text |
| mqttMethod | Método correspondiente del servicio, en este caso UpdateEnergySensorValueSummation | string |
| mqttRID | Identificador opcional para la petición, en caso de que se desee obtener una respuesta de confirmación. | string |
Reporte de energía acumulada en formato "raw" [#reporte-de-energía-acumulada-en-formato-raw]
La energía acumulada puede ser reportada como un **valor crudo (raw),** utilizando el [conversor de expresiones](/docs/configuracion-del-cliente/dispositivos-y-endpoints/endpoints/conversion-de-datos-crudos-raw). Esta opción es conveniente cuando el dispositivo no es capaz de realizar conversiones, y emite valores que necesitan ser transformados antes de inyectarse en la plataforma.
A continuación, se muestra un ejemplo de una petición en formato raw:
```
{
"accessToken": "xxxxxxxxxxxxxxxxxxxxxxxxxxxxxxxxxxxxxxxx",
"endpointID": 1,
"rawData": "112685.9/18973.4",
"timestamp": "2021-02-23T14:55:03",
"mqttMethod": "UpdateEnergySensorValueSummationRaw",
"mqttRID": "tkrs34"
}
```
Como puede verse en este ejemplo, el campo RawData combina el acumulado de energía activa y el acumulado de energía reactiva en un único string, en el que ambos valores están separados por una coma.
Parameters [#parameters-1]
| Name | Description | Data Type |
| ----------- | -------------------------------------------------------------------------------------------------------------------------------------------------------------------------------------------------------------------------------------------------------------------------------------------------------------------------------------------------------------------------------------------------------------------------------------------------------------------------------------------------------------------------------------------------------------------------------------------------------------------------------------------------------------------------------------------------------------------------------------------------------------- | --------- |
| accessToken | Access token with permissions to update endpoint information. See this page for more information. | text |
| endpointID | Unique endpoint identifier, which can be found on the endpoint management page. | numeric |
| rawData | Valor reportado por el sensor, como texto. Deben indicarse dos expresiones en el conversor de expresiones. La primera expresión se utiliza para obtener la energía activa acumulada a partir de la variable rawData. La expresión debe devolver un valor numérico indicando expresado en expresado en watt-hora (Wh). En el ejemplo anterior, podría utilizarse la siguiente expresión:ToNumber(StringPart(rawData, 1, ','))La segunda expresión se utiliza para obtener la energía reactiva acumulada a partir de la variable rawData. La expresión debe devolver un valor numérico indicando expresado en expresado volt-ampere-reactivo-hora (VARh). En el ejemplo anterior, podría utilizarse la siguiente expresión:ToNumber(StringPart(rawData, 2, ',')) | text |
| timestamp | Optional value indicating the UTC date and time corresponding to the measurement. The date format must match one of those specified in the date formats section. If the field is omitted, the platform will assume the measurement corresponds to the current date and time. | text |
| mqttMethod | Método correspondiente del servicio, en este caso UpdateEnergySensorValueSummationRaw | string |
| mqttRID | Identificador opcional para la petición, en caso de que se desee obtener una respuesta de confirmación. | string |
# Current Sensors
Reporting Current in Amperes [#reporting-current-in-amperes]
The integration de sensores de corriente por MQTT uses the following structure:
```
{
"accessToken": "xxxxxxxxxxxxxxxxxxxxxxxxxxxxxxxxxxxxxxxx",
"endpointID": 1,
"currentAmperes": 18.5,
"timestamp": "2021-02-23T14:55:03",
"mqttMethod": "UpdateCurrentSensorStatus",
"mqttRID": "tkrs34"
}
```
Parameters [#parameters]
| Name | Description | Data Type |
| -------------- | ---------------------------------------------------------------------------------------------------------------------------------------------------------------------------------------------------------------------------------------------------------------------------- | --------- |
| accessToken | Access token with permissions to update endpoint information. See this page for more information. | text |
| endpointID | Unique endpoint identifier or combination of device address and endpoint address in format \[deviceAddress]:endpointAddress (e.g.: \[device-1234]:1). These values can be found on the endpoint management page. | text |
| currentAmperes | Current, expressed in Amperes. | numeric |
| timestamp | Optional value indicating the UTC date and time corresponding to the measurement. The date format must match one of those specified in the date formats section. If the field is omitted, the platform will assume the measurement corresponds to the current date and time. | text |
| mqttMethod | Método correspondiente del servicio, en este caso UpdateCurrentSensorStatus | string |
| mqttRID | Identificador opcional para la petición, en caso de que se desee obtener una respuesta de confirmación. | string |
Reporte de corriente en formato "raw" [#reporte-de-corriente-en-formato-raw]
La corriente puede ser reportada como un **valor crudo (raw),** utilizando el [conversor de expresiones](/docs/configuracion-del-cliente/dispositivos-y-endpoints/endpoints/conversion-de-datos-crudos-raw). Esta opción es conveniente cuando el dispositivo no es capaz de realizar conversiones, y emite valores que necesitan ser transformados antes de inyectarse en la plataforma.
A continuación, se muestra un ejemplo de una petición en formato raw:
```
{
"accessToken": "xxxxxxxxxxxxxxxxxxxxxxxxxxxxxxxxxxxxxxxx",
"endpointID": 1,
"rawData": "233",
"timestamp": "2021-02-23T14:55:03",
"mqttMethod": "UpdateCurrentSensorStatusRaw",
"mqttRID": "tkrs34"
}
```
Parameters [#parameters-1]
| Name | Description | Data Type |
| ----------- | ---------------------------------------------------------------------------------------------------------------------------------------------------------------------------------------------------------------------------------------------------------------------------- | --------- |
| accessToken | Access token with permissions to update endpoint information. See this page for more information. | text |
| endpointID | Unique endpoint identifier, which can be found on the endpoint management page. | numeric |
| rawData | Valor reportado por el sensor, como texto. Debe indicarse una expresión en el conversor de expresiones. La expresión debe devolver un valor numérico indicando la corriente, expresada en Amperes. | text |
| timestamp | Optional value indicating the UTC date and time corresponding to the measurement. The date format must match one of those specified in the date formats section. If the field is omitted, the platform will assume the measurement corresponds to the current date and time. | text |
| mqttMethod | Método correspondiente del servicio, en este caso UpdateCurrentSensorStatusRaw | string |
| mqttRID | Identificador opcional para la petición, en caso de que se desee obtener una respuesta de confirmación. | string |
# Cos Phi Sensors
Reporting Cos Phi [#reporting-cos-phi]
The integration de sensores de [coseno fi](https://es.wikipedia.org/wiki/Factor_de_potencia) por MQTT uses the following structure:
```
{
"accessToken": "xxxxxxxxxxxxxxxxxxxxxxxxxxxxxxxxxxxxxxxx",
"endpointID": 1,
"cosPhi": 0.96,
"timestamp": "2021-02-23T14:55:03",
"mqttMethod": "UpdateCosPhiSensorStatus",
"mqttRID": "tkrs34"
}
```
Parameters [#parameters]
| Name | Description | Data Type |
| ----------- | ---------------------------------------------------------------------------------------------------------------------------------------------------------------------------------------------------------------------------------------------------------------------------- | --------- |
| accessToken | Access token with permissions to update endpoint information. See this page for more information. | text |
| endpointID | Unique endpoint identifier or combination of device address and endpoint address in format \[deviceAddress]:endpointAddress (e.g.: \[device-1234]:1). These values can be found on the endpoint management page. | text |
| cosPhi | Coseno fi, en el rango de -1 a 1. | numeric |
| timestamp | Optional value indicating the UTC date and time corresponding to the measurement. The date format must match one of those specified in the date formats section. If the field is omitted, the platform will assume the measurement corresponds to the current date and time. | text |
| mqttMethod | Método correspondiente del servicio, en este caso UpdateCosPhiSensorStatus | string |
| mqttRID | Identificador opcional para la petición, en caso de que se desee obtener una respuesta de confirmación. | string |
Reporting Cos Phi en formato "raw" [#reporting-cos-phi-en-formato-raw]
El coseno fi puede ser reportado como un **valor crudo (raw),** utilizando el [conversor de expresiones](/docs/configuracion-del-cliente/dispositivos-y-endpoints/endpoints/conversion-de-datos-crudos-raw). Esta opción es conveniente cuando el dispositivo no es capaz de realizar conversiones, y emite valores que necesitan ser transformados antes de inyectarse en la plataforma.
A continuación, se muestra un ejemplo de una petición en formato raw:
```
{
"accessToken": "xxxxxxxxxxxxxxxxxxxxxxxxxxxxxxxxxxxxxxxx",
"endpointID": 1,
"rawData": "0.96",
"timestamp": "2021-02-23T14:55:03",
"mqttMethod": "UpdateCosPhiSensorStatusRaw",
"mqttRID": "tkrs34"
}
```
Parameters [#parameters-1]
| Name | Description | Data Type |
| ----------- | ---------------------------------------------------------------------------------------------------------------------------------------------------------------------------------------------------------------------------------------------------------------------------- | --------- |
| accessToken | Access token with permissions to update endpoint information. See this page for more information. | text |
| endpointID | Unique endpoint identifier, which can be found on the endpoint management page. | numeric |
| rawData | Valor reportado por el sensor, como texto. Debe indicarse una expresión en el conversor de expresiones. La expresión debe devolver un valor numérico indicando el coseno fi, en el rango de -1 a 1. | text |
| timestamp | Optional value indicating the UTC date and time corresponding to the measurement. The date format must match one of those specified in the date formats section. If the field is omitted, the platform will assume the measurement corresponds to the current date and time. | text |
| mqttMethod | Método correspondiente del servicio, en este caso UpdateCosPhiSensorStatusRaw | string |
| mqttRID | Identificador opcional para la petición, en caso de que se desee obtener una respuesta de confirmación. | string |
# Flow Sensors de personas
Reporting Endpoint Status [#reporting-endpoint-status]
The integration de sensores de flujo de personas por MQTT uses the following structure:
```
{
"accessToken": "xxxxxxxxxxxxxxxxxxxxxxxxxxxxxxxxxxxxxxxx",
"endpointID": 1,
"summationValue": 25,
"timestamp": "2021-02-23T14:55:03",
"mqttMethod": "UpdateFlowSensorValueSummation",
"mqttRID": "tkrs34"
}
```
Parameters [#parameters]
| Name | Description | Data Type |
| -------------- | ---------------------------------------------------------------------------------------------------------------------------------------------------------------------------------------------------------------------------------------------------------------------------- | --------- |
| accessToken | Access token with permissions to update endpoint information. See this page for more information. | text |
| endpointID | Unique endpoint identifier or combination of device address and endpoint address in format \[deviceAddress]:endpointAddress (e.g.: \[device-1234]:1). These values can be found on the endpoint management page. | text |
| summationValue | Valor acumulado de flujo informado por el sensor, expresado en personas. | numeric |
| timestamp | Optional value indicating the UTC date and time corresponding to the measurement. The date format must match one of those specified in the date formats section. If the field is omitted, the platform will assume the measurement corresponds to the current date and time. | text |
| mqttMethod | Método correspondiente del servicio, en este caso UpdateFlowSensorValueSummation | string |
| mqttRID | Identificador opcional para la petición, en caso de que se desee obtener una respuesta de confirmación. | string |
Reporte de estado en formato "raw" [#reporte-de-estado-en-formato-raw]
El estado del endpoint puede ser reportado como un **valor crudo (raw),** utilizando el [conversor de expresiones](/docs/configuracion-del-cliente/dispositivos-y-endpoints/endpoints/conversion-de-datos-crudos-raw). Esta opción es conveniente cuando el dispositivo no es capaz de realizar conversiones, y emite valores que necesitan ser transformados antes de inyectarse en la plataforma.
A continuación, se muestra un ejemplo de una petición en formato raw:
```
{
"accessToken": "xxxxxxxxxxxxxxxxxxxxxxxxxxxxxxxxxxxxxxxx",
"endpointID": 1,
"rawData": 25,
"timestamp": "2021-02-23T14:55:03",
"mqttMethod": "UpdateFlowSensorValueSummationRaw",
"mqttRID": "tkrs34"
}
```
Parameters [#parameters-1]
| Name | Description | Data Type |
| ----------- | ---------------------------------------------------------------------------------------------------------------------------------------------------------------------------------------------------------------------------------------------------------------------------- | --------- |
| accessToken | Access token with permissions to update endpoint information. See this page for more information. | text |
| endpointID | Unique endpoint identifier, which can be found on the endpoint management page. | numeric |
| rawData | Valor reportado por el sensor, como texto. Debe indicarse una expresión en el conversor de expresiones. La expresión debe devolver un valor numérico indicando el valor acumulado de flujo informado por el sensor, expresado en personas. | text |
| timestamp | Optional value indicating the UTC date and time corresponding to the measurement. The date format must match one of those specified in the date formats section. If the field is omitted, the platform will assume the measurement corresponds to the current date and time. | text |
| mqttMethod | Método correspondiente del servicio, en este caso UpdateFlowSensorValueSummationRaw | string |
| mqttRID | Identificador opcional para la petición, en caso de que se desee obtener una respuesta de confirmación. | string |
# Flow Sensors
Reporting Accumulated Flow in Liters [#reporting-accumulated-flow-in-liters]
The integration de sensores de flujo por MQTT uses the following structure:
```
{
"accessToken": "xxxxxxxxxxxxxxxxxxxxxxxxxxxxxxxxxxxxxxxx",
"endpointID": 1,
"summationValue": 112685,
"timestamp": "2021-02-23T14:55:03",
"mqttMethod": "UpdateFlowSensorValueSummation",
"mqttRID": "tkrs34"
}
```
Parameters [#parameters]
| Name | Description | Data Type |
| -------------- | ---------------------------------------------------------------------------------------------------------------------------------------------------------------------------------------------------------------------------------------------------------------------------- | --------- |
| accessToken | Access token with permissions to update endpoint information. See this page for more information. | text |
| endpointID | Unique endpoint identifier or combination of device address and endpoint address in format \[deviceAddress]:endpointAddress (e.g.: \[device-1234]:1). These values can be found on the endpoint management page. | text |
| summationValue | Valor acumulado de flujo informado por el sensor, expresado en litros. | numeric |
| timestamp | Optional value indicating the UTC date and time corresponding to the measurement. The date format must match one of those specified in the date formats section. If the field is omitted, the platform will assume the measurement corresponds to the current date and time. | text |
| mqttMethod | Método correspondiente del servicio, en este caso UpdateFlowSensorValueSummation | string |
| mqttRID | Identificador opcional para la petición, en caso de que se desee obtener una respuesta de confirmación. | string |
Reporte de flujo acumulado en formato "raw" [#reporte-de-flujo-acumulado-en-formato-raw]
El flujo puede ser reportado como un **valor crudo (raw),** utilizando el [conversor de expresiones](/docs/configuracion-del-cliente/dispositivos-y-endpoints/endpoints/conversion-de-datos-crudos-raw). Esta opción es conveniente cuando el dispositivo no es capaz de realizar conversiones, y emite valores que necesitan ser transformados antes de inyectarse en la plataforma.
A continuación, se muestra un ejemplo de una petición en formato raw:
```
{
"accessToken": "xxxxxxxxxxxxxxxxxxxxxxxxxxxxxxxxxxxxxxxx",
"endpointID": 1,
"rawData": "112685",
"timestamp": "2021-02-23T14:55:03",
"mqttMethod": "UpdateFlowSensorValueSummationRaw",
"mqttRID": "tkrs34"
}
```
Parameters [#parameters-1]
| Name | Description | Data Type |
| ----------- | ---------------------------------------------------------------------------------------------------------------------------------------------------------------------------------------------------------------------------------------------------------------------------- | --------- |
| accessToken | Access token with permissions to update endpoint information. See this page for more information. | text |
| endpointID | Unique endpoint identifier, which can be found on the endpoint management page. | numeric |
| rawData | Valor reportado por el sensor, como texto. Debe indicarse una expresión en el conversor de expresiones. La expresión debe devolver un valor numérico indicando el valor acumulado de flujo informado por el sensor, expresado en litros. | text |
| timestamp | Optional value indicating the UTC date and time corresponding to the measurement. The date format must match one of those specified in the date formats section. If the field is omitted, the platform will assume the measurement corresponds to the current date and time. | text |
| mqttMethod | Método correspondiente del servicio, en este caso UpdateFlowSensorValueSummationRaw | string |
| mqttRID | Identificador opcional para la petición, en caso de que se desee obtener una respuesta de confirmación. | string |
# Humidity Sensors
Reporting Humidity as Percentage [#reporting-humidity-as-percentage]
The integration de sensores de humedad por MQTT uses the following structure:
```
{
"accessToken": "xxxxxxxxxxxxxxxxxxxxxxxxxxxxxxxxxxxxxxxx",
"endpointID": 1,
"humidityPercentage": 20,
"timestamp": "2021-02-23T14:55:03",
"mqttMethod": "UpdateHumiditySensorStatus",
"mqttRID": "RXmp123"
}
```
Parameters [#parameters]
| Name | Description | Data Type |
| ------------------ | ---------------------------------------------------------------------------------------------------------------------------------------------------------------------------------------------------------------------------------------------------------------------------- | --------- |
| accessToken | Access token with permissions to update endpoint information. See this page for more information. | text |
| endpointID | Unique endpoint identifier or combination of device address and endpoint address in format \[deviceAddress]:endpointAddress (e.g.: \[device-1234]:1). These values can be found on the endpoint management page. | text |
| humidityPercentage | Humidity percentage, from 0 to 100. | text |
| timestamp | Optional value indicating the UTC date and time corresponding to the measurement. The date format must match one of those specified in the date formats section. If the field is omitted, the platform will assume the measurement corresponds to the current date and time. | text |
| mqttMethod | Método correspondiente del servicio, en este caso UpdateHumiditySensorStatus | string |
| mqttRID | Identificador opcional para la petición, en caso de que se desee obtener una respuesta de confirmación. | string |
Reporte de humedad en formato "raw" [#reporte-de-humedad-en-formato-raw]
La humedad puede ser reportada como un **valor crudo (raw),** utilizando el [conversor de expresiones](/docs/configuracion-del-cliente/dispositivos-y-endpoints/endpoints/conversion-de-datos-crudos-raw). Esta opción es conveniente cuando el dispositivo no es capaz de realizar conversiones, y emite valores que necesitan ser transformados antes de inyectarse en la plataforma.
A continuación, se muestra un ejemplo de una petición en formato raw:
```
{
"accessToken": "xxxxxxxxxxxxxxxxxxxxxxxxxxxxxxxxxxxxxxxx",
"endpointID": 1,
"rawData": "25",
"timestamp": "2021-02-23T14:55:03",
"mqttMethod": "UpdateHumiditySensorStatusRaw",
"mqttRID": "RXmp123"
}
```
Parameters [#parameters-1]
| Name | Description | Data Type |
| ----------- | ---------------------------------------------------------------------------------------------------------------------------------------------------------------------------------------------------------------------------------------------------------------------------- | --------- |
| accessToken | Access token with permissions to update endpoint information. See this page for more information. | text |
| endpointID | Unique endpoint identifier, which can be found on the endpoint management page. | numeric |
| rawData | Valor reportado por el sensor, como texto. Debe indicarse una expresión en el conversor de expresiones. La expresión debe devolver un valor numérico entre 0 y 100. | text |
| timestamp | Optional value indicating the UTC date and time corresponding to the measurement. The date format must match one of those specified in the date formats section. If the field is omitted, the platform will assume the measurement corresponds to the current date and time. | text |
| mqttMethod | Método correspondiente del servicio, en este caso UpdateHumiditySensorStatusRaw | string |
| mqttRID | Identificador opcional para la petición, en caso de que se desee obtener una respuesta de confirmación. | string |
# Light Level Sensors
Reporting Light Level as Percentage [#reporting-light-level-as-percentage]
The integration de sensores de iluminación por MQTT uses the following structure:
```
{
"accessToken": "xxxxxxxxxxxxxxxxxxxxxxxxxxxxxxxxxxxxxxxx",
"endpointID": 1,
"lightIntensity": 7550,
"timestamp": "2021-02-23T14:55:03",
"mqttMethod": "UpdateLightSensorStatus",
"mqttRID": "Ht4jk"
}
```
Parameters [#parameters]
| Name | Description | Data Type |
| -------------- | ---------------------------------------------------------------------------------------------------------------------------------------------------------------------------------------------------------------------------------------------------------------------------- | --------- |
| accessToken | Access token with permissions to update endpoint information. See this page for more information. | text |
| endpointID | Unique endpoint identifier or combination of device address and endpoint address in format \[deviceAddress]:endpointAddress (e.g.: \[device-1234]:1). These values can be found on the endpoint management page. | text |
| lightIntensity | Light intensity expressed in lux. | text |
| timestamp | Optional value indicating the UTC date and time corresponding to the measurement. The date format must match one of those specified in the date formats section. If the field is omitted, the platform will assume the measurement corresponds to the current date and time. | text |
| mqttMethod | Método correspondiente del servicio, en este caso UpdateLightSensorStatus | string |
| mqttRID | Identificador opcional para la petición, en caso de que se desee obtener una respuesta de confirmación. | string |
Reporte de nivel de iluminación en formato "raw" [#reporte-de-nivel-de-iluminación-en-formato-raw]
El nivel de iluminación puede ser reportado como un **valor crudo (raw),** utilizando el [conversor de expresiones](/docs/configuracion-del-cliente/dispositivos-y-endpoints/endpoints/conversion-de-datos-crudos-raw). Esta opción es conveniente cuando el dispositivo no es capaz de realizar conversiones, y emite valores que necesitan ser transformados antes de inyectarse en la plataforma.
A continuación, se muestra un ejemplo de una petición en formato raw:
```
{
"accessToken": "xxxxxxxxxxxxxxxxxxxxxxxxxxxxxxxxxxxxxxxx",
"endpointID": 1,
"rawData": "7550",
"timestamp": "2021-02-23T14:55:03",
"mqttMethod": "UpdateLightSensorStatusRaw",
"mqttRID": "RXmp123"
}
```
Parameters [#parameters-1]
| Name | Description | Data Type |
| ----------- | ---------------------------------------------------------------------------------------------------------------------------------------------------------------------------------------------------------------------------------------------------------------------------- | --------- |
| accessToken | Access token with permissions to update endpoint information. See this page for more information. | text |
| endpointID | Unique endpoint identifier, which can be found on the endpoint management page. | numeric |
| rawData | Valor reportado por el sensor, como texto. Debe indicarse una expresión en el conversor de expresiones. La expresión debe devolver un valor numérico indicando la intensidad luminosa expresada en lux. | text |
| timestamp | Optional value indicating the UTC date and time corresponding to the measurement. The date format must match one of those specified in the date formats section. If the field is omitted, the platform will assume the measurement corresponds to the current date and time. | text |
| mqttMethod | Método correspondiente del servicio, en este caso UpdateLightSensorStatusRaw | string |
| mqttRID | Identificador opcional para la petición, en caso de que se desee obtener una respuesta de confirmación. | string |
# Weight Sensors
Reporting Weight in Grams [#reporting-weight-in-grams]
The integration de sensores de peso por MQTT uses the following structure:
```
{
"accessToken": "xxxxxxxxxxxxxxxxxxxxxxxxxxxxxxxxxxxxxxxx",
"endpointID": 1,
"weightGrams": 45,
"timestamp": "2021-02-23T14:55:03",
"mqttMethod": "UpdateWeightSensorStatus",
"mqttRID": "tkrs34"
}
```
Parameters [#parameters]
| Name | Description | Data Type |
| ----------- | ---------------------------------------------------------------------------------------------------------------------------------------------------------------------------------------------------------------------------------------------------------------------------- | --------- |
| accessToken | Access token with permissions to update endpoint information. See this page for more information. | text |
| endpointID | Unique endpoint identifier or combination of device address and endpoint address in format \[deviceAddress]:endpointAddress (e.g.: \[device-1234]:1). These values can be found on the endpoint management page. | text |
| weightGrams | Weight, expressed in grams. | numeric |
| timestamp | Optional value indicating the UTC date and time corresponding to the measurement. The date format must match one of those specified in the date formats section. If the field is omitted, the platform will assume the measurement corresponds to the current date and time. | text |
| mqttMethod | Método correspondiente del servicio, en este caso UpdateWeightSensorStatus | string |
| mqttRID | Identificador opcional para la petición, en caso de que se desee obtener una respuesta de confirmación. | string |
Reporte de peso en formato "raw" [#reporte-de-peso-en-formato-raw]
El peso puede ser reportado como un **valor crudo (raw),** utilizando el [conversor de expresiones](/docs/configuracion-del-cliente/dispositivos-y-endpoints/endpoints/conversion-de-datos-crudos-raw). Esta opción es conveniente cuando el dispositivo no es capaz de realizar conversiones, y emite valores que necesitan ser transformados antes de inyectarse en la plataforma.
A continuación, se muestra un ejemplo de una petición en formato raw:
```
{
"accessToken": "xxxxxxxxxxxxxxxxxxxxxxxxxxxxxxxxxxxxxxxx",
"endpointID": 1,
"rawData": "25",
"timestamp": "2021-02-23T14:55:03",
"mqttMethod": "UpdateWeightSensorStatusRaw",
"mqttRID": "RXmp123"
}
```
Parameters [#parameters-1]
| Name | Description | Data Type |
| ----------- | ---------------------------------------------------------------------------------------------------------------------------------------------------------------------------------------------------------------------------------------------------------------------------- | --------- |
| accessToken | Access token with permissions to update endpoint information. See this page for more information. | text |
| endpointID | Unique endpoint identifier, which can be found on the endpoint management page. | numeric |
| rawData | Valor reportado por el sensor, como texto. Debe indicarse una expresión en el conversor de expresiones. La expresión debe devolver un valor numérico indicando el peso, expresado en gramos. | text |
| timestamp | Optional value indicating the UTC date and time corresponding to the measurement. The date format must match one of those specified in the date formats section. If the field is omitted, the platform will assume the measurement corresponds to the current date and time. | text |
| mqttMethod | Método correspondiente del servicio, en este caso UpdateWeightSensorStatusRaw | string |
| mqttRID | Identificador opcional para la petición, en caso de que se desee obtener una respuesta de confirmación. | string |
# Active Power Sensors
Reporting Active Power in Watts [#reporting-active-power-in-watts]
The integration de sensores de potencia activa por MQTT uses the following structure:
```
{
"accessToken": "xxxxxxxxxxxxxxxxxxxxxxxxxxxxxxxxxxxxxxxx",
"endpointID": 1,
"activePowerWatts": 18.5,
"timestamp": "2021-02-23T14:55:03",
"mqttMethod": "UpdateActivePowerSensorStatus",
"mqttRID": "tkrs34"
}
```
Parameters [#parameters]
| Name | Description | Data Type |
| ---------------- | ---------------------------------------------------------------------------------------------------------------------------------------------------------------------------------------------------------------------------------------------------------------------------- | --------- |
| accessToken | Access token with permissions to update endpoint information. See this page for more information. | text |
| endpointID | Unique endpoint identifier or combination of device address and endpoint address in format \[deviceAddress]:endpointAddress (e.g.: \[device-1234]:1). These values can be found on the endpoint management page. | text |
| activePowerWatts | Active power, expressed in Watts. | numeric |
| timestamp | Optional value indicating the UTC date and time corresponding to the measurement. The date format must match one of those specified in the date formats section. If the field is omitted, the platform will assume the measurement corresponds to the current date and time. | text |
| mqttMethod | Método correspondiente del servicio, en este caso UpdateActivePowerSensorStatus | string |
| mqttRID | Identificador opcional para la petición, en caso de que se desee obtener una respuesta de confirmación. | string |
Reporte de potencia activa en formato "raw" [#reporte-de-potencia-activa-en-formato-raw]
La potencia activa puede ser reportada como un **valor crudo (raw),** utilizando el [conversor de expresiones](/docs/configuracion-del-cliente/dispositivos-y-endpoints/endpoints/conversion-de-datos-crudos-raw). Esta opción es conveniente cuando el dispositivo no es capaz de realizar conversiones, y emite valores que necesitan ser transformados antes de inyectarse en la plataforma.
A continuación, se muestra un ejemplo de una petición en formato raw:
```
{
"accessToken": "xxxxxxxxxxxxxxxxxxxxxxxxxxxxxxxxxxxxxxxx",
"endpointID": 1,
"rawData": "18.5",
"timestamp": "2021-02-23T14:55:03",
"mqttMethod": "UpdateActivePowerSensorStatusRaw",
"mqttRID": "tkrs34"
}
```
Parameters [#parameters-1]
| Name | Description | Data Type |
| ----------- | ---------------------------------------------------------------------------------------------------------------------------------------------------------------------------------------------------------------------------------------------------------------------------- | --------- |
| accessToken | Access token with permissions to update endpoint information. See this page for more information. | text |
| endpointID | Unique endpoint identifier, which can be found on the endpoint management page. | numeric |
| rawData | Valor reportado por el sensor, como texto. Debe indicarse una expresión en el conversor de expresiones. La expresión debe devolver un valor numérico indicando la potencia activa medida, expresada en Watts. | text |
| timestamp | Optional value indicating the UTC date and time corresponding to the measurement. The date format must match one of those specified in the date formats section. If the field is omitted, the platform will assume the measurement corresponds to the current date and time. | text |
| mqttMethod | Método correspondiente del servicio, en este caso UpdateActivePowerSensorStatusRaw | string |
| mqttRID | Identificador opcional para la petición, en caso de que se desee obtener una respuesta de confirmación. | string |
# Apparent Power Sensors
Reporting Apparent Power in VA [#reporting-apparent-power-in-va]
The integration de sensores de [potencia aparente](https://es.wikipedia.org/wiki/Potencia_el%C3%A9ctrica) por MQTT uses the following structure:
```
{
"accessToken": "xxxxxxxxxxxxxxxxxxxxxxxxxxxxxxxxxxxxxxxx",
"endpointID": 1,
"apparentPowerVA": 2850.5,
"timestamp": "2021-02-23T14:55:03",
"mqttMethod": "UpdateApparentPowerSensorStatus",
"mqttRID": "tkrs34"
}
```
Parameters [#parameters]
| Name | Description | Data Type |
| --------------- | ---------------------------------------------------------------------------------------------------------------------------------------------------------------------------------------------------------------------------------------------------------------------------- | --------- |
| accessToken | Access token with permissions to update endpoint information. See this page for more information. | text |
| endpointID | Unique endpoint identifier or combination of device address and endpoint address in format \[deviceAddress]:endpointAddress (e.g.: \[device-1234]:1). These values can be found on the endpoint management page. | text |
| apparentPowerVA | Apparent power, expressed in VA. | numeric |
| timestamp | Optional value indicating the UTC date and time corresponding to the measurement. The date format must match one of those specified in the date formats section. If the field is omitted, the platform will assume the measurement corresponds to the current date and time. | text |
| mqttMethod | Método correspondiente del servicio, en este caso UpdateApparentPowerSensorStatus | string |
| mqttRID | Identificador opcional para la petición, en caso de que se desee obtener una respuesta de confirmación. | string |
Reporte de potencia aparente en formato "raw" [#reporte-de-potencia-aparente-en-formato-raw]
La potencia aparente puede ser reportado como un **valor crudo (raw),** utilizando el [conversor de expresiones](/docs/configuracion-del-cliente/dispositivos-y-endpoints/endpoints/conversion-de-datos-crudos-raw). Esta opción es conveniente cuando el dispositivo no es capaz de realizar conversiones, y emite valores que necesitan ser transformados antes de inyectarse en la plataforma.
A continuación, se muestra un ejemplo de una petición en formato raw:
```
{
"accessToken": "xxxxxxxxxxxxxxxxxxxxxxxxxxxxxxxxxxxxxxxx",
"endpointID": 1,
"rawData": "2850.5",
"timestamp": "2021-02-23T14:55:03",
"mqttMethod": "UpdateApparentPowerSensorStatusRaw",
"mqttRID": "tkrs34"
}
```
Parameters [#parameters-1]
| Name | Description | Data Type |
| ----------- | ---------------------------------------------------------------------------------------------------------------------------------------------------------------------------------------------------------------------------------------------------------------------------- | --------- |
| accessToken | Access token with permissions to update endpoint information. See this page for more information. | text |
| endpointID | Unique endpoint identifier, which can be found on the endpoint management page. | numeric |
| rawData | Valor reportado por el sensor, como texto. Debe indicarse una expresión en el conversor de expresiones. La expresión debe devolver un valor numérico indicando la potencia aparente, expresada en VA. | text |
| timestamp | Optional value indicating the UTC date and time corresponding to the measurement. The date format must match one of those specified in the date formats section. If the field is omitted, the platform will assume the measurement corresponds to the current date and time. | text |
| mqttMethod | Método correspondiente del servicio, en este caso UpdateApparentPowerSensorStatusRaw | string |
| mqttRID | Identificador opcional para la petición, en caso de que se desee obtener una respuesta de confirmación. | string |
# Reactive Power Sensors
Reporting Reactive Power in VAR [#reporting-reactive-power-in-var]
The integration de sensores de [potencia reactiva](https://es.wikipedia.org/wiki/Potencia_el%C3%A9ctrica) por MQTT uses the following structure:
```
{
"accessToken": "xxxxxxxxxxxxxxxxxxxxxxxxxxxxxxxxxxxxxxxx",
"endpointID": 1,
"reactivePowerVAR": 2850.5,
"timestamp": "2021-02-23T14:55:03",
"mqttMethod": "UpdateReactivePowerSensorStatus",
"mqttRID": "tkrs34"
}
```
Parameters [#parameters]
| Name | Description | Data Type |
| ---------------- | ---------------------------------------------------------------------------------------------------------------------------------------------------------------------------------------------------------------------------------------------------------------------------- | --------- |
| accessToken | Access token with permissions to update endpoint information. See this page for more information. | text |
| endpointID | Unique endpoint identifier or combination of device address and endpoint address in format \[deviceAddress]:endpointAddress (e.g.: \[device-1234]:1). These values can be found on the endpoint management page. | text |
| reactivePowerVAR | Reactive power, expressed in VAR. | numeric |
| timestamp | Optional value indicating the UTC date and time corresponding to the measurement. The date format must match one of those specified in the date formats section. If the field is omitted, the platform will assume the measurement corresponds to the current date and time. | text |
| mqttMethod | Método correspondiente del servicio, en este caso UpdateReactivePowerSensorStatus | string |
| mqttRID | Identificador opcional para la petición, en caso de que se desee obtener una respuesta de confirmación. | string |
Reporte de potencia reactiva en formato "raw" [#reporte-de-potencia-reactiva-en-formato-raw]
La potencia reactiva puede ser reportado como un **valor crudo (raw),** utilizando el [conversor de expresiones](/docs/configuracion-del-cliente/dispositivos-y-endpoints/endpoints/conversion-de-datos-crudos-raw). Esta opción es conveniente cuando el dispositivo no es capaz de realizar conversiones, y emite valores que necesitan ser transformados antes de inyectarse en la plataforma.
A continuación, se muestra un ejemplo de una petición en formato raw:
```
{
"accessToken": "xxxxxxxxxxxxxxxxxxxxxxxxxxxxxxxxxxxxxxxx",
"endpointID": 1,
"rawData": "2850.5",
"timestamp": "2021-02-23T14:55:03",
"mqttMethod": "UpdateReactivePowerSensorStatusRaw",
"mqttRID": "tkrs34"
}
```
Parameters [#parameters-1]
| Name | Description | Data Type |
| ----------- | ---------------------------------------------------------------------------------------------------------------------------------------------------------------------------------------------------------------------------------------------------------------------------- | --------- |
| accessToken | Access token with permissions to update endpoint information. See this page for more information. | text |
| endpointID | Unique endpoint identifier, which can be found on the endpoint management page. | numeric |
| rawData | Valor reportado por el sensor, como texto. Debe indicarse una expresión en el conversor de expresiones. La expresión debe devolver un valor numérico indicando la potencia reactiva, expresada en VAR. | text |
| timestamp | Optional value indicating the UTC date and time corresponding to the measurement. The date format must match one of those specified in the date formats section. If the field is omitted, the platform will assume the measurement corresponds to the current date and time. | text |
| mqttMethod | Método correspondiente del servicio, en este caso UpdateReactivePowerSensorStatusRaw | string |
| mqttRID | Identificador opcional para la petición, en caso de que se desee obtener una respuesta de confirmación. | string |
# Pressure Sensors
Reporting Pressure in Pascals [#reporting-pressure-in-pascals]
The integration de sensores de presión por MQTT uses the following structure:
```
{
"accessToken": "xxxxxxxxxxxxxxxxxxxxxxxxxxxxxxxxxxxxxxxx",
"endpointID": 1,
"pressurePascals": 101300,
"timestamp": "2021-02-23T14:55:03"
"mqttMethod": "UpdatePressureSensorStatus",
"mqttRID": "Prafw6H"
}
```
Parameters [#parameters]
| Name | Description | Data Type |
| --------------- | ---------------------------------------------------------------------------------------------------------------------------------------------------------------------------------------------------------------------------------------------------------------------------- | --------- |
| accessToken | Access token with permissions to update endpoint information. See this page for more information. | text |
| endpointID | Unique endpoint identifier or combination of device address and endpoint address in format \[deviceAddress]:endpointAddress (e.g.: \[device-1234]:1). These values can be found on the endpoint management page. | text |
| pressurePascals | Pressure, expressed in Pascals. | numeric |
| timestamp | Optional value indicating the UTC date and time corresponding to the measurement. The date format must match one of those specified in the date formats section. If the field is omitted, the platform will assume the measurement corresponds to the current date and time. | text |
| mqttMethod | Método correspondiente del servicio, en este caso UpdatePressureSensorStatus | string |
| mqttRID | Identificador opcional para la petición, en caso de que se desee obtener una respuesta de confirmación. | string |
Reporte de presión en formato "raw" [#reporte-de-presión-en-formato-raw]
La presión puede ser reportada como un **valor crudo (raw),** utilizando el [conversor de expresiones](/docs/configuracion-del-cliente/dispositivos-y-endpoints/endpoints/conversion-de-datos-crudos-raw). Esta opción es conveniente cuando el dispositivo no es capaz de realizar conversiones, y emite valores que necesitan ser transformados antes de inyectarse en la plataforma.
A continuación, se muestra un ejemplo de una petición en formato raw:
```
{
"accessToken": "xxxxxxxxxxxxxxxxxxxxxxxxxxxxxxxxxxxxxxxx",
"endpointID": 1,
"rawData": "101300",
"timestamp": "2021-02-23T14:55:03"
"mqttMethod": "UpdatePressureSensorStatusRaw",
"mqttRID": "Prafw6H"
}
```
Parameters [#parameters-1]
| Name | Description | Data Type |
| ----------- | ---------------------------------------------------------------------------------------------------------------------------------------------------------------------------------------------------------------------------------------------------------------------------- | --------- |
| accessToken | Access token with permissions to update endpoint information. See this page for more information. | text |
| endpointID | Unique endpoint identifier, which can be found on the endpoint management page. | numeric |
| rawData | Valor reportado por el sensor, como texto. Debe indicarse una expresión en el conversor de expresiones. La expresión debe devolver un valor numérico indicando la presión medida, expresada en Pascales. | text |
| timestamp | Optional value indicating the UTC date and time corresponding to the measurement. The date format must match one of those specified in the date formats section. If the field is omitted, the platform will assume the measurement corresponds to the current date and time. | text |
| mqttMethod | Método correspondiente del servicio, en este caso UpdatePressureSensorStatusRaw | string |
| mqttRID | Identificador opcional para la petición, en caso de que se desee obtener una respuesta de confirmación. | string |
# Temperature Sensors
Reporting Temperature in Degrees Celsius [#reporting-temperature-in-degrees-celsius]
The integration de sensores de temperatura por MQTT uses the following structure:
```
{
"accessToken": "xxxxxxxxxxxxxxxxxxxxxxxxxxxxxxxxxxxxxxxx",
"endpointID": 1,
"temperatureCelsius": 25,
"timestamp": "2021-02-23T14:55:03",
"mqttMethod": "UpdateTemperatureSensorStatus",
"mqttRID": "RXmp123"
}
```
Parameters [#parameters]
| Name | Description | Data Type |
| ------------------ | ---------------------------------------------------------------------------------------------------------------------------------------------------------------------------------------------------------------------------------------------------------------------------- | --------- |
| accessToken | Access token with permissions to update endpoint information. See this page for more information. | text |
| endpointID | Unique endpoint identifier or combination of device address and endpoint address in format \[deviceAddress]:endpointAddress (e.g.: \[device-1234]:1). These values can be found on the endpoint management page. | text |
| temperatureCelsius | Measured temperature, numeric value greater than or equal to -273.15, indicating the measured temperature in degrees Celsius (C). | numeric |
| timestamp | Optional value indicating the UTC date and time corresponding to the measurement. The date format must match one of those specified in the date formats section. If the field is omitted, the platform will assume the measurement corresponds to the current date and time. | text |
| mqttMethod | Método correspondiente del servicio, en este caso UpdateTemperatureSensorStatus | string |
| mqttRID | Identificador opcional para la petición, en caso de que se desee obtener una respuesta de confirmación. | string |
Reporte de temperatura en formato "raw" [#reporte-de-temperatura-en-formato-raw]
La temperatura puede ser reportada como un **valor crudo (raw),** utilizando el [conversor de expresiones](/docs/configuracion-del-cliente/dispositivos-y-endpoints/endpoints/conversion-de-datos-crudos-raw). Esta opción es conveniente cuando el dispositivo no es capaz de realizar conversiones, y emite valores que necesitan ser transformados antes de inyectarse en la plataforma.
A continuación, se muestra un ejemplo de una petición en formato raw:
```
{
"accessToken": "xxxxxxxxxxxxxxxxxxxxxxxxxxxxxxxxxxxxxxxx",
"endpointID": 1,
"rawData": "45",
"timestamp": "2021-02-23T14:55:03",
"mqttMethod": "UpdateTemperatureSensorStatusRaw",
"mqttRID": "RXmp123"
}
```
Parameters [#parameters-1]
| Name | Description | Data Type |
| ----------- | ---------------------------------------------------------------------------------------------------------------------------------------------------------------------------------------------------------------------------------------------------------------------------- | --------- |
| accessToken | Access token with permissions to update endpoint information. See this page for more information. | text |
| endpointID | Unique endpoint identifier, which can be found on the endpoint management page. | numeric |
| rawData | Valor reportado por el sensor, como texto. Debe indicarse una expresión en el conversor de expresiones. La expresión debe devolver un valor numérico mayor o igual a -273.15, indicando la temperatura medida, en grados Celsius (ºC). | text |
| timestamp | Optional value indicating the UTC date and time corresponding to the measurement. The date format must match one of those specified in the date formats section. If the field is omitted, the platform will assume the measurement corresponds to the current date and time. | text |
| mqttMethod | Método correspondiente del servicio, en éste caso UpdateTemperatureSensorStatusRaw | string |
| mqttRID | Identificador opcional para la petición, en caso de que se desee obtener una respuesta de confirmación. | string |
# Voltage Sensors
Reporting Voltage in Volts [#reporting-voltage-in-volts]
The integration de sensores de voltaje por MQTT uses the following structure:
```
{
"accessToken": "xxxxxxxxxxxxxxxxxxxxxxxxxxxxxxxxxxxxxxxx",
"endpointID": 1,
"voltageVolts": 233,
"timestamp": "2021-02-23T14:55:03",
"mqttMethod": "UpdateVoltageSensorStatus",
"mqttRID": "tkrs34"
}
```
Parameters [#parameters]
| Name | Description | Data Type |
| ------------ | ---------------------------------------------------------------------------------------------------------------------------------------------------------------------------------------------------------------------------------------------------------------------------- | --------- |
| accessToken | Access token with permissions to update endpoint information. See this page for more information. | text |
| endpointID | Unique endpoint identifier or combination of device address and endpoint address in format \[deviceAddress]:endpointAddress (e.g.: \[device-1234]:1). These values can be found on the endpoint management page. | text |
| voltageVolts | Voltage expressed in volts. | numeric |
| timestamp | Optional value indicating the UTC date and time corresponding to the measurement. The date format must match one of those specified in the date formats section. If the field is omitted, the platform will assume the measurement corresponds to the current date and time. | text |
| mqttMethod | Método correspondiente del servicio, en este caso UpdateVoltageSensorStatus | string |
| mqttRID | Identificador opcional para la petición, en caso de que se desee obtener una respuesta de confirmación. | string |
Reporte de voltaje en formato "raw" [#reporte-de-voltaje-en-formato-raw]
El voltaje puede ser reportado como un **valor crudo (raw),** utilizando el [conversor de expresiones](/docs/configuracion-del-cliente/dispositivos-y-endpoints/endpoints/conversion-de-datos-crudos-raw). Esta opción es conveniente cuando el dispositivo no es capaz de realizar conversiones, y emite valores que necesitan ser transformados antes de inyectarse en la plataforma.
A continuación, se muestra un ejemplo de una petición en formato raw:
```
{
"accessToken": "xxxxxxxxxxxxxxxxxxxxxxxxxxxxxxxxxxxxxxxx",
"endpointID": 1,
"rawData": "233",
"timestamp": "2021-02-23T14:55:03",
"mqttMethod": "UpdateVoltageSensorStatusRaw",
"mqttRID": "tkrs34"
}
```
Parameters [#parameters-1]
| Name | Description | Data Type |
| ----------- | ---------------------------------------------------------------------------------------------------------------------------------------------------------------------------------------------------------------------------------------------------------------------------- | --------- |
| accessToken | Access token with permissions to update endpoint information. See this page for more information. | text |
| endpointID | Unique endpoint identifier, which can be found on the endpoint management page. | numeric |
| rawData | Valor reportado por el sensor, como texto. Debe indicarse una expresión en el conversor de expresiones. La expresión debe devolver un valor numérico indicando el voltaje, expresado en voltios. | text |
| timestamp | Optional value indicating the UTC date and time corresponding to the measurement. The date format must match one of those specified in the date formats section. If the field is omitted, the platform will assume the measurement corresponds to the current date and time. | text |
| mqttMethod | Método correspondiente del servicio, en este caso UpdateVoltageSensorStatusRaw | string |
| mqttRID | Identificador opcional para la petición, en caso de que se desee obtener una respuesta de confirmación. | string |
# Volume Sensors
Reporting Volume in Liters [#reporting-volume-in-liters]
The integration de sensores de volumen por MQTT uses the following structure:
```
{
"accessToken": "xxxxxxxxxxxxxxxxxxxxxxxxxxxxxxxxxxxxxxxx",
"endpointID": 1,
"volumeLiters": 45,
"timestamp": "2021-02-23T14:55:03",
"mqttMethod": "UpdateVolumeSensorStatus",
"mqttRID": "tkrs34"
}
```
Parameters [#parameters]
| Name | Description | Data Type |
| ------------ | ---------------------------------------------------------------------------------------------------------------------------------------------------------------------------------------------------------------------------------------------------------------------------- | --------- |
| accessToken | Access token with permissions to update endpoint information. See this page for more information. | text |
| endpointID | Unique endpoint identifier or combination of device address and endpoint address in format \[deviceAddress]:endpointAddress (e.g.: \[device-1234]:1). These values can be found on the endpoint management page. | text |
| volumeLiters | Volume expressed in liters. | numeric |
| timestamp | Optional value indicating the UTC date and time corresponding to the measurement. The date format must match one of those specified in the date formats section. If the field is omitted, the platform will assume the measurement corresponds to the current date and time. | text |
| mqttMethod | Método correspondiente del servicio, en este caso UpdateVolumeSensorStatus | string |
| mqttRID | Identificador opcional para la petición, en caso de que se desee obtener una respuesta de confirmación. | string |
Reporte de volumen en formato "raw" [#reporte-de-volumen-en-formato-raw]
El volumen puede ser reportado como un **valor crudo (raw),** utilizando el [conversor de expresiones](/docs/configuracion-del-cliente/dispositivos-y-endpoints/endpoints/conversion-de-datos-crudos-raw). Esta opción es conveniente cuando el dispositivo no es capaz de realizar conversiones, y emite valores que necesitan ser transformados antes de inyectarse en la plataforma.
A continuación, se muestra un ejemplo de una petición en formato raw:
```
{
"accessToken": "xxxxxxxxxxxxxxxxxxxxxxxxxxxxxxxxxxxxxxxx",
"endpointID": 1,
"rawData": "25",
"timestamp": "2021-02-23T14:55:03",
"mqttMethod": "UpdateVolumeSensorStatusRaw",
"mqttRID": "RXmp123"
}
```
Parameters [#parameters-1]
| Name | Description | Data Type |
| ----------- | ---------------------------------------------------------------------------------------------------------------------------------------------------------------------------------------------------------------------------------------------------------------------------- | --------- |
| accessToken | Access token with permissions to update endpoint information. See this page for more information. | text |
| endpointID | Unique endpoint identifier, which can be found on the endpoint management page. | numeric |
| rawData | Valor reportado por el sensor, como texto. Debe indicarse una expresión en el conversor de expresiones. La expresión debe devolver un valor numérico indicando el volumen medido, expresado en litros. | text |
| timestamp | Optional value indicating the UTC date and time corresponding to the measurement. The date format must match one of those specified in the date formats section. If the field is omitted, the platform will assume the measurement corresponds to the current date and time. | text |
| mqttMethod | Método correspondiente del servicio, en este caso UpdateVolumeSensorStatusRaw | string |
| mqttRID | Identificador opcional para la petición, en caso de que se desee obtener una respuesta de confirmación. | string |
# Generic Sensors de flujo
> The integration de sensores de flujo genéricos utiliza la misma API que los sensores de flujo no-genéricos. La única diferencia es que los sensores genéricos deben informar el flujo utilizando la unidad de medida correspondiente a la variable genérica asociada al sensor.
Reporte de flujo acumulado en unidades [#reporte-de-flujo-acumulado-en-unidades]
The integration de sensores genéricos de flujo por MQTT lleva la siguiente estructura, que es idéntica a la de los sensores de flujo no-genéricos:
```
{
"accessToken": "xxxxxxxxxxxxxxxxxxxxxxxxxxxxxxxxxxxxxxxx",
"endpointID": 1,
"summationValue": 112685,
"timestamp": "2021-02-23T14:55:03",
"mqttMethod": "UpdateFlowSensorValueSummation",
"mqttRID": "tkrs34"
}
```
Parameters [#parameters]
| Name | Description | Data Type |
| -------------- | ---------------------------------------------------------------------------------------------------------------------------------------------------------------------------------------------------------------------------------------------------------------------------- | --------- |
| accessToken | Access token with permissions to update endpoint information. See this page for more information. | text |
| endpointID | Unique endpoint identifier or combination of device address and endpoint address in format \[deviceAddress]:endpointAddress (e.g.: \[device-1234]:1). These values can be found on the endpoint management page. | text |
| summationValue | Valor acumulado de flujo informado por el sensor. Las unidades son las mismas que las elegidas para la variable genérica asociada al sensor. | numeric |
| timestamp | Optional value indicating the UTC date and time corresponding to the measurement. The date format must match one of those specified in the date formats section. If the field is omitted, the platform will assume the measurement corresponds to the current date and time. | text |
| mqttMethod | Método correspondiente del servicio, en este caso UpdateFlowSensorValueSummation | string |
| mqttRID | Identificador opcional para la petición, en caso de que se desee obtener una respuesta de confirmación. | string |
Reporte de flujo acumulado en formato "raw" [#reporte-de-flujo-acumulado-en-formato-raw]
El flujo puede ser reportado como un **valor crudo (raw),** utilizando el [conversor de expresiones](/docs/configuracion-del-cliente/dispositivos-y-endpoints/endpoints/conversion-de-datos-crudos-raw). Esta opción es conveniente cuando el dispositivo no es capaz de realizar conversiones, y emite valores que necesitan ser transformados antes de inyectarse en la plataforma.
A continuación, se muestra un ejemplo de una petición en formato raw:
```
{
"accessToken": "xxxxxxxxxxxxxxxxxxxxxxxxxxxxxxxxxxxxxxxx",
"endpointID": 1,
"rawData": "112685",
"timestamp": "2021-02-23T14:55:03",
"mqttMethod": "UpdateFlowSensorValueSummationRaw",
"mqttRID": "tkrs34"
}
```
Parameters [#parameters-1]
| Name | Description | Data Type |
| ----------- | ----------------------------------------------------------------------------------------------------------------------------------------------------------------------------------------------------------------------------------------------------------------------------------------- | --------- |
| accessToken | Access token with permissions to update endpoint information. See this page for more information. | text |
| endpointID | Unique endpoint identifier, which can be found on the endpoint management page. | numeric |
| rawData | Valor reportado por el sensor, como texto. Debe indicarse una expresión en el conversor de expresiones. La expresión debe devolver un valor numérico indicando el valor acumulado de flujo informado por el sensor, expresado en las unidades de la variable genérica asociada al sensor. | text |
| timestamp | Optional value indicating the UTC date and time corresponding to the measurement. The date format must match one of those specified in the date formats section. If the field is omitted, the platform will assume the measurement corresponds to the current date and time. | text |
| mqttMethod | Método correspondiente del servicio, en este caso UpdateFlowSensorValueSummationRaw | string |
| mqttRID | Identificador opcional para la petición, en caso de que se desee obtener una respuesta de confirmación. | string |
# Generic Sensors
Reporting Generic Sensor Value [#reporting-generic-sensor-value]
The integration de sensores genéricos por MQTT uses the following structure:
```
{
"accessToken": "xxxxxxxxxxxxxxxxxxxxxxxxxxxxxxxxxxxxxxxx",
"endpointID": 1,
"value": 45,
"timestamp": "2021-02-23T14:55:03",
"mqttMethod": "UpdateGenericSensorStatus",
"mqttRID": "tkrs34"
}
```
Parameters [#parameters]
| Name | Description | Data Type |
| ----------- | ---------------------------------------------------------------------------------------------------------------------------------------------------------------------------------------------------------------------------------------------------------------------------- | --------- |
| accessToken | Access token with permissions to update endpoint information. See this page for more information. | text |
| endpointID | Unique endpoint identifier or combination of device address and endpoint address in format \[deviceAddress]:endpointAddress (e.g.: \[device-1234]:1). These values can be found on the endpoint management page. | text |
| value | Valor genérico. La unidad de medida dependerá de lo que se establezca en la configuración del tipo de variable correspondiente al endpoint. | numeric |
| timestamp | Optional value indicating the UTC date and time corresponding to the measurement. The date format must match one of those specified in the date formats section. If the field is omitted, the platform will assume the measurement corresponds to the current date and time. | text |
| mqttMethod | Método correspondiente del servicio, en este caso UpdateGenericSensorStatus | string |
| mqttRID | Identificador opcional para la petición, en caso de que se desee obtener una respuesta de confirmación. | string |
Reporte de valor en formato "raw" [#reporte-de-valor-en-formato-raw]
El valor del sensor genérico puede ser reportado como un **valor crudo (raw),** utilizando el [conversor de expresiones](/docs/configuracion-del-cliente/dispositivos-y-endpoints/endpoints/conversion-de-datos-crudos-raw). Esta opción es conveniente cuando el dispositivo no es capaz de realizar conversiones, y emite valores que necesitan ser transformados antes de inyectarse en la plataforma.
A continuación, se muestra un ejemplo de una petición en formato raw:
```
{
"accessToken": "xxxxxxxxxxxxxxxxxxxxxxxxxxxxxxxxxxxxxxxx",
"endpointID": 1,
"rawData": "45",
"timestamp": "2021-02-23T14:55:03",
"mqttMethod": "UpdateGenericSensorStatusRaw",
"mqttRID": "tkrs34"
}
```
Parameters [#parameters-1]
| Name | Description | Data Type |
| ----------- | --------------------------------------------------------------------------------------------------------------------------------------------------------------------------------------------------------------------------------------------------------------------------------- | --------- |
| accessToken | Access token with permissions to update endpoint information. See this page for more information. | text |
| endpointID | Unique endpoint identifier, which can be found on the endpoint management page. | numeric |
| rawData | Valor reportado por el sensor, como texto. Debe indicarse una expresión en el conversor de expresiones. La expresión debe devolver un valor numérico. La unidad de medida dependerá de lo que se establezca en la configuración del tipo de variable correspondiente al endpoint. | text |
| timestamp | Optional value indicating the UTC date and time corresponding to the measurement. The date format must match one of those specified in the date formats section. If the field is omitted, the platform will assume the measurement corresponds to the current date and time. | text |
| mqttMethod | Método correspondiente del servicio, en este caso UpdateGenericSensorStatusRaw | string |
| mqttRID | Identificador opcional para la petición, en caso de que se desee obtener una respuesta de confirmación. | string |
# IAS Sensors (Motion, Occupancy, and Binary Sensors)
Reporting Sensor Status [#reporting-sensor-status]
The integration de sensores IAS MQTT uses the following structure:
```
{
"accessToken": "xxxxxxxxxxxxxxxxxxxxxxxxxxxxxxxxxxxxxxxx",
"endpointID": 1,
"state": 2,
"timestamp": "2021-02-23T14:55:03",
"mqttMethod": "UpdateIASSensorStatus",
"mqttRID": "Prafw6H"
}
```
Parameters [#parameters]
| Name | Description | Data Type |
| ----------- | ---------------------------------------------------------------------------------------------------------------------------------------------------------------------------------------------------------------------------------------------------------------------------------------------------------------------------------------------------------------------------------------------------------------------------------------------------------------------------------------------------------------------------------------------------------------------------------------------------------------------------------------------------------------------------------------------------------------------------------------------------------------------------------------------------------------- | --------- |
| accessToken | Access token with permissions to update endpoint information. See this page for more information. | text |
| endpointID | Unique endpoint identifier or combination of device address and endpoint address in format \[deviceAddress]:endpointAddress (e.g.: \[device-1234]:1). These values can be found on the endpoint management page. | text |
| state | Indicates the sensor status. The possible states are as follows:1: Inactive. The sensor detects no activity.2: Active. The sensor detects activity.3: En limpieza. El espacio asociado al sensor está siendo limpiado.4: Necesita limpieza. El espacio asociado al sensor necesita limpieza.5: En modo test. El sensor está actualmente en modo de prueba.6: Manipulado. El sensor ha sido manipulado y puede no estar funcionando correctamente.7: En mantenimiento. El sensor requiere mantenimiento y puede no estar funcionando correctamente.8: El sensor detecta que un vehículo está entrando a la plaza de estacionamiento.9: El sensor detecta que un vehículo está saliendo de la plaza de estacionamiento.10: El sensor informa que la plaza de estacionamiento se encuentra en estado de infracción. | numeric |
| timestamp | Optional value indicating the UTC date and time corresponding to the measurement. The date format must match one of those specified in the date formats section. If the field is omitted, the platform will assume the measurement corresponds to the current date and time. | text |
| mqttMethod | Método correspondiente del servicio, en este caso UpdateIASSensorStatus | string |
| mqttRID | Identificador opcional para la petición, en caso de que se desee obtener una respuesta de confirmación. | string |
Reporte de estado en formato "raw" [#reporte-de-estado-en-formato-raw]
El estado del sensor puede ser reportado como un **valor crudo (raw),** utilizando el [conversor de expresiones](/docs/configuracion-del-cliente/dispositivos-y-endpoints/endpoints/conversion-de-datos-crudos-raw). Esta opción es conveniente cuando el dispositivo no es capaz de realizar conversiones, y emite valores que necesitan ser transformados antes de inyectarse en la plataforma.
A continuación, se muestra un ejemplo de una petición en formato raw:
```
{
"accessToken": "xxxxxxxxxxxxxxxxxxxxxxxxxxxxxxxxxxxxxxxx",
"endpointID": 1,
"rawData": "2",
"timestamp": "2021-02-23T14:55:03",
"mqttMethod": "UpdateIASSensorStatusRaw",
"mqttRID": "RXmp123"
}
```
Parameters [#parameters-1]
| Name | Description | Data Type |
| ----------- | ---------------------------------------------------------------------------------------------------------------------------------------------------------------------------------------------------------------------------------------------------------------------------- | --------- |
| accessToken | Access token with permissions to update endpoint information. See this page for more information. | text |
| endpointID | Unique endpoint identifier, which can be found on the endpoint management page. | numeric |
| rawData | Valor reportado por el sensor, como texto. Debe indicarse una expresión en el conversor de expresiones. La expresión debe devolver un valor numérico que corresponda a los estados de la tabla que puede verse más arriba. | text |
| timestamp | Optional value indicating the UTC date and time corresponding to the measurement. The date format must match one of those specified in the date formats section. If the field is omitted, the platform will assume the measurement corresponds to the current date and time. | text |
| mqttMethod | Método correspondiente del servicio, en este caso UpdateIASSensorStatusRaw | string |
| mqttRID | Identificador opcional para la petición, en caso de que se desee obtener una respuesta de confirmación. | string |
# Date formats
The platform allows some flexibility in the use of date/time fields in the HTTP and MQTT APIs. Fields are always of type string, but the content can be specified using the formats described here. This section also describes characteristics related to UTC handling, time zone conversion, and other details.
Separators [#separators]
Date separator [#date-separator]
The characters "/" and "-" are accepted interchangeably as date separators.
Time separator [#time-separator]
The time separator must always be ":".
Date and time separator [#date-and-time-separator]
Optionally, a "**T**" character can be used to separate the date and time. The following two dates, for example, are equivalent:
```
2020-02-25 14:35:18
2020-02-25T14:35:18
```
Formats [#formats]
Date formats (without time) [#date-formats-without-time]
The platform supports the following formats for specifying a date.
| Format | Comments |
| ---------- | ----------------------------------------------------------------------------------------------------------------------------------------------------- |
| yyyy/M/d | Specifies the 4-digit year, followed by month and day, without using zeros to pad month and day. The date separator can be any of the supported ones. |
| yyyy/MM/dd | Specifies the 4-digit year, followed by month and day, using zeros to pad month and day. The date separator can be any of the supported ones. |
Time formats [#time-formats]
The platform supports the following formats for time.
| Format | Comments |
| -------- | --------------------------------------------------------------------------------------------------------------------------- |
| H:m | Time is specified in 24-hour format, providing hours and minutes, without zero-padding, using the time separator. |
| H:m:s | Time is specified in 24-hour format, providing hours, minutes, and seconds, without zero-padding, using the time separator. |
| HH:mm | Time is specified in 24-hour format, providing hours and minutes, with zero-padding, using the time separator. |
| HH:mm:ss | Time is specified in 24-hour format, providing hours, minutes, and seconds, with zero-padding, using the time separator. |
Epoch format [#epoch-format]
It is possible to specify a date and time in [epoch](https://en.wikipedia.org/wiki/Unix_time) format, that is, as the number of seconds since midnight on January 1, 1970, UTC. The epoch format is always expressed in UTC, and therefore does not allow time zone indication.
| Format | Comments |
| ---------- | ----------------------------------------------------------------------------------------------------------------------------------------------------------------------------------------------------------- |
| nnnnnnnnnn | Epoch format. In this format, the date and time are reported as a number of seconds from midnight on January 1, 1970, UTC. For example, the date "2010/10/23 02:47:25" corresponds to the value 1287802045. |
Time zone indication (optional) [#time-zone-indication-optional]
All APIs require the use of UTC dates and times. However, local times are allowed as long as they contain the time zone offset indication.
* For all dates and times that do not contain a time zone offset (or that contain the "Z" suffix), they will be assumed to be expressed in UTC.
* If a time zone offset is provided, it must consist of a "+" or "-" sign, followed by hours and minutes using the time separator between them.
* Time zone offsets are not compatible with epoch format. Epoch format must always be reported in UTC.
Below are some examples.
| Example | UTC value used | Comments |
| -------------------------- | -------------------------- | ------------------------------------------------------------------------------------------------------------------ |
| 2020-02-21 03:37:14 | 2020-02-21 03:37:14 (same) | No time indication, so UTC is assumed. Corresponds to 03:37:14 on February 21, 2020, UTC time. |
| 2020-02-21 03:37:14Z | 2020-02-21 03:37:14 (same) | The Z suffix indicates the time is expressed in UTC, so this example is equivalent to the previous one. |
| 2020-02-21 20:30:25 -05:00 | 2020/02/22 01:30:25 | Indicates a 5-hour offset to the west. Note that in UTC time, the date advances 5 hours and moves to the next day. |
| 2020-02-21 20:30:25 +05:00 | 2020-02-21 15:30:25 | Indicates a 5-hour offset to the east. |
# Data Formats
When using the APIs via HTTP and MQTT, certain data formats must be followed, as described below.
[Date formats](/docs/configuracion-del-cliente/dispositivos-y-endpoints/endpoints/conversion-de-datos-crudos-raw/expresiones/formatos-de-datos/formatos-de-fechas)
# Functions
Functions allow obtaining values through the transformation of others. The following is a list of functions divided into categories, according to their typical use.
Mathematical functions [#mathematical-functions]
| Function | Comments |
| ------------------- | ---------------------------------------------------------------- |
| CelsiusToFahrenheit | Converts a temperature in degrees Celsius to degrees Fahrenheit. |
| FahrenheitToCelsius | Converts a temperature in degrees Fahrenheit to degrees Celsius. |
| Max | Returns the maximum value among a series of values. |
| Min | Returns the minimum value among a series of values. |
| Power | Returns the result of raising a given number to a given power. |
| Round | Rounds a number to the specified number of decimal places. |
| Sqrt | Calculates the square root of a number. |
| Trunc | Truncates a number, removing the fractional part. |
String handling functions [#string-handling-functions]
| Function | Comments |
| ----------- | ----------------------------------------------------- |
| LowerCase | Converts all characters in a string to lowercase. |
| StringClean | Cleans a string by removing all unwanted characters. |
| StringPart | Returns a part of a string that contains sub-strings. |
| UpperCase | Converts all characters in a string to uppercase. |
Interpolation functions [#interpolation-functions]
| Function | Comments |
| ------------------- | ----------------------------------------------------------------- |
| LinearInterpolation | Performs a linear interpolation between a series of given points. |
JSON handling functions [#json-handling-functions]
| Function | Comments |
| --------- | ----------------------------------------------------------------- |
| JsonField | Gets the value of a field within a text expressed in JSON format. |
Other functions [#other-functions]
| Function | Comments |
| ----------- | ---------------------------------------------------------------- |
| Error | Generates an error condition containing the specified message. |
| HexToNumber | Converts a number in hexadecimal format (string) to a number. |
| If | Returns a value, between two given values, based on a condition. |
| ToBoolean | Converts a value of any type to boolean. |
| ToNumber | Converts a value of any type to numeric. |
| ToString | Converts a value of any type to string. |
# Operators
[Operators](https://en.wikipedia.org/wiki/Operator_\(computer_programming\)) allow creating expressions by modifying or calculating values from others, known as "operands".
Depending on the type of operation to perform, and/or the data type they apply to, operators can be classified as:
* **Arithmetic operators**. Applied in mathematical operations, and the result of their application is always a number.
* **Logical operators**. Applied in logical operations, and the result of their application is always a boolean value (true / false).
* **String operators**. Applied to strings, and the result of their application is always a string value.
* **Relational operators**. Applied in comparison operations, and the result of their application is always a boolean value (true / false).
Additionally, depending on the number of operands the operator acts on, they can be classified as:
* **Unary operators**. These operators act on a single operand.
* **Binary operators**. These operators act on two operands.
The following table summarizes the list of all operators available in the Gear Studio platform, classified by operation type. In each case, additional information can be obtained by clicking on the respective operator.
Arithmetic operators [#arithmetic-operators]
Arithmetic operators are applied in mathematical operations, and the result of their application is always a number.
| Operator | Explanation | Unary / Binary |
| -------- | ------------------------------------------------------------------------------------------------------------------------------------------------------------------------------------- | -------------- |
| + | Adds the two numbers on each side of the operator. | Binary |
| - | Takes the number to the left of the operator and subtracts the number to the right of the operator. | Binary |
| \* | Multiplies the two numbers on both sides of the operator. | Binary |
| / | Takes the number to the left of the operator and divides it by the number to the right of the operator. | Binary |
| MOD | Takes the number to the left of the operator, divides it by the number to the right of the operator, and returns the remainder of the division. | Binary |
| - | Sign change. This unary operator changes the sign of the operand to its right. | Unary |
| NOT | Takes the number given as a parameter, considered as a 32-bit integer, and inverts all bits. Commonly known as "bitwise NOT". | Unary |
| AND | Takes the operands on both sides of the operator, considered as 32-bit integers, and performs a logical AND operation for each bit of both operands. Commonly known as "bitwise AND". | Binary |
| OR | Takes the operands on both sides of the operator, considered as 32-bit integers, and performs a logical OR operation for each bit of both operands. Commonly known as "bitwise OR". | Binary |
| XOR | Takes the operands on both sides of the operator, considered as 32-bit integers, and performs a logical XOR operation for each bit of both operands. Commonly known as "bitwise XOR". | Binary |
Logical operators [#logical-operators]
Logical operators are applied in logical operations, and the result of their application is always a boolean value (true / false).
| Operator | Explanation | Unary / Binary |
| -------- | ------------------------------------------------------------------------------------------------------------------------------------------------------------------------------------------------------------- | -------------- |
| NOT | Computes the complement of the operand to the right of the operator. If the operand is true, the result is false and vice versa. | Unary |
| AND | Computes the logical AND operation between the operands on both sides of the operator. The AND operation results in a true value only when both operands have a true value, and false otherwise. | Binary |
| OR | Computes the logical OR operation between the operands on both sides of the operator. The OR operation results in a true value if at least one of the operands has a true value, and false in any other case. | Binary |
| XOR | Computes the logical XOR operation between the operands on both sides of the operator. The XOR operation results in a true value if only one of the operands has a true value, and false in any other case. | Binary |
String operators [#string-operators]
String operators are applied to character strings, and the result of their application is always a string value.
| Operator | Explanation | Unary / Binary |
| -------- | -------------------------------------------------------------------------------------------------------------------------------- | -------------- |
| + | Concatenates (joins) the operands on both sides of the operator, using the left one first, and then concatenating the right one. | Binary |
Relational operators [#relational-operators]
Relational operators are applied in comparison operations, and the result of their application is always a boolean value (true / false). They can be applied to any data type, but in all cases, both operands must be of the same type. It is important to remember some comparison rules:
* When comparing boolean values, the value true is considered greater than the value false.
* For string values, a string is considered greater than another if it is sorted alphabetically after the other.
| Operator | Explanation | Unary / Binary |
| -------- | ------------------------------------------------------------------------------------------------------------------------------------- | -------------- |
| `>` | Compares the operands on both sides of the operator and returns true when the left operand is greater than the right one. | Binary |
| `>=` | Compares the operands on both sides of the operator and returns true when the left operand is greater than or equal to the right one. | Binary |
| `<` | Compares the operands on both sides of the operator and returns true when the left operand is less than the right one. | Binary |
| `<=` | Compares the operands on both sides of the operator and returns true when the left operand is less than or equal to the right one. | Binary |
| `=` | Compares the operands on both sides of the operator and returns true when both are equal. | Binary |
| `<>` | Compares the operands on both sides of the operator and returns true when both are different. | Binary |
# Arithmetic operators
Arithmetic operators [#arithmetic-operators]
Arithmetic operators are applied in mathematical operations, and the result of their application is always a number.
| Operator | Explanation | Unary / Binary |
| -------- | ------------------------------------------------------------------------------------------------------------------------------------------------------------------------------------- | -------------- |
| + | Adds the two numbers on each side of the operator. | Binary |
| - | Takes the number to the left of the operator and subtracts the number to the right of the operator. | Binary |
| \* | Multiplies the two numbers on both sides of the operator. | Binary |
| / | Takes the number to the left of the operator and divides it by the number to the right of the operator. | Binary |
| MOD | Takes the number to the left of the operator, divides it by the number to the right of the operator, and returns the remainder of the division. | Binary |
| - | Sign change. This unary operator changes the sign of the operand to its right. | Unary |
| NOT | Takes the number given as a parameter, considered as a 32-bit integer, and inverts all bits. Commonly known as "bitwise NOT". | Unary |
| AND | Takes the operands on both sides of the operator, considered as 32-bit integers, and performs a logical AND operation for each bit of both operands. Commonly known as "bitwise AND". | Binary |
| OR | Takes the operands on both sides of the operator, considered as 32-bit integers, and performs a logical OR operation for each bit of both operands. Commonly known as "bitwise OR". | Binary |
| XOR | Takes the operands on both sides of the operator, considered as 32-bit integers, and performs a logical XOR operation for each bit of both operands. Commonly known as "bitwise XOR". | Binary |
# Logical operators
Logical operators [#logical-operators]
Logical operators are applied in logical operations, and the result of their application is always a boolean value (true / false).
| Operator | Explanation | Unary / Binary |
| -------- | ------------------------------------------------------------------------------------------------------------------------------------------------------------------------------------------------------------- | -------------- |
| NOT | Computes the complement of the operand to the right of the operator. If the operand is true, the result is false and vice versa. | Unary |
| AND | Computes the logical AND operation between the operands on both sides of the operator. The AND operation results in a true value only when both operands have a true value, and false otherwise. | Binary |
| OR | Computes the logical OR operation between the operands on both sides of the operator. The OR operation results in a true value if at least one of the operands has a true value, and false in any other case. | Binary |
| XOR | Computes the logical XOR operation between the operands on both sides of the operator. The XOR operation results in a true value if only one of the operands has a true value, and false in any other case. | Binary |
# String operators
String operators [#string-operators]
String operators are applied to character strings, and the result of their application is always a string value.
| Operator | Explanation | Unary / Binary |
| -------- | -------------------------------------------------------------------------------------------------------------------------------- | -------------- |
| + | Concatenates (joins) the operands on both sides of the operator, using the left one first, and then concatenating the right one. | Binary |
# Relational operators
Relational operators [#relational-operators]
Relational operators are applied in comparison operations, and the result of their application is always a boolean value (true / false). They can be applied to any data type, but in all cases, both operands must be of the same type. It is important to remember some comparison rules:
* When comparing boolean values, the value true is considered greater than the value false.
* For string values, a string is considered greater than another if it is sorted alphabetically after the other.
| Operator | Explanation | Unary / Binary |
| -------- | ------------------------------------------------------------------------------------------------------------------------------------- | -------------- |
| `>` | Compares the operands on both sides of the operator and returns true when the left operand is greater than the right one. | Binary |
| `>=` | Compares the operands on both sides of the operator and returns true when the left operand is greater than or equal to the right one. | Binary |
| `<` | Compares the operands on both sides of the operator and returns true when the left operand is less than the right one. | Binary |
| `<=` | Compares the operands on both sides of the operator and returns true when the left operand is less than or equal to the right one. | Binary |
| `=` | Compares the operands on both sides of the operator and returns true when both are equal. | Binary |
| `<>` | Compares the operands on both sides of the operator and returns true when both are different. | Binary |
# Battery and RSSI Status
Report the RSSI Status and/or Battery Level of a Device [#report-the-rssi-status-andor-battery-level-of-a-device]
This method does not store a history of the status; it only takes the last reported value and displays it on the platform. That is, if 3 batteries were reported in the first request and only one is reported in the second request, then it is assumed that the device now has only one battery. The same applies to RSSI. If empty arrays are sent, it will be assumed that there is no battery level or RSSI record and previously reported data will be cleared.
The HTTP integration for RSSI status and battery level uses the following structure:
```
POST /services/gear/DeviceIntegrationService.svc/UpdateDeviceStatus HTTP/1.1
Host: gear-dev.cloud.studio
Content-Type: application/json
{
"accessToken": "xxxxxxxxxxxxxxxxxxxxxxxxxxxxxxxxxxxxxxxx",
"deviceID": 1,
"battery": [
{
"type": 2,
"percentage": 30,
"voltage": 3.5
},
{
"type": 3,
"percentage": 100,
"voltage": 5
}
],
"rssi": [
{
"type": 2,
"quality": 100,
"strength": -40
}
]
}
```
Parameters [#parameters]
| Name | Description | Data Type |
| ----------- | ------------------------------------------------------------------------------------------------------------------------------------------------------- | --------- |
| accessToken | Access token with permissions to update endpoint information. See this page for more information. | text |
| deviceID | Unique device identifier or device address in format \[deviceAddress] (e.g.: \[device-1234]). These values can be found on the device management page. | number |
| battery | List of statuses for the device's different batteries. One or more can be sent. Property descriptions for this parameter can be found below. | array |
| rssi | List of statuses for the device's different wireless connections. One or more can be sent. Property descriptions for this parameter can be found below. | array |
"battery" Array Parameter [#battery-array-parameter]
In each element of this array, at least "percentage" or "voltage" must be reported. Type is mandatory.
| Name | Description | Data Type |
| ---------- | ------------------------------------------------------------------------------------------------------------------------------------------------------------------------------------------------------------------------- | --------- |
| type | Type of battery being reported. Allowed types are: 0: Unknown. If this value is sent, it will automatically be changed to 1. 1: Default. 2: Primary. 3: Secondary. 4: Backup. Types cannot be repeated in the same array. | number |
| percentage | Numeric value of the remaining battery percentage. | number |
| voltage | Numeric value of the current battery voltage. | number |
"rssi" Array Parameter [#rssi-array-parameter]
In each element of this array, at least "quality" or "strength" must be reported. Type is mandatory.
| Name | Description | Data Type |
| -------- | -------------------------------------------------------------------------------------------------------------------------------------------------------------------------------------------------------------------------------------------------------------------------------------------------------------------- | --------- |
| type | Represents a type of wireless technology where RSSI can be measured. Allowed values are: 0: Unknown. If this value is sent, it will automatically be changed to 1. 1: Default. 2: WiFi. 3: LoRaWAN. 4: Cellular (2G/3G/4G/5G/Cat-M/NB-IoT/etc). 5: ZigBee. 6: Custom RF. Types cannot be repeated in the same array. | number |
| quality | Numeric value representing signal quality. From 0 to 100. If this value is not provided but the "strength" parameter is, this parameter's value will be auto-calculated. | number |
| strength | Numeric value representing signal strength in dBm (negative). If the provided value is positive, its sign will be changed. If this value is not provided but the "quality" parameter is, this parameter's value will be auto-calculated. | number |
# Device Data Update
Introduction [#introduction]
This section describes the options for updating device information, such as geographic location, battery level, or signal level. For more information, see the following sections:
[Battery and RSSI Status](/docs/configuracion-del-cliente/dispositivos-y-endpoints/dispositivos/integracion-de-dispositivos/http/api-http/actualizacion-de-datos-del-dispositivo/estado-de-bateria-y-rssi)
[Geographic Location](/docs/configuracion-del-cliente/dispositivos-y-endpoints/dispositivos/integracion-de-dispositivos/http/api-http/actualizacion-de-datos-del-dispositivo/ubicacion-geografica)
# Geographic Location
Report the Geographic Location of a Device [#report-the-geographic-location-of-a-device]
This method allows updating the current location of the device on the platform. Location history is not stored.
The HTTP device location update uses the following structure:
```
POST /services/gear/DeviceIntegrationService.svc/UpdateDeviceGeolocation HTTP/1.1
Host: gear.cloud.studio
Content-Type: application/json
{
"accessToken": "xxxxxxxxxxxxxxxxxxxxxxxxxxxxxxxxxxxxxxxx",
"deviceID": 1,
"latitude": 40.4052,
"longitude": -3.87699
}
```
Parameters [#parameters]
| Name | Description | Data Type |
| ----------- | ------------------------------------------------------------------------------------------------------------------------------------------------------ | --------- |
| accessToken | Access token with permissions to update endpoint information. See this page for more information. | text |
| deviceID | Unique device identifier or device address in format \[deviceAddress] (e.g.: \[device-1234]). These values can be found on the device management page. | number |
| latitude | Indicates the latitude of the device's current location. | number |
| longitude | Indicates the longitude of the device's current location. | number |
Example [#example]
We choose a device to modify; in this case, we choose one named "Interwave Tracker Test 1". The parameter we need is the device's "DeviceID", which in this case is "23712".

Open Postman and use the "UpdateDeviceGeolocation" method, enter the accessToken, the DeviceId (which in this case is 23712), and then send the longitude and latitude of the device. Once the data is loaded, press "Send" and the device will change position.
_fac2.png)
This position change can be viewed on the device map.

# Air Quality Index (AQI) Sensors
Reporting Endpoint Status [#reporting-endpoint-status]
The HTTP integration of air quality (AQI) sensors uses the following structure:
```
POST /services/gear/DeviceIntegrationService.svc/UpdateAirQualitySensorStatus HTTP/1.1
Host: gear.cloud.studio
Content-Type: application/json
{
"accessToken": "xxxxxxxxxxxxxxxxxxxxxxxxxxxxxxxxxxxxxxxx",
"endpointID": 1,
"index": 15,
"timestamp": "2021-02-23T14:55:03"
}
```
Parameters [#parameters]
| Name | Description | Data Type |
| ----------- | ---------------------------------------------------------------------------------------------------------------------------------------------------------------------------------------------------------------------------------------------------------------------------- | --------- |
| accessToken | Access token with permissions to update endpoint information. See this page for more information. | text |
| endpointID | Unique endpoint identifier or combination of device address and endpoint address in format \[deviceAddress]:endpointAddress (e.g.: \[device-1234]:1). These values can be found on the endpoint management page. | numeric |
| index | Indica el valor del índice de calidad del aire, el valor deber ser entre 0 a 500, expresada en AQI:0-50: Buena51-100: Moderada101-150: Insalubre para grupos sensibles151-200: Insalubre201-300: Muy insalubre301-500: Peligrosa | numeric |
| timestamp | Optional value indicating the UTC date and time corresponding to the measurement. The date format must match one of those specified in the date formats section. If the field is omitted, the platform will assume the measurement corresponds to the current date and time. | text |
Reporting Status in "raw" Format [#reporting-status-in-raw-format]
El estado del endpoint can be reported as a **raw value** using the [expression converter](/docs/configuracion-del-cliente/dispositivos-y-endpoints/endpoints/conversion-de-datos-crudos-raw). This option is convenient when the device is unable to perform conversions and emits values that need to be transformed before being injected into the platform.
Below is an example of a raw format request:
```
POST /services/gear/DeviceIntegrationService.svc/UpdateAirQualitySensorStatusRaw HTTP/1.1
Host: gear.cloud.studio
Content-Type: application/json
{
"accessToken": "xxxxxxxxxxxxxxxxxxxxxxxxxxxxxxxxxxxxxxxx",
"endpointID": 1,
"rawData": "15",
"timestamp": "2021-02-23T14:55:03"
}
```
Parameters [#parameters-1]
| Name | Description | Data Type |
| ----------- | ---------------------------------------------------------------------------------------------------------------------------------------------------------------------------------------------------------------------------------------------------------------------------------------------------------------------------------------------- | --------- |
| accessToken | Access token with permissions to update endpoint information. See this page for more information. | text |
| endpointID | Unique endpoint identifier, which can be found on the endpoint management page. | numeric |
| rawData | Value reported by the sensor, as text. An expression must be specified in the expression converter. La expresión debe devolver un valor numérico indicando la calidad del aire (entre 0 a 500), expresada en AQI.0-50: Buena51-100: Moderada101-150: Insalubre para grupos sensibles151-200: Insalubre201-300: Muy insalubre301-500: Peligrosa | text |
| timestamp | Optional value indicating the UTC date and time corresponding to the measurement. The date format must match one of those specified in the date formats section. If the field is omitted, the platform will assume the measurement corresponds to the current date and time. | text |
# Appliances and Other On/Off Devices
Reporting Endpoint Status [#reporting-endpoint-status]
The HTTP integration of appliances and other on/off devices (valves, lamps, motors, etc.) uses the following structure:
```
POST /services/gear/DeviceIntegrationService.svc/UpdateApplianceStatus HTTP/1.1
Host: gear.cloud.studio
Content-Type: application/json
{
"accessToken": "xxxxxxxxxxxxxxxxxxxxxxxxxxxxxxxxxxxxxxxx",
"endpointID": 1,
"isOn": true,
"timestamp": "2021-02-23T14:55:03"
}
```
Parameters [#parameters]
| Name | Description | Data Type |
| ----------- | ---------------------------------------------------------------------------------------------------------------------------------------------------------------------------------------------------------------------------------------------------------------------------- | --------- |
| accessToken | Access token with permissions to update endpoint information. See this page for more information. | text |
| endpointID | Unique endpoint identifier or combination of device address and endpoint address in format \[deviceAddress]:endpointAddress (e.g.: \[device-1234]:1). These values can be found on the endpoint management page. | numeric |
| isOn | Indica si el artefacto está encendido (true) o apagado (false) | bool |
| timestamp | Optional value indicating the UTC date and time corresponding to the measurement. The date format must match one of those specified in the date formats section. If the field is omitted, the platform will assume the measurement corresponds to the current date and time. | text |
Reporting Status in "raw" Format [#reporting-status-in-raw-format]
El estado del endpoint can be reported as a **raw value** using the [expression converter](/docs/configuracion-del-cliente/dispositivos-y-endpoints/endpoints/conversion-de-datos-crudos-raw). This option is convenient when the device is unable to perform conversions and emits values that need to be transformed before being injected into the platform.
Below is an example of a raw format request:
```
POST /services/gear/DeviceIntegrationService.svc/UpdateApplianceStatusRaw HTTP/1.1
Host: gear.cloud.studio
Content-Type: application/json
{
"accessToken": "xxxxxxxxxxxxxxxxxxxxxxxxxxxxxxxxxxxxxxxx",
"endpointID": 1,
"rawData": "true",
"timestamp": "2021-02-23T14:55:03"
}
```
Parameters [#parameters-1]
| Name | Description | Data Type |
| ----------- | ---------------------------------------------------------------------------------------------------------------------------------------------------------------------------------------------------------------------------------------------------------------------------- | --------- |
| accessToken | Access token with permissions to update endpoint information. See this page for more information. | text |
| endpointID | Unique endpoint identifier, which can be found on the endpoint management page. | numeric |
| rawData | Value reported by the sensor, as text. An expression must be specified in the expression converter. La expresión debe devolver un valor booleano indicando si el artefacto está encendido (true) o apagado (false). | text |
| timestamp | Optional value indicating the UTC date and time corresponding to the measurement. The date format must match one of those specified in the date formats section. If the field is omitted, the platform will assume the measurement corresponds to the current date and time. | text |
# Cameras
Storing Snapshots [#storing-snapshots]
The HTTP integration of cameras allows storing snapshots using the following structure:
```
POST /services/gear/DeviceIntegrationService.svc/UploadCameraSnapshot HTTP/1.1
Host: gear.cloud.studio
Content-Type: application/json
{
"accessToken": "xxxxxxxxxxxxxxxxxxxxxxxxxxxxxxxxxxxxxxxx",
"endpointID": 1,
"fileType": "jpg",
"content": "/9j/4QB4RXhpZgAATU0AKgAAAAgABAEAAAQAAAABAAAFAAEBAAQAAAABAAAC0IdpAAQAAAA....[truncated]....",
"timestamp": "2021-02-23T14:55:03"
}
```
Parameters [#parameters]
| Name | Description | Data Type |
| ----------- | ----------------------------------------------------------------------------------------------------------------------------------------------------------------------------------------------------------------------------------------------------------- | --------- |
| accessToken | Access token with permissions to update endpoint information. See this page for more information. | text |
| endpointID | Unique endpoint identifier or combination of device address and endpoint address in format \[deviceAddress]:endpointAddress (e.g.: \[device-1234]:1). These values can be found on the endpoint management page. | numeric |
| fileType | Tipo de archivo que se está almacenando, por ejemplo “jpg”, o “png”. | text |
| content | Contenido binario del snapshot, en formato base/64. Nota: en el ejemplo más arriba, el campo “content” está truncado para más legibilidad. | text |
| timestamp | Optional value indicating the UTC date and time of the snapshot. The date format must match one of those specified in the date formats section. If the field is omitted, the platform will assume the measurement corresponds to the current date and time. | text |
# People Counters
Reporting Endpoint Status [#reporting-endpoint-status]
The HTTP integration of people counters uses the following structure:
```
POST /services/gear/DeviceIntegrationService.svc/UpdatePeopleCounterStatus HTTP/1.1
Host: gear.cloud.studio
Content-Type: application/json
{
"accessToken": "xxxxxxxxxxxxxxxxxxxxxxxxxxxxxxxxxxxxxxxx",
"endpointID": 1,
"peopleCount": 25,
"timestamp": "2021-02-23T14:55:03"
}
```
Parameters [#parameters]
| Name | Description | Data Type |
| ----------- | ---------------------------------------------------------------------------------------------------------------------------------------------------------------------------------------------------------------------------------------------------------------------------- | --------- |
| accessToken | Access token with permissions to update endpoint information. See this page for more information. | text |
| endpointID | Unique endpoint identifier or combination of device address and endpoint address in format \[deviceAddress]:endpointAddress (e.g.: \[device-1234]:1). These values can be found on the endpoint management page. | numeric |
| peopleCount | Indica la cantidad de personas detectadas por el sensor. | numeric |
| timestamp | Optional value indicating the UTC date and time corresponding to the measurement. The date format must match one of those specified in the date formats section. If the field is omitted, the platform will assume the measurement corresponds to the current date and time. | text |
Reporting Status in "raw" Format [#reporting-status-in-raw-format]
El estado del endpoint can be reported as a **raw value** using the [expression converter](/docs/configuracion-del-cliente/dispositivos-y-endpoints/endpoints/conversion-de-datos-crudos-raw). This option is convenient when the device is unable to perform conversions and emits values that need to be transformed before being injected into the platform.
Below is an example of a raw format request:
```
POST /services/gear/DeviceIntegrationService.svc/UpdatePeopleCounterStatusRaw HTTP/1.1
Host: gear.cloud.studio
Content-Type: application/json
{
"accessToken": "xxxxxxxxxxxxxxxxxxxxxxxxxxxxxxxxxxxxxxxx",
"endpointID": 1,
"rawData": "15.3",
"timestamp": "2021-02-23T14:55:03"
}
```
Parameters [#parameters-1]
| Name | Description | Data Type |
| ----------- | ---------------------------------------------------------------------------------------------------------------------------------------------------------------------------------------------------------------------------------------------------------------------------- | --------- |
| accessToken | Access token with permissions to update endpoint information. See this page for more information. | text |
| endpointID | Unique endpoint identifier, which can be found on the endpoint management page. | numeric |
| rawData | Value reported by the sensor, as text. An expression must be specified in the expression converter. La expresión debe devolver un valor numérico indicando la cantidad de personas detectadas por el sensor. | text |
| timestamp | Optional value indicating the UTC date and time corresponding to the measurement. The date format must match one of those specified in the date formats section. If the field is omitted, the platform will assume the measurement corresponds to the current date and time. | text |
# Curtain and Closure Controllers
Reporting Endpoint Status [#reporting-endpoint-status]
The HTTP integration of curtain controllers and other closures uses the following structure:
```
POST /services/gear/DeviceIntegrationService.svc/UpdateClosureControllerStatus HTTP/1.1
Host: gear.cloud.studio
Content-Type: application/json
{
"accessToken": "xxxxxxxxxxxxxxxxxxxxxxxxxxxxxxxxxxxxxxxx",
"endpointID": 1,
"position": 75,
"isMoving": true,
"timestamp": "2021-02-23T14:55:03"
}
```
Parameters [#parameters]
| Name | Description | Data Type |
| ----------- | ---------------------------------------------------------------------------------------------------------------------------------------------------------------------------------------------------------------------------------------------------------------------------- | --------- |
| accessToken | Access token with permissions to update endpoint information. See this page for more information. | text |
| endpointID | Unique endpoint identifier or combination of device address and endpoint address in format \[deviceAddress]:endpointAddress (e.g.: \[device-1234]:1). These values can be found on the endpoint management page. | numeric |
| position | Indica la posición actual del cerramiento como porcentaje, entre 0 (completamente cerrado) y 100 (completamente abierto). | bool |
| isMoving | Indica si el cerramiento está actualmente en movimiento. El valor true indica que el cerramiento está siendo cerrado o abierto, mientras que el valor false indica que está detenido. | numeric |
| timestamp | Optional value indicating the UTC date and time corresponding to the measurement. The date format must match one of those specified in the date formats section. If the field is omitted, the platform will assume the measurement corresponds to the current date and time. | text |
Reporting Status in "raw" Format [#reporting-status-in-raw-format]
El estado del endpoint can be reported as a **raw value** using the [expression converter](/docs/configuracion-del-cliente/dispositivos-y-endpoints/endpoints/conversion-de-datos-crudos-raw). This option is convenient when the device is unable to perform conversions and emits values that need to be transformed before being injected into the platform.
Below is an example of a raw format request:
```
POST /services/gear/DeviceIntegrationService.svc/UpdateClosureControllerStatus HTTP/1.1
Host: gear.cloud.studio
Content-Type: application/json
{
"accessToken": "xxxxxxxxxxxxxxxxxxxxxxxxxxxxxxxxxxxxxxxx",
"endpointID": 1,
"rawData": "75/true",
"timestamp": "2021-02-23T14:55:03"
}
```
Parameters [#parameters-1]
| Name | Description | Data Type |
| ----------- | ---------------------------------------------------------------------------------------------------------------------------------------------------------------------------------------------------------------------------------------------------------------------------------------------------------------------------------------------------------------------------------------------------------------------------------------------------------------------------------------------------------------------------------------- | --------- |
| accessToken | Access token with permissions to update endpoint information. See this page for more information. | text |
| endpointID | Unique endpoint identifier, which can be found on the endpoint management page. | numeric |
| rawData | Valor reportado por el sensor, como texto. Deben indicarse dos expresiones en el conversor de expresiones:La primera expresión debe devolver un valor numérico indicando la posición actual del cerramiento como porcentaje, entre 0 (completamente cerrado) y 100 (completamente abierto).La segunda expresión debe devolver un valor booleano indicando si el cerramiento está actualmente en movimiento. El valor true indica que el cerramiento está siendo cerrado o abierto, mientras que el valor false indica que está detenido. | text |
| timestamp | Optional value indicating the UTC date and time corresponding to the measurement. The date format must match one of those specified in the date formats section. If the field is omitted, the platform will assume the measurement corresponds to the current date and time. | text |
# Dimmers
Reporting Endpoint Status [#reporting-endpoint-status]
The HTTP integration of dimmers and other similar devices (speed controllers, etc.) uses the following structure:
```
POST /services/gear/DeviceIntegrationService.svc/UpdateDimmerStatus HTTP/1.1
Host: gear.cloud.studio
Content-Type: application/json
{
"accessToken": "xxxxxxxxxxxxxxxxxxxxxxxxxxxxxxxxxxxxxxxx",
"endpointID": 1,
"isOn": true,
"dimValue": 75,
"timestamp": "2021-02-23T14:55:03"
}
```
Parameters [#parameters]
| Name | Description | Data Type |
| ----------- | ---------------------------------------------------------------------------------------------------------------------------------------------------------------------------------------------------------------------------------------------------------------------------- | --------- |
| accessToken | Access token with permissions to update endpoint information. See this page for more information. | text |
| endpointID | Unique endpoint identifier or combination of device address and endpoint address in format \[deviceAddress]:endpointAddress (e.g.: \[device-1234]:1). These values can be found on the endpoint management page. | numeric |
| isOn | Indica si el artefacto está encendido (true) o apagado (false) | bool |
| dimValue | Indica el nivel de dimerización, como porcentaje entre 1 y 100. | numeric |
| timestamp | Optional value indicating the UTC date and time corresponding to the measurement. The date format must match one of those specified in the date formats section. If the field is omitted, the platform will assume the measurement corresponds to the current date and time. | text |
Reporting Status in "raw" Format [#reporting-status-in-raw-format]
El estado del endpoint can be reported as a **raw value** using the [expression converter](/docs/configuracion-del-cliente/dispositivos-y-endpoints/endpoints/conversion-de-datos-crudos-raw). This option is convenient when the device is unable to perform conversions and emits values that need to be transformed before being injected into the platform.
Below is an example of a raw format request:
```
POST /services/gear/DeviceIntegrationService.svc/UpdateDimmerStatusRaw HTTP/1.1
Host: gear.cloud.studio
Content-Type: application/json
{
"accessToken": "xxxxxxxxxxxxxxxxxxxxxxxxxxxxxxxxxxxxxxxx",
"endpointID": 1,
"rawData": "true/75",
"timestamp": "2021-02-23T14:55:03"
}
```
Parameters [#parameters-1]
| Name | Description | Data Type |
| ----------- | -------------------------------------------------------------------------------------------------------------------------------------------------------------------------------------------------------------------------------------------------------------------------------------------------------------------------------------------------------------------- | --------- |
| accessToken | Access token with permissions to update endpoint information. See this page for more information. | text |
| endpointID | Unique endpoint identifier, which can be found on the endpoint management page. | numeric |
| rawData | Valor reportado por el sensor, como texto. Deben indicarse dos expresiones en el conversor de expresiones:La primera expresión debe devolver un valor booleano indicando si el artefacto está encendido (true) o apagado (false).La segunda expresión debe devolver un valor numérico indicando el nivel de dimerización del aparato, como porcentaje entre 1 y 100. | text |
| timestamp | Optional value indicating the UTC date and time corresponding to the measurement. The date format must match one of those specified in the date formats section. If the field is omitted, the platform will assume the measurement corresponds to the current date and time. | text |
# Frequency Meters
Reporting Frequency in Hertz [#reporting-frequency-in-hertz]
The HTTP integration of frequency meters uses the following structure:
```
POST /services/gear/DeviceIntegrationService.svc/UpdateFrequencySensorStatus HTTP/1.1
Host: gear.cloud.studio
Content-Type: application/json
{
"accessToken": "xxxxxxxxxxxxxxxxxxxxxxxxxxxxxxxxxxxxxxxx",
"endpointID": 1,
"frequency": 45,
"timestamp": "2021-02-23T14:55:03"
}
```
Parameters [#parameters]
| Name | Description | Data Type |
| ----------- | ---------------------------------------------------------------------------------------------------------------------------------------------------------------------------------------------------------------------------------------------------------------------------- | --------- |
| accessToken | Access token with permissions to update endpoint information. See this page for more information. | text |
| endpointID | Unique endpoint identifier or combination of device address and endpoint address in format \[deviceAddress]:endpointAddress (e.g.: \[device-1234]:1). These values can be found on the endpoint management page. | numeric |
| frequency | Frecuencia expresada en Hertz. | numeric |
| timestamp | Optional value indicating the UTC date and time corresponding to the measurement. The date format must match one of those specified in the date formats section. If the field is omitted, the platform will assume the measurement corresponds to the current date and time. | text |
Reporting Frequency in "raw" Format [#reporting-frequency-in-raw-format]
Frequency can be reported as a **raw value** using the [expression converter](/docs/configuracion-del-cliente/dispositivos-y-endpoints/endpoints/conversion-de-datos-crudos-raw). This option is convenient when the device is unable to perform conversions and emits values that need to be transformed before being injected into the platform.
Below is an example of a raw format request:
```
POST /services/gear/DeviceIntegrationService.svc/UpdateFrequencySensorStatusRaw HTTP/1.1
Host: gear.cloud.studio
Content-Type: application/json
{
"accessToken": "xxxxxxxxxxxxxxxxxxxxxxxxxxxxxxxxxxxxxxxx",
"endpointID": 1,
"rawData": "45",
"timestamp": "2021-02-23T14:55:03"
}
```
Parameters [#parameters-1]
| Name | Description | Data Type |
| ----------- | ---------------------------------------------------------------------------------------------------------------------------------------------------------------------------------------------------------------------------------------------------------------------------- | --------- |
| accessToken | Access token with permissions to update endpoint information. See this page for more information. | text |
| endpointID | Unique endpoint identifier, which can be found on the endpoint management page. | numeric |
| rawData | Value reported by the sensor, as text. An expression must be specified in the expression converter. La expresión debe devolver un valor numérico indicando la frecuencia, expresada en Hertz. | text |
| timestamp | Optional value indicating the UTC date and time corresponding to the measurement. The date format must match one of those specified in the date formats section. If the field is omitted, the platform will assume the measurement corresponds to the current date and time. | text |
# HVAC / Thermostats
Reporting HVAC Device Status [#reporting-hvac-device-status]
The HTTP integration of HVAC devices uses the following structure:
```
POST /services/gear/DeviceIntegrationService.svc/UpdateHVACStatus HTTP/1.1
Host: gear.cloud.studio
Content-Type: application/json
{
"accessToken": "xxxxxxxxxxxxxxxxxxxxxxxxxxxxxxxxxxxxxxxx",
"endpointID": 1,
"mode": 4,
"fanMode": 1,
"setpoint": 21,
"ambientTemperature": 21.5,
"timestamp": "2021-02-23T14:55:03"
}
```
Parameters [#parameters]
| Name | Description | Data Type |
| ------------------ | --------------------------------------------------------------------------------------------------------------------------------------------------------------------------------------------------------------------------------------------------------------------------------------------------------------------------- | --------- |
| accessToken | Access token with permissions to update endpoint information. See this page for more information. | text |
| endpointID | Unique endpoint identifier or combination of device address and endpoint address in format \[deviceAddress]:endpointAddress (e.g.: \[device-1234]:1). These values can be found on the endpoint management page. | numeric |
| mode | Modo actual del dispositivo:1: el dispositivo está apagado.2: el dispositivo está encendido en modo automático.3: el dispositivo está encendido en modo calor.4: el dispositivo está encendido en modo frío.5: el dispositivo está encendido en modo deshumidificación.6: el dispositivo está encendido en modo ventilador. | numeric |
| fanMode | Modo actual del ventilador:1: el ventilador está en modo automático.2: el ventilador está en velocidad baja.3: el ventilador está en velocidad media.4: el ventilador está en velocidad alta. | numeric |
| setpoint | Indica el valor de temperatura deseado, en grados Celsius. | numeric |
| ambientTemperature | Indica el valor de la temperatura ambiente, en grados Celsius. | numeric |
| timestamp | Optional value indicating the UTC date and time corresponding to the measurement. The date format must match one of those specified in the date formats section. If the field is omitted, the platform will assume the measurement corresponds to the current date and time. | text |
# Sensor Data Storage
Introduction [#introduction]
This section contains information about storing data from sensors using the REST API over HTTP/HTTPS. Integration examples are provided for all endpoint types supported on the platform.
Integration by Sensor Type [#integration-by-sensor-type]
[Temperature Sensors](/docs/configuracion-del-cliente/dispositivos-y-endpoints/dispositivos/integracion-de-dispositivos/http/api-http/almacenamiento-de-datos-de-sensores/sensores-de-temperatura)
[Humidity Sensors](/docs/configuracion-del-cliente/dispositivos-y-endpoints/dispositivos/integracion-de-dispositivos/http/api-http/almacenamiento-de-datos-de-sensores/sensores-de-humedad)
[Light Level Sensors](/docs/configuracion-del-cliente/dispositivos-y-endpoints/dispositivos/integracion-de-dispositivos/http/api-http/almacenamiento-de-datos-de-sensores/sensores-de-nivel-de-iluminacion)
[Weight Sensors](/docs/configuracion-del-cliente/dispositivos-y-endpoints/dispositivos/integracion-de-dispositivos/http/api-http/almacenamiento-de-datos-de-sensores/sensores-de-peso)
[Volume Sensors](/docs/configuracion-del-cliente/dispositivos-y-endpoints/dispositivos/integracion-de-dispositivos/http/api-http/almacenamiento-de-datos-de-sensores/sensores-de-volumen)
[Pressure Sensors](/docs/configuracion-del-cliente/dispositivos-y-endpoints/dispositivos/integracion-de-dispositivos/http/api-http/almacenamiento-de-datos-de-sensores/sensores-de-presion)
[IAS Sensors (Motion, Occupancy, and Binary Sensors)](/docs/configuracion-del-cliente/dispositivos-y-endpoints/dispositivos/integracion-de-dispositivos/http/api-http/almacenamiento-de-datos-de-sensores/sensores-ias-movimiento-ocupacion-y-sensores-binarios)
[Voltage Sensors](/docs/configuracion-del-cliente/dispositivos-y-endpoints/dispositivos/integracion-de-dispositivos/http/api-http/almacenamiento-de-datos-de-sensores/sensores-de-voltaje)
[Current Sensors](/docs/configuracion-del-cliente/dispositivos-y-endpoints/dispositivos/integracion-de-dispositivos/http/api-http/almacenamiento-de-datos-de-sensores/sensores-de-corriente)
[Active Power Sensors](/docs/configuracion-del-cliente/dispositivos-y-endpoints/dispositivos/integracion-de-dispositivos/http/api-http/almacenamiento-de-datos-de-sensores/sensores-de-potencia-activa)
[Reactive Power Sensors](/docs/configuracion-del-cliente/dispositivos-y-endpoints/dispositivos/integracion-de-dispositivos/http/api-http/almacenamiento-de-datos-de-sensores/sensores-de-potencia-reactiva)
[Apparent Power Sensors](/docs/configuracion-del-cliente/dispositivos-y-endpoints/dispositivos/integracion-de-dispositivos/http/api-http/almacenamiento-de-datos-de-sensores/sensores-de-potencia-aparente)
[Cos Phi Sensors](/docs/configuracion-del-cliente/dispositivos-y-endpoints/dispositivos/integracion-de-dispositivos/http/api-http/almacenamiento-de-datos-de-sensores/sensores-de-coseno-fi)
[Frequency Meters](/docs/configuracion-del-cliente/dispositivos-y-endpoints/dispositivos/integracion-de-dispositivos/http/api-http/almacenamiento-de-datos-de-sensores/frecuencimetros)
[Energy Consumption Sensors](/docs/configuracion-del-cliente/dispositivos-y-endpoints/dispositivos/integracion-de-dispositivos/http/api-http/almacenamiento-de-datos-de-sensores/sensores-de-consumo-de-energia)
[Flow Sensors](/docs/configuracion-del-cliente/dispositivos-y-endpoints/dispositivos/integracion-de-dispositivos/http/api-http/almacenamiento-de-datos-de-sensores/sensores-de-flujo)
[Generic Sensors](/docs/configuracion-del-cliente/dispositivos-y-endpoints/dispositivos/integracion-de-dispositivos/http/api-http/almacenamiento-de-datos-de-sensores/sensores-genericos)
[Generic Flow Sensors](/docs/configuracion-del-cliente/dispositivos-y-endpoints/dispositivos/integracion-de-dispositivos/http/api-http/almacenamiento-de-datos-de-sensores/sensores-genericos-de-flujo)
[Appliances and Other On/Off Devices](/docs/configuracion-del-cliente/dispositivos-y-endpoints/dispositivos/integracion-de-dispositivos/http/api-http/almacenamiento-de-datos-de-sensores/appliances-y-otros-dispositivos-on-off)
[Dimmers](/docs/configuracion-del-cliente/dispositivos-y-endpoints/dispositivos/integracion-de-dispositivos/http/api-http/almacenamiento-de-datos-de-sensores/dimmers)
[Curtain and Closure Controllers](/docs/configuracion-del-cliente/dispositivos-y-endpoints/dispositivos/integracion-de-dispositivos/http/api-http/almacenamiento-de-datos-de-sensores/controladores-de-cortinas-y-cerramientos)
[Run-time Meters (Hour Meters)](/docs/configuracion-del-cliente/dispositivos-y-endpoints/dispositivos/integracion-de-dispositivos/http/api-http/almacenamiento-de-datos-de-sensores/run-time-meters-horometros)
[Location Trackers](/docs/configuracion-del-cliente/dispositivos-y-endpoints/dispositivos/integracion-de-dispositivos/http/api-http/almacenamiento-de-datos-de-sensores/rastreadores-de-ubicacion)
[PPM Concentration Sensors](/docs/configuracion-del-cliente/dispositivos-y-endpoints/dispositivos/integracion-de-dispositivos/http/api-http/almacenamiento-de-datos-de-sensores/sensores-de-concentracion-ppm)
[Mass/Volume Concentration Sensors](/docs/configuracion-del-cliente/dispositivos-y-endpoints/dispositivos/integracion-de-dispositivos/http/api-http/almacenamiento-de-datos-de-sensores/sensores-de-concentracion-masavolumen)
[Air Quality Sensors (AQI)](/docs/configuracion-del-cliente/dispositivos-y-endpoints/dispositivos/integracion-de-dispositivos/http/api-http/almacenamiento-de-datos-de-sensores/air-quality-index-aqi-sensors)
[People Flow Sensors](/docs/configuracion-del-cliente/dispositivos-y-endpoints/dispositivos/integracion-de-dispositivos/http/api-http/almacenamiento-de-datos-de-sensores/sensores-de-flujo-de-personas)
[People Counters](/docs/configuracion-del-cliente/dispositivos-y-endpoints/dispositivos/integracion-de-dispositivos/http/api-http/almacenamiento-de-datos-de-sensores/contadores-de-personas)
[Cameras](/docs/configuracion-del-cliente/dispositivos-y-endpoints/dispositivos/integracion-de-dispositivos/http/api-http/almacenamiento-de-datos-de-sensores/camaras)
[Text](/docs/configuracion-del-cliente/dispositivos-y-endpoints/dispositivos/integracion-de-dispositivos/http/api-http/almacenamiento-de-datos-de-sensores/sensores-de-texto)
# Location Trackers
Reporting Endpoint Status [#reporting-endpoint-status]
The HTTP integration of location trackers uses the following structure:
```
POST /services/gear/DeviceIntegrationService.svc/UpdateLocationTrackerStatus HTTP/1.1
Host: gear.cloud.studio
Content-Type: application/json
{
"accessToken": "xxxxxxxxxxxxxxxxxxxxxxxxxxxxxxxxxxxxxxxx",
"endpointID": 1,
"latitude": -13.9957594,
"longitude": 48.9339384,
"flags": 0,
"timestamp": "2021-02-23T14:55:03"
}
```
Parameters [#parameters]
| Name | Description | Data Type |
| ----------- | ----------------------------------------------------------------------------------------------------------------------------------------------------------------------------------------------------------------------------------------------------------------------------------------------------------------------------------------------------------------------------------------------------------------------------------------------------------------------------------------------------------------------------------------------------------------------- | --------- |
| accessToken | Access token with permissions to update endpoint information. See this page for more information. | text |
| endpointID | Unique endpoint identifier or combination of device address and endpoint address in format \[deviceAddress]:endpointAddress (e.g.: \[device-1234]:1). These values can be found on the endpoint management page. | numeric |
| latitude | Indica la latitud. El valor debe ser entre -90 y 90. El separador para los decimales es el punto | numeric |
| longitude | Indica la longitud. El valor debe ser entre -180 y 180. El separador para los decimales es el punto | numeric |
| flags | Indica información extra para la posición. Es un valor entero que representa una suma bit a bit. Los estados disponibles son: 0 = Nada en especial1 = La posición del sensor está cambiando2 = El sensor no puede adquirir la posición4 = El sensor no funciona correctamente. La posición informada puede ser incorrecta8 = La posición informada tiene baja precisiónLos valores pueden combinarse a través de la operación OR. Por ejemplo, para indicar que la posición informada tiene baja precisión, y la posición está cambiando, debe utilizarse (8 OR 1) = 9. | numeric |
| timestamp | Optional value indicating the UTC date and time corresponding to the measurement. The date format must match one of those specified in the date formats section. If the field is omitted, the platform will assume the measurement corresponds to the current date and time. | text |
Reporting Status in "raw" Format [#reporting-status-in-raw-format]
El estado del endpoint can be reported as a **raw value** using the [expression converter](/docs/configuracion-del-cliente/dispositivos-y-endpoints/endpoints/conversion-de-datos-crudos-raw). This option is convenient when the device is unable to perform conversions and emits values that need to be transformed before being injected into the platform.
Below is an example of a raw format request:
```
POST /services/gear/DeviceIntegrationService.svc/UpdateLocationTrackerStatusRaw HTTP/1.1
Host: gear.cloud.studio
Content-Type: application/json
{
"accessToken": "xxxxxxxxxxxxxxxxxxxxxxxxxxxxxxxxxxxxxxxx",
"endpointID": 1,
"rawData": "-13.9957594,48.933938,0",
"timestamp": "2021-02-23T14:55:03"
}
```
Parameters [#parameters-1]
| Name | Description | Data Type |
| ----------- | ------------------------------------------------------------------------------------------------------------------------------------------------------------------------------------------------------------------------------------------------------------------------------------------------------------------------------------------------------------------------------------------------------------------------------------------------------------------------------------------------------------------------------------------------------------------------------------------------------------------------------------------------------------------------------------------------------------------------------------------------------------------------------------------------------------------------------------------------------------------------------------------------------------------------------------------------------------------------------------------------------------------------------------------------------- | --------- |
| accessToken | Access token with permissions to update endpoint information. See this page for more information. | text |
| endpointID | Unique endpoint identifier, which can be found on the endpoint management page. | numeric |
| rawData | Valor reportado por el sensor, como texto. Deben indicarse dos expresiones en el conversor de expresiones:La primera expresión debe devolver un valor numérico indicando la longitud. El valor debe ser entre -90 y 90. El separador para los decimales es el puntoLa segunda expresión debe devolver un valor numérico indicando la longitud. El valor debe ser entre -180 y 180. El separador para los decimales es el puntoLa tercera expresión debe devolver un valor entero indicando detalles de la posición (flags). Es un valor entero que representa una suma bit a bit. Los estados disponibles son:0 = Nada en especial1 = La posición del sensor está cambiando2 = El sensor no puede adquirir la posición4 = El sensor no funciona correctamente. La posición informada puede ser incorrecta8 = La posición informada tiene baja precisiónLos valores pueden combinarse a través de la operación OR. Por ejemplo, para indicar que la posición informada tiene baja precisión, y la posición está cambiando, debe utilizarse (8 OR 1) = 9. | text |
| timestamp | Optional value indicating the UTC date and time corresponding to the measurement. The date format must match one of those specified in the date formats section. If the field is omitted, the platform will assume the measurement corresponds to the current date and time. | text |
# Run-time Meters (Hour Meters)
> The integration de run-time meters utiliza la misma API que los sensores de flujo no-genéricos. La única diferencia es que los run time meters deben informar el flujo de tiempo **en segundos**.
Reporte de tiempo acumulado en segundos [#reporte-de-tiempo-acumulado-en-segundos]
The integration de run time meters por HTTP uses the following structure, que es idéntica a la de cualquier sensor de flujo:
```
POST /services/gear/DeviceIntegrationService.svc/UpdateFlowSensorValueSummation HTTP/1.1
Host: gear.cloud.studio
Content-Type: application/json
{
"accessToken": "xxxxxxxxxxxxxxxxxxxxxxxxxxxxxxxxxxxxxxxx",
"endpointID": 1,
"summationValue": 112685,
"timestamp": "2021-02-23T14:55:03"
}
```
Parameters [#parameters]
| Name | Description | Data Type |
| -------------- | ---------------------------------------------------------------------------------------------------------------------------------------------------------------------------------------------------------------------------------------------------------------------------- | --------- |
| accessToken | Access token with permissions to update endpoint information. See this page for more information. | text |
| endpointID | Unique endpoint identifier or combination of device address and endpoint address in format \[deviceAddress]:endpointAddress (e.g.: \[device-1234]:1). These values can be found on the endpoint management page. | numeric |
| summationValue | Valor acumulado de tiempo informado por el sensor, expresado en segundos. | numeric |
| timestamp | Optional value indicating the UTC date and time corresponding to the measurement. The date format must match one of those specified in the date formats section. If the field is omitted, the platform will assume the measurement corresponds to the current date and time. | text |
Reporte de tiempo acumulado en formato "raw" [#reporte-de-tiempo-acumulado-en-formato-raw]
Accumulated time can be reported as a **raw value** using the [expression converter](/docs/configuracion-del-cliente/dispositivos-y-endpoints/endpoints/conversion-de-datos-crudos-raw). This option is convenient when the device is unable to perform conversions and emits values that need to be transformed before being injected into the platform.
Below is an example of a raw format request:
```
POST /services/gear/DeviceIntegrationService.svc/UpdateFlowSensorValueSummationRaw HTTP/1.1
Host: gear.cloud.studio
Content-Type: application/json
{
"accessToken": "xxxxxxxxxxxxxxxxxxxxxxxxxxxxxxxxxxxxxxxx",
"endpointID": 1,
"rawData": "112685",
"timestamp": "2021-02-23T14:55:03"
}
```
Parameters [#parameters-1]
| Name | Description | Data Type |
| ----------- | ---------------------------------------------------------------------------------------------------------------------------------------------------------------------------------------------------------------------------------------------------------------------------- | --------- |
| accessToken | Access token with permissions to update endpoint information. See this page for more information. | text |
| endpointID | Unique endpoint identifier, which can be found on the endpoint management page. | numeric |
| rawData | Value reported by the sensor, as text. An expression must be specified in the expression converter. La expresión debe devolver un valor numérico indicando el tiempo acumulado informado por el sensor, expresado en segundos. | text |
| timestamp | Optional value indicating the UTC date and time corresponding to the measurement. The date format must match one of those specified in the date formats section. If the field is omitted, the platform will assume the measurement corresponds to the current date and time. | text |
# Mass/Volume Concentration Sensors
Reporting Endpoint Status [#reporting-endpoint-status]
The HTTP integration of mass/volume concentration sensors uses the following structure:
```
POST /services/gear/DeviceIntegrationService.svc/UpdateConcentrationSensorStatus HTTP/1.1
Host: gear.cloud.studio
Content-Type: application/json
{
"accessToken": "xxxxxxxxxxxxxxxxxxxxxxxxxxxxxxxxxxxxxxxx",
"endpointID": 1,
"concentration": 17.9,
"timestamp": "2021-02-23T14:55:03"
}
```
Parameters [#parameters]
| Name | Description | Data Type |
| ------------- | ---------------------------------------------------------------------------------------------------------------------------------------------------------------------------------------------------------------------------------------------------------------------------- | --------- |
| accessToken | Access token with permissions to update endpoint information. See this page for more information. | text |
| endpointID | Unique endpoint identifier or combination of device address and endpoint address in format \[deviceAddress]:endpointAddress (e.g.: \[device-1234]:1). These values can be found on the endpoint management page. | numeric |
| concentration | Indica la concentración de materia (masa/volumen), expresada en microgramos/metro cúbico (μg/m³). El separador para los decimales es el punto. | numeric |
| timestamp | Optional value indicating the UTC date and time corresponding to the measurement. The date format must match one of those specified in the date formats section. If the field is omitted, the platform will assume the measurement corresponds to the current date and time. | text |
Reporting Status in "raw" Format [#reporting-status-in-raw-format]
El estado del endpoint can be reported as a **raw value** using the [expression converter](/docs/configuracion-del-cliente/dispositivos-y-endpoints/endpoints/conversion-de-datos-crudos-raw). This option is convenient when the device is unable to perform conversions and emits values that need to be transformed before being injected into the platform.
Below is an example of a raw format request:
```
POST /services/gear/DeviceIntegrationService.svc/UpdateConcentrationSensorStatusRaw HTTP/1.1
Host: gear.cloud.studio
Content-Type: application/json
{
"accessToken": "xxxxxxxxxxxxxxxxxxxxxxxxxxxxxxxxxxxxxxxx",
"endpointID": 1,
"rawData": "17.9",
"timestamp": "2021-02-23T14:55:03"
}
```
Parameters [#parameters-1]
| Name | Description | Data Type |
| ----------- | ---------------------------------------------------------------------------------------------------------------------------------------------------------------------------------------------------------------------------------------------------------------------------- | --------- |
| accessToken | Access token with permissions to update endpoint information. See this page for more information. | text |
| endpointID | Unique endpoint identifier, which can be found on the endpoint management page. | numeric |
| rawData | Value reported by the sensor, as text. An expression must be specified in the expression converter. La expresión debe devolver un valor numérico indicando la concentración de materia (masa/volumen), expresada en microgramos/metro cúbico (μg/m³). | text |
| timestamp | Optional value indicating the UTC date and time corresponding to the measurement. The date format must match one of those specified in the date formats section. If the field is omitted, the platform will assume the measurement corresponds to the current date and time. | text |
# PPM Concentration Sensors
Reporting Endpoint Status [#reporting-endpoint-status]
The HTTP integration of PPM concentration sensors uses the following structure:
```
POST /services/gear/DeviceIntegrationService.svc/UpdateConcentrationSensorStatus HTTP/1.1
Host: gear.cloud.studio
Content-Type: application/json
{
"accessToken": "xxxxxxxxxxxxxxxxxxxxxxxxxxxxxxxxxxxxxxxx",
"endpointID": 1,
"concentration": 17.9,
"timestamp": "2021-02-23T14:55:03"
}
```
Parameters [#parameters]
| Name | Description | Data Type |
| ------------- | ---------------------------------------------------------------------------------------------------------------------------------------------------------------------------------------------------------------------------------------------------------------------------- | --------- |
| accessToken | Access token with permissions to update endpoint information. See this page for more information. | text |
| endpointID | Unique endpoint identifier or combination of device address and endpoint address in format \[deviceAddress]:endpointAddress (e.g.: \[device-1234]:1). These values can be found on the endpoint management page. | numeric |
| concentration | Indica la concentración de materia, expresada en en partes por millón (ppm). El separador para los decimales es el punto. | numeric |
| timestamp | Optional value indicating the UTC date and time corresponding to the measurement. The date format must match one of those specified in the date formats section. If the field is omitted, the platform will assume the measurement corresponds to the current date and time. | text |
Reporting Status in "raw" Format [#reporting-status-in-raw-format]
El estado del endpoint can be reported as a **raw value** using the [expression converter](/docs/configuracion-del-cliente/dispositivos-y-endpoints/endpoints/conversion-de-datos-crudos-raw). This option is convenient when the device is unable to perform conversions and emits values that need to be transformed before being injected into the platform.
Below is an example of a raw format request:
```
POST /services/gear/DeviceIntegrationService.svc/UpdateConcentrationSensorStatusRaw HTTP/1.1
Host: gear.cloud.studio
Content-Type: application/json
{
"accessToken": "xxxxxxxxxxxxxxxxxxxxxxxxxxxxxxxxxxxxxxxx",
"endpointID": 1,
"rawData": "17.9",
"timestamp": "2021-02-23T14:55:03"
}
```
Parameters [#parameters-1]
| Name | Description | Data Type |
| ----------- | ---------------------------------------------------------------------------------------------------------------------------------------------------------------------------------------------------------------------------------------------------------------------------- | --------- |
| accessToken | Access token with permissions to update endpoint information. See this page for more information. | text |
| endpointID | Unique endpoint identifier, which can be found on the endpoint management page. | numeric |
| rawData | Value reported by the sensor, as text. An expression must be specified in the expression converter. La expresión debe devolver un valor numérico indicando la concentración de materia en partes por millón (ppm). | text |
| timestamp | Optional value indicating the UTC date and time corresponding to the measurement. The date format must match one of those specified in the date formats section. If the field is omitted, the platform will assume the measurement corresponds to the current date and time. | text |
# Energy Consumption Sensors
Reporting Accumulated Energy in Wh and VARh [#reporting-accumulated-energy-in-wh-and-varh]
The HTTP integration of energy sensors uses the following structure:
```
POST /services/gear/DeviceIntegrationService.svc/UpdateEnergySensorValueSummation HTTP/1.1
Host: gear.cloud.studio
Content-Type: application/json
{
"accessToken": "xxxxxxxxxxxxxxxxxxxxxxxxxxxxxxxxxxxxxxxx",
"endpointID": 1,
"activeEnergySummationWh": 112685.9,
"reactiveEnergySummationVARh": 18973.4,
"timestamp": "2021-02-23T14:55:03"
}
```
Parameters [#parameters]
| Name | Description | Data Type |
| --------------------------- | ---------------------------------------------------------------------------------------------------------------------------------------------------------------------------------------------------------------------------------------------------------------------------- | --------- |
| accessToken | Access token with permissions to update endpoint information. See this page for more information. | text |
| endpointID | Unique endpoint identifier or combination of device address and endpoint address in format \[deviceAddress]:endpointAddress (e.g.: \[device-1234]:1). These values can be found on the endpoint management page. | numeric |
| activeEnergySummationWh | Valor acumulado de energía activa informado por el sensor, expresado en watt-hora (Wh). | numeric |
| reactiveEnergySummationVARh | Valor acumulado de energía reactiva informado por el sensor, expresado en volt-ampere-reactivo-hora (VARh). | numeric |
| timestamp | Optional value indicating the UTC date and time corresponding to the measurement. The date format must match one of those specified in the date formats section. If the field is omitted, the platform will assume the measurement corresponds to the current date and time. | text |
Reporting Accumulated Energy in "raw" Format [#reporting-accumulated-energy-in-raw-format]
Accumulated energy can be reported as a **raw value** using the [expression converter](/docs/configuracion-del-cliente/dispositivos-y-endpoints/endpoints/conversion-de-datos-crudos-raw). This option is convenient when the device is unable to perform conversions and emits values that need to be transformed before being injected into the platform.
Below is an example of a raw format request:
```
POST /services/gear/DeviceIntegrationService.svc/UpdateFlowSensorValueSummationRaw HTTP/1.1
Host: gear.cloud.studio
Content-Type: application/json
{
"accessToken": "xxxxxxxxxxxxxxxxxxxxxxxxxxxxxxxxxxxxxxxx",
"endpointID": 1,
"rawData": "112685.9,18973.4",
"timestamp": "2021-02-23T14:55:03"
}
```
Como puede verse en este ejemplo, el campo RawData combina el acumulado de energía activa y el acumulado de energía reactiva en un único string, en el que ambos valores están separados por una coma.
Parameters [#parameters-1]
| Name | Description | Data Type |
| ----------- | -------------------------------------------------------------------------------------------------------------------------------------------------------------------------------------------------------------------------------------------------------------------------------------------------------------------------------------------------------------------------------------------------------------------------------------------------------------------------------------------------------------------------------------------------------------------------------------------------------------------------------------------------------------------------------------------------------------------------------------------------------------- | --------- |
| accessToken | Access token with permissions to update endpoint information. See this page for more information. | text |
| endpointID | Unique endpoint identifier, which can be found on the endpoint management page. | numeric |
| rawData | Valor reportado por el sensor, como texto. Deben indicarse dos expresiones en el conversor de expresiones. La primera expresión se utiliza para obtener la energía activa acumulada a partir de la variable rawData. La expresión debe devolver un valor numérico indicando expresado en expresado en watt-hora (Wh). En el ejemplo anterior, podría utilizarse la siguiente expresión:ToNumber(StringPart(rawData, 1, ','))La segunda expresión se utiliza para obtener la energía reactiva acumulada a partir de la variable rawData. La expresión debe devolver un valor numérico indicando expresado en expresado volt-ampere-reactivo-hora (VARh). En el ejemplo anterior, podría utilizarse la siguiente expresión:ToNumber(StringPart(rawData, 2, ',')) | text |
| timestamp | Optional value indicating the UTC date and time corresponding to the measurement. The date format must match one of those specified in the date formats section. If the field is omitted, the platform will assume the measurement corresponds to the current date and time. | text |
# Current Sensors
Reporting Current in Amperes [#reporting-current-in-amperes]
The HTTP integration of current sensors uses the following structure:
```
POST /services/gear/DeviceIntegrationService.svc/UpdateCurrentSensorStatus HTTP/1.1
Host: gear.cloud.studio
Content-Type: application/json
{
"accessToken": "xxxxxxxxxxxxxxxxxxxxxxxxxxxxxxxxxxxxxxxx",
"endpointID": 1,
"currentAmperes": 18.5,
"timestamp": "2021-02-23T14:55:03"
}
```
Parameters [#parameters]
| Name | Description | Data Type |
| -------------- | ---------------------------------------------------------------------------------------------------------------------------------------------------------------------------------------------------------------------------------------------------------------------------- | --------- |
| accessToken | Access token with permissions to update endpoint information. See this page for more information. | text |
| endpointID | Unique endpoint identifier or combination of device address and endpoint address in format \[deviceAddress]:endpointAddress (e.g.: \[device-1234]:1). These values can be found on the endpoint management page. | numeric |
| currentAmperes | Current, expressed in Amperes. | numeric |
| timestamp | Optional value indicating the UTC date and time corresponding to the measurement. The date format must match one of those specified in the date formats section. If the field is omitted, the platform will assume the measurement corresponds to the current date and time. | text |
Reporting Current in "raw" Format [#reporting-current-in-raw-format]
Current can be reported as a **raw value** using the [expression converter](/docs/configuracion-del-cliente/dispositivos-y-endpoints/endpoints/conversion-de-datos-crudos-raw). This option is convenient when the device is unable to perform conversions and emits values that need to be transformed before being injected into the platform.
Below is an example of a raw format request:
```
POST /services/gear/DeviceIntegrationService.svc/UpdateCurrentSensorStatusRaw HTTP/1.1
Host: gear.cloud.studio
Content-Type: application/json
{
"accessToken": "xxxxxxxxxxxxxxxxxxxxxxxxxxxxxxxxxxxxxxxx",
"endpointID": 1,
"rawData": "18.5",
"timestamp": "2021-02-23T14:55:03"
}
```
Parameters [#parameters-1]
| Name | Description | Data Type |
| ----------- | ---------------------------------------------------------------------------------------------------------------------------------------------------------------------------------------------------------------------------------------------------------------------------- | --------- |
| accessToken | Access token with permissions to update endpoint information. See this page for more information. | text |
| endpointID | Unique endpoint identifier, which can be found on the endpoint management page. | numeric |
| rawData | Value reported by the sensor, as text. An expression must be specified in the expression converter. The expression must return a numeric value indicating current, expressed in Amperes. | text |
| timestamp | Optional value indicating the UTC date and time corresponding to the measurement. The date format must match one of those specified in the date formats section. If the field is omitted, the platform will assume the measurement corresponds to the current date and time. | text |
# Cos Phi Sensors
Reporting Cos Phi [#reporting-cos-phi]
The integration de sensores de [coseno fi](https://es.wikipedia.org/wiki/Factor_de_potencia) por HTTP uses the following structure:
```
POST /services/gear/DeviceIntegrationService.svc/UpdateCosPhiSensorStatus HTTP/1.1
Host: gear.cloud.studio
Content-Type: application/json
{
"accessToken": "xxxxxxxxxxxxxxxxxxxxxxxxxxxxxxxxxxxxxxxx",
"endpointID": 1,
"cosPhi": 0.96,
"timestamp": "2021-02-23T14:55:03"
}
```
Parameters [#parameters]
| Name | Description | Data Type |
| ----------- | ---------------------------------------------------------------------------------------------------------------------------------------------------------------------------------------------------------------------------------------------------------------------------- | --------- |
| accessToken | Access token with permissions to update endpoint information. See this page for more information. | text |
| endpointID | Unique endpoint identifier or combination of device address and endpoint address in format \[deviceAddress]:endpointAddress (e.g.: \[device-1234]:1). These values can be found on the endpoint management page. | numeric |
| cosPhi | Coseno fi, en el rango de -1 a 1. | numeric |
| timestamp | Optional value indicating the UTC date and time corresponding to the measurement. The date format must match one of those specified in the date formats section. If the field is omitted, the platform will assume the measurement corresponds to the current date and time. | text |
Reporting Cos Phi en formato "raw" [#reporting-cos-phi-en-formato-raw]
Cos phi can be reported as a **raw value** using the [expression converter](/docs/configuracion-del-cliente/dispositivos-y-endpoints/endpoints/conversion-de-datos-crudos-raw). This option is convenient when the device is unable to perform conversions and emits values that need to be transformed before being injected into the platform.
Below is an example of a raw format request:
```
POST /services/gear/DeviceIntegrationService.svc/UpdateCosPhiSensorStatusRaw HTTP/1.1
Host: gear.cloud.studio
Content-Type: application/json
{
"accessToken": "xxxxxxxxxxxxxxxxxxxxxxxxxxxxxxxxxxxxxxxx",
"endpointID": 1,
"rawData": "0.96",
"timestamp": "2021-02-23T14:55:03"
}
```
Parameters [#parameters-1]
| Name | Description | Data Type |
| ----------- | ---------------------------------------------------------------------------------------------------------------------------------------------------------------------------------------------------------------------------------------------------------------------------- | --------- |
| accessToken | Access token with permissions to update endpoint information. See this page for more information. | text |
| endpointID | Unique endpoint identifier, which can be found on the endpoint management page. | numeric |
| rawData | Value reported by the sensor, as text. An expression must be specified in the expression converter. La expresión debe devolver un valor numérico indicando el coseno fi, en el rango de -1 a 1. | text |
| timestamp | Optional value indicating the UTC date and time corresponding to the measurement. The date format must match one of those specified in the date formats section. If the field is omitted, the platform will assume the measurement corresponds to the current date and time. | text |
# Flow Sensors de personas
Reporting Endpoint Status [#reporting-endpoint-status]
The HTTP integration of people flow sensors uses the following structure:
```
POST /services/gear/DeviceIntegrationService.svc/UpdateFlowSensorValueSummation HTTP/1.1
Host: gear.cloud.studio
Content-Type: application/json
{
"accessToken": "xxxxxxxxxxxxxxxxxxxxxxxxxxxxxxxxxxxxxxxx",
"endpointID": 1,
"summationValue": 25,
"timestamp": "2021-02-23T14:55:03"
}
```
Parameters [#parameters]
| Name | Description | Data Type |
| -------------- | ---------------------------------------------------------------------------------------------------------------------------------------------------------------------------------------------------------------------------------------------------------------------------- | --------- |
| accessToken | Access token with permissions to update endpoint information. See this page for more information. | text |
| endpointID | Unique endpoint identifier or combination of device address and endpoint address in format \[deviceAddress]:endpointAddress (e.g.: \[device-1234]:1). These values can be found on the endpoint management page. | numeric |
| summationValue | Valor acumulado de flujo informado por el sensor, expresado en personas. | numeric |
| timestamp | Optional value indicating the UTC date and time corresponding to the measurement. The date format must match one of those specified in the date formats section. If the field is omitted, the platform will assume the measurement corresponds to the current date and time. | text |
Reporting Status in "raw" Format [#reporting-status-in-raw-format]
El estado del endpoint can be reported as a **raw value** using the [expression converter](/docs/configuracion-del-cliente/dispositivos-y-endpoints/endpoints/conversion-de-datos-crudos-raw). This option is convenient when the device is unable to perform conversions and emits values that need to be transformed before being injected into the platform.
Below is an example of a raw format request:
```
POST /services/gear/DeviceIntegrationService.svc/UpdateFlowSensorValueSummationRaw HTTP/1.1
Host: gear.cloud.studio
Content-Type: application/json
{
"accessToken": "xxxxxxxxxxxxxxxxxxxxxxxxxxxxxxxxxxxxxxxx",
"endpointID": 1,
"rawData": "25",
"timestamp": "2021-02-23T14:55:03"
}
```
Parameters [#parameters-1]
| Name | Description | Data Type |
| ----------- | ---------------------------------------------------------------------------------------------------------------------------------------------------------------------------------------------------------------------------------------------------------------------------- | --------- |
| accessToken | Access token with permissions to update endpoint information. See this page for more information. | text |
| endpointID | Unique endpoint identifier, which can be found on the endpoint management page. | numeric |
| rawData | Value reported by the sensor, as text. An expression must be specified in the expression converter. La expresión debe devolver un valor numérico indicando el valor acumulado de flujo informado por el sensor, expresado en personas. | text |
| timestamp | Optional value indicating the UTC date and time corresponding to the measurement. The date format must match one of those specified in the date formats section. If the field is omitted, the platform will assume the measurement corresponds to the current date and time. | text |
# Flow Sensors
Reporting Accumulated Flow in Liters [#reporting-accumulated-flow-in-liters]
The HTTP integration of flow sensors uses the following structure:
```
POST /services/gear/DeviceIntegrationService.svc/UpdateFlowSensorValueSummation HTTP/1.1
Host: gear.cloud.studio
Content-Type: application/json
{
"accessToken": "xxxxxxxxxxxxxxxxxxxxxxxxxxxxxxxxxxxxxxxx",
"endpointID": 1,
"summationValue": 112685,
"timestamp": "2021-02-23T14:55:03"
}
```
Parameters [#parameters]
| Name | Description | Data Type |
| -------------- | ---------------------------------------------------------------------------------------------------------------------------------------------------------------------------------------------------------------------------------------------------------------------------- | --------- |
| accessToken | Access token with permissions to update endpoint information. See this page for more information. | text |
| endpointID | Unique endpoint identifier or combination of device address and endpoint address in format \[deviceAddress]:endpointAddress (e.g.: \[device-1234]:1). These values can be found on the endpoint management page. | numeric |
| summationValue | Valor acumulado de flujo informado por el sensor, expresado en litros. | numeric |
| timestamp | Optional value indicating the UTC date and time corresponding to the measurement. The date format must match one of those specified in the date formats section. If the field is omitted, the platform will assume the measurement corresponds to the current date and time. | text |
Reporting Accumulated Flow in "raw" Format [#reporting-accumulated-flow-in-raw-format]
Flow can be reported as a **raw value** using the [expression converter](/docs/configuracion-del-cliente/dispositivos-y-endpoints/endpoints/conversion-de-datos-crudos-raw). This option is convenient when the device is unable to perform conversions and emits values that need to be transformed before being injected into the platform.
Below is an example of a raw format request:
```
POST /services/gear/DeviceIntegrationService.svc/UpdateFlowSensorValueSummationRaw HTTP/1.1
Host: gear.cloud.studio
Content-Type: application/json
{
"accessToken": "xxxxxxxxxxxxxxxxxxxxxxxxxxxxxxxxxxxxxxxx",
"endpointID": 1,
"rawData": "112685",
"timestamp": "2021-02-23T14:55:03"
}
```
Parameters [#parameters-1]
| Name | Description | Data Type |
| ----------- | ---------------------------------------------------------------------------------------------------------------------------------------------------------------------------------------------------------------------------------------------------------------------------- | --------- |
| accessToken | Access token with permissions to update endpoint information. See this page for more information. | text |
| endpointID | Unique endpoint identifier, which can be found on the endpoint management page. | numeric |
| rawData | Value reported by the sensor, as text. An expression must be specified in the expression converter. La expresión debe devolver un valor numérico indicando el valor acumulado de flujo informado por el sensor, expresado en litros. | text |
| timestamp | Optional value indicating the UTC date and time corresponding to the measurement. The date format must match one of those specified in the date formats section. If the field is omitted, the platform will assume the measurement corresponds to the current date and time. | text |
# Humidity Sensors
Reporting Humidity as Percentage [#reporting-humidity-as-percentage]
The HTTP integration of humidity sensors uses the following structure:
```
POST /services/gear/DeviceIntegrationService.svc/UpdateHumiditySensorStatus HTTP/1.1
Host: gear.cloud.studio
Content-Type: application/json
{
"accessToken": "xxxxxxxxxxxxxxxxxxxxxxxxxxxxxxxxxxxxxxxx",
"endpointID": 1,
"humidityPercentage": 49,
"timestamp": "2021-02-23T14:55:03"
}
```
Parameters [#parameters]
| Name | Description | Data Type |
| ------------------ | ---------------------------------------------------------------------------------------------------------------------------------------------------------------------------------------------------------------------------------------------------------------------------- | --------- |
| accessToken | Access token with permissions to update endpoint information. See this page for more information. | text |
| endpointID | Unique endpoint identifier or combination of device address and endpoint address in format \[deviceAddress]:endpointAddress (e.g.: \[device-1234]:1). These values can be found on the endpoint management page. | text |
| humidityPercentage | Humidity percentage, from 0 to 100. | text |
| timestamp | Optional value indicating the UTC date and time corresponding to the measurement. The date format must match one of those specified in the date formats section. If the field is omitted, the platform will assume the measurement corresponds to the current date and time. | text |
Reporting Humidity in "raw" Format [#reporting-humidity-in-raw-format]
Humidity can be reported as a **raw value** using the [expression converter](/docs/configuracion-del-cliente/dispositivos-y-endpoints/endpoints/conversion-de-datos-crudos-raw). This option is convenient when the device is unable to perform conversions and emits values that need to be transformed before being injected into the platform.
Below is an example of a raw format request:
```
POST /services/gear/DeviceIntegrationService.svc/UpdateHumiditySensorStatusRaw HTTP/1.1
Host: gear.cloud.studio
Content-Type: application/json
{
"accessToken": "",
"endpointID": 1,
"rawData": "49",
"timestamp": "2021-02-23T14:55:03"
}
```
Parameters [#parameters-1]
| Name | Description | Data Type |
| ----------- | ---------------------------------------------------------------------------------------------------------------------------------------------------------------------------------------------------------------------------------------------------------------------------- | --------- |
| accessToken | Access token with permissions to update endpoint information. See this page for more information. | text |
| endpointID | Unique endpoint identifier, which can be found on the endpoint management page. | numeric |
| rawData | Value reported by the sensor, as text. An expression must be specified in the expression converter. The expression must return a numeric value between 0 and 100. | text |
| timestamp | Optional value indicating the UTC date and time corresponding to the measurement. The date format must match one of those specified in the date formats section. If the field is omitted, the platform will assume the measurement corresponds to the current date and time. | text |
# Light Level Sensors
Reporting Light Level as Percentage [#reporting-light-level-as-percentage]
The HTTP integration of light sensors uses the following structure:
```
POST /services/gear/DeviceIntegrationService.svc/UpdateLightSensorStatus HTTP/1.1
Host: gear.cloud.studio
Content-Type: application/json
{
"accessToken": "xxxxxxxxxxxxxxxxxxxxxxxxxxxxxxxxxxxxxxxx",
"endpointID": 1,
"lightIntensity": 7550,
"timestamp": "2021-02-23T14:55:03"
}
```
Parameters [#parameters]
| Name | Description | Data Type |
| -------------- | ---------------------------------------------------------------------------------------------------------------------------------------------------------------------------------------------------------------------------------------------------------------------------- | --------- |
| accessToken | Access token with permissions to update endpoint information. See this page for more information. | text |
| endpointID | Unique endpoint identifier or combination of device address and endpoint address in format \[deviceAddress]:endpointAddress (e.g.: \[device-1234]:1). These values can be found on the endpoint management page. | text |
| lightIntensity | Light intensity expressed in lux. | text |
| timestamp | Optional value indicating the UTC date and time corresponding to the measurement. The date format must match one of those specified in the date formats section. If the field is omitted, the platform will assume the measurement corresponds to the current date and time. | text |
Reporting Light Level in "raw" Format [#reporting-light-level-in-raw-format]
Light level can be reported as a **raw value** using the [expression converter](/docs/configuracion-del-cliente/dispositivos-y-endpoints/endpoints/conversion-de-datos-crudos-raw). This option is convenient when the device is unable to perform conversions and emits values that need to be transformed before being injected into the platform.
Below is an example of a raw format request:
```
POST /services/gear/DeviceIntegrationService.svc/UpdateLightSensorStatusRaw HTTP/1.1
Host: gear.cloud.studio
Content-Type: application/json
{
"accessToken": "xxxxxxxxxxxxxxxxxxxxxxxxxxxxxxxxxxxxxxxx",
"endpointID": 1,
"rawData": "7550",
"timestamp": "2021-02-23T14:55:03"
}
```
Parameters [#parameters-1]
| Name | Description | Data Type |
| ----------- | ---------------------------------------------------------------------------------------------------------------------------------------------------------------------------------------------------------------------------------------------------------------------------- | --------- |
| accessToken | Access token with permissions to update endpoint information. See this page for more information. | text |
| endpointID | Unique endpoint identifier, which can be found on the endpoint management page. | numeric |
| rawData | Value reported by the sensor, as text. An expression must be specified in the expression converter. The expression must return a numeric value indicating light intensity expressed in lux. | text |
| timestamp | Optional value indicating the UTC date and time corresponding to the measurement. The date format must match one of those specified in the date formats section. If the field is omitted, the platform will assume the measurement corresponds to the current date and time. | text |
# Weight Sensors
Reporting Weight in Grams [#reporting-weight-in-grams]
The HTTP integration of weight sensors uses the following structure:
```
POST /services/gear/DeviceIntegrationService.svc/UpdateWeightSensorStatus HTTP/1.1
Host: gear.cloud.studio
Content-Type: application/json
{
"accessToken": "xxxxxxxxxxxxxxxxxxxxxxxxxxxxxxxxxxxxxxxx",
"endpointID": 1,
"weightGrams": 4500,
"timestamp": "2021-02-23T14:55:03"
}
```
Parameters [#parameters]
| Name | Description | Data Type |
| ----------- | ---------------------------------------------------------------------------------------------------------------------------------------------------------------------------------------------------------------------------------------------------------------------------- | --------- |
| accessToken | Access token with permissions to update endpoint information. See this page for more information. | text |
| endpointID | Unique endpoint identifier or combination of device address and endpoint address in format \[deviceAddress]:endpointAddress (e.g.: \[device-1234]:1). These values can be found on the endpoint management page. | text |
| weightGrams | Weight, expressed in grams. | numeric |
| timestamp | Optional value indicating the UTC date and time corresponding to the measurement. The date format must match one of those specified in the date formats section. If the field is omitted, the platform will assume the measurement corresponds to the current date and time. | text |
Reporting Weight in "raw" Format [#reporting-weight-in-raw-format]
Weight can be reported as a **raw value** using the [expression converter](/docs/configuracion-del-cliente/dispositivos-y-endpoints/endpoints/conversion-de-datos-crudos-raw). This option is convenient when the device is unable to perform conversions and emits values that need to be transformed before being injected into the platform.
Below is an example of a raw format request:
```
POST /services/gear/DeviceIntegrationService.svc/UpdateWeightSensorStatusRaw HTTP/1.1
Host: gear.cloud.studio
Content-Type: application/json
{
"accessToken": "xxxxxxxxxxxxxxxxxxxxxxxxxxxxxxxxxxxxxxxx",
"endpointID": 1,
"rawData": "4500",
"timestamp": "2021-02-23T14:55:03"
}
```
Parameters [#parameters-1]
| Name | Description | Data Type |
| ----------- | ---------------------------------------------------------------------------------------------------------------------------------------------------------------------------------------------------------------------------------------------------------------------------- | --------- |
| accessToken | Access token with permissions to update endpoint information. See this page for more information. | text |
| endpointID | Unique endpoint identifier, which can be found on the endpoint management page. | numeric |
| rawData | Value reported by the sensor, as text. An expression must be specified in the expression converter. The expression must return a numeric value indicating weight, expressed in grams. | text |
| timestamp | Optional value indicating the UTC date and time corresponding to the measurement. The date format must match one of those specified in the date formats section. If the field is omitted, the platform will assume the measurement corresponds to the current date and time. | text |
# Active Power Sensors
Reporting Active Power in Watts [#reporting-active-power-in-watts]
The HTTP integration of active power sensors uses the following structure:
```
POST /services/gear/DeviceIntegrationService.svc/UpdateActivePowerSensorStatus HTTP/1.1
Host: gear.cloud.studio
Content-Type: application/json
{
"accessToken": "xxxxxxxxxxxxxxxxxxxxxxxxxxxxxxxxxxxxxxxx",
"endpointID": 1,
"activePowerWatts": 18.5,
"timestamp": "2021-02-23T14:55:03"
}
```
Parameters [#parameters]
| Name | Description | Data Type |
| ---------------- | ---------------------------------------------------------------------------------------------------------------------------------------------------------------------------------------------------------------------------------------------------------------------------- | --------- |
| accessToken | Access token with permissions to update endpoint information. See this page for more information. | text |
| endpointID | Unique endpoint identifier or combination of device address and endpoint address in format \[deviceAddress]:endpointAddress (e.g.: \[device-1234]:1). These values can be found on the endpoint management page. | numeric |
| activePowerWatts | Active power, expressed in Watts. | numeric |
| timestamp | Optional value indicating the UTC date and time corresponding to the measurement. The date format must match one of those specified in the date formats section. If the field is omitted, the platform will assume the measurement corresponds to the current date and time. | text |
Reporting Active Power in "raw" Format [#reporting-active-power-in-raw-format]
Active power can be reported as a **raw value** using the [expression converter](/docs/configuracion-del-cliente/dispositivos-y-endpoints/endpoints/conversion-de-datos-crudos-raw). This option is convenient when the device is unable to perform conversions and emits values that need to be transformed before being injected into the platform.
Below is an example of a raw format request:
```
POST /services/gear/DeviceIntegrationService.svc/UpdateActivePowerSensorStatusRaw HTTP/1.1
Host: gear.cloud.studio
Content-Type: application/json
{
"accessToken": "xxxxxxxxxxxxxxxxxxxxxxxxxxxxxxxxxxxxxxxx",
"endpointID": 1,
"rawData": "18.5",
"timestamp": "2021-02-23T14:55:03"
}
```
Parameters [#parameters-1]
| Name | Description | Data Type |
| ----------- | ---------------------------------------------------------------------------------------------------------------------------------------------------------------------------------------------------------------------------------------------------------------------------- | --------- |
| accessToken | Access token with permissions to update endpoint information. See this page for more information. | text |
| endpointID | Unique endpoint identifier, which can be found on the endpoint management page. | numeric |
| rawData | Value reported by the sensor, as text. An expression must be specified in the expression converter. The expression must return a numeric value indicating the measured active power, expressed in Watts. | text |
| timestamp | Optional value indicating the UTC date and time corresponding to the measurement. The date format must match one of those specified in the date formats section. If the field is omitted, the platform will assume the measurement corresponds to the current date and time. | text |
# Apparent Power Sensors
Reporting Apparent Power in VA [#reporting-apparent-power-in-va]
The integration de sensores de [potencia aparente](https://es.wikipedia.org/wiki/Potencia_el%C3%A9ctrica) por HTTP uses the following structure:
```
POST /services/gear/DeviceIntegrationService.svc/UpdateApparentPowerSensorStatus HTTP/1.1
Host: gear.cloud.studio
Content-Type: application/json
{
"accessToken": "xxxxxxxxxxxxxxxxxxxxxxxxxxxxxxxxxxxxxxxx",
"endpointID": 1,
"apparentPowerVA": 2850.5,
"timestamp": "2021-02-23T14:55:03"
}
```
Parameters [#parameters]
| Name | Description | Data Type |
| --------------- | ---------------------------------------------------------------------------------------------------------------------------------------------------------------------------------------------------------------------------------------------------------------------------- | --------- |
| accessToken | Access token with permissions to update endpoint information. See this page for more information. | text |
| endpointID | Unique endpoint identifier or combination of device address and endpoint address in format \[deviceAddress]:endpointAddress (e.g.: \[device-1234]:1). These values can be found on the endpoint management page. | numeric |
| apparentPowerVA | Apparent power, expressed in VA. | numeric |
| timestamp | Optional value indicating the UTC date and time corresponding to the measurement. The date format must match one of those specified in the date formats section. If the field is omitted, the platform will assume the measurement corresponds to the current date and time. | text |
Reporting Apparent Power in "raw" Format [#reporting-apparent-power-in-raw-format]
Apparent power can be reported as a **raw value** using the [expression converter](/docs/configuracion-del-cliente/dispositivos-y-endpoints/endpoints/conversion-de-datos-crudos-raw). This option is convenient when the device is unable to perform conversions and emits values that need to be transformed before being injected into the platform.
Below is an example of a raw format request:
```
POST /services/gear/DeviceIntegrationService.svc/UpdateApparentPowerSensorStatusRaw HTTP/1.1
Host: gear.cloud.studio
Content-Type: application/json
{
"accessToken": "xxxxxxxxxxxxxxxxxxxxxxxxxxxxxxxxxxxxxxxx",
"endpointID": 1,
"rawData": "2850.5",
"timestamp": "2021-02-23T14:55:03"
}
```
Parameters [#parameters-1]
| Name | Description | Data Type |
| ----------- | ---------------------------------------------------------------------------------------------------------------------------------------------------------------------------------------------------------------------------------------------------------------------------- | --------- |
| accessToken | Access token with permissions to update endpoint information. See this page for more information. | text |
| endpointID | Unique endpoint identifier, which can be found on the endpoint management page. | numeric |
| rawData | Value reported by the sensor, as text. An expression must be specified in the expression converter. La expresión debe devolver un valor numérico indicando la potencia aparente, expresada en VA. | text |
| timestamp | Optional value indicating the UTC date and time corresponding to the measurement. The date format must match one of those specified in the date formats section. If the field is omitted, the platform will assume the measurement corresponds to the current date and time. | text |
# Reactive Power Sensors
Reporting Reactive Power in VAR [#reporting-reactive-power-in-var]
The integration de sensores de [potencia reactiva](https://es.wikipedia.org/wiki/Potencia_el%C3%A9ctrica) por HTTP uses the following structure:
```
POST /services/gear/DeviceIntegrationService.svc/UpdateReactivePowerSensorStatus HTTP/1.1
Host: gear.cloud.studio
Content-Type: application/json
{
"accessToken": "xxxxxxxxxxxxxxxxxxxxxxxxxxxxxxxxxxxxxxxx",
"endpointID": 1,
"reactivePowerVAR": 2850.5,
"timestamp": "2021-02-23T14:55:03"
}
```
Parameters [#parameters]
| Name | Description | Data Type |
| ---------------- | ---------------------------------------------------------------------------------------------------------------------------------------------------------------------------------------------------------------------------------------------------------------------------- | --------- |
| accessToken | Access token with permissions to update endpoint information. See this page for more information. | text |
| endpointID | Unique endpoint identifier or combination of device address and endpoint address in format \[deviceAddress]:endpointAddress (e.g.: \[device-1234]:1). These values can be found on the endpoint management page. | numeric |
| reactivePowerVAR | Reactive power, expressed in VAR. | numeric |
| timestamp | Optional value indicating the UTC date and time corresponding to the measurement. The date format must match one of those specified in the date formats section. If the field is omitted, the platform will assume the measurement corresponds to the current date and time. | text |
Reporting Reactive Power in "raw" Format [#reporting-reactive-power-in-raw-format]
Reactive power can be reported as a **raw value** using the [expression converter](/docs/configuracion-del-cliente/dispositivos-y-endpoints/endpoints/conversion-de-datos-crudos-raw). This option is convenient when the device is unable to perform conversions and emits values that need to be transformed before being injected into the platform.
Below is an example of a raw format request:
```
POST /services/gear/DeviceIntegrationService.svc/UpdateReactivePowerSensorStatusRaw HTTP/1.1
Host: gear.cloud.studio
Content-Type: application/json
{
"accessToken": "xxxxxxxxxxxxxxxxxxxxxxxxxxxxxxxxxxxxxxxx",
"endpointID": 1,
"rawData": "2850.5",
"timestamp": "2021-02-23T14:55:03"
}
```
Parameters [#parameters-1]
| Name | Description | Data Type |
| ----------- | ---------------------------------------------------------------------------------------------------------------------------------------------------------------------------------------------------------------------------------------------------------------------------- | --------- |
| accessToken | Access token with permissions to update endpoint information. See this page for more information. | text |
| endpointID | Unique endpoint identifier, which can be found on the endpoint management page. | numeric |
| rawData | Value reported by the sensor, as text. An expression must be specified in the expression converter. La expresión debe devolver un valor numérico indicando la potencia reactiva, expresada en VAR. | text |
| timestamp | Optional value indicating the UTC date and time corresponding to the measurement. The date format must match one of those specified in the date formats section. If the field is omitted, the platform will assume the measurement corresponds to the current date and time. | text |
# Pressure Sensors
Reporting Pressure in Pascals [#reporting-pressure-in-pascals]
The HTTP integration of pressure sensors uses the following structure:
```
POST /services/gear/DeviceIntegrationService.svc/UpdatePressureSensorStatus HTTP/1.1
Host: gear.cloud.studio
Content-Type: application/json
{
"accessToken": "xxxxxxxxxxxxxxxxxxxxxxxxxxxxxxxxxxxxxxxx",
"endpointID": 1,
"pressurePascals": 101300,
"timestamp": "2021-02-23T14:55:03"
}
```
Parameters [#parameters]
| Name | Description | Data Type |
| --------------- | ---------------------------------------------------------------------------------------------------------------------------------------------------------------------------------------------------------------------------------------------------------------------------- | --------- |
| accessToken | Access token with permissions to update endpoint information. See this page for more information. | text |
| endpointID | Unique endpoint identifier or combination of device address and endpoint address in format \[deviceAddress]:endpointAddress (e.g.: \[device-1234]:1). These values can be found on the endpoint management page. | text |
| pressurePascals | Pressure, expressed in Pascals. | numeric |
| timestamp | Optional value indicating the UTC date and time corresponding to the measurement. The date format must match one of those specified in the date formats section. If the field is omitted, the platform will assume the measurement corresponds to the current date and time. | text |
Reporting Pressure in "raw" Format [#reporting-pressure-in-raw-format]
Pressure can be reported as a **raw value** using the [expression converter](/docs/configuracion-del-cliente/dispositivos-y-endpoints/endpoints/conversion-de-datos-crudos-raw). This option is convenient when the device is unable to perform conversions and emits values that need to be transformed before being injected into the platform.
Below is an example of a raw format request:
```
POST /services/gear/DeviceIntegrationService.svc/UpdatePressureSensorStatusRaw HTTP/1.1
Host: gear.cloud.studio
Content-Type: application/json
{
"accessToken": "xxxxxxxxxxxxxxxxxxxxxxxxxxxxxxxxxxxxxxxx",
"endpointID": 1,
"rawData": "101300",
"timestamp": "2021-02-23T14:55:03"
}
```
Parameters [#parameters-1]
| Name | Description | Data Type |
| ----------- | ---------------------------------------------------------------------------------------------------------------------------------------------------------------------------------------------------------------------------------------------------------------------------- | --------- |
| accessToken | Access token with permissions to update endpoint information. See this page for more information. | text |
| endpointID | Unique endpoint identifier, which can be found on the endpoint management page. | numeric |
| rawData | Value reported by the sensor, as text. An expression must be specified in the expression converter. The expression must return a numeric value indicating the measured pressure, expressed in Pascals. | text |
| timestamp | Optional value indicating the UTC date and time corresponding to the measurement. The date format must match one of those specified in the date formats section. If the field is omitted, the platform will assume the measurement corresponds to the current date and time. | text |
# Temperature Sensors
Reporting Temperature in Degrees Celsius [#reporting-temperature-in-degrees-celsius]
The HTTP integration of temperature sensors uses the following structure:
```
POST /services/gear/DeviceIntegrationService.svc/UpdateTemperatureSensorStatus HTTP/1.1
Host: gear-dev.cloud.studio
Content-Type: application/json
{
"accessToken": "xxxxxxxxxxxxxxxxxxxxxxxxxxxxxxxxxxxxxxxx",
"endpointID": 1,
"temperatureCelsius": 45,
"timestamp": "2021-02-23T14:55:03"
}
```
Parameters [#parameters]
| Name | Description | Data Type |
| ------------------ | ---------------------------------------------------------------------------------------------------------------------------------------------------------------------------------------------------------------------------------------------------------------------------- | --------- |
| accessToken | Access token with permissions to update endpoint information. See this page for more information. | text |
| endpointID | Unique endpoint identifier or combination of device address and endpoint address in format \[deviceAddress]:endpointAddress (e.g.: \[device-1234]:1). These values can be found on the endpoint management page. | numeric |
| temperatureCelsius | Measured temperature, numeric value greater than or equal to -273.15, indicating the measured temperature in degrees Celsius (C). | numeric |
| timestamp | Optional value indicating the UTC date and time corresponding to the measurement. The date format must match one of those specified in the date formats section. If the field is omitted, the platform will assume the measurement corresponds to the current date and time. | text |
Reporting Temperature in "raw" Format [#reporting-temperature-in-raw-format]
Temperature can be reported as a **raw value** using the [expression converter](/docs/configuracion-del-cliente/dispositivos-y-endpoints/endpoints/conversion-de-datos-crudos-raw). This option is convenient when the device is unable to perform conversions and emits values that need to be transformed before being injected into the platform.
Below is an example of a raw format request:
```
POST /services/gear/DeviceIntegrationService.svc/UpdateTemperatureSensorStatusRaw HTTP/1.1
Host: gear-dev.cloud.studio
Content-Type: application/json
{
"accessToken": "xxxxxxxxxxxxxxxxxxxxxxxxxxxxxxxxxxxxxxxx",
"endpointID": 1,
"rawData": "45",
"timestamp": "2021-02-23T14:55:03"
}
```
Parameters [#parameters-1]
| Name | Description | Data Type |
| ----------- | ---------------------------------------------------------------------------------------------------------------------------------------------------------------------------------------------------------------------------------------------------------------------------- | --------- |
| accessToken | Access token with permissions to update endpoint information. See this page for more information. | text |
| endpointID | Unique endpoint identifier, which can be found on the endpoint management page. | numeric |
| rawData | Value reported by the sensor, as text. An expression must be specified in the expression converter. The expression must return a numeric value greater than or equal to -273.15, indicating the measured temperature in degrees Celsius (C). | text |
| timestamp | Optional value indicating the UTC date and time corresponding to the measurement. The date format must match one of those specified in the date formats section. If the field is omitted, the platform will assume the measurement corresponds to the current date and time. | text |
# Text Sensors
Storing Text [#storing-text]
The HTTP integration of text allows storing text up to 255 characters in length using the following structure:
```
POST /services/gear/DeviceIntegrationService.svc/UpdateTextContainerStatus HTTP/1.1
Host: gear.cloud.studio
Content-Type: application/json
{
"accessToken": "xxxxxxxxxxxxxxxxxxxxxxxxxxxxxxxxxxxxxxxx",
"endpointID": 1,
"text": "Sample text...",
"timestamp": "2024-02-23T14:55:03"
}
```
Parameters [#parameters]
| Name | Description | Data Type |
| ----------- | ----------------------------------------------------------------------------------------------------------------------------------------------------------------------------------------------------------------------------------------------------------- | --------- |
| accessToken | Access token with permissions to update endpoint information. See this page for more information. | text |
| endpointID | Unique endpoint identifier or combination of device address and endpoint address in format \[deviceAddress]:endpointAddress (e.g.: \[device-1234]:1). These values can be found on the endpoint management page. | numeric |
| text | Contenido de texto que se desea almacenar | text |
| timestamp | Optional value indicating the UTC date and time of the snapshot. The date format must match one of those specified in the date formats section. If the field is omitted, the platform will assume the measurement corresponds to the current date and time. | text |
# Voltage Sensors
Reporting Voltage in Volts [#reporting-voltage-in-volts]
The HTTP integration of voltage sensors uses the following structure:
```
POST /services/gear/DeviceIntegrationService.svc/UpdateVoltageSensorStatus HTTP/1.1
Host: gear.cloud.studio
Content-Type: application/json
{
"accessToken": "xxxxxxxxxxxxxxxxxxxxxxxxxxxxxxxxxxxxxxxx",
"endpointID": 1,
"voltageVolts": 45,
"timestamp": "2021-02-23T14:55:03"
}
```
Parameters [#parameters]
| Name | Description | Data Type |
| ------------ | ---------------------------------------------------------------------------------------------------------------------------------------------------------------------------------------------------------------------------------------------------------------------------- | --------- |
| accessToken | Access token with permissions to update endpoint information. See this page for more information. | text |
| endpointID | Unique endpoint identifier or combination of device address and endpoint address in format \[deviceAddress]:endpointAddress (e.g.: \[device-1234]:1). These values can be found on the endpoint management page. | numeric |
| voltageVolts | Voltage expressed in volts. | numeric |
| timestamp | Optional value indicating the UTC date and time corresponding to the measurement. The date format must match one of those specified in the date formats section. If the field is omitted, the platform will assume the measurement corresponds to the current date and time. | text |
Reporting Voltage in "raw" Format [#reporting-voltage-in-raw-format]
Voltage can be reported as a **raw value** using the [expression converter](/docs/configuracion-del-cliente/dispositivos-y-endpoints/endpoints/conversion-de-datos-crudos-raw). This option is convenient when the device is unable to perform conversions and emits values that need to be transformed before being injected into the platform.
Below is an example of a raw format request:
```
POST /services/gear/DeviceIntegrationService.svc/UpdateVoltageSensorStatusRaw HTTP/1.1
Host: gear.cloud.studio
Content-Type: application/json
{
"accessToken": "xxxxxxxxxxxxxxxxxxxxxxxxxxxxxxxxxxxxxxxx",
"endpointID": 1,
"rawData": "45",
"timestamp": "2021-02-23T14:55:03"
}
```
Parameters [#parameters-1]
| Name | Description | Data Type |
| ----------- | ---------------------------------------------------------------------------------------------------------------------------------------------------------------------------------------------------------------------------------------------------------------------------- | --------- |
| accessToken | Access token with permissions to update endpoint information. See this page for more information. | text |
| endpointID | Unique endpoint identifier, which can be found on the endpoint management page. | numeric |
| rawData | Value reported by the sensor, as text. An expression must be specified in the expression converter. The expression must return a numeric value indicating voltage, expressed in volts. | text |
| timestamp | Optional value indicating the UTC date and time corresponding to the measurement. The date format must match one of those specified in the date formats section. If the field is omitted, the platform will assume the measurement corresponds to the current date and time. | text |
# Volume Sensors
Reporting Volume in Liters [#reporting-volume-in-liters]
The HTTP integration of volume sensors uses the following structure:
```
POST /services/gear/DeviceIntegrationService.svc/UpdateVolumeSensorStatus HTTP/1.1
Host: gear.cloud.studio
Content-Type: application/json
{
"accessToken": "xxxxxxxxxxxxxxxxxxxxxxxxxxxxxxxxxxxxxxxx",
"endpointID": 1,
"volumeLiters": 45,
"timestamp": "2021-02-23T14:55:03"
}
```
Parameters [#parameters]
| Name | Description | Data Type |
| ------------ | ---------------------------------------------------------------------------------------------------------------------------------------------------------------------------------------------------------------------------------------------------------------------------- | --------- |
| accessToken | Access token with permissions to update endpoint information. See this page for more information. | text |
| endpointID | Unique endpoint identifier or combination of device address and endpoint address in format \[deviceAddress]:endpointAddress (e.g.: \[device-1234]:1). These values can be found on the endpoint management page. | text |
| volumeLiters | Volume expressed in liters. | numeric |
| timestamp | Optional value indicating the UTC date and time corresponding to the measurement. The date format must match one of those specified in the date formats section. If the field is omitted, the platform will assume the measurement corresponds to the current date and time. | text |
Reporting Volume in "raw" Format [#reporting-volume-in-raw-format]
Volume can be reported as a **raw value** using the [expression converter](/docs/configuracion-del-cliente/dispositivos-y-endpoints/endpoints/conversion-de-datos-crudos-raw). This option is convenient when the device is unable to perform conversions and emits values that need to be transformed before being injected into the platform.
Below is an example of a raw format request:
```
POST /services/gear/DeviceIntegrationService.svc/UpdateVolumeSensorStatusRaw HTTP/1.1
Host: gear.cloud.studio
Content-Type: application/json
{
"accessToken": "xxxxxxxxxxxxxxxxxxxxxxxxxxxxxxxxxxxxxxxx",
"endpointID": 1,
"rawData": "45",
"timestamp": "2021-02-23T14:55:03"
}
```
Parameters [#parameters-1]
| Name | Description | Data Type |
| ----------- | ---------------------------------------------------------------------------------------------------------------------------------------------------------------------------------------------------------------------------------------------------------------------------- | --------- |
| accessToken | Access token with permissions to update endpoint information. See this page for more information. | text |
| endpointID | Unique endpoint identifier, which can be found on the endpoint management page. | numeric |
| rawData | Value reported by the sensor, as text. An expression must be specified in the expression converter. The expression must return a numeric value indicating the measured volume, expressed in liters. | text |
| timestamp | Optional value indicating the UTC date and time corresponding to the measurement. The date format must match one of those specified in the date formats section. If the field is omitted, the platform will assume the measurement corresponds to the current date and time. | text |
# Generic Sensors de flujo
> The integration de sensores de flujo genéricos utiliza la misma API que los sensores de flujo no-genéricos. La única diferencia es que los sensores genéricos deben informar el flujo utilizando la unidad de medida correspondiente a la variable genérica asociada al sensor.
Reporte de flujo acumulado en unidades [#reporte-de-flujo-acumulado-en-unidades]
The integration de sensores genéricos de flujo por HTTP uses the following structure, que es idéntica a la de los sensores de flujo no-genéricos:
```
POST /services/gear/DeviceIntegrationService.svc/UpdateFlowSensorValueSummation HTTP/1.1
Host: gear.cloud.studio
Content-Type: application/json
{
"accessToken": "xxxxxxxxxxxxxxxxxxxxxxxxxxxxxxxxxxxxxxxx",
"endpointID": 1,
"summationValue": 112685,
"timestamp": "2021-02-23T14:55:03"
}
```
Parameters [#parameters]
| Name | Description | Data Type |
| -------------- | ---------------------------------------------------------------------------------------------------------------------------------------------------------------------------------------------------------------------------------------------------------------------------- | --------- |
| accessToken | Access token with permissions to update endpoint information. See this page for more information. | text |
| endpointID | Unique endpoint identifier or combination of device address and endpoint address in format \[deviceAddress]:endpointAddress (e.g.: \[device-1234]:1). These values can be found on the endpoint management page. | numeric |
| summationValue | Valor acumulado de flujo informado por el sensor. Las unidades son las mismas que las elegidas para la variable genérica asociada al sensor. | numeric |
| timestamp | Optional value indicating the UTC date and time corresponding to the measurement. The date format must match one of those specified in the date formats section. If the field is omitted, the platform will assume the measurement corresponds to the current date and time. | text |
Reporting Accumulated Flow in "raw" Format [#reporting-accumulated-flow-in-raw-format]
Flow can be reported as a **raw value** using the [expression converter](/docs/configuracion-del-cliente/dispositivos-y-endpoints/endpoints/conversion-de-datos-crudos-raw). This option is convenient when the device is unable to perform conversions and emits values that need to be transformed before being injected into the platform.
Below is an example of a raw format request:
```
POST /services/gear/DeviceIntegrationService.svc/UpdateFlowSensorValueSummationRaw HTTP/1.1
Host: gear.cloud.studio
Content-Type: application/json
{
"accessToken": "xxxxxxxxxxxxxxxxxxxxxxxxxxxxxxxxxxxxxxxx",
"endpointID": 1,
"rawData": "112685",
"timestamp": "2021-02-23T14:55:03"
}
```
Parameters [#parameters-1]
| Name | Description | Data Type |
| ----------- | ------------------------------------------------------------------------------------------------------------------------------------------------------------------------------------------------------------------------------------------------------------------------------------- | --------- |
| accessToken | Access token with permissions to update endpoint information. See this page for more information. | text |
| endpointID | Unique endpoint identifier, which can be found on the endpoint management page. | numeric |
| rawData | Value reported by the sensor, as text. An expression must be specified in the expression converter. La expresión debe devolver un valor numérico indicando el valor acumulado de flujo informado por el sensor, expresado en las unidades de la variable genérica asociada al sensor. | text |
| timestamp | Optional value indicating the UTC date and time corresponding to the measurement. The date format must match one of those specified in the date formats section. If the field is omitted, the platform will assume the measurement corresponds to the current date and time. | text |
# Generic Sensors
Reporting Generic Sensor Value [#reporting-generic-sensor-value]
The HTTP integration of generic sensors uses the following structure:
```
POST /services/gear/DeviceIntegrationService.svc/UpdateGenericSensorStatus HTTP/1.1
Host: gear.cloud.studio
Content-Type: application/json
{
"accessToken": "xxxxxxxxxxxxxxxxxxxxxxxxxxxxxxxxxxxxxxxx",
"endpointID": 1,
"value": 45,
"timestamp": "2021-02-23T14:55:03"
}
```
Parameters [#parameters]
| Name | Description | Data Type |
| ----------- | ---------------------------------------------------------------------------------------------------------------------------------------------------------------------------------------------------------------------------------------------------------------------------- | --------- |
| accessToken | Access token with permissions to update endpoint information. See this page for more information. | text |
| endpointID | Unique endpoint identifier or combination of device address and endpoint address in format \[deviceAddress]:endpointAddress (e.g.: \[device-1234]:1). These values can be found on the endpoint management page. | numeric |
| value | Valor genérico. La unidad de medida dependerá de lo que se establezca en la configuración del tipo de variable correspondiente al endpoint. | numeric |
| timestamp | Optional value indicating the UTC date and time corresponding to the measurement. The date format must match one of those specified in the date formats section. If the field is omitted, the platform will assume the measurement corresponds to the current date and time. | text |
Reporte de valor en formato "raw" [#reporte-de-valor-en-formato-raw]
The generic sensor value can be reported as a **raw value** using the [expression converter](/docs/configuracion-del-cliente/dispositivos-y-endpoints/endpoints/conversion-de-datos-crudos-raw). This option is convenient when the device is unable to perform conversions and emits values that need to be transformed before being injected into the platform.
Below is an example of a raw format request:
```
POST /services/gear/DeviceIntegrationService.svc/UpdateGenericSensorStatusRaw HTTP/1.1
Host: gear.cloud.studio
Content-Type: application/json
{
"accessToken": "xxxxxxxxxxxxxxxxxxxxxxxxxxxxxxxxxxxxxxxx",
"endpointID": 1,
"rawData": "45",
"timestamp": "2021-02-23T14:55:03"
}
```
Parameters [#parameters-1]
| Name | Description | Data Type |
| ----------- | ----------------------------------------------------------------------------------------------------------------------------------------------------------------------------------------------------------------------------------------------------------------------------- | --------- |
| accessToken | Access token with permissions to update endpoint information. See this page for more information. | text |
| endpointID | Unique endpoint identifier, which can be found on the endpoint management page. | numeric |
| rawData | Value reported by the sensor, as text. An expression must be specified in the expression converter. La expresión debe devolver un valor numérico. La unidad de medida dependerá de lo que se establezca en la configuración del tipo de variable correspondiente al endpoint. | text |
| timestamp | Optional value indicating the UTC date and time corresponding to the measurement. The date format must match one of those specified in the date formats section. If the field is omitted, the platform will assume the measurement corresponds to the current date and time. | text |
# IAS Sensors (Motion, Occupancy, and Binary Sensors)
Reporting Sensor Status [#reporting-sensor-status]
The HTTP integration of IAS sensors uses the following structure:
```
POST /services/gear/DeviceIntegrationService.svc/UpdateIASSensorStatus HTTP/1.1
Host: gear.cloud.studio
Content-Type: application/json
{
"accessToken": "xxxxxxxxxxxxxxxxxxxxxxxxxxxxxxxxxxxxxxxx",
"endpointID": 1,
"state": 2,
"timestamp": "2021-02-23T14:55:03"
}
```
Parameters [#parameters]
| Name | Description | Data Type |
| ----------- | -------------------------------------------------------------------------------------------------------------------------------------------------------------------------------------------------------------------------------------------------------------------------------------------------------------------------------------------------------------------------------------------------------------------------------------------------------------------------------------------------------------------------------------------------------------------------------------------------------------------------------------------------------------------------------------------------------------------------------------------------- | --------- |
| accessToken | Access token with permissions to update endpoint information. See this page for more information. | text |
| endpointID | Unique endpoint identifier or combination of device address and endpoint address in format \[deviceAddress]:endpointAddress (e.g.: \[device-1234]:1). These values can be found on the endpoint management page. | text |
| state | Indicates the sensor status. The possible states are as follows:0: Unknown. The sensor status is not known1: Inactive. The sensor detects no activity.2: Active. The sensor detects activity.3: Cleaning. The space associated with the sensor is being cleaned.4: Needs cleaning. The space associated with the sensor needs cleaning.5: Test mode. The sensor is currently in test mode.6: Tampered. The sensor has been tampered with and may not be working correctly.7: In maintenance. The sensor requires maintenance and may not be working correctly.8: The sensor detects a vehicle entering the parking space.9: The sensor detects a vehicle leaving the parking space.10: The sensor reports the parking space is in violation state. | numeric |
| timestamp | Optional value indicating the UTC date and time corresponding to the measurement. The date format must match one of those specified in the date formats section. If the field is omitted, the platform will assume the measurement corresponds to the current date and time. | text |
Reporting Status in "raw" Format [#reporting-status-in-raw-format]
El estado del sensor can be reported as a **raw value** using the [expression converter](/docs/configuracion-del-cliente/dispositivos-y-endpoints/endpoints/conversion-de-datos-crudos-raw). This option is convenient when the device is unable to perform conversions and emits values that need to be transformed before being injected into the platform.
Below is an example of a raw format request:
```
POST /services/gear/DeviceIntegrationService.svc/UpdateIASSensorStatusRaw HTTP/1.1
Host: gear.cloud.studio
Content-Type: application/json
{
"accessToken": "xxxxxxxxxxxxxxxxxxxxxxxxxxxxxxxxxxxxxxxx",
"endpointID": 1,
"rawData": "2",
"timestamp": "2021-02-23T14:55:03"
}
```
Parameters [#parameters-1]
| Name | Description | Data Type |
| ----------- | ---------------------------------------------------------------------------------------------------------------------------------------------------------------------------------------------------------------------------------------------------------------------------- | --------- |
| accessToken | Access token with permissions to update endpoint information. See this page for more information. | text |
| endpointID | Unique endpoint identifier, which can be found on the endpoint management page. | numeric |
| rawData | Value reported by the sensor, as text. An expression must be specified in the expression converter. The expression must return a numeric value corresponding to the states in the table shown above. | text |
| timestamp | Optional value indicating the UTC date and time corresponding to the measurement. The date format must match one of those specified in the date formats section. If the field is omitted, the platform will assume the measurement corresponds to the current date and time. | text |
# CelsiusToFahrenheit
The **CelsiusToFahrenheit** function converts a value from degrees **Celsius** to **Fahrenheit**.
Definition: [#definition]
```
CelsiusToFahrenheit(valor)
```
Parameters [#parameters]
| Name | Description | Data type |
| ----- | ------------------------------------------------------------- | --------- |
| valor | Celsius value provided, which will be converted to Fahrenheit | numeric |
Example: [#example]
The following example converts 30 degrees Celsius to Fahrenheit:
```
CelsiusToFahrenheit(30)
```
The result is 86 (numeric value).
More information [#more-information]
More information about the Celsius to Fahrenheit conversion can be found on [Wikipedia](https://es.wikipedia.org/wiki/Grado_Fahrenheit#Conversi%C3%B3n_a_otras_unidades).
# FahrenheitToCelsius
The **FahrenheitToCelsius** function converts a value from degrees **Fahrenheit** to **Celsius**.
Definition [#definition]
```
FahrenheitToCelsius(valor)
```
Parameters [#parameters]
| Name | Description | Data type |
| ----- | ------------------------------------------------------------- | --------- |
| valor | Fahrenheit value provided, which will be converted to Celsius | numeric |
Example [#example]
The following example converts 86 degrees Fahrenheit to Celsius:
```
FahrenheitToCelsius(86)
```
The result is 30 (numeric value).
More information [#more-information]
More information about the Fahrenheit to Celsius conversion can be found on [Wikipedia](https://es.wikipedia.org/wiki/Grado_Fahrenheit#Conversi%C3%B3n_a_otras_unidades).
# Mathematical Functions
| Function | Comments |
| ------------------- | ---------------------------------------------------------------- |
| CelsiusToFahrenheit | Converts a temperature in degrees Celsius to degrees Fahrenheit. |
| FahrenheitToCelsius | Converts a temperature in degrees Fahrenheit to degrees Celsius. |
| Max | Returns the maximum value among a series of values. |
| Min | Returns the minimum value among a series of values. |
| Power | Returns the result of raising a given number to a given power. |
| Round | Rounds a number to the specified number of decimal places. |
| Sqrt | Calculates the square root of a number. |
| Trunc | Truncates a number, removing all decimals without rounding. |
# Max
The **Max** function returns the maximum value among a series of values.
Definition [#definition]
```
Max(v1, [v2, v3, ..., vn])
```
Parameters [#parameters]
| Name | Description | Data type |
| ------- | -------------------------------------------------------------------------------------------------------- | --------- |
| v1...vn | List of provided values, all values must be numbers. The function is limited to a maximum of 100 values. | numeric |
Example [#example]
The following example obtains the largest value from the following list of numbers: 2, -5, 4, 10:
```
Max(2, -5, 4, 10)
```
The result is 10 (numeric value).
# Min
The **Min** function returns the minimum value among a series of values.
Definition [#definition]
```
Min(v1, [v2, v3, ..., vn])
```
Parameters [#parameters]
| Name | Description | Data type |
| ------ | -------------------------------------------------------------------------------------------------------- | --------- |
| v1..vn | List of provided values, all values must be numbers. The function is limited to a maximum of 100 values. | numeric |
Example: [#example]
The following example obtains the smallest value from the following list of numbers: 2, -5, 4, 10:
```
Min(2, -5, 4, 10)
```
The result is -5 (numeric value).
# Power
The **Power** function returns the result of raising a given number to a given power.
Definition [#definition]
```
Power(valor, potencia)
```
Parameters [#parameters]
| Name | Description | Data type |
| -------- | ----------------------------------------------------------------------------------------- | --------- |
| valor | Provided number, integers or decimals are allowed. | numeric |
| potencia | Indicates the power to which the number will be raised, integers or decimals are allowed. | numeric |
Example [#example]
The following example squares the provided value 25:
```
Power(25, 2)
```
The result is 625 (numeric value).
More information [#more-information]
More information about exponentiation can be found on [Wikipedia](https://es.wikipedia.org/wiki/Potenciaci%C3%B3n#:~:text=La%20potenciaciaci%C3%B3n%20es%20una%20operaci%C3%B3n,n%C3%BAmero%20que%20se%20llama%20exponente.).
# Round
The **Round** function rounds a number to the specified number of decimal places.
Definition [#definition]
```
Round(valor, [decimales])
```
Parameters [#parameters]
| Name | Description | Data type |
| --------- | ------------------------------------------------------------------------------------------------------------------------------- | --------- |
| valor | Value to be rounded | numeric |
| decimales | Optional parameter indicating how many decimal places to use for rounding. If not specified, rounding is done without decimals. | numeric |
Examples [#examples]
Rounding without decimals [#rounding-without-decimals]
In this example, we will round a given value, removing all decimals:
```
Round(25.65)
```
The result is 26 (numeric).
Rounding to one decimal place [#rounding-to-one-decimal-place]
In this example, we will round a given value, leaving one decimal place:
```
Round(25.66, 1)
```
The result is 25.7 (numeric).
More information [#more-information]
More information about number rounding can be found on [Wikipedia](https://es.wikipedia.org/wiki/Redondeo).
# Sqrt
The **Sqrt** function calculates the square root of a number.
Definition [#definition]
```
Sqrt(valor)
```
Parameters [#parameters]
| Name | Description | Data type |
| ----- | -------------------------------------- | --------- |
| valor | Provided number, decimals are allowed. | numeric |
Example [#example]
The following example obtains the square root of the number 1288.56:
```
Sqrt(1288.56)
```
The result is 35.896517936981 (numeric value).
More information [#more-information]
More information about square roots can be found on [Wikipedia](https://es.wikipedia.org/wiki/Ra%C3%ADz_cuadrada).
# Trunc
The **Trunc** function truncates a number, removing the fractional part.
Definition [#definition]
```
Trunc(valor)
```
Parameters [#parameters]
| Name | Description | Data type |
| ----- | ----------------- | --------- |
| valor | Value to truncate | numeric |
Example [#example]
In this example, the truncated value of 24.899 is obtained:
```
Trunc(24.899)
```
The result is 24 (numeric value).
# Interpolation Functions
| Function | Comments |
| ------------------- | ----------------------------------------------------------------- |
| LinearInterpolation | Performs a linear interpolation between a series of given points. |
# LinearInterpolation
The **LinearInterpolation** function obtains a value by performing a [linear interpolation](https://es.wikipedia.org/wiki/Interpolaci%C3%B3n_lineal) between a set of values given as reference.
Definition [#definition]
```
LinearInterpolation(valor, x1, y1, x2, y2, ..., xn, yn)
```
Parameters [#parameters]
| Name | Description | Data type |
| ------------------- | ------------------------------------------------------------------------------------------------------------------------------------------------ | --------- |
| valor | Value for which a linear interpolation is desired. | numeric |
| x1, y1, ..., xn, yn | Set of (x, y) points from the reference table used for linear interpolation. The function is limited to a maximum of 20 points (40 x, y values). | numeric |
Example [#example]
In the following example, the table below is used to calculate the interpolated value corresponding to x = 2.5.
| X | Y |
| --- | - |
| 2 | 3 |
| 2.5 | ? |
| 4 | 6 |
Get the value for x = 2.5 [#get-the-value-for-x--25]
The interpolation result for x = 2.5 can be obtained using the following expression:
```
LinearInterpolation(2.5, 2, 3, 4, 6)
```
The result is 3.75 (numeric value).
More information [#more-information]
More information about linear interpolations can be found on [Wikipedia](https://es.wikipedia.org/wiki/Interpolaci%C3%B3n_lineal).
# JSON Handling Functions
| Function | Comments |
| --------- | ----------------------------------------------------------------- |
| JsonField | Gets the value of a field within a text expressed in JSON format. |
# JsonField
The **JsonField** function is used to extract the value of an element within a data structure in [JSON](https://es.wikipedia.org/wiki/JSON) format.
Definition [#definition]
```
JsonField(texto, elemento)
```
Parameters [#parameters]
| Name | Description | Data type |
| -------- | --------------------------------------------------------------------------------------------------------------------------------------------------------------------------------------------------------------------------------------------------------------- | --------- |
| texto | The first parameter contains the text, in JSON format, that contains the data to be extracted. | string |
| elemento | The second parameter identifies what to extract from the structure provided in the first parameter. This parameter uses JsonPath format, whose structure can be consulted here. An online evaluator for testing JsonPath expressions can also be accessed here. | string |
Example [#example]
The following example shows the use of the JsonField function to extract the "loginCount" field from a JSON structure:
**JSON**:
```
{
"firstName":"Thomas",
"lastName":"Brown",
"loginCount":4,
"devices":[
{
"name":"Cold chamber",
"type":"Temperature sensor"
},
{
"name":"Cold room door",
"type":"Door sensor"
}
]
}
```
Get the value of the "loginCount" field [#get-the-value-of-the-logincount-field]
Assuming the JSON text shown in the previous section is loaded in a variable named "Json", to get the value of the "loginCount" field, use the following expression:
```
JsonField(Json, '$.loginCount')
```
The result is 4 (numeric value).
Get the value of the "name" field of the second device [#get-the-value-of-the-name-field-of-the-second-device]
Assuming the JSON text shown in the previous section is loaded in a variable named "Json", to get the value of the "name" field of the second device, use the following expression:
```
JsonField(Json, '$.devices[1].name')
```
The result is "Cold room door" (string).
More information [#more-information]
For more information about JSON structured data, consult [this page](https://es.wikipedia.org/wiki/JSON).
For more information about the usage possibilities of the function's second parameter (JsonPath), review the following page [https://goessner.net/articles/JsonPath/index.html#e2](https://goessner.net/articles/JsonPath/index.html#e2,), or use the following online evaluator: [https://jsonpath.com/](https://jsonpath.com/)
# String Handling Functions
| Function | Comments |
| ----------- | ----------------------------------------------------- |
| LowerCase | Converts all characters in a string to lowercase. |
| StringClean | Cleans a string by removing all unwanted characters. |
| StringPart | Returns a part of a string that contains sub-strings. |
| UpperCase | Converts all characters in a string to uppercase. |
# LowerCase
The **LowerCase** function converts all characters in a string to lowercase.
Definition [#definition]
```
LowerCase(texto)
```
Parameters [#parameters]
| Name | Description | Data type |
| ----- | --------------------------------------------------- | --------- |
| texto | Provided text, which will be converted to lowercase | string |
Example [#example]
The following example converts the word 'PASSWORD' to lowercase.
```
LowerCase('PASSWORD')
```
The result is "password" (string).
Other uses [#other-uses]
In the following example, the value 1 should be returned if the provided text matches the text 'dispositivo', regardless of whether it is written in uppercase, lowercase, or a mix of both. This can be achieved by converting the text to lowercase:
```
If(LowerCase('DISPOsitiVo') = 'dispositivo', 1, 0)
```
The result is 1 (numeric value).
# StringClean
The **StringClean** function cleans a character string by removing all unwanted characters.
Definition [#definition]
```
StringClean(texto, v1, v2, ..., v3)
```
Parameters [#parameters]
| Name | Description | Data type |
| ------- | -------------------------------------------------------------------------------------------------------- | --------- |
| texto | The first parameter refers to the text string to be cleaned. | string |
| v1...vn | Set of values to be removed from the text string. The function is limited to a maximum of 40 parameters. | string |
Example [#example]
The following example shows the use of the StringClean function to remove brackets, parentheses, asterisks, dots, and the letter 's' from the text **'(Dev.ic\[e]s\*)'**
```
StringClean('(Dev.ic[e]s*)', '[', ']', '(', ')', '*', '.', 's')
```
The result is "Device" (string).
# StringPart
The **StringPart** function returns a part of a string that contains sub-strings.
Definition [#definition]
```
StringPart(texto, posicion, separador)
```
Parameters [#parameters]
| Name | Description | Data type |
| --------- | ----------------------------------------------------------------- | --------- |
| texto | The first parameter refers to the text string. | string |
| posicion | Position of the element to obtain within the text, starting at 1. | numeric |
| separador | Separator used to distinguish the parts of the text. | string |
Example [#example]
The following example shows how to get the third element from the text 'Temperatura/exterior/33', where the parts are separated by '/'.
```
StringPart('Temperatura/exterior/33', 3, '/')
```
The result is '33' (string).
Additional notes [#additional-notes]
If the function is used to obtain a part that does not exist (i.e., when the text contains fewer parts), the function returns an empty string. For example, in the following case, the result of the function is an empty string.
```
StringPart('Temperatura/exterior/33', 6, '/')
```
The result is an empty string ('') because the sixth part is requested, but the string contains only 3 parts.
# UpperCase
The **UpperCase** function converts all characters in a string to uppercase.
Definition [#definition]
```
UpperCase(texto)
```
Parameters [#parameters]
| Name | Description | Data type |
| ----- | ---------------------------- | --------- |
| texto | Text to convert to uppercase | string |
Example [#example]
The following example converts the word 'password' to uppercase.
```
UpperCase('password')
```
The result is 'PASSWORD' (string).
Other uses [#other-uses]
In the following example, the value 1 should be returned if the provided text matches the text 'temperatura', regardless of whether it is written in uppercase, lowercase, or a mix of both. This can be done by converting the text to uppercase:
```
If(UpperCase('tempErAtura') = 'TEMPERATURA', 1, 0)
```
The result is 1 (numeric value).
# Error
The **Error** function generates an error condition containing the specified message.
Definition [#definition]
```
Error(texto)
```
Parameters [#parameters]
| Name | Description | Data type |
| ----- | --------------------------------------------------- | --------- |
| texto | Contains the message text to be used for the error. | string |
Example [#example]
The following expression returns the value of variable x divided by 50, except if x is greater than 50, in which case it produces an error.
```
If(x > 50, Error('El resultado no es el esperado'), x / 50)
```
The result is "El resultado no es el esperado" (string).
# HexToNumber
The **HexToNumber** function converts a number in hexadecimal format (string) to a number.
Definition [#definition]
```
HexToNumber(valor)
```
Parameters [#parameters]
| Name | Description | Data type |
| ----- | ------------------------------------------------------ | --------- |
| valor | Text containing the hexadecimal value to be converted. | string |
Example [#example]
The following example converts the hexadecimal value '144e' to a number:
```
HexToNumber('144e')
```
The result is 5198 (numeric value).
More information [#more-information]
More information about the hexadecimal system can be found on [Wikipedia](https://es.wikipedia.org/wiki/Sistema_hexadecimal).
# If
The **If** function returns a value, between two given values, based on a condition.
Definition [#definition]
```
If(condicion, v1, v2)
```
Parameters [#parameters]
| Name | Description | Data type |
| --------- | ------------------------------------------ | --------- |
| condicion | Logical condition to be evaluated. | boolean |
| v1 | Value to return if the condition is true. | any |
| v2 | Value to return if the condition is false. | any |
Examples [#examples]
Conditional division example [#conditional-division-example]
The following example uses the **If** function to check whether variable x has a value of zero, in which case it reports an error. Otherwise, it returns the result of dividing 150 by the value of x:
```
If(x = 0, Error('El valor no puede ser cero'), 150 / x)
```
For a value of x equal to zero, an error will be obtained. For any other value, the result of dividing 150 by the value of x will be returned.
Example to get the maximum of two numbers [#example-to-get-the-maximum-of-two-numbers]
The following example uses the **If** function to return the maximum value between two variables x1 and x2. Note that for this particular case, it would be simpler to use the [Max](/docs/configuracion-del-cliente/dispositivos-y-endpoints/endpoints/conversion-de-datos-crudos-raw/expresiones/funciones/funciones-matematicas/max) function.
```
If(x1 > x2, x1, x2)
```
This example will always return the maximum between the two values passed in x1 and x2.
# Other Functions
| Function | Comments |
| ----------- | ---------------------------------------------------------------- |
| Error | Generates an error condition containing the specified text. |
| HexToNumber | Converts a number in hexadecimal format (string) to a number. |
| If | Returns a value, between two given values, based on a condition. |
| ToBoolean | Converts a value of any type to boolean. |
| ToNumber | Converts a value of any type to numeric. |
| ToString | Converts a value of any type to string. |
# ToBoolean
The **ToBoolean** function converts a value of any type to boolean.
Definition [#definition]
```
ToBoolean(valor)
```
Parameters [#parameters]
| Name | Description | Data type |
| ----- | -------------------------------------------------------------------------------------------------------------------------------------------------------------------------------------------------------------------------------------------------------------------------------------------------------------------------------------------------------------------------------------------------- | --------- |
| valor | Value to convert to boolean. If the value is numeric, it will be converted to false when the value is zero, and to true in any other case. If the value is a string, it will be converted to false when the text is 'false' or '0', and to true when the text is 'true' or '1'. The function will produce an error in any other case. If the value is already boolean, the same value is returned. | any |
Examples [#examples]
Numeric value conversion [#numeric-value-conversion]
In the following example, 'false' should be displayed if the received value is zero and 'true' if the received value is not zero. This example uses the If function for the comparison; for more information about this function [go here](/docs/configuracion-del-cliente/dispositivos-y-endpoints/endpoints/conversion-de-datos-crudos-raw/expresiones/funciones/otras-funciones/if).
```
ToBoolean(125)
```
The result of this expression is true (boolean).
String value conversion [#string-value-conversion]
```
ToBoolean('0')
```
The result is **false** (bool).
# ToNumber
The **ToNumber** function converts a value of any type to numeric.
Definition [#definition]
```
ToNumber(valor)
```
Parameters [#parameters]
| Name | Description | Data type |
| ----- | ------------------------------------------------------------------------------------------------------------------------------------------------------------------------------------------------------------------------------------------------------------------------------------------------------------------------------------------------ | --------- |
| valor | Value to convert to numeric. If the value is a string, it will be converted to the equivalent number. If the string contains decimals, the separator must always be a period. If the value is boolean, 1 will be returned when the value is true, and 0 when the value is false. If the value is already numeric, it will be returned unchanged. | any |
String to number conversion example [#string-to-number-conversion-example]
The following example converts a text value to a number.
```
ToNumber('-123.45')
```
The result is -123.45 (numeric).
Boolean to number conversion example [#boolean-to-number-conversion-example]
```
ToNumber(true)
```
The result is 1 (numeric).
# ToString
The ToString function converts a value of any type to string.
Definition [#definition]
```
ToString(valor)
```
Parameters [#parameters]
| Name | Description | Data type |
| ----- | ----------------------------------------------------------------------------------------------------------------------------------------------------------------------------------------------------------------------------------------------------------------------------------------------------------------------------- | --------- |
| valor | Value to convert to string. If the value is boolean, 'true' will be returned when the value is true, and 'false' when the value is false. If the value is numeric, it will be converted to string, always using a period to separate decimal places, if any. If the value is already a string, it will be returned unchanged. | any |
Numeric to string conversion example [#numeric-to-string-conversion-example]
In this example, a numeric expression is converted to a string.
```
ToString(10 / 4)
```
The result will be '2.5' (string)
Boolean to string conversion example [#boolean-to-string-conversion-example]
In this example, a boolean expression is converted to a string.
```
ToString(20 < 100)
```
The result will be 'true' (string)